Monitor Set - Baby monitor AUDIOLINE - Free user manual and instructions
Find the device manual for free Monitor Set AUDIOLINE in PDF.

| Product Type | Baby Monitor |
| Brand | Audioline |
| Model | Monitor Set |
| Parent Unit Dimensions | Approx. 10 x 8 x 5 cm |
| Baby Unit Dimensions | Approx. 5 x 4 x 3 cm |
| Weight (Parent Unit) | Approx. 200 g |
| Weight (Baby Unit) | Approx. 150 g |
| Power Supply | Rechargeable battery (parent unit) and AC adapter |
| Battery Life (Parent Unit) | Up to 6 hours |
| Range (Outdoor) | Up to 300 m |
| Sound Activation | Yes, with adjustable sensitivity |
| Two-Way Talk | Yes |
| Volume Control | Adjustable on parent unit |
| Night Light | Built-in on baby unit |
| Temperature Sensor | Displays room temperature |
| Cleaning Instructions | Wipe with a soft, damp cloth; do not use solvents |
| Safety Warnings | Keep away from water; use only supplied accessories |
| Spare Parts Availability | Contact Audioline support for replacement parts |
| Intended Use | Indoor use only |
| Operating Temperature | 0°C to 40°C |
Frequently Asked Questions - Monitor Set AUDIOLINE
User questions about Monitor Set AUDIOLINE
0 question about this device. Answer the ones you know or ask your own.
Ask a new question about this device
Download the instructions for your Baby monitor in PDF format for free! Find your manual Monitor Set - AUDIOLINE and take your electronic device back in hand. On this page are published all the documents necessary for the use of your device. Monitor Set by AUDIOLINE.
USER MANUAL Monitor Set AUDIOLINE
natural_image
Silver Audioline phone with circular lens and perforated base (no visible text or symbols on device body)1.1 Intended use 20....
1.2 Safety information 20....
1.3 Information on disposal 22.
1.4 Rechargeable standard batteries 22.....
1.5 Cleaning and upkeep 22.
2 Operating Elements 23.
2.1 Transmitter 23
2.2 Receiver 23
3 Starting Up 24
3.1 Safety Information 24
3.2 Checking the package contents 24
3.3 Connecting the transmitter (mains operation) .... 24
3.4 Connecting the receiver (mains operation) ..... 25
3.5 Fitting the holding clip 25
3.6 Wall fixation 25
3.7 Operation on a television set 26
4 Operation 27
4.1 Transmitter 27
4.1.1 Switching the transmitter on /off 27
4.1.2 Nighttime vision 27
4.2 Receiver 28
4.2.1 Switching the receiver on /off 28
4.3 Screen settings 28
4.3.1 Brightness / Contrast / Colour intensity ..... 28
4.3.2 Switching the Auto function on/off 29
4.4 Battery mode 29
5 Troubleshooting 30
6 Important Information 32
6.1 Technical data 32
6.2 Guarantee 33
7 Declaration of Conformity 34
8 Important Notes on the Guarantee ..... 35
- General Information -
1 General Information
Please read this operating instruction manual thoroughly.
If you have any queries, please contact our service hotline 0180 5 00 13 88 (cost via Telekom at time of going to print: 12 ct/min). Under no circumstances open the devices or complete any repair work yourself. In the case of claims under the terms of guarantee, contact your sales outlet.
We reserve the right to make technical and visual modifications to the product during the course of product improvement.
1.1 Intended use
The monitoring set has been developed to monitor rooms. The transmitter sends acoustic and image signals from its point of installation to the receiver. Any other use is considered unintended use.
Hinweis: The use of this equipment does not substitute personal supervision, e.g. of a child. Users are not relieved of their personal liability.
1.2 Safety information
- Never lay the transmitter in a baby's bed or playpen.
- Ensure that the transmitter and power cable are out of reach of children, i.e. they are at least one meter away.
- Pay attention that the components are sufficiently well-ventilated when in operation. Do not lay a cushion or towel over the devices.
- General Information -
- The devices are not intended for medical purposes. Warning and signal tones from respiratory or heartbeat monitoring equipment are not transmitted.
- Do not use the equipment in potentially explosive areas.
- The devices are designed for use in protected rooms with a temperature range from 10 °C to 30 °C. The equipment should not be set up in rooms exposed to moisture, such as bathrooms or laundries.
- Do not locate the devices in the vicinity of sources of heat such as radiators, and never expose them to direct sunlight.
- The installation location plays a decisive role in ensuring proper operation. Maintain a minimum distance of one meter to other electronic equipment, such as microwave ovens or hi-fi systems, since they could cause mutual disturbance.
- Only use the power adapter plug supplied because other power adapter plugs could damage the equipment. Other power adapter plugs could cause the devices to catch fire, for example.
- When using the equipment with a power adapter plug, pay attention that the plug and cable are in perfect condition. Kinked or worn cable represents the risk of a fatal accident.
Caution: Electric shock, short circuit and risk of fire!
- General Information -
1.3 Information on disposal
The implementation of European law in national laws and directives obliges you to dispose of consumable goods appropriately. This serves to protect both persons and the environment.
The adjacent symbol indicates that electrical and electronic apparatus no longer required must be disposed of separate from domestic waste.
Equipment which is old or has outlived its service life
must be disposed of at a suitable collection point provided by the public waste authorities.
Batteries and power packs must be disposed of at the point of sale or at the appropriate collection points provided by the public waste authorities.
Packaging materials must be disposed of according to local regulations.


1.4 Rechargeable standard batteries
Do not use other rechargeable batteries or power packs because they could cause a short circuit. When replacing batteries, only use those of the type 3x AA Ni-Mh 3.6V 1600 mAh.
Do not throw rechargeable batteries or power packs into a fire or immerse them in water. The operating times specified apply to the rechargeable batteries supplied used under optimum conditions. In addition, the charge capacity is reduced for technical reasons during use or when stored at extremely high or low temperatures.
1.5 Cleaning and upkeep
Clean the equipment surfaces with a soft, dry, fluff-free cloth. Never use cleaning agents or solvents.
- Operating Elements -
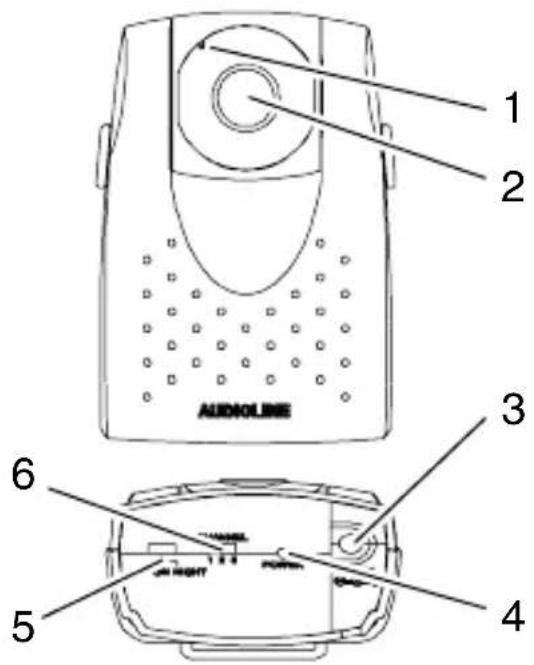
2 Operating Elements
2.1 Transmitter
- Microphone
- Lens
- Power adapter plug connection socket
- Power control lamp on/off
- Operating mode switch
- Channel switch
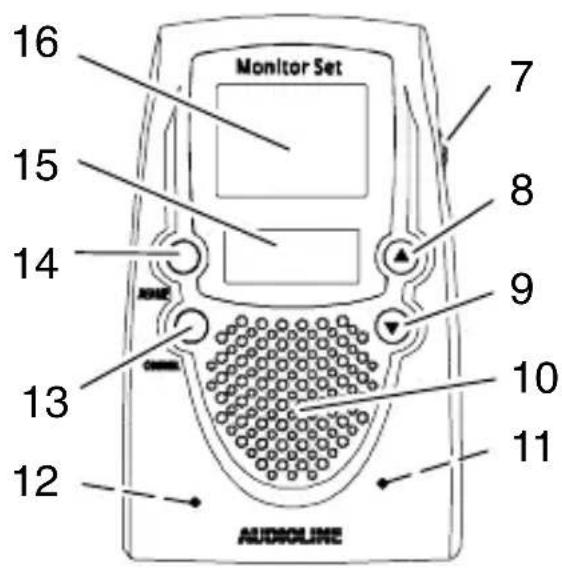
2.2 Receiver
- Volume control
- "UP" button
- "DOWN" button
- Loudspeaker
- TV output socket (rear side)
- Power adaptor plug connection socket (rear side)
- Channel selection button
- Menu button
- Display
- Screen
- Starting Up -
3 Starting Up
3.1 Safety Information
Hinweis: It is essential to read the “General Information” in Chapter 1 at the beginning of this manual before starting up.
3.2 Checking the package contents
The package contains:
| a transmitter | a receiver a holding clip |
| two power adapter plugs | two battery packs a velcro strip |
| an audio/video cable an operating manual | |
3.3 Connecting the transmitter (mains operation)
Hinweis: Ensure to use the correct power adapter plug, otherwise there is a risk the transmitter could be damaged. The transmitter may only be operated using the power adapter plug with an output power of 800 mA (angled plug).
- Open the battery compartment on the rear side of the transmitter. To do this, press the clamping clip downward and remove the cover.
- Connect the plug leading from the rechargeable battery pack to the corresponding socket in the battery compartment.
- Place the battery pack in the battery compartment.
- Close the battery compartment cover.
- Insert the small, angled plug on the power adapter plug cable in the corresponding socket on the underside of the transmitter.
- Starting Up -
- Connect the power adapter plug to a power outlet (230 V). The battery pack is then charged. When charging the battery pack for the first time, we recommend a charging time of 24 hours.
3.4 Connecting the receiver (mains operation)
Hinweis: Ensure to use the correct power adapter plug. The receiver may only be operated using the power adapter plug with an output power of 1000 mA (straight plug).
- Open the battery compartment on the rear side of the receiver. To do this, press the clamping clip downward and remove the cover.
- Connect the battery pack to the device and close the battery compartment as described in Section 3.3.
- Insert the small plug on the power adapter plug cable in the corresponding socket on the rear side of the receiver.
- Connect the power adapter plug to a power outlet (230 V). When charging the battery pack for the first time, we recommend a charging time of 24 hours.
3.5 Fitting the holding clip
The transmitter can be hung on the holding clip.
Slide the holding clip over the sides of the transmitter until it audibly snaps into place in the recesses. Thread the velcro strip through the slot of the holding clip and suspend the transmitter from it.
3.6 Wall fixation
Hinweis: Be careful not to drill into electrical lines or water pipes! Ensure that no lines or pipes are under the required installation location! Dowels and screws are not included in the delivery.
- Starting Up -
- Drill two holes (5 mm diameter) 30 mm apart and horizontal to each other.
- Insert a dowel (5 mm diameter) in each hole.
- Insert a screw (4 mm diameter) in each dowel.
Hinweis: Leave approx. 3 mm from the head of the screw to the wall.
- Align the recesses on the respective device over the screw heads and pull the device down lightly.
3.7 Operation on a television set
The audio and video signals can be transmitted to a television or video recorder. The audio transmission is in mono. In the case of a stereo unit, the sounds are only transmitted from one channel.
- Connect the black phone jack in the "TV OUT" socket on the rear side of the receiver.
- Connect the yellow and red phone plugs in the correspondingly coloured sockets in your colour television or video recorder. For further information, refer to the operating manual provided with the respective device.
- Operation -
4 Operation
Hinweis: Check the transmitter and receiver are working properly each time before the equipment is put into operation.
4.1 Transmitter
4.1.1 Switching the transmitter on /off
Hinweis: Position the transmitter out of reach of children! Never lay the transmitter in a baby's bed or playpen.
- Set the channel switch on the transmitter to the same channel (1-3) as that set on the receiver.
- Set the operating mode switch to "ON". The power control lamp on the underside lights up. The transmitter is now ready to operate. It transmits sounds and pictures to the receiver from the area being monitored.
- Place the transmitter in a favourable position, point the lens to the area to be monitored and turn the lens head to the necessary angle.
- To switch the transmitter off, set the operating mode switch to "OFF".
Hinweis: The receiver issues an acoustic signal when the battery charge is low.
4.1.2 Nighttime vision
The transmitter is equipped with six infra-red diodes. This enables the transmission of pictures from areas which are not illuminated.
- To activate the nighttime vision function, set the operating mode switch to "NIGHT".
Hinweis: When the nighttime vision function is activated, the screen display on the receiver turns to black and white.
- Operation -
4.2 Receiver
4.2.1 Switching the receiver on /off
- Turn the volume control towards "ON", the receiver is switched on.
Regulate the volume to that required using the volume control.
- Press the “CHANNEL” button as often as necessary until the same channel (1-3) is set as that on the transmitter. The current channel is indicated in the display:
The receiver is now ready to operate. It receives the sounds and pictures transmitted by the transmitter activated at the installation location.
- To switch the receiver off, turn the volume control towards "OFF" until it audibly clicks.
Hinweis: The ▼ icon flashes when the battery charge of the receiver is low.
4.3 Screen settings
The brightness, contrast and colour intensity of the screen can be adapted to individual needs.
4.3.1 Brightness / Contrast / Colour intensity
-
Press the "MENUE" button. The ⚙️ icon appears in the display.
-
Press the ▲ or ▼ button to regulate the brightness. The setting selected is indicated by bars at the bottom edge of the display.
-
Press the "MENUE" button. The Ⓞ icon appears in the display.
-
Press the ▲ or ▼ button to regulate the contrast.
- Operation -
- Press the "MENUE" button. The 🎨 icon appears in the display.
- Press the ▲ or ▼ button to regulate the colour intensity.
- Press the "MENUE" button. The settings are completed.
Hinweis: If the menu is activated and no input is made for a period of 15 seconds, the menu is closed. You can exit from the menu at any time by pressing the "MENUE" button as often as necessary until the corresponding icons no longer appear in the display.
4.3.2 Switching the Auto mode on/off
If no sound is detected by the transmitter for a period of 15 seconds, the screen switches to AUTO mode and is deactivated. When a sound is subsequently detected or a button is pressed on the receiver, the screen is automatically reactivated.
- Press and hold the "CHANNEL" button (4 seconds) until a short acoustic signal is issued. AUTO appears in the display.
- To switch AUTO mode off, press and hold the "CHANNEL" button (4 seconds) until a short acoustic signal is issued. AUTO disappears from the display.
4.4 Battery mode
If the equipment is to be used powered by the battery pack, disconnect the power adapter plug connectors from the sockets on the transmitter and receiver.
The battery charge capacity is indicated in the display by a battery icon. Operating time with charged battery refer to Chapter 6.1, Technical data.
Hinweis: In the case of a power failure or disconnection from the mains supply, the devices are switched off when still connected to the power adapter plug. To switch to battery mode, disconnect the power adapter plug connectors from the devices.
- Troubleshooting -
5 Troubleshooting
If you experience problems with the Monitor Set, please refer to the information below first of all.
In the case of technical problems, you can also contact our hotline service, tel. 0180 5 00 13 88 (cost via Telekom at time of going to print: 12 ct/min).
In the case of claims under the terms of guarantee, contact your sales outlet. There is a 2 year period of guarantee.
| Faults | Cause |
| Equipment does not function | - Transmitter and/or receiver are not switched on. - Battery pack is discharged or defect. |
| No reception - Transmitter and receiver are not switched to the same channel. - Transmitter is too far from object being monitored, e.g. baby. Observe the minimum distance of one meter. - Distance between the receiver and transmitter is too large. - Volume setting of the receiver is too low. | |
| Reception interference | - Distance between the receiver and transmitter is too large. - Battery power is too low. - Select another channel on the receiver and transmitter. - Other electronic devices cause interference in the field of transmission. |
| Beeping noise (acoustic feedback) | - Increase the distance between receiver and transmitter. - Reduce the volume on the receiver. |
- Troubleshooting -
| Noise - Battery power is too low.- Transmitter and receiver are not switched to the same channel. |
| Reception on external device- A device nearby is using the same channel. Switch to another channel. |
| Picture but no sound transmission- Volume setting is too low. |
- Important Information -
6 Important Information
6.1 Technical data
| Feature Value | |
| Range Up to 50 meters | under optimum conditions. Range is reduced in buildings through walls, doors etc. |
| Power supply receiver | Power adapter plug 6 VDC/1000 mA or battery pack 3x AA Ni-Mh 3.6V 1600 mAh |
| Power supply transmitter | Power adapter plug 6 VDC/800 mA or battery pack 3x AA Ni-Mh 3.6V 1600 mAh |
| Operating time with charged battery | Receiver: Up to four hours Transmitter: Up to 8 hours in normal operation Up to 5 hours in nighttime operation |
| Frequencies Channel 1 | = 2.411 GHz Channel 2 = 2.431 GHz Channel 3 = 2.451 GHz |
| Transmitting power 10 | mW |
| Permissible ambient temperature | 10°C to 30°C |
| Permissible relative humidity | 20% to 75% |
- Important Information -
6.2 Guarantee
AUDIOLINE equipment is produced and tested according to the latest production methods. The implementation of carefully chosen materials and highly developed technologies ensure trouble-free functioning and a long service life. The terms of guarantee do not apply to the standard batteries or power packs used in the products. The period of guarantee is 24 months from the date of purchase.
All deficiencies resulting from material or production faults which occur during the period of guarantee will be eliminated free of charge. Rights to claims under the terms of guarantee are annulled following intervention by the purchaser or third parties. Damage caused as a result of improper handling or operation, incorrect positioning or storing, improper connection or installation, Acts of God or other external influence are not covered by the terms of guarantee. In the case of complaints, we reserve the right to repair or replace defect parts or provide a replacement device. Replacement parts or devices become our property. Rights to compensation in the case of damage are excluded where there is no evidence of intent or gross negligence by the manufacturer.
If your equipment shows signs of defect during the period of guarantee, please return it to the sales outlet in which you purchased the AUDIOLINE equipment together with the purchase receipt. All rights to claims under the terms of guarantee in accordance with this agreement must be asserted exclusively with regard to your sales outlet. Two years after the purchase and transfer of our products, claims under the terms of guarantee can no longer be asserted.
- Declaration of Conformity -
7 Declaration of Conformity
This device fulfils the requirements stipulated in the EU directive:
1999/5/EU directive on radio equipment and telecommunications terminal equipment and the mutual recognition of their conformity. Conformity with the above mentioned directive is confirmed by the CE symbol on the device.
To view the complete Declaration of Conformity, please refer to the free download available on our web site www.audioline.de.
CE
Important Notes on the Guarantee
8 Important Notes on the Guarantee
The period of guarantee for the AUDIOLINE product begins on the date of purchase. Rights to claims under the terms of guarantee relate to deficiencies resulting from material or production faults. Rights to claims under the terms of guarantee are annulled following intervention by the purchaser or third parties. Damage caused as a result of improper handling or operation, normal wear and tear, incorrect positioning or storing, improper connection or installation, Acts of God or other external influence are not covered by the terms of guarantee.
CLAIMS UNDER THE TERMS OF GUARANTEE MAY ONLY BE ASSERTED TO THE RETAILER WHERE THE EQUIPMENT WAS PURCHASED, WHEREBY THE PURCHASE RECEIPT MUST ALSO BE SUBMITTED.
TO PREVENT UNNECESSARY LONG DELAYS, PLEASE DO NOT SEND EQUIPMENT UNDER COMPLAINT TO OUR OFFICE ADDRESS.
IN THE CASE OF QUESTIONS CONCERNING OPERATION OR THE TERMS OF GUARANTEE, PLEASE REFER TO THE OPERATING MANUAL OR CONTACT OUR HOTLINE:
0180 500 13 88 (Telekom cost at time of going to print: 12 ct/min)
AUDIOLINE GmbH
Neuss
Service Hotline 0180 500 13 88
(Telekom cost at time of going to print: 12 ct/min)
Internet: www.audioline.de - E-mail: info@audioline.de