Baby Care 2 - Baby monitor AUDIOLINE - Free user manual and instructions
Find the device manual for free Baby Care 2 AUDIOLINE in PDF.

User questions about Baby Care 2 AUDIOLINE
0 question about this device. Answer the ones you know or ask your own.
Ask a new question about this device
Download the instructions for your Baby monitor in PDF format for free! Find your manual Baby Care 2 - AUDIOLINE and take your electronic device back in hand. On this page are published all the documents necessary for the use of your device. Baby Care 2 by AUDIOLINE.
USER MANUAL Baby Care 2 AUDIOLINE
Operating Instructions 21
natural_image
Simple line drawing of a symmetrical object with a curved top and a small semicircular base, labeled with the number 24 (no text or symbols on the object itself)

- Inbetriebnahme -
3 Inbetriebnahme
natural_image
Line drawing of a device with red arrows indicating rotation or movement (no text or symbols)Clip anbringen
natural_image
Simple line drawing of a door handle with a circular inset showing red arrows indicating rotation (no text or symbols)Clip entfernen
1 General safety information ....22
2 User controls ....24
3 Setting up ....26
3.1 Check contents of pack 26
3.2 Parent unit ...... 26
3.2.1 Fitting standard batteries....26
3.2.2 Fitting or removing the belt clip .....26
3.2.3 Connecting the charging station....26
3.2.4 Charging the parent unit....27
3.3 Baby unit....27
3.3.1 Connecting the power supply .....27
3.3.2 Fitting batteries as a backup in the case of supply failure or for battery mode.....27
4 Operation....28
4.1 Display indicators and their meaning....28
4.2 Position for the baby unit....28
4.3 Switching the baby unit on and off .....28
4.4 Switching the parent unit on and off....29
4.5 Adjusting the volume....29
4.6 Setting the transmission sensitivity ....30
4.7 Playing lullabies....31
4.8 Intercom function to the baby.... 32
4.9 Temperature monitoring.... 32
4.10 Switching the warning tone on and off ....34
4.11 Switching the nightlight on/off 34
4.12 Searching for the parent unit ....35
4.13 Monitoring the radio contact....35
4.14 Restoring factory settings.... 35
5 Important information....36
5.1 Troubleshooting....36
5.2 Technical data....37
5.3 Warranty....38
5.4 Declaration of Conformity/CE mark.... 38
- General safety information -
1 General safety information
With the Baby Care 2 Babyphone you have purchased a quality AUDIOLINE product. Please read these operating instructions carefully in order to learn about all the options. If you should have any questions, please contact our Service Department on the Hotline number 0180 5 00 13 88. Under no circumstances open the unit yourself and do not try to carry out your own repairs. For any claims under the warranty, please refer to your dealer.
Intended use
The unit is designed for transmitting speech signals such as noises made by children. Warning or signal tones from breathing or heartbeat monitors CANNOT be transmitted.
NOTE: The use of this unit CANNOT replace the personal supervision of a child or other person requiring care. No liability that falls outside the statutory regulations can be accepted.
Safety Information
- The unit is not suitable for medicinal applications.
- Maintain a safe distance of at least one metre when using the unit.
- Use only high-quality batteries.
- For safety reasons, use only the original power supplies provided. The unit may set on fire if unsuitable power supplies are used.
- When using a power supply, make sure that the cable and plug are in perfect condition. Kinked or chafed cables can cause a short-circuit. Note: Fire hazard.
-
Ensure that all components are adequately ventilated during operation. Do not place pillows or towels on the units.
-
Do not use the units in areas where there is a risk of explosion.
- The units are designed for use in protected rooms with a temperature range of 10 °C to 30 °C. The units must not be installed in damp rooms such as a bathroom or laundry room. Avoid proximity to sources of heat such as radiators and do not expose the unit to direct sunlight.
- If the useful life of the complete equipment has expired, please dispose of it carefully in accordance with the statutory requirements and in a manner friendly to the environment.
- The maximum range is up to 300 metres outdoors and up to 50 metres indoors.
- General safety information -
Rechargeable standard batteries/ordinary batteries
• Use only high-quality batteries for the baby unit as a backup in the case of supply failure or in battery mode.
- For the parent unit, use only standard rechargeable batteries, Type AA 1.2V 1300mAh.
• Always change all standard rechargeable batteries/ordinary batteries at the same time.
- Do not throw standard rechargeable batteries/ordinary batteries into the fire or immerse in water.
- If you are not using the units over an extended period, please remove the standard rechargeable batteries/ordinary batteries. Long-term storage with the standard rechargeable batteries/ordinary batteries fitted can cause the batteries to leak.
- Do not dispose of old or defective standard rechargeable batteries/ordinary batteries with the normal household waste. You are legally obliged to return all batteries and rechargeable batteries to suitable collection points.
Position
Do not set up the units in the immediate vicinity of other electrical equipment such as microwaves or hi-fi systems, as this may result in mutual interference. The location has a decisive influence on trouble-free operation.
Place the units on a flat and non-slip surface. The feet do not normally leave any marks on the surface. However, due to the large number of varnishes and surfaces in use, it may not be possible to prevent marks occurring on the surface due to the feet of the unit.
Cleaning and care
The surface of the case can be cleaned with a soft, dry, lint-free cloth. Never use cleaning agents, particularly aggressive solvents. No attention is necessary apart from cleaning the case occasionally. The rubber feet of the Babyphone are not resistant to all cleaning agents. The manufacturer can therefore not accept any liability for possible damage to furniture or the like.
- User controls -
2 User controls
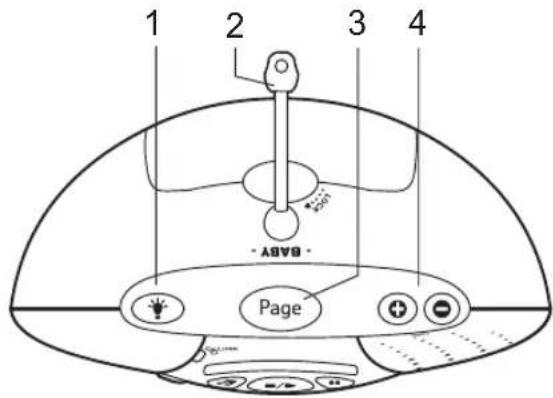
Baby unit
1 Nightlight on/off
2 Temperature probe
3 Search for parent unit with the Page button
4 Volume adjustment
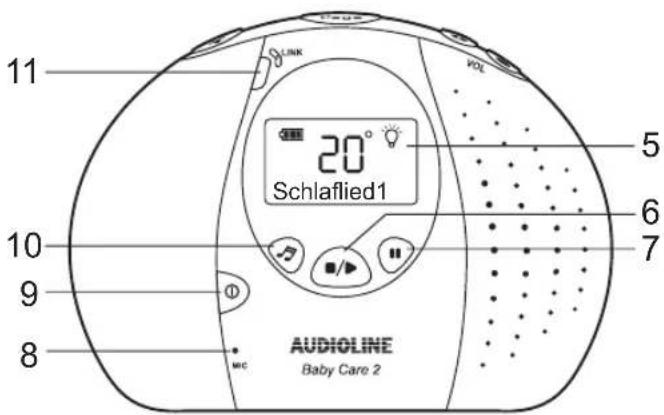
5 Illuminated display
6 Start/Stop for playing back lullabies
7 Pause button when playing back lullabies
8 Microphone
9 On/Off
10 For selecting lullabies
11 Visual indicator that there is a connection to the parent unit
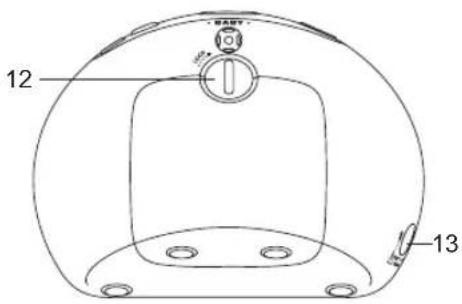
Back
12 Battery compartment
13 Connection for power supply
- User controls -
Parent unit
14 Button for intercom function to baby unit
15 On/Off
16 Illuminated display
17 Confirmation button for menu functions
18 Visual indicator that there is a connection to the baby unit
19 Menu button
20 Volume adjustment/Selection of menu functions
21 Visual indication of baby monitoring
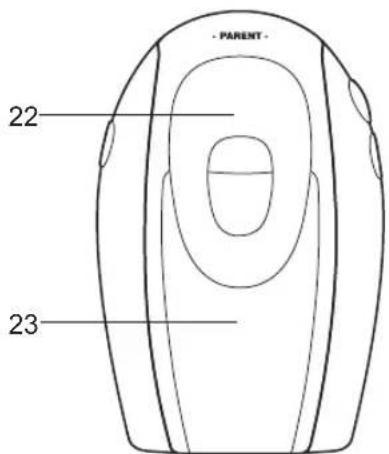
Back
22 Belt clip
23 Battery compartment
Charging station for parent unit
24 Charge monitoring light; illuminates when parent unit is being charged

natural_image
Simple line drawing of a symmetrical object with a curved top and a small oval base, labeled '24' at the bottom (no text or symbols on the object itself)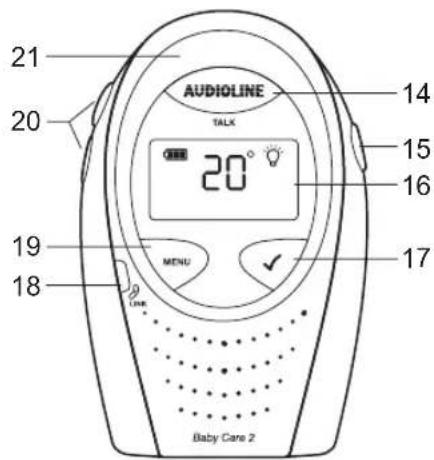
- Setting up -
3 Setting up
3.1 Check contents of pack
The following items are supplied
| one parent unit including belt clip charging station for parent | unit including power supply |
| one baby unit Plug-in power supply for baby unit | |
| 2 rechargeable standard batteries for parent unit one instruction manual | |
3.2 Parent unit
3.2.1 Fitting standard batteries
Open the battery compartment on the parent unit by pushing up the battery compartment cover by its bottom end. If the belt clip has been fitted, this must be removed first. Now insert the standard rechargeable batteries taking care to ensure that the polarity is correct. Close the battery compartment cover.
NOTE:
Do not use normal, non-rechargeable batteries in the parent unit.
Never use the parent unit on the charging station without standard rechargeable batteries.
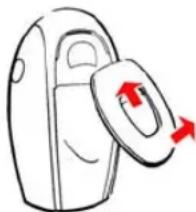
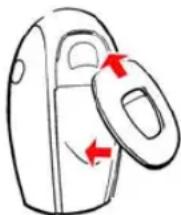
3.2.2 Fitting or removing the belt clip
To fit the belt clip, place the top end into the parent unit and then press the belt clip downwards. To remove the belt clip, use a screwdriver to press on the retainer inside the clip and pull the belt clip upwards.
natural_image
Simple line drawing of a device with a handle and two red arrows indicating direction (no text or symbols)Fitting the clip

natural_image
Simple line drawing of a door handle with a circular inset showing red arrows indicating rotation (no text or symbols)Removing the clip
3.2.3 Connecting the charging station
The plug-in mains power supply is permanently connected to the charging station. Plug the power supply into a properly installed 230 V mains socket.
- Setting up -
3.2.4 Charging the parent unit
Place the parent unit in the charging station with the display to the front for at least 16 hours. The charge monitoring light on the charging station will come on and charging will be indicated by a cycling display of the battery symbol. When the parent unit is fully charged, the display will show a complete battery symbol. The standard rechargeable batteries have an operating time of max. 12 to 24 hours at room temperature.
The current battery capacity is shown in the display.
 Full Full |  Half Half |  Low Low |
If the battery capacity is too low, an appropriate message will appear in the display and you will hear a warning tone every minute. The parent unit must only be used for a further 1 hour after the first warning tone.
3.3 Baby unit

Note: The baby unit is designed for operation with the plug-in mains power supply provided. The baby unit can be operated with four 1.5V AA alkaline batteries (not included) as a backup in the case of supply failure or for short-term operation in battery mode.
3.3.1 Connecting the power supply
Use the plug-in mains power supply provided for the baby unit. Insert the small round plug into the socket provided on the rear of the baby unit (13) and plug the power supply into a mains socket (230V/50Hz). Ensure that the plug-in mains power supply is adequately ventilated.
3.3.2 Fitting batteries as a backup in the case of supply failure or for battery mode.
The baby unit is designed for operation with the plug-in mains power supply provided. The baby unit can be operated with four 1.5V AA alkaline batteries as a backup in the case of supply failure or for short-term operation in battery mode. In this case, the baby unit can be used for 16 hours with new batteries and the message BATTERY will appear in the display.
If the battery capacity is too low, an appropriate message will appear in the display and you will hear a warning tone every minute. The baby unit can be used for a further 1 hour after the first warning tone.
Open the battery compartment on the rear using a coin and insert the batteries. When doing so, take care to ensure that the polarity is correct and close the battery compartment.
- Operation -
4 Operation
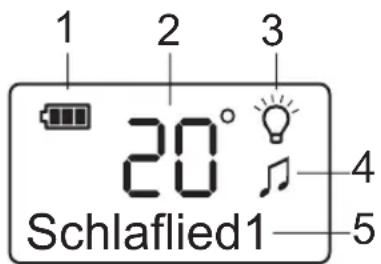
4.1 Display indicators and their meaning
- Battery capacity
- Indication of current temperature
- Nightlight is switched on.
- A lullaby is being played
- Different menu displays
4.2 Position for the baby unit
Position the baby unit near to the baby. Please observe the minimum distance of one metre. For best transmission, the integral microphone (8) should be pointing towards the child. Please pay attention to the additional safety information in Chapter 1 of these operating instructions.
Note: Please do not use the parent unit too close to the baby unit, as this can lead to loud whistling noises. In this case, move further away from the baby unit or reduce the volume.
4.3 Switching the baby unit on and off
Switch the baby unit on by pressing the On/Off button (9) for one second. A search will now be made for the parent unit and after a few seconds the indicator (11) will light up green. If the baby unit does not find the parent unit, the indicator (11) will flash red.
If you want to switch the baby unit off, press and hold the On/Off button (9) for one second.
- Operation -
4.4 Switching the parent unit on and off
Switch the parent unit on by pressing the On/Off button (15) for one second. A search will now be made for the baby unit and after a few seconds the indicator (18) will light up green. If the baby unit does not find the parent unit, the indicator (18) will flash red.
If you want to switch the parent unit off, press and hold the On/Off button (15) for one second.
Note: The parent unit can also be used when it is sitting on the charging station. In this case, the standard rechargeable batteries will continue to be charged, but full charging will take longer.
4.5 Adjusting the volume
Baby unit
The volume on the baby unit can be adjusted in five steps by means of the buttons ⏻ and Ⓜ. The volume that is set relates to the playing of lullabies and, at the same time, to the volume for the intercom function. For more information see Chapter 4.8.
Parent unit
The volume on the parent unit can be set in five steps by means of the buttons ⏻ and ⏱ (20). In addition, the loudspeaker can also be switched off completely (SPEAKER OFF).
As well as audible transmission via the loudspeaker, noises are also displayed visually by means of five green and three red indicators (21). Monitoring can therefore be carried out even when the volume has been reduced or switched off altogether.
Note:
- When the volume on the parent unit is switched off, it can still sound a warning tone if the baby makes a noise. For more information see Chapter 4.10.
- The volume on the parent unit will automatically be reset to a medium volume when the intercom function is used and the volume was previously switched off.
- Operation -
4.6 Setting the transmission sensitivity
The transmission sensitivity from the baby unit to the parent unit can be adjusted in 5 steps. In Step 5, even very quiet noises can be heard at the parent unit. In Step 1, only loud noises can be heard. If you want to be sure that you will hear all noises, use Step 5.
Note: This setting has no effect on the visual indication of noise on the parent unit.
| 1. Press the MENU button (19). |
| 2. Select SENSITIVITY from the menu with the ⊕ button (20). |
| 3. Press the √ button (17). The display will show the sensitivity that is currently set in 5 steps. |
| 4. Now select the required sensitivity using the ⊙ and ⊖ buttons (20). |
| 5. Confirm with the √ button (17). The display will briefly show STORED and then the menu item SENSITIVITY. |
| 6. Press the MENU button to exit programming. |
- Operation -
4.7 Playing lullabies
Five lullabies, each with a length of 30 seconds, have been stored to help your baby fall asleep peacefully. With several repeats, the playing time amounts to approximately 5 minutes. Lullabies can be played both via the baby unit and via the parent unit.
Playing lullabies from the baby unit
You can find the required LULLABY 1 to 5 or select PLAY ALL by repeatedly pressing the button (10). In the PLAY ALL setting, all lullabies will be played one after the other for 5 minutes.
You can start and stop the playback by pressing the 📋/▶ button (6). You can pause playback by pressing the 📋 button (7) and then continue with the same button ⏻ (7).
Playing lullabies from the parent unit
| 1. Press the MENU button (19). |
| 2. Select LULLABY from the menu with the ⏻ button (20). |
| 3. Confirm with the √ button (17). The display will show PLAY?. |
| 4. Press the √ button (17) once more and the lullaby that was last played will be played again. If you want to select a different lullaby, first press the ⊖ button (20). The message CHOOSE LULLABY will appear in the display. |
| 5. Confirm with √ me button (17). |
| 6. Now select the required lullaby using the ⊖ and ⊕ buttons (20). Or select PLAY ALL. |
| 7. Confirm with the √ button (17) and the selected lullaby will be played. In the PLAY ALL setting, all lullabies will be played one after the other for 5 minutes. |
| 8. The √ button (17) can be used as a PAUSE button during playback. |
| 9. To stop playback, press the MENU button (19). The display will show LULLABY OFF?. |
| 10. Confirm with the √ button (17) and playback will be stopped. |
- Operation -
Note:
- While the lullabies are being played, the 🎩 indicator and the name of the lullaby currently being played will appear in the display of the baby unit and also of the parent unit. In this way, you can tell from the parent unit whether a lullaby is being played.
- If playback is switched to Pause, then the musical indicator will flash in both displays.
• The pause must not be longer than 60 seconds. After this, playing of the lullaby will be stopped automatically.
• You can make full use of the entire menu on the parent unit even when lullabies are being played.
4.8 Intercom function to the baby
You can speak to the baby in order to calm it by using the intercom function. To do this, press and hold the TALK button (14) on the parent unit and speak. You will be able to hear the baby again when you release the TALK button (14). The indicator light (11/18) on both the parent and baby unit will flash while you are speaking.
Note: If the volume on the parent unit is switched off, this will be automatically reset to a medium volume.
4.9 Temperature monitoring
The temperature in the baby's room is shown continuously on both displays. Make sure that the temperature probe is not covered by any objects.
An adjustable temperature range can also be monitored. If the temperature falls outside this range, you will hear a short signal tone at the parent unit each time this occurs and the temperature indication will flash in the display. If the temperature rises or falls further, you will hear these short signal tones each time it changes.
Note: Normally, the signal tone will sound for every degree that the temperature rises or falls outside the set temperature range. You can offset the range by 2^ C up or down by pressing any button on the parent unit so that the signal tone will only sound the next but one time the temperature moves out of the range.
- Operation -
Setting the temperature range
| 1. Press the MENU button (19). |
| 2. Select TEMPERATURE from the menu with the ⚠ button (20). |
| 3. Press the √ button (17) twice. The display will show the currently selected minimum temperature. |
| 4. Now select the required minimum temperature using the ⏻ and ⚠ buttons (20). The adjustment range is from 10 to 19°C. |
| 5. Confirm with the √ button (17). The display will briefly show STORED and then the currently selected maximum temperature. |
| 6. Now select the required maximum temperature using the ⏻ und ⚠ buttons (20). The adjustment range is from 22 to 30°C. |
| 7. Confirm with the √ button (17). The display will briefly show STORED and then the menu item TEMPERATURE. |
| 8. Press the MENU button to exit programming. |
Switching temperature monitoring on/off
| 1. Press the MENU button (19). |
| 2. Select TEMPERATURE from the menu with the ⚠ button (20). |
| 3. Press the √ button (17) once. The display will show the menu item RANGE. |
| 4. Now select ALARM ON/OFF from the menu using the ⚡ and ⚢ buttons (20). |
| 5. Confirm with the √ button (17). If the monitoring is switched off, the display will show ALARM ON?. When the monitoring is switched off, the display will show ALARM OFF?. |
| 6. Confirm with the √ button (17). The display will briefly show STORED and then the menu item TEMPERATURE. |
| 7. Press the MENU button (19) to exit programming. |
- Operation -
4.10 Switching the warning tone on and off
When the volume on the parent unit is switched off, it can still sound a warning tone if the baby makes a noise. When the second last step of the visual indicator has been reached, the warning tone will sound and the WARNING indicator will appear in the display. Then increase the volume so that you can hear your baby.
Note: When the volume is switched on, the warning tone is automatically deactivated.
| 1. Press the MENU button (19). |
| 2. Select WARNING TONE from the menu with the ⏻ button (20). |
| 3. Confirm with the √ button (17). If the warning tone is switched off, the display will show WARNING TONE ON?.When the warning tone is switched off, the display will show WARNING TONE OFF?. |
| 4. Confirm with the √ button (17). The display will briefly show STORED and then the menu item WARNING TONE. |
| 5. Press the MENU button (19) to exit programming. |
4.11 Switching the nightlight on/off
You can switch the nightlight on the baby unit on and off by means of the 🎨 button (1). When the nightlight is switched on, the 🎨 indicator appears in both displays. You can therefore also check from the parent unit whether the nightlight is switched on or off. The nightlight can also be switched from the parent unit.
Switching the nightlight on from the parent unit
| 1. Press the MENU button (19). |
| 2. If the nightlight is switched off, LIGHT ON? will appear in the display. |
| 3. Confirm with √(17). The nightlight will be switched on and the indicator will appear in the display. |
Switching the nightlight off from the parent unit
| 1. Press the MENU button (19). |
| 2. If the nightlight is switched on, LIGHT OFF? will appear in the display. |
| 3. Confirm with √(17). The nightlight will be switched off and the ⏻ indicator will appear in the display. |
- Operation -
4.12 Searching for the parent unit
If you cannot remember where you have left the parent unit, press the PAGE button (3) on the baby unit. You will hear the call signals from the parent unit for 2 minutes and thus be able to find it again easily. You can cancel the audible signals prematurely by pressing any button on the parent or baby unit.
Note: If the volume on the parent unit is switched off, this will be automatically reset to a medium volume.
4.13 Monitoring the radio contact
The radio contact between the parent unit and the baby unit is monitored continuously. When there is a good connection, the green LINK indicator light (18/11) on the parent and baby unit illuminates.
If you have moved the parent unit too far away from the baby unit or if the baby unit is switched off, the green indicator light will flash and you will hear a warning tone every 30 seconds. After this, the indicator light will flash red, the message NO CONTACT will appear in the display and you will hear a warning tone every 30 seconds.
Note: The warning tone for loss of radio contact cannot be switched off. However, the warning tone can be silenced for 3 minutes by pressing any button on the parent unit.
4.14 Restoring factory settings
The factory settings can be reset individually on the parent and baby unit.
Switch on the parent or baby unit.
While all the indicators are on, press the volume button Ⓞ (4= Baby unit, 20= parent unit) immediately until RESET appears in the display. The reset will be carried out after a few seconds.
Factory settings, baby unit Factory settings, parent unit
| Volume: | Step | 3 | Volume: | Step | 1 |
| Lullaby: | 1 | Sensitivity | Step | 5 |
Temperature monitoring: Minimum 14°C, Maximum 23°C Warning tone: On
Temperature monitoring: Off
- Important information -
5 Important information
5.1 Troubleshooting
If you have problems with your product, please check the following points first. For technical problems, you can also contact our hotline on telephone number 0180 5 00 13 88. For any claims under the warranty, please refer to your dealer. The warranty period is 2 years.
| Problem | Possible | cause | Remedy |
| Indicator light (18/11) flashes red. Parent unit or baby unit not switched on Press ON button. | |||
| Whistling sound The parent and baby unit are too close together.The volume is too high. | Move the parent unit further away from the baby unit.Reduce the volume. | ||
| No transmission The volume on the parent unit is too low.The sensitivity is set too low.The range has been exceeded. | Increase the volume on the parent unit.Increase the sensitivity via the parent unit.Move the parent unit nearer to the baby unit. | ||
| The parent unit cannot be switched on. The parent unit is not charged. Charge the parent unit on the charging station. | |||
| The batteries in the parent unit are not charged. | The standard rechargeable batteries have reached the end of their life. | Change the standard batteries. | |
| BATT. LOW display on the baby unit. | The batteries in the baby unit are flat. | Change the batteries in the baby unit. | |
- Important information -
5.2 Technical data
| Standard DECT | |
| Number of channels 120 channels between 1880 and 1990 MHz | |
| Range Indoors up to 50 m | |
| Range Outdoors up to 300 m | |
| Standby, parent unit ca. 12 to 24 hours | |
| Power supply, parent unit 2 x AA 1.2V 1300mAh standard rechargeable batteries | |
| Power supply, charging station, parent unit Plug-in mains power supply DC 9.0V/300mA permanently connected to the charging station | |
| Power supply, baby unit Plug-in mains power supply DC 9.0V/300mA | |
| Backup in case of supply failure, baby unit 4 x 15V AA alkaline batteries | |
| Standby, baby unit in battery mode up to 16 hours | |
| Permissible ambient temperature 10°C to 30°C | |
| Permissible relative humidity 20 to 75% | |
- Important information -
5.3 Warranty
AUDIOLINE units are manufactured and tested in accordance with the most up-to-date manufacturing procedures. Selected materials and highly developed technologies ensure trouble-free operation and long life. If, however, your unit should develop a fault within the warranty period, please contact the shop where you bought your AUDIOLINE unit, taking with you your purchase receipt. The warranty period is 24 months calculated from the day of purchase. This warranty is not applicable to the batteries or battery packs used in the various products.
Warranty conditions:
All defects, which are the result of material or manufacturing faults, will be rectified free of charge within the warranty period. Claims under the warranty shall not be considered if the equipment has been tampered with by the purchaser or third parties. Damage, which results from improper handling or use, incorrect positioning or storage, inappropriate connection or Installation and through Act of God or other external influences are not covered by the warranty. In the case of complaints, we reserve the right to repair or to replace the defective parts or to exchange the unit. Parts or units that have been exchanged shall become our property. Claims for damages shall not be entertained unless they relate to intention or gross negligence on the part of the manufacturer. In accordance with these conditions, all claims under the warranty shall be made exclusively to your dealer. Rights under the warranty can no longer be enforced after the expiry of two years from the purchase and handing over of our products.
5.4 Declaration of Conformity/CE mark
The product complies with the basic requirements of the R&TTE Directive "1999/5/EEC". This is confirmed by the CE mark.
For the complete Declaration of Conformity, please use the free download from our web site www.audioline.de.
CE 0681