
TM-T88IV - POS Thermal Printer EPSON - Free user manual and instructions
Find the device manual for free TM-T88IV EPSON in PDF.
| Product Type | POS Thermal Printer |
| Brand | EPSON |
| Model | TM-T88IV |
| Dimensions (approx) | 145 x 197 x 148 mm (W x D x H) |
| Weight (approx) | 1.8 kg |
| Power Supply | AC adapter (input AC 100-240V, output DC 24V) |
| Paper Type | Thermal roll (width 80 mm) |
| Print Method | Direct Thermal |
| Available Interfaces | Serial (null modem), parallel (IEEE 1284), USB (with driver) |
| Main Functions | Receipt printing, auto cutter, manual paper feed |
| Control Panel | Paper feed button, power, error, paper out indicators |
| Installation | Horizontal (flat surface) or vertical (optional wall mount WH-10) |
| Safety | Overheat shutdown, protected cutter, switch cover to prevent accidental operation |
| Maintenance | Clean thermal head with isopropyl alcohol every 3 months |
| Supplied Accessories | Printer, paper roll, switch cover, connector cover, AC adapter |
| Compliance | CE, FCC Class A, ICES-003 Class A, VCCI Class A, UL 1950, CSA C22.2 No.950 |
| Troubleshooting - Error light on | Check paper presence (PAPER OUT) or close the cover |
| Troubleshooting - Paper jam | Open cover, remove jammed paper, use cutter cover if necessary |
| Spare Parts | Thermal head, cutter, paper rollers, covers |
| Repairability | Do not disassemble yourself, contact an Epson service center |
Frequently Asked Questions - TM-T88IV EPSON
User questions about TM-T88IV EPSON
0 question about this device. Answer the ones you know or ask your own.
Ask a new question about this device
Download the instructions for your POS Thermal Printer in PDF format for free! Find your manual TM-T88IV - EPSON and take your electronic device back in hand. On this page are published all the documents necessary for the use of your device. TM-T88IV by EPSON.
USER MANUAL TM-T88IV EPSON
Serial Interface (DIP switch 1)
| SW | Function | ON | OFF |
| 1-1 | Data receive error | Ignored | Prints “?” |
| 1-2 | Receive buffer capacity | 45 bytes | 4K bytes |
| 1-3 | Handshaking | XON/XOFF | DTR/DSR |
| 1-4 | Data word length | 7 bits | 8 bits |
| 1-5 | Parity check | Enabled | Disabled |
| 1-6 | Parity selection | Even | Odd |
| 1-7 | Transmission speed (See table below.) | ||
| 1-8 | |||
Transmission speed
| Transmission speed (bps)-bits per second | 1-7 | 1-8 |
| 38400 *1 | ON | ON |
| 4800 | OFF | ON |
| 9600 | ON | OFF |
| 19200 | OFF | OFF |
Serial Interface (DIP switch 2)
| SW | Function | ON | OFF |
| 2-1 | Handshaking (BUSY condition) | Receive buffer full | Offline or Receive buffer full |
| 2-2 | Do not change | ||
| 2-3 2-4 | Print density/ Low power | See Table A | |
| 2-5 | Release condition of receive buffer BUSY (if receive buffer capacity set to 4 KB.) | Releases BUSY when remaining receive buffer capacity reaches 138 bytes. | Releases BUSY when remaining receive buffer capacity reaches 256 bytes. |
| 2-6 | Do not change | ||
| 2-7 | I/F pin 6 reset | Enabled | Disabled |
| 2-8 | I/F pin 25 reset | Enabled | Disabled |
*1. Only when DIP Switches 1-7 and 1-8 are on, the transmission speed can be selected from one of seven speeds: 2400, 4800, 9600, 19200, 38400, 57600, and 15200 bps. The default is 38400.
Parallel Interface (DIP switch 1)
| SW | Function | ON | OFF |
| 1-1 | Auto line feed | Always enabled | Always disabled |
| 1-2 | Receive buffer capacity | 45 bytes | 4K bytes |
| 1-3 | Select paper sensors to output paper-end signals (default value of ESC C 3) | Disabled | Roll Paper end sensor enabled, Roll Paper near-end sensor enabled |
| 1-4 | Error signal output | Disabled | Enabled |
| 1-5~1-8 | Undefined | ||
Parallel Interface (DIP switch 2)
| SW | Function | ON | OFF |
| 2-1 | Handshaking (BUSY condition) | Receive buffer full | Offline or Receive buffer full |
| 2-2 | Do not change | ||
| 2-3 | Print density/ Low power | See Table A | |
| 2-4 | |||
| 2-5 | Release condition of receive buffer BUSY (If receive buffer capacity set to 4 KB.) | Releases BUSY when remaining receive buffer capacity reaches 138 bytes. | Releases BUSY when remaining receive buffer capacity reaches 256 bytes. |
| 2-6 | Do not change | ||
| 2-7 | |||
| 2-8 | I/F pin 31 reset (Do not change) | ||
Table A
| Print density/low power | SW 2-3 | SW 2-4 |
| - Low power consumption mode | ON | ON |
| Print density “Normal” | OFF | OFF |
| Print density “Medium” | ON | OFF |
| Print density “Dark” | OFF | ON |
Specifications
| Printing method | Thermal line printing |
| Dot density | 180 dpi × 180 dpi (dots per 25.4 mm {1"}) |
| Printing direction | Unidirectional with friction feed |
| Printing width | 80 mm paper width model: 72 mm {2.83", 512 dot positions} |
| Characters per line (default) | 80 mm paper width model: Font A: 42; Font B: 56 |
| Character spacing (default) | Font A: 0.28 mm {.01"} (2 dots); Font B: 0.28 mm {.01"} (2 dots) |
| Character size | Standard/Double-height/Double-width/Double-width and Double-height Font A: 1.41 × 3.39 mm/1.41 × 6.77 mm/2.82 × 3.39 mm/2.82 × 6.77 mm Font B: 0.99 × 2.40 mm/0.99 × 4.80 mm/1.98 × 2.40 mm/1.98 × 4.80 mm |
| Number of characters | Alphanumeric characters: 95; International characters: 37 Extended graphics: 128 × 11 pages (including user-defined page) |
| Printing speed | High-speed mode: 200 mm/s {7.9"/s} max.; 47.2 lps (4.23 mm {1/6"} feed) Ladder bar code and 2D code: 100mm/s {2.4"/s} Low-power consumption mode: 150 mm/s {5.9"/s} max.; 35.5 lps (4.23 mm feed {1/6"}) Bit image, Ladder bar code, 2D code and Page mode: 60mm/s {2.4"/s} The above speed values are approximate. The values are when the printer prints with density "Normal" at 24 V and 25°C {77°F} Speed is adjusted automatically depending on the voltage applied and head temperature. |
| Paper feed speed | Approx. 200 mm/s {approx. 7.9"/s} continuous paper feed |
| Line spacing (default) | 4.23 mm {1/6"} |
| Character structure | Font A: 12 × 24; Font B: 9 × 17 (including 2-dot horizontal spacing) Font A is the default. |
| Roll Paper (single-ply) | Size: 80 mm paper width model: 79.5 mm ± 0.5 mm {3.13" ± 0.02", Maximum outside diameter: 83 mm {3.26"} Roll Paper spool diameter: Inside: 12 mm {0.47"}; Outside: 18 mm {0.71"} |
| Thermal paper type | Specified: NTP080-80 |
| Interface (compatible) | Serial (RS232/RS485)/Parallel (IEEE1284)/Ethernet (10/100Base-T)/ USB (Full speed) |
| Receive buffer | 4KB/45 bytes |
| Cash drawer function | 2 drives |
| Supply voltage | DC + 24 V ± 7% |
| Current consumption | High-speed mode: Mean: Approx. 1.8A Low-power consumption mode: Mean: Approx. 1.1A |
| Temperature | Operating: 5 to 45°C {41 to 113°F} Storage: -10 to 50°C {14 to 122°F}, except for paper |
| Humidity | Operating: 10 to 90% RH Storage: 10 to 90% RH, except for paper |
| Overall dimensions | 148 × 145 × 195 mm {5.83 × 5.71 × 7.68"} (H × W × D) |
| Weight (mass) | Approx. 1.8 kg {3.96 lb} |
DIP Switch Tables and Specifications
The DIP switch tables and technical specifications are at the beginning of this manual.
Illustrations
All of the illustrations are at the beginning of this manual. They are identified by letters (A, B, C...). Some of the illustrations have numbers in them. See the list below for the meaning of the numbers.
Illustration A:
Printer Parts
- Printer cover
- Cutter cover
- Cover open button
- Control panel
Illustration C:
- Hook
- Bottom of the printer
All rights reserved. No part of this publication may be reproduced, stored in a retrieval system, or transmitted in any form or by any means, electronic, mechanical, photocopying, recording, or otherwise, without the prior written permission of Seiko Epson Corporation. No patent liability is assumed with respect to the use of the information contained herein. While every precaution has been taken in the preparation of this book, Seiko Epson Corporation assumes no responsibility for errors or omissions. Neither is any liability assumed for damages resulting from the use of the information contained herein. Neither Seiko Epson Corporation nor its affiliates shall be liable to the purchaser of this product or third parties for damages, losses, costs, or expenses incurred by purchaser or third parties as a result of: accident, misuse, or abuse of this product or unauthorized modifications, repairs, or alterations to this product, or (excluding the U.S.) failure to strictly comply with Seiko Epson Corporation's operating and maintenance instructions.
Seiko Epson Corporation shall not be liable against any damages or problems arising from the use of any options or any consumable products other than those designated as Original Epson Products or Epson Approved Products by Seiko Epson Corporation.
EPSON and ESC/POS are registered trademarks of Seiko Epson Corporation.
NOTICE: The contents of this manual are subject to change without notice.
Copyright © 2005 by Seiko Epson Corporation, Nagano, Japan.
EMC and Safety Standards Applied
Product Name: TM-T88IV
Model Name: M129H
The following standards are applied only to the printers that are so labeled. (EMC is tested using the Epson power supplies.)
Europe: CE marking Safety: EN 60950
North America: EMI: FCC/ICES-003 Class A Safety: UL 1950/CSA C22.2 No. 950
Japan: EMC: VCCI Class A
Oceania: EMC: AS/NZS CISPR22 Class B
China: EMC: GB9254 GB17625.1 Safety: GB4943
Taiwan: EMC: CNS13438 Safety: CNS14336
WARNING
The connection of a non-shielded printer interface cable to this printer will invalidate the EMC standards of this device. You are cautioned that changes or modifications not expressly approved by Seiko Epson Corporation could void your authority to operate the equipment.
CE Marking
The printer conforms to the following Directives and Norms:
Directive 89/336/EEC EN 55022 Class B EN 55024
IEC 61000-4-2
IEC 61000-4-3
IEC 61000-4-4
IEC 61000-4-5
IEC 61000-4-6
IEC 61000-4-11
FCC Compliance Statement For American Users
This equipment has been tested and found to comply with the limits for a Class A digital device, pursuant to Part 15 of the FCC Rules. These limits are designed to provide reasonable protection against harmful interference when the equipment is operated in a commercial environment.
This equipment generates, uses, and can radiate radio frequency energy and, if not installed and used in accordance with the instruction manual, may cause harmful interference to radio communications.
Operation of this equipment in a residential area is likely to cause harmful interference, in which case the user will be required to correct the interference at his own expense.
For Canadian Users
This Class A digital apparatus complies with Canadian ICES-003.
Precautions When Installing the Power Supply Box
A description of EMI standards is on the bottom of the printer. When the optional power supply box (OT-BX88) is installed, it is hard to check it. In such case, uninstall the power supply box if necessary.
Safety Precautions
This section presents important information intended to ensure safe and effective use of this product. Please read this section carefully and store it in an accessible location.
WARNING:
Shut down your equipment immediately if it produces smoke, a strange odor, or unusual noise. Continued use may lead to fire. Immediately unplug the equipment and contact your dealer or a Seiko Epson service center for advice.
Never attempt to repair this product yourself. Improper repair work can be dangerous.
Never disassemble or modify this product. Tampering with this product may result in injury or fire.
Be sure to use the specified power source. Connection to an improper power source may cause fire.
Do not allow foreign matter to fall into the equipment. Penetration by foreign objects may lead to fire.
If water or other liquid spills into this equipment, unplug the power cord immediately, and then contact your dealer or a Seiko Epson service center for advice. Continued usage may lead to fire.
If you open the DIP switch cover, be sure to close the cover and tighten the screw after adjusting the DIP switch. Using this product with the cover open may cause fire or electric shock.
CAUTION:
Do not connect cables in ways other than those mentioned in this manual. Different connections may cause equipment damage and burning.
Be sure to set this equipment on a firm, stable, horizontal surface. The product may break or cause injury if it falls.
Do not use in locations subject to high humidity or dust levels. Excessive humidity and dust may cause equipment damage or fire.
Do not place heavy objects on top of this product. Never stand or lean on this product. Equipment may fall or collapse, causing breakage and possible injury.
To ensure safety, unplug this product before leaving it unused for an extended period.
When using compressed air products; such as air dusters, for cleaning during repair and maintenance, the use of such products containing flammable gas is prohibited.
Caution Labels
CAUTION:
The thermal head is hot.
CAUTION:
Touching the manual cutter may cause injury.
Restriction of Use
When this product is used for applications requiring high reliability/safety such as transportation devices related to aviation, rail, marine, automotive etc.; disaster prevention devices; various safety devices etc; or functional/precision devices etc, you should use this product only after giving consideration to including fail-safes and redundancies into your design to maintain safety and total system reliability. Because this product was not intended for use in applications requiring extremely high reliability/safety such as aerospace equipment, main communication equipment, nuclear power control equipment, or medical equipment related to direct medical care etc, please make your own judgment on this product's suitability after a full evaluation.
Unpacking
The following items are included with the standard specification printer. If any item is damaged, contact your dealer.
□ Printer
Roll Paper
Power switch cover
Connector cover *
ACadapter*
- May not be included with your printer.
Important Installation Notes
For a serial interface, use a null modem cable.
For a parallel interface, use an IEEE 1284 cable.
For a USB interface, install the driver before connecting the printer.
Downloading Drivers, Utilities, and Manuals
Drivers, utilities, and manuals can be downloaded from one of the following URLs.
For customers in North America, go to the following web site:
http://www.epsonexpert.com/ and follow the on-screen instructions.
For customers in other countries, go to the following web site:
http://www.epson-pos.com/
Select the product name from the "Select any product" pulldown menu.
Installing the Printer Horizontally or Vertically
You can install the printer horizontally on a flat surface (with the paper exit on top) or vertically (with the paper exit at the front) by hanging it on a wall, using the optional WH-10 hanging bracket set.
WARNING:
When hanging the printer on the wall with the hanging bracket set, be sure to attach a connector cover to the printer.
Control Panel
FEED button
This button feeds paper.
ERROR LED
This indicates an error.
PAPER OUT LED
On indicates a paper near end or out. Flashing indicates standby.
Using the Power Switch Cover
WARNING:
If an accident occurs with the power switch cover attached, unplug the power cord immediately. Continued use may cause fire or shock.
The enclosed power switch cover ensures that the power switch is not pressed accidentally. To use this cover, install it as shown in illustration ±bB .
Attaching and Removing the Connector Cover
These instructions apply if a connector cover is packed with your printer to protect your cables. To attach it, follow the steps below:
- First, connect all the cables. The connector cover has three possible cable exits: on the right, left, and back.
- Position the two hooks on the connector cover so that they hook the printer case, as shown in illustration C.
- Push the connector cover down to click onto the printer case.
To remove the connector cover, turn the printer over, and push the connector cover down while pushing both sides of the connector cover inward to detach the hooks from the printer case. See illustration ±bD .
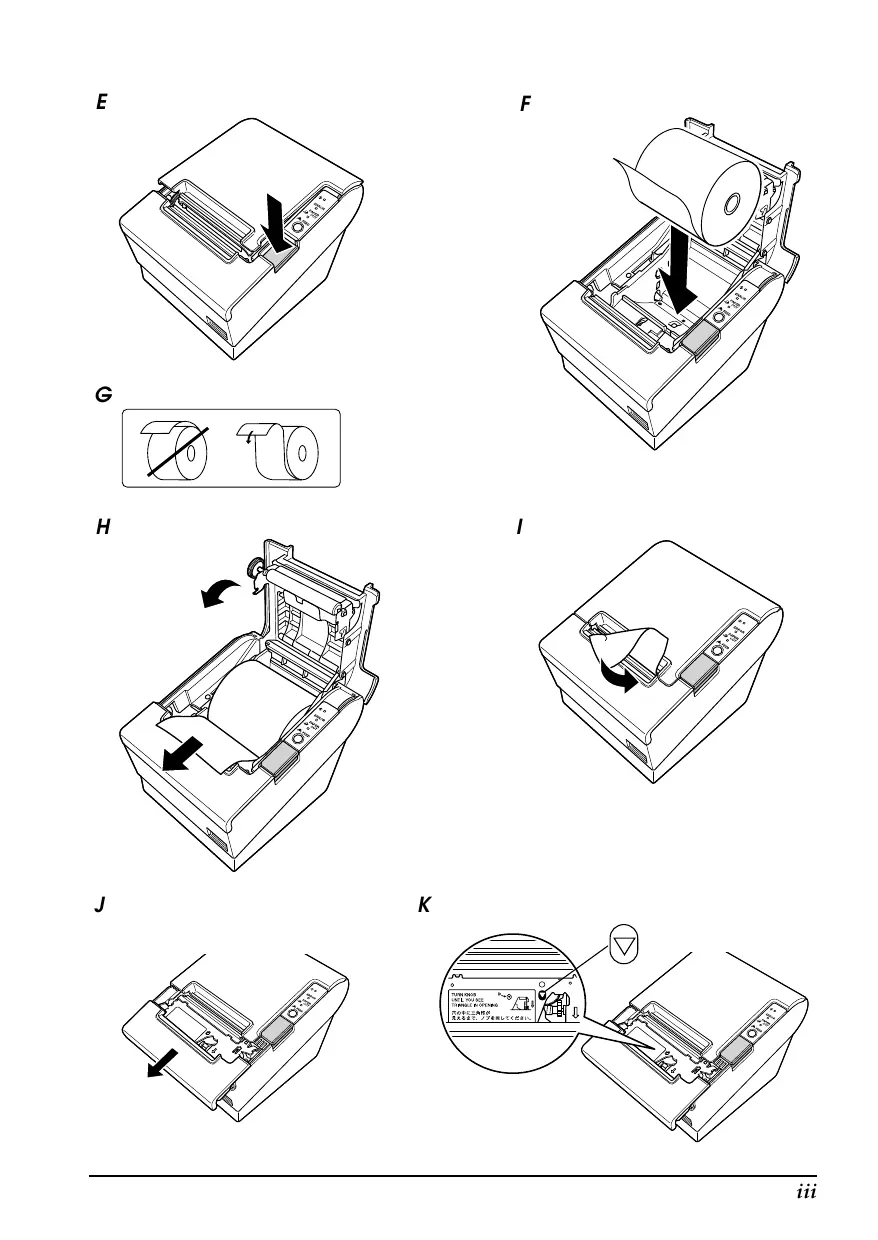
Installing Roll Paper
- Press the button to open the cover. See illustration E.
- Remove the used roll paper core, and insert the roll paper. See illustration ±bF .
- The correct direction of the paper is shown in illustration ±bG
- Pull out some paper, as shown in illustration H . Close the cover, and tear off the paper, as shown in illustration I .
Troubleshooting
No lights on the control panel
Check the power supply cable connections and the power outlet.
ERROR LED on (not flashing) with no printing
If PAPER OUT is on, the roll paper is not installed or is near the end. If PAPER OUT is off, the printer cover is not closed properly.
ERROR LED flashing with no printing (and no paper jam)
Printing stops if the head overheats and resumes automatically when it cools. If overheating is not the cause, turn the printer off, and after 10 seconds, back on.
Removing Jammed Paper

CAUTION:
Do not touch the thermal head because it can be very hot after printing.
- Turn the printer off and press the cover open button.
- Remove jammed paper, reinstall the roll, and close the cover.
- If paper is caught in the cutter and you cannot open the printer cover, open the cutter cover as shown in illustration J .
- Turn the knob until you see a triangle in the opening. This returns the cutter blade to the normal position. There is a label near the cutter to assist you. See illustration K .
- Close the cutter cover.
- Open the printer cover and remove the jammed paper.
Cleaning the Thermal Head

CAUTION:
After printing, the thermal head can be very hot. Be careful not to touch it and to let it cool before you clean it. Do not damage the thermal head by touching it with your fingers or any hard object.
Turn off the printer, open the printer cover, and clean the thermal elements of the thermal head with a cotton swab moistened with an alcohol solvent (ethanol, methanol, or IPA).
Epson recommends cleaning the thermal head periodically (generally every 3 months) to maintain receipt print quality.
TM-T88IV
Benutzerhandbuch
Copyright © 2005 Seiko Epson Corporation, Nagano, Japan.
Japan: EMC: VCCI Class A
Copyright © 2005 by Seiko Epson Corporation, Nagano, Japan.
Japan: EMC: VCCI Class A
Oceani: EMC: AS/NZS CISPR22 Class B
China: EMC: GB9254
GB17625.1
Veiligheid: GB4943
Taiwan: EMC: CNS13438
Veiligheid: CNS14336
WAARSCHUWING
Taiwan: CEM: CNS13438
Sécurité : CNS14336
AVERTISSEMENT
Copyright © 2005 Seiko Epson Corporation, Nagano, Japon.
Copyright © 2005 Seiko Epson Corporation, Nagano, Giappone.
Copyright © 2005, Seiko Epson Corporation, r. HaraHO, JIoHnHa.
Ppumehyemblc mahdapmbI 3JIeKmpomazHumho coBmecmu u o6ceueHua 6e0nachocmu
HaHMeHOBaHNHe IpoDyKUHH: TM-T88IV
MoJIeJIb: M129H
CJIeIyIOUHHe cTaNdApTbI pIPhMeHHOITcO TJIbKO IIpN H3rTOBJIeHHN IIpHHTepOB, O6O3HaueHHbIX COOTBeTcTBYIOUHMn IApJIbKAMH. (COOTBcTcBHe o6OpuyIOBaHH cTaNdApTam 3JIeKTPOMaHHTHOJ COBMecTHMOCTH IIPOBepaETcA HCIIIOJIb3OBAHHem HcToOHNKOB 3JIeKTPoIHTaHHa hMpMb EpsOn.)
Еврona: Маркнровka «CE» 06ecпechенбзпасноTN EN60950
Pocchra: MoJIb COOTBcTBye Tpe6ObaHnM HOpMaTHBbIX DOKUMeHTOB: FOCT P 51318.22-99 (KJIacc B), FOCT P 51318.24-99, FOCT P M'K 60950-2002, FOCT 26329-84 (III. 1.2, 1.3).
CebepnaAmepnka: ΘJIeKTPOMaTHHTbIe IOMexH: FCC/ICES-003, KJIacc A Be3OIIaChOCTb: UL 1950/CSA C22.2 No 950
JIOHNA: 3JIeKtpOMaHTHHa COBmecTHMOCTb: VCCI, KJIacc A
AbctpaJIHn HIOJIHHe3n: 3JIeKtPOMaHHTHaC OBMeCTHMocTb: AS/NZS CISPR22, KJIacc B
KHTai: ΘJIeKTpOMaΓHnTHaY COBMeCTHMocTb: GB9254 GB17625.1
Be3oIacHocTb: GB4943
TaiBaHb: 3JIeKtpomarHHTHaa COBMeCTHMocTB:CNS13438 Be30IaChOCTb:CNS14336
PPEyPPEKDEHNE
IIOIcOeIHHeHne K 3TOMy yCTPOHCTBy HE kKaPhaHnPoBaHHoro Ka6eJI HHTepFeJaCa c PnHHTepom PnHBeJET K Heo6JIIOHeHIO pIMHeHMbIX B OTHIOHEH NTOr YoCTpCTBa CTAndAPToB 3JIeKTPoMaHrTHHO COBMeCTMHOCTH. He 3a6BaIbAte o TOM, YTO BHeCHeNKe KAKHX-JINBO H3MeHEnB H KOHNCTpyKUHIO OOpbyOBaHHo KOpPiopaiHH Seiko Epson 6E3 CNEuHaJIbHorO pArpeHHeHHa H3OTOBHTeJI MOKET PnIEBCTN K IOTEpe IIOJIb3OBATeJIeM IpaBa HA nIOlyueHHe rapaHTHnHO rpeMOHTa H TeXHnueCKOrO 06CJyKHBaHHI PnH 3KCIJIYataaHH OOpdyOBaHH
MapkupoKa «CE»
YcTpoIcTBo COOTBETCTBye Tpe6OBaHHM, IpeyCMTopeHHbIM CJIeIyIOHMM HnPeKTHBaMHn HOPMaTHBaMH:
Диpeктнва 89/336/EEC EN55022,КлaccA
EN 55024
IEC 61000-4-2
IEC 61000-4-3
IEC 61000-4-4
IEC 61000-4-5
IEC 61000-4-6
IEC 61000-4-11
Mepbl no o6ecneyuho 6e3onacHocmu
B 3TOM pa3IJIe IpiHBOJNTcB BaxKHaI HhOpMaIIa, IIOMOraIOIaO 6oecneHTb 6e30IaChyIO u 3ofoekTHBHyIO 3KcIIlyaTaIuIO OINCbIbAemOgObpyIOBaHH. IopKaJIyCTa. BHIMATEJIbHO IpoUHTHe 3TOT pa3JeI IN XpaHHTe HNCTpyKIIHN B JIEKoIOCTUYIHOM MceTe.
IPEyPPEKDEHNA
Ecn npu ucnonb3o8aHuu 8aweseo obopydo8aHua 6dym 3ameeHbIbIM, HnpuBvHbI 3anax UU HeobHybI uWM, HmeDneHHO bIKNIOUme obopydo8aHue. Eao daIbHeuwe uCnoB3o8aHue moKem npubecmu K noXapy. Cpazy je omcoedunume obopydo8aHue om cemu u obpamumecb 3a peKOMehdaqumau K mop2o8Omy npedcmaBumelu 1zAomoeumela unu 6 eHmp mexHuceckoa0 obcnykuehuaOBopydo8aHua KompaHuu Seiko Epson.
Hukoada He nbimaumecb camocmormenbho pemohmuoeamb 3mo obopydoaHue. HenpaeunbHOe bInonHeHue peMOHa moKem npueecMu K Bo3HukHOeHuO onaHou cumyaauu.
Hukoəa He pa3bupaime obopydoaHue u He u3MeHnme e0 KOhcmpykuu.
Heymeno obaeHue c obopydoaHuem MoKem npueecmu K HaHeceHuO mpaembl uIu nojapy.
- Moxem He exodumb 6 Komnlekm bauueo npunhmepa.
Baxkhble npumeyaHua, omHocyauecK ycmaHoEke
EeJIN Tpe6yeTcIIOJIeIOBAteJIbHbI INHTepfSeic, IprHMHeIte «HyJIb-MoJeMHbI» Ka6eJIb.
EeJIn Tpe6yETcI npaJIJIeJIbHbI INHTepFeIc, IIpHMEnHaTe Ka6eJIb IEEE 1284.
EcnI Tpe6yeTcra HHTepfeic yHnBepcaJIbHOIOscJIeIOBaTeJIbHOIIHHbI (USB), IIpeJIOKJIIOueHHem IpnHTEpa ycTaHOBHte COOTBeCTBYIOHN IpaHBep.
3a2py3ka dpaueepoe, cnyxekhix npoapmm u pyko0odme
3aKpbTaj KpbIIka IpeKJIIOUaTeJI INHTAHN IpeIOTBpaIIaET CJyAaHHe HaKaTne IpeKJIIOUaTeJI. 3Ta KpbIIka ycTaHaBJIbBaETc Ta, KaK IOKa3aHO Ha IIJIIOCTpaIIHH B.
YcmaHObKa u ydaJIeHue KpbIuKu coedunHeMBoHO20 pa3beMa
3TH HNCTpyKUHN BbIIOJIHJHO TcOJIbKO B TOM CJIyae,ecJIH B KOMIIJEKT BaIIIErO IIpHHTepa BXoIHIT 3aIINIIaIOIIa Ka6eJIH KpbIIIIka CoEINHHTeJIbHOrO pa3bema.ДJIra TOrO, YTO6bI yCTaHOBHTb 3Tu KpbIIIKy,BblIOJIHnTE cJIeIyIOIIHe OIIepaIIHN.
- Ппекд BCERO ПОДСоЕДИНHTе Се Ka6eJIH.В Крьшke coeДИНHTeЛь HOrO pa3bema IIpeIycmOTpeHb TpH OTBepCTHЯ ДЯ Ka6eJIe: IIpaBOE, JIEBOEи 3aJHee.
- PacIOJIOKHTe IBa BbICTyIa Ha KpbIJIke CoeIHHITeJIbHOrpo3bema TaK, YTO6bI OH 3aΦHKCHPOBAJIcK KopIIycom IIpHHTepa (CM. HJIJIHOCTpaIIHIO C).
- BctabbTe KpbIbKy coeINHHTeJIbHOro pa3bema B KopIyc IIpnHTepa HnKaMnTe Ha Hee TaK, YTObI OHa 3aIIeJIKNHyJIacb.
IJIy TORO, YTO6bI ydaJIHT b KpbIIHKy COeIHHHTeJIbHORo pa3bema, IpeBepHHTe IIpHHTep HIOITAHTE KpbIIHKY COeIHHHTeJIbHORo pa3bema BHN3, OJHOBPemEHNO HaKHMAR BHYTpHa 06e 6OKOBbIe IaHeJI N KpbIIHKN COeIHHHTeJIbHORo pa3bema IJIY TORO, YTO6bI 3aIeIKN OTcoeIHHHJIHCb OT KopIIyca IIpHHTepa (cM. IJIIOCTpaIHIU D).
YcmaHOeKa pyloHa 6yMa2U
- Haxmnte Ha KhoIky, YTObIOTKpbITb KpbIIky (cM. IJIIOCTpaIIIO E).
- YIaJIHTe cepJHcNIOJIb3OBAHHOro pyIOHa 6yMaIHN BCTaBbTe HOBbIpyIOH 6ymaIIN (cm. HJIIOCTpaIIIO F).
- IpaBnIbHa opHeHTaIIHpyJIOHa 6yMaHn IOKa3aHa Ha NJIJIIOCTpaIHH G.
- BbIyHHTe POJIOCKy 6ymaHn TaK, KaK IOKa3aHO Ha IIJIIOCTpaUHN H, IocJIe Yero 3aKpoIte KpbIuKy I OTOpBHTe JINIIHHIO 6yMaY TaK, KaK IOKa3aHO Ha IIJIIOCTpaUHN I.
Pouck u ycmpaheHue npuun Heucnpaehocmei
Ha anheJn ynpabJeHn He ropert HndKkaTopbl
IpoBepbTe coeHHeHHKa Ka6eJe HcToUHHKa IHTaHHn P03eTKy cetn IIHTaHH.
TopHT (He mHraa) CII OoHn6Kn (ERROR), IIpnHtep He neHaTaet
EcJIN roPHT INIINKATOp «KOHUAETCBUMA» (PAPER OUT), 3NaHT, He yctaHOBJeH pyJOH 6bMaHn IJIIN 3aIIAC 6bMaHn IOXoINT K KOHUY.
EcJIN INHIIKAtOp «KOHUAETCBYMAFAGPAPEROUT) He ropt,3NaHT, HeIOCTaTOUHO IIIOTHO 3aKpbIa KpbIIka IIpIHTepa.
Mnraer CIN oinn6kn (ERROR), npHnTep He neyatae (6ymara He 3actpJia)
Ieaytb Ipekpaiaaetc npn IpeperpeBe neyataoioe roIOBkn n ABTOmatHueckn BO306HOBJAETcN IOCJIe DOCTaTOUHORO OXJaKJDeHHN rOIOBKn.
EcJINIpeKpaIeHHe neaHTn He Bb3BaHO IpeIpeBOM rOIOBKN, BbIKIOOHTe IIpHTEp Ha 10 cekyH, IocJIe Yero ChOBA BKIOHOTe erO.
YdaheHue 3acmpyueu 6ymazu

BHIMAHHE!
He npukacaimecb k mepmoneyamaioe zonokke! Bo epem neamu oHa moxem Haapeabcdo ouheb bicoko mempapymbl.
WEEE (Waste Electrical and Electronic Equipment) Directive
This information only applies to customers in the European Union, according to Directive 2002/96/EC OF THE EUROPEAN PARLIAMENT AND OF THE COUNCIL OF 27 January 2003 on waste electrical and electronic equipment (WEEE) and legislation transposing and implementing it into the various national legal systems.
For other countries, please contact your local government to investigate the possibility of recycling your product.

English
The crossed out wheeled bin label that can be found on your product indicates that this product should not be disposed of via the normal household waste stream. To prevent possible harm to the environment or human health please separate this product from other waste streams to ensure that it can be recycled in an environmentally sound manner. For more details on available collection facilities please contact your local government office or the retailer where you purchased this product.
Deutsch
Printed on Recycled Paper
Printed in China
2005.12
- Specifications
- DIP Switch Tables and Specifications
- Illustrations
- Illustration A:
- Printer Parts
- Illustration C:
- EMC and Safety Standards Applied
- WARNING
- CE Marking
- FCC Compliance Statement For American Users
- For Canadian Users
- Precautions When Installing the Power Supply Box
- Safety Precautions
- WARNING:
- CAUTION:
- Caution Labels
- Restriction of Use
- Unpacking
- Important Installation Notes
- Downloading Drivers, Utilities, and Manuals
- Installing the Printer Horizontally or Vertically
- Control Panel
- FEED button
- ERROR LED
- PAPER OUT LED
- Using the Power Switch Cover
- Attaching and Removing the Connector Cover
- Installing Roll Paper
- Troubleshooting
- No lights on the control panel
- ERROR LED on (not flashing) with no printing
- ERROR LED flashing with no printing (and no paper jam)
- Removing Jammed Paper
- Cleaning the Thermal Head
- TM-T88IV
- Benutzerhandbuch
- WAARSCHUWING
- AVERTISSEMENT
- Ppumehyemblc mahdapmbI 3JIeKmpomazHumho coBmecmu u o6ceueHua 6e0nachocmu
- PPEyPPEKDEHNE
- MapkupoKa «CE»
- Mepbl no o6ecneyuho 6e3onacHocmu
- IPEyPPEKDEHNA
- Baxkhble npumeyaHua, omHocyauecK ycmaHoEke
- 3a2py3ka dpaueepoe, cnyxekhix npoapmm u pyko0odme
- YcmaHObKa u ydaJIeHue KpbIuKu coedunHeMBoHO20 pa3beMa
- YcmaHOeKa pyloHa 6yMa2U
- Pouck u ycmpaheHue npuun Heucnpaehocmei
- Ha anheJn ynpabJeHn He ropert HndKkaTopbl
- TopHT (He mHraa) CII OoHn6Kn (ERROR), IIpnHtep He neHaTaet
- Mnraer CIN oinn6kn (ERROR), npHnTep He neyatae (6ymara He 3actpJia)
- YdaheHue 3acmpyueu 6ymazu
- BHIMAHHE!
- WEEE (Waste Electrical and Electronic Equipment) Directive
- English
- Deutsch
Brand : EPSON
Model : TM-T88IV
Category : POS Thermal Printer