
U73T - Gps SONY - Free user manual and instructions
Find the device manual for free U73T SONY in PDF.
| Product Type | Personal GPS navigation system (NV-U73T) |
| Brand | Sony |
| Model | U73T |
| Dimensions (L × H × D) | Approx. 133 × 79 × 20 mm |
| Weight | Approx. 210 g |
| Screen | 4.3-inch TFT LCD screen (16:9), 816 × 480 pixels |
| Power supply | 5–5.2 V DC via car adapter (12/24 V), AC adapter (optional) or USB cable |
| Battery | Built-in rechargeable lithium-ion battery; charge ~2 h (on), ~1 h (standby); battery life up to 2 h |
| GPS reception | Built-in GPS antenna; supports external antenna VCA-42 (optional) |
| TMC function | Yes, with supplied TMC antenna (dedicated TMC jack) |
| Bluetooth | Version 2.0, HFP and OPP profiles; for hands-free calls |
| External memory | Slot for Memory Stick Duo (up to 4 GB) – read-only |
| Speaker | 30 mm circular speaker |
| Voice guidance | Yes |
| Operating temperature | 5 °C to 45 °C |
| Supplied accessories | Car battery adapter, USB cable, TMC antenna, mounting bracket, quick start guide, CD-ROM software |
| Optional accessories | AC adapter XA-AC13, installation kit XA-49FM, external GPS antenna VCA-42, TMC mount NVA-CU5T |
| Maintenance and cleaning | Clean the screen with a soft cloth; clean the suction cup with a damp lint-free cloth |
| Safety | Do not install in front of an airbag; securely attach the mount; do not look at the screen while driving |
| Repairability | Replaceable fuse (2.5 A); battery not user-replaceable (removal only for disposal) |
Frequently Asked Questions - U73T SONY
User questions about U73T SONY
0 question about this device. Answer the ones you know or ask your own.
Ask a new question about this device
Download the instructions for your Gps in PDF format for free! Find your manual U73T - SONY and take your electronic device back in hand. On this page are published all the documents necessary for the use of your device. U73T by SONY.
USER MANUAL U73T SONY
Customer Support Portal
If you have any questions or for the latest support information on navigation, visit the website below:
http://www.navu.sony-europe.com/support
Sony Corporation Printed in Thailand
sONY
SONY
Personal Navigation System Quick Start Guide
3-275-816-11 (1)
Quick Start Guide
GB
© 2007 Sony Corporation
How to use this manual
When reading this manual, keep the control layout illustration (on the rear of this page or the adjacent page) open for quick reference from any page.
- This Quick Start Guide contains instructions for basic operations of NV-U93T, U83, U73T, and U53.
- Before installing and operating this system, read this manual and the supplied "Read This First" (Installation Manual) thoroughly.
For more information, see the PDF manual on the supplied Application Disc. - NV-U93T is the model used for screen illustration purposes.
Available functions such as POSITION plus, Bluetooth, or TMC differ depending on the model.
Check your model name, and refer to the difference indications in each section of this manual. - Illustrations in this manual may differ from the actual device.
- Retain this manual and "Read This First" in a place where you can refer to them at any future time.

Disposal of Old Electrical &
Electronic Equipment (Applicable in the European Union and other
European countries with separate collection systems)
This symbol on the product or on its
packaging indicates that this product shall not be treated as household waste. Instead it shall be handed over to the applicable collection point for the recycling of electrical and electronic equipment. By ensuring this product is disposed of correctly, you will help prevent potential negative consequences for the environment and human health, which could otherwise be caused by inappropriate waste handling of this product. The recycling of materials will help to conserve natural resources. For more detailed information about recycling of this product, please contact your local Civic Office, your household waste disposal service or the shop where you purchased the product.
Applicable accessory: Car battery adapter

Disposal of waste batteries
Applicable in the European Union and other European countries with
separate collection systems)
This symbol on the battery or on the packaging indicates that the battery provided with this product shall not be treated as household waste. By ensuring these batteries are disposed of correctly, you will help prevent potentially negative consequences for the environment and human health which could otherwise be caused by inappropriate waste handling of the battery. The recycling of the materials will help to conserve natural resources. In case of products that for safety, performance or data integrity reasons require a permanent connection with an incorporated battery, this battery should be replaced by qualified service staff only. To ensure that the battery will be treated properly, hand over the product at end-of-life to the applicable collection point for the recycling of electrical and electronic equipment. For all other batteries, please view the section on how to remove the battery from the product safely. Hand the battery over to the applicable collection point for the recycling of waste batteries. For more detailed information about recycling of this product or battery, please contact your local Civic Office, your household waste disposal service or the shop where you purchased the product.
On copyrights
The map and POI data may contain copyrighted material. Copyrighted data on a "Memory Stick Duo" should be used within the limits of the copyright law. Do not violate the provisions of the copyright law.
On trademarks
Microsoft and Windows are registered trademarks of Microsoft Corporation.
- "Memory Stick", "Memory Stick Duo", "MEMORY STICK DUO", "Memory Stick PRO DUO", "MEMORY STICK PRO DUO", "Memory Stick Micro" ("M2"), "MagicGate", "MagicGate", "nav-u" and "Nav-U" are trademarks of Sony Corporation.
"MagicGate" is a generic name of a copyright protection technology, developed by Sony Corporation.
- The Bluetooth word mark and logos are owned by the Bluetooth SIG, Inc. and any use of such marks by Sony Corporation is under license.
- All other trademarks are trademarks of their respective owners.
vtrafc
V-Traffic Information in France is provided by Mediamobile company.

Traffic Information in the UK is provided by ITIS Holdings Plc.
© 1993 - 2007 NAVTEQ. All Rights Reserved.
Austria
Croatia, Estonia, Latvia, Lithuania, Poland,
Slovenia
© EuroGeographics
France
source: Géoroute© IGN France & BD Carto® IGN France
Germany
Based upon Crown Copyright material.
Greece
Copyright Geomatics Ltd.
Hungary
Copyright © 2003; Top-Map Ltd.
Italy
Copyright © 2000; Norwegian Mapping Authority
Portugal
Source: IgeoE - Portugal
Spain
Based upon electronic data © National Land Survey Sweden.
Switzerland
Hereby, Sony Corp., declares that these NV-U93T/ U83 are in compliance with the essential requirements and other relevant provisions of Directive 1999/5/EC. For details, please access the following URL: http://www.compliance.sony.de/
Use of this radio equipment is not allowed in the geographical area within a radius of 20km from the centre of Ny-Alesund, Svalbard in Norway.
NV-U73T/U53
C
The manufacturer of this product is Sony Corporation, 1-7-1 Konan Minato-ku Tokyo, 108-0075 Japan. The Authorized Representative for EMC and product safety is Sony Deutschland GmbH, Hedelfinger Strasse 61, 70327 Stuttgart, Germany. For any service or guarantee matters please refer to the addresses given in separate service or guarantee documents.
Caution
IN NO EVENT SHALL SONY BE LIABLE FOR ANY INCIDENTAL, INDIRECT OR CONSEQUENTIAL DAMAGES OR OTHER DAMAGES INCLUDING WITHOUT LIMITATION LOSS OF PROFITS, LOSS OF REVENUE, LOSS OF DATA, LOSS OF USE OF THE PRODUCT OR ANY ASSOCIATED EQUIPMENT, DOWNTIME, AND PURCHASER'S TIME RELATED TO OR ARISING OUT OF THE USE OF THIS PRODUCT, ITS HARDWARE AND/OR ITS SOFTWARE.
Table of Contents
Warning. 6
Location of controls. 8
Turning the unit on/off 9
Performing initial setup. 9
Receiving GPS signals 9
Basic Operations 9
Menu operation 9
Gesture Command operation. 10
Keyboard operation 10
Route Searching 11
Setting the destination and starting guidance. 11
Setting the destination in other ways. 11
Guidance displays 12
System Settings 13
Bluetooth function (NV-U93T/U83 only) 13
Activating the Bluetooth function. 13
Pairing and connecting this unit with a mobile phone 13
Connecting with a mobile phone from this unit. 13
Making calls 14
Receiving calls. 14
Using the Supplied Software 14
Contents 14
Connecting to your computer. 15
Additional Information 15
Precautions 15
On Bluetooth communication (NV-U93T/U83 only). 15
About the "Memory Stick" 16
What is a "Memory Stick"? 16
Types of "Memory Stick Duo" that the system can use 16
Note on LCD panel. 17
Maintenance 17
Cleaning 17
Fuse replacement 17
Notes on unit disposal. 18
Specifications 19
Troubleshooting 21
Resetting the unit 22
Warning
PLEASE READ THIS MANUAL AND THE SUPPLIED READ THIS FIRST (INSTALLATION MANUAL) COMPLETELY BEFORE INSTALLING OR OPERATING YOUR PERSONAL NAVIGATION SYSTEM. IMPROPER INSTALLATION OR USE OF THIS DEVICE MAY CAUSE ACCIDENT, INJURY OR DEATH.
Be sure to use the supplied or optional car battery adapter or AC adapter, which is compatible with the unit/cradle. Otherwise, excessive voltage may be applied to the unit/cradle and may cause smoke, fire, or accident.
For details on optional accessories for your model, see "Specifications" on page 19.
On safety
-
Be sure to:
-
install the navigation system in a safe place where it does not obstruct the driver's view.
not install the unit above an airbag. - place the cables and cradle where they do not obstruct driving.
- attach the unit to the cradle properly, otherwise the unit may fall.
clean the surface of the suction cup and attachment surface before attaching. When installing on the dashboard, clean the surface on which the suction cup will be attached. Also, confirm that the suction cup is securely attached after installation. Otherwise, the unit or cradle may fall.
Failure to do so may result in unsafe driving conditions.
- Do not apply excessive force to the unit or cradle as it may fall.
- Comply with local traffic rules, laws and regulations.
- Do not continuously watch the unit while driving. It is dangerous and may cause a traffic accident.
- If you need to operate the navigation system while driving, be sure to stop the car in a safe place before operating.
- Do not modify the unit.
- Do not disassemble the unit except when disposing of it.
On handling
- Do not let foreign objects get inside the connector of the unit, as it may cause a malfunction.
- When the unit is not in use, turn it off by pressing I/O (1)/sliding I/O (1). Remove the unit from the cradle, then disconnect the car battery adapter, otherwise battery drain may result. Note the following:
If your car's cigarette lighter socket is not connected to ACC on your ignition switch, power will continue to be supplied to the unit's built-in power supply even when the ignition is off or the unit is not in use.
- Do not connect any accessory other than those supplied or optional.
- Do not expose the unit to fire or water, as it may cause malfunction.
- To disconnect a cable, pull it out by grasping the plug, not the cable.
- Be sure to remove the unit out of the car when leaving your car to prevent theft or high temperature damage inside the car.
Note that the built-in battery cannot be charged outside the temperature range 5 - 45^ (41 - 113^) - Do not leave the unit in high ambient temperature as the built-in battery capacity will deteriorate, or will become unchargeable.
On GPS
As GPS information is obtained from satellites, it may be impossible or difficult to obtain information in locations such as:
- Tunnel or underground
Under a highway - Between high buildings
- Between tall trees with dense foliage
Note
GPS signal reception may be poor depending on the material of the car's windscreen.
On the positioning system (POSITION plus) (NV-U93T/U83 only)
The system has a function that allows the current car position to be correctly displayed even at locations where the GPS signal is temporarily interrupted or poorly received, as when going under an overpass. To activate this function, do the following:
- Attach the unit to the cradle.
- Drive for a while in an area where the GPS signal is clearly received.
The positioning system will become ready for operation after you have driven a little with the unit on.
Notes
- The accuracy of this function may deteriorate if the unit is installed near a heated or heat-reflecting windscreen.
- Depending on the conditions, the current car position or the movement may not be accurately displayed. This, however, will be corrected as soon as the GPS signal reception resumes.
- This function is available only during route guidance.
IMPORTANT NOTICE for the Bluetooth function! (NV-U93T/U83 only)
Safe and efficient use
Changes or modifications to this unit not expressly approved by Sony may void the user's authority to operate the equipment.
Please check for exceptions, due to national requirement or limitations, in usage of Bluetooth equipment before using this product.
Driving
Check the laws and regulations on the use of mobile (cellular) phones and hands-free equipment in the areas where you drive.
Always give full attention to driving and pull off the road and park before making or answering a call if driving conditions so require.
Radio frequency exposure
RF signals may affect improperly installed or inadequately shielded electronic systems in cars, such as electronic fuel injection systems, electronic antiskid (antilock) braking systems, electronic speed control systems or air bag systems. For installation or service of this device, please consult with the manufacturer or its representative of your car. Faulty installation or service may be dangerous and may invalidate any warranty that may apply to this device.
Consult with the manufacturer of your car to ensure that the use of your mobile (cellular) phone in the car will not affect its electronic system.
Check regularly that all wireless device equipment in your car is mounted and operating properly.
Connecting to other devices
When connecting to any other device, please read its user guide for detailed safety instructions.
Emergency calls
This Bluetooth car hands-free and the electronic device connected to the hands-free operate using radio signals, mobile (cellular) phone, and landline networks as well as user-programmed function, which cannot guarantee connection under all conditions. Therefore do not rely solely upon any electronic device for essential communications (such as medical emergencies).
Remember, in order to make or receive calls, the hands-free and the electronic device connected to the hands-free must be switched on in a service area with adequate cellular signal strength.
Emergency calls may not be possible on all mobile (cellular) phone networks or when certain network services and/or phone features are in use.
Check with your local service provider.
On the software
Read the "END-USER LICENSE AGREEMENT" carefully before use.
Location of controls
Refer to the pages listed for details.
NV-U93T/U83
1 I/ (on/standby) button 9
To turn the unit on/off.
Built-in microphone
To talk on the telephone using the Bluetooth function.
3 Screen buttons 12
4 Display window/touch screen
5 Auto dimmer sensor
Detects ambient light and automatically adjusts the display brightness.
6 (Bluetooth) indicator
Lights up in blue while outputting the Bluetooth signal.
7 CHG (battery charge) indicator
Lights up in red while charging, and changes to green when fully charged.
When the adapter is disconnected, the indicator goes off.
3 Cradle connector
9 RESET button 22
10 DC IN 5V jack
To connect to the car battery adapter or AC adapter*.
11 (USB) jack 15
To connect to a computer with the USB cable.
2 OPEN/RELEASE button
To open the built-in GPS aerial or remove the unit from the cradle.
For details, see the supplied "Read This First" (Installation Manual).
13 Nameplate
14 Built-in GPS aerial
15 Speaker
Outputs guidance and warnings.
Memory Stick access indicator
PRO DUO (Memory Stick Duo) slot
For "Memory Stick Duo" insertion for functional expansion.
18 (headphones) jack
NV-U73T/U53
1 I/ (on/standby) switch 9
To turn the unit on/off.
2 Screen buttons 12
CHG (battery charge) indicator
Lights up in red while charging, and changes to green when fully charged.
When the adapter is disconnected, the indicator goes off.
4 Auto dimmer sensor
Detects ambient light and automatically adjusts the display brightness.
Display window/touch screen
6 Name plate
7 Speaker
Outputs guidance and warnings.
8 RELEASE button
To remove the unit from the cradle.
For details, see the supplied "Read This First" (Installation Manual).
9 Memory Stick access indicator
PRO DUO (Memory Stick Duo) slot
For "Memory Stick Duo" insertion for functional expansion.
Built-in GPS aerial
GPS ANT (GPS antenna (aerial)) jack
To connect the External GPS Antenna VCA42*.
13 (USB) jack 15
To connect to a computer with the USB cable.
14 TMC (TMC aerial) jack (NV-U73T only) To connect the supplied TMC aerial.
15 DC IN 5-5.2V jack
To connect to the car battery adapter or AC adapter*.
16 RESET button 22
- Optional accessory
Turning the unit on/off
NV-U93T/U83
Press1/(1).
NV-U73T/U53
If you do not use the unit for a long term, the built-in battery may be depleted, and the unit will not turn on. In such a case, connect the car battery adapter and charge the unit.
After you charge the unit, it may take time to receive GPS signals when turning on the unit.
Performing initial setup
Follow the on-screen instructions to perform the setup.
The setting can then be further configured in the setting menu at any time (page 13).
Receiving GPS signals
After the initial installation, park your car in a safe, open place (no high buildings, etc.) for up to 20 minutes to allow for GPS signals to calculate the current car position properly before using the navigation system.
The GPS signal reception condition icon is displayed on the screen. The indicator lights up in red when the signal cannot be received.
Basic Operations
Common procedures to operate the system are explained.
General operations can be performed on the touch screen. Touch the displayed icons with your finger gently.
Note
Do not press the display with excessive force, or use any sharp article, such as a pen, etc., to tap on the display.
Menu operation
The top menu appears when turning on the unit (except during route guidance, in which case the map appears).
To show the top menu from the map display, touch the map.
To return to the top menu from any menu display, touch VOICE/POS., then touch the map.
During menu operation:
To return to the previous display, touch or X.
To cancel the menu selection, touch VOICE/ POS. (the current car position display appears).
Gesture Command operation
In map displays (except in map scrolling mode), by assigning a screen finger stroke such as line, etc., frequently-used operations can be performed easily.
| To | Draw |
| start navigation to your home | a circumflex |
| start navigation to the nearest POI (Point Of Interest) stored on Quick Links* | Quick Link 1 → horizontal line (left to right) |
| Quick Link 2 ↓ vertical line (downwards) | |
| Quick Link 3 ← horizontal line (right to left) | |
| Make a call to your home (NV-U93T/U83 only) | a “V” |
- For details on Quick Links, see page 11.
Keyboard operation
The keyboard display appears when you need to enter text.
You need only enter characters in upper case, as the system automatically converts them to appropriate characters. You can enter special characters when necessary.
Candidate/entry field
| To | Touch |
| enter an alphabetical character | the desired character key |
| enter a special character | “ÂÄÁ” to switch to the special character keyboard, then the desired character; and “ABC” to switch back |
| enter a number | “123” to switch to the numeric keyboard, then the desired number key; and “ABC” to switch back |
| enter a space | - |
| delete a character | × |
| select a candidate | ✓ or the candidate in the list |
| show the candidate list* | “List” |
- The candidate list automatically appears when candidates are narrowed down as you continue inputting characters.
Route Searching
The system searches for routes automatically after setting the destination.
Before starting, check that GPS signals are sufficient for navigation (page 9).
Setting the destination and starting guidance
The procedure for searching for the route and starting route guidance is explained.
As an example, setting the destination by the address is introduced here.
For details on setting the destination in other ways, see "Setting the destination in other ways" on page 11.
1 Show the top menu.
In the map display, touch the map.
In the menu display, touch VOICE/POS., then touch the map.
2 Select "Navigate."
3 Select "Address Input," then input the address details.
Input the items in the order below, and touch
or the candidate in the list to proceed.
For details on how to input characters, see
"Keyboard operation" on page 10.
"Country"
"Town / Postal Code"
If it is possible to pinpoint the destination by the selected postal code*, the address confirmation display appears. Select "Calculate Route."
3"Street / Destination"
4 "No." or "Intersection"*2
The address confirmation display appears.
1 Available only in the UK and Netherlands.
2 Selectable only if existent in the selected street.
4 Select "Calculate Route."
The route is calculated, and route guidance starts.
Setting the destination in other ways
You can also set the destination and search for routes by the following methods.
From the top menu, select the items in the following order, then "Calculate Route" (if necessary).
For details, see the supplied PDF manual.
Search Nearby
Searches for routes to a POI, such as restaurant, hotel, etc., near the current car position.
Select "Search Nearby," then any of the following options.
"Quick Link 1 - 3"
Searches for routes to the nearest POI of the category stored on Quick Links. Categories on Quick Links can be customized in the setting menu.
"Search by Name"
Enter the name of the POI directly.
"Search by Category"
Select the desired POI category from the list.
Go Home
Searches for routes to your home when it is registered.
Navigate
Select "Navigate," then any of the following options.
"POI Search Nationwide"
Set a wide search area but with limited search categories. Suitable when searching big landmarks such as an airport.
"POI Search Town"
Set a narrow search area but all categories become the target of the search. Suitable when searching small places such as a petrol station and restaurant.
"Address Book"
Searches for routes to a saved destination point. "Recent Destinations"
Searches for routes to recently searched destinations.
Guidance displays
Once a route has been calculated, visual guidance navigates you to the destination along with voice guidance.
Information on map tool menu
1 During route guidance: To switch to the Dynamic Route Information display.
To switch to the call in progress display.*1
To view detailed TMC information.*2*3
To adjust the volume.
During route guidance: To hear the next voice guidance. In map scrolling mode:
To switch to the current car position display.
To show option menu.
7 To switch to map scrolling mode.
1 NV-U93T/U83 only. Appears only during a call in the map display.
2 NV-U93T/U73T only. Appears only when the found route is congested.
*3 iTMC (UK) and v-trafic (France) are optional. To subscribe the service(s), please visit our website. http://www.navu.sony-europe.com
Map display
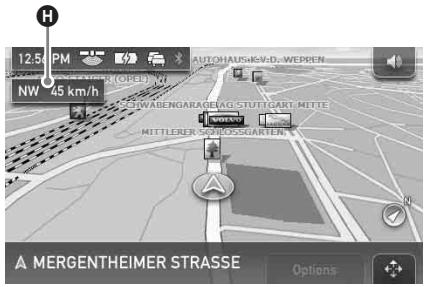
Straight-ahead driving

Approaching an intersection
Current time/GPS status/Battery condition/ TMC status*1/Bluetooth status*2 For details, see the supplied PDF manual.
Distance/ETA (Estimated Time of Arrival) to destination
Current position
Distance to next turn
Current street name
F Next street name
North indicator
Current direction/Current speed
Instruction after next
Bar indicator of the distance to next turn
K Next turn instruction
1 NV-U93T/U73T only.
2 NV-U93T/U83 only.
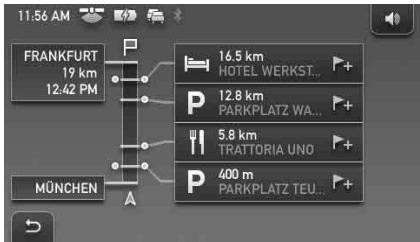
Dynamic Route Information
This display shows the distance to the destination, POI information, etc.
Route display
You can view the entire route to the destination. To view, from map display, select "Options" "Show Route."
Map scrolling mode
You can switch to map scrolling mode from map display by touching , whether during route guidance or not.
In map scrolling mode, the crosshair is displayed on the map, and you can drag the screen to scroll the map.
Touch / to adjust map scale.
Drag the desired point to the intersection of the crosshair, then touch to show the map scrolling mode menu, where you can set the point as a destination, etc.
Touch to return to the current car position display.
System Settings
Various settings related to the system and memory are configurable.
From the top menu, select "More..." "Settings" the desired category the desired item to make each setting.
Bluetooth function (NV-U93T/U83 only)
Activating the Bluetooth function
1 Touch "Phone" in the top menu. The Bluetooth function menu appears.
2 Select "Phone Settings."
3 Set "Bluetooth Signal" to "On."
Pairing and connecting this unit with a mobile phone
The following operation is required only for the first time.
Connecting with a mobile phone from this unit
Check that the mobile phone is set to allow for searching (discoverable) beforehand.
1 Touch "Phone" in the top menu.
2 Select "Phone Settings" "Connect Phone" "New Registration."
3 When "Search for Phone" appears, select "OK."
The process of searching for a connectable mobile phone begins, then the detected mobile phone name(s) appear in a list. Search time varies depending on the number of mobile phones.
4 Select the mobile phone to connect. Pairing starts.
continue to next page
5 Input a passkey*.
Input the same passkey for this unit and the connecting mobile phone. The passkey can be either your own selected number or the number determined by the connecting mobile phone. For details, see the manual of the connecting mobile phone.
6 Touch "OK" to confirm.
"Connected" appears and connection is complete.
Depending on the model of your mobile phone, the connection may also require an operation on the mobile phone.
- Passkey may be called "passwd," "PIN code," "PIN number," "password," etc., depending on the mobile phone.
Making calls
You can make a call from the connected mobile phone by operating this unit.
1 Touch "Phone" in the top menu.
2 Select "Make a Call" "Numeric Input."
3 Input the phone number.
4 Touch to start the call.
To end calls
Touch "End Call."
Receiving calls
When receiving a call, the ring tone is output from the unit's speaker.
1 When receiving a call, touch "Answer."
The phone call starts.
The built-in microphone of this unit will pick up your voice.
Using the Supplied Software
The major functions of the software on the supplied disc are introduced below. If you insert the disc into your computer, the screen appears automatically. Follow the on-screen instructions.
Contents
Install PC Connection Software*1
PC connection software (ActiveSync) can be installed. Be sure to log on as administrator when installing this software.
Language Manager
Language data for on-screen display and voice guidance can be added to the unit, and unnecessary language data can be deleted from the unit.
Read the Manual
You can read the PDF manual which contains further information on operations available.
Support Link
Easy access to the Sony navigation support site is available.
Visit this site for technical support, such as software updates, FAQs, etc.
Map Manager*2
Map data can be copied to the unit or "Memory Stick" (not supplied) from the supplied disc. When copying, you may need to delete unnecessary map data to free up memory space.
1 Installation is required only for Windows 2000/Windows XP users.
2 The Map Manager function can be used only for the model with the disc containing map data.
Connecting to your computer
Before connecting to your computer, install the PC connection software on your computer.
- For Windows 2000/Windows XP users: Install ActiveSync from the supplied disc.
- For Windows Vista users: Download "Windows Mobile Device Center 6.1" or later from the Microsoft support site, if not already installed.
1 Connect the unit to your computer with the USB cable.
Notes when transferring data
During transfer, do not:
- disconnect the USB cable.
- enter unit standby mode, or reset the unit.
- shut down the computer, enter computer standby mode, or restart the computer.
Additional Information
Precautions
On Bluetooth communication (NV-U93T/U83 only)
- Bluetooth wireless technology operates within a range of about 10m (about 30 ft). Maximum communication range may vary depending on obstacles (person, metal, wall, etc.) or electromagnetic environment.
- When using the Bluetooth function, install the unit at a place within 60~cm (about 20 in) from the driver.
-
The following conditions may affect the sensitivity of Bluetooth communication.
-
There is an obstacle such as a person, metal, or wall between this unit and mobile phone.
-A device using 2.4 GHz frequency, such as a wireless LAN device, cordless telephone, or microwave oven, is in use near this unit. - Because Bluetooth devices and wireless LAN (IEEE802.11b/g) use the same frequency, microwave interference may occur and resulting in communication speed deterioration, noise, or invalid connection if this unit is used near a wireless LAN device. In such as case, perform the following.
- Use this unit at least 10m (about 30 ft) away from the wireless LAN device.
- If this unit is used within 10m of a wireless LAN device, turn off the wireless LAN device.
- Install this unit and mobile phone as near to each other as possible.
- Microwaves emitting from a Bluetooth device may affect the operation of electronic medical devices. Turn off this unit and the mobile phone in the following locations, as it may cause an accident.
where inflammable gas is present, in a hospital, train, airplane, or a petrol (gas) station -
near automatic doors or a fire alarm
-
This unit supports security capabilities that comply with the Bluetooth standard to provide a secure connection when the Bluetooth wireless technology is used, but security may not be enough depending on the setting. Be careful when communicating using Bluetooth wireless technology.
- We do not take any responsibility for the leakage of information during Bluetooth communication.
- Connection with all mobile phones cannot be guaranteed.
-A mobile phone featuring Bluetooth function is required to conform to the Bluetooth standard specified by Bluetooth SIG, and be authenticated. - Even if the connected mobile phone conforms to the above mentioned Bluetooth standard, some mobile phones may not be connected or work correctly, depending on the features or specifications of the mobile phone.
- While talking on the phone hands-free, noise may occur, depending on the model of your mobile phone or communication environment.
Depending on the mobile phone to be connected, it may require some time to start communication.
Others
- Using the Bluetooth device may not function on mobile phones, depending on radio wave conditions and location where the equipment is being used.
- If you experience discomfort after using the Bluetooth device, stop using the Bluetooth device immediately. Should any problem persist, consult your nearest Sony dealer.
About the "Memory Stick"
What is a "Memory Stick"?
"Memory Stick" is a compact-size IC recording medium with a large capacity. It has been designed not only for exchanging/sharing digital data among "Memory Stick" compatible products, but also for serving as an insertable/ removable external storage medium that can save data.
Types of "Memory Stick Duo" that the system can use
With the system, you can use the following types of "Memory Stick Duo."
- "Memory Stick Duo" (Not compatible with MagicGate)
"MagicGate Memory Stick Duo"*2
"Memory Stick PRO Duo"*2
1 The system has been demonstrated as operable with a "Memory Stick Duo" with a capacity of 4 GB or smaller. However, we do not guarantee the operations of all the "Memory Stick Duo" media.
2 "MagicGate Memory Stick Duo" and "Memory Stick PRO Duo" are equipped with MagicGate functions. MagicGate is copyright protection, using encryption technology. Data with MagicGate protection cannot be played with this unit.
Notes
- This system supports only the reading of data on a "Memory Stick Duo." "Memory Stick Duo" formatting and writing cannot be performed.
- This system does not support parallel high-speed data transfer.
- Standard-size "Memory Stick" cannot be used in this system.
- When using a "Memory Stick Duo," make sure to check correct insertion direction. Wrong usage may cause trouble with the system.
- Do not insert "Memory Stick Micro" directly into "Memory Stick PRO" compliant product without M2 adapter supplied with the media (or sold separately). If you attempt to insert it without attaching to the M2 adapter, it may not be able to be removed.
- Do not place the "Memory Stick Duo," "Memory Stick Micro," or M2* adapter within the reach of a small child to prevent him from swallowing it by accident.
- Avoid removing the "Memory Stick Duo" from the system while the system is reading data.
Data may be damaged in such occasions:
- "Memory Stick Duo" is removed or the system is turned off during a read operation.
- "Memory Stick Duo" is used in a location subject to static electricity or electrical noises.
- We recommend that you save backup of the important data.
- Do not bend, drop or apply strong shock to the "Memory Stick Duo."
- Do not disassemble or modify the "Memory Stick Duo."
- Do not allow the "Memory Stick Duo" to get wet.
- Do not use or store the "Memory Stick Duo" in a location that is subject to:
- Extremely high temperature, such as in a car parked in the sun
- Direct sunlight
- High humidity or places with corrosive substances
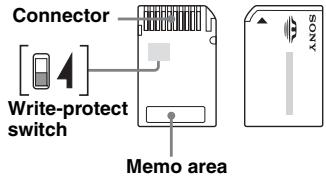
- Do not touch the "Memory Stick Duo" connector with your finger or metallic objects.
- You cannot record, edit or delete data if you slide the write-protect switch to LOCK.
- When you slide the write-protect switch of the "Memory Stick Duo," use a thin-pointed device.
- When you use a "Memory Stick Duo" without the write-protect switch, be careful not to edit or delete the data by accident.
- When you write on the memo area of the attached label, do not write forcefully.
-
When you carry or store the "Memory Stick Duo," put it in the case supplied with it.
-
Abbreviation for "Memory Stick Micro."
Note on LCD panel
Some stationary blue, red or green dots may appear on the monitor. These are called "bright spots," and can happen with any LCD. The LCD panel is precision-manufactured with more than 99.99% of its segments functional. However, it is possible that a small percentage (typically 0.01 % ) of the segments may not light up properly. This will not, however, interfere with your viewing.
Maintenance
Cleaning
- Clean the surface of the suction cup with a soft, wet lint-free cloth if it becomes dirty and attachment strength weakens.
Be sure to dry the suction cup before reattaching. - Clean the display window with a commercially available cleaning cloth.
Note
If the suction cup leaves a trace on the windscreen, wipe with water.
Fuse replacement
When replacing the fuse in the car battery adapter, be sure to use one matching the amperage rating stated on the original fuse (2.5 A). If the fuse blows, check the power connection and replace the fuse. If the fuse blows again after replacement, there may be an internal malfunction. In such a case, consult your nearest Sony dealer.
Warning
Never use a fuse with an amperage rating exceeding the one supplied with the unit as this could damage the unit.
Notes on unit disposal
Remove the built-in lithium-ion battery when disposing of the unit, and return the battery to a recycling location.
The procedure for removing the battery is explained below.
Note
Never disassemble the unit except when disposing of it.
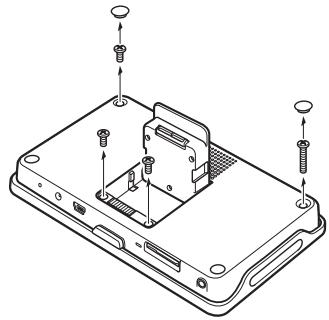
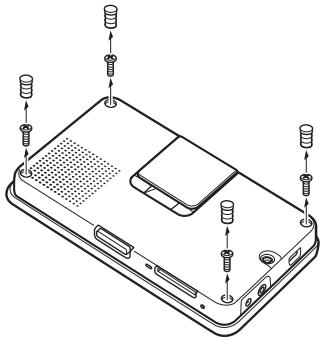
1 Press the RESET button to turn off the unit.
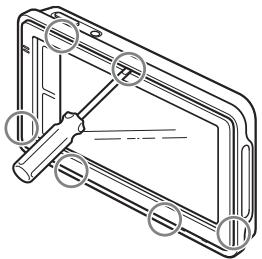
2 Remove the rubber plugs on the rear of the unit, then the screws using a screw driver.
NV-U93T/U83
Remove the 2 rubber plugs, then the 4 screws.
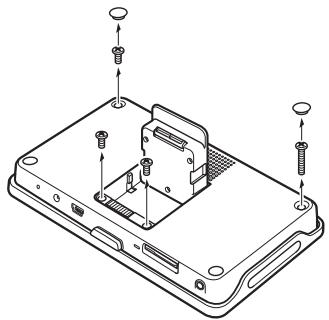
NV-U73T/U53
Remove the 4 rubber plugs, then the 4 screws.

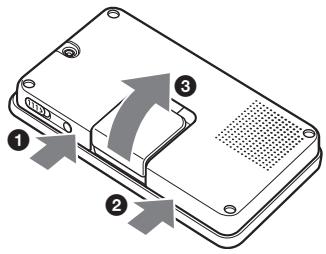
3 Remove the rear cover.
NV-U93T/U83
Use a sharp object, such as a flat head driver, in the places shown in the illustration to release the catches and open the rear cover.
NV-U73T/U53
Press where shown in the illustration 1 and 2 to release the catches, then open the rear cover with your hands 3.
4 Remove the battery.
NV-U93T/U83
Before removing the battery, remove the screw as shown below.
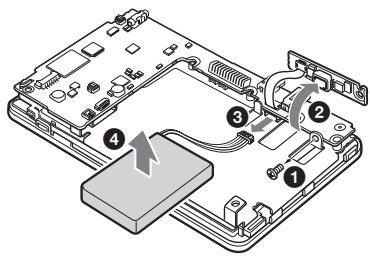
NV-U73T/U53
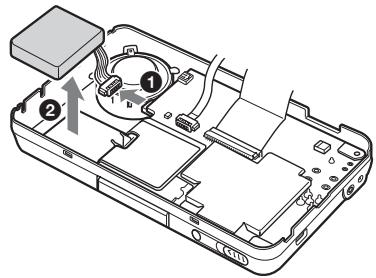
5 Insulate the connector terminal by wrapping with a tape.
Notes on the lithium-ion battery
- Keep the battery out of the reach of children.
- Do not hold the battery with metallic tweezers, otherwise a short-circuit may occur.
WARNING
Battery may explode if mistreated.
Do not recharge, disassemble, or dispose of in fire.
Specifications
NV-U93T/U83
Main unit
Operating temperature: 5 - 45^ (41 - 113^)
Power requirements: DC 5 V from supplied USB cable or optional AC adapter
Connection terminals: Cradle connector DC IN 5V jack USB jack Headphone jack
Memory card slot: Memory Stick Duo slot
Speaker: 20 × 40 ~mm (0.8 × 1.6 in) oval speaker
Consumption current: Max. 1.5 A
Dimensions: Approx. 145 × 87 × 20 ~mm (5.7 × 3.4 × 0.8 in) (w × h × d, protruding parts excluded)
Mass: Approx. 250g (8.8 oz)
Monitor
System: Transmissive liquid crystal display
Drive system: a-Si TFT active matrix system
Dimensions: 4.8 in (16:9) Approx. 106 × 60 , 122 ~mm (4.2 × 2.4, 4.8 ~in) (h × v, d)
Segment: 391,680 (816× 480) dots
Wireless Communication
Communication System: Bluetooth Standard version 2.0
Output: Bluetooth Standard Power Class 2 (Max. +4 dBm)
Maximum communication range: Line of sight approx. 10m (32.8 ft)*1
Frequency band: 2.4 GHz band (2.4000 - 2.4835 GHz)
Modulation method: FHSS
Compatible Bluetooth Profiles*2: HFP (Hands-free Profile) OPP (Object Push Profile)
1 The actual range will vary depending on factors such as obstacles between devices, magnetic fields around a microwave oven, static electricity, reception sensitivity, aerial's performance, operating system, software application, etc.
2 Bluetooth standard profiles indicate the purpose of Bluetooth communication between devices.
Cradle
Operating temperature: 5 - 45^ (41 - 113^)
Power requirements: DC 5.2 V
from supplied 12V / 24V car battery adapter (negative earth)
Connection terminals:
Unit connector
DC IN 5.2V jack
TMC aerial jack (NV-U93T only)
Reception frequency: 87.5 - 108.0 MHz
(NV-U93T only)
Built-in battery charging time/usage time
Charging time
With the supplied car battery adapter/optional AC adapter: Approx. 3 hours (with unit turned on), or 1.5 hours (in standby mode)
With the supplied USB cable:
Approx. 3 hours (in standby mode)
Usage time
Up to 2 hours (depending on usage)
Optional accessories
Car Install Kit:XA-49FM
AC Adapter:XA-AC13
Car Battery Adapter:XA-DC3
TMC Car Cradle: NVA-CU5T
Design and specifications are subject to change without notice.

- Halogenated flame retardants are not used in the certain printed wiring boards.
- Use of rechargeable lithium ion batteries.
Corrugated cardboard is used for the packaging cushions.
VOC (Volatile Organic Compound)-free vegetable oil based ink is used for printing the carton.
NV-U73T/U53
Main unit
Operating temperature: 5 - 45^ (41 - 113°F)
Power requirements: DC 5 - 5.2 V
from supplied USB cable, optional AC adapter, or supplied 12V / 24V car battery adapter (negative earth)
Connection terminals:
DC IN 5-5.2V jack
USB jack
External GPS aerial jack
TMC aerial jack (NV-U73T only)
Reception frequency: 87.5 - 108.0 MHz
(NV-U73T only)
Memory card slot: Memory Stick Duo slot
Speaker: 30mm (1.2 in) circular speaker
Consumption current: Max. 1.5 A
Dimensions: Approx. 133 × 79 × 20 ~mm
(5.2× 3.1× 0.8 in)
(w× h× d , protruding parts excluded)
Mass: Approx. 210g (7.4 oz)
Monitor
System: Transmissive liquid crystal display
Drive system: a-Si TFT active matrix system
Dimensions: 4.3 in (16:9)
Approx. 95 × 54, 109 ~mm
(3.7× 2.1,4.3in)(h× v,d)
Segment: 391,680 (816 × 480) dots
Built-in battery charging time/usage time
Charging time
With the supplied car battery adapter/optional AC adapter: Approx. 2 hours (with unit turned on), or 1 hour (in standby mode)
With the supplied USB cable:
Approx. 2 hours (in standby mode)
Usage time
Up to 2 hours (depending on usage)
Optional accessories
Car Install Kit:XA-49FM
AC Adapter:XA-AC13
Car Battery Adapter:XA-DC3
External GPS Antenna: VCA-42
Design and specifications are subject to change without notice.

- Halogenated flame retardants are not used in the certain printed wiring boards.
- Use of rechargeable lithium ion batteries.
- Corrugated cardboard is used for the packaging cushions.
VOC (Volatile Organic Compound)-free vegetable oil based ink is used for printing the carton.
Troubleshooting
The following checklist will help you remedy problems you may encounter with your unit. Before going through the checklist below, check the connection and operating procedures.
General
The unit does not turn on.
Charge the built-in battery.
Check that the car battery adapter is securely inserted into the cigarette lighter socket.
The built-in battery cannot be charged.
Turn on the unit, then turn off the unit.
If the car battery adapter is being used, disconnect it from the cigarette lighter socket, then reconnect.
The built-in lithium-ion battery can be charged at temperatures between 5 - 45^ (41 - 113^) . The battery may not be charged if the temperature inside the unit increases because of direct sunlight exposure, etc. This is not a malfunction.
Turn on the computer during USB charge. Note that the CHG indicator 7/3 may light up in green in the computer standby mode, even though the built-in battery is not fully charged.
GPS signal cannot be received.
Firstly, read the GPS overview (page 6), then check the GPS status by selecting "More..." in the top menu "GPS Status."
- The system cannot receive GPS signals due to an obstruction.
Move your car to a place where signals can be received clearly. - There is an obstacle in front of the GPS aerial.
Install the unit where the signal is not interrupted by the body of the car, etc. - GPS signal reception may be poor depending on the material of the car's windscreen.
Use the optional External GPS Antenna VCA-42. (NV-U73T/U53 only)
The car position on the map does not match the current road.
The error margin of the signal from the GPS satellites is too large. A maximum error margin of a few hundred metres can exist.
Voice guidance cannot be heard.
The volume is set too low.
Raise the volume (page 12).
The LCD is not displayed normally.
- In high temperatures, the LCD may darken and not display clearly. In low temperatures, afterimage may occur on the LCD. These are not malfunctions, and the LCD will return to normal when the temperature returns to within the specified operating range.
The LCD is dark.
→The auto dimmer function may be activated because its sensor 5 page 8)/4 page 8) is covered by a hand, etc.
The cradle comes off the attachment surface.
Attachment strength weakens if the surface of the suction cup or attachment surface becomes dirty.
Clean the surface of the suction cup and the attachment surface with a soft, wet lint-free cloth (page 17).
The demonstration mode starts automatically even if no operation is performed.
Turn off the auto demonstration mode by selecting "More..." in the top menu "Settings" "General Settings" "Demo Mode." Then, confirm that "Demo Mode" is set to off.
continue to next page
Bluetooth function (NV-U93T/U83 only)
The connecting mobile phone cannot detect this unit.
Set "Bluetooth Signal" to "On" (page 13).
- While connecting to the mobile phone, this cannot be detected from another mobile phone.
Disconnect the current connection and search for this unit from another mobile phone.
Bluetooth connection is not possible.
Perform pairing again.
Depending on the model of your mobile phone, searching from this unit may not be possible.
Search for this unit from the mobile phone.
- Depending on the status of the mobile phone, searching from this unit may not be possible.
Search for this unit from the mobile phone.
- Check the pairing and connection procedures in the manual of the mobile phone, etc., and perform the operation again.
Go to the Sony website to verify that the mobile phone model is one that can be connected to this unit.
The name of the detected mobile phone does not appear.
Depending on the status of the mobile phone, it may not be possible to obtain the name.
The caller's voice volume is low.
Adjust the volume by touching + / - in the display.
Echo or noise occurs in phone call conversations.
- Lower the volume.
- "Noise / Echo Cancellation" is set to "Off."
Set "Noise / Echo Cancellation" to "Mode 1" or "Mode 2."
- If the ambient noise other than the phone call sound is loud, try reducing this noise. E.g.: If a window is open and road noise, etc., is loud, shut the window. If the air conditioner is loud, lower the air conditioner.
The sound quality of the caller's voice is poor.
Phone sound quality depends on reception conditions of mobile phone.
Move your car to a place where you can enhance the mobile phone's signal if the reception is poor.
Some functions do not work.
Check that the connecting mobile phone supports the functions in question.
The name of the other party does not appear when a call is received.
- The other party is not stored in the phone book. Store in the phone book.
- The calling phone is not set to send the phone number.
Pairing failed due to time out.
Depending on the connecting mobile phone, the time limit for pairing may be short. Try completing the pairing within the time.
No sound is output from the unit's speaker during hands-free call.
If the sound is output from the mobile phone, set the mobile phone to output the sound from the unit's speaker.
Resetting the unit
If the navigation software freezes, try resetting the unit.
Press the RESET button, then turn on the unit.
Note
After you reset the unit, it may take time to receive GPS signals when turning on the unit.
Wichtig!
These are the most important features of radio broadcasting. These are also the main reasons why radio broadcasting is so popular today. The first one is the use of radio broadcasting in the form of radio programmes, which are usually made available to people who have access to the radio. These programmes are usually free and can be transmitted from a variety of sources, including radio广播, television, and even radio电视台. These programmes are often used by people who do not have access to the radio. These programmes are usually made available to people who have access to the radio. These programmes are usually made available to people who do not have access to the radio.
12 Taste OPEN/RELEASE
6 Temoin (Bluetooth)
12 Touche OPEN/RELEASE
3 Retirez le capot arrriere.
NV-U93T/U83
12 OPEN/RELEASE-toets
"Snelkoppeling 1 - 3"
12 Tasto OPEN/RELEASE
6 (Bluetooth)-indicator
2 OPEN/RELEASE-knapp
Retire as 2 fichas de borracha e(before os 4 parafusos.
NV-U73T/U53
Retire as 4 fichas de borracha e(before os 4 parafusos.
3 Retire a tampa traseira.
NV-U93T/U83
Characteristicas techniques
NV-U93T/U83
Unidade principal
Temperatura de funciona: 5 - 45 °C
Alimentação: DC 5 V
atravs do cabo USB fornecido ou do
transformador de CA optional


- Customer Support Portal
- SONY
- Personal Navigation System Quick Start Guide
- How to use this manual
- On copyrights
- On trademarks
- Austria
- Croatia, Estonia, Latvia, Lithuania, Poland,
- Slovenia
- France
- Germany
- Greece
- Hungary
- Italy
- Portugal
- Spain
- Switzerland
- NV-U73T/U53
- C
- Caution
- Table of Contents
- Basic Operations 9
- Route Searching 11
- System Settings 13
- Bluetooth function (NV-U93T/U83 only) 13
- Using the Supplied Software 14
- Additional Information 15
- Warning
- On safety
- On handling
- On GPS
- Note
- On the positioning system (POSITION plus) (NV-U93T/U83 only)
- Notes
- IMPORTANT NOTICE for the Bluetooth function! (NV-U93T/U83 only)
- Safe and efficient use
- Driving
- Radio frequency exposure
- Connecting to other devices
- Emergency calls
- On the software
- Location of controls
- NV-U93T/U83
- Turning the unit on/off
- Performing initial setup
- Receiving GPS signals
- Basic Operations
- Menu operation
- Gesture Command operation
- Keyboard operation
- Route Searching
- Setting the destination and starting guidance
- Setting the destination in other ways
- Search Nearby
- "Quick Link 1 - 3"
- "Search by Name"
- "Search by Category"
- Go Home
- Navigate
- "POI Search Nationwide"
- "POI Search Town"
- "Address Book"
- Guidance displays
- Map display
- Dynamic Route Information
- Route display
- Map scrolling mode
- System Settings
- Bluetooth function (NV-U93T/U83 only)
- Activating the Bluetooth function
- Pairing and connecting this unit with a mobile phone
- Connecting with a mobile phone from this unit
- Input a passkey*.
- Touch "OK" to confirm.
- Making calls
- To end calls
- Receiving calls
- When receiving a call, touch "Answer."
- Using the Supplied Software
- Contents
- Install PC Connection Software*1
- Language Manager
- Read the Manual
- Support Link
- Map Manager*2
- Connecting to your computer
- Connect the unit to your computer with the USB cable.
- Notes when transferring data
- Additional Information
- Precautions
- On Bluetooth communication (NV-U93T/U83 only)
- Others
- About the "Memory Stick"
- What is a "Memory Stick"?
- Types of "Memory Stick Duo" that the system can use
- Note on LCD panel
- Maintenance
- Cleaning
- Fuse replacement
- Notes on unit disposal
- Remove the rear cover.
- Remove the battery.
- Insulate the connector terminal by wrapping with a tape.
- Notes on the lithium-ion battery
- Specifications
- Main unit
- Monitor
- Wireless Communication
- Cradle
- Built-in battery charging time/usage time
- Charging time
- Usage time
- Optional accessories
- Troubleshooting
- General
- The unit does not turn on.
- The built-in battery cannot be charged.
- GPS signal cannot be received.
- The car position on the map does not match the current road.
- Voice guidance cannot be heard.
- The LCD is not displayed normally.
- The cradle comes off the attachment surface.
- The demonstration mode starts automatically even if no operation is performed.
- The connecting mobile phone cannot detect this unit.
- Bluetooth connection is not possible.
- The name of the detected mobile phone does not appear.
- The caller's voice volume is low.
- Echo or noise occurs in phone call conversations.
- The sound quality of the caller's voice is poor.
- Some functions do not work.
- The name of the other party does not appear when a call is received.
- Pairing failed due to time out.
- No sound is output from the unit's speaker during hands-free call.
- Resetting the unit
- Wichtig!
- Taste OPEN/RELEASE
- Touche OPEN/RELEASE
- Retirez le capot arrriere.
- OPEN/RELEASE-toets
- Tasto OPEN/RELEASE
- Retire a tampa traseira.
- Characteristicas techniques
- Unidade principal
Brand : SONY
Model : U73T
Category : Gps