
NV-U82 - Gps SONY - Free user manual and instructions
Find the device manual for free NV-U82 SONY in PDF.

| Product type | Personal navigation GPS |
| Brand and model | Sony NV-U82 |
| Dimensions | 145 × 87 × 20 mm |
| Weight | Approx. 250 g |
| Screen | LCD TFT 4.8 inches (16:9), 816 × 480 pixels, touchscreen |
| Power supply | 5 V DC (via car adapter or optional AC adapter), max current 1.5 A |
| Battery | Rechargeable lithium-ion, battery life up to 2.5 h, charging: approx. 3 h (on) or 1.5 h (standby) with car adapter |
| Operating temperature | 5 °C to 45 °C |
| GPS reception | Built-in GPS antenna, automatic repositioning, satellite reception |
| Main functions | Road navigation, voice guidance, gesture control, search by address/POI/coordinates, destination memory (home, recent, address book), TMC information (optional), map scrolling mode |
| External memory | Slot for Memory Stick Duo (read only, compatible with Duo and PRO Duo up to 4 GB) |
| Connectors | Cradle connector, DC IN 5V jack, USB port, headphone jack (non-audio), TMC antenna connector (TMC models) |
| Speaker | Built-in, for voice guidance and warnings |
| Included software | Disc with ActiveSync installation, language assistant, PDF manual, support website |
| Included accessories | Car battery adapter, suction cup mount, USB cable, quick start guide and installation manual |
| Maintenance | Clean the suction cup with a soft, damp, lint-free cloth; screen with cleaning cloth |
| Safety | Install out of driver's reach, do not obstruct airbags, securely fasten mount, do not use while driving |
| Spare parts / repairability | Replaceable 2.5 A fuse, removable battery for disposal, contact Sony for repair |
| General information | Brand: Sony, Model: NV-U82, Category: GPS |
Frequently Asked Questions - NV-U82 SONY
User questions about NV-U82 SONY
0 question about this device. Answer the ones you know or ask your own.
Ask a new question about this device
Download the instructions for your Gps in PDF format for free! Find your manual NV-U82 - SONY and take your electronic device back in hand. On this page are published all the documents necessary for the use of your device. NV-U82 by SONY.
USER MANUAL NV-U82 SONY
Customer Support Portal
If you have any questions or for the latest support Information on navigation, visit the website below:
http://www.navu.sony-europe.com/support
Sony Corporation Prima in Thailand
3-298-741-21(1)
Quick Start Guide
How to use this manual
When nealing this manual, keep the control layout illustration (on the rear of this page) open for quick reference from any page.
Hinweis zu dieser
Bedienungsanleitung
About this manual
This Quick Start Guide contains instructions
10. Name: specifin
Before installing and operating this system,
read this manual and the supplied "Real This First" (Installation Manual) thoroughly
For more information, see the PDFs manual.
For more information, see the FD on the supplied Application line.
In the supposed Applied to I have. Illustrations in this manual may did
the actual device
Retain this manual and "Read This First" in
a place where you can refer to them if any
future time.

This symbol on the product or on its
packaging indicates that this product shall not be heard as peripheral waste. Instead it shall be handed over on the upplushie collection point, for the setting of electri In exchange stipple, by ending its mode is disposed or correctly, we will be in priority personal regulating obligations for the government and human health which could otherwise be caused by inappropriate where binding of this product. The recycling of chemicals will help to move a natural resource. For more details In connection with the order of no proof, 3250, or your local Cai. Office was broadcast at once 2016年1月1日,公司向银行申请的银行贷款。 Agrichit, consensus: Culliptum investor

The manufacturer of this product is Sony
Corporation, 1? 1 Kouna Minato in Tokyo,
108-0075 Japan
The Authorized Representative for LMC and
product safety is Sony Deutschland GmbH,
Hedalringer Strasse 61, 70327 Stuttgart, Germany. For any service or guarantee matters please refer to the kallices given in:
Caution
IN NO EVENT SHALL SONY DE LIABLE FOR ANY INCIDENTAL, INDIRECT OR CONSEQUENTIAL DAMAGES OR OTHER
DAMAGES INCLUDING WITHOUT
LIMITATION LOSS OF PROFITS, LOSS OF
REVENUE, LOSS OF DATA. LOSS OF USE OF THE PRODUCT OR ANY 1250% CHAPED
OF THE PRODUCT OR ANY ASS EQUIPMENT, DOCUMENTS, ANTI
EQUIPMENT DOWNTIME, AND
PURCHASER'S TIME RELATED FOR ARISING OUT OF THE USE OF THIS
ARISING OUT OF THE USE OF THIS PRODUCT ITS HARDWARE AND/OR ITS
PRODUCT, ITS HARDWARE AND/OR ITS SOFTWARE.
On copyrights
The name of POL-364 may contain respondents.
material. Copyrighted data on a "Memory Stick
Duo" should be used within the limits of the
copyright law. Do not violate the provisions of the
copyright
On trademarks
• Microsoft and Windows are regional (accessories)
of Mission Corporation
• "Menarch Stick"
Memory StockRun, "Memory Stick PRO Data"
Memory Stick PRO Duo, "Magic Gate"
MAGICGATE, "m-1" and NOV-U
trademarks of Sony Corporation
"MagicGate" is a genetic name of a copyright.
preparation
• All other underwriters are trademarks of their
• The other exchange risks are hedging risks of the following risks.
Inquisition

THE BIG LIME COUNC
V-Traffic Information in France is
provided by Medismobile
company.
Traffic Information in the L-K is
i TMC unvisited by ITIS Holdings Pk
2 TIME
- 901 NAVTEQ, All Rights Reserved.
A. 2016年1月1日
A. 1995
August 3, 1956 Belaine 82, 1995
Benedue C. 1943
Central Europe © 1993
Czech Republic © 2002
Denmark 8:195
Finland © 2001
France 8/1993
Germany © 1990
Cultural England & 1973
Italy 6.1994
Medicranian Com © 1993
Norway © 2001
Portugal 30 1997
Spain © 1997
Sweden © 1993
Switzerland © 1996
The Netherlands © 1993
Australia
Belgium Traffic Information is provided by the Minions
Traffic information is provided by the Minister's Office in 2017.
Croatia, Estonia, Latvia, Lithuania, Poland
Budella. Slovenia
Sikoviril G. Lyruficca position
C. ELEC
France
Sinha: Gaimihe? (IN France & BD (Sino)? IN
1982
Germany
Based upon Crown Copyright material.
Greece
Copyright Geometries Ltd.
Hungary
Copyright © 2012; Top Map Ltd.
Italy
Copyright © 2010 Acreagean Marince Authority
Portugal
Portugal
Source
Spain
Information on programs, popular in the US
Sweden
Based upon electronic data © National Land Survey
Sw:dk:n
Switzerland
Location of controls....5
Turning the unit on/off 6
Performing initial setup 6
Receiving GPS signals 6
Basic Operations 6
Menu operation....6
Gesture Command operation....7
Keyboard operation 7
Route Searching 8
Setting the destination and starting guidance....8
Setting the destination in other ways. . . . . . . . 8
Guidance displays 9
System Settings 10
Using the Supplied Software 10
Contents 10
Connecting to your computer.... 11
Additional Information 11
About the "Memory Stick" 11
What is "Memory Stick"? 11
Types of “Memory Stick Duo” that the system can use .... 11
Note on LCD panel. 12
Maintenance 12
Cleaning 12
Fuse replacement 12
Notes on unit disposal. 13
Specifications 14
Troubleshooting 14
Resetting the unit 15
Warning
PLEASE READ THIS MANUAL AND THE SUPPLIED READ THIS FIRST (INSTALLATION MANUAL) COMPLETELY BEFORE INSTALLING OR OPERATING YOUR PERSONAL NAVIGATION SYSTEM. IMPROPER INSTALLATION OR USE OF THIS DEVICE MAY CAUSE ACCIDENT, INJURY OR DEATH.
On safety
- Besure to:
- install the navigation system in a safe place where it does not obstruct the driver's view.
- not install the unit above an airbag.
- place the cables and cradle where they do not obstruct driving.
- attach the unit to the cradle properly, otherwise the unit may fall.
– clean the surface of the suction cup and attachment surface before attaching. When installing on the dashboard, clean the surface on which the suction cup will be attached. Also, confirm that the suction cup is securely attached after installation. Otherwise, the unit or cradle may fall.
Failure to do so may result in unsafe driving conditions.
- Do not apply excessive force to the unit or cradle as it may fall.
- Comply with local traffic rules, laws and regulations.
- Do not continuously watch the unit while driving. It is dangerous and may cause a traffic accident.
- If you need to operate the navigation system while driving, be sure to stop the car in a safe place before operating.
- Do not modify the unit.
- Do not disassemble the unit except when disposing of it.
On handling
- Do not let foreign objects get inside the cradle connector (6) of the unit, as it may cause a malfunction.
- When the unit is not in use, turn it off by pressing I/⏻ (1). Remove the unit from the cradle, then disconnect the car battery adapter, otherwise battery drain may result. Note the following. If your car's cigarette lighter socket is not connected to ACC on your ignition switch, power will continue to be supplied to the unit's built-in power supply even when the ignition is off or the unit is not in use.
- Do not connect any accessory other than those supplied or optional.
- Do not expose the unit to fire or water, as it may cause a malfunction.
- To disconnect a cable, pull it out by grasping the plug, not the cable.
- Be sure to remove the unit out of the car when leaving your car to prevent theft or high temperature damage inside the car.
- Note that the built-in battery cannot be charged outside the temperature range 5 - 45^ (41 - 113^ ).
- Do not leave the unit in high ambient temperature as the built-in battery capacity will deteriorate, or it will become unchargeable.
On GPS
As GPS information is obtained from satellites, it may be impossible or difficult to obtain information in locations such as:
- Tunnel or underground
• Under a highway - Between high buildings
- Between tall trees with dense foliage
Note
GPS signal reception may be poor depending on the material of the car's windscreen.
On the positioning system
The system has a function that allows the car's current position to be correctly displayed even at locations where the GPS signal is temporarily interrupted or poorly received, as when going under an overpass. To activate this function, do the following.
- Attach the unit to the cradle.
- Drive for a while in an area where the GPS signal is clearly received.
The positioning system will become ready for operation after you have driven a little with the unit on.
Notes
- The accuracy of this function may deteriorate if the unit is installed near a heated or heat-reflecting windscreen.
- Depending on the conditions, the car's current position or the movement may not be accurately displayed. This, however, will be corrected as soon as the GPS signal reception resumes.
- This function is available only during route guidance.
On the software
Read the “END-USER LICENSE AGREEMENT” carefully before use.
Location of controls
Refer to the pages listed for details.
1 I/⏻ (on/standby) button 6
To turn the unit on/off.
2 Screen buttons 9
3 Display window/touch screen
4 Auto dimmer sensor
Detects ambient light and automatically adjusts the display brightness.
5CHG (battery charge) indicator
Lights up in red while charging, and changes to green when fully charged. When the adapter is disconnected, the indicator goes off.
6 Cradle connector
7 RESET button 15
8 DC IN 5V jack
To connect to the car battery adapter or AC adapter*.
9USB jack 11
To connect to a computer with the USB cable.
10 OPEN/RELEASE button
To open the built-in GPS aerial or remove the unit from the cradle. For details, see the supplied “Read This First” (Installation Manual).
11 Nameplate
12 Built-in GPS aerial
13Speaker
Outputs guidance and warnings.
14 Memory Stick access indicator
15 Memory Stick Duo slot
For “Memory Stick Duo” insertion for functional expansion.
16 Headphone jack
This jack cannot be used as an audio output terminal.
* Optional accessory
Turning the unit on/off
To turn the unit on/off
Press I/① (1).
Note
If you do not use the unit for a long term, the built-in battery may be depleted, and the unit will not turn on. In such a case, connect the car battery adapter and charge the unit.
After you charge the unit, it may take time to receive GPS signals when turning on the unit.
Performing initial setup
Follow the on-screen instructions to perform the setup.
The setting can then be further configured in the setting menu at any time (page 10).
Receiving GPS signals
After the initial installation, park your car in a safe, open place (no high buildings, etc.) for up to 20 minutes to allow for GPS signals to calculate the current car position properly before using the navigation system.
The GPS signal reception condition icon is displayed on the screen. The indicator lights up in red when the signal cannot be received.
Basic Operations
Common procedures to operate the system are explained.
General operations can be performed on the touch screen. Touch the displayed icons with your finger gently.
Note
Do not press the display with excessive force, or use any sharp article, such as a pen, etc., to tap on the display.
Menu operation
The top menu appears when turning on the unit by pressing I/⏻ (except during route guidance, in which case the map appears).
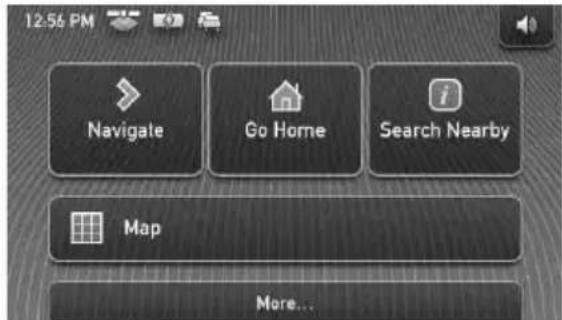
To show the top menu from the map display, touch the map.
To return to the top menu from any menu display, touch VOICE/POS., then touch the map.
During menu operation:
To return to the previous display, touch or

To cancel the menu selection, touch VOICE/POS. (the current car position display appears).
Gesture Command operation
In map displays (except in map scrolling mode), by assigning a screen finger stroke such as line, etc., frequently-used operations can be performed easily.
To Draw
| start navigation to your home |  a circumflex a circumflex |
| start navigation to the nearest POI (Point Of Interest) stored on Quick Links* | Quick Link 1 horizontal line(left to right) horizontal line(left to right) |
| Quick Link 2 | |
| vertical line(downwards) | |
Quick Link 3 horizontal line(right to left) horizontal line(right to left) |
* For details on Quick Links, see page 8.
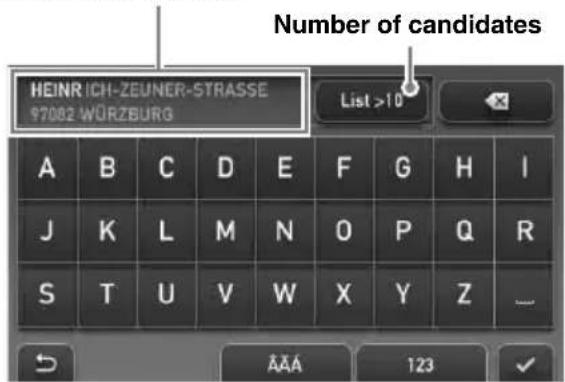
Keyboard operation
The keyboard display appears when you need to enter text.
You need only enter characters in upper case, as the system automatically converts them to appropriate characters. You can enter special characters when necessary.
Candidate/entry field
To Touch
| enter an alphabetical character | the desired character key |
| enter a special character | “ÂÄÄ” to switch to the special character keyboard, then the desired character; and “ABC” to switch back |
| enter a number “123” to switch to the numeric keyboard, then the desired number key; and “ABC” to switch back | |
| enter a space | |
| delete a character | |
| select a candidate or the candidate in the list | |
| show the candidate list* | “List” |
* The candidate list automatically appears when candidates are narrowed down as you continue inputting characters.
Route Searching
The system searches for routes automatically after setting the destination.
Before starting, check that GPS signals are sufficient for navigation (page 6).
Setting the destination and starting guidance
The procedure for searching for the route and starting route guidance is explained.
As an example, setting the destination by the address is introduced here.
For details on setting the destination in other ways, see “Setting the destination in other ways” on page 8.
1 Show the top menu.
In the map display, touch the map.
In the menu display, touch VOICE/POS., then touch the map.
2 Select "Navigate."
3 Select "Address Input," then input the address details.
Input the items in the order below, and touch
√ or the candidate in the list to proceed.
For details on how to input characters, see “Keyboard operation” on page 7.
If it is possible to pinpoint the destination by the selected postal code*, the address confirmation display appears. Select "Calculate Route."
③“Street / Destination”
④“No.” or “Intersection”* 2
The address confirmation display appears.
*1 Available only in the UK and Netherlands.
*2 Selectable only if existent in the selected street.
4 Select "Calculate Route."
The route is calculated, and route guidance starts.
Setting the destination in other ways
You can also set the destination and search for routes by the following methods.
From the top menu, select the items in the following order, then “Calculate Route” (if necessary).
For details, see the supplied PDF manual.
Search Nearby
Searches for routes to a POI, such as restaurant, hotel, etc., near the current car position.
Select “Search Nearby,” then any of the following options.
"Quick Link 1 - 3"
Searches for routes to the nearest POI of the category stored on Quick Links. Categories on Quick Links can be customized in the setting menu.
"Search by Name"
Enter the name of the POI directly.
"Search by Category"
Select the desired POI category from the list.
Go Home
Searches for routes to your home when it is registered.
Navigate
Select “Navigate,” then any of the following options.
"POI Search Nationwide"
Set a wide search area but with limited search categories. Suitable when searching big landmarks such as an airport.
"POI Search Town"
Set a narrow search area but all categories become the target of the search. Suitable when searching small places such as a petrol station and restaurant.
"Address Book"
Searches for routes to a saved destination point.
"Recent Destinations"
Searches for routes to recently searched destinations.
Guidance displays
Once a route has been calculated, visual guidance navigates you to the destination along with voice guidance.
Information on map tool menu
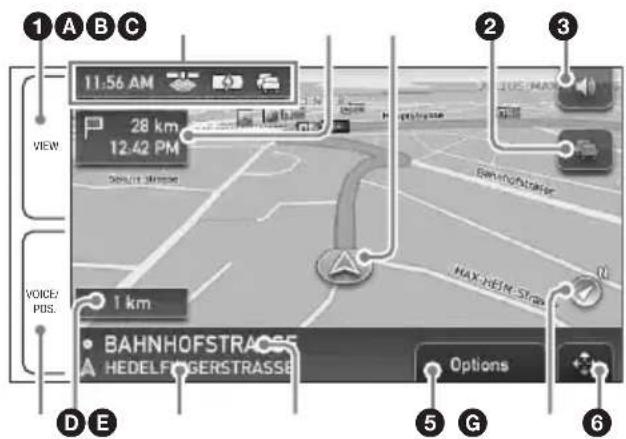
①During route guidance:
To switch the Dynamic Route Information display.
②To view detailed TMC information.* 1*2
③To adjust the volume.
④ During route guidance:
To hear the next voice guidance.
In map scrolling mode:
To switch to the current car position display.
⑤To show option menu.
⑥To switch to map scrolling mode.
*1 When the supplied (or optional) TMC cradle is used, this appears only when the route that has been found is congested.
*2 iTMC (UK) and v-trafic (France) are optional. To subscribe the service(s), please visit our website. http://www.navu.sony-europe.com
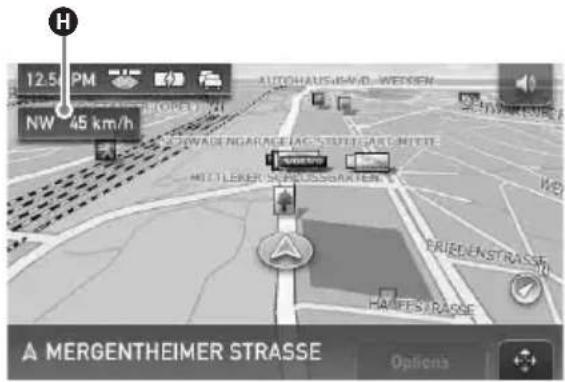
Map display
Straight-ahead driving
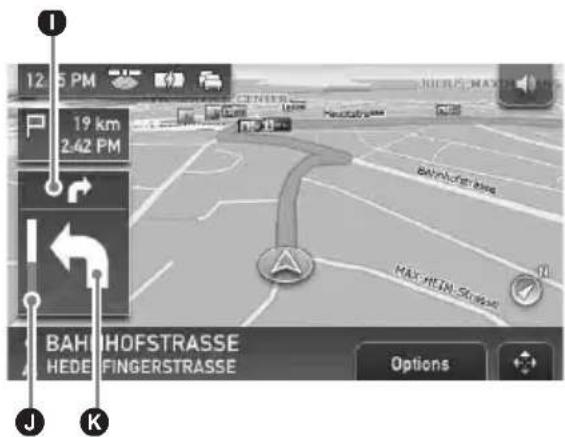
Approaching an intersection
A Current time/GPS status/Battery condition/TMC status
For details, see the supplied PDF manual.
B Distance/ETA (Estimated Time of Arrival) to destination
©Current position
D Distance to next turn
ECurrent street name
FNext street name
G North indicator
HCurrent direction/Current speed
① Instruction after next
J Bar indicator of the distance to next turn
KNext turn instruction
continue to next page →
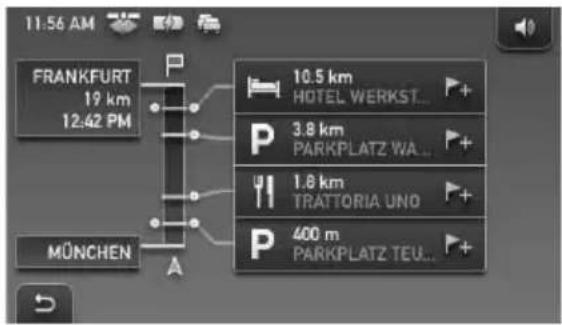
Dynamic Route Information
This display shows the distance to the destination, POI information, etc.
Route display
You can view the entire route to the destination. To view, from map display, select "Options" → "Show Route."
Map scrolling mode
You can switch to map scrolling mode from map display by touching ✦whether during route guidance or not.
In map scrolling mode, the crosshair is displayed on the map, and you can drag the screen to scroll the map.
Touch / to adjust map scale.
Place the intersection of the crosshair on a desired point, then touch to show the map scrolling mode menu, where you can set the point as a destination, etc.
Touch -to return to the current car position display.
System Settings
Various settings related to the system and memory are configurable.
From the top menu, select "More..." → "Settings"
→ the desired category → the desired item to make each setting.
Using the Supplied Software
The major functions of the software on the supplied disc are introduced below. If you insert the disc into your computer, the screen appears automatically. Follow the on-screen instructions.
Contents
Install PC Connection Software
PC connection software (ActiveSync) can be installed. Be sure to log on as administrator when installing this software.
Language Manager
Language data for on-screen display and voice guidance can be added to the unit, and unnecessary language data can be deleted from the unit.
Read the Manual
You can read the PDF manual which contains further information on operations available.
Support Link
Easy access to the Sony navigation support site is available.
Visit this site for technical support, such as software updates, FAQs, etc.
Map Manager\*
Map data can be added to the unit or "Memory Stick" (not supplied) from the supplied disc. When adding, you may need to delete unnecessary map data to free up memory space.
Connecting to your computer
Before connecting to your computer, install the PC connection software (ActiveSync) to your computer.
1 Connect the unit to your computer with the USB cable.
Notes when transferring data
During transfer, do not
– disconnect the USB cable.
- enter unit standby mode, or reset the unit.
- shut down the computer, enter computer standby mode, or restart the computer.
Additional Information
About the "Memory Stick"
What is "Memory Stick"?
“Memory Stick” is a compact-size IC recording medium with a large capacity. It has been designed not only for exchanging/sharing digital data among “Memory Stick” compatible products, but also for serving as an insertable/removable external storage medium that can save data.
Types of “Memory Stick Duo” that the system can use
With the system, you can use the following types of “Memory Stick Duo.”*
- Memory Stick Duo (Not compatible with MagicGate)
- MagicGate Memory Stick Duo
• Memory Stick PRO Duo
* The system has been demonstrated as operable with a “Memory Stick Duo” with a capacity of 4 GB or smaller. However, we do not guarantee the operations of all the “Memory Stick Duo” media.
continue to next page →
Notes
- This system supports only the reading of data on a "Memory Stick Duo." "Memory Stick Duo" formatting and writing cannot be performed.
- This system does not support parallel high-speed data transfer.
- Standard-size "Memory Stick" cannot be used in this system.
- When using a “Memory Stick Duo,” make sure to check correct insertion direction. Wrong usage may cause trouble with the system.
- Do not place the “Memory Stick Duo” within the reach of a small child to prevent him from swallowing it by accident.
- Avoid removing the "Memory Stick Duo" from the system while the system is reading data.
• Data may be damaged in such occasions:
- "Memory Stick Duo" is removed or the system is turned off during a read operation.
- “Memory Stick Duo” is used in a location subject to static electricity or electrical noises.
- We recommend that you save backup of the important data.
- Do not bend, drop or apply strong shock to the "Memory Stick Duo."
- Do not disassemble or modify the "Memory Stick Duo."
- Do not allow the "Memory Stick Duo" to get wet.
-
Do not use or store the "Memory Stick Duo" in a location that is subject to:
-
Extremely high temperature, such as in a car parked in the sun
- Direct sunlight
– High humidity or places with corrosive substances
Memo area
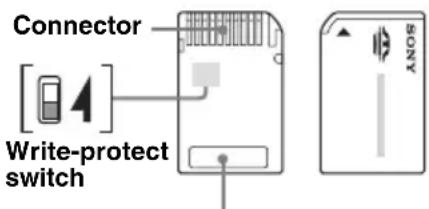
- Do not touch the "Memory Stick Duo" connector with your finger or metallic objects.
- You cannot record, edit or delete data if you slide the write-protect switch to LOCK.
- When you slide the write-protect switch of the "Memory Stick Duo," use a thin-pointed device.
- When you use a “Memory Stick Duo” without the write-protect switch, be careful not to edit or delete the data by accident.
- When you write on the memo area of the attached label, do not write forcefully.
- When you carry or store the "Memory Stick Duo," put it in the case supplied with it.
Note on LCD panel
Some stationary blue, red or green dots may appear on the monitor. These are called “bright spots,” and can happen with any LCD. The LCD panel is precision-manufactured with more than 99.99 % of its segments functional. However, it is possible that a small percentage (typically 0.01 %) of the segments may not light up properly. This will not, however, interfere with your viewing.
Maintenance
Cleaning
- Clean the surface of the suction cup with a soft, wet lint-free cloth if it becomes dirty and attachment strength weakens.
Be sure to dry the suction cup before reattaching. - Clean the display window with a commercially available cleaning cloth.
Note
If the suction cup leaves a trace on the windscreen, wipe with water.
Fuse replacement
When replacing the fuse in the car battery adapter, be sure to use one matching the amperage rating stated on the original fuse (2.5)
A). If the fuse blows, check the power connection and replace the fuse. If the fuse blows again after replacement, there may be an internal malfunction. In such a case, consult your nearest Sony dealer.
Warning
Never use a fuse with an amperage rating exceeding the one supplied with the unit as this could damage the unit.
Notes on unit disposal
Remove the built-in lithium-ion battery when disposing of the unit, and return the battery to a recycling location.
The procedure for removing the battery is explained below.
Note
Never disassemble the unit except when disposing of it.
1 Press the RESET button to turn off the unit.
2 Remove the 2 rubber plugs on the rear of the unit, then remove the 4 screws using a screw driver.
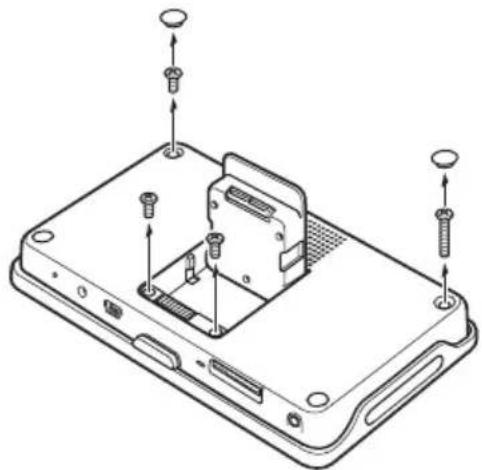
natural_image
Isometric line drawing of a computer chassis with labeled components (no text or symbols)3 Detach the claws with a sharpened object, such as a flat headed driver, then remove the rear cover.
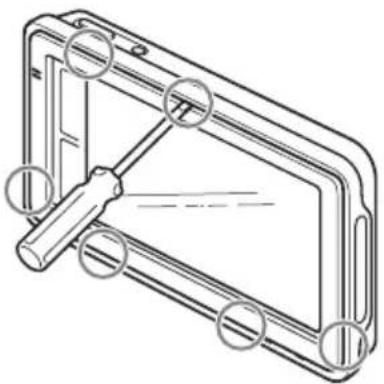
natural_image
Technical line drawing of a mechanical clamp or bracket assembly (no text or symbols)4 Remove the screw and battery as shown below.
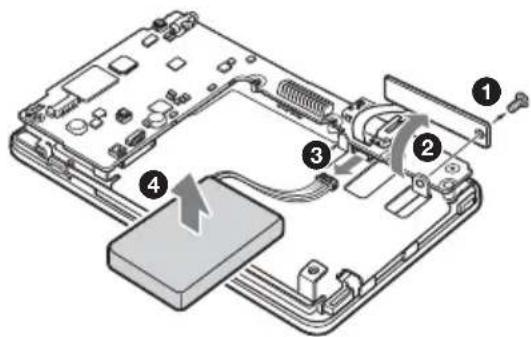
5 Insulate the connector terminal by wrapping with a tape.
Notes on the lithium-ion battery
- Keep the battery out of the reach of children.
- Do not hold the battery with metallic tweezers, otherwise a short-circuit may occur.
WARNING
Battery may explode if mistreated.
Do not recharge, disassemble, or dispose of in fire.
Specifications
Main unit
Operating temperature: 5 - 45 °C (41 - 113 °F)
Power requirements: DC 5 V (from supplied USB cable/AC adapter*)
Connection terminals:
Cradle connector
DC IN 5V jack
USB jack
Headphone out jack
Memory card slot:
Memory Stick Duo slot
Speaker: 20 × 40 mm (0.8 × 1.6 in) oval speaker
Consumption current: Max. 1.5 A
Dimensions: Approx. 145 × 87 × 20 mm
(5.7×3.4×0.8 in)
(w × h × d, protruding parts excluded)
Mass: Approx. 250 g (8.8 oz)
Monitor
System: Transmissive liquid crystal display
Drive system: a-Si TFT active matrix system
Dimensions: 4.8 in (16:9)
Approx. 106 × 60, 122 mm
(4.2 × 2.4, 4.8 in) (h × v, d)
Segment: 391,680 (816 × 480) dots
Cradle
Operating temperature: 5 - 45 °C (41 - 113 °F)
Power requirements: DC 5.2 V
(from supplied 12 V/24 V car battery adapter
(negative ground (earth)))
Connection terminals:
Unit connector
Cradle connector
DC IN 5.2V jack
TMC aerial jack (TMC models only)
Reception frequency: 87.5 - 108.0 MHz
(TMC models only)
Built-in battery charging time/usage time
Charging time
With the supplied car battery adapter/AC adapter*:
Approx. 3 hours (with unit turned on), or 1.5 hours (in standby mode)
With the supplied USB cable:
Approx. 3 hours (in standby mode)
Usage time
Up to 2.5 hours (depending on usage)
Optional accessories
Car Install Kit: XA-49FM
AC Adapter: XA-AC13
Car Battery Adapter: XA-DC3
TMC Car Cradle: NVA-CU5T
* Optional accessory
Design and specifications are subject to change without notice.

- Halogenated flame retardants are not used in the certain printed wiring boards.
- Use of rechargeable lithium ion batteries.
- Corrugated cardboard is used for the packaging cushions.
- VOC (Volatile Organic Compound)-free vegetable oil based ink is used for printing the carton.
Troubleshooting
The following checklist will help you remedy problems you may encounter with your unit.
Before going through the checklist below, check the connection and operating procedures.
The unit does not turn on.
→ Charge the built-in battery.
→ Check that the car battery adapter is securely inserted into the cigarette lighter socket.
The built-in battery cannot be charged.
→Press I/ ^① to turn on the unit, then press it again to turn off the unit.
→ If the car battery adapter is being used, disconnect it from the cigarette lighter socket, then reconnect.
→ The built-in lithium-ion battery can be charged at temperatures between 5 – 45 °C (41 – 113 °F). The battery may not be charged if the temperature inside the unit increases because of direct sunlight exposure, etc. This is not a malfunction.
→ Turn on the computer during USB charge.
GPS signal cannot be received.
Firstly, read the GPS overview (page 4), then check the GPS status by selecting “More…” in the top menu → “GPS Status.”
- The system cannot receive GPS signals due to an obstruction.
→ Move your car to a place where signals can be received clearly. - There is an obstacle in front of the GPS aerial. → Install the unit where the signal is not interrupted by the body of the car, etc.
The car position on the map does not match the current road.
The error margin of the signal from the GPS satellites is too large. A maximum error margin of a few hundred metres can exist.
Voice guidance cannot be heard.
The volume is set too low.
→ Raise the volume (page 9).
The LCD is not displayed normally.
- In high temperatures, the LCD may darken and not display clearly. In low temperatures, afterimage may occur on the LCD. These are not malfunctions, and the LCD will return to normal when the temperature returns to within the specified operating range.
- The LCD is dark. → The auto dimmer function may be activated because its sensor 4 (page 5) is covered by a hand, etc.
The cradle comes off the attachment surface.
Attachment strength weakens if the surface of the suction cup or attachment surface becomes dirty.
→ Clean the surface of the suction cup and the attachment surface with a soft, wet lint-free cloth (page 12).
The demonstration mode starts automatically even if no operation is performed.
→ Turn off the auto demonstration mode by selecting "More..." in the top menu → "Settings" → "General Settings" → "Demo Mode." Then, confirm that "Demo Mode" is set to off.
Resetting the unit
If the navigation software freezes, try resetting the unit.
Press the RESET button, then press I/⏻ to turn on the unit.
Note
After you reset the unit, it may take time to receive GPS signals when turning on the unit.
Wichtig!
10Taste OPEN/RELEASE
natural_image
Technical line drawing of a computer chassis with screw and socket components (no text or symbols)natural_image
Technical line drawing of a mechanical clamp or bracket assembly (no text or symbols)10 Touche OPEN/RELEASE
natural_image
Isometric line drawing of a computer chassis with multiple screw fasteners and mounting holes (no text or labels)natural_image
Technical line drawing of a mechanical component with circular features and a central rod (no text or symbols)(1 × h × p, parties saillantes non comprises)
10 OPEN/RELEASE-toets
2 Selecteer "Navigeren".
"Snelkoppeling 1 - 3"
natural_image
Isometric line drawing of a computer chassis with labeled components (no text or symbols)natural_image
Technical line drawing of a mechanical clamp or bracket assembly (no text or symbols)Ongeveer 106 × 60, 122 mm (h × v, d)
Segment: 391.680 (816 × 480) punten
Houder
10 Tasto OPEN/RELEASE
natural_image
Technical line drawing of a device casing with internal components and mounting screws (no text or symbols)natural_image
Technical line drawing of a mechanical assembly with no visible text or symbolsnatural_image
Technical line drawing of a computer chassis with screw and socket components (no text or symbols)natural_image
Technical line drawing of a mechanical clamp or bracket assembly (no text or symbols)10 OPEN/RELEASE-knapp
natural_image
Isometric line drawing of a computer chassis with labeled components (no text or symbols)natural_image
Technical line drawing of a mechanical clamp or bracket assembly (no text or symbols)natural_image
Technical line drawing of a device casing with internal components and mounting screws (no text or symbols)natural_image
Technical line drawing of a mechanical assembly with no visible text or symbols

- Customer Support Portal
- Caution
- On copyrights
- On trademarks
- Basic Operations 6
- Route Searching 8
- System Settings 10
- Using the Supplied Software 10
- Additional Information 11
- Warning
- On safety
- On handling
- On GPS
- Note
- On the positioning system
- Notes
- On the software
- Location of controls
- Turning the unit on/off
- To turn the unit on/off
- Performing initial setup
- Receiving GPS signals
- Basic Operations
- Menu operation
- Gesture Command operation
- Keyboard operation
- Route Searching
- Setting the destination and starting guidance
- Show the top menu.
- Select "Navigate."
- Select "Address Input," then input the address details.
- Select "Calculate Route."
- Setting the destination in other ways
- Search Nearby
- "Quick Link 1 - 3"
- "Search by Name"
- "Search by Category"
- Go Home
- Navigate
- "POI Search Nationwide"
- "POI Search Town"
- "Address Book"
- "Recent Destinations"
- Guidance displays
- Map display
- Dynamic Route Information
- Route display
- Map scrolling mode
- System Settings
- Using the Supplied Software
- Contents
- Install PC Connection Software
- Language Manager
- Read the Manual
- Support Link
- Map Manager\*
- Connecting to your computer
- Connect the unit to your computer with the USB cable.
- Notes when transferring data
- Additional Information
- About the "Memory Stick"
- What is "Memory Stick"?
- Types of “Memory Stick Duo” that the system can use
- Note on LCD panel
- Maintenance
- Cleaning
- Fuse replacement
- Notes on unit disposal
- Notes on the lithium-ion battery
- Specifications
- Main unit
- Monitor
- Cradle
- Built-in battery charging time/usage time
- Charging time
- Usage time
- Optional accessories
- Troubleshooting
- The unit does not turn on.
- The built-in battery cannot be charged.
- GPS signal cannot be received.
- The car position on the map does not match the current road.
- Voice guidance cannot be heard.
- The LCD is not displayed normally.
- The cradle comes off the attachment surface.
- The demonstration mode starts automatically even if no operation is performed.
- Resetting the unit
- Wichtig!
- Houder
Brand : SONY
Model : NV-U82
Category : Gps