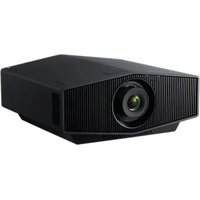
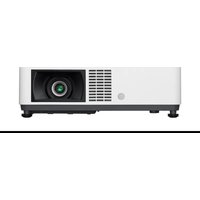
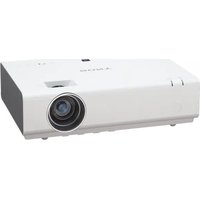
VPL-CS5 - Projector SONY - Free user manual and instructions
Find the device manual for free VPL-CS5 SONY in PDF.


| Product type | 3-panel LCD projector |
| Brand | Sony |
| Model | VPL-CS5 |
| Native resolution | SVGA (800 × 600 pixels) |
| Brightness | 1600 ANSI lumens |
| Lamp | UHP 165 W, lifespan varies with use |
| Dimensions (W × H × D) | 285 × 68 × 228 mm (without protrusions) |
| Weight | Approx. 2.7 kg |
| Power supply | 100-240 V AC, 50/60 Hz |
| Power consumption | Max. 240 W (standby: 5 W) |
| Built-in speaker | Mono, 40 × 20 mm, 1 W max |
| Video inputs | Composite (RCA), S-Video (4-pin mini-DIN), RGB/Component (HD D-sub 15-pin) |
| Audio input | 3.5 mm stereo minijack |
| USB connectivity | USB Type B (for wireless mouse function and control) |
| Keystone correction | Vertical, automatic or manual |
| Main features | Intelligent auto setup, digital zoom, freeze, eco standby, remote control with wireless mouse |
| Maintenance | Clean air filter every 300 hours; replace lamp (model LMP-C150) |
| Safety | Overheating protection, auto shutdown, abnormal temperature detection |
| Supplied accessories | Remote control, batteries, HD D-sub 15-pin cable, USB cable, CD-ROM (application software for VPL-CX5), carrying case, power cord, spare air filter, instruction manual, quick reference card, ferrite core |
| Country of manufacture | Not specified, but brand Sony (Japan) |
Frequently Asked Questions - VPL-CS5 SONY
User questions about VPL-CS5 SONY
0 question about this device. Answer the ones you know or ask your own.
Ask a new question about this device
Download the instructions for your Projector in PDF format for free! Find your manual VPL-CS5 - SONY and take your electronic device back in hand. On this page are published all the documents necessary for the use of your device. VPL-CS5 by SONY.
USER MANUAL VPL-CS5 SONY
To avoid electrical shock, do not open the cabinet. Refer servicing to qualified personnel only.
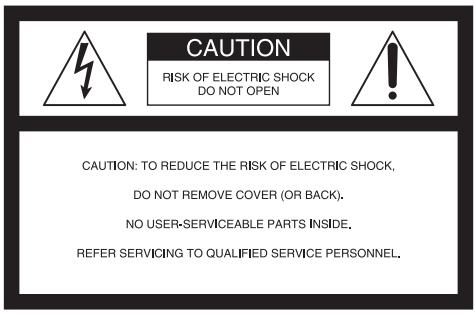
This symbol is intended to alert the user to the presence of uninsulated "dangerous voltage" within the product's enclosure that may be of sufficient magnitude to constitute a risk of electric shock to persons.

This symbol is intended to alert the user to the presence of important operating and maintenance (servicing) instructions in the literature accompanying the appliance.
For the customers in the USA
If you have any questions about this product, you may contact:
Sony Electronics Inc.
Attn: Business Information Center (BIC)
12451 Gateway Boulevard
Ft. Myers, Florida 33913
Telephone No.: 800-686-7669
The number below is for FCC related matters only.
Declaration of Conformity
Trade Name:SONY
Model No.: VPL-CS5/VPL-CX5
Responsible Party: Sony Electronics Inc.
Address: 680 Kinderkamack Road, Oradell, NJ 07649 U.S.A.
Telephone No.: 201-930-6972
This device complies with Part 15 of the FCC Rules. Operation is subject to the following two conditions: (1) This device may not cause harmful interference, and (2) this device must accept any interference received, including interference that may cause undesired operation.
This equipment has been tested and found to comply with the limits for a Class B digital device, pursuant to Part 15 of the FCC Rules. These limits are designed to provide reasonable protection against harmful interference in a residential installation.
This equipment generates, uses, and can radiate radio frequency energy and, if not installed and used in accordance with the instructions, may cause harmful interference to radio communications. However, there is no guarantee that interference will not occur in a particular installation. If this equipment does cause harmful interference to radio or television reception, which can be determined by turning the equipment off and on, the user is encouraged to try to correct the interference by one or more of the following measures:
- Reorient or relocate the receiving antenna.
- Increase the separation between the equipment and receiver.
- Connect the equipment into an outlet on a circuit different from that to which the receiver is connected.
- Consult the dealer or an experienced radio/ TV technician for help.
You are cautioned that any changes or modifications not expressly approved in this manual could void your authority to operate this equipment.
For the customers in Canada
This Class B digital apparatus complies with Canadian ICES-003.
The socket-outlet should be installed near the equipment and be easily accessible.
Table of Contents
Overview
Precautions 6
Notes on Installation 7
Unsuitable Installation 7
Unsuitable Conditions 7
Features 8
Location and Function of Controls .10
Top/Front/Left Side 10
Rear/Right Side/Bottom 10
Control Panel 12
Connector Panel 12
Remote Commander 13
Setting Up and Projecting
Installing the Projector 16
Connecting the Projector 17
Connecting with a Computer ....17
Connecting with a VCR or 15k RGB/Component Equipment 19
Selecting the Menu Language 21
Projecting 23
Effective Tools for Your Presentation 27
Adjustments and Settings Using the Menu
Using the MENU 28
The PICTURE SETTING Menu ....29
The INPUT SETTING Menu 31
The SET SETTING Menu 32
The MENU SETTING Menu 33
The INSTALL SETTING Menu .... 34
The INFORMATION Menu 35
Maintenance
Maintenance 36
Replacing the Lamp 36
Cleaning the Air Filter 37
Troubleshooting 39
Warning Messages 41
Caution Messages 42
Other
Specifications 43
Index 48
Precautions
On safety
- Check that the operating voltage of your unit is identical with the voltage of your local power supply.
- Should any liquid or solid object fall into the cabinet, unplug the unit and have it checked by qualified personnel before operating it further.
- Unplug the unit from the wall outlet if it is not to be used for several days.
- To disconnect the cord, pull it out by the plug. Never pull the cord itself.
- The wall outlet should be near the unit and easily accessible.
- The unit is not disconnected to the AC power source (mains) as long as it is connected to the wall outlet, even if the unit itself has been turned off.
- Do not look into the lens while the lamp is on.
- Do not place your hand or objects near the ventilation holes. The air coming out is hot.
- Be careful not to have your fingers caught by the adjuster. The powered tilt adjuster of this unit automatically extends when the power is turned on, and is put away automatically when the power is turned off. Do not touch the unit while the adjuster is in operation. Adjust the powered tilt adjuster carefully after its automatic operation is completed.
- Do not spread a cloth or paper under the unit.
On illumination
- To obtain the best picture, the front of the screen should not be exposed to direct lighting or sunlight.
- Ceiling-mounted spot lighting is recommended. Use a cover over fluorescent lamps to avoid lowering the contrast ratio.
- Cover any windows that face the screen with opaque draperies.
- It is desirable to install the projector in a room where floor and walls are not of
light-reflecting material. If the floor and walls are of reflecting material, it is recommended that the carpet and wall paper be changed to a dark color.
On preventing internal heat buildup
After you turn off the power with the 1 / 心 key, do not disconnect the unit from the wall outlet while the cooling fan is still running.
Caution
The projector is equipped with ventilation holes (intake) and ventilation holes (exhaust). Do not block or place anything near these holes, or internal heat build-up may occur, causing picture degradation or damage to the projector.
On cleaning
- To keep the cabinet looking new, periodically clean it with a soft cloth. Stubborn stains may be removed with a cloth lightly dampened with a mild detergent solution. Never use strong solvents, such as thinner, benzene, or abrasive cleansers, since these will damage the cabinet.
- Avoid touching the lens. To remove dust on the lens, use a soft dry cloth. Do not use a damp cloth, detergent solution, or thinner.
- Clean the filter at regular intervals.
On LCD data projector
- The LCD data projector is manufactured using high-precision technology. You may, however, see tiny black points and/or bright points (red, blue, or green) that continuously appear on the LCD data projector. This is a normal result of the manufacturing process and does not indicate a malfunction.
Notes on Installation
Unsuitable Installation
Do not install the projector in the following situations. These installations may cause malfunction or damage to the projector.
Poorly ventilated
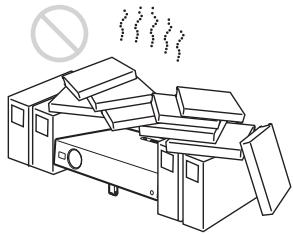
- Allow adequate air circulation to prevent internal heat build-up. Do not place the unit on surfaces (rugs, blankets, etc.) or near materials (curtains, draperies) that may block the ventilation holes. When the internal heat builds up due to the block-up, the temperature sensor will function with the message "High temp.! Lamp off in 1 min." The power will be turned off automatically after one minute.
- Leave space of more than 30~cm (11 7/8 inches) around the unit.
- Be careful that the ventilation holes may inhale tininess such as a piece of paper.
Highly heated and humid
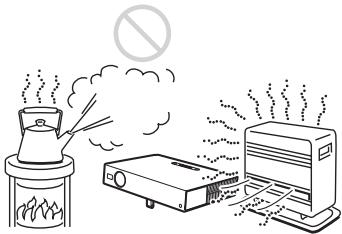
- Avoid installing the unit in a location where the temperature or humidity is very high, or temperature is very low.
- To avoid moisture condensation, do not install the unit in a location where the temperature may rise rapidly.
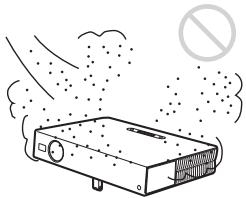
Very dusty
Avoid installing the unit in a location where there is a lot of dust; otherwise, the air filter will be obstructed. The dust blocking the air through the filter may cause raising the
internal heat of the projector. Clean it up periodically.
Unsuitable Conditions
Do not use the projector under the following conditions.
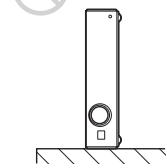
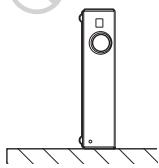
Toppling the unit
Avoid using as the unit topples over on its side. It may cause malfunction.
Tilting the unit out of the range of the adjuster setting
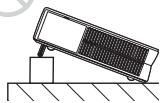
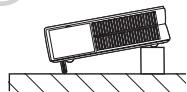
Avoid using when the unit is tilted out of the range of the adjuster setting. Such installation may cause malfunction.
Blocking the ventilation holes
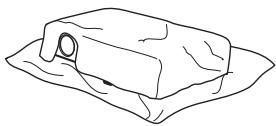
Avoid using something to cover over the ventilation holes (exhaust/intake); otherwise, the internal heat may build up.
For details on the ventilation holes (intake/ exhaust), see "Location and Function of Controls" on page 10.
Installing the unit at altitudes
Before installing the unit at altitudes higher than 1500m (4921 feet), consult qualified Sony personnel. Installation at such altitudes may affect the reliability of the projector.
Features
High operability
- Intelligent Auto-setup function
Simply press the power key, and the projector automatically performs the setups required before use. The projector opens the lens protector, corrects the V Keystone, and sets optimum conditions for projection. This function is called Intelligent Auto-setup.
For easier operations, the keys that will be used frequently are allocated on the top of the projector.
Accepts various input signals
- Scan converter loaded
- Compatible input signals
This projector has a build-in scan converter that converts the input signal within 1024 × 768 dots (VPL-CX5) or 800 × 600 dots (VPL-CS5).
This projector accepts video signals of composite, S video, and component as well as VGA, SVGA, XGA, SXGA^1) and SXGA + ^1) signals, which all can be displayed.
- Compatible with six color systems NTSC, PAL, SECAM, NTSC ^4.43 , PAL-M, or PAL-N color system can be selected automatically or manually.
Easy presentation
- Simple setup with external equipment
This projector is preset for 38 kinds ^3) (VPL-CX5) of input signals. You can project images from an external signal source just by connecting the equipment with the supplied cable. You can use the supplied Remote Commander as the wireless mouse by connecting the projector to the computer with the USB cable. You can also control the projector by using the application software (Projector Station) ^4) supplied with the projector from a computer operated with Windows 98, Windows 98 SE, Windows ME, Windows 2000 or Windows XP.
Easy-to-use Remote Commander
The Remote Commander is equipped with various convenient keys, including the D ZOOM key for zooming in on the image, the FREEZE key for keeping the image projected even if the equipment is disconnected, and the MUTING PIC key for muting the picture temporarily.
Memory Stick slot (VPL-CX5 only)
By inserting a Memory Stick into the built-in Memory Stick slot, you can make the presentation easily without connecting the computer.
High brightness, high picture quality
High brightness
Adopting Sony's unique new, high-efficiency optical system allows the 165 W UHP lamp a light output of 2000 ANSI lumen (VPL-CX5) or 1800 ANSI lumen (VPL-CS5).
1) The SXGA and SXGA+ signals are available for the VPL-CX5 only.
2) NTSC4.43 is the color system used when playing back a video recorded on NTSC on a NTSC4.43 system VCR.
3) The VPL-CS5 is preset for 25 kinds of input signals.
4) The application software (Projector Station) can be used with the VPL-CX5 only.
High resolution
For VPL-CX5: Three superhigh-aperture 0.7-inch XGA panels with approximately 790,000 pixels, and with micro-lens array, provide a resolution of 1024 × 768 dots (horizontal/vertical) for RGB input, and 750 horizontal TV lines for video input.
For VPL-CS5: Three superhigh-aperture 0.7-inch SVGA panels with approximately 480,000 pixels provide a resolution of 800 × 600 dots (horizontal/vertical) for RGB input, and 600 horizontal TV lines for video input.
Quiet operation
Because the projector uses Sony's unique cooling mechanism, it operates more quietly.
High portability
- Light weight/small size/simple design
This projector has been miniaturized to approx. 2.7kg (5 lb 15 oz) in weight and B5-file size.
Its simple yet sophisticated design fits comfortably in your office. - Windows is a registered trademark of Microsoft Corporation in the United States and/or other countries.
- IBM PC/AT, VGA, SVGA, XGA and SXGA are registered trademarks of the International Business Machines Corporation, U.S.A.
- Kensington is a registered trademark of Kensington Technology Group.
- Macintosh is a registered trademark of Apple Computer, Inc.
- VESA is a registered trademark of Video Electronics Standard Association.
- Display Data Channel is a trademark of Video Electronics Standard Association.
- Memory Stick and , are trademarks of Sony Corporation.
Location and Function of Controls
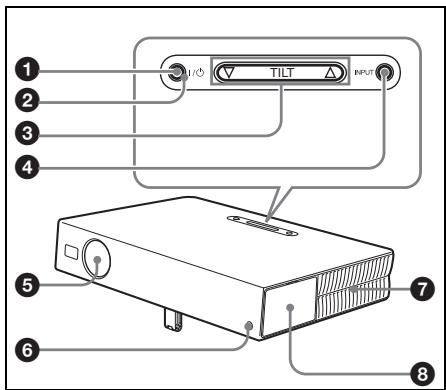
Top/Right/Left Side
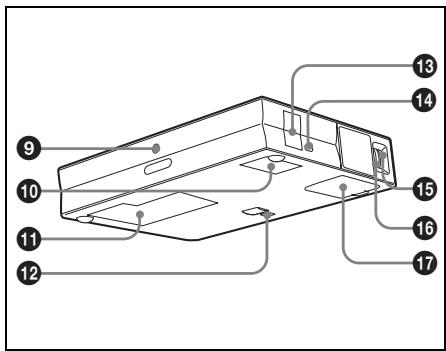
Rear/Right Side/Bottom
1 I/ (on/standby) key
Turns on and off the projector when the projector is in standby mode. The ON/STANDBY indicator around the I / 心 key lights in green when the power is turned on.
When turning off the power, press the 1 / 1 key twice following the message on the screen, or press and hold the key for about two seconds.
For details on steps for turning off the power, see "To turn off the power" on page 26.
ON/STANDBY indicator (located around the I / key)
Lights up or flashes under the following conditions:
- Lights in red when a AC power cord is plugged into a wall outlet. Once in standby mode, you can turn on the projector with the I / (1) key.
- Lights in green when the power is turned on.
- Flashes in green while the cooling fan runs after the power is turned off with the 1 / 0 key. The fan runs for about 90 seconds after the power is turned off.
The ON/STANDBY indicator flashes quickly for the first 60 seconds.
During this time, you cannot light up the ON/STANDBY indicator with the 1/ 出 key.
For details on the LAMP/COVER and the TEMP/FAN indicators, see on page 41.
3 TILT adjustment key
For details, see "How to use the powered tilt adjuster" on page 11.
4 INPUT key
Selects the input signal. Each time you press the key, the input signal switches as follows:

Lens protector (lens cover)
The lens protector automatically opens when the power is turned on.
Front remote control detector
7 Ventilation holes (exhaust)
Connector/Control panel
For details, see "Connector Panel" and "Control Panel" on page 12.
Rear remote control detector
10 Ventilation holes (intake)
Lamp cover
12 Powered tilt adjuster
Speaker
Security lock
Connects to an optional security cable (Kensington's).
Web page address:
http://www.kensington.com/
Focus ring
Adjusts the picture focus.
Zoom ring
Adjusts the picture size.
Ventilation holes (intake)/air filter cover
Notes
- Do not place anything near the ventilation holes as it may cause internal heat build-up.
- Do not place your hand or objects near the ventilation holes as it may cause the air coming out heat buildup.
- To maintain optimal performance, clean the air filter every 300 hours.
For details, see "Cleaning the Air Filter" on page 37.
How to use the powered tilt adjuster
To adjust the height
Adjust the height of the projector as follows:
1 Press the I/ key
The lens protector opens, and the powered tilt adjuster rises automatically. The adjuster stops at its previously adjusted position.
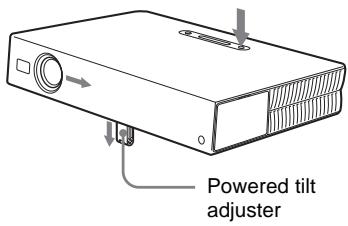
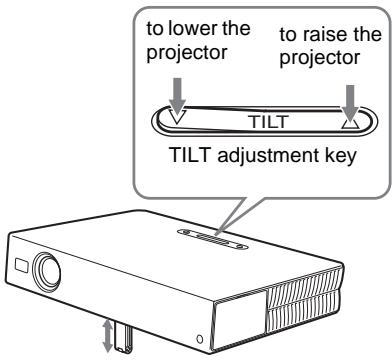
2 Press or of the TILT key to adjust the tilt of the projector.
You may press the KEYSTONE key on the Remote Commander to display the Tilt menu and adjust the tilt using the / / / keys.
Notes
- Be careful not to let the projector down on your fingers.
- Do not push hard on the top of the projector with the powered tilt adjuster out. It may be occurred malfunction.
Control Panel
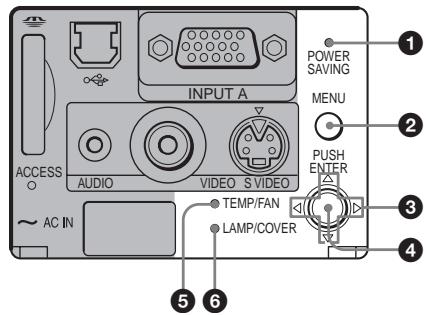
POWER SAVING indicator
Lights up when the projector is in power saving mode. When "Power Saving" in the SET SETTING menu is set to "ON," the projector goes into power saving mode if no signal is input for 10 minutes. Although the lamp goes out, the cooling fan keeps running. The power saving mode is canceled when a signal is input or any key is pressed. In power saving mode, any key does not function for the first 60 seconds after the lamp goes out.
2 MENU key
Displays the on-screen menu. Press again to clear the menu.
3 Arrow keys ( / / /)
Select the menu or to make various adjustments.
ENTER key
Enters the settings of items in the menu system.
TEMP (Temperature)/FAN indicator
Lights up or flashes under the following conditions:
- Lights up when temperature inside the projector becomes unusually high.
- Fashes when the fan is broken.
For details, see page 41.
LAMP/COVER indicator
Lights up or flashes under the following conditions:
- Lights up when the lamp has reached the end of its life or becomes a high temperature.
- Flashes when the lamp cover or air filter cover is not secured firmly.
For details, see page 41.
Connector Panel
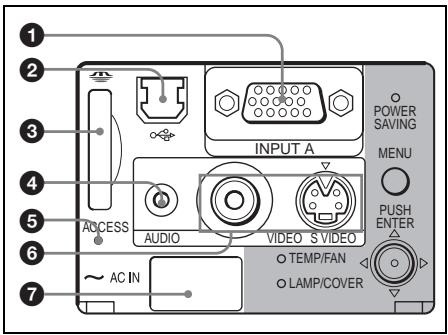
INPUT A connector (HD D-sub 15-pin, female)
Connect to external equipment such as a computer.
Connects to the monitor output on a computer using the supplied cable.
When inputting a component or 15k RGB signal, use an optional cable.
For details, see "To connect a 15k RGB/ Component equipment" on page 20.
USB connector (USB plug for upstream, 4-pin)
Connect to the USB connector on a computer. When you connect the projector to the computer, you can
control the mouse function with the supplied Remote Commander. The supplied application software (VPLCX5 only) can be installed in the computer attached to this connector.
Memory Stick slot (VPL-CX5 only)
The Memory Stick can be inserted. Never insert an object other than the Memory Stick.
For details, see the attached "Operating Instructions" for Memory Stick
4 AUDIO (stereo minijack) connector
When listening to sound output from the computer, connect to the audio output of the computer.
When listening to sound output from the VCR, connect to the audio output of the VCR.
Access lamp
Lights during having access to the Memory Stick.
Do not remove the Memory Stick while the access lamp is lit.
Video input connector
Connect to external video equipment such as a VCR.
- VIDEO (phono type): Connects to the composite video output of video equipment.
- SVIDEO (mini DIN 4-pin): Connects to the S video output (Y/C video output) of video equipment.
AC IN socket
Connects the supplied AC power cord.
Remote Commander
The keys that have the same names as those on the control panel function identically.

1 I/ (on/standby) key
2 APA (Auto Pixel Alignment) key
Adjusts a picture clearest automatically while a signal is input from a computer. Used when "Smart APA" in the SET SETTING menu is set to "Off." Normally set to "On."
Notes
-
Press the APA key when the full image is displayed on the screen. If there are black edges around the image, the APA function will not function properly and the image may extend beyond the screen.
-
You can cancel the adjustment by pressing the APA key again while "Adjusting" appears on the screen.
- The picture may not be adjusted properly depending on the kinds of input signals.
- Adjust the items "Dot Phase," "H Size" and "Shift" in the INPUT SETTING menu when you adjust the picture manually.
PIC MUTING key
Used to mute the picture temporarily.
Press again to restore the picture.
ENTER key
Keys emulate a mouse
Functions like a mouse of a computer connected via USB with the projector.
a) L Click key (Rear): Functions as the left button on a mouse.
b)Joystick
c) R Click key: Functions as the right button on a mouse.
Note
These keys function as mouse buttons of a computer only when the projector is connected to the computer using the USB cable.
For details, see "To control the computer using the supplied Remote Commander" on page 25.
FUNCTION 1, 2 keys (VPL-CX5 only)
When you connect the projector with a computer, you can open a file on the screen by just pressing the FUNCTION key. This will enhance your presentation. To use this function, allocate a file to the FUNCTION key by using the supplied application software.
For details, see the README file and the HELP file supplied with the application software.
Note
Connect a computer to the projector using the USB cable to activate the FUNCTION keys.
For details, see "To connect an IBM PC/AT compatible computer" on page 18".
7 RESET key
Reset the value of an item back to its factory preset value or returns the enlarged image back to its original size. This key functions when the menu or a setting item is displayed on the screen.
D ZOOM (Digital Zoom) +/- key
Enlarges the image at a desired location on the screen.
+: Pressing the + key once displays the icon. This icon indicates the point you want to enlarge. Use an arrow key (///) to move the icon to the point to be enlarged. Press the + key repeatedly until the image is enlarged to your requirements.
- Pressing the -key reduces an image that has been enlarged with the D ZOOM + key.
Arrow keys (///)
10 MENU key
1 KEYSTONE key
Used to adjust the tilt of the projector, or the trapezoidal distortion of the image manually. Each time you press this key, the Tilt menu and the V Keystone menu is displayed alternately. Use the arrow keys (///) for the adjustment.
12 INPUT key
13 FREEZE key
Used to freeze the picture projected. To cancel the frozen picture, press the key again.
MS SLIDE key (VPL-CX5 only)
Used to execute the slide show. When the input signal is other than MS, it switches to MS. To begin the slide show, press the key again.
15 Infrared transmitter
To install batteries
1 Push and slide to open the lid, then install the two size AA (R6) batteries (supplied) with the correct polarity.
While pressing the lid, slide it.
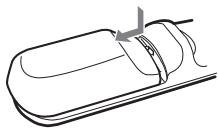
Be sure to install the battery from the side.
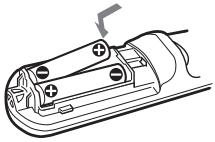
2 Replace the lid.
Notes on batteries
- Make sure that the battery orientation is correct when inserting batteries.
- Do not mix an old battery with a new one or different types of batteries.
- If you do not use the Remote Commander for a long time, remove the batteries to avoid damage from battery leakage. If batteries have leaked, remove them, wipe and dry the battery compartment, and replace the batteries with new ones.
Notes on Remote Commander operation
- Make sure that nothing obstructs the infrared beam between the Remote Commander and the remote control detector on the projector. Direct the Remote Commander toward the front or rear remote control detector.
- The operation range is limited. The shorter the distance between the Remote Commander and the projector is, the wider the angle within which the commander can control the projector becomes.
Installing the Projector
This section describes how to install the projector.
The distance between the lens and the screen varies depending on the size of the screen. Use the following table as a guide.
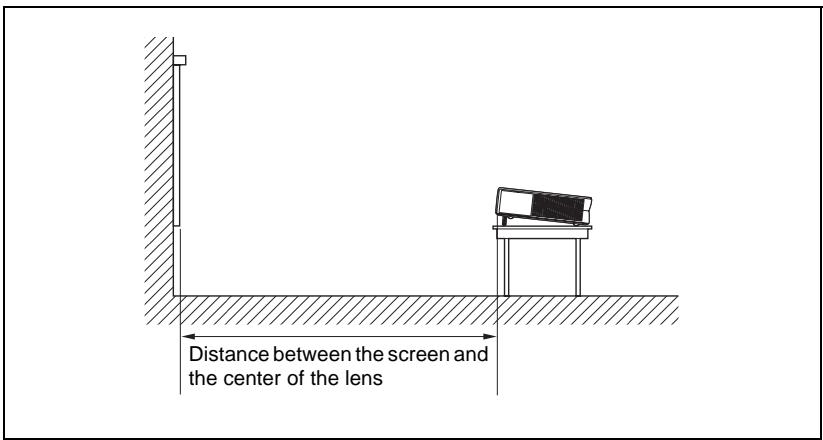
Unit: m (feet)
| Screen size (inches) | 40 | 60 | 80 | 100 | 120 | 150 |
| Minimum Distance | 1.5(4.9) | 2.3(7.5) | 3.1(10.2) | 3.9(12.8) | 4.7(15.4) | 5.9(19.4) |
| Maximum Distance | 1.9(6.2) | 2.9(9.5) | 3.8(12.5) | 4.8(15.7) | 5.7(18.7) | 7.2(23.6) |
There may be a slight difference between the actual value and the design value shown in the table above.
Connecting the Projector
When you connect the projector, make sure to:
- Turn off all equipment before making any connections.
- Use the proper cables for each connection.
- Insert the cable plugs firmly; loose connections may increase noise and reduce performance of picture signals. When pulling out a cable, be sure to pull it out from the plug, not the cable itself
To connect the projector, refer to the illustrations on the next and the following pages.
Connecting with a Computer
This section describes how to connect the projector to a computer. For more information, refer to the computer's instruction manual.
Notes
- The projector accepts VGA, SVGA, XGA, SXGA (VPL-CX5 only) and SXGA+ (VPL-CX5 only) signals. However, we recommend that you set the output mode of your computer to XGA mode (VPL-CX5) or SVGA mode (VPL-CS5) for the external monitor.
- If you set your computer, such as a notebook type, to output the signal to both your computer's display and the external monitor, the picture of the external monitor may not appear properly. Set your computer to output the signal to only the external monitor.
For details, refer to the computer's operating instructions supplied with your computer.
- This projector is compatible with a DDC2B (Digital Data Channel 2B). If your computer is compatible with a DDC, turn the projector on according to the following procedures.
1 Connect the projector to the computer by using the supplied HD D-sub 15 pin cable.
2 Turn the projector on.
3 Start the computer.
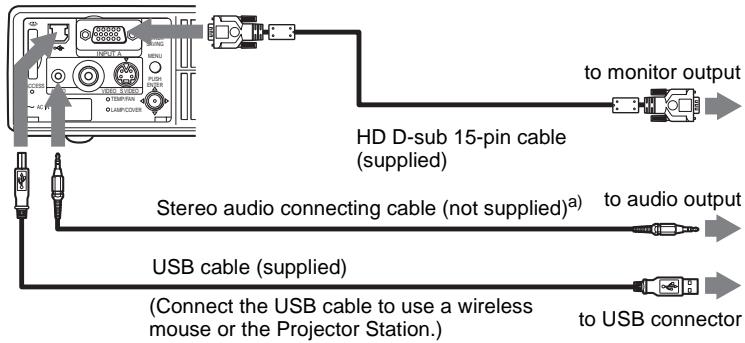
Left side
Computer

a) Use a no-resistance cable.
On the USB function
When connecting the projector to a computer by using the USB cable for the first time, the computer recognizes the following devices automatically.
1 USB hub (general use) (VPL-CX5 only)
2 USB human interface device (wireless mouse function)
3 USB human interface device (projector control function) (VPL-CX5 only)
Recommended operating environment
When you use the USB function, connect the USB cable as illustrated above. This application software and the USB function can be used on a computer loaded with Windows 98, Windows 98 SE, Windows ME, Windows 2000 or Windows XP preinstall models.
Notes
- Your computer may not start correctly when connected to the projector via the USB cable. In this case, disconnect the USB cable, restart the computer, then connect the computer to the projector using the USB cable.
- This projector is not guaranteed for suspend, standby mode. When you use the projector in suspend, standby mode, disconnect the projector from the USB port on the computer.
- Operations are not guaranteed for all the recommended computer environments.
To connect a Macintosh computer
To connect a Macintosh computer equipped with video output connector of a type having two rows of pins, use a commercially available plug adaptor. When you connect a USB capable Macintosh computer using the USB cable to the projector, wireless mouse functions become available.
Note
The supplied software does not run on Macintosh computer.
Connecting with a VCR or 15k RGB/Component Equipment
This section describes how to connect the projector to a VCR and 15k RGB/ component equipment.
For more information, refer to the instruction manuals of the equipment you are connecting.
To connect a VCR
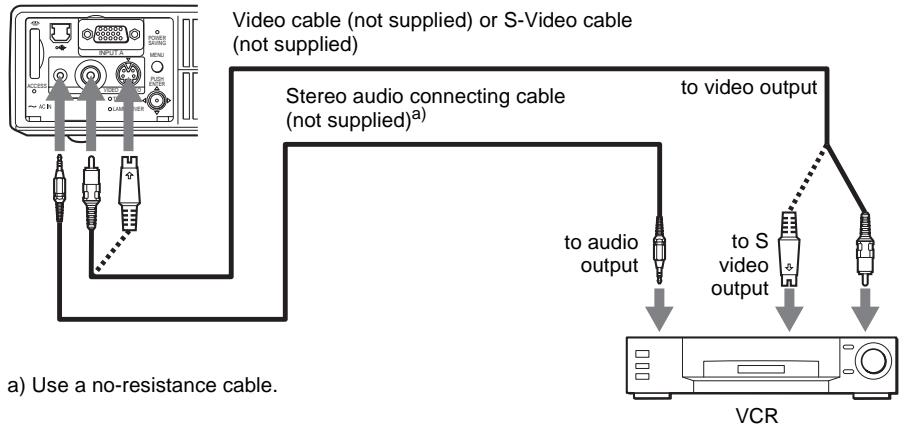
Left side
To connect a 15k RGB/Component equipment
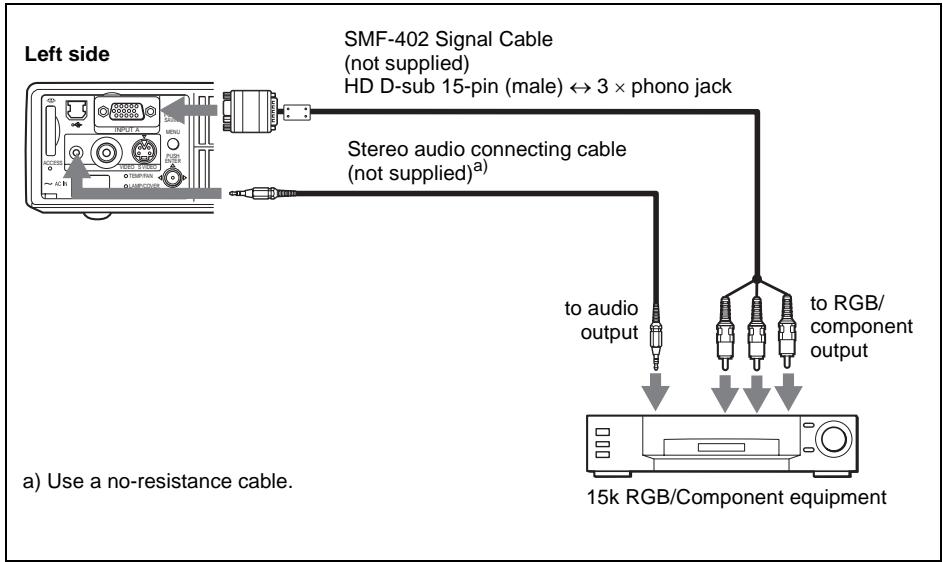
Notes
- Set the aspect ratio using "Wide Mode" in the INPUT SETTING menu according to the input signal.
- When you connect the unit to 15k RGB or component video equipment, select video GBR or component with the "Input-A Signal Sel." setting in the SET SETTING menu.
- Use the composite sync signal when you input the external sync signal from 15k RGB/component equipment.
Selecting the Menu Language
You can select one of nine languages for displaying the menu and other on-screen displays. The factory setting is English.
To change the menu language, proceed as follows:
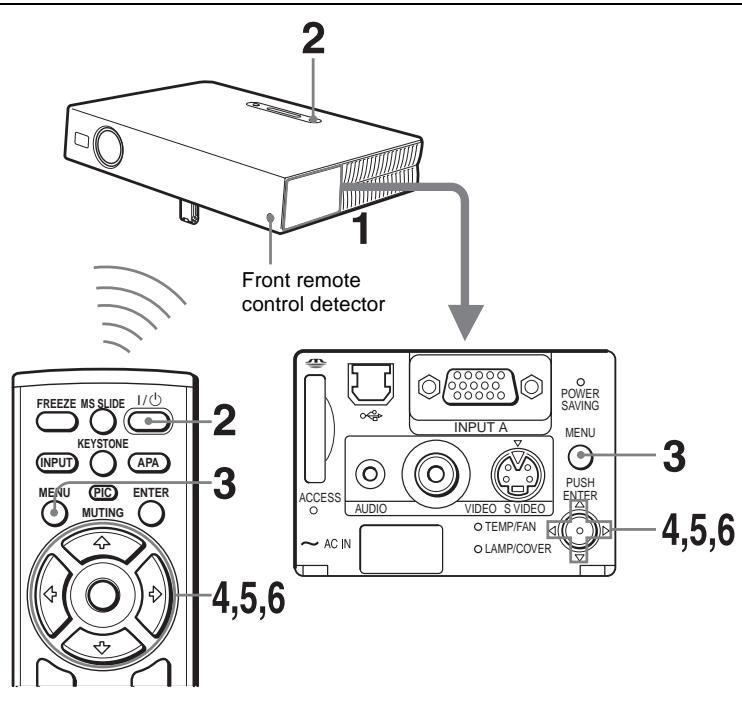
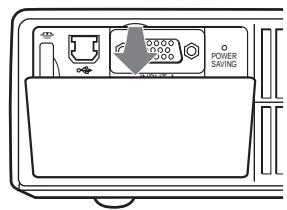
1 Open the connector panel, then plug the AC power cord into a wall outlet.
2 Press the I / O key to turn on the projector.
3 Press the MENU key.
The menu appears.
The menu presently selected is shown as a yellow button.
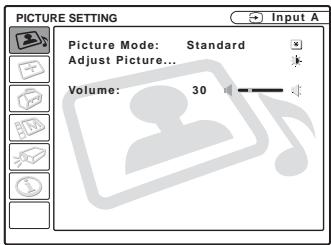
4 Press the or key to select the MENU SETTING menu, then press the or ENTER key.
The selected menu appears.
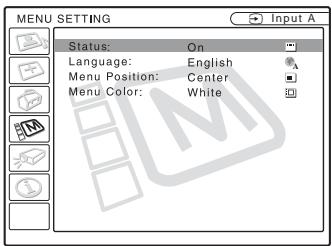
5 Press the or key to select "Language," then press the or ENTER key.
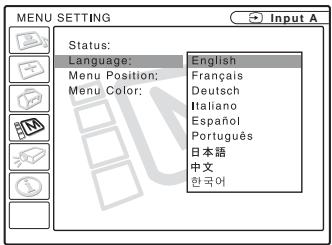
6 Press the or key to select a language, then press the or ENTER key.
The menu changes to the selected language.
To clear the menu
Press the MENU key.
The menu disappears automatically if a key is not pressed for one minute.
Projecting
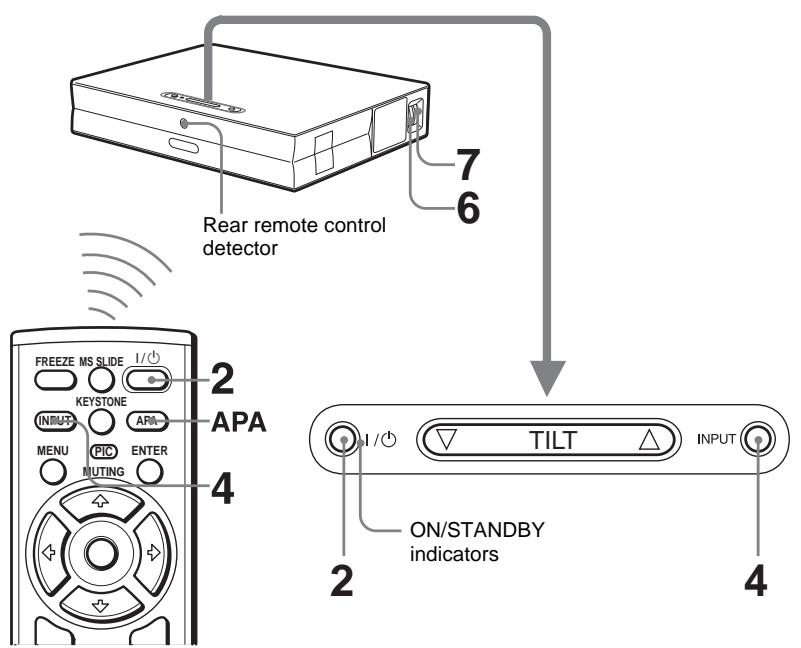
1 Open the connector panel, plug the AC power cord into a wall outlet, then connect all equipment.
The ON/STANDBY indicator lights in red and the projector goes into standby mode.
2 Press the I/ 心 key.
The ON/STANDBY indicator lights in green and the Intelligent Auto-setup starts. The lens protector opens, and the powered tilt adjuster rises and stops at the previously adjusted position.
3 Turn on the equipment connected to the projector.
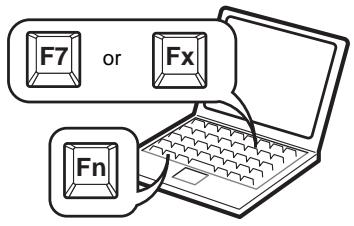
Depending on the type of your computer, for example a notebook, or an all-in-one LCD type, you may have to switch the computer to output to the projector by pressing certain keys (e.g., LCD/ VGA, /, etc.), or by changing your computer's settings.
4 Press the INPUT key to select the input source.
| To input from | Press INPUT to display |
| Computer connected to the INPUT A connector | INPUT A |
| Memory Stick inserted to the Memory Stick slot | MS |
| Video equipment connected to the VIDEO input connector | VIDEO |
| Video equipment connected to the S VIDEO input connector | SVIDEO |
Smart APA (Auto Pixel Alignment) adjusts the picture of the connected equipment so that it is projected clearly.
Notes
- If "Auto Input Search" is set to "On," the projector searches for the signals from the connected equipment and displays the input channel where the input signals are found.
For details, see "Auto Input Search" in the SET SETTING menu on page 32. - The Smart APA is effective for the input signal from a computer only.
5 Adjust the position of the picture by pressing the TILT key.
To adjust the position of the picture using the Remote Commander, press the KEYSTONE key on the Remote Commander to display the Tilt menu and adjust the tilt using the / / keys.
For details on the TILT adjustment key, see "How to use the powered tilt adjuster" on page 11.
Note
When you adjust the powered tilt adjuster with the TILT key, the automatic keystone adjustment is performed at the same time. If you do not want to perform the automatic keystone adjustment, set the V Keystone menu to "Manual." (See page 34.)
6 Turn the zoom ring to adjust the size of the picture.
7 Turn the focus ring to adjust the focus.
Note
The auto keystone adjustment may not correct the trapezoidal distortion perfectly, depending on the room temperature or the screen angle. In this case, adjust it manually. Press the KEYSTONE key on the Remote Commander until "V Keystone" appears on the screen, and adjust the value with the / / / key. The corrected value is effective until the power turn off.
Attention
Looking into the lens when projecting may cause injury to your eyes.
To switch from the Intelligent Auto-setup function to manual adjustments
You can switch the following functions of the Intelligent Auto-setup to manual adjustments using the menu.
- V Keystone correction (correction of trapezoidal distortion) Set "V Keystone" in the INSTALL SETTING menu to "Manual."
- Smart APA (Auto Pixel Alignment) Set "Smart APA" in the SET SETTING menu to "Off."
- Auto Input Search Set "Auto Input Search" in the SET SETTING menu to "Off."
For details on the menu operations, see "Using the MENU" on page 28.
To adjust the volume
The volume can be adjusted in the on-screen menu. See "Volume" in the PICTURE SETTING menu on page 29.
To mute the picture temporarily
Press the PIC MUTING key on the Remote Commander. Press it again to restore the picture.
To control the computer using the supplied Remote Commander
When you connect an IBM PC/AT compatible computer to the projector by using the USB cable, you can control the mouse of the computer using the Remote Commander.
The R/L CLICK keys and joystick function as follows.
| Key and joystick | Function |
| R CLICK (front) | Right button |
| L CLICK (rear) | Left button |
| Joystick | Corresponds with the movements of the mouse |
For details on USB connection, see "To connect an IBM PC/AT compatible computer" on page 18.
Note
Make sure that nothing obstructs the infrared beam between the Remote Commander and the remote control detector on the projector.
To turn off the power
1 Press the I/ 心 key.
"POWER OFF? Please press I / key again." appears to confirm that you want to turn off the power.
Note
A message disappears if you press any key except the 1 / 0 key, or if you do not press any key for five seconds.
2 Press the 1 / 心 key again.
The powered tilt adjuster is put away in the projector and the lens protector closes. The ON/STANDBY indicator flashes in green and the fan continues to run for about 90 seconds to reduce the internal heat. Also, the ON/STANDBY indicator flashes quickly for the first 60 seconds. During this time, you will not be able to light up again the ON/STANDBY indicator with the I / 心 key.
3 Unplug the AC power cord from the wall outlet after the fan stops running and the ON/STANDBY indicator lights in red.
When you cannot confirm the on-screen message
When you cannot confirm the on-screen message in a certain condition, you can turn off the power by holding the I/ key for about two seconds.
Note
Do not unplug the AC power cord while the fan is still running; otherwise, the fan will stop even though the internal heat is still high, which could result in a breakdown of the projector.
On air filter
To maintain optimal performance, clean the air filter every 300 hours.
For details, see "Cleaning the Air Filter" on page 37.
Effective Tools for Your Presentation
To enlarge the image (Digital Zoom function)
You can select a point in the image to enlarge. This function works when a signal from a computer is input, or when a still picture (except a movie picture) stored in a Memory Stick is projected (VPL-CX5 only). This function does not work when a video signal is input.
1 Press the D ZOOM + key on the Remote Commander. The digital zoom icon appears in the center of the image.
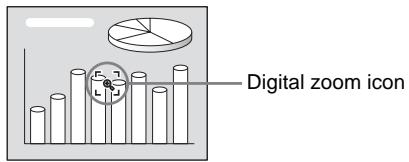
2 Move the icon to the point on the image you want to enlarge. Use the arrow key (/// ) to move the icon.
3 Press the D ZOOM + key again. The image where the icon is located is enlarged. The enlargement ratio is displayed on the screen for a few seconds. By pressing the + key repeatedly, the image size increases (ratio of enlargement: max. 4 times.)
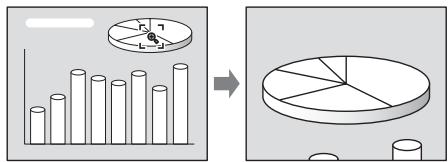
Use the arrow key (//) to scroll the enlarged image.
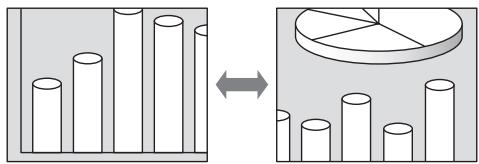
To return the image back to its original size
Press the D ZOOM - key.
Just pressing the RESET key returns the image back to its original size immediately.
To freeze the image projected (Freeze function)
Press the FREEZE key. "Freeze" appears when the key is pressed. This function works when a signal from a computer is input or when a still picture stored in a Memory Stick is projected (VPL-CX5 only).
To restore the original screen, press the FREEZE key again.
Using the MENU
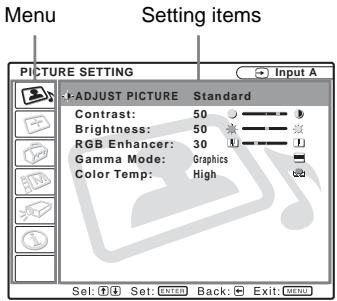
The projector is equipped with an on-screen menu for making various adjustments and settings. The setting items are displayed in a pop-up menu or in a sub menu. If you select an item name followed by dots (...), a sub menu with setting items appear. You can change the tone of the menu display and the menu language displayed in the on-screen menu.
To change the menu language, see "Selecting the Menu Language" on page 21.
Display items
Input signal indicator
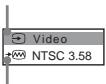
Input signal setting indicator
Picture adjustment menu

Input signal indicator
Shows the selected input channel. x is displayed when no signal is input. You can hide this indicator using "Status" in the MENU SETTING menu.
Input signal setting indicator
For Input A: Shows "Computer,"
"Component" or "Video GBR."
For Video/S Video input: Shows "Auto" or
the "Color System" setting in the SET
SETTING menu.
1 Press the MENU key.
The menu appears.
The menu presently selected is shown as a yellow button.
2 Use the or key to select a menu, then press the or ENTER key.
The selected menu appears.
3 Select an item.
Use the or key to select the item, then press the or ENTER key.
The setting items are displayed in a pop-up menu or in a sub menu.
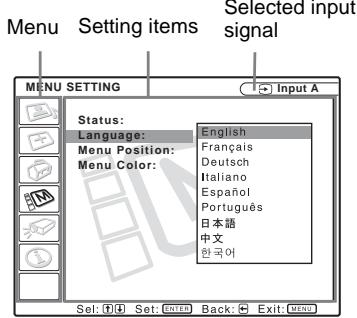
Pop-up menu
Sub menu
4 Make the setting or adjustment on an item.
- When changing the adjustment level: To increase the number, press the or key.
To decrease the number, press the or key.
Press the ENTER key to restore the previous screen.
- When changing the setting: Press the or key to change the setting.
Press the ENTER or key to restore the previous screen.
To clear the menu
Press the MENU key.
The menu disappears automatically if a key is not pressed for one minute.
To reset items that have been adjusted
Press the RESET key on the Remote Commander.
"Complete!" appears on the screen and the settings appearing on the screen are reset to their factory preset values.
Items that can be reset are:
- "Contrast," "Brightness," "Color," "Hue," "Sharpness" and "RGB Enhancer" in the Adjust Picture... menu.
- "Dot Phase," "H Size," and "Shift" in the Adjust Signal... menu
About the memory of the settings
The settings are automatically stored in the projector memory.
If no signal is input
If there is no input signal, "Cannot adjust this item." appears on the screen.
About the menu display
You can set the display position of the menu, intensity of the background picture and tone of the menu items as you like.
For details, see "The MENU SETTING Menu" on page 33.
The PICTURE SETTING Menu
The PICTURE SETTING menu is used for adjusting the picture or volume.
Items that cannot be adjusted depending on the input signal are not displayed in the menu.
For details on the unadjustable items, see page 45.
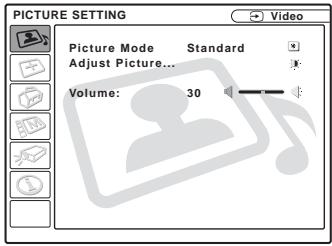
When the video signal is input
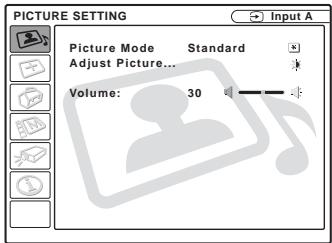
When the RGB signal is input
Menu Items
Picture Mode
Selects the picture mode.
Dynamic: Emphasizes the contrast to produce a "dynamic" picture.
Standard: Normally select this setting. If the picture has roughness with the "Dynamic" setting, this setting reduces the roughness.
Volume
Adjusts the volume.
Adjust Picture... Menu Items
The unit can store the setting values of the following sub menu items for each "Dynamic" or "Standard" picture mode separately.
Contrast
Adjusts the picture contrast. The higher the setting, the greater the contrast between a dark portion and a bright portion of the picture. The lower the setting, the lower the contrast.
Brightness
Adjusts the picture brightness. The higher the setting, the brighter the picture. The lower the setting, the darker the picture.
Color
Adjusts color intensity. The higher the setting, the greater the intensity. The lower the setting, the lower the intensity.
Hue
Adjusts color tones. The higher the setting, the picture becomes greenish. The lower the setting, the picture becomes purplish.
Sharpness
Selects the picture sharpness from among "High," "Middle" and "Low." The "High" setting makes the picture sharp; the "Low" setting makes it soft.
RGB Enhancer
Adjusts the picture sharpness when RGB signals are input.
The higher the setting, the sharper the picture. The lower the setting, the softer the picture.
Gamma Mode
Selects a gamma correction curve.
Graphics: Improves the reproduction of halftones. Photos can be reproduced in natural tones.
Text: Contrasts black and white. Suitable for images that contain lots of text.
Color Temp.
Adjusts the color temperature.
High: Makes the white color bluish.
Low: Makes the white color reddish.
The INPUT SETTING Menu
The INPUT SETTING menu is used to adjust the input signal.
Items that cannot be adjusted depending on the input signal are not displayed in the menu.
For details on the unadjustable items, see page 45.
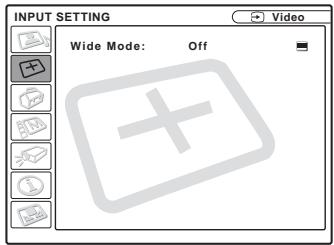
When the video signal is input
When the RGB signal is input
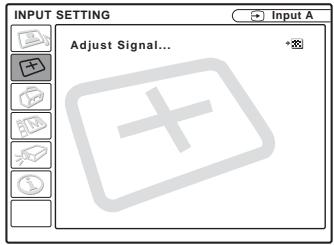
MENU Items
"Dot Phase," "H Size" and "Shift" are displayed in a sub menu under "Adjust Signal...
Dot Phase
Adjusts the dot phase of the LCD panel and the signal output from a computer.
Adjust the picture further for finer picture after the picture is adjusted by pressing the APA key.
Adjust the picture to where it looks clearest.
H Size
Adjusts the horizontal size of picture output from a connector. The higher the setting, the larger the horizontal size of the picture. The lower the setting, the smaller the horizontal size of the picture. Adjust the setting according to the dots of the input signal.
For details on the suitable value for the preset signals, see page 46.
Shift
Adjusts the position of the picture. H adjusts the horizontal position of the picture.V adjusts the vertical position of the picture. As the setting for H increases, the picture moves to the right, and as the setting decreases, the picture moves to the left. As the setting for V increases, the picture moves up, and as the setting decreases, the picture moves down. Use the or the key to adjust the horizontal position and the and key for the vertical position.
Wide Mode
Sets the aspect ratio of the picture. When inputting 16:9 (squeezed) signal from equipment such as a DVD player, set to On.
Off: When the picture with ratio 4:3 is input.
On: When the picture with ratio 16:9 (squeezed) is input.
Scan Converter
Converts the signal to display the picture according to the screen size.
On: Displays the picture according to the screen size. The picture will lose some clarity.
Off: Displays the picture while matching one pixel of input picture element to that of the LCD. The picture will be clear but the picture size will be smaller.
Notes
- When XGA, SXGA or SXGA+ signal is input, this item will not be displayed (VPL-CX5).
- When SVGA or XGA signal is input, this item will not be displayed (VPL-CS5).
About the Preset Memory No.
This projector has 38 types of preset data for input signals (the preset memory). When a preset signal is input, the projector automatically detects the signal type and recalls the data for the signal from the preset memory to adjust it to an optimum picture. The memory number and signal type of that signal are displayed in the INFORMATION menu (See page 35). You can also adjust the preset data through the INPUT SETTING menu.
This projector has 20 types of user memories for INPUT-A into which you can save the setting of the adjusted data for an unpreset input signal.
When an unpreset signal is input for the first time, a memory number is displayed as 0. When you adjust the data of the signal in the INPUT SETTING menu, it will be registered to the projector. If more than 20 user memories are registered, the newest memory always overwrites the oldest one.
See the chart on page 46 to find if the signal is registered to the preset memory.
Since the data is recalled from the preset memory about the following signals, you can use these preset data by adjusting "H Size." Make fine adjustment by adjusting "Shift."
| Signal | Memory No. | SIZE |
| Super Mac-2 | 23 | 1312 |
| SGI-1 | 23 | 1320 |
| Macintosh 19" | 25 | 1328 |
| The following are for the VPL-CX5 only. | ||
| Macintosh 21" | 27 | 1456 |
| Sony News | 36 | 1708 |
| PC-9821 1280 × 1024 | 36 | 1600 |
| WS Sunmicro | 37 | 1664 |
Note
When the aspect ratio of input signal is other than 4:3, a part of the screen is displayed in black.
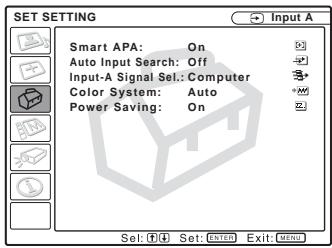
The SET SETTING Menu
The SET SETTING menu is used for changing the settings of the projector.
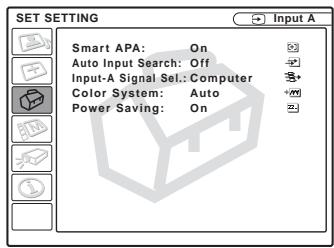
Menu Items
Smart APA
Activates or deactivates the Smart APA 1).
On: Normally select this setting. When a signal is input from a computer, the APA functions automatically so that the picture can be seen clearly. Once the specified input signal has been adjusted by the Smart APA, it will not be readjusted even when the cable is disconnected and connected again or the input channel is changed. You can adjust the picture by pressing APA key on the Remote Commander even if the Smart APA set to "On."
Off: The APA functions when you press the APA key on the Remote Commander.
1) The APA (Auto Pixel Alignment) automatically adjusts "Dot Phase," "H Size" and "Shift" in the INPUT SETTING menu for the input signal from a computer.
Auto Input Search
Normally set to "Off."
When set to "On," the projector detects input signals in the following order: Input-A/MS(VPL-CX5 only)/Video/S-Video. It
indicates the input channel when the power is turned on or the INPUT key is pressed.
Input-A Signal Sel.
Selects the computer, component or video GBR signal input from the INPUT A connector.
Note
If the setting is not correct, the color of the picture becomes strange or "Please check INPUT-A setting." appears on the screen and the picture is not displayed.
Color System
Selects the color system of the input signal. If you select "Auto," the projector detects the color system of the input signal automatically. If the picture is distorted or colorless, select the color system according to the input signal.
Power Saving
When set to "On," the projector goes into power saving mode if you do not operate the unit for 10 minutes with no signal input.
The MENU SETTING Menu
The MENU SETTING menu is used for changing the settings of the projector.
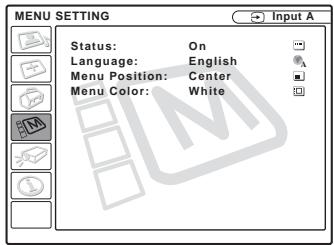
Menu Items
Status (on-screen display)
Sets up the on-screen display.
On: Shows all of the on-screen displays.
Off: Turns off the on-screen displays except for the menus, a message when turning off the power, and warning messages.
Language
Selects the language used in the menu and on-screen displays. Available languages are: English, Français, Deutsch, Italiano, Espanol, Portugues, Japanese, Chinese and Korean.
Menu Position
Selects the display position of the menu from Top Left, Bottom Left, Center, Top Right and Bottom Right.
Menu Color
Selects the tone of the menu display from Black or White.
The INSTALL SETTING Menu
The INSTALL SETTING menu is used for changing the settings of the projector.
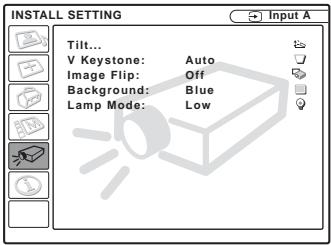
Menu Items
Tilt...
Adjusts the position (height) of the projected picture. Pressing the on the TILT adjustment key or / key on the Remote Commander, the more the projector tilts and the higher the position of the picture. Pressing the on the TILT adjustment key or / key on the Remote Commander, the less the projector tilts and the lower the position of the picture.
V Keystone
Corrects the trapezoidal distortion caused by the projection angle. Select "Auto" for automatic correction, or "Manual" for manual correction using the or key.
When the bottom of the trapezoid is longer than the top : Sets a lower value.
When the top of the trapezoid is longer than the bottom : Sets a higher value.
Note
The auto V Keystone adjustment may not correct the trapezoidal distortion perfectly, depending on the room temperature or the screen angle.
Image Flip
Flips the image on the screen horizontally and/or vertically.
Off: The image does not flip.
HV: Flips the image horizontally and vertically.
H: Flips the image horizontally.
V: Flips the image vertically.
Note
When the Image Flip is set to "HV" or "V", the Lamp Mode works with "Low" setting.
Background
Select the background color of the screen when no signal is input to the projector. Select black or blue. Normally set to "blue."
Lamp Mode
Sets the lamp brightness in the projection.
High: Illuminates the projected image brightly.
Low: Reduces fan noise and power consumption. The brightness of the projected image will be lower compared with the "High" setting.
The INFORMATION Menu
The INFORMATION menu displays the horizontal and vertical frequencies of the input signal and the used time of the lamp.
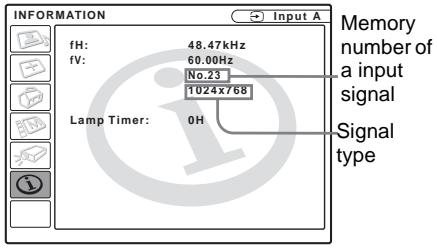
Menu Items
fH
Displays the horizontal frequency of the input signal.
The displayed value is approximate.
fV
Displays the vertical frequency of the input signal.
The displayed value is approximate.
Lamp Timer
Indicates how long the lamp has been turned on.
Note
These only display on the screen. You cannot alter the display.
Maintenance
Replacing the Lamp
Replace the lamp with a new one in the following case.
- When the lamp has burnt out or dims
- "Please replace the LAMP." appears on the screen
- The LAMP/COVER indicator lights up
The lamp life varies depending on conditions of use. Use LMP-C150 Projector Lamp as the replacement lamp.
When replacing the lamp after using the projector
Turn off the projector, then unplug the power cord.
Wait for at least an hour for the lamp to cool.
Caution
The lamp becomes a high temperature after turning off the projector with the 1 / 心 key. If you touch the lamp, you may scald your finger. When you replace the lamp, wait for at least an hour for the lamp to cool.
Notes
- If the lamp breaks, consult with qualified Sony personnel.
- Pull out the lamp by holding the handle. If you touch the lamp, you may be burned or injured.
- When removing the lamp, make sure it remains horizontal, then pull straight up. Do not tilt the lamp. If you pull out the lamp while tilted and if the lamp breaks, the pieces may scatter, causing injury.
1 Place a protective sheet (cloth) beneath the projector. Turn the projector over so you can see its underside.
Note
Be sure that the projector is stable after turning it over.
2 Open the lamp cover by loosening a screw with the Phillips screwdriver (supplied with the Projector Lamp).
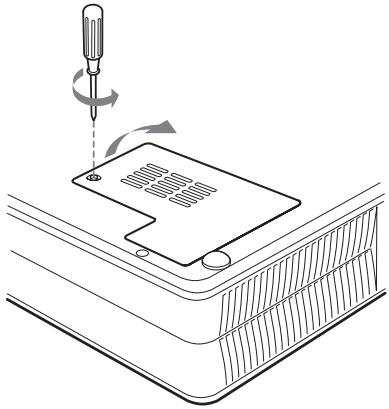
Note
For safety sake, do not loosen any other screws.
3 Loosen the three screws on the lamp unit with the Phillips screwdriver. Pull out the lamp unit by the handle.
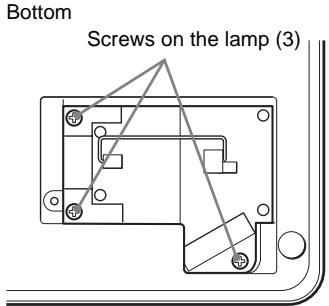
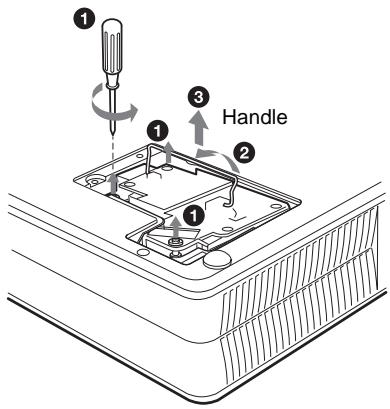
4 Insert the new lamp all the way in until it is securely in place. Tighten the screws. Fold the handle.
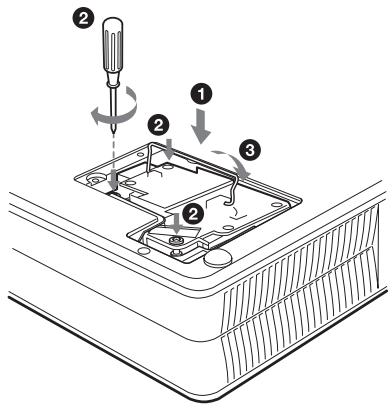
Notes
- Be careful not to touch the glass surface of the lamp.
- The power will not turn on if the lamp is not secured properly.
5 Close the lamp cover and tighten the screws.
6 Turn the projector back over.
7 Connect the power cord and turn the projector to standby mode.
Press the following keys on the remote commander in the following order for less than five seconds each: RESET, , , ENTER.
Notes
- Be sure to use the LMP-C150 Projector Lamp for replacement. If you use lamps other than LMP-C150, the projector may cause a malfunction.
- Be sure to turn off the projector and unplug the power cord before replacing the lamp.
- Do not put your hands into the lamp replacement spot, or not fall any liquid or object into it to avoid electrical shock or fire.
Disposal of the used lamp
As the used lamp contains Mercury, dispose of the lamp according to local, state or federal laws.
As the materials used in this lamp are similar to those of a fluorescent lamp, you should dispose of a used projector lamp in the same way as a fluorescent lamp.
Cleaning the Air Filter
The air filter should be cleaned every 300 hours.
Remove dust from the outside of the ventilation holes with a vacuum cleaner.
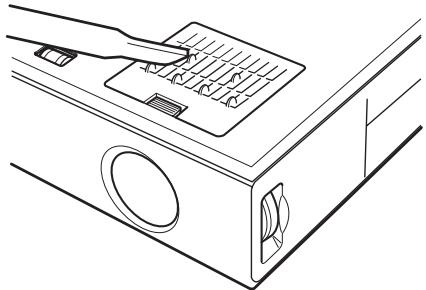
When it becomes difficult to remove the dust from the filter with a vacuum cleaner, remove the air filter and wash it.
1 Turn off the power and unplug the power cord.
2 Place a protective sheet (cloth) beneath the projector and turn the projector over.
3 Remove the air filter cover.
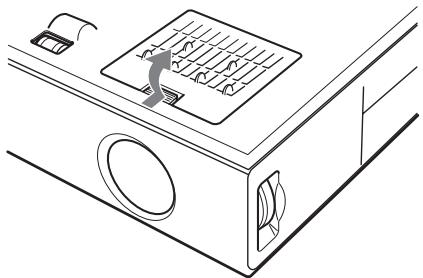
4 Remove the air filter.
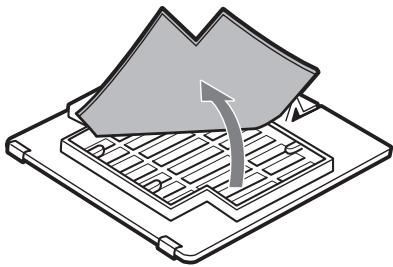
5 Wash the air filter with a mild detergent solution and dry it in a shaded place.
6 Attach the air filter and replace the cover.
Notes
- If you neglect to clean the air filter, dust may accumulate, clogging it. As a result, the temperature may rise inside the unit, leading to a possible malfunction or fire.
- If the dust cannot be removed from the air filter, replace the air filter with the supplied new one.
- Be sure to attach the air filter cover firmly; the power will not be turned on if it is not closed securely.
- The air filter has a face and a reverse side. Place the air filter so that it fits in a notch on the air filter cover.
Troubleshooting
If the projector appears to be operating erratically, try to diagnose and correct the problem using the following instructions. If the problem persists, consult with qualified Sony personnel.
Power
| Symptom | Cause and Remedy |
| The power is not turned on. | ·The power has been turned off and on with the 1/2 key at a short interval. →Wait for about 90 seconds before turning on the power (see page 26). ·The lamp cover is detached. →Close the lamp cover securely (see page 36). ·The air filter cover is detached. →Close the air filter cover securely (see page 37). |
| Both the LAMP/COVER and TEMP/FAN indicators light up. | ·The electrical system breaks down. →Consult with qualified Sony personnel. |
| The powered tilt adjuster and the lens protector do not close. | ·The AC power cord is unplugged with the power of the projector turned on. →Connect the power cord plug to the AC outlet again, then turn off the power of the projector. |
Picture
| Symptom | Cause and Remedy |
| No picture. | ·Cable is disconnected or the connections are wrong. →Check that the proper connections have been made (see page 17). ·Input selection is incorrect. →Select the input source correctly using the INPUT key (see page 24). ·The picture is muted. →Press the PIC MUTING key to release the picture muting (see page 25). ·The computer signal is not set to output to an external monitor or set to output both to an external monitor and a LCD monitor of a computer. →Set the computer signal to output only to an external monitor (see page 17). |
| The picture is noisy. | ·Noise may appear on the background depending on the combination of the numbers of dot input from the connector and numbers of pixel on the LCD panel. →Change the desktop pattern on the connected computer. |
| The picture from INPUT A connector is colored strange. | ·Setting of “Input-A Signal Sel.” in the SET SETTING menu is incorrect. →Select “Computer,” “Video GBR” or “Component” correctly according to the input signal (see page 33). |
| “Please check INPUT-A setting.” appears in spite of inputting the correct signal from INPUT A. | Setting of “Input-A Signal Sel.” in the SET SETTING menu is incorrect. → Select “Computer,” “Video GBR” or “Component” correctly according to the input signal (see page 33). |
| On-screen display does not appear. | Status” in the SET SETTING menu has been set to “Off.” → Set “Status” in the SET SETTING menu to “On” (see page 32). |
| Color balance is incorrect. | Picture has not been adjusted properly. → Adjust the picture (see page 30). → Projector is set to wrong color system. → Set “Color System” in the SET SETTING menu to match the color system being input (see page 33). |
| The picture is too dark. | Contrast or brightness has not been adjusted properly. → Adjust the contrast or brightness in the “Adjust Picture...” menu properly (see page 29). → The lamp has burnt or dims. → Replace the lamp with a new one (see page 36). |
| The picture is not clear. | Picture is out of focus. → Adjust the focus (see page 24). → Condensation has occurred on the lens. → Leave the projector for about two hours with the power on. |
| The image extends beyond the screen. | The APA key is pressed although there are black edges around the image. → Display the full image on the screen and press the APA key. → Adjust “Shift” in the INPUT SETTING menu properly (see page 31). |
| The picture flickers. | “Dot Phase” in the INPUT SETTING menu has not been adjusted properly. → Adjust “Dot Phase” in the INPUT SETTING menu properly (see page 31). |
Sound
| Symptom | Cause and Remedy |
| No sound. | • Cable is disconnected or the connections are wrong. → Check that the proper connections have been made (see page 17). • The audio connecting cable is incorrect. → Use a no-resistance stereo audio cable (see page 18). • The sound is not adjusted properly. → Adjust the sound (see page 25). |
Remote Commander
| Symptom | Cause and Remedy |
| The Remote Commander does not work. | • The Remote Commander batteries are dead. → Replace with a new battery (see page 15). |
Others
| Symptom | Cause and Remedy |
| The LAMP/COVER indicator flashes. | ·The lamp cover or the air filter cover is detached. →Attach the cover securely (see pages 36 and 37). |
| The LAMP/COVER indicator lights up. | ·The lamp has reached the end of its life. →Replace the lamp (see page 36). ·The lamp becomes a high temperature. →Wait for 90 seconds to cool down the lamp and turn on the power again (see page 26). |
| The TEMP/FAN indicator flashes. | ·The fan is broken. →Consult with qualified Sony personnel. |
| The TEMP/FAN indicator lights up. | ·The internal temperature is unusually high. →Check to see if nothing is blocking the ventilation holes. |
| Both the LAMP/COVER and TEMP/FAN indicators light up. | ·The electrical system breaks down. →Consult with qualified Sony personnel. |
Warning Messages
Use the list below to check the meaning of the messages displayed on the screen.
| Message | Meaning and Remedy |
| High temp.! Lamp off in 1 min. | ·Internal temperature is too high. →Turn off the power. →Check to see if nothing is blocking the ventilation holes. |
| Frequency is out of range! | ·This input signal cannot be projected as the frequency is out of the acceptable range of the projector. →Input a signal that is within the range of the frequency. ·The resolution setting of the output signal of a computer is too high. →Set the setting of output to XGA (VPL-CX5) or SVGA (VPL-CS5) (see page 17). |
| Please check INPUT-A setting. | ·You have input RGB signal from the computer when “Input-A Signal Sel.” in the SET SETTING menu is set to “Component.” →Set “Input-A Signal Sel.” correctly (see page 33). |
| Please replace the LAMP. | ·It is time to replace the lamp. →Replace the lamp. |
Caution Messages
Use the list below to check the meaning of the messages displayed on the screen.
| Message | Meaning and Remedy |
| Not applicable! | • You have pressed the wrong key. → Press the appropriate key. |
Specifications
Optical characteristics
Projection system
3 LCD panels, 1 lens, projection system
LCD panel VPL-CS5:Superhigh-aperture
0.7-inch SVGA panel,
1,440,000 pixels (480,000 pixels × 3
VPL-CX5: Superhigh-aperture
0.7-inch XGA panel with micro-lens array, about
2,360,000 pixels (786,432 pixels × 3
Lens 1.2 times zoom lens (manual)
f 28.2 to 33.8mm / F 1.8 to 2.15
Lamp 165 W UHP
Projection picture size
Range: 40 to 150 inches (diagonal measure)
Light output VPL-CS5: ANSI lumen1) 1800 lm
VPL-CX5: ANSI lumen ^1) 2000 lm
(When the Lamp Mode is set to "High")
Throwing distance
When the XGA signal is input
40-inch: 1.5 to 1.9m
(4.9 to 6.2 feet)
60-inch: 2.3 to 2.9m
(7.5 to 9.5 feet)
80-inch: 3.1 to 3.8m
(10.2 to 12.5 feet)
100-inch: 3.9 to 4.8m
(12.8 to 15.7 feet)
120-inch: 4.7 to 5.7m
(15.4 to 18.7 feet)
150-inch: 5.9 to 7.2m
(19.4 to 23.6 feet)
There may be a slight difference between the actual value and the design value shown above.
1) ANSI lumen is a measuring method of
American National Standard IT 7.228.
Electrical characteristics
Color system NTSC3.58/PAL/SECAM/
NTSC4.43/PAL-M/PAL-N
system, switched automatically/ manually
Resolution VPL-CS5:600 horizontal TV lines
(Video input)
800 × 600 dots (RGB input)
VPL-CX5: 750 horizontal TV
lines (Video input)
1,024× 768 dots (RGB input)
Acceptable computer signals
VPL-CS5: fH: 19 to 72kHz
fV: 48 to 92Hz
VPL-CX5: fH: 19 to 92kHz
fV: 48 to 92Hz
(Maximum input signal resolution:
XGA 1024× 768
1) Set the resolution and the frequency of the
signal of the connected computer within the
range of acceptable preset signals of the
projector.
Applicable video signals
15 kHz RGB/component 50/60
Hz, composite video, S video
Speaker Monaural speaker system, 40× 20
mm (1^5 / 8×^13 / 16 inches), max.
1 W
Input/Output
Video input
VIDEO:phonotype
Composite video: 1Vp - p± 2 dB
sync negative (75 ohms
terminated)
C (chrominance): burst
0.286 Vp-p ±2 dB (NTSC)
(75 ohms terminated),
burst 0.3Vp - p± 2 dB (PAL)
(75 ohms terminated)
INPUT A
HD D-sub15-pin (female)
Analog RGB/component:
(75 ohms terminated)
G: 0.7Vp - p± 2 dB
(75 ohms terminated)
G with sync/Y: 1Vp - p± 2 dB
sync negative
(75 ohms terminated)
(75 ohms terminated)
SYNC/HD:
Composite sync input: 1-5 Vp-p
high impedance, positive/
negative
Horizontal sync input: 1-5 Vp-p
high impedance, positive/
negative
VD:
Vertical sync input: 1-5 Vp-p high impedance, positive/ negative
AUDIO
Stereo minijack
500 mVrms, impedance more than 47 kilohms
USB
Up (female) × 1
Memory Stick Slot
× 1 (VPL-CX5 only)
Safety regulations
UL60950, cUL (CSA No. 60950), FCC Class B, IC Class B, NEMKO (EN60950), CE (LVD, EMC), C-Tick
General
Dimensions
285× 68× 228mm (11^1 / 4×
2^5 / 8 × 9 inches) (w/h/d)
(without the projection parts)
Mass
Approx. 2.7kg (5 lb 15 oz)
Power requirements
AC 100 to 240V 50 / 60Hz
Power consumption
Max. 240 W
(Standby mode:
VPL-CS5: 5 W
VPL-CX5:7W)
Heat dissipation
819 BTU
Operating temperature
0^ to 35^ (32^ to 95^)
Operating humidity
35% to 85% (no condensation)
Storage temperature
-20^ to 60^ (-4^ to 140^)
Storage humidity
10% to 90%
Supplied accessories
Remote Commander (1)
Size AA (R6) batteries (2)
HD D-sub 15 pin cable (2 m) (1) (1-791-992-21)
USB cable A type - B type (1) (1-790-081-31)
CD-ROM (Application software) (VPL-CX5 only) (1)
Carrying case (1)
AC power cord (1)
Air filter (for replacement) (1)
Operating Instructions (1)
Quick Reference Card (1)
Ferrite core (1)
Memory Stick (1) (VPL-CX5 only)
Design and specifications are subject to change without notice.
Optional accessories
Projector Lamp
LMP-C150 (for replacement)
Signal Cable
SMF-402 (HD D-sub 15-pin (male) 3× phono type (male))
Screens
50-inch Portable Screen VPS- 50C^1)
100-inch Flat Screen
VPS-100FH
Some of the items may not be available in some areas. For details, please consult your nearest Sony office.
1) VPS-50C may not be available in some areas. For details, please consult your nearest Sony office.
Pin assignment
INPUT A connector (HD D-sub 15-pin, female)
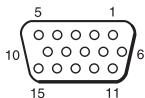
| 1 | R/R-Y | 9 | N.C. |
| 2 | G/Y | 10 | GND |
| 3 | B/B-Y | 11 | GND |
| 4 | GND | 12 | DDC/SDA |
| 5 | GND | 13 | HD/C.Sync |
| 6 | GND (R) | 14 | VD |
| 7 | GND (G) | 15 | DDC/SCL |
| 8 | GND (B) |
Input signals and adjustable/ setting items
Adjust Picture... menu
| Item | Input signal | ||||
| Video or S video (Y/C) | Com- ponent | Video GBR | Com- puter | B&W | |
| Contrast | ● | ● | ● | ● | ● |
| Brightness | ● | ● | ● | ● | ● |
| Color | ● | ● | ● | - | - |
| Hue | ●(NTSC 3.58/ 4.43 only) | - | - | - | - |
| Sharpness | ● | ● | ● | - | ● |
| RGB Enhancer | - | - | - | ● | - |
| Gamma Mode | - | - | ● | ● | - |
| Color Temp. | ● | ● | ● | ● | ● |
| Volume | ● | ● | ● | ● | ● |
: Adjustable/can be set
- : Not adjustable/cannot be set
INPUT SETTING menu
| Item | Input signal | ||||
| Video or S video (Y/C) | Com- ponent | Video GBR | Com- puter | B&W | |
| Dot Phase | - | - | - | ● | - |
| H Size | - | - | - | ● | - |
| Shift | - | - | - | ● | - |
| Scan Converter | - | - | - | ● (VPL-CS5: lower than VGA, VPL-CX5: lower than SVGA) | - |
| Wide Mode | ● | ● | ● | - | ● |
: Adjustable/can be set
- : Not adjustable/cannot be set
Preset signals
| Memory No. | Preset signal | fH (kHz) | fV (Hz) | Sync | SIZE | |
| 1 | Video 60 Hz | 15.734 | 59.940 | |||
| 2 | Video 50 Hz | 15.625 | 50.000 | |||
| 3 | 15k RGB/Component 60 Hz | 15.734 | 59.940 | S on G/Y or Composite Sync | ||
| 4 | 15k RGB/Component 50 Hz | 15.625 | 50.000 | S on G/Y or Composite Sync | ||
| 6 | 640 × 350 | VGA mode 1 | 31.469 | 70.086 | H-pos, V-neg | 800 |
| 7 | VGA VESA 85 Hz | 37.861 | 85.080 | H-pos, V-neg | 832 | |
| 8 | 640 × 400 | PC-9801 Normal | 24.823 | 56.416 | H-neg, V-neg | 848 |
| 9 | VGA mode 2 | 31.469 | 70.086 | H-neg, V-pos | 800 | |
| 10 | VGA VESA 85 Hz | 37.861 | 85.080 | H-neg, V-pos | 832 | |
| 11 | 640 × 480 | VGA mode 3 | 31.469 | 59.940 | H-neg, V-neg | 800 |
| 12 | Macintosh 13" | 35.000 | 66.667 | H-neg, V-neg | 864 | |
| 13 | VGA VESA 72 Hz | 37.861 | 72.809 | H-neg, V-neg | 832 | |
| 14 | VGA VESA 75 Hz | 37.500 | 75.000 | H-neg V-neg | 840 | |
| 15 | VGA VESA 85 Hz | 43.269 | 85.008 | H-neg V-neg | 832 | |
| 16 | 800 × 600 | SVGA VESA 56 Hz | 35.156 | 56.250 | H-pos, V-pos | 1024 |
| 17 | SVGA VESA 60 Hz | 37.879 | 60.317 | H-pos, V-pos | 1056 | |
| 18 | SVGA VESA 72 Hz | 48.077 | 72.188 | H-pos, V-pos | 1040 | |
| 19 | SVGA VESA 75 Hz | 46.875 | 75.000 | H-pos, V-pos | 1056 | |
| 20 | SVGA VESA 85 Hz | 53.674 | 85.061 | H-pos, V-pos | 1048 | |
| 21 | 832 × 624 | Macintosh 16" | 49.724 | 74.550 | H-neg, V-neg | 1152 |
| 22* | 1024 × 768 | XGA VESA 43 Hz | 35.524 | 86.958 | H-pos, V-pos | 1264 |
| 23 | XGA VESA 60 Hz | 48.363 | 60.004 | H-neg V-neg | 1344 | |
| 24 | XGA VESA 70 Hz | 56.476 | 69.955 | H-neg V-neg | 1328 | |
| 25 | XGA VESA 75 Hz | 60.023 | 75.029 | H-pos, V-pos | 1312 | |
| 26 | XGA VESA 85 Hz | 68.677 | 84.997 | H-pos, V-pos | 1376 | |
| 27 | 1152 × 864 | SXGA VESA 70 Hz | 63.995 | 70.019 | H-pos, V-pos | 1472 |
| 28 | SXGA VESA 75 Hz | 67.500 | 75.000 | H-pos, V-pos | 1600 | |
| 29 | SXGA VESA 85 Hz | 77.487 | 85.057 | H-pos, V-pos | 1568 | |
| 30 | 1152 × 900 | Sunmicro LO | 61.795 | 65.960 | H-neg, V-neg | 1504 |
| 31 | Sunmicro HI | 71.713 | 76.047 | Composite Sync | 1472 | |
| 32 | 1280 × 960 | SXGA VESA 60 Hz | 60.000 | 60.000 | H-pos, V-pos | 1800 |
| 33 | SXGA VESA 75 Hz | 75.000 | 75.000 | H-pos, V-pos | 1728 | |
| 34* | 1280 × 1024 | SXGA VESA 43 Hz | 46.433 | 86.872 | H-pos, V-pos | 1696 |
| 35 | SGI-5 | 53.316 | 50.062 | S on G | 1680 | |
| 36 | SXGA VESA 60 Hz | 63.974 | 60.013 | H-pos, V-pos | 1696 | |
| 37 | SXGA VESA 75 Hz | 79.976 | 75.025 | H-pos, V-pos | 1688 | |
| 38 | SXGA VESA 85 Hz | 91.146 | 85.024 | H-pos, V-pos | 1296 | |
| 52 | 1400 × 1050 | SXGA+ 60 Hz | 63.981 | 60.020 | H-pos, V-pos | 1685 |
Memory No. 1 to No. 26 (VPL-CS5)
Memory No. 1 to No. 38, No. 52 (VPL-CX5)
Notes
- When a signal other than the preset signals shown above is input, the picture may not appear properly.
- Memory No. 22 and 34 show the interlace signal.
- When a SXGA+ signal is input, the image may extend beyond the screen. In this case, input a signal with no black edges around the image, and disconnect and reconnect the cable or select the input signal by pressing INPUT key.
Warning on power connection
Use the supplied power cord when you use the projector in your country. Otherwise, use a proper power cord meeting the following specification.
| The United States, Canada | Continental Europe, Korrea | UK | Australia | Japan | |
| Plug type | YP-11 | YP-21 | SP-61 | B8 | YP-13 |
| Female end | YC-13L | YC-13L | YC-13L | C7-2 | YC-13L |
| Cord type | SPT-2 | H03VVH2-F | H03VVH2-F | H03VVH2-F | VCTFK |
| Rated Voltage & Current | 10A/125V | 2.5A/250V | 2.5A/250V | 2.5A/250V | 7A/125V |
| Safety approval | UL/CSA | VDE | BS | SAA | DENAN |
| Cord length (max.) | 4.5 m | - | - | - | - |
Index
A
Adjusting memory of the settings 29
the picture .........29
the picture size/shift ...31
Air filter 37
Auto Input Search 32
B
Background 34
Brightness 30
C
Color 30
Color System 33
Color Temp. 30
Connections
component equipment 19
computer 17
VCR 19
Contrast 30
D
Digital Zoom function ...27
Dot Phase 31
F
fH (Horizontal Frequency) 35
fV (Vertical Frequency) 35
G
Gamma Mode 30
H
H Size 31
Hue 30
1
Image Flip 34
INPUT A connector ....... 12
pin assignment 44
Input-A Signal Sel. 33
Installation examples ....16
notes 7
unsuitable conditions .... 7
unsuitable installation ..7
L
Lamp Mode 34
Lamp replacement 36
Lamp Timer 35
Language 33
selecting the menu language 21
Location and function of controls
connector panel 12
control panel 12
rear/right side/bottom . 10
Remote Commander ..13
top/front/left side ....10
M
Menu
clearing the menu display 29
INFORMATION Menu 35
INPUT SETTING menu 31
INSTALL SETTING menu 34
MENUSETTING menu 33
PICTURE SETTING menu 29
SET SETTING menu .32
using the menu 28
Menu Color 33
Menu Position 33
Message caution 42
warning 41
0
Optional accessories 44
P
Picture Mode 29
Pin assignment 44
Power turn on 23
Power Saving 12,33
Powered tilt adjuster ....11
Precautions 6
R
Remote Commander .... 13 location and function of controls 13
Remote control detector front 11
Reset
resettable items 29
resetting the item 29
RGB Enhancer 30
s
Scan Converter 31
Screen size 16, 43
SET SETTING menu .... 32
Sharpness 30
Shift 31
Smart APA 32
Specifications 43
Status 33
Supplied accessories ......44
T
Tilt.. 34
Troubleshooting 39
U
USB connector 18
V
V Keystone 34
Ventilation holes intake 11
Volume 29
W
Wide Mode 31
AVERTISSEMENT
NTSC4.43/PAL-M/PAL-N,
(termination 75 ohms),
salve 0,3Vcc± 2 dB (PAL)
(termination 75 ohms)
INPUT A
(termination 75 ohms)
G:0,7Vcc ± 2 dB
(termination 75 ohms)
(termination 75 ohms)
B/B-Y:0,7 Vcc ±2 dB
(termination 75 ohms)
SYNC/HD:
Entree synchro composite :
1-5 Vcc
haute impédance, positive/
negative
500mV efficace, impedance
Printed on recycled paper

Printed on 100% recycled paper using VOC (Volatile Organic Compound) free vegetable oil based ink.