VT-1825 - Vacuum Cleaner Vitek - Free user manual and instructions
Find the device manual for free VT-1825 Vitek in PDF.


| Product Type | Vacuum Cleaner |
| Brand | Vitek |
| Model | VT-1825 |
| Dimensions (L x W x H) | 30 cm x 25 cm x 25 cm |
| Weight | 4.5 kg |
| Power Supply | 220-240 V AC, 50/60 Hz |
| Power Consumption | 1200 W |
| Dust Capacity | 1.5 L |
| Filtration System | HEPA filter with washable pre-filter |
| Noise Level | 75 dB |
| Cord Length | 5 m |
| Bag Type | Disposable dust bag (sold separately) |
| Accessories Included | Crevice tool, upholstery brush, floor nozzle |
| Main Functions | Dry vacuuming on hard floors and carpets |
| Maintenance and Cleaning | Replace dust bag when full; clean pre-filter monthly; replace HEPA filter annually |
| Safety Features | Thermal overload protection; do not vacuum liquids or hot ashes |
| Spare Parts Availability | Dust bags, HEPA filters, pre-filters available online |
| Repairability | User-replaceable filters and bag; professional repair for motor issues |
| General Information | Compact and lightweight design; suitable for small to medium homes |
Frequently Asked Questions - VT-1825 Vitek
User questions about VT-1825 Vitek
0 question about this device. Answer the ones you know or ask your own.
Ask a new question about this device
Download the instructions for your Vacuum Cleaner in PDF format for free! Find your manual VT-1825 - Vitek and take your electronic device back in hand. On this page are published all the documents necessary for the use of your device. VT-1825 by Vitek.
USER MANUAL VT-1825 Vitek
2
natural_image
Diagram showing a curved pipe with an arrow pointing to a small component, labeled '1' (no text or symbols on the diagram itself)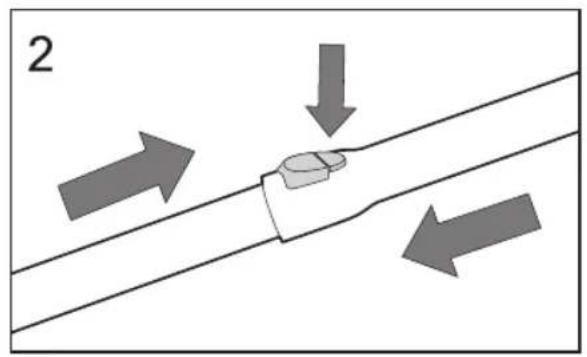
natural_image
Diagram of a vacuum cleaner with an upward arrow indicating motion (no text or symbols present)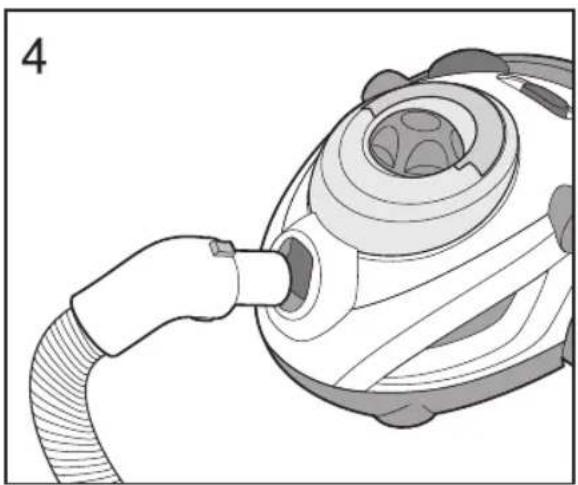
natural_image
Illustration of a hand inserting a plug into a vacuum cleaner (no text or symbols present)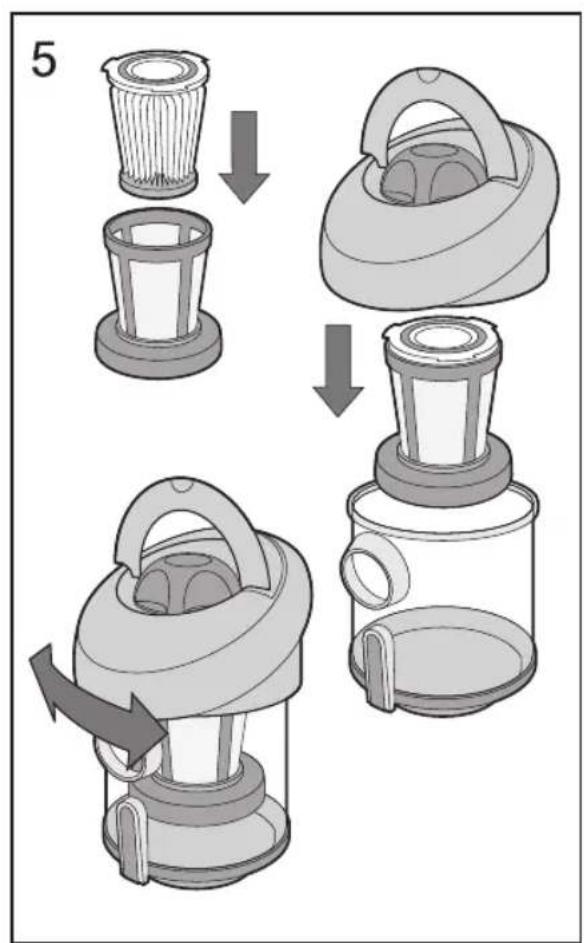
natural_image
Illustration of a cleaning or dust removal device with a bucket and filter, showing no text or symbols.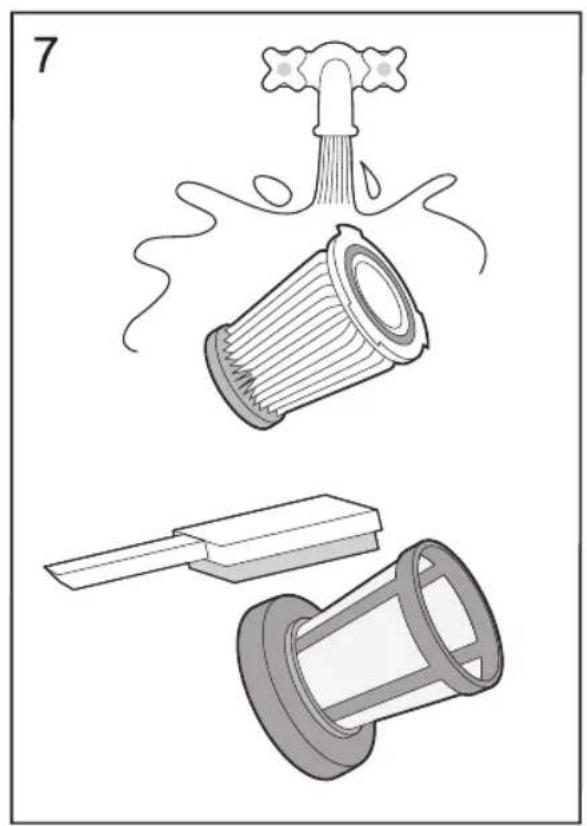
natural_image
Illustration of three different cleaning tools: a faucet with water spray, a filter blade with a handle, and a spool stopper (no text or symbols present)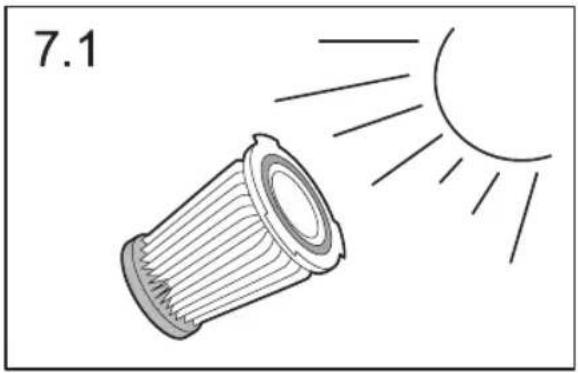
natural_image
Simple line drawing of a sun shining onto a cylindrical object, labeled '7.1' (no text or symbols on the object itself)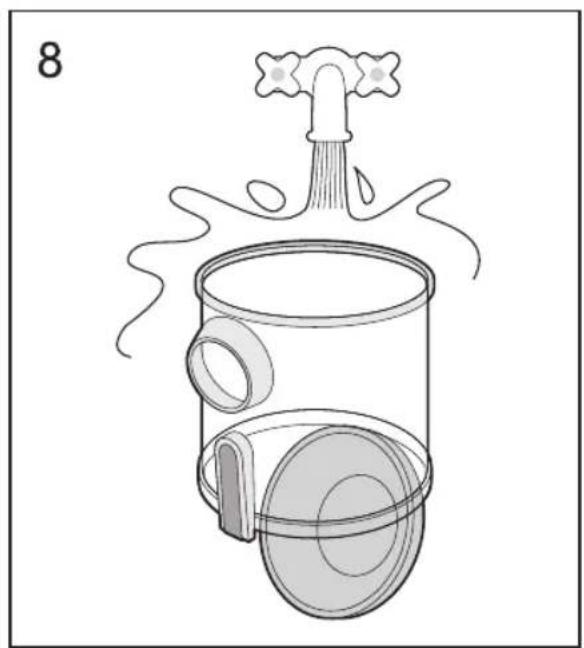
natural_image
Line drawing of a faucet spraying water into a cylindrical container with a lid, emitting steam (no text or symbols)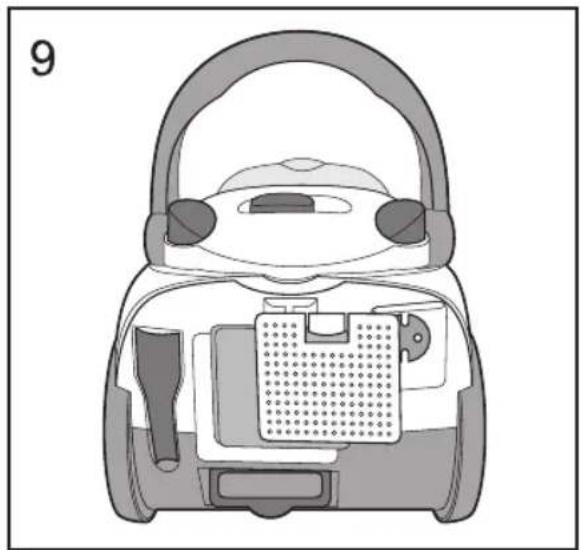
natural_image
Diagram of a vacuum cleaner with internal components and a labeled number 9 (no text or symbols on the diagram itself)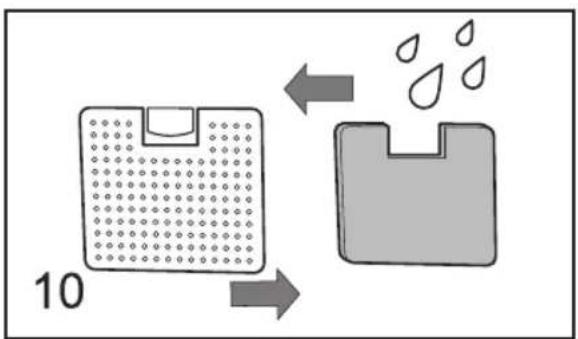
natural_image
Illustration of a vacuum cleaner cleaning a textured surface with coiled fibers (no text or symbols)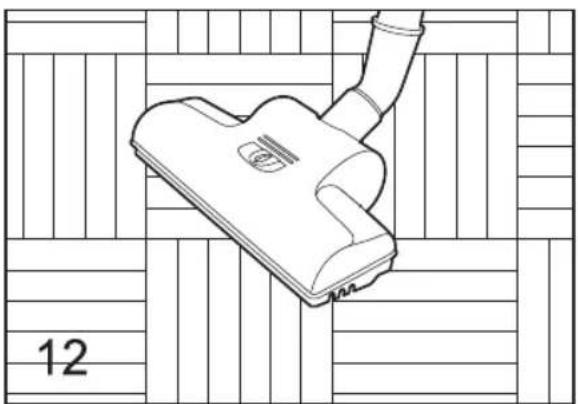
natural_image
Line drawing of a hairdryer with label '12' on a grid background (no text or symbols on the diagram itself)ENGLISH
VACUUM CLEANER
Dear customer!
Thank you for purchasing this VITEK product. The technology, design, function and conformity with quality standards guarantees reliability and convenience in the use of the bagless vacuum cleaner.
The vacuum cleaner is equipped with a HEPA filter (the filter traps dust particles 0.3 micrometers and larger), installed in the dust container.
HEPA filters effectively trap particles like spores, ash, pollen, bacteria and microscopic dust particles. This prevents respiratory system irritation among children and people suffering from allergies or asthma, or who are especially sensitive to allergens.
USAGE INSTRUCTIONS
IMPORTANT SAFETY MEASURES
When using electric home appliances, you should always observe standard precautions, including the following:
CAREFULLY READ ALL THE INSTRUCTIONS BEFORE USING THE HOME VACUUM CLEANER
WARNING
To reduce risk of fire, electric shock or serious injury:
- Do not leave the vacuum cleaner unattended when it is plugged into a power outlet. Always remove the plug from the outlet when you are not using the vacuum cleaner or before servicing it.
- To reduce the risk of electric shock, do not use the vacuum cleaner outdoors or on wet surfaces.
-
Do not allow children to use the vacuum cleaner as a toy. Pay special attention when children or handicapped persons are nearby.
-
Regularly check the power cord. If you notice any defects in the power cord, do not use the device.
- To replace the power cord or repair the device, contact an authorized service center.
- Use this device only for home cleaning purposes and in accordance with the usage instructions.
- Do not use the power cord as a carrying handle, do not close the door if the power cord passes through the doorway, and keep the power cord away from sharp edges or corners. Do not run the vacuum over the power cord—you might damage it. Keep the power cord away from heat sources.
- Do not pull the cord to unplug the device from the power outlet. Instead, grasp the plug.
- Do not touch the plug with wet hands.
- Do not cover the input and output openings. Never turn on the device if either of the openings is blocked. Remove accumulations of dust, lint, hair, and other trash often to ensure normal suction.
- Keep hair, loose clothing, fingers and other parts of the body away from the suction openings.
- Always turn the vacuum cleaner off first with the on/off button, and only then unplug it from the power outlet.
- Be especially attentive when vacuuming on stairs.
- Never use the vacuum cleaner on flammable liquids such as petrol, solvents, and never use it where such liquids are stored.
- Never use the vacuum cleaner on water or other liquids, burning or smoke-emitting cigarettes, smoldering ashes or fine dust such as from stucco, cement, flour or cinder.
This might serious damage the electric motor. Note also that such substances are not covered by the warrantee.
ENGLISH
- Do not use the vacuum cleaner without the dust container and filter unit attached.
- When unwinding the power cord, hold the cable in your hands and don't let the plug hit the floor.
STORE THE INSTRUCTIONS IN A CONVENIENT PLACE
Description
- Turbo brush
- Telescoping tube
- Flexible hose
- Dust container
- On/off button
- Large ring
- Main housing
- Power control
- Power cord winder
- Outgoing air filter cover
- Outgoing filter
-
Universal attachment
-
Attachment for hard-to-reach places
Description of the dust container
- Top lid with handle for removing the container
- HEPA-filter self-cleaning handle
- Filter unit (preliminary mesh screen and main HEPA-filter)
- Lower part of the container with lid for removing trash
- Lower container lid latch
SAFETY PRECAUTIONS
If suction power decreases abruptly while cleaning, immediately turn off of vacuum cleaner and check the telescoping tube or flexible hose for foreign objects. Turn off the vacuum cleaner, then unplug it from the power outlet. Clear the obstruction and only then proceed with cleaning.
- Do not use the vacuum cleaner in the immediate vicinity of very hot surfaces,
next to ash trays, or where flammable liquids are stored.
- Insert the plug into the outlet only with dry hands.
- Before beginning to clean, remove sharp objects from the floor to avoid damage to the filter unit.
- When pulling the plug from the outlet, always grasp the plug, not the power cord.
ASSEMBLING THE VACUUM CLEANER
Completely unpack the vacuum cleaner and check it for damage. Factory defects or damage occurring in shipment are covered by the VITEK warranty.
Before turning on the vacuum cleaner, make sure that the voltage of the electrical system matches that of the vacuum cleaner.
Always turn off the vacuum cleaner and unplug it from the outlet before changing the brushes/attachments, and before performing maintenance on it.
1. Attaching and removing the flexible hose (drawing 4)
Insert the flexible hose (3) into the air opening located on the front of the vacuum cleaner housing. Insert the hose until it snaps, confirming a proper connection.
To remove the flexible hose, press the fixation button and disconnect the hose.
2. Attaching the extension tubes and brushes
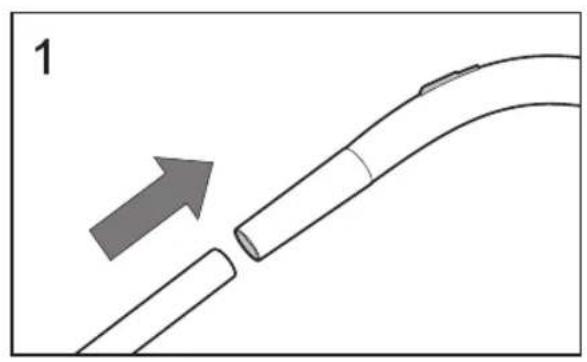
- Attach the telescoping extension tube to the flexible hose (drawing 1). Extend the lower part of the telescoping tube to the desired length by pressing the fixation button ( drawing 2).
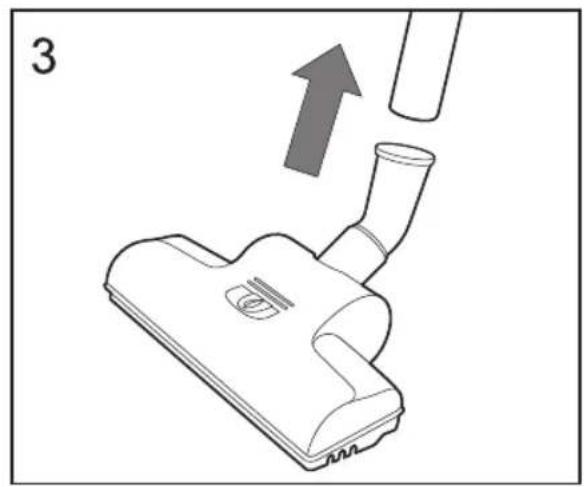
- Select the desired attachment: the turbo brush (1), universal attachment (17) or the attachment for hard-to-reach places (18). Attach it to the telescoping extension tube (drawing 3).
ENGLISH
Using the brush attachments
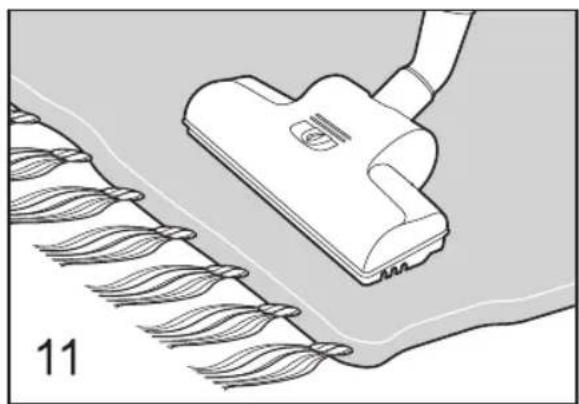
Turbobrush for floors/carpets (1) (drawings 11-12)
The turbo brush can be used to vacuum floors, rugs and carpets with long or short pile, and is ideal for picking up animal fur. The cylindrical brush with hard bristles rotates under the action of the air current and its bristles effectively remove animal fur and loose carpet and rug fibers.
Note: Never use the turbo brush to clean rugs with fringe and pile of 15 mm or more, because the rotating brush can cause damage to such rugs. Do not run the turbo brush over power cords and turn off the vacuum cleaner immediately after you are done using it.
Universal brush attachment (17)
- For cleaning furniture upholstery.
- With attached brush: for cleaning furniture, curtains, books, floor-lamps, shelves, and to remove dust from plants.
Attachment for hard-to-reach places (18)
For cleaning radiators, crevices, corners and between sofa pillows.
Note: Attachments (17) and (18) are located on the rear of the vacuum cleaner.
USAGE INSTRUCTIONS
Before using the vacuum, pull the power cord out to the desired length and insert the plug into an outlet. The yellow mark on the power cord warns you when to stop pulling. Never pull the power cord past the red mark.
Always make sure the dust container and filter unit are attached before turning on the vacuum cleaner.
- To turn the vacuum cleaner, press the
ON/OFF button (5).
- To rewind the power cord, press the power cord rewind button (9) and guide the rewinding process with your hand to prevent entanglement.
- While using the vacuum, you can regulate the suction power by moving the regulating handle (8) and mechanical regulator located on the handle of the flexible hose.
SERVICING
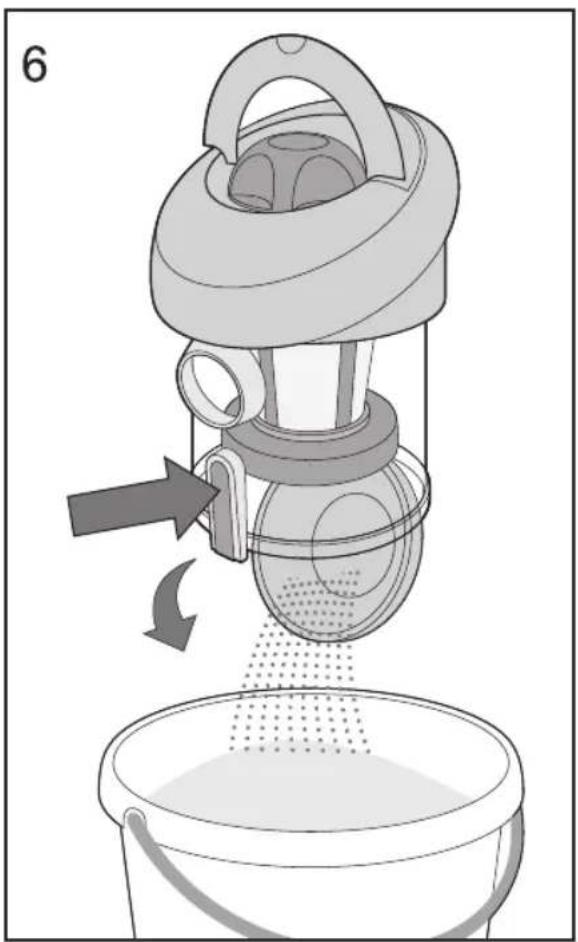
1. Removing the dust container (4) and emptying dust and trash from it (drawing 6).
- Turn off the vacuum cleaner and unplug it from the power outlet.
- Turn the self-cleaning handle of the HEPA-filter (13) clockwise/counterclockwise.
- Lift the handle on the dust container and pull it off.
- Press the fixation button of the lower lid (16) to remove trash and then close it.
- Set the dust container (4) in place and lightly press on it from above on to snap it into place.
Note: We recommend emptying the dust container after every use of the vacuum cleaner.
2. Dissembling the dust container (drawing 5).
- Turn off the vacuum cleaner and unplug it from the power outlet. Disconnect the dust container, empty dust and trash from it and close the lower lid.
- Turn the top lid of the dust container counterclockwise and remove the lower part of the dust container.
- Holding the lower part of the filter unit, turn it counterclockwise and disconnect it from the top lid.
3. Cleaning the filter unit (drawing 7)
Always make sure the filter unit is clean,
ENGLISH
otherwise the vacuum cleaner won't work properly. Clean the filter unit at least 2 or 3 times a year, or more often if it gets dirty quickly. Replace the filter unit when you notice that it is no longer filtering effectively.
- Turn off the vacuum cleaner and unplug it from the power outlet, disconnect the container, empty dust and trash from it, open the filter unit and remove it.
- Remove dust and trash from the mesh screen.
- Rinse the filter unit under lukewarm water. Do not wash it in a dishwasher.
- Dry the filter unit. Never use a blow dryer to dry it.
- Rinse the lower part of the dust container and dry it.
- Wipe the outer and inner surfaces of the top lid with a damp cloth.
Assemble the dust container:
- Set the filter unit on the top lid of the container and turn it counterclockwise until it snaps into place.
- Align the arrows on the top lid and lower part of the container and turn the lid clockwise.
- Lift the handle on the dust container lid and attach it in the vacuum cleaner.
- Lightly press on the container to snap it into place.
4. Replacing the outgoing air filter (drawings 9-10).
- Open the lid of the outgoing air filter (10).
- Disconnect the filter and rinse it under running water, dry it or replace it with a new one.
- Close the lid of the outgoing air filter (10).
5. Cleaning the turbo brush
Remove the turbo brush from the telescoping tube and remove pieces of thread and hairs from the cylindrical brush.
If the brushes do not rotate:
- Use a flat screwdriver to remove the two small wheels.
- Use a Philips screwdriver to remove the fastening screws.
- Disconnect the cylindrical brush and the impeller of its drive gear and remove hair, etc. from them.
- Clean the bearings of the impeller and cylindrical brush,
- Assemble the brush.
6. Vacuum cleaner housing
- Wipe the housing with a damp cloth.
- Do not allow water or other liquid to get inside the housing of the vacuum cleaner.
- Never use solvents or abrasive cleaning products to clean the surface of the vacuum cleaner
Technical data
Power source: 220-230 V \~ 50 Hz
Power consumption: 2000 W
Suction power: 450 W
Dust container capacity: 1.5 l
Noise level: 87 dB
Specifications subject to change without prior notice.
MINIMUM SERVICE LIFE - 5 YEARS
GUARANTEE
Details regarding guarantee conditions can be obtained from the dealer from whom the appliance was purchased. The bill of sale or receipt must be produced when making any claim under the terms of this guarantee.
CE
This product conforms to the EMC-Requirements as laid down by the Council Directive 89/336/EEC and to the Law Voltage Regulation (73/23 EEC)
DEUTSCH
STAUBSAUGER
A production date of the item is indicated in the serial number on the technical data plate. A serial number is an eleven-unit number, with the first four figures indicating the production date. For example, serial number 0606xxxxxxx means that the item was manufactured in June (the sixth month) 2006.
DE
- ENGLISH
- VACUUM CLEANER
- Dear customer!
- USAGE INSTRUCTIONS
- IMPORTANT SAFETY MEASURES
- CAREFULLY READ ALL THE INSTRUCTIONS BEFORE USING THE HOME VACUUM CLEANER
- WARNING
- STORE THE INSTRUCTIONS IN A CONVENIENT PLACE
- Description
- Description of the dust container
- SAFETY PRECAUTIONS
- ASSEMBLING THE VACUUM CLEANER
- Attaching and removing the flexible hose (drawing 4)
- Attaching the extension tubes and brushes
- Using the brush attachments
- Turbobrush for floors/carpets (1) (drawings 11-12)
- Universal brush attachment (17)
- Attachment for hard-to-reach places (18)
- SERVICING
- Removing the dust container (4) and emptying dust and trash from it (drawing 6).
- Dissembling the dust container (drawing 5).
- Cleaning the filter unit (drawing 7)
- Assemble the dust container:
- Replacing the outgoing air filter (drawings 9-10).
- Cleaning the turbo brush
- Vacuum cleaner housing
- Technical data
- MINIMUM SERVICE LIFE - 5 YEARS
- GUARANTEE
- DEUTSCH
- STAUBSAUGER
- DE
Brand : Vitek
Model : VT-1825
Category : Vacuum Cleaner