Pro Airway - Stroller Beemoo - Free user manual and instructions
Find the device manual for free Pro Airway Beemoo in PDF.

User questions about Pro Airway Beemoo
0 question about this device. Answer the ones you know or ask your own.
Ask a new question about this device
Download the instructions for your Stroller in PDF format for free! Find your manual Pro Airway - Beemoo and take your electronic device back in hand. On this page are published all the documents necessary for the use of your device. Pro Airway by Beemoo.
USER MANUAL Pro Airway Beemoo
natural_image
Line drawing of a baby stroller with adjustable arms and wheels (no text or symbols)
natural_image
Circular icon with a baby symbol in the center, no text or numbers present.
IMPORTANT!VIKTIGT!ADVARSEL!
READ CAREFULLY AND
KEEP FOR FUTURE
REFERENCE.
Model: Beemoo Pro Airway
LÄS NOGA OCH
BEHÅLL FÖR FRAMTIDA
REFERENS.
Modell: Beemoo Pro Airway
LES N∅YE OG BEHOLD
FOR FREMTIDIG
REFERANSE.
Modell: Beemoo Pro Airway
ADVARSEL!TÄRKEÄÄ!
LÆS OMHYGGELIGT
OG GEM TIL
FREMTIDIG
REFERENCE.
Model: Beemoo Pro Airway
LUE OHJEET
HUOLELLISESTI JA
SÄILYTÄ NE TULEVAA
TARVETTA VARTEN.
Malli: Beemoo Pro Airway
WICHTIG!
LESEN SIE DIESE HINWEISE
AUFMERKSAM UND
BEWAHREN SIE SIE FÜR
ZUKÜNFTIGE FRAGEN AUF.
Modell: Beemoo Pro Airway
WARNING
- Please read these instructions carefully before use and keep them for later reference. The safety of your child could be put at risk if you do not follow these instructions.
- WARNING! Never leave the child unattended.
- WARNING! Ensure that all the locking devices are engaged before use.
- WARNING! To avoid injury ensure that the child is kept away when unfolding and folding this product.
- WARNING! Do not let the child play with this product.
- WARNING! This seat unit is not suitable for children under 6 months.
- WARNING! Always use the restraint system.
- WARNING! Check that the pram body, seat unit, carrycot unit and/or car seat attachment devices are correctly engaged before use.
- WARNING! This product is not suitable for running or skating.
- WARNING! Maximum weight of a child for which the product is intended is up to 22 kg or 4 years, whichever comes first.
- This stroller is designed for one child and may only be used to transport one child.
- Do not insert any additional mattresses into the stroller.
- The maximum loading weight for the basket is 3 kg.
- Any load attached to the handle and on the back of the backrest and on the sides of the vehicle will affect the stability of the vehicle.
- Do not hang weight on the handle.
- Use only accessories and spare parts provided and approved by the manufacturer.
- Accessories which are not approved by the manufacturer shall not be used.
• Always put in the parking device when placing a child in or taking it out of the stroller. Always make sure the stroller is parked properly. - This product is tested and approved according to European Standards: EN 1888-1 & EN 1888-2:2018+A1:2022.
ASSEMBLY & FUNCTIONS
Opening The Stroller
Push the safety lock button (1), and then hold upwards the release button (2), while lifting handle up and unfold the stroller away from you, it will open and lock automatically into position.
NOTE! Lift the stroller in the handle and shake to make sure it is completely locked.
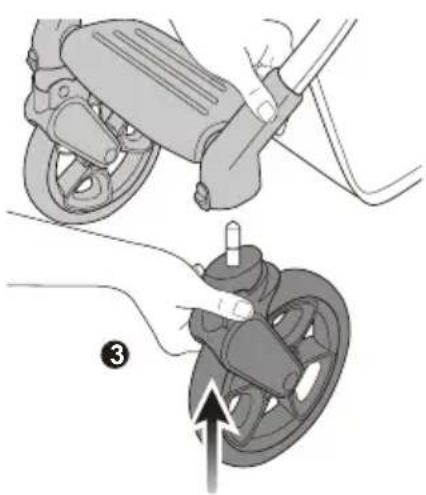
Front Wheels Assembly
Press the wheel assembly shaft (3) into the front frame connector (4) until it locks into place with a click. Repeat for other side.
To remove front wheels, press the locking tab and slide the wheel out of the connector.
natural_image
Mechanical assembly diagram showing a hand operating a brake caliper and a valve, with no visible text or symbols.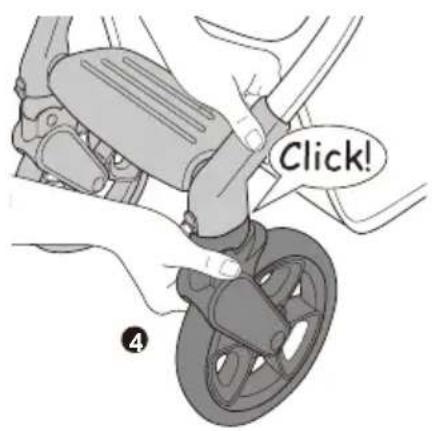
Rear Wheels Assembly
Install the rear wheels (5) on the rear axle assembly (6).
Make sure each wheel locks into position with a click. Pull the wheels to make sure they are locked securely.
natural_image
Illustration of a hand turning a wheel component with a tool, no text or symbols present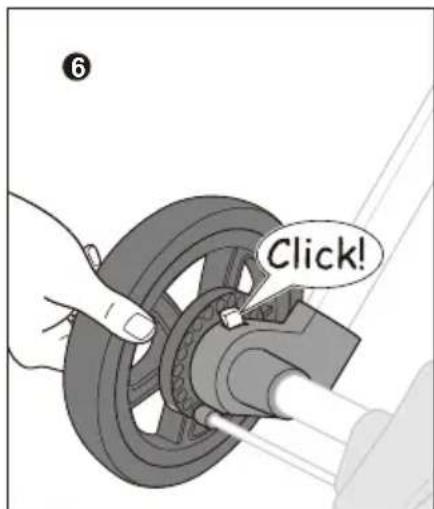
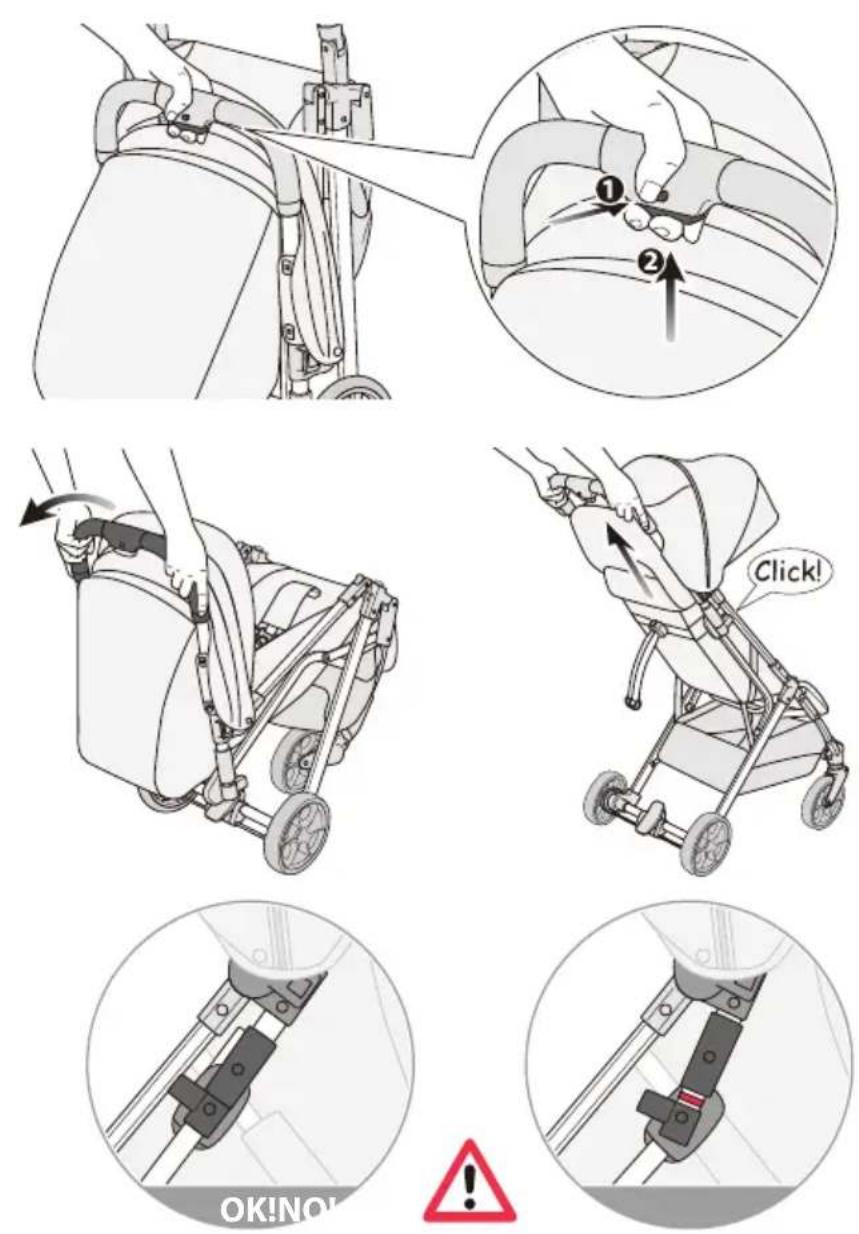
Attaching the Front Bar
Install the seat unit front bar (7) onto the front bar mounts (8). Make sure the front bar locks into position on both sides with a click.
Pull on each side of the front bar to make sure it is completely attached.
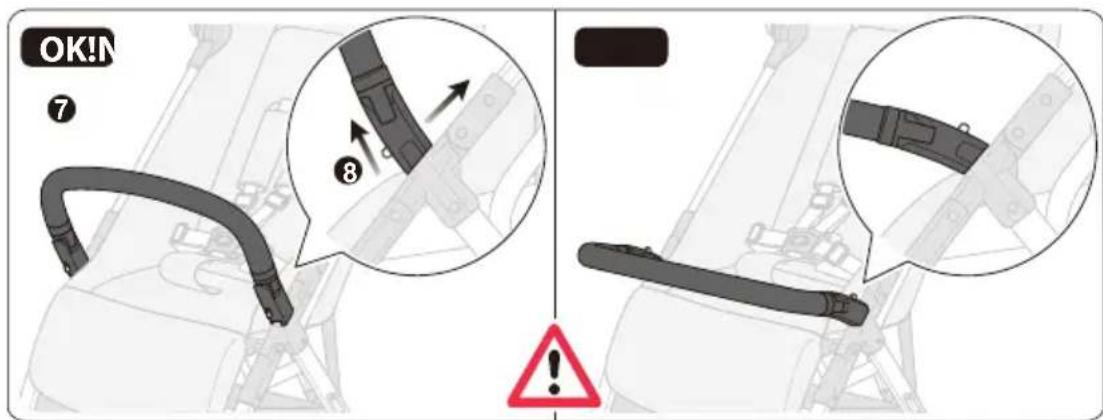
To Remove the Front Bar
Pull both side button as arrow direction (8), then pull up to release the front bar.
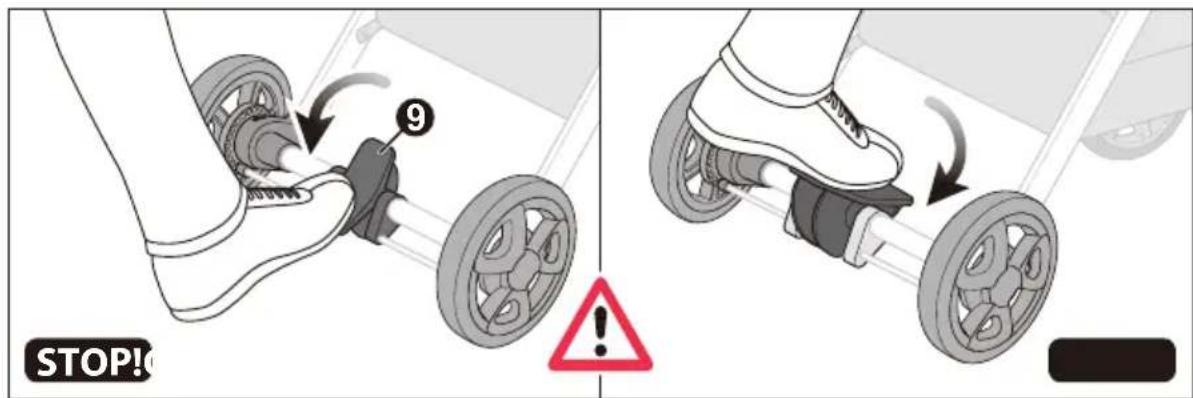
Using the Parking Device
Step on the rear parking levers (9) to lock the rear wheels on the stroller. To release the parking device, lift the parking levers.
Always engage the parking device when stopping and parking the stroller. Push the stroller forward to ensure that the parking device is securely engaged.
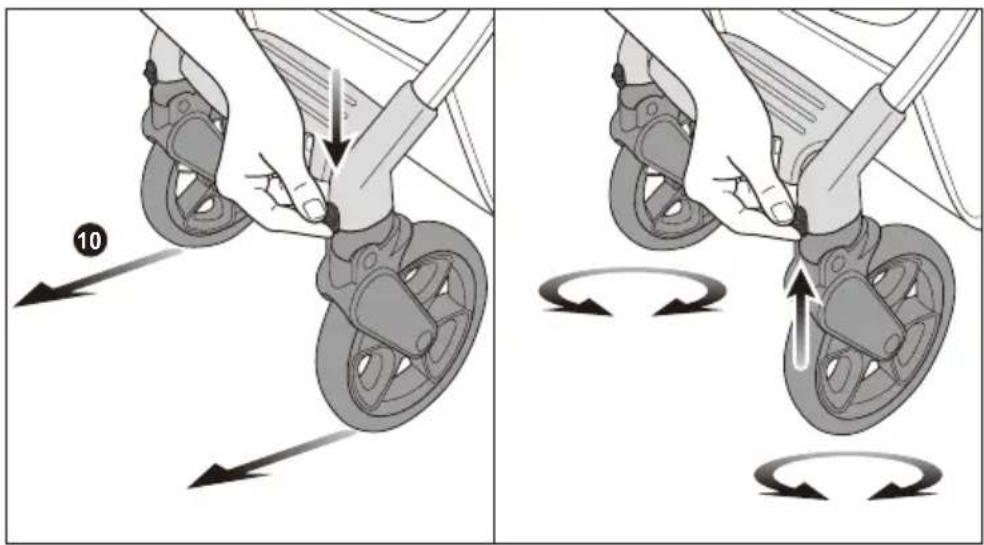
Using the Swivels Wheels
To keep wheels from swiveling, press down on the swivel lock levers (10). Flip up the swivel locks to activate the swivel function.
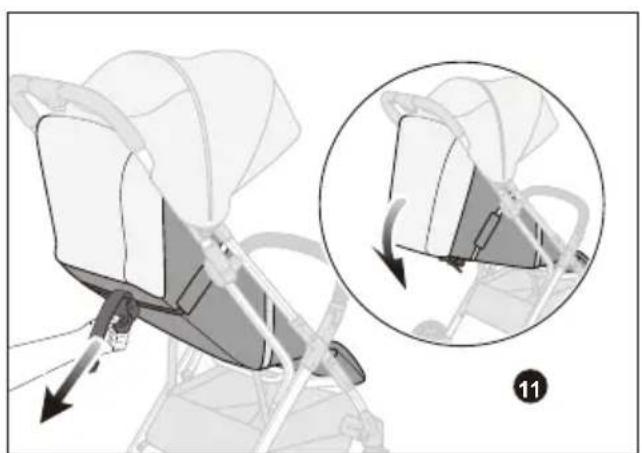
Using the Reclining Backrest
For reclined position, press the adjusting button and to pull the strap downwards (11).
Pull the strap upwards for upright position (12).
CAUTION! To avoid serious injury, DO NOT raise or recline seat while the child is in the stroller.
natural_image
Illustration of a child's seatbelt device with a magnified inset showing the mechanism (no text or symbols)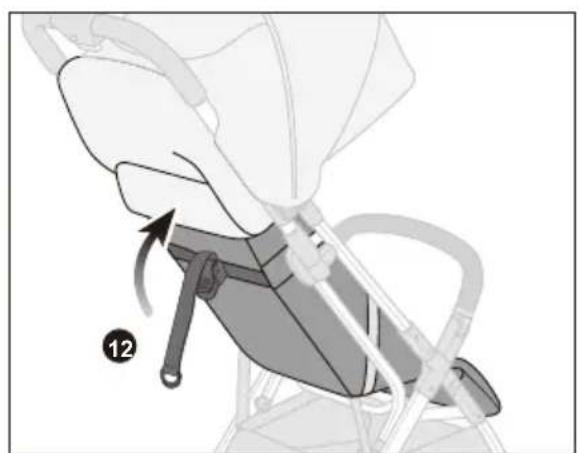
natural_image
Illustration of a hand holding a device with a curved arrow indicating motion (no text or symbols)Adjusting the Seat Belt
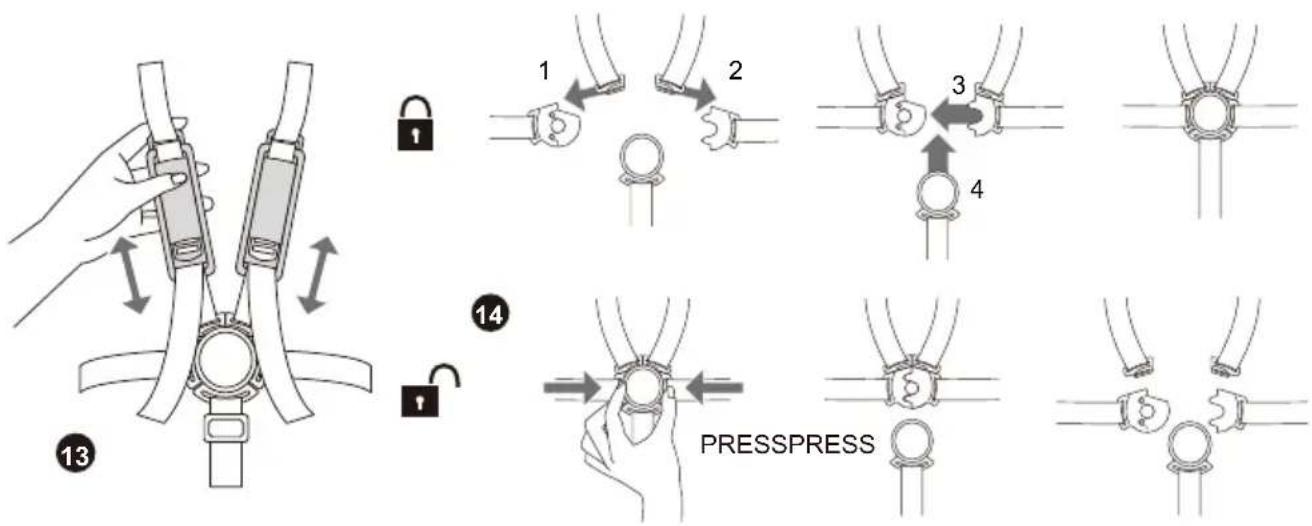
WARNING! To avoid serious injury from the child falling or sliding out of the seat, ALWAYS use the restraint system.
To adjust the harness length, pull the strap upwards or downwards (13).
To release the harness belts, press the buckle (14).
CAUTION! Even when the seat belt is fastened, never leave the child unattended. Never use seat belts that are torn or damaged.
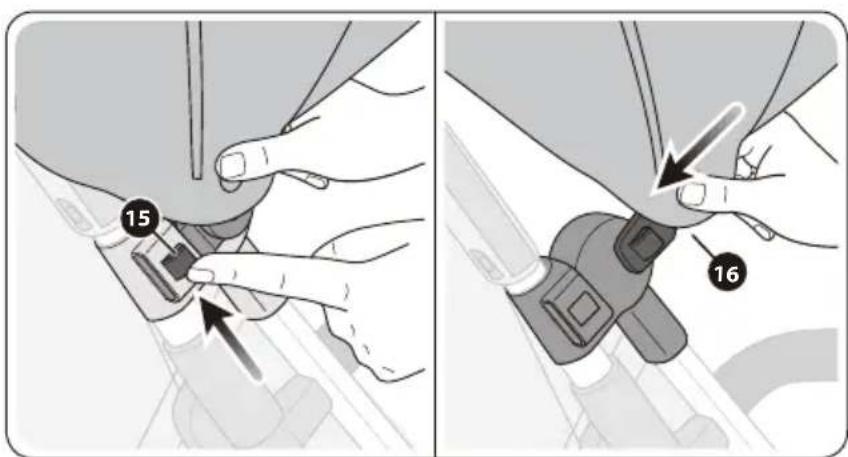
Canopy
Push the buttons of both sides of the canopy and unzip the zipper to release it from the stroller (15).
Assemble canopy, insert the plastic link onto the mount until it clicks into place, and pull up the zipper (16).
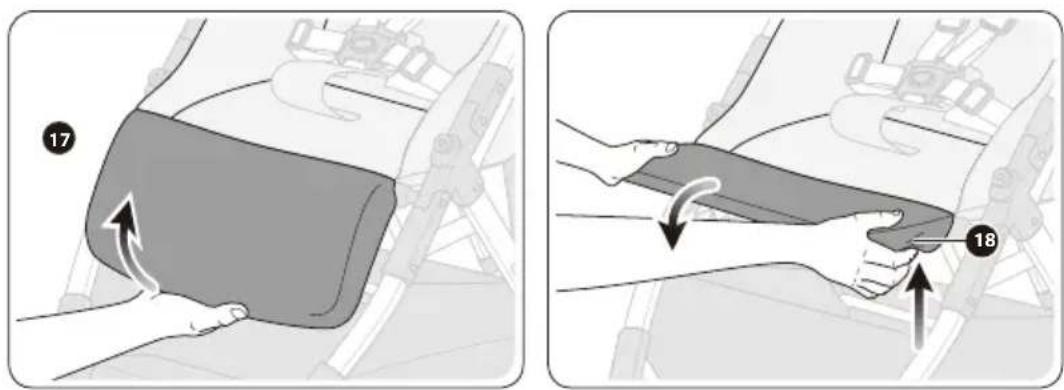
Using the Leg Extension
Push the levers on each side under the leg extension to adjust it (17) up to horizontal position.
When not in use, push the release levers (18) to rotate down to its original position.
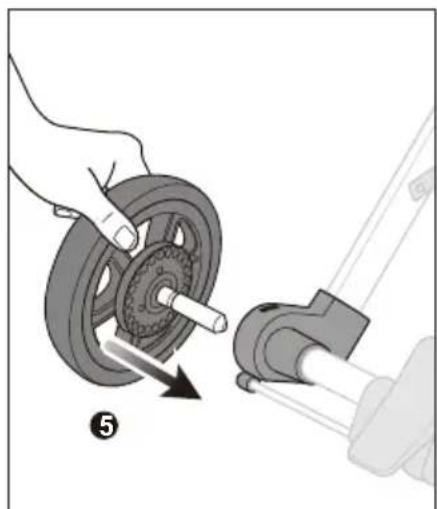
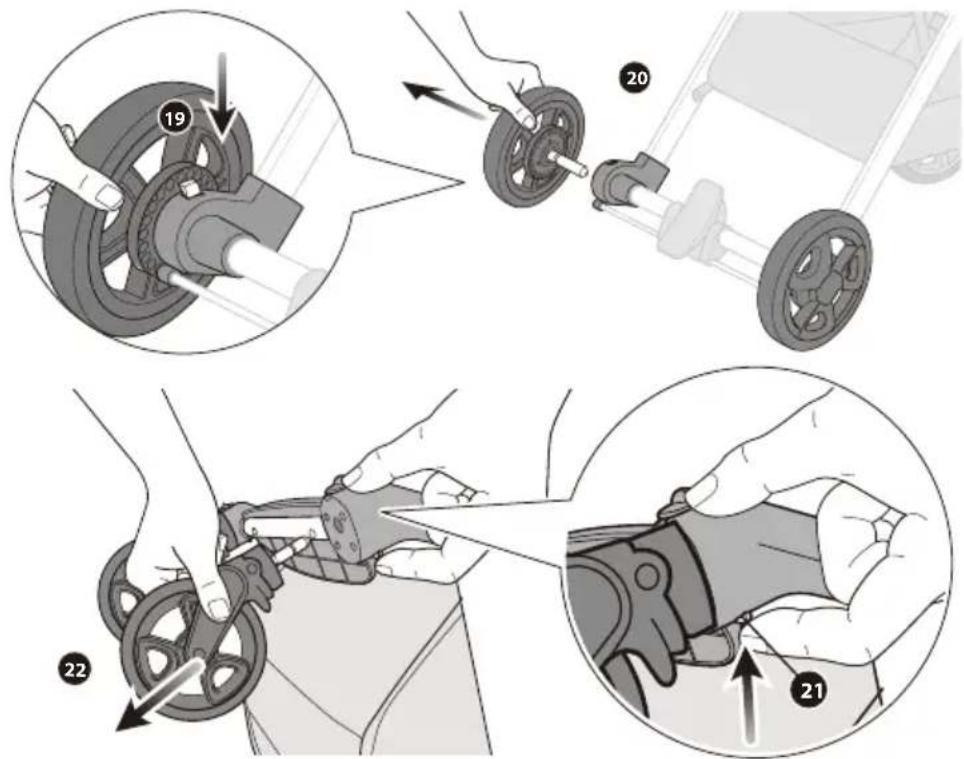
Remove the Rear Wheel/Front Wheel
Wheels can be removed. Press the rear wheel release button (19) located at the on top of brake lever (20), then pull off the wheel from the shaft. Press the release button (21). Pull off front wheels (22).
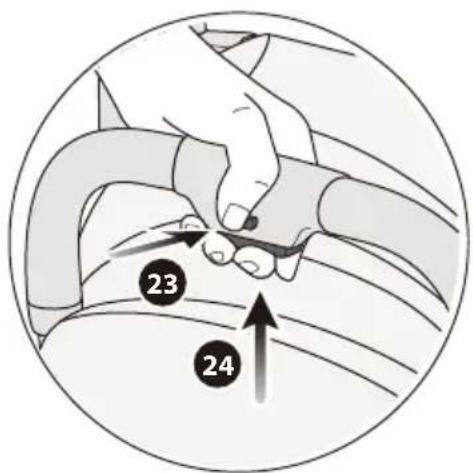
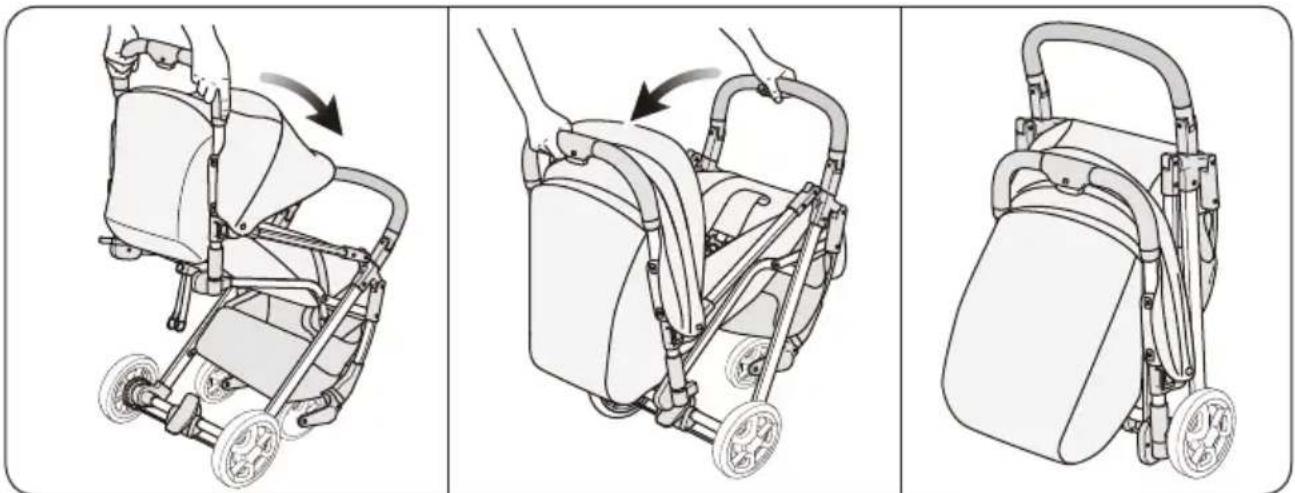
Folding the Stroller
Before folding the stroller, lock the front swivel wheels, withdraw the canopy, and remove the child from the stroller.
Push the safety lock button (23) and hold the release button upwards (24) to fold the stroller. Tilt the stroller onto its back wheels, roll it forward and pull it back quickly so the front bar will fold inward.
natural_image
Three-step illustration of a baby stroller with hand positioning, showing body positioning and seat arrangement (no text or symbols)CARE & MAINTENANCE
- Clean and inspect the product regularly.
- Check on a regular basis that the brakes, wheels, latches, connecting elements, belt systems and seams are properly functional.
- Do not expose the product to strong sunlight.
• After use in rain or snow, the wheels should be lubricated, and the vehicle dried to prevent rust. - If stroller is wet due to washing or rain/snow, make sure it dries entirely.
- Stop using the stroller if it is damaged.
- Only use spare parts provided and approved by the manufacturer.
- Do not use harsh cleaning detergent (such as solvents).
Cleaning Chassis
To clean the chassis, wipe with damp cloth. Then wipe out any traces of moisture on the chassis with a dry cloth. Chassis might become moldy and musty if not properly wiped dry.
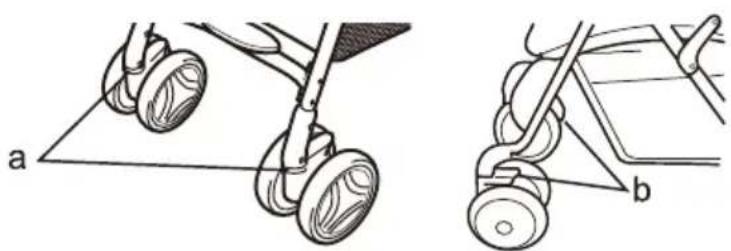
Wheels and swivel mechanisms
After prolonged normal use, the wheels of your stroller may not swivel as easily as when the stroller was new. This is usually due to a buildup of dirt in the swivel mechanism. Before adding lubricant, test the swivel action to determine whether lubrication is necessary. Using compressed air aimed at point (a) and (b), to blow dirt from the swivel mechanisms. Regularly check that all screws, bolts, and nuts are tightened.
natural_image
Technical line drawing showing two mechanical assembly steps labeled a and b, with no visible text or symbols.Adding Lubricant
Avoid lubricating the swivel wheels whenever possible. Excessive lubrication or adding lubricant to swivel wheels when new may cause them to develop a shimmy or wobble that may quicken their deterioration. Add lubricant (silicon spray*) to the area required in small amounts. (Do not use cooking oil or WD-40 because oil attracts dust and would hinder the movement rather than improve it.) * Compressed air is available in varying size cans at most hardware stores. * Please don't be excessive in the sun, it could cause premature color fading of the fabric and plastic parts.
WARNING
ASSEMBLY & FUNCTIONS
MONTERING AV BAKHJUL
Montera de bakre hjulen (5) på den bakre axelenheten (6).
Montera frontbygel
natural_image
Illustration of a bicycle seat with directional arrows indicating movement, showing a close-up of the seat (no text or symbols present)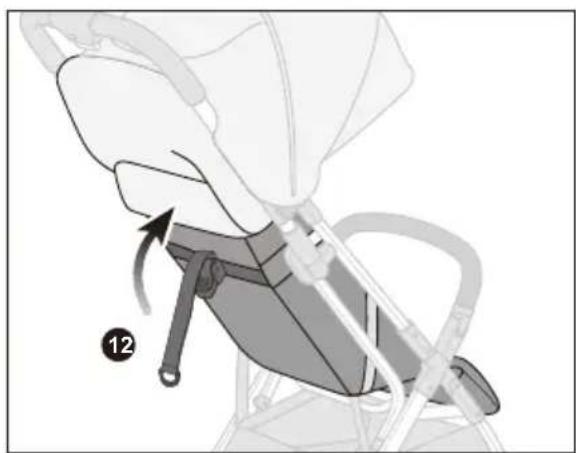
natural_image
Mechanical assembly diagram showing a belt drive mechanism with a numbered label (12), no text or symbols present.Använda fotstödet
Ta bort bakhjulet/framhjulet
natural_image
Three-step illustration of a baby stroller with hand positioning and side arm mechanism (no text or symbols)SKÖTSEL OCH UNDERHÅLL
natural_image
Technical line drawing of two mechanical components labeled a and b, showing wheel assembly and mounting details (no text or symbols beyond labels)natural_image
Illustration of a hand turning a wheel component with a tool, showing mechanical assembly (no text or symbols)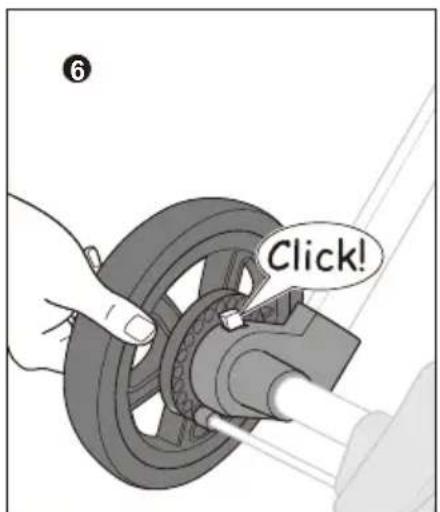
Feste frontstangen
Monter frontstangen på seteenheten (7) på de fremre styrefestene (8). Forsikre deg om at frontstangen låses på plass på begge sider med et klikk.
natural_image
Illustration of a baby seat with a magnified inset showing the seat structure (no text or symbols)
natural_image
Illustration of a person using a medical device to interact with a device, showing mechanical components and a numbered label (12) — no text or symbols present.Folde sammen vognen
natural_image
Three-step illustration of a stroller with hand positioning and side arm mechanism (no text or symbols)RENGJ∅RING OG VEDLIKEHOLD
natural_image
Technical line drawing of two mechanical components labeled a and b, showing different wheel configurations (no text or symbols present)natural_image
Two-step illustration showing hands assembling a bicycle wheel, labeled 5 and 6 (no text or symbols on the diagram itself)natural_image
Illustration of a person using a roller skates on a stroller, showing foot positioning and wheel assembly (no text or symbols)Justering af ryglæn
natural_image
Illustration of a children's seatbelt device with a close-up inset showing the interior frame (no text or symbols)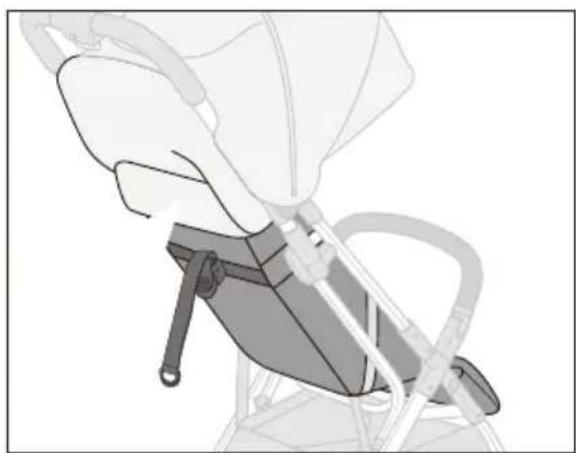
natural_image
Illustration of a person seated in a chair using a bicycle seatbelt device (no text or symbols visible)Brug af fodstøtten
Fjern baghjul/forhjul
natural_image
Three-step illustration of a baby stroller with hand positioning and body positioning, showing mechanical assembly (no text or symbols)PLEJE OG VEDLIGEHOLDELSE
natural_image
Technical line drawing of two mechanical components labeled a and b, showing different wheel configurations (no text or symbols present)Brug af smøremiddel
KOKOAMINEN JA TOIMINNOT
Etupyörien asennus
Takapyörien asennus
natural_image
Illustration of a hand turning a wheel with a shaft, next to a mechanical component (no text or symbols)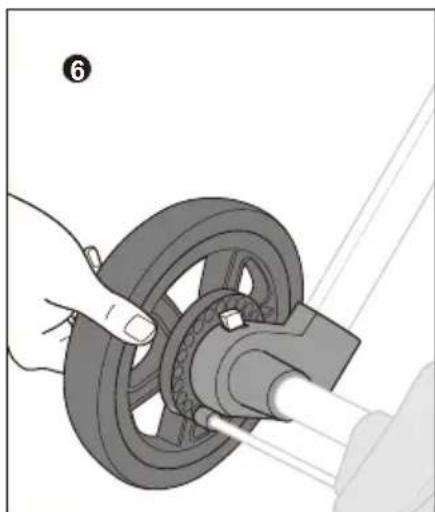
natural_image
Illustration of hands operating a mechanical component with a ring and shaft (no text or symbols)natural_image
Illustration of a person using a roller skates, showing foot positioning and seat alignment (no text or symbols)natural_image
Illustration of a child's seatbelt device with zoomed-in detail view (no text or symbols)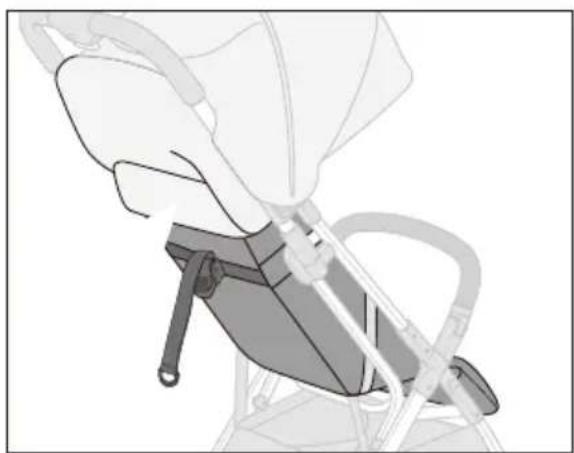
natural_image
Illustration of a person using a handheld device to interact with a device (no text or symbols visible)natural_image
Three-step illustration of a baby stroller with hand positioning, showing body positioning and seat assembly (no text or symbols)HUOLTO JA PUHDISTUS
natural_image
Technical line drawings of two mechanical components labeled a and b, showing different wheel configurations (no text or symbols present)natural_image
Mechanical assembly diagram showing a hand operating a brake caliper and a wheel component with an arrow indicating motion (no text or symbols present)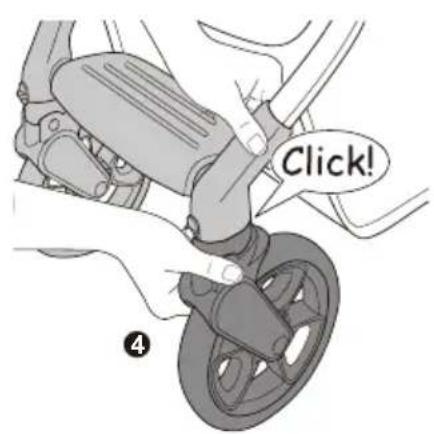
natural_image
Illustration of a hand turning a wheel with a shaft, next to a mechanical component (no text or symbols)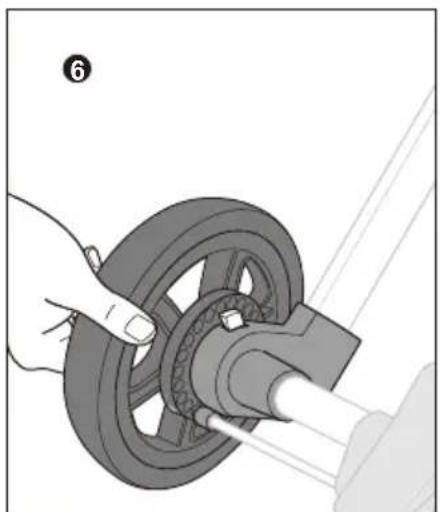
natural_image
Illustration of a hand operating a car wheel assembly with a shaft (no text or symbols)natural_image
Illustration of a person's foot and ankle roller skates being adjusted for a seatbelt (no text or symbols present)natural_image
Illustration of a bicycle seatbelt device with zoomed-in detail view (no text or symbols)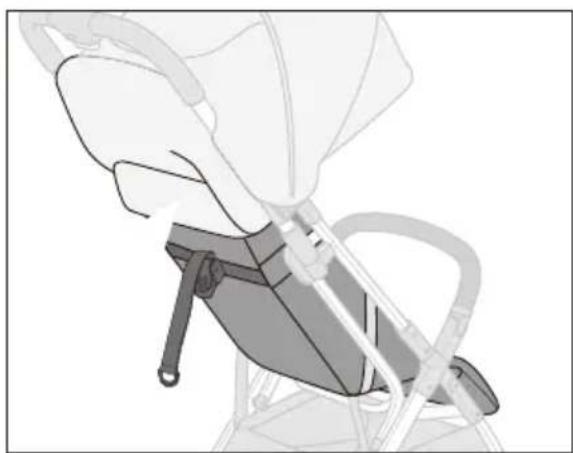
natural_image
Illustration of a person seated in a chair with a seatbelt and mechanical device (no text or symbols visible)natural_image
Three-step illustration of a baby stroller with hand positioning, showing body positioning and seat assembly (no text or symbols)PFLEGE UND WARTUNG
natural_image
Technical line drawing of two mechanical components labeled a and b, showing wheel assembly and mounting details (no text or symbols present)Produced by: Jollyroom AB
Sörredsvägen 111
SE- 418 78 Göteborg
SWEDEN
Contact:
+46(0)31 310 00 00

Fremstillet af: Jollyroom AB
Sörredsvägen 111
SE-418 78 Gøteborg
SVERIGE
Kundeservice:
+45 88 44 88 88

Producerad av: Jollyroom AB
Sörredsvägen 111
SE-418 78 Göteborg
SVERIGE
Konsumentkontakt:
+46(0)31 310 00 00
