HS85-D - Service après-vente Cocraft - Free user manual and instructions
Find the device manual for free HS85-D Cocraft in PDF.


| Product Type | Heat Gun |
| Brand | Cocraft |
| Model | HS85-D |
| Voltage | 230 V |
| Power | 2000 W |
| Temperature Range | 50-600 °C |
| Airflow Settings | 2-speed: 300/500 L/min |
| Dimensions (LxWxH) | 280 x 80 x 200 mm |
| Weight | 0.8 kg |
| Cord Length | 2.5 m |
| Certifications | CE, RoHS |
| Warranty | 2 years |
| Included Accessories | 3 nozzles, heat-resistant stand |
| Maintenance | Keep air vents clean; replace filters as needed |
| Safety Features | Overheat protection, non-slip handle |
| Spare Parts Availability | Nozzles, heating element, fan motor available |
| Repairability | Modular design; professional repair recommended |
| General Information | Ideal for paint stripping, shrink tubing, bending plastic |
Frequently Asked Questions - HS85-D Cocraft
User questions about HS85-D Cocraft
0 question about this device. Answer the ones you know or ask your own.
Ask a new question about this device
Download the instructions for your Service après-vente in PDF format for free! Find your manual HS85-D - Cocraft and take your electronic device back in hand. On this page are published all the documents necessary for the use of your device. HS85-D by Cocraft.
USER MANUAL HS85-D Cocraft
Read the entire instruction manual carefully and make sure that you fully understand it before you use the equipment. Keep the manual for future reference.
Viktig information:
Original instructions
Bruksanvisning i original
Originalbruksanvisning
Please read the entire instruction manual before using the product and save it for future reference. We apologise for any text or photo errors and any changes of technical data. If you have any questions concerning technical problems please contact our Customer Service Department (see address on reverse.)
Safety
General Safety Instructions
Warning: When using this machine all basic safety precautions must be followed to avoid the risk of fire, electrocution and personal injury. Read these instructions carefully before using the product and keep them for future reference.
- Keep work area clean.
Cluttered areas and benches invite injuries.
- Consider work area environment.
Do not expose power tools to rain. Do not use power tools in damp or wet locations. Keep work area well lit. Do not use power tools where there is risk of cause fire or explosion.
- Guard against electric shock.
Avoid body contact with earthed or grounded surfaces (e.g. pipes, radiators, ranges, refrigerators).
- Keep children away.
Do not let visitors touch the tool or extension cord. All visitors should be kept away from area.
- Store idle tools.
When not in use, tools should be stored in a dry, high or locked up place, out of reach of children.
- Do not force the tool.
It will do the job better and safer at the rate for which it was intended.
- Use the right tool.
Do not force small tools or attachments to do the job of a heavy duty tool. Do not use tools for purposes not intended; for example, do not use circular saws to cut tree limbs or logs.
- Dress properly.
Do not wear loose clothing or jewellery, they can be caught in moving parts. Rubber gloves and non-skid footwear are recommended when working outdoors. Wear protecting hair covering to contain long hair.
- Use safety glasses.
Also use face or dust mask if the cutting operation is dusty.
- Connect dust extraction equipment.
If devices are provided for the connection of dust extraction and collection facilities ensure these are connected and properly used.
- Do not abuse the cord.
Never carry the tool by the cord or yank it to disconnect it from the socket. Keep the cord away from heat, oil and sharp edges.
- Secure work.
Use clamps or a vice to hold the work. It is safer than using your hand and it frees both hands to operate the tool.
- Do not overreach.
Keep proper footing and balance at all times.
- Maintain tool with care.
Keep cutting tools sharp and clean for better and safer performance. Follow instructions for lubrication and changing accessories. Inspect tool cord periodically and if damaged have it repaired by an authorized service facility. Inspect extension cords periodically and replace, if damaged. Keep handles dry, clean and free from oil and grease.
- Disconnect tools.
When not in use, before servicing and when changing accessories such as blades, bits and cutters.
- Remove adjusting keys and wrenches.
Form the habit of checking to see that keys and adjusting wrenches are removed from the tool before turning it on.
- Avoid unintentional starting.
Do not carry a plugged-in tool with a finger on the switch. Ensure switch is off when plugging in.
- Use outdoor extension leads.
When tool is used outdoors, use only extension cords intended for outdoor use.
- Stay alert.
Watch what you are doing. Use common sense. Do not operate tool when you are tired.
- Check damaged parts.
Before further use of the tool, a guard or other part that is damaged should be carefully checked to determine that it will operate properly and perform its intended function. Check for alignment of moving pans, free running of moving parts, breakage of pans, mounting and any other conditions that may affect its operation. A guard or other pan that is damaged should be properly repaired or replaced by an authorized service centre unless otherwise indicated in this instruction manual. Have defective switches replaced by an authorized service facility. Do not use the tool if the switch does not turn it on and off.
- Use recommended accessories.
The use of any accessory or attachment, other than those recommended in this instruction manual, may present a risk of personal injury.
- Have your tool repaired by a qualified person.
This electric tool is in accordance with the relevant safety requirements. Repairs should only be carried out by qualified persons using original spare parts, otherwise this may result in considerable danger to the user.
Additional Safety Rules for Scroll Saws
- Never have your hands under the table when using the scroll saw.
- Make sure that the scroll saw is securely fastened to the table/workbench with clamps or bolts and that the table is stable.
- Avoid holding the workpiece in such a way that you need to change grip in the middle of a cut. Think carefully about how to hold the workpiece safely before starting to cut.
- Never place hands or fingers in the path of the saw blade or in such a position that they might come into contact with the saw blade if your hand slips.
- Make sure that the scroll saw blade has completely stopped and that the plug has been pulled before making any adjustments or clearing away sawdust and offcuts.
• Always use safety glasses, ear defenders and a face mask. - Never start the scroll saw unless the saw table is clear of tools and waste materials.
- Make sure that the correct type of saw blade has been fitted and that it is securely fixed before starting the scroll saw.
- Extra care should be exercised when sawing very small, very large or irregularly shaped workpieces. Never saw a workpiece that does not lie flat on the surface of the saw table without arranging extra means of support for the workpiece.
- Hold the workpiece steady on the saw table and feed the workpiece slowly towards the saw blade.
- Care should be taken when reversing the workpiece out of a saw cut. The saw blade could get stuck in the saw cut. Switch the power off, pull out the plug and knock a suitable wedge in the saw cut to open it. The workpiece can then be reversed out of the saw cut.
- Make sure that the blade guard is undamaged and correctly attached.
Product safety labels

Always wear eye and ear protection.
Respiratory protection required, sawdust can be harmful to your health.
Product Description
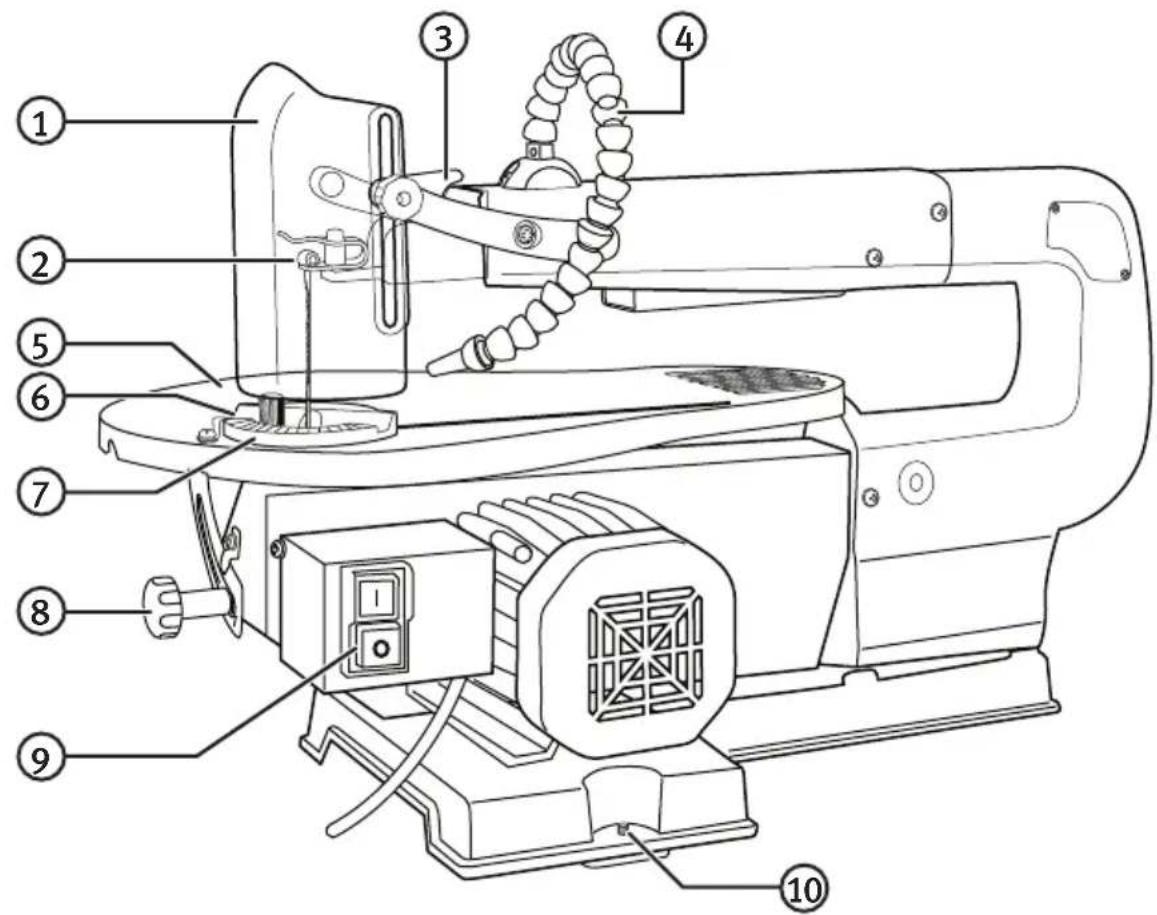
- Blade Guard
- Upper Blade Holder (the lower one is inside the machine, under the saw table)
- Blade Tensioner
- Dust Blower
- Saw Table
- Table Insert
- Mitre Guide
- Tilt Angle Locking Knob
- ON/OFF Switch (1/0)
- Mounting Hole (3×)
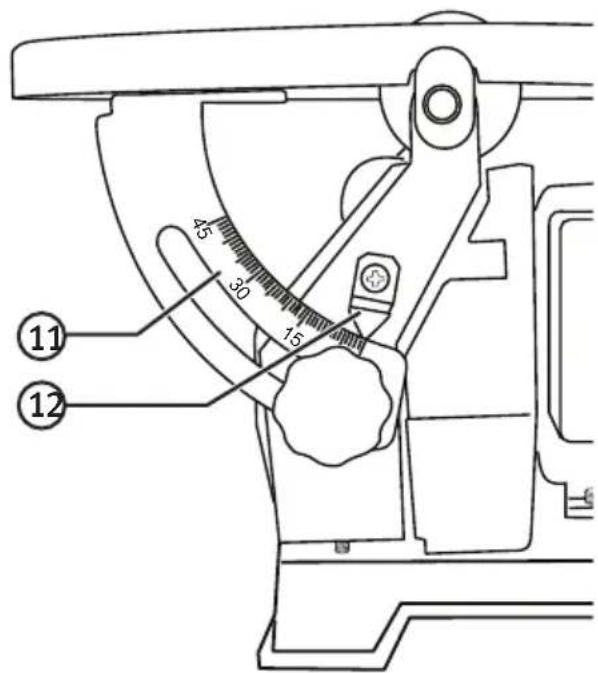
- Tilt Angle Scale
- Tilt Angle Pointer
Assembly
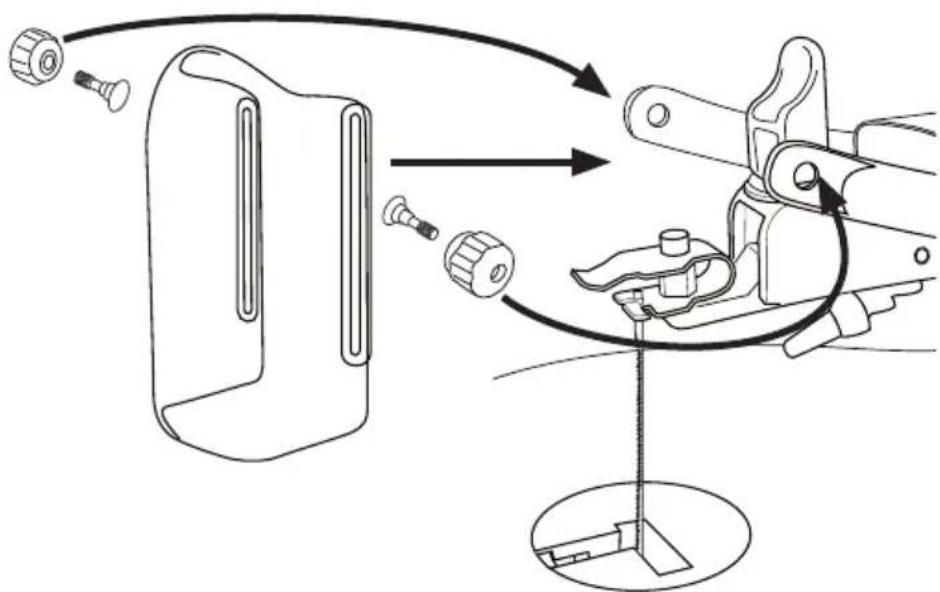
The saw is delivered fully assembled except for the blade guard and dust blower tube.
Attach the blade guard as shown in the figure and screw on the blower tube.
Installation
Select a good position for the scroll saw. It should have plenty of space, good ventilation, be well-lit and close to an earthed wall socket.
Mounting the Scroll Saw
The scroll saw has three mounting holes. Bolt the machine to a stable surface. Place flat washers between the heads of the bolts and the holes, use lock nuts that do not vibrate loose. Do not overtighten the bolts (the bolts, washers and nuts needed to mount the machine are not included).
Calibrating the Tilt Angle Scale
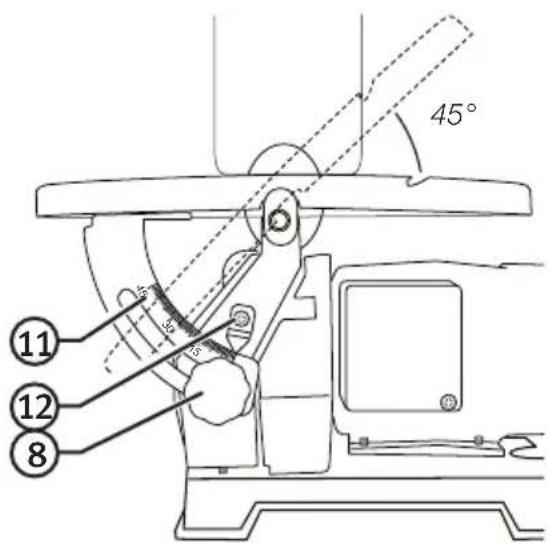
To calibrate the tilt angle scale first undo the table locking knob (8) and then set the table at 90 degrees to the saw blade. Use a try square or similar instrument to make sure that the angle is 90^ .
Undo the screw holding the pointer (12), set it to 0^ and then tighten the screw again. The angle scale (11) is convenient to use but is not 100% accurate. For best results it is best to double-check the angle using a bevel gauge before sawing.
Fitting and Replacing the Blade
Switch the scroll saw off and pull out the plug before fitting or replacing the saw blade.
Pin End Saw Blades
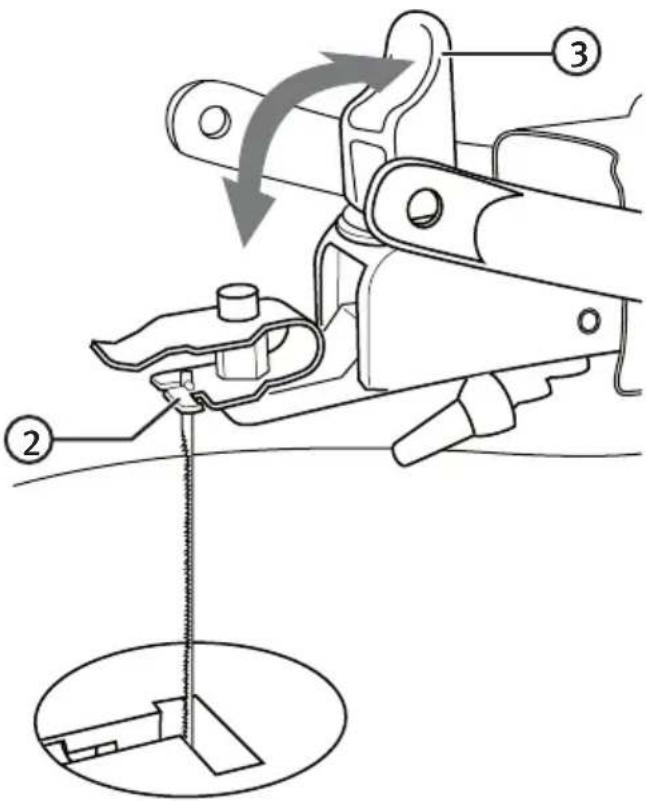
- Release the blade tension by lifting the quick-release blade tension lever (3).
- The blade can then be unhooked from first the upper and then the lower blade holder.
- When fitting a new blade the teeth must point downwards. Certain blades have teeth pointing in both directions, in which case it does not matter which way up the blade is fitted.
- Hook the blade into the lower blade holder first and then into the upper blade holder (2) before tensioning the blade with the tension lever (3).
• Make sure that the blade is sitting securely in the slots of the blade holder. - The tension of the saw blade can be adjusted by turning the dial on the quick-release tensioner. Turn it clockwise to increase the tension and anticlockwise to reduce the tension.
Note:
Look at the blade holders when you have removed the saw blade. It is possible to insert the blades in two ways: For sawing from the front and from the side. Sawing from the side is appropriate for workpieces longer than 410 mm.
Important: Only saw from the side when the table is set on 0° angle.
Pinless Saw Blade
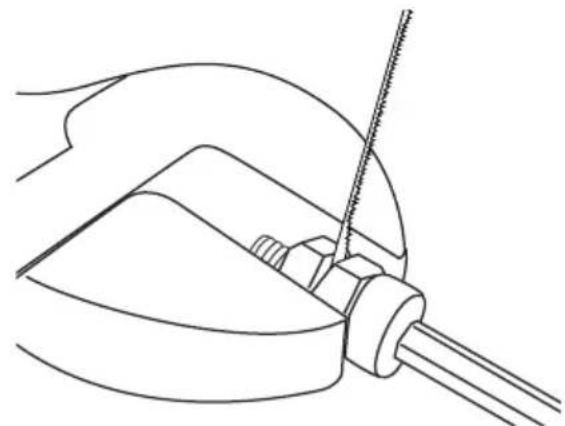
Two holders for pinless saw blades are included. First the holder must be attached to the blade; an adjustable spanner will be needed (an adjustable spanner is not included).
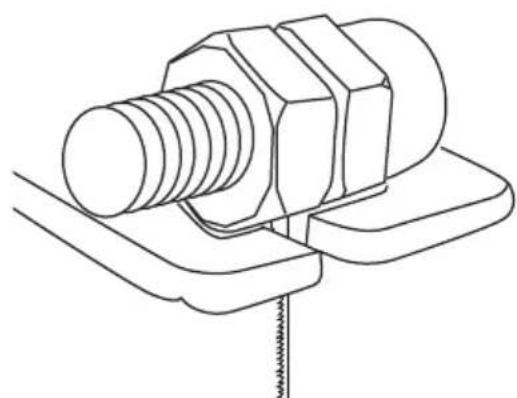
- Insert the saw blade between the two nuts and tighten the socket head screw onto the nut using the allen key. Make sure that the blade is placed at one of the corners of the nuts and that the nuts are in line. This is very important as the corners of the nuts are going to act as "pins" and fit into the slots in the upper and lower blade holders.
natural_image
Line drawing of a mechanical component with a tool inserted, no text or symbols present- After having attached a blade holder to each end of the saw blade it can be installed in the same way as a pin end saw blade. Make sure that the corners of the nuts slot into the slots of the upper and lower blade holders.
natural_image
Technical line drawing of a bolt and nut assembly (no text or symbols)Helpful Suggestions
There are five common causes of saw blade failure:
- The saw blade is under too much or too little tension.
- Too much pressure is exerted on the blade whilst sawing.
- The blade is twisted or bent because the workpiece is not fed straight.
- The blade is worn out.
- The workpiece is too thick. The saw can cut material up to 50 mm thick.
Using the Scroll Saw
A scroll saw can cut difficult curves where other types of saw are inappropriate. A scroll saw can also be used for cross-cutting, rip sawing and bevelling. Things to consider when using a scroll saw:
- The saw will not work on its own. The operator of the saw is responsible for ensuring that the workpiece is fed into the blade and for letting the blade do the sawing.
-
The workpiece must be fed into the blade slowly and smoothly because the teeth of the saw blade are very small and only cut on the downward stroke. Feeding the workpiece into the blade too quickly could easily break the blade.
-
Even if the saw is capable of sawing through wood up to 50 mm thick, best results are achieved working with materials up to 25 mm thick. When sawing wood thicker than 25 mm the rate of feed must be very slow and care must be taken not to bend the blade.
- Sooner or later the teeth of the saw blade will wear out. Best results will be achieved if the blade is changed regularly. Depending on the material of the workpiece the saw blade will retain its edge for anything from a half-hour to two hours continuous sawing.
- Bear in mind that the saw blade will try to follow the grain of the wood (the path of least resistance).
- If you have never used a scroll saw before, it will take a while to get to know how the saw and the workpiece behave during the sawing process. You can count on getting through a few saw blades. Scroll saw blades are quite fragile, not at all as sturdy as the blades used in handsaws or circular saws.
Responsible disposal
This symbol indicates that this product should not be disposed of with general household waste. This applies throughout the entire EU. In order to prevent any harm to the environment or health hazards caused by incorrect waste disposal, the product must be handed in for recycling so that the material can be disposed of in a responsible manner. When recycling your product, take it to your local collection facility or contact the place of purchase. They will ensure that the product is disposed of in an environmentally sound manner.
natural_image
Symbol of a trash bin crossed with no text or labels, accompanied by a blank rectangular block below (no text or symbols present)Technical Data
Power Supply 230 V, 50 Hz
Output Power 85 W
Max Cutting Depth 50 mm
Throat 410 mm
Blade Length 133 mm
Strokes per Minute 1400
Stroke Length 17 mm
Table Size 375 × 250 mm
Overall Size 580 × 280 × 340 mm
Table Tilt 0–45°
Saw Blade Pin End (holders for pinless blade included)
Weight 12.5 kg
Kontursåg
Art.nr 18-3058 Modell MQ50II-UK
30-9686
MQ50II
flowchart
graph TD
    A["Component 1"] --> B["Assembly Step"]
    B --> C["Assembly Point"]
    C --> D["Assembly End"]
Installation
Obs!
natural_image
Line drawing of a mechanical component with a tool inserted, no text or symbols presentnatural_image
Technical line drawing of a bolt and nut assembly (no text or symbols)Tänk på detta:
natural_image
Symbol of a trash bin crossed with no text or labels, accompanied by a black rectangular block below (no text or symbols present)Tekniska data
Drivspänning 230 V, 50 Hz
Effekt 85 W
Max. såghöjd 50 mm
Max. sågdjup 410 mm
Bladlängd 133 mm
Slag per minut 1440
Slaglängd 17 mm
flowchart
graph TD
    A["Device with two bolts"] --> B["Battery with two bolts"]
    B --> C["Switch mechanism with clamp mechanism"]
    C --> D["Close-up of clamp mechanism"]
    style A fill:#f9f,stroke:#333
    style D fill:#bbf,stroke:#333
Installasjon
Velg en bra plassering for kontursagen med god plass rundt den og med skikkelig ventilasjon og belysning, samt et jordet strømuttak på bekvem avstand.
Obs!
natural_image
Line drawing of a mechanical component with a tool inserted, no text or symbols present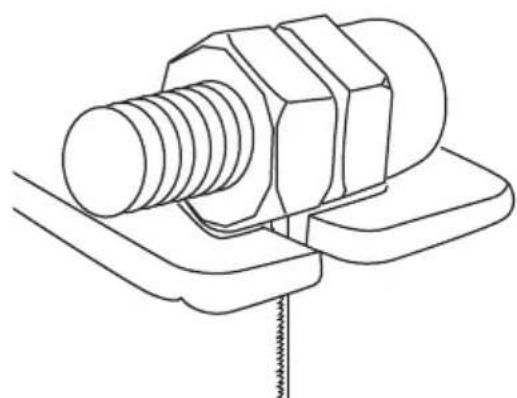
natural_image
Technical line drawing of a bolt and nut assembly (no text or symbols)Tenk på dette:
natural_image
Symbol of a trash bin crossed with no text or numbers, representing waste sorting or disposal (no text present)Tekniske data
Drivspenning 230 V, 50 Hz
Effekt 85 W
Huom.!
natural_image
Line drawing of a mechanical component with a tool inserted, no text or symbols present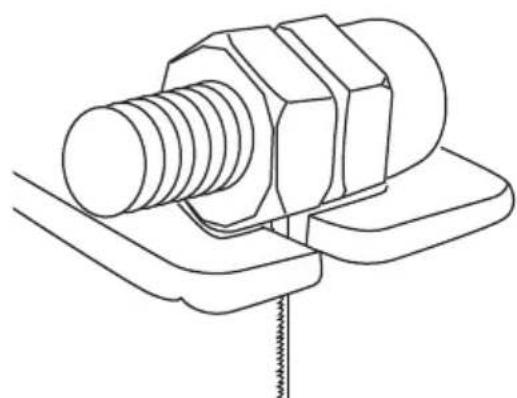
natural_image
Technical line drawing of a bolt and nut assembly (no text or symbols)Huom.:
natural_image
Symbol of a trash bin crossed with no visible text or labelsTekniset tiedot
Hinweis:
natural_image
Line drawing of a mechanical component with a rod inserted, no text or symbols presentnatural_image
Technical line drawing of a bolt and nut assembly (no text or symbols)Bitte beachten:
natural_image
Symbol of a trash bin crossed with no text or numbers, representing waste sorting or disposal (no text present)Technische Daten
Declaration of Conformity
Declares that this product complies with the requirements of the following directives and standards
Manager Technique & Quality
Insjön, Sweden, 2016-11-24
Sverige
Postal 10 - 13 Market Place
Kingston Upon Thames
Surrey
KT1 1JZ
Deutschland
Kundenservice Hotline: 040 2999 78111
E-Mail: kundenservice@clasohlson.de
Homepage
www.clasohlson.de
- Viktig information:
- Safety
- General Safety Instructions
- Additional Safety Rules for Scroll Saws
- Product safety labels
- Product Description
- Assembly
- Installation
- Mounting the Scroll Saw
- Calibrating the Tilt Angle Scale
- Fitting and Replacing the Blade
- Pin End Saw Blades
- Note:
- Pinless Saw Blade
- Helpful Suggestions
- Using the Scroll Saw
- Responsible disposal
- Technical Data
- Kontursåg
- Obs!
- Tänk på detta:
- Tekniska data
- Installasjon
- Tenk på dette:
- Tekniske data
- Huom.!
- Huom.:
- Tekniset tiedot
- Hinweis:
- Bitte beachten:
- Technische Daten
- Declaration of Conformity
- Sverige
- Deutschland
Brand : Cocraft
Model : HS85-D
Category : Service après-vente