LSV6T - Service après-vente Cocraft - Free user manual and instructions
Find the device manual for free LSV6T Cocraft in PDF.


| Product Type | Jigsaw |
| Brand | Cocraft |
| Model | LSV6T |
| Power | 650 W |
| Voltage | 230 V ~ 50 Hz |
| Variable Speed | 500–3000 strokes/min |
| Stroke Length | 20 mm |
| Cutting Capacity (Wood) | 80 mm |
| Cutting Capacity (Steel) | 6 mm |
| Blade Type | T-shank |
| Weight | 2.4 kg |
| Dimensions (LxWxH) | 270 x 80 x 210 mm |
| Power Cord Length | 2.5 m |
| Protection Class | II |
| Safety Features | Blade guard, lock-off switch, dust blower |
| Maintenance | Clean air vents, lubricate blade guide, check carbon brushes |
| Spare Parts Available | Blades, base plate, brush set |
| Accessories Included | 3 wood blades, 1 metal blade, hex key, anti-splinter insert |
| Warranty | 2 years |
Frequently Asked Questions - LSV6T Cocraft
User questions about LSV6T Cocraft
0 question about this device. Answer the ones you know or ask your own.
Ask a new question about this device
Download the instructions for your Service après-vente in PDF format for free! Find your manual LSV6T - Cocraft and take your electronic device back in hand. On this page are published all the documents necessary for the use of your device. LSV6T by Cocraft.
USER MANUAL LSV6T Cocraft
Read the entire instruction manual carefully and make sure that you fully understand it before you use the equipment. Keep the manual for future reference.
Viktig information:
Original instructions
Bruksanvisning i original
Originalbruksanvisning
LS 6T Vertical Log Splitter
Art.no 40-9065 Model 65585
Please read the entire instruction manual before using the product and then save it for future reference. We reserve the right for any errors in text or images and any necessary changes made to technical data. In the event of technical problems or other queries, please contact our customer services (see address details on the back).
Safety
Log Splitter Warning Symbols

Make sure that you have read and understood the entire instruction manual and that you have read and understood all the safety instructions and warnings.


Place the log splitter on dry, level and firm ground. Make sure that there is enough space to work safely. Keep the work area clean and tidy. Do not leave tools, logs or other items where they could become a tripping hazard.

Make sure that the log splitter is undamaged, that none of the safety features are missing and that they fitted and working properly. Never operate the log splitter if it is damaged or if any of the safety features is damaged or missing. Check the oil level before starting the log splitter.
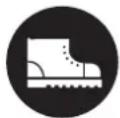

Wear non-slip footwear and protective gloves. Remove loose-fitting clothing and jewellery and contain long hair.

Wear safety glasses.

Do not smoke whilst operating the log splitter or when topping up the oil. Do not use the log splitter in the vicinity of naked flames or where sparks might be produced.
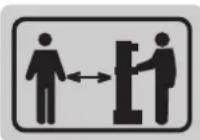
The log splitter must always be operated by one person only. Keep children and bystanders at a safe distance from the work area. Never allow another person to help you free a jammed log. Persons under 16 years of age must not operate the log splitter unsupervised. If persons under 18 years of age are to operate the log splitter, they must be instructed in the safe use of the product and understand the hazards involved. Persons under 18 years of age must be supervised by an adult whilst operating the log splitter.
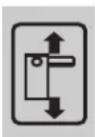
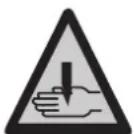
Do not overreach. Maintain correct balance and footing at all times. Never stack your logs in such a way that you need to stretch to reach them. Only use your hands to operate the log splitter. Never use other parts of the body or devices which could enable your hands to become crushed between the wedge and the log. Pay attention to the movement of the splitting wedge at all times. Never attempt to split two logs at once; one may be ejected with serious consequences. Never attempt to load a log into the log splitter whilst it is motion. Keep hands away from moving parts.
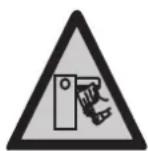
Keep hands away when the splitting wedge is returning after it has split the log. The log splitter is designed to stop only when the splitting wedge has returned to its original position. Keep your hands away from any splits and cracks which open in logs. They may close suddenly which could cause serious personal injury. Never attempt to remove jammed logs by hand. Use an appropriate tool for the job.

Disconnect the plug from the power supply before making any adjustments, servicing or repairing the log splitter.
General safety instructions
- Keep the working area tidy. Cluttered surfaces and benches invite accidents.
- Do not use the machine in dangerous environments. The machine should not be used on moist or wet surfaces or in rain. Make sure that the work area is well lit. When working in dusty atmospheres, make sure that the air is adequately circulated. Do not operate power tools in explosive atmospheres, such as in the presence of flammable liquids, gases or dust.
- Avoid electric shocks. Avoid body contact with earthed or grounded surfaces such as pipes, radiators, ranges and refrigerators when using power tools.
- Keep children and bystanders away. Keep children and visitors at a safe distance from electrical machinery/tools and electric cables in the workplace.
- Store power tools out of the reach of children. When not in use, power tools should be stored locked away in a safe place, away from children.
- Do not force the machine. The correct feed rate makes the work better and safer.
- Use the correct tool for the job. Do not force a tool to perform a task that it was not designed for.
- Wear suitable attire. Do not wear any loose-fitting clothing, gloves, necklaces, bracelets or other jewellery that can get caught in moving parts. Non-slip footwear is recommended. Wear a hairnet or similar if you have long hair.
- Always wear safety glasses. Normal glasses are not tough enough to withstand impacts. Use a dust mask or dust filter when working in dusty environments.
- Connect dust extraction equipment. If the machine is equipped with dust extraction equipment, ensure that it is connected and used properly. Make sure to empty the dust bag regularly.
- Do not abuse the mains lead. Do not carry the machine by its mains lead. Do not yank the mains lead to turn the power off, pull the plug out instead. Make sure that the mains lead does not come into contact with heat, oil, or sharp edges.
- Secure the workpiece firmly. Where possible, use clamps or a vice. You can then operate the tool using two hands. This is much safer than holding the workpiece in one hand.
- Do not overreach. Make sure that you stand steady and balanced all times.
- Look after your tools. Keep blades sharp and clean for the best and safest performance. Follow the instruction manual's recommendations regarding lubrication and replacement of accessories. Inspect the mains lead regularly. If it is damaged it should be replaced by a qualified service technician. Inspect all leads and cables regularly to check for any damage. Make sure that the machine's handles and controls are clean, dry and free from oil and grease.
- Turn the power off. Pull out the plug and push in the emergency stop button before servicing or changing any blades, drill bits, cutters or sanding discs.
- Remove all spanners and repair tools. Make a habit of checking to make sure that the machine is free of all spanners and tools before turning the power on.
- Avoid accidental starts. Do not walk around with your finger on the trigger of a power tool if it is plugged in. Make sure that the on/off switch is set to OFF before plugging in any power tool.
- Use the correct extension leads. If you use extension leads outdoors, only use those designed for outdoor use. Only use extension leads with thick enough diameter core wires and roll out the whole lead.
- Use common sense and be careful. Think carefully before carrying out every action, so that it is carried out safely. Never operate machines/power tools when you are tired or under the influence of medicine.
- Inspect the tool for damage. Before starting the tool, make sure that the guards and other parts are undamaged and working properly, that moving parts can rotate freely and are correctly aligned, that no moving parts can get caught and that there is no fault or defect that could affect the performance of the machine. A safety guard or any other part that is damaged should be repaired by a tradesman or replaced. Damaged power leads and switches must always be replaced by a tradesman. Never operate a tool if you cannot stop or start the tool comfortably.
- Use only recommended accessories. The use of non-recommended accessories can cause accidents and personal injury.
- Repairs should only be carried out by a qualified repair person using genuine identical replacement parts.
- All power tools should be connected to the mains via a portable residual current device (PRCD). The product must not be modified or used for any other purpose than that for which it has been designed. Regularly check that all screws and nuts are securely tightened.
Specific safety instructions for log splitters
- The log splitter is only intended to be used by one operator at a time. The log splitter must not be operated by more than one person at a time.
- Locate the log splitter on dry, level ground which is not slippery.
- Make sure that branches are cut off flush with the log before splitting.
- Save the instruction manual, make sure that it accompanies the log splitter if it is borrowed.
- Split wood in the direction of the grain. Do not attempt to split wood across the grain.
- Read the warning labels on the log splitter and make sure that they are legible.
- Make sure that the electrical socket you intend to use has the correct voltage (230 V) before connecting the log splitter.
- Never attempt to adjust the force setting yourself. The log splitter is pre-set at the factory for a maximum splitting force of 6 tonnes.
- Tampering with the pressure settings can lead to diminished performance and damage to the machine and result in serious person injury.
- Do not attempt to split two logs at the same time.
- Never attempt to right a leaning log with your hand whilst the ram is in motion. Stop the machine and move the log so that it is standing vertically.
- Never attempt to hold a log with your hand whilst the ram is in motion.
- If a log jams or fails to be split because it exceeds the capacity of the ram, release both control levers and let the ram return to its original position, otherwise there is a risk that the motor will become damaged by overheating.
- Switch off the log splitter and disconnect it from the mains supply whenever you take a break and before starting any maintenance procedures. Make sure that log splitter cannot be started by any children or unauthorised person.
- Make sure that all the safety features on the log splitter are correctly fitted and functioning properly.
- Wear safety glasses, ear defenders and safety shoes if necessary.
- Always stand in such a way that you can perform all work tasks whilst maintaining good balance and grip the control levers in both hands.
- Keep your hands and fingers well away from the and splitting wedge. When operating machines, always use your common sense and be careful.
- Make sure that there are no bystanders or pets close to the machine, sharp splinters can be ejected by the blade with great force.
- Connect the log splitter to a wall socket via an RCD.
- Never use the log splitter in the rain or wet conditions.
- Never use the log splitter if the power switch, plug, mains lead or any other part is damaged. The defective part must be replaced by a qualified repair person.
Safety equipment

Risk of flying wood chips! Wear safety glasses.

Risk of falling pieces of wood. Wear safety shoes.

Risk of flying wood chips! Wear protective gloves.

Do not wear loosely-fitting clothes that may get trapped in moving parts.

If your hair is long, wear a hair net.

Use ear protectors when working with the machine.

Never remove wood chips, dust, etc. with your hands. Turn off the machine and use a brush to remove accumulated material.
Avoid cleaning the product with solvents or other substances that are harmful to health, flammable or explosive.
Contents
Note: The log splitter is heavy, make sure to have help unpacking it.
A) Log splitter
B) Control lever with hand guard
C) Support table
D) Wheels
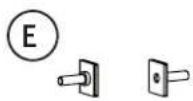
E) Wheel bracket
F) Instruction manual
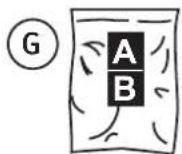
G) Screws, nuts, etc.
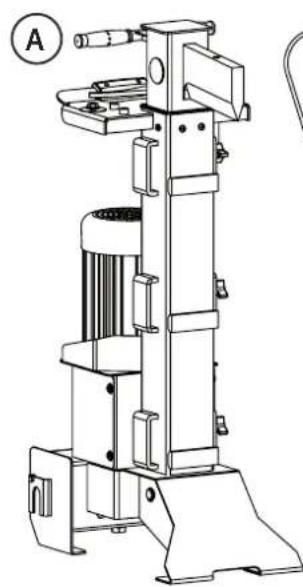
natural_image
Technical line drawing of a vertical industrial machine with control panel and base mount (no text or symbols)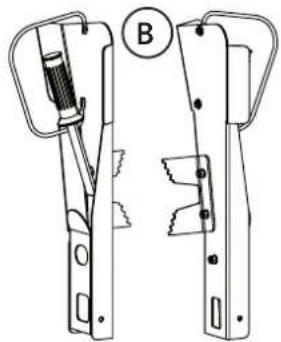
natural_image
Technical line drawing of two mechanical components with no visible text or symbols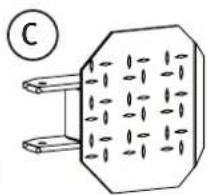
natural_image
Diagram of a rectangular conductor with internal parallel plates and a circular symbol labeled 'C' (no text or symbols on the conductor itself)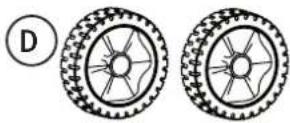

Assembly
Wheels
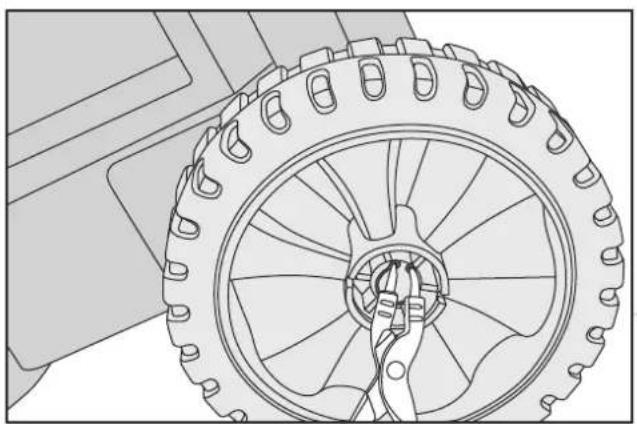
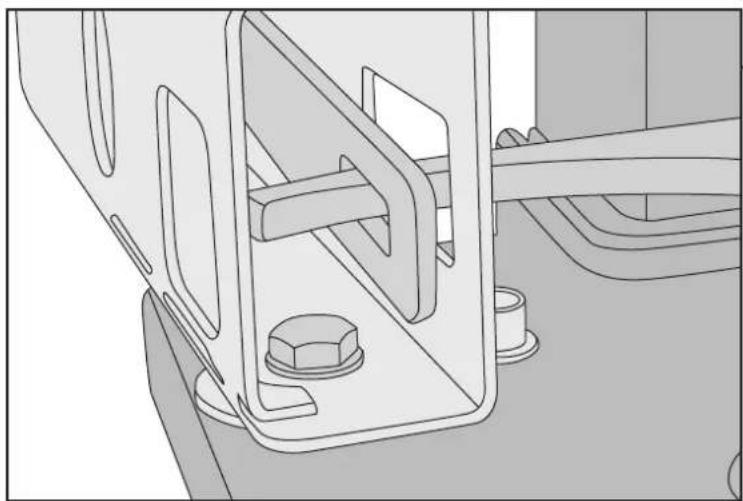
- Screw the wheel brackets onto the log splitter using M6 × 8 screws.
- Slide the wheels onto the axles.
- Secure the wheels using the locking washers.
natural_image
Technical line drawing of a mechanical tire assembly (no text or symbols)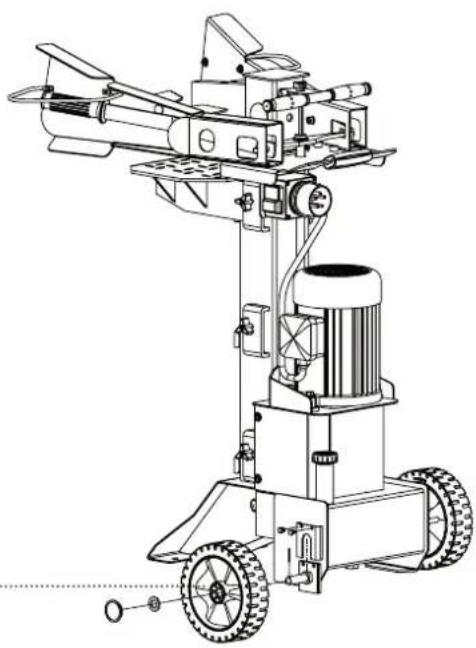
natural_image
Technical line drawing of a mechanical device with wheels and a central motor (no text or symbols)- Fit the hub caps onto the wheels.
Control levers
Attach the control levers using M10 × 30 bolts, washers and nuts. Make sure that the link to the push rod slots into the control levers.
natural_image
Technical line drawing of a mechanical assembly with mounting holes and a central bracket (no text or symbols)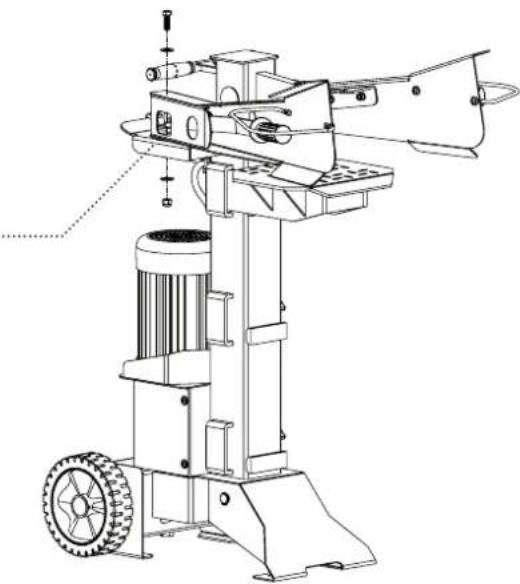
natural_image
Technical line drawing of a manual milling machine with a wheel and bucket (no text or symbols)Support table
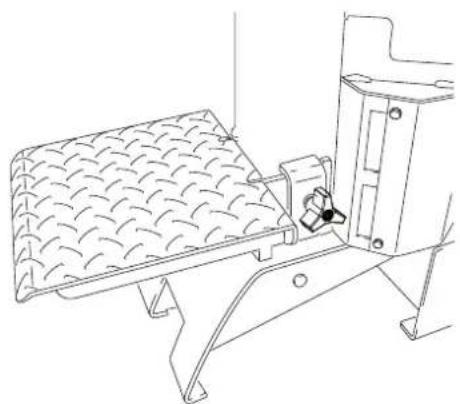
The support table can be fixed in 3 positions.

Danger! This is dangerous and might result in personal injury.
Insert the arms of the support table as far as possible into both side brackets. Make sure that the lugs on the ends of the arms hook onto the back of the brackets.
natural_image
Technical line drawing of a mechanical device with a meshed panel and mounting bracket (no text or symbols)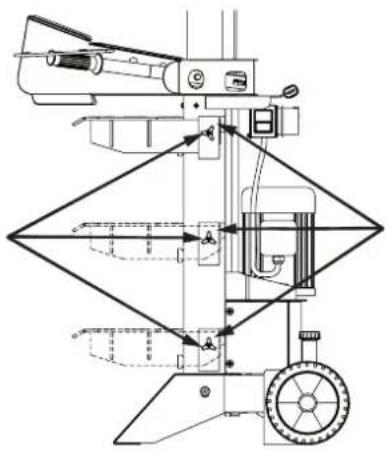
natural_image
Technical line drawing of a mechanical device with no visible text or symbolsIdentification of parts
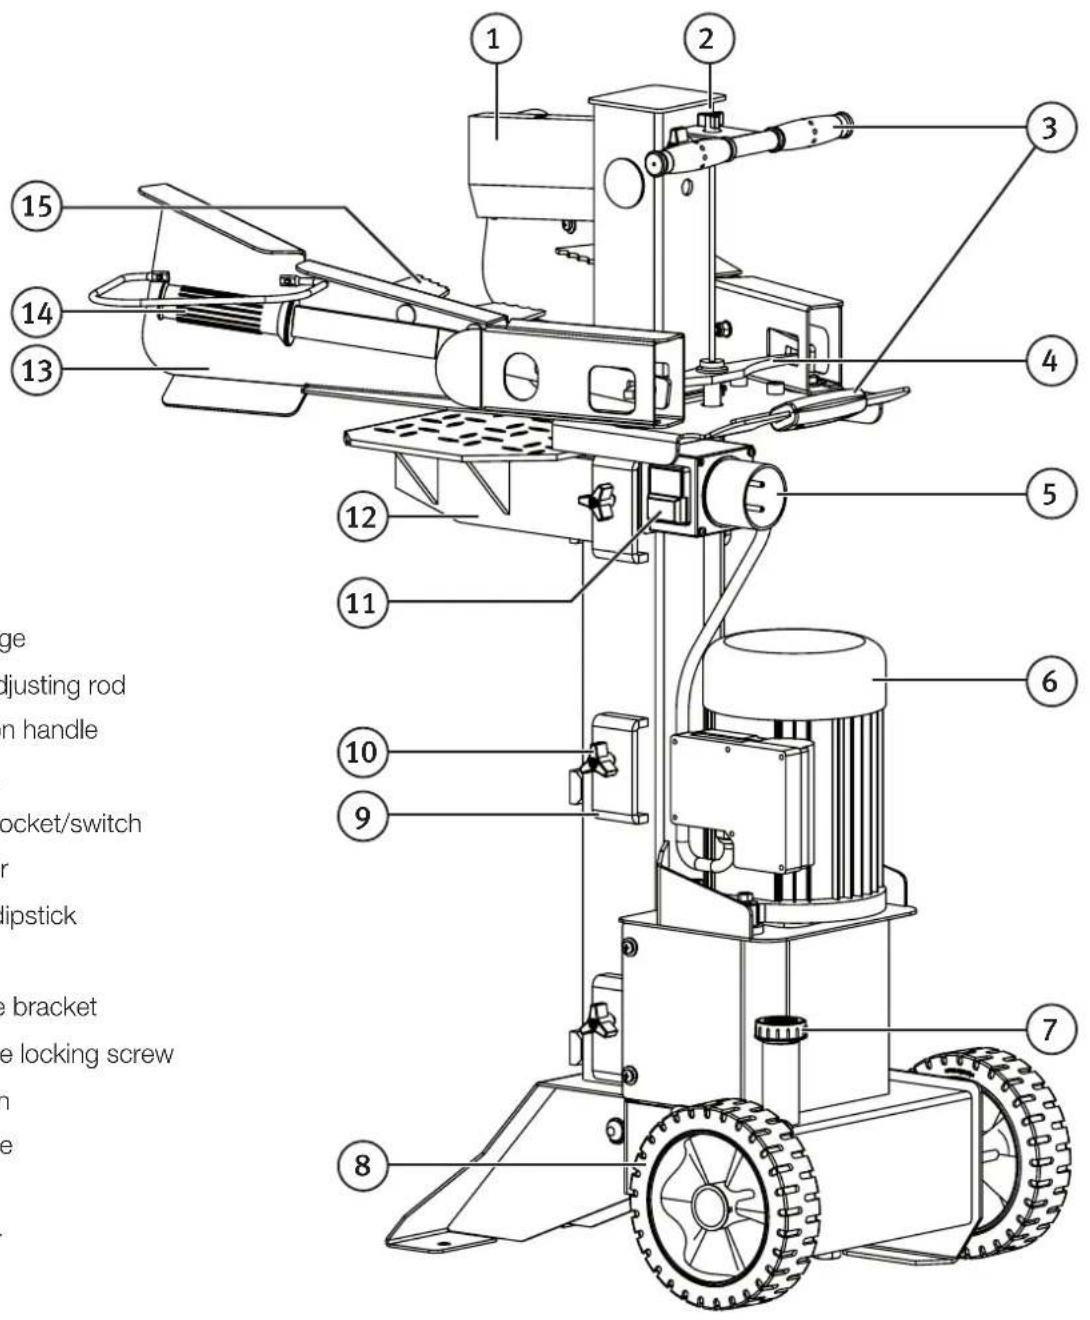
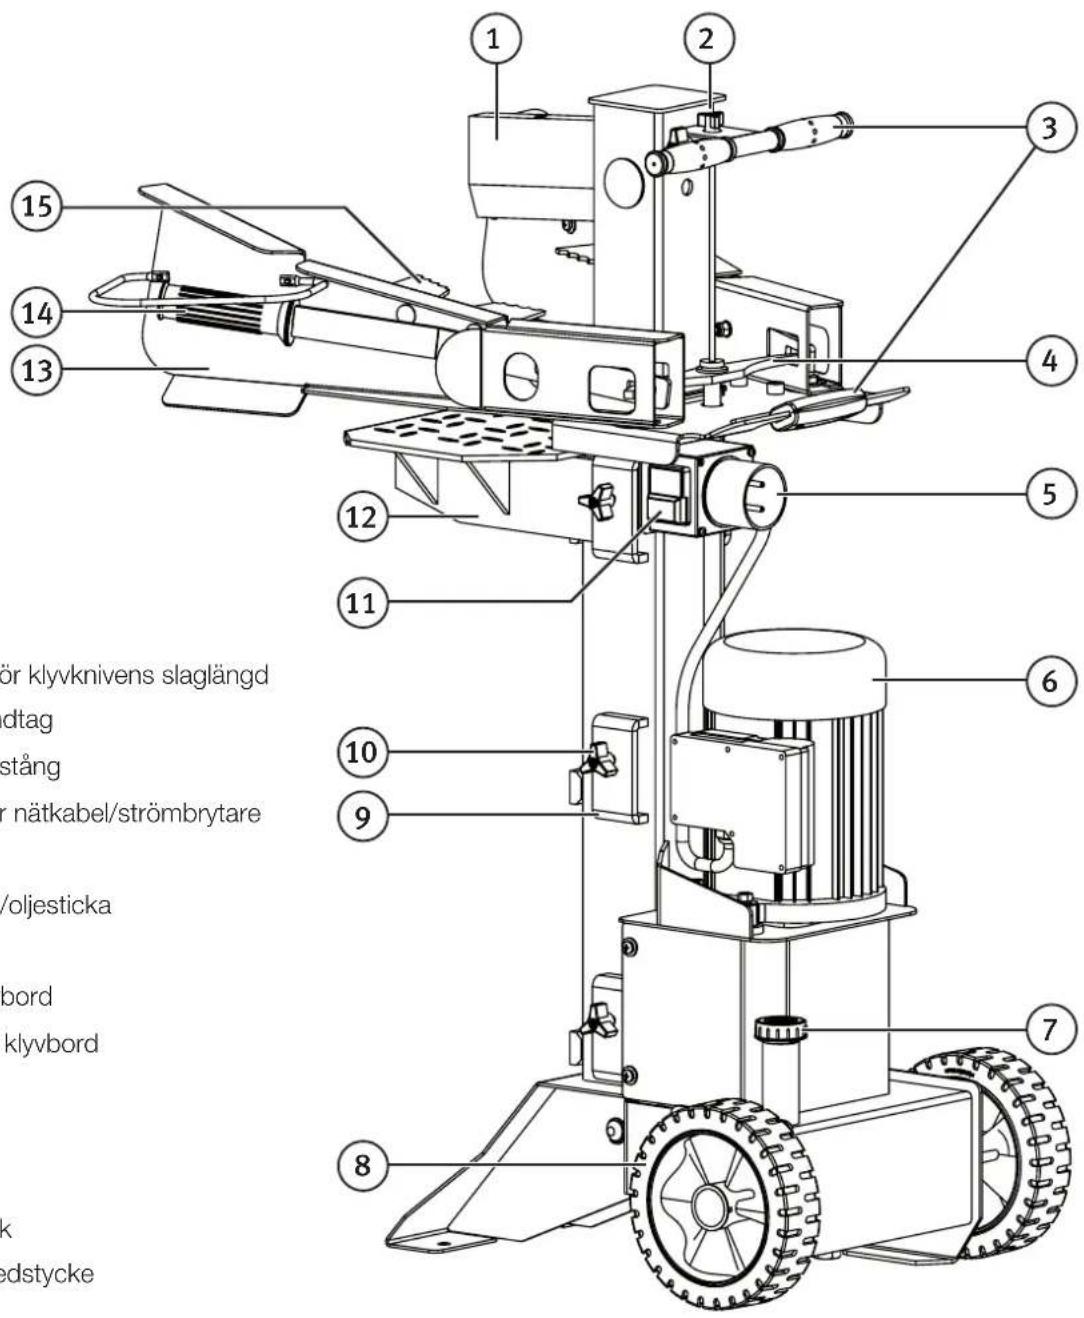
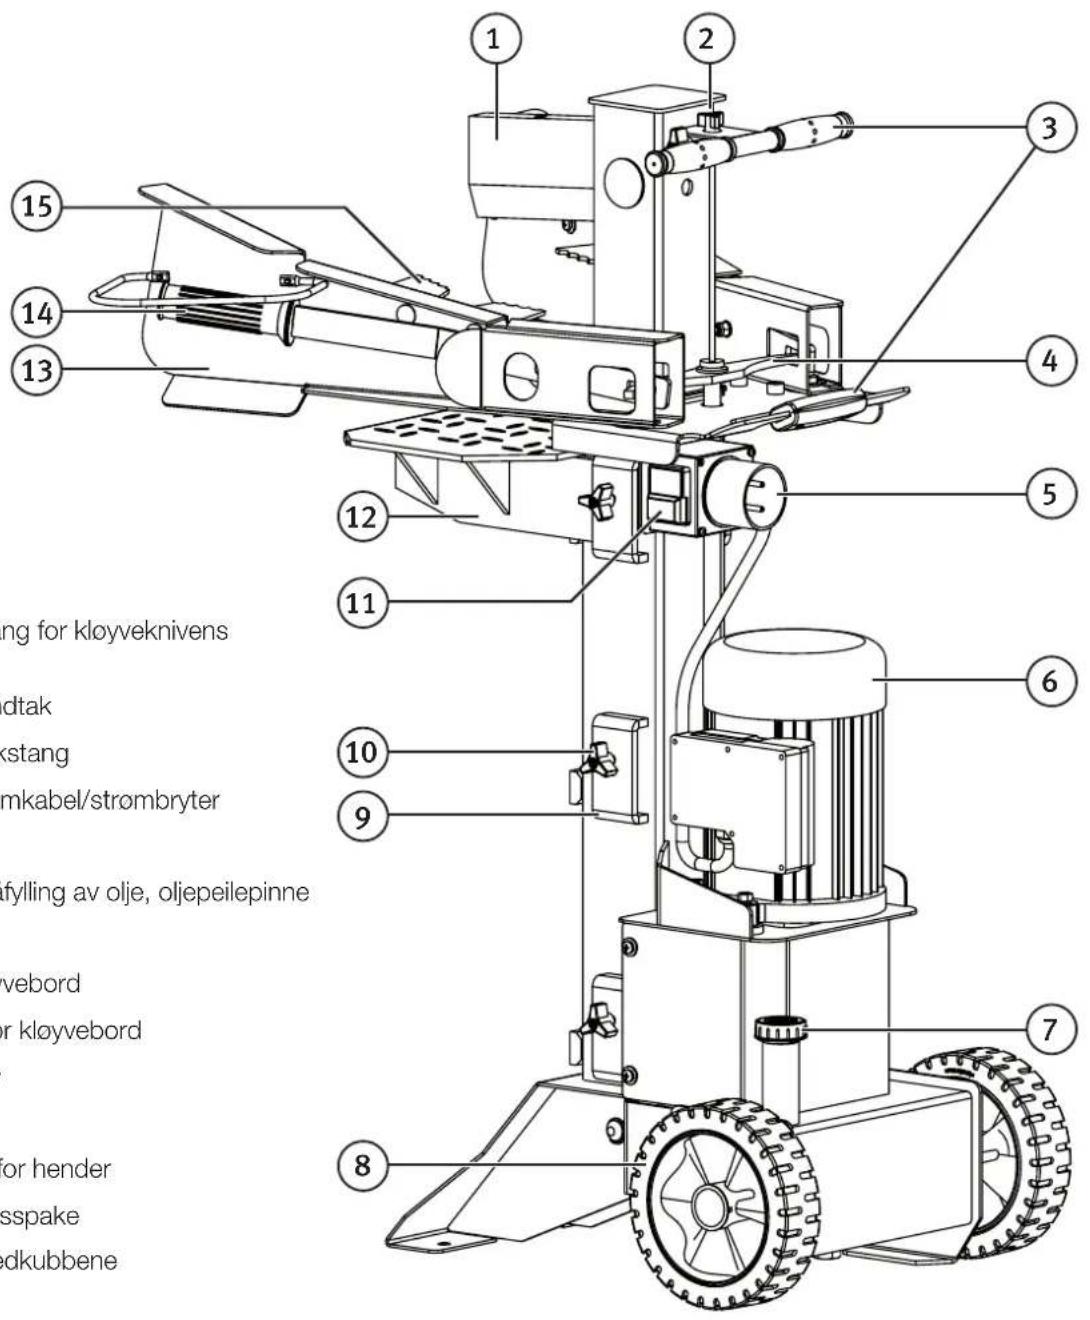
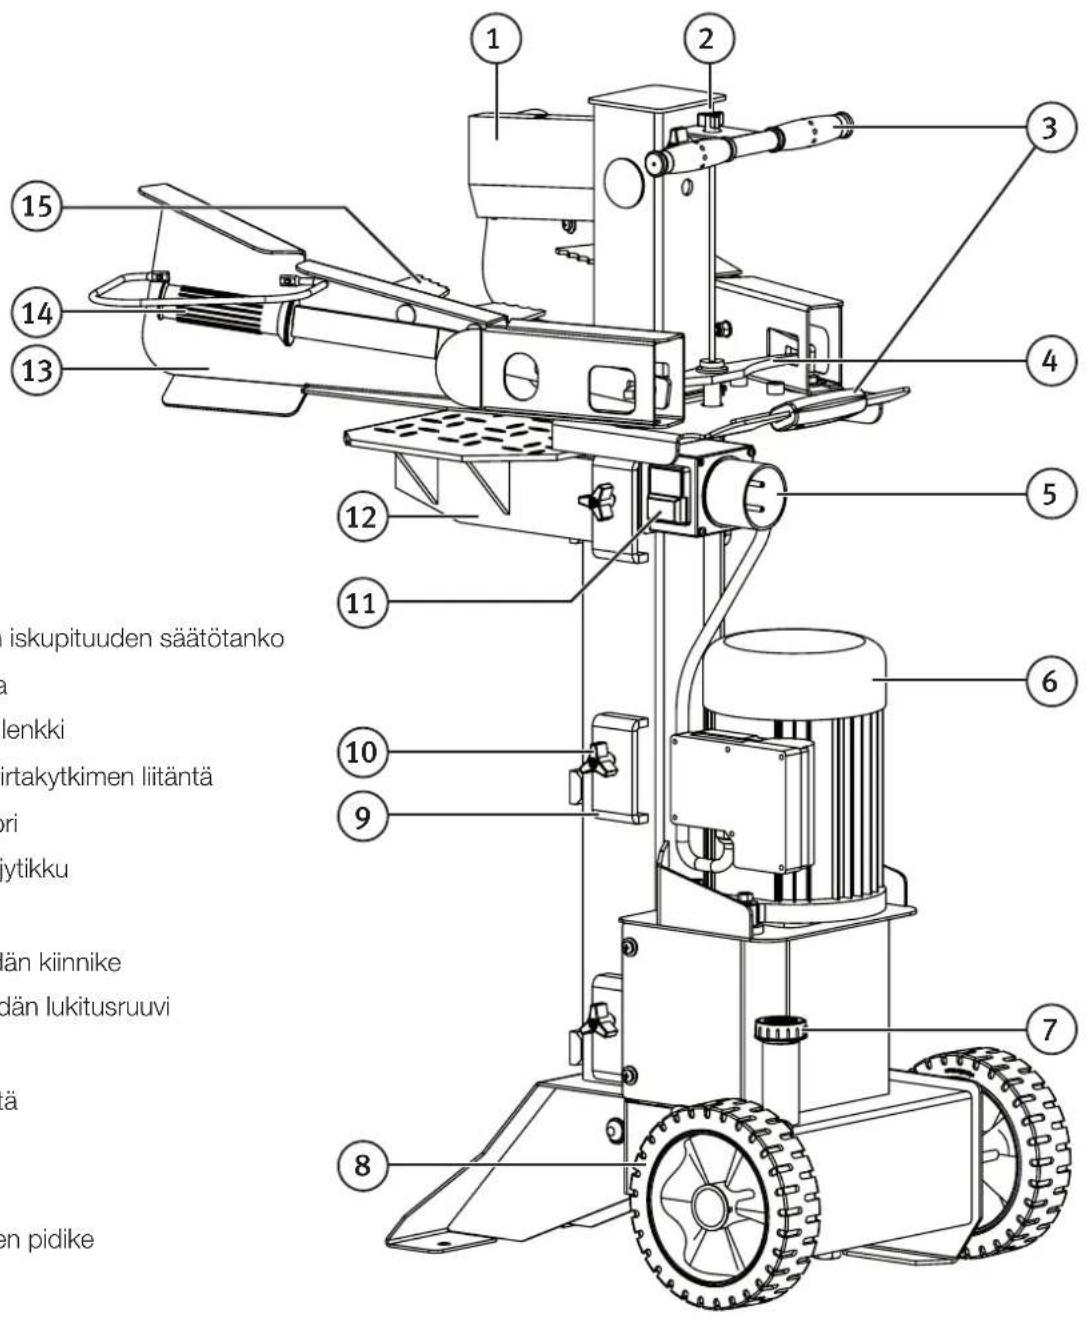
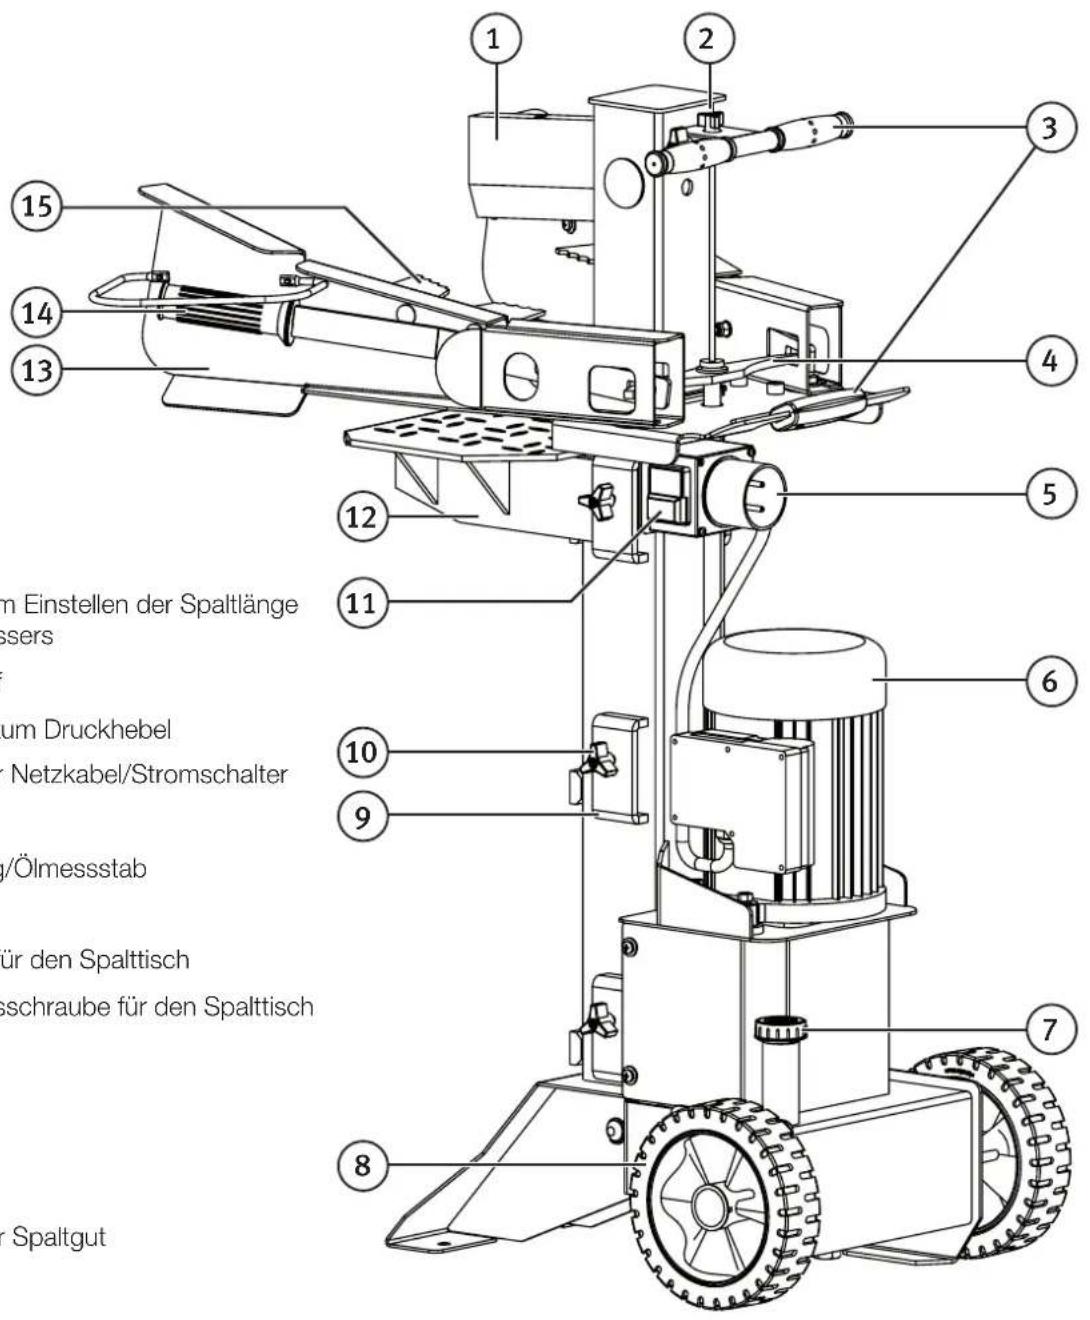
- Splitting wedge
- Ram travel adjusting rod
- Transportation handle
- Push rod link
- Power lead socket/switch
- Electric motor
- Oil filler cap/dipstick
- Wheels
- Support table bracket
- Support table locking screw
- On/off button
- Support table
- Hand guard
- Control lever
- Log holder
Operating instructions
Familiarise yourself with the controls and make sure that you understand how the log splitter works before beginning work.
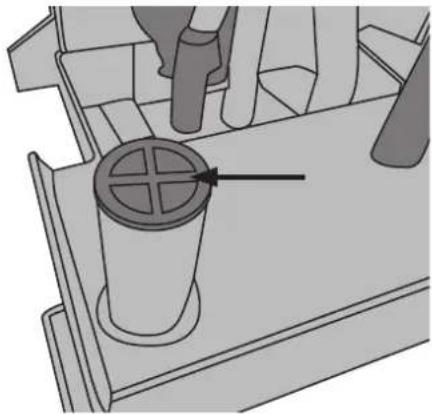
Note: The log splitter is sold fitted with a transport cap on the oil tank. The transport cap must be changed for the oil filler cap/dipstick before the log splitter is used. The log splitter must not be used with the transport cap fitted.
natural_image
3D mechanical assembly diagram showing a cylindrical component inserted into a housing, with no visible text or symbolsMoving and positioning the log splitter
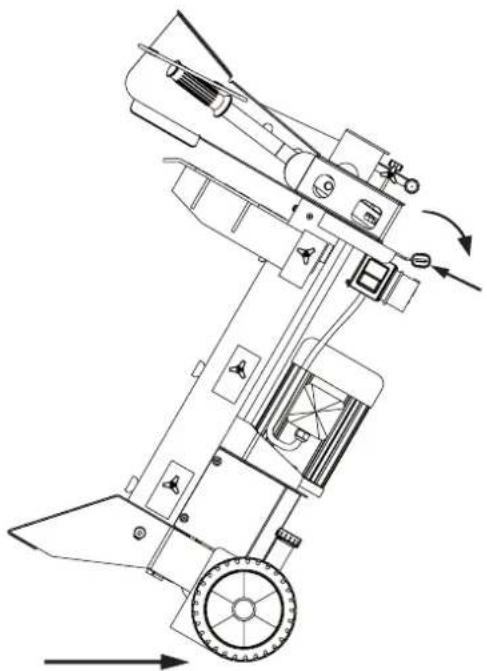
Note: Bear in mind that the log splitter is very heavy, get someone to help you if you are unsure whether or not you can move it alone.
- Grasp the transportation handles, tilt the log splitter towards you slightly and roll it to the new location.
- Stand the log splitter on a firm, level surface where there is no risk of it tipping over.
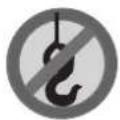
Note: If the log splitter is hoisted using a crane, attach the lifting slings to suitably secure lifting points. Do NOT fasten lifting slings around the transportation handles.
natural_image
Technical line drawing of a mechanical device with directional arrows indicating motion (no text or symbols)Things to consider before beginning work
Preparing the work area
- The log splitter is sold with hydraulic oil in it, always check the level of the oil before starting work. Remove the oil filler cap. The cap has a dipstick attached. The level should be 1–2 cm below the lip of the oil tank, on the bevelled part of the dipstick.
- Position the log splitter in such a way that you can safely reach the logs to be split.
- Prepare a place for stacking the split logs away from the log splitter.
- Keep the work area uncluttered and free of split logs to reduce the risk of tripping and personal injury.
- Position the mains lead in such a way that it will not be damaged during operation of the log splitter. Ensure also that the mains lead does not constitute a tripping hazard.

Danger: Risk of personal injury!
- The log splitter must only be operated if it is correctly assembled and undamaged.
- Any damaged or missing parts must be replaced before the log splitter is used.

Warning: Risk of damage to the log splitter!
- Check the level of the hydraulic oil before use.
• Using the log splitter with too little oil will damage it.

Warning: Risk of damage to the log splitter!
- When the log splitter is switched on, the wedge will travel up to its maximum height.
- Check that there is at least 1 m of free space above the log splitter.
- When the log splitter is switched on, the wedge will travel up to its maximum height. - Check that there is at least 1m of free space above the log splitter.

Danger: Risk of personal injury!
- Only split logs with diameters of 13–30 cm.
- Ensure that the log is vertical and that the wedge will contact the log squarely on the end.
- A log can be turned 90^ if it fails to split at the first attempt.
- Make sure that the log does not slip or become jammed.
- Do not attempt to remove jammed logs with your hands. Do not attempt to knock jammed logs out of the splitter, use a suitable lever.

Danger: Risk of personal injury!
The log must only be held in place using the log holders (15). Holding the log with your hands could result in serious injuries.

Warning: Risk of damage to the log splitter!
- Never try to split wood for longer than 5 seconds.
- If the log is too hard to split, release both the levers to prevent the log splitter from overloading.
Splitting a log
Operation check
Note: Before starting work, check the operation of the log splitter as follows:
- Switch the log splitter on by pressing [I].
- Lower both control levers – the splitting wedge should begin to lower.
- Release either of the levers – the splitting wedge should stop in the position it was in when the lever was released.
- Release both levers – the splitting wedge should rise to its original/highest position.
Note: If the log splitter does not work as described above, it must not be used. - If the log splitter is used in extremely low temperature such as during the winter, it should be turned on 15 minutes before use to preheat the hydraulic oil.
- Place a log on the support table.
- Grip the log securely in the log holders (15) by pushing the control levers towards each other.
- Press down on both levers simultaneously. The splitting wedge will start to move down towards the support table and split the log.
- Release both the levers simultaneously. The splitting wedge will return to its original position.
- Stack split logs as you work to keep the work area uncluttered and safe.
- Switch the log splitter off by pressing the [0] switch.

Danger: Risk of personal injury!
- Never attempt to knock loose a log which has fastened; keep your hands away from the log.
- Knocking a jammed log out of the log splitter with an implement could damage the machine.
- NEVER ask another person to help dislodge a jammed log.
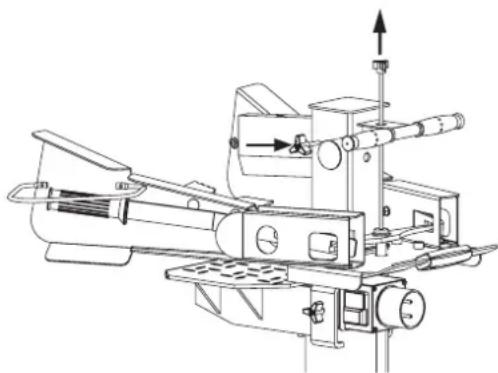
Setting the wedge ram stroke
- Switch the log splitter on, press down both control levers until the splitting wedge is at the desired height.
- Release either of the levers when the log splitter has reached the desired height and switch off the log splitter. The upper position of the wedge should be about 3–5 cm above the log being split.
- Undo the locking screw (see fig.).
- Raise the ram travel adjusting rod (2) as far as it will go and then tighten the locking screw.
- Check the operation of the log splitter and the ram stroke.
natural_image
Technical line drawing of a mechanical device with no visible text or symbolsControl lever positions
- When both levers are pressed down, the splitting wedge will begin to lower.
- When just one of the levers is pressed down, the wedge stops where it is.
- When both levers are released, the wedge will rise to its original position.
Overload protection
The hydraulic oil and the oil pump will become very hot when the machine is used for splitting large logs. For this reason, the machine is fitted with a thermal overload protection device which automatically switches the motor off. If the overload protection device has tripped, wait until the motor and oil pump have cooled before pressing [1] (11) to restart the machine.
No-volt release switch
The no-volt release switch prevents the motor from automatically starting again following a power cut. If the no-volt release switch has been triggered, the machine can only be restarted by pushing in the [1] button (11).
Care and maintenance

Danger: Risk of electrical shock or fire!
Unplug the log splitter and let it cool down before carrying out any maintenance or cleaning.
Cleaning
- Keep the log splitter free from wood chippings.
• Always keep the motor, especially the top of it, free from dust and debris to ensure adequate cooling. - Clean the log splitter regularly using a moist cloth and washing up liquid.
- Avoid strong detergents and solvents. The plastic parts of the log splitter can be damaged by chemicals.
The hydraulic system
- The log splitter has a closed hydraulic system comprising an oil tank, oil pump and control valve. Get into the habit of always checking the oil level before using the log splitter.
- The hydraulic oil should be changed every year.
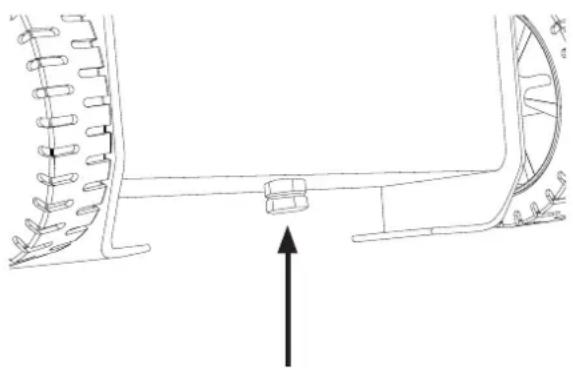
Changing the oil
Note: Used oil should be disposed of responsibly and taken to your local recycling centre where it can be managed correctly. Contact your local council if you are at all unsure on how to proceed.
- Switch the log splitter off, pull out the plug and let it cool.
- Undo the oil drain plug (see fig.) on the bottom of the log splitter and drain the oil out.
- Screw the oil drain plug back in.
- Clean the area around the oil filler cap and remove the oil filler cap. Pour in 4 litres of oil (mineral hydraulic oil with viscosity grade 32).
- Refit the oil filler cap and check the level. The level should be 1–2 cm below the lip of the oil tank, on the bevelled part of the dipstick.
- Switch the log splitter on and move the wedge up and down a few times without splitting any logs to circulate the oil in the system.
natural_image
Technical line drawing of a mechanical component with spring-like elements and an upward arrow indicator (no text or symbols)Splitting wedge
The splitting wedge can be sharpened using a flat file if necessary.
Troubleshooting guide
| The motor does not start. • Check | that the wall socket is live.• Check that none of the electrical cables are damaged and that they are all properly connected.• Extension lead too long or wrong type. |
| The log splitter emits abnormal noise and shuts off. | • Check the oil level.• Extension lead too long or wrong type. |
| The log splitter does not work while the motor is running. | • Check the oil level.• Check that all parts are undamaged and that all screws and nuts are tight. |
| The wedge does not split the logs. • | • Check the oil level.• The log is too big, too hard or incorrectly positioned.• The splitting wedge is blunt.• Extension lead too long or wrong type. |
| Abnormal noise and vibration. • Check | • Check the oil level.• Check that all parts are undamaged and that all screws and nuts are tight. |
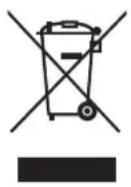
Responsible disposal
This symbol indicates that this product should not be disposed of with general household waste. This applies throughout the entire EU. In order to prevent any harm to the environment or health hazards caused by incorrect waste disposal, the product must be handed in for recycling so that the material can be disposed of in a responsible manner. When recycling your product, take it to your local collection facility or contact the place of purchase. They will ensure that the product is disposed of in an environmentally sound manner.
Specifications
Rated voltage 230 V AC, 50 Hz
Power 2700 W, S6 40%
Max force 6 tonnes
Hydraulic pressure 24 MPa
IP rating IP54
Oil capacity 41
Splitting speed 3.6 cm/s
Returning speed 19 cm/s
Recommended log thickness ∅ 13–30 cm
Splitting lengths 56/81/107 cm
Sound level (LWA) 78.8 dB(A) under no load, 89.8 dB(A) under load
Working temperature 5–40 °C
Storage temperature -25 to 55 °C
Weight 97 kg
Size 735 × 545 × 149 cm
Recommended oil: Mineral hydraulic oil with viscosity grade 32. Available at well-stocked petrol stations.
natural_image
Technical line drawing of a mechanical tire assembly (no text or symbols)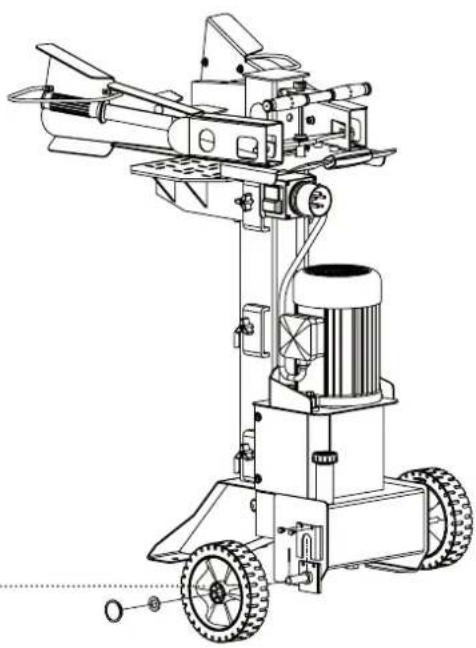
natural_image
Technical line drawing of a mechanical device with wheels and a central cylinder (no text or symbols)- Tryck fast hjulens centrumkåpor.
Manöverspakar
natural_image
Technical line drawing of a mechanical assembly with mounting holes and a central bracket (no text or symbols)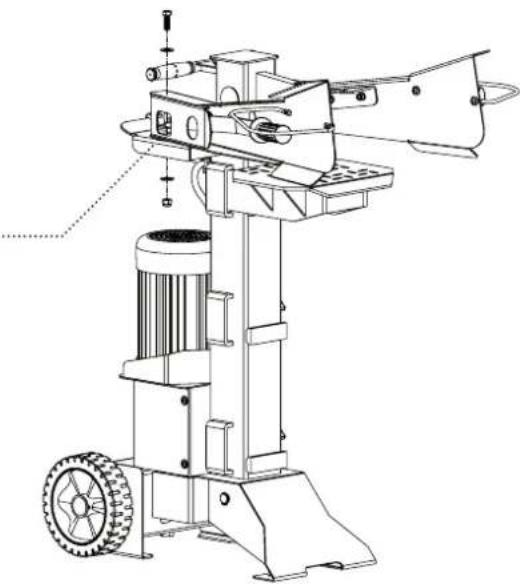
natural_image
Technical line drawing of a mechanical device with wheels and a handle (no text or symbols)Klyvbord
Klyvfordet kan monteras i 3 fasta positioner.

Fara!
natural_image
Technical line drawing of a mechanical device with a meshed panel and mounting bracket (no text or symbols)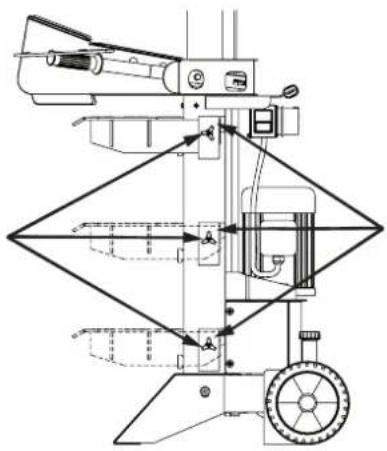
natural_image
Technical line drawing of a mechanical device with no visible text or symbolsÖversikt
natural_image
3D mechanical assembly diagram showing a cylindrical component inserted into a housing, with no visible text or symbolsnatural_image
Technical line drawing of a mechanical device with directional arrows indicating motion (no text or symbols)natural_image
Technical line drawing of a mechanical device with no visible text or symbolsnatural_image
Technical line drawing of a mechanical component with spring-like elements and an upward arrow indicator (no text or symbols)Klyvkniv
natural_image
Technical line drawing of a mechanical tire assembly (no text or symbols)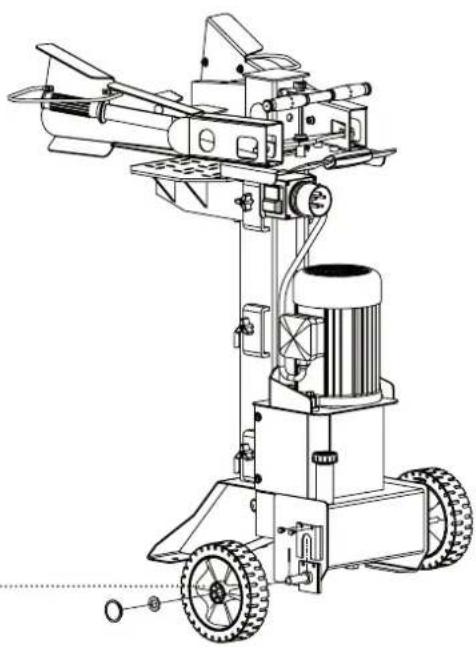
natural_image
Technical line drawing of a mechanical device with wheels and a central motor (no text or symbols)natural_image
Technical line drawing of a mechanical assembly with mounting holes and a central bracket (no text or symbols)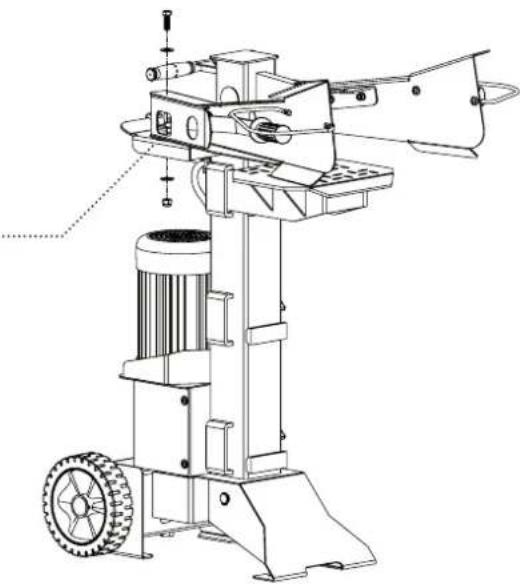
natural_image
Technical line drawing of a manual milling machine with a wheel and bucket (no text or symbols)Arbeidsbord
natural_image
Technical line drawing of a mechanical device with a meshed panel and mounting bracket (no text or symbols)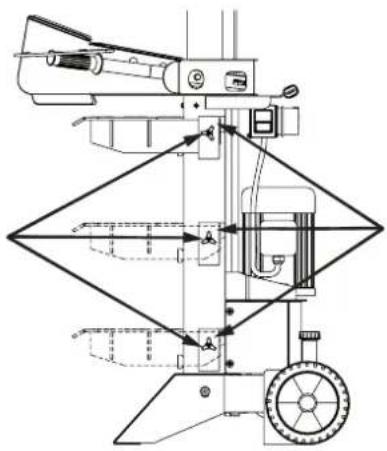
natural_image
Technical line drawing of a mechanical device with no visible text or symbolsOversikt
natural_image
3D mechanical assembly diagram showing a cylindrical component inserted into a housing, with no visible text or symbols.natural_image
Technical line drawing of a mechanical device with directional arrows indicating motion (no text or symbols)natural_image
Technical line drawing of a mechanical device with no visible text or symbolsnatural_image
Technical line drawing of a mechanical component with spring-like elements and an upward arrow indicator (no text or symbols)Kløyvekniv
Slip klyvekniven ved behov. Bruk en flatfil.
Feilsøking
natural_image
Technical line drawing of a mechanical tire assembly (no text or symbols)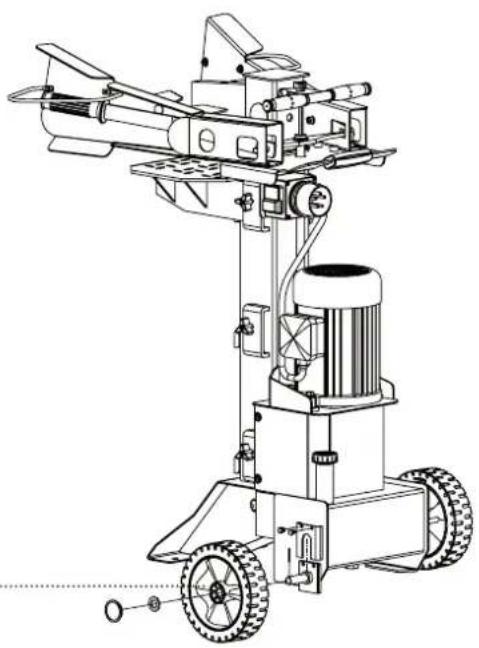
natural_image
Technical line drawing of a mechanical device with wheels and a central cylindrical component (no text or symbols)natural_image
Technical line drawing of a mechanical assembly with mounting holes and a central bracket (no text or symbols)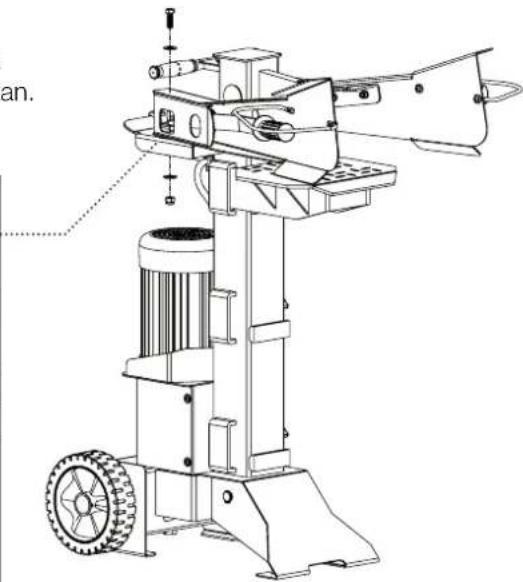
natural_image
Technical line drawing of a mechanical presser or milling machine with a wheel and shaft (no text or symbols)Halkaisupöytä
natural_image
Technical line drawing of a mechanical device with a meshed panel and mounting bracket (no text or symbols)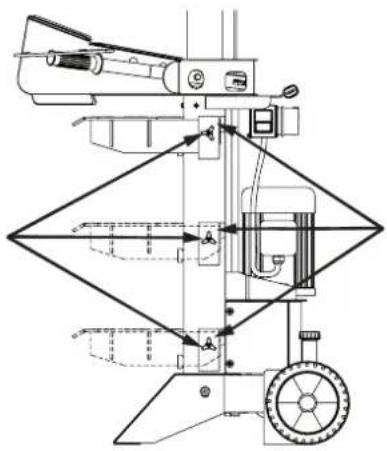
natural_image
Technical line drawing of a mechanical device with no visible text or symbolsHalkomakoneen osat
natural_image
Technical line drawing of a mechanical device with component assembly and rotation arrows (no text or symbols)natural_image
Technical line drawing of a mechanical device with no visible text or symbolsnatural_image
Technical line drawing of a mechanical component with no visible text or symbolsHalkaisukiila
natural_image
Technical line drawing of a mechanical tire assembly (no text or symbols)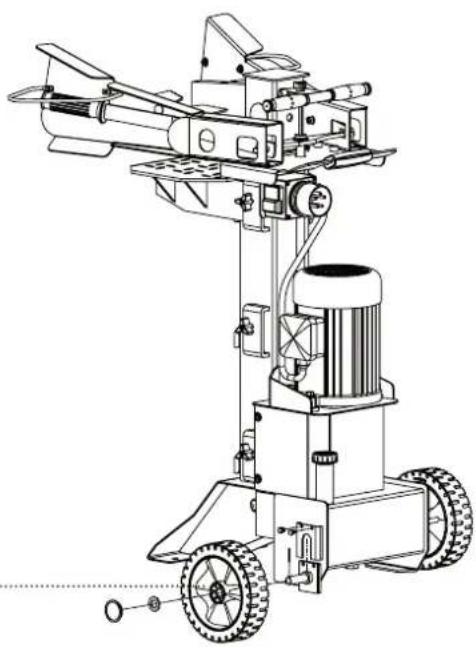
natural_image
Technical line drawing of a mechanical device with wheels and a central cylindrical component (no text or symbols)natural_image
Technical line drawing of a mechanical assembly with no visible text or symbols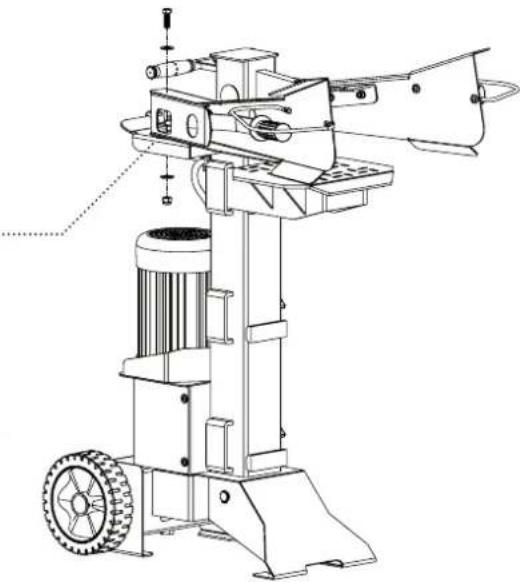
natural_image
Technical line drawing of a mechanical device with wheels and a handle (no text or symbols)Spalttisch
natural_image
Technical line drawing of a mechanical device with a meshed panel and mounting bracket (no text or symbols)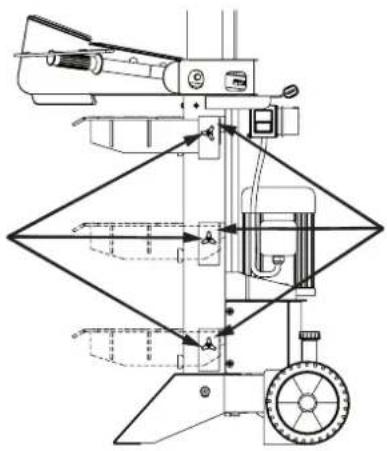
natural_image
Technical line drawing of a mechanical device with no visible text or symbolsÜbersicht
natural_image
3D mechanical assembly diagram showing a cylindrical component inserted into a housing, with no visible text or symbolsnatural_image
Technical line drawing of a mechanical device with directional arrows indicating motion (no text or symbols)natural_image
Technical line drawing of a mechanical device with no visible text or symbolsnatural_image
Technical line drawing of a mechanical component with spring-like elements and an upward arrow indicator (no text or symbols)Spaltmesser
Declaration of Conformity
10 - 13 Market Place
Kingston Upon Thames
Surrey
KT1 1JZ
Deutschland
- Viktig information:
- LS 6T Vertical Log Splitter
- Safety
- Log Splitter Warning Symbols
- General safety instructions
- Specific safety instructions for log splitters
- Safety equipment
- Contents
- Assembly
- Wheels
- Control levers
- Support table
- Identification of parts
- Operating instructions
- Moving and positioning the log splitter
- Things to consider before beginning work
- Preparing the work area
- Danger: Risk of personal injury!
- Warning: Risk of damage to the log splitter!
- Splitting a log
- Operation check
- Setting the wedge ram stroke
- Control lever positions
- Overload protection
- No-volt release switch
- Care and maintenance
- Cleaning
- The hydraulic system
- Changing the oil
- Splitting wedge
- Troubleshooting guide
- Responsible disposal
- Specifications
- Manöverspakar
- Klyvbord
- Översikt
- Klyvkniv
- Arbeidsbord
- Oversikt
- Kløyvekniv
- Feilsøking
- Halkaisupöytä
- Halkomakoneen osat
- Halkaisukiila
- Spalttisch
- Übersicht
- Spaltmesser
- Declaration of Conformity
- Deutschland
Brand : Cocraft
Model : LSV6T
Category : Service après-vente