HCI 2400-T - After-sales service Cocraft - Free user manual and instructions
Find the device manual for free HCI 2400-T Cocraft in PDF.


| Product Type | Electric Chainsaw |
| Power | 2400 W |
| Rated Voltage | 230 V, 50 Hz |
| Chain Speed | 14 m/s |
| Max Cutting Length | 350 mm (14 in) |
| Weight (without bar and chain) | 4.7 kg |
| Oil Tank Capacity | 110 ml |
| Guide Bar Length | 14 in (35 cm) |
| Saw Chain | 3/8", 52-link, 0.050" gauge |
| Sound Pressure Level (LpA) | 93 dB(A), K=3 dB(A) |
| Sound Power Level (LwA) | 106 dB(A), K=3 dB(A) |
| Vibration Level | 7.5 m/s², K=1.5 m/s² |
| Safety Features | Chain brake, kickback guard, overload indicator, lock-off switch |
| Chain Lubrication | Automatic, check oil level regularly |
| Chain Tension Adjustment | Tool-less knob on sprocket cover |
| Soft Start | Yes, reaches full speed after approx. 3 seconds |
| Extension Lead Requirement | Outdoor rated, min 1.5 mm², max 75 m |
| Recommended Protective Equipment | Safety glasses/visor, ear muffs, gloves, chainsaw trousers, non-slip footwear |
| Intended Use | Cutting wood only; not for plastic, masonry, or building materials |
| Storage | Dry, well-ventilated, out of children's reach |
| Disposal | Recycle according to EU regulations; do not mix with household waste |
Frequently Asked Questions - HCI 2400-T Cocraft
User questions about HCI 2400-T Cocraft
0 question about this device. Answer the ones you know or ask your own.
Ask a new question about this device
Download the instructions for your After-sales service in PDF format for free! Find your manual HCI 2400-T - Cocraft and take your electronic device back in hand. On this page are published all the documents necessary for the use of your device. HCI 2400-T by Cocraft.
USER MANUAL HCI 2400-T Cocraft
Read the entire instruction manual carefully and make sure that you fully understand it before you use the equipment. Keep the manual for future reference.
Viktig information:
natural_image
Close-up of a Double Guard Croatia chainsaw with black and orange blade, no visible text or symbols on the instrument itself.Ver. 20170216
Original instructions
Bruksanvisning i original
Originalbruksanvisning
Please read the entire instruction manual before using the product and then save it for future reference. We reserve the right for any errors in text or images and any necessary changes made to technical data. If you have any questions concerning technical problems please contact our Customer Services.
Contents
1. Safety Requirements – Handheld power tools....3
1.1 General Safety Requirements - EN 60745-1....3
1.2 Chainsaw safety warnings .... 4
1.3 Causes of chainsaw kickback.... 5
1.4 Operator prevention of kickback.... 5
1.5 Product Safety symbols....6
1.6 Safety information 6
-
Description ....7
-
Pre-use checks....8
3.1 Fitting the guide bar and saw chain.... 8
3.2 Chain tension....9
3.3 Topping up the chain oil.... 10
3.4 Attaching the extension lead to the chainsaw....10
3.5 Chain lubrication 10
3.6 Guide bar 11
3.7 Kickback guard/chain brake 11
-
Grinding/filing the saw chain 12
-
Starting to use the chainsaw....12
5.1 Safety precautions 12
5.2 Important considerations ...... 13
5.3 Overload warning 13
-
Tips for using the chainsaw 13
-
Remember....13
-
Sawing trees that are under tension or compression....14
-
Tree felling....15
-
De-limbing/Snedding 16
-
Bucking....17
-
Care and cleaning....18
-
Storage 18
-
Responsible disposal 18
-
Troubleshooting .... 18
-
Technical data .... 18
Caution! When you are using electric hand tools the included safety instructions should be followed to avoid risk of fire, electric shock, and personal injury.
Always pull the plug out of the wall socket before servicing and adjusting the product.
1. Safety Requirements - Handheld power tools
1.1 General Safety Requirements - EN 60745-1
Caution! Read all the instructions. Failure to adhere to the following instructions may lead to electric shocks, fires and/or serious injury. The term “power tool” in the following text refers to your handheld mains operated or battery operated tool.
SAVE THESE INSTRUCTIONS.
1) Work area
a) Keep the work area clean and well illuminated. Cluttered and poorly lit areas invite accidents.
b) Do not use power tools in explosive environments, e.g. near flammable liquids, gases or dust. Power tools generate sparks that can easily ignite dust or fumes.
c) Keep children and other bystanders away from the area where you are using the power tool. Distractions can cause you to lose concentration and control.
2) Electrical safety
a) The power tool's plug must fit correctly into the wall socket. Never modify the plug in any way. Never use an adaptor plug together with earthed power tools. Unmodified plugs and suitable wall sockets minimize the risk of electric shocks.
b) Avoid physical contact with earthed objects, such as pipes, radiators, ovens or refrigerators. There is an increased risk of receiving an electrical shock if your body is earthed.
c) Do not expose the power tool to rain or other wet conditions. Water entering a power tool will increase the risk of electric shock.
d) Do not abuse the mains lead. Never use the lead to carry the tool or pull the plug from a wall socket. Keep the lead away from heat, oil, sharp edges and moving parts. Damaged or tangled leads increase the risk of electric shock.
e) When using power tools outdoors, use an extension lead that is suitable for this purpose. The use of an extension lead designed for outdoor use decreases the risk of electric shocks.
f) If for some reason you must use a power tool in a wet environment, always connect it to the mains via an earth-fault circuit breaker such as an RCD (residual current device). Using an RCD significantly reduces the chances of you receiving an electric shock.
3) Personal safety
a) Pay attention to your actions and use common sense when using power tools. Never use power tools if you are tired or under the influence of drugs, alcohol or medication. One moment of inattention while using a power tool may result in serious injury.
b) Use protective equipment. Always wear eye protection. Using protective clothing such as dust masks, non-slip safety shoes, helmets and ear defenders when needed decreases the risk of injury.
c) Avoid accidental starts. Make sure that the power switch is set to OFF before plugging the tool into a wall socket. Never carry a power tool with your finger on the trigger and never connect the power tool to a wall socket when the switch is set to ON, since it may result in injury.
d) Remove all service tools/keys before switching on the power tool. A service tool left on a rotating part of the power tool may result in personal injury.
e) Do not overreach. Keep proper footing and balance at all times. This will allow you to have more control in unexpected situations.
f) Wear suitable attire. Do not wear loose-fitting clothing or jewellery. Keep hair, clothes and gloves away from moving parts. Loose-fitting clothes, jewellery or long hair could potentially become caught in any moving parts.
g) If equipment for dust extraction or collection is available, make sure that it is connected and used properly. Use of dust collection equipment can reduce dust related hazards.
4) Use and maintenance of the power tool
a) Do not force the power tool. Use the correct power tool for your application. The correct power tool will do the job better and safer if used at the rate for which it was designed.
b) Never use the power tool if the power switch does not switch the tool on and off properly. Any power tool that cannot be controlled by the power switch is dangerous and must be repaired.
c) Unplug the lead from the wall socket before making any adjustments, changing accessories or storing the power tool. These precautions reduce the risk of the power tool starting unexpectedly.
d) Store any power tools that are not being used out of children's reach. Do not allow people who are unfamiliar with the tool or its functions to operate the tool. Power tools can be dangerous if they fall into the hands of inexperienced users.
e) Maintaining power tools. Check for any incorrect settings, parts that catch, broken parts or anything else which may cause the power tool to malfunction. If something is damaged, have the power tool repaired before use. Many accidents are caused by poorly maintained power tools.
f) Keep tools sharp and clean. Properly maintained cutting tools with sharp cutting edges are less likely to bind and are easier to control.
g) Use the power tool, accessories and similar in accordance with these instructions and in an appropriate way suitable for the type of power tool used, taking into account the working conditions and the work to be performed. Use of the power tool for a purpose other than that for which it is intended could result in a dangerous situation.
5) Service
a) Have your power tool serviced by a qualified repair person using only identical replacement parts. This guarantees that the safety of the power tool is maintained.
1.2 Chainsaw safety warnings
- Keep all parts of the body away from the chainsaw when the saw chain is moving. Before starting the chainsaw, make sure that the saw chain is not in contact with anything. A moment of inattention while operating the chainsaw may cause entanglement of your clothing or body with the saw chain.
- Always hold the rear handle of the chainsaw in your right hand and the front handle in your left hand. Holding the chainsaw with a reversed hand configuration increases the risk of personal injury and should never be done.
- Use protective eyewear and hearing protection. Further protective equipment for head, hands, legs and feet is recommended. Wearing the correct protective equipment reduces the risk of personal injury from flying debris or accidental contact with the saw chain.
- Do not operate a chainsaw in a tree. Operating a chainsaw whilst up in a tree may result in personal injury.
- Always keep proper footing and operate the chainsaw only when standing on a fixed, secure and level surface. Slippery or unstable working positions such as ladders can lead to loss of balance and loss of control over the chainsaw.
- When cutting a limb that is under tension you should always be alert for spring back. When the tension in the wood fibres is released, the spring-loaded limb may strike the operator and/or throw the chainsaw out of control.
- Use extreme caution when cutting brush and saplings. Thin twigs can get caught in the saw chain and be projected towards you or cause you to lose your balance.
- Always carry the chainsaw by the front handle with the motor switched off and the guide bar pointing away from your body. When transporting or storing the chainsaw, always fit the guide bar cover. Proper handling of the chainsaw will reduce the likelihood of accidental contact with the moving saw chain.
- Always follow the instructions regarding lubrication, chain tensioning and changing of accessories. An incorrectly tensioned or lubricated saw chain can snap or increase the risk of kickback.
- Always keep the handles dry, clean and free of oil and grease. Oily and greasy handles are slippery and can cause you to lose control of the chainsaw.
- Cut wood only. Do not use the chainsaw for any purpose other than that for which it was intended. For example: Never saw plastic, masonry or other building material not made of wood. Use of the chainsaw for a purpose other than that for which it was intended could result in a hazardous situation.
1.3 Causes of chainsaw kickback
- Kickback may occur when the nose or tip of the guide bar touches an object or when the wood being sawed closes together and pinches the saw chain in the cut.
- In some case tip contact may cause a sudden reverse reaction, kicking the guide bar up and back towards the operator.
- Pinching the saw chain along the top of the guide bar may push the guide bar rapidly back towards the operator.
- Either of these reactions may cause you to lose control of the saw which could result in serious personal injury. Do not rely exclusively upon the safety devices built into your saw. As the user of the chainsaw you are always responsible for taking all possible precautionary measures to prevent accidents.
1.4 Operator prevention of kickback
Kickback is the result of tool misuse and/or incorrect operating procedures or conditions and can be avoided by taking proper precautions as given below:
- Maintain a firm grip, with thumbs and fingers encircling the chainsaw handles and both hands on the saw. Position your body and arms in such a way that you can resist kickback forces. The force of a kickback can be controlled by the user if the proper precautions have been taken. Do not let go of the chainsaw.
- Do not overreach and do not cut above shoulder height. This helps prevent unintended tip contact and enables better control of the chainsaw in unexpected situations.
- Only use replacement guide bars and chains of the types specified by the manufacturer. Incorrect replacement bars and chains may cause chain breakage and/or kickback.
- Follow the manufacturer's instructions regarding sharpening and maintenance. Grinding the rakers too much increases the risk of kickback.
- Hold the power tool by insulated gripping surfaces only, because the saw chain may contact hidden wiring or its own lead. Saw chains contacting a live wire may make exposed metal parts of the power tool live and could give the operator an electric shock.
1.5 Product Safety symbols
Warning:

Warning.

Read the instruction manual.
Read the instruction manual, follow the safety rules and observe the warnings.

Always use protective goggles/visor.
Risk of flying debris.

Use hearing protection.

Do not expose the power tool to rain or moisture.
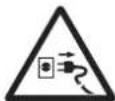
Pull out the plug immediately if the extension lead is damaged, do not touch the lead, only the plug itself.
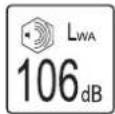
Sound power level (LwA).
1.6 Safety information
WRONG:
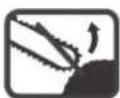
Do not cut using the tip of the guide bar.
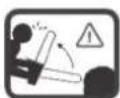
Using the nose or tip of the guide bar can cause the bar to kickback suddenly towards the operator.
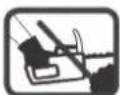
Under no circumstances is the chainsaw to be operated with one hand as this increases the risk of kickback and loss of control over the saw.
RIGHT:
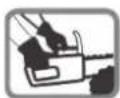
Always hold the saw in both hands, the right hand on the rear handle and the left hand on the front handle.
2. Description
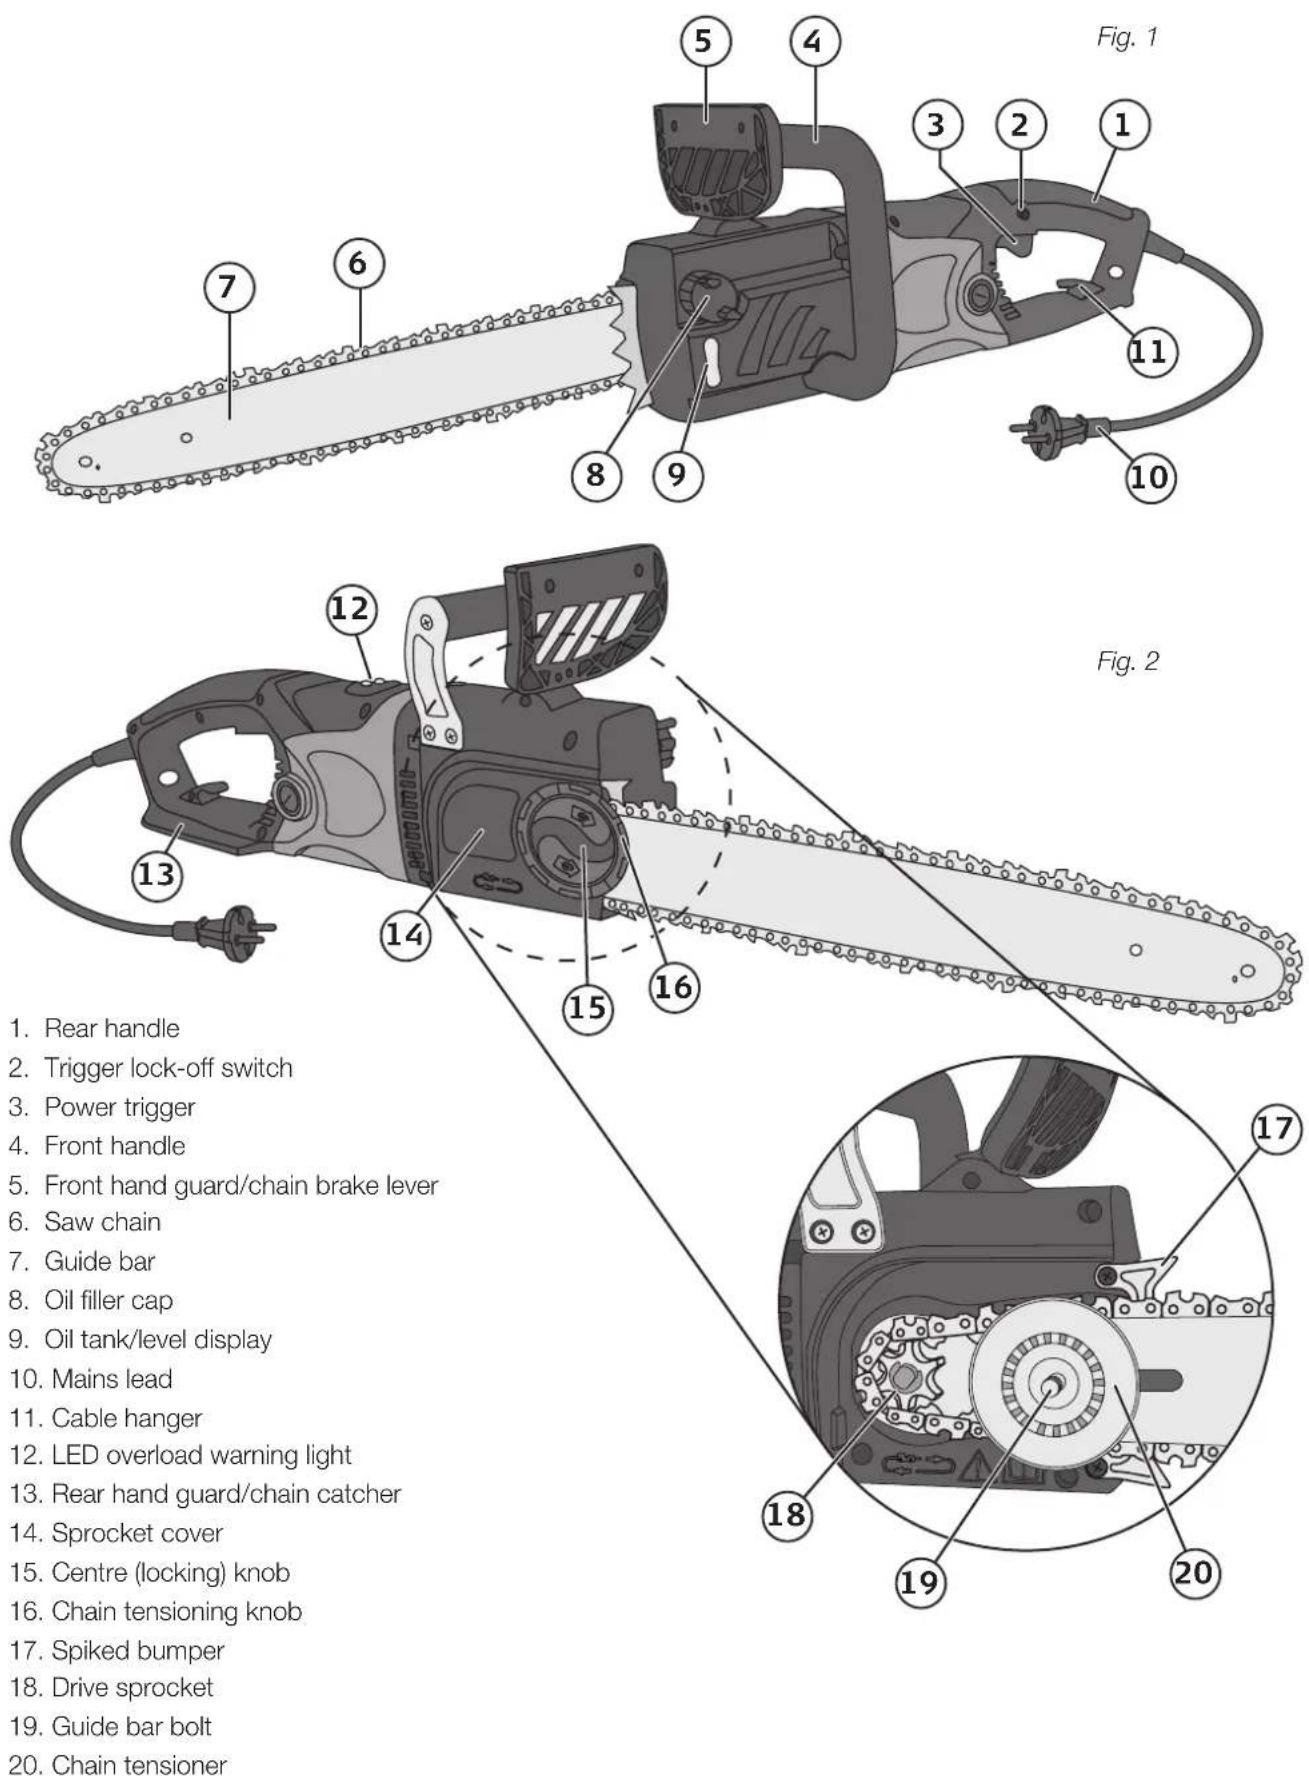
- Rear handle
- Trigger lock-off switch
- Power trigger
- Front handle
- Front hand guard/chain brake lever
- Saw chain
- Guide bar
- Oil filler cap
- Oil tank/level display
- Mains lead
- Cable hanger
- LED overload warning light
- Rear hand guard/chain catcher
- Sprocket cover
- Centre (locking) knob
- Chain tensioning knob
- Spiked bumper
- Drive sprocket
- Guide bar bolt
- Chain tensioner
3. Pre-use checks
- Check that the power supply marked on the rating plate of the chainsaw corresponds to your local mains power supply.
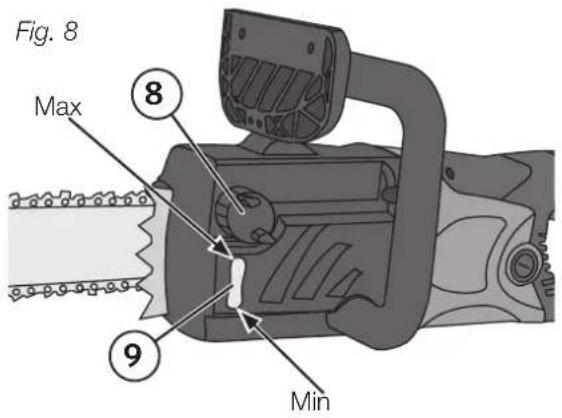
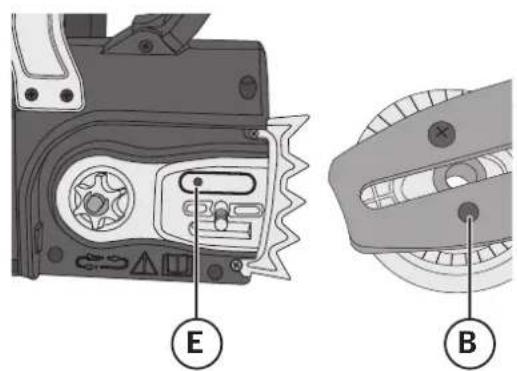
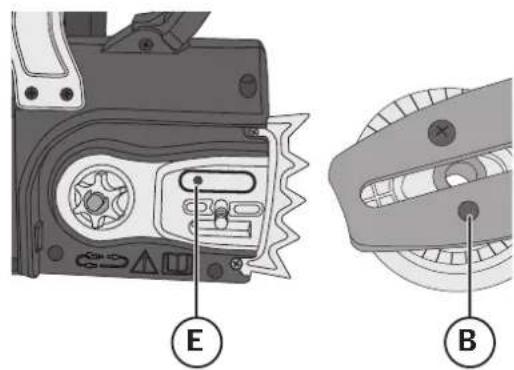
- Check that the chainsaw is undamaged and safe to use. Make sure that the lubrication system is working and that there is plenty of oil in the tank (see fig.8). Top up the chain oil before it falls to the "MIN" mark. When the oil level is above this mark the lubrication system will work well. Check the chain lubrication as follows: Start the chainsaw and hold the bar roughly 20 cm above a tree stump or other light background. If the lubrication system is working properly, some oil will fly off the chain and show up on the light object. If no traces of oil appear, you should clean the outlet hole (see fig. 11, E) and the upper hole in the guide bar (see fig. 12, B), or contact your retailer or service centre. (Read the 3.3 Topping up the chain oil and 3.5 Chain lubrication section).
- Make sure that the chain is properly tensioned (read the 3.2 Chain tension section). Make sure that the kickback guard/chain brake works properly (read Resetting the kickback guard/chain brake).
Note: This electric chainsaw has a soft start feature which means that it takes about 3 seconds to reach full revs.
3.1 Fitting the guide bar and saw chain
Description
The chain guide bar and chain are not fitted when the saw is sold, the saw has a new type of setting for chain tension and guide bar fastening which consists of two parts:
A. A combined tensioning/locking knob on the drive sprocket cover
The tensioning/locking knob consists of two parts: A centre knob (15) for locking the guide bar (and for locking the tensioning knob) and an outer knob (16) for tensioning the chain (see fig. 3).
Fig. 3
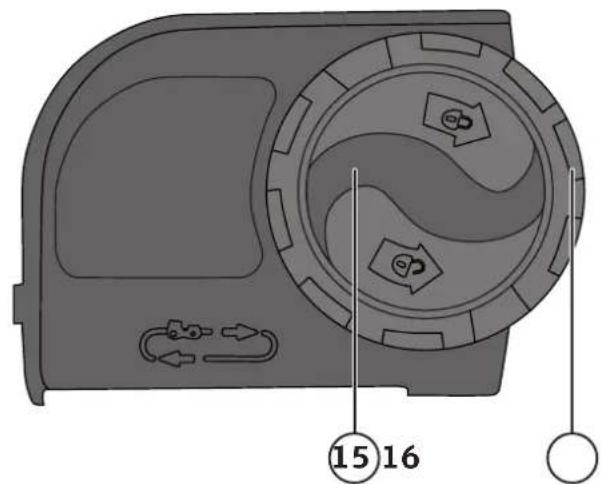
B. A tensioning wheel for the chain tension, mounted on the guide bar.
The chain tensioner (20) is fixed to the guide bar by a screw (A) through the lower hole and a guide pin in the upper hole (B) of the guide bar (see fig. 4).
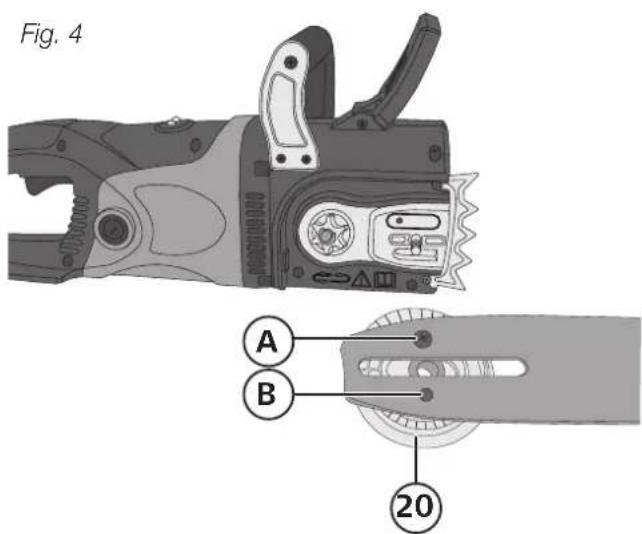
Assembling the guide bar and saw chain
Note: The chainsaw must be unplugged.
- Turn the centre locking knob (15) anticlockwise and remove the sprocket cover (14).
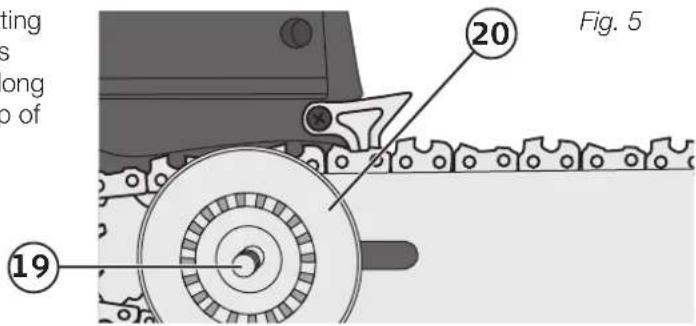
- The guide bar has a tensioning wheel (20) fixed to it. Turn the guide bar so that the tensioning wheel is on the outside of the bar. Fit the bar in such a way that the bolt sticks through the hole in the tensioning wheel (see fig. 5).
-
Turn the tensioning wheel anticlockwise as far as it will turn.
-
Turn the saw chain so that the edges of the cutting links on the top of the bar are pointing forwards toward the tip of the bar (the saw chain pulls along the bottom of the bar and pushes along the top of the bar).
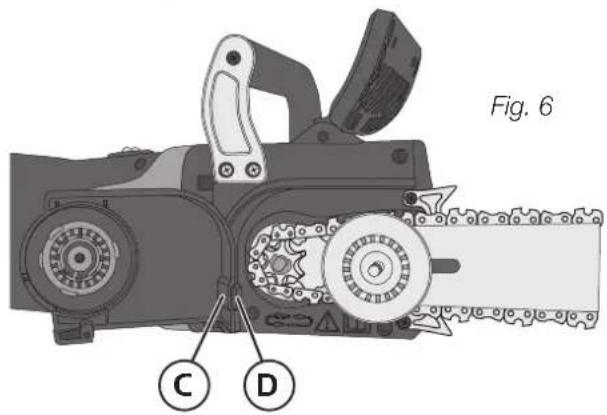
- Fit the saw chain so that it passes over the drive sprocket and in the guide track all the way round the guide bar. (See fig. 6)
- Turn the tensioning wheel clockwise and carefully tension the chain, making sure that it sits properly on the bar and sprocket.
- Refit the drive sprocket cover (14) by slotting the tab (C) at the back of the cover into the hole (D) in the saw and positioning the cover so that the threading on centre knob (15) lines up with the guide bar bolt (19). Turn the centre knob (15) clockwise so that it threads onto the guide bar bolt (19) and tension the chain by turning the outer knob (16) clockwise. (The centre knob (15) is only for locking the guide bar whereas the outer knob (16) is only for tensioning.)
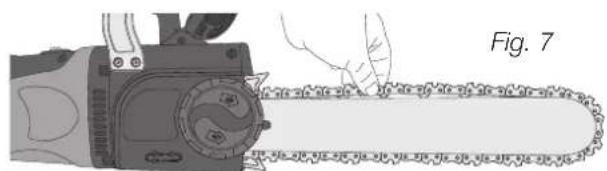
- Tensioning the chain: The saw chain should be able to be lifted approximately 5 mm in the middle of the guide bar when the tension is correct, adjust as necessary: Undo the black locking knob (15) a little, adjust the chain tension by turning the outer knob (16), then tighten the black locking knob to keep the set tension.
natural_image
Illustration of a chain-linking device with a hand operating it, labeled Fig. 7 (no text or symbols on the diagram itself)3.2 Chain tension
Note: Always pull the plug out of the wall socket before servicing and adjusting the chainsaw.
Wear protective gloves.
Adjusting the chain tension
- First check the chain tension: The saw chain should be able to be lifted approximately 5 mm in the middle of the guide bar when the tension is correct.
- Adjust it if necessary: Undo the black locking knob (15) a little, adjust the chain tension by turning the outer knob (16) (see fig. 3).
- Tighten the black locking knob to keep the set tension. Always check that the chain is sitting properly on the sprocket and in the guide track all the way around the bar before tightening the locking knob.
3.3 Topping up the chain oil
Wipe the oil filler cap (8) before taking it off to prevent dirt from falling into the tank. Unscrew the cap and top up with chain lubrication oil. The oil level in the tank (9) can be seen by looking through the glass under the filling hole. Fill the tank to the top and screw the cap on tightly. Wipe off any spilt oil.
3.4 Attaching the extension lead to the chainsaw
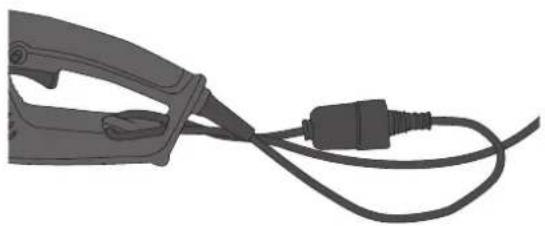
Use only extension leads intended for outdoor use and which are capable of carrying sufficient current (core area of at least 1.5 mm², max 75 m long).
Fix the extension lead to the rear handle as shown in the figure. If you use an extension lead longer than 30 m, you might get some voltage drop and notice that the saw loses power.
3.5 Chain lubrication
The saw chain and guide bar must be lubricated constantly when the saw is running to prevent excessive wear. The chainsaw lubricates itself automatically. Never use the chainsaw if the lubrication system is not working, otherwise both the chain and the guide bar will soon wear out. It is therefore important that you check the lubrication and oil level at every opportunity. (Fig. 10) Never use the chainsaw if the oil level is below "MIN".
- Min: When the oil level falls below "MIN" or 5 mm below the bottom of the "window" in the oil tank (9), top up the oil.
- Max: Fill the oil tank up to the top of the "window".
Checking the chain lubrication
Start the chainsaw and hold the bar roughly 20 cm above a tree stump or other light background. If the lubrication system is working properly, some oil will fly off the chain and show up on the light object. If no traces of oil appear, you should clean the outlet hole (fig. 11, E) and the upper hole in the guide bar (fig. 12, B), or contact your retailer or service centre. Be careful not to let the saw chain come in contact with the ground.
Chain oil
The useful life of the guide bar and saw chain depend on which chain oil is used. Only use chain oil, never waste oil. Use environmentally friendly oil and keep it in a sealed container specially reserved for chain oil.
Fig. 9
natural_image
Illustration of a hairpin connecting a cable with a plug (no text or symbols)Fig. 10
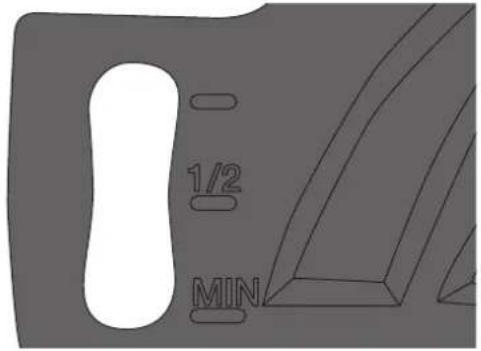
Fig. 11 Fig. 12
3.6 Guide bar
The guide bar (7) wears out more at the tip and along the bottom edge, turn the bar over when you remove it to sharpen the chain so that it wears evenly on both edges. File off any unevenness in the bar using a flat file.
Drive sprocket
The sprocket (18) also becomes worn, check it regularly for signs of wear or deformity and change it if necessary. A worn sprocket will wear out a new saw chain more quickly. Contact your retailer or service centre for replacement sprockets.
Chain guard
Put the blade cover on the blade as soon as you have finished sawing and whenever storing or transporting the saw.
3.7 Kickback guard/chain brake
In the event of kickback, the chain brake will be activated by the front handle guard (5) being pushed forward by your hand. The chain will stop immediately.
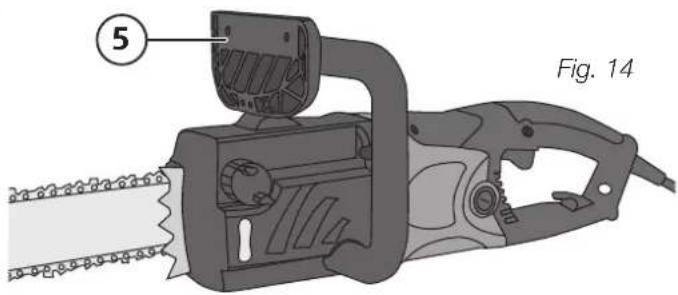
Testing the kickback guard
Warning: Always check the chain brake before using the chainsaw.
Hold the chainsaw firmly in both hands, start it and push the kickback guard forward (towards "0") with your wrist. The saw chain should stop immediately.
Resetting the kickback guard/chain brake
The chain brake must be reset before the saw can be started again: Switch off the chainsaw (release the power switch), push the kickback guard (5) back until it returns to the upright position (fig. 15). The kickback guard is now reset.
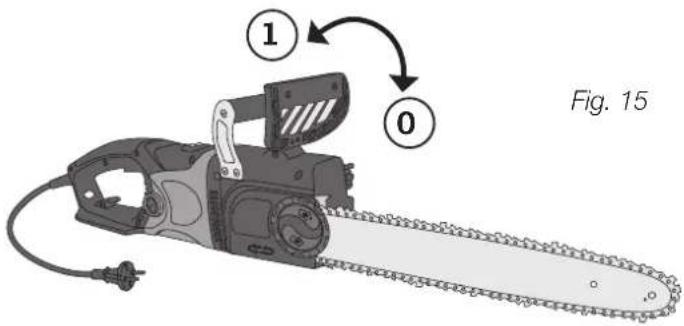
Fig. 13
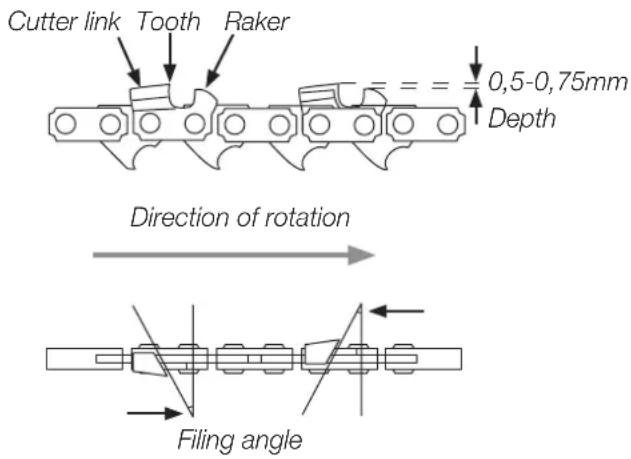
4. Grinding/filing the saw chain
When the saw chain becomes blunt, it no longer cuts safely and efficiently and must be replaced or sharpened.
Note: It is easiest to file the chain with the help of a file gauge which you can buy from a trade supplies store.
The file gauge will come with instructions for its use.
File the chain as follows:
- Unplug the chainsaw from the wall socket.
- Wear gloves to protect your hands.
- Check the chain tension.
- Use a 4 mm diameter round file.
- File horizontally across the guide bar at an angle of 30^ to the chains direction of rotation.
- File each tooth outwards/forwards in the chain's direction of rotation.
- File each tooth with the same number of strokes, so that the chain is evenly filed.
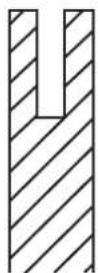
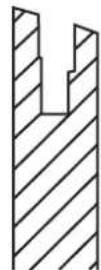
- Check the clearance of the rakers (depth gauge) every 5th time you sharpen the chain. If the rakers need filing, use a flat file. It is important that their original shape is not altered.
- Measure the height (depth setting) of the rakers after filing using a guide that can be bought at a trade supplies store.
Fig. 16
5. Starting to use the chainsaw
Note: Always wear safety glasses/visor, ear muffs, safety gloves and protective clothing which is specially designed for chain saw work.
Use only extension leads intended for outdoor use and which have sufficient core area (at least 1.5 mm^2 , max 75 m long). The chainsaw is equipped with a safety switch: The power trigger and lock-off switch on the rear handle (1) must both be pressed in simultaneously in order for the chainsaw to start. The chainsaw must be held firmly in both hands when it is started.
If the chainsaw does not start, reset the kickback guard/chain brake: Return the kickback guard (5) to the upright position. Refer to 3.7 Kickback guard/chain brake, Resetting the kickback guard/chain brake (fig. 15). The chainsaw starts slowly (soft start) and reaches maximum speed after a couple of seconds.
Switching the chainsaw off
Release the power trigger (3) and the lock-off switch (2) and the chainsaw will switch off.
After finishing work
Always clean the saw chain and guide bar then put the cover on the guide bar.
5.1 Safety precautions
Note: Never use the chainsaw in the rain or a damp environment.
Note: Pull out the plug immediately if the extension lead is damaged, do not touch the lead, only the plug itself. Never use a damaged extension lead.
Check that the chainsaw is undamaged. Make sure that the chainsaw's guards and safety devices are in working order and that nothing is damaged before the saw is used. Make sure that all moving parts can move freely and work properly. Every part of the chainsaw must be assembled correctly and work properly in order for the chainsaw to be safe to use. Damaged safety devices must be repaired/replaced by a qualified service technician unless otherwise stated in the instruction manual.
5.2 Important considerations
Kickback
- Kickback is when the guide bar is thrown upward/backward with force and can occur when the tip of the guide bar comes into contact with an object or obstruction.
- Prevent accidents by never using the tip of the guide bar as this can cause the bar to kickback suddenly and violently towards the user.
- Always wear safety glasses/visor, ear muffs, safety gloves, protective clothing and shoes specially designed for chainsaw work.
- Make sure that the wood being cut is held in place, secure it with some kind of fastener if necessary (especially round straight logs which can start to roll), this also makes it easier to use the chainsaw safely with both hands.
- Kickbacks often cause the saw chain to loosen and become blunt. A blunt chain also increases the likelihood of kickback. Never work above shoulder height.
- It is very important that the chainsaw is sharpened regularly and correctly. An incorrectly ground/filed chain is unpleasant to work with and can be dangerous!
5.3 Overload warning
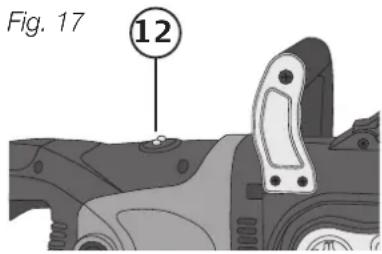
This chainsaw is fitted with an overload indicator (12). The saw has two indicator lights: A green light comes on when the saw is switched on and shines so long as the saw is operated under normal load. The green light goes out and a red indicator light (on the left) comes on if the saw is overloaded.
The indicator light only warns you that the saw is being overloaded; the saw does not immediately shut-off if it is overloaded. If you continue to saw for a long time after the red light has come on, the saw could become damaged or the fuse might blow.
Reduce the load on the saw by applying less pressure on the wood until the red light goes out.
6. Tips for using the chainsaw
Chopping firewood
Safety rules:
- Make sure that the log is secure and not able to slide/roll around during sawing. Try to fasten small logs before starting to cut them.
- Only use the chainsaw for cutting wood. Make sure that no stones, nails or other objects that can be projected or damage the chain are close to the chainsaw during use. Avoid letting the chainsaw come into contact with the ground, barbed wire fences, etc, during operation.
- Make sure that the tip of the guide bar does not come into contact with small branches, chop one branch/twig at a time. Make sure you have a steady stance, use safety footwear with non-slip soles.
- The chainsaw must always be switched off when you move around. Do not keep your hand on the power trigger so that the saw can start if you trip over something.
7. Remember
- The chainsaw must always be started first and running at full speed before the saw chain is pressed against the wood.
- Start the saw by pressing in the lock-off switch and squeezing the trigger on the rear handle (1).
- Place the lower part of the spiked bumper (17) against the wood and begin sawing. Pull the chainsaw backwards a little and move it so that the wood is higher up on the spiked bumper and continue sawing.
- Be careful when sawing wood that is split or cracked, splinters might be ejected.
8. Sawing trees that are under tension or compression
Warning: Be careful when cutting branches that are under tension or compression.
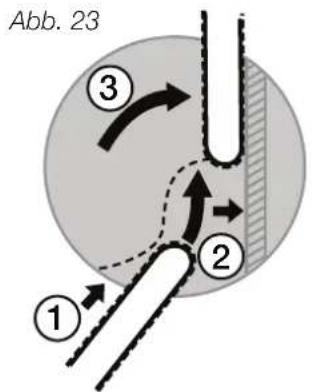
Size up the job and work out how the tree or branch is bowed before starting to saw. If you saw into wood that is under compression, the saw could get stuck; if you saw into wood that is under tension, the wood could split and spring back unexpectedly.
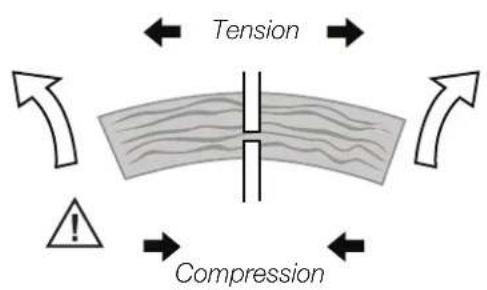
The top of the wood is under tension and the bottom of the wood is under compression.
Warning: The wood will spring upwards when it is cut.
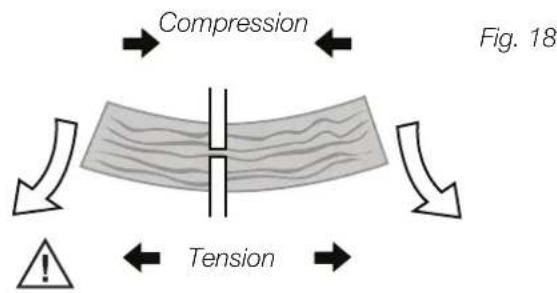
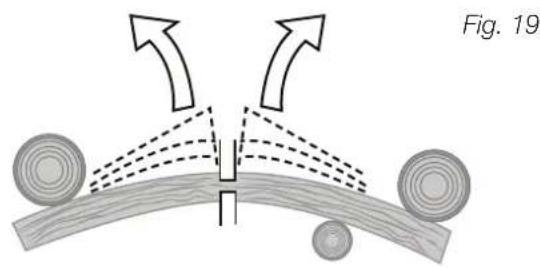
The bottom of the wood is under tension and the top of the wood is under compression.
Warning: The wood will collapse when it is cut.
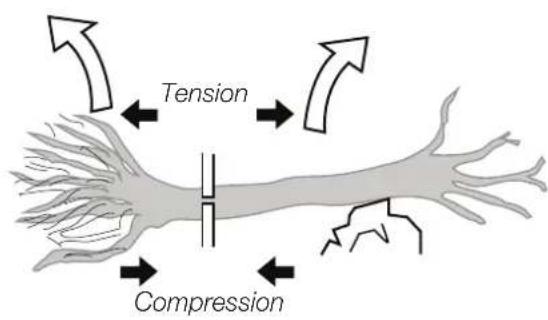
The top of the wood is under tension and the bottom of the wood is under compression.
Warning: The tree trunk will spring up with force and twist when cut and the roots can tip forwards or backwards. Use extreme caution in this situation!
natural_image
Diagram showing two circular objects interacting with a central vertical structure, connected by dashed lines and arrows indicating motion or force directions (no text or symbols)Both sides of the wood are under stress.
Warning: The tree trunk can move sideways when cut. Use extreme caution in this situation!
9. Tree felling
This chainsaw is not intended for felling, but mostly for small jobs such as removing branches and sawing logs. However, it can be used on exception for felling small trees. Ask someone who knows how to use a chainsaw for advice if you are in the least unsure of how to use the chainsaw.
Protective equipment should always be used for forestry work: Helmet with ear defenders and visor, chainsaw trousers or leggings, chainsaw boots or shoes with non-slip soles and toe caps and of course a first aid kit. Also use work clothes in a visible colour that stands out.
- Small trees can often be felled with one cut almost entirely through the whole trunk and pushed in the correct direction by hand or by a shoulder. (Do not cut completely through, save a little of the trunk to be used as a hinge).
- Larger trees require directional cuts. Directional cuts determine the direction of the fall.
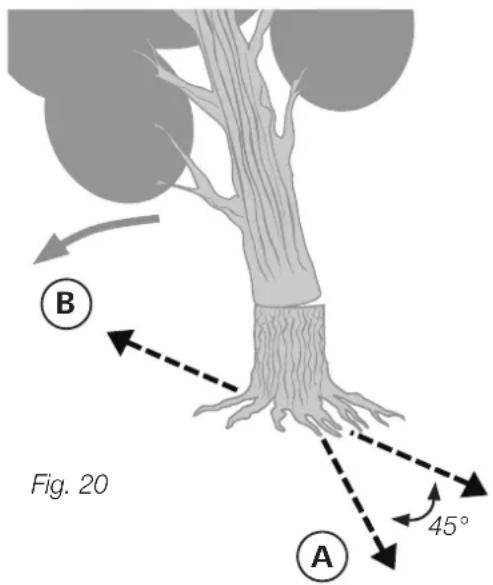
Warning: Always make sure that you have an escape route ready. If needed take away bushes and branches that are in the way. The best escape route (A) is diagonally to the rear of the expected line of fall.
Warning: If the terrain is sloped or uneven, the chainsaw operator should keep on the uphill side of the tree, as the tree is likely to roll or slide downhill after it is felled.
Note: The direction of fall (B) is determined by the notch cut. Before felling, consider the natural lean of the tree, the location of larger branches and the wind direction to judge which way the tree will fall.
Warning: Never fell a tree alone if there is a risk of it falling onto something which can be damaged such as a house or fence. Get help from a professional. Never fell a tree close to a power line or telephone line. Check that there are no onlookers or pets close by before you begin cutting. Look up often and check that no one is approaching the danger area.
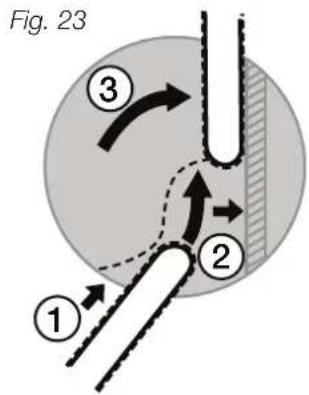
Normal tree felling consists of two cutting phases, the notching undercut (C) and the felling back cut (D).
Start with the upper notching cut (C) on the side of the tree facing the direction of fall (E). Then make the lower, horizontal notching cut so that it meets the upper notching cut (do not cut too far). The notching undercut should be wide enough to steer the tree during as much of the fall as possible.
Warning: Never walk in front of a tree in which you have made a notching undercut.
Make the felling back cut (D) from the other side of the tree, parallel to but 3–5 cm higher than the horizontal notching cut.
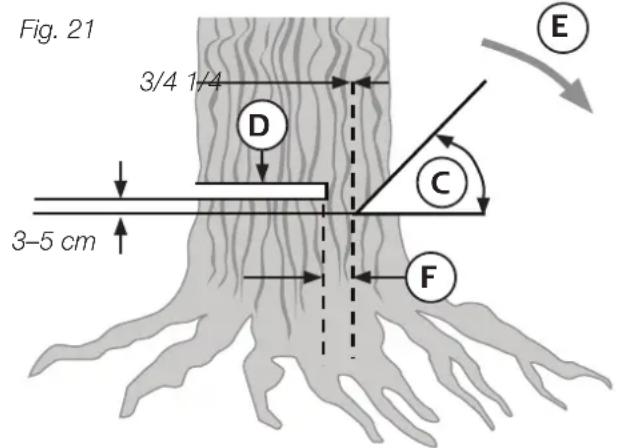
NEVER cut completely through the remaining trunk. ALWAYS leave a hinge (F). It is the hinge that steers the tree during the fall. The hinge wood keeps the tree from twisting and falling in the wrong direction. Do not cut through the hinge. As the saw chain gets close to the hinge, a felling wedge should be inserted into the felling back cut. If the entire felling cut is made before a felling wedge has been placed in the saw cut, there is a risk of the tree rocking backwards and pinching the saw chain. Before felling the tree by driving in the felling wedge, make sure that there are no bystanders or pets in the fall area.
Warning: Before making the final cut, check again that there are no onlookers, pets or other obstacles in the vicinity.
- Use a felling wedge of plastic or wood (A) to prevent the guide bar (B) from being clamped down upon in the cut.
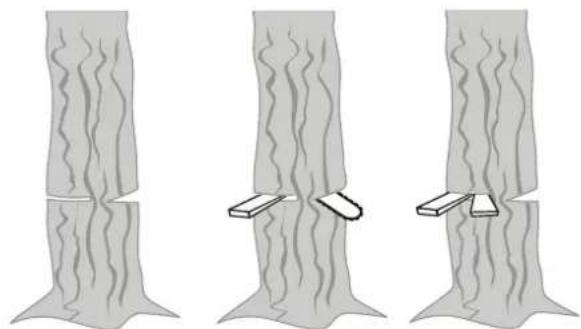
natural_image
Three diagrams showing a tree with wavy lines and two blocks attached to it, no text or symbols present.Fig. 22
- If the diameter of the tree is larger than the length of the guide bar you must make two cuts.
Warning: When the felling cut (D) has been made so deep that only the hinge (F) is left, the tree can begin to fall, otherwise you must use a felling wedge or crowbar to help.
When the tree begins to fall, remove the chainsaw from the cut and switch off the motor. Retreat diagonally backwards and to the side along your planned escape route and keep your eye on the tree while it is falling (fig. 20).
10. De-limbing/Snedding
De-limbing (or snedding) means cutting away the branches and shoots of a fallen tree. Start by cutting the higher branches on the tree. Stand to one side of the tree and de-limb them from the other side of the trunk/stem (the trunk will serve as protection between you and the chainsaw). Use caution when cutting branches which are under tension. They must be cut from the correct side; otherwise the guide bar will get stuck.
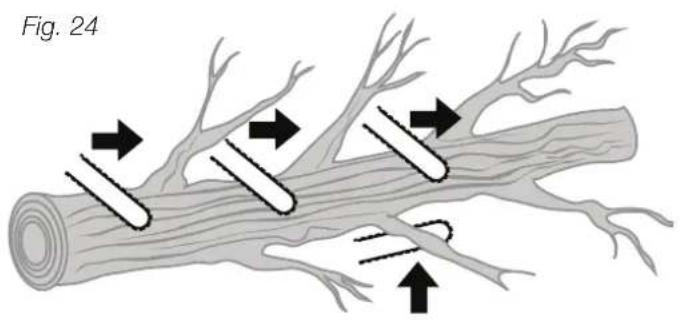
Warning: Never stand on the stem of a tree while de-limbing (snedding) it.
11. Bucking
Bucking is cutting fallen tree stems into lengths. Make sure that you are standing steady with good balance. If the ground is sloped you should stand uphill of the tree stem when cutting. The stem of the tree should preferably be chocked up on something so that it is not lying directly on the ground. This helps to prevent the saw chain from cutting into the ground and blunting. If the stem is supported at both ends, you must begin by cutting the stem in half at the middle. Start by cutting half the way through the stem from the upper side, then cut up towards this cut from the underside of the stem (to avoid pinching). Be careful not to let the saw chain come in contact with the ground.
- A tree stem supported along the entire length: Cut from the top first, then roll the stem over and make another cut from the top which meets the first cut (fig. 25).
- A tree stem supported at one end (such as a log lying in a saw horse): Cut 1/3 of the way through the stem from the underside first (to avoid splintering). Then make a cut from above which meets the first cut (to avoid pinching).
- A tree stem supported at both ends: First cut 1/3 of the way through the stem from the upper side (to avoid splitting). Then make a second cut from underneath to meets the first cut (fig. 26).
Note: Whenever possible the stem should be supported and raised off the ground, preferably in a saw horse. If this is not possible, the stem should be supported on limbs, logs or chocks. Make sure that the log is secure and not able to slide/roll around while it is being cut.
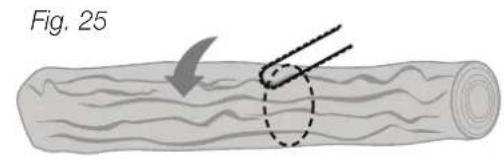
natural_image
Diagram of a wooden log being cut with arrows indicating direction (no text or symbols)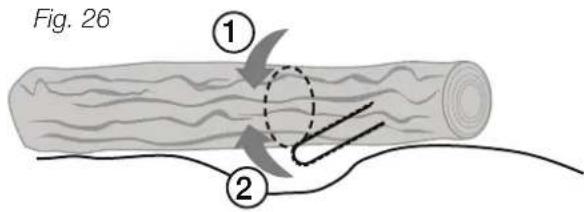
Bucking with the help of a saw horse
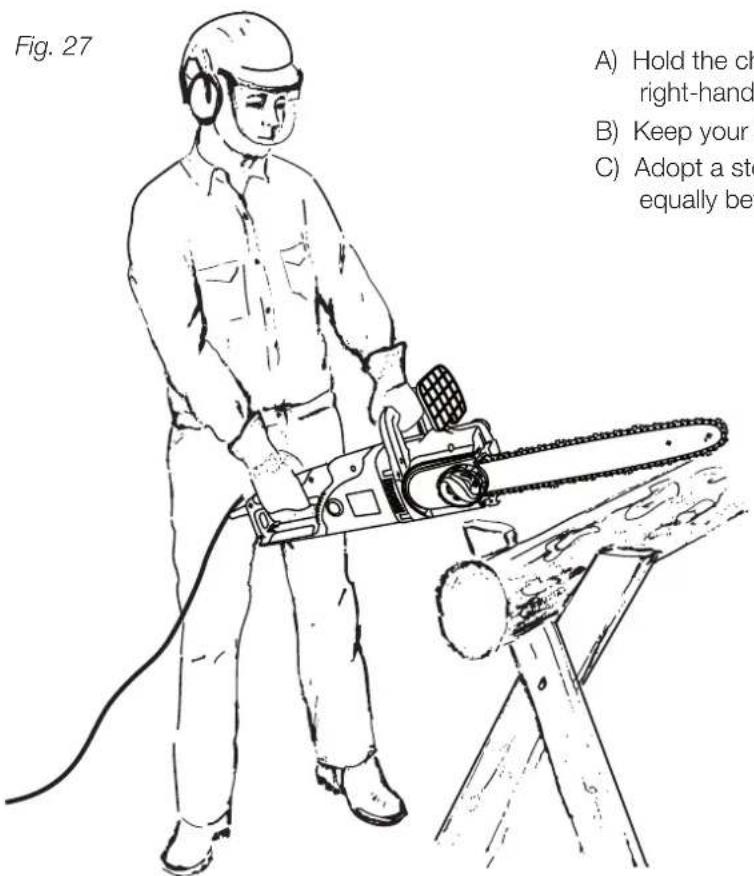
A) Hold the chainsaw firmly with both hands on your right-hand side while cutting.
B) Keep your left arm as straight as possible.
C) Adopt a steady stance with your weight divided equally between both feet.
12. Care and cleaning
Note: Always pull the plug out of the wall socket before servicing and adjusting the chainsaw.
Always keep the ventilation openings of the motor free from dust and debris. Only those maintenance operations mentioned in this manual may be performed at home, all other repairs and adjustments must only be performed by a service technician. This product must not be altered or used in any other way than mentioned in this manual, otherwise the chainsaw will not be safe to use.
13. Storage
Store the chainsaw on a dry, well-ventilated and level surface which is locked away or out of children's reach when not in use.
14. Responsible disposal
This symbol indicates that this product should not be disposed of with general household waste. This applies throughout the entire EU. In order to prevent any harm to the environment or health hazards caused by incorrect waste disposal, the product must be handed in for recycling so that the material can be disposed of in a responsible manner. When recycling your product, take it to your local collection facility or contact the place of purchase. They will ensure that the product is disposed of in an environmentally sound manner.
15. Troubleshooting
| Error Cause Solution | ||
| The motor will not start. No power. Check plug, socket and lead/cable. | ||
| Kickback guard/chain brake triggered. | Refer to Resetting the kickback guard/chain brake (fig. 15). | |
| Worn brushes. Have a service technician change the brushes. | ||
| The chain doesn’t move. Kickback guard/chain brake triggered. | Refer to Resetting the kickback guard/chain brake (fig. 15). | |
| Poor performance. Incorrectly fitted saw chain. Saw chain on backwards, check the direction. | ||
| Poor performance - chain keeps coming off. | Chain tension. Check the saw chain tension. | |
| Saw chain gets hot. Chain lubrication. Check the oil level. | ||
16. Technical data
Wattage 2400 W
Rated voltage 230 V, 50 Hz
Chain speed 14 m/s
Max cutting length 350 mm
Weight 4.7 kg (without guide
bar and chain)
Sound levels LpA = 93 dB(A), KpA = 3 dB(A)
LwA = 106 dB(A), KwA = 3 dB(A)
Vibration level 7.5 m/s ^2 , K: 1.5 m/s ^2
Oil tank 110 ml
Saw chain 3/8", 52-link, 0.050"
Guide bar 14" (35 cm)
Elkedjesåg 2400 W
Art.nr 18-3573
40-9509
Modell SF7J101-24-SLN
SF7J101-24-SLN
natural_image
Illustration of a chain-linking device with a hand operating it, labeled 'Bild 7' (no text or symbols on the diagram itself)3.2 Kedjespänning
natural_image
Illustration of a hairpin connecting a cable to a plug (no text or symbols)3.5 Kedjesmörjning
3.6 Sågsvärd
natural_image
Diagram showing two curved arrows pointing upward from a central vertical structure, with surrounding circular components and dashed lines indicating motion or force directions (no text or symbols)natural_image
Three-panel illustration showing a tree with wavy lines and two small blocks attached to its base (no text or symbols)Bild 22
natural_image
Diagram of a wooden log with a dashed circular outline and an arrow pointing to it, labeled 'Bild 25' (no other text or symbols)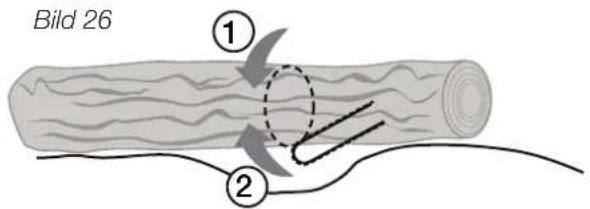
natural_image
Illustration of a chain-linking device with a hand holding the blade (no text or symbols)natural_image
Diagram of a hairpin connected to a cable, labeled 'Bilde 9' (no other text or symbols)natural_image
Two identical cross-sectional diagrams of a U-shaped mechanical part, shown in two different angles (no text or symbols)3.7 Beskyttelse mot kast/kjedebrems
natural_image
Diagram showing two curved wooden structures with circular components and directional arrows, labeled 'Bilde 19' (no text or symbols on the diagram itself)natural_image
Three-panel illustration showing a tree with wavy lines and two small blocks attached to its base (no text or symbols)Bilde 22
natural_image
Diagram of a mechanical component with internal channels and mounting features (no text or symbols)IWONS
natural_image
Illustration of a hand using a chain-linking tool to cut a single sheet of material (no text or symbols visible)3.2 Ketjun kireys
natural_image
Illustration of a hairpin connecting a cable with a plug (no text or symbols)3.5 Ketjun voitelu
3.6 Terälevy
natural_image
Two identical cross-sectional diagrams of a mechanical part with hatched fill (no text or symbols)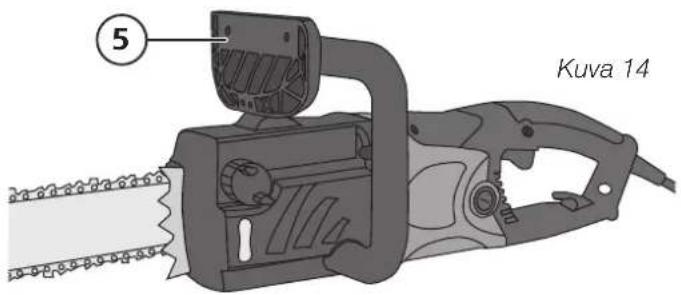
natural_image
Three sequential illustrations of a tree with wavy lines and two small blocks attached to its base (no text or symbols)Kuva 22
natural_image
Illustration of a chain saw cutting through a gear (no text or symbols)3.2 Kettenspannung
natural_image
Illustration of a hairpin connecting a cable to a plug (no text or symbols)Abb. 10
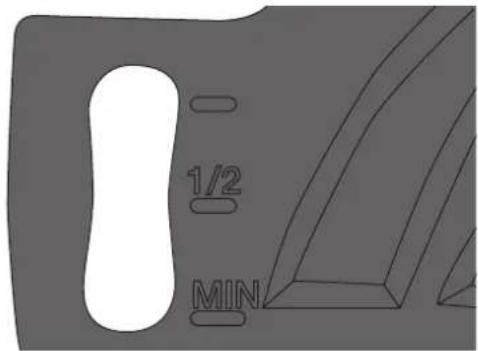
Abb. 11 Abb. 12
3.6 Schwert
natural_image
Three-panel illustration showing a tree with wavy lines and two small blocks attached to its base (no text or symbols)Abb. 22
Declaration of Conformity
Declares that this product complies with the requirements of the following directives and standards
EC type certificate, no. 11SHW1874-04
Issued by the following notified body:
(Notified Body no. 0905)
Henrik Alfredsson
Manager Technique & Quality
Insjön, Sweden, 2016-10-25
Sverige
10 - 13 Market Place
Kingston Upon Thames
Surrey
KT1 1JZ
Deutschland
Kundenservice
Hotline: 040 2999 78111
E-Mail: kundenservice@clasohlson.de
Homepage
www.clasohlson.de
Postanschrift
- Viktig information:
- Contents
- Safety Requirements – Handheld power tools....3
- Safety Requirements - Handheld power tools
- General Safety Requirements - EN 60745-1
- 1) Work area
- 2) Electrical safety
- 3) Personal safety
- 4) Use and maintenance of the power tool
- 5) Service
- Chainsaw safety warnings
- Causes of chainsaw kickback
- Operator prevention of kickback
- Product Safety symbols
- Safety information
- Description
- Pre-use checks
- Fitting the guide bar and saw chain
- Description
- A combined tensioning/locking knob on the drive sprocket cover
- A tensioning wheel for the chain tension, mounted on the guide bar.
- Assembling the guide bar and saw chain
- Note: The chainsaw must be unplugged.
- Chain tension
- Adjusting the chain tension
- Topping up the chain oil
- Attaching the extension lead to the chainsaw
- Chain lubrication
- Checking the chain lubrication
- Chain oil
- Guide bar
- Drive sprocket
- Chain guard
- Kickback guard/chain brake
- Testing the kickback guard
- Resetting the kickback guard/chain brake
- Grinding/filing the saw chain
- File the chain as follows:
- Starting to use the chainsaw
- Switching the chainsaw off
- After finishing work
- Safety precautions
- Important considerations
- Kickback
- Overload warning
- Tips for using the chainsaw
- Chopping firewood
- Safety rules:
- Remember
- Sawing trees that are under tension or compression
- Tree felling
- De-limbing/Snedding
- Bucking
- Bucking with the help of a saw horse
- Care and cleaning
- Storage
- Responsible disposal
- Troubleshooting
- Technical data
- Elkedjesåg 2400 W
- Kedjespänning
- Kedjesmörjning
- Sågsvärd
- Beskyttelse mot kast/kjedebrems
- Ketjun kireys
- Ketjun voitelu
- Terälevy
- Kettenspannung
- Schwert
- Declaration of Conformity
- Sverige
- Deutschland
Brand : Cocraft
Model : HCI 2400-T
Category : After-sales service