
x Ducky One 2 Mini - Keyboard HYPERX - Free user manual and instructions
Find the device manual for free x Ducky One 2 Mini HYPERX in PDF.


| Product Type | Mechanical Keyboard |
| Form Factor | 60% (Compact) |
| Dimensions (L x W x H) | 295 x 105 x 40 mm (11.6 x 4.1 x 1.6 in) |
| Weight | Approx. 600 g (1.32 lbs) |
| Connection Type | USB-C (Detachable Cable) |
| Cable Length | 1.5 m (USB-C to USB-A) |
| Switch Type | Cherry MX (Blue, Brown, Red, Silver, or Silent Red) |
| Backlighting | Per-key RGB LED |
| Keycap Material | PBT doubleshot |
| Rollover | N-key rollover |
| Anti-Ghosting | Yes |
| Programmable Macros | Onboard via DIP switches and software |
| Onboard Memory | Yes (for lighting profiles) |
| Operating System Support | Windows, macOS, Linux |
| Power Source | USB bus powered (5V, 500mA) |
| Cleaning Instructions | Disconnect, use compressed air for debris; gently wipe surface with damp cloth; avoid solvents. |
| Safety Precautions | Keep away from liquids; do not disassemble; avoid excessive force on keys. |
| Spare Parts Available | Keycaps, cable, USB-C port (requires soldering for replacement), switch replacement not supported (soldered). |
| Repairability | Limited; keycaps and cable are user-serviceable; internal components require professional repair. |
| Warranty | 2 years limited warranty |
| Included Accessories | USB-C cable, keycap puller, extra keycaps (Ducky special edition), user manual |
Frequently Asked Questions - x Ducky One 2 Mini HYPERX
User questions about x Ducky One 2 Mini HYPERX
0 question about this device. Answer the ones you know or ask your own.
Ask a new question about this device
Download the instructions for your Keyboard in PDF format for free! Find your manual x Ducky One 2 Mini - HYPERX and take your electronic device back in hand. On this page are published all the documents necessary for the use of your device. x Ducky One 2 Mini by HYPERX.
USER MANUAL x Ducky One 2 Mini HYPERX
Table of Contents
Ducky One 2 Mini Specifications and Features 1
Standard Layer Keyboard Layout 2
Fn Layer Keyboard Layout 3
Fn+Alt Layer Keyboard Layout 4
RGB Lighting Operation Modes 5
RGB Memory Area Backlight 6
Ducky Game Interaction Mode 7
Multimedia Functions 8
Setting Debounce Time 9
Power Bank Demo Mode 1
Store Window Demo Mode 1
Restore Factory Settings 1
Windows Lock Function 1
Key Switching and DIP Switch Functions 1
Ducky Mini Macro 1
Ducky One 2 Mini specs & features 21
Standard layer keyboard configuration diagram 22
Fn layer keyboard configuration diagram 23
Fn+Alt layer keyboard configuration diagram 24
RGB Backlit modes 25
RGB zone customization modes 26
Ducky Gaming Interaction mode 27
Multimedia function 28
Debounce time setting 29
Demo mode 30
Display mode 30
Reset to factory defaults 31
Windows key lock feature 31
Key switch functions / DIP switch functions 32
Ducky Mini Macro 33
Ducky Mini Macro hotkeys function 34
Ducky Mini Macro setting section 35
Ducky Mini Macro multimedia function keys 36
Ducky Mini Macro keyboard button function keys 37
Ducky Mini Macro Windows common function keys 38
Ducky Mini Macro set up example 39

Ducky One 2 Mini
Product specifications:
Ducky One 2 Mini
Keyboard layout diagram, using US layout as an example
Standard layer![ESC 1 ! @ 3 # 5 6 S % ^ 7 &2 8* 9 ( 0 ) - _ = + ← ≡ T U I Y R W E Q O P [ ] I ↓ A S D F G H J K L ; : , " ← ↑ Z X C V B N M , < > · / ? ↑ Ctrl CtrlFnAlt A#](/content/2026/05/1008498/images/2c6e595425896ade583d40be58fdcd60512e738cd1e8edbdabc0e10b80ed95d1.jpg)

Ducky One 2 Mini
Keyboard layout diagram, using US layout as an example
Fn layer

Ducky One 2 Mini
Keyboard layout diagram, using US layout as an example
Fn + Alt layer

RGB lighting operation modes
RGB memory area backlight
RGB memory area backlight
Operation process
Ducky game interaction mode
Key switch and DIP switch functions
Key switch function
- Applicable keys: Fn/Alt/Ctrl/Windows/Caps Lock keys
- Operation method:
DIP switch functions
| DIP1 | OFF(預設) | ON |
| Windows鍵功能ON | Windows鍵功能OFF | |
| DIP2 | OFF(預設) | ON |
| 任意全鍵輸出 | 任意6鍵輸出 | |
| DIP3 | OFF(預設) | ON |
| Ducky VID | 可自定VID | |
| DIP4 | OFF(預設) | ON |
| 標準鍵盤模式 | 櫥窗展示模式 |
Ducky Mini Macro
Step 1. Select the profile to record
Ducky Mini Macro
Basic shortcut key functions
Ducky Mini Macro
Scope of the setting area
Keyboard layers that can be set on the Ducky Mini Macro
Note:
Ducky Mini Macro
Input commands for specifying "multimedia key functions"
Ducky Mini Macro
Input commands for specifying "keyboard key functions"
Ducky Mini Macro
Common Windows shortcut keys
Ducky Mini Macro
Usage examples
Ducky One 2 Mini
Specification:
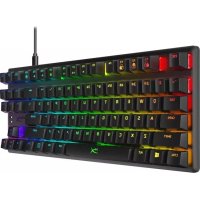
Type: Mechanical keyboard Switch: HyperX RGB switches Keycap material: PBT or ABS Printing method: Double-shot or Laser Engraved Origin of production: Taiwan Size: 302 x 108 x 40 mm Weight: 590g
Features:
HyperX key switches for quality assurance. Various RGB LED lighting modes which includes brand new game modes True USB Type-C interface, compatible with all Type-C devices Provides mouse functions for a convenient experience Miniature yet packed with features Supports Ducky Macro through hardware, personalize functions as you like RGB version with Four-layer PCB featured, insisting on using the best specs Products with PBT Double-Shot Seamless keycaps, providing the perfectly exceptional typing experience

Ducky One 2 Mini
Keyboard configuration diagram, US layout used as example
Standard layer![ESC 1 ! @ 3 4#5 6 $ % ^ 7 &2 8 * 9 ( 0 ) - _ = + ← ≡ T U IYRW EQ O P [ ]# ↓ A S D F G H J K L ; : ' " ← ↑ Z X C V B N M , < > · / ? ↑ Ctrl CtrlFnAlt](/content/2026/05/1008498/images/2e933084949118119a8a2c775caed9c2779733f78e51dd5dc9251855b7c65f71.jpg)

Ducky One 2 Mini
Keyboard configuration diagram, US layout used as example
Fn layer

Ducky One 2 Mini
Keyboard configuration diagram, US layout used as example
Fn + Alt layer

RGB Backlit Modes
| Fn + Alt + T | First mode: Wave mode (Default) | Seventh mode: Halo mode |
| Second mode: Color Cycle mode | Eighth mode: 100% Full Backlit mode | |
| Third mode: Rain Drop mode | Ninth mode: Breathe mode | |
| Fourth mode: Ripple mode | Tenth mode: Radar mode | |
| Fifth mode: Random Reactive mode | Eleventh mode: Backlit OFF | |
| Sixth mode: Reactive mode |
● All above modes can be adjusted with the following key sequence:
◆ Fn + Alt + J : Decrease speed ◆ Fn + Alt + L : Increase speed
- Hold Fn + Alt + T for 3 seconds to turn off all backlit (including CM1 and CM2).
- Only the backlit modes with ⚙ can be adjusted using the following:
◆ Fn + Alt + Z : Adjust color red(R) brightness. 10 Levels. ◆ Fn + Alt + X : Adjust color green(G) brightness. 10 Levels. ◆ Fn + Alt + C : Adjust color blue (B) brightness. 10 Levels. ◆ Fn + Alt + V : Erase red, green and blue color setting. ◆ Fn + Alt + Spacebar (Color palette) : Activate color palette to display various colors on each key, press on the desired color, all the keys will automatically change to match.

RGB LED Zone Customization Modes
| Fn + Alt + G | CM1 cycle:First step: Turn on user's customized zone and color.Second step: Turn on user's customized zone and color in breathe mode.Third step: Turn off CM1. |
| Fn + Alt + B | CM2 cycle:First step: Turn on user's customized zone and color.Second step: Turn on user's customized zone and color in breathe mode.Third step: Turn off CM2. |
| Fn + Alt + Caps Lock (REC) | Press for 3 seconds until the G (CM1) and B (CM2) keys light up,choose the layer for setting, press it again and start recording. |
| Caps Lock + Z | Adjust color red (R), 10 levels. |
| Caps Lock + X | Adjust color green (G), 10 levels. |
| Caps Lock + C | Adjust color blue (B), 10 levels. |
| Caps Lock + V | Erase all LED light |
| Caps Lock + Spacebar | Color palette |
| Caps Lock + Left Shift | REC over, finish recording |

RGB LED Zone Customization Modes
Recording steps:
- Adjust to the color first, then set the individual keys to be set to that color.
- Press Fn + Alt + Caps Lock for 3 seconds, the buttons G (CM1) and B (CM2) will illuminate then press G to set CM1 and press B to set CM2.
- When starting recording mode, Caps Lock will display the current LED color. The color can be adjusted by hitting Caps Lock + Z / X / C / V. After setting the desired color, hitting any key on the keyboard will set that key to the selected color.
- Repeating the above steps allows the user to set different colors to different keys. If the key has been set, press again to cancel the setting.
- To finish recording, press Caps Lock + Left Shift (REC over) to finish recording. The color of the Caps Lock key is the value you set.
Note:
- When starting recording mode, Caps Lock will display the current LED Color.
- CM1, CM2 can work with other LED light modes at the same time. CM1 and CM2 can be turned on along with other lighting modes. In addition, CM1 has the priority over CM2 when the zone overlaps. Press Fn + Alt + T for 3 seconds to turn off ALL backlit modes.
- If there is no activity in 30 seconds in the recording mode, the recording session will terminate without saving.
- Caps Lock LED color follows the "100% Full Backlit mode".

Ducky Gaming Interaction Mode
Ducky Gamble mode
| Fn + Alt + N | 2 blocks flashing |
| Fn + Alt + M | 4 blocks flashing |
Operation method:
Hold the combine keys for 3 seconds to perform multi-block flashing. Press the spacebar and it will randomly stay on one block. Press the spacebar again to start the next round.
Note:
● Ducky Gamble mode can be adjusted using the following:
◆ Fn + Alt + J : Decrease speed. ◆ Fn + Alt + L : Increase speed.
- If you start any light mode on Fn + Alt layer, the Gamble mode will be closed.
- If there is no activity in 10 minutes, the gaming interaction mode will terminate.
Ducky Minesweeper mode
| Fn + Alt + , | Minesweeper game |
RGB LED Operation method:
Press for 3 seconds to start the minesweeper game. The keyboard will randomly select 1 or several buttons as mines. When the user turns the button in turn, the color will be displayed. The green color will continue to play the game safely. The red button is used as the mine, the game will end. At the end of the game, it will stay in the original display light color; press the blank button to enter the next round.

Multimedia Function
| Fn + W | Mouse cursor up | Fn + Q | Left mouse button |
| Fn + A | Mouse cursor left | Fn + E | Right mouse button |
| Fn + S | Mouse cursor down | Fn + R | Roller up |
| Fn + D | Mouse cursor right | Fn + F | Roller down |

Debounce Time Setting
| 5ms | Fn + Alt + Y | Hold the combine keys for 3 sec, the keyboard will flash 3 times to indicate the debounce time has been switched successfully. |
| 10ms (Default) | Fn + Alt + U | |
| 15ms | Fn + Alt + I | |
| 25ms | Fn + Alt + O |
Note:
The method is to adjust the debounce time of the metal shrapnel in the mechanical shaft during the pressing process. The shorter the time, the sooner it can be triggered, but if the time is too short may cause misjudgement. If it's not necessary to change the time, the default value is recommended.

Demo Mode
Hold Left Ctrl + Left Shift + Caps Lock then plug the keyboard into power source
Note: It is suitable for plugging in the mobile power supply or USB charging stand to provide lighting effects display, and the keyboard won't send any signal. Please note that it is limited to power supply devices with an output voltage of 5V. If the voltage does not match, the keyboard may be damaged.

Display Mode
Hold Fn + Alt + Ctrl for 3 sec
To display various LED backlit modes
Note: Used for showcasing purposes.

Reset To Factory Defaults
| US ANSI and EU ISO layout | Left Windows key + Right Windows key |
| JP JIS layout | Fn+ Left Windows key |
Note:
Hold for 3 seconds. The keyboard's backlight will flash 3 times to indicate the keyboard has been reset.

Enable / Disable Windows Function (Windows Key Lock)
Fn + any Alt key + any Windows key for 3 seconds, the keyboard's backlit will flash 3 times to indicate the keyboard has been enabled / disabled.

DIP Switch Functions
Key Switch Function
- Applicable keys: Fn/Alt/Ctrl/Windows/Caps lock
- Operation:
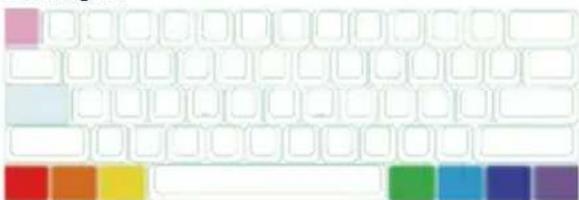
● Press Fn + Alt + k for 5 seconds. ● Until the ESC, L_Ctrl, L_Win, L_Alt, R_Alt, R_Win, Fn, R_Ctrl, and Caps lock keys are all lighting up. The colorways are respectively pink, red, orange, yellow, green, blue, indigo and purple.
● Except for Caps lock key, the rest of 6 keys are able to switch each function and color at will. (2 keys max at the same time)
- Press Caps lock once will change its own function to Fn (turns into indigo LED color) then L_Ctrl key (turns into red LED color) in order.
- Press Esc key once to finish the switching function. Note: You can press Esc key to leave the switching function before starting it.
DIP switch functions
| DIP1 | OFF (Default) | ON |
| Windows key ON | Windows key OFF | |
| DIP2 | OFF (Default) | ON |
| N-Key Rollover mode | 6-Key Rollover mode | |
| DIP3 | OFF (Default) | ON |
| Ducky Vender ID (VID) | Vender ID definable | |
| DIP4 | OFF (Default) | ON |
| Standard mode | Display mode |
Note: You can input the ideal VID in both situation, but the VID can be only changed when DIP 3 turned on.

Ducky Mini Macro
Step 1. Profile selections
| Fn + Alt + | 1 | = | Switch to profile 1 | Factory settings (Default) |
| 2 | Switch to profile 2 | Customize Macro key features | ||
| 3 | Switch to profile 3 | |||
| 4 | Switch to profile 4 | |||
| 5 | Switch to profile 5 | |||
| 6 | Switch to profile 6 |
Note:
- When keyboard is plugged in, Caps Lock and Number Keys will blink based on selected profile number.
- Adjust profile to 2~6 in order to set Macro. ● After profile is switched, Caps Lock or Indicator light will blink based on the current profile number.
Step2. To start Macro recording
Press Fn + Alt + Tab for 3 seconds to start Macro recording. Once in recording mode the Caps Lock or indicator lights will flash slowly.
Step3. Press a key to start recording Macro
Press on the key you want to use to activate Macro. The key pressed will blink (Non-backlit version will not) and the Caps Lock or indicator lights will flash swiftly.
Step4. Recording Macro
Enter any key, and choose the Macro implementation and record time option.
Step5. To continue recording another key (Jump out the current recording file)
Press Fn + Alt to choose another key to continue recording.
Step6. Finish recording
Press Fn + Alt + Tab for 1 second to finish recording and back to the profile.

Ducky Mini Macro
Hotkeys Function
| Fn + Alt + | Tab | Start recording : Press for 3 seconds. Finish recording: Press for 1 second. |
| ESC | Caps Lock will blink in the amount of selected profile number. | |
| Backspace | Delete current profile value. |
| Fn + Alt |
| Press for 1 sec to finish recording the current key and choose another key to record. |

Ducky Mini Macro
Setting Section
Ducky Mini Macro configurable keyboard layer
- Standard layer Fn layer
- Fn + Ctrl layer
Ducky Mini Macro unsettable key
Fn Caps Lock

Note:
● Supports recording N keys at the same time, and outputs N keys at the same time. - Macro function will record based on the user's typing speed.

Ducky Mini Macro
Multimedia Function Keys
| Fn + Windows key + Keys below | |||||||
| A | Mute | G | Previous playlist | M | Search | S | Mouse cursor up |
| B | Volume up | H | Calculator | N | Previous page | T | Mouse cursor down |
| C | Volume down | I | My computer | O | Next page | U | Mouse cursor left |
| D | Play / Pause | J | Browser | P | Mouse left click | V | Mouse cursor right |
| E | Stop | K | Q | Mouse right click | W | Mouse scroll up | |
| F | Next playlist | L | Multimedia | R | Mouse middle click | X | e scroll down |
Note: Need to be recorded first before use.

Ducky Mini Macro
Keyboard Button Function Keys
| Fn + Shift+ Keys below | |||
| A | Prompt profile value | N | Backlit mode : Wave mode (Default) |
| B | Profile 1 | O | Backlit mode : Color Cycle mode |
| C | Profile 2 | P | Backlit mode : Rain Drop mode |
| D | Profile 3 | Q | Backlit mode : Ripple mode |
| E | Profile 4 | R | Backlit mode : Random Reactive mode |
| F | Profile 5 | S | Backlit mode : Reactive mode |
| G | Profile 6 | T | Backlit mode : 100% Full backlit mode |
| H | Backlit modes switching | U | Backlit mode : Breathe mode |
| I | Adjust color red | V | Backlit mode : Radar mode |
| J | Adjust color green | W | Backlit mode : Backlit OFF |
| K | Adjust color blue | X | The key “ . ” on number pad (Num_) |
| L | Erase all value | Y | Number Lock |
| M | Color palette | ||
Note: 1. Need to be recorded first before use. 2. All versions support functions without an icon

Ducky Mini Macro
Windows Common Function Keys
| Ctrl + C | Copy select item | Windows + D | Desktop |
| Ctrl + X | Cut select item | Windows + M | Minimize all windows |
| Ctrl + V | Paste select item | Windows + L | Lock computer or change user |
| Ctrl + Z | Undo | Windows + R | Open [Run] window |
| Ctrl + Y | Redo | Windows + F | Search files or folders |
| Ctrl + N | Open new file | Windows + ↑ | Maximize all windows |
| Ctrl + O | Open current file | Windows+ ↓ | Minimize windows |
| Ctrl + S | Save file change | Windows + ← | Maximize window to the left side |
| Ctrl + P | Print file | Windows + → | Maximize window to the right side |
| Alt + F4 | Quit the software | Windows + Home | Minimize all windows other than the one used |
- http://windows.microsoft.com/en-us/windows/keyboard-shortcuts

Ducky Mini Macro
Set Up Example
Note: Set the profile to profile 2~6 before setting Macro.
Example A Configure the key "Z" to "Q" output.
Operation method :
Press Fn + Alt + Tab for 3 seconds → Press Z → Press down Q → Press Fn + Alt → Press Fn + Alt + Tab for 1 second
Example B To set Z as show "desktop" (under Windows system)
Operation method :
Press Fn + Alt + Tab for 3 seconds → Press Z → Press Windows key + D → Press Fn + Alt → Press Fn + Alt + Tab for 1 second
Example C To set Fn + Ctrl + M as "mute volume"
Operation method :
Press Fn + Alt + Tab for 3 seconds → Press Fn + Ctrl + M → Press Fn + Windows key + A → Press Fn + Alt →
Press Fn + Alt + Tab for 1 second
Example D: To set Fn + Ctrl + Q as "Reactive mode"
Operation method:
Press Fn + Alt + Tab for 3 seconds → Press Fn + Ctrl + Q → Press Fn + Shift + S → Press Fn + Alt → Press Fn + Alt +
Tab for 1 second

Ducky
Chattan



duckychannel.com.twhyperxgaming.com
4402186
- TABLE OF CONTENTS
- DUCKY ONE 2 MINI
- PRODUCT SPECIFICATIONS
- KEYBOARD LAYOUT DIAGRAM, USING US LAYOUT AS AN EXAMPLE
- RGB LIGHTING OPERATION MODES
- RGB MEMORY AREA BACKLIGHT
- OPERATION PROCESS
- DUCKY GAME INTERACTION MODE
- KEY SWITCH AND DIP SWITCH FUNCTIONS
- KEY SWITCH FUNCTION
- DUCKY MINI MACRO
- BASIC SHORTCUT KEY FUNCTIONS
- SCOPE OF THE SETTING AREA
- INPUT COMMANDS FOR SPECIFYING "MULTIMEDIA KEY FUNCTIONS
- INPUT COMMANDS FOR SPECIFYING "KEYBOARD KEY FUNCTIONS
- COMMON WINDOWS SHORTCUT KEYS
- USAGE EXAMPLES
- SPECIFICATION
- FEATURES
- RGB BACKLIT MODES
- RGB LED ZONE CUSTOMIZATION MODES
- RECORDING STEPS
- NOTE
- DUCKY GAMING INTERACTION MODE
- OPERATION METHOD
- RGB LED OPERATION METHOD
- MULTIMEDIA FUNCTION
- DEBOUNCE TIME SETTING
- DEMO MODE
- DISPLAY MODE
- RESET TO FACTORY DEFAULTS
- ENABLE / DISABLE WINDOWS FUNCTION (WINDOWS KEY LOCK)
- DIP SWITCH FUNCTIONS
- STEP2. TO START MACRO RECORDING
- STEP3. PRESS A KEY TO START RECORDING MACRO
- STEP4. RECORDING MACRO
- STEP5. TO CONTINUE RECORDING ANOTHER KEY (JUMP OUT THE CURRENT RECORDING FILE)
- STEP6. FINISH RECORDING
- HOTKEYS FUNCTION
- SETTING SECTION
- MULTIMEDIA FUNCTION KEYS
- KEYBOARD BUTTON FUNCTION KEYS
- WINDOWS COMMON FUNCTION KEYS
Brand : HYPERX
Model : x Ducky One 2 Mini
Category : Keyboard