
SYMBIO - Strollers GRACO - Free user manual and instructions
Find the device manual for free SYMBIO GRACO in PDF.
| Product type | Modular stroller |
| Brand | Graco |
| Model | Symbio |
| Recommended age (baby seat) | 6 months to 15 kg |
| Recommended age (carrycot) | Birth to 9 kg |
| Recommended age (car seat) | Birth to 13 kg |
| Maximum child weight | 15 kg (baby seat) |
| Basket capacity | 5 kg maximum |
| Changing bag capacity | 2 kg maximum |
| Wheel type | Swivel front wheels, pneumatic at front |
| Tire pressure | 28 psi maximum |
| Tire dimensions | 270 mm x 47 mm x 203 mm (rim) |
| Harness | 5-point, height adjustable |
| Handle | Reversible (facing front or back) |
| Brake | Foot parking brake |
| Folding | Compact, with locking |
| Included accessories | Hood, bumper bar, harness, cushion |
| Optional accessories | Carrycot, changing bag, footmuff, rain cover, car seat adapter |
| Textile care | Hand wash, no bleach |
| Frame care | Mild soap and warm water |
| Repairability | Tires repairable like a bicycle tire |
| Safety standards | Use harness as soon as child sits, brake engaged when stopped |
Frequently Asked Questions - SYMBIO GRACO
User questions about SYMBIO GRACO
0 question about this device. Answer the ones you know or ask your own.
Ask a new question about this device
Download the instructions for your Strollers in PDF format for free! Find your manual SYMBIO - GRACO and take your electronic device back in hand. On this page are published all the documents necessary for the use of your device. SYMBIO by GRACO.
USER MANUAL SYMBIO GRACO
A Hood
Body support
C Harness covers
Bumper bar
E Harness
F Crotch pad
G Seat pad
J Front wheel
K -Basket
L Rear wheel
M
N Handle release
0 ——Frame release
P Carseat adapter
C Carrycot (Sold separately)
{Optional Accessories}
R Baby bag (Sold separately)
S Footmuff (Sold separately)
T Toddler seat raincover (Sold separately)
Read these instructions carefully before use and keep them for future reference. Your child's safety may be affected if you do not follow these instructions.
WARNING: It may be dangerous to leave your child unattended.
Children should be harnessed in at all times and should never be left unattended.
The child should be clear of all moving parts while making adjustments.
This pushchair requires regular maintenance by the user. Overloading, incorrect folding and the use of non-approved accessories may damage or break this pushchair.
Do not hang shopping bags on the handle or carry shopping bags on the pushchair except in a Graco-approved shopping basket. Maximum load 5 kg. NEVER ON THE FOOTREST.
It may be unsafe to use accessories e.g. child seats, bag hooks, rain covers, etc. other than those approved by the manufacturer.
Use only replacement parts supplied or approved by the manufacturer.
Be aware of the risk to open fire and other sources of strong heat.
This pushchair is intended for one child only.
Use of this pushchair with a child weighing more than 15kg will cause excessive wear and stress on this pushchair.
This pushchair is intended for one child: with carrycot from birth up to 9 kgs, with Logico S car seat from birth up to 13 kgs, with seat unit from 6 months up to 15 kgs. Do not use raincover on a pushchair, carrycot, or carseat not fitted with a hood.
Always remove coseat from adapter before removing the adapter from the pushchair frame.
WARNING: the toddler seat is not suitable for children under 6 months
Use this pushchair only with Graco® Group 0+ car seats. Use this pushchair frame only with SYMBIO toddler seat, SYMBIO GO carrycot and SYMBIO DRIVE carrycot.
WARNING: This product is not suitable for running or skating.
WARNING: Ensure that all the locking devices are engaged before use.
WARNING: Check that the SYMBIO toddler seat or Graco Group 0+ attachment devices are correctly engaged before use.
WARNING: Use a harness as soon as your child can sit unaided.
WARNING: Always use the crotch strap in combination with the waist belt.
WARNING: Any load attached to the handle affects the stability of the pram/pushchair.
WARNING: Regularly lubricate all moving parts sparingly with a light general purpose machine oil, making sure that the oil penetrates between the components that move together in use.
Check the various safety devices and use them correctly. Keep your child away from the folded free-standing unit so that it does not fall and injure your child.
Pushchairs should be serviced after an extended period of no use.
If your pushchair is used by anyone unfamiliar with it, e.g. grandparents, always show them how it works.
Do not use a raincover indoors, in a hot atmosphere or near a direct heat source-baby may overheat.
Please fully remove raincover before folding the pushchair.
Do not let go of your pushchair when close to roads or trains, even with the brake ON, the draught from the vehicle or train may move a free standing pushchair.
When ascending or descending stairs or escalators, always remove your child and fold the pushchair.
Avoid strangulation. DO NOT suspend strings from your pushchair or place items with strings on your child.
To avoid tipping, always help your child in and out of toddler seat.
To avoid injury, make sure all body parts are clear when reversing the handle.
Use care when reversing the handle to avoid catching child's arms or hands in the mechanism. When making adjustments to your pushchair, always be sure that all parts of your child's body are clear of any moving parts.
Always remove child from carseat, carrycot or toddler seat when reversing the direction of these products on the pushchair frame.
Do not carry pushchair frame up stairs when using with child in toddler seat, carrycot or carseat.
Assembly
1 - 3 Squeeze handle release and pull up to rotate it until it locks into position as shown.
4 Attach front wheels until they click into place.
5 Attach rear wheels until they click into place.
6 Assembled frame.
Folding Your Pushchair
7 Squeeze handle release and rotate handle forward and down as shown.
8 To fold, press button 1 down and pull up on lever 2 while pulling frame up.
9 Lay frame down with handle up.
10 - 11 Place hand under storage latch and attach to connector as shown.
Unfolding Your Pushchair
12 - 13 Squeeze handle release and rotate handle to position as shown.
14 - 15 Swiftly pull up on handle to lock pushchair frame into place.
Using Your Pushchair
16 - 17 Swivel wheels- Pull up to lock, Press down to unlock. When using the handle in reversed position you should lock the swivel wheels for a better maneuverability.
18 To remove front wheels, press button as shown.
19 To remove rear wheels, press button as shown.
20 To lock brakes, pull handle up.
21 To release brakes, press button in and rotate handle down.
Pram Position (SYMBIO GO Carrycot, Optional)
From birth up to 9 kgs (approx 10 months), in just one click, you can easily switch Symbio into a pram, which is the optimal position to best protect your baby while he is asleep.
22 To attach carrycot to pushchair frame, place carrycot on mounts as shown until they lock into place on both sides of pushchair.
23 To remove, squeeze handle at back of carrycot and pull off pushchair frame.
Pram Position (SYMBIO DRIVE Carrycot, Optional)
24 Attach carrycot to pushchair as shown. Make sure the carrycot is securely attached on both sides.
25 To remove carrycot from the pushchair, slide the button A on top of the handle. while pushing in button B on bottom of handle as shown.
Travel System Position
From birth up to 13 kgs (approx 12 months) you can turn SYMBIO into a travel system in just one click. It is a very convenient solution as it is very maneuverable and you can take it in and out of the car without waking up your child.
26 There are two labels on the inside of the coseat adapter identifying the correct direction in which to install your coseat into the adapter. The coseat will only fit securely into the adapter in one direction. Please refer to the labels on the insides of the bracket so that you install your coseat correctly.
27 To attach adapter, place adapter onto mounts as shown until they lock into place on both sides of pushchair. Adapter may be placed on pushchair in either direction.
28 - 29 Attach carseat into bracket as shown. Your seat will only lock into the adapter one way. Please double check that your seat is securely locked into the adapter by pulling up on the seat.
30 To remove coseat from adapter, squeeze release handle on rear of coseat and pull up on the coseat as shown.
31 - 32 To remove adapter from pushchair, squeeze release handles on sides of bracket and pull up on it.
Pushchair Position
The SYMBIO seat is suitable from 6 months up to 15 kgs (approx 3 years).
33 To attach seat, place seat on mounts as shown until they lock into place on both sides of pushchair. Seat may be placed on pushchair in either direction, seat facing towards front of pushchair or seat facing rear of pushchair.
34 To attach arm bar, push into holes on both sides of seat as shown.
35 To remove, press buttons and pull arm bar away from pushchair.
36 To attach hood, place hood mounts in between notches on both sides of the pushchair frame as shown.
37 Fasten hood poppers to top of seat as shown.
38 - 39 To recline, pull up on handle at top of seat as shown and lower.
40 To raise seat back, pull up on handle at top of seat.
41 To remove seat from frame, squeeze release handles at sides of seat and pull up off pushchair frame.
Securing Your Child
42 Press button to unlock harness.
43 Pull buckles from crotch strap.
44 To lock, insert buckles into crotch strap buckle.
45 Use slide adjusters to adjust harness to tighten or loosen fit.
Adjusting Harness Height Position
46 Unfasten 2 poppers at top of seat pad.
47 Pull harness straps off metal clip. Repeat on other side.
48 Push harness straps through to front of seat pad.
49 Insert harness straps into the correct harness height position needed for your child. Make sure both harness straps are inserted and connected to their corresponding height positions.
50 Reattach harness straps to metal clips.
51 Reattach top of seat pad with 2 poppers as shown.
Using Reversible Handle:
You can reverse the handle position in an instant with one hand. This changes the configuration of your pushchair to have your child either in front of you to interact with, or facing forward to see the same as you do.
- Swivel wheels in front are better for great maneuverability
- Pneumatic tyres in front provide more comfort for outdoor use in the park or the forest for example.
52 To change handle position, squeeze handle release and rotate to front or rear of pushchair depending on which handle orientation you desire.
53 - 54 Reversible handle with toddler seat installed.
Using the Baby Bag
55 There are 3 hooks on the rear of the toddler seat for attaching the baby bag (Weight limit is 2kg
56 Attach straps from baby bag to metal clips as shown.
Using the Footmuff
57 Unbuckle harness.
58 Unhook straps from metal clips.
59 Lay footmuff in seat and pull the crotch strap through footmuff.
60 Pull the waist straps through slots as shown.
61 Reattach the harness straps at the desired level.
62 Place flaps over top of seat as shown.
63 Fasten zipper around footmuff as shown.
Using the Toddler Seat Raincover
64 Place raincover over pushchair as shown. Fasten poppers on raincover to the inside hood mounts as shown. Fasten zipper on rear of the raincover as shown.
65 - 66 To use raincover with the babybag attached, you will need to undo the raincover poppers at side of panel in order to attach your babybag to the back of the seat.
Once the poppers have been undone and you have attached the babybag, you can fasten zipper at rear of seat.
Using the Carseat Raincover
67 Place raincover over carseat as shown. Always remove raincover before placing in vehicle.
Removing Seat Pad for washing
68 Undo 2 poppers at top of seat.
69 Remove harness straps from metal clips.
70 Unfasten poppers on both sides of the pushchair seat pad.
Pull waist straps through slots in sides of seat pad.
72 Unfasten 2 poppers on the footrest.
73 Push crotch strap through pad.
74 Seat pad can now be washed.
REMOVABLE SEAT PAD. To clean removable seat pad hand wash.
WHEN USING YOUR PUSHCHAIR at the beach, completely clean your pushchair afterwards to remove sand and salt from the wheel assemblies.
FROM TIME TO TIME CHECK YOUR PUSHCHAIR for loose screws, worn parts, torn material or stitching. Replace or repair the parts as needed.
DISCONTINUE USING YOUR PUSHCHAIR should it become damaged or broken.
TO CLEAN PUSHCHAIR FRAME, use only household soap or detergent and warm water. NO BLEACH, SPIRIT OR ABRASIVE CLEANERS. Allow to dry before storing.
To clean raincover hand wash. DO NOT BLEACH. To clean baby bag, wipe with damp cloth. DO NOT BLEACH.
To clean foot muff, hand wash and drip dry. DO NOT BLEACH.
EXCESSIVE EXPOSURE TO THE SUN could cause premature fading of pushchair plastic and fabric.
TO INFLAT TYRES
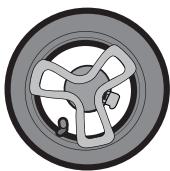
- Inflate the rear tyres to a maximum pressure of 28 PSI. The tyres are equipped with a tyre valve and can be inflated using a hand pump. The valves on the rear wheels can be easily accessed from the inside of the wheels as shown. DO NOT use a pressurised pump.
- If the inner tube has a puncture, repair it as you would a bicycle tyre or have it repaired at a bicycle repair shop.
- Always deflate the tyres when taking the SYMBIO on an aircraft, as the pressure difference could cause the tyres to burst.
- Dimensions:
270mm X 47mm wide x 203mm Rim.
Pressure: 28psi MAX
- {Optional Accessories}
- Assembly
- Folding Your Pushchair
- Unfolding Your Pushchair
- Using Your Pushchair
- Pram Position (SYMBIO GO Carrycot, Optional)
- Pram Position (SYMBIO DRIVE Carrycot, Optional)
- Travel System Position
- Pushchair Position
- Securing Your Child
- Adjusting Harness Height Position
- Using Reversible Handle:
- Using the Baby Bag
- Using the Footmuff
- Using the Toddler Seat Raincover
- Using the Carseat Raincover
- Removing Seat Pad for washing
- TO INFLAT TYRES
Brand : GRACO
Model : SYMBIO
Category : Strollers