
LOVIN HUG - Strollers GRACO - Free user manual and instructions
Find the device manual for free LOVIN HUG GRACO in PDF.
| Product Type | Electronic baby swing |
| Brand | Graco |
| Model | LOVIN HUG |
| Maximum weight supported | 11 kg (from 2.5 kg to 11 kg) |
| Recommended age | From birth until the child sits up alone (approximately 9 months) |
| Power supply | 3 LR20 (D) 1.5 V batteries (alkaline recommended) |
| Swing speeds | 6 adjustable speeds |
| Music | 10 built-in songs |
| Nature sounds | 5 nature sounds |
| Timer | 10, 20, or 30 minutes |
| Volume | 5 adjustable levels |
| Safety harness | 5-point, height-adjustable |
| Folding | Yes, folds for storage |
| Included accessories | Removable tray, mobile (depending on model) |
| Cover care | Machine washable, delicate cycle, air dry |
| Frame care | Clean with a damp cloth and mild soap |
| Safety | Never leave the child unattended, stop use if child weighs 11 kg or attempts to climb out |
| Customer service (France) | Graco Continental Europe, Luxembourg |
Frequently Asked Questions - LOVIN HUG GRACO
User questions about LOVIN HUG GRACO
0 question about this device. Answer the ones you know or ask your own.
Ask a new question about this device
Download the instructions for your Strollers in PDF format for free! Find your manual LOVIN HUG - GRACO and take your electronic device back in hand. On this page are published all the documents necessary for the use of your device. LOVIN HUG by GRACO.
USER MANUAL LOVIN HUG GRACO
To secure your child
ACCESSORIES (certain models only)
Assembly

Attaching Tray

Attaching Rear Legs
Attaching Front Legs

Front Tube
Rear Tube
To Secure Child
28
29
30
31
32
33
34
35
To Adjust Recline
36
37
Head Support
38
Starting Swing
39

40

41

42
43

44

45
For Storage
Installing batteries
Assembling Mobile


Mix 'N Move Toys (on certain models only)
GB IMPORTANT: READ THESE INSTRUCTIONS CAREFULLY BEFORE USE AND KEEP THEM FOR FUTURE REFERENCE.YOUR CHILD'S SAFETY MAY BE AFFECTED IF YOU DO NOT FOLLOW THESE INSTRUCTIONS.
F IMPORTANT : LISEZ SOIGNEUSMENT CES INSTRUCTIONS AVANT Toute UTILISATION ET CONSERVEZ-LES POUR VOUSY REFERER ULTERIEUREMMENT. SI VOUS NE LES RESPECTEZ PAS, LA SECURITE DE VOTRE ENFANT PEUT EN ETRE AFFECTEE !
WICHTIG:VOR DER BENUTZUNG DES KINDERWAGENS DIESE ANLEITUNG UNBEDINGT SORGFALTIG DURCHLESEN UND AUFBEWAHREN. DIE SICHERHEIT IHRES KINDES KANN GEFAHRDET SEIN,WENN SIE DIESANEANWEISUNGEN NICT BEFOLGEN.
NL BELANGRIJK: LEES DEZE INSTRUCTIES ZORGVULDIG DOOR EN BEWAAR ZETER REFERENTIE IN DE TOEKOMST. U KUNT DE VEILIGHEID VAN UW KIND IN GEVAAR BRENGEN ALS U DEZE INSTRUCTIES NIET LEEST.
E IMPORTANTE: LEA ESTAS INSTRUCCIONES DETENIDAMENTE ANTES DE UTILizar EL CARRITO Y GUARDELA PARA USOS FUTROS. LA SEGURIDAD DEL NINO PUEDE VERSE COMPROMETIDA SI NO SE SIGUEN ESTAS INSTRUCCIONES.
1 IMPORTANTE: LEGGERE ATTENTAMENTE QUESTE ISTRUZIONI PRIMA DELL'uso E CONSERVARLE PER RIFERIMENTI FUTURI. LA MANCATA CONSULTAZIONE DI TALI ISTRUZIONI PUO COMPROMETTERE LA SICUREZZA DEL VOSTRO BAMBINO.
P IMPORTANTE: LEIA ESTAS INSTRUÇÉS ATENTAMENTE ANTES DA UTILIZACHO E GUARDE-AS PARA FUTURA REFERÊNCIA.A SEGURANÇA DO SEU FILHO PODE SER AFECTADA SE NÃO SEGUIR ESTAS INSTRUÇÉS.
H FONTOS: A HASNZÁLAT ELÖTT GONDOSAN OLVASSA ÀT EZEKET AZ UTASITÁSOKAT ÉS ORIZZEE MEG AZOKAT KESÖBBI HIVATKOZÁS CÉLJÁBOL, KEDVEZÖTLENÜL BEFOLYÁSOLHATJA GYERMEKÉNEK BIZTONSAGAT, HA NEM TARTJA BE EZEKET AZ UTASITÁSOKAT.
SK DOLEZITE: PRED POUZITIM SI POZORNE PRECITATJE NASLEDUJUCE POKNYA USCHOVAJE ICH PRE DALSIE POUZITIE. AK SA TYMITO POKYNMI NEBUDETE RIADIT, MOZETE OHROZIT BEZPECNOST SVOJHO DIETATA.
DK VIGTIGT: LEs BRUGSANVISNINGEN OMHYGGELIGT FOr KLASPVOGNENTAGES I BRUG OG GEM BRUGSANVISNINGEN TIL FREMTIDIG BRUG AF HENSYN TIL BARNETS SIKKERHED.
S VIKTIGT: LÄS DENNA BRUKSANVISNING NOGA FÖRE ANVÄNDNING OCH SPARA DEN FÖR FRAMTIDA BRUK. BARNETS SÄKERHET KAN PÄVERKAS OM INTE DESSA INSTRUKTIONER FÖLJS.
FIN TÄRKEÄ: LUE KÄYTTÖOHJE ENNN KÄYTTÖA JA SÄLYTÄ SE MAHDOLLISTA TARVETTA VARTEN. JOS ET NOUDATA NÄITÄ OHJEITA, LAPSESI TURVALLISUUS SAATTAA VAARANTUA.
NVIKTIG: LES DISSE INSTRUKSJONENE NOYE FOR BRUK OG OPPBEVAR DEM FOR SENERE BRUK. BARNETS SIKKERHET KAN KOMPROMITTERES HVIS DU IKKE FOLLGER DISSE INSTRUKSJONEONE.
RU BAXKHO: BHIMATEJbHO INPOOTNE DAHNYIO IHCTPYKUHIO DO HAHAJIA 3KCPNJYATAUIN KOJIACKN. COXAHPNTE IHCTPYKUHIO JIAIJIHEIWEERO IICNIJIb3OBAHIN. HECOBJIQIOJEHNE PIPBVEDEHbIX IHCTPYKUHIO MOXET NOCTABITb IOD YTP03V BE3ONACHOCTb BAWEERO PEBEHKA.
PL WAZNE: PRZED PRZYSTAPIENIEM DO UZYTKOWANIA WOZKA NALEZY UWAZNIE PRZECZYTAĆ NINEJSZA INSTRUKCJE I ZACHOWAĆ JA NA PRZYSZLOŚC. NIÉPRZESTRZEGANIE INSTRUKCJI MO[ZE NORAZIC BEZPIECZENSTWO TWOJEGO DZIECKA.
EL HMMANTIKO: IABA TE POSEKTIA T1\S APOY E O H E PIN ANO TH XPH KH Y A TE T1\S ATI A A ANOYN XPH IME ETO ME ON. H A A EIA TOY AI IOY A E APTATAI ANO THN THP H TOY .
CZ DULEZITE: PRED POUZITIM SI PECLIVE
PRECTETE NASLEDUJICI POKNYA USCHOVEJTE JE PRO DALSIPOUZITI. POKUD SE TEMITO POKNY NEBUDETE RIDIT, MÜZETE OHROZIT BEZPECI SVÉHO DITÉTE.
HR VAZNO:PRIJEUPORABEPAIZLJIVO PROCITAJTE OVE UPREI CUVAJTE IH RADI NAKNADNIH POTREBA.SIGURNOST VASEG DJETETA MOZE BITIUGROZENA AKON ES LIJEDITE OVE UPRET.
RO IMPORTANT: CITITI ACESTE INSTRUCTIONSI CUPATENTIE INAINTE DE UTILIZARE SIPASTRATI-LEPENTRU REFERINTA VIITOARE: SIGURANTACOPILULUI DVS. POATE FI AFFECTATIN CAZ DENERESPECTARE A ACESTOR INSTRUCTIONSI.
EE TAHTIS! LUGEGE KAESOLEV KASUTUSJUHEND ENNE TOOTE KASUTAMIST HOOLIKALT LABI JA HOIDKE SEE ALLES EDASPIDISEKS KASUTAMISEKS: KASUTUSJUHENDI MITTE JARGIMINE VOIB TEIE LAPSE OHTU SEADA.
LT SVARBU: PRIES NAUDIOJIMA, ATIDZIAI
PERSKAITYKITE SIA INSTRUKCJA IR ISSAUGOKITE
JA KAIP NUORDA ATEICIAI: SIU NUODYMU
NESILAIKYMAS GALI JTAKOTI JUSU VAIKO
SAUGUMA.
LV SVARIGI:PIRMS LIETOŞANAS,LUDZU,IZLASIET UZMANIGI SO INSTRUKCIJU UN UZGLABAJIET TO TURPMAKAI ATSAUCEI.JA JUS NEIEVEROJAT SO INSTRUKCIJU,TAS VAR IETEKMET JUSBERN AROSBIBU.
AR
J:Jaiu 13 Jg 10 J 12 aJauu
HR/BH VAZNO: PAZLJIVO PROCITAJE OVE UPUTE PRIJE UPOTREBE I SACUVAJTE IH U SLUCAJU DA VAM USTREBAJU: SIGURNOST VASEG DJETA MOZE BITI UGROZENA AKO NE SLIJEDITE OVE UPUTE.
SRA VA ZNO:PROCITAJTE PAZLJIVO OVA UPUTSTVA PRE UPOTREBE I SACUVAJTE IH Z KASNIJU UPOTREBU:BEZBEDNOST VASEG DETETA MOZE BITI UGROZENA AKO NE SLEDITE OVA UPUTSTVA.
SL POMEMBNO: PRED UPORABO PAZLJIVO PREBERITE TA NAVODILA IN JIH SHRANITE ZA PRIHODNJE. VARNOST VAŠEGA OTROKA JE LAHKO OGROŽENA, ČE NE BOSTE SLEDILI TEM NAVODILOM.
TR UYARI: KULLANMADAN ONCE BU TALIMATLARI DIKKATLICE OKUYUN VE ILERIDE REFERANS OLARAK KULLANMAK IÇIN SAKLAYIN. BU TALIMATLARA UYMAZSANIZ ÇOCUUGHTUNZUN GÜVENLIKINI TEHLIKEYE ATABILIRSINIZ.
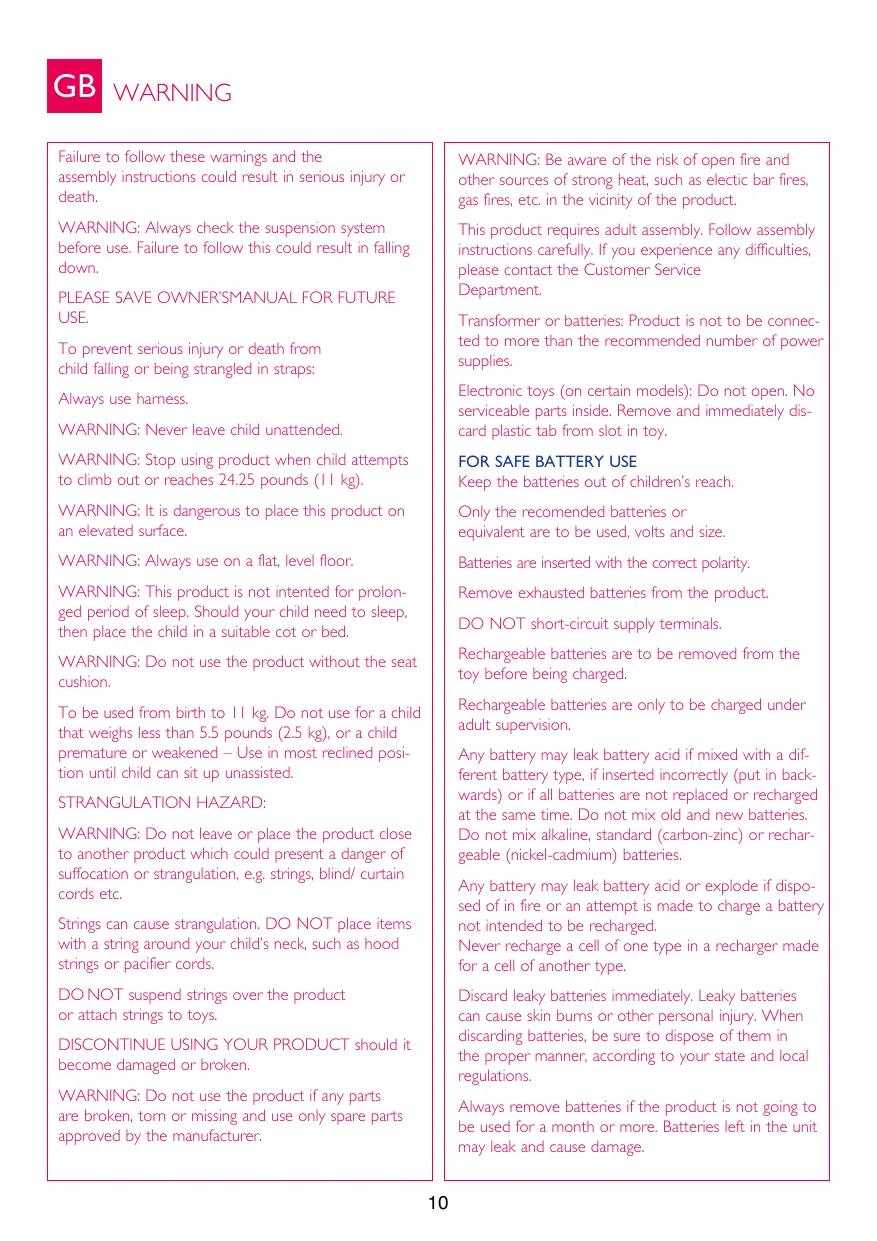
Failure to follow these warnings and the assembly instructions could result in serious injury or death.
WARNING: Always check the suspension system before use. Failure to follow this could result in falling down.
PLEASE SAVE OWNER'SMANUAL FOR FUTURE USE.
To prevent serious injury or death from child falling or being strangled in straps:
Always use harness.
WARNING: Never leave child unattended.
WARNING: Stop using product when child attempts to climb out or reaches 24.25 pounds (11 kg).
WARNING: It is dangerous to place this product on an elevated surface.
WARNING: Always use on a flat, level floor.
WARNING: This product is not intended for prolonged period of sleep. Should your child need to sleep, then place the child in a suitable cot or bed.
WARNING: Do not use the product without the seat cushion.
To be used from birth to 11kg . Do not use for a child that weighs less than 5.5 pounds (2.5kg) , or a child premature or weakened - Use in most reclined position until child can sit up unassisted.
STRANGULATION HAZARD:
WARNING: Do not leave or place the product close to another product which could present a danger of suffocation or strangulation, e.g. strings, blind/curtain cords etc.
Strings can cause strangulation. DO NOT place items with a string around your child's neck, such as hood strings or pacifier cords.
DO NOT suspend strings over the product or attach strings to toys.
DISCONTINUE USING YOUR PRODUCT should it become damaged or broken.
WARNING: Do not use the product if any parts are broken, torn or missing and use only spare parts approved by the manufacturer.
WARNING: Be aware of the risk of open fire and other sources of strong heat, such as electric bar fires, gas fires, etc. in the vicinity of the product.
This product requires adult assembly. Follow assembly instructions carefully. If you experience any difficulties, please contact the Customer Service Department.
Transformer or batteries: Product is not to be connected to more than the recommended number of power supplies.
Electronic toys (on certain models): Do not open. No serviceable parts inside. Remove and immediately discard plastic tab from slot in toy.
FOR SAFE BATTERY USE
Keep the batteries out of children's reach.
Only the recommended batteries or equivalent are to be used, volts and size.
Batteries are inserted with the correct polarity.
Remove exhausted batteries from the product.
DO NOT short-circuit supply terminals.
Rechargeable batteries are to be removed from the toy before being charged.
Rechargeable batteries are only to be charged under adult supervision.
Any battery may leak battery acid if mixed with a different battery type, if inserted incorrectly (put in backwards) or if all batteries are not replaced or recharged at the same time. Do not mix old and new batteries. Do not mix alkaline, standard (carbon-zinc) or rechargeable (nickel-cadmium) batteries.
Any battery may leak battery acid or explode if disposed of in fire or an attempt is made to charge a battery not intended to be recharged.
Never recharge a cell of one type in a recharger made for a cell of another type.
Discard leaky batteries immediately. Leaky batteries can cause skin burns or other personal injury. When discarding batteries, be sure to dispose of them in the proper manner, according to your state and local regulations.
Always remove batteries if the product is not going to be used for a month or more. Batteries left in the unit may leak and cause damage.
CARE AND MAINTENANCE
Recommended type batteries—alkaline disposables, size D(LR20-1.5V). NEVER mix battery types. Change batteries when product ceases to operate satisfactorily.

The crossed out wheelie bin symbol indicates the product is to be recycled.
FROM TIME TO TIME CHECK YOUR PRODUCT for loose screws, worn parts, torn material or stitching. Replace or repair the parts as needed. Use only Graco replacement parts.
REMOVABLE CLOTH SEAT COVER may be machine washed in cold water on delicate cycle and drip-dried. NO BLEACH.
TO CLEAN FRAME, use only household soap and warm water.
NO BLEACH or detergent.
Excessive exposure to sun or heat could cause fading or warping of parts.
PROBLEM SOLVING
Product won't operate:
I. No batteries in swing.
2. Batteries dead.
3. Speed setting too low.
4. Batteries in backwards — check "+" and "-"
5. Corrosion on battery terminals. Rotate batteries in place against terminals, or clean with sandpaper or steel wool if corrosion is severe.
6. Baby leaning too far forward.
7. Baby grabbing swing legs. (Discontinue use.)
8. Seat not pushed high enough for a good start.
9. Protective device activated. (Turn off motor, wait 3 minutes, then restart swing.)
Seat doesn't swing very high:
- Control setting too low.
- Blanket hanging down, causing increased wind resistance.
- Batteries too weak.
- Baby leaning too far forward.
- Baby too heavy or too active. (Discontinue use.)
- Soft carpet (swings higher on hard floors).
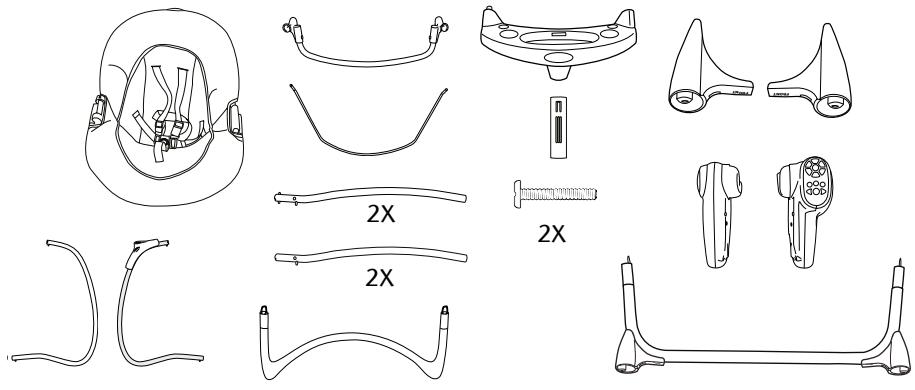
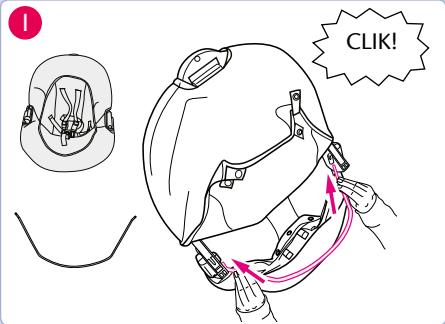
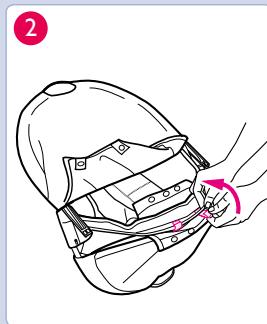
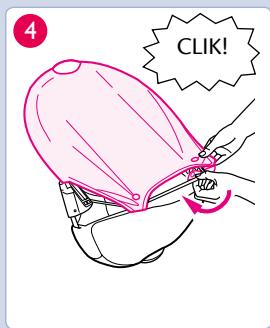
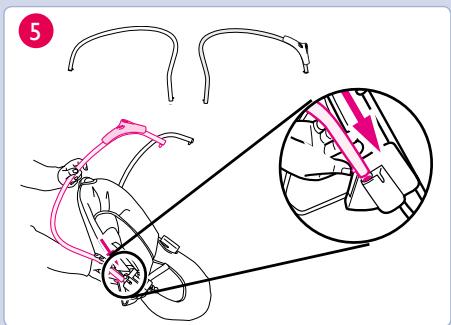
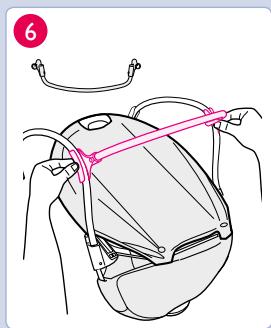
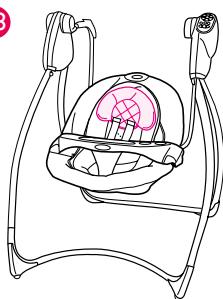
Assembling Product
See images 1 - 6
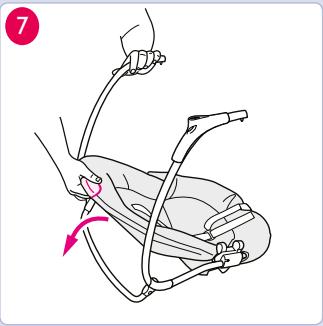
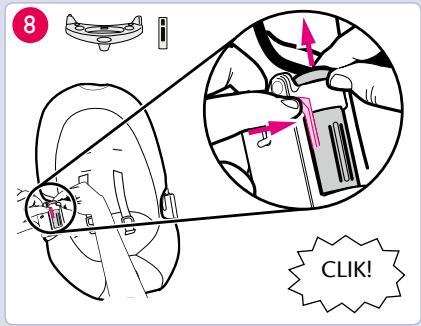
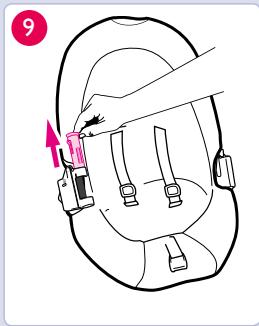
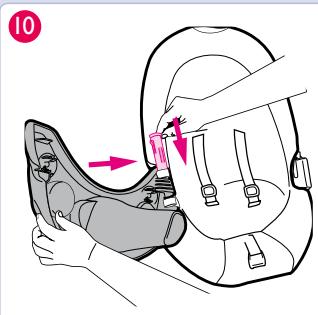
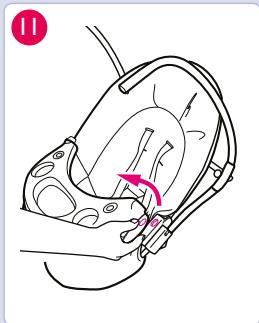
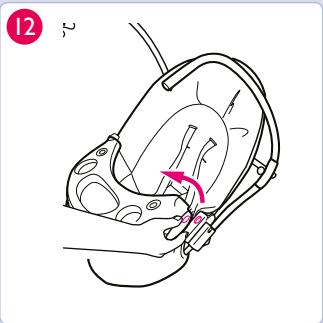
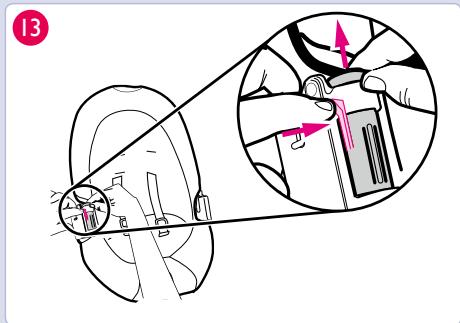
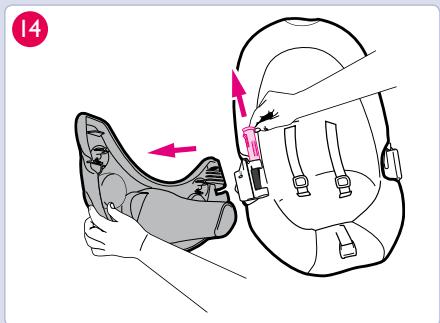
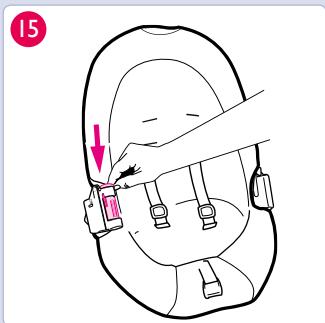
Attaching Tray
See images 7-15
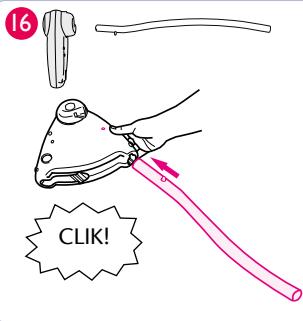
Attaching Legs
16 The double buttons must fit into the channels inside the housings. Button MUST snap through hole.
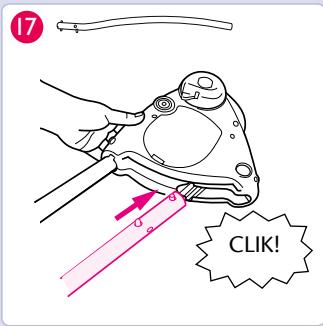
17 Insert rear legs into holes in housing as shown. Button MUST snap through hole. REPEAT steps 10 through 12 with other housing and legs.
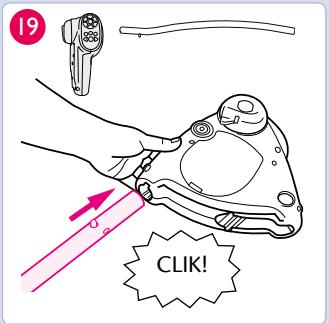
18 See image
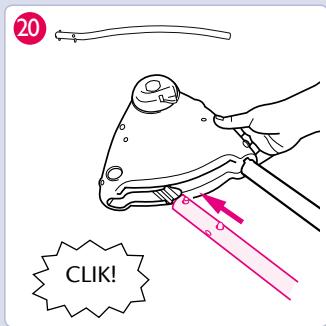
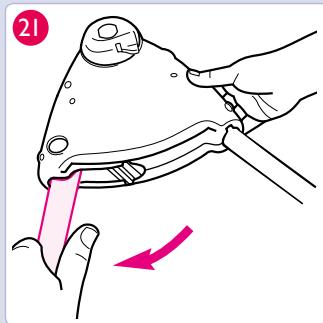
Swing the legs outward until the single button snaps into its notch. CHECK that the legs are properly attached by twisting them in the housings.
20 - 21 See images
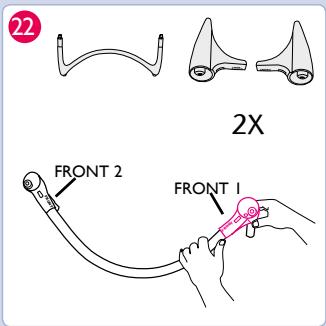
Front Tube
22 Place feet with the text "FRONT" onto the front tube as shown. The text "FRONT" should face floor.
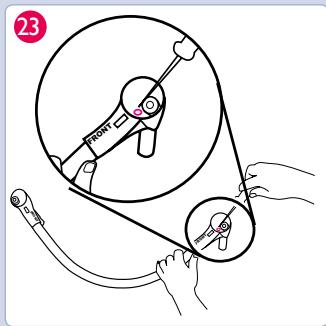
23 Secure front foot with screw. Repeat on other side.
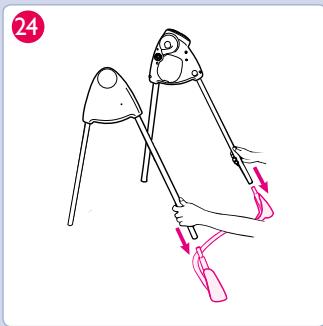
24 Snap front tube onto swing legs. CHECK that all tubes are securely attached.
Rear Tube
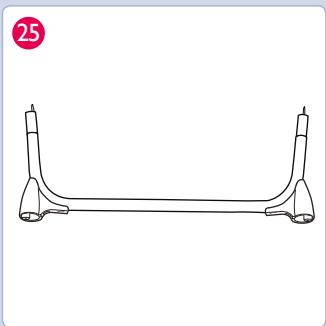
25 See image
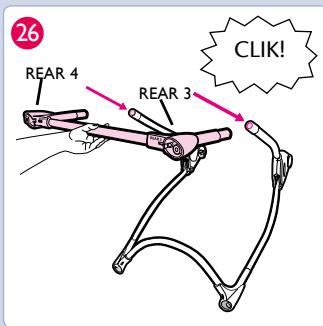
26 Place feet with the text "REAR" onto the rear tube as shown. The text "REAR" should face floor. Secure foot with screw. Repeat on other side. Snap hangar tubes into brackets on each side of housing.
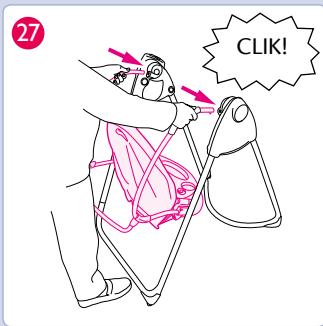
27 CHECK that hangar tubes are secure in brackets by pulling firmly on them.
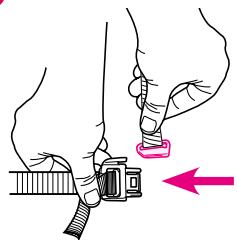
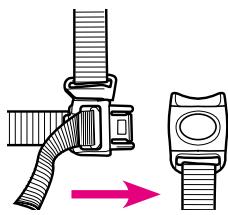
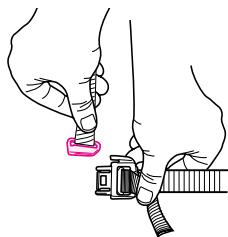
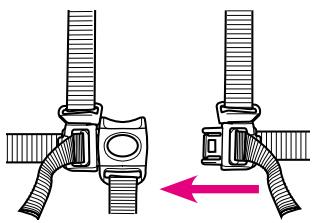
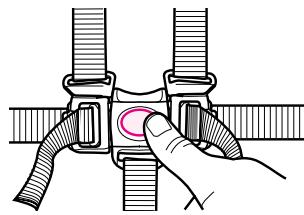
To Secure Child
See images 28-32
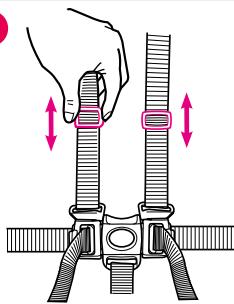
3 Use slide adjuster at shoulder and waist for further adjustment. Repeat on other side.
34 When changing harness strap slots, MAKE SURE harness straps are going through same slots in seat pad.
35 The harness straps must go into the slot that is even with or slightly above the shoulders. Avoid twisting straps.
To Adjust Recline
See images 36-37
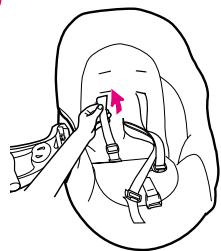
Head Support
38 Only use this head support on this swing. Never use this head support on any other product.
Starting Product
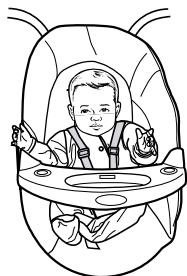
WARNING: avoid serious injury from falling or sliding out. Always use harness. After fastening buckles, adjust belts to get a snug fit around your child.
TO TURN PRODUCT ON:Press On/Off button or press any speed from 1 to 6. When pressing On/Off button, it automatically starts with the last speed setting that was selected before the product was turned off.
Observe the swinging motion for a minute. It takes time for the product to adjust to a setting. Change setting if needed.
A small, quiet baby will swing higher on each setting than a larger, more active baby.
Your seat may be stopped at any time the motor is running without damaging the motor. Push product to restart.
If your product motor stops operating by itself, a protective device may have been activated. Tum off motor, wait three minutes, then restart swing.
TO TURN PRODUCT OFF: Press On /Off button.
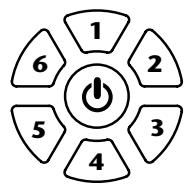
Button Functions
39 SPEED - Press On /Off button or press any speed from 1 to 6. When pressing On/Off button, it automatically starts with the last speed setting that was selected before the swing was turned off.
40 ON/OFF POWER - Press to turn ON and turn OFF. Press button to stop swing motion.
4 MUSIC - Push "Music" button to turn on music. Push button again to advance to next track. There are 10 songs.
42 MUSIC/NATURE OFF - Press button to turn OFF.
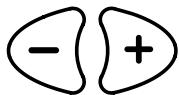
43 VOLUME— Press the plus (+) to raise the volume and the minus (-) to lower the volume. There are 5 volume settings.
44 NATURE SOUNDNS—Push "Nature" button to tum on nature sound selection. Each press will change to the next nature sound. After the 5th sound is selected, it will return to the first track.
45 TIMER—Push "Timer" button to set the timer for the swing and/or Music/Nature sounds. If the timer button is not pushed, the swing and/or music/nature sound will continue to play until the power on/off button is pushed or the music/nature off button is pushed.
When using the timer with the product on, if the button is pushed once, the red speed light will flash once and timer is set for 10 minutes. Pushing the timer button a second time will increase the run time to 20 minutes and the red speed light will flash twice.
Pushing a third time will increase the time to 30 minutes and the red speed light will flash three times.
When using the timer with the Music/Nature sounds on, the timer will set to 10, 20 or 30 minutes as described for the swing, but there will be no flashing light.
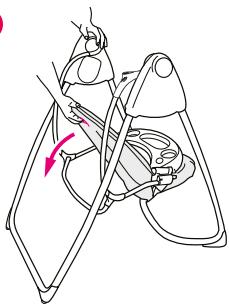
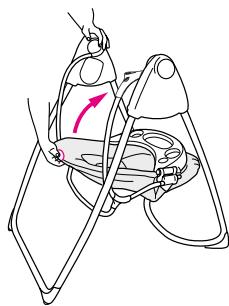
Storage
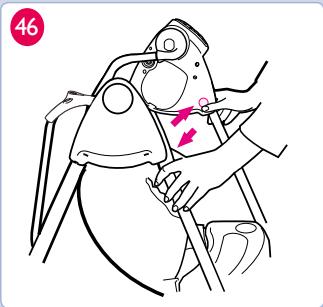
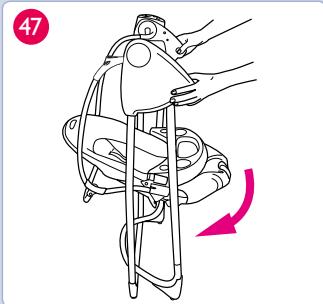
See images 46-47
46 Push buttons to fold.
Installing Batteries
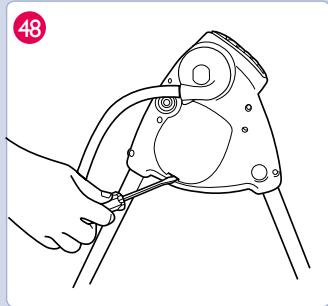
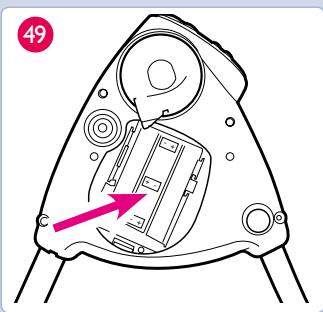
48 With baby out of swing, open the battery compartment lid by inserting a screwdriver into the coin slot. Insert three "D"-LR20 (1.5V) cell batteries.
49 CHECK that the batteries are put in correctly. Your swing will not run if the batteries are put in backwards.
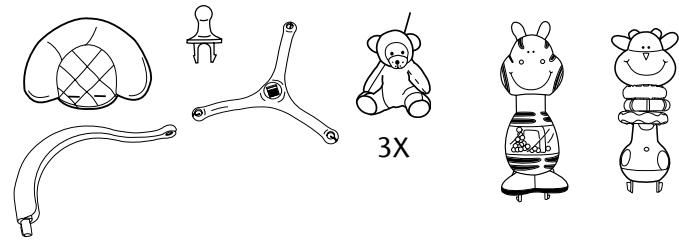
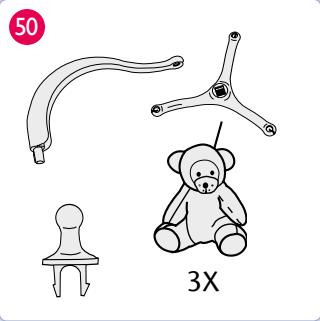
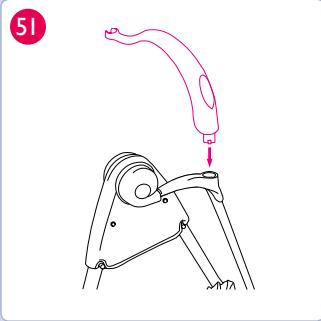
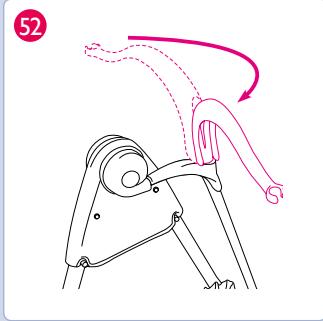
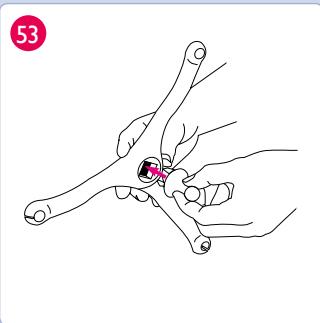
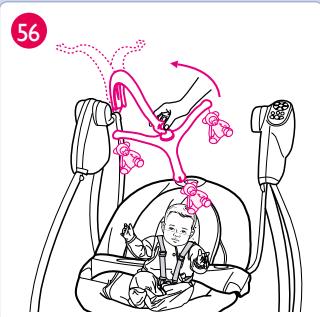
Assembling Mobile
See images 50-56
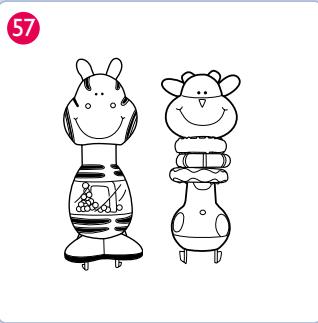
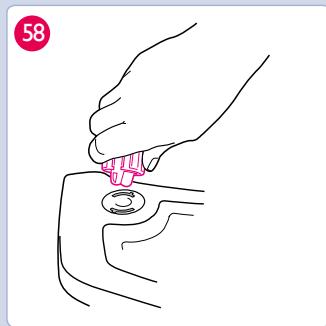
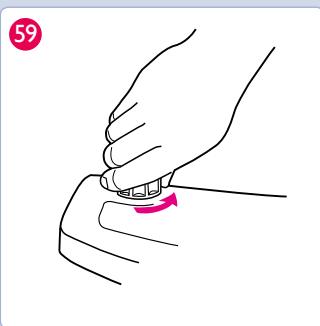
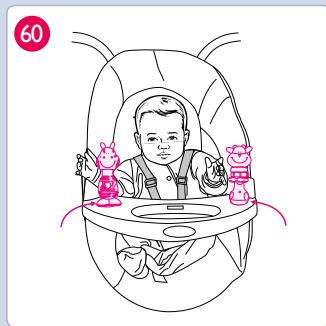
Mix N' Move Toys
See images 57-60

UK Graco consumer Services
Newell Rubbermaid
Graco Children's Products
Halifax Avenue
Fradley Park
Lichfield WS13 8SS
United Kingdom
44844 412 1212
Graco Continental Europe
Newell Rubbermaid Luxembourg SARL
I rue Edmond Reuter
L-5326 CONTERN
Luxembourg
- To secure your child
- ACCESSORIES (certain models only)
- Assembly
- Attaching Tray
- Attaching Rear Legs
- Attaching Front Legs
- Front Tube
- Rear Tube
- To Secure Child
- To Adjust Recline
- Head Support
- Starting Swing
- For Storage
- Installing batteries
- Assembling Mobile
- Mix 'N Move Toys (on certain models only)
- FOR SAFE BATTERY USE
- CARE AND MAINTENANCE
- PROBLEM SOLVING
- Product won't operate:
- Seat doesn't swing very high:
- Assembling Product
- Attaching Legs
- Starting Product
- Button Functions
- Storage
- Mix N' Move Toys
Brand : GRACO
Model : LOVIN HUG
Category : Strollers