SH1490 - Razor Zelmer - Free user manual and instructions
Find the device manual for free SH1490 Zelmer in PDF.


| Product Type | Electric Foil Shaver |
| Brand | Zelmer |
| Model | SH1490 |
| Power Source | Rechargeable Lithium-Ion battery |
| Battery Life | Approximately 45 minutes of cordless use |
| Charging Time | 1 hour for a full charge |
| Voltage | 100-240 V, 50/60 Hz (automatic adjustment) |
| Dimensions | 160 x 60 x 35 mm (approx.) |
| Weight | 180 g (approx.) |
| Cutting System | Double foil with 4-directional pivoting head |
| Trimmer | Pop-up precision trimmer for sideburns and mustache |
| Wet/Dry Usage | Yes, fully washable for wet and dry use |
| Display | LED battery level indicator and travel lock |
| Travel Lock | Yes, prevents accidental activation |
| Cleaning | Rinse under running water; includes cleaning brush |
| Replacement Parts | Foil and cutter set (model: ZS1090) available |
| Material | High-quality plastic body with rubberized grip |
| Accessories | Charging cable, cleaning brush, protective cap |
| Warranty | 2 years limited warranty |
Frequently Asked Questions - SH1490 Zelmer
User questions about SH1490 Zelmer
0 question about this device. Answer the ones you know or ask your own.
Ask a new question about this device
Download the instructions for your Razor in PDF format for free! Find your manual SH1490 - Zelmer and take your electronic device back in hand. On this page are published all the documents necessary for the use of your device. SH1490 by Zelmer.
USER MANUAL SH1490 Zelmer
natural_image
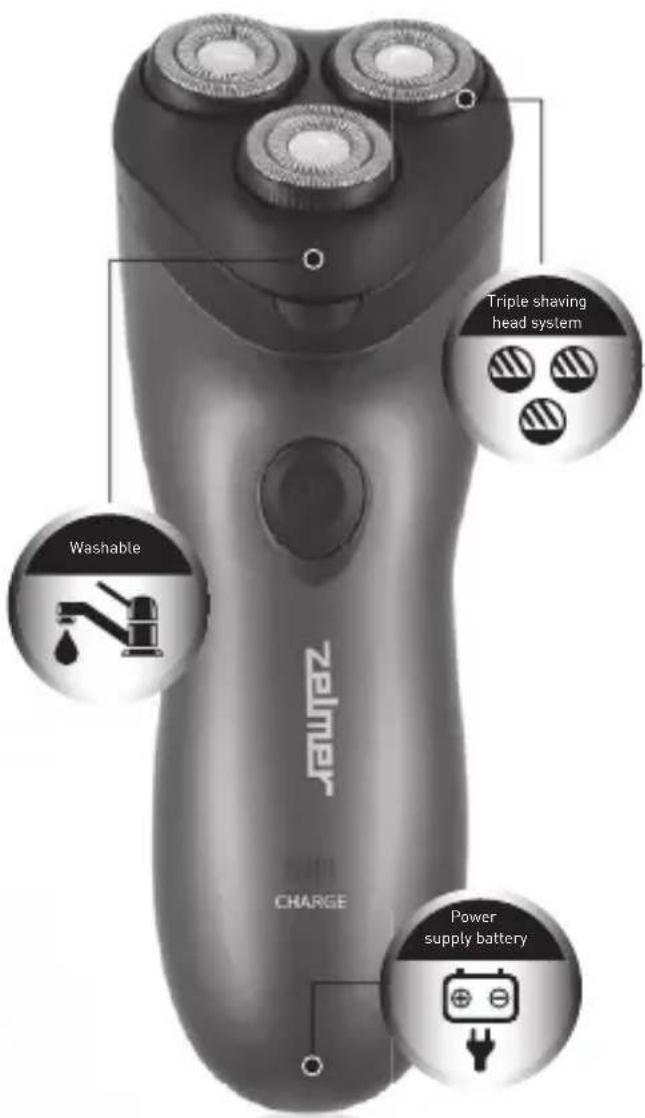
Circular button with a black power symbol on top, no text or labels present
CHARGE
SH1490
zelmer
PL KRÓTKI CZAS ŁADOWANIA - 1 H
CZ KRÁTKÁ DOBA NABÍJENÍ - 1 H
SK KRÁTKA DOBA NABÍJANIA - 1 H
HU RÖVID TÖLTÉSI IDŐ - 1 H
RO TIMP SCURT DE ÎNCĂRCARE - 1 H
RU КОРОТКОЕ ВРЕМЯ ЗАРЯДКИ - 1 Ч.
BG КРАТКО ВРЕМЕ НА ЗАРЕЖДАНЕ - 1 Ч.
UA ШВИДКА ЗАРЯДКА - 1 ГОД.
EN SHORT CHARGING TIME - 1 H
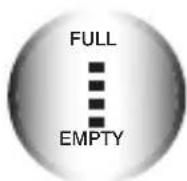
PL WSKAŻNIK ŁADOWANIA
CZ UKAZATEL NABÍJENÍ
SK UKAZOVATEL NABÍJANIA
HU TÖLTÉSI SZINT JELZŐ
RO INDICATOR ÎNCĂRCARE
RU УКАЗАТЕЛЬ ЗАРЯДКИ
BG ПОКАЗАТЕЛ ЗА ЗАРЕЖДАНЕ
UA ІНДИКАТОР ЗАРЯДКИ
EN CHARGE INDICATOR
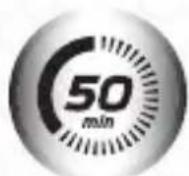
PL CZAS PRACY BEZPRZEWODOWEJ - 50 MINUT
CZ BEZŠNŮROVĚ POUŽITÍ - 50 MINUT
SK POUŽITIE BEZ PRÍVODNÉHO KÁBLA - 50 MINÚT
HU CSATLAKOZÁSMENTES KÉSZENLÉT - 50 PERC
RO DURATĂ DE FUNCTIONARE FĂRĂ CABLU - 50 MINUTE
RU ВРЕМЯ БЕСПРОВОДНОЙ РАБОТЫ - 50 МИНУТ
BG ВРЕМЕ НА БЕЗКАБЕЛНА РАБОТА - 50 МИНУТИ
UA ЧАС БЕЗПРОВІДНОЇ РОБОТИ - 50 ХВ.
EN CORDLESS MODE - 50 MINUTES

PL TRYMER
cz ZASTŘIHOVAČ
SK HOLIACI STROJČEK
FU TRIMMER
RO TRIMMER
RU ТРИММЕР
BG ТРИМЕР
UA ТРИМЕР
EN TRIMMER
Szanowni Klienci!

natural_image
Simple line drawing of a hand holding a small object with a 30° angle marker (no text or symbols)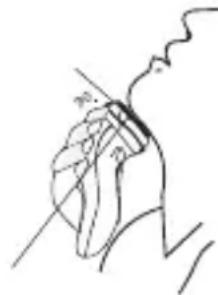
natural_image
Line drawing of a hand holding a small object, possibly a tool or device, with no visible text or symbols.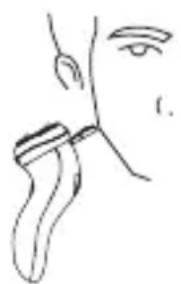
natural_image
Line drawing of a human face with a bandage and a curved object, no text or symbols present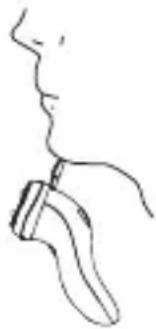
natural_image
Simple line drawing of a human hand holding a stylus or object (no text or symbols)natural_image
Three-step illustration of a sock repair procedure: opening, removing, and disassembly (no text or symbols)natural_image
Technical illustration of a hand-operated earbuds with mechanical components, showing internal gear assembly and disassembly (no text or symbols)natural_image
Technical illustration of a mechanical assembly showing three stages: disassembly, gear meshing, and final assembly (no text or symbols present)natural_image
Illustration of three hands holding a mechanical component, showing step-by-step assembly (no text or symbols)
natural_image
Three identical mechanical gears or tires, shown in grayscale with no text or markings.natural_image
Symbol of a trash bin crossed with a diagonal line, no text or numbers presentnatural_image
Line drawings showing four different anatomical or mechanical configurations of a human head, possibly depicting facial and neck movements (no text or symbols present)natural_image
Three-step illustration of a sock repair procedure: opening, removing, and disassembly (no text or symbols)natural_image
Technical illustration of a hand-operated earbuds with mechanical components, showing internal gear assembly and disassembly (no text or symbols)natural_image
Technical illustration of a mechanical assembly showing three stages: disassembly, gear meshing, and final assembly (no text or symbols present)natural_image
Illustration of three hands holding a mechanical component, showing step-by-step assembly (no text or symbols)
natural_image
Three identical mechanical gear components with no visible text or markingsnatural_image
Symbol of a trash bin with crossed lines indicating no waste or discharge (no text or labels)natural_image
Line drawings showing four different anatomical or mechanical configurations of a human head, possibly depicting facial and neck movements (no text or symbols present)natural_image
Three-step illustration of a sock repair procedure: opening, removing, and disassembly (no text or symbols)natural_image
Technical illustration of a handwashing device with three circular insets showing internal components (no text or symbols)natural_image
Technical illustration of a mechanical assembly showing three stages: disassembly, gear meshing, and final assembly (no text or symbols present)natural_image
Illustration of three hands performing a mechanical repair or disassembly procedure (no text or symbols present)
natural_image
Three identical mechanical gears or tires, shown in side profile with no text or markings.natural_image
Symbol of a trash bin crossed with no text or numbers, representing waste sorting or disposal (no text present)
natural_image
Four-panel line drawing showing a human face with surgical hardware, illustrating different anatomical or medical procedures (no text or symbols present)natural_image
Three-step illustration showing a shoe being opened, then closed, and finally into a postpartum (no text or symbols present)natural_image
Technical illustration of a handwashing device with three circular insets showing internal components (no text or symbols)natural_image
Technical illustration of a mechanical assembly showing three stages: disassembly, gear meshing, and final assembly (no text or symbols present)natural_image
Illustration of three hands assembling a mechanical component, showing step-by-step assembly (no text or symbols)
natural_image
Three identical mechanical gears or tires, shown in grayscale with no text or markings.natural_image
Symbol of a trash bin with crossed lines indicating no waste or discharge (no text or labels)
natural_image
Three-step illustration of a sock repair procedure: showing step-by-step insertion, opening, and disassembly (no text or symbols)natural_image
Technical illustration of a hand-operated device with three circular insets showing internal components (no text or symbols)natural_image
Technical illustration of a mechanical assembly showing three stages: disassembly, gear meshing, and final assembly (no text or symbols present)natural_image
Illustration of three hands holding a mechanical component, showing step-by-step assembly (no text or symbols)
natural_image
Three identical mechanical gear or pulley components shown in grayscale (no text or symbols)natural_image
Symbol of a trash bin with no text or labelsnatural_image
Simple line drawing of a hand holding a tool or object, no text or symbols present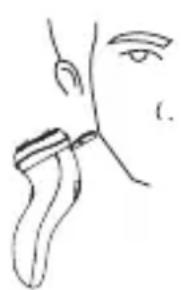
natural_image
Line drawing of a person's face and upper torso, showing a bandage or banding tool (no text or symbols)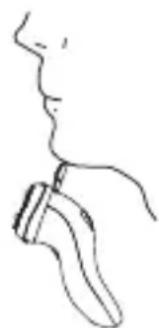
natural_image
Line drawing of a human hand holding a handheld device (no text or symbols)
natural_image
Three-step illustration of a sock repair procedure: opening, removing, and removing the foot (no text or symbols)natural_image
Technical line drawing showing three stages of a device: open, gear assembly, and three circular components (no text or symbols)natural_image
Technical illustration of a mechanical assembly showing three stages: disassembly, gear meshing, and final assembly (no text or symbols present)natural_image
Illustration of three hands performing a mechanical repair or disassembly procedure (no text or symbols present)
natural_image
Three identical mechanical gear or pulley components (no text or symbols visible)natural_image
Symbol of a trash bin with crossed lines indicating no waste or discharge (no text or labels)natural_image
Three-step illustration showing a sock being opened, then open with a hand, and finally disassembled into a socket (no text or symbols)natural_image
Technical illustration showing three stages of a device with mechanical components and directional arrows (no text or symbols)natural_image
Technical illustration of a mechanical gear assembly showing three stages: disassembly, rolling, and cutting (no text or symbols present)natural_image
Illustration of three hands holding a mechanical component, showing step-by-step assembly (no text or symbols)
natural_image
Three identical mechanical gears or tires, shown in grayscale with no text or markings.natural_image
Symbol of a trash bin with no text or numbers, crossed by diagonal lines and a solid black rectangle below (no text or symbols present)natural_image
Three-step illustration of a sock repair procedure: showing step-by-step insertion, opening, and disassembly (no text or symbols)natural_image
Technical illustration of a handwashing device with three circular insets showing internal components (no text or symbols)natural_image
Technical illustration of a mechanical assembly showing three stages: disassembly, gear meshing, and final assembly (no text or symbols present)natural_image
Illustration of three hands performing mechanical repair: a tool, a close-up of a gear component, and a ring with a handle (no text or symbols)
natural_image
Three identical mechanical gear components with no text or symbolsnatural_image
Symbol of a trash bin with crossed lines indicating no waste or discharge (no text or labels)Congratulations on your choice of our appliance, and welcome among the users of Zelmer products.
In order to achieve best possible results we recommend using exclusively original Zelmer accessories. They have been specially designed for this product.
Please read this instruction manual carefully. Pay special attention to important safety instructions. Keep this instruction manual for future reference.
Operation and safety precautions
This information concerns your health and safety. You must read all the operation and safety precautions before using your shaver for the first time.

DANGER! / WARNING!
Risk of injury
- Do not use the appliance if the shaver or AC adaptor is damaged. In such a case take your shaver to a local service centre for repair. Do not attempt to repair the shaver on your own.
- If the cord or plug of the AC adaptor is damaged, or if the plug is damaged or loose in the outlet, do not recharge the shaver or use it with an AC power supply.
- The shaver may be repaired by qualified personnel only. In case of any defects, contact a local ZELMER service centre.
- This appliance can be used by children aged from 8 years and above and persons with reduced physical, sensory or mental capabilities or lack of experience and knowledge if they have been given supervision or instruction concerning use of the appliance in a safe way and understand the hazards
involved. Children shall not play with the appliance. Cleaning and user maintenance shall not be made by children without supervision.
- Unplug the AC adaptor from the outlet when the shaver is not in use and before cleaning.
- Do not pull the cord to unplug the shaver from the outlet.
- Do not use the shaver in a bath or under a shower.
- Do not immerse the shaver and AC adaptor in water or any other liquid.
- Do not plug and unplug the mains cord from the outlet with wet hands.
- Use the shaver only with a power supply of 220-240 V (50 Hz). Otherwise it may result in a fire or an electric shock.
- Do not break, bend, stretch, twist or bundle the mains cord. Do not place heavy objects on the cord or put it between them. A broken cord will cause a fire or an electric shock.
- Before using the shaver, make sure that the foil or inner blade is not damaged, as such foil or blade may scratch your face.
- Do not touch the inner parts of the inner blade as its edges are very sharp.
- Do not use the shaver on any other part of your body than your face (such as your head). This may cause an injury to your skin, and will shorten the service life of the outer foil.

WARNING!
Risk of property damage
Do not cover the AC adaptor, as it may cause the temperature inside the adaptor to increase dangerously.
The shaver is intended for shaving and trimming natural hair only. It may be used with human hair only. Do not use the shaver to shave or trim artificial or animal hair.
When finished using or charging the shaver, be sure to remove the AC adaptor from the outlet.
Do not forcibly press against the outer foil, as this may break the foil to cause an injury to your skin.
Do not use the AC adaptor included with the shaver to recharge other electric appliances.
Before washing the shaver under running water, unplug the AC adaptor from the socket of the shaver.
Do not recharge the shaver or use it with an AC power supply when the room temperature is below 0^ C or over 40^ C. Never recharge the shaver in direct sunlight or near a heating element such as a heater.
Do not charge and use the shaver with an AC power supply in a humid place or in a place where the AC adaptor is exposed to splashes of water.
Do not store the shaver in a humid place or where it may be exposed to splashes of water, or in high temperatures.
To clean the body case of the shaver, wipe it with a cloth soaked with a diluted water solution of a neutral detergent. Do not use thinners or benzine as they may damage the plastic parts of the body case.
Do not leave the shaver unattended when charging.

TIP
Product information user instructions
The shaver is for household use only.
The shaver should be preferably charged at temperature between 15^ C and 35^ C.
Failure to use the shaver in accordance with its purpose will void the guarantee.
The shaver may be operated on AC power or rechargeable battery.
Before shaving, degrease the skin of your face to prevent hair sticking to the outer foil and causing blades to rub against it. If the foil is dirty, clean it before shaving (e.g. using a handkerchief).
When cleaning the shaver make sure that you do not apply too much oil on the shaving heads. Too much oil will soil the foil of the shaving heads. Before shaving, wipe the residual shaver oil from the shaving heads (e.g. using a handkerchief). Use oil available in stores (e.g. oil for sewing machines).

This symbol means that the shaver is washable, however only when unplugged from the outlet.
For ensuring additional protection, it is recommended to install in the electrical wiring a residual-current device with a rated residual current not exceeding 30 mA. For this purpose contact a qualified electrician.
Make sure that you understand the above tips.
Technical specification
Technical specifications are given on the nameplate.
The charging adaptor is a Class II electrical device and does not require grounding

The shaver meets the requirements of applicable standards.
This appliance complies with Commission Regulation (EC) no. 1275/2008 on eco-design requirements.
The appliance complies with the following directives:
– Electrical equipment designed for use within specific voltage limits (LVD) – 2006/95/EC.
– Electro-Magnetic Compatibility (EMC) – 2004/108/EC.
The product is marked with ⌈ symbol on the nameplate. For ⌈ marking declaration of conformity please visit the manufacturer's website at www.zelmer.com.
Battery: 2 x Ni-MH 800 mAh cell. Standard charging time: 1 hour. Working temperature range: 0-40°C.
Elements and accessories
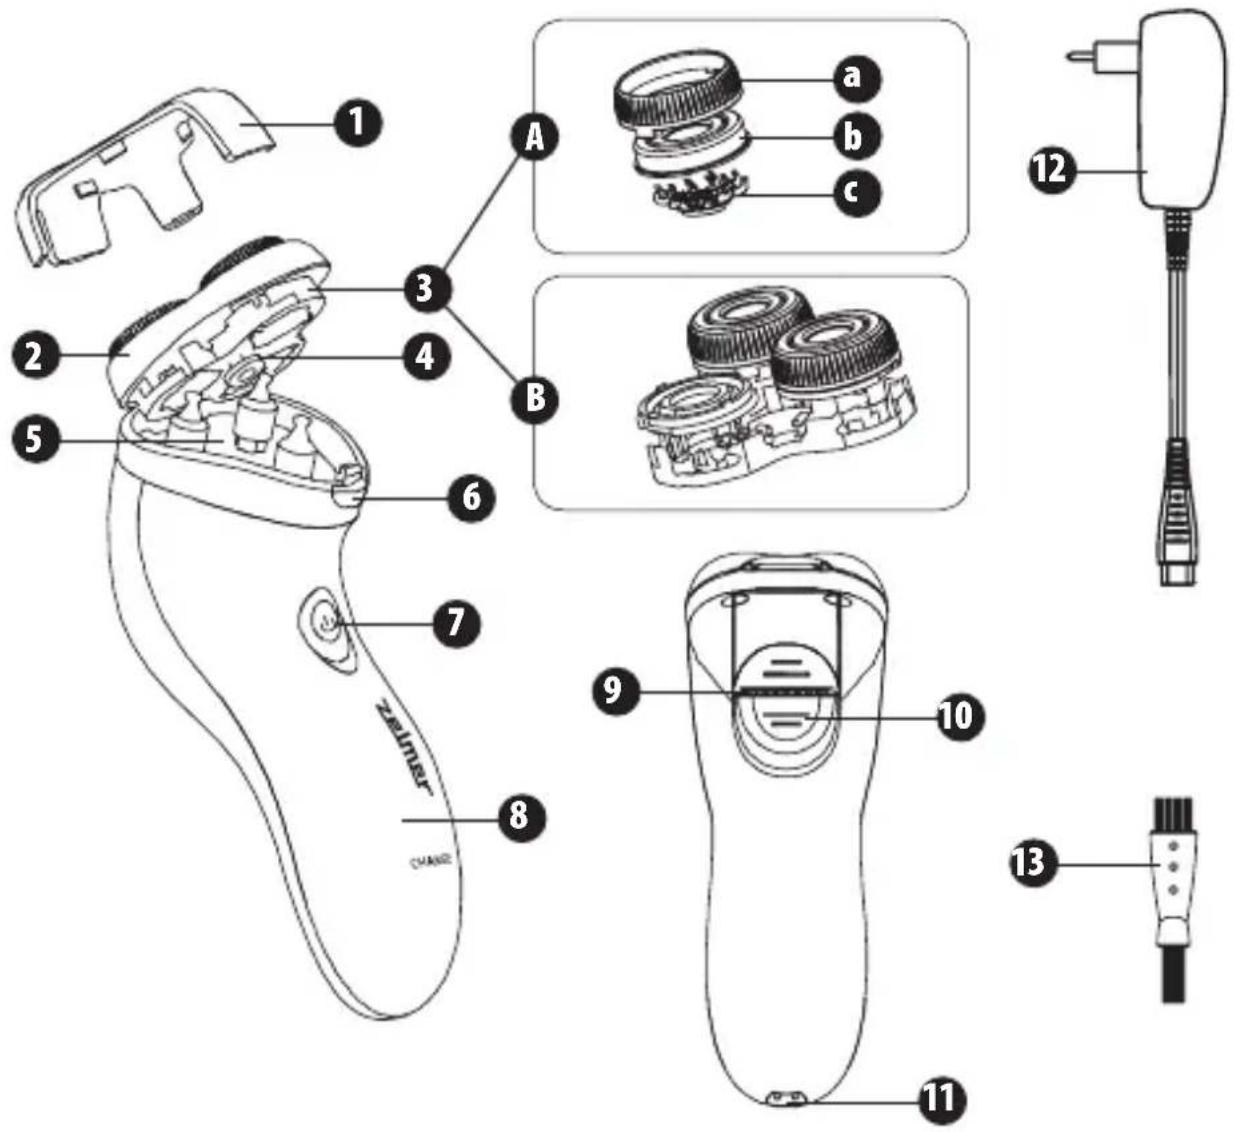
1 Cap
2 Shaving unit
3 Shaving heads
A a Guard
b Foil
Cutter
B Retaining frame
4 Retaining frame release knob
5 Hair pocket
6 Shaving unit release button
7 ON/OFF button
8 Charging indicator
9 Trimmer
10 Trimmer slide
11 Socket
12 AC adaptor
13 Brush
Operation
CHARGING
For recharging the shaver use only the AC adaptor provided with the shaver.
Battery activation
When the shaver is first used after being purchased or being left unused for a long time, be sure to recharge the shaver for 12 hours to the full capacity before use, to activate the rechargeable battery.

Do not leave the shaver plugged in for more than 24 hours.
After that, approximately 1 hour of charging will fully charge the shaver.

Charging is indicated by the charging indicator (8) lit in red.
"Battery Memory Effect"
To avoid the “memory effect”, recharge the shaver only after the battery is completely empty.
What is the "memory effect"?
If the Ni-MH battery in your shaver is repeatedly recharged before it runs out of energy, the voltage drops more quickly to decrease the number of times you can use the shaver before the battery runs down.
If you have noticed the "memory effect"
If the full recharge allows less number of shaves before the battery is depleted, consume the recharged energy completely, and then recharge the shaver for approximately 12 hours. Repeating this procedure 2 to 3 times will restore the battery. If the “memory effect” persists, the service life of the battery may have expired. Consult the retailer from whom your shaver was purchased.
Charging
① Make sure that the shaver is off. To turn it off press the ON/OFF button. Put the cap on the shaver head (1).

The battery cannot be charged when the shaver is on.
② Insert the socket plug of the AC adaptor into the socket (11) at the bottom of the shaver.
Before putting the plug of the AC adaptor into the socket of the shaver, make sure that the socket is completely dry to prevent any possible malfunction.
③ Insert the outlet plug of the AC adaptor into an appropriate outlet (see the rating plate on the AC adaptor).
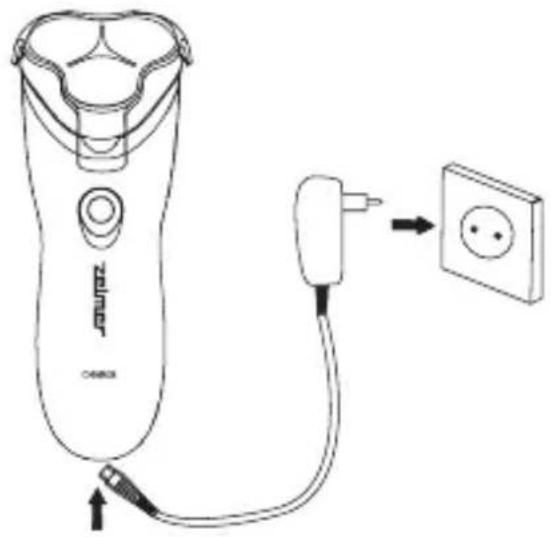

- The shaver is fully charged in approximately 60 minutes. - During charging, the charge indicator flashes to indicate that charging is in process.
④ When charging is completed, unplug the AC adaptor from the outlet.

When unplugging the mains cord, do not pull the cord. Be sure to hold the plug to pull it out.
- To prevent possible malfunctions, before charging make sure that the plug and outlet are not damaged. - While the shaver is charging, the shaver body or AC adaptor may emit a slight noise and/or become slightly warm. This is not a defect.

On a fully charged battery the shaver will operate for approx. 50 minutes.
USING THE SHAVER WITH AC POWER SUPPLY
Check if the shaver is off. Insert the socket plug of the AC adaptor securely into the socket at the bottom of the shaver. Insert the outlet plug of the AC adaptor into the outlet. Turn on the shaver.

If the shaver will not operate by pressing the power switch immediately after the plugs are inserted, the rechargeable battery is completely depleted. In that case, turn off the shaver, put it away for 1 minute to charge the battery and turn it on again.

After use, be sure to turn off the shaver and then unplug the AC adaptor from the outlet and the socket of the shaver.
In a humid place, such as bathroom, do not use the shaver with an AC power supply.

When using the shaver with an AC power supply, do not use soap or shaving foam.

The energy stored in the rechargeable battery decreases even while the shaver is used with an AC power supply. Recharge the shaver once every three weeks.
USE
If the shaving heads are deformed or damaged, replace them with new ones (see the “REPLACEMENT OF SHAVING HEADS” section). Otherwise, the shaving heads may scratch your face.
① Remove the cap and turn on the shaver by pressing the ON/OFF button.
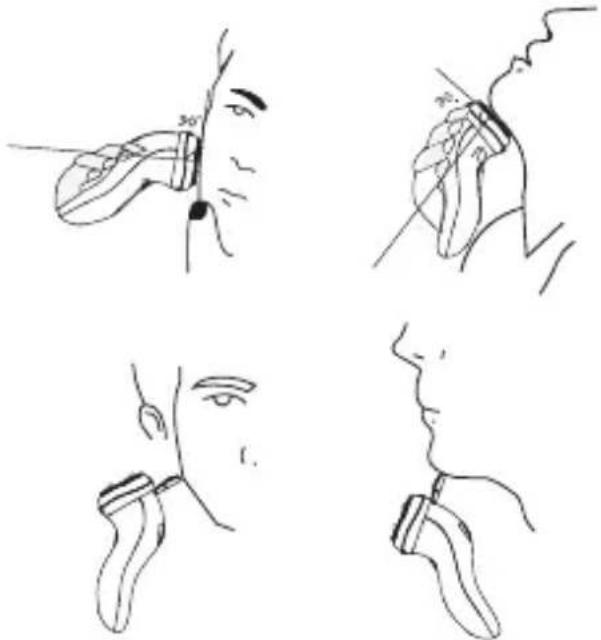
② Bring the shaving heads in gentle contact with the skin at the right angle, stretch the skin and move the shaver gently upwards against the grain.
● While shaving, take care not to push the shaving heads too strongly against the skin. Otherwise, the shaving heads will wear at a higher rate and become dull.
- To shave delicate parts like the chin, pull up the slack of the skin by hand, and stroke upwards. When shaving the throat, lift the face upwards to thrust the throat out to pull the slack upwards.
③ To use the trimming blade, slide the trimming blade button downwards. The trimming blade vibrates correspondingly with the inner blade.
natural_image
Line drawings of human neck and shoulder positions with no text or symbols④ To cut sideburns, apply the trimming blade to the skin lightly at a right angle, and move the shaver gently downwards.
⑤ After use, turn off and clean the shaver (see the "Cleaning and maintenance" section). Be sure to put on the cap (1) after cleaning.

Even if the charging indicator indicates that the shaver is empty and the shaver stops vibrating, never leave it with the power switch turned on.
Cleaning and maintenance
Before any cleaning and/or maintenance activities, unplug the AC adaptor from the shaver.
CLEANING USING BRUSH / WASHING UNDER RUNNING WATER
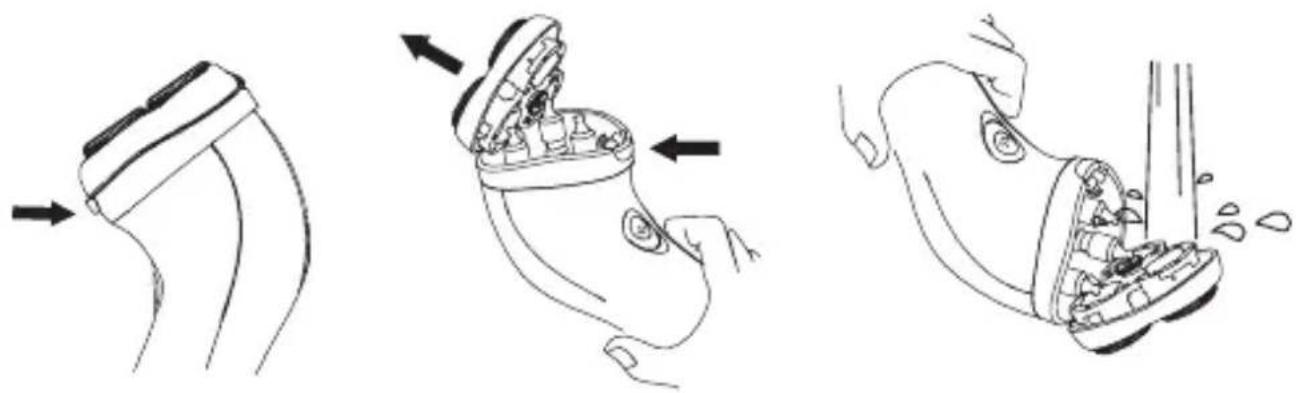
① Before cleaning, make sure that the shaver is off. Press the shaving unit release button (6) and tilt back the shaving unit (2).
② Empty the hair pocket (5). Using the brush, clean the shaving unit, the trimmer and the body case of the shaver.
natural_image
Three-step illustration of a sock repair procedure: opening, removing, and disassembly (no text or symbols)③ In order to carefully clean the shaving unit, remove the shaving heads. For this purpose follow the instructions below:
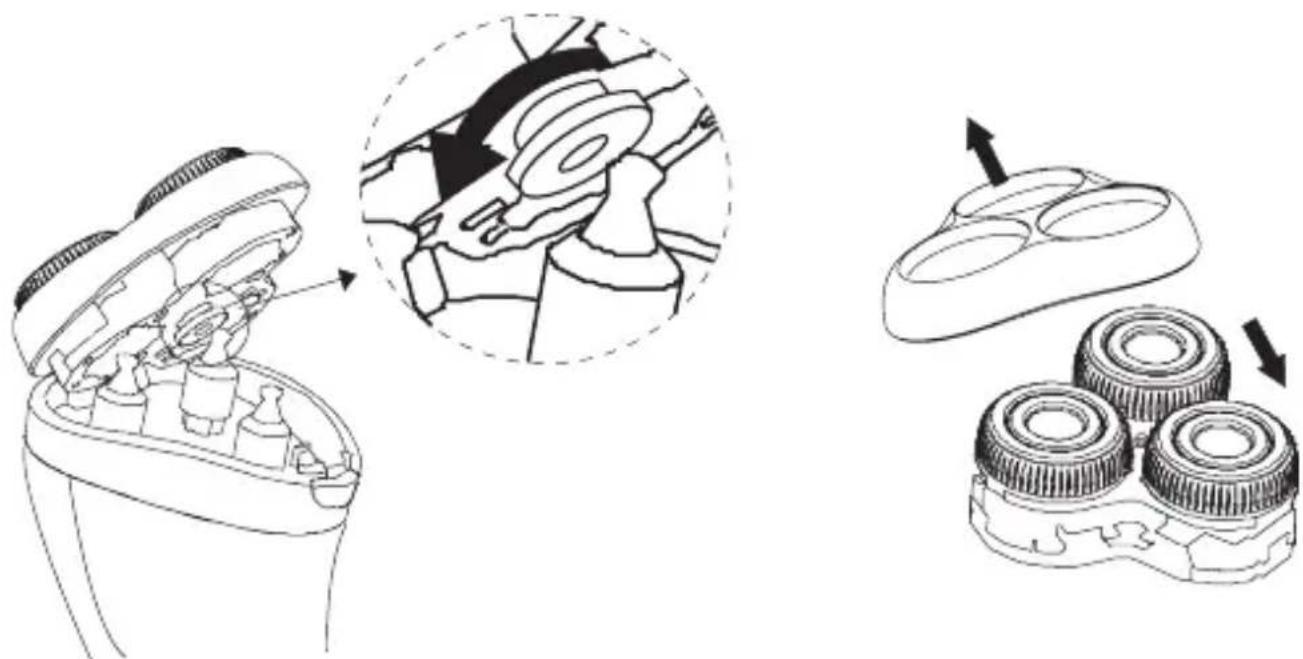
Tilt back the shaving unit (2).
Turn the retaining frame release knob (4) counter clockwise and remove the retaining frame (B).
natural_image
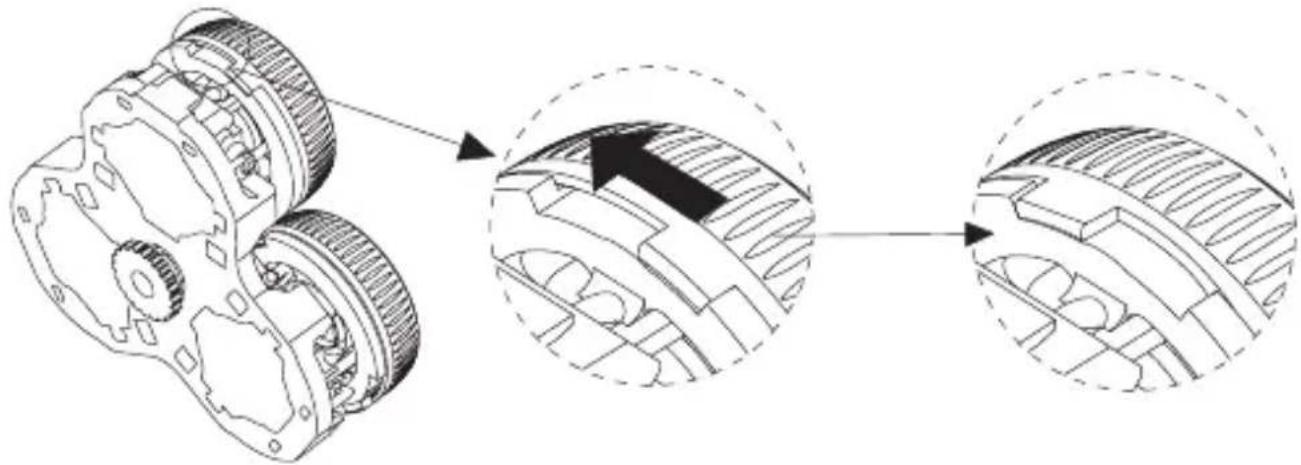
Technical illustration of a hand-operated earbuds with mechanical components, showing internal gear assembly and disassembly (no text or symbols)To clean the individual shaving heads, rotate the guard (a) as shown in the picture below.
natural_image
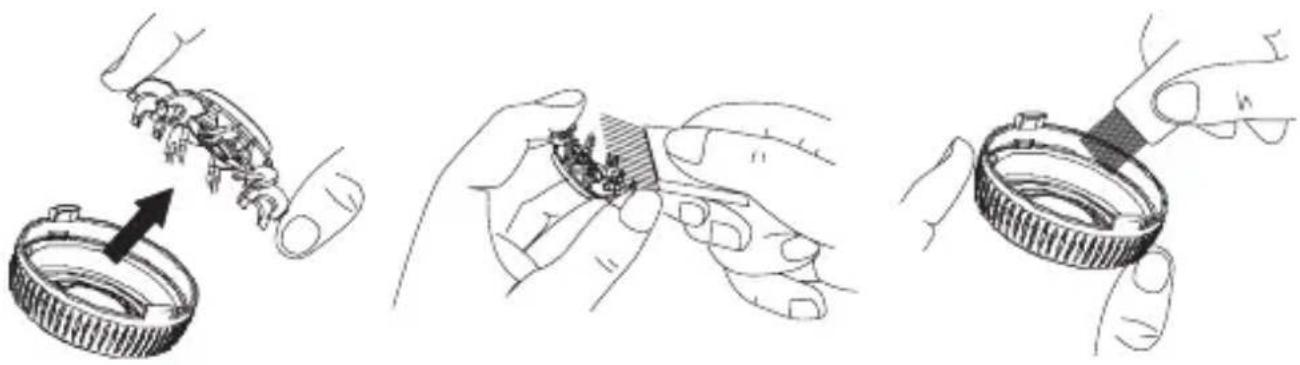
Technical illustration of a mechanical assembly showing three stages: disassembly, gear meshing, and final assembly (no text or symbols present)To remove the cutter (c) from the head, hold the cutter on its side and gently pull it upwards (see the picture below).
natural_image
Illustration of three hands performing a mechanical repair or disassembly procedure (no text or symbols present)
All parts should be cleaned gently to avoid any possible damage.
④ After cleaning, refit all the parts in the reverse order. Next, fit the shaving unit in the shaver body, taking care not to touch the foil of the shaving head.

Poor shaving quality and abnormal sound may indicate that the shaving unit elements are fitted incorrectly.
⑤ Before cleaning the trimmer, turn off the shaver. Clean the trimmer blades using the brush (sweep the brush along the blades and not across them).

Check that the trimming blade is not moving when cleaning it.
REPLACEMENT OF SHAVING HEADS
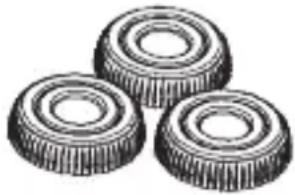
The shaving heads are consumables. In order to enjoy a comfortable clean shave, it is recommended that the shaving heads be replaced with new ones in a set at least once a year. Use of shaving heads beyond its serviceable life may not only result in poor shaving performance but also damage such heads to scratch your skin.

The above replacement period of shaving heads serves as a guideline only, and their serviceable lives vary greatly depending on the condition of use of each user. If you find them unable to give a good shave, damaged or deformed, replace them with new ones immediately.

Before replacing the shaving heads, be sure to turn off the shaver.
We recommend using only original ZELMER spare parts. Spare parts set no. SH0090111.
natural_image
Three identical mechanical gears or tule components, shown in grayscale with no text or markings.How to replace the shaving heads:
① Press the shaving unit release button (6) and tilt back the shaving unit (2).
② Tilt back the shaving unit (2).
③ Turn the retaining frame release knob counter clockwise and remove the retaining frame (B).
④ To replace the individual shaving heads (4), rotate the guard (a) and remove the cutter together with the guard.
⑤ Replace the shaving heads with new ones.
⑥ Refit all the parts in the reverse order.
Ecology – protect the environment
Each user can contribute to protecting the environment. It is not difficult or too expensive. For this purpose, dispose of the carton and plastic packaging materials into appropriate waste paper and plastic (PE) recycling containers.
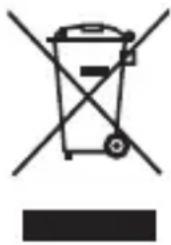
Batteries contain substances harmful to the environment. Do not dispose the appliance in household waste. Bring the battery to an official recycling centre.
At the end of its useful life, bring the appliance to an official waste collection site, as some of its components may be hazardous to the environment.
natural_image
Symbol of a trash bin with crossed lines indicating no waste or discharge (no text or labels)Do not dispose of together with domestic waste!
The manufacturer does not accept any liability for any damages resulting from unintended use or improper handling.
The manufacturer reserves his rights to modify the product any time in order to adjust it to law regulations, norms, directives, or due to construction, trade, aesthetic or other reasons, without notifying in advance.


- Szanowni Klienci!
- Operation and safety precautions
- DANGER! / WARNING!
- Risk of injury
- WARNING!
- Risk of property damage
- TIP
- Product information user instructions
- Technical specification
- Elements and accessories
- Operation
- CHARGING
- Battery activation
- "Battery Memory Effect"
- USING THE SHAVER WITH AC POWER SUPPLY
- USE
- Cleaning and maintenance
- CLEANING USING BRUSH / WASHING UNDER RUNNING WATER
- REPLACEMENT OF SHAVING HEADS
- How to replace the shaving heads:
- Ecology – protect the environment
Brand : Zelmer
Model : SH1490
Category : Razor