
IAN 86342 - Remote control SILVERCREST - Free user manual and instructions
Find the device manual for free IAN 86342 SILVERCREST in PDF.


| Product Type | Remote Control |
| Brand | SilverCrest |
| Model | IAN 86342 |
| Dimensions (approx.) | 15 x 4 x 2 cm |
| Weight (approx.) | 100 g |
| Power Source | 2 x AAA batteries (not included) |
| Operating Range | Up to 8 meters |
| Main Functions | Power, volume, channel, mute, source, menu, navigation, numeric keypad |
| Compatible Devices | TV, STB, DVD, etc. (programmable) |
| Programming | Auto-search or manual code entry |
| Material | ABS plastic |
| Color | Black |
| Battery Life (approx.) | 6 months with normal use |
| Care and Cleaning | Wipe with a dry, soft cloth. Do not use liquids or solvents. |
| Safety Precautions | Keep away from heat sources, water, and direct sunlight. Remove batteries if not used for long periods. |
| Spare Parts / Repairability | Only batteries are user-replaceable. Device is not designed for repair; dispose of according to local regulations. |
| General Information | Universal remote control, compatible with most brands. Manual available for download. |
Frequently Asked Questions - IAN 86342 SILVERCREST
User questions about IAN 86342 SILVERCREST
0 question about this device. Answer the ones you know or ask your own.
Ask a new question about this device
Download the instructions for your Remote control in PDF format for free! Find your manual IAN 86342 - SILVERCREST and take your electronic device back in hand. On this page are published all the documents necessary for the use of your device. IAN 86342 by SILVERCREST.
USER MANUAL IAN 86342 SILVERCREST
GB
Before reading, unfold the page containing the illustrations and familiarise yourself with all functions of the device.
DK
Operating instructions
DK
UNIVERSAL-FJERNBETJENING
GB Operating instructions Page 1
Important safety instructions 2
Device summary 3
Initial use 4
Unpacking the device/checking the package contents 4
Inserting the batteries 4
Operating components 5
LCD display 5
Buttons 6
The configuration menu 9
Menu language configuration 11
Code configuration (Programming the remote control) 11
Programming by brand code search 11
Programming by manual code input 12
Programming by automatic code search 13
System configuration 14
Setting the time 14
Setting the date 14
Adjust contrast 15
Background Illumination 15
Setting the global volume/mute switching 15
Select a Tape-/Disc device for direct operation 16
Setting the lock function 17
System reset 17
Timer configuration 18
Sleep timer 18
Event timer 18
Delete Timer 19
Learn configuration 19
Code learn function 20
Macro configuration 21
Favourites channel 22
Volume control 24
Vol +/−, ☒ (Mute switching) 24
For operation 24
All OFF 24
Cleaning and storage 25
Faults / Remedies 25
Disposal 26
Technical data 26
Note regarding conformity 27
Importer 27
Warranty & Service 27
Introduction
Congratulations on the purchase of your new appliance. You have clearly decided in favour of a quality product. These operating instructions are a part of this product. They contain important information in regard to safety, use and disposal. Before using the product, familiarise yourself with all of these operating and safety instructions. Use the product only as described and only for the specified areas of application. Retain these instructions for future reference. In addition, pass these documents on, together with the product, to any future owner.
Copyright
This documentation is copyright protected. All rights including those of photographic reproduction, duplication and distribution by means of particular methods (for example data processing, data carriers and data networks), wholly or partially as well as substantive and technical changes are reserved.
Important safety instructions
Proper use
Children may only operate the remote control under adult supervision.
The universal remote control can replace a maximum of ten remote controls. It can only be used for entertainment electronics with infrared receivers. The functions of the Universal remote control essentially correspond to those of the original remote control. The universal remote control is intended for private use. It is not suitable for commercial use.
Any other use is considered improper use. The manufacturer accepts no responsibility for damage caused by improper handling or unauthorized reconstruction.

Warning
A warning of this danger level signifies a possible dangerous situation. If the dangerous situation is not avoided it can lead to injuries. The directives in this warning are there to avoid personal injuries.

Important
A warning of this danger level signifies possible property damage. If the situation is not avoided it can lead to property damage. The directives in this warning are there to avoid property damage.

Note
A note signifies additional information that assists in the handling of the device.

Warning of injury danger as a result of improper handling of batteries!
Batteries must be handled with special care. Take note of the following safety instructions:
- Keep batteries well away from children. Children can put batteries into their mouths and swallow them. If a battery is swallowed medical assistance must be sought IMMEDIATELY.
- Do not throw batteries into a fire. Never subject batteries to high temperatures.
- Explosion hazard! Non-rechargeable batteries must never be recharged.
- Do not open the batteries or short-circuit them.
- Battery acid leaking from a battery can cause inflammation of the skin. In event of contact with the skin, rinse with large amounts of water. If the liquid comes into contact with your eyes, rinse thoroughly with water, do not rub and immediately consult a doctor.

Attention!
The Universal remote control contains an infrared diode of laser class 1. In order to avoid eye injuries do not look at the diode with optical devices.
Damage to the device
- If the device is defective, do not attempt to repair it yourself. In case of damage, contact the manufacturer or the manufacturer's service hotline (see Warranty information).
- If liquid escapes from the device or if the device has been otherwise damaged, it must be inspected by the manufacturer or the manufacturer's service hotline. Contact the manufacturer or the manufacturer's service hotline (see Warranty information).
- Take the batteries out of the battery compartment as soon as they are depleted.
- If you will not be using the device for a long period of time, remove the batteries to prevent them from discharging.
- Always change all batteries at the same time and always use batteries of the same type.
Device summary
① LCD display
② ALL OFF button
③ Device buttons
4 S button
5 Arrow buttons
6 EXIT button
⑦ P +/- buttons
8 MACRO button
9 Number buttons
10 Button for one or two digit programme numbers
⑪ Teletext function buttons
12 Illumination button
13 Playback buttons
14 AV button
15 Mute switching
16 VOL +/- buttons
17 MENU button
18 OK button
19 FAV / EPG button
20 Infrared sender/receiver
21 Battery compartment cover
i Tips:
- The functions described here pertain to the theoretically ideal circumstance that the button structure of the respective original remote control is identical to this universal remote control. This only occurs, however, in rare cases. If, therefore, not all of the original remote control's functions can be reproduced it is not due to a deficiency in the Universal remote control.
- All the brand names used in these instructions or in the accompanying code list are trademarks of the corresponding companies.
Initial use
Unpacking the device/checking the package contents
Warning!
Keep the plastic packaging well away from small children. There is a risk of suffocation!
- Unpack the device and accessories.
- Check the package contents
- Universal remote control (URC),
- Operating instructions,
- Manufacturers directory with device code list:
- 2 x 1,5 V Batteries, type AAA/LR03 (Micro)
i Note: Transport damage
If you notice any transport damage contact the manufacturer or the manufacturer's Service-Hotline (see warranty information).
Inserting the batteries
Attention!
The Universal remote control must only be operated with 1.5 Volt batteries (Type AAA, LR03).
Carry out the battery change as quickly as possible. Preset settings will remain saved for approx. 1 minute. If new batteries have not been installed within this time all of the settings will have to be carried out again. The time of day and date will, however, be lost in either case.
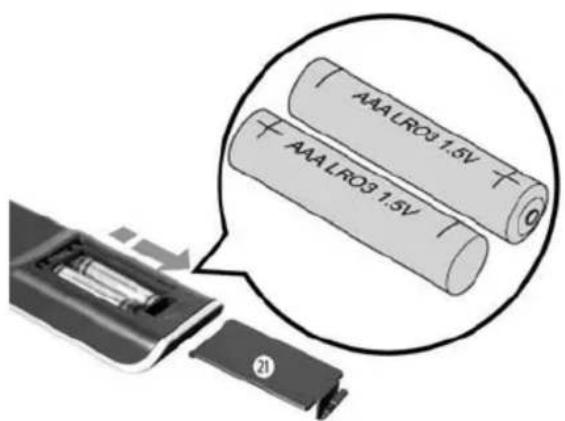
- Open the battery compartment cover 21 in the direction of the arrow.
- Insert the batteries as shown in the diagram and close the battery compartment.
The LCD display ① is activated as long as batteries are installed. The following diagram shows the LCD display ① after the batteries have been installed or changed.
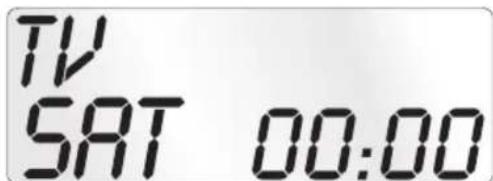
(i) Note:
If no LCD display ① is visible check the polarity of the batteries or install new ones.
Operating components
LCD display
The LCD display ① is divided into fields.
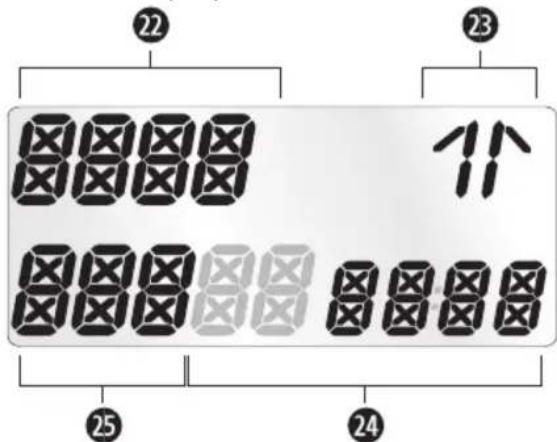
Text field 22
Here is shown the currently selected device, for example DVD, TV VCR etc.
Infrared symbol ②3
Every time a button is pressed, with which an infrared signal is to be sent the Infrared symbol illuminates.
Code/Time field 24
Here is shown the device code of the relevant selected device or the time of day. With the time of day indicator: ^1 the numbers blink in the middle. For time displays in the 12-hour format, the period of the day code is shown to the left of the time.
Day of the week field 25
Here you can read the shortened form of the current day of the week after you have entered the date.
Standard display:
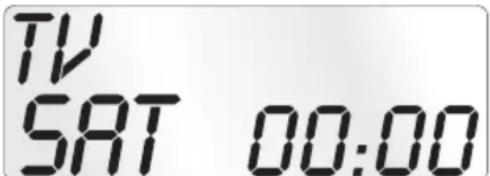
The standard readout of the LCD display ① consists of the details for the relevant device, for example, "TV", the initial for the day of the week and the time of day indicator.
Buttons

Note:
All the functions described here can, of course, only be used if they are supported by the device being controlled.

/ALL OFF button. ②
ALL OFF

To switch the device on/off; press and hold for a few seconds to switch all devices on/off.
Device buttons ③
The device buttons are used to select the device that should be operated.
TV
Television
VCR
Video recorder
AUX1
Accessory unit 1
CBL
Cable receiver
CD
CD player
BD
BluRay Disc Player
AMP
Audio amplifier
DVD
DVD player
DSAT
Digital satellite receiver
AUX2
Accessory unit 2
The mentioned button allocation is not compulsory. You can, for example, also save the code for the video recorder on the TV slot.
"S" button ④
S
Press and hold for 3 seconds to access the configuration menu or press briefly to show the date.
GB
To access the target device's electronic programme guide (EPG) first press briefly the S button ④ and then the FAV/EPG button ⑲.
To control the "PIP" function (picture in picture) of your television set, first press the S button ④ followed by the - button of the Videotext function buttons ⑪.
Arrow buttons 5

EXIT button 6
EXIT Move a level backward in the menu.
P +/- buttons ⑦
+ changing the reception channel. P in the DVD and CD-mode these buttons — control the SKIP function
MACRO button 8
MACRO button ⑧ followed by a number button ⑨ 1-6 activates a previously saved chain of commands.
Number buttons ⑨
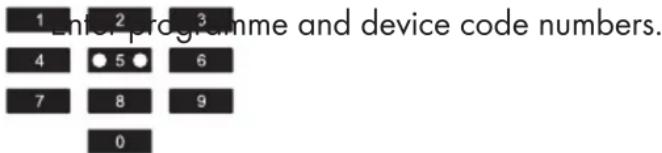
Button for one/two digit programme numbers 10
For two digit programme numbers (depending on the device type) first press the 10 button then via the number buttons 9 enter the programme number. When pressed again the display becomes single digit once more.
Teletext function buttons ⑪
In teletext operation the buttons have the following functions:
Access the teletext function. Stop automatic paging forward for multi-page teletexts. Enlarge page presentation Screen text and TV image one upon the other To end the teletext function.
To end the teletext function.
To access the SWAP function of the target device briefly press the S button ④, followed by the □-button.

Note:
- The teletext function is only available in the European TV mode and your reception device must be teletext ready.
- In addition the P +/- buttons ⑦ control the following teletext functions:
P + Leaf one page forward P – Leaf one page backwards
Playback buttons 13
The playback buttons 13 control devices such as DVD/CD players and video recorders:

Start playback

age format switching with TV operation.

Record

Stop Playback/Record/Wind

Pause playback

Rewind

Wind forward
The coloured marking of the playback buttons refer to the coloured fields in the video text, over which the Toptext functions can be controlled.
AV button 14
Switch to the AV input.

Mute switching 15

Switch sound on/off.
VOL+/- buttons 16
t volume (Volume).
MENU button 17

Access the menu of the controlled device.
OK button 18

You can confirm a menu selection with the OK button.
FAV/EPG button 19

Press the FAV/EPG button to access your y programmed favourite station.
To access the EPG function of the target device first press briefly the S button ④.
The configuration menu
In the system settings you undertake the following:
- Programming the remote control to the devices to be controlled
- Settings for the menu language, time of day, date, display contrast, background illumination, volume, lock function as well as system reset.
- Timer settings
• The "learning" of designated button commands - Setting up Macros
- Assigning favourites
On the following page you can see a summary of the menu structure.
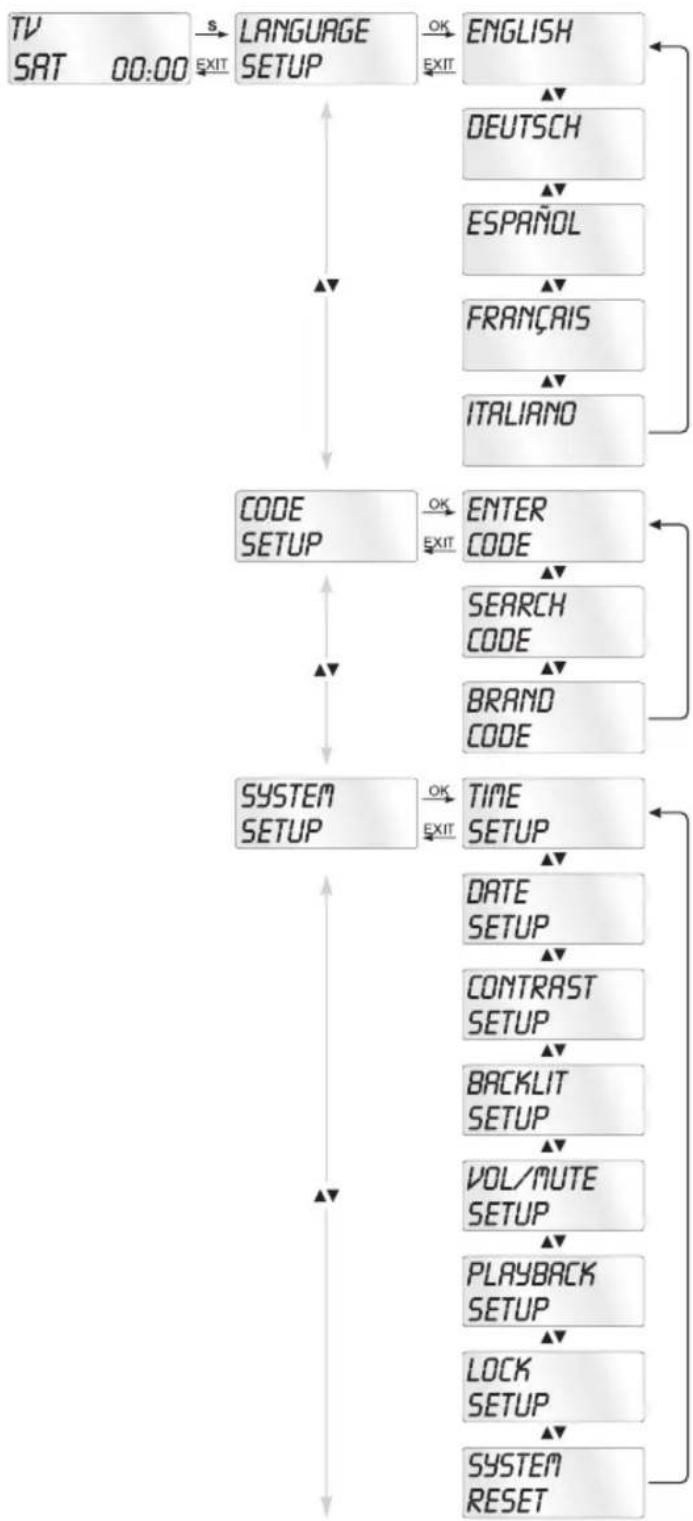
flowchart
graph TD
    A["TV SAT 00:00"] -->|s EXIT| B["LANGUAGE SETUP"]
    B -->|OK EXIT| C["ENGLISH"]
    B -->|▼| D["DEUTSCH"]
    D --> E["ESPAÑOL"]
    E --> F["FRANÇAIS"]
    F --> G["ITALIANO"]
    B --> H["CODE SETUP"]
    H -->|OK EXIT| I["ENTER CODE"]
    I --> J["SEARCH CODE"]
    J --> K["BRAND CODE"]
    H --> L["SYSTEM SETUP"]
    L -->|OK EXIT| M["TIME SETUP"]
    M --> N["DATE SETUP"]
    N --> O["CONTRAST SETUP"]
    O --> P["BACKLIT SETUP"]
    P --> Q["VOL/MUTE SETUP"]
    Q --> R["PLAYBACK SETUP"]
    R --> S["LOCK SETUP"]
    S --> T["SYSTEM RESET"]
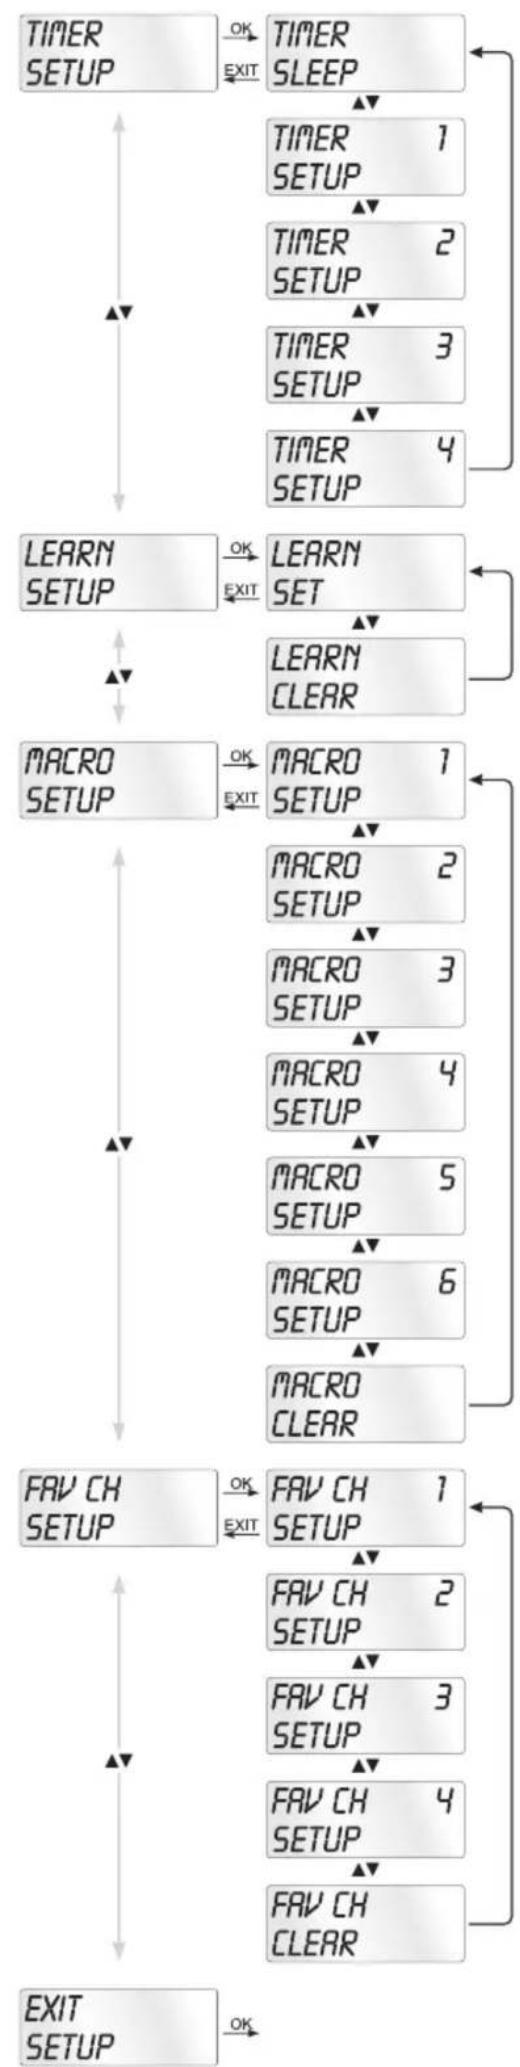
flowchart
graph TD
    A["TIMER SETUP"] -->|OK EXIT| B["TIMER SLEEP"]
    B -->|▲▼| C["TIMER 1 SETUP"]
    C -->|▲▼| D["TIMER 2 SETUP"]
    D -->|▲▼| E["TIMER 3 SETUP"]
    E -->|▲▼| F["TIMER 4 SETUP"]
    F --> G["LEARN SETUP"]
    G -->|OK EXIT| H["LEARN SET"]
    H -->|▲▼| I["LEARN CLEAR"]
    I --> J["MACRO SETUP"]
    J -->|OK EXIT| K["MACRO 1 SETUP"]
    K -->|▲▼| L["MACRO 2 SETUP"]
    L -->|▲▼| M["MACRO 3 SETUP"]
    M -->|▲▼| N["MACRO 4 SETUP"]
    N -->|▲▼| O["MACRO 5 SETUP"]
    O -->|▲▼| P["MACRO 6 SETUP"]
    P -->|▲▼| Q["MACRO CLEAR"]
    Q --> R["FAV CH SETUP"]
    R -->|OK EXIT| S["FAV CH 1 SETUP"]
    S -->|▲▼| T["FAV CH 2 SETUP"]
    T -->|▲▼| U["FAV CH 3 SETUP"]
    U -->|▲▼| V["FAV CH 4 SETUP"]
    V -->|▲▼| W["FAV CH CLEAR"]
    W --> X["EXIT SETUP"]
Menu language configuration
For the device menu display you can select from 5 languages: English, German, Spanish, French and Italian.
- Hold down the S button ④ for a little longer than 3 seconds. Carry out entries in the menu quickly because after approx. 15 seconds without an entry the menu will end.
- "LANGUAGE SETUP" appears in the LCD display ①. Press the OK button ⑱.
- "ENGLISH" now appears in the LCD display ①. With the ▲▼ buttons ⑤ select the desired language and confirm with the OK button ⑱.
- With the EXIT button ⑥ you exit the menu.
The device menu is now displayed in the selected language. For the following instructions we are assuming that you have selected your own language.
Code configuration
(Programming the remote control)
3 Programming methods are available for the remote control: Programming by brand code search, by automatic code search and by direct code input (manual).
First you should use the brand code search since this method is the fastest way of programming if the manufacturer of your device is itemized in the code list. As second is recommended the direct code input followed by the automatic code search.
Programming by brand code search
With this method you select the brand and code direct via the LCD display ①.
Observe the following operational references to programme the remote control:
- Press the device button Ⓔ for the device that you want to programme the remote control.
- Hold down the S button ④ for a little longer than 3 seconds. "LANGUAGE SETUP" appears in the LCD display ①. With the ▲ or ▼ button ⑤ select "CODE SETUP" and confirm with the OK button ⑱.
- "ENTER CODE" now appears in the LCD display ①. With the ▲▼ buttons ⑤ select "BRAND CODE" and confirm with the OK button ⑱.
- Now appears the alphabetical first brand name from the list of pre-programmed devices.
- With the ◀▶ buttons ⑤ select the various brand names.
- To make access easier you can skip directly to specific letters of the alphabet with the number buttons ⑨:
Example for the search of a TV brand code: With button
$$ \begin{array}{l} 2 \Rightarrow A 3 \Rightarrow D \quad 4 \Rightarrow G 5 \Rightarrow J \ 6 \Rightarrow M 7 \Rightarrow P \quad 8 \Rightarrow T 9 \Rightarrow W \ \end{array} $$
number 5 the display skips to the letter "J". The first brand is "JEC"*. If, for example, you own a "Kenwood"* brand device, continue leafing with the ▶ button ⑤ until this brand name appears. (* All brand names used here are trademarks of the corresponding manufacturer.)
- The majority of manufacturers use several different codes for the remote control. You must now ascertain which of the available codes is best suited to your device. On the right underneath the brand name the relevant code will be shown in the LCD display ①.
-
To test the code, point the remote control at the actual device and press the buttons that correspond to the functions of this device (except ▲▼◀▶5, OK 18, EXIT 6, the device buttons 3 or the numeric buttons 9).
-
If most of the buttons function press the OK button ⑱ to save the setting. In the LCD display ① "OK" appears. Subsequently the menu will close automatically.
-
If, however, none or only a few of the buttons function select with the ▲ or ▼ button ⑤ the next code and test again as described in step 8.
-
With the EXIT button ⑥ you move back one level in the menu.
Repeat these operational steps for all devices that you would like to control with the remote control.
Programming by manual code input
In this mode the remote control can be programmed by direct input of a code number. You can obtain the necessary code number from the enclosed manufacturers directory with device code list. In the event that the new code is invalid the last valid programmed code will be restored.
- Press the device button ③ for the device that you want to programme the remote control.
- Hold down the S button ④ for a little longer than 3 seconds. "LANGUAGE SETUP" appears in the LCD display ①. With the ▲ or ▼ button ⑤ select "CODE SETUP" and confirm with the OK button ⑱.
- "ENTER CODE" now appears in the LCD display ①. To access this function press the OK button ⑱.
- In the LCD display ① appears the presently used code for the selected device. Now the first digit of the code blinks and waits for your code input. Enter the new four digit code via the number buttons ⑨. After entering the fourth digit the whole code flashes. You can now test if the URC can control the device you want with this code. Press those keys that correspond to the functions of the device, with a TV set for example, PROG +/- . If the device reacts as required, confirm the code input with the OK button ⑱. If it does not, enter the next possible code from the list and try again.
- If the entered CODE is valid the code will be saved. In the LCD display ① "OK" appears briefly. Subsequently
the menu will close automatically. In the event of failure the LCD display ① shows briefly "ERROR" and waits for a new code entry. Then you repeat step 4.
- With the EXIT button ⑥ you move back one level in the menu.
Programming by automatic code search
This process can take several minutes per device since all codes for the selected device have to be gone through. Therefore this method should only be used when the device cannot be programmed via brand code search or direct code input or if your device is not listed at all in the manufacturers directory with device code list.
Follow the steps listed below to carry out programming by means of the automatic code search.
-
Press the device button ③ for the device that is to be controlled (i.e. VCR).
-
Switch the device that is to be controlled with the remote control on. With VCR/DVD/CD devices please insert a tape and/or disc.
-
Hold down the S button ④ for a little longer than 3 seconds. "LANGUAGE SETUP" appears in the LCD display ①. With the ▲ or ▼ button ⑤ select "CODE SETUP" and confirm with the OK button ⑱.
-
"ENTER CODE" now appears in the LCD display ①. Press the ▲ or ▼ button ⑤ until "SEARCH CODE" is shown in the LCD display ①. Point the remote control to the device and then press the OK button ⑱ to access the mode "automatic code search".
-
The search begins. Thereby the device sends, one after the other, the code numbers in ascending order. The infrared symbol ②3 indicates this. Every search starts with the currently programmed code.
-
When the device reacts by switching off press immediately the OK button 18 to save the relevant code. The LCD display 1 shows briefly "OK".
-
Check to see if the majority of your device's functions can now be controlled with the remote control. If yes you have most probably found the correct code. In the event that a few functions are not working you can start the automatic code search again beginning with step 1.
-
However if the device does not react any more you probably did not press the OK button 18 quick enough in step 6. Then press repeatedly the EXIT button 6 to exit the menu and return to the standard display.
-
Now hold down the device button ③ of the device for which you have just sought the relevant code. Below on the right in the LCD display ① will thereby be shown the relevant code. Make a note of this number.
-
Then proceed as described in the preceding chapter "Programming by manual code entry" and check to see if the code with the next lowest number combination will function.
i Tips:
-
While the code search is activated none of the buttons will function apart from OK ⑱ and EXIT ⑥.
-
If the automatic search has reached the end of the code list it stops there. The display then returns to "SEARCH CODE".
System configuration
Setting the time
The LCD display ① shows you the time of day. You set this as follows:
-
Hold down the S button ④ for a little longer than 3 seconds. The notice "LANGUAGE SETUP" appears. If appox. 15 seconds passes without an entry the device exits the menu and returns to the standard display.
-
With the ▲ or ▼ button ⑤ select "SYSTEM SETUP" and confirm with the OK button ⑱.
-
In the LCD display ① "TIME SETUP" appears. Confirm with the OK button ⑱. The LCD display ① now shows "TIME" and the time format (24 HR) blinks.
-
With the ▲ or ▼ button ⑤ you can switch to the other time format (12 HR). After which the time display for the time of day will show an "Rf" or "Pf" before the time. „Rf" stands fpr "AM" = "ante meridium" (Morning, 0:00 o'clock midnight to 12:00 o'clock midday). „Pf" stands for "PM" = "post meridium" (Afternoon and evening, 12:00 o'clock midday to 0:00 o'clock midnight). Press the OK button ⑱ to confirm.
-
Now the hour indicator blinks. With the ▲ or ▼ button ⑤ select the hour number for the present time of day and press the OK button ⑱.
-
Now the minute indicator blinks. With the ▲ or ▼ button ⑤ select the minute number for the present time of day and press the OK button ⑱ to save. The "TIME SETUP" notice appears again.
-
To exit this or the following menus press repeatedly the EXIT button ⑥ until the standard display appears in the LCD display ①.
Setting the date
The LCD display ① shows you the date when you press the S button ④. You set the date in this way:
-
Hold down the S button ④ for a little longer than 3 seconds. The notice "LANGUAGE SETUP" appears.
-
With the ▲ or ▼ button ⑤ select "SYSTEM SETUP" and confirm with the OK button ⑱.
-
In the LCD display ① "TIME SETUP" appears. Press the ▼ button ⑤ to change to "DATE SETUP". Confirm with the OK button ⑱.
- In the display the year "2011" blinks. With the ▲ or ▼ button ⑤ you can change the year and confirm with the OK button ⑱. With the ▲ or ▼ button ⑤ you can change the now blinking month and confirm with the OK button ⑱. Now the day indicator blinks which you can also change with the ▲ or ▼ button ⑤.
- To save press the OK button 18. The "DATE SETUP" notice appears again.
Adjust contrast
You can set the display's contrast as follows:
- Hold down the S button ④ for a little longer than 3 seconds. The notice "LANGUAGE SETUP" appears.
- With the ▲ or ▼ button ⑤ select "SYSTEM SETUP" and confirm with the OK button ⑱.
- With the ▲ or ▼ button ⑤ select "CONTRAST SETUP" and confirm with the OK button ⑱.
- In the LCD display ① the contrast value now blinks which you can set with the ▲ or ▼ button ⑤.
Display readout:
0 = highest contrast:
15 = lowest contrast
- With the OK button 18 you can save the desired setting. The notice "CONTRAST SETUP" appears again.
Background Illumination
You can set how long the LCD display's ① background and the button illuminations remain alight after completion of the operation.. Thereby taking into account that the longer the illumination remains lit the shorter the battery life will be.
- Hold down the S button ④ for a little longer than 3 seconds. The notice "LANGUAGE SETUP" appears.
- With the ▲ or ▼ button ⑤ select "SYSTEM SETUP" and confirm with the OK button ⑱.
- With the ▲ or ▼ button ⑤ select "BACKLIT SETUP" and confirm with the OK button ⑱.
- In the LCD display ① now blinks the second count for the length of time that the light is to be left on which you can set with the ▲ ▼ buttons ⑤ from 0 to 60. If you select "0" the background illumination will shut off completely.
- With the OK button 18 you can save the desired setting. The notice "BACKLIT SETUP" appears again.
Setting the global volume/mute switching
So that you don't always have to first press a device button for the volume control and mute switching, for these functions the URC always only responds to an individual device. You can determine this target device yourself.
- Hold the S button ④ down for a little longer than 3 seconds. The notice „LANGUAGE SETUP“ appears.
- With the ▲ or ▼ button ⑤ select "SYSTEM SETUP" and confirm with the OK button ⑱.
- With the ▲ or ▼ button ⑤ select "VOL/MUTE SETUP" and confirm with the OK button ⑱.
- The LCD display ① shows "ALL VOL SET". Press the OK button ⑱, the display changes to „ALL VOL MODE”.
- Now press the device button ③ for the device that is to be controlled by the global volume control.
- If the specified device is equipped with a volume control, "SUCCESS" will be displayed briefly and the menu will close. From now on the volume control functions on the device just specified.
- If this device is not equipped with its own volume control the URC will not allow this selection and shows "VOLUME ERROR". Even then the menu will close. The volume control will then continue to function on the former device.
You can also deactivate the global volume control for specific devices.
-
For this select in the menu "VOL/MUTE SETUP" with the ▲ or ▼ button ⑤ the function "MODE VOL SET" and confirm with the OK button ⑱. In the LCD display ⑪ appears „MODE VOL MODE”.
-
Now press the device button ③ for the device that is to be excluded from the global volume control. The LCD display ① shows „SUCCESS“ and the global volume control is deactivated if the URC is working in the operational mode of one of the selected devices.
You can again override the settings in the "VOL/MUTE SETUP" menu.
-
For this select in the menu "VOL/MUTE CONF" with the ▲ or ▼ button ⑤ the function "VOL/MUTE RESET" and confirm with the OK button ⑱.
-
The LCD display ① prompts you, with CONFIRM RESET, to a confirmation which is done by pressing the OK button ⑱. Press the OK button ⑱ if you want to delete the setting, the displayed "SUCCESS" then confirms the deletion of the device assignment to global volume control. Otherwise you press the EXIT button ⑥ to abort the deletion.
Select a Tape-/Disc device for direct operation
You can select a tape or disk device that you can control with the playback buttons 13 without first having to press the corresponding device button 3.
- Hold down the S button ④ for a little longer than 3 seconds. The notice "LANGUAGE SETUP" appears.
-
With the ▲ or ▼ button ⑤ select "SYSTEM SETUP" and confirm it with the OK button ⑱.
-
In the LCD display ① "TIME SETUP" appears. Press the ▼ button ⑤ to switch to "PLAYBACK SETUP". Confirm with the OK button ⑱.
- With the ▲ or ▼ buttons ⑤ now select the device that should respond to the URC when you use the playback buttons ⑬. Confirm with the OK button ⑱.
- If instead of a device you select "OFF" and confirm it with the OK button 18, you switch the direct operation off. If you select "RESET" and confirm with the OK button 18 you activate the pre-programmed default settings (DVD) for this function.
- The LCD display ① shows "SUCCESS" and the selected device can now be directly controlled using the playback buttons ⑬.
Setting the lock function
With the lock function you can block access to all configuration menus.
- Hold down the S button ④ for a little longer than 3 seconds.
- With the ▲ or ▼ button ⑤ select „SYSTEM SETUP“ and confirm with the OK button ⑱.
- With the ▲ or ▼ button ⑤ select "LOCK SETUP and confirm with the OK button ⑱. The LCD display ⑪ shows the current settings.
- With the ▲ or ▼ button ⑤ now select between „LOCK" (Block) or „UNLOCK" (Unblock).
- With the OK button 18 you save the setting. In the LCD display 1 „LOCK SETUP“ then appears again.
System reset
With this function you can delete the assignment of all or individual device buttons.
- Hold down the S button ④ for a little longer than 3 seconds. The notice "LANGUAGE SETUP" appears.
- With the ▲ or ▼ button ⑤ select "SYSTEM SETUP" and confirm with the OK button ⑱.
- With the ▲ or ▼ button ⑤ select "SYSTEM RESET" and confirm with the OK button ⑱.
- With the ▲ or ▼ buttons ⑤ you can now select the desired function. To delete the assignments (Code) of all device buttons ③, as well as all data to macros, timer and learned functions, select "ALL RESET" and confirm it with the OK button ⑱.
- In the LCD display ① there now appears "CONFIRM RESET". Confirm the deletion with the OK button ⑱. Then the LCD display ① shows "SUCCESS RESET". The detailed information is now deleted and the menu is terminated.
- To delete only the assignments of individual device keys ③, select "MODE RESET" and then press the OK button ⑱. The LCD display ① now shows MODE" and asks you to
press the device button ③ whose assignment you want to delete. To conclude, "SUCCESS" briefly appears, then you will again read "MODE" in the LCD display. Now press any other further desired device buttons ③ to also delete their assignment.
- Otherwise, you can exit the menu by pressing the EXIT button ⑥.
Timer configuration
The URC offers 2 timer modes, sleep timer and event timer.
Sleep timer
- Press the device button ③ for the device that is to be controlled (i.e. VCR).
- Hold down the S button ④ for a little longer than 3 seconds. The notice "LANGUAGE SETUP" appears.
- Press the ▲ or ▼ button ⑤ until "TIMER SETUP" is shown. Press the OK button ⑱ "TIMER SLEEP" appears in the LCD display ①. Confirm the selection of this function with the OK button ⑱.
- Now, below to the right in the LCD display ① blinks the minutes for the remaining time of the selected device. Set with the ▲ or ▼ button ⑤ the desired value from 1 to 99 minutes. Press the OK button ⑱ to confirm. With programmed sleep-timer the LCD display ① shows "zZ" on the right next to the time.
- Position the remote control in such a way that your infrared signal can reach the device to be switched off. After expiration of the set time the remote control will switch the device off.
- If you now press the S button ④ "SL" is shown in the display ① below on the left.
Event timer
The remote control has 4 event timers available via which you are allowed to send out specific series of button combinations at designated times.
- Hold down the S button 4 for a little longer than 3 seconds. The notice "LANGUAGE SETUP" appears.
- With the ▲ or ▼ button ⑤ select "TIMER SETUP" and confirm with the OK button ⑱. "TIMER SLEEP" appears in the LCD display ①. With the ▲ or ▼ button ⑤ select the desired memory slot "TIMER SETUP 1" to "TIMER SETUP 4" and confirm with the OK button ⑱.
- Now the hour of the time of day, to which the desired button combinations are to be carried out, blinks. Set with the ▲ or ▼ button ⑤ the desired hour and press for confirmation the OK button ⑱.
-
Now the minutes of the time of day, to which the desired button combinations are to be carried out, blinks. Set with the ▲ or ▼ button ⑤ the desired minutes and press for confirmation the OK button ⑱.
-
In the LCD display ① you will see "TIMER X KEY" (X stands for the desired timer). Now press the desired device button ③ followed by the desired sequence of the button commands.
-
By default, the timer commands are sent at intervals of 1 second. Since many devices react sluggishly, it is possible that the sequences of the timer commands are sent to the device too quickly. Then you have the option of programming, before a button command, a pause of between 5 to 21 seconds. For this press, if necessary repeatedly, on the MACRO button ⑧. Below and to the right the LCD display ① shows the current pause length in seconds.
-
Press the S button ④ to save your entry and to return to the timer menu.
-
Procede in a similar manner in order to, if required, programme the other timer memory slots also.
-
With programmed event timer the LCD display ① shows the timer symbol „♡” on the right next to the time.
i Tips:
-
Per timer memory slot a maximum of 14 buttons can be programmed. After entry of the 14th button the sequence will be automatically saved and "FULL" is shown in the LCD display ①.
-
In this menu also the device will return to the standard display after approx. 15 seconds without an entry.
Delete Timer
You can delete a programmed sleep or event timer as follows:
-
Select the timer that you wish to delete (see chapter Sleep-Timer/Event-Timer) and then press the OK button ^18 . In the LCD display ^1 you will read „TIMER CLEAR”.
-
Press the OK button 18. The LCD display 1 changes to "CONFIRM CLEAR".
-
Press the OK button 18 once again to delete the timer. The LCD display 1 confirms the successful deletion with the message „SUCCESS“.
Learn configuration
The Universal remote control (URC) can learn and save button signals of an original remote control. If the URC does not work after applying the programming methods already described or cannot carry out all commands please attempt to teach the URC with the help of the original remote control.
- Use new batteries for the URC and the original remote control.
- Maintain a distance of at least one metre from other light sources. The light sources could disrupt the infrared transmission.
- Place the URC and the original remote control at a distance of 20 to 50 mm from each other on an even surface so that the infrared diodes 20 are facing each other.
i Tips:
- Do not use the following buttons for the learn function: all device buttons ③, MACRO ⑧, S button ④, EXIT ⑥.
- If when teaching, during the notice "LEARNING", no button is pressed on the original RC after 25 seconds the learn menu will end. This mode can not be ended by pressing a button on the URC.
- The memory can accommodate 150 button commands. If the memory is full the LCD display ① shows "LEARN FULL" and the learn mode will end.
- With the EXIT button ⑥ you return to the previous status (except with a notice of "LEARN KEY" and/or "LEARNING").
Code learn function
-
Press the device button ③ for the device that the URC should learn a button code.
-
Hold down the S button ④ for a little longer than 3 seconds. The notice "LANGUAGE SETUP" appears.
-
With the ▲ or ▼ button ⑤ select the menu "LEARN SETUP" and then press the OK button ⑱.
-
In the LCD display ① "LEARN SET" appears. Then press the OK button ⑱. In the LCD display ① "LEARN KEY" appears.
-
First press the button on the URC that is to be taught. In the LCD display ① "LEARNING" appears. The URC now waits for the infrared signal from the original remote control.
i Note:
Should the notice not change to "LEARNING" you have selected a button for which no button code can be taught.
- Point the infrared sensors 20 of both remote controls towards each other.
- Now hold down the desired button of the original remote control until "SUCCESS" or "LEARN ERROR" appears in the display ① of the URC.
- If in the LCD display ① "SUCCESS" appears (process successful), you can teach further buttons beginning with step 5. If "LEARN ERROR" appears (process unsuccessful) repeat the process in any case from step 5.
- To stop/end the learn process press the S button and subsequently, while "LEARN KEY" is displayed, repeatedly the EXIT button ⑥ until the normal indicator appears in the LCD display ①. During the displayed "LEARNING" simply allow 30 seconds to pass without any operation and the device will then exit the menu.
Delete all programmed buttons of all devices
- Hold down the S button 4 for a little longer than 3 seconds. The notice "LANGUAGE SETUP" appears.
-
With the ▲ or ▼ button ⑤ select the menu "LEARN SETUP" and then press the OK button ⑱. In the LCD display ⑪ "LEARN SET" appears.
-
With the ▲ or ▼ button ⑤ select "LEARN CLEAR" (taught delete) and confirm with the OK button ⑱. In the LCD display ① "CONFIRM CLEAR" (confirm delete) appears.
-
Confirm with the OK button 18 in the LCD display 1 "SUCCESS" appears. All programmed buttons are deleted. Finally the menu will automatically end.
Note:
When the LCD display shows "CONFIRM CLEAR" you can stop the deletion with the EXIT button 6.
Macro configuration
With the MACRO function up to 16 button commands can be carried out with the press of a single button, that is to say, several previously saved control commands can be deleted with one MACRO button. There are 6 Macro memory slots available for you.
To programme a Macro
For Macro programming proceed as follows:
-
Hold down the S button ④ for a little longer than 3 seconds. The notice "LANGUAGE SETUP" appears.
-
With the ▲ or ▼ button ⑤ select "MACRO SETUP" and confirm with the OK button ⑱. In the display "MACRO SETUP 1" appears.
-
With the ▲ or ▼ button ⑤ select the memory slot to be programmed (MACRO SETUP 1 - 6) and confirm with the OK button ⑱.
-
In the LCD display ① "MACRO STEP" appears. Now press, one after the other, the desired buttons (max. 16). The sequence should begin with a device button ③.
-
By default the Macro commands are sent in intervals of 1 every second. Since many devices react sluggishly it is possible that the sequence of the Macro commands are sent too quickly to the device. Then you have the option of programming, before a button command, a pause of between 5 - 21 seconds. For this purpose press, if necessary repeatedly, the MACRO button ⑧. Below and to the right the LCD display ① shows the current pause length in seconds.
-
When the maximum number of button commands is reached the LCD display ① shows "FULL".
-
Save the entry with the S button ④. In the LCD display ① "MACRO SETUP" appears.
-
If, with the selection of the Macros to be programmed (step 3), you select a memory slot that is already occupied the existing Macro will be overwritten.
-
Repeat the process from step 3 to create further Macros.
-
With the EXIT button ⑥ you move back a level in the menu, except during the input of the button commands.
i Tips:
- A maximum of 16 button commands can be saved in a Macro. After input of the 16th button command, "FULL" appears in the LCD display ①.
- To exit the mode without saving allow approx. 15 seconds to pass without an entry.
- In the mode "MACRO STEP" you can only return to the previous status with the S button ④.
Example: You want to save a command chain in a Macro. We begin in the mode "MACRO STEP".
Desired command chain: Switch on TV => PAUSE => switch to the AV input => switch on DVD => PAUSE => Playback DVD.
In the mode "MACRO STEP", for this you enter the following button commands:

Execute a Macro
To execute a pre-programmed Macro proceed as follows:
- Press the MACRO button ⑧.
- With the corresponding number button ⑨ you access the desired Macro (1-6). Example: If Macro 3 is to be implemented press first the Macro button ⑧ and then, within 5 seconds, the number button "3".
To delete all Macros
To delete all pre-programmed Macros proceed as follows:
- Hold down the S button ④ for a little longer than 3 seconds. The notice "LANGUAGE SETUP" appears.
- With the ▲ or ▼ button ⑤ select "MACRO SETUP" and confirm with the OK button ⑱. In the display "MACRO SETUP 1" appears.
- With the ▲ or ▼ button ⑤ select "MACRO CLEAR" and confirm with the OK button ⑱.
- In the LCD display ① "CONFIRM CLEAR" (confirm delete) appears. Confirm the delete process with the OK button ⑱. The LCD display ① shows "SUCCESS". All Macros are now deleted and the menu will end.
i Tips:
- When the LCD display ① shows "CONFIRM CLEAR" you can stop the delete process with the EXIT button ⑥.
- Individual Macros can not be deleted they can only be overwritten.
Favourites channel
Note:
With this function you can save your preferred stations as favourites.
To programme favourites
Your favourite stations are saved as follows:
- Press the device button ③ for the device that you want to save a favourite.
- Hold down the S button ④ for a little longer than 3 seconds. The notice "LANGUAGE SETUP" appears.
- With the ▲ or ▼ button ⑤ select "FAV CH SETUP" and confirm with the OK button ⑱. In the display "FAV CH 1 SETUP" appears.
- With the ▲ or ▼ button ⑤ select the memory slot to be programmed (FAV CH 1 - 4 SETUP) and confirm with the OK button ⑱.
- In the LCD display ① "FAV CH STEP" appears. Now press, one after the other, the buttons (max. 4) for access to your desired favourite stations.
- When the maximum number of button commands is reached the LCD display ① shows "FULL".
- Save the entry with the S button ④ the LCD display ① "FAV CH SETUP 1 - 4" appears.
- If, with the selection of the favourites to be programmed (step 4), you select a memory slot that is already occupied the existing favourite will be overwritten.
- Repeat the steps to apply further favourites.
- With the EXIT button ⑥ you move a level backwards in the menu except during the entry of the button commands.
(i) Note:
The input of the channel numbers can vary according to the model and brand of the selected devices. If necessary, with multi-digit channel numbers you must first press the button 10.
To access favourites
To access a pre-programmed favourite press the FAV/EPG button 19 followed by the corresponding number button for the desired memory slot (1 - 4).
Delete All FAV channels
To delete all pre-programmed favourites proceed as follows:
- Hold down the S button ④ for a little longer than 3 seconds.
- With the ▲ or ▼ button ⑤ select "FAV CH SETUP" and confirm with the OK button ⑱. In the display "FAV CH 1 SETUP" appears.
- With the ▲ or ▼ button ⑤ select "FAV CH CLEAR" and confirm with the OK button ⑱.
- In the LCD display ① "CONFIRM CLEAR" (confirm delete) appears. Confirm the delete process with the OK button ⑱. The LCD display ① shows "SUCCESS". All favourites are now deleted and the menu will end.
i Tips:
-
When the LCD display ① shows "CONFIRM CLEAR" you can stop the delete process with the EXIT button ⑥.
-
Individual favourites can not be deleted they can only be overwritten.
Volume control
Vol +/-, Ⓧ(Mute switching)
Press the "VOL+" button to increase the volume. With the "VOL—" button you reduce the volume. To mute the sound press the ☒ -button 15. A further press of this button turns the sound back on.
If you have not set any other device as the target for the global volume control, when you press the VOL +/- buttons 16 on the URC the volume control of the TV set is addressed by default, regardless of which device button 3 was previously pressed. However, this does not apply to the following devices: "AMP", "DVD", and "DSAT" since it can be assumed that these devices are equipped with their own volume control.
For operation
To operate one of the programmed devices with the URC first press the corresponding device button ③. Then point the URC to this device and press the desired button.
→ Put the number buttons ⑨ exactly as you do with the original remote control. Before you make a two digit entry press, if necessary, the □ button ⑩.
→ Press the S button ④ and subsequently the FAV/EPG button ⑲ to start the electronic programme guide of a device equipped with this function.
→ If you press the S button ④ the date is superimposed for 10 seconds in the LCD display ① below and on the right.
→ Whilst you hold down one of the device buttons ③ the active code for this device will be superimposed below to the right in the LCD display ①.
→ Via the MENU button ⑰ you access the dialogue for the setting of the respective target device.
→ Press the illumination button 12 to switch the display and button illuminations on and/or off.
All OFF
i Tips:
With the button ☐ OFF (all off) ② all devices that are switched on can be automatically switched off. This function can switch on again devices that have already been switched off (depending on the device). For this, press and hold the ALL OFF button ② for a few seconds. It may take up to 10 seconds before all devices are switched off. This will only function under the following circumstances:
-
A visible connection exists between all the devices and the URC.
-
Automatic code search, brand code search and MACRO function are not active.
- All target devices must be suitable for remote control switch off.
To again switch on all devices automatically hold down once more the button ⏻ ② until all devices are switched on.
Cleaning and storage

Attention!
Ensure that moisture cannot permeate into the device during cleaning! Otherwise there is the danger of causing irreparable damage to the device!
→ Clean the housing of the device exclusively with a soft moist cloth and a mild dishwashing detergent.
→ Store the device exclusively in an environment that complies with the specifications given in the technical data.
→ Before storing remove the batteries so that they will not cause damage to the device if, during storage, they happen to leak.
Faults / Remedies
Your device does not react to the URC.
→ Check the batteries. They must have enough voltage and be properly installed.
→ Firstly have you pressed the correct device button ③ for the desired target device?
→ Check to see that the correct code is programmed in for the target device (see section "Code Setup").
The URC is transmitting the commands incorrectly.
→ Press the corresponding device button ③ to set the URC to the correct mode.
→ The batteries must have enough voltage and be properly installed.
It is possible that you are using the wrong code. Start the brand code search, the automatic code search or the direct code input (manual).
The URC does not change the station on the device.
→ Press the corresponding device button ③ to set the URC to the correct mode.
In the event that the original RC does not have a "-/- -" button, change the programme with the P +/- buttons ⑦ or the number buttons ⑨.
→ If this also does not work the child protection for the target device could be activated.
Some buttons on the URC do not function properly.
→ It is possible that your URC does not have all of the functions that are on the device's original remote control.
→ It is possible that you have not programmed in the optim code. Search for a code that supports more of the target device's functions.
The URC stops reacting after a button is pressed.
→ The batteries must have enough voltage and be properly installed.
→ Point the URC towards your device.
The LCD display ① shows nothing.
→ The batteries must have enough voltage and be properly installed.
→ The contrast could be set too low. Increase the contrast setting.
Disposal
Do not dispose of the device in your normal domestic waste. This product is subject to the European directive 2002/96/EC.
Universal remote control
- Have the universal remote control or parts of it disposed of by a professional disposal company or by your communal disposal facility.
- Observe the currently applicable regulations. In case of doubt contact your disposal facility.
Batteries/rechargeable batteries
- Used batteries/rechargeable batteries may not be disposed of in household waste.
- Batteries can contain poisons which are damaging to the environment. Therefore, dispose of the batteries/rechargeable batteries in accordance with statutory regulations.
- Every consumer is legally obliged to surrender batteries/rechargeable batteries to a community collection centre in their district or to a dealer. The purpose of this obligation is to ensure that batteries are disposed of in a non-polluting manner.
- Only dispose of batteries when they are fully discharged.
Packaging
- Dispose of packaging materials in an environmentally responsible manner.

Technical data
Controllable devices: 10
Dimensions
L x W x H: 217 x 50 x 22 mm
Weight : 133 g (incl. batteries)
Infrared LED: Laser class 1
Power supply
Batteries: 2 x 1.5 V, type AAA/LR03 (micro)
(supplied)
Note regarding conformity

This device satisfies the fundamental requirements and other relevant regulations of the EMC Directive 2004/108/EC and the RoHS Directive 2011/65/EU.
Importer
KOMPERNASS GMBH
BURGSTRASSE 21
44867 BOCHUM, GERMANY
www.kompernass.com
Warranty & Service
You receive a 3-year warranty for this appliance as of the purchase date. This appliance has been manufactured with care and meticulously examined before delivery.
Please retain your receipt as proof of purchase. In the case of a warranty claim, please make contact by telephone with our service department. Only in this way can a post-free despatch for your goods be assured.
The warranty covers only claims for material and manufacturing defects, but not for transport damage, wearing parts or for damage to fragile components, e.g. buttons or batteries.
This product is for private use only and is not intended for commercial use. The warranty is void in the case of abusive and improper handling, use of force and internal modifications not carried out by our authorized Service Centre.
Your statutory rights are not restricted in any way by this warranty.
The warranty period is not extended through repairs made under warranty. This applies also for replaced or repaired parts. Any damages or deficiencies found on purchase must be reported as soon as possible after unpacking, at the latest two days after purchase. On expiry of the warranty, all repairs carried out are subject to payment.
GB Service Great Britain
Tel.: 0871 5000 720 (£ 0.10/Min.)
E-Mail: kompernass@lidl.co.uk
IAN 86342
IE Service Ireland
Tel.: 1890 930 034
(0,08 EUR/Min., (peak))
(0,06 EUR/Min., (off peak))
E-Mail: kompernass@lidl.ie
IAN 86342
INDHOLDSFORTEGNELSE SIDE
Bemærk:
natural_image
Circular diagram with a central circle and four directional arrows, no text or symbols present.Taste EXIT 6
EXIT Skifter et niveau tilbage i menuen.
Taster P +/- ⑦
flowchart
graph TD
    A["TIMER SETUP"] -->|OK EXIT| B["TIMER SLEEP"]
    B --> C["TIMER 1 SETUP"]
    C --> D["TIMER 2 SETUP"]
    D --> E["TIMER 3 SETUP"]
    E --> F["TIMER 4 SETUP"]
    F --> G["LEARN SETUP"]
    G -->|OK EXIT| H["LEARN SET"]
    H --> I["LEARN CLEAR"]
    I --> J["MACRO SETUP"]
    J -->|OK EXIT| K["MACRO 1 SETUP"]
    K --> L["MACRO 2 SETUP"]
    L --> M["MACRO 3 SETUP"]
    M --> N["MACRO 4 SETUP"]
    N --> O["MACRO 5 SETUP"]
    O --> P["MACRO 6 SETUP"]
    P --> Q["MACRO CLEAR"]
    Q --> R["FAV CH SETUP"]
    R -->|OK EXIT| S["FAV CH 1 SETUP"]
    S --> T["FAV CH 2 SETUP"]
    T --> U["FAV CH 3 SETUP"]
    U --> V["FAV CH 4 SETUP"]
    V --> W["FAV CH CLEAR"]
    W --> X["EXIT SETUP"]
Brug af makro
i Hinweis:
Makro ausführen
10-in-1 Remote Control SFB 10.1 B2
GB Manufacturer List with Device Code List
IE
DK Producentfortegnelse med apparat-kodeliste
Auxiliary Set-Top Boxes
Web & Compu-
| ter TV | |
| BUSH | 1352 |
| CYBERLINK | 2482 |
| GERICOM | 4030 |
| HAUPPAUGE | 6144 4036 |
| NOW TV | 6143 |
| PACKARD BELL | 2482 |
| PANASONIC | 5342 |
| PINNACLE | 6145 6146 6147 |
| PREMIERE | 5342 |
| PANASONICA | 6148 |
| THOMSON | 5400 |
Media Receivers
| SONY NETWORK | 5272 |
| MECEIVER |
Scart Switch
| Boxes | |
| COUNTRYMAN | 6139 |
| FUNK | 6141 |
| MARMITEK | 6139 5431 |
| SKARDIN | 6140 |
| SKYMASTER | 6140 |
| VIVANCO | 6027 |
Digital Set Top
| Boxes | |
| ADECQ | 5539 |
| ECHOSTAR | 5442 |
| SKYMASTER | 4056 |
| TEVION | 5436 4045 5250 |
| YUNG FU | 4056 |
Misc. Set Top
| Boxes |
| PARDY LIGHT BOX 6142 |
Enteetainment Box
| EMTEC | 6137 6138 |
| DMA | 6149 |
| Home Server | 6149 |
| MEDION | 6149 |
Video On Demand
| MAXDOME | 6150 |
MISC
| Picture Frames | |
| AUDIOVOX | 6180 |
| COBY | 6178 |
| DIGITAL DECOR | 6184 |
| DIGITAL LIVING | 6183 |
| DYNEX | 6180 |
| INSIGNIA | 6181 |
| KODAK | 6190 6171 6191 |
| MEMOREX | 6177 |
| NORCENT | 6179 |
| PANDIGITAL | 6184 6174 |
| PHOTOSHARE | 6176 |
| POLAROID | 6184 6182 6173 |
| ROYAL | 6174 |
| SMARTPARTS | 6184 6172 |
| TRUTECH | 6175 |
Media Center PC
| MCE | 2481 |
| MICROSOFT | 2481 |
| VISTA | 2481 |
ADSL
| ALICE TV | 6164 |
| DARTY | 6164 6188 |
| FRANCE TELECOM | 6164 |
| FREEBOX TV | 6186 4058 |
| MALIGNTE TV | 6164 6188 |
| MAXDOME | 6150 |
| NEUF TELECOM | 6187 4074 |
| NEUFTV | 6187 4074 |
| NOOS | 4052 6164 6165 |
| 4059 | |
| NUMERICABLE | 4059 |
| ORANGE | 4059 6164 6188 |
| SAGEM | 6164 4057 4052 |
| SAMSUNG | 6185 |
| TELE2BOX | 6187 |
| THOMSON | 6165 6188 |
| TPS ADSL | 6164 6187 6188 |
| UPC | 4052 6164 6165 |
| VERSATEL | 6185 |
AUX
| CENTRUM | 6028 |
| CRITERION | 6067 |
| CYBERCOM | 6113 6067 6068 |
| CYBERMAXX | 6113 6067 6068 |
| CYTRON | 6113 6067 6068 |
| DENON | 6136 6070 6072 |
| DUAL | 6113 6067 6086 |
| ELTA | 6022 6023 |
| GRUNDIG | 6031 6032 6036 |
| HARMON/KARDON | 6026 |
| KENWOOD | 6058 |
| LIFETEC | 6113 6067 6068 |
| LINN | 6120 |
| MARANTZ | 6036 |
| MEDION | 6113 6067 6068 |
| MICROMAXX | 6113 6067 6068 |
| MICROSTAR | 6113 6067 6068 |
| NAD | 6041 6042 6043 |
| 6044 6087 6088 | |
| NUVO | 6123 6124 6125 |
| 6126 | |
| ONKYO | 6076 6082 6083 |
| 6105 | |
| PHILIPS | 6109 6040 6117 |
| 6036 | |
| PRO2 | 6113 6067 6068 |
| SANSUI | 6036 |
| SCHNEIDER | 6081 |
| SHERWOOD | 6073 |
| SILVERCREST | 6021 |
| SONY | 6045 6046 6052 |
| 6054 6055 6056 | |
| 6057 | |
| TCM | 6113 6067 6068 |
| 6091 | |
| TEAC | 6084 6085 |
| TECHNICS | 6059 6069 6078 |
| TEVION | 6067 6068 6096 |
| 6097 6113 | |
| THEORIE & ANWENDING | 6090 |
| THOMSON | 6114 6060 |
| XANTECH | 6127 |
| YAMAHA | 6133 6132 6111 |
| 6110 6035 6049 | |
| 6062 6063 6064 |
Audio Tape Players
| AIWA | 6080 |
| DENON | 6071 |
| GRUNDIG | 6038 6032 |
| HARMON KARDON | 5445 |
| KENWOOD | 6058 |
| MAGNAVOX | 6038 |
| MARANTZ | 6038 |
| NAD | 6087 |
| ONKYO | 6075 |
| PHILIPS | 6038 |
| SANSUI | 6038 |
| SHERWOOD | 6074 |
| SONY | 6051 6052 6053 |
| TEAC | 6084 |
| TECHNICS | 6059 6069 6077 |
| THOMSON | 6114 |
| YAMAHA | 6035 6064 |
MINI Systems
| AIWA | 6065 6066 |
| CYBERCOM | 6119 6121 6033 |
| 6048 6092 6093 | |
| 6099 6098 | |
| CYBERMAXX | 6119 6121 6033 |
| 6048 6092 6093 | |
| 6094 6095 6099 | |
| 6098 | |
| CYTRON | 6119 6121 6033 |
| 6048 6092 6093 | |
| 6094 6095 6099 | |
| 6098 | |
| DUAL | 6119 6121 6033 |
| 6048 6086 6099 | |
| 6098 | |
| E-BENCH | 6094 |
| ELTA | 6029 6048 |
| GRUNDIG | 6034 |
| INSIGNIA | 6039 |
| INTERTRONIC | 6094 |
| LIFE | 6129 6102 6094 |
| LIFETEC | 6129 6102 6119 |
| 6121 6033 6048 | |
| 6092 6093 6094 | |
| 6095 6099 6098 | |
| MEDION | 6129 6102 6039 |
| 6037 6119 6121 | |
| 6033 6048 6092 | |
| 6093 6094 6095 | |
| 6099 6098 | |
| MICROMAXX | 6119 6121 6033 |
| 6048 6092 6093 | |
| 6094 6095 6099 | |
| 6098 | |
| MICROSTAR | 6119 6121 6033 |
| 6048 6092 6093 | |
| 6094 6095 6099 | |
| 6098 | |
| PIONEER | 6050 |
| PRO2 | 6119 6121 6033 |
| 6048 6092 6093 | |
| 6094 6095 6099 | |
| 6098 | |
| SAMSUNG | 6061 |
| SHARP | 6079 |
| SILVERCREST | 6107 6094 6108 |
| 6128 | |
| SONY | 6047 |
| TCM | 6129 6130 6119 |
| 6121 6033 6048 | |
| 6092 6093 6094 | |
| 6099 6098 6030 | |
| 6102 6103 6104 | |
| TEVION | 6129 6130 6119 |
| 6121 6033 6048 | |
| 6092 6093 6094 | |
| 6095 6099 6098 | |
| 6100 6101 6102 | |
| WELLTECH | 6131 6119 6093 |
| 6099 6098 6030 | |
| 6089 6094 6106 |
Misc
| APPLE IPOD | 6135 |
| AUDIO COMBI | 6115 |
| CAR RADIO | 6122 |
| CDR | 6118 6025 |
| DBS | 6116 |
| INTERNET RADIO | 6024 |
| IPOD | 6134 |
| SWITCH BOX | 6027 |
| VIDEO CD | 6112 |
CD
| ADCOM | 7001 7103 |
| AIWA | 7002 7104 7105 |
| 7106 7086 | |
| AKAI | 7107 7108 7109 |
| ALBA | 7110 |
| ARCAM | 7008 7077 |
| BESTAR | 7111 |
| BSR | 7112 |
| BUSH | 7003 7031 |
| CARRERA | 7004 7032 |
| CLASSIC | 7095 |
| CONDOR | 7112 |
| CYBERCOM | 7102 2343 6023 |
| 7039 6025 6030 | |
| 7076 7079 7080 | |
| 7081 6048 7082 | |
| 7083 7092 7093 | |
| 6089 7095 7096 | |
| 7100 6098 | |
| CYBERMAXXX | 7102 2343 6023 |
| 7039 6025 6030 | |
| 7076 7079 7080 | |
| 7081 6048 7082 | |
| 7083 7092 7093 | |
| 6089 7096 7096 | |
| 7100 6098 | |
| CYTRON | 7102 2343 6023 |
| 7039 6025 6030 | |
| 7076 7079 7080 | |
| 7081 6048 7082 | |
| 7083 7092 7093 | |
| 6089 7098 7096 | |
| 7100 6098 | |
| DENON | 7015 7019 7033 |
| 7034 | |
| DUAL | 7001 7103 2343 |
| 6023 6025 6030 | |
| 7076 7079 7080 | |
| 7081 6048 7082 | |
| 7102 7091 7092 | |
| 7093 6089 7083 | |
| 6094 | |
| E-BENCH | 6094 |
| ELTA | 7009 7114 6022 |
| 6023 6029 6030 | |
| 6048 | |
| EMERSON | 7001 7103 7111 |
| FISHER | 7005 7035 |
| GENEXXA | 7111 7036 7037 |
| 7038 6025 7040 | |
| 7041 | |
| GOLDSTAR | 7004 7032 |
| GOODMANS | 7042 7043 |
| GRUNDIG | 7008 7044 6031 |
| 6032 7077 | |
| HARMAN/KARDON | 7006 7045 |
| HITACHI | 7001 7103 7046 |
| 7047 | 7057 7058 6076 | ||
| INNOVATION | 7076 7079 7080 | 6082 | |
| 7081 6048 7082 | PANASONIC | 7003 7031 7059 | |
| 7083 7009 | PHILIPS | 7008 7016 6118 | |
| JVC | 7007 2342 7048 | 7060 7077 | |
| KENWOOD | 7005 7035 7049 | PHILIPS CD-V | 7000 6112 |
| 7050 7051 7087 | PIONEER | 7014 7020 7038 | |
| LG | 7004 7032 | 7041 6050 | |
| LIFE | 6102 | PRO2 | 7102 2343 6023 |
| LIFETEC | 7009 7102 2343 | 7039 6025 6030 | |
| 6023 7039 6025 | 7076 7079 7080 | ||
| 6030 7076 7079 | 7081 6048 7082 | ||
| 7080 7081 6048 | 7083 7092 7093 | ||
| 6102 7092 7093 | 6089 7095 7096 | ||
| 6089 7095 7096 | 7100 6098 | ||
| 7100 6098 7082 | PROTON | 7008 7077 | |
| 7083 | QUAD | 7008 7077 | |
| LINN | 7008 7077 | REALISTIC | 7001 7103 7111 |
| LUXMAN | 7115 | 6025 | |
| MAGNUM | 7009 7076 7079 | ROADSTAR | 7060 7061 |
| 7080 7081 6048 | ROTEL | 7008 7022 7077 | |
| 7082 7083 | SABA | 7001 7103 | |
| MARANTZ | 7008 7018 7021 | SAE | 7008 7077 |
| 7052 7077 | SAMSUNG | 7010 6061 | |
| MATSUI | 7008 7053 7077 | SANSUI | 7008 6118 7062 |
| MEDION | 7009 7102 6037 | 7063 7064 7077 | |
| 2343 6023 7039 | SCHNEIDER | 7008 7112 7077 | |
| 6025 6030 7076 | SCOTT | 7111 | |
| 7079 7080 7081 | SHARP | 7037 7065 7066 | |
| 6102 7082 7030 | 7067 | ||
| 7092 7093 6089 | SHERWOOD | 6073 | |
| 7095 7096 7100 | SILVERCREST | 7026 7027 7028 | |
| 6098 6048 7083 | 7029 6094 | ||
| MEMOREX | 7001 7103 7111 | SINGER | 6089 |
| 7041 | SKYMASTER | 7089 | |
| MERIDIAN | 7008 7077 | SONY | 7011 7036 7068 |
| MICROMAEGA | 7008 | 7069 7070 6047 | |
| MICROMAXX | 7009 2343 6023 | 7084 7085 7116 | |
| 7039 6025 6030 | TANDBERG | 7008 7077 | |
| 7076 7079 7080 | TCM | 7009 7023 7024 | |
| 7081 6048 7082 | 7025 7039 6025 | ||
| 7102 7092 7093 | 6030 7076 7079 | ||
| 6089 7095 7096 | 7080 7081 6048 | ||
| 7100 6098 7083 | 6130 7102 2343 | ||
| MICROMEGA | 7077 | 6023 6089 7095 | |
| MICROSTAR | 7009 2343 6023 | 7096 6102 6103 | |
| 7039 6025 6030 | 6104 7082 7083 | ||
| 7076 7079 7080 | 7092 7093 | ||
| 7081 6048 7082 | TEAC | 7012 7090 | |
| 7102 7092 7093 | TECHNICS | 7017 7059 7072 | |
| 6089 7095 7096 | 7088 7114 7117 | ||
| 7100 6098 7083 | TELEFUNKEN | 7001 7103 | |
| MISSION | 7008 7077 | TEVION | 7009 7102 2343 |
| NAD | 7036 7078 6041 | 6023 7039 6025 | |
| 6042 6043 6088 | 6030 7076 7079 | ||
| NAIM | 7008 7077 | 7080 7081 6048 | |
| NAKAMICHI | 7054 7055 | 6102 7083 7092 | |
| NUVO | 7113 | 7093 6089 7095 | |
| ONKYO | 7000 6112 7056 | 7096 7097 7098 |
| 7099 7100 6098 | |
| 7082 6101 6100 | |
| THEORIE & ANWENDING | 7094 |
| THOMSON | 7001 6114 7103 |
| TOSHIBA | 7073 7074 |
| UNIVERSUM | 7008 7077 |
| VECTOR RESEARCH | 7032 |
| VICTOR | 7007 7048 |
| VICTOR RESEARCH | 7004 |
| WELLTECH | 6131 7095 6025 |
| 6030 7081 6094 | |
| 6106 6107 | |
| YAMAHA | 7013 7065 7071 |
| 7075 6063 | |
| YORX | 7061 |
AUDIO
| Amplifier | |
| BUSH | 8000 |
| DENON | 8006 8028 80298030 8062 |
| GOODMANS | 8023 |
| GRUNDIG | 8000 |
| KENWOOD | 8012 |
| LINN | 8000 |
| MARANTZ | 8000 8005 80098024 8052 |
| MERIDIAN | 8000 |
| MICROMEGA | 8000 |
| NAIM | 8000 |
| PHILIPS | 8000 |
| PIONEER | 8000 8004 80078017 8020 8025 |
| QUAD | 8000 |
| ROTEL | 8065 |
| SILVERCREST | 8119 |
| SONY | 8001 8010 80118014 8044 |
| TEAC | 8015 8022 8027 |
| TECHNICS | 8002 8008 8016 |
| THORENS | 8000 |
| YAMAHA | 8003 8013 80188019 8021 8026 |
LCD TV/Radio Tuner Combo
| PHILIPS | 8090 |
| Receiver | |
| PIONEER | 8043 |
| YAMAHA | 8018 |
| Receiver/Amplifier | |
| YAMAHA | 8013 |
| Receiver/Tuner | |
| AIWA | 8084 8112 |
| AKAI | 8036 |
| DENON | 8062 8072 8073 |
| 8074 8076 8077 | |
| 8078 8079 8080 | |
| 8082 8083 | |
| DK DIGITAL | 8097 |
| ELTAX | 8095 |
| GOLDSTAR | 8035 |
| GOODMANS | 8036 |
| GRUNDIG | 8033 8034 8035 |
| HARMAN/KARDON | 8031 8033 |
| HITACHI | 8106 |
| JVC | 8064 8075 8098 |
| KENWOOD | 8056 8067 8109 |
| LG | 8035 8107 |
| MARANTZ | 8033 8034 8052 |
| 8070 8085 8086 | |
| 8087 8089 | |
| MICROMEGA | 8033 |
| MITSUBISHI | 8036 |
| OKANO | 8036 |
| ONKYO | 8032 8088 |
| PANASONIC | 8061 8100 8104 |
| 8105 8113 | |
| PHILIPS | 8033 8052 8060 |
| 8096 | |
| PIONEER | 8043 8045 8047 |
| 8053 8055 8066 | |
| 8092 8093 8110 | |
| REVOX | 8033 |
| ROTEL | 8065 |
| SAMSUNG | 8103 |
| SANSUI | 8033 |
| SANYO | 8034 8099 8108 |
| SHARP | 8081 |
| SONY | 8037 8039 8040 |
| 8041 8044 8046 | |
| 8058 8059 8094 | |
| 8102 | |
| TCM | 8114 8115 8116 |
| 8117 8118 | |
| TEAC | 8031 |
| TECHNICS | 8050 8051 8061 |
| THOMSON | 8057 8069 8071 |
| THORENS | 8033 |
| UNIVERSUM | 8035 8036 |
| YAMAHA | 8013 8038 8042 |
| 8048 8049 8054 | |
| 8063 8068 |
| Tuner | |
| MUSTEK | 8101 |
| PHILIPS | 8090 8091 |
| PIONEER | 8092 8093 |
| SONY | 8111 |
| YAMAHA | 8003 |
| TV/Tuner | |
| PHILIPS | 8091 |
HOME AUTO-
MATION
HOME AUTOMATION8124
LUTRON 8123
X-10 HOME 8124
AUTOMATION
LD
DENON 8120 8121
GRUNDIG 8121
MITSUBISHI 8121
NAD 8121
PIONEER 8121
TELEFUNKEN 8121
THORN 8122
- GB
- DK
- Introduction
- Copyright
- Important safety instructions
- Proper use
- Warning
- Important
- Note
- Warning of injury danger as a result of improper handling of batteries!
- Attention!
- Damage to the device
- Device summary
- i Tips:
- Initial use
- Unpacking the device/checking the package contents
- Warning!
- i Note: Transport damage
- Inserting the batteries
- Note:
- Operating components
- LCD display
- Text field 22
- Infrared symbol ②3
- Code/Time field 24
- Day of the week field 25
- Standard display:
- Buttons
- Note:
- /ALL OFF button. ②
- Device buttons ③
- "S" button ④
- Arrow buttons 5
- EXIT button 6
- P +/- buttons ⑦
- MACRO button 8
- Number buttons ⑨
- Button for one/two digit programme numbers 10
- Teletext function buttons ⑪
- Playback buttons 13
- AV button 14
- Mute switching 15
- VOL+/- buttons 16
- MENU button 17
- OK button 18
- FAV/EPG button 19
- The configuration menu
- Menu language configuration
- Code configuration
- Programming by brand code search
- Programming by manual code input
- Programming by automatic code search
- System configuration
- Setting the time
- Setting the date
- Adjust contrast
- Background Illumination
- Setting the global volume/mute switching
- Select a Tape-/Disc device for direct operation
- Setting the lock function
- System reset
- Timer configuration
- Sleep timer
- Event timer
- Delete Timer
- Learn configuration
- Code learn function
- i Note:
- Delete all programmed buttons of all devices
- Macro configuration
- To programme a Macro
- Execute a Macro
- To delete all Macros
- Favourites channel
- To programme favourites
- To access favourites
- Delete All FAV channels
- Volume control
- Vol +/-, Ⓧ(Mute switching)
- For operation
- All OFF
- Cleaning and storage
- Faults / Remedies
- Your device does not react to the URC.
- The URC is transmitting the commands incorrectly.
- The URC does not change the station on the device.
- Some buttons on the URC do not function properly.
- The URC stops reacting after a button is pressed.
- The LCD display ① shows nothing.
- Disposal
- Universal remote control
- Batteries/rechargeable batteries
- Packaging
- Technical data
- Note regarding conformity
- Importer
- Warranty & Service
- GB Service Great Britain
- IE Service Ireland
- INDHOLDSFORTEGNELSE SIDE
- Bemærk:
- Taste EXIT 6
- Taster P +/- ⑦
- Brug af makro
- i Hinweis:
- Makro ausführen
- 10-in-1 Remote Control SFB 10.1 B2
- HOME AUTO-
- MATION
- LD
Brand : SILVERCREST
Model : IAN 86342
Category : Remote control