
KH 2150 - Remote control SILVERCREST - Free user manual and instructions
Find the device manual for free KH 2150 SILVERCREST in PDF.


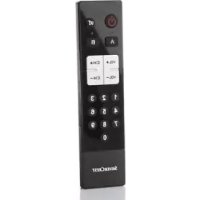
| Product type | 10-in-1 universal remote control |
| Brand | SILVERCREST |
| Model | KH 2150 |
| Dimensions (L x W x H) | 200 x 48 x 22 mm |
| Weight | 92 g |
| Power supply | 2 x 1.5 V AAA/LR03 (micro) batteries |
| Infrared frequency | >100 kHz |
| Infrared range | 8 m |
| Infrared angle | 50° |
| Laser class | Class 1 laser |
| Number of controllable devices | 10 |
| Display | Backlit LCD screen |
| Main functions | Code programming, automatic search, learning function, macros (3 x 10 commands), TV sleep timer, 4 timers, global or per-device volume control |
| Care and cleaning | Clean exterior with a slightly damp cloth and mild detergent; avoid moisture penetration |
| Safety | Do not open or repair yourself; keep batteries out of reach of children; do not dispose of batteries in fire |
| Spare parts and repairability | Not user-repairable; contact hotline in case of defect |
| General information | 3-year warranty; manufacturer: Kompernaß GmbH; importer: KOMPERNASS GMBH, Burgstrasse 21, 44867 Bochum, Germany |
Frequently Asked Questions - KH 2150 SILVERCREST
User questions about KH 2150 SILVERCREST
0 question about this device. Answer the ones you know or ask your own.
Ask a new question about this device
Download the instructions for your Remote control in PDF format for free! Find your manual KH 2150 - SILVERCREST and take your electronic device back in hand. On this page are published all the documents necessary for the use of your device. KH 2150 by SILVERCREST.
USER MANUAL KH 2150 SILVERCREST
Operating instructions
Unpacking the device / checking the package contents .....5
Inserting the batteries ....5
Operating elements 6
LCD display 6
Buttons 7
EXIT button (8) 8
SYSTEM-SETUP-System settings 10
VOL/MUTE SETUP ....11
VOL/MUTE SET 12
VOL/MUTE RESET 12
TIME-SETUP 12
DATE-SETUP 13
BACKLIGHT SETUP 14
SYSTEM-RESET 14
CODE-SETUP - Device code 15
LIST CODES 15
ENTER CODES 17
SEARCH CODES 17
BRAND CODES 19
Entering device codes for combination devices . . .20
Controlling combination devices .....20
Display device code 20
TIMER SETUP – Timer functions 21
TV SLEEP SETUP ....21
TIMER SETUP 22
LEARN-SETUP – Learning functions 24
MODE LEARN .....25
MODE CLEAR 26
ALL LEARN CLEAR 26
| MACRO-SETUP – Macro functions | 27 |
| MACRO SET | 27 |
| MACRO CLEAR | 28 |
| Maintenance and Cleaning | 29 |
| Battery maintenance | 29 |
| Cleaning the remote control | 29 |
| Disposal | 29 |
| Troubleshooting | 30 |
| Technical data | 31 |
| Manufacturer codes | 31 |
| Personal macros | 32 |
| Personal device codes | 32 |
| Conformity | 33 |
| Importer | 33 |
| Warranty and Service | 34 |
Read the operating instructions carefully before using the device for the first time and preserve these instructions for later reference. Hand over the instruction manual to whomsoever you might pass the device on to.
Safety
Proper use
Children may only operate the remote control under adult supervision.
The universal remote control can replace a maximum of ten remote controls. It can only be used for entertainment electronics with infrared receivers.
The functions of the universal remote correspond to those of the original remote controls. The universal remote control is intended for private use. It is not suitable for commercial use.
Any other use is considered improper use. The manufacturer declines to accept responsibility for damage(s) arising from improper use.
⚠️ Risk of injury through incorrect handling of batteries!
Batteries must be handled with special care. Take note of the following safety instructions:
- Take the batteries out of the battery compartment as soon as they are empty.
- Do not throw batteries into a fire. Never subject batteries to high temperatures.
- If you will not be using the device for a longer period of time, remove the batteries to prevent them from discharging.
- Explosion hazard! Non-rechargeable batteries must never be recharged.
- Do not open the batteries or short-circuit them.
- Battery acid leaking from a battery can cause inflammation of the skin. In event of contact with the skin, rinse with large amounts of water. If the liquid comes into contact with your eyes, rinse thoroughly with water, do not rub and immediately consult a doctor.
Laser
The universal remote control has an infrared diode of laser class 1. A safety system prevents the emission of hazardous laser radiation during use. To prevent eye injuries, do not modify or damage the safety system of the device.
Damage to the device
- If the device is defective, do not attempt to repair it yourself. In case of damage, contact the manufacturer or his service hotline (see Warranty section).
- If liquid escapes from the device or if the device has been otherwise damaged, it must be inspected by the manufacturer or his service hotline. Contact the manufacturer or his service hotline (see Warranty section).
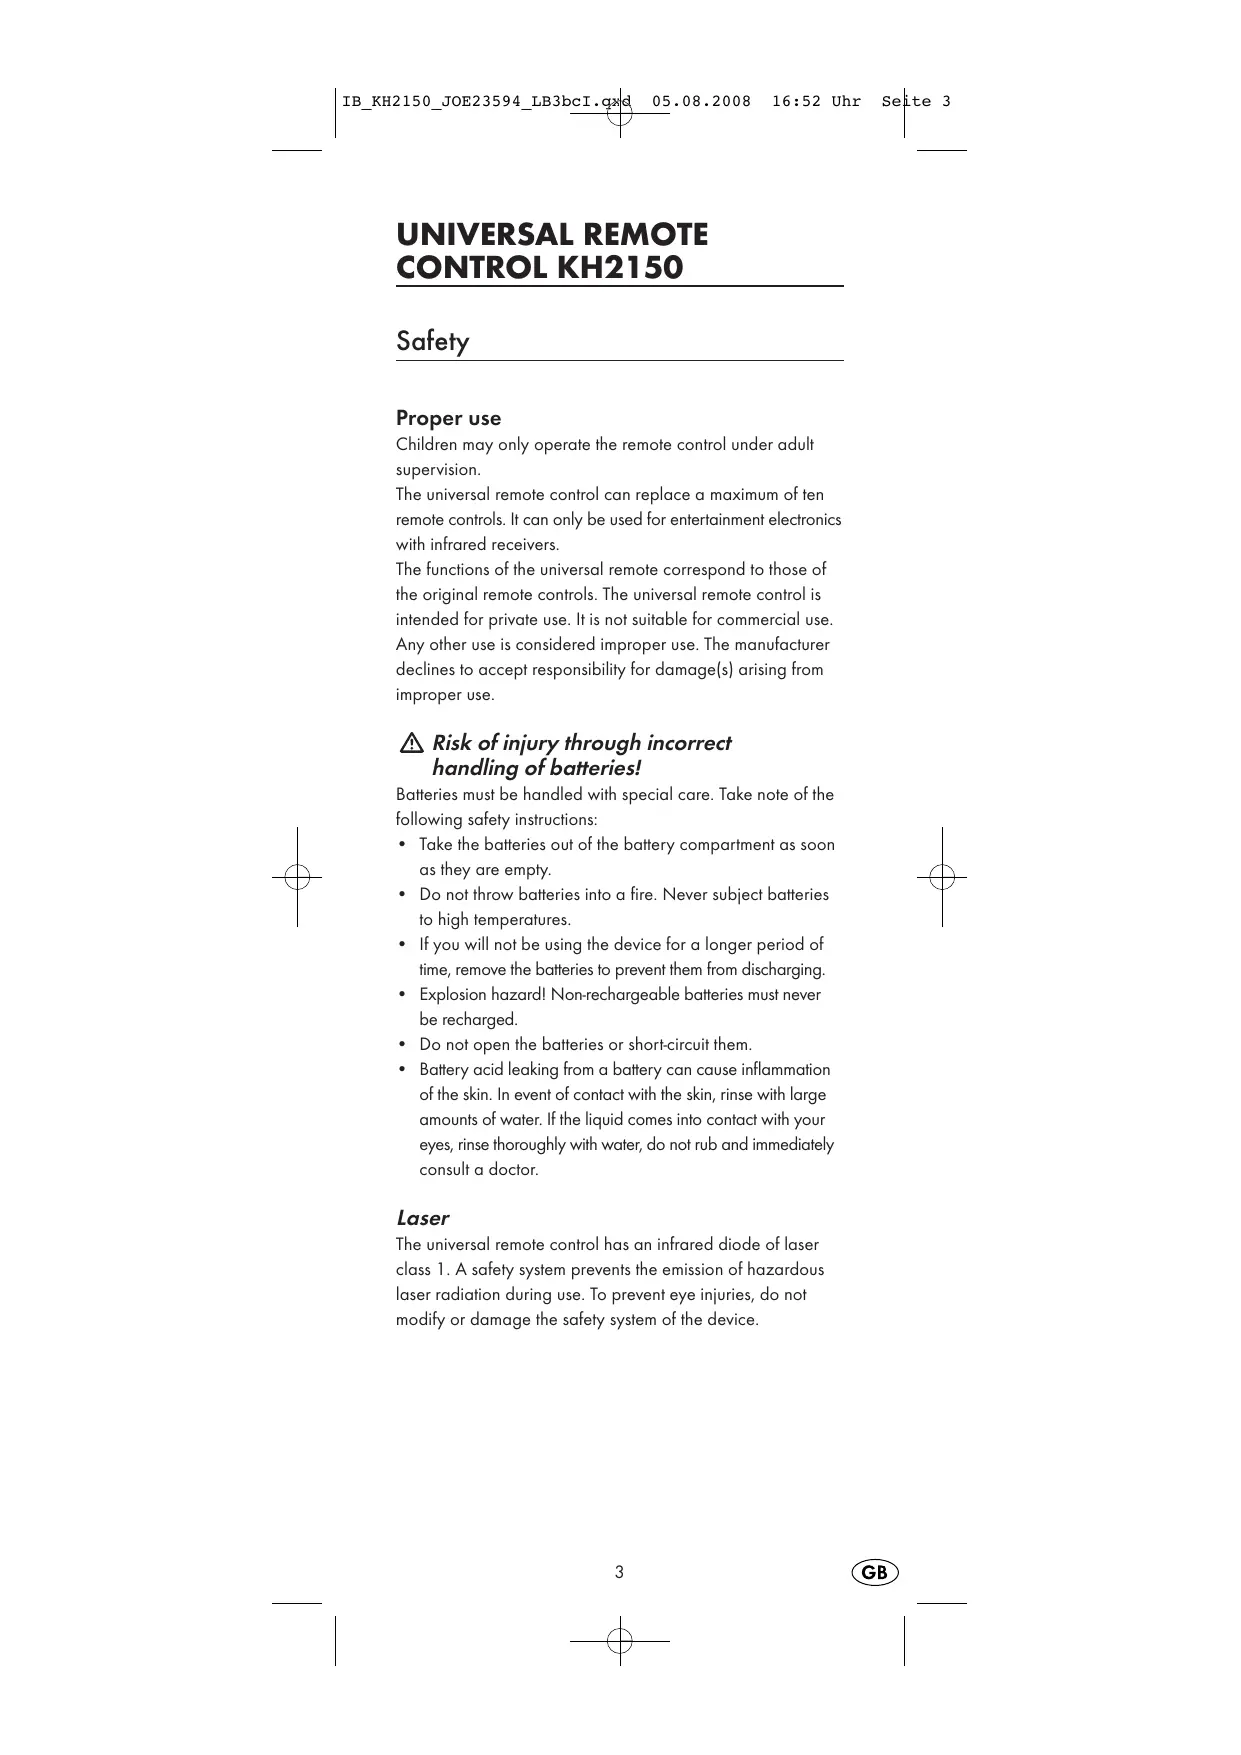
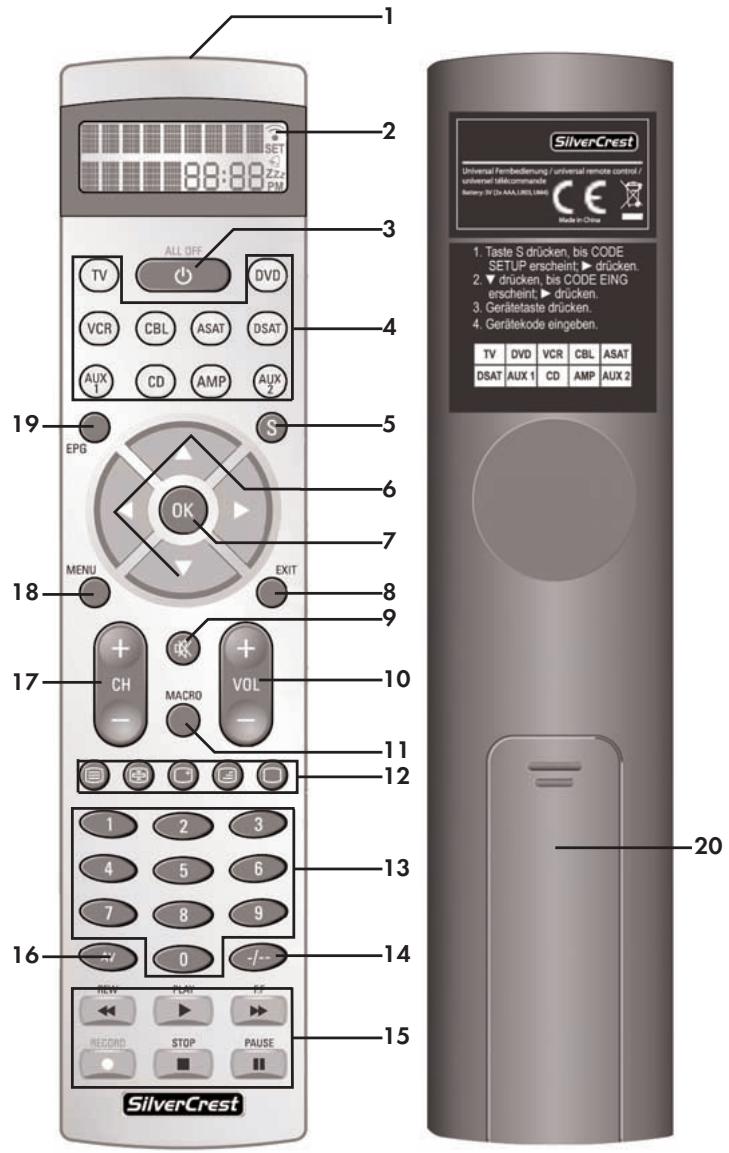
Appliance Overview
1 Infrared transmitter/receiver
2 LCD display with text field, number field and symbol field
3 ALL OFF button
4 Device buttons
5 S button
6 Arrow buttons
7 OK button
8 EXIT button
9 Speaker button
10 VOL button
11 MACRO button
12 Video text buttons
13 Number buttons
14 Button for one-/two-digit programme numbers
15 Playback buttons and function buttons
16 AV button
17 CH button
18 MENU button
19 EPG button
20 Battery compartment
Unpacking the device / checking the package contents
⚠ Attention!
Keep the plastic packaging well away from small children. There is a risk of suffocation.
- Unpack the device and accessories.
- Check the package contents
- Universal remote control
- Operating instructions
- Manufacturer list with device code list
- Remove the protective foil from the LCD display (2).
(i) Note: Transport damage
If you notice transport damage, contact customer service (see Warranty section).
Inserting the batteries
⚠ Attention!
The universal remote control may only be operated with 1.5 volt batteries.
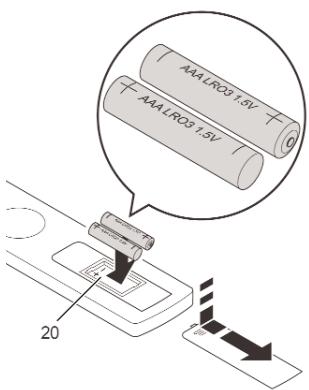
- Open the battery compartment (20) in the direction indicated by the arrow.
- Insert the batteries as shown in the figure and close the battery compartment.
The LCD display (2) is activated as long as the batteries are inserted.
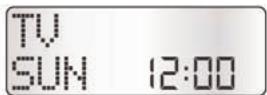
The following figure shows the LCD display (2) after the batteries have been inserted or replaced.
(i) Note:
If the LCD display (2) remains dark, check the polarity of the batteries or insert new batteries.
The LCD display (2) is explained in the section LCD display.
Operating elements
LCD display
The LCD display (2) is divided into fields.
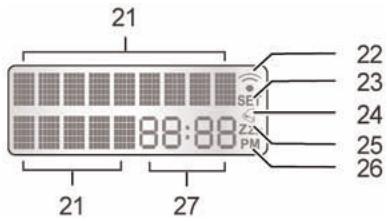
Text field (21)
The text field has two lines. The first line indicates the current device, such as DVD, TV or VCR. The second line shows the day of week information or device code.
Information in the LCD display (2) that is shown in the display on two lines is shown in these operating instructions on a single line.
Example
LCD display
Operating instructions
SYSTEM-
SYSTEM-SETUP
SETUP
Infrared symbol (22)
Every time a button is pressed, an infrared signal is sent and the infrared symbol lights up.
SET symbol (23)
The SET symbol indicates that the remote control is in setup mode and device codes can be entered, for example.
Timer symbol (24)
The Timer symbol indicates that a timer function has been configured and is active.
Zzz symbol (25)
The SLEEPTIMER function for the television is activated.
After the time elapses, the television will be switched off.
AM/PM symbol (26)
If the time is set to 12-hour format, a PM symbol is displayed in the afternoon between 12:00 and 24:00. (See section SYSTEM-SETUP - System settings).
Number field (27)
The display field for time and date information as well as the device code.
Standard display
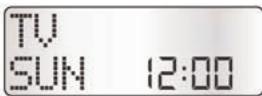
The standard display on the LCD display (2) consists of the information for the current device "TV", the day of the week "SUN" and the time "12:00".
How to change the settings for day of the week "SUN" and the time "12:00" is described in the sections DATE-SETUP and TIME-SETUP.
Lighting
The LCD display (2) lights up as soon as you press a button on the remote control. The backlight switches off automatically. The backlight time can be configured. See the section "BACKLIGHT SETUP". The default setting is ten seconds.
Buttons
ALL OFF button (3)
Switch device on/off.
Device buttons (4)
The device buttons are used to select which device should be operated. The TV button is permanently assigned, all other buttons can be freely configured.

Television

DVD player (Digital Versatile Disk)

Video recorder (Video Cassette Recorder)

Cable connection

Analogue satellite receiver

Digital satellite receiver

Auxiliary 1

CD player (Compact Disk)

Amplifier

Auxiliary 2
S button (5)

Load SETUP menu or activate SHIFT function.
Arrow buttons (6)
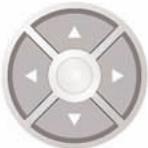
natural_image
Circular abstract design with radial arrows and a central circle (no text or symbols)Move up, right, left and down in menus.
OK button (7)

You can confirm a menu selection with the OK button.
EXIT button (8)

Leave menu.
Speaker button (9)

Switch sound on/off.
VOL button (10)
Set volume.
MACRO button (11)
MACRO

Pressing the MACRO button (11) followed by a number button (13) 1, 2 or 3 activates the saved commands.
Video text buttons (12)

Switch on video text.

Stop automatic paging forward for multi-page video texts.

Display information on the selected device.

Show video text and television programme at the same time.

Switch off video text.
Number buttons (13)


Enter programme and device code numbers.
Button for one-/two-digit programme numbers (14)

Button for one-/two-digit programme numbers. For two-digit programme numbers, first press button (14), then enter the programme number with the number buttons (13).
Playback buttons and function buttons (15)
The playback buttons REW, PLAY, F.F, RECORD, STOP and PAUSE control devices such as DVD players, VCRs and CD players. The coloured function buttons open categories in the video text selection.

REW - Rewind, video text, category red.

PLAY - Playback, video text, category yellow.

F.F. – Fast forward, video text, category blue.

RECORD - Record.
Press twice to record.

STOP - Stop playback, video text, category green.

PAUSE – Pause playback, video text, category magenta.
AV button (16)

Switch the video input (SCART).
CH button (17)
Change the television channel.
MENU button (18)
MENU

Open the menu.
EPG button (19)

Depending on the selected device, the EPG button activates the following functions:
TV/SAT
Access the electronic television programme guide.
DVD :
Access the title menu.
VCR :
Access ShowView.

Note:
Consult the operating instructions of your VCR to learn whether the "ShowView" function is supported.
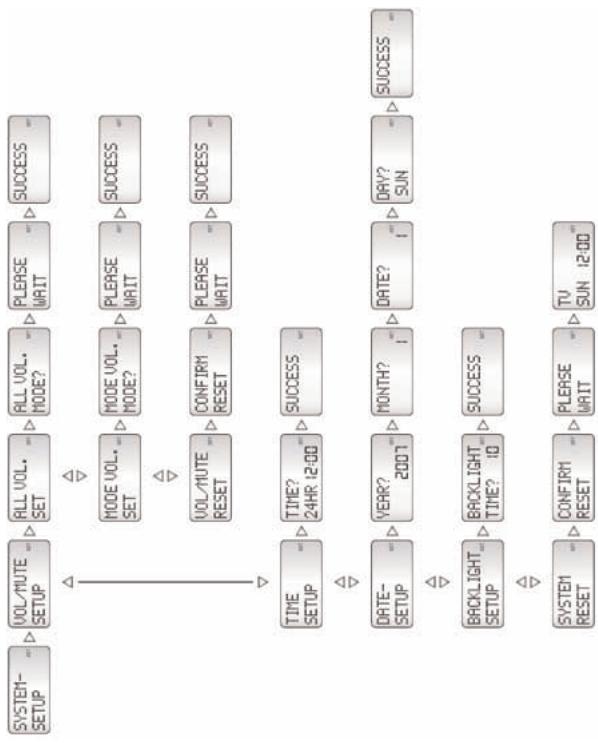
SYSTEM-SETUP-System settings
In the system settings, you can configure the following:
VOL/MUTE SETUP
Volume control via a specific device.
TIME-SETUP
Time format and setting the time.
DATE-SETUP
Setting the date, year and day of the week.
BACKLIGHT SETUP
Backlighting of the LCD display (2).
SYSTEM-RESET
Reset all settings.
flowchart
graph TD
    A["SYSTEM-SETUP"] --> B["Δ"]
    B --> C["VOLUME-TIME SETUP"]
    C --> D["Δ"]
    D --> E["TIME SETUP"]
    E --> F["Δ"]
    F --> G["BACKLIGHT TIME"]
    G --> H["Δ"]
    H --> I["DATA-SETUP"]
    I --> J["Δ"]
    J --> K["TIME? 24HR.12:00"]
    K --> L["TIME? 24HR.12:00"]
    L --> M["VOLUME-TIME RESET"]
    M --> N["VOLUME-VOLUME_SET"]
    N --> O["Δ"]
    O --> P["ALL VOL. MODE?"]
    P --> Q["Δ"]
    Q --> R["MODE VOL. MODE?"]
    R --> S["Δ"]
    S --> T["CONFIRM RESET"]
    T --> U["Δ"]
    U --> V["ORV? SUN"]
    V --> W["SUCCESS"]
    W --> X["SUCCESS"]
    X --> Y["SUCCESS"]
    Y --> Z["SUCCESS"]
    Z --> AA["SUCCESS"]
    AA --> AB["SUCCESS"]
    AB --> AC["SUCCESS"]
    AC --> AD["SUCCESS"]
    AD --> AE["SUCCESS"]
    AE --> AF["SUCCESS"]
    AF --> AG["SUCCESS"]
    AG --> AH["SUCCESS"]
    AH --> AI["SUCCESS"]
    AI --> AJ["SUCCESS"]
VOL/MUTE SETUP
All devices use their own volume control, if available.
If a video device, such as a VCR or DVD player, does not have its own volume control, the volume control of the television device is automatically used ("punch-through function").
The function VOL/MUTE SETUP allows you to set the volume control to operate through a specific device, such as the television.
- Hold the S button (5) pressed until CODE-SETUP appears in the LCD display (2).
- Press the down arrow button (6). SYSTEM-SETUP appears in the LCD display (2).
- Press the right arrow button (6). VOL/MUTE SETUP appears in the LCD display (2).
- Press the right arrow button (6). ALL VOL.SET appears in the LCD display (2).
- Press the right arrow button (6). ALL VOL. MODE? appears in the LCD display (2).
- Press the desired device button (4), such as TV. PLEASE WAIT... then SUCCESS appears in the LCD display (2). The volume for all devices is now controlled via the TV.
VOL/MUTE SET
Set the volume control for each individual device.
- Hold the S button (5) pressed until CODE-SETUP appears in the LCD display (2).
- Press the down arrow button (6). SYSTEM-SETUP appears in the LCD display (2).
- Press the right arrow button (6). VOL/MUTE SETUP appears in the LCD display.
- Press the right arrow button (6). ALL VOL.SET appears in the LCD display (2).
- Press the down arrow button (6) repeatedly until VOL/MUTE SET appears in the LCD display (2).
- Press the right arrow button (6). MODE VOL. MODE? appears in the LCD display (2).
- Press the desired device button (4), such as "DVD". PLEASE WAIT... then SUCCESS appears in the LCD display (2).
The volume is set via the selected device. Automatic switching to the volume control on the television is deactivated.
VOL/MUTE RESET
Reset all VOL/MUTE settings to the factory defaults.
- Hold the S button (5) pressed until CODE-SETUP appears in the LCD display (2).
- Press the down arrow button (6). SYSTEM-SETUP appears in the LCD display (2).
- Press the right arrow button (6). VOL/MUTE SETUP appears in the LCD display (2).
- Press the right arrow button (6). ALL VOL.SET appears in the LCD display (2).
- Press the down arrow button (6) repeatedly until VOL/MUTE RESET appears in the LCD display (2).
- Press the right arrow button (6). CONFIRM RESET appears in the LCD display (2).
- Press the right arrow button (6). First PLEASE WAIT... then SUCCESS appears in the LCD display (2).
The remote control is reset to the factory defaults of the manufacturer.
TIME-SETUP
Set the time format and the time.
(i) Note:
Press the up or down arrow button (6) for 12-hour display. All other settings are explained using 24-hour display as example.
- Hold the S button (5) pressed until CODE-SETUP appears in the LCD display (2).
- Press the down arrow button (6). SYSTEM-SETUP appears in the LCD display (2).
-
Press the right arrow button (6). VOL/ MUTE SETUP appears in the LCD display (2).
-
Press the down arrow button (6) repeatedly until TIME-SETUP appears in the LCD display (2).
-
Press the right arrow button (6). TIME? 24HR 12:00 appears in the LCD display (2). The message 24HR blinks.
(i) Note:
Press the up or down arrow button for (6) 12-hour display. All other settings are explained using 24-hour display as example.
-
Press the right arrow button (6). TIME? 24HR 12:00 appears in the LCD display(2). The hours value blinks.
-
Press the up or down arrow button (6) to set the hours.
-
Press the right arrow button (6). The minutes value blinks.
-
Press the up or down arrow button (6) to set the minutes.
-
Press the right arrow button (6). SUCCESS appears in the LCD display (2).
-
Press the EXIT button (8) repeatedly until the standard display appears in the LCD display (2).
(i) Note:
If no button is pressed for approx. 30 seconds, the message TIMEOUT appears in the LCD display (2). Then the standard display is shown automatically.
DATE-SETUP
Set the year, month, date and day of the week.
-
Hold the S button (5) pressed until CODE-SETUP appears in the LCD display (2).
-
Press the down arrow button (6). SYSTEM-SETUP appears in the LCD display (2).
-
Press the right arrow button (6). VOL/MUTE SETUP appears in the LCD display (2).
-
Press the down arrow button (6) repeatedly until DATE-SETUP appears in the LCD display (2).
-
Press the right arrow button (6). YEAR? 2006 appears in the LCD display (2). The numbers for the year blink.
-
Press the up or down arrow button (6) to set the year.
-
Press the right arrow button (6). MONTH? 1 appears in the LCD display (2). The month value blinks.
-
Press the up or down arrow button (6) to set the month.
-
Press the right arrow button (6). DATE? 1 appears in the LCD display (2). The date value blinks.
-
Press the up or down arrow button (6) to set the day.
-
Press the right arrow button (6). DAY? SUN appears in the LCD display (2). The letters for the day of the week blink.
-
Press the up or down arrow button (6) to set the day of the week.
-
Press the right arrow button (6). SUCCESS appears in the LCD display (2).
-
Press the EXIT button (8) repeatedly until the standard display appears in the LCD display (2).
(i) Note:
If no button is pressed for approx. 30 seconds, the message TIMEOUT appears in the LCD display (2). Then the standard display is shown automatically.
BACKLIGHT SETUP
Set the backlight time for the LCD display (2).
The backlight time can be changed in five second steps.
- Hold the S button (5) pressed until CODE-SETUP appears in the LCD display (2).
- Press the down arrow button (6). SYSTEM-SETUP appears in the LCD display (2).
- Press the right arrow button (6). VOL/MUTE SETUP appears in the LCD display (2).
- Press the down arrow button (6) repeatedly until BACK-LIGHT SETUP appears in the LCD display (2).
- Press the right arrow button (6). BACKLIGHT TIME 10 appears in the LCD display (2). The seconds value blinks.
- Press the up or down arrow button (6) to set the seconds.
- Press the right arrow button (6). SUCCESS appears in the LCD display (2).
- Press the EXIT button (8) repeatedly until the standard display appears in the LCD display (2).
(i) Note:
If no button is pressed for approx. 30 seconds, the message TIMEOUT appears in the LCD display (2). Then the standard display is shown automatically.
SYSTEM-RESET
The remote control can be reset to the factory defaults.
(i) Note:
All device codes, the system settings, all learned functions and macros are deleted!
-
Hold the S button (5) pressed until CODE-SETUP appears in the LCD display (2).
-
Press the down arrow button (6). SYSTEM-SETUP appears in the LCD display (2).
- Press the right arrow button (6). VOL/MUTE SETUP appears in the LCD display (2).
- Press the down arrow button (6) repeatedly until SYSTEM-RESET appears in the LCD display (2).
- Press the right arrow button (6). CONFIRM RESET appears in the LCD display (2).
- Press the right arrow button (6). PLEASE WAIT... appears in the LCD display (2). All system settings are reset to the factory defaults.
CODE-SETUP - Device code
To control a device with the remote control, a device code must be entered for every device.
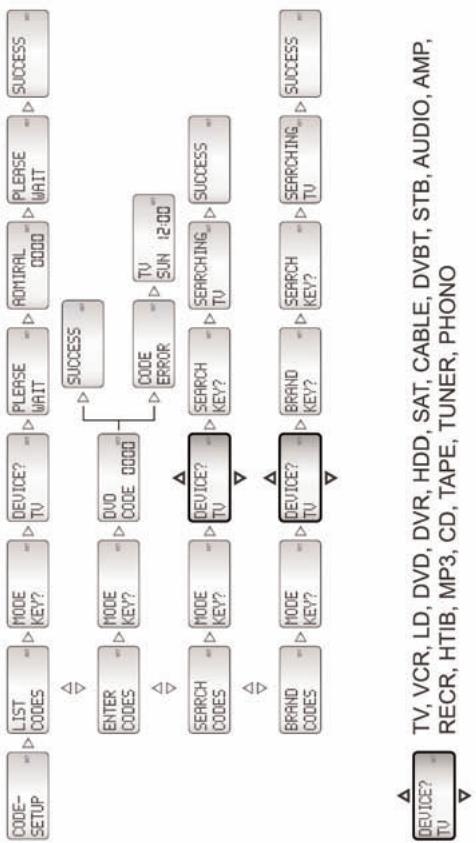
The device codes can be entered as follows:
LIST CODES From the internal device list of the remote control.
ENTER CODES From the additional manual with the device codes.
SEARCH CODES Automatically or manually search for codes.
BRAND CODES From the table of manufacturer codes.
LIST CODES
Select the device code for a device (TV, VCR, LD, DVD etc.) from the internal list on the remote control.
(i) Note:
To conclude your input, press the EXIT button (8).
- Switch on the device for which you would like to program the remote control.
- Hold the S button (5) pressed until CODE-SETUP appears in the LCD display (2).
- Press the right arrow button (6). LIST CODES appears in the LCD display (2).
- Press the right arrow button (6). MODE KEY? appears in the LCD display (2).
- Press the desired device button (4). DEVICE? TV appears in the LCD display (2).
(i) Note:
For a television, press the device button TV (4), then continue with step 7.
- Press the up or down arrow button (6). The next device appears in the LCD display (2).
flowchart
graph TD
    A["CODE-SETUP"] --> B["LIST CODES"]
    B --> C["MODE KEY?"]
    C --> D["ENTER CODES"]
    D --> E["MODE KEY?"]
    E --> F["SEARCH CODES"]
    F --> G["BRAND CODES"]
    G --> H["DEVICE? TV"]

    I["SUCCESS"] --> J["PLERSE WAIT"]
    J --> K["ADMIRAL 0000"]
    K --> L["AMIRAL 0000"]
    L --> M["PLERSE WAIT"]
    M --> N["SUCCESS"]
    N --> O["CODE ERROR"]
    O --> P["DVU CODE 0000"]

    Q["SUCCESS"] --> R["SERRCHING TV"]
    R --> S["BRAND KEY?"]
    S --> T["DEVICE? TV"]

    U["SUCCESS"] --> V["SERRCHING TV"]
    V --> W["BRAND KEY?"]

    X["DEVICE"] --> Y["TV, VCR, LD, DVD, DVR, HDD, SAT, CABLE, DVBT, STB, AUDIO, AMP, RECR, HTIB, MP3, CD, TAPE, TUNER, PHONO"]
- Confirm the selection with the OK button (7). First PLEASE WAIT... then the first entry of the manufacturer list, such as ADMIRAL 0000, appears in the LCD display (2).
- Press the up or down arrow button (6). The next manufacturer with device code appears in the LCD display (2).
- Press various buttons on the remote control to test the functions. If your device responds, you have selected the correct device code. Continue with step 12.
- Press the left or right arrow button (6). The next device code of the same manufacturer appears in the LCD display (2).
- Repeat step 9.
- Press the OK button (7). The device code is saved. First PLEASE WAIT... then SUCCESS appears in the LCD display (2).
Repeat steps 1 to 12 for all devices that you would like to control with the remote control.
ENTER CODES
With the ENTER CODES function, you locate the device code in the enclosed manual "Manufacturer List with Device Code List".
(i) Note:
To conclude your input, press the EXIT button (8).
- Switch on the device for which you would like to program the remote control.
- Hold the S button (5) pressed until CODE-SETUP appears in the LCD display (2).
- Press the right arrow button (6). LIST CODES appears in the LCD display (2).
- Press the down arrow button (6). ENTER CODES appears in the LCD display (2).
- Press the right arrow button (6). MODE KEY appears in the LCD display (2).
- Press the desired device button (4). The LCD display (2) shows CODE 0001, for example. Find the device code in the manual "Manufacturer List with Device Code List".
- Enter the device code with the number buttons (13). SUCCESS appears in the LCD display (2). If the entered device code is incorrect, the message CODE ERROR appears in the LCD display (2). Repeat steps 2 to 8.
Repeat steps 1 to 8 for all devices that you would like to operate.
SEARCH CODES
Automatic search
Automatically search for the device code within the internal list of the remote control.
(i) Note:
To conclude your input, press the EXIT button (8).
- Switch on the device for which you would like to program the remote control.
- Hold the S button (5) pressed until CODE-SETUP appears in the LCD display (2).
- Press the right arrow button (6). LIST CODES appears in the LCD display (2).
- Press the down arrow button (6) repeatedly until SEARCH CODES appears in the LCD display (2).
- Press the right arrow button (6). MODE KEY? appears in the LCD display (2).
- Press the desired device button (4). DEVICE? TV appears in the LCD display (2).
(i) Note:
For a television, press the device button TV (4), then continue with step 8.
-
Press the up or down arrow button (6). The next device appears in the LCD display (2).
-
Confirm the selection with the OK button (7). SEARCH KEY? appears in the LCD display (2).
(i) Note:
The remote control switches the device code every second and sends an infrared signal. To set the time to three seconds, press the CH button (17) twice during the next step.
- Press the CH button (17) once. SEARCHING... appears in the LCD display (2). The remote control automatically searches for the device code for your device.
(i) Note:
The remote control searches the device list in the forward direction. To change the search direction, press "Minus" on the CH button (17). To return to a forward search, press "Plus" on the CH button (17).
- As soon as your device reacts, press the OK button (7). The device code is saved. SUCCESS appears in the LCD display (2).
- Press various buttons on the remote control to check the setting. If your device only partially responds, repeat the steps with the next device code.
Manual search
Manually search for the device code within the internal list of the remote control.
(i) Note:
To conclude your input, press the EXIT button (8).
- Switch on the device for which you would like to program the remote control.
- Hold the S button (5) pressed until CODE-SETUP appears in the LCD display (2).
- Press the right arrow button (6). LIST CODES appears in the LCD display (2).
- Press the down arrow button (6) repeatedly until SEARCH CODES appears in the LCD display (2).
- Press the right arrow button (6). MODE KEY? appears on the LCD display (2).
- Press the desired device button (4). DEVICE? TV appears in the LCD display (2).
(i) Note:
For a television, press the device button TV (4), then continue with step 8.
-
Press the up or down arrow button (6). The next device appears in the LCD display (2).
-
Confirm the selection with the OK button (7). SEARCH KEY? appears on the LCD display (2).
(i) Note:
The remote control searches the device list in the forward direction. To change the search direction, press "Minus" on the CH button (17). To return to a forward search, press "Plus" on the CH button (17).
-
Press the "Plus" CH button (17) repeatedly until your device responds.
-
Press the OK button (7). The device code is saved. SUCCESS appears in the LCD display (2).
-
Press various buttons on the remote control to check the setting. If your device only partially responds, repeat the steps with the next device code.
BRAND CODES
Select a manufacturer code from the "Manufacturer codes" table. The table can be found at the end of the operating instructions.
(i) Note:
To conclude your input, press the EXIT button (8).
- Switch on the device for which you would like to program the remote control.
- Hold the S button (5) pressed until CODE-SETUP appears in the LCD display (2).
- Press the right arrow button (6). LIST CODES appears in the LCD display (2).
- Press the down arrow button (6) repeatedly until BRAND CODES appears in the LCD display (2).
- Press the right arrow button (6). MODE KEY? appears in the LCD display (2).
- Press the desired device button (4). DEVICE? TV appears in the LCD display (2).
(i) Note:
For a television, press the device button TV (4), then continue with step 8.
- Press the up or down arrow button (6). The next device in the list is displayed.
(i) Note:
All entries in the device list can be found in the overview graphic.
- Confirm the selection with the OK button (7).
BRAND CODES? appears in the LCD display (2).
-
Search for the manufacturer code in the "Manufacturer codes" table in the appendix to these operating instructions.
-
Enter the manufacturer code with the number buttons (13). SEARCH KEY? appears in the LCD display (2).
-
Press the CH button (17) until the device responds. SEARCH... appears in the LCD display (2).
i Note:
To change the search direction, press "Minus" on the CH button (17).
-
Press the OK button (7). The device code is saved. SUCCESS appears in the LCD display (2).
-
Press various buttons on the remote control to test the functions. If your device only partially responds, repeat steps 1 to 11 with a different manufacturer code from the table.
Repeat steps 1 to 11 for all devices that you would like to operate.
Entering device codes for combination devices
For combination devices, such as television/VCR or DVD/VCR, it is necessary to enter a device code for each device type.
Controlling combination devices
Some combination devices, such as TV/VCR or DVD/VCR, have separate device buttons on the original remote control.
- Press device button (4) DVD. The DVD signal is sent.
- Press the S button (5). DVD (S) DATE 1: 1 appears in the LCD display (2).
- Press device button (4) DVD. The VCR signal is sent.
(i) Note:
Not all devices support switching between two devices with the S button (5).
Display device code
The current device code for each device can be displayed.
- Press and hold the device button (4). The LCD display (2) shows DVD CODE 0768, for example.
(i) Note:
Note the identified device code in the table "Personal device codes" at the end of these operating instructions.
Program the automatic switch-off function SLEEPTIMER and the automatic switch-on function "TIMER".
See the graphic "TIMER-SETUP overview".
TV SLEEP SETUP
The SLEEPTIMER function automatically switches off the television after the configured time has elapsed. The SLEEPTIMER function can be set between 1 and 90 minutes.
TV SLEEP SET
Programming the SLEEPTIMER function.
- Switch on the television.
- Hold the S button (5) pressed until CODE-SETUP appears in the LCD display (2).
- Press the down arrow button (6) repeatedly until TIMER-SETUP appears in the LCD display (2).
- Press the right arrow button (6). TV SLEEP SETUP appears in the LCD display (2).
TIMER-SETUP overview
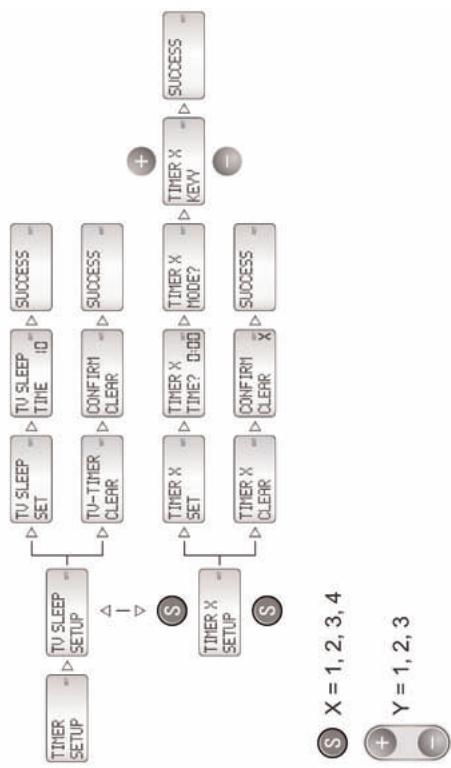
flowchart
graph TD
    A["Success"] --> B["+"]
    B --> C["TIMER X KEVV"]
    C --> D["+"]
    D --> E["TU SLEEP TIME ID"]
    E --> F["CONFIRM CLEAR"]
    F --> G["TIMER X MODE?"]
    G --> H["+"]
    H --> I["TU SLEEP SET"]
    I --> J["TU-TIMER CLEAR"]
    J --> K["TIMER X SET"]
    K --> L["TIMER X CLEAR"]
    L --> M["TU SLEEP SETUP"]
    M --> N["TIMER X SETUP"]
    N --> O["S"]
    O --> P["X = 1, 2, 3, 4"]
    P --> Q["Y = 1, 2, 3"]
- Press the right arrow button (6). TV-SLEEP SET appears in the LCD display (2).
- Press the right arrow button (6). TV SLEEP TIME? appears in the LCD display (2). The minutes value blinks.
(i) Note:
Select a value between 1 and 90 minutes.
- Press the up or down arrow button (6) to set the minutes.
- Press the right arrow button (6). SUCCESS and the Zzz symbol (25) appear in the LCD display (2).
- Point the remote control at the television. After the configured number of minutes elapse, the remote control will switch off the television.
- Press the EXIT button (8) repeatedly until the standard display appears in the LCD display (2).
(i) Note:
If no button is pressed for approx. 30 seconds, the message "TIMEOUT" appears in the LCD display (2). Then the standard display is shown automatically.
TV SLEEP CLEAR
Switching off the SLEEPTIMER function for the television.
- Hold the S button (5) pressed until CODE-SETUP appears in the LCD display (2).
- Press the down arrow button (6) repeatedly until TIMER-SETUP appears in the LCD display (2).
- Press the right arrow button (6). TV SLEEP SET appears in the LCD display (2).
- Press the right arrow button (6). TV SLEEP CLEAR appears in the LCD display (2).
- Press the right arrow button (6). CONFIRM CLEAR appears in the LCD display (2).
- Press the right arrow button (6). SUCCESS appears in the LCD display (2).
- Press the EXIT button (8) repeatedly until the standard display appears in the LCD display (2).
(i) Note:
If no button is pressed for approx. 30 seconds, the message "TIMEOUT" appears in the LCD display (2). Then the standard display is shown automatically.
TIMER SETUP
(i) Note:
If a timer is already programmed, this must be cleared. See the section "TIMER X CLEAR".
The remote control can be programmed with four timers.
Each timer can switch on one device.
Each timer can be programmed with up to three buttons in sequence.
TIMER X SET
Programming TIMER X. The "X" is a placeholder and stands for 1, 2, 3 or 4.
All settings are described using TIMER 1 as an example.
- Hold the S button (5) pressed until CODE-SETUP appears in the LCD display (2).
- Press the down arrow button (6) repeatedly until TIMER-SETUP appears in the LCD display (2).
- Press the right arrow button (6). TV SLEEP SETUP appears in the LCD display (2).
- Press the down arrow button (6) until TIMER 1 SETUP appears in the LCD display (2).
- Press the right arrow button (6). TIMER 1 SET appears in the LCD display (2).
- Press the right arrow button (6). TIMER 1 TIME? 0:00 appears in the LCD display (2). The hours value blinks.
- Press the up or down arrow button (6) to set the hours.
- Press the right arrow button (6). The minutes value blinks.
- Press the up or down arrow button (6) to set the minutes.
- Press the right arrow button (6). TIMER 1 MODE? appears in the LCD display (2).
- Press the desired device button (4). TIMER 1 KEY 1 appears in the LCD display (2).
(i) Note:
To save fewer than three buttons, press the OK button (7).
- Press the desired buttons. The messages TIMER 1 KEY2, TIMER 1 KEY3, SUCCESS, and then CODE-SETUP appear in sequence on the LCD display (2).
- Press EXIT (8) repeatedly until the device, day of the week and time appear in the LCD display (2). The timer symbol (24) also appears.
- Point the remote control at the configured device. After the time elapses, the remote control switches the device on and executes the saved button sequence.
TIMER X CLEAR
Switching off programmed TIMER X. The "X" stands for 1, 2, 3 or 4.
- Hold the S button (5) pressed until CODE-SETUP appears in the LCD display (2).
- Press the down arrow button (6) repeatedly until TIMER-SETUP appears in the LCD display (2).
- Press the right arrow button (6). TV SLEEP SETUP appears in the LCD display (2).
-
Press the down arrow button (6). TIMER 1 SETUP appears in the LCD display (2).
-
Press the down arrow button (6) repeatedly until the desired TIMER appears in the LCD display (2).
- Press the right arrow button (6). CONFIRM CLEAR appears in the LCD display (2).
- Press the right arrow button (6). First SUCCESS then CODE SETUP appears in the LCD display (2).
- Press the EXIT button (8) repeatedly until the standard display appears in the LCD display (2).
(i) Note:
If no button is pressed for approx. 30 seconds, the message "TIMEOUT" appears in the LCD display (2). Then the standard display is shown automatically.
LEARN-SETUP - Learning functions
The universal remote control can learn the button signals of an original remote control. Take note of the following points:
- The learning function can learn a maximum of 150 button signals.
- Use new batteries for the universal remote control and the original remote control.
- Maintain a distance of at least one metre to other light sources. The light sources could disrupt the infrared transmission.
- You can extend the configured device codes using the learning function.
- Place the universal remote control and the original remote control on a flat surface at a distance between 15 and 50 mm. See the graphic "Remote control spacing".
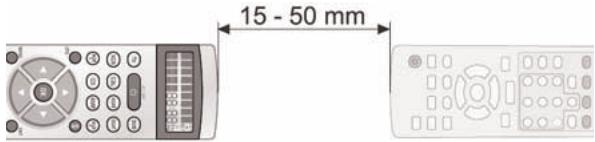
Remote control spacing
The "LEARN SETUP" menu offers the following functions:
MODE LEARN - Learn buttons for a device.
MODE CLEAR - Clear learned buttons for a device.
ALL LEARN CLEAR - Clear learned buttons for all devices.
LEARN SETUP overview
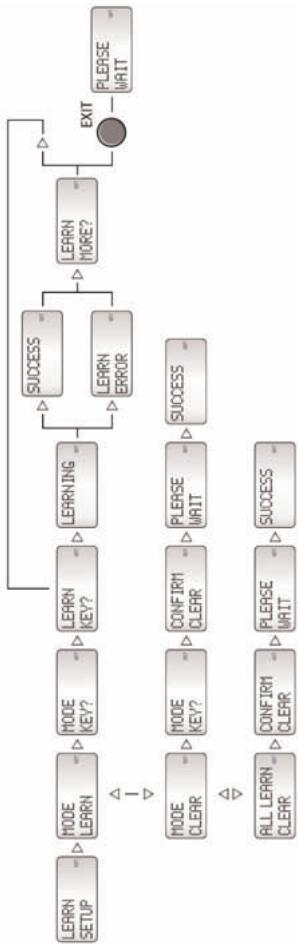
flowchart
graph TD
    A["PLEASE WAIT"] --> B["EXIT"]
    B --> C["LEERN MORE?"]
    C --> D["SUCCESS"]
    C --> E["LERRN ERROR"]
    D --> F["LEERNING"]
    E --> G["SUCCESS"]
    F --> H["LEERN KEY?"]
    G --> I["PLEASE WAIT"]
    H --> J["MODE KEY?"]
    I --> K["CONFIRM CLEAR"]
    J --> L["MODE KEY?"]
    K --> M["ALL LERRN CLEAR"]
    L --> N["ALL LERRN CLEAR"]
    M --> O["ALL LERRN CLEAR"]
    P["LEERN SETUP"] --> Q["MODE LERRN"]
    Q --> R["MODE LERRN"]
    R --> S["MODE LERRN"]
    S --> T["MODE LERRN"]
    T --> U["MODE LERRN"]
    U --> V["MODE LERRN"]
    V --> W["MODE LERRN"]
    W --> X["MODE LERRN"]
    X --> Y["MODE LERRN"]
    Y --> Z["MODE LERRN"]
    Z --> AA["MODE LERRN"]
    AA --> AB["MODE LERRN"]
    AB --> AC["MODE LERRN"]
    AC --> AD["MODE LERRN"]
    AD --> AE["MODE LERRN"]
    AE --> AF["MODE LERRN"]
    AF --> AG["MODE LERRN"]
    AG --> AH["MODE LERRN"]
    AH --> AI["MODE LERRN"]
    AI --> AJ["MODE LERRN"]
    AJ --> AK["MODE LERRN"]
    AK --> AL["MODE LERRN"]
    AL --> AM["MODE LERRN"]
    AM --> AN["MODE LERRN"]
    AN --> AO["MODE LERRN"]
    AO --> AP["MODE LERRN"]
    AP --> AQ["MODE LERRN"]
    AQ --> AR["MODE LERRN"]
    AR --> AS["MODE LERRN"]
    AS --> AT["MODE LERRN"]
    AT --> AU["MODE LERRN"]
    AU --> AV["MODE LERRN"]
    AV --> AW["MODE LERRN"]
    AW --> AX["MODE LERRN"]
    AX --> AY["MODE LERRN"]
MODE LEARN
i Note:
Execute "ALL LEARN CLEAR" before executing "MODE LEARN" for the first time. See section "ALL LEARN CLEAR".
Learning the button signals of an original remote control.
- Hold the S button (5) pressed until CODE-SETUP appears in the LCD display (2).
- Press the down arrow button (6) repeatedly until LEARN-SETUP appears in the LCD display (2).
- Press the right arrow button (6). MODE LEARN appears in the LCD display (2).
- Press the right arrow button (6). MODE KEY appears in the LCD display (2).
- Press the desired device button (4). LEARN KEY appears on the LCD display (2).
- Press the desired button on the universal remote control. For example, the playback button (14) PLAY. LEARNING appears in the LCD display (2).
(i) Note:
If "LEARN ERROR" appears in the LCD display (2), repeat the learning function process starting from step 5.
- Hold the button on the original remote control pressed until first SUCCESS then LEARN MORE? appears in the LCD display (2).
(i) Note:
To end the learning function, press the EXIT button (8).
- Press the right arrow button (6) to learn more buttons. LEARN MORE? appears in the LCD display (2).
Repeat steps 5 to 7 to learn more buttons.
MODE CLEAR
Clearing the learned buttons of a device.
- Hold the S button (5) pressed until CODE-SETUP appears in the LCD display (2).
- Press the down arrow button (6) repeatedly until LEARN-SETUP appears in the LCD display (2).
- Press the right arrow button (6). MODE LEARN appears on the LCD display (2).
- Press the down arrow button (6) repeatedly until MODE CLEAR appears in the LCD display (2).
- Press the right arrow button (6). MODE KEY? appears in the LCD display (2).
- Press the desired device button (4). CONFIRM CLEAR appears in the LCD display (2).
- Press the right arrow button (6). First PLEASE WAIT... then SUCCESS appears in the LCD display (2).
ALL LEARN CLEAR
Clearing the learned buttons of all devices.
- Hold the S button (5) pressed until CODE-SETUP appears in the LCD display (2).
- Press the down arrow button (6) repeatedly until LEARN-SETUP appears in the LCD display (2).
- Press the right arrow button (6). MODE LEARN appears in the LCD display (2).
- Press the down arrow button (6) repeatedly until ALL LEARN CLEAR appears in the LCD display (2).
- Press the right arrow button (6). CONFIRM CLEAR appears in the LCD display (2).
- Press the right arrow button (6). First PLEASE WAIT... then SUCCESS appears in the LCD display (2).
Then the standard display appears.
With the macro function, you can save a sequence of button presses. The saved macro can be loaded with the MACRO button (11) and the number buttons (13) 1, 2 or 3. The saved button sequence is executed automatically.
An example of a button sequence would be:
- Switch on television.
- Change television channel.
- Switch on VCR.
- Record programme.
The macro function an store three different macros. Each macro can contain a maximum sequence of ten buttons.
MACRO-SETUP overview
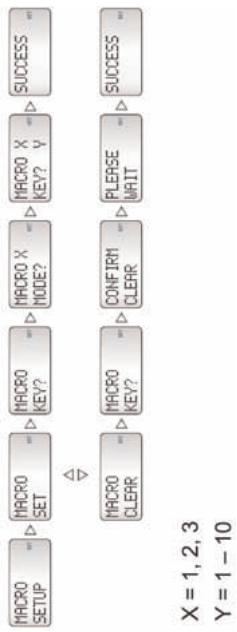
flowchart
graph TD
    A["MACRO SETUP"] --> B["MACRO SET"]
    B --> C["MACRO KEY?"]
    C --> D["MACRO X MODE?"]
    D --> E["MACRO X KEY?"]
    E --> F["MACRO CLEAR"]
    F --> G["MACRO Key?"]
    G --> H["MACRO CLEAR"]
    H --> I["CONFRIRM CLEAR"]
    I --> J["PLERSE WAIT"]
    J --> K["SUCCESS"]
    K --> L["SUCCESS"]
MACRO SET
Programming and saving a macro.
- Hold the S button (5) pressed until CODE-SETUP appears in the LCD display (2).
- Press the down arrow button (6) repeatedly until MACROSETUP appears in the LCD display (2).
- Press the right arrow button (6). MACRO SET appears in the LCD display (2).
- Press the right arrow button (6). MACRO KEY? appears in the LCD display (2).
- Press the number button (13) 1, 2 or 3. The LCD display (2) shows MACRO 1 MOD.?, for example.
- Press the desired device button (4). MACRO 1 KEY! 02 appears in the LCD display (2).
(i) Note:
After the tenth button press, the macro is automatically saved.
To save the macro at an earlier point, press the button MACRO (11).
- Press the desired button sequence. With each button press, the counter goes up by one: MACRO1 KEY? 03, MACRO 1 KEY? 04 etc. After the tenth button press, the macro is saved and SUCCESS appears in the LCD display (2).
(i) Note:
Note the programmed macros in the table "Personal macros" at the end of these operating instructions.
Playing back a saved macro
(i) Note:
The remote control must remain pointed at the device.
- Press the MACRO button (11). MACRO KEY? appears in the LCD display (2).
(i) Note:
If no macro is saved under 1, for example, MACRO 1 VOID appears in the LCD display (2).
- Press the number button (13) 1, 2 or 3. The LCD display (2) shows MACRO 1, for example. The infrared symbol (22) blinks and the saved button sequence is sent.
MACRO CLEAR
Clearing a saved macro.
- Hold the S button (5) pressed until CODE-SETUP appears in the LCD display (2).
- Press the down arrow button (6) repeatedly until MACRO SETUP appears in the LCD display (2).
- Press the right arrow button (6). MACRO SET appears in the LCD display (2).
- Press the down arrow button (6). MACRO CLEAR appears in the LCD display (2).
- Press the right arrow button (6). MACRO KEY? appears in the LCD display (2).
- Press the number button (13) 1, 2 or 3. CONFIRM CLEAR appears in the LCD display (2).
- Press the right arrow button (6). First PLEASE WAIT... then SUCCESS appears in the LCD display (2).
Battery maintenance
Memory function
The device codes and learned buttons are retained during a battery change.
The following are immediately deleted:
Time information and the lighting time for the backlight of the LCD display (2).
These settings must be entered again after a battery change.
Change the batteries...
- once per year.
- when the LCD display (2) is difficult to read.
- when the remote control does not react to button presses.
Cleaning the remote control

Warning!
If moisture enters into the device, the remote control could be irreparably damaged!
Clean the housing and buttons of the remote control only with a slightly damp cloth and a mild cleanser. Ensure that no moisture enters the remote control during cleaning!
Disposal

Do not dispose of the device in your normal domestic waste. This product is subject to the European directive 2002/96/EC.
Dispose of the device through an approved disposal centre or at your community waste facility.
Observe the currently applicable regulations. In case of doubt, please contact your waste disposal centre.
Disposal of batteries
Used batteries/rechargeable batteries may not be disposed of in household waste. Every consumer is legally obliged to dispose of batteries at a collection site of his community/city district or at a retail store.
The purpose of this obligation is to ensure that batteries are disposed of in a non-polluting manner. Only dispose of batteries when they are fully discharged.

Dispose of all packaging materials in an environmentally friendly manner.
| Problem | Possible cause | Solution |
| Universal remote control does not respond | Device (e.g. TV) is defective. | Check functioning of the device (e.g. TV) with the original remote control. |
| Batteries are inserted incorrectly. | Insert the batteries into the battery compartment with the correct polarity. | |
| Batteries are empty. | Insert new batteries. | |
| Device codes are not saved. | Batteries are empty. | Insert new batteries. |
| LCD display (2) is dim. | Batteries are empty. | Insert new batteries. |
| Device only partially reacts to a button press. | Device code is incorrect. | Enter a different device code of the manufacturer. |
| Searching for the device code with the AUTOSEARCH function. | ||
| Buttons of an original remote control cannot be learned. | The distance between the remote controls is too large or too small. | Change the distance. |
| The button on the original remote control is not functioning. | Check functioning of the original button. Does the device respond to pressing the button on the original remote control? | |
| Manufacturer: | Kompernaß GmbH | |
| Device type: | 10-in-1 universal remote control | |
| Model: | KH 2150 | |
| Controllable devices | 10 | |
| Dimensions L x W x H: | 200 x 48 x 22 mm | |
| Weight : | 92 g | |
| Infrared transmitter frequency: | >100 kHz | |
| Range: | 8 m | |
| Angle: | 50° | |
| Laser: | Laser class 1 | |
| Power supply | ||
| Battery: | 2 x 1.5 V, type AAA/LR03 (micro) | |
Manufacturer codes
One manufacturer code applies to multiple manufacturers. For example, enter the code 3 for a Sharp device.
| Button | Manufacturer |
| 1 | Medion, Tchibo |
| 2 | Eye, Philco, Philips, Pye, Radiola |
| 3 | Akai, Daewoo, JVC, Panasonic, Sharp, Sony, Toshiba |
| 4 | Brandt, Fergusson, Thomson |
| 5 | Nordmende, Saba, Telefunken |
| 6 | Blaupunkt, Grundig |
Personal macros
| Steps | Macro button | ||
| 1 | 2 | 3 | |
| 1 | |||
| 2 | |||
| 3 | |||
| 4 | |||
| 5 | |||
| 6 | |||
| 7 | |||
| 8 | |||
| 9 | |||
| 10 | |||
Personal device codes
| Button | Device | Device code |
| TV | ||
| DVD | ||
| VCR | ||
| CBL | ||
| ASAT | ||
| DSAT | ||
| AUX 1 | ||
| CD | ||
| AMP | ||
| AUX 2 |
Conformity
The first party placing the product KH 2150 and all its accessories on the market and bearing responsibility in accordance with the German Equipment and Product Safety Act (GPSG) as well as for compliance with the directives on use of the CE mark is:
KOMPERNASS GMBH
BURGSTRASSE 21
44867 BOCHUM, GERMANY
The conformity declaration can be requested from the first party placing the product on the market.
Importer
KOMPERNASS GMBH
BURGSTRASSE 21
44867 BOCHUM, GERMANY
www.kompernass.com
You receive a 3-year warranty for this device as of the purchase date. Should you have grounds for complaint in spite of our high quality standards, please contact our Service Hotline. In the event that processing of your complaint is not possible by telephone here you will receive
• a processing number (RMA number) as well as
- an address, to which you can send your product for warranty processing.
In the case of a mail-in shipment, please enclose a copy of the purchase receipt (sales slip). The device must be securely packed and the RMA number clearly visible. Products sent in without the RMA number cannot be processed.
(i) Note:
The warranty provisions cover only material or factory defects.
The warranty is not valid;
- for worn out parts
- damage to breakable parts like switches or rechargeable batteries.
This product is for private use only and is not intended for commercial use. In the event of misuse and improper handling, use of force and manipulations not carried out by our authorised service centre, the warranty will become void.
Your statutory warranty claims are not restricted by this warranty.
Sender, please write clearly:
Last name
First name
Street
Zipcode/City
Country
Telephone
Date/Signature
SilverCrest
UNIVERSAL REMOTE CONTROL KH 2150
In order to guarantee a cost free repair procedure please get in touch with the service hotline. Make sure you have your sales slip handy.
www.mysilvercrest.de
Warranty
GB DES Ltd
Tel.: 0870/787-6177
Fax: 0870/787-6168
e-mail: support.uk@kompernass.com
IE Irish Connection
Tel: 00353 (0) 87 99 62 077
Fax: 00353 18398056
e-mail: support.ie@kompernass.com
Description of fault:
- Operating elements 6
- SYSTEM-SETUP-System settings 10
- CODE-SETUP - Device code 15
- TIMER SETUP – Timer functions 21
- LEARN-SETUP – Learning functions 24
- Safety
- Proper use
- ⚠️ Risk of injury through incorrect handling of batteries!
- Laser
- Damage to the device
- Appliance Overview
- Unpacking the device / checking the package contents
- ⚠ Attention!
- Note: Transport damage
- Inserting the batteries
- Note:
- Operating elements
- LCD display
- Text field (21)
- Infrared symbol (22)
- SET symbol (23)
- Timer symbol (24)
- Zzz symbol (25)
- AM/PM symbol (26)
- Number field (27)
- Standard display
- Lighting
- Buttons
- ALL OFF button (3)
- Device buttons (4)
- S button (5)
- Arrow buttons (6)
- OK button (7)
- EXIT button (8)
- Speaker button (9)
- VOL button (10)
- MACRO button (11)
- Video text buttons (12)
- Number buttons (13)
- Button for one-/two-digit programme numbers (14)
- Playback buttons and function buttons (15)
- AV button (16)
- MENU button (18)
- EPG button (19)
- Note:
- SYSTEM-SETUP-System settings
- VOL/MUTE SETUP
- VOL/MUTE SET
- VOL/MUTE RESET
- TIME-SETUP
- DATE-SETUP
- BACKLIGHT SETUP
- SYSTEM-RESET
- CODE-SETUP - Device code
- LIST CODES
- ENTER CODES
- SEARCH CODES
- Automatic search
- Manual search
- BRAND CODES
- i Note:
- Entering device codes for combination devices
- Controlling combination devices
- Display device code
- TV SLEEP SETUP
- TV SLEEP SET
- TV SLEEP CLEAR
- TIMER SETUP
- TIMER X SET
- TIMER X CLEAR
- LEARN-SETUP - Learning functions
- LEARN SETUP overview
- MODE LEARN
- MODE CLEAR
- ALL LEARN CLEAR
- MACRO SET
- Playing back a saved macro
- MACRO CLEAR
- Battery maintenance
- Memory function
- Cleaning the remote control
- Warning!
- Disposal
- Do not dispose of the device in your normal domestic waste. This product is subject to the European directive 2002/96/EC.
- Disposal of batteries
- Manufacturer codes
- Conformity
- Importer
- SilverCrest
- Warranty
- Description of fault:
Brand : SILVERCREST
Model : KH 2150
Category : Remote control