
Quattor 7 - Tablet Overmax - Free user manual and instructions
Find the device manual for free Quattor 7 Overmax in PDF.


| Product Type | Tablet |
| Model | Quattor 7 |
| Brand | Overmax |
| Display Size | 7 inches |
| Operating System | Android |
| Processor | Quad-core 1.3 GHz |
| RAM | 1 GB |
| Storage | 8 GB internal, microSD up to 32 GB |
| Battery Capacity | 3000 mAh |
| Connectivity | Wi-Fi 802.11 b/g/n, Bluetooth 4.0 |
| Cameras | Rear 2 MP, Front 0.3 MP |
| Dimensions | 191 x 108 x 10 mm |
| Weight | 300 g |
| Power Supply | 5V/2A via micro USB |
| Main Functions | Web browsing, multimedia playback, apps, e-reading, games |
| Maintenance & Cleaning | Wipe with a soft, dry cloth; avoid liquids |
| Safety Precautions | Do not expose to water or extreme temperatures |
| Spare Parts & Repairability | Battery and screen can be replaced by authorized service |
| General Information | Supported languages: multiple, including English, French, Spanish |
Frequently Asked Questions - Quattor 7 Overmax
User questions about Quattor 7 Overmax
0 question about this device. Answer the ones you know or ask your own.
Ask a new question about this device
Download the instructions for your Tablet in PDF format for free! Find your manual Quattor 7 - Overmax and take your electronic device back in hand. On this page are published all the documents necessary for the use of your device. Quattor 7 by Overmax.
USER MANUAL Quattor 7 Overmax
natural_image
Black tablet with blue abstract geometric design on screen (no text or symbols)Instrukcja obstugi
User Manual
PL / EN / CZ / SK / RO / HU
OVERMAX
Your electronic world
Drodzy użytkownicy:
2. W
Aby
7-2 Kliknij
Turn on USB storage
Aplikacje
Play mode – Tryb odtwarzania
First of all, thank you for giving us the opportunity to serve you!
Before using this product, please read the instructions carefully.
This "manual" is intended to introduce you the basic characteristics of this product, in order to help you using it at the best way. This manual describes the product's features and information in details, as well as recommendations and attentions to help you fully understand the technical characteristics of the product.
In the annex provided with the product, you will find "warranty card", which indicates the effectiveness of the relevant provisions of maintenance, as well as additional services provided to users, please read it carefully in order to avoid unnecessary problems. The product has powerful functions and high performance, it will greatly improve your enjoy and satisfaction online.
Special note:
All the information in this manual is correct at time of publication. However, as we continue to update and improve the product, so the software on your device may be described slightly different in appearance and functions.
(We reserve the right to improve products, specifications and designs are subject to change without notice!)
Prompt
... Do not disassemble the product; do not use alcohol, thinner or benzene to clean the surface of the product, if there is any problem, please contact us.
... The product should be charged more than 12 hours in the first three times.
... Do not put the product in a place with high temperature, humidity or dust; do not put the product in a vehicle with windows closed especially in summer.
... To avoid dropping or strong impact to the product, do not let the touch screen be shaken violently, otherwise, it may cause damage to the touch screen or display incorrectly.
... Please select the appropriate volume, volume should not be too high when using earphones, if you feel tinnitus, please turn down the volume or stop using the product.
... Please charge the product in the following cases:
A. The battery icon shows no power.
B. The system is automatically shut down, reboot it will be shut down again soon. (Low battery, the system will be automatically shut down)
C. No response when press keys.
Note: Please use the attached adapter to charge the machine, it can not be charged by any other rechargers; otherwise the machine may be burned.
... Please do not suddenly disconnect the machine when it has been formatting or uploading and downloading in progress, otherwise it may cause a program error.
... After improperly shutdown, the machine will scan and repair the disk when reboot, the interface may stay a long time in the progress.
... For memory loss caused by product damage, repair or other reasons, the company is not responsible; please properly use the product by following the manual.
... Does not use the product in places prohibit the use of electronic device, for example, on an aircraft.
... Please do not use the product when driving or walking in a street, otherwise it may cause a car accident.
... USB is used for data transmission only, can't charge.
... This machine has no water resistance.
1. Appearance Introduction
This chapter describes the appearance of the machine, including buttons and ports; it will guide you to understand the features and accessories.
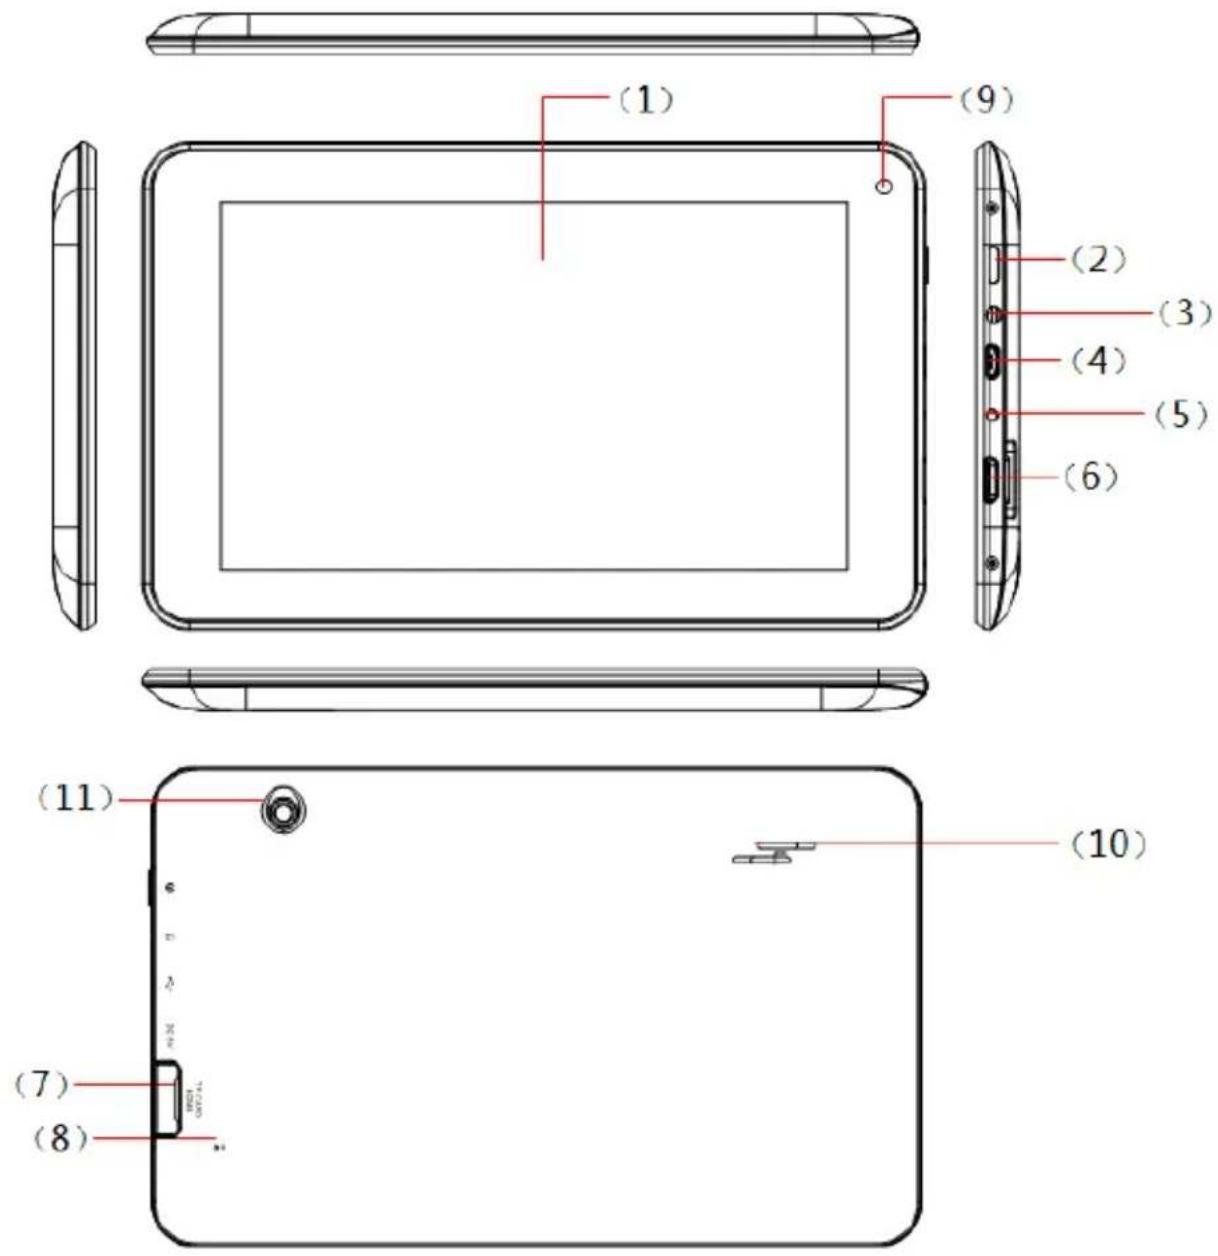
(7) TF card slot
(8) Reset
(9) Front Camera
(10) Speakers
(11) Rear Camera
Appearance Preview
Note: (1) The LCD is a touch screen; you can carry out clicking and dragging operations in the touch area; please do not use pen, pencil or other sharp objects to click on the screen to avoid scratching.
(2) Please keep the speakers clean to avoid the dirt blocking the hole and affect the sound.
(3) The back of the MID has antenna and model, please do not cover with metal objects to avoid weak signal.
2. TF card
When plug a TF card, please do follow the icon on the machine, pay attention to the direction of oblique angle.
(When remove the card, press the card with your thumb and release, the card will be automatically ejected.)
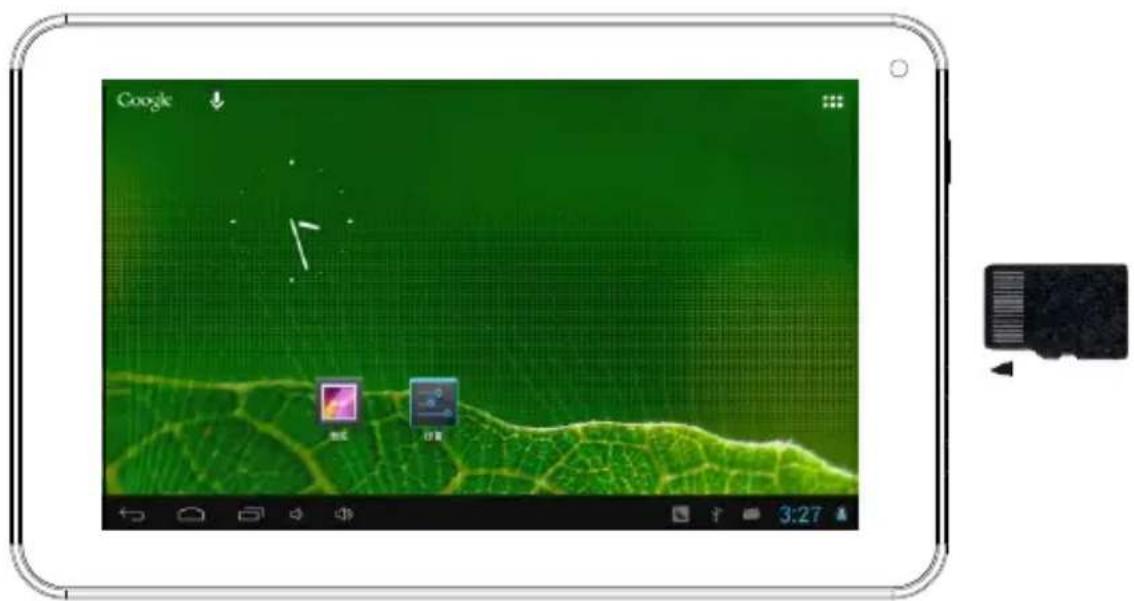
Note: (1) Do not let objects come into the card slot. (In order to prevent the harm of dust or moisture, please put cards back into box or package when don't be used)
(2) When remove a TF card, be sure that the machine is power off.
(3) To remove a TF card with the machine is working, please don't pull out the TF card indirectly.
3. Charge
This product uses 5V/2A standard voltage, Please use the attached power charger, other chargers may cause failure and risk.
Do not use the charger in humid environment. If your hands and feet are wet, please do not touch the charger.
When using the charger or charging the product, please maintain good ventilation, do not
cover the machine with paper or other items resulting in reduced cooling effect.
First experience
The MID can achieve a variety of operating modes: (1) Clicking. (2) Holding. (3) Sliding. (4) Dragging. (5) Rotating.
Keys action definition: (1) Short press: the time is less than 1.2 seconds. (2) Long press: the time is longer than 3 seconds. There are all short presses in this manual without special instructions.
360 degree rotation: for most interfaces or images, it can automatically rotate the screen from horizontal into vertical as long as rotate the MID.
1. Boot the MID
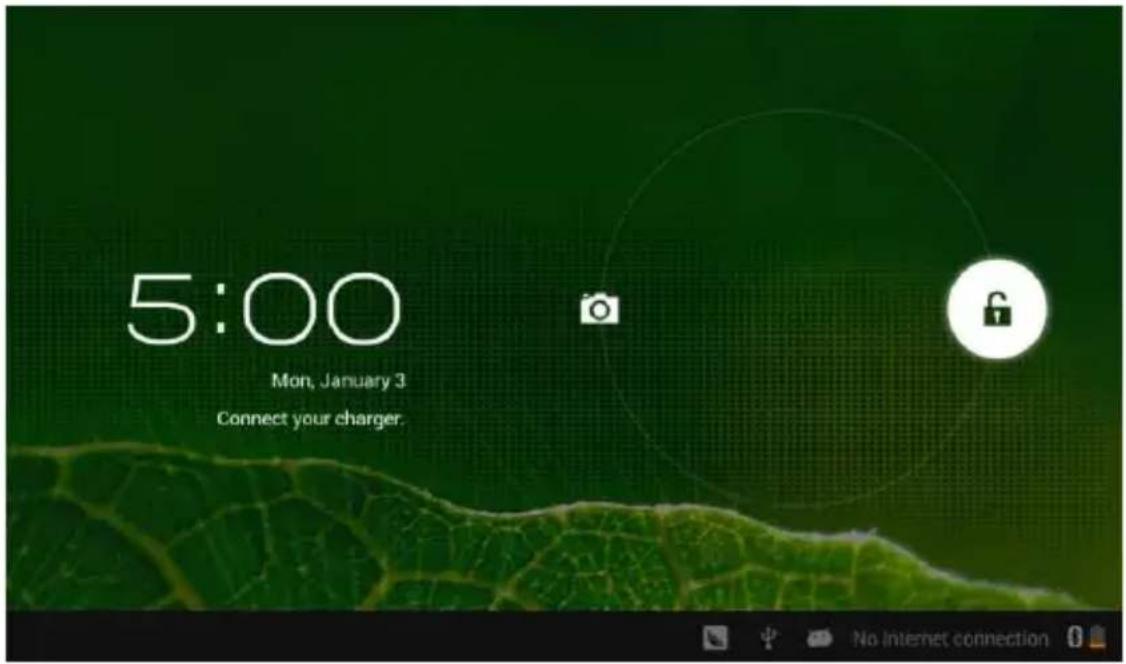
1-1. Press the power switch key at the side of the machine (long press), the machine will be booted. The LCD screen will display booting screen and animation first, a few seconds later, it will enter into the Lock screen interface, shown as below.
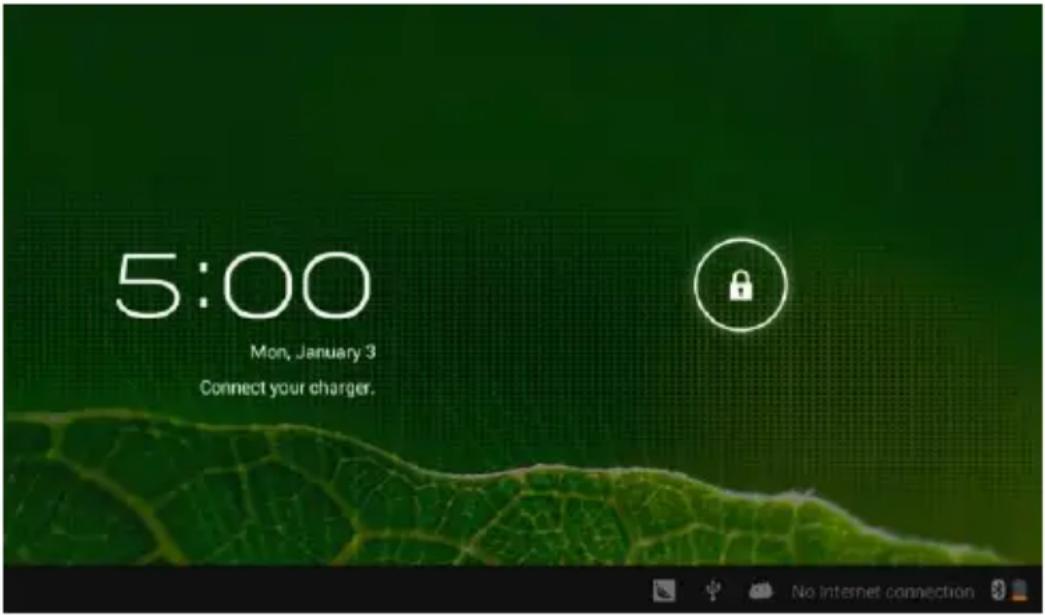
1-2. Holding unlock button, there will be a white wire frame around. Drag unlock button to the right unlock icon, then unfasten to enter into the main interfuse menu.
2. Shutdown
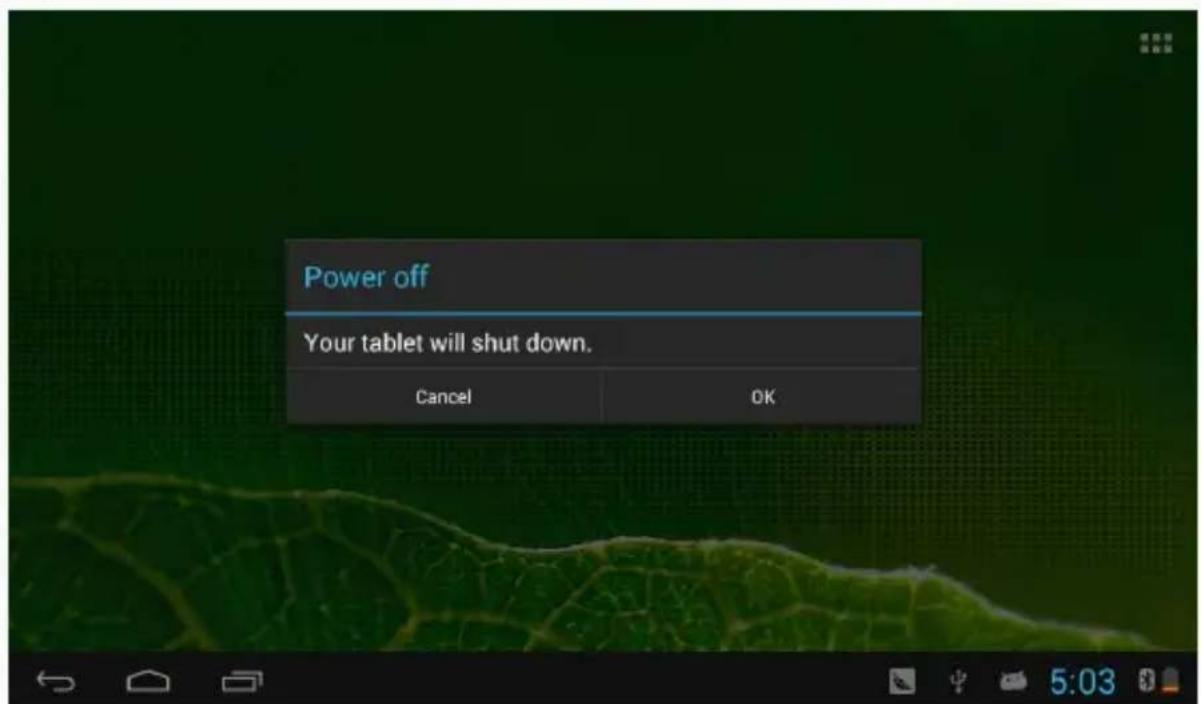
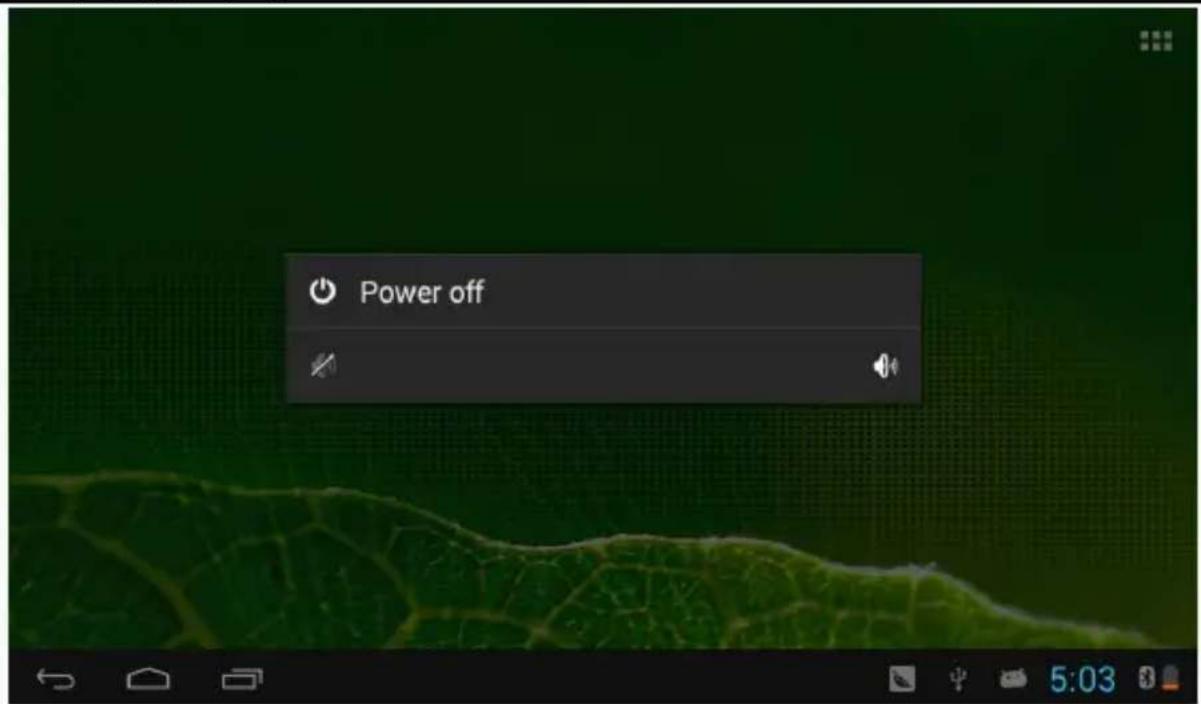
When the MID is running, press the power switch key (long press), the system will display the shutdown screen.
First experience
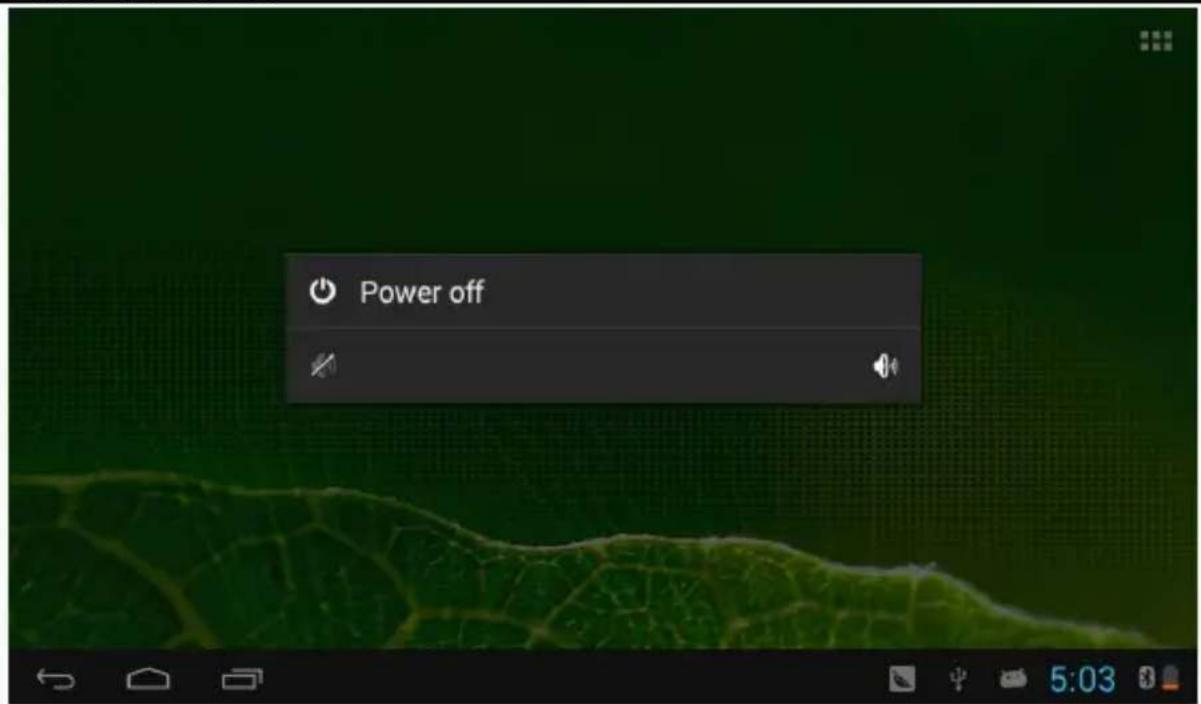
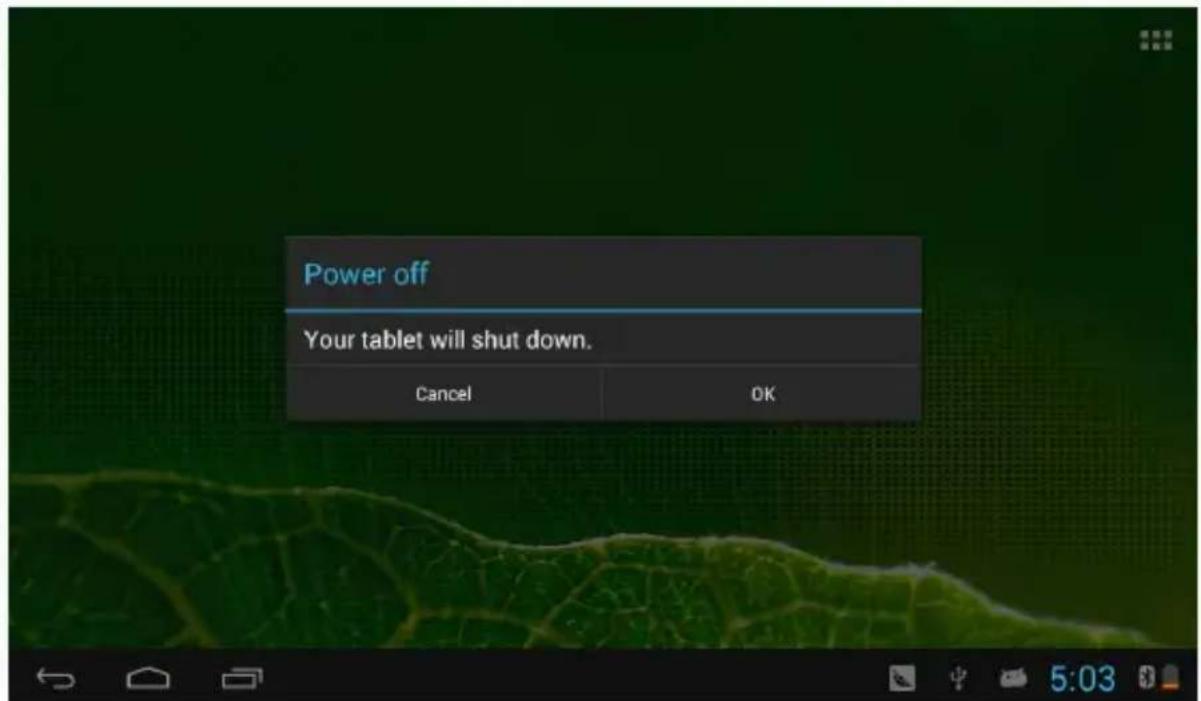
Click the "Power off" into the following screen.
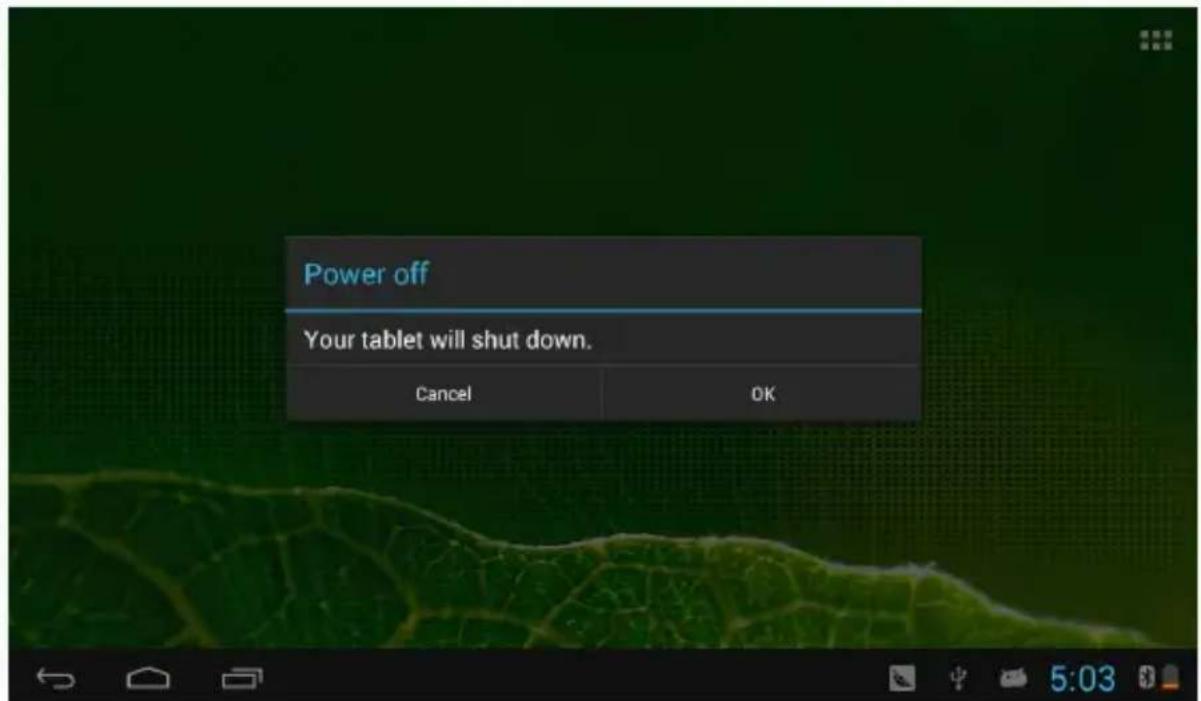
Click the "OK" options, the MID will enter the shutting down status, in a few seconds the machine will shutdown.
* * * When electricity to 15%, the system will prompt charge. When battery is running low, the system will automatically shut down.
3. Lock-screen and power-saving mode
When the machine is on, press the power switch or the screen is inactivity a certain time, the MID will enter into screen-off / lock-screen status for power saving.
Now the programs are still running, but the screen is blank.
When press the power switch again, MID will open the unlock menu.
Hold and drag unlock button to the right unlock icon, the MID will resume normal state.
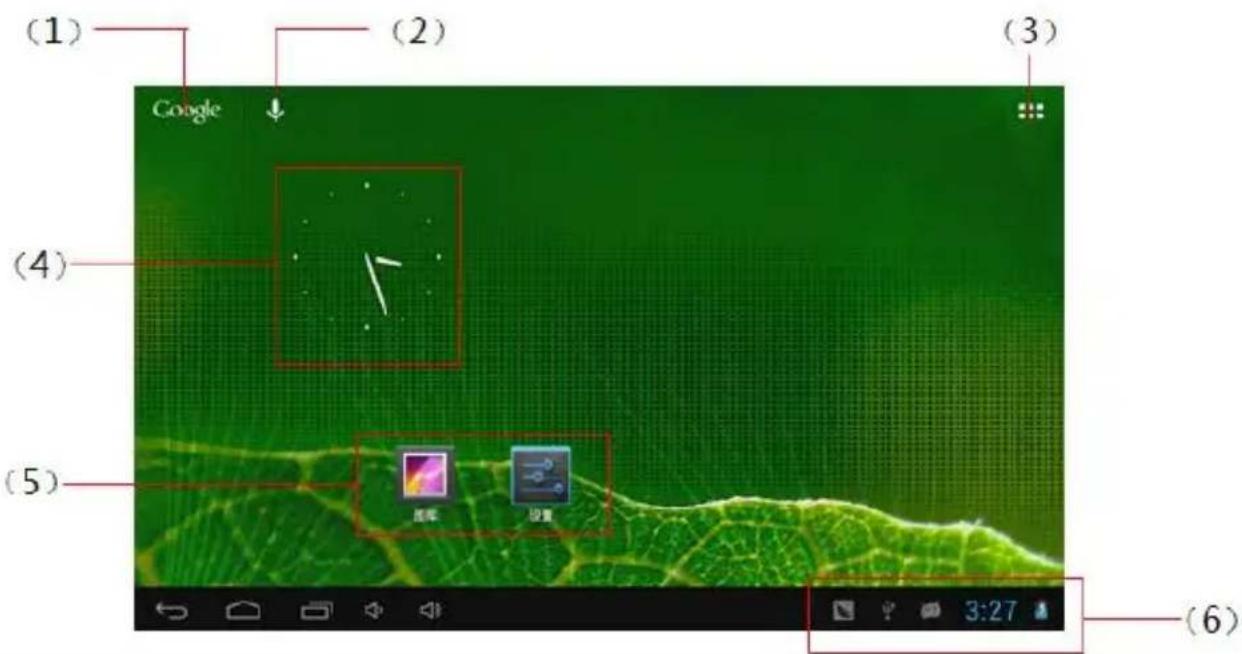
4. Main interface description
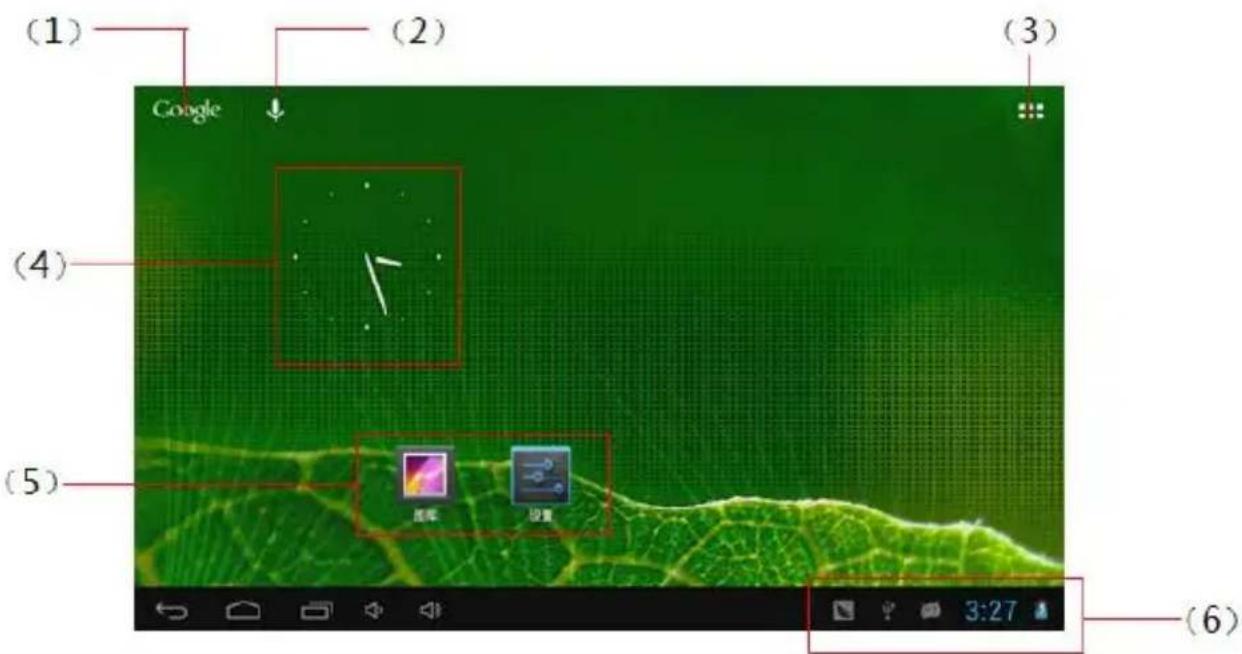
| (1) | Under the system has used a correct network, click to enter into the Text search menu. Input a key word and search. |
| (2) | Under the system has used a correct network, click to enter into the voice search menu. Aim straight the MIC and say a key word. |
| (3) | Click to enter into the applications menu. |
| (4) | Shortcut icon add/delete will be covered later. |
| (5) | Widgets add/delete will be covered later. |
  | In pop-up menu, press it to cancel operation.In the other menu, press it to back the front menu.In any menu, press it to back the main interface. |
 | Click to display all APPS programs that have been opened.Click each of the application to enter into its relevant menu. |
 | In any menu, press it to adjust the volume. |
| (6) | Click to display more information: USB, WIFI, Date etc.Click each item to enter into its setting menu. |
First experience
In the main interface, the system sets 5 display menus. You can browse them freely
through sliding screen from left and right.
**You can add/delete different icons in each the main menu.
5. Custom Screen
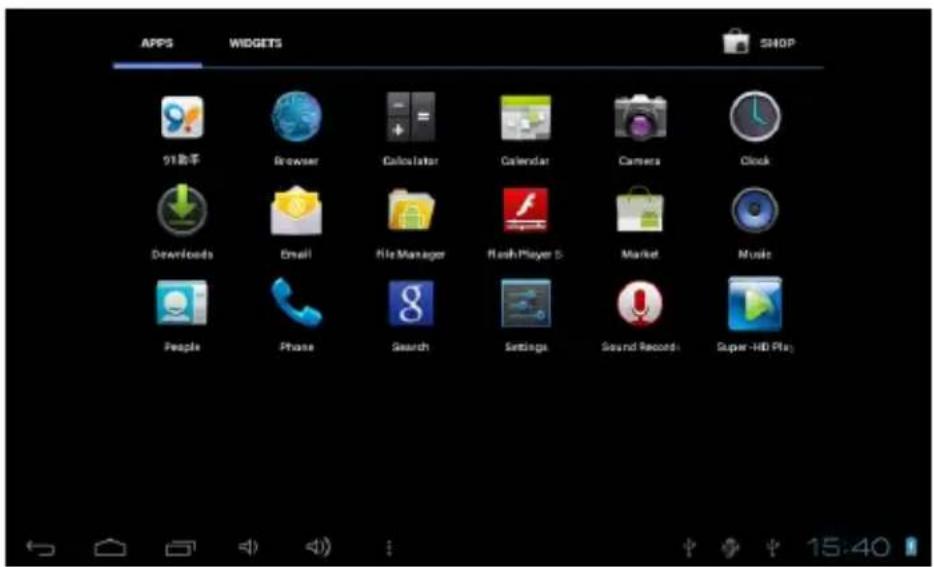
5-1 Add shortcut
5-1-1 In the main interface, click button to open Application Program menu.
5-1-2 Press and hold the icon, will open the add □□□t interface.
5-1-3 Move the icon to the place you want to place, the program will add shortcut to the main interface.
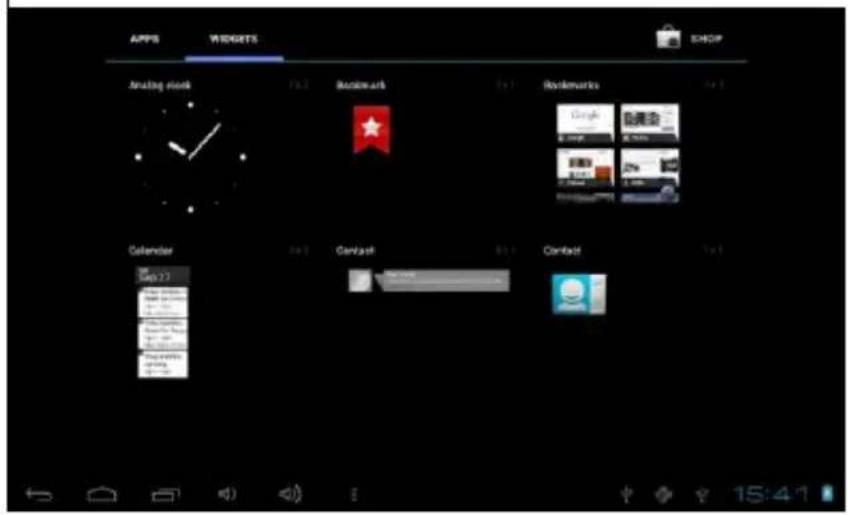
5-2 Add widgets
5-2-1 In the main interface, click button to open Application Program menu.
5-2-2 Press the "WIDGETS" options to open the w interface.
5-2-3 Press and hold the icon, will open the add widget interface.
5-2-4 Move the icon to the place you want to place, the widget will add to the main interface.
5-3 Delete shortcut/widgets
5-3-1 In the main interface, press and hold the shortcut icon and Widgets until the

5-3-3 Loosen the icon, it will be deleted.
First experience
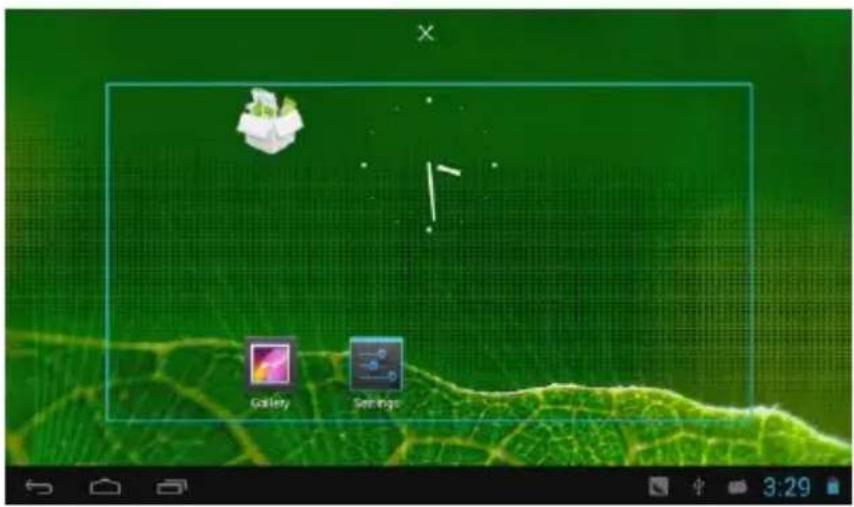
*** In the main interface, users can click and drag any shortcut icon and Widgets to the place to achieve personalized arrangement.
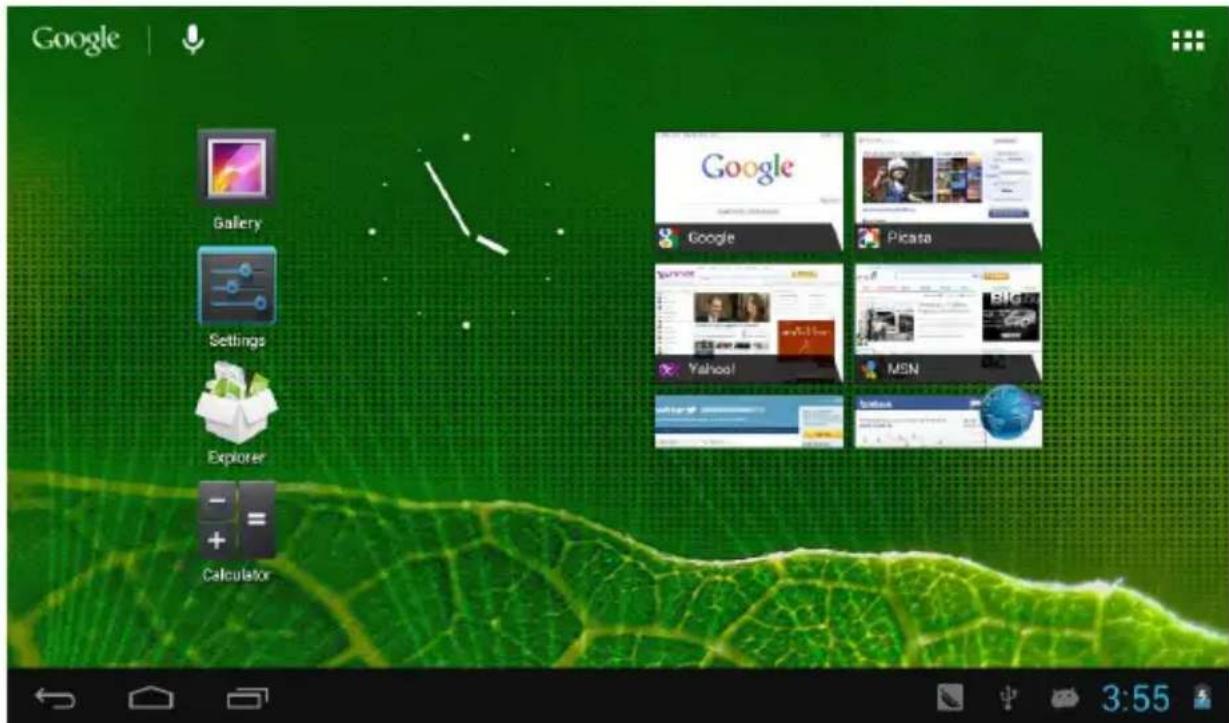
6. Change your wallpaper
In order to decorate personalized main interface, users can set their favorite pictures, photos ... as wallpaper of the main interface.
6-1 Press and holding touch screen in the main interface, the machine will pop-up
the wall paper dialog box.
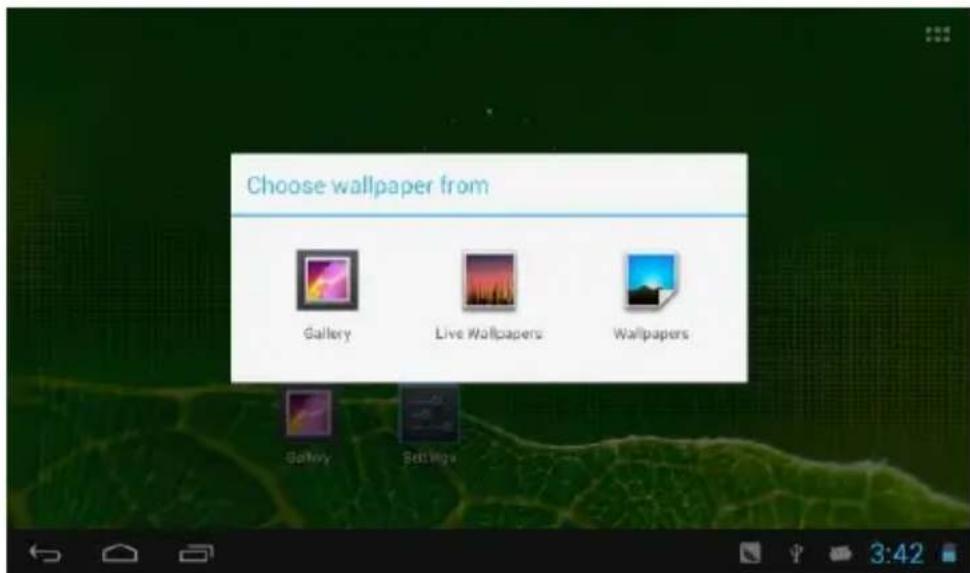
6-2 Select one item, for example: click "Wallpaper" options to enter its sub menu.
6-3 Slide the screen, browse and select the appropriate picture.
6-4 Clicking Set wallpaper , MID will return to the settings interface and display selected wallpaper.
First experience
7. Connection of USB cable.
When connect the MID to computer with a USB cable,
icon will be
displayed in the information column of the main interface.
7-1 Click in the information column of the main interface, the machine
will open the following interface.
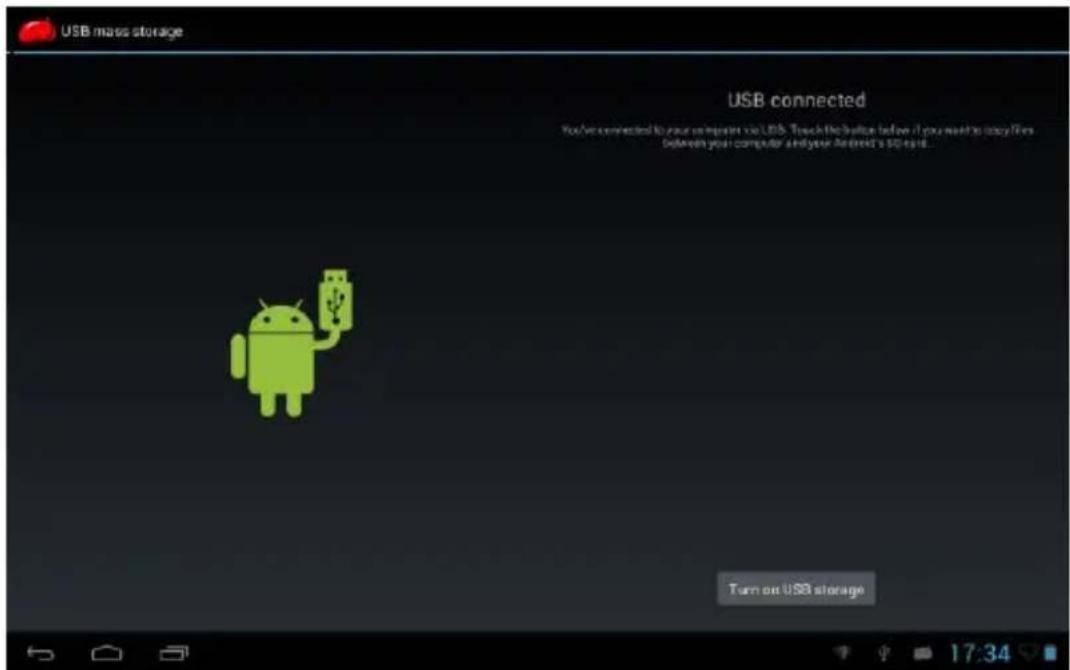
7-2 Click Turn on USB storage it can realize synchronized operation between MID and computer.
7-3 At this time, files in TF card and memory of MID will be displayed on the computer; you can copy and transfer the data.
System setting
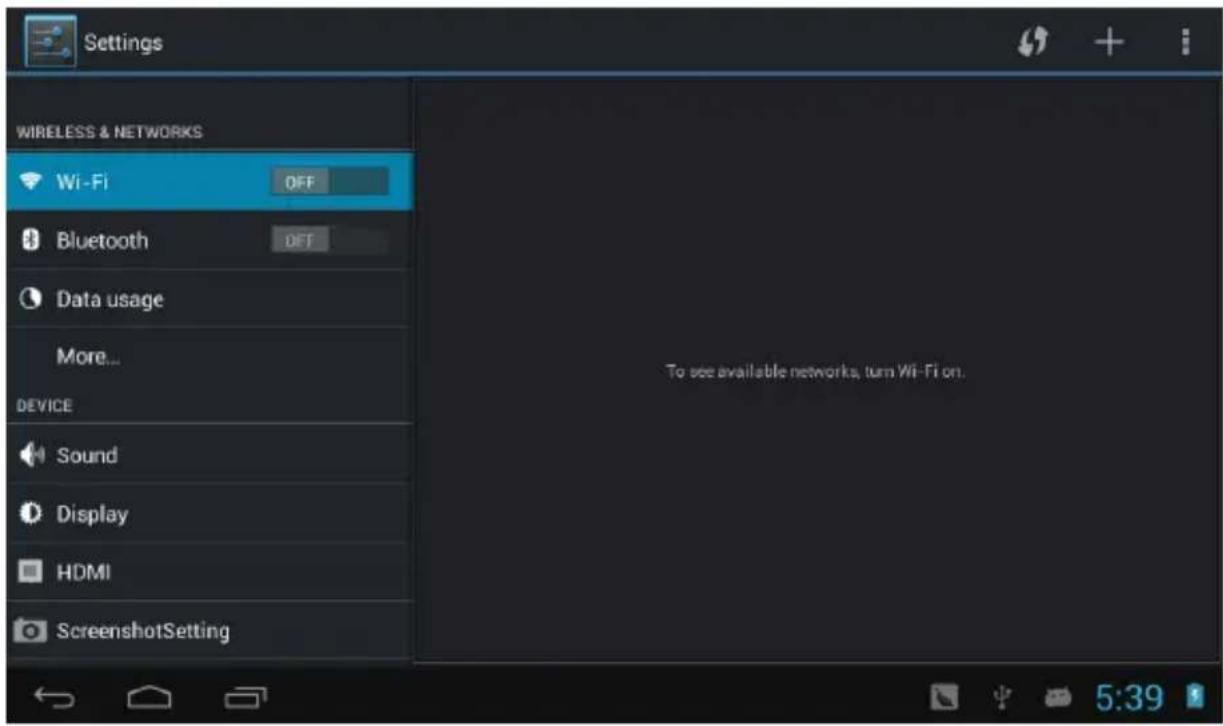
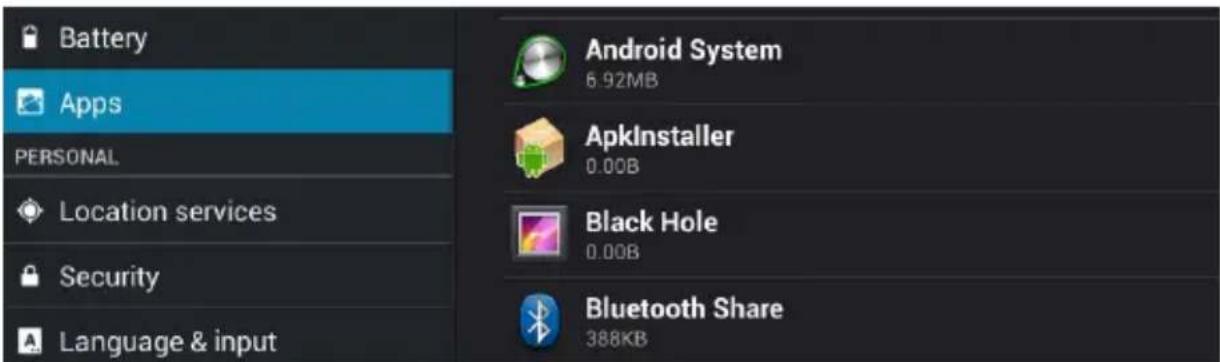
In the setting interface, user can complete many custom settings and inspect the relevant information of all the software that being installed.
Click
menu.
in the Application Program menu to enter into its setting
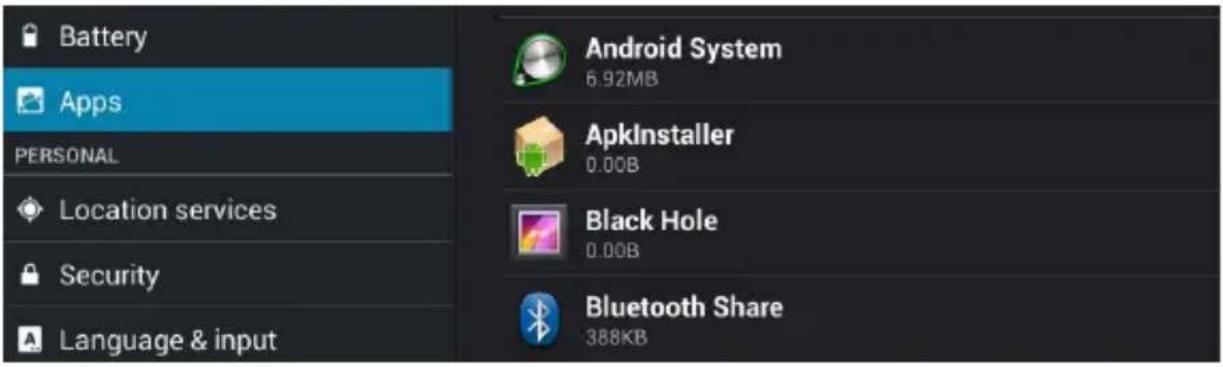
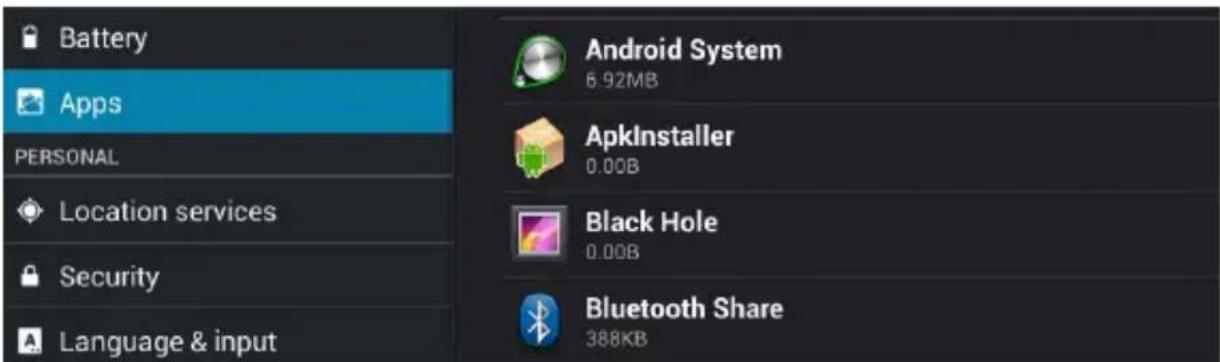
1. APPS
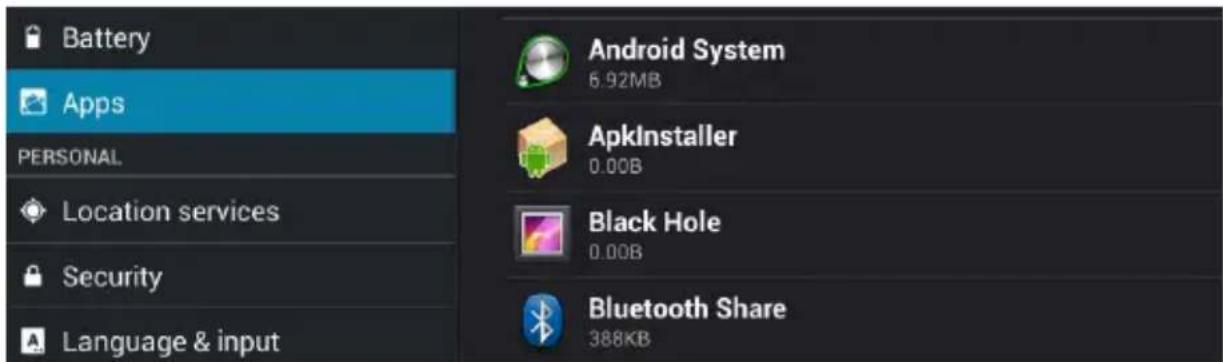
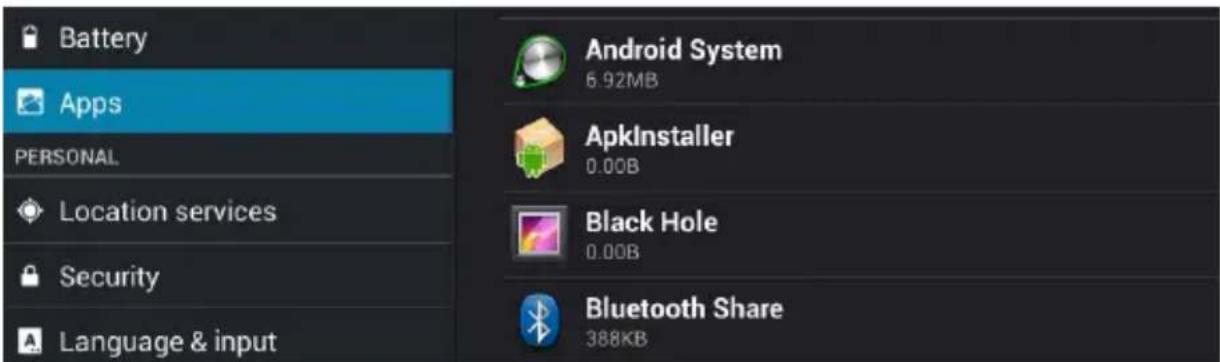
1-1 In the apps settings interface, user can see all installation applications.
1-2 If you open one application, you can browse its relevant information.
1-3 As to not be used application again, you can select to delete one application.
1. WI-FI
The MID achieves internet access through built-in WI-FI.
Click
, MID will pop-up settings menu.
1-1 Sliding the "Wi-Fi" switch button

to open the Wi-Fi.
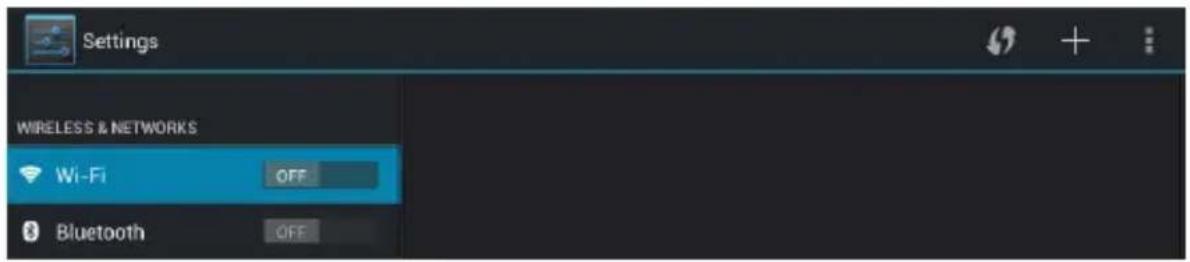
1-2 Click "Wi-Fi" to enter into the Wi-Fi setting menu.
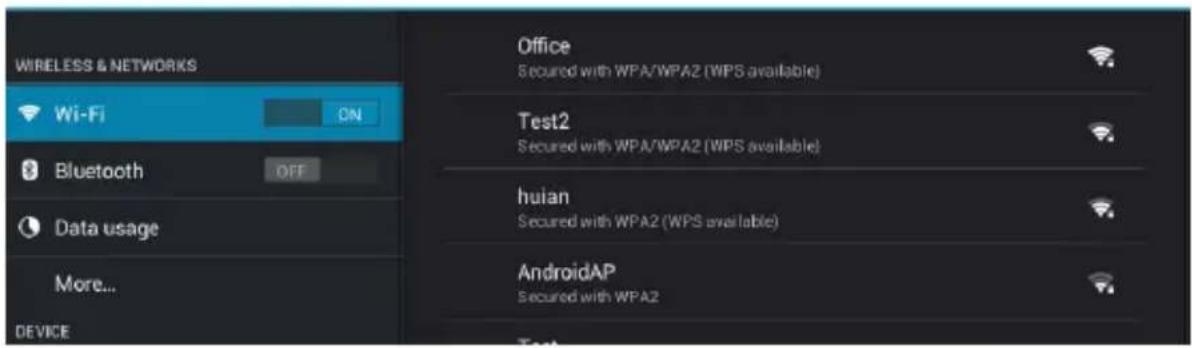
1-3 The system will automatically search and add the nearby networks can be connected, and display the name of network.
1-4 Clicking a wireless network, MID will pop-up messages menu. After entering the password, click Connect
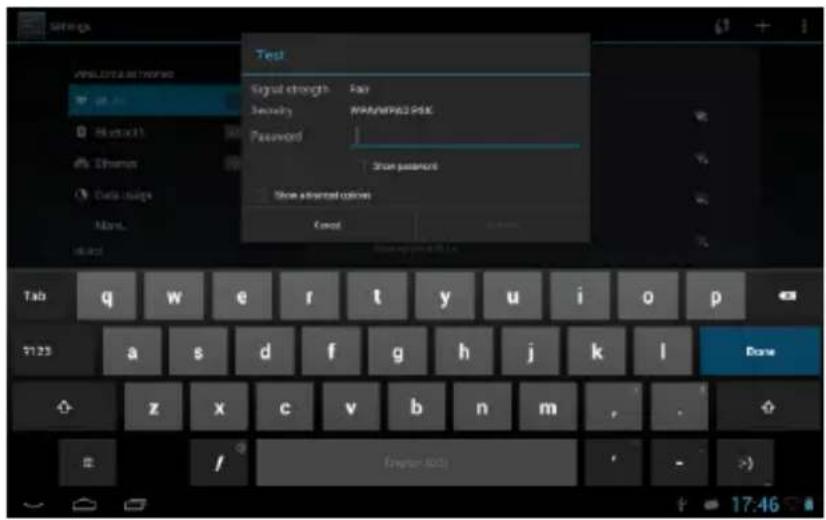
If the connection is successful, the network icon information
will be displayed in the
column of the main interface.
Special note:
As to the Wi-Fi router which have been connected before, this machine will keep searching the Wi-Fi router automatically and then connect to it.
When the network icon
will be displayed in main interface, the machine has connected WIFI successfully.
2. Internet
2-1 Under the normal statue of the network connection, Click in the main interface to enter into its menu. There will display all the Web of having been opened.
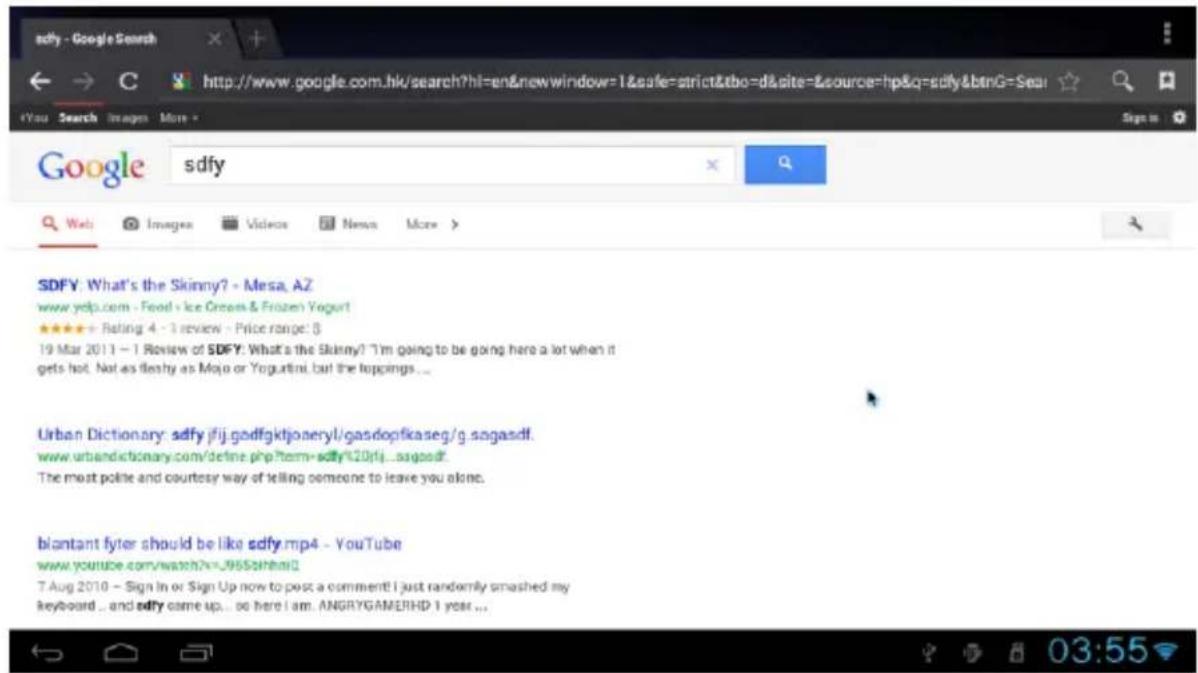
2-2 Click the input frame, keyboard menu will pop-up, input a new Web site and open.
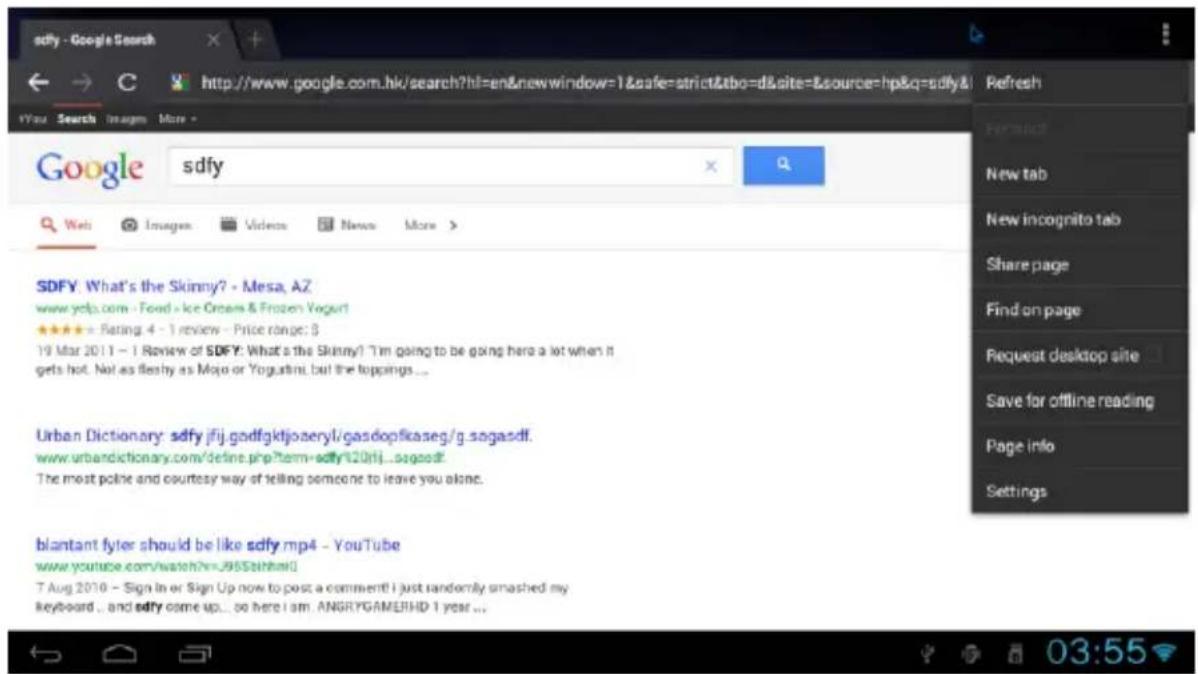
2-3 Click
icon ( see the red frame ), the machine will pop-up the operation function menu.
Applications
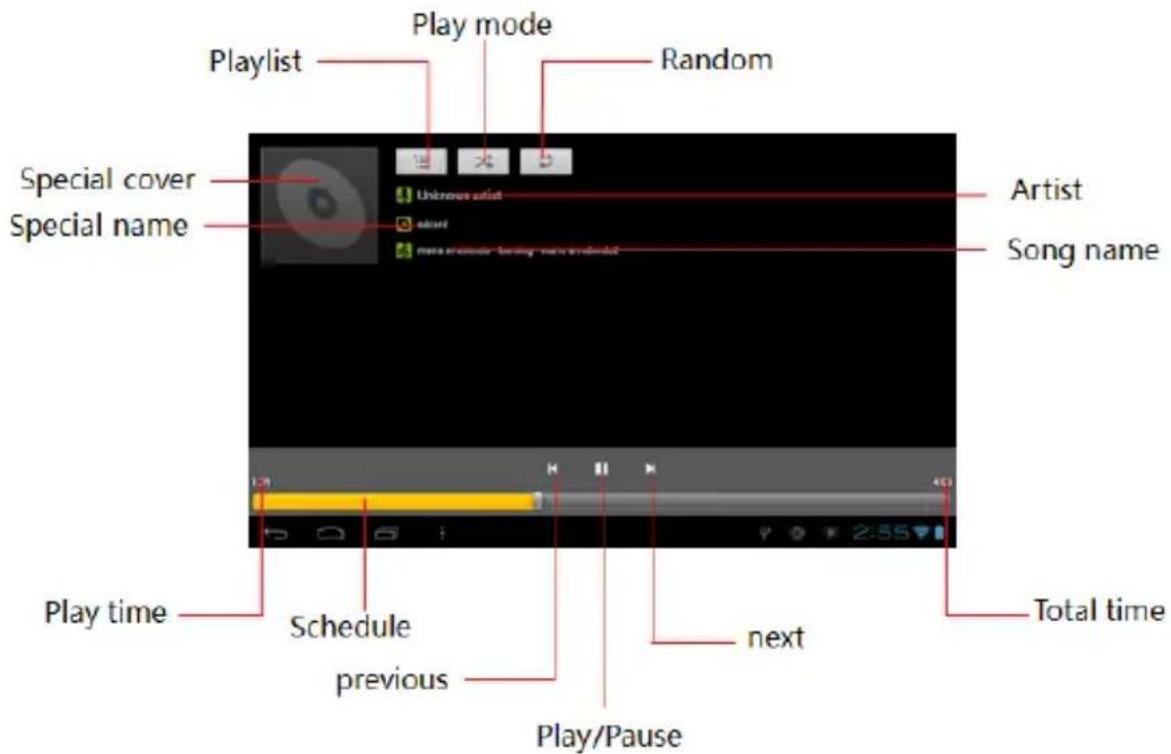
1. Music Playing
1-1 Click playlist.

in the "Application Program Interface" to enter into the
1-2 Click a music file to open the player and play it.
1-3 Backstage play
When have playing a music, click to back the main interface, the machine will enter into a backstage play mode.
Click in the main interface to display its menu.
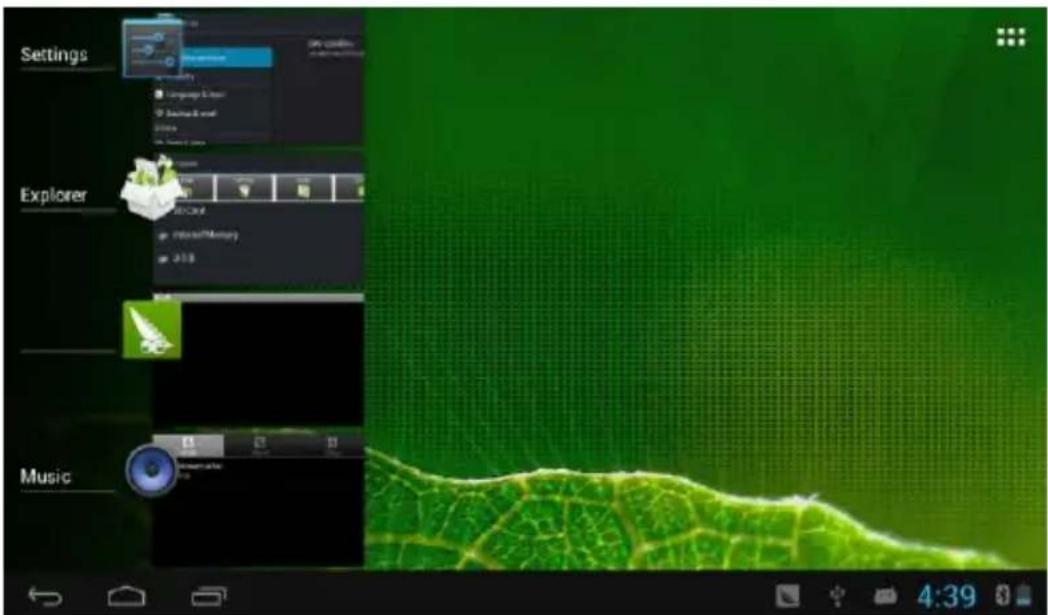
Select the music player to back the player menu.
Applications
2. Picture browsing
2-1 Click browsing
in "Application Program Interface" to enter into picture interface. there are all the picture and video data stored in
the machine and a TF card.
2-2 Select a picture to browse.

2-3 Select a video data to play.
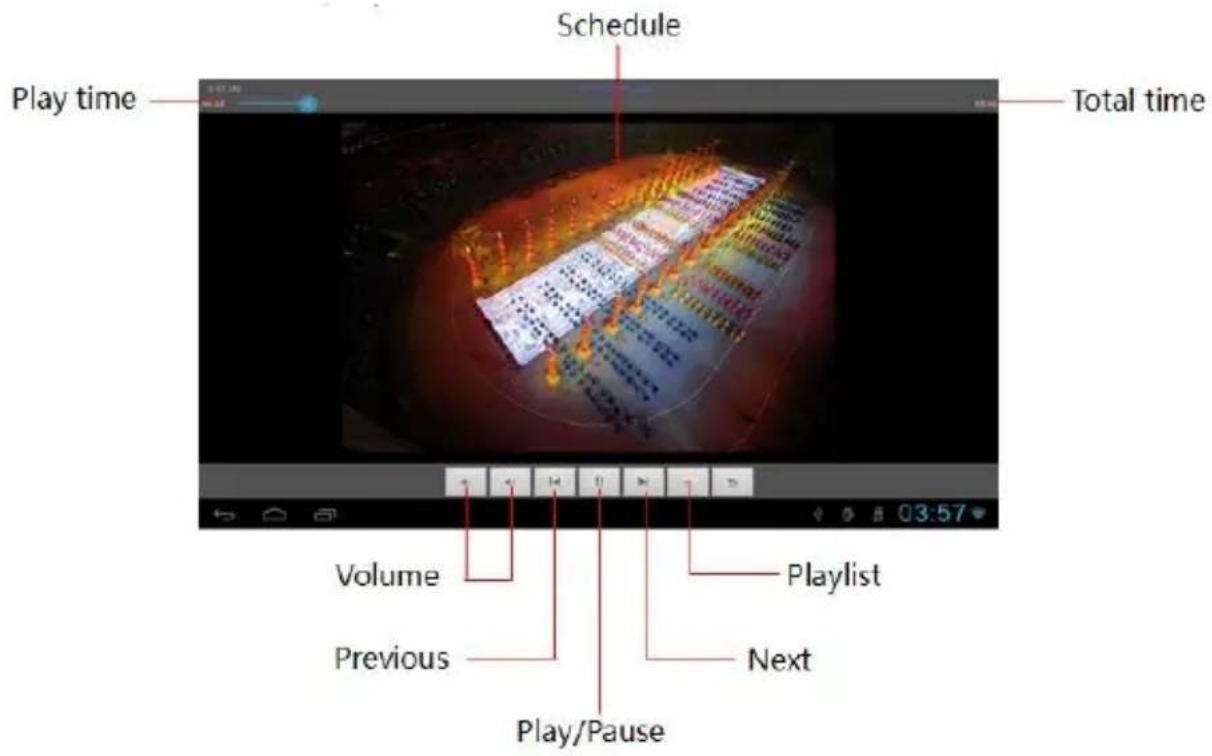
3. E-mail
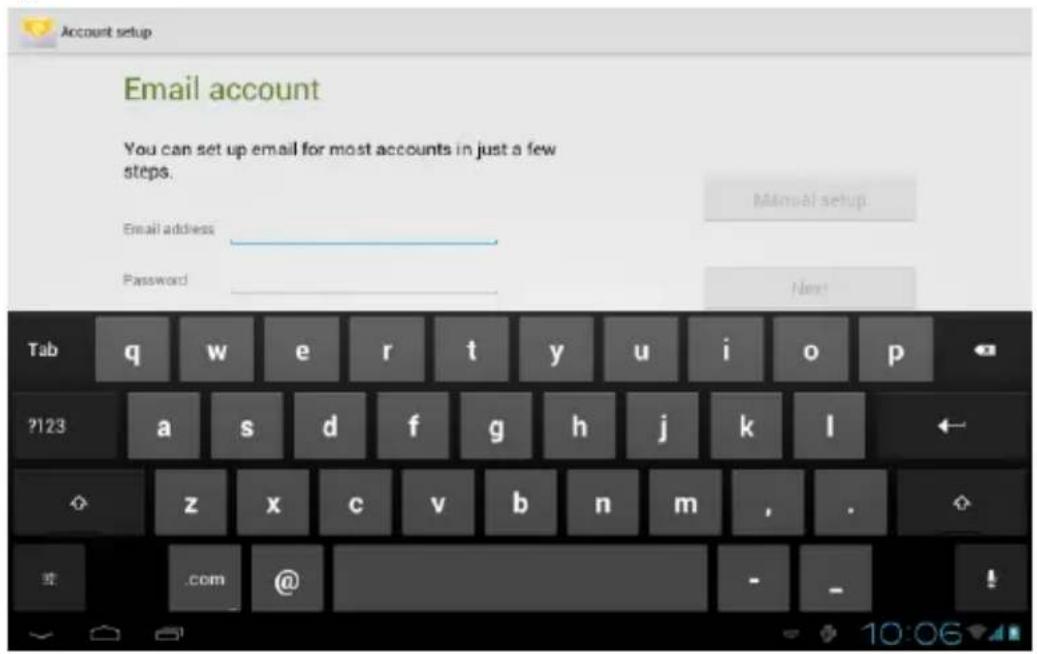
Click
in "Application Program Interface" to enter into E-mail settings, input the email address and password, you can send and receive email messages.
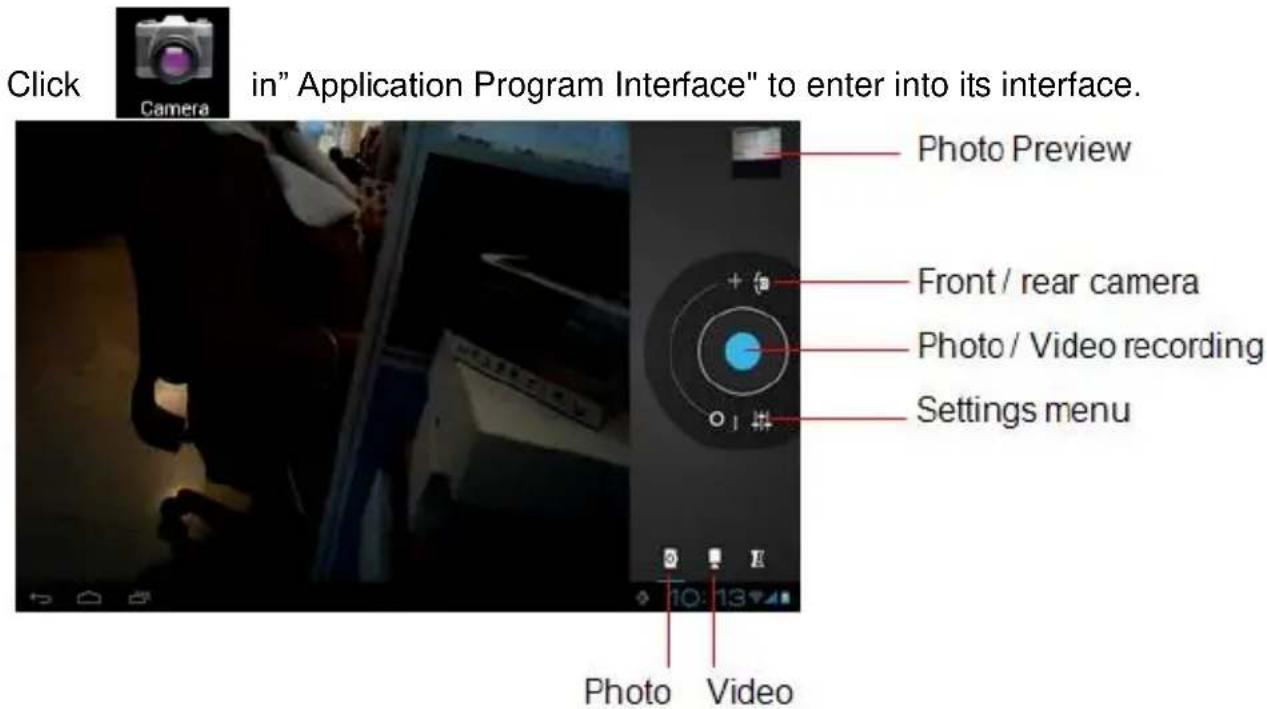
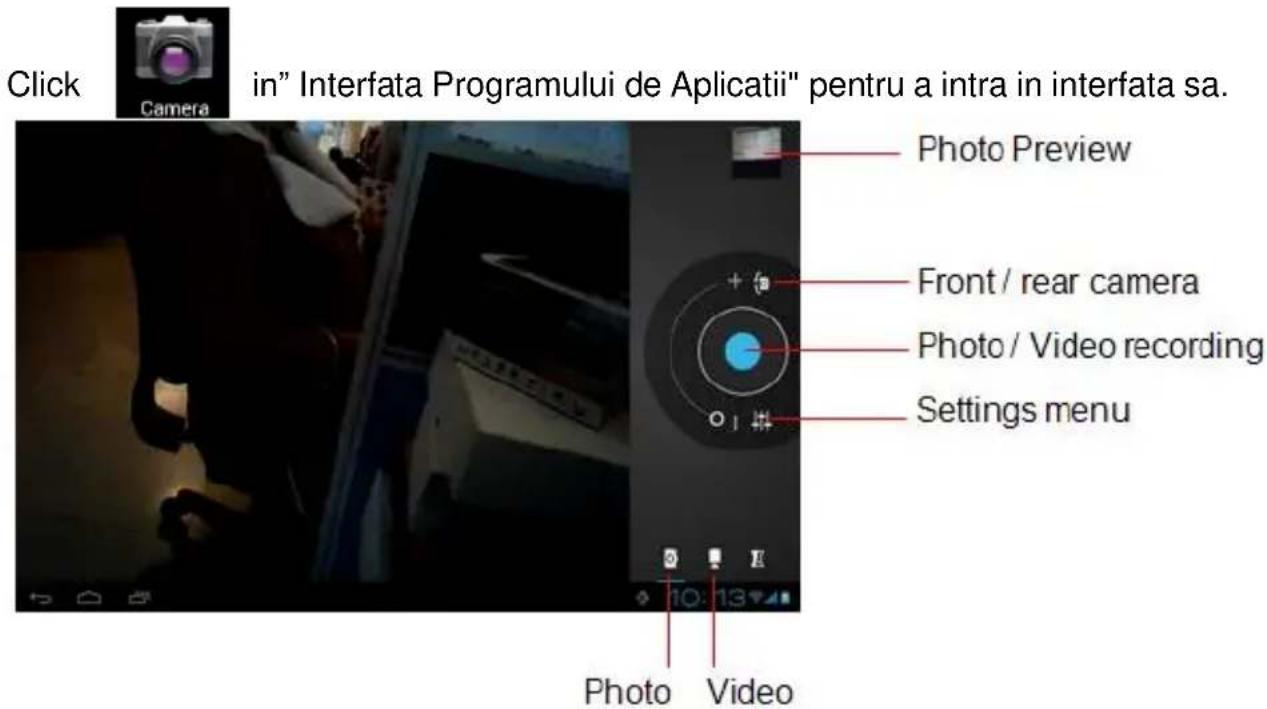
4. Camera and video recording
Klepnutím na "Power off" se dostanete na tuto obrazovku.
5-2 Přidání widgets
1. APPS
Aplikace
1. Přehrávání hudby
3. E-mail
Klepněte na

Klepnutím na "Power off" sa dostanete na túto obrazovku.
5-2 Pridanie widgets
6-2 Zvol'te položku, napr.: klepnite na vol'bu "Wallpaper" (pozadie) pre prechod do podmenu.
6-3 Posuňte obrazovku a vyberte požadovaný obrázok.
6-4 Klepnite na zvolené pozadie. Set wallpaper, a vrátite sa na rozhranie nastavení, zobrazí sa
Prvé skúsenosti
7. Pripojenie USB kábla
1. APPS
Aplikácie
v "Application Program Interface" (rozhranie
aplikácií) a vstúpite do playlistu.
3. E-mail
Klepnite na
Manual de utilizare Romana
Dragi utilizatori:
... Does not use the product in places prohibit the use of electronic device, for example, on an aircraft.
... Va rugam sa nu folositi produsul atunci cand conduceti sau cand mergeti pe strada, altfel puteti provoca un accident.
1. Introducere aspect
2. Oprirea
Cand MID functioneaza apasati butonul POWER (apasare lunga) si sistemul va afisa ecranul de oprire.
Prima experienta
Click optiunile "OK" si MID va intra in starea de inchidere. In cateva secunde aparatul se va opri.
4. Descrierea interfetei principale
5-2 Adaugati widget-uri
5-2-1 In interfata principala, click butonul Program al Aplicatiilor.

6-2 Slectati un articol, de exemplu: click optiuni "Wallpaper" pentru a intra in sub-meniu.
6-3 Glisati ecranul, cautati si selectati imaginea potrivita.
6-4 Facand click pe Set wallpaper , MID se va intoarce la setarile interfetei si va afisa imaginea de fundal selectata.
Prima experienta
7-2 Click computer,
1. APPS
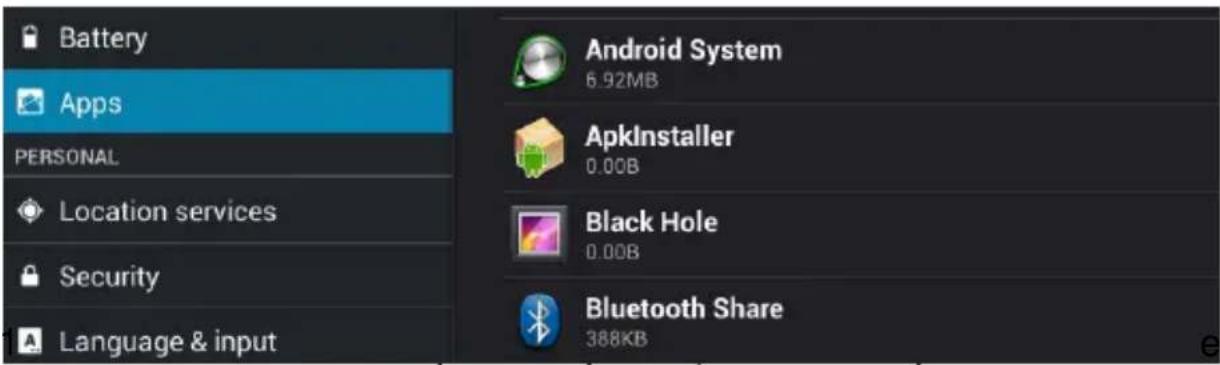
optiunile instalarii.
1-2 Daca deschideti o aplicatie, puteti sa-i cautati informatiile relevante.
1-3 Daca aplicatia nu va mai fi folosita, puteti selecta stergerea ei.
Functia de Internet
1. WI-FI
MID ofera acces la Internet prin WI-FI incorporat.
Click
, MID va afisa meniul de setari.
2-2 Click pe cadrul de intrare, meniul tasstaturii va fi afisat. Introduceti un nou
site web si deschideti-I.
2-3 Click pictograma
1. Redare muzica
1-1 Click

1-3 Backstage play
Aplicatii
3. E-mail
Click
4. Camera si inregistrare video
1. Alkalmazások
Alkalmazások
1. Zenelejátszó

1-3 Háttérzene
3. E-mail
Klikkeljen az
Notes
Notes
Declaration of Conformity
We, the undersigned:
Declare the following apparatus:
| Products name: | Tablet Quattor 7 |
| Brand and Model name: | OV-Quattor7 |
Hereby we conrm above product compliance with the European direcve of CE :
| EMC : | 2004/108/EC |
| LVD : | 2006/95/EC |
| R&TTE : | 1999/5/EC |
| ROHS : | 2011/65/EU |
| WE : | 1275/2008 |
Below standards were tested and passed :
| EMC : | ETSI EN 301 489-1 V1.8.1 (2008-04)ETSI EN 301 489-17 V2.1.1 (2009-05) |
| LVD : | EN 60950-1:2006 + A11:2009 +A1:2010 + A12:2011 |
| R&TTE : | EN 300328 V1.7.1:2006EN 62311:2008 |

May be sold in: BE CZ DK DE EE IE EL ES FR HR
Release date: 21.09.2012
The original document is located in the headquarter Overmax Poland sp. z o.o sp. k.
OVERMAX
Your electronic world
OV-Quaor7
- Instrukcja obstugi
- W
- 7-2 Kliknij
- Aplikacje
- Prompt
- Appearance Introduction
- Appearance Preview
- TF card
- Charge
- First experience
- Boot the MID
- Shutdown
- Lock-screen and power-saving mode
- Main interface description
- Custom Screen
- 5-1 Add shortcut
- 5-2 Add widgets
- 5-3 Delete shortcut/widgets
- Change your wallpaper
- Connection of USB cable.
- System setting
- APPS
- WI-FI
- Special note:
- Internet
- 2-3 Click
- Applications
- Music Playing
- 1-3 Backstage play
- Picture browsing
- Camera and video recording
- 5-2 Přidání widgets
- Aplikace
- Přehrávání hudby
- 5-2 Pridanie widgets
- Prvé skúsenosti
- Pripojenie USB kábla
- Aplikácie
- Manual de utilizare Romana
- Dragi utilizatori:
- Introducere aspect
- Oprirea
- Prima experienta
- Descrierea interfetei principale
- 5-2 Adaugati widget-uri
- Functia de Internet
- 2-3 Click pictograma
- Redare muzica
- 1-1 Click
- Aplicatii
- Camera si inregistrare video
- Alkalmazások
- Alkalmazások
- Zenelejátszó
- 1-3 Háttérzene
- Declaration of Conformity
- OVERMAX
Brand : Overmax
Model : Quattor 7
Category : Tablet