SportCam X3 - Action Camera Evolveo - Free user manual and instructions
Find the device manual for free SportCam X3 Evolveo in PDF.


| Product Type | Action Camera |
| Brand | Evolveo |
| Model | SportCam X3 |
| Dimensions (approx.) | 61 x 42 x 28 mm |
| Weight (approx.) | 80 g (including battery) |
| Power Supply | Built-in rechargeable Li-ion battery (3.7V, 1000 mAh) |
| Charging | USB-C, 5V / 1A |
| Video Resolution | 4K @ 30fps, 2.7K @ 60fps, 1080p @ 120fps |
| Photo Resolution | 12 MP |
| Field of View | 170° wide angle |
| Waterproof (with case) | Up to 30 m |
| Connectivity | Wi-Fi 802.11 b/g/n, Bluetooth 4.0 |
| Storage | microSD card up to 128 GB (Class 10 or UHS-I) |
| Image Stabilization | Electronic Image Stabilization (EIS) |
| Main Features | Time-lapse, slow motion, loop recording, burst mode |
| Display | 2.0-inch IPS LCD touchscreen |
| Remote Control | via smartphone app (iOS/Android) |
| Maintenance & Cleaning | Wipe lens with soft microfiber cloth; keep ports dry and clean |
| Safety Precautions | Do not disassemble; avoid extreme temperatures; use only original accessories |
| Spare Parts & Repairability | Spare batteries, chargers, mounts, and waterproof cases available; repair by authorized service only |
| General Information | Evolveo SportCam X3 action camera for outdoor and sports recording |
Frequently Asked Questions - SportCam X3 Evolveo
User questions about SportCam X3 Evolveo
0 question about this device. Answer the ones you know or ask your own.
Ask a new question about this device
Download the instructions for your Action Camera in PDF format for free! Find your manual SportCam X3 - Evolveo and take your electronic device back in hand. On this page are published all the documents necessary for the use of your device. SportCam X3 by Evolveo.
USER MANUAL SportCam X3 Evolveo
natural_image
Simple line drawing of a cylindrical object with a rectangular inset containing a square and four cross marks (no text or symbols)(USB disk): Win ME, 2000, XP, Vista, Win 7/8; Mac OS X 10.6+
15.Záruka:
Copyright © 2013 ABACUS Electric s.r.o.
(USB disk): Win ME, 2000, XP, Vista, Win 7/8; Mac OS X 10.6 +
15.Záruka
Copyright © 2013 ABACUS Electric s.r.o.
(1) LED
(2) On/Off/Felvétel
(3) Hátlapi borítás
(4) Üzemmód váltó
(5) USB
(6) Memóriakártya olvasó
(7) Akkumulátor
(8) Mikrofon
Copyright © 2013 ABACUS Electric s.r.o.
Thank you for purchasing this durable camera
-please read this instruction manual to ensure correct use of the product before using it
-please keep this instruction manual in a safe place
-the warranty will be provided by the proof of purchase
-the warranty does not cover any damage that may occur during a sport activity. It is the user's responsibility to secure the action camera securely to any sport equipment
Content
- Package contents
- Introduction of camera
- Initial setup
- Charging the battery
- Set date & time
- Saving the MicroSD / MicroSDHC card
- Take a Video
- Photography
- Playing back in a PC
- Playing back in a MAC
- Installing drivers webcam
- Overview of status LEDs
- Replacing the battery
- Technical specifications
- Warranty
1. Package contents
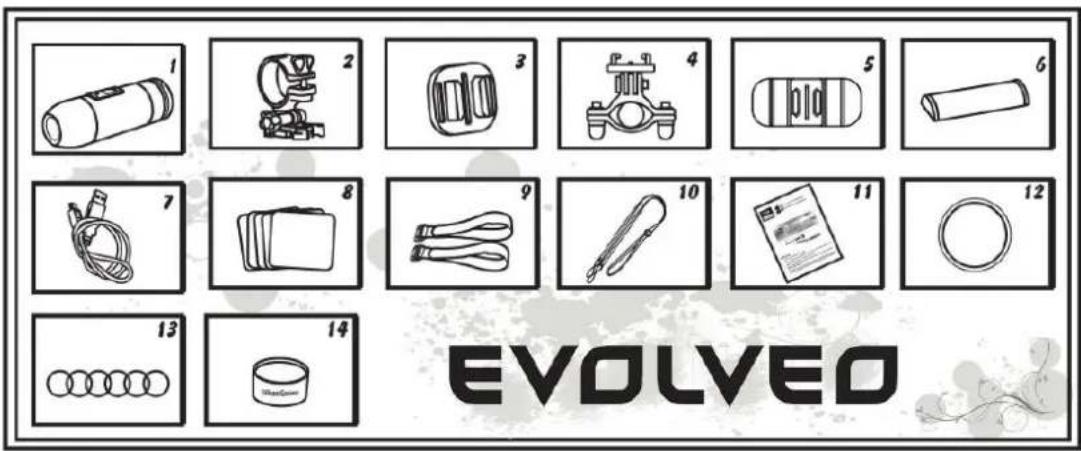
- Camcorder with Sound Cap (water resistant) 8. Adhesive stickers
- Camcorder Holder 9. Magic tape 2 pc.
- Universal Holder 10. Hand Safety Strap
- Roll Bar Holder 11. User Manual
- Arc Holder 12. Waterproof Cap
- Battery 13. Rubber O-ring 6x
- USB cable 14. Silicone grease
USING CAMCORDER
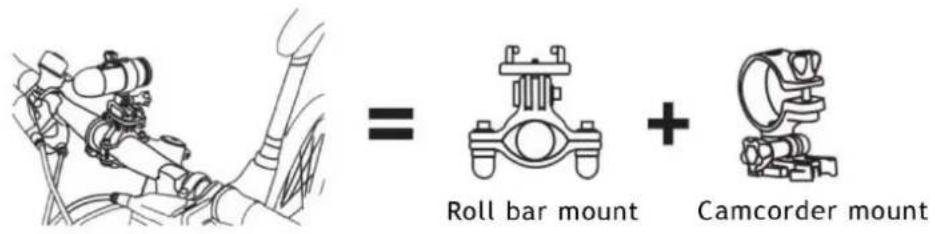
- Camcorder on Handlebar
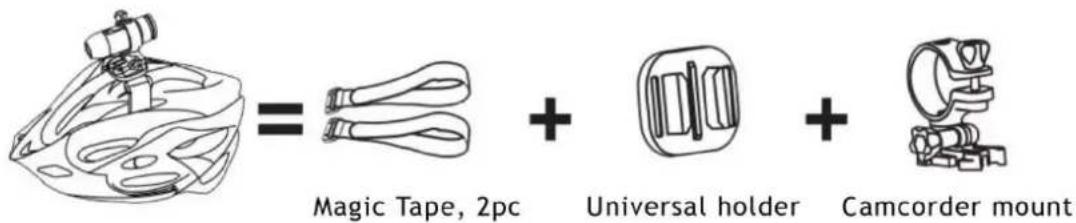
- Camcorder on the helmet with vents
- Camcorder on the helmet without vents
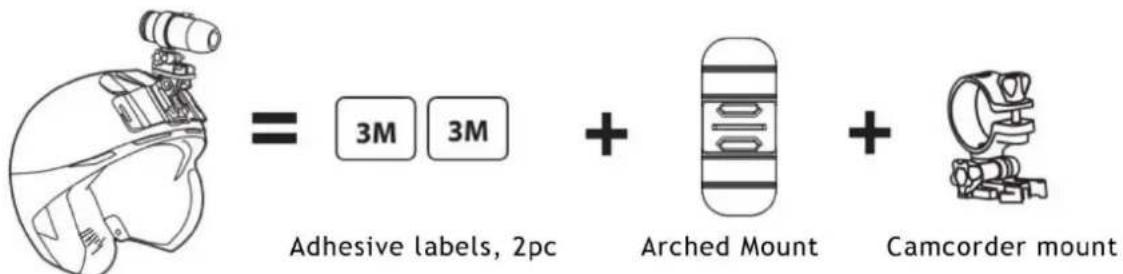
- Camcorder on a flat surface

- Introduction of camera
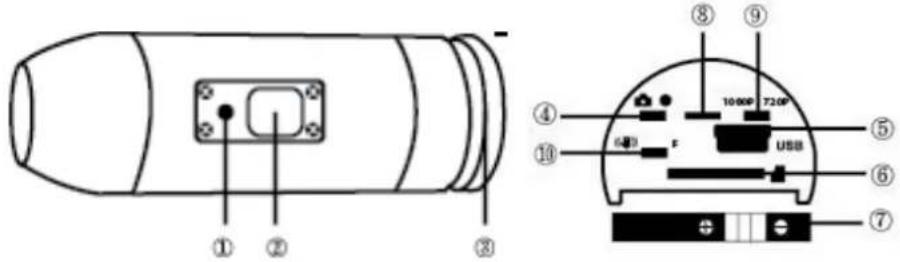
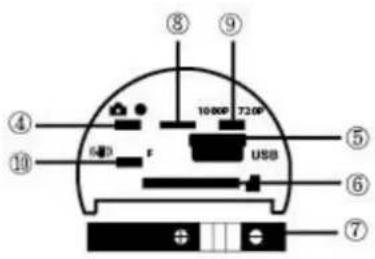
(1) LED
(2) On/Off/Recording
(3) Back cap
(4) Mode switch
(5) USB
(6) Micro SD card slot
(7) Battery
(8) Microphone
(9) Mode switch 1080p/720p
(10) Stabilizer/Firmware
3. Initial setup
-
Make sure the camera is OFF before adding or removing the memory card.
-
Screw out the rear cap (open) located at the back of the camera (3)
-
Install a MicroSD/MicroSDHC memory card (max up to 32GB) into the rear slot. To insert the MicroSD/MicroSDHC card, slide the MicroSD/MicroSDHC card into the card slot on the back of the camera with the card label facing down. The MicroSD/MicroSDHC card will click into place once it is inserted past flush with the camera. Use your fingernail to do this. Then screw in the rear cap till it is completely locked.
-
If no MicroSD/MicroSDHC memory card is inserted in the camera, the LED on top of the camera will blink red and green.
-
When using a MicroSD/MicroSDHC memory card in the camera, there should be no data from other devices on the card. If you are using a MicroSD/MicroSDHC memory card for the first time, you should format the card in your computer (FAT32 format is recommended).

Using the camera at water sports
It is necessary to apply the silicone paste (it is the part of the package) onto the rubber sealing ring from time to time, especially before using the camera during diving. Make sure that the back cap ③ is securely tightened. There is no right to make a claim for the warranty. The possible penetration of water into the camera because of the nonobservance of these warnings will void the warranty.
Two back caps are the part of the package. The waterproof cap is usually installed on the camera. The other one is only damp proof but with the good sound transmission (sound cap).
During using the camera at sports as swimming, canoeing, etc. it is necessary to use the waterproof back cap. At the other sports where there isn't the straight contact with water it is possible to use the damp proof back cap only for better sound recording. The camera is during using the waterproof back cap waterproof up to the depth of 10m. But it is necessary to bolt the waterproof cap on properly and screw it tight. There mustn't be any dirt in the sealing and there must be applied the silicone gel on it.

flowchart
graph LR
    A["Swimming icon"] --> B["Boiler with 'O' ring"]
    B --> C["Silicone gel"]
    C --> D["Waterproof cap"]

4. Charging the battery
Screw out the back cap located at the back of the camera (3) and plug the USB charger to the camera. The green light is on while charging, it goes off when the battery is fully charged. On the first time charge the battery 10 hours before use! You can record up to 60-70 minutes with one charge.
Camera On/Off
| Turning on the camera | Turn on the camera by pressing the Power/Shutter button for at least 3 seconds until the blue LED turns on. After releasing the button the camera vibrates, indicating that it is in the standby mode. |
| Turning of the camera | You will turn the camera off by pressing long the same button for next 3 seconds. The camera will vibrate twice, which serves as the confirmation of turning off. |
5. Set date & time
Download the "time.txt" from www.evolveo.eu. Open the file "time.txt" and change the date & time as follows:
YYYY.MM.DD hh:mm:ss
$$ \begin{array}{l} Y = \text { year } \quad h = \text { hour } \ M = \text { month } \quad m = \text { minute } \ D = \text { day } \quad s = \text { second } \ \end{array} $$
Then copy the file to memory card! Now you can take a photo or video to test it.
6. Saving the MicroSD / MicroSDHC card
Don't forget to insert the memory card MicroSD/MicroSDHC type into the camera before recording or taking the photos.
| Overview of storage capacity | ||||||||
| Mode | Digital photography | HD video recording | ||||||
| 4GB | 8GB | 16GB | 32GB | 4GB | 8GB | 16GB | 32GB | |
| 720p | 450 | 850 | 1700 | 3500 | 55 min | 115 min | 230 min | 450 min |
| 1080p | 45 min | 90 min | 180 min | 350 min | ||||
7. Recording a Video

For checking if the camera is in the mode for recording the video unscrew the back cap (3) and check if the modes switch (4) is on the right in the video position and then screw the cap back on. After turning the camera on the blue LED diode will go on and the camera will switch to the standby mode. Press the Power/Shutter button shortly to start a video recording. The red LED will blink while the video is recording. Press the Power/Shutter button again to stop recording.
8. Taking photographs

For checking if the camera is in the mode for taking photos unscrew the back cap (3) and check if the modes switch (4) is on the left in the photo position and then screw the cap back on. After turning the camera on the blue LED diode will go on and the camera will switch to the stand-by mode. Press the Power/Shutter button to start taking photos, the red LED will blink. Press the Power/Shutter button again to stop taking photos. In photo mode the camera will take sequentially photos every 3 seconds. It stops automatically if the battery is empty or if the micro SD card is full.

9. Playing back in a PC
Turn off the camera. Screw the back cap (3) and switch the modes switch to the right to the video mode. Connect the camera with your computer via USB cable from the USB port and turn the camera on. The camera will be recognized automatically as USB Device. Or you can take out the micro SD card and use your own card reader to connect with your computer too.

The device must be turned on while connected with computer for data download. Don't remove the battery! When you remove the battery while the video is playing, the damage to your video data could occur!
10. Playing back in a MAC
Turn off the camera and plug it into your MAC with the included USB cable. Turn the camera on, and the MAC OS will recognize the camera as an external hard drive.
IMPORTANT TIP FOR MAC USERS
When deleting files from your Micro SD cards you must empty the trash before removing it or unplugging the camera. If you do not empty your trash the photos and videos files will not be completely erased from your cards.
11. Webcam Function
IT is not necessary to install the driver to view videos or pictures. The driver is only necessary to install when using the camera as a webcam which is available for Windows OS system only. The driver can be found on www.evolveo.eu
12. Overview of status LEDs
| Overview LED indicator | Green LED | Red LED | Blue LED |
| Standby | off | off | on |
| Battery charging | on | off | off |
| Taking video | off | flashing | on |
| Taking photo | off | flashing | on |
| Low battery | off | alternately flashing | |
| Micro SD card fill up | off | on | on |
| Data transfer | off | off | on |
NOTE - THE SPECIFICATION IS SUBJECT TO CHANGE WITHOUT NOTICE
ATTENTION:
13. Removing battery
The battery is designed to have a very tight fix to maximize reliability in high vibration activities. To remove the battery, pull it out with the battery holder. It is intentionally not easy to do, but the battery will come out. For additional batteries and mount packages ask your dealer or e-shops.
14. Technical specifications
Optics:
• FISHEYE in 1080p mode
• SUPER WIDE ANGEL in 720p mode
• f/2.4, fixed focus glass lens
Video:
• Parameters of FullHD resolution: 1080p: 1920x 1080 @30fps
• Parameters of HD resolution: 720p: 1280x 720 @ 60fps
• Digital Image Stabilization
• Light sensitivity: 960mV/ (Lux-sec)
• Video format: H.264(avc1)/MOV
• Exposure: Auto
• White balance: Auto
Audio:
• Built-in microphone
Photo:
• Resolution: 5296 x 3968 px
- Format: JPEG
• Shooting Mode: Automatically every 3 seconds
Storage:
• Memory: MicroSD/MicroSDHC, support up to 32GB capacity (not included in the package, recommended Class 6 or above)
• Average recording time: 10 \~ 15min/1GB
Product size: 104 x 32 x 32 mm
Weight: 104g
Operating system
(for USB drive): Win ME, 2000, XP, Vista, Win 7/8; Mac OS X 10.6+
15.Warranty
Your wearable sports camcorder is covered by a 2 years warranty on parts and labour from the date of original purchase, and purchases must be made through an authorized dealer. The warranty covers defects in workmanship and materials. The warranty does not apply to units, which have been damaged or abused intentionally or unintentionally. Purchase from individuals or unauthorized internet sites void the warranty. The warranty does not apply to units where the back cap was incorrectly closed.
This camera is designated for the extreme sports and activities. Therefore it is considerably probable that it will be during these activities damaged or destroyed. The warranty does not cover any damage that may occur during a sport activity.

ECLARATION OF CONFORMITY:
Hereby, the company ABACUS Electric s.r.o. declares that EVOLVEO SportCam X3 (EAN: 8594161335177) is in compliance with the requirements of the norms and regulations, relevant for the given type of device.
The complete text of Declaration of conformity can be found on www.evolveo.eu
Copyright © 2013 ABACUS Electric s.r.o.
All rights reserved. Design and specification can be changed without prior notice.
RU
Copyright © 2013 ABACUS Electric s.r.o.
(USB disk): Win ME, 2000, XP, Vista, Win 7/8; Mac OS X 10.6+
15. Gwarancja
Copyright © 2013 ABACUS Electric s.r.o.
- 15.Záruka:
- 15.Záruka
- Thank you for purchasing this durable camera
- Content
- Package contents
- USING CAMCORDER
- Initial setup
- Using the camera at water sports
- Charging the battery
- Set date & time
- Saving the MicroSD / MicroSDHC card
- Recording a Video
- Taking photographs
- Playing back in a PC
- Playing back in a MAC
- Webcam Function
- Overview of status LEDs
- ATTENTION:
- Removing battery
- Technical specifications
- Optics:
- Video:
- Audio:
- Photo:
- Storage:
- 15.Warranty
- ECLARATION OF CONFORMITY:
- RU
- Gwarancja
Brand : Evolveo
Model : SportCam X3
Category : Action Camera