SportCam W8 - Action Camera Evolveo - Free user manual and instructions
Find the device manual for free SportCam W8 Evolveo in PDF.


| Product Type | Action Camera |
| Brand | Evolveo |
| Model | SportCam W8 |
| Dimensions | 58 x 46 x 38 mm |
| Weight | 60 g (without battery and case) |
| Power Supply | Li-Po 1050 mAh rechargeable battery |
| Video Resolution | Up to 1080p @ 60fps (NTSC/PAL), 720p @ 120fps |
| Photo Resolution | Up to 16 MP (16, 12, 5 MP selectable) |
| Lens | Glass FishEye, aperture f/2.8, 150° field of view |
| Sensor | Panasonic 1/2.3" CMOS 16 MP |
| Chipset | Ambrella A7L |
| Storage | microSD / SDHC / SDXC up to 64 GB (Class 6 or higher) |
| Waterproof | Up to 60 m with included waterproof case |
| Wireless Connectivity | Built-in Wi-Fi (802.11 b/g/n) |
| Remote Control | Included wireless remote with up to 10 m range |
| Interfaces | Mini USB 2.0, Mini HDMI, microSD slot |
| Battery Life | Approx. 60 minutes continuous recording |
| Charging Time | Approx. 4 hours (with 500 mA charger) |
| Package Contents | Camera, waterproof case, remote control, battery, USB cable, remote charger, adhesive stickers, magic tape, pivot arm, various mounts (universal clamp, flexible clamp, pad clamp, handlebar clamp), user manual |
| Operating System Compatibility | Windows XP SP2+, Windows 7/8, Mac OS X 10.8.4+ |
| Waterproof Case Seal Maintenance | Clean rubber seal with fresh water after each use; dry thoroughly before closing |
| Safety Note | User responsible for secure mounting; warranty does not cover damage during sport activities |
Frequently Asked Questions - SportCam W8 Evolveo
User questions about SportCam W8 Evolveo
0 question about this device. Answer the ones you know or ask your own.
Ask a new question about this device
Download the instructions for your Action Camera in PDF format for free! Find your manual SportCam W8 - Evolveo and take your electronic device back in hand. On this page are published all the documents necessary for the use of your device. SportCam W8 by Evolveo.
USER MANUAL SportCam W8 Evolveo
flowchart
graph TD
    A["Device with battery"] -->|①| B["Motor with screwdriver"]
    B -->|②| C["Internal switch"]
    C -->|③| D["Internal switch with screwdriver"]
    D -->|④| E["Internal switch with screwdriver"]
CZ
Použití:
- Upevnění na helmu
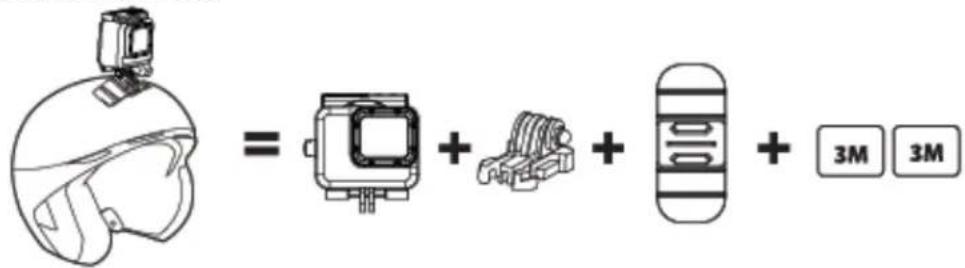
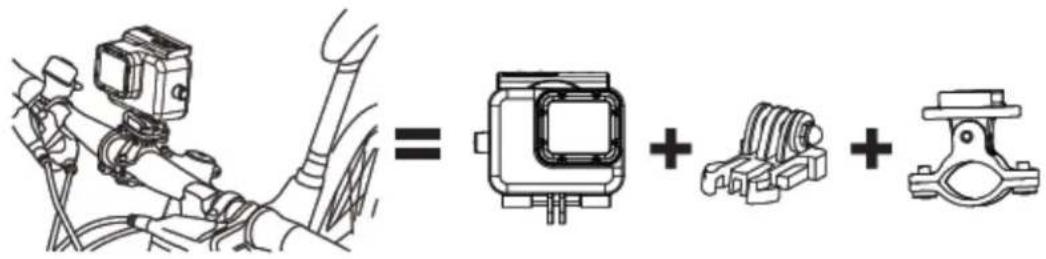
- Upevnění na řidítka
Poznámka:
CZ
flowchart
graph TD
    A["Camera"] -->|①| B["Camera with left hand"]
    B -->|②| C["Camera with right hand"]
    C -->|③| D["Camera with right hand"]
    D -->|④| E["Camera with left hand"]
    E -->|ok| A
CZ
Sestavení kamery
flowchart
graph LR
    A["Device with numbered parts"] --> B["Adjustment"]
    B --> C["Assembly"]
    C --> D["Bracket with four parts"]
    D --> E["Ordering"]
    E --> F["Order with four parts"]
    F --> G["End"]
CZ
Dálkové ovládání:
Thank you for purchasing this camera!
Please read this instruction manual to ensure correct use of the product prior to use.
The warranty does not cover any damage that may occur during a sport activity. The user is responsible for a safe fastening of the camera to any sport equipment to avoid its damage.
Table of contents
Camera Controls
Mountings for Sport Activities
Overview
Package Content
Use of the Camera
Initial Set-up
Default Setting
TV Playback
Play
USB Port
Built-in Wi-Fi
LED Status Table
Camera Settings
Video Settings
Settings
Memory Card / Storage Table
Technical Specification
System Requirements
Battery Life
Assembling the Camera
Remote Control
Remote Control LED Status Indicators
Preventing Water Damage to Your Camera
Warning
DECLARATION OF CONFORMITY
EN
Camera Controls:
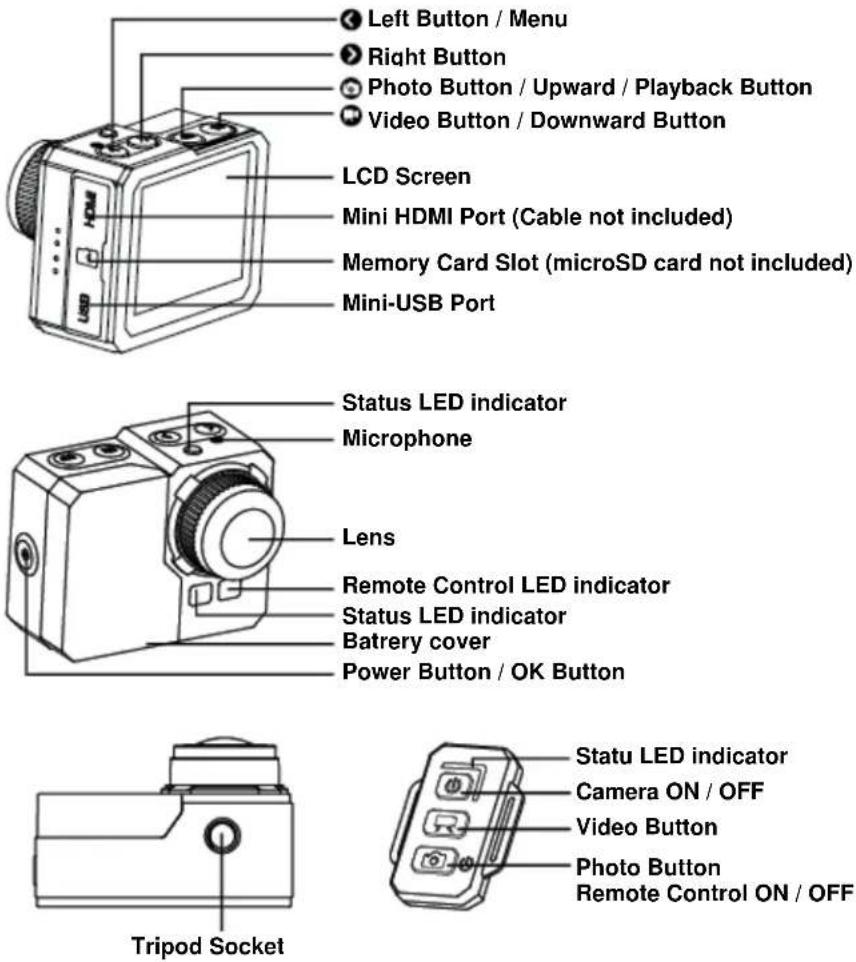
Left Button / Menu
Right Button
Photo Button / Upward / Playback Button
Video Button / Downward Button
LCD Screen
Mini HDMI Port (Cable not included)
Memory Card Slot (microSD card not included)
Mini-USB Port
EN
Package Content:
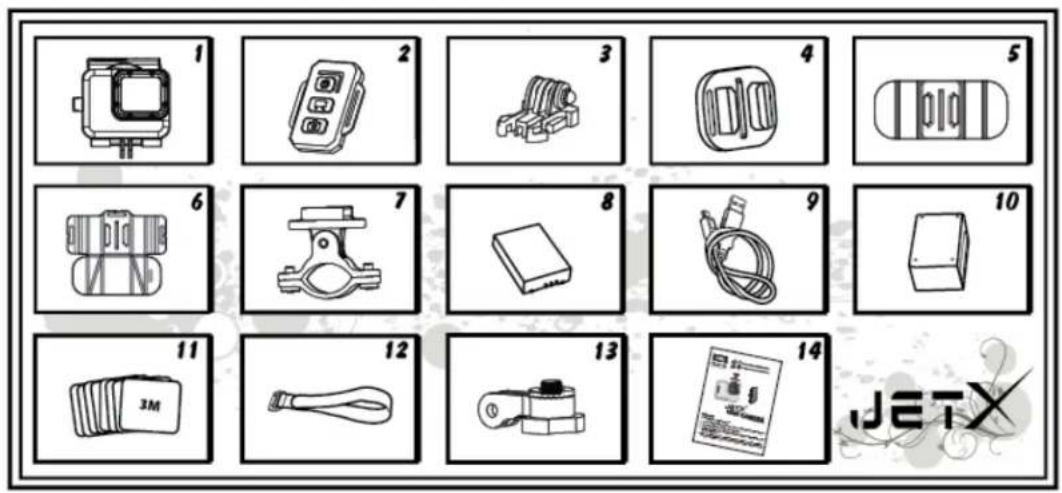
- Waterproof case
- Remote Control
- Buckle
- Universal Clamp
- Flexible Clamp
- Pad Clamp
- Handlebar Clamp
- Battery
- USB Cable
- Remote Control Charger
- Adhesive Stickers 8pcs
- Magic Tape
- Pivot Arm
- User Manual
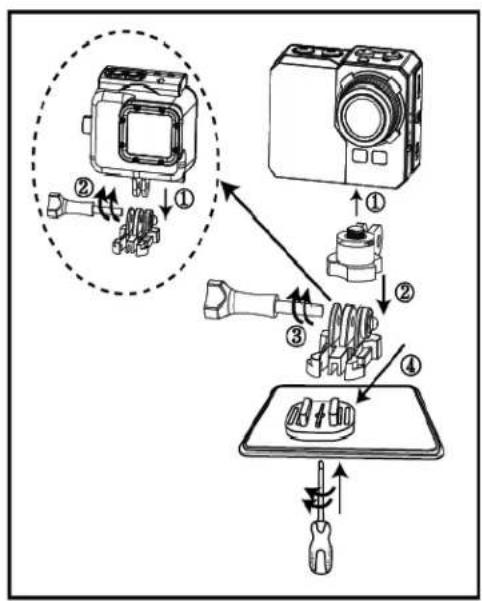
flowchart
graph TD
    A["Camera with two connectors"] -->|①| B["Internal component with pins and connectors"]
    B -->|②| C["Internal component with pins and connectors"]
    C -->|③| D["Internal component with pins and connectors"]
    D -->|④| E["Internal component with pins and connectors"]
EN
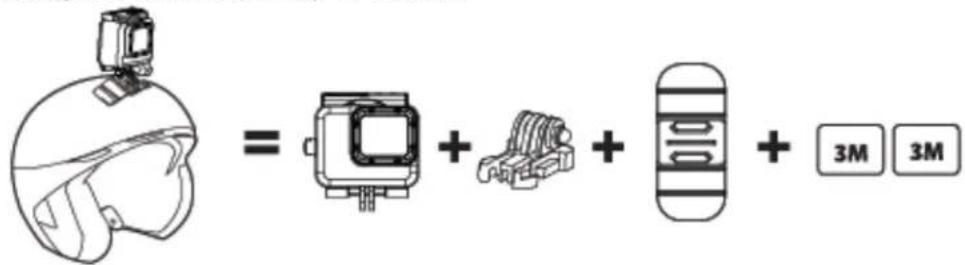
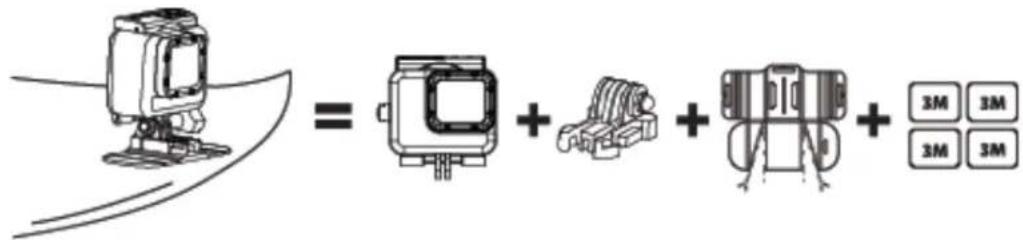
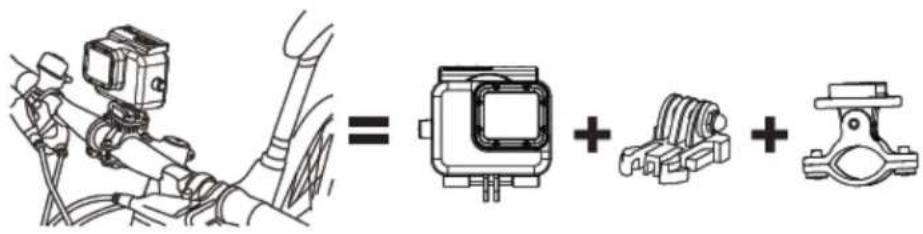
Use of the Camera:
- Mounting the camera on a flat surface / tripod

- Mounting the camera on top of helmet
- Mounting the camera on curved surface
- Mounting the camera on handlebar
Note:
It is the user responsibility to mount the camera to any sport equipment securely. The screws of the mounts have to be retightened time to time. The warranty does not cover any damage that may occur during a sport activity.
EN
Initial Set Up
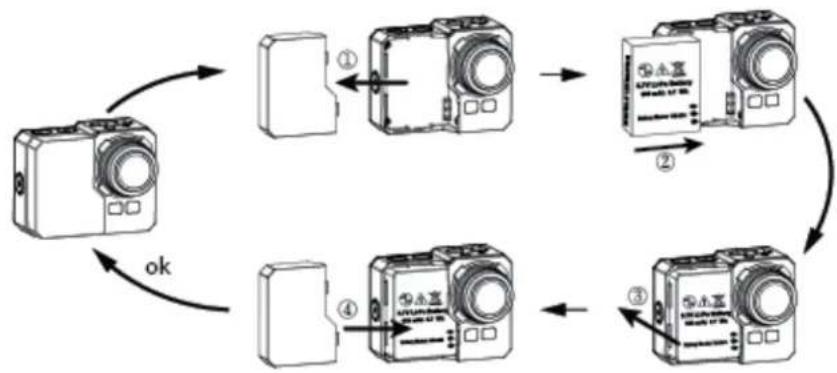
- Install a microSD memory card (64 GB max, class 6 or higher) into the camera. Contact surface of the card is towards the lens. Use your fingernail to insert the camera into the slot until it clicks into place. On the card there should not be saved any data from other devices. Before first use of the microSD card in the camera, it is recommended to format the card in your computer.
- Install battery into the camera.
- Charging the battery - to charge, connect the included USB cable to the camera and connect the other end of the cable to a power source such as USB charger, your PC or NB.
There will no damage to the card or camera occur if you disconnect it from the power source before it is fully charged.
If the camera does not operate during the initial start-up, charge the battery for 3 hours at least.
Turn ON /OFF:
| Turn ON | Turn on the camera by pressing the Power button 📋 at least 3 seconds until the red LED flashes. Then the LCD display will turn on. |
| Turn OFF | Turn the camera off by pressing the Power button 📋 the standby mode for at least 3 seconds.To save power, the camera will automatically turn off if no button is pressed for more than 3 minutes in standby mode.This interval can be changed in the Settings Menu. |
Video recording:
| To Start a record | Press the Video Record buttonWhile recording the red LED indicator flashes. |
| To Stop a record | Press the Video Record button again to stop recording. |
Note: The camera automatically stops recording when the memory card is full or the battery is empty.
Your video will be saved before the camera powers off.
Taking Still photos:
| To take a photo | Press the Photo button  the shutter "clicks". the shutter "clicks". |
EN
Burst Photo:
In this mode the camera takes photos in a sequence according to the burst rate setting: 3 pic. / 1 s, 5 pic. / 1 s, 10 pic. / 1 s, 10 pic. / 2 s.
This setting can be changed in the Photo Menu>Burst Rate.
If this setting is set to OFF, the camera takes a single photo only.
| To Start | Press the Photo button ^(DH67) the red LED status indicator will flash and the shutter will actuate several times. |
| To Stop | Press the Photo button ^(S240) gain to stop shooting. |
Time Lapse:
In this mode the camera will take sequentially: 1 frame per second, 1 frame per 2 seconds,
| To Start | Press and hold button  , Menu > Video setting > Time Lapse and set required interval for time lapse video recording. Press the Video button [STD2] the red LED status indicator will light up and you can hear the shutter sound repeatedly. The LED will flash each time a photo is taken. , Menu > Video setting > Time Lapse and set required interval for time lapse video recording. Press the Video button [STD2] the red LED status indicator will light up and you can hear the shutter sound repeatedly. The LED will flash each time a photo is taken. |
| To Stop | Press the Video button [2500] again to stop recording. |
When using the Time Lapse mode, a microSD card Speed Class 10 is required. Verify that the camera is in the Time Lapse mode before capturing the Time Lapse series.
Self-Timer:
| To activate | Press and hold button  , Menu > Photo Setting > Self Timer.Select “OFF”/3/5/10/30/60 second intervals. , Menu > Photo Setting > Self Timer.Select “OFF”/3/5/10/30/60 second intervals. |
Default Settings:
The camera powers up with the following default settings:
Video resolution 1080p @60fps
Photo resolution 16.0 Megapixels (MP)
Photo Burst mode: SINGLE
Wi-Fi: ON
Display: ON
Date and time stamp: OFF
EN
TV Playback
You can playback your photos and videos stored in the camera on a HDTV. Playback appears as of the camera modes when the camera is powered on and plugged into a HDTV. Through the HDMI port you can transmit the images to an external HDTV display device for playback, display, etc.
- Connect the camera into a HDTV with the HDMI cable.
- Power ON.
- Now you can view all photos and videos stored in the camera on the HDTV display.
- Press the upward button 📷 and the downward button 🔒 to select more media files.
Play
| To Play Videos | Press and hold the Photo button play. Select the Video icon and press confirm.Press the Photo and Video button to select more media files. |
| To View Photos | Press and hold the Photo button. Select the Photo icon and press confirm.Press the Photo and Video button to select more media files. |
| Close the View | Press and hold the Photo button return to the Standby mode.Press and hold the same button again to close the View. |
USB Port
Connect the camera to the computer using included USB cable and select between charging mode and storage drive mode.
On a PC:
- Double click "My Computer" and locate "Removable Disk".
- Double click the "Removable Disk" icon.
- Double click the "DCIM" folder icon.
- Double click the "100media" icon to view all photo / video files.
- Copy / move files to the computer or external hard drive.
On a MAC:
- Connect the camera to a MAC using included USB cable.
- Power on the camera and select "Mass Storage".
- The MAC recognizes the camera as an external hard drive.
- Double click the external drive icon to access files.
- Copy / move files to your computer or external hard drive.
* When deleting files from the memory card, empty the trash before removing the memory card or unplugging the camera.
EN
Built-in Wi-Fi
You can connect this camera to your smartphone / tablet via special application.
First turn on Wi-Fi function on your camera:
- press and hold the Menu button ⬇ select Settings>Wi-Fi ON
- press button ⏻ confirm.
- the Wi-Fi function initialization takes 30 seconds, afterwards the Wi-Fi icon on the LED display lights green.
Before starting the application, it is necessary to connect to the camera Wi-Fi.
Setting Wi-Fi on your smartphone:
Click the Setting icon and check that the Wi-Fi function is ON. Afterwards connect to the Wi-Fi device named "wifi_cam" and insert password: 00000000.
The smartphone is connected to the camera and you can start the application.
You can find the application on Google Play as „EVOLVEO SportCam W8“ or you can download the installation APK on WWW.EVOLVEO.EU.
This application enables you to control the camera remotely using your smartphone or tablet. The application functions include remote control of the camera general settings* - live video preview, video streaming, download and playback. Before recording you can see what your camera sees by viewing it on your smartphone or tablet's screen.
Notice: When a white page appears after starting the application, your smartphone / tablet is not Wi-Fi connected. Follow the above described instructions to connect to the camera and start the application again.
EN
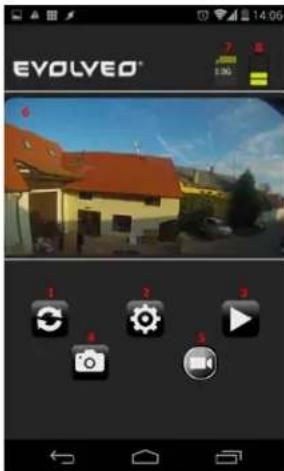
Home screen
Main screen
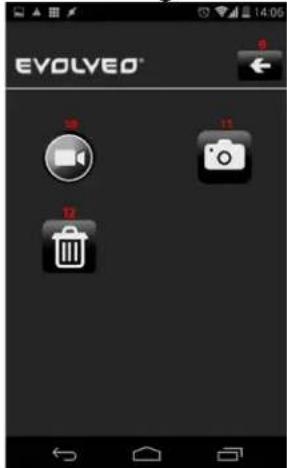
Settings
- Refresh button
- Settings button
- Playback button
- Photos capture button
- Video recording button
- View
- Size of saved files
- Battery capacity
- Back button
- Camera Settings button
- Photo Settings button
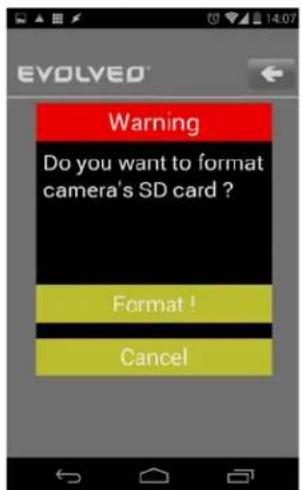
- MicroSD card format button
In the Settings Menu you can change video and photos parameters setting.
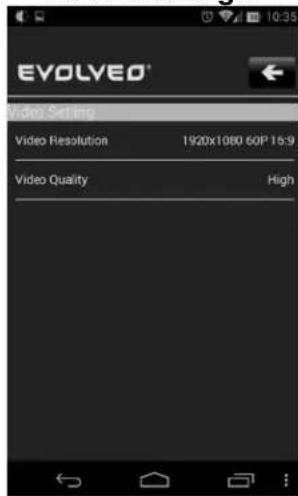
Video Settings
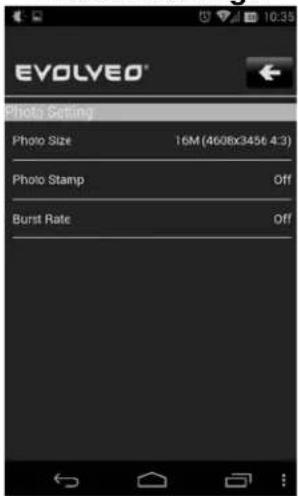
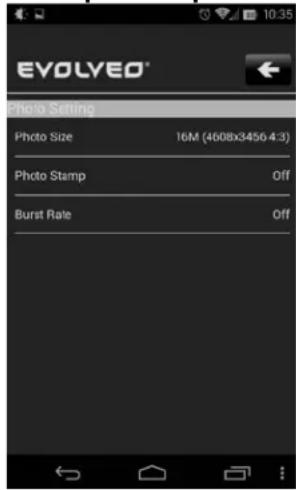
Photos Settings
MicroSD card format
EN
Video Settings:
Video Resolution
Video Quality - High - Medium - Low
Photos Setting:
Photo Size
Photo Stamp - date stamp on the photos OFF/ON
Burst Rate - OFF, 3, 5, 10 photos/s
MicroSD card format button
Pressing the trash bin icon button the microSD card will be formatted.
Press the "Format" button to confirm or the "Cancel" button to close.
Notice: After formatting all data on the microSD card will be erased!!!
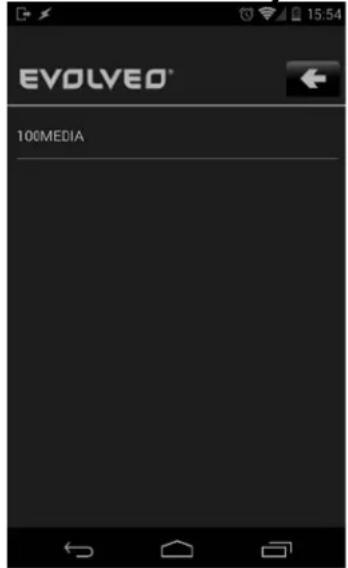
Select directory
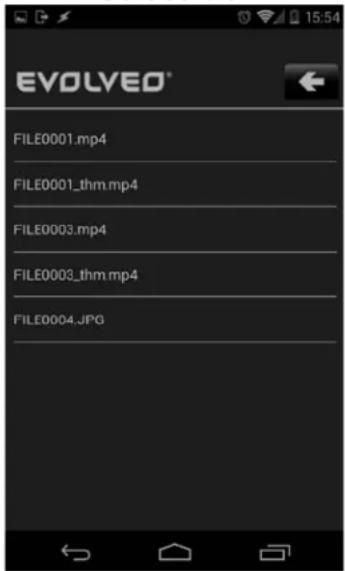
Select file
File playback
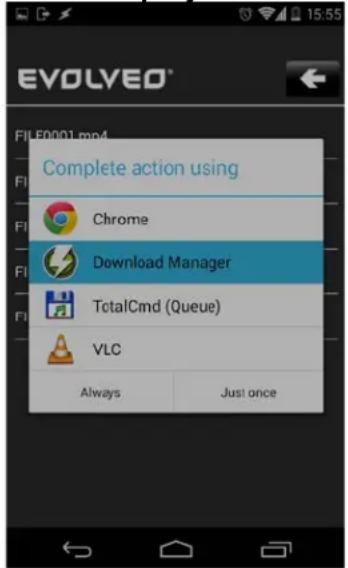
- Select directory, e. g. 100MEDIA
- Afterwards select the file to be replayed. JPG = photos, MP4 = videos.
- After the file selection is done, you will be asked to finish the process. To playback the video files, we recommend the VLC program for example, to download files into your smartphone use the Download Manager application for example. All these applications are available on Google Play for free.
- While recording the camera creates two files. The first one is the original file (FILE0001.mp4), the second one is its size reduced copy with VGA resolution (FILE0001.thm.mp4), which is more suitable for streaming on your smartphone.
EN
LED Status Table
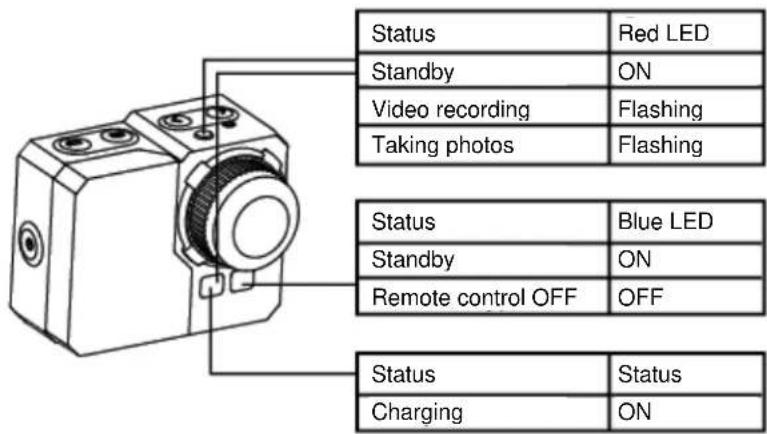
Camera Settings:
| Photo size | 16 MP12 MP5 MP |
| Self-Timer | OFF/3/5/10/30/60 seconds |
| Burst rate | OFF3 photos in 1 second5 photos in 1 second10 photos in 1 second10 photos in 2 seconds |
| Autoshooting | OFF/1/3/5/10/30/60 seconds |
| Time stamp | ON/OFF |
| Quality | High/Medium/Low |
Video Settings
| Video size | NTSC 1080p 1920x1080 @60fpsNTSC 1080p 1920x1080 @30fpsNTSC 1200p 1600x1200 @60fpsNTSC 960p 1280x960 @60fpsNTSC 720p 1280x720 @120fpsNTSC 720p 1280x720 @60fpsNTSC 720p 1280x720 @30fpsNTSC 480p 848x480 @240fpsPAL 1080p 1920x1080 @50fpsPAL 1080p 1920x1080 @25fpsPAL 720p 1280x720 @100fpsPAL 720p 1280x720 @50fps |
EN
| PAL 720p 1280x720 @25fpsPAL 480p 848x480 @200fps | |
| Quality | High / Medium / Low |
| Video Durationvide | 5 min / 10 min / 15 min / 20 min / 30 min |
| Time Stamp | ON/OFF |
| Dual Stream | ON/OFF |
| Time Lapse | OFF1 frame per second1 frame per 2 seconds1 frame per 5 seconds1 frame per 10 seconds1 frame per 30 seconds1 frame per 60 seconds |
| Motion Detection | OFF / High Sensitivity / Medium Sensitivity / Low Sensitivity |
| Loop Recording | ON / OFF (10 minutes/videofile) |
| Mic Volume | OFF / 100% / 90% / 80% / 70% / 60% / 50%(Default 80%) |
Settings button
| Language | English, Czech, Polish, Hungarian, Russian, Italian |
| Date | RRRR-MM-DD |
| Time | HH:MM |
| Video format | PAL / NTSC |
| Auto LCD screen saver | OFF / 30 seconds / 1 min. / 3 min. / 5 min. |
| Auto Shutdown | OFF / 3 min. / 5 min. / 10 min. |
| Frequency | 50Hz / 60Hz |
| Metering | Multi / Centre / Spot |
| ISO | Auto / 100 / 200 / 400 / 800 / 1600 |
| White Balance | Auto / Incandescent / Daylight / Cloudy |
| Color Setting | Rich / Natural / Diving / Deep Sea |
| EV | -2.0 -1.7 -1.3 -1.0 -0.7 -0.3 0.0 +0.3 +0.7 +1.0 +1.3 +1.7 +2.0 |
| Buzzer | ON/OFF |
| Wi-Fi | ON/OFF |
| Format | MicroSD card |
| Default Setting | |
| Firmware Update | V 1.07 |
EN
Memory Card / Storage Table
The camera is compatible with microSD, microSDHC and microSDXC cards with capacity 2GB, 4GB, 8GB, 16GB, 32GB and 64GB. Although the camera supports cards of all speed classes, it is necessary to use a microSD card class 10 or higher for recording video or use the Time Lapse mode with the speed of 1 fps. We recommend using brand name memory cards for maximum reliability in high-vibration activities.
* Work with class 6 or higher.
Technical Specifications:
- Lens: glass FishEye
- Aperture: f2,8
- Shooting Angle: 150^
- Sensor: Panasonic 1/2.3" CMOS 16MP
- Chipset: Ambrella A7L
• Video resolution: 1080p@60fps; 720p@120fps
• Photos Resolution 5, 12MP, 16MP - Burst Rate: 3, 5, 10 fps
• Auto Shooting intervals: 1, 3, 5, 10, 30, 60 sec. - Self-Timer
• Video Duration: 5-30 min./file - Recording Time: up to 60 min.
- Battery Li-Po 1050mAh
EN
- Time Stamp: yes
- Dual Stream: yes
- Storage: microSD card, up to 64GB micro SD/SDHC, CLAAS 6 min.
- white Balance: Auto, Manual
• EV Setting: Auto, +-2EV correction - Microphone: Mono; 48kHz AAC compression
- Interface: Mini USB, Mini HDMI
• Dimensions: 58x46x38 mm
• Weight: 60g without battery and case - Waterproof in Case up to: 60m
System Requirements
The camera is compatible with Microsoft® XP (Service Pack 2 or later) and Mac OS X 10.8.4 or later.
Windows / Windows 7 / Windows 8
Windows XP (Service Pack 2 or later) or Vista
3.2GHz Pentium 4 or faster
DirectX 9.0c or later
Minimum 1GB of system RAM
Video card with min. 256MB RAM
MAC
Mac OS® X 10.8.4 or later
2.0GHz Intel Core Duo or faster
Minimum 1GB system RAM
Video card with min. 128MB RAM
Battery life:
The battery icon will alert to a low battery status. If the battery reaches 0% when recording is being in process, the camera will save the file and power OFF.
To charge the battery:
- Connect the camera to a power source.
- The red status LED indicator remains on while the battery is being charged.
- Once the battery is fully charged, the red status LED will turn off.
The battery will be charged to 100% in 4 hours when using 500mAh USB-compatible A/C wall charger.
Other chargers may charge at only half this rate.
No damage will occur to the camera or the battery if the camera is used prior to full charge.
EN
To remove the battery:
- Remove the battery cover (on the back of the camera) by placing your thumb into the indentation in the battery cover and slide it to the left.
- The cover will release and pop out. Grasp the battery pull-tab and remove it from the camera.
flowchart
graph TD
    A["Camera"] -->|①| B["Light Box"]
    B --> C["Light Box with 3D marking"]
    C -->|②| D["Light Box with 3D marking"]
    D -->|③| E["Light Box with 3D marking"]
    E -->|④| F["Light Box with 3D marking"]
    F -->|ok| A
Assembling the Camera
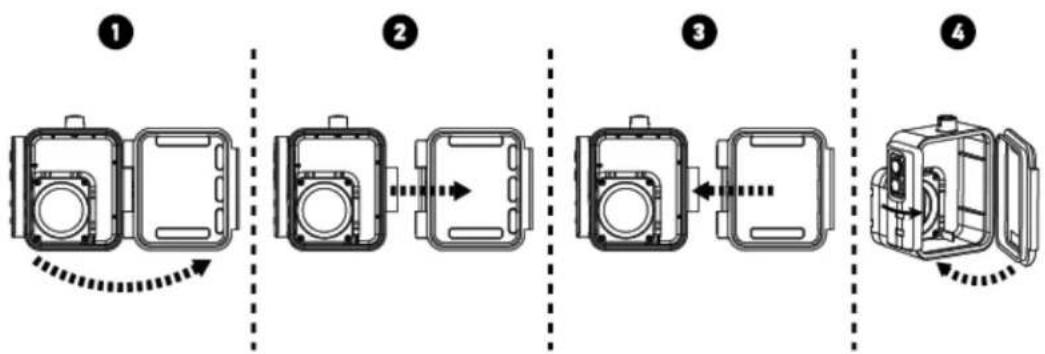
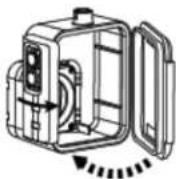
The camera comes with 2 types of the backdoors – waterproof and sound-in.
flowchart
graph LR
    A["Step 1: Initial device with circular ports"] --> B["Step 2: Internal component with arrow"]
    B --> C["Step 3: Internal component with left-pointing arrow"]
    C --> D["Step 4: Final device with right-pointing arrow"]

Use the waterproof backdoor to protect the camera from water leak-in up to 60m underwater.
When used in rain or under water, there may occur water drops on the lens.
EN
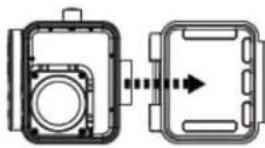
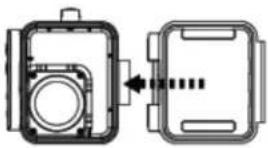
To place the camera into the waterproof case.
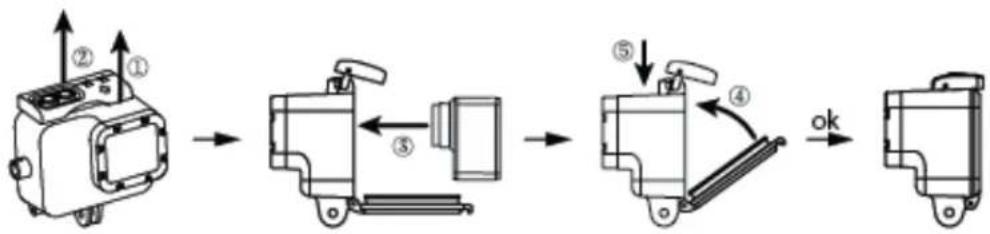
flowchart
graph LR
    A["Device with numbered components"] --> B["Component with directional arrows"]
    B --> C["Component with numbered parts"]
    C --> D["Final Component with arrow indicating rotation or change"]
    style A fill:#f9f,stroke:#333
    style D fill:#bbf,stroke:#333
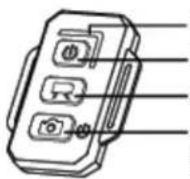
Remote Control:
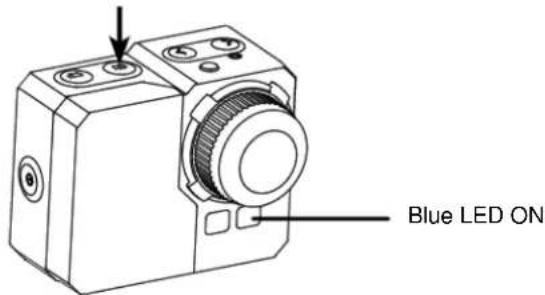
- Power off the camera, press and hold the Photo button for 3 seconds, the blue LED will turn ON / OFF.
- Press and hold the Photo button for 3 seconds, the green LED will turn ON / OFF.
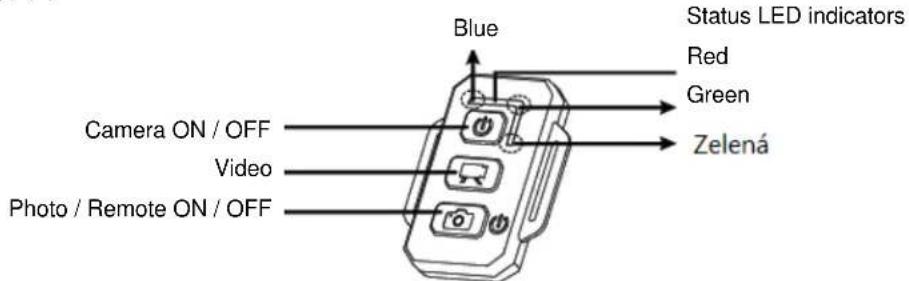
| Remote Control ON / OFF | Press and hold the Photo button for 3 seconds. |
| Camera ON / OFF | Press the Power button |
| Take a Photo | Press the Photo button |
| Record a Video | Press the Video button |
* Turn OFF both the camera & remote to shut down this function.
EN
Remote Control Status LED indicators
| Green | ON |
| Red | Photo taking |
| Blue | Video recording |
| Red | Charging* |
* LED turns OFF when the battery is fully charged
Preventing Water Damage to Your Camera:
- Keep the rubber seal clean with fresh water and dry after every use.
- After every use in salt water, please rinse the case in fresh water.
- Clean the seal, rinse in fresh water and shake dry.
* Failure to follow these instructions each time you use the camera can result in leaks that may damage or destroy your camera. Your warranty does not cover water damage resulting from a user error.
HIGH TEMPERATURE DANGER WARNING

After two hours of continuous recording the camera will warm up and it is advisable to let it cool down.
Stop recording and let the camera in the Standby mode for a while.
However, the camera is equipped with a thermal protection function that protects it from damage due to extreme use.

Disposal
The symbol of crossed out container on the product, in the literature or on the wrapping means that in the European Union all the electric and electronic products, batteries and accumulators must be placed into the separate salvage after finishing their lifetime. Do not throw these products into the unsorted municipal waste
Settings, manuals and other information relating to the products EVOLVEO can be found on www.evolveo.eu.
EN
① C6197 DECLARATION OF CONFORMITY
The ABACUS Electric spol. s r.o. company hereby declares that the model EVOLVEO SportCam W8 (EAN: 8594161336259) is in compliance with the requirements of the standards and regulations relevant for the given type of device. Find the complete text of Declaration of conformity at ftp://ftp.evolveo.eu/ce
Copyright © 2014 ABACUS Electric spol. s r.o. www.evolveo.eu All rights reserved. Design and specification can be changed without prior notice. Printing errors reserved.
Technical specifications changes and errors reserved! For latest information visit www.evolveo.eu.
HU
natural_image
Pure technical line drawing of a mechanical component with no text or symbolsHU
Megjegyzés:
HU
Videó beállítások:
Videó felbontása
flowchart
graph TD
    A["Camera"] -->|①| B["Camera with left eye"]
    B -->|②| C["Camera with right eye"]
    C -->|③| D["Camera with right eye"]
    D -->|④| E["Camera with left eye"]
    E -->|ok| A
natural_image
Pure technical line drawing of a mechanical component with no text or symbols- Fissaggio sul casco
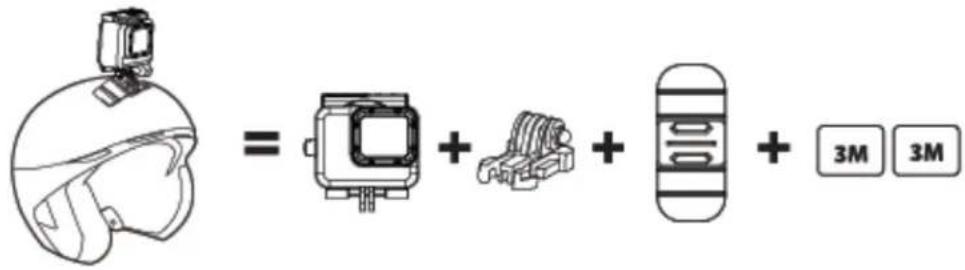
Nota:

Impostazione video:
| Dimensione video | NTSC 1080p 1920x1080 @60fpsNTSC 1080p 1920x1080 @30fpsNTSC 1200p 1600x1200 @60fpsNTSC 960p 1280x960 @60fpsNTSC 720p 1280x720 @120fpsNTSC 720p 1280x720 @60fpsNTSC 720p 1280x720 @30fpsNTSC 480p 848x480 @240fpsPAL 1080p 1920x1080 @50fpsPAL 1080p 1920x1080 @25fps |
IT
flowchart
graph LR
    A["Step 1: Display with circular components"] --> B["Step 2: Insert a rectangular box with arrow"]
    B --> C["Step 3: Insert a rectangular box with arrow"]
    C --> D["Step 4: Remove a closed device with arrow"]


All rights reserved.
PL
Użytkowanie:
natural_image
Diagram showing mechanical components and a central icon, no text or symbols presentUwaga:
PL
Video Setting:
| Wielkość wideo | NTSC 1080p 1920x1080 @60fpsNTSC 1080p 1920x1080 @30fpsNTSC 1200p 1600x1200 @60fpsNTSC 960p 1280x960 @60fpsNTSC 720p 1280x720 @120fpsNTSC 720p 1280x720 @60fpsNTSC 720p 1280x720 @30fpsNTSC 480p 848x480 @240fpsPAL 1080p 1920x1080 @50fps |
PL
flowchart
graph LR
    A["Top View"] --> B["Left View"]
    B --> C["Right View"]
    C --> D["Left View"]
    D --> E["Right View"]
    E --> F["Front View"]

natural_image
Pure technical line drawing of a mechanical component with no text or symbolsГнездо для штатива
RU
Примечание:
Настройки фото
Настройки видео:
Разрешение видео
| Размер видео | NTSC 1080p 1920x1080 @60fpsNTSC 1080p 1920x1080 @30fpsNTSC 1200p 1600x1200 @60fpsNTSC 960p 1280x960 @60fpsNTSC 720p 1280x720 @120fpsNTSC 720p 1280x720 @60fpsNTSC 720p 1280x720 @30fpsNTSC 480p 848x480 @240fpsPAL 1080p 1920x1080 @50fpsPAL 1080p 1920x1080 @25fpsPAL 720p 1280x720 @100fpsPAL 720p 1280x720 @50fps |
RU
natural_image
Diagram of a camera module with no visible text or symbols2
3
4

- CZ
- Použití:
- Poznámka:
- Sestavení kamery
- Dálkové ovládání:
- Table of contents
- EN
- Camera Controls:
- Package Content:
- Use of the Camera:
- Note:
- Initial Set Up
- Burst Photo:
- Time Lapse:
- Default Settings:
- TV Playback
- USB Port
- On a PC:
- On a MAC:
- Built-in Wi-Fi
- Video Settings:
- Photos Setting:
- MicroSD card format button
- Memory Card / Storage Table
- Technical Specifications:
- System Requirements
- MAC
- Battery life:
- To charge the battery:
- To remove the battery:
- Assembling the Camera
- Remote Control:
- Preventing Water Damage to Your Camera:
- HIGH TEMPERATURE DANGER WARNING
- Disposal
- ① C6197 DECLARATION OF CONFORMITY
- HU
- Videó beállítások:
- Impostazione video:
- IT
- PL
- Użytkowanie:
- Uwaga:
- Video Setting:
- RU
- Примечание:
- Настройки видео:
Brand : Evolveo
Model : SportCam W8
Category : Action Camera