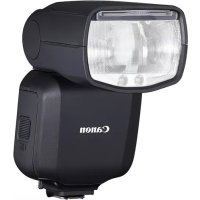
SPEEDLITE 580EX - Flash externe CANON - Notice d'utilisation et mode d'emploi gratuit
Retrouvez gratuitement la notice de l'appareil SPEEDLITE 580EX CANON au format PDF.

| Type de produit | Flash externe Canon Speedlite 580EX |
| Caractéristiques techniques principales | Guide numéro : 58 (ISO 100, m), plage de zoom : 24-105 mm, angle de diffusion : 14 mm avec diffuseur intégré |
| Alimentation électrique | 4 piles AA (alkaline, NiMH ou lithium) |
| Dimensions approximatives | 75 x 113 x 90 mm |
| Poids | 400 g (sans piles) |
| Compatibilités | Compatible avec les appareils photo Canon EOS et certains modèles PowerShot |
| Type de batterie | Piles AA |
| Tension | 6 V |
| Puissance | 58 (guide numéro à ISO 100) |
| Fonctions principales | Mode TTL, mode manuel, mode stroboscopique, compensation d'exposition au flash, synchronisation haute vitesse |
| Entretien et nettoyage | Utiliser un chiffon doux et sec, éviter les produits chimiques agressifs |
| Pièces détachées et réparabilité | Réparabilité limitée, pièces disponibles via le service après-vente Canon |
| Informations générales utiles | Vérifier la compatibilité avec votre appareil photo avant l'achat, idéal pour les photographes professionnels et amateurs avancés |
FOIRE AUX QUESTIONS - SPEEDLITE 580EX CANON
Questions des utilisateurs sur SPEEDLITE 580EX CANON
0 question sur cet appareil. Repondez a celles que vous connaissez ou posez la votre.
Poser une nouvelle question sur cet appareil
Téléchargez la notice de votre Flash externe au format PDF gratuitement ! Retrouvez votre notice SPEEDLITE 580EX - CANON et reprennez votre appareil électronique en main. Sur cette page sont publiés tous les documents nécessaires à l'utilisation de votre appareil SPEEDLITE 580EX de la marque CANON.
MODE D'EMPLOI SPEEDLITE 580EX CANON
SPEEDLITE
580EX

natural_image
Black Canon Speeddute 500X flash unit (no visible text or symbols on body)Thank you for purchasing a Canon product.
The Canon Speedlite 580EX is an EOS-dedicated, high-output flash unit automatically compatible with E-TTL II, E-TTL, and TTL autoflash. It can be used in three different ways: As a normal on-camera flash, the master unit for a wireless, multi-Speedlite flash system, or a slave unit.
Read this instruction manual while also referring to your camera's instruction manual.
Before using the Speedlite, read this instruction manual and your camera's instruction manual to familiarize yourself with the Speedlite operations.
The basic operation is the same as with normal AE shooting.
When the 580EX is attached to an EOS camera, almost all automatic exposure control for flash photography is handled by the camera.
It is almost the same as using the camera's built-in flash if it has one.
You can think of the 580EX as a built-in, high-output flash.
It is automatically compatible with the camera's flash metering mode (E-TTL II, E-TTL, and TTL).
The camera controls the Speedlite automatically in the following flash metering modes:
-
E-TTL II autoflash (evaluative flash metering with preflash reading/lens distance information)
-
E-TTL autoflash (evaluative flash metering with preflash reading)
-
TTL autoflash (off-the-film metering for real-time flash metering)
Regarding the camera's available flash metering modes, refer to the camera's instruction manual. The Speedlite's major specifications are listed in "External Flash Items."
The camera instruction manual's chapter on flash photography will refer to cameras having 1 and 2 as a Type-A camera (compatible with E-TTL or E-TTL II). And cameras having 3 (compatible with only TTL) are called Type-B cameras.
* This instruction manual assume that you are using the 580EX with a Type-A camera.
For Type-B cameras, see page 53.
1 Getting Started and Basic Operation.... 7
2 Using Flash 13
3 Wireless Flash 31
4 Reference.... 45
Conventions Used in this Manual

natural_image
Simple circular diagram with radial lines and a central circle, no text or symbols present.The <∅> symbol in the text refers to the Select Dial.

natural_image
Simple circular diagram with radial lines and a central black circle, no text or symbols present.The <●> symbol in the text refers to the Select/Set button.
The operation procedures in this instruction manual assume that both the camera and Speedlite's power switches are ON.
Icons are used in the text to indicate the respective buttons, dials, and settings. They match the same icons found on the camera and Speedlite.
The (♂8) / (♂12) icons indicate that the respective function remains in effect for 8 sec. or 12 sec.
Reference page numbers are indicated by (p.**).
This instruction manual uses the following alert symbols:
: The Caution symbol indicates a warning to prevent shooting problems.
: The Note symbol gives supplemental information.


Asterisked buttons have a timer that keep the button's function active for 8 sec. (♂8) after you let go of the button. The <♂> illumination lasts for 12 sec.
LCD Panel

To illuminate the LCD panel, press the <→> button.
The items actually displayed depend on the current settings.
Getting Started and Basic Operation
Installing Batteries 8
Attaching to the Camera.... 9
Turn on the Power Switch 10
Fully Automatic Flash Shooting 11
Using E-TTL II and E-TTL Autoflash in the
Shooting Modes.... 12

To avoid overheating and deteriorating the flash head, do not fire rapid bursts of more than 20 continuous flashes. After 20 continuous flashes, allow a rest time of at least 10 min.

1
Open the cover.
- Slide the battery compartment cover as shown by the arrow and open it.

2
Install the batteries.
Make sure the + and – battery contacts are correctly oriented as shown in the battery compartment.

3
Close the cover.
Close the battery compartment cover and slide it as shown by the arrow.
Recycling Time and Flash Count (with size-AA alkaline batteries)
| Recycling Time (Approx.) | Flash Count (Approx.) | |
| Quick Flash | Normal Flash | |
| 0.1 - 3 | 0.1 - 6 | 100 - 700 |
Based on new size-AA alkarine batteries and Canon's testing standards.
- Quick flash enables a flash to be fired before flash-ready (p.10).

Since the shape of their contacts is not standardized, using non-alkaline size-AA batteries may result in faulty battery connection.

Use four new batteries of the same brand and type. Do not mix battery types. When replacing batteries, replace all four batteries at the same time.
- Size-AA Ni-MH or lithium batteries can also be used.
Attaching to the Camera

1 Loosen the locking ring.
Turn the locking ring as shown by the arrow to loosen it.

Attach it to the camera.
Slip the Speedlite's mounting foot all the way into the hot shoe.

3 Tighten.
Turn the locking ring as shown by the arrow. The locking pin will protrude from the mounting foot to further secure the attachment.
To detach the Speedlite, loosen the locking ring until the locking pin disengages. Then slip the Speedlite out of the hot shoe.
Wireless Selector Settings

The wireless selector is for switching between normal flash shooting and wireless flash shooting.
For normal flash shooting, be sure to set the wireless selector to

1 Set the power switch to .
The flash will start recycling.

Check that the flash is ready.
The pilot lamp will first turn green (ready for quick flash), then red (fully recycled or flash ready).
To fire a test flash, press the pilot lamp.
About Quick Flash
Quick flash enables a flash to be fired before flash-ready, when the pilot lamp is still green.
Although the Guide No. will be 1/6 to 1/2 that of the full output, quick flash is effective for near subjects and when you want a shorter recycle time.
Set the drive mode to Single. Quick flash cannot be used in the continuous shooting, FEB, manual flash, and stroboscopic flash modes.
About Auto Power Off
To save battery power, the power will turn off automatically after 90 sec. of idle use. To turn on the Speedlite again, press the shutter button halfway. Or press the Speedlite's test firing button.

- A test firing cannot be fired while the camera's operation timer ⚙4 or ⚙6 is active.
The Speedlite's settings will be retained in memory even after the power is turned off. To retain the Speedlite's settings when you replace the batteries, replace the batteries within 1 minute after turning off the power.
Fully Automatic Flash Shooting
When you set the camera's shooting mode to
(Program AE) or <□> (Full Auto), E-TTL II/E-TTL fully automatic flash will make it as easy as normal AE shooting.

Set the Speedlite to .
Press the

Focus the subject.
- Press the shutter button halfway to focus.
The shutter speed and aperture will be set as displayed in the viewfinder.
Check that the <⚡> icon is lit in the viewfinder.

Take the picture.
Check that the subject is within the effective range displayed on the LCD panel.
A preflash is fired right before the shot is taken, then the main flash is fired.
If a standard flash exposure was obtained, the flash exposure confirmation lamp will light for about 3 sec.

natural_image
Technical line drawing of a mechanical assembly with gears and shafts (no text or symbols)
will be displayed on the LCD panel even if the camera is compatible with E-TTL II.
If the flash exposure confirmation lamp does not light, move closer to the subject and take the picture again. You can also increase the camera's ISO speed.
Using E-TTL II and E-TTL Autoflash in the Shooting Modes

Just set the camera's shooting mode to
| Tv | Select this mode when you want to set the shutter speed manually.The camera will then automatically set the aperture matching the shutter speed to obtain a standard exposure.If the aperture display blinks, it means that the background exposure will be underexposed or overexposed. Adjust the shutter speed until the aperture display stops blinking. |
| Av | Select this mode when you want to set the aperture manually.The camera will then automatically set the shutter speed matching the aperture to obtain a standard exposure.If the background is dark like a night scene, a slow sync speed will be used to obtain a standard exposure of both the main subject and background. Standard exposure of the main subject is obtained with the flash, while a standard exposure of the background is obtained with a slow shutter speed.Since a slow shutter speed will be used for low-light scenes, using a tripod is recommended.If the shutter speed display blinks, it means that the background exposure will be underexposed or overexposed. Adjust the aperture until the shutter speed display stops blinking. |
| M | Select this mode when you want to set both the shutter speed and aperture manually.Standard exposure of the main subject is obtained with the flash. The exposure of the background is obtained with the shutter speed and aperture combination you set. |
If you use the (Program AE) mode. Flash Sync Speeds and Apertures Use Flash Exposure Compensation 14 FEB (Flash Exposure Bracketing).... 15 FEL FE Lock 16 High-Speed Sync (FP Flash) 17 Bounce Flash.... 18 ZOOM Setting the Flash Coverage and Using the Wide Panel 20 M Manual Flash 22 MULTI Stroboscopic Flash.... 24 ▶ Second-Curtain Sync 26 C.Fn Setting Custom Functions.... 27 Custom Function Settings 28 You can adjust the flash output as easily as normal exposure compensation. Flash exposure compensation can be set up to ± 3 stops in 1/3-stop increments. (If the camera enables only 1/2-stop increments, then only 1/2-stop increments can be set.) 1 Press the <◎> button so that the <52> icon and flash exposure compensation amount blink. 2 Turn the <◎> dial to set the amount. 3 The flash exposure compensation amount will be set. If flash exposure compensation has been set with both the Speedlite and camera, the Speedlite's flash exposure compensation amount will override the camera's. You can take three flash shots while automatically changing the flash output for each shot up to ±3 stops in 1/3-stop increments (1/2-stop increments if the camera enables only 1/2-stop increments). This is called FEB (Flash Exposure Bracketing). 1 Press the <◎> button so that the <◀> icon and flash exposure bracketing amount blink. 2 Set the flash exposure bracketing amount. Turn the <○> dial to set the amount. 3 Press the <◎> button.
▶ FEB will be set. FE (flash exposure) lock enables you to lock the correct flash exposure for any part of the picture. With Aim the viewfinder center over the subject and press the If the subject is too far away and underexposure will result, the <⚡> icon will blink in the viewfinder. Move closer to the subject and try the FE lock again. With high-speed sync, you can use flash with all shutter speeds. This is convenient when you want to use aperture priority for fill-flash portraits. ETTL Zoom 50mm 0.5 0.7 1 1.5 2 3 4 6 9 13 18 m If you set a shutter speed that is the same or slower than the camera's maximum flash sync speed, < 7_H> will not be displayed in the viewfinder. By pointing the flash head toward a wall or ceiling, the flash will bounce off the surface before illuminating the subject. This can soften shadows behind the subject for a more natural-looking shot. This is called bounce flash. Hold down the If the flash coverage is set automatically, the flash coverage will be set to 50mm. The LCD panel will also display <--> mm. - You can also set the flash coverage manually. If the wall or ceiling is too far away, the bounced flash might be too weak and result in underexposure. With the catchlight panel, you can create a catchlight in the subject's eyes to add life to the facial expression. 1 Point the flash head upward by 90°. Pull out the wide panel. The catchlight panel will come out at the same time. 3 Push in the wide panel. - Push in only the wide panel. - Follow the same procedure as for bounce flash. - Point the flash head straight ahead and then upward by 90°. The catchlight will not work if you swing the flash head left or right. - For maximum catchlight effect, stay within 1.5 m/4.9 ft of the subject. If you want to shoot a subject about 0.5 - 2 m (1.6 - 6.6 ft) away, hold down the The flash coverage can be set to match the lens focal length from 24mm to 105mm. The flash coverage can be set automatically or manually. Also, with the built-in wide panel, the flash coverage can be expanded to 14mm wide-angle lenses. ETTL ☒ Zoom 24mm 0.5 0.7 1 1.5 2 3 4 6 9 13 18 m Turn the <○> dial to change the flash coverage. If you set the flash coverage manually, make sure it covers the lens focal length so that the picture will not have a dark periphery. Pull out the wide panel and place it over the flash head as shown. The flash coverage will then be extended to 14mm. The catchlight panel will come out at the same time. Push the catchlight panel back in. If you use bounce flash with the wide panel in place, the entire display on the LCD panel will blink as a warning. Since the subject will be illuminated by both the bounce flash and direct flash, it will look unnatural. The flash coverage will not be compatible with the EF15mm f/2.8 Fisheye lens. EOS digital cameras have one of three image sizes. The lens' effective focal length will differ depending on the camera's image size. The Speedlite automatically recognizes the EOS digital camera's image size and automatically sets the flash coverage for lens focal lengths from 24mm to 105mm. When the Speedlite is attached to a compatible camera, <> will appear on the Speedlite's LCD panel. You can set the flash output from 1/128 power to 1/1 full power in 1/3-stop increments. Use a hand-held flash meter to determine the required flash output to obtain a correct flash exposure. Press the Press the <◎> button. When you change the flash output during shooting, the table below makes it easier to see how the stop changes such as 1/2 -0.3 1/2 1/2 +0.3 . You can see how the stop changes when you increase or decrease the flash output. For example, when you decrease the flash output to 1/2, 1/2 -0.3, or 1/2 -0.7, and then increase the flash output to more than 1/2, 1/2 +0.3, 1/2 +0.7, and 1/1 will be displayed. Figures for decreased flash output → ← Figures for increased flash output With stroboscopic flash, a rapid series of flashes is fired. It can be used to capture multiple images of a moving subject in a single photograph for later study. You can set the firing frequency (number of flashes per sec. expressed as Hz), the number of flashes, and the flash output. 1 Press the - Press the <◎> button to select the item (blinks). Turn the <◎> dial to set the setting, then press the <◎> button. During stroboscopic flash, the shutter should remain open until the firing stops. Use the formula below to calculate the shutter speed and set it with the camera. Number of flashes ÷ Firing frequency (Hz) = Shutter speed For example, if the number of flashes is 10 and the firing frequency is 5 Hz, the shutter speed should be at least 2 sec. To avoid overheating and deteriorating the flash head, do not fire more than 10 stroboscopic bursts. Then allow the Speedlite to rest for at least 10 min. Stroboscopic flash is most effective with a highly reflective subject against a dark background. Max. Stroboscopic Flashes If the number of flashes is displayed as - , the maximum number of flashes will be as shown by the table below regardless of the firing frequency. With a slow shutter speed, you can create a light trail following the subject. The flash fires right before the shutter closes. ETTL Zoom 50mm 0.5 0.7 1 1.5 2 3 4 6 9 13 18 m Press the <_H/> button so that <> is displayed. Stroboscopic flash cannot be set. Setting the shooting mode to "buLb" will make it easier for second-curtain sync. You can customize Speedlite features to suit your preferences. Do it with Custom Functions. 1 Press the <☀/C.Fn> button for 2 sec. so that 2 Select the Custom Function No. Turn the <@> dial to set the Custom Turn the <○> dial to set the Custom Function No. 2 Change the setting. After step 1 above, press the <◎> button for 2 sec. With the distance display blinking, turn the <◎> dial to change the unit to feet or meters. Press the <◎> button. Custom Function Settings C.Fn-06: Convenient when you want to check the depth of field. (p.41) C.Fn-07: If both the external power source and the Speedlite's internal batteries are used to recharge the flash, both power sources will be used together. However, if the internal batteries become exhausted, shooting may be disabled. If 1 is set, only the external power source will be used to recharge the flash and the internal batteries will be spared. Note that even if you set it to 1, the Speedlite will still require internal batteries for flash control. C.Fn-03-1 is a setting for EOS-1 series film cameras only. If you use a Type-B camera and set C.Fn-03-0, E-TTL II/E-TTL autoflash will not work. About Wireless Flash 32 Fully Automatic Wireless Flash 34 Flash Ratio with E-TTL II 38 Wireless Manual Flash with Varied Flash Output..... 42 Setting Manual Flash and Stroboscopic Flash with the Slave Unit 43 With multiple Canon Speedlites having the wireless flash feature, you can create various lighting effects with the same ease as using normal E-TTL II autoflash. The settings you input with the 580EX (master unit) attached to the camera are also transmitted to the slave units which are controlled by the master unit via wireless. Thus, you need not operate the slave units at all during the shoot. The basic wireless set-up is illustrated below. Then all you do is set the master unit to Basic Wireless Settings & Setup Any flash exposure compensation amount, high-speed sync (FP flash), FE lock, FEB amount, manual flash, and stroboscopic flash settings set with the master unit will all be automatically transmitted to the slave units. You can create two or three slave groups and set the flash ratio for E-TTL II autoflash shooting (p.38 - 42). This method has all the Speedlites fire at the same flash output with E-TTL II autoflash controlling the total flash output. 1 Set the wireless selector to 2 Set the wireless selector to 3 If the master unit and slave unit(s) are set to a different channel, set them all to the same channel (p.37). 4 Position the Speedlites within the range shown on the next page. 5 The slave unit(s) will also be automatically set to 6 When the slave unit is ready to fire, the AF-assist beam will blink once each second. 7 Press the master unit's test firing button. 8 Set the camera in the same way as with normal flash shooting. Use the mini stand (tripod socket provided) to prop up the slave unit. The Speedlite's zoom setting will be set automatically to 24mm. It is possible to change the master unit's zoom setting. However, note that the master unit transmits wireless signals to the slave unit(s) with the preflash. Therefore, the flash coverage must cover the slave unit's position. If you change the master unit's zoom setting, be sure to test the wireless operation before shooting. You can disable the master unit from firing during actual exposure so that only the slave unit(s) will fire in the final picture. 1 Press the 2 Disable the master unit's flash firing. Turn the <◎> dial to select <○ FF>, then press the <◎> button. Even if you disable the master unit's flash firing, it will still fire a preflash to transmit wireless signals. Flash exposure compensation and other settings set with the master unit will also be automatically set in the slave units. Thus, you need not make settings on the slave unit(s). Wireless flash with the following settings can be done in the same way as with normal flash shooting. • FEB With FE lock, if even one Speedlite will result in underexposure, the <4> icon will blink in the viewfinder. Open the aperture more or move the slave unit closer to the subject. If there is another Canon wireless flash system nearby, you can change the channel No. to prevent signal confusion. Both the master and slave units must be set to the same channel No. Press the Turn the <○> dial to select the channel number, then press the <●> button. With one master unit and one or two slave units off-camera, you can adjust the flash ratio for E-TTL II autoflash shooting. The example below has two slave units and the master unit disabled from firing. Multiple slave units can be assigned to different slave groups by setting the slave ID. 1 Set the wireless selector to 2 Press the Turn the <○> dial to select , then press the <●> button. 1 Set the wireless selector to 2 Disable the master unit's flash firing. (p.36) 3 Press the Turn the <○> dial to select Turn the <○> dial to set the flash ratio. Set the camera in the same way as with normal flash shooting. With the EOS ELAN II/ELAN II E/50/50E, EOS 500N/REBEL G, EOS IX, EOS IX7/IX Lite, EOS 300/REBEL 2000, and EOS 3000N/66/REBEL XS N/REBEL G II, the flash ratio cannot be set with multiple Speedlites. The flash ratio range of 8:1 - 1:1 - 1:8 is equivalent to 3:1 - 1:1 - 1:3 in stops (1/2-stop increments). Wireless Flash with Three Slave Groups You can have slave groups A and B and also add slave group C. You can use slave groups A and B to obtain the standard flash exposure of the subject, and slave group C to illuminate the background to eliminate shadows. See "Set the Slave Unit" on page 38 to set the slave unit's ID to <A> , <B> , or <C> . See "Set the Master Unit" on page 39. In step 4, select If If you point the slave group < C> Speedlite toward the subject, the subject will be overexposed. If the camera has a depth-of-field preview button, press it to fire a 1-sec. burst of flashes. This is the modeling flash. You can check the lighting and shadow effects. You can fire the modeling flash for both wireless and normal flash shooting. Do not fire the modeling flash more than 10 consecutive times. If you fire the modeling flash 10 consecutive times, allow the Speedlite to rest for at least 10 min. to avoid overheating and deteriorating the flash head. The modeling flash cannot be fired with the EOS 300/REBEL 2000 and Type-B cameras (p.2). For example, if you have the slave ID set to for three Speedlites, all three Speedlites will be controlled as if they were one Speedlite in slave group A. With manual flash and multiple Speedlites, you can set a different flash output for each slave unit (group). All settings are done with the master unit. 1 Press the 2 Press the 2 Select the flash ratio. Turn the <○> dial to select 4 Set the flash output. Press the <◎> button. Manual flash or stroboscopic flash can be set manually with the slave unit. Do this in the following cases: (1) When you want to set the flash output with the slave units individually for wireless or manual flash, as with studio flash units. (2) When you use Speedlite Transmitter ST-E2 for wireless or manual flash. Press the Press the 580EX System.... 46 Troubleshooting 48 Major Specifications 50 Using a Type-B Camera 53 ① Speedlite 580EX (On-camera/Master unit) Dedicated transmitter for wireless control of 580EX/420EX set as slave units. ③ Compact Battery Pack CP-E3 Compact and lightweight external power source. Accommodates eight size-AA alkaline or Ni-MH batteries. It can also use size-AA lithium batteries. ④ Speedlite 580EX (Slave unit) Enables the 580EX to be connected to the camera up to 60 cm/2 ft away. All of the EOS camera's automatic functions can be used. ⑧ Speedlite Bracket SB-E1 When the flash fires, the color temperature information is transmitted to certain specific EOS digital camera. This feature optimizes the flash picture's white balance. When the camera's color balance is set to To see if this feature works with your camera, see the white balance specification in the “Major Specifications” of your camera’s instruction manual. If your EOS camera has the Under low-light or low-contrast conditions, the built-in AF-assist beam will be emitted automatically to make it easier to autofocus. The AF-assist beam works with all EOS cameras. The AF-assist beam is compatible with 28mm and longer lenses. The effective range is shown below. The mounting foot's locking pin has not been retracted. The batteries are installed in the wrong orientation. The slave's wireless selector is not set to After 90 sec. of idle operation, auto power off took effect. The wide panel has been pulled out for bounce flash. ▶ Retract the wide panel. (p.20) The flash head has been tilted down by 7°. When you set the flash coverage manually, the setting was a higher number than the lens focal length, resulting in a dark periphery. There was a highly reflective object (glass window, etc.) in the picture. The shooting mode was set to . (p.12) Flash exposure Recycling time/ Transmission range All specifications are based on Canon's testing criteria. Normal Flash (Full Output) and Quick Flash (GNo.) Manual Flash (GNo.) If you use the 580EX with a Type-B camera (TTL autoflash camera), note the available features and restrictions below. When a Type-B camera is used with the 580EX set to autoflash, Features Available with All Type-B Cameras ● E-TTL II/E-TTL autoflash This device complies with Part 15 of the FCC Rules. Operation is subject to the following two conditions: (1) This device may not cause harmful interference, and (2) this device must accept any interference received, including interference that may cause undesired operation. Do not make any changes or modifications to the equipment unless otherwise specified in the instructions. If such changes or modifications should be made, you could be required to stop operation of the equipment. This equipment has been tested and found to comply with the limits for a class B digital device, pursuant to part 15 of the FCC Rules. These limits are designed to provide reasonable protection against harmful interference in a residential installation. This equipment generates, uses and can radiate radio frequency energy and, if not installed and used in accordance with the instructions, may cause harmful interference to radio communications. However, there is no guarantee that interference will not occur in a particular installation. If this equipment does cause harmful interference to radio or television reception, which can be determined by turning the equipment off and on, the user is encouraged to try to correct the interference by one or more of the following measures: • Reorient or relocate the receiving antenna. This digital apparatus does not exceed the Class B limits for radio noise emissions from digital apparatus as set out in the interference-causing equipment standard entitled “Digital Apparatus”, ICES-003 of the Industry Canada. The apparatus shall not be exposed to dripping or splashing. Batteries shall not be exposed to excessive heat such as sunshine, fire or the like. Dry batteries shall not be subjected to charging. This mark indicates that the product complies with Australia's EMC regulations. This Instructions booklet is dated July 2004. For information on the camera's compatibility with system accessories marketed after this date, contact your nearest Canon Service Center. CANON INC. 30-2, Shimomaruko 3-chome, Ohta-ku, Tokyo 146-8501, Japan U.S.A. CANON U.S.A. INC. For all inquiries concerning this camera, call toll free in the U.S. 1-800-OK-CANON or write to: Customer Relations, Canon U.S.A., Inc. One Canon Plaza, Lake Success, N.Y. 11042-1198 CANADA — CANON CANADA INC. HEADQUARTERS 6390 Dixie Road, Mississauga, Ontario L5T 1P7, Canada CANON CANADA INC. MONTREAL BRANCH 5990, Côte-de-Liesse, Montréal Québec H4T 1V7, Canada1010 CANON CANADA INC. CALGARY OFFICE 2828, 16th Street, N.E. Calgary, Alberta T2E 7K7, Canada For all inquiries concerning this camera, call toll free in Canada 1-800-OK-CANON EUROPE, — CANON EUROPA N.V. AFRICA & Bovenkerkerweg 59-61, P.O. Box 2262, 1180 EG Amstelveen, The Netherlands MIDDLE EAST CANON COMMUNICATION & IMAGE FRANCE S.A. 102, Avenue du Général de Gaulle 92257 La Garenne-Colombes Cedex, France CANON UK LTD. Woodhatch Reigate Surrey RH2 8BF, United Kingdom CANON DEUTSCHLAND GmbH Europark Fichtenhain A10, 47807 Krefeld, Germany CANON ITALIA S.p.A. Via Milano 8 I-20097 San Donato Milanese, Milano, Italy CANON Schweiz AG Geschäftsbereich Wiederverkauf, Industriestrasse 12, CH-8305 Dietlikon, Switzerland CANON G. m. b. H. Oberlaerstrasse 233, 4th floor, 1100 Wien, Austria CANON España, S. A. C/Joaquín Costa, 41, 28002 Madrid, Spain SEQUE Soc. Nac. de Equip., Lda., Praça da Alegria, 58, 2°, 1269-149 Lisboa, Portugal CENTRAL & — CANON LATIN AMERICA, INC. DEPTO DE VENTAS SOUTH AMERICA 703 Waterford Way Suite 400 Miami, FL 33126 U.S.A. CANON LATIN AMERICA, INC. CENTRO DE SERVICIO Y REPARACION Apartado 2019, Zona Libre de Colón, República de Panamá ASIA —— CANON HONGKONG CO., LTD. 9/F, The Hong Kong Club Building, 3A Chater Road, Central, Hong Kong CANON SINGAPORE PTE. LTD. 79 Anson Road #09-01/06 Singapore 079906 OCEANIA — CANON AUSTRALIA PTY. LTD. 1 Thomas Holt Drive, North Ryde, N.S.W. 2113, Australia CANON NEW ZEALAND LTD. Akoranga Business Park, Akoranga Drive, Northcote, Auckland, New Zealand JAPAN CANON SALES CO., INC. 16-6, Kohnan 2-chome, Minato-ku, Tokyo 108-8011, Japan The Limited Warranty set forth below is given by CANON COMPANY listed below with respect to Canon Photographic Products purchased in the United States, Canada, Australia, the United Kingdom, New Zealand, Mexico or Japan. This Limited International Warranty is only effective upon presentation of the warranty card and proof of purchase. This Canon equipment is warranted against defective materials or workmanship for one (1) year from the date of original purchase and is limited to repair, adjustment and/or replacement of defective parts. Equipment covered by this Warranty will be repaired by Canon International Warranty Members located in the United States, Canada, Australia the United Kingdom, New Zealand, Mexico and Japan, WITHOUT CHARGE. (List of Canon International Warranty Members included with the equipment.) Equipment covered by this Warranty will be repaired by Canon International Warranty Members WITHOUT CHARGE. except for insurance, transportation and handling charges. (See list of Canon International Warranty Members included with the equipment.) When returning equipment for warranty service, the shipping charges must be prepaid and the equipment should be shipped in its original carton or box, or an equivalent, properly packed to withstand the hazards of shipment and be fully insured. A copy of this warranty card and proof of purchase should be enclosed, as well as a description of the problem, film samples, etc. Repairs will be made and the equipment will be returned, shipped at NO CHARGE within the country of repair. This warranty only covers defective materials or workmanship encountered in normal use of the equipment and does not apply in the following cases: (a) Loss of damage to the equipment due to abuse causing deterioration, mishandling, accident or failure to follow operating instructions. Equipment covered by this warranty may be repaired by Canon International Warranty Members located outside the United States, Canada, Australia, the United Kingdom, New Zealand, Mexico and Japan. WITHOUT CHARGE, except for insurance, transportation and handling charges. (Worldwide list of Canon International Warranty Members included with equipment.) CANON COMPANY EXCLUDES ALL REPRESENTATIONS, WARRANTIES, CONDITIONS OR LIABILITIES (WHETHER EXPRESS OR IMPLIED, INCLUDING MERCHANTABILITY AND FITNESS FOR A PARTICULAR PURPOSE) IN RELATION TO THE EQUIPMENT, EXCEPT THOSE WHICH ARE SET FORTH ABOVE AND/OR EXCEPT TO THE EXTENT THAT ANY SUCH EXCLUSION WOULD CONTRAVENE ANY STATUTE OR CAUSE THIS TERM TO BE VOID. EXCEPT TO THE EXTENT THAT ANY SUCH EXCLUSION WOULD CONTRAVENE ANY STATUTE OR CAUSE THIS TERM TO BE VOID, CANON COMPANY EXCLUDES ALL LIABILITY TO THE PURCHASER IN RESPECT OF ANY CLAIM (WHETHER CONTRACTUAL, TORTIOUS, STATUTORY OR OTHERWISE) FOR ANY GENERAL, SPECIAL, INCIDENTAL OR CONSEQUENTIAL LOSS, DAMAGE, COST OR EXPENSE (INCLUDING, WITHOUT LIMITATION, ANY LOSS OF FILM) IN RELATION TO THE EQUIPMENT OR ANY SERVICES SUPPLIED ANY OTHER THAN ANY WARRANTY SHALL NOT EXTEND TO ANYONE OTHER THAN THE ORIGINAL PURCHASER OF THIS PROPERTY. This warranty gives you specific legal rights, and you may also have other rights which vary from state to state, province to province and country to country. KEEP THIS WARRANTY CARD. IT IS YOUR PERMANENT RECORD OF WARRANTY. IF LOST IT WILL NOT BE RE-ISSUED. *Limited Warranty means that the contents of this warranty are limited to the above-mentioned terms and conditions. CANON PHOTOGRAPHIC PRODUCTS INTERNATIONAL SERVICE NETWORK ご購入いただいたキャノン製品の修理は、下記キャノン修理相談窓口にてお受けしております。国際保証書(上記Canon International Warranty Systemのシンボルマーク)付の製品は、購入された国や海外でも、⊕マークの付いた修理窓口にて保証内修理をお受けしております。保証内修理をお受けになる場合は、必ず保証書を掲示して下さい。保証書の掲示がない場合や保証書に販売店名、購入日がない場合は有料となります。 ・修理内容によっては、部品を特別に注文しなければならず、通常よりも日数がかかる場合もあります。 Service of your Canon product will be provided at any of the listed authorized service facilities. Warranty service of products with international Warranty certificate (with the symbol ⊕ for Canon International Warranty System indicated above) will be provided at the listed service facilities marked ⊕ in areas other than the country or region where the product was purchased. You must present your warranty certificate when requesting repairs during the warranty period. If no certificate is presented, or if the warranty does not bear the place and date of purchase, you will be charged the cost of the repairs. - Some types of repair may require that parts be ordered specially. In this event, the repairs may take longer than usual. • The contents of this document are subject to change without notice. 凡列名委托的任何服务单位都能为您的 Canon 佳能产品提供服务的。在购买产品的国家或地区以外的地区而标识有 ⊕ 标记的列名服务单位即能提供附带有国际保证书(带有上面所指 Canon 佳能国际保证系统用的标记 ⊕)的 Canon 佳能产品的保证服务。在保证期间内,当您要送修产品时,一定要出示您的保证书。如不出示保证书,或保证书未记载购买产品的商店和日期时,便须付一切修理费用。 - 某些型式产品的修理可能必须特别订购零件。因此,可能需要较长的修理期间。 - 本文件内容有所变更时,恕不另行奉告。 凡列名委托的任何服務單位都能為您的 Canon 佳能產品提供服務的。在購買產品的國家或地區以外的地區而標識有 ⊕ 標記的列名服務單位即能提供附帶有國際保證書(帶有上面所指 Canon 佳能國際保證系統用的標記 ⊕)的 Canon 佳能產品的保證服務。在保證期間內,當您要送修產品時,一定要出示您的保證書。如不出示保證書,或保證書未記載購賠產品的商店和日期時,便須付一切修理費用。 - 某些型式產品的修理可能必須特別訂購零件。因此,可能需要較長的修理期間。 - 本文件內容有所變更時,恕不另行奉告。Shutter Speed Setting Aperture Setting P Automatic (1/60 sec. - 1/X sec.) Automatic Tv Manual (30 sec. - 1/X sec.) Automatic Av Automatic (30 sec. - 1/X sec.) Manual M Manual (buLb, 30 sec. - 1/X sec.) Manual

Using Flash
Flash Exposure Compensation


Set the flash exposure compensation amount.
To cancel the flash exposure compensation, set the amount to +0.
Press the <◎> button.


The shots will be taken in the drive mode set with the camera.
For FEB shooting, set the camera's drive mode to Single shooting and be sure the flash is ready before you shoot. 1 Focus the subject.

Press the
▶ A preflash will be fired to obtain a flash exposure reading for the subject.
“FEL” will be displayed on the LCD panel for 0.5 sec.
Each time you press the 
If
- If the subject is too small, FE lock might not be very effective.Press the <_H/> button so that <_H> is displayed.
Stroboscopic flash cannot be set.
With high-speed sync, the faster the shutter speed, the shorter the effective flash range will be. Check the LCD panel for the effective flash range.
To return to normal flash, press the <H/> button so that <H> icon turns off.Bounce Flash
Set the Bounce Direction


The wall or ceiling should be a plain, white color for high reflectance. If the bounce surface is not white, a color cast may result in the picture.
After you take the shot, if the flash exposure confirmation lamp does not light, use a larger aperture opening and try again.Creating a Catchlight

natural_image
Illustration of a laptop with a grid screen and an upward arrow, no text or symbols present

natural_image
Diagram showing a device with a screen and a downward arrow, no text or symbols present

Closeup Flash Shooting

ZOOM Setting the Flash Coverage and Using the Wide Panel

Press the
When the flash coverage is set automatically, <M> is not displayed.
Using the Wide Panel

natural_image
Line drawing of a portable electronic device with a mesh grille (no text or symbols)
The 
Pull out the wide panel gently. Using excessive force may detach the wide panel.
If the wide panel is accidentally detached, the 
natural_image
Line drawing of a portable electronic device with ventilation grille (no text or symbols)

Automatic Setting of Flash Coverage for the Camera's Image Size


Set the flash output.
The flash output display will blink.
Turn the <○> dial to set the flash output, then press the <○> button.
- Press the shutter button halfway to see the effective flash range displayed.
Displayed Flash Output Figures
Sample Flash Output Figures
1/1 1/1 -0.3 1/1 -0.7 1/2 1/2 -0.3 1/2 -0.7 1/4 ... 1/2 +0.7 1/2 +0.3 1/4 +0.7 1/4 +0.3 ... MULTI Stroboscopic Flash


Select the item to be set.

Set the desired setting.
The next item to be set will blink.
After you set the flash output and press the <◎> button, the entire display will turn on.Calculating the Shutter Speed


Using a tripod, a remote switch, and external power source is recommended.
- A flash output of 1/1 or 1/2 cannot be set for stroboscopic flash.
- Stroboscopic flash can be used with "buLb."
If the number of flashes is displayed as --, the firing will continue until the shutter is closed or the battery runs out. The number of flashes will be limited as shown by the table below.Flash Output\Hz 1 2 3 4 5 6 - 7 8 - 9 1/4 7 6 5 4 4 3 3 1/8 14 14 12 10 8 6 5 1/16 30 30 30 20 20 20 10 1/32 60 60 60 50 50 40 30 1/64 90 90 90 80 80 70 60 1/128 100 100 100 100 100 90 80 Flash Output\Hz 10 11 12 - 14 15 - 19 20 - 50 60 - 199 1/4 2 2 2 2 2 2 1/8 4 4 4 4 4 4 1/16 8 8 8 8 8 8 1/32 20 20 20 18 16 12 1/64 50 40 40 35 30 20 1/128 70 70 60 50 40 40 Flash Output 1/4 1/8 1/10 1/32 1/64 1/128 Flashes 2 4 8 12 20 40 

To return to normal flash, press the <▼H/▼> button so that the <▼> icon turns off.
With E-TTL II/E-TTL, the flash will fire twice even with a slow sync speed. The first flash is the preflash.C.Fn Setting Custom Functions


The selected setting will blink.
▶ Turn the <◎> dial to select "0" or "1", then press the <◎> button.
▶ After you set the Custom Function and press the Changing Meters or Feet

Custom Function No. Item Setting No. Setting Description C.Fn-01 Automatic cancellation of FEB 0 Enabled 1 Disabled C.Fn-02 FEB sequence 0 Standard exposure → Decreased exposure → Increased exposure 1 Decreased exposure → Standard exposure → Increased exposure C.Fn-03 Flash metering mode 0 E-TTL II/E-TTL autoflash 1 TTL autoflash C.Fn-04 Slave unit's auto power off time 0 Auto power off after 60 min. 1 Auto power off after 10 min. C.Fn-05 Cancellation of slave unit's auto power off 0 Cancellable with master unit within 1 hour 1 Cancellable with master unit within 8 hours C.Fn-06 Modeling Flash 0 Enabled 1 Disabled C.Fn-07 Flash recycling method when external power source is used 0 Recycle with both the Speedlite and external power source 1 Recycle with only the external power source C.Fn-08 Quick flash with continuous shooting 0 Disabled 1 Enabled C.Fn-09 Test firing with autoflash 0 1/32 1 Full output C.Fn-10 Modeling flash with test firing button 0 Disabled 1 Enabled C.Fn-11 Auto setting of flash coverage to match camera's image size 0 Enabled 1 Disabled C.Fn-12 AF-assist beam OFF 0 Disabled 1 Enabled C.Fn-13 Flash exposure compensation setting method 0 Set with <◎> button and <◎> dial. 1 Set directly with <◎>. C.Fn-14 Auto Power Off activation 0 On 1 Off 
Do not use this setting if you have an EOS digital camera or EOS REBEL T2/300X.
With an EOS digital camera or EOS REBEL T2/300X, this setting will cause improper flash control—the flash might not fire or it may fire only at full output.
If you use a Type-A camera and set C.Fn-03-1, wireless autoflash will not work.
If "AF-assist beam OFF" is set with the Speedlite or camera, the AF-assist beam will not be emitted.

natural_image
Black-and-white landscape photo of a forested hillside with a small house reflected in calm water (no text or symbols visible)

Wireless Flash
About Wireless Flash


Even with multiple Speedlies positioned as slave units, all will be controlled by wireless.
A 580EX set as a slave unit can also be controlled by wireless by Speedlite Transmitter ST-E2 (optional).
Hereinafter, the "master unit" will refer to a 580EX set as the master unit. and a wirelessly-controlled "slave unit" will be a 580EX set as the slave unit.Multi-Speedlite, Wireless Lighting Configurations
Wireless flash with two slave groups (p.38)

Wireless flash with three slave groups (p.40)

Fully Automatic Wireless Flash

Set the camera-attached 580EX as the master unit.

Set the slave 580EX Speedlites(s) as the slave unit(s).

Check the communication channel.
Position the camera and Speedlites as desired.
Set the master unit's flash mode to

Check that the flash is ready.

Check the flash operation.
The slave unit will fire. If the flash does not fire, adjust the slave unit's angle toward the master unit and distance from the master unit.Set the camera and shoot.

Use the bounce feature to swing the slave unit's flash body so that the wireless sensor faces the master unit.
Indoors, the wireless signal may also bounce off the wall so there is more leeway in positioning the slave unit(s).
After positioning the slave unit(s), be sure to test the wireless operation before shooting.
Do not place any obstacles between the master unit and slave unit(s). Obstacles can block the transmission of wireless signals.
If the slave unit enters auto power off, it can be turned on again by pressing the master unit's test firing button.
A test flash cannot be fired while the camera's operation timer ⚙4 or ⚙6 is active.Master Unit's Flash ON/OFF


The 

Using Fully Automatic Wireless Flash
• High-speed sync (FP flash)
- Manual flash
- Stroboscopic flash
Setting Communication Channel


Set the channel No.
Flash Ratio with E-TTL II

radar
| Location | Value (ft.) |
|---|---|
| Indoor | 15 |
| Indoor | 10 |
| Indoor | 8 |
| Outdoor | 32.8 |
| Outdoor | 26.2 |
The chart displays a radial scale with the angle labeled as 80° between the center of the chart. The penguin icon is positioned at the top of the chart, indicating its position within the range of 15m to 12m (49.2 ft.).
Set the Slave Unit

Set the slave ID.
- Repeat steps1 to 3 to set for the other slave unit.Set the Master Unit


Select the flash ratio.

5 Set the flash ratio.
Set the camera and shoot.


The flash ratio at the ■ is shown in parentheses below the scale.


Set the slave units.
For slave Set the master unit and shoot.

Modeling Flash


About Slave Group Control

Wireless Manual Flash with Varied Flash Output


The slave ID will blink.
Turn the <⊙> dial to set the flash output for , then press the <⊙> button.
The slave ID <> will blink. Turn the <> dial to set the flash output for <> , then press the <> button.
The slave ID <> will blink. Turn the <> dial to set the flash output for <> , then press the <> button.
All the slave IDs will light.Setting Manual Flash and Stroboscopic Flash with the Slave Unit

Manual Flash

▶
Set the manual flash output (p.22).Stroboscopic Flash

▶
Press the
Set the stroboscopic flash (p.24).
natural_image
Black-and-white aerial view of a dense forest with a small lake visible in the distance (no text or symbols)

Reference

② Speedlite Transmitter ST-E2
⑤ Speedlite 420EX (Slave unit)
⑥ Mini stand (included with 580EX/420EX)
⑦ Off-Camera Shoe Cord 2About Color Temperature Information Transmission
Reverting to 580EX Default Settings
About the AF-Assist Beam
Position Effective Range (m / ft) Center 0.6 - 10 / 2 - 32.8 Periphery 0.6 - 5 / 2 - 16.4 The Speedlite does not detach from the camera.
Loosen the locking ring all the way before detaching the Speedlite. (p.9)The Speedlite does not fire.
Install the batteries in the correct orientation. (p.8)
The Speedlite's internal batteries are exhausted.
If the flash recycling time is 30 sec. or longer, replace the batteries. (p.8)
Install the Speedlite's internal batteries even when you use an external power source. (p.8)
Attach the Speedlite securely to the camera.
Attach the Speedlite's mounting foot securely to the camera. (p.9)
The electrical contacts of the Speedlite and camera are dirty.
▶ Clean the contacts. (p.9)The slave unit does not fire.
Set it to
The slave unit is not positioned properly.
Place the slave unit within the master unit's transmission range. (p.35)
Point the slave unit's sensor toward the master unit. (p.35)The power turns off by itself.
Press the shutter button halfway or press the test firing button. (p.10)The entire LCD panel blinks.
The flash range scale bars blink.
▶ Change the bounce position. (p.19)The periphery or bottom of the picture looks dark.
Set the flash coverage that is a lower number than the lens focal length or set it to auto zoom. (p.20)
If only the bottom of the picture looks dark, you were too close to the subject.
If the subject is closer than 2 m/6.6 ft, tilt the flash head downward by 7°. (p.19)The flash exposure is underexposed or overexposed.
▶ Use FE lock. (p.16)
The subject has a very dark or light color.
Set flash exposure compensation. For a dark subject, set a decreased flash exposure. And for a bright subject, set an increased flash exposure. (p.14)
You used high-speed sync.
With high-speed sync, the effective flash range will be shorter. Make sure the subject is within the effective flash range displayed. (p.17)The picture is really blurred.
Use a tripod or set the shooting mode to Major Specifications
- Type
Type: On-camera, E-TTL II/E-TTL/TTL autoflash Speedlite Compatible cameras: Type-A EOS cameras (E-TTL II/E-TTL autoflash), Type-B EOS cameras (TTL autoflash) Guide No.: 58/190 (at 105mm focal length, ISO 100 in meters/feet) Flash coverage: 24 - 105mm (14mm with wide panel)Auto zoom (flash coverage set automatically for lens focal length and image size)Manual zoomFlash head swing (bounce flash) Flash duration: Normal flash: 1.2 ms or shorter,Quick flash: 2.3 ms or shorter Color temperature information transmission: Flash color temperature information transmitted to camera - Exposure Control
Exposure Control Type: E-TTL II/E-TTL/TTL autoflash, manual flash Flash range (with 50mm f/1.4, ISO 100): Normal flash: 0.5 - 30 m / 1.6 - 98.4 ftQuick flash: 0.5 - 7.5 m / 1.6 - 24.6 ft (min.)0.5 - 21m / 1.6 - 68.9 ft (max.)High-speed sync: 0.5 - 15 m / 1.6 - 49.2 ft (at 1/250 sec.) compensation: Manual, FEB: ±3 stops in 1/3-stop increments(Manual and FEB can be combined) FE lock: Withbutton orbutton High-speed sync: Provided Stroboscopic flash: Provided (1 - 199 Hz) Flash exposure confirmation: Pilot lamp lights - Flash Recycling (with size-AA alkaline batteries)
Flash-ready indicator: Normal flash: 0.1 to 6 sec. / Red pilot lamp lights Quick flash: 0.1 to 3 sec. / Green pilot lamp lights - Wireless Flash
Transmission method: Optical pulse Channels: 4 Wireless options: OFF, Master, and Slave (Approx.): Outdoors: 12 - 15 m / 39.4 - 49.2 ft,Indoors: 8 - 10 m / 26.2 - 32.8 ftReception angle: ±40° horizontal, ±30° vertical Controllable slave groups: 3 (A, B, and C) Flash ratio control: 1:8 - 1:1 - 8:1 in 1/2-stop increments Slave-ready indicator: AF-assist beam blinks Modeling flash: Fired with camera's depth-of-field preview button - Custom Functions:
- AF-Assist Beam
Linkable AF points: 1 - 45 AF points (28mm or longer focal length) Effective range (Approx.): At center: 0.6 - 10 m / 2.0 - 32.8 ft, Periphery: 0.6 - 5 m / 2.0 - 16.4 ft - Power Source
Internal power: Four size-AA alkaline* Size-AA Ni-MH or lithium batteries also possible Battery life(Approx. flash count): 100 - 700 flashes (with size-AA alkaline batteries) Battery life(Approx. wireless transmissions): 1500 transmissions (Master unit firing disabled, size-AA alkaline batteries) Power saving: Power off after 90 sec. or idle operation (60 min. if set as slave) External power sources: Compact Battery Pack CP-E3 - Dimensions
(W x H x D): 76 x 134 x 114 mm / 3.0 x 5.3 x 4.5 in • Weight: 375 g / 13.2 oz (Speedlite only, excluding batteries)
Product specifications and external appearance are subject to change without notice.Guide No. (GNo.) (ISO 100, in meters/feet)
Flash Coverage (mm) 14 24 28 35 50 70 80 105 Normal Flash(Full output) 15/49.2 28/91.9 30/98.4 36/118.1 42/137.8 50/164 53/173.9 58/190.3 Quick Flash Same as 1/2 to 1/6 manual flash output Flash Output Flash Coverage (mm) 14 24 28 35 50 70 80 105 1/1 15/49.2 28/91.9 30/98.4 36/118.1 42/137.8 50/164 53/173.9 58/190.3 1/2 10.6/34.8 19.8/65 21.2/69.6 25.5/83.7 29.7/97.4 35.4/116.1 37.5/123 41/134.5 1/4 7.5/24.6 14/45.9 15/49.2 18/59.1 21/68.9 25/82 26.5/86.9 29/95.1 1/8 5.3/17.4 9.9/32.5 10.6/34.8 12.7/41.7 14.8/48.6 17.7/58.1 18.7/61.4 20.5/67.3 1/16 3.8/12.5 7/23 7.5/24.6 9/29.5 10.5/34.4 12.5/41 13.3/43.6 14.5/47.6 1/32 2.7/8.9 4.9/16.1 5.3/17.4 6.4/21 7.4/24.3 8.8/28.9 9.4/30.8 10.3/33.8 1/64 1.9/6.2 3.5/11.5 3.8/12.5 4.5/14.8 5.3/17.4 6.3/20.7 6.6/21.7 7.3/24 1/128 1.3/4.3 2.5/8.2 2.7/8.9 3.2/10.5 3.7/12.1 4.4/14.4 4.7/15.4 5.1/16.7 Using a Type-B Camera
Configuration Available Features On-camera shooting TTL autoflash Flash exposure compensation FEB Manual flash Stroboscopic flash Second-curtain sync Wireless flash Manual flash Stroboscopic flash Features not Available with Any Type-B Cameras
- FE lock
● High-speed sync (FP flash)
● Autoflash with wireless flash
● Flash ratio set with multi-Speedlite wireless flashFeatures Available with Some Type-B Cameras
- Increase the separation between the equipment and receiver.
- Consult the dealer or an experienced radio/TV technician for help.
Canon
Canon
Canon
LIMITED WARRANTY
(b) If equipment is defective as a result of leaking batteries or liquid damage.
(c) Defective materials or workmanship where the defect is due to the equipment having been serviced or modified by other than Canon International Warranty Members or other authorized service facilities around the world.
(d) Malfunction resulting from the use of accessories, attachments, product supplies, parts or devices (including, without limitation, batteries, film, lenses, flash attachments and other accessories) with this Canon photographic equipment that do not conform to Canon specifications.
(e) Damage resulting during shipment. (Claim must be presented and examined by the shipper.)Canon

キャノンカメラ国際サービス網
・都合により記載内容を変更する場合があります。
・当リストに無いサービス拠点の問い合わせは各地域の修理窓口へお問い合わせ願います。Canon Photographic Product International Service Network
CANON 照相机国际服务网
CANON 照相機國際服務網