
VPC-S880P - Caméra numérique SANYO - Notice d'utilisation et mode d'emploi gratuit
Retrouvez gratuitement la notice de l'appareil VPC-S880P SANYO au format PDF.

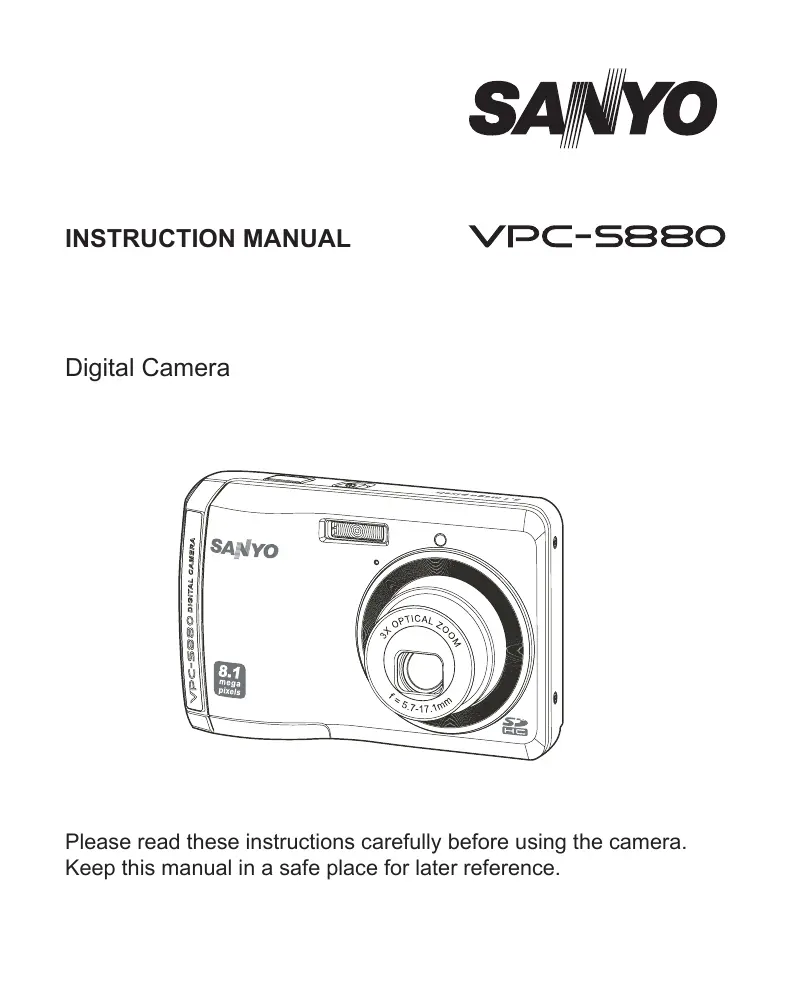

| Type de produit | Caméra numérique compacte |
| Marque | SANYO |
| Modèle | VPC-S880P |
| Capteur d'image | CCD 1/2,5", 8,1 mégapixels |
| Résolution maximale (photo) | 3264 x 2448 pixels |
| Résolution vidéo maximale | 640 x 480 pixels à 24 ips |
| Objectif | Zoom optique 3x, focale 5,7-17,1 mm (équiv. 34-102 mm en 35 mm) |
| Plage d'ouverture | f/2,9 (W) - f/5,2 (T) |
| Écran LCD | 2,8" TFT couleur, 230 000 pixels |
| Support de stockage | Mémoire interne 16 Mo (12 Mo disponibles) + carte SD/SDHC (jusqu'à 4 Go, optionnelle) |
| Format de fichier | JPEG, DCF, EXIF 2.2, AVI |
| Alimentation | 2 piles AA (alcalines recommandées, rechargeables Ni-MH possibles) |
| Dimensions (L x H x P) | 97,1 x 62,2 x 20,9 mm (sans parties saillantes) |
| Poids | Environ 132 g (sans piles ni carte mémoire) |
| Température de fonctionnement | 0°C à 40°C |
| Humidité de fonctionnement | 10% à 85% (sans condensation) |
| Flash intégré | Oui, portée 0,5-2,4 m (W) / 0,5-2,1 m (T) |
| Connexion USB | USB 2.0 |
| Fonctions principales | Détection de visages, 20 modes scène, panorama, réduction d'yeux rouges, retouche d'image |
| Entretien et nettoyage | Nettoyer l'objectif avec un chiffon doux sec ou du papier optique. Éviter l'humidité, la poussière et les chocs. |
| Sécurité | Ne pas exposer à l'eau, ne pas démonter, ne pas utiliser en marchant ou en conduisant. Tenir les piles hors de portée des enfants. |
| Pièces détachées et réparabilité | Pièces non spécifiées ; contacter le revendeur pour réparation. Les piles sont standard AA. |
| Informations générales | Notice d'utilisation au format PDF disponible en ligne. Compatible PictBridge pour impression directe. |
FOIRE AUX QUESTIONS - VPC-S880P SANYO
Questions des utilisateurs sur VPC-S880P SANYO
0 question sur cet appareil. Repondez a celles que vous connaissez ou posez la votre.
Poser une nouvelle question sur cet appareil
Téléchargez la notice de votre Caméra numérique au format PDF gratuitement ! Retrouvez votre notice VPC-S880P - SANYO et reprennez votre appareil électronique en main. Sur cette page sont publiés tous les documents nécessaires à l'utilisation de votre appareil VPC-S880P de la marque SANYO.
MODE D'EMPLOI VPC-S880P SANYO
INSTRUCTION MANUAL
VPC-5880
Digital Camera
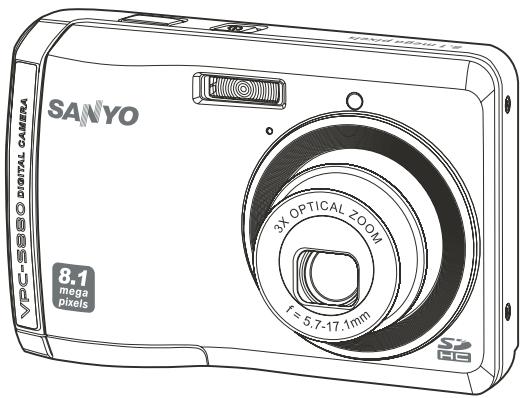
Please read these instructions carefully before using the camera. Keep this manual in a safe place for later reference.
FCC STATEMENT
This device complies with Part 15 of the FCC Rules. Operation is subject to the following two conditions:
(1) This device may not cause harmful interference, and
(2) This device must accept any interference received, including interference that may cause undesired operation.
Note:
This equipment has been tested and found to comply with the limits for Class B digital devices, pursuant to Part 15 of the FCC rules. These limits are designed to provide reasonable protection against harmful interference in a residential installation. This equipment generates uses and can radiate radio frequency energy and, if not installed and used in accordance with the instructions, may cause harmful interference to radio communications. However, there is no guarantee that interference will not occur in a particular installation. If this equipment does cause harmful interference to radio or television reception, which can be determined by turning the equipment off and on, the user is encouraged to try to correct the interference by one or more of the following measures:
Reorient or relocate the receiving antenna.
■ Increase the separation between the equipment and receiver.
- Connect the equipment into an outlet on a circuit different from that to which the receiver is connected.
■ Consult the dealer or an experienced radio/TV technician for help.
Use of shielded cable is required to comply with Class B limits in Subpart B of Part 15 of the FCC rules.
Do not make any changes or modifications to the equipment unless otherwise specified in the manual. If such changes or modifications should be made, you could be required to stop operation of the equipment.
Notice
If static electricity or electromagnetism causes data transfer to discontinue midway (fail), restart the application or disconnect and connect the communication cable (USB, etc.) again.
READ THIS FIRST
Trademark Information
Microsoft® and Windows® are U.S. registered trademarks of Microsoft Corporation.
Pentium® is a registered trademark of Intel Corporation.
Macintosh is a trademark of Apple Inc.
SD^TM is a trademark.
SDHC™ is a trademark.

- Other names and products may be trademarks or registered trademarks of their respective owners.
Product Information
Product design and specifications are subject to change without notice. This includes primary product specifications, software, software drivers, and user's manual. This User Manual is a general reference guide for the product.
- The product and accessories that come with your camera may be different from those described in this manual. This is due to the fact that different retailers often specify slightly different product inclusions and accessories to suit their market requirements, customer demographics, and geographical preferences. Products very often vary between retailers especially with accessories such as batteries, chargers, AC adapters, memory cards, cables, pouches, and language support. Occasionally a retailer will specify a unique product color, appearance, and internal memory capacity. Contact your dealer for precise product definition and included accessories.
The illustrations in this manual are for the purpose of explanation and may differ from the actual design of your camera.
The manufacturer assumes no liability for any errors or discrepancies in this user manual.
SAFETY INSTRUCTIONS
Read and understand all Warnings and Cautions before using this product.
Warnings
If foreign objects or water have entered the camera, turn the power off and remove the batteries.
Continued use might cause fire or electric shock. Consult the store of purchase.
If the camera has fallen or its case has been damaged, turn the power off and remove the batteries.
Continued use might cause fire or electric shock. Consult the store of purchase.
Do not disassemble, change or repair the camera.
This might cause fire or electric shock. For repair or internal inspection, ask the store of purchase.
Do not use the camera in areas near water.
This might cause fire or electric shock. Take special care during rain, snow, on the beach, or near the shore.
Do not place the camera on inclined or unstable surfaces.
This might cause the camera to fall or tilt over, causing damage.
Keep the batteries out of the reach of children.
Swallowing the batteries might cause poisoning. If the batteries are accidentally swallowed, immediately consult a physician.
Do not use the camera while you are walking, driving or riding a motorcycle.
This might cause you to fall over or result in traffic accident.


Cautions
Insert the battery paying careful attention to the polarity (+ or -) of the terminals.
Inserting the battery with its polarities inverted might cause fire and injury, or damage to the surrounding areas due to the battery rupturing or leaking.
Do not fire the flash close to anyone's eyes.
This might cause damage to the person's eyesight.
Do not subject the LCD monitor to impact.
This might damage the glass on the screen or cause the internal fluid to leak. If the internal fluid enters your eyes or comes into contact with your body or clothes, rinse with fresh water. If the internal fluid has entered your eyes, consult a physician to receive treatment.
A camera is a precision instrument. Do not drop it, strike it or use excessive force when handling the camera.
This might cause damage to the camera.
Do not use the camera in humid, steamy, smoky, or dusty places.
This might cause fire or electric shock.
Do not remove the battery immediately after long period of continuous use.
The battery becomes hot during use. Touching a hot battery might cause burns.
Do not wrap the camera or place it in cloth or blankets.
This might cause heat to build up and deform the case, resulting in fire. Use the camera in a well-ventilated place.
Do not leave the camera in places where the temperature may rise significantly, such as inside a car.
This might adversely affect the case or the parts inside, resulting in fire.
Before you move the camera, disconnect cords and cables.
Failure to do this might damage cords and cables, resulting in fire and electric shock.


Warning:
TO PREVENT THE RISK OF FIRE OR ELECTRIC SHOCK, DO NOT EXPOSE THIS APPLIANCE TO RAIN OR MOISTURE
FOR AMERICAN USERS
The following advisory is included in accordance with the laws of the State of California (USA):
WARNING:
This product contains chemicals, including lead, known to the States of California to cause cancer, birth defects or other reproductive harm. Wash hands after handling.
-
This equipment has been tested and found to comply with the limits for a Class B digital device, pursuant to Part 15 of the FCC Rules. These limits are designated to provide reasonable protection against harmful interference in a residential installation. This equipment generates, uses and can radiate radio frequency energy and, if not installed and used in accordance with instructions, may cause harmful interference to radio communications. However, there is no guarantee that interference will not occur in a particular installation. If this equipment does cause harmful interference to radio or television reception, which can be determined by turning the equipment off and on, the user is encouraged to try to correct the interference by one or more of the following measures:
-
Reorient or relocate the receiving antenna.
- Increase the separation between the equipment and receiver.
- Connect the equipment into an outlet on a circuit different from that to which the receiver is connected.
-
Consult the dealer or an experienced radio/TV technician for help.
-
Changes or modifications not expressly approved by the party responsible for compliance could void the user's authority to operate the equipment.
FOR CANADIAN USERS
This Class B digital apparatus complies with Canadian ICES-003
FOR EU USERS

Note:
- This symbol mark and recycle system apply to EU countries and do not apply to countries in other areas of the world.
Your SANYO product is designed and manufactured with high quality materials and components which can be recycled and reused.
This symbol means that electrical and electronic equipment, at their end-of-life, should be disposed of separately from your household waste.
Please dispose of the equipment at your local community waste collection/recycling centre.
In the European Union there are separate collection systems for used electrical and electronic products.
Please help up to conserve the environment we live in!
Manufacturer and Address
SANYO Electric Co., Ltd.
5-5, Keihan-hondori, 2-chome,
Moriguchi City, Osaka, Japan
Authorized Representative and Address
SANYO FISHER Sales (Europe) GmbH
Stahlgruberring 4, D-81829 Munich, Germany
Points giving some extended instructions or special points to pay attention to.
You may find the answers to questions or problems concerning camera operation in the sections "Troubleshooting".
FCC information

Tested To Comply
With FCC Standards
FOR HOME OR OFFICE USE
Declaration of Conformity
Model number: VPC-S880
Trade Name: SANYO
Responsible party: SANYO FISHER COMPANY
Address: 21605 Plummer Street
Chatsworth, California 91311
Telephone No.: (818) 998-7322
This device complies with Part 15 of the FCC Rules. Operation is subject to the following two conditions:
(1) this device may not cause harmful interference, and
(2) this device must accept any interference received, including interference that may cause undesired operation.
Canadian ICES-003 information
This class B digital apparatus complies with Canadian ICES-003.
Notes on Battery Usage
When you use the batteries, carefully read and strictly observe the Safety Instructions and the notes described below:
Use only the specified batteries.
- Avoid extremely cold environments as low temperatures can shorten the battery life and reduce camera performance. Therefore Ni-MH rechargeable batteries are highly recommended.
- When you are using a new rechargeable batteries or rechargeable batteries that have not been used for an extended period of time (the batteries that passed the expiry date are exception), it may affect the number of images that can be captured. Therefore, to maximize their performance and lifetime, we recommend that you fully charge the batteries and discharge them for at least one complete cycle before use.
- The batteries may feel warm after a long period of continuous use of the camera or the flash. This is normal and not a malfunction.
The camera may feel warm after a long period of continuous use. This is normal and not a malfunction.
If the batteries are not to be used for a long period of time, remove them from the camera to prevent leakage or corrosion and store them after no battery power is left. Stored for a long time in a fully charged condition, their performance may be impaired.
Always keep the battery terminals clean.
There is a risk of explosion if the batteries are replaced by an incorrect type.
- Dispose of used batteries according to the recycle instructions.
Charge the rechargeable batteries fully before using for the first time.
- Never use batteries of different types (together) or mix old and new batteries.
Never use manganese batteries.
- To prevent short-circuiting or fire, keep the batteries away from other metal objects when carrying or storing.
CONTENTS
10 INTRODUCTION
10 Overview
10 Package Contents
11 GETTING TO KNOW YOUR CAMERA
11 Front View
12 Rear View
13 LCD Monitor Display
15 GETTING START
15 Preparation
16 Initial Settings
18 CAPTURE MODE
18 Capturing Images
19 Recording Shots using Face Detection Technology
20 Setting the Scene Mode
22 Panorama Mode
23VIDEO MODE
23 Recording Video Clips
23 Playing Back Video Clips
24 PLAYBACK MODE
24 Playing Back Still Images
25 Thumbnail Display
25 Removing Red-eye
26 Protecting Images
27 Erasing Images
28 MENU OPTIONS
28 Capture Menu
30 Video Menu
31Playback Menu
32 Setup Menu
34 TRANSFERRING FILES TO YOUR COMPUTER
34 Downloading Your Files
35 EDITING SOFTWARE INSTALLATION
36 SPECIFICATIONS
37 APPENDIX
37 Possible Number of Shots
38 Troubleshooting
39 Connecting to a PictBridge Compatible Printer
INTRODUCTION
Overview
Congratulations on your purchase of the new digital camera.
Capturing high-quality digital images is fast and easy with this state-of-the-art smart camera. Equipped with an 8.1-megapixel sensor, this camera is capable of capturing images with a resolution of up to 3264 x 2448 pixels.
Package Contents
Carefully unpack your camera and ensure that you have the following items:
Common Product Components:
Digital camera
Software CD-ROM
USB cable
Camera strap
Camera pouch
2 x AA size batteries
Instruction manual
Optional Accessory:
SD/SDHC memory card

Accessories and components may vary by retailer.
GETTING TO KNOW YOUR CAMERA
Front View
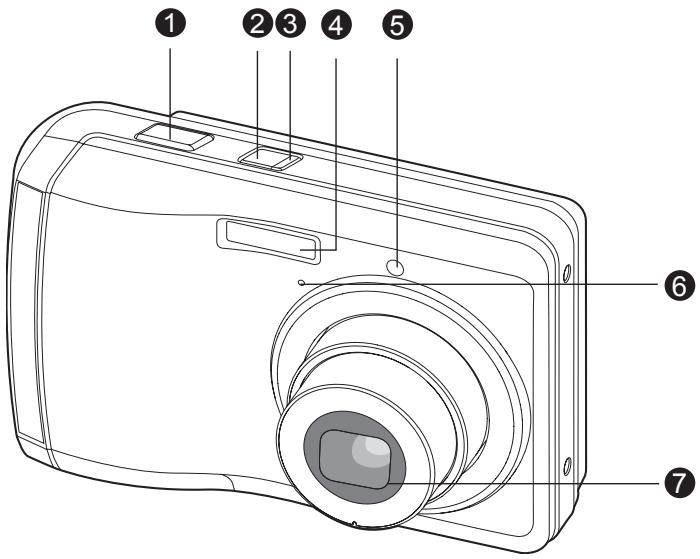
1.Shutter button
2. Power button
3. Status LED
4. Flash
5. Self-timer LED
6. Microphone
7. Lens
Rear View
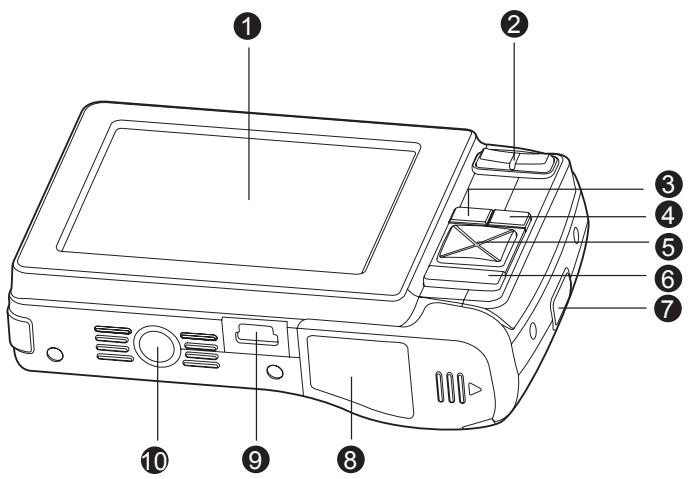
- LCD monitor
- Zoom in button Zoom out button
- MENU Menu button
- MODE Mode button Capture mode Video mode Playback mode
- 4-way control button
Up button Focus button
Right button Flash button
Down button Self-timer/Delete button
Left button Backlight/Exposure compensation button
-
SET/DISPLAY Set/Display/Scene mode button
-
Strap holder
- Battery / Memory card cover
- USB connector
- Tripod socket
LCD Monitor Display
Capture Mode
- Scene mode
- Flash mode
Auto Flash
[4] Red-eye Reduction
[4] Forced Flash
[3] Flash Off
- Zoom status
- Battery condition
[Full battery power
[20] Medium battery power
[ ] Low battery power
[□] No battery power
- Storage media
[SI] Internal memory (no card)
[SD] SD/SDHC memory card
- Capture Mode
[Blank] Single
[ ] Cont.
[ ]AEB
- Image size resolution
[8M] 8M (3264 x 2448 pixels)
[6M] 6M (2816 x 2112 pixels)
[4M] 4M (2272 x 1704 pixels)
[2M] 2M (1600 x 1200 pixels)
[0.3M] 0.3M (640 x 480 pixels)
- Image quality
[ ]Fine
[ ] Normal
Economy
-
Available number of shots
-
Main focus area
- Date
- Self-timer icon
[2s] 2 sec.
[10s] 10 sec.
[10+2s] 10+2 sec.
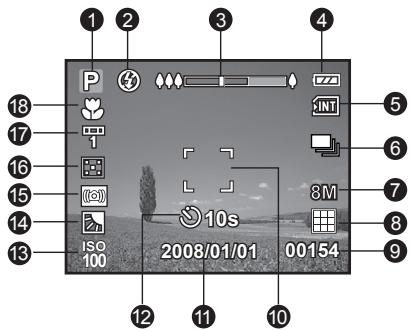
13.ISO
- [Backlight correction
[2] Exposure compensation
-
Slow shutter warning
-
Poor lighting conditions.
Images will be vulnerable to vibration.
- Metering
[ ] Average
[ ] Spot
- W.Balance
[Blank] Auto
[·] Incand.
[1]F11
[2]F12
[+] Daylight
[ ] Cloudy
[Manual]
- Focus setting
[Blank] Auto focus
[ ] Face detection
[ ] Macro
[∞] Infinity
Video mode [ ]
- Mode icon
- Zoom status
- Battery condition
- Storage media
- Video resolution
- Available recording time/Elapsed time
- Main focus area
- Date
- Self-timer icon
- Focus setting
![SANYO VPC-S880P - Video mode [ ] - 1](/content/2025/01/96671/images/2b5dd575a8983d4312b510a0840b113e2e5ba323fb3439b3f27acb6bb1c1983a.jpg)
Playback mode [E] - Still image playback
- Mode icon
- File number
- Folder number
- Protect icon
Playback mode [B] - Video playback
- Total recorded time
- Video status bar
- Elapsed time
- File number
- Folder number
- Protect icon
7.Mode icon - Play mode
![SANYO VPC-S880P - Playback mode [B] - Video playback - 1](/content/2025/01/96671/images/d1e1f55ce1a8a04abd30679ef97b75e976798fe7d19be25e14ed4c15837fc98b.jpg)
GETTING START
Preparation
-
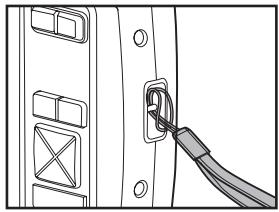
Attach the camera strap.
-
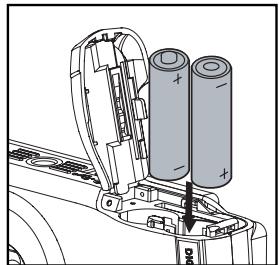
Open the battery/memory card cover.
- Load the supplied batteries with correct orientation as shown.
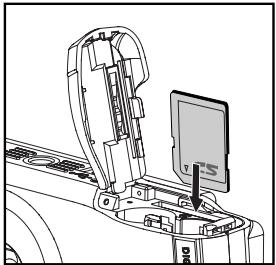
- Insert an SD/SDHC memory card (Optional).
The camera has 16MB internal memory (12MB available for image storage), but you can load an SD/SDHC memory card to expand the camera's memory capacity.
- Be sure to format the memory card with this camera before its initial usage.
- Close the battery/memory card cover and make sure it is locked securely.

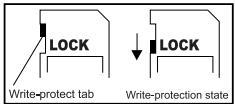
To prevent valuable data from being accidentally erased from an SD/SDHC memory card, you can slide the write protect tab (on the side of the SD/SDHC memory card) to "LOCK".
To save, edit, or erase data on an SD/SDHC memory card, you must unlock the card.
To prevent damaging of an SD/SDHC memory card, be sure to turn off the power when inserting or removing the SD/SDHC memory card. If inserting or removing the SD/SDHC memory card with the power on, the
■ Be careful not to drop the batteries when opening or closing the battery cover.
Initial Settings
Setting the Date and Time
The date/time needs to be set if and when:
Camera is turned on for the first time.
- Camera is turned on after leaving the camera without the battery for an extended period of time.
Follow these steps to set the correct date and time:
- Press the Power button to turn the power on.
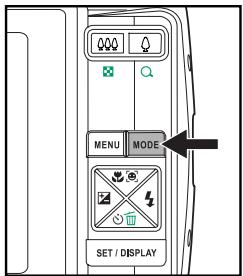
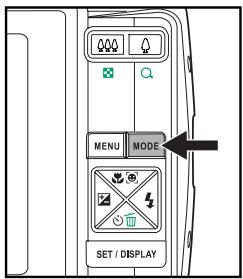
- Press the MODE button to set the camera mode to [] / [量] .
In the [ ] Capture mode, the LCD monitor display is followed by the scene mode setting.
- Press the MENU button
- Select [Setup] with the button.
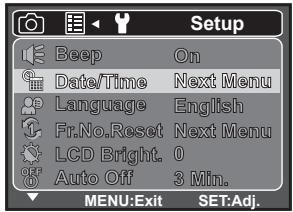
- Select [Date/Time] with the / buttons, and press the SET/DISPLAY button.
-
Select the date type with the / buttons, and press the SET/DISPLAY button.
-
Select the item's field with the / buttons and adjust the value for the date and time with the / buttons.
The time is displayed in 24-hour format.
After confirming all settings are correct, press the SET/DISPLAY button. -
To exit from the [Setup] menu, press the MENU button.

Choosing the Language
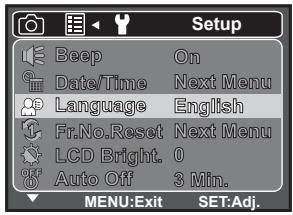
Specify in which language menus and messages are to be displayed on the LCD monitor.
- Set the camera mode to [] / [] .
You may set the language from the playback mode.
- Press the MENU button.
- Select [Setup] menu with the button.
- Select [Language] with the / buttons, and press the SET/DISPLAY button.
The Language setting screen will be displayed.
- Select the displayed language with the / buttons, and press the SET/DISPLAY button.
The setting will be stored.
Formatting the Memory Card or Internal Memory
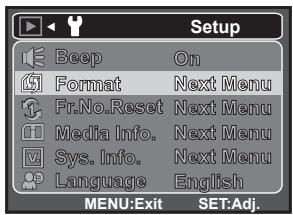
This utility formats the internal memory (or memory card) and erases all stored images and data.
- Set the camera mode to [D].
- Press the MENU button
- Select [Setup] menu with the button.
- Select [Format] with the / buttons, and press the SET/DISPLAY button.
- Select [Execute] with the / buttons, and press the SET/DISPLAY button.
To cancel formatting, select [Cancel] and press the SET/DISPLAY button.
CAPTURE MODE
Capturing Images
Your camera is equipped with a 2.8" full color TFT LCD monitor to help you compose images, playback recorded images/video clips or adjust menu settings.
- Press the Power button to turn the power on.
The status LED lights green and the camera is initiated.
-
Set the camera mode to [O].
-
Compose your image in the LCD monitor.
-
Pressing the button zooms in on the subject, and enlarges the subject on the LCD monitor.
Pressing the button provides a wider angle image. -
Press the shutter button.
-
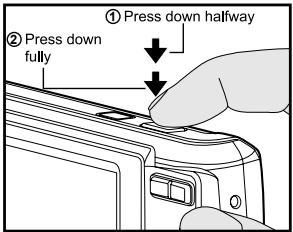
Pressing the shutter button down halfway automatically focuses and adjusts the exposure, and pressing the shutter button down fully captures the images.
The focus area frame turns blue when the camera is in focus and the exposure is calculated. - When the focus or exposure is not suitable, the frame of the focus area turns yellow.
Recording Shots using Face Detection Technology
Face Detection Technology can identify and focus on the human faces in the image. This advanced function simultaneously detects up to 5 human faces regardless of their position in the scene.
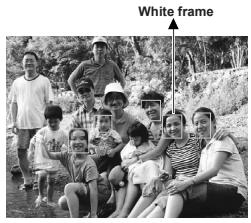
Face detection function is on
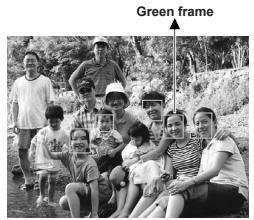
Focus lock
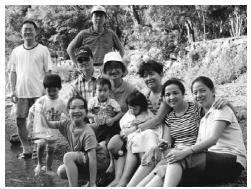
Out of focus
- Set the camera mode to [O].
- Toggle the button until [ ] icon appears on the LCD monitor.
The white frame is identified as the "top priority" face (main focus frame), and gray ones around the other faces.
- Press the shutter button halfway down to lock the focus.
The main focus frame simultaneously turns green.
If the "top priority" face is out of focus, the main focus frame turns red.
- Press the shutter button down fully to capture your image.

Subjects that are not suitable with this function:
a. A person wearing glasses, sunglasses, or face covered with hat or hair.
b. A person turning sideways.
Setting the Scene Mode
By simply selecting one of the following 20 modes, you can capture the image with the most appropriate settings.
- Set the camera mode to [O].
- Press the SET/DISPLAY button.
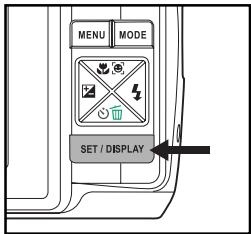
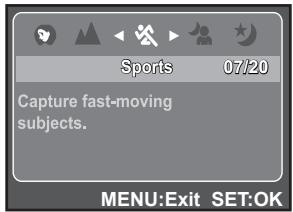
- Select the desired scene mode with the / buttons, and press the SET/ DISPLAY button.
- Compose the image and press the shutter button.
The table below will help you choose the appropriate scene mode:
| Scene mode | Description |
| P Program AE | This mode allows you to manually set parameters other than the shutter speed and the aperture value. |
| Panorama | Select this mode when you want to capture a series of shots then stitch them together with software to make a single photo. |
| Anti-Shake | This mode minimizes the influences of hand shaking when you want to capture an image. |
| Portrait Man | Select this mode when you want to capture an image that makes a man stand out against a blurred background. |
| Portrait Lady | Select this mode when you want to capture an image that makes a lady stand out against a blurred background. |
| Landscape | Select this mode when you want to capture an image with infinity focus, hard sharpness and high saturation. |
| Sports | Select this mode when you want to capture fast-moving subjects. |
| Night Portrait | Select this mode when you want to capture people with an evening or night scene background. |
| Night Scene | Select this mode when you want to capture dark scenes such as night views. |
| Candlelight | Select this mode when you want to capture photos of candlelit scene, without spoiling the ambience. |
| Fireworks | Select this mode when you want to capture fireworks clearly with optimal exposure. The shutter speed becomes slower, so using a tripod is recommended. |
| Text Text | Select this mode when you want to capture an image that contains black and white subjects like printed documents. |
| Sunset | Select this mode when you want to capture a sunset. This mode helps keep the deep hues in the scene. |
| Sunrise | Select this mode when you want to capture a sunrise. This mode helps keep the deep hues in the scene. |
| Splash Water | Select this mode when you want to capture photos of splashing water. |
| Flow Water | Select this mode when you want to capture the soft flowing water. |
| Snow | Select this mode when you want to capture clear snow scenes without darkened subjects and bluish tint. |
| Beach | Select this mode when you want to capture bright beach scenes and sunlit water surfaces. |
| Pets | Select this mode when you want to capture your pets. Shoot from their eye level. |
| User Setting | This mode allows you to manually set your favorite parameters and these settings will be memorized. |
Panorama Mode
This mode is designed to make it easier to take a series of shots then stitch them together with software to make a single photo. You can capture a photographic subject that won't fit into a single frame, such as a landscape, and stitch it together later with a program such as Cool 360 or Photoshop application.
- Set the camera mode to [O].
- Press the SET/DISPLAY button.
- Select [Panorama] with the / buttons, and press the SET/DISPLAY button.
- Shoot the first image.
The next image appears beside the previous image.
- Orient the camera so that the second frame overlaps a small portion of the photographic subject of the first image and press the shutter button to capture the next image.
- Follow the same steps to capture subsequent images in the sequence.
- Finish the sequence by pressing the SET/DISPLAY button after the last image has been recorded.
VIDEO MODE
Recording Video Clips
This mode allows you to record video clips at a resolution of 320 × 240 / 640 × 480 pixels. Voice can also be recorded.
- Set the camera mode to [].
- Compose the image.
- Press the shutter button.
The recording of the video clip will start.
- Pressing the shutter button one more time will end the recording of the video clip.
The recording time depends on the storage size and the subject of the image to be recorded.
The zoom function cannot be used during video recording.

When recording a video clip, the flash cannot be used.
If the write speed of your SD/SDHC memory card is not fast enough for recording video clips in the currently selected size, and then the video recording will stop. In this case, select a video size lower than the current one.
Playing Back Video Clips
You can play back recorded video clips on the camera.
- Set the camera mode to [D].
The last image appears on the screen. - Select the desired video clip with the / buttons.
- Press the SET/DISPLAY button.
A press of the / buttons during playback allows fast forward play/flash reverse play.
To stop video playback, press the button. This stops playback and returns to the start of the video clip.
To pause video playback, press the SET/DISPLAY button. This pauses video playback.
To cancel pause, press the SET/DISPLAY button again.

Video clips cannot be displayed rotated or enlarged.
This camera does not have a built-in speaker so that you can not play back sound with the camera. To play the video clip back on your computer, you may use either Windows Media Player or Apple "QuickTime Player".
- QuickTime basic player is available free of charge, compatible with Mac and Windows-computers and can be downloaded from the Apple web site at www.apple.com. For help using QuickTime Player usage, please refer to the QuickTime on-line help for more information.
PLAYBACK MODE
Playing Back Still Images
You can play back the still images on the LCD monitor.
- Set the camera mode to [B].
The last image appears on the screen.
- The images can be displayed in reverse or forward sequence with the / buttons.
To view the previous image, press the button.
To view the next image, press the button.
Pressing the 四 _ 0 button enlarges the image.
To return to normal magnification, press the 444 button.
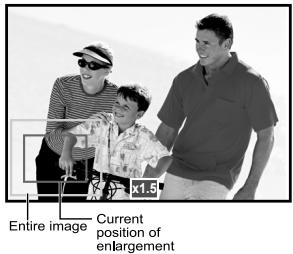

An [ ] icon is displayed with the video data.
Thumbnail Display
This function allows you to view 9 thumbnail images on the LCD monitor at the same time, which can let you quickly search for the image that you want.
- Set the camera mode to [B].
The last image appears on the screen.
- Press the button.
The images are displayed in the thumbnail display.
Images that have been selected with the / / buttons will be indicated by a yellow frame.
- When there are ten or more images, scroll the screen with the / buttons.
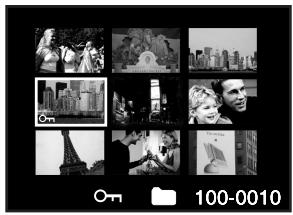
- Press the / / / buttons to select the image to be displayed at regular size.
- Press the SET/DISPLAY button.
The selected image is displayed at its regular size.

In the 9-thumbnail mode, an [] , [] icon may be displayed in a thumbnail.
Removing Red-eye
You can use this function to remove the red-eye effect after an image is taken.
- Set the camera mode to [B].
-
Select the image that you want to edit with the / buttons.
-
Press the MENU button.
- Select [Fix Red Eyes], and press the SET/ DISPLAY button.
- Select [Execute] with the / buttons, and press the SET/DISPLAY button.
- View the changes on the corrected image.
-
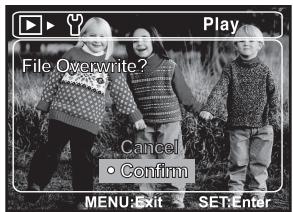
To save your corrected image, select [Confirm] with the / buttons, and press the SET/DISPLAY button.
-
When this process ends, this replaces the original image with the corrected image.
Protecting Images
Set the data to read-only to prevent images from being erased by mistake.
- Set the camera mode to [D].
- Select the image that you want to protect with the / buttons.
- Press the MENU button.
- Select [Protect] with the / buttons, and press the SET/DISPLAY button.
- Select [Single] or [All] with the / buttons, and press the SET/DISPLAY button.
- Select [Set] with the / buttons, and press the SET/DISPLAY button.
Protection is applied to the image and the camera returns to the previous menu mode.
The protect icon [ -] is displayed with protected images. When [All] has been selected, [ -] is displayed with all the images.
Canceling the Protection
To cancel protection for only one image, display the image on which you want to remove the image protection.
- Select [Protect] with the / buttons from the playback menu, and press the SET/DISPLAY button.
- Select [Single] or [All] with the / buttons, and press the SET/DISPLAY button.
- Select [Cancel Protect] with the / buttons, and press the SET/DISPLAY button.
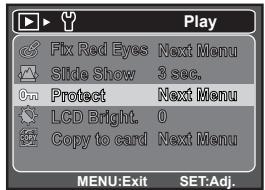
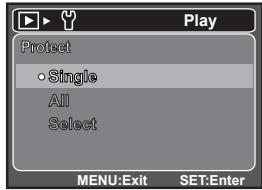
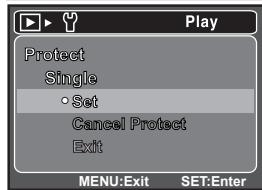
The removal of image protection is executed and the camera returns to the previous menu mode.
Protecting multiple images simultaneously
- Select [Protect] with the / buttons from the playback menu, and press the SET/ DISPLAY button.
- Select [Select] with the / buttons, and press the SET/DISPLAY button.
The images are displayed in the thumbnail display.
- Select the images you want to protect with the / / buttons, and press the button.
- The protect icon [ -] is displayed with protected images. Selecting a protected image and pressing the button again will cancel the protection. This procedure is repeated to select multiple images.
- Press the SET/DISPLAY button.
Protection and cancellation of the protection are executed and the camera returns to playback mode.

- Formatting an SD/SDHC memory card or internal memory overrides protection, and erases all images regardless of their protected status.
Erasing Images
Erasing single image / Erasing all images
- Set the camera mode to [D].
The last image will be displayed on the screen.
-
Select the image you want to erase with the / buttons.
-
Press the button.
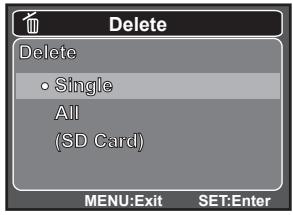
The deletion menu will be displayed.
- Select [Single] or [All] with the / buttons, and press the SET/DISPLAY button.
[Single]: Erases the selected image or the last image.
[All]: Erases all of the images except for the protected images.
- Select [Execute] with the / buttons, and press the SET/DISPLAY button.
To not erase, select [Cancel], and press the SET/DISPLAY button.
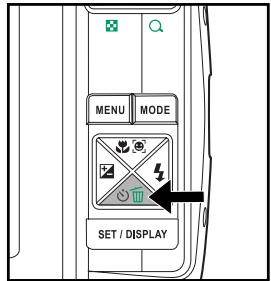

- Deleting an image will not affect sequential image numbering. For example, if you delete image number 240, the next captured image will be numbered 241 even though 240 no longer exists. In other words, an image-number is retired when an image is deleted and will not be reused or reassigned to another subsequently captured image.
MENU OPTIONS
Capture Menu
This menu is for the basic settings to be used when capturing still images.
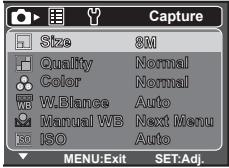
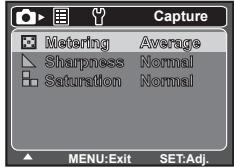
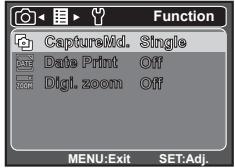
- Set the camera mode to [O].
- Press the MENU button, and select the [Capture] / [Function] menu with the button.
- Select the desired option item with the / buttons, and press the SET/DISPLAY button to enter its respective menu.
- Select the desired setting with the / buttons, and press the SET/DISPLAY button.
- To exit from the menu, press the MENU button.
Size
This sets the size of the image that will be captured.
- [8M] 8M (3264 x 2448 pixels)
- [6M] 6M (2816 x 2112 pixels)
- [4M] 4M (2272 x 1704 pixels)
- [2M] 2M (1600 x 1200 pixels)
- [0.3M] 0.3M (640 x 480 pixels)
Quality
This sets the quality (compression) at which the image is captured.
- [ ] Fine
- [ ] Normal
* [ ] Economy
Color
This sets the color of the image that will be captured.
- Normal / Vivid / Sepia / B&W
W. Balance
This sets the white balance for a variety of lighting conditions and permits images to be captured that approach the conditions that are seen by the human eye.
- [Blank] Auto
- [★] Incand.
EN-28
- [ ] F11
- [ ½ ] FI2
- [ ] Daylight
- [ ] Cloudy
- [ ] Manual
Manual WB
This manually sets the white balance and stores it. Use of this is convenient when the white balance does not offer a good match. Before selecting [Execute] and before taking your image, place a white paper in the scene and set the white balance manually.
- Cancel / Execute
ISO
This sets the sensitivity for capturing images. When the sensitivity is raised (and the ISO figure is increased), photography will become possible even in dark locations, but the more pixelated (grainier) the image will appear.
- Auto / 64 / 100 / 200 / 400 / 800
Metering
This sets the metering method for calculating the exposure.
- [ ] Average: The entire area of the screen is measured, and the exposure is calculated.
- [□] Spot: A very small portion of the center of the screen is measured, and the exposure is calculated.
Sharpness
This sets the sharpness of the image that will be captured.
- Hard / Normal / Soft
Saturation
This sets the saturation of the image that will be captured.
- High / Normal / Low
CaptureMd.
This sets the recording method at the time of capturing images.
- [Blank] Single:Captures one image at a time.
- [ ] Cont.: Permits continuous capture of up to 3 images.
- [ ] AEB: Permits 3 consecutive images in the order of standard exposure, underexposure and overexposure compensation.
Date Print
The date of recording can be printed directly on the still images. This function must be activated before the image is captured.
- On / Off
Digi. Zoom
This sets whether or not to use digital zoom at the time of photography.
- On / Off
Video Menu
This menu is for the basic settings to be used when recording video clips.
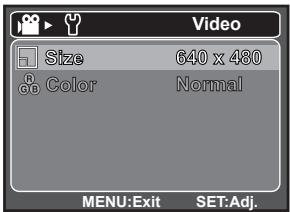
- Set the camera mode to [ ]
- Press the MENU button.
- Select the desired option item with the / buttons, and press the SET/DISPLAY button to enter its respective menu.
- Select the desired setting with the / buttons, and press the SET/DISPLAY button.
- To exit from the menu, press the MENU button.
Size
This sets the size of the video clip that will be captured.
- [VGA] 640 x 480
- [QVGA] 320 x 240
Color
This sets the color of the video clip that will be captured.
- Normal / Vivid / Sepia / B&W
Playback Menu
In the [mode, choose which settings are to be used for playback.
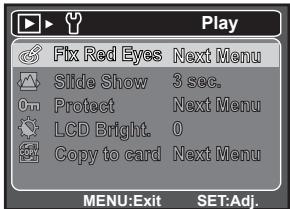
- Set the camera mode to [B].
- Press the MENU button.
- Select the desired option item with the / buttons, and press the SET/DISPLAY button to enter its respective menu.
- Select the desired setting with the / buttons, and press the SET/DISPLAY button.
- To exit from the menu, press the MENU button.
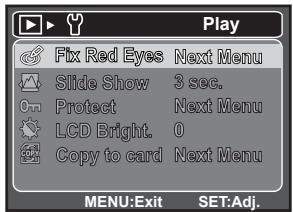
Fix Red Eyes
Refer to section in this manual titled "Removing Red-eye" for further details.
Slide Show
You can play back recorded images in order automatically with a selected interval.
* 3 sec. / 5 sec. / 10 sec.
Protect
Refer to section in this manual titled "Protecting Images" for further details.
LCD Bright.
Select a brightness level for the LCD monitor.
The LCD becomes brighter with the button and darker with the button. The adjustment range is from -5 to 5.
Copy to Card
Allows you to copy your files from the camera's internal memory to an SD/SDHC memory card. Of course, you can only do this if you have a memory card installed and some files in internal memory.
- Cancel / Execute
Setup Menu
Set your camera's operating environment.
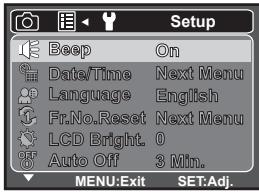
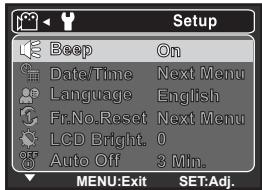
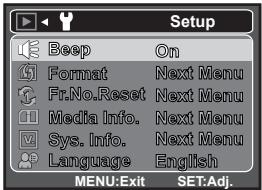
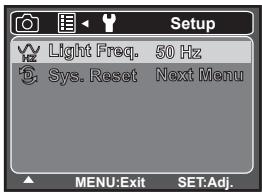
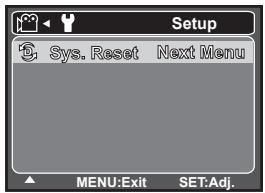
- Set the camera mode to [O] / [O] / [O].
- Press the MENU button.
- Select the [Setup] menu with the button.
- Select the desired option item with the / buttons, and press the SET/DISPLAY button to enter its respective menu.
- Select the desired setting with the / buttons, and press the SET/DISPLAY button.
- To exit from the menu, press the MENU button.
Beep
This sets whether or not to mute the camera sound each time you press the camera's buttons.
- On / Off
Date/Time
Refer to section in this manual titled "Setting the Date and Time" for further details.
Language
Refer to section in this manual titled "Choosing the Language" for further details.
Fr. No. Reset
This creates a new folder. The captured images are recorded to the newly created folder from number 0001.
- Cancel / Execute
LCD Bright.
Refer to section in this manual titled "LCD Bright." in Playback Menu for further details.
Auto Off
If no operation is performed for a specific period of time, the power to the camera is automatically turned off. This feature is useful for reducing battery usage.
- 1 Min. / 2 Min. / 3 Min. /Off
Light Freq.
This camera supports different lighting frequencies: 50 Hz and 60 Hz. When photographing under fluorescent lighting, select the correct frequency setting depending in your local area's voltage. This function is only effective if you set the White Balance to Fluorescent setting.
- 50 Hz / 60 Hz
Sys. Reset
This returns all basic settings to the camera's default settings. The time setting will not be reset.
- Cancel / Execute
Format
Refer to section in this manual titled " Formatting the Memory Card or Internal Memory" for further details.
Media Info.
This displays the free capacity of the internal memory or the memory card.
Sys. Info.
This displays the firmware version of the camera.
TRANSFERRING FILES TO YOUR COMPUTER
System Requirement
| Windows | Macintosh |
| ■ Pentium 166 MHz or higher | ■ PowerPC G3/G4/G5 |
| ■ Windows 2000/XP/Vista | ■ OS 9.0 or later |
| ■ 128MB RAM | ■ 128MB RAM |
| ■ 128MB hard disk space | ■ 128MB hard disk space |
| ■ CD-ROM drive | ■ CD-ROM drive |
| ■ Available USB port | ■ Available USB port |
Downloading Your Files
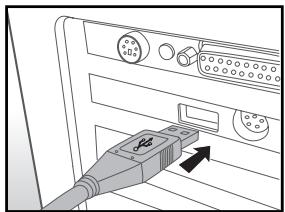
- Connect one end of the USB cable to an available USB port on your computer.
- Connect the other end of the USB cable to the USB terminal on the camera.
- Turn on your camera.
- Select [PC] using the / buttons, and press the SET/DISPLAY button.
- From the Windows desktop, double click on "My Computer".
- Look for a new "removable disk" icon.
This "removable disk" is actually the memory (or memory card) in your camera. Typically, the camera will be assigned drive letter "e" or higher.
- Double click on the removable disk and locate the DCIM folder.
- Double click on the DCIM folder to open it to find more folders.
■ Your recorded images and video clips will be inside these folders. - Copy & Paste or Drag-N-Drop image and video files to a folder on your computer.
Mac users: Double-click the "untitled" or "unlabeled" disk drive icon on your desktop. iPhoto may automatically launch.
EDITING SOFTWARE INSTALLATION
There are 2 types of software that are included on the CD-ROM:
MediaOne Gallery SE - makes it the easiest way to manage and share your digital life with family & friends. The intuitive thumbnail library automatically organizes, updates and sorts files for the most natural way to browse your multimedia collection.
COOL 360 SE - combines ease-of-use, power and flexibility to allow even novice digital imaging enthusiasts to move beyond traditional photos into immersive imaging. Its intuitive interface and easy-to-use wizard deliver great-looking panoramicas while advanced warping, blending and alignment tools ensure excellent results.
To install software:
- Insert the CD-ROM that came with the camera into your CD-ROM drive. The welcome screen appears.
- Click the respective software name. Follow the on-screen instructions to complete the installation.

For more information about the operation of the software, refer to its respective help documentation.
For Windows 2000/XP/Vista users, please make sure to install and use the software in "Administrator" mode.
The software is not supported on the Mac.
COOL 360 SE is not supported by Windows Vista.
SPECIFICATIONS
| Item | Description |
| Image sensor | 1/2.5" CCD sensor (8.1 megapixels) |
| Image resolution | <Still image>3264 x 2448, 2816x2112, 2272x1704, 1600 x 1200, 640 x 480<Video clip>640 x 480 (24 fps), 320 x 240 (30 fps) |
| LCD monitor | 2.8" full color TFT LCD (230K pixels) |
| Recording media | 16MB internal memory (12MB available for image storage)Supports SD/SDHC memory card (up to 4GB) (optional) |
| File format | JPEG, DCF, EXIF 2.2, AVI |
| Lens | 3x optical zoom lensAperture range: 2.9 (W) - 5.2 (T)Focal length: 5.7mm - 17.1mm(equivalent to 34mm - 102mm on a 35mm camera) |
| Focus Range | Auto Focus0.4m to infinityMacroWide: 0.10m to infinityTele: 0.35m to infinity |
| Shutter speed | 1/2 - 1/2000 sec. |
| Sensitivity | <Skill image>Auto (ISO 64-200)Manual (ISO 64/100/200/400/800)* Sensitivity is measured in compliance with the ISO standard(ISO12232:2006). |
| Digital zoom | 4x (Capture mode)1-4x in 0.5x increment (Playback mode) |
| Flash effective range | 0.5m - 2.4m (Wide)0.5m - 2.1m (Tele) |
| Terminal | USB 2.0 |
| Power supply | 2 x AA size batteries |
| Operating environment | Temperature: 0°C - 40°C(32°F to 104°F)Humidity: 10% - 85%(Non-condensing) |
| Dimensions | Approx. 97.1 x 62.2 x 20.9 mm (without protruding parts) |
| Weight | Approx. 132g (without batteries and memory card) |
- Design and specifications are subject to change without notice.
APPENDIX
Possible Number of Shots
Possible number of shots (still image)
The table shows the approximate shots that you can capture at each setting based on the capacity of the internal memory and the SD/SDHC memory card.
| Size | Quality | Internal Memory | SD/SDHC memory card capacity | ||||||
| 64MB | 128MB | 256MB | 512MB | 1GB | 2GB | 4GB SDHC | |||
| 8M3264 x 2448 | □ Fine | 3 | 17 | 35 | 72 | 146 | 293 | 587 | 1176 |
| □ Normal | 4 | 23 | 48 | 98 | 197 | 395 | 791 | 1585 | |
| □ Economy | 5 | 28 | 58 | 118 | 238 | 475 | 957 | 1916 | |
| 6M2816 x 2112 | □ Fine | 4 | 23 | 48 | 98 | 197 | 396 | 793 | 1588 |
| □ Normal | 6 | 32 | 65 | 132 | 265 | 532 | 1066 | 2134 | |
| □ Economy | 7 | 35 | 72 | 146 | 293 | 588 | 1177 | 2357 | |
| 4M2272 x 1704 | □ Fine | 9 | 42 | 86 | 174 | 350 | 702 | 1405 | 2814 |
| □ Normal | 9 | 46 | 94 | 189 | 380 | 762 | 1527 | 3057 | |
| □ Economy | 11 | 54 | 111 | 224 | 450 | 902 | 1805 | 3614 | |
| 2M1600 x 1200 | □ Fine | 17 | 82 | 167 | 336 | 675 | 1353 | 2709 | 5422 |
| □ Normal | 21 | 100 | 204 | 410 | 824 | 1650 | 3304 | 6612 | |
| □ Economy | 24 | 112 | 228 | 459 | 921 | 1845 | 3694 | 7394 | |
| 0.3M640 x 480 | □ Fine | 53 | 243 | 491 | 987 | 1980 | 3965 | 7938 | 15887 |
| □ Normal | 61 | 282 | 571 | 1148 | 2304 | 4615 | 9237 | 18486 | |
| □ Economy | 75 | 345 | 698 | 1404 | 2816 | 5640 | 11289 | 22595 | |
Possible recording time / sec (video clip)
| Size | Internal Memory | SD/SDHC memory card capacity | ||||||
| 64MB | 128MB | 256MB | 512MB | 1GB | 2GB | 4GB SDHC | ||
| VGA 640 x 480 | 00:06 | 00:31 | 01:02 | 02:06 | 04:13 | 08:28 | 16:57 | 33:55 |
| QVGA 320 x 240 | 00:21 | 01:38 | 03:09 | 06:40 | 13:24 | 26:50 | 53:43 | 47:31 |
Troubleshooting
Refer to the symptoms and solutions listed below before sending the camera for repairs. If the problem persists, contact your local reseller or service center.
| Symptom | Cause | Solutions / Corrective Actions |
| The power does not come on. | The batteries are not loaded. | Load the batteries correctly. |
| The batteries are exhausted. | Replace with a new set of batteries. | |
| The batteries or camera feels warm. | Long period of continuous use of the camera or the flash. | |
| Even if I press the shutter button, the camera does not shoot. | The shutter button is not pressed all the way down. | Press the shutter button all the way down. |
| The internal memory or memory card does not have any free capacity. | Insert a new memory card, or delete unwanted files. | |
| The flash is charging. | Wait until the status LED stops blinking. | |
| The memory card is write-protected. | Remove the write-protection. | |
| Although it is set to auto focus, it does not focus. | The lens is dirty. | Wipe clean with a soft, dry cloth or lens paper. |
| The distance to the subject is smaller than the effective range. | Get your subject within the effective focus range. | |
| Files cannot be deleted. | The file is protected. | Cancel protection. |
| The memory card is write-protected. | Remove the write-protection. | |
| Cannot download images. | The free space on the hard disk in your computer may be insufficient. | Check whether the hard disk has a space for running Windows, and if the drive for loading image files has a capacity at least that of the memory card inserted in the camera. |
| No power supply. | Replace with a new set of batteries. |
Connecting to a PictBridge Compatible Printer
Read this section if the model you purchased is included with the PictBridge functions. If a printer that supports PictBridge is available, images can be printed by connecting the digital still camera directly to the PictBridge-compatible printer without using a computer.
Connecting the camera to the printer
- Connect one end of the USB cable to your camera.
- Connect the other end of the USB cable to the USB port on the printer.
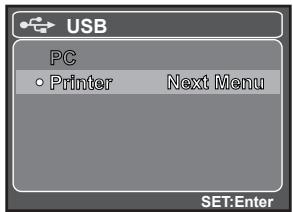
- Turn on your camera.
- Select [Printer] with the / buttons, and press the SET/DISPLAY button.
Printing images
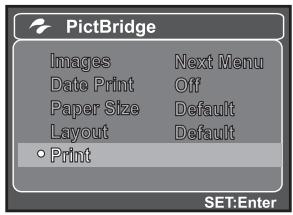
When the camera is properly connected to a PictBridge compliant printer and set to [Printer], the PictBridge menu is displayed on the monitor.
- Select the item you want to configure with the / buttons, and press the SET/DISPLAY button.
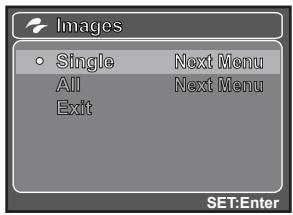
[Images]: Select whether you want to print specific image or all images. You may also select printing number for specific image.
- [Date Print]: According to the printer type, select whether you want to print the image with date imprint or not.
[Paper Size]: Select the desired paper size according to the printer type. You can select [Default], [L Format], [2L Format], [Postcard], [Card], [10 x 15cm], [4 x 6] or [A4].
- [Layout]: Select the desired printing layout according to the printer type. You can select [Default], [1 Up], [2 Up], [3 Up], [4 Up], [Index] or [No Border].
[Print]: After all settings are configured, select this item to start printing.
- If you select [Images] in the previous step, the figure shown on the right hand side will appear. Select [Single], [All] with the / buttons, and press the SET/DISPLAY button.
[Single]: Select to print one specific image.
[All]: Select to print all images.
- [Exit]: Exit from Images option.
-
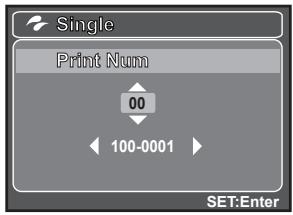
If you select [Single] in the previous step, the figure shown on the right hand side will appear.
-
Select the image that you want to print with the / buttons.
- Select the [Print Num] (up to 99) with the / buttons.
After selecting the desired image and printing number, press the SET/DISPLAY button to confirm.
- Select [Print] with the / buttons, and press the SET/DISPLAY button to start printing.
-
The printing starts and the figure shown on the right hand side appears.
-
[COMPLETE] will be displayed temporarily, reminding you that the printing procedure is finished.
If a print error is detected, [PRINT ERROR] will be displayed.

The image printing may be failed if the power to the camera is cut off.