MODE D'EMPLOI VPC-X1200EX SANYO INSTRUCTION MANUAL ADVANCED
Digital Camera
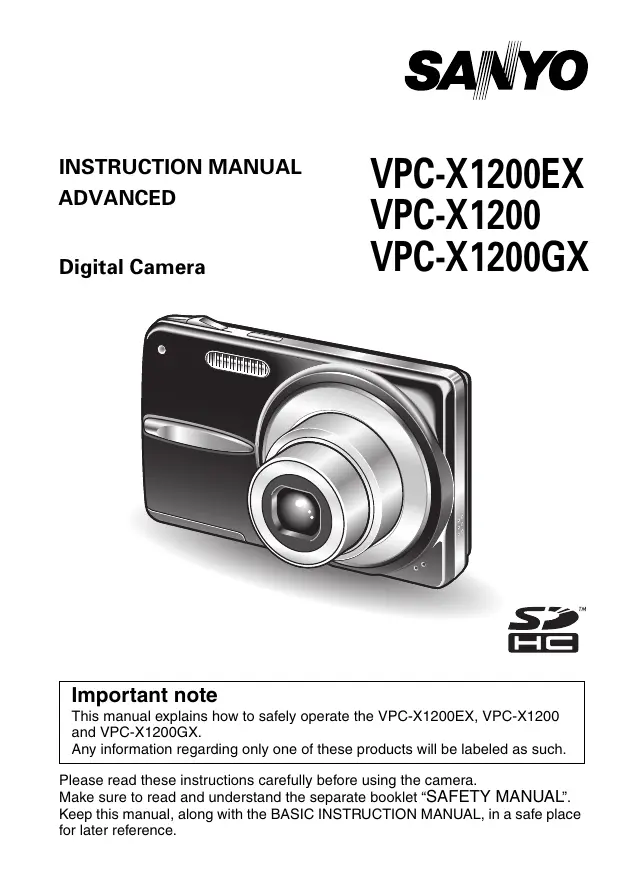
VPC-X1200EX VPC-X1200 VPC-X1200GX
natural_image
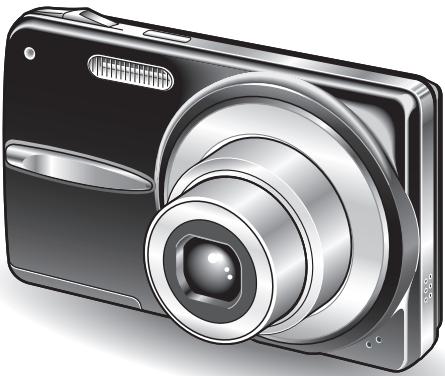
Illustration of a digital camera with lens and screen (no text or symbols)
Important note
This manual explains how to safely operate the VPC-X1200EX, VPC-X1200 and VPC-X1200GX.
Any information regarding only one of these products will be labeled as such.
Please read these instructions carefully before using the camera.
Make sure to read and understand the separate booklet "SAFETY MANUAL".
Keep this manual, along with the BASIC INSTRUCTION MANUAL, in a safe place for later reference.
HOW TO READ THIS MANUAL
■ Symbols used in this manual
HINT Points giving some extended instructions or special points to pay attention to.
CAUTION Points that require special attention.
(page xx) Refer to the page indicated for detailed information.
You may find the answers to questions or problems concerning camera operation in the sections “COMMONLY ASKED QUESTIONS” (page 46) and “TROUBLESHOOTING” (page 52).
CONTENTS
CONTENTS 1
SETUP
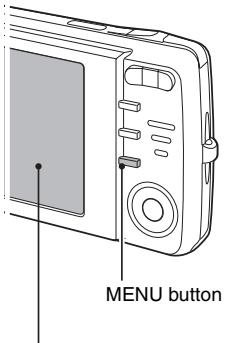
ACCESSING THE MENUS 3
How to display the menus....3
How to operate the menus....4
Overview of the Menus 5
■ SHOOTING
RECORDING SETTINGS 11
Recording and playing back audio files 11
Focus area setting 13
ISO sensitivity 14
White balance 15
Date imprint 16
■ PLAYBACK
PLAYBACK SETTINGS 17
Image protect....17
Rotating images....18
Resize....18
Blur correction....19
Contrast correction 20
Red-eye correction 21
Distortion correction 21
Print orders (DPOF) 22
Slideshow playback 27
Displaying image properties (Information Screen) 28
OPTION
OPTION SETTINGS 29
File No. continued setting 29
Initializing the card memory and internal memory 31
Resetting the camera settings 32
Checking the remaining internal memory and card memory ..... 33
CHECKING THE REMAINING BATTERY CHARGE 35
■ OTHER DEVICES AND CONNECTIONS
CONNECTING TO A TV 37
DIRECT PRINTING 38
Print preparations ....38
To select one image and print it (print selected image)......40
To print all the images (all images)......42
To print the images that are set to print
(print reserved images)......43
To change the printer settings and print images
(change printer settings)......44
■ APPENDICES
COMMONLY ASKED QUESTIONS 46
TROUBLESHOOTING 52
CAMERA 52
Notes regarding the scene function....57
Detailed camera settings are accessed from the menus.
1 Turn on the camera, and set it to the recording or playback mode.
- Set the camera to the recording mode to display the Recording Menu, or the playback mode to display the Playback Menu.
- The menu for the mode specified in step 1 appears.
Press the MENU button to exit the menu.
Use the arrow buttons to select the item you wish to change, press the SET button, and the corresponding screen will appear.
2 Select the 📄 or ▶ tab.
Display the Recording Menu:
Select the 📄 tab.
Display the Playback Menu:
Select the ▶ tab.
Display the Option Menu:
Select the 🖱 tab.
• The Setting Screen appears.
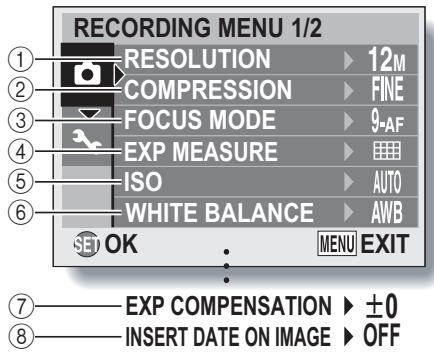
- ⑦ and ⑧ are displayed when you press the [▲] or [▼] button to scroll.
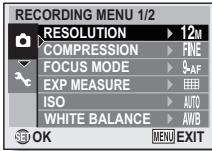
① Resolution menu/video size menu
12M: Shoot at 4000 × 3000 pixels
9M: Shoot at 4000 × 2256 pixels (16:9 aspect ratio)
6M: Shoot at 2816 × 2112 pixels
4M: Shoot at 2288 × 1712 pixels
2M: Shoot at 1600 × 1200 pixels
0.3M: Shoot at 640 × 480 pixels
TV: Shoot at 640 × 480 pixels
WEB: Shoot at 320 × 240 pixels
☐: Make an audio recording (page 11)
② Compression rate menu (single-shot/sequential shots mode only)
FINE: For shooting at low compression
NORM: For shooting at normal (moderate) compression
③ Focus mode menu (page 13)
9-AF: 9-point focus mode
S-AF: Spot focus mode
AFO: The focus follows the focus-locked subject.
④ Light-measuring mode menu
: Multi-section light-measuring
☐: Center-weighted light-measuring
: Spot light-measuring
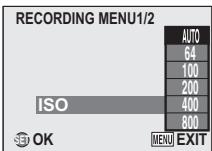
⑤ ISO sensitivity menu (page 14)
AUTO: Sets the ISO sensitivity automatically (ISO64 to 400).
64: ISO64
100: ISO100
200: ISO200
400: ISO400
800: ISO800
1600: ISO1600
3200: ISO3200
⑥ White balance menu (page 15)
AWB: The camera will determine the setting automatically.
☀️: For photography in fair weather (sunny) conditions
: In overcast conditions
: Under fluorescent lighting
: Under incandescent lighting
☐: For setting the most accurate white balance
⑦ Exposure correction menu
\- Change the brightness of the image.
⑧ Date imprint menu (page 16)
\- Imprint the capture date on still images.
\- When you specify multiple functions that cannot be simultaneously enabled, the function which was last set becomes the active setting, and the other settings accordingly change automatically.

\- ⑦ through ⑩ are displayed when you press the [▲] or [▼] button to scroll.
① [Slideshow]
\- Play back the images in a slideshow format.
② [Protect] (page 17)
\- Protect data from accidental erasure (write protect).
③ [Rotate] (page 18)
\- Rotate still images.
④ [Blur correction] (page 19)
\- Correct the effects of camera shake in still images.
⑤ [Contrast correct] (page 20)
\- Add contrast (light and dark) to the image to make it clearer.
⑥ [Red-eye correct.] (page 21)
• Repair the red-eye effect to make eyes look more natural.
⑦ [Repair distort] (page 21)
\- Correct the curvature (distortion) in the image caused by the lens.
⑧ [Resize] (page 18)
\- Reduce the resolution of a still image.
⑨ [File copy]
\- Copy files from the card to the internal memory, or vice versa.
⑩ [Print instructions] (page 22)
\- Specify the print settings.

\- ⑦ through ⑪ are displayed when you press the [▲] or [▼] button to scroll.
① [Clock set]
\- Set the camera's internal clock.
② [Startup display]
\- Select the display that appears on the monitor when the camera is turned on in the recording mode.
DATE & TIME: The camera's date and time setting is shown.
SANYO: The SANYO logo is shown.
OFF: No startup display.
③ [Sound]
\- Adjust the sounds produced by the camera.
④ [Post view]
\- Specify how long a still image is displayed on the monitor after it is captured.
⑤ [Brightness]
\- Adjust the brightness of the monitor.
⑥ [abc language]
\- Select the language in which the monitor messages are displayed.
⑦ [TV system]
\- Select the type of TV signal that is output from the camera's USB/AV terminal.
⑧ [Auto power off]
\- Specify the time elapsed before the auto power off function operates to turn the camera off.
⑨ [File no. cont'd] (page 29)
\- Set the file number continued function to ON or OFF.
⑩ [Format] (page 31)
\- Reformat the camera's internal memory or the card installed in the camera.
⑪ [Reset settings] (page 32)
\- Reset the camera to the factory-preset settings.
RECORDING SETTINGS
Recording and playing back audio files
In the video clip recording mode, your camera can make audio recordings. The audio recordings are monaural.
Record an audio file
1 Display the Recording Menu for the video clip recording mode (page 3).
2 Select the audio recording icon 🖱️ from the video size menu, and press the SET button.
3 Press the MENU button.
\- The recording mode is enabled.
4 Press the shutter button.
- Audio recording begins. During recording, the length of the audio track and the remaining recording time available are shown on the monitor.
- It is not necessary to continue pressing the shutter button while recording.
• Take care not to cover the microphone with your fingers.

5 End the recording.
\- Press the shutter button again to stop recording.
1 Display the desired audio data.
\- A musical note graphic appears on the screen.

2 Play back the recording.
To do this... Do this Forward playback Press the SET button. Stop playback During playback, press the [▼] button. Pause During playback, press the SET button.During fast forward or fast reverse, press the [▲] button. Fast forward During forward playback, press the [►] button.* The speed changes each time the [►] button is pressed, as follows:Normal playback → 2x → 5x → 10x → 15xPress the [◄] button to resume normal speed. Fast reverse During forward playback, press the [◄] button.* The speed changes each time the [◄] button is pressed, as follows:15x ← 10x ← 5xPress the [►] button to resume normal speed. Return to normal playback speed Press the SET button. Adjusting the volume Louder: During playback, press [T] on the zoom switch.Softer: During playback, press [W] on the zoom switch.
HINT
\- During 5× or faster accelerated playback, the audio is not played back.
Focus area setting
You can choose from different types of autofocus:
9-point range finder focus:
The correct focus is determined from 9 different focus points within the shooting area visible on the monitor. When the image is focused, a target mark [] appears.
Spot focus:
The camera focuses on the subject in the center of the monitor.
AF seeker:
Once the focus is locked on a subject, it follows the subject. The focus point automatically changes to remain continuously focused on a moving subject.
HINT
When spot focus is selected...
\- The focus mark + appears in the center of the monitor.
When AF seeker is selected...
- The focus mark + appears in the center of the monitor.
- When the focus-lock is activated, the seeker mark appears on the focused subject.
- During focus-lock, even if the focused subject moves, the seeker mark automatically follows the subject.
- If the camera loses the focus-lock on the subject, the seeker mark disappears.
- In dark environments, the seeker mark may follow the subject more slowly.
- When the AFO setting is selected, the digital zoom is not available.

natural_image
Illustration of a cat sitting with a camera icon and frame number F5.0 (no text or symbols on the cat or frame)
Seeker mark
ISO sensitivity
With the initial settings, the ISO sensitivity is automatically set according to the brightness of the subject. However, the ISO sensitivity can be set to a fixed setting.
HINT
\- By setting a higher ISO sensitivity, you can set higher shutter speeds and capture images in darker locations, but noise in the captured images may increase.
CAUTION
Does the image appear to flicker when recording a video clip?
\- If recording a video clip under fluorescent lights, a noticeable flicker may appear in the image.
Did the resolution change to 4M ?
\- When the ISO sensitivity is set to 3200, the resolution setting automatically changes to 4M.
RECORDING SETTINGS
White balance
This camera automatically adjusts the white balance under most lighting conditions. However, if you want to specify the lighting conditions or change the overall tone of the image, the white balance can be manually set.
- The white balance menu appears.
AWB: The camera will make the white balance adjustment automatically based on the natural and artificial light conditions. This is the setting used in the auto mode.
☀️: For shooting outside on a sunny day.
☐: For shooting outside on a cloudy day.
: For shooting inside under fluorescent lighting.
☐: For shooting inside under incandescent lighting.
☐: For more accurate adjustment or when the light source cannot be specified (one-push).
Select the 📄 icon from the white balance menu, fill the entire screen with a plain white paper, and press the SET button to set the white balance. To use any of the other white balance settings, proceed to step 3.
\- This completes the white balance setting.
HINT
To cancel the white balance setting
\- Perform steps 1 and 2, select AWB, and then press the SET button.
Date imprint
You can choose to have the date the image was captured imprinted on the image.
HINT
About the capture date and date imprinting
\- When an image is edited, the date of the image file changes to the date and time the image was edited. However, the imprinted capture date remains unchanged.
Is the sequential shots speed slow?
\- When the date imprint mode is set to "ON", the sequential shots speed may become slower.
If the imprinted date is shown as [----] ...
\- The date and time settings have not yet been completed. Set the camera to the correct date and time.
PLAYBACK SETTINGS
Image protect
Prevent accidental erasure of data.
CAUTION
\- Even if the protect mode is set for certain data files, they will be deleted if the card is reformatted.
Rotating images
Captured still images can be rotated to the correct orientation for viewing.
HINT
- On the 9-image/20-image display playback, rotated images are shown in their original orientation.
- An image for which the protect (locked) mode has been set cannot be rotated.
Resize
The size of a still image can be reduced and the resized image saved as a separate image.
HINT
Why can't the image be resized?
\- An image can be resized only to a smaller (or the same) size, not to a larger size.
PLAYBACK SETTINGS
Blur correction
Correct the effects of camera movement (camera shake) to produce a sharper image.
HINT
About the blur correction icon
\- On the Blur Correction Screen, an icon indicating the degree of blur appears.

: Blur correction unnecessary or blur correction completed.

: Blur correction possible

: Blur correction not possible
If the “Blur correction not successful” message appears...
- The camera was not able to successfully repair the image.
- The correction function works to automatically edit flaws that the camera detects in captured images. In some cases, the camera may not be able to repair the image.
- Blur correction is not possible for images captured at a shutter speed of 1/8 sec or less, for resized images, or for images captured using a different digital camera. Also, blur correction may not be possible in cases of extreme blur.
Concerning the date and time information for the modified image
\- The date display that is shown when an edited image is played back is the date that the image was saved after it was modified.
Contrast correction
Add contrast (light and dark) to an image to make it clearer.
HINT
\- The date display that is shown when an edited image is played back is the date that the image was saved after it was modified.
PLAYBACK SETTINGS
Red-eye correction
If you photograph your subjects at night using the flash, they may appear in the image with glowing red eyes (red-eye effect). Now you can amend the image so that the subjects' eyes appear more natural (red-eye correction).
Distortion correction
Correct the curvature (distortion) in the still image that is caused by the lens. Images that were captured using the digital zoom or at the 9M setting, images that have already been corrected, and images that were captured using a different camera cannot be corrected.
HINT
If the “Red-eye correction not successful” message appears...
- The camera was not able to successfully correct the red-eye effect.
- The red-eye correction function works to automatically edit the red-eye effect that the camera detects in captured images. In some cases, the camera may fail to correctly detect the red-eye effect, or it may incorrectly identify the red-eye effect where it does not exist.
Concerning the date and time information for the modified image
\- The date display that is shown when an edited image is played back is the date that the image was saved after it was modified.
Print orders (DPOF)
In addition to using your printer to print out still images captured with your camera, as with conventional film, you can have prints made at shops offering digital print services. Moreover, this camera is DPOF-compatible, so you can use the camera to specify the number of prints, or whether or not the date is displayed on the print.
Display the screen to set the print settings
\- The screen to set the print settings appears.
EACH IMAGE:
The print settings are specified for each individual image.
ALL IMAGES:
The specified print settings apply to all the still images.
ALL CLEAR:
Clear all the print settings.

PLAYBACK SETTINGS
HINT
Printing a single frame from a video clip
\- To print with a printer or have the digital print service shop print out a still image from a video clip, you must first save it (extract still) as a still image.
\- DPOF (Digital Print Order Format) is a print order format. You can connect your camera to a DPOF-compatible printer to produce your prints. You can also set the print settings (page 43) for the desired images, and then have the reserved images printed automatically.
About the finished prints
\- Images that have been rotated will be printed in their original orientation.
\- The quality of the print output will differ depending on the print service and printer used.
CAUTION
\- It is not possible to set the print settings when there are 10,000 or more files saved on the card.
Specifying date imprinting and number of prints
You can specify print settings for each individual image (EACH IMAGE), or apply the print settings to all the images on the card (ALL IMAGES).
1 Display the screen to set the print settings (page 22).
2 Select "EACH IMAGE" or "ALL IMAGES".
EACH IMAGE:
The set print settings are applied only to the image currently displayed.
ALL IMAGES:
The set print settings are applied to all the still images on the card.

- The Date/Copies Print Screen appears.
- If "EACH IMAGE" was selected, press the [◀] or [▶] button to display the desired image to print.
- The print settings for the currently displayed image are shown in the upper left area of the monitor. You can press the [◀] or [▶] button to confirm the print settings for each image.

4 Specify the number of prints and whether the date is imprinted.
\- Please specify the number of prints before setting the date imprint setting. The date imprint setting cannot be set until the number of prints has been entered.
CAUTION
\- Do not specify dated prints for images that were captured with the date imprint function (pages 6 and 16) set to ON, or else the date will appear on the photo print twice.
25 English
Clearing all the print settings
Delete the print settings for all images.
1 Display the screen to set the print settings (page 22).
2 Select "ALL CLEAR".

3 Press the SET button.
• The Confirm All Clear Screen appears.
YES: Clear the print settings for all images.
EXIT: Cancel the clear procedure and return to the screen to set the print settings.
4 Select "YES", and press the SET button.
\- All the print settings are cleared and you are returned to the Playback Menu.
PLAYBACK SETTINGS
Slideshow playback
To stop slideshow playback, press the SET button or MENU button.
HINT
\- Audio data is not played during slideshow playback.
On the Information Screen you can check what the settings were when an image was captured.
1 Display the desired image.
- The Information Screen appears.
- If the MENU button is pressed again, the Information Screen is canceled.

① Resolution setting
② Resolution
③ Scene function setting
④ Image number
⑤ Protect setting
⑥ Voice memo setting
⑦ File size
⑧ Aperture value
⑨ Shutter speed
⑩ Exposure correction setting
⑪ Video size setting/audio file indicator
⑫ Resolution and frame rate
⑬ File format
⑭ Playback time
⑮ Remaining battery power


OPTION SETTINGS
File No. continued setting
If a newly formatted card is used, the file name (image number) of the captured image automatically begins from 0001. If the card is subsequently reformatted, or if a different reformatted card is used, the file names again begin from 0001. This is because the file number continued function is set to "OFF", and consequently it results in more than one card containing images with the same numbers. By setting the file number continued function to "ON", even if the card is reformatted or the card is replaced with another card, the consecutive numbering of file names continues from the last number recorded by the camera.
File name (image number) Card A 0001, 0002......0012, 0013 :Replace card↓ Card B 0001, 0002......0012, 0013
File name (image number) Card A 0001, 0002......0012, 0013 :Replace card↓ Card B 0014, 0015......0025, 0026
\- If Card B already has files in it when it replaces Card A, file names are assigned as follows.
When the highest file number on Card B (before replacing) is lower than the highest file number on Card A: the file name of the next recorded image continues from last file name recorded on Card A.

When the highest file number on Card B (before replacing) is higher than the highest file number on Card A: the file name of the next recorded image continues from last file name recorded on Card B.

HINT
\- Until the file number continued function is turned “OFF”, consecutive file names are assigned. It is recommended that the file number continued function be returned to “OFF” at the end of each photography session.
What about the internal memory?
\- The file number continued function works the same for the internal memory.
Initializing the card memory and internal memory
A card must be formatted with this camera:
• After purchasing, when used for the first time, or
- If it was formatted using a personal computer or another digital camera.
The card cannot be reformatted if the lock switch is set to the “LOCK” position. Proceed with the reformat procedure after setting the lock switch to the unlocked position.
CAUTION
\- Please do not turn off the camera or insert/remove the card while the card is being formatted.
\- When the card or internal memory is initialized, all the recorded data is erased. Protected data is also erased, so before reformatting a card, any data you want to keep should be copied to your personal computer's hard disk or other storage medium.
- If a card is reformatted or the data is erased from the card using the camera or a computer, the card's control data may be merely modified and the data itself may not be completely erased from the card.
- In some cases it may be possible to recover the data from a reformatted card using special software for that purpose. However, if the camera is used to execute a full format, it will be impossible to recover the data even by the use of data recovery software.
- If you are disposing of a card, it is recommended that you physically destroy it. If you are transferring the card to someone else to use, it is recommended that you use the camera's full format function to reformat the card, or use commercially available software for erasing card data. Managing data is the responsibility of the user.
Resetting the camera settings
Reset the camera to the factory-preset settings.
HINT
\- Note that the following settings do not change with this procedure:
Date and time setting
Language setting
TV system setting
File No. continued setting
Checking the remaining internal memory and card memory
You can check the possible number of images, audio recording time and video clip recording time remaining on the card.
Set the recording mode to the single-shot or sequential shots mode.
Set the recording mode to the video clip recording mode.
- The remaining recording time is shown on the monitor.
- The remaining number of images and video recording time will differ depending on the resolution and video size settings.
Remaining number of images


1 Set the camera to the audio recording mode (page 11).
\- The remaining audio recording time is shown.
Remaining recording time

HINT
- When the remaining number of images or the remaining video recording time is "0", you cannot capture any more images. To capture more images, either install a new card, or save the images to a computer and then erase them from the card.
- When the remaining number of images or the remaining video recording time is "0", it may be possible to capture a few more images by changing the resolution setting or video size setting (pages 4 and 6).
- The maximum number of images is 99,999, and the maximum video/audio recording time is 99:59:59. Note that if a large-capacity card is used, the remaining number of images or recording time may not be correctly displayed.
CHECKING THE REMAINING BATTERY CHARGE
When using the battery pack, the remaining battery pack charge can be checked on the monitor. Make sure to check this indicator before capturing an image.
- The battery pack remaining charge indicator appears in the lower right corner of the monitor.
- Due to the battery pack characteristics, when the ambient temperature is low, ☐ may appear early for an incorrect indication of the remaining charge. Also, depending on the conditions of use of the camera or the ambient conditions (temperature, etc.), the indicated remaining charge may change. Therefore, this indication can only be used as a general approximation of the remaining charge.
Battery pack remaining charge indicator Battery remaining charge No indication, or Approx. full.( □ appears only in certain operation modes.) Power is low. It will soon be impossible to capture or play back images. If this icon flashes when the shutter button is pressed, images cannot be captured. Recharge the battery pack.

HINT
- If any data is present, you can also check the remaining battery pack charge on the Information Screen (page 28).
- Battery life may differ even among battery packs of the same type.
- Depending on the usage of the camera (such as the number of times the flash is used, etc.) or the ambient temperature (temperatures below 10^ C [50°F]), the number of images that can be saved on a fully charged battery pack will vary greatly.
- It is recommended that you prepare an extra battery pack(s) when taking pictures at a wedding or while traveling, for example, so you don't miss capturing images of important moments due to the battery pack power running out. The same is recommended for taking photos in cold environments. (In a ski area, for example, the battery pack can be kept warm in your pocket until ready to use.)
CONNECTING TO A TV
Connect the supplied AV interface cable from the USB/AV terminal on the digital camera to the AUDIO and VIDEO input terminals on the TV.

Playback
- After connecting the digital camera to the television, set the TV input switch to VIDEO input.
- When an AV interface cable is connected, no image appears on the camera's monitor.
- The playback method is the same as when viewing images on the camera's monitor.
- The same playback procedure as when playing back with the camera is used to play back voice memos and audio recordings as well.
CAUTION
Insert and pull out the cable carefully
\- When connecting the cables, make sure that the cable plugs are correctly oriented and that they match the shapes of the terminal sockets on the devices. Push the plugs in straight when connecting them. If undue force is used to connect a cable, it may permanently damage the connector pins in the terminal socket.
\- Do not use excessive force when connecting and disconnecting cables.
DIRECT PRINTING
Your camera supports the PictBridge function. By connecting the camera directly to a PictBridge-enabled printer, the camera's monitor can be used to select images and initiate printing (PictBridge printing).
Print preparations
1 Turn the printer on, and use the supplied USB interface cable to connect the camera to the printer.
- Connect the camera's USB/AV terminal to the printer's USB connector.
- The USB Connection Screen appears on the camera's monitor.

\- The screen to select the images to print appears.

CAUTION
Caution when connecting a printer
- If the power to the printer is turned off while it is connected, the camera may not operate correctly. If the camera does not operate correctly, disconnect the USB interface cable, turn off the camera, and then reconnect the cable.
- During PictBridge printing, the camera's button operation response is slower.
- If the camera is powered by the battery pack for printing, make sure that the remaining battery charge is sufficient.
Insert and pull out the cable carefully
- When connecting the cables, make sure that the cable plugs are correctly oriented and that they match the shapes of the terminal sockets on the devices. Push the plugs in straight when connecting them. If undue force is used to connect a cable, it may permanently damage the connector pins in the terminal socket.
- Do not use excessive force when connecting and disconnecting cables.
To select one image and print it (print selected image)
Procedure to select one still image and print it.
1 Complete the printing setup (page 38).

3
Specify the number of prints or date-imprinted prints.
4
\- Printing begins.
HINT
To cancel printing
① During printing, press the [▼] button.
- The Confirm Cancel Printing Screen appears.
② Select "YES", and press the SET button.
- If "EXIT" is selected and the SET button is pressed, printing resumes.
CAUTION
\- Do not specify dated prints for images that were captured with the date imprint function (pages 6 and 16) set to ON, or else the date will appear on the photo print twice.
To print all the images (all images)
Print all of the images.
1 Complete the printing setup (page 38).
• The PictBridge Menu appears.
\- The Print All Images Screen appears.

4 Specify the number of prints or date-imprinted prints.
\- Press the [▲] or [▼] button to specify the number of prints.
- Press the [▲] or [▼] button until the desired number of prints is displayed.
\- Press [W] on the zoom switch to add a check mark (√) next to Ⓛ.

\- Printing begins.
CAUTION
Printing is not possible if there are more than 999 still images in the card or internal memory
\- Delete unwanted images before printing.
DIRECT PRINTING
To print the images that are set to print (print reserved images)
Procedure to print all the images that are set to print.
1 Make the print settings (page 22), and complete the printing setup (page 38).
2 Press the MENU button.
• The PictBridge Menu appears.

3 Select "DPOF", and press the SET button.
- The Print Scheduled Images Screen appears.
- An image that is set to print (page 22) is displayed.

4 Press the SET button.
- Printing begins.
- Printing begins about 1 minute after the SET button is pressed.
HINT
\- In step 3, if you press the [◀] or [▶] button, you can confirm the images that are set to print and their DPOF settings.
CAUTION
- Reserved images printing is not possible if a printer is used that does not support your camera's DPOF function.
- Multi-prints are not possible.
To change the printer settings and print images (change printer settings)
Images are printed according to settings specified by the camera, such as paper type, size, layout, printing quality, etc.
1 Complete the printing setup (page 38).
• The PictBridge Menu appears.
\- The Printer Settings Menu appears.
DATE STAMP:
Print the date the photo was taken.
Specify the type of paper used for printing.
PAPER SIZE:
Specify the size of paper used for printing.
LAYOUT:
Specify how the images are to be arranged on the paper.
QUALITY:
Select the print quality for the images.

4 Adjust the printer settings.
① Use the arrow buttons to select a printer setting parameter, and press the SET button.
\- The screen to set the selected parameter appears.
② Press the [▲] or [▼] button to adjust the setting, and press the SET button.
- The selected parameter is set, and you are returned to the Printer Settings Menu.
- Follow the same procedure to adjust the other parameters, as desired.
- The contents of the settings that can be made for each parameter will differ depending on the printer.
HINT
- The parameters that are displayed on the Printer Settings Menu will differ depending on the printer that is connected.
- To use printer functions which do not appear on your camera's Printer Settings Menu, select "☐ VALUES".
- If a function set by the camera is not available in the printer, the camera's printer settings will automatically change to “☐ VALUES”.
COMMONLY ASKED QUESTIONS
If you have a question about the camera operation, you might find the answer in this compilation of commonly asked questions.
Question Answer Action Power Why doesn’t the power turn on? Due to cold temperatures, the battery pack temporarily lost its power. Place the camera in your pocket to warm it up before using it. Why is the battery pack consumed so quickly? The ambient temperature is very low. Keep the battery pack in an environment of 10 to 40°C (50 to 104°F). The battery pack life has expired. Replace with a new battery pack. Why does the icon appear? The remaining battery pack power is low. Recharge the battery pack. Shooting Why doesn’t the flash operate? The camera has determined that the image is bright enough and the flash is not necessary. Not a malfunction. Capture the image; the camera will determine when the flash is necessary.
COMMONLY ASKED QUESTIONS
Question Answer Action Shooting Are the settings retained even after the camera is turned off? — All settings except the self-timer and the exposure correction are retained even after the camera is turned off. Which resolution setting should I use? — Select the resolution setting according to the intended use. 12M 9M 6M 4M :Appropriate for printing letter-size or larger, and for printing a close-up of part of a photo (trimming). 2M : For printing standard photo (photo service) sizes. 03M : For photos displayed on a web page, or sent as e-mail attachments. What is the difference between the digital zoom and the optical zoom? — Because shooting with the optical zoom uses the optics of a physical lens, you can shoot without losing minute details in the image. The digital zoom, on the other hand, works by magnifying a portion of the image that hits the CCD sensor and may produce a coarser image. Shooting How can I get the distant view into focus? — Set the scene function to the landscapemode when photographing. Or, set the focus range setting to manual focusMF, and set the distance to∞. Monitor When used in cold weather, why does the image seem to leave traces as it moves? Condition due to the liquid crystals. Not a malfunction. Spots that appear in the monitor only appear in the monitor and will not be recorded with the images. Why does the displayed image contain some red, blue and green dots, or why are black spots visible?
COMMONLY ASKED QUESTIONS
Question Answer Action Viewing images Why is the image too bright? The subject was too bright. When capturing an image, devise a way to compensate for a bright subject, for example, by changing the shooting angle. Why is the image out of focus? The focus is not locked properly. Hold the camera correctly, and when the image is locked in focus, gently press the shutter button all the way to capture the image. Why doesn’t the zoom jump playback work? Zoom jump playback does not work for an image that was created from a magnified portion of a zoom jump image, or for video clips. Not a malfunction. Why is there no image (☐ is shown)? This may happen when trying to play back images stored on a card from a different digital camera. Play back images that were recorded on a card using this camera. Why do vertical stripes appear? If a bright subject is shot in the video clip recording mode, vertical stripes may appear on the monitor or in the image. Not a malfunction. Viewing images Why isn't the magnified image clear? Due to the characteristics of the camera, magnified images appear less clear. Not a malfunction. Why isn't the captured image clear? The image was captured using the digital zoom. Not a malfunction. Zoom in only within the optical zoom range when shooting. Can I play back image data that I edited using my computer? — We cannot guarantee the accurate playback of data that has been edited using a computer. Printing Why does a message appear during PictBridge printing? There is a problem with the printer. Please refer to the instruction manual for your printer. Misc. Why does the “Card full” or “Internal memory full” message appear? There is no more available memory on the card or in the camera's internal memory. Delete unnecessary data, or use a card that has more memory available. Why does the “Card is protected” message appear? The lock switch on the card is in the locked (protect) position. Move the lock switch to the unlocked position.
COMMONLY ASKED QUESTIONS
Question Answer Action Misc. Why can’t the camera be operated? A temporary internal circuitry problem may be the cause. Remove the battery pack from the camera, wait a few minutes, then reinstall the battery pack and try again. Can I use my camera abroad? — If you have questions about using the power cord abroad, please consult with a dealer near you for advice. Why does the “System error” message appear? A problem has occurred within the camera or card. Check the following items:1 Remove the card and then install it again.2 Remove the battery pack and then install them again.3 Install a different card.If “System error” still appears after performing the above steps, then take the camera to the dealer for service.
TROUBLESHOOTING
Before taking your camera to the repair shop, check the following table for a possible solution to the problem.
B: BASIC INSTRUCTION MANUAL
A: ADVANCED INSTRUCTION MANUAL
CAMERA
Problem Cause Action Reference page Power No power. The battery pack is dead. Recharge the battery pack. B-8 The battery pack has not been inserted correctly. Reinsert the battery pack, making sure to orient it correctly. B-12 The battery/ card compartment cover is not completely closed. Close the battery/card compartment cover completely. The camera turns off by itself. The power save function is operating. Not a malfunction. B-15 Shooting An image is not captured when the shutter button is pressed. The power is not turned on. If the auto power off function was activated, turn the camera on before shooting. If the camera was turned off, press the ON/OFF button to turn it on. B-15
TROUBLESHOOTING
Problem Cause Action Reference page Shooting An image is not captured when the shutter button is pressed. The maximum number of images that can be captured or the maximum video clip recording time has been reached. Install a new card. B-12 Delete the images that are not necessary.Save the images to separate media, then delete all the images from the card. B-33 The operation buttons (arrow buttons, MENU button, etc.) do not work. A finger is touching the shutter button, and the focus lock is active. Remove your finger from the shutter button, and then use the operation buttons. — The flash does not operate. The flash off mode is selected. Set the flash to automatic flash mode or forced flash mode. B-48 The battery pack is dead. Recharge the battery pack. B-8 The “Battery depleted” message appears. The battery pack is consumed. Recharge the battery pack. B-8 Shooting When zooming in or out, the zoom movement stops momentarily. The optical zoom has moved to the maximum magnification position. Not a malfunction. Release the zoom switch, and press it again. B-46 There is noise in the captured image. The ISO sensitivity setting is too high. Set the ISO sensitivity to a lower setting. A-6, 14 When recording a video clip under fluorescent lights, a noticeable flicker appears in the image. This occurs when the shutter speed is too fast. Set the ISO sensitivity to [200] or less. A-6, 14 Monitor No playback image appears. The playback mode is not active. Press the playback button [▶]. B-19 Viewing images The image is too dark. The flash was blocked by a finger or other object. Hold the camera correctly, and make sure the flash is not obstructed. — The subject was too far away. Capture the image in the range of operation of the flash. B-57
TROUBLESHOOTING
Problem Cause Action Reference page Viewing images The image is too dark. The subject was lit from behind. Use the forced flash mode. B-48 Use the exposure correction function. A-6 There is not enough light. Adjust the ISO sensitivity setting. A-6, 14 The image is too bright. The forced flash mode is selected. Select a different flash mode. B-48 The subject was too bright. Use the exposure correction function. A-6 The ISO sensitivity setting is incorrect. Set the ISO sensitivity to AUTO. A-6, 14 The image is not in focus. The subject is too close to the camera. Select the correct focus setting for your needs. B-52 The focus setting is not correct. The camera moved when the shutter button was pressed. Hold the camera correctly and press the shutter button correctly. B-24 The focus is not locked properly. The lens is dirty. Clean the lens. — Viewing images The colors of the images captured indoors are not correct. This is due to ambient lighting. Capture the image using the forced flash mode. B-48 The white balance setting is incorrect. Set the white balance setting correctly. A-6, 15 A part of the image is missing. The handstrap or a finger was blocking the lens. Hold the camera correctly, and make sure the lens is not obstructed. — “No image” is shown. There is no image stored in the installed card or the internal memory. Play back after capturing images. — Image editing You cannot edit or rotate an image. The protect mode is set. Cancel the protect mode. A-8 Misc. The “Image is protected” message appears and the data cannot be deleted. You have attempted to delete data that is protected from accidental erasure. Cancel the protect mode. A-8 You cannot save a file size equivalent to the stated capacity of the card. The recording capacity is less than the value specified for the card. Depending on the card, the capacity may be less than the specified value. Please refer to the instructions that accompanied the card. B-59
Notes regarding the scene function
The macro focus range setting is not available. — The pan PF, macro and manual focus MF focus range settings are not available.The AF seeker AFC focus mode setting is not available.The digital zoom is not available. [DC08] The resolution cannot be set to 2M or more.The flash is disabled even when shooting single shots. The macro focus range setting is not available. —[YBY7] The macro and manual focus MF focus range settings are not available.The flash is disabled even when shooting single shots.The AF seeker AFC focus mode setting is not available. The pan PF, macro and manual focus MF focus range settings are not available.The AF seeker AFC focus mode setting is not available.The digital zoom is not available. —