B250MPIXIU - Carte mère ASUS - Notice d'utilisation et mode d'emploi gratuit
Retrouvez gratuitement la notice de l'appareil B250MPIXIU ASUS au format PDF.

| Caractéristiques Techniques | Format Mini-ITX, Socket LGA 1151, Chipset Intel B250 |
|---|---|
| Processeurs Compatibles | Processeurs Intel Core de 6ème et 7ème génération |
| RAM | 2 x DIMM DDR4, jusqu'à 2400 MHz, capacité maximale de 32 Go |
| Slots d'Extension | 1 x PCIe 3.0 x16, 1 x PCIe 3.0 x1 |
| Stockage | 4 x SATA 6 Gb/s, support RAID 0, 1, 5, 10 |
| Connectivité Réseau | LAN 10/100/1000 Mbps, contrôleur Intel |
| Ports USB | 4 x USB 3.0, 2 x USB 2.0 |
| Audio | Codec audio Realtek ALC887, 8 canaux |
| Utilisation | Idéale pour des configurations compactes, jeux légers et bureautique |
| Maintenance et Réparation | Vérifier régulièrement les mises à jour du BIOS et des pilotes |
| Sécurité | Support TPM 2.0 pour la sécurité des données |
| Informations Générales | Compatible avec les systèmes d'exploitation Windows et Linux |
FOIRE AUX QUESTIONS - B250MPIXIU ASUS
Questions des utilisateurs sur B250MPIXIU ASUS
0 question sur cet appareil. Repondez a celles que vous connaissez ou posez la votre.
Poser une nouvelle question sur cet appareil
Téléchargez la notice de votre Carte mère au format PDF gratuitement ! Retrouvez votre notice B250MPIXIU - ASUS et reprennez votre appareil électronique en main. Sur cette page sont publiés tous les documents nécessaires à l'utilisation de votre appareil B250MPIXIU de la marque ASUS.
MODE D'EMPLOI B250MPIXIU ASUS
Al Suite 3 用户手册
200 系列
安装华硕 Al Suite 3 程序 ..... 2
运行华硕 AI Suite 3 程序 ....4
华硕 DIGI+ VRM(数字供电设计) 6
华硕 EPU(智能节能处理器)....7
华硕 TurboV EVO 8
华硕 Fan Xpert 4 Core ....10
PC Cleaner....12
华硕 EZ Update ....13
系统信息....14
LED 指示灯控制 15
版本 16
安装华硕 AI Suite 3 程序
通过友好的用户界面,华硕 AI Suite 3 程序将所有的华硕独家功能集成在一个软件套件中,可以同时操控并运行各项功能及应用程序。

- Al Suite 3 的选项及功能视机型而定。
- 当您在 Windows® 7、Windows® 8、Windows® 8.1 或 Windows® 10 操作系统中运行驱动程序及应用程序 DVD 光盘之前,请先确认您拥有管理员权限。
请按照下列步骤将华硕 AI Suite 3 程序安装到您的电脑:
Windows ^® 7 操作系统
- 将驱动程序及应用程序 DVD 光盘放入光驱。
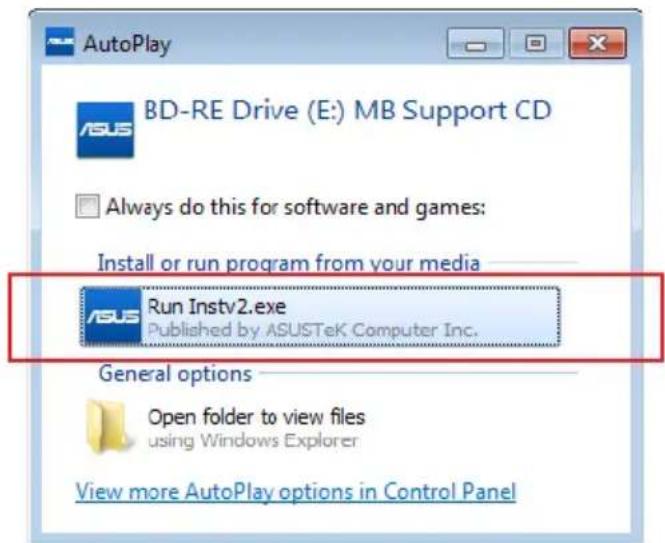
- 在自动播放(AutoPlay)对话框中点击“运行 ASSETUP.exe”,然后选择应用程序(Utilities)标签页。

Al Suite 3 的主画面仅供参考,视机型不同而不同。
text_image
AutoPlay BD-RE Drive (E:) MB Support CD Always do this for software and games: Install or run program from your media Run Instv2.exe Published by ASUSTeK Computer Inc. General options Open folder to view files using Windows Explorer View more AutoPlay options in Control Panel- 在应用程序(Utilities)标签页中,点击【AI Suite 3】,然后请按照屏幕指示来完成安装步骤。
Windows® 8 与 Windows® 8.1 操作系统
- 将驱动程序及应用程序 DVD 光盘放入光驱,然后按照屏幕的指示操作。
- 在“华硕主板驱动程序及应用程序 DVD 光盘(ASUS motherboard support DVD)”主菜单中,选择“应用程序(Utilities)”标签并点击“AI Suite 3”。
- 请按照屏幕的指示操作。
若是 “华硕主板驱动程序及应用程序 DVD 光盘 (ASUS motherboard support DVD)” 主菜单没有出现,请参考以下步骤:
a. 至 “开始” 屏幕,然后点击或轻触 “桌面” 的应用程序。
b. 在 “桌面” 的左下角点击或轻触 File Explorer,然后选择 DVD 光盘并轻触或双击【设置】。
Windows ^® 10 操作系统
- 将驱动程序及应用程序 DVD 光盘放入光驱,然后按照屏幕的指示操作。
- 从 “华硕主板驱动程序及应用程序 DVD 光盘(ASUS motherboard support DVD)” 主菜单中选择应用程序(Utilities)标签页,然后点击 AI Suite 3。
运行华硕 AI Suite 3 程序
Windows ^® 7 操作系统
从桌面点击【开始】>【所有应用程序】>【ASUS】>【Al Suite 3】。
您也可以在 Windows ^® 7 的通知任务栏中点击

Windows ^® 8 与 Windows ^® 8.1 操作系统
在开始屏幕轻触 Al Suite 3 应用程序,若您使用鼠标,则请在开始屏幕点击 Al Suite 3 应用程序。

Windows ^® 10 操作系统
从桌面点击【开始】>【所有应用程序】>【ASUS】>【AI Suite 3】。

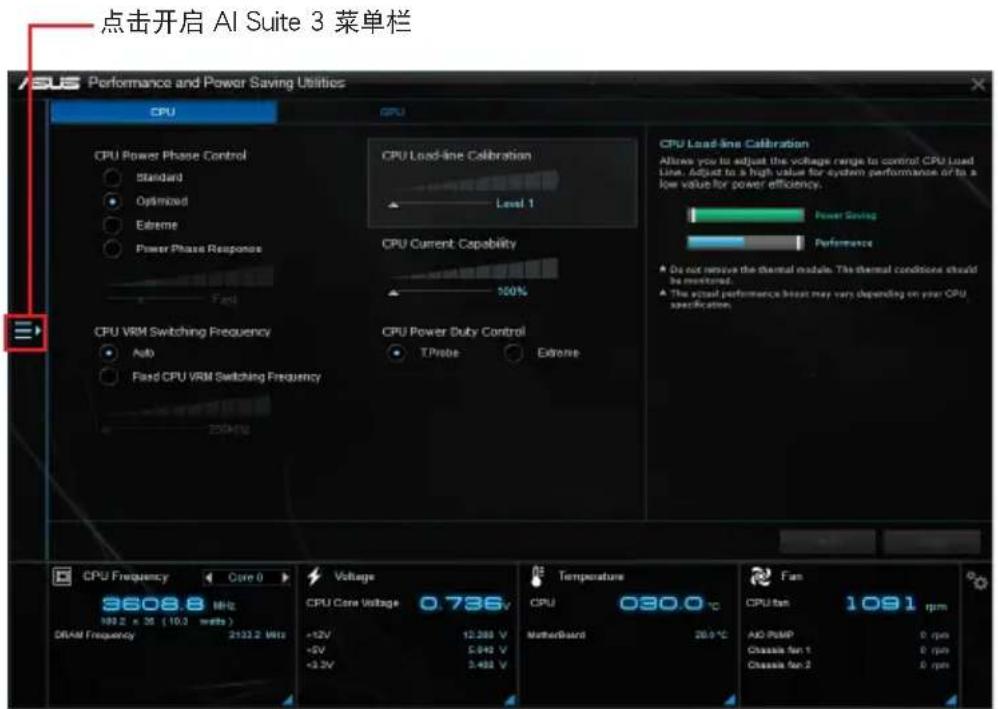
Al Suite 3 主画面
Al Suite 3 主画面提供您轻松进入控制和了解电脑发生了什么状况 - 能提供您将性能做最佳化设置,并同时确保系统的稳定性。
Al Suite 主画面包含一个快速进入的主菜单工具栏,可以让您快速开启任何集中在这里的华硕应用程序。点击主画面左侧图标便可以开启此主菜单工具栏。

Al Suite 3 主画面仅供参考,请以您实际看到的画面为准。
text_image
点击开启 AI Suite 3 菜单栏 Performance and Power Saving Utilities CPU CPU CPU Power Phase Control Standard Optimized Extreme Power Phase Response Fast CPU Load-line Calibration Level 1 CPU Current Capability 100% CPU VRM Switching Frequency Auto Fixed CPU VRM Switching Frequency 250Hz CPU Load-line Calibration Allows you to adjust the voltage range to control CPU Load Line. Adjust to a high value for system performance or to a low value for power efficiency. Power Swing Performance Do not remove the thermal module. The thermal conditions should be monitored. The actual performance heat may vary depending on your CPU specification. CPU Frequency Core 0 3608.8 MHz 1992 x 35 (10.3 watts) DRAM Frequency 2133.2 MHz Voltage CPU Core Voltage 0.736V +2V -12.388 V +5V 5.042 V +3.2V 3.482 V Temperature CPU 030.0 °C MotherBoard 20.0 °C Fan CPU fan 1091 rpm ACI PUMP 0 rpm Classic fan 1 0 rpm Classic fan 2 0 rpmAl Suite 3 主菜单栏
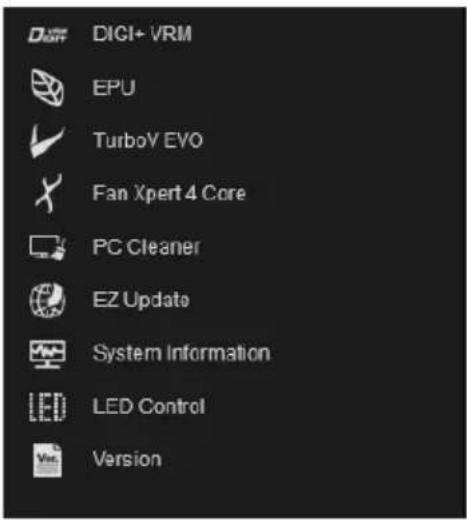
text_image
DIGI+ VRM EPU TurboY EVO Fan Xpert 4 Core PC Cleaner EZ Update System Information LED Control Version
- 本章节的画面仅供参考,请以您实际看到的画面为准。
- 请参考驱动程序与应用程序光盘中的软件手册或访问华硕网站 http://www.asus.com.cn 获取软件设置的详细信息。
Al Suite 3 迷你菜单
Ai Suite 3 迷你菜单画面图标显示于桌面,方便您运行功能,且菜单可随处移动位置。AI Suite 3 迷你菜单让您可以快速开启 Ai Suite 3 里的重要项目。
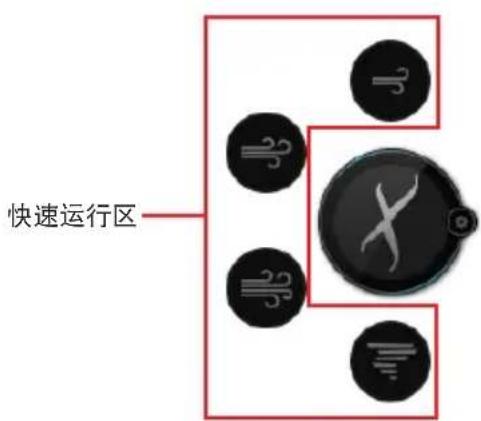
text_image
快速运行区点击以展开或开始快速运行

natural_image
Close-up of a black circular device with a white X mark and three circular icons (no text or symbols)点击以选择 Ai Suite 3 的功能
华硕 DIGI+ VRM(数字供电设计)
华硕 DIGI+ VRM 程序允许您调整 VRM 电压与频率以提升系统稳定性。此功能也可提供最高的电源效率,但产生热量减少,可延长元件寿命并减少电能流失。
开启 DIGI+ VRM
要开启 DIGI+ VRM,请点击 AI Sutie 3 主菜单左侧的图标,然后选择【DIGI+ VRM】。
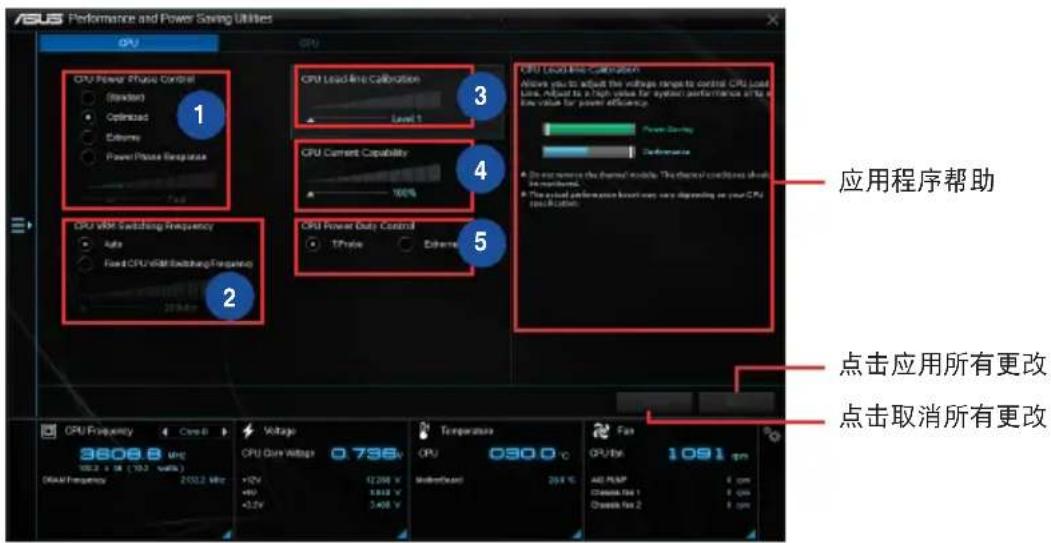
text_image
ASUS Performance and Power Saving Utilities CPU CPU CPU Power Music Control (Standard) Optimized Extreme Power Phase Respiration 1 2 3 4 5 CPU Load Line Calibration Level 1 CPU Current Capability 100% 4 5 CPU Load Line Calibration Allow you to adjust the voltage range to control CPU Load Line, Adjust to a high value for system performance shift to low value for power efficiency. Power Supply Performance A. Do not remove the thermal module. The thermal conditions should be maintained. B. The actual performance button may vary depending on your CPU specification. 应用程序帮助 点击应用所有更改 点击取消所有更改 CPU Frequency Core B Voltage 3608.8 µHz 103.2 x 16 (103.2 volts) Disk Frequency 2032.2 MHz CPU Data Voltage 0.736V +12V +90 +3.2V 12200 V 3100 V Temperature 030.0 °C Median/Max 203 V Fan CPU Max 1091 pm All PUMP Chassis Test 1 Chassis Test 2 6 pm1 CPU Power Phase Control
在系统高负载时增加相位数可提高瞬时响应速度并得到更好的散热性能。系统低负载时减少相位数可提高 VRM 效率。
2 CPU VRM Switching Frequency
调整频率将会影响 VRM 的瞬时响应和元件的散热。频率越高,瞬时响应越快。
3 CPU Load-line Calibration
本项目允许您调整电压范围以控制 CPU Load-line。较高的设置值可得到更高的系统性能,降低设置值可节省系统能耗。
4 CPU Current Capability
为超频提供更宽的电源调整范围。设置值越高,电源范围越宽,同时扩展超频频率范围。
5 CPU Power Duty Control
用来调整每个 VRM 相位的电流以及每个相位元件的热量。

• 实际提升的性能将依使用的处理器型号而异。
- 请勿卸除散热模块,散热情况应受到监控。

请访问华硕网站 http://www.asus.com.cn 获取软件设置的详细信息。
华硕 EPU(智能节能处理器)
华硕 EPU 是个省电工具,可让您调整中央处理器和风扇控制设置以达到省电的效果。
开启 EPU
要开启 EPU,请点击 AI Sutie 3 主菜单左侧的 □ 标,然后选择【EPU】。
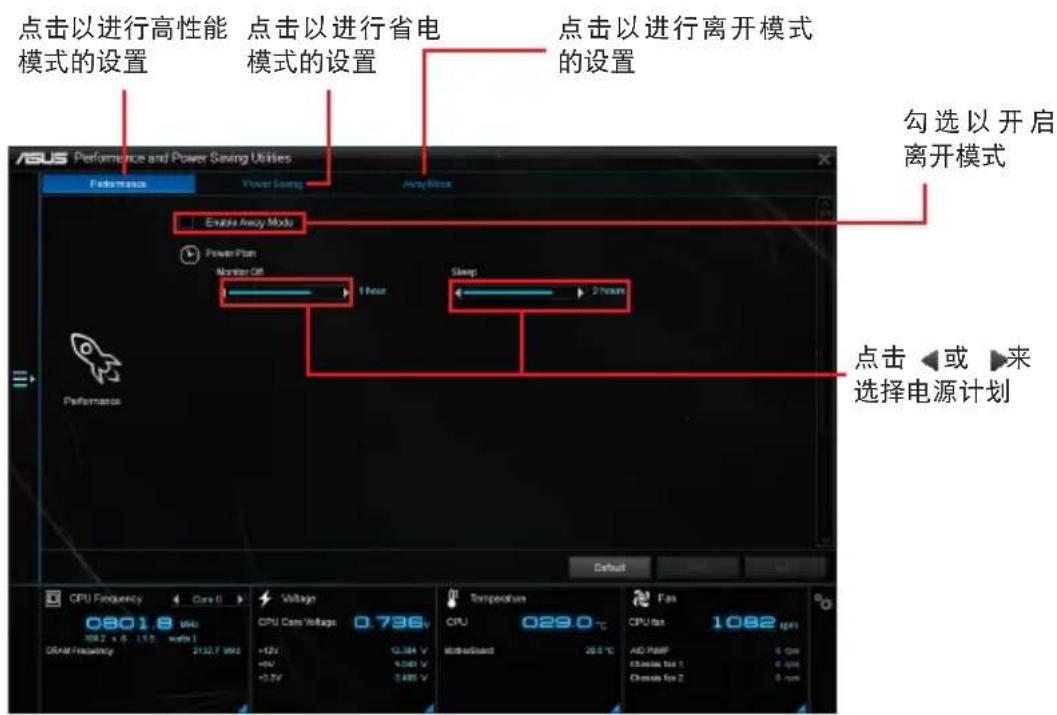
text_image
点击以进行高性能 模式的设置 点击以进行省电 模式的设置 点击以进行离开模式 的设置 Enabling Away Mode Power Plan Monitor Off 1 Hour Sleep 2 Hours Power Accuracy Control Battery 0801.8 Vdc 10V 2.5 V 1.5 V 3.5 V CPU Frequency 0.736V +12V 12.34 V +9V 1.04 V +5.5V 5.68 V Temperature CPU 029.0 °C Motorboard 20.0 °C Fan CPU Max 1082 μm AD PWM 0 Gpc Close Max 1 0 Gpc Close Max 2 0 Gpc 勾选以开启 离开模式 点击◀或▶来 选择电源计划华硕 TurboV EVO
华硕 TurboV EVO 程序结合了 TurboV 这个性能强大的超频工具,提供您手动调整处理器频率及相关电压,更提供了 Auto Tuning 功能,让您轻松提升系统性能。
开启 TurboV EVO
要开启 TurboV EVO,请点击 AI Sutie 3 主菜单左侧的图标,然后选择【TurboV EVO】。

请访问华硕网站 http://www.asus.com.cn 获取软件设置的详细信息。

在调整处理器电压设置前,请先参考处理器使用说明。设置过高的电压可能会造成处理器的永久损害,而设置过低的电压则可能会造成系统不稳定。

为求系统稳定,在华硕 TurboV 程序中的所有更改都不会保存至 BIOS 设置中,亦不会在下一次开机时维持相同设置。请使用 Save Profile(保存模式)功能保存您的个人化超频设置,并在 Windows 操作系统启动之后手动载入设置模式。
使用 TurboV EVO
CPU 频率
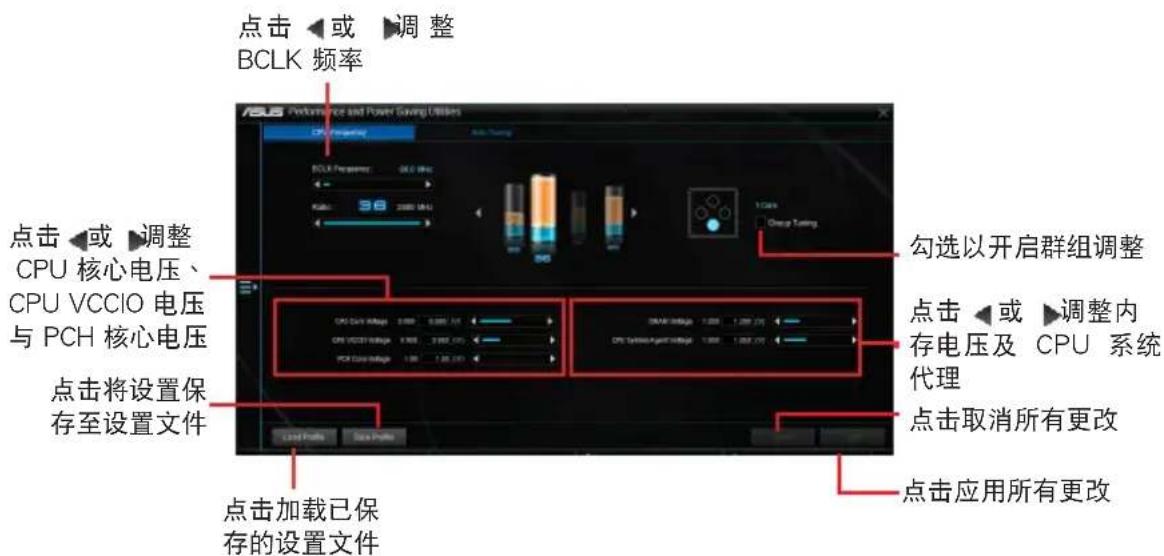
text_image
点击◀或▶调整 BCLK 频率 ASU Performance and Power Saving Utilities CPU Frequency BCLK Frequency: 36.0 MHz Kath: 98 2000 MHz 1 Class Chang Tuning 点击◀或▶调整 CPU 核心电压、 CPU VCCIO 电压 与 PCH 核心电压 点击将设置保 存至设置文件 点击加载已保 存的设置文件 勾选以开启群组调整 点击◀或▶调整内 存电压及 CPU 系统 代理 点击取消所有更改 点击应用所有更改Auto Tuning
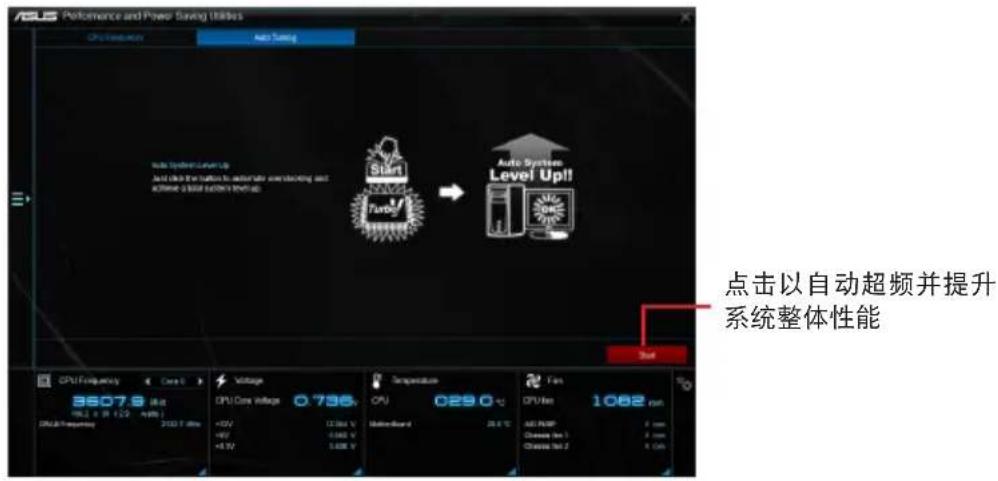
text_image
ASLS Performance and Power Saving Utilities CPU Frequency Auto Turning Auto System Level Up Auto System Low Voltage Auto System Low Voltage Auto System Low Voltage Auto System Low Voltage Auto System Low Voltage Auto System Low Voltage Auto System Low Voltage Auto System Low Voltage Auto System Low Voltage Auto System Low Voltage Auto System Low Voltage Auto System Low Voltage Auto System Low Voltage Auto System Low Voltage Auto System Low Voltage Auto System Low Voltage Auto System Low Voltage Auto System Low Voltage Auto System Low Voltage Auto System Low Voltage Auto System Low Value Auto System Low Value Auto System Low Value Auto System Low Value Auto System Low Value Auto System Low Value Auto System Low Value Auto System Low Value Auto System Low Value Auto System Low Value Auto System Low Value Auto System Low Value Auto System Low Value Auto System Low Value Auto System Low Value Auto System Low Value Auto System Low Value Auto System Low Value Auto System Low Value Auto System Low Value Auto System Low V Auto System Low V Auto System Low V Auto System Low V Auto System Low V Auto System Low V Auto System Low V Auto System Low V Auto System Low V Auto System Low V Auto System Low V Auto System Low V Auto System Low V Auto System Low V Auto System Low V Auto System Low V Auto System Low V Auto System Low V Auto System Low V Auto System Low V Auto System Low Value Auto System Low Value Auto System Low Value Auto System Low Value Auto System Low Value Auto System Low Value Auto System Low Value Auto System Low Value Auto System Low Value Auto System Low Value Auto System Low Value Auto System Low Value Auto System Low Value Auto System Low Value Auto System Low Value Auto System Low Value Auto System Low Value Auto System Low Value Auto System Low Value Auto System Low Output Auto System Low Output Auto System Low Output Auto System Low Output Auto System Low Output Auto System Low Output Auto System Low Output Auto System Low Output Auto System Low Output Auto System High Output 1.0V 2.0V 3.0V 4.0V 5.0V 6.0V 7.0V 8.0V 9.0V 10.0V 11.0V 12.0V 13.0V 14.0V 15.0V 16.0V 17.0V 18.0V 19.0V 20.0V 21.0V 22.0V 23.0V 24.0V 25.0V 26.0V 27.0V 28.0V 29.0V 30.0V 31.0V 32.0V 33.0V 34.0V 35.0V 36.0V 37.0V 38.0V 39.0V 40.0V 41.0V 42.0V 43.0V 44.0V 45.0V 46.0V 47.0V 48.0V 49.0V 50.0V 51.0V 52.0V 53.0V 54.0V 55.0V 56.0V 57.0V 58.0V 59.0V 60.0V 61.0V 62.0V 63.0V 64.0V 65.0V 66.0V 67.0V 68.0V 69.0V 70.0V 71.0V 72.0V 73.0V 74.0V 75.0V 76.0V 77.0V 78.0V 79.0V 80.0V 81.0V 82.0V 83.0V 84.0V 85.0V 86.0V 87.0V 88.0V 89.0V 90.0V 91.0V 92.0V 93.0V 94.0V 95.0V 96.0V 97.0V 98.0V 99.0V 100.0V Auto Systems High Output Level Up Auto Systems High Output Level Down Level Up Auto Systems High Output Level Down Level Down Level Up Auto Systems High Output Level Down Level Down Level Up Auto Systems High Output Level Up Level Up Level Down Level Up Level Up Level Up Level Up Level Up Level Up Level Up Level Up Level Up Level Up Level Up Level Up Level Up Level Up Level Up Level Up Level Up Level Up Level Up Level Up Level Up Level Up Level Up Level Up Level Up Level Up Level Up Level Up Level Up Level Up Level Up Level Up Level Up Level Up Level Up Level Up Level Up Level Up Level Up Level Up Level Up Level Up Level Up Level Up Level Up Level Up Level Up Level Up Level Up Level Up Level up level up level up level up level up level up level up level up level up level up level up level up level up level up level up level up level up level up level up level up level up level up level up level up level up level up level up level up level up level up level up level up level up level up level up level up level up level up level up level up level up level up level up level up level up level up level up level up level up level up level up levels up level up levels up levels up levels up levels up levels up levels up levels up levels up levels up levels up levels up levels up levels up levels up levels up levels up levels up levels up levels up levels up levels up levels up levels up levels up levels up levels up levels up levels up levels up levels up levels up levels up levels up levels up levels up levels up levels up levels up levels up levels up levels up levels up levels up levels up levels up levels up levels up levels up levels up levels up layers. Click at automatic super frequency and提升系统整体性能华硕 Fan Xpert 4 Core
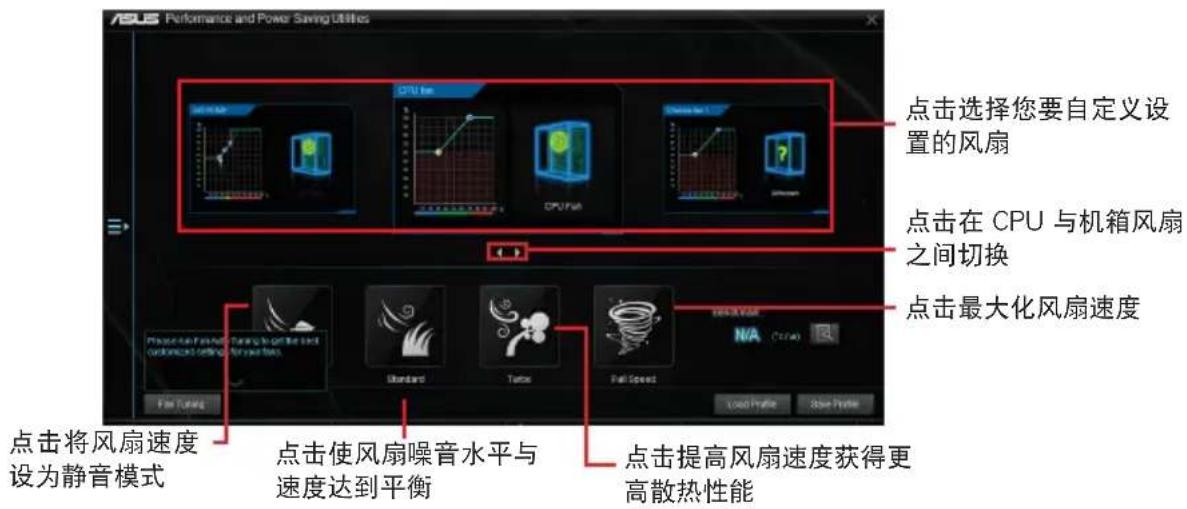
华硕 Fan Xpert 4 Core 可以自动检测并调整风扇速度。用户可以根据风扇规格及不同的地理位置、气候条件而带来的不同环境温度优化风扇设置。
开启 Fan Xpert 4 Core
要开启 Fan Xpert 4 Core,请点击 Al Sutie 3 主菜单左侧的图标,然后选择【Fan Xpert 4 Core】。
text_image
ASUS Performance and Power Saving Utilities 点击选择您要自定义设置的风扇 点击在 CPU 与机箱风扇之间切换 点击最大化风扇速度 点击将风扇速度设为静音模式 点击使风扇噪音水平与速度达到平衡 点击提高风扇速度获得更高散热性能自定义风扇设置
Smart Mode(智能模式)
Smart Mode 允许您依据系统温度自定义风扇转速与反应。

text_image
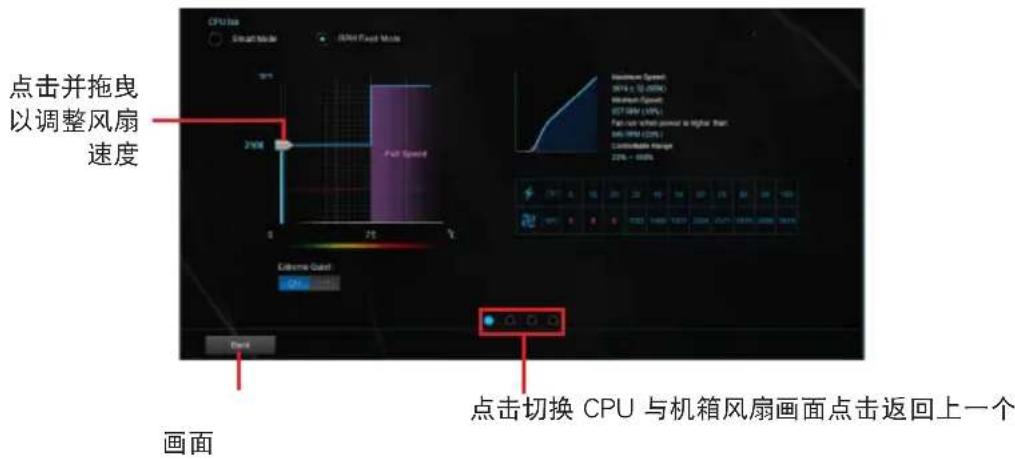
ASUS Performance and Power Saving Options 点击并拖曳以 设置风扇转速 点击并拖曳滑杆 调整风扇反应 点击返回上一个 画面 点击切换 CPU 与机 箱风扇画面 点击取消 所有更改 点击应用所有更改RPM Fixed Mode(固定 RPM 模式)
RPM Fixed Mode 允许您设置当 CPU 温度低于 75^ C 时的 CPU 风扇转速。
text_image
点击并拖曳 以调整风扇 速度 24Hz P/FF Speed External Guard CPU Front 画面 点击切换 CPU 与机箱风扇画面点击返回上一个
- 当 CPU 温度达到 75^ C 时, 风扇将自动以全速运行以保护 CPU。
- 仅 FAN Xpert3 及以上版本支持 CPU 风扇自动检测。
- 对于不支持 CPU 风扇检测的主板,Fan Xpert 4 Core 程序仅可控制 4-pin CPU 风扇。
- 若您的风扇安装时带有外接速度控制设备,则 Fan Xpert 4 Core 可能无法检测风扇速度。
- Fan Xpert 4 Core 程序不支持 2-pin 风扇。若您安装了 2-pin 风扇,则风扇只可以全速运行。
- 若更换了 CPU 或机箱风扇,需重复风扇自动调整过程。

风扇自动调整过程中请勿移除风扇。
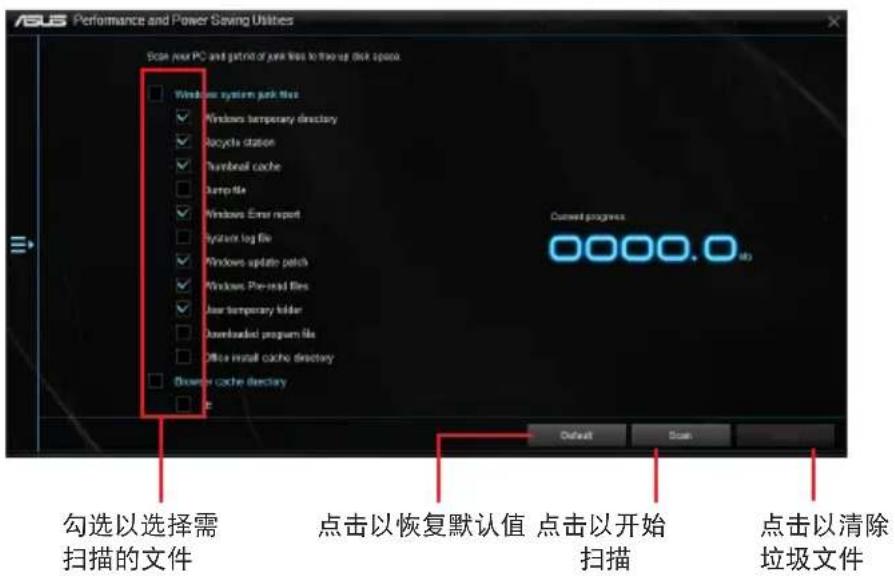
PC Cleaner
PC Cleaner 扫描您的电脑并清除垃圾文件,释放更多硬盘空间。
开启 PC Cleaner
要开启 PC Cleaner,请点击 AI Sutie 3 主菜单左侧的图标,然后选择【PC Cleaner】。
text_image
ASUS Performance and Power Saving Utilities Scale Your PC and park of junk files to free up disk space Windows system junk files Windows temporary directory Recycle station Thumball cache Jump file Windows Enter report System log file Windows update patch Windows Pre-read files User temporary folder Downloaded program file Office install cache directory Mouse cache directory New Current progress 0000.0 勾选以选择需扫描的文件 点击以恢复默认值 点击以开始扫描 点击以清除垃圾文件华硕 EZ Update
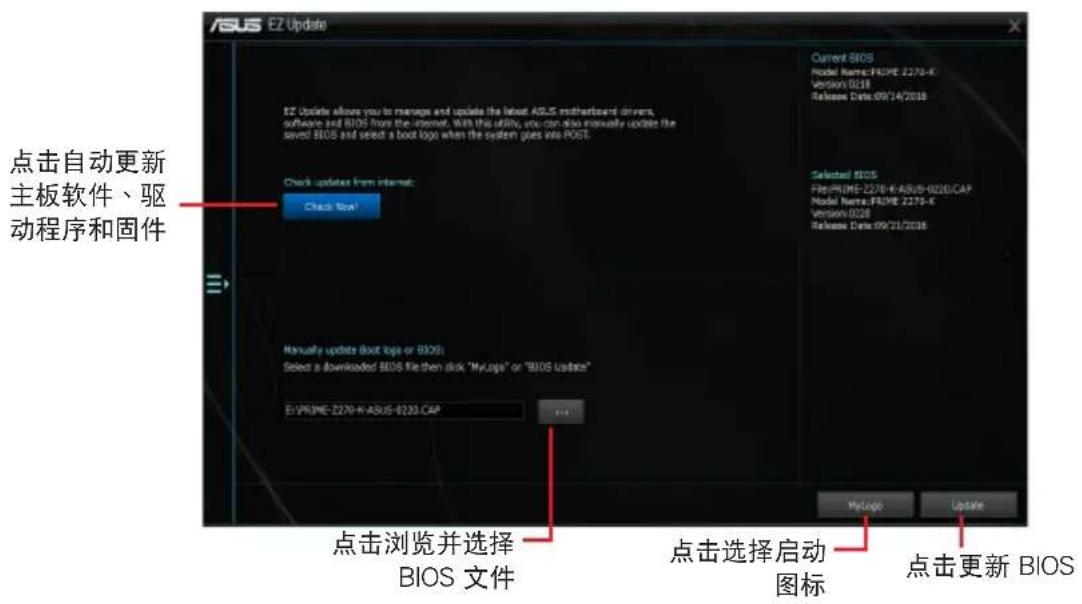
EZ Update 程序可让您自动更新主板软件、驱动程序和 BIOS。您也可以手动升级已保存的 BIOS 文件,并选择系统进入开机自检(POST)时的启动图标。
开启 EZ Update
要开启 EZ Update,请点击 AI Sutie 3 主菜单左侧的图标,然后选择【EZ Update】。
text_image
ASUS E2 Update E2 Update allows you to manage and update the latest ASUS motherboard driver, software and BIOS from the internet. With this utility, you can also manually update the saved BIOS and select a boot logo when the system goes via POST. Current BIOS Model Name:FIOME 2270-K Version:0018 Release Date:09/14/2016 Check update from Internet: Check Now! Selected BIOS File:PRIME-2270-K:A828-0020/CAP Model Name:FIOME 2270-K Version:0028 Release Date:09/21/2016 Manually update boot logs or BIOS: Select a downloaded BIOS file then click "MyLogo" or "BIOS Updates" E:\PRIME-2270-K:ASUS-0230.CAP 点击浏览并选择 BIOS 文件 点击选择启动 图标 MyLogo Update 点击更新 BIOS手动更新 BIOS 与选择开机图案
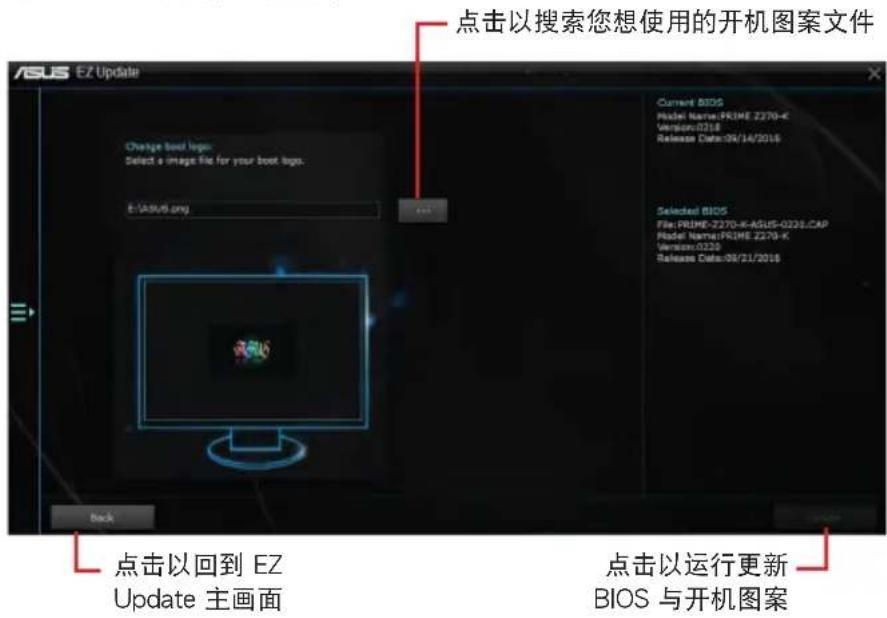
text_image
ASUS EZ Update Change boot logo Select a image file for your boot logo. E:\ASUS.org 点击以搜索您想使用的开机图案文件 Current BIOS Model Name:PRIME 2270-K Version:0218 Release Date:04/14/2016 Selected BIOS File: PRIME-2270-K-ASUS-0226.CAP Model Name:PRIME 2270-K Version:0226 Release Date:09/21/2016 点击以回到 EZ Update 主画面 点击以运行更新 BIOS 与开机图案在您点击 BIOS Update 按钮后,点击 Flash 开始更新 BIOS 与上传开机图案文件至您的系统。
系统信息
System Information 可显示主板、处理器、内存等信息。
开启系统信息
要开启系统信息,请点击 AI Sutie 3 主菜单左侧的图标,然后选择【System Information】。
查看主板信息
- 点击【MB】标签页可以查看主板的制造商、产品名称、版本以及 BIOS 的信息。

text_image
ASUS Systems Information SB CPU B/D Referencing Manufacture ASUSTAC COMPUTER INC Product PMRC 02134 Order Free Use System MS-12/458766 BDS Manufacture American Technologies Inc. Copper 03/14/2019 Network 0218查看 CPU 信息
- 点击【CPU】标签页可以查看处理器和缓存的信息。
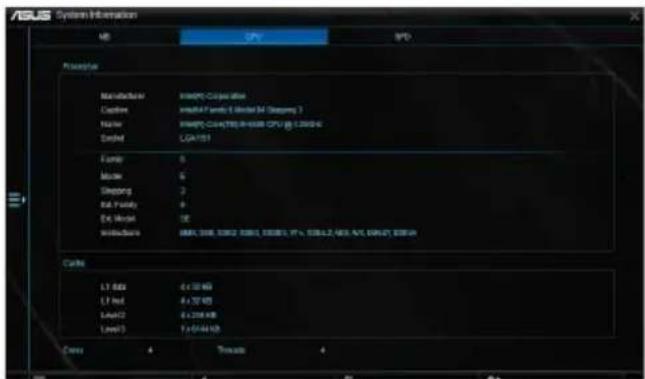
text_image
ASUS System Information MB CPU SPD Powertrain Maintenance 8000% Co-operative Device 8000% power 6 Motor M (Sleeping 1) Name 8000% Co-operative CPU @ 2.0000 Control CGAT157 Ferry 0 Mask 6 Sleeping 2 Auto Quality 9 Ex Audio DE Buildings 8000% Co-operative CPU @ 2.0000, 37% Power 2/4/4/4/4/4/4/4/4/4/4/4/4/4/4/4/4/4/4/4/4/4/4/4/4/4/4/4/4/4/4/4/4/4/4/4/4/4/4/4/4/4/4/4/4/4/4/4/4/4/4/8 Carls LT Data 6 x 10 KB LT Host 8 x 10 KB LSAT2 8 x 208 KB LSAT3 1 x 614 KB Carry 4 Trauto 4查看 SPD 信息
- 点击 “SPD” 标签页,然后选择内存插槽,可以查看安装于该插槽的内存条信息。
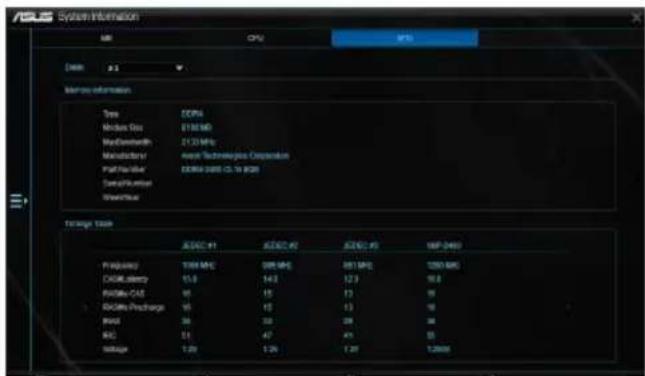
text_image
ASLS System Information CPU ASP [00] 2.1 Server Information Type: DESP4 Module Data: E130 MB MaxDiameter: 2130 MHz Manufacturer: max Technologies Corporation Port Number: EXERC-0005 CD.16 (GB) Data/Number Waterfall Through Task ACDC #1 ACDC #2 ACDC #3 MIP 2449 Propulsion: 1000 MHz 500 MHz 851 MHz 1200 MHz DCOMumber: 15.8 14.2 12.9 16.8 PWM-CAS: 66 15 13 16 RCDMA/Procharge: 66 15 13 16 Itoo: 39 33 28 28 BSC: 51 47 43 33 SMMage: 1.0K 1.2K 1.3K 1.366MLED 指示灯控制
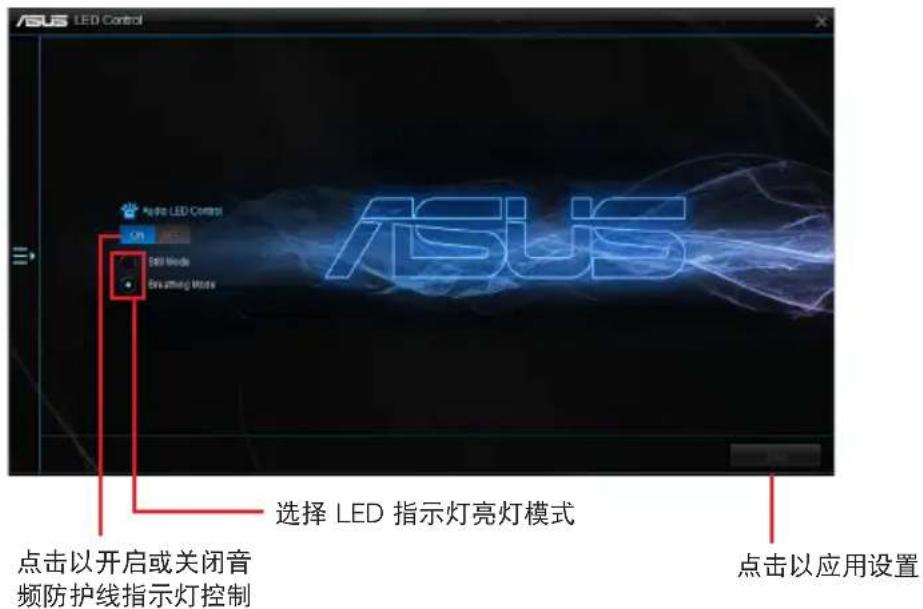
本功能可用来开启或关闭音频防护线 LED 指示灯控制。
开启 LED 指示灯控制
要开启 LED 指示灯控制,请点击 AI Sutie 3 主菜单左侧的图标,然后选择【LED Control】。
text_image
ASUS LED Control 选择 LED 指示灯亮灯模式 点击以开启或关闭音 频防护线指示灯控制 点击以应用设置版本
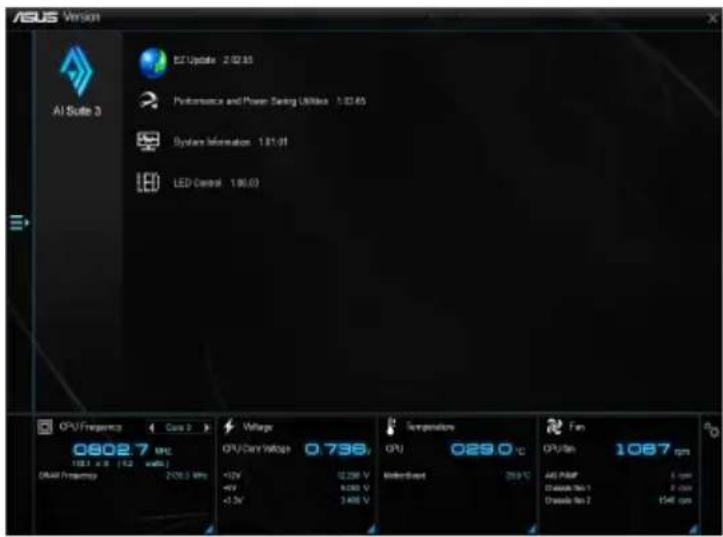
显示集成在 AI Suite 3 中的应用程序的版本信息。
开启版本
要开启版本信息,请点击 AI Sutie 3 主菜单左侧的图标,然后选择【Version】。