MAGENTA MILK - Machine à café GAGGIA - Notice d'utilisation et mode d'emploi gratuit
Retrouvez gratuitement la notice de l'appareil MAGENTA MILK GAGGIA au format PDF.



| Type de produit | Machine à café automatique avec mousseur à lait |
| Caractéristiques techniques principales | Système de café en grains, broyeur intégré, pression de 15 bars |
| Alimentation électrique | 230 V, 50 Hz |
| Dimensions approximatives | 24 x 34 x 43 cm |
| Poids | 8 kg |
| Compatibilités | Compatible avec café en grains et café moulu |
| Fonctions principales | Préparation de café, cappuccino, latte macchiato, mousse de lait |
| Entretien et nettoyage | Réservoir d'eau amovible, programme de nettoyage automatique |
| Pièces détachées et réparabilité | Disponibilité de pièces de rechange, manuel d'utilisation inclus |
| Sécurité | Protection contre la surchauffe, arrêt automatique |
| Informations générales utiles | Garantie de 2 ans, service après-vente disponible |
FOIRE AUX QUESTIONS - MAGENTA MILK GAGGIA
Questions des utilisateurs sur MAGENTA MILK GAGGIA
0 question sur cet appareil. Repondez a celles que vous connaissez ou posez la votre.
Poser une nouvelle question sur cet appareil
Téléchargez la notice de votre Machine à café au format PDF gratuitement ! Retrouvez votre notice MAGENTA MILK - GAGGIA et reprennez votre appareil électronique en main. Sur cette page sont publiés tous les documents nécessaires à l'utilisation de votre appareil MAGENTA MILK de la marque GAGGIA.
MODE D'EMPLOI MAGENTA MILK GAGGIA
GAGGIA
MILANO
ENGLISH
NEDERLANDS
POLSKI
GAGGIA MAGENTA
MILK
RI8701 (SUP 051P)
Operating instructions
Gebruiksaanwijzing
Instrukcja obstugi
CE
02

ENGLISH
Congratulations on your purchase of Gaggia Magenta Milk!
This easy-to-use machine guarantees excellent results every day.
Thanks to the intuitive interface, you can choose among 9 beverages and customise them according to your preferences.
Before being packed, each of our high-quality machines undergoes rigorous testing in our laboratories in order to ensure its correct operation. Some coffee residue might be found in your machine, since real coffee is normally used during testing. However, this does not compromise the integrity of the product. Please be assured that this is a brand new machine.
In this user manual you will find all the information you need to install, use, clean and descale your machine. Before using it for the first time, please read carefully the safety manual provided separately and store it for future use.
NEDERLANDS
Van harte gelukgewenst met de aanschaf van een Gaggia Magenta Milk!
Met deze machine zal u op eenvoudige wijze steeds uitstekende resultaten verzriijgen.
Dankzij de intuitieve interface kan u kiezen uit 9 drankjes en deze maar uw voorkeur aanpassen.
Alvorens verpakt te worden, ondergaat elke machine strenge tests in once laboratoria om de hoge kwaliteit en correcte werkung ervan te garanderen. Er wordt ookijdens het testen koffie gebruikt, dus het is möglichk dat er wat residu achechterblickt. Dit doet geen afbreuk aan de integritweit van het product: het is een volledigarenduwe machine.
In deze handleiding zult u alle nodige informatie vinden om uw machine te installeren, te gebruiken, schoon te makeen en te ontkalken. Lees de parte veiligheidsbrochure zorgvuldig door voordat u ze voor het eerst gebruikt en bewaar deze voor toekomstig gebruik.
POLSKI
Gratuljemy zakupu urzadzenia Gaggia Cadorna Milk!
Dzieki temu urzadzeniu zawsze;będieszcz cieszyc sie doskonałymi rezultatami, oktość w tym przypadku nie trudno.
Intuicyjny interfejs pozwoli Ci na wybór spośród 9 napojów i dostosowanie ich do Twoich preferencji.
Przed zapakowaniem kaźde urzadzenia przechodzi szereg rygorystycznych testów w naszych laboratoriach, aby zapewnić ich wysoka jakość i prawidowej dziatanie.
Podczas odbioru urzadzenia testujemy je przy uzyciu kawy, dlatego moga pozostac w nim jej pozostaluosci. Nie wplywa to jak na integralność produktu: jest to urzadzenia calkowicie nowe.
W niniejszej instrukcji zawarto wszelkie informacje niedzedne do zainstalowania, uzytkowania, czyszczenia i odwapniania urzadzenia. Przed黢 goingierwszym uzyciem zapoznaj sie uwaznie z dostarczoną obsobrozura dotyczagu bezpieczentwa i zachowaj ja w razie potrzeby skorzystania z niece w przyszlosci.
First installation / Eerste installment / Pierwsza instalacja
Capp in Cup System / Capp in Cup-system / System Capp in Cup
Contents
Machine overview (Fig.2) 6
Control panel and display 7
Control panel overview (Fig. 1) 7
Multifunction buttons 7
First installation 8
Manual rinse cycle 8
Measuring water hardness 9
INTENZA+ water filter 9
Installing the INTENZA+ water filter 10
Replacing the INTENZA+ water filter 10
Types of beverage 11
Espresso tray 12
Coffee Brewing 12
Brewing coffee using coffee beans 12
Brewing coffee using pre-ground coffee 13
Preparation of coffee-based beverages and frothed milk 14
How to assemble the Capp in Cup system 14
Brewing coffee-based and frothed milk beverages 14
Dispensing hot water 15
Customising beverages and saving settings (MEMO) 16
Beverage Customisation 16
Coffee grind settings 17
Cleaning and maintenance 18
Cleaning table 18
Cleaning the Capp in Cup system 20
Cleaning the brew group 21
Lubricating the brew group 23
24
24
What to do if the descending process is interrupted 25
Other settings 26
Language 26
Water filter 26
Stand-by Time 26
Units 27
Water hardness 27
Beverage counter 27
Button sound 27
Factory settings 27
Error code key 28
Troubleshooting 29
GAGGIA accessories 32
Technical specifications 32

6 English
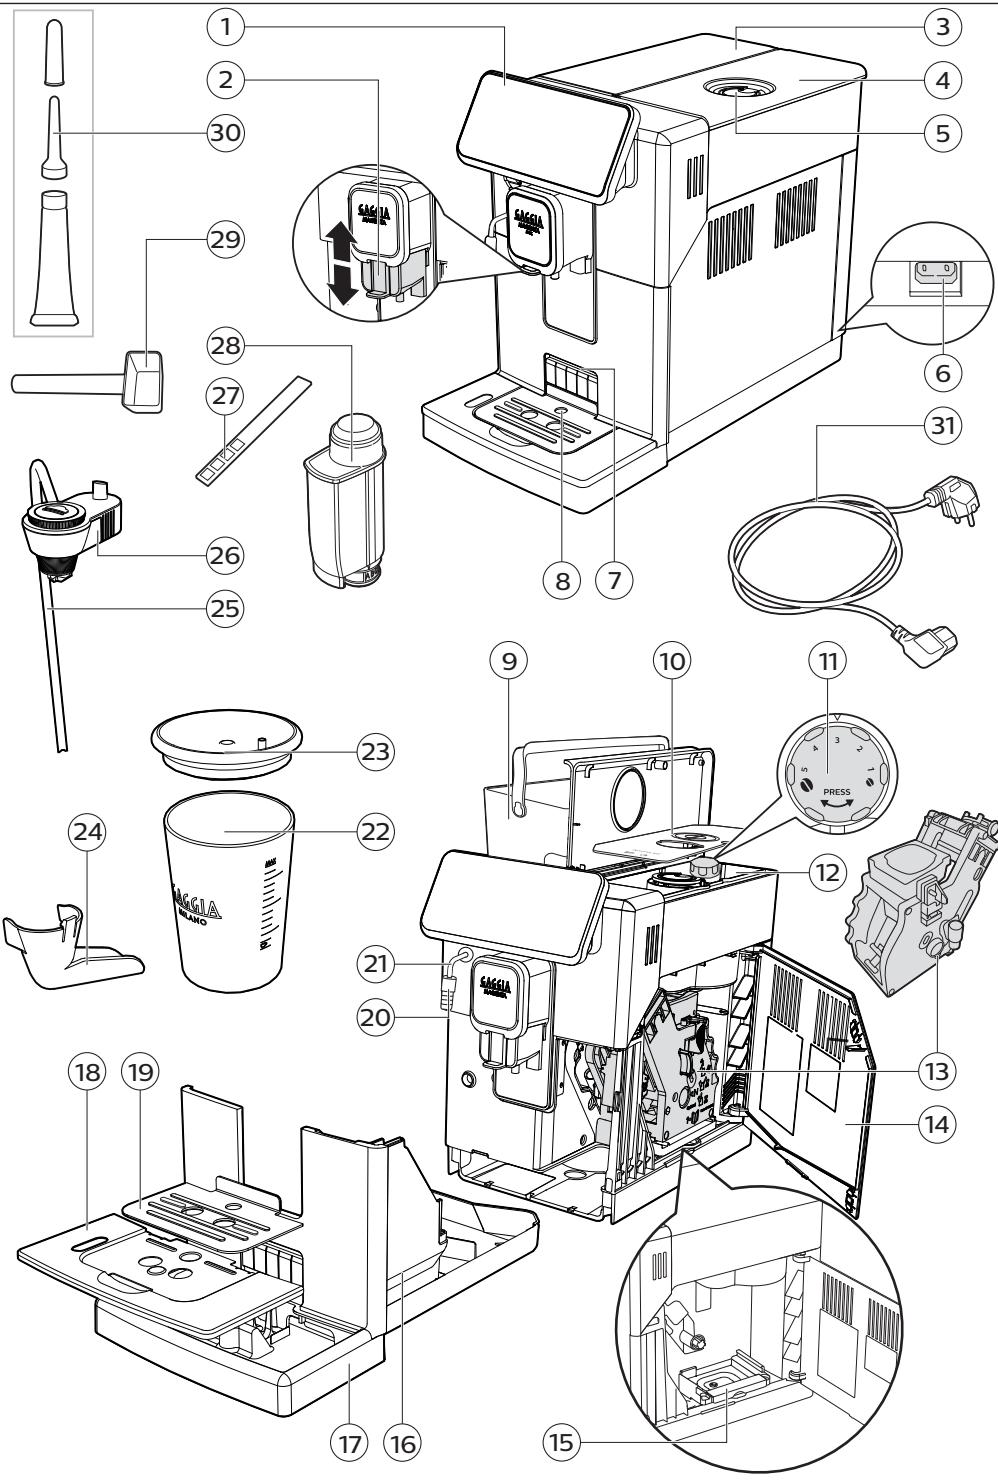
Machine overview (Fig.2)
| 1 | Control panel | 17 | Drip tray |
| 2 | Adjustable coffee dispensing spout | 18 | Drip tray grid |
| 3 | Water tank lid | 19 | Espresso tray |
| 4 | Coffee bean container lid | 20 | Capp in Cup system handle |
| 5 | Pre-ground coffee compartment | 21 | Steam tube |
| 6 | Power cord socket | 22 | Glass milk carafe |
| 7 | Espresso tray insertion slot | 23 | Glass milk carafe lid |
| 8 | Full drip tray indicator | 24 | Capp in Cup system Spout |
| 9 | Water tank | 25 | Milk suction tube |
| 10 | Aroma lid | 26 | Main body of Capp in Cup system |
| 11 | Coffee grinder adjustment knob | 27 | Water hardness tester |
| 12 | Coffee bean container | 28 | Water filter |
| 13 | Brew group | 29 | Pre-ground coffee measuring scoop |
| 14 | Service door | 30 | Lubricant |
| 15 | Coffee residues drawer | 31 | Power cord |
| 16 | Coffee pucks container |
Control panel and display
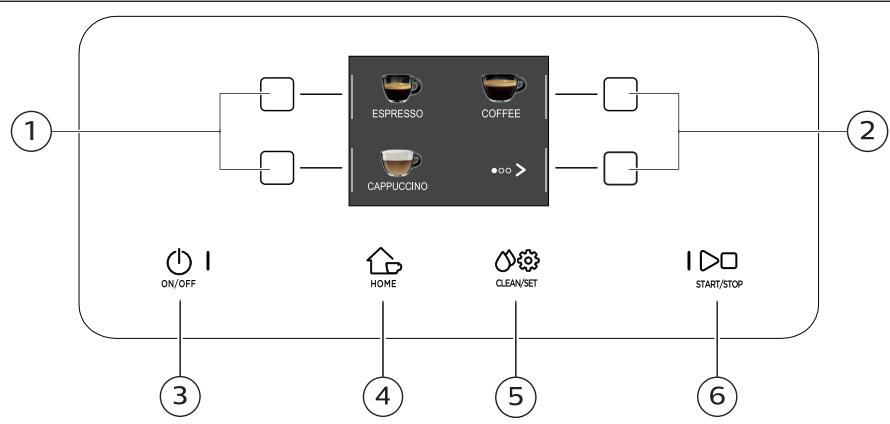
01
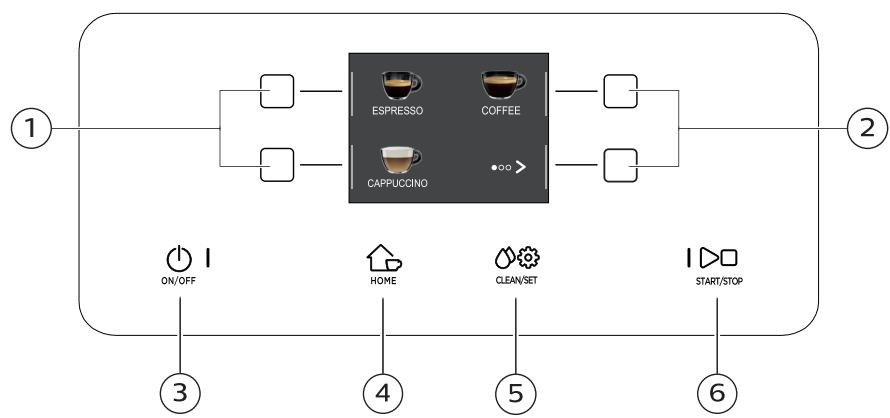
Control panel overview (Fig. 1)
| 1/2 | MULTIFUNCTION buttons | Select the function shown on the display. |
| 3 | ON/OFF button | To switch the machine on or off, by keeping the button pressed for a few seconds. |
| 4 | HOME button | To open the beverage menu. |
| 5 | CLEAN/SET button | To open the cleaning and settings menu. |
| 6 | START/STOP button | To start/stop the dispensing of the selected beverage, or to start/stop the procedure indicated on the display. |
Note: HOME and CLEAN/SET also work as ESC buttons. You can exit the screen by pressing one of the two buttons to go back to the main menu. This will not be possible if you have already accessed a function or a programme.
Multifunction buttons
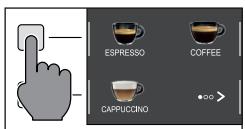
The multifunction buttons on the sides of the display are used to select the function or the beverage to which they refer at that time.
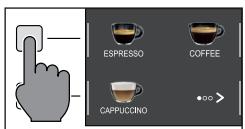
Note: To make the reading of this manual easier,<

First installation
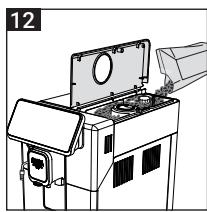
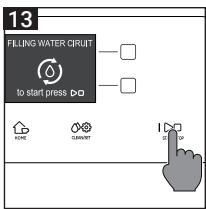
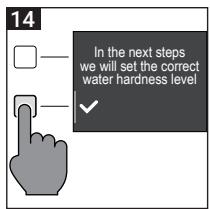
Before using the machine, it is essential to follow a few simple steps, clearly described in the explanatory drawings you found in the quick guide at the beginning of this instruction manual.
Note: for even tastier coffee, we recommend that you initially prepare 5 cups of coffee to allow the machine to self-adjust.
Manual rinse cycle
During the first installation or after a long period of machine inactivity, a manual rinse cycle must be carried out.
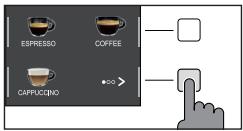
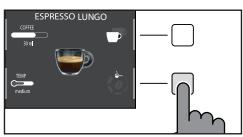
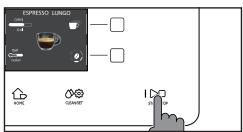
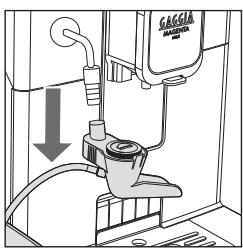
1 Place a container under the coffee dispensing spout, scroll through the different pages and select a "ESPRESSO LUNG".
2 Press the "0" button until "1" is selected, without adding pre-ground coffee.
3 Press the START/STOP button to start dispensing. The machine will dispense hot water.
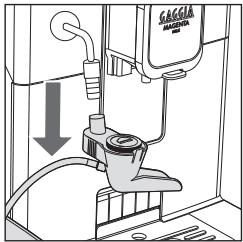
4 Empty the container and remove the Capp in Cup system from the steam tube.
5 Place the container under the steam tube and select "HOT WATER".
6 Press the START/STOP button to start dispensing.
7 Empty the container and repeat steps 5 to 7 until the water tank is empty.
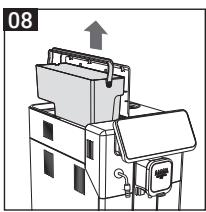
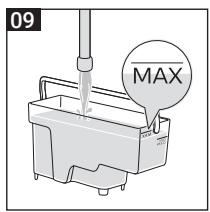
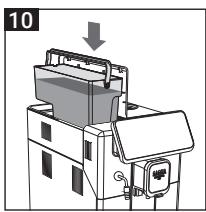
8 When finished, refill the water tank to the MAX level. The machine is now ready for use.
Measuring water hardness
You will need to set the water hardness when you install your machine.
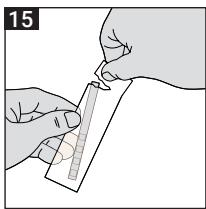
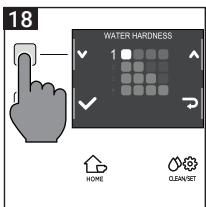
Take the water hardness measuring strip contained in the packaging and follow the steps shown on the display during the installation phase. To change the water hardness later, press the CLEAN/SET button, then select " SETTINGS", and once in the settings menu, please select "WATER HARDNESS".
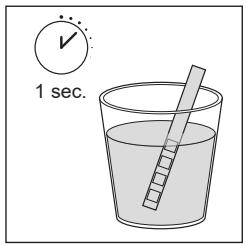
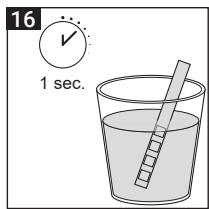
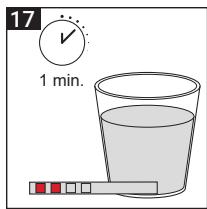
1 Immerse the water hardness measuring strip in a glass of water for 1 second. Remove the strip from the water and wait 1 minute.
2 Note how many squares turn red.
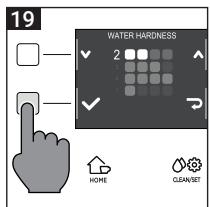
3 Use the green "✔" and "▲" buttons to select the water hardness according to the table below. Confirm the setting by pressing "✔".
| Small red squares | Value to set | Water hardness | INTENZA+ |
| ■□□□ | 1 | very soft water | A |
| ■□□□ | 2 | soft water | A |
| ■□□□ | 3 | hard water | B |
| ■□□□ | 4 | very hard water | C |


INTENZA+ water filter
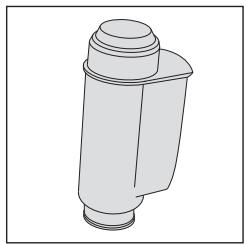
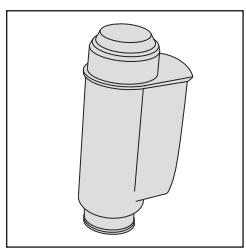
We recommend using the INTENZA+ water filter to limit limescale formation. This ensures a longer operating life of your machine and a better coffee aroma over time.
Water is an essential element in brewing coffee. Therefore, it is extremely important that water is always filtered adequately.
The INTENZA+ water filter prevents the formation of mineral deposits, improving the quality of the water.
10 English
Installing the INTENZA+ water filter
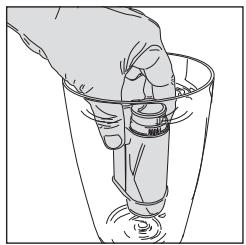
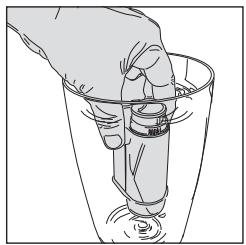
Immerse the INTENZA+ water filter in cold water, in a vertical position and with the opening facing upwards. Press both sides of the filter gently to let air bubbles out.
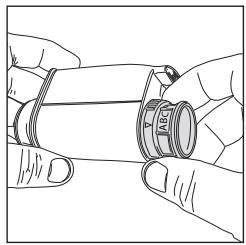
Remove the INTENZA+ water filter from the water. Set the machine according to the detected water hardness - see the "Measuring water hardness" chapter. On the filter base, please set one of the following:
A = soft water - 1 or 2 small squares
B = hard water (standard) - 3 small squares
C = very hard water - 4 small squares
Place the INTENZA+ filter in the water tank, ensuring it is correctly positioned. Refill the water tank and place it back in its housing.
1 Press the CLEAN/SET button and then the " SETTINGS" button.
2 Select "WATER FILTER" and press the "√" button.
3 Select "ACTIVATE" and follow the instructions on the display to activate the filter correctly.
Note: you can pause the filter activation procedure by pressing the START/STOP button. To resume the filter activation procedure, press the START/STOP button again.
Replacing the INTENZA+ water filter
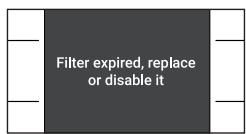
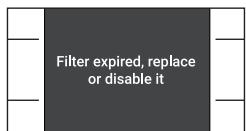
When the INTENZA+ water filter expires, the warning message appears on the display.
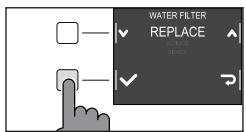
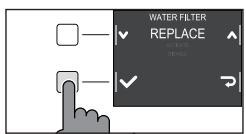
1 Replacement or deactivation can be executed by pressing the CLEAN/SET button and then the " SETTINGS" button.
2 Select "WATER FILTER" then press the "√" button.
3 Select "REPLACE" to change the filter or "DISABLE" if you do not intend to use the filter. Confirm with the "√" button.
Follow the instructions shown on the display to activate the filter.
Types of beverage
| Original recipe | Description | ||
| Ristretto | Coffee | 30 ml | A ristretto, served in a small cup, is an espresso whose brewing time is shorter than a regular espresso. This results in a coffee that is shorter and less in rich in caffeine. |
| Espresso | Coffee | 40 ml | The espresso is known around the globe as true Italian coffee. Served in a small cup, its unmistakable features are a full and intense aroma and a top layer of compact, natural "crema". It is the result of the pressurized hot water extraction process invented by Achille Gaggia in 1938. |
| Espresso lungo | Coffee | 80 ml | The long espresso is an espresso with a longer extraction time. It is more diluted, with a different aromatic intensity and a higher caffeine content. It is served in a medium-sized cup. |
| Coffee | Coffee | 120 ml | Coffee is a beverage prepared with more water than espresso. It has a lighter aroma and is served in a medium-large cup. |
| American coffee | Coffee | 40 ml | American coffee is a less intense long coffee, prepared with an espresso to which hot water is added. |
| Water | 110 ml | ||
| Cappuccino | Milk | 120 ml | The cappuccino is an Italian classic, among the most loved in the world. It is prepared with espresso, milk and a milk froth, which must be no less than 1 cm thick. It is served in a large cup. |
| Coffee | 40 ml | ||
| Café au lait | Coffee | 90 ml | A café au lait is a beverage composed of equal parts coffee and milk. This can even be enriched by a thin layer of milk froth. It is served in a large cup. |
| Milk | 90 ml | ||
| Frothed milk | Milk | 180 ml | Frothed milk is used to make cappuccinos, latte macchiatos and several other beverages. The result is a compact, homogeneous layer of milk froth. |
| Hot water | Water | 150 ml | Hot water can be used to prepare hot teas, infusions and instant beverages. |
Note: In the original recipes the beverages are all set to an average temperature and aroma intensity.
12 English
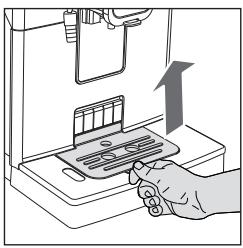
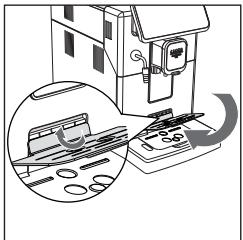
Espresso tray
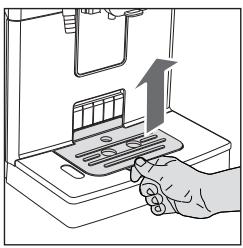
This machine was designed to guarantee flawless results, from a traditional espresso to a number of different beverages. If you want to enjoy an Italian espresso with a delicious layer of its natural "crema" on top and as tradition dictates, we suggest your using of the "Espresso Tray" which is specifically designed for this purpose. This tray allows the use of traditional espresso cups, ensuring the perfect height for a compact, homogeneous "crema" and a splash-free brewing.
Lift the espresso tray off the grid of the drip tray and place it into the dedicated slot as shown in the drawing.
Coffee Brewing
Brewing coffee using coffee beans
Warning: only use coffee beans when making espresso. Do not put any pre-ground, unroasted, freeze-dried or instant coffee in the coffee bean container, as they may damage the machine.
Tip: Preheat the cups with hot water to enjoy a warmer coffee.
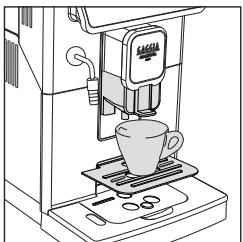
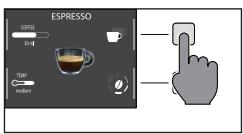
1 Upon positioning the espresso tray, place a cup under the coffee dispensing spout, raise or lower the coffee dispensing spout according to the size of the cup you are using.
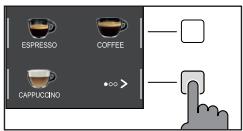
Press the HOME button to access the beverage menu.
2 Browse the various pages to find and select the desired coffee.
3 Upon selection of your desired coffee, it is possible to prepare two cups at the same time- besides AMERICANO, using the " " button.
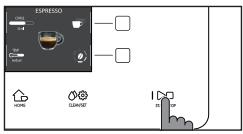
4 Finally, press the START/STOP button to start brewing.
Note: you can interrupt the brewing at any time by pressing the START/STOP button.
If you wish to customise the settings of a specific beverage, please refer to the "Beverage customisation" chapter.
Brewing coffee using pre-ground coffee
Use the measuring scoop provided to insert the correct dose in the pre-ground coffee compartment.
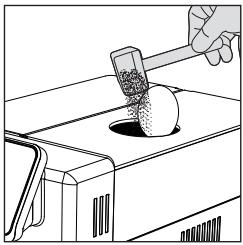
1 Lift the lid of the pre-ground coffee compartment and add a little less than one level scoop of pre-ground coffee.
Warning: do not insert anything other than pre-ground coffee, as it may damage the machine.
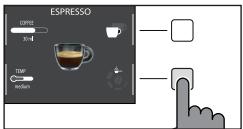
2 Place a cup under the coffee dispensing spout and select the desired beverage.
3 Press the " " button until " ^ 一 is selected.
Note: The "pre-ground coffee" function excludes the possibility of brewing two cups of coffee at the same time, as well as the aroma setting. In fact, these are only possible with coffee beans.
4 Press the START/STOP button to start brewing the coffee.
If you wish to customise the settings of a specific beverage, please refer to the "Beverage customisation" chapter.
Note: you can interrupt the brewing at any time by pressing the START/STOP button.
14 English
Preparation of coffee-based beverages and frothed milk
How to assemble the Capp in Cup system
Note: Before preparing any milk-based beverage, make sure that the Capp in Cup system is fitted properly on the machine.
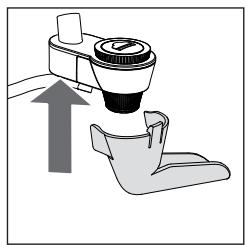
1 Fit the spout on the main body of the Capp in Cup system.
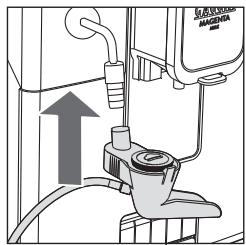
2 Insert the Capp in Cup system into the rubber grip on the steam tube until it locks into place.
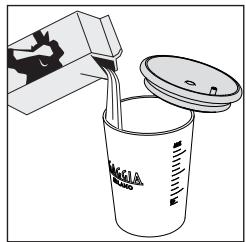
Brewing coffee-based and frothed milk beverages
Tip: use only cold milk at a temperature of 5^ approx. and with at least a 3% protein content so as to obtain a perfect milk froth. You can use either whole milk or semi-skimmed milk. Also, you can use skimmed, soy or lactose-free milk.
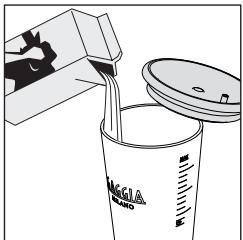
1 Lift the carafe lid and pour the milk into the carafe: the milk must reach a level between the minimum (MIN) and the maximum (MAX) level marks available on the carafe.

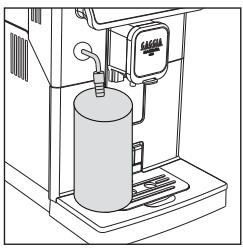
2 Insert the suction tube of the main body of the Capp in Cup system into the milk carafe until it reaches the carafe bottom.
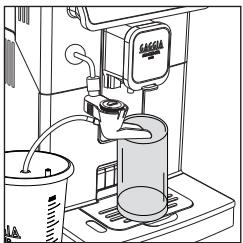
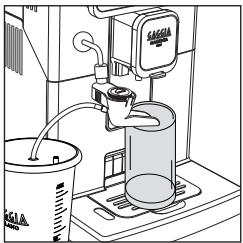
3 Place a cup or a glass under the Coffee dispensing spout and the Capp in Cup system.
4 Press the HOME button and choose the desired beverage from the menu.
- Press the button corresponding to the desired beverage.
- Press the START/STOP button to start dispensing the selected beverage.
5 The machine dispenses a default amount of coffee and frothed milk into the cup or the glass. Depending on the beverage chosen, either coffee or frothed milk will be dispensed first.
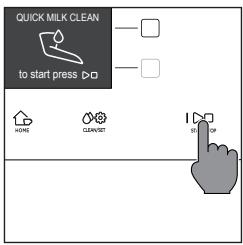
If you wish to customise the settings of a specific beverage, please refer to the "Beverage customisation" chapter.
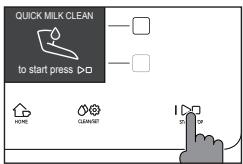
6 After dispensing your coffee-based and frothed milk beverages, it is best to complete the quick cleaning procedure of the milk circuit within 10 seconds. However, the procedure can also be carried out later by accessing the cleaning menu via the CLEAN/SET button. Press the "CLEAN" button and select the "QUICK CLEAN" option. Then press the "√" button. Then, follow the instructions shown on the display.

Note:We suggest that you carry out a quick clean at least once a day and that you rinse the Capp in Cup system Spout under running water.
Press the START/STOP button to confirm, or " ⑦ " to carry out the procedure later.
Dispensing hot water
Warning: when preparation starts, the steam tube may spray steam and hot water.
1 Remove the Capp in Cup system and place a container under the steam tube.
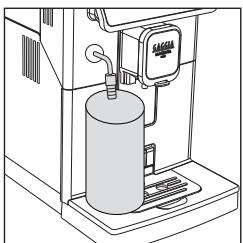
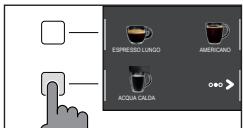
2 Press the HOME button, browse the various screens using the green ">>" button, and select hot water.

16 English
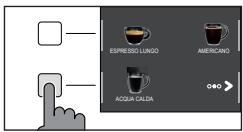
3 Press the "HOT WATER" button Finally, press the START/STOP button to commence dispensing.
Note: you can interrupt dispensing at any time by pressing the START/STOP button.
If you wish to customise the settings of a specific beverage, please refer to the "Beverage Customisation" chapter.
Customising beverages and saving settings (MEMO)
This machine allows you to change the settings of a beverage according to your preferences and save them (MEMO), by overwriting the previous settings.
Beverage Customisation
1 Press the HOME button.
2 Select your beverage.
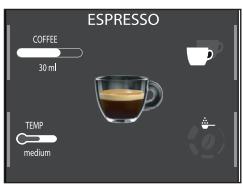
3 All the settings that can be adjusted and/or selected are displayed on the screen. Based on the type of beverage, you can adjust and/or select:
- coffee and milk amount;
- coffee temperature;
- pre-ground coffee use;
- aroma intensity (only when using coffee beans);
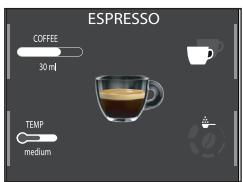
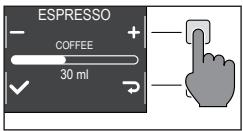
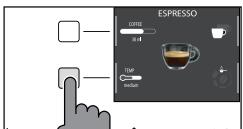
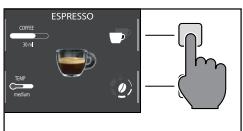
4 Once the "COFFEE" or "MILK" button has been pressed, use the green "+ " and "--" buttons to select the desired amount.
Press "√" to confirm and return to the previous screen, where the new quantity will be displayed.
5 Press the "TEMP" button repeatedly to adjust the temperature of the beverage among the following options:
low;
medium;
- high;
6 Press " " button to brew two cups, or " " for a single cup. The picture of the beverage in the centre of the display will indicate the number of cups selected.
Note: this function is not available for beverages with milk, AMERICANO and HOT WATER.
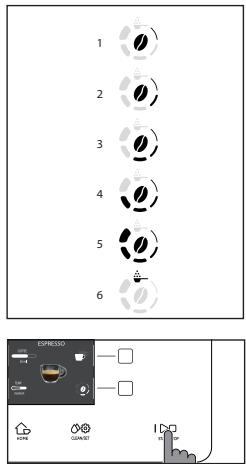
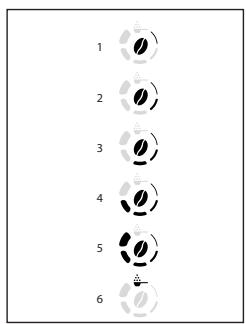
8 To change the intensity of the aroma or select the pre-ground, press the " " button. You can choose among 5 different degrees of intensity. Every time you press the " " button, the aroma strength changes by one degree. The display shows the selected intensity or the selection of the pre-ground.
1 Very light
2 Light
3 Normal
4 Strong
5 Very strong
6 Pre-ground.
Note: the function Pre-ground allows the brewing of just one coffee at a time.
9 Once the beverage has been customised according to your preferences, you can proceed with dispensing it by pressing START/STOP button.
10 If you have changed any of the parameters listed above, you will be asked at the end of dispensing if you would like to save the recipe with the changes made.
Note: the new saved settings will overwrite those of the previous recipe.
Note: to return to the factory settings of the single recipes, you must re-enter and save the settings indicated in the "Beverage type" section.
Coffee grind settings
You can adjust the grind setting using the grinder adjustment knob on the coffee bean container. The ceramic coffee grinder guarantees a perfect and homogeneous grinding for the preparation of every cup of coffee. The aroma is thus preserved, ensuring the perfect flavour every time.
Note: you can only adjust the grind setting while the machine is grinding the coffee beans. The difference in taste will be perceived after brewing 2-3 cups of coffee.
Warning: to avoid damaging the coffee grinder, do not rotate the grinder adjustment knob more than one notch at a time.
1 Place a cup under the coffee dispensing spout.
2 Open the lid of the coffee bean container.
3 Prepare an espresso as described in the chapter "Brewing coffee with coffee beans".
18 English
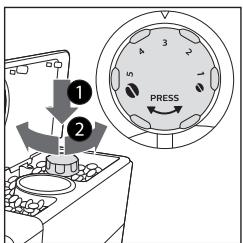
4 While the machine is grinding coffee, press the grind settings adjustment knob in the bean container and turn it one notch at a time, to the left or right.
5 You can select from 5 different grinding settings. The smaller the notch, the stronger and richer the coffee.
Note:
- Coarse grind: lighter taste, for dark roasted coffee blends (3-5);
- Fine grind: stronger taste, for light roasted coffee blends (1-3);
Cleaning and maintenance
Regular cleaning and maintenance keep the machine in perfect condition and ensure perfect coffee flavour, a constant coffee flow and an excellent milk froth. Please refer to the following table to know when and how to clean the removable parts of the machine. Please read the specific chapter for further information.
Cleaning table
| Part description | When to clean | How to clean |
| Capp in Cup system | After use | Start the " QUICK CLEAN" process following the instructions on the display. Disassemble and wash the Capp in Cup system Spout under running water. |
| Daily | Wash the glass milk carafe or place it in your fridge by positioning the milk suction tube as shown in the figure. You can also dishwasher. | |
| Monthly | Start the "DEEP CLEAN" cycle by following the instructions described in the chapter "Capp in Cup System Cleaning". For this cleaning cycle use the Philips Milk Circuit Cleaner. Remove the Capp in Cup system and wash all its components under running water. | |
| Brew group | Weekly | Remove the brew group and clean it under running water. |
| Depending on usage | See the “Cleaning and lubricating the brew group” chapter. | |
| Monthly | Clean the brew group with the Gaggia coffee oil remover to remove any oily coffee residue | |
| Drip tray full | When the red mark appears from the drip tray grid. | Empty the drip tray and clean it under running water. |
| Coffee pucks container | Whenever the machine requires it | Empty the coffee pucks container and clean it under running water. Ensure that the machine is switched on during this procedure, otherwise the coffee pucks container will not reset. |
| Water tank | Weekly | Clean it under running water. |
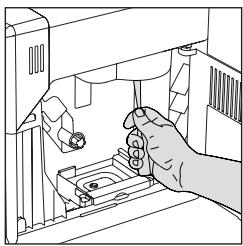
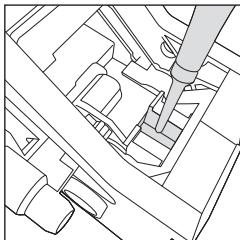
| Pre-ground coffee compartment/coffee outlet duct | Weekly | Clean the upper part using the handle of a spoon, as shown below. |
| Espresso tray | Depending on usage | Remove the espresso tray and clean it with running water. You can also dishwasher it in the upper tray. |
Cleaning the Capp in Cup system
Capp in Cup system Cleaning Programmes
The machine allows two cleaning programmes for the Capp in Cup system: quick and deep clean. Both programmes can be selected with the CLEAN/SET button. Press the "CLEANING" button upon selection.
Quick clean is also recommended after dispensing a milk-based beverage. For both programmes, follow the instructions shown on the display.
- Quick clean programme
The quick clean programme includes the milk circuit cleaning with hot water.
- Deep clean programme
The deep clean programme for the Capp in Cup system includes also the deep cleaning of the whole milk circuit by means of Philips "Milk Circuit Cleaner".
Cleaning of the Capp in Cup system under running water
Warning: the steam tube may be hot after use.
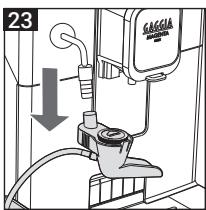
1 Remove the Capp in Cup system from the steam tube (Fig. 23).
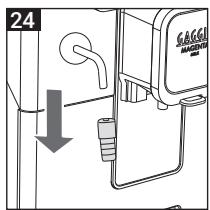
2 Remove the rubber handle from the steam tube. (Fig. 24).
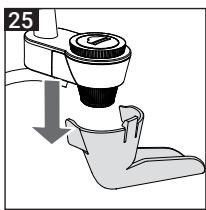
3 Remove the Capp in Cup system spout (Fig. 25).
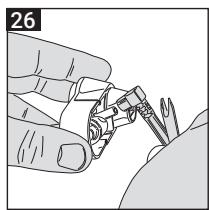
4 Remove the milk suction tube from the main body of the Capp in Cup system (Fig. 26).
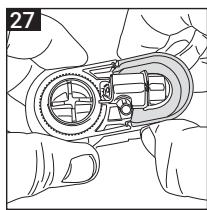
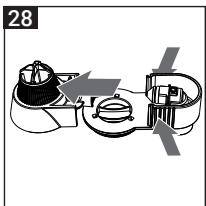
5 To disassemble the main body: hold it tight from the sides as shown (Fig. 27); pull and extract the left part as shown in figure (Fig. 28);
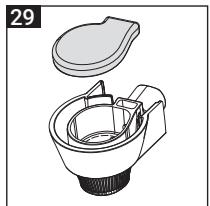
6 Remove the rubber lid (Fig. 29).
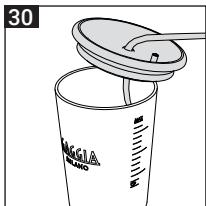
7 Disassemble the glass milk carafe (Fig. 30).
8 Wash all components under running water.
9 After cleaning, reassemble all the components by following the same procedure in reverse order.
Cleaning the brew group
Warning: do not wash the brew group in the dishwasher and do not use dishwashing detergents, since they may cause the malfunctioning of the brew group and alter the coffee flavour.
Removing the brew group
1 Turn off the machine and disconnect the power cord.
2 Remove the drip tray and the coffee pucks container.
3 Open the service door.
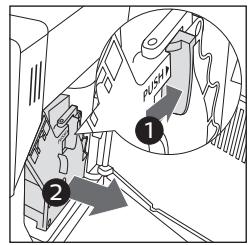
4 Press the PUSH lever (1) and pull the handle of the brew group (2) to remove it from the machine.
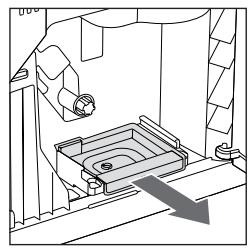
5 Remove the coffee residues drawer.
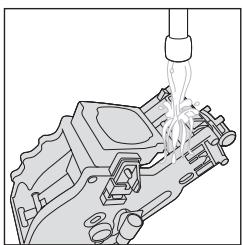
Cleaning the brew group under running water
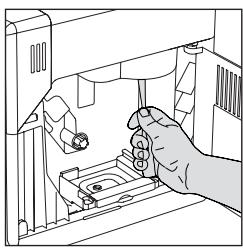
1 Clean the coffee outlet duct thoroughly with a spoon handle or with another round-tipped kitchen utensil.
2 Rinse the brew group and the coffee residues drawer thoroughly with lukewarm water. Carefully wash the upper filter.
3 Let the brew group air dry.
Note: to avoid the build-up of fibres in its interior, do not dry the brew group with cloth.
22 English
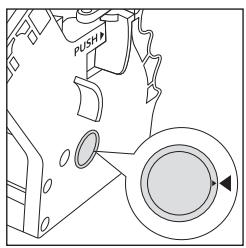
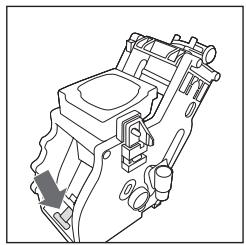
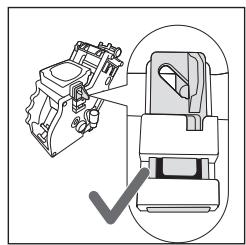
Reinserting the brew group
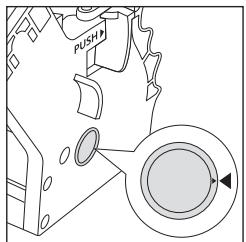
1 Before placing the brew group back into the machine, make sure that the two yellow reference marks on the side match. If this is not the case, perform the following step:
Make sure that the lever is in contact with the base of the brew group.
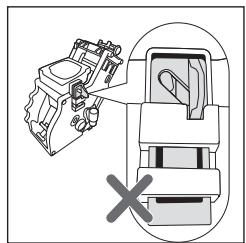
2 Make sure that the yellow locking hook of the brew group is in the right position.
To position the hook correctly, push it upwards to the highest possible position.
If the hook is still in the lower position, it means that it is not positioned correctly.
3 Reinsert the coffee residues drawer.
4 Reinsert the brew group into the machine along the side guides until it locks in the right position with a click.
Warning: do not press the PUSH lever.
5 Close the service door.
Cleaning the brew group with cleaning tablets for the removal of oily coffee residues
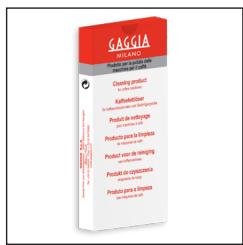
Warning: use only Gaggia cleaning tablets to remove oily coffee residues.
1 Place a container under the coffee dispensing spout.
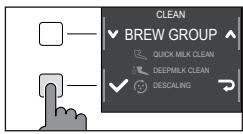
2 Press the CLEAN/SET button and select the "CLEAN" button shown on the display.
3 Select "BREW GROUP CLEANING" and press the "√" button, then press START/STOP button to start the cleaning procedure.
4 Follow the instructions shown on the display to clean the brew group correctly.
5 The procedure will take approximately 5 minutes. START/STOP button can be used to pause and resume the procedure.
Lubricating the brew group
In order to ensure the perfect performance of the machine, it is necessary to lubricate the brew group. Refer to the following table for the frequency of lubrication.
| Frequency of use | Number of beverages prepared daily | Lubrication frequency |
| Low | 1-5 | Every 4 months |
| Regular | 6-10 | Every 2 months |
| High | >10 | Every month |
1 Turn off the appliance and disconnect the power cord.
2 Remove the brew group and rinse it using lukewarm water - see the "Cleaning the brew group under running water" chapter.
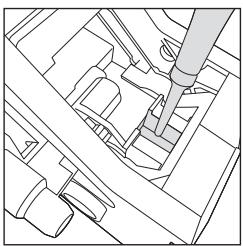
3 Apply a thin layer of the lubricant provided around the insertion pin on the lower part of the brew group.
24 English
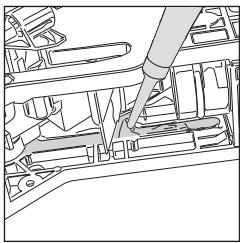
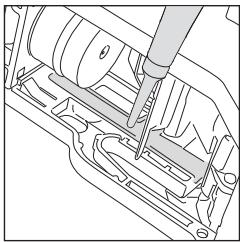
4 Apply a thin layer of lubricant to the guides, on both sides (see figure).
5 Reinsert the brew group - see the "Reinserting the brew group" chapter.
Note: you can use the lubricant tube multiple times.
Dscaling
Descending procedure
Dscaling needs to be carried out when the machine requires it.
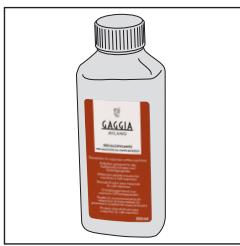
Use only Gaggia descending solution designed to guarantee the machine's excellent performance. The use of different products could damage the machine and leave residue in the water. Failure to descale the machine will void the warranty.
1 Remove the Capp in Cup system if fitted on the machine.
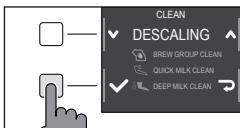
2 Press CLEAN/SET button and select the "CLEAN" button shown on the display.
- Select "DESCALING" and after confirming with "✔" press the START/STOP button to start.
3 Remove the drip tray and the coffee pucks container, empty and place them all back into the machine.
4 Remove the water tank and empty it. Remove the INTENZA+ filter, if in place.
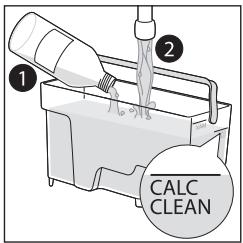
5 Pour the entire bottle of Gaggia descending solution into the water tank and fill the tank with water up to the CALC CLEAN level. Reinsert it into the machine.
6 Place a large recipient (1.5l) under the steam tube and the coffee dispensing spout.
7 Follow the instructions shown on the display to launch the descending procedure. This procedure lasts approximately 25 minutes and consists of a descending cycle and a rinse cycle, carried out with dispensing at regular intervals.
8 Once the descending cycle is complete, rinse the water circuit and tank by following the instructions shown on the display.
9 Position the INTENZA+ filter back into the water tank.
Note: it is possible to pause and resume the procedure at any time by pressing the START/STOP button.
Warning: when the descending procedure is active, the brew group cannot be removed. Wait for the descending process to end, then remove the brew group.
What to do if the descending process is interrupted
You can exit the descending procedure by keeping the ON/OFF button on the control panel, pressed for a few seconds. If the descending procedure is interrupted before its completion, proceed as follows:
1 Empty the water tank and wash it thoroughly.
2 Fill the water tank with running water up to the CALC CLEAN level mark, then switch the machine back on. The machine will warm up and perform an automatic rinse cycle.
3 Before preparing any beverages, carry out a manual rinse cycle as described in the dedicated chapter.
Note: if the procedure has not been completed, it will be necessary to carry out another descaling procedure as soon as possible.
Other settings
By pressing the CLEAN/SET button and selecting " SETTINGS" on the display, you can reset or modify some of the machine parameters including:
- Language.
Water filter. - Stand-by Time.
- Units.
Water hardness. - Beverage counter.
- Button sound
Factory settings.
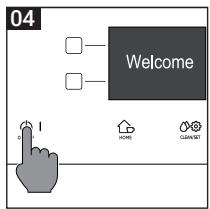
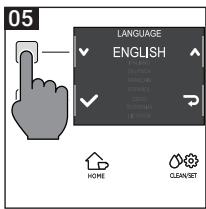
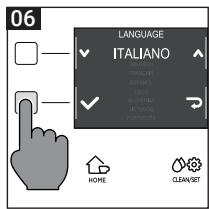
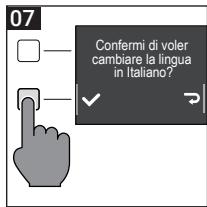
Language
When the language setting icon is selected, the list of available languages will be displayed.
Available languages
| ITALIAN | DANISH | CZECH |
| ENGLISH | GREEK | SLOVAKE |
| GERMAN | POLISH | LITHUANIAN |
| FRENCH | RUSSIAN | JAPANESE |
| SPANISH | ROMANIAN | KOREAN |
| PORTUGUESE | HUNGARIAN | TRADITIONAL CHINESE |
| DUTCH | BULGARIAN | SIMPLIFIED CHINESE |
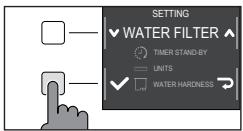
Water filter
When "WATER FILTER" is selected, follow the instructions on the display and those described under the "Installing the INTENZA+ water filter" and "Replacing the INTENZA+ water filter" chapters.
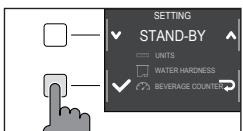
Stand-by Time
When "STAND-BY TIME" is selected, the timer can be set to:
- 15 min
- 30 min
- 60 min
- 180 min

Units
By selecting "UNITS".
you can set the unit of measurement in "ml" or "oz".
Water hardness
With "WATER HARDNESS" selected, follow the instructions on the display and those described under the "Measuring water hardness" chapter.
Beverage counter
It is possible to display the number of cups of each beverage that have been dispensed since the first operation of the machine. These data cannot be reset.
Button sound
You can turn the button sound off by selecting "OFF" so as not to be disturbed.
Factory settings
You can reset the machine to factory default values. The machine will require a double confirmation before proceeding.

Error code key
The list below reports the error codes that the display can show, their meanings and how to solve the problem. If the indicated solutions are ineffective because the display continues to show the error code icon and the machine does not return to normal operation, or if other error codes are displayed, you must contact an authorized service center or distributors in your country.
The contact info is listed on www.gaggia.com and www.gaggia.it.
| Error code | Problem | Cause | Possible solution |
| 01 | The coffee grinder is clogged. | The coffee outlet duct is clogged. | Remove the power cord and remove the brew group. Clean the coffee outlet duct thoroughly using a spoon handle. Switch the appliance back on again. |
| 03 - 04 | A problem occurred in the brew group. | The brew group is dirty or not well lubricated. | Switch off the machine. Remove the brew group and clean it thoroughly. (Refer to the "Cleaning the Brew Group" chapter) |
| The brew group is not positioned correctly. | Switch off the machine. Remove the brew group and reinsert it. Ensure that the brew group is in the correct position before inserting it. Refer to the "Reinserting the brew group" chapter. | ||
| 05 | A problem occurred in the water circuit. | There is air in the water circuit. | Remove and reinsert the tank in the machine a couple of times. Make sure you insert the tank correctly in the machine. Check that the water tank seat is clean. |
| If you use an "INTENZA+" filter: pull out the filter from the water tank and shake it to remove the air from the filter. Then place the "INTENZA+" filter back into the water tank. | |||
| 14 | The machine is overheated. | There may be multiple causes. | Switch off the machine and switch it back on again after 30 minutes. Perform this operation 2 or 3 times. |
Troubleshooting
This chapter outlines the most common problems you may encounter while using the machine. If you are unable to solve the problem using the information provided below, visit the FAQ sections on www.gaggia.com or www.gaggia.it or contact the either the Customer Service Centre or the local distributors in your country.
| Problem | Cause | Solution |
| The machine does not switch on. | The machine is not connected. | Check that the power cord has been inserted correctly. |
| The on / off button was not pressed and held down long enough. | Keep the on / off key pressed for a few seconds. | |
| The drip tray fills up quickly. | It is a normal phenomenon. The machine uses water to rinse the internal circuit and the brew group. Part of the water flows through the internal system directly into the drip tray. | Empty the drip tray when the red mark appears through the grid. We recommend your placing a cup under the dispensing spout to collect rinse water |
| The display continuously shows the "coffee pucks container full" icon. | The coffee pucks container has been emptied when the machine was off. | Always empty the coffee pucks container when the machine is on. If you empty the coffee pucks container when the machine is off, the coffee cycle counter does not reset. In this case, the display shows the icon even if the container is not full. |
| The coffee pucks container has been placed back too quickly. | Always wait about 5 seconds when you replace the coffee pucks container. This way, the counter will reset to zero. | |
| The machine requests to empty the coffee pucks container even if it is not full. | The machine has not reset the counter last time the coffee pucks container has been emptied. | Always wait about 5 seconds when you replace the coffee pucks container. This way, the coffee grounds counter will reset to zero. |
| Always empty the coffee pucks container when the machine is on. If you empty the coffee pucks container when the machine is off, the coffee cycle counter does not reset. | ||
| The coffee pucks container is too full and the "coffee pucks container full" icon, did not display. | The drip tray has been removed without emptying the coffee pucks container. | When you remove the drip tray, also empty the coffee pucks container even if it contains only a few coffee pucks. In this way the coffee grounds counter will be reset to zero, re-starting to correctly count the coffee pucks. |
| Impossible to remove the brew group. | The brew group is not in the correct position. | Close the service door. Switch the machine off and then back on. Wait for the display to show the ready message, then remove the brew group. |
30 English
| Problem | Cause | Solution |
| The brew group cannot be inserted. | The brew group is not in the correct position. | The brew group has not been positioned correctly before being placed back. Ensure that the lever is in contact with the base of the brew group and that the hook of the brew group is in its correct position. See the “Reinserting the brew group” chapter. |
| To reset the machine put the drip tray with the coffee pucks container back in place. Do not insert the brew group. Close the service door, then unplug the power cord and plug it back in. Then try to reinsert the brew group and switch on the machine. | ||
| The espresso is not creamy enough or it is watery. | The coffee grinder is set to a coarse grinding. | Adjust the coffee grinder to a finer setting. |
| The machine is performing its self-adjustment. | Dispense several cups of coffee so that the machine adjusts itself automatically. | |
| The coffee outlet duct is clogged. | Clean the coffee outlet duct with a spoon as described in the “Cleaning the brew group under running water” chapter. | |
| The brewed coffee is not hot enough. | The set temperature is too low. Check the menu settings. | Set the menu temperature to “MAX”. |
| The machine grinds the coffee beans, but no brewing happens. | The coffee grinder is set to a too fine grinding. | Adjust the coffee grinder to a coarser grinding. |
| The coffee dispensing spout is blocked. | Dispense a long coffee from pre-ground coffee but without actually adding pre-ground coffee. | |
| The nozzles of the coffee dispensing spout are blocked. | Clean the nozzles of the coffee dispensing spout with a small bottlebrush. | |
| The coffee comes out slowly or in drops. | The coffee grinder is set to a too fine grinding. | Adjust the coffee grinder to a coarser grinding. |
| The nozzles of the coffee dispensing spout are blocked. | Clean the nozzles of the coffee dispensing spout with a small bottlebrush. | |
| The machine circuit is clogged by limescale. | Descale the machine. | |
| The milk does not froth. | The Capp in Cup system is dirty or not correctly inserted. Or, the system has not been correctly installed in all its components. | Clean the Capp in Cup system as indicated in the chapter "Capp in Cup System Deep Cleaning Under Running Water", then place it back in the right way. |
| Make sure all components have been correctly assembled. | ||
| The type of milk used is not suitable for foaming. | The amount and the quality of froth vary depending on the type of milk. | |
| The "INTENZA+" filter cannot be inserted. | Remove the air from the filter. | Let the air bubbles out of the filter. |
| The tank still contains some water. | Empty the water tank before installing the filter. | |
| The rubber seal is not inserted onto the "INTENZA+" filter. | Check the packaging and insert the seal onto the "INTENZA+" filter. | |
| You can not activate the "INTENZA+" filter. | Another filter is already active | The machine indicates the filter usage in percentage. However, if you want to activate a new filter before the one currently in use has expired, the latter must be disabled first and as described in section "Replacing INTENZA+ water filter" |
| There is some water under the machine. | The drip tray is too full and has spilled over. | Empty the drip tray when the mark appears though the tray. Always empty the drip tray before starting the descaling procedure. |
| The machine is in DEMO mode. | While switching on the machine, you pressed a combination of buttons (HOME - CLEAN/SET - HOME - CLEAN/SET). | Switch the machine off and on again, with the ON/OFF button on the control panel. |

32 English
GAGGIA accessories
Coffee and accessories are available through authorised centres (Italy), or distributors in your country.
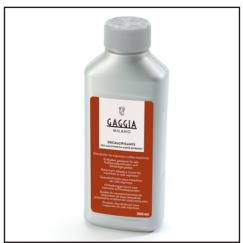
Dscaling product
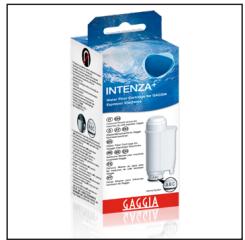
INTENZA+ water filter
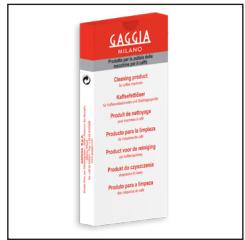
Coffee oil remover

Milk circuit cleaner (Philips)







Coffee range available in beans and powder: 100% Arabica / Intense / Decaffeinated
Technical specifications
| Nominal voltage - Power rating - Power supply | See data plate on the inside of the service door |
| Housing material | Thermoplastic type |
| Dimensions | 224 x 357 x 435 mm |
| Weight | 7,7 kg |
| Power cord length | 1200 mm |
| Control panel | Front panel |
| Water tank | 1.8 litres - Removable type |
| Coffee bean container capacity | 250 g |
| Coffee pucks container capacity | 15 |
| Pump pressure | 15 bar |
| Boiler | Stainless steel boiler |
| Safety devices | Thermal Fuse |
Inhoudsopgave
Overzicht van de machine (afb. 2) 34
Controlepaneel en display 35
Overzicht van het contropaneel (afb. 1) 35
Multifunctietaetsen 35
Eerste installment 36
Handmatige spoelcylclus 36
Meting van de waterhardheid 37
Waterfilter INTENZA+ 37
Installatie van het waterfilter INTENZA+ 38
Vervanging van het waterfilter INTENZA+ 38
Type drank 39
Espresso tray 40
Koffieafgiffe 40
Afgithe van koffie met koffiebonen 40
Afgithe van de koffie met voorgemalen koffie 41
Bereiding van dranken op basis van koffie en opgeschuimde melk 42
Hoe het Capp in Cup-systeme assembleren 42
Afgithe van de dranken op basis van koffie en opgeschuiimde melk 42
Afgithe van heet water 44
Aanpassing van de dranken en opslag van de instellenen (MEMO) 44
Aanpassing van de dranken 44
Aanpassing van de maalfijnheid 46
Reiniging en onderhoud 47
Reinigungstabel 47
Reiniging van het Capp in Cup-system 48
Reiniging van de zetgroep 49
Invetten van de zetgroep 52
Ontkalking 53
Frequentie van de ontkalking 53
Wat te doen in geval van onderbreking van de ontkalkingsprocedure 54
Verschillende instellungen 54
Taal 54
Waterfilter 55
Stand-by tijd 55
Meeteenheid 55
Waterhardheid 55
Drankenteller 55
Toetsgeluid 55
Standaardinstellungen 55
Betekenis van de foutdcodes 56
Oplossing van problemen 57
Accessoires GAGGIA 60
Technische gegevens 60
34 Nederlands
Overzicht van de machine (afb. 2)
| 1 | Controlepaneel | 17 | Lekbakje |
| 2 | Afstelbare koffietuit | 18 | Rooster lekbakje |
| 3 | Deksel van het waterreservoir | 19 | Espresso tray |
| 4 | Deksel van het koffiebonenreservoir | 20 | Handgreep Capp in Cup-systeel |
| 5 | Compartment voorgemalen koffie | 21 | Stoompijpje |
| 6 | Aansluiting voor voedingskabel | 22 | Glazen melkkan |
| 7 | Gleufplaatsing Espresso tray | 23 | Deksel van de glazen melkkan |
| 8 | Indicator lekbakje vol | 24 | Pijpje van het Capp in Cup-systeel |
| 9 | Waterreservoir | 25 | Melkaanzuigbuisje |
| 10 | Aromadeksel | 26 | Centrale behuizing van het Capp in Cup-systeel |
| 11 | Instelknop van de koffiemolen | 27 | Tester van de waterhardheid |
| 12 | Koffiebonenreservoir | 28 | Waterfilter |
| 13 | Zetgroep | 29 | Maatlepel voor voorgemalen koffie |
| 14 | Servicedeur | 30 | Smeervet |
| 15 | Koffieopvanglade | 31 | Voedingskabel |
| 16 | Koffieresidureservoir |
Controlepaneel en display
01
Overzicht van het contrôlepaneel (afb. 1)
| 1/2 | MULTIFUNCTIETOETSEN | Om de op het display aangegeven functie te selecteren. |
| 3 | Toets ON/OFF | Om de machine aan of UIT te schakelen, door de toets enkele sekonden, ingedrukt te houden. |
| 4 | Toets HOME | Voor toegang tot het drankenmenu. |
| 5 | Toets CLEAN/SET | Voor toegang tot het menu van de reiniging en van de instelleningen. |
| 6 | Toets START/STOP | Om de afgifte van de geselecteerde drank te starten/stappen, of de op het display weergegeven procedure te starten/stappen. |
Opmerking: de toetsen HOME CLEAN/SET , zich ook toetsen voor ESC. De schermen können verlaten worden door te drukken op een van deze tweet toetsen die terugkeren maar hun oorspronkelijke menu, behalte binnen een functie of programma.
Multifunctietoetsen
De multifunctionele toetsen aan de zijkanten van het display dienen om de functie of de drank te selecteren waarnaar ze op dat moment verwijzen.
Opmerking: om het lezen van deze handleiding te vergemakkelijken, waar u leest <
Eerste installment
Voordat u de machine gebruikt, is het van essentieel belang dat u een paar eenvoudige stappen volgt, duidelijk beschreiben in de beknopte handleiding aan het begin van deze handleiding met verklarende tekeningen.
Opmerking: om een nog hebelijkere koffie te verkrijgen, raden we u aan eerst 5 kopjes koffie te zetten zodate machine de zelf-afstelling kanuitvoeren.
Handmatige spoelcyclus
Tijdens de eerste installmentie of na een langeperiode van inactiviteit van de machine, moet het watercircuit bevuld worden, met de handmatige spoelcyclus.
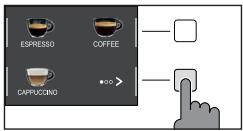
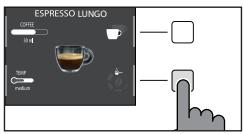
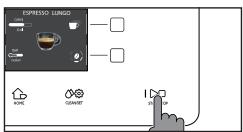
1 Plaats een bak onder de koffietuit, blader door de verschillende paging's en selecteer een "ESPRESSO LUNG".
2 Druk op de toets " " tot selectie van " ", zonder voorgemalen koffie toe te voegen.
3 Druk op de toets START/STOP om de afgifte te starten, de machine begint heet water te verstrekken.
4 Leeg de houder en haal het Capp in Cup-systeem van het stoompijpje.
5 Plaats een houder onder het stoompijpje en kies de drank " HEET WATER".
6 Druk op de toets START/STOP om de afgifte te starten.
7 Leeg de houder en herhaal de stappen van 5 tot 7, tot het waterreservoir leeg is.
8 Vul na beeindig het waterreservoir opnieuw tot het MAX niveau. De machine is nu maar voor gebruik.
Meting van de waterhardheid
Tijdens de eerste installmentie, moet de waterhardheid ingesteld worden. Neem het meetstrookje van de waterhardheid uit de verpakking en volg de stappen die op het display weergegeven wordenijdens de installmentiefase. Om de waterhardheid later te veranderen, drukt u op de toets CLEAN/SET , selecteert u "INSTELLINGEN" en selecteert u eenmaal in het instelleningenmu "WATERHARDHEID".
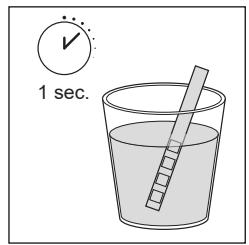
1 Dompel de strook voor de meting van de waterhardheid gedurende 1 seconde in een glas water. Haal de strook uit het water en wacht 1 minuut.
2 Controller hooveel vierkantjes rood geworden zijn.
3 Gebruik de groene toetsen "✔" en "▲" om de waarde te kiezen van de hardheid die ingesteld要去 worden volgens de hierna volgende tabel, en bevestig dan met de toets "✔".
| Aantal rode vierkantjes | In te stellen waarde | Waterhardheid | INTENZA+ |
| ■□□□ | 1 | zeer zacht water | A |
| ■□□□ | 2 | zacht water | A |
| ■□□□ | 3 | hard water | B |
| ■□□□ | 4 | zeer hard water | C |
Waterfilter INTENZA+
Het is aangeraden het waterfilter INTENZA+ te installereren, om de vorming van kalksteen te beperken. Dit verzekert een langere duur van de machine en een better aroma van de koffie in de loop van de tijd.
Water is een heel belangrijk bestanddeel bij het zetten van koffie: waarom is het heel belangrijk dit.altijd professioneel te filtreren.
Het waterfilter INTENZA+ voorkomt de vorming van mineraalafzettingen, door de kwaliteit van het water te verbeteren.
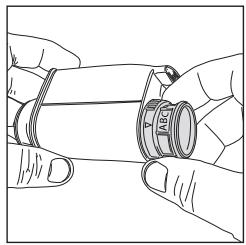
Installatie van het waterfilter INTENZA+
Dompel het waterfilter INTENZA+ in verticale positie (met de opening maar boven) in koud water en druk zachtjes op de zijkanten om de luchtballetjes eruit te lately komen.
Verwijder het waterfilter INTENZA+uit het water en stel het in op basis van de gedetecteerde hardheid van het water (zie het hoofdstuk "Meting van de waterhardheid") en gespecifieerd aan de onderkant van het filter:
A = zacht water - komt overeen met 1 of 2 vakjes
B = hard water (standaard) - komt overeen met 3 vierkantjes
C = zeer hard water - komt overeen met 4 vierkantjes
Plaats het filter INTENZA+ in het waterreservoir en verzeker uervaan dat het correct geplaatst is. Vul het waterreservoir opnieuw en plaat het in het compartment.
1 Druk op de toets CLEAN/SET en cervolgens op de toets "INSTELLINGEN".
2 Selecteer "FILTER VAN HET WATER " en druk op de toets " ✓".
3 Selecteer "ACTIVEREN" en volg de aanwijzingen op het display om het filter correct in te schakelen.
Opmerking: de activeringsprocedure van het filter kan onderbroken worden door te drukken op de knop START/STOP . Om de activeringsprocedure van het filter opnieuw te starten, drukt u opnieuw op de toets START/STOP
Vervanging van het waterfilter INTENZA+
Wonneer het waterfilter INTENZA+ op is, verschijnt het waarschuwingsbericht op het display.
1 Vervang of schakel het filter UIT door te drukken op de toets CLEAN/SET en verrolgens op de toets "INSTELLINGEN".
2 Selecteer " FILTER VAN HET WATER " en druk op de toets " ✓".
3 Kies "VERVANGEN" om het filter te wisselen of "UITSCHAKELEN " indien u het filter Niet wenST te gebruiken. Bevestig met de toets "✔".
Volg de aanwijzingen op het display om het filter correct in te schakelen.
Type drank
| Oorspronkelijk recept | Beschrijving | |
| Ristretto | Koffie | 30 ml |
| Espresso | Koffie | 40 ml |
| Espresso lungo | Koffie | 80 ml |
| Koffie | Koffie | 120 ml |
| Americano | Koffie | 40 ml |
| Water | 110 ml | |
| Cappuccino | Melk | 120 ml |
| Koffie | 40 ml | |
| Café au lait | Koffie | 90 ml |
| Melk | 90 ml | |
| Opgeschuemde melk | Melk | 180 ml |
| Heet water | Water | 150 ml |
Opmerking: In de originele recepten zichn de drankjes allemaal ingesteld op een gemiddelde temperatuur en intensiteit van het aroma.
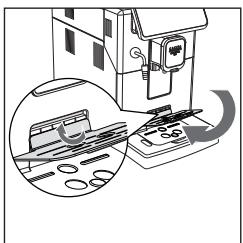
Espresso tray
Deze machine is ontworpen om onberispelijke resultaten in het kopje te garanderen, van de traditionele espresso tot tal van andere beschikbare dranken. Als u een Italiaanse espresso wilt proeven zoals de traditie vereist, met een heerlijke laag naturuurlijke room op het oppervlak, raden we aan de speciala onthorpen "Espresso tray" te gebruiken. Met dit vlak sunt u tradionele effressokopjes gebruiken, zodat de perfekte hoogte worden bereikt voor een compacte en homogene room en een afgithe zonder spatten.
Til de Espresso tray uit het rooster van het lekbakje en stek deze in de waarvoort bestemde gleuf, Zoals aangegeven in de tekening.
Koffieafgifte
Afgithe van koffie met koffiebonen
Let op: gebruik enkel koffiebonen voor espresso. Plaats geen gemalen koffie, ongebrande koffie of oploskoffie in de koffiebonencontainer, waar dat deze de machine konnen beschaden.
Raad: verwarm de kopjes voor met heet water om een warmere koffie te krijgen.
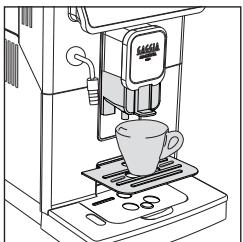
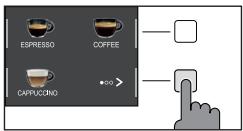
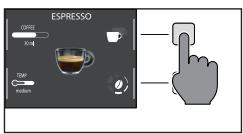
1 Plaats de Espresso tray, plaat een kopje onder de koffietuit, verplaats de koffietuit omhoog of omlaag, afhankelijk van het formaat van het gebruekte kopje.
Druk op de toets HOME voor toegang tot het drankenmenu.
2 Doorloop de verschillende paging's om de gewenste koffie te vinden en te selecteren.
3 Eens de gewenste koffie geseleeteerd is, kan men aan de hand van de toets "twee kopjes tegelijkertijd zetten, behalve de AMERICANO.
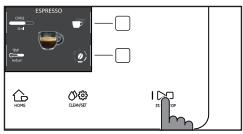
4 Druktenslotte op de toets START/STOP l om de afgithe te starten.
Opmerking: de afgifte kan op eender welt moment onderbroken worden, door op de toets START/STOP te drukken.
Indien u deinstallingen van de drank wenst aan te passen, zie dan hoofdstuk "Aanpassing van de dranken".
Afgithe van de koffie met voorgemalen koffie
Gebruik de speciale meegeleverde maatlepel en voeg de juiste dosis in het compartment voor voorgemalen koffie.
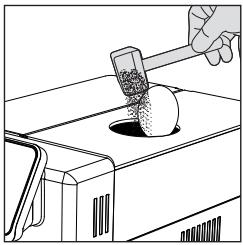
1 Open het deksel van het reservoir voor voorgemalen koffie, en voeg een afgestreken maatlepel voorgemalen koffie toe.
Let op: voeg geen andere stoffen in dan de voorgemalen koffie om de machine nicht te beschadigen.
2 Plaats een kopje onder de koffietuit en selecteer de gewenste drank.
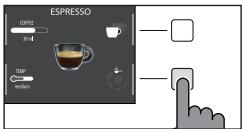
3 Druk op de toets 串 _ ^ , tot selectie van "
Opmerking: de functie "voorgemalen koffie" sluit de möglichkheid UIT om twee kopjes koffie tegelijk te zetten en het aroma in te stellen, wat alleen möglichk is met koffiebonen.
4 Druk op de toets START/STOP om de koffieafgifte te starten.
Indien u deinstallingen van de drank wenst aan te passen, zie dan hoofdstuk "Aanpassing van de dranken".
Opmerking: de afgifte kan op eender welt moment onderbroken worden, door op de toets START/STOP te drukken.
42 Netherlands
Bereiding van dranken op basis van koffie en opgeschuimde melk Hoe het Capp in Cup-systeme assembleren
Opmerking: Voordat u een drank op basis van melk bereidt, moet u ervoor zorgen dat het Capp in Cup-systeem correct op de machine gemonteerd is.
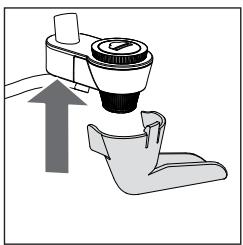
1 Assembleer het pijpe op het centrale huis van het Capp in Cup-system.
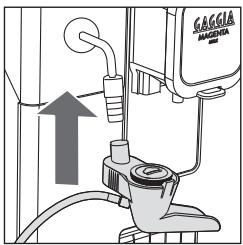
2 Plaats het Capp in Cup-systeem in de rubberen handgreep van het stoompijpje totdat het op+zijn plaatsv klikt.
Afgithe van de dranken op basis van koffie en opgeschuimde melk
Raad: gebruik koude melk (aan een temperatuur van ongeveer 5^ ) met een gehalte aan proteinen van minstens 3% om een optimaal resultaat te garanderen voor het schuim. U kan zowel volle als halfvolle melk gebruiken. U kan bovendien afgeroomde melk, sojamelk en lactosevrijne melk gebruiken.
1 Til het deksel van de kan op en giet de melk er in: de hoeveelheid melk dientussen het minimumniveau (MIN) en het maximumniveau (MAX) aangeduid op de melkkan te liggen.
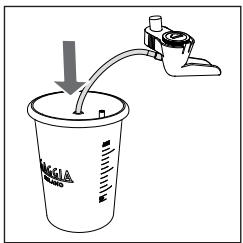
2 Steek het aanzuigbuisje van de centrale behuizing van het Capp in Cupsysteme in de melkkan totdat het de bodem van de kan bereikt.
3 Plaats een kopje of een beker onder de koffietuit en het Capp in Cup-system.
4 Druk op de toets HOME en kies uw drank op het menu.
- Druk op de toets van de gewenste drank.
- Druk op de toets START/STOP om de afgifte van de gekozen drank te starten.
5 De machine geeft een vooraf bepaald volume opgeschuiimde melk en koffie af in het kopje of in de beker. Afhankelijk van de gekozen drank, worden eerst de koffie of eerst de opgeschuiimde melk afgegeven.
Indien u deinstallingen van de drank wenst aan te passen, zie dan hoofdstuk "Aanpassing van de dranken".
6 Na elke voorbereiding van dranken op basis van koffie en opgeschuiimde melk, kan men binnen de 10 seconden de procedure voor snelle reiniging van het melkcircuit uitvoeren. De procedure kan in ieder geval ook later uitgevoerd worden, vanuit het menu van de reiniging aan de hand van de toets CLEAN/ SET Druk op de toets "REINIGING" en selecteer de functie "SNELLE REINIGING " en druk op de toets " . Volg verwolgens de instructies op het display.
Opmerking: voer de snelle reinigingsprocedure ten minste eenmaal per dag UIT, was het pijpe van het Capp in Cup-systeem onder stromend water.
Druk op de toets START/STOP om te bevestigen, of op de toets " " om ze later uit te voeren.

44 Nederlands
Afgithe van heet water
Let op: wanneer de Voorbereiding begint, kan het stoompijpje stoom en heet water afspuiten.
1 Verwijder het Capp in Cup-systeem enplaats een houder onder het stoompijpje.
2 Druk op de toets HOME, doorloop de verschillende schermen met de groene toets 串 ^ , en selecteer het heet water.
3 Druk op de toets van het "HEET WATER". Druk verzolgens op de toets START/ STOP om de afgifte te starten.
Opmerking: de afgifte kan op eender werk moment onderbroken worden, door op de toets START/STOP te drukken.
Indien men de instellingen van de drank wenst aan te passen, zie dan hoofdstuk "Aanpassing van de dranken".
Aanpassing van de dranken en opsga van de instellingen (MEMO)
Met deze machine=kunt u deinstallingen van een drank aanpassen aan uw voorkeuren en deze opslaan (MEMO), door ze over de vorige instelleningen te overschrijven.
Aanpassing van de dranken
1 Druk op de toets HOME
2 Kies uw drank.
3 Op het scherm worden alle instellenen weergegeven die u kunt aanpassen en/ of selecteren op basis van uw voorkeuren. Al naargelang het type drank, kan u de volgende waarden afstellen of selecteren:
- het volume van de koffie en van de melk;
- de temperatuur van de koffie;
- de afgifte van twee kopjes tegelijkkertijd;
- het gebruik van voorgemalen koffie;
- de intensiteit van het aroma (enkel bij gebruik van koffiebonen);
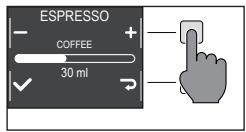
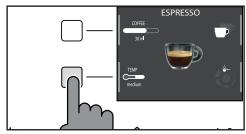
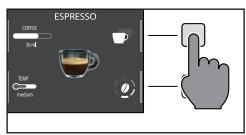
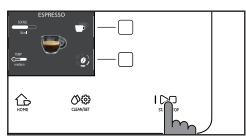
4 Na de toets " KOFFIE " of de toets " MELK ", ingedrukt te hebben, gebrukt u de groene toetsen " + " en -, om het gewenste volume in te stellen. Druk cervolgens op de knop " ✓ " om te bevestigen en terug te keren maar het vorige scherm, waar de(APpe ingestelde hoeveelheid weergegeven worden.
5 Druk de toets "TEMP" meerdere malen in om de temperatuur van de drank te wijzigem met de volgende opties:
laag;
gemidd.;
- hoog;
6 Druk op de toets " " om twee kopjes te zetten, of op de toets " " om slechts een kopje te zetten. Het beeld van de drank in het midden van het display geeft het gekozen+aantal kopjes weeer.
Opmerking: deze functie kan nicht gebruikt worden voor de dranken met melk, de AMERICANO en HEET WATER.
8 Druk op de toets " 0" om de intensiteit van het aroma te wijzigen of de voorgemalen koffie te selecteren. U kankiezen uit 5 verschillende intensiteitsniveauaus. Bij elke druk op de toets " 0", wordt de intensiteit van het aroma met een graad gewijzigd. Het display toont de gekozen intensiteit of de selectie van voorgemalen koffie.
1 Zeer mild
2 Mild
3 Normaal
4 Sterk
5 Zeer sterk
6 Voorgemalen
Opmerking: met de functie Voorgemalen koffie kan men slechts een koffie per keer zetten.
9 Nadat u de drank aan uw smaak hebt aangepast, kutu deze verstrekken met START/STOP
10 Als u een van de bovenstaande parameters heeft gewijzigd, worden u aan het einde van de afgifte gesvraagd of u het recept met de aangebrachte wijzigingen wilt opslaan.
Let op: de neue opgeslagen instellen gen overschrijven die van het vorige recept.
Opmerking: om terug te keren aan de fabrieksinstellenen van de afzonderlijke recepten,要去 und instellenen die aangegeven zijn in de paragraaf "Type drank" opnieuw invoeren en opslaan.
Aanpassing van de maalfijnheid
U kurz de maalfijnheid aanpassen met de instelknop voor de maalfijnheid die zich in de koffiebonencontainer bevindt. De keramische koffiemolen garandeert een perfecte en homogene maling voor de bereiding van elk kopje koffie. Zo worden het aroma bewaard, om algijd een perfecte smaak te garanderen.
Opmerking: de maalfijnheid kan enkel afgesteld worden terwijl de machine de koffiebonen maalt. Het verschil in smaak za na de afgifte van 2-3 koffiekopjes geproofd worden.
Let op: om beschadiging van de koffiemolen te voorkomen, draai de selectieknop van de maalfijnheid Niet meer dan een klik per keer.
1 Plaats een kopje onder de koffietuit.
2 Open het deksel van het koffiebonenreservoir.
3 Zet een espresso zoals beschreiben in het hoofdstuk "Afgithe van een koffie met koffiebonen".
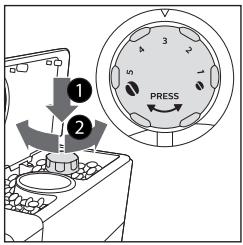
4 Terwijl de machine de koffie maalt, drukt u op de instelknop van de maalfijnheid in het koffliebonenreservoir en draait u deze met eén klik per keer maar links of rechts.
5 Er+zijn 5 verschillende graden van maalfijnheid beschikbaar waaruit men kan kiezen. Hoe kleiner het streepe, des te sterker en rond de koffie.
Opmerking:
- Grove maling: mildere smaak, voor koffiemelanges met donkere branding (3-5);
- Fijne maling: intensere smaak, voorlichtgebrande koffiemelanges (1-3);
Reiniging en onderhoud
Regelmatige reiniging en onderhoud houden de machine in optimale staat en garanderen een constante, uiststekende koffie, constante toevoer en uiststekend melkschuim. Raadpleeg de onderstaande tabel om te weten wanner en hoe u alle verwijderbare delen van de machine要去 reinigen. Lees de desbetreffende hoofdstukken voor meer gedetailleerde informatie.
Reinigungstabel
| Beschrijving deel | Wonneer reinigen | Hoe reinigen |
| Capp in Cup-system | Na gelebruik | Start de cyclus " SNELLE REINIGING " volgens de instructies op het display. Demonteer en reinig het pijpje van het Capp in Cup-system onder stromend water |
| Dagelijks | Was de glazen melkkan of zet deze in de koelkast met het melkaanzuigbuisje zoals weergegeven in de afbeelding.U kan deze ook in de vaatwasser reinigen. | |
| Maandelijks | Start de cyclus " INTENSE REINIGING " volgens de aanwijzingen beschreiben in het hoofdstuk" Reinigung van het Capp in Cup-system", gekruik voor deze reinigingscylus het product voor de reinigung van het melkcircuit "Milk Circuit Cleaner" van Philips. Demonteer verrolgens het Capp in Cup-systemen was alle onderdelen onder stromend water. | |
| Zetgroep | Wekelijks | Verwijder de zetgroep en reinig hem onder stromend water. |
| In functie van het type gebruik | Zie het hoofdstuk "Reinigung en smering van de zetgroep". | |
| Maandelijks | Reinig de zetgroep met de koffieolieverwijderingstabetten Gaggia om de olieachtige resten van de koffie te verwijderen | |
| Lekbakje vol | Wonneer de speciale rode indicator uit het rooster van het lekbakje komt | Leeg het lekbakje en reinig het onder stromend water. |
48 Netherlands
| Beschrijving deel | Wonneer reinigen | Hoe reinigen |
| Koffieresidreservoir | Wonneer de machine dit vereist | Leeg het koffieresidreservoir en reinig het onder stromend water. Verzeker u ervan dat de machine ingeschakeld is tijdens deze werkzaamheid, anders worden het kofferesidreservoir Niet op nul gezet. |
| Waterreservoir | Wekelijks | Reinig het onder stromend water. |
| Compartment van de voorgemalen koffie/ koffieleding | Wekelijks | Reinig het bovenste deel met de steel van een lepel zoals hierna aangegeven. |
| Espresso tray | In functie van het type gebruik | Verwijder de espresso tray, reinig deze met stromend water. U kan deze ook in de bovenste mand van de vaatwasser reinigen. |
Reiniging van het Capp in Cup-system Reinigingsprogramma's van het Capp in Cup-system
De machine heeft twee programma's om het Capp in Cup-systeem te reinigen, de snelle reiniging en de intense reiniging. Beide programma's konnen gekozen worden met de toets CLEAN/SET en door cervolgens op de toets " REINIGING " te drukken. De snelle reiniging worden ook aan het einde van de afgithe van dranken op basis van melk voorgesteld. Volg voor beiden programma's de instructies weergegeven op het display.
- Programma voor de snelle reiniging
Het programma voor snelle reiniging voorziet de reiniging van het melkcircuit met heet water.
- Programma voor de intense reiniging
Hetrogramma voor de intense reiniging van het Capp in Cup-systeem voorziet een zorgvuldige reiniging van het hele melkircuit met gebruik van het product voor de reiniging van de melkcircuits van Philips "Milk Circuit Cleaner".
Reiniging van het Capp in Cup-systemen onder stromend water
Let op: het stoompijpje kan heet+zijn na gebruik.
1 Verwijder het Capp in Cup-systeem van het stoompijpe (afb. 23).
2 Verwijder de rubberen handgreep van het stoompijpe (afb. 24).
3 Verwijder het pijpe van het Capp in Cup-systeem (afb. 25).
4 Verwijder het aanzuigbuisje van de melk van de centrale behuizing van het Capp in Cup-system (afb. 26).
5 Om de centrale behuizing te demonteren:
- haal het aan de aangegeven kanten aan (afb. 27);
- trek aan het linkerdeel en verwijder het zoals aangegeven op de afbeelding (afb. 28);
6 Verwijder het rubberen deksel (afb.29)
7 Demonteer de glazen belkkan (afb.30).
8 Was alle onderdelen onder stromend water.
9 Hermonteer na de reiniging alle onderdelen door de procedure in omgeekerde volgorde uit te voeren.
Reiniging van de zetgroep
Let op: reinig de zetgroep Niet in de vaatwasmachine en gebruik geen afwasmiddelen voor afwas- of reinigingsmiddelen, waar dit de zetgroep kan beschadigen en de smaak van de koffie kan beinvloeden.
Verwijdering van de zetgroep
1 Schakel de machine uit en koppel de voedingskabel los.
2 Verwijder het lekbakje met het koffieresidureservoir.
3 Open de servicedeur.
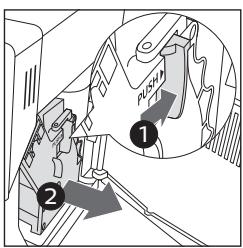
4 Druk op de PUSH-hendel (indrukken) (1) en trek aan de handgreep van de zetgroep (2) om deze uit de machine te halen.
50 Netherlands
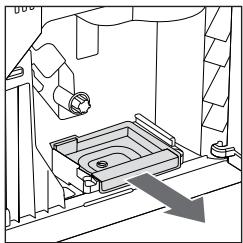
5 Verwijder de koffieopvanglade.
Reiniging van de zetgroep onder stromend water

1 Reinig de koffieleiding grondig met de steel van een lepeltje of met een ander afgerond keukengereedschap.
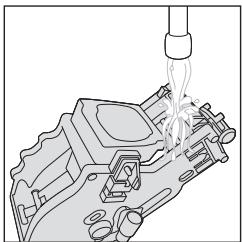
2 Spoel de zetgroep en de koffieopvanglade grondig met lauw water. Reinig het bovenste filter zorgvuldig.
3 Laat de zetgroep aan de lucht drogen.

Opmerking: droog de zetgroep Niet af met doeken om de ophoping van stofvezels erin te vermijden.

Herplaatsing van de zetgroep
1 Voordat u de zetgroep opniew in de machine plaatst, moet u ervoor zorgen dat de twee gele referentietekens aan de zichkant overeenkomen. Indien dit nicht zo is, doet u als volgt:
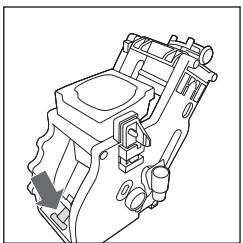
Zorg ervoor dat de hendel in aanraking kommt met de basis van de zetgroep.
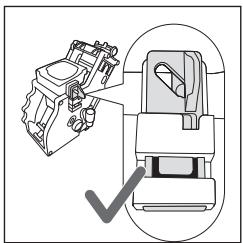
2 Verzeker u ervan dat de gele ontgrendelhaak van de zetgroep op de correcte positie is.
Om de haak correct teplaatsen, duwt u hem omhoog tot de maximaal bereikbare positie.
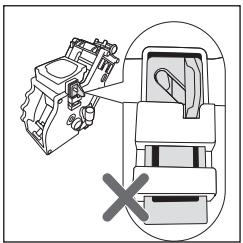
Indien de haak nog onderaan is, betekent dit dat hij Niet correct gespositioneerd is.
3 Verwijder de koffieopvanglade.
4 Plaats de zetgroep opnieuw in de machine langs de geleiders aan derijkanten totdat deze met een klik op zichenplaats blokkeert.
Let op: druk Niet op de hendel PUSH.
5 Sluit de servicedeur.
Reiniging van de zetgroep met tabletten om de olieachtige resten van de koffie te verwijderen
Let op: Gebruik voor het schoonmaken alleen Gaggia-tableten om olieachtige resten van de koffie te verwijderen.

1 Plaats een houder onder de koffietuit.
2 Druk op de toets CLEAN/SET en selecteer de toets "REINIGING" die op het display weergegeven worden.
3 Kies "REINIGING ZETGROEP" en druk op de toets , en druk verwolgens op de toets START/STOP om de reinigingsprocedure te starten.
4 Volg de aanwijzingen op het display om de zetgroep correct te reinigen.
5 De procedure duurt onceveer 5 Minutes en u kan de toets START/STOP gebruiken om ze te onderbreken en cervolgens weir verdter te lately gaan.
52 Netherlands
Invetten van de zetgroep
Om optimale machineprestaties te garanderen,要去 de zetgroep gesmeerd worden. Raadpleeg de volgende tabel voor de freiuentie voor invetten.
| Frequentie van gezruik | Dagelijks,aantal bereide dranken | Frequentie voor invetten |
| Laag | 1-5 | Om de 4 maanden |
| Normaal | 6-10 | Om de 2 maanden |
| Hoog | >10 | Elke maand |
1 Schakel het apparaat uit en koppel de voedingskabel los.
2 Verwijder de zetgroep en spoel deze af met warm water (zie het hoofdstuk "Reiniging van de zetgroep onder stromend water").
3 Breng een dunne laag van het meegeleverde smeervet aan rond de pin die in de machine gestoken worden, onderaan de zetgroep.
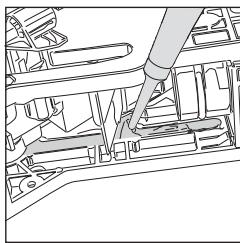
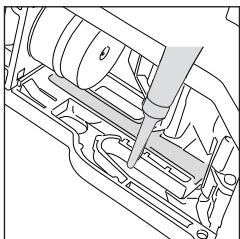
4 Breng een dunne laag smeervet aan op de geleiders, aan beiden kanten (zie afbeelding).
5 Plaats de zetgroep opnieuw (zie het hoofdstuk "Herplaatsing van de zetgroep").
Opmerking: u=kunt de tube smeervet meerdere keren hergebruiken.
Ontkalking
Frequentie van de ontkalking
Wonneer de machine dit vereist,要去 de ontkalking uitgevoerd worden.
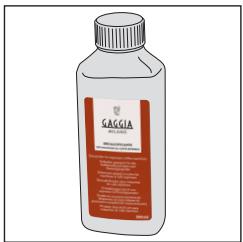
Gebruik alleen de ontkalkingsoplossing van Gaggia die ontworpen is om optimale prestaties van de machine te garanderen. Het gebruik van andere producten zouschade aan de machine hun verroorzaken en resten in het water achechterlaten. Indien de ontkalking van de machine Niet uitgevoerd worden, vervalt de garantie.
1 Verwijder het Capp in Cup-system indien dit op de machine gemonteerd is.
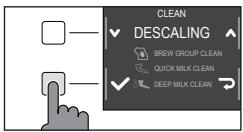
2 Druk op de toets CLEAN/SET en selecteer de toets "REINIGING" die op het display weergegeven worden.
- Selecteer "ONTKALKING" en druk, na bevestiging met de toets "✔" op de toets START/STOP ▷om te starten.
3 Verwijder het lekbakje met het koffieresidureservoir, leeg ze enplaats ze terug in de machine.
4 Verwijder het waterreservoir en leeg het. Verwijder verrolgens, indien aanwezig, het filter INTENZA+.
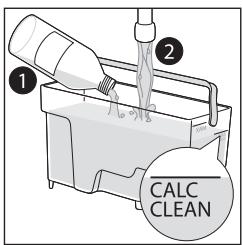
5 Giet de hele fles ontkalkingsoplossing Gaggia in het waterreservoir en vul met water tot u het niveau van CALC CLEAN bereikt. Plaats het verrolgens wee in de machine.
6 Plaats een große houder (1,5l) onder het stoompijpje en de koffietuit.
7 Volg de aanwijzingen die weergegeven worden op het display om de ontkalkingsprocedure te starten. Deze procedure duurt ongeveer 25 minutes en bestaat UIT een ontkalkingscylus en een spoelcylus, uitgevoerd met regelmatige afgiftes.
8 Als de ontkalkingscylclus is voltooid, moet u de réserve en het watercircuit spoelen volgens de instructies op het display.
9 Plaats het filter INTENZA+ weer in het waterreservoir.
Opmerking: de activeringsprocedure van het filter kan onderbroken worden door op de toets START/STOP te drukken.
Let op: wonneer de ontkalkingsprocedure actief is, is het nicht möglichk om de zetgroep te verwijderen. Wacht tot het ontkalkingsproces voltooid is en verwijder dan de zetgroep.
54 Netherlands
Wat te doen in geval van onderbreking van de ontkalkingsprocedure
U kan de ontkalkingsprocedure verlaten door de ON/OFF 山 toets op het contropaneel, enkele sekonden ingedrukt te houden. Als de ontkalkingsprocedure onderbroken worden voordat deze is voltooid, voert u het volgende UIT:
1 Leeg het waterreservoir en reinig het zorgvuldig.
2 Vul het waterreservoir met stromend water tot aan de indicateie van het CALC CLEAN niveau en schakel de machine opnieuw in. De machine worden voorverwarmd en voert een automatische spoelcylus UIT.
3 Voer, voordat u eender welke drank klaarmaakt, een handmatige spoelcclusuit zoals beschreven in het betreffende hoofdstuk.
Opmerking: als de procedure Niet voltooid is, moet er zo snel möglichn nog een ontkalkingsprocedure uitgevoerd worden.
Verschillende instellingen
Door op de toets CLEAN/SET te drukken en "INSTELLINGEN" te selecteren op het display,{kunnen sommige machineparameters hersteld of gewijzigd worden, zoals:
- Taal.
Waterfilter. - Stand-by tijd.
- Meeteenheid.
Waterhardheid. - Drankenteller.
- Toetsgeluid
- Standaardinstallingen.
Taal
Nadat het pictogram voor de taalinstelling geselecteerd is, worden de lijst met beschikbare talen geopend.
| Beschikbare talen | ||
| ITALIAANS | DEENS | TSJECHISCH |
| ENGELS | GRIKS | SLOWAAKS |
| DUITS | POOLS | LITUAANS |
| FRANS | RUSSISCH | JAPANS |
| SPAANS | ROEMEENS | KOREAANS |
| PORTUGEEES | HONGAARS | CHINESE (TRADITIONEEL) |
| NEDERLANDS | BULGAARS | CHINESE (VEREENVoudIGD) |

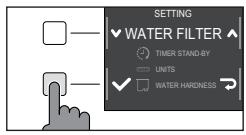
Waterfilter
Nadat "WATERFILTER" is geseleerd, volgt u de instructies op het display en zoals beschreiben in het hoofdstuk "Installatie waterfilter INTENZA+ " en in het hoofdstuk "Vervanging waterfilter INTENZA+.
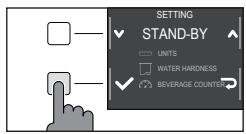
Stand-by hijd
Na "STAND-BY-TIJD" geselecteerd te hebben, kan de timer ingesteld worden op:
- 15 min.
- 30 min.
- 60 min.
- 180 min.
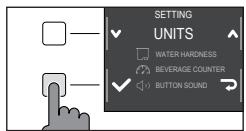
Meeteenheid
Door "MEETEENHEID" te selecteren:
kan men de meeteenheid instellen in "ml" of "once".
Waterhardheid
Nadat "WATERHARDHEID" is geselecteerd, volgt u de instructies op het display en zoals beschreiben in het hoofdstuk "Meting van de waterhardheid".
Drankenteller
Voor elke drank kan het aantal kopjes weergegeven worden dat afgegeven werden sinds de eerste keerDat de machine werd gebruikt. Deze geveens konnen nicht geseset worden.
Toetsgeluid
U kont het geluid van de toetsen uitschakelen door "OFF" te selecteren om nicht gestoord te worden.
Standaard instellingen
De machine kan weeer op de fabriekswaarden ingesteld worden. De machine zal een dubbele bevestiging vragen alvorens verder te gaan.

Betekenis van de foutcodes
Hieronder staan een aantal foutcodes die het display kan weergeven, hun betekenis en hoe het probleem op te losesten. Als de aangegeven oplossingen Niet werken en het display het pictogram van de foutcode blijft weergeven en de machine nicht correct werkt, of als er andere foutcodes worden weergegeven, moet u contact opnemen met een erkend servicecentrum of met de dealers in uw land. U vindt de contactgegevens op de website www.gaggia.com of www.gaggia.it.
| Foutcode | Probleem | Oorzaak | Mogelijk oplossing |
| 01 | De koffiemolen is geblokkeerd | De koffieleiding is geblokkeerd. | Verwijder de voedingskabel en verwijder de zetgroep. Reinig de koffieleding grondig met de steel van een lepel. Schakel het apparaat opnieuw in. |
| 03 - 04 | Er heeft zich een probleem voorgerdaan met de zetgroep. | De zetgroep is vuil of nicht goed gesmeerd. | Zet de machine uit. Verwijder de zetgroep en reinig hem zorgvuldig. (Raadpleeg het hoofdstuk "Reiniging van de zetgroep") |
| De zetgroep is nicht correct geplaatst. | Zet de machine uit. Verwijder de zetgroep enplaats hem terug. Verzeker u ervan dat de zetgroep op de juiste positie is alvorens deze teplaatsen. Raadpleeg het hoofdstuk "Herplaatsing van de zetgroep". | ||
| 05 | Er is een probleem in het watercircuit. | Er is lucht aanwezig in het watercircuit. | Haal het reservoir enkele keren uit de machine enplaats het opnieuw. Zorg ervoor dat het correct in de machine geplaatst worden. Controller of de ruimte van het waterreservoir schoon is. |
| Als u een "INTENZA+" filter gezruikt: verwijder het filter uit het waterreservoir en schud het om alle lucht uit het filter te verwijderen. Plaatservolgens het filter "INTENZA+" weir in het waterreservoir. | |||
| 14 | De machine is oververhit. | Er zijn meerere mogelijk oorzaken. | Schakel de machine uit en schakel ze na 30 minutes opnieuw in. Doe dit 2 of 3maal. |
Oplossing van problemen
Dit hoofdstuk vat de meest voorkomende problemen samen die u kutantreffen bij de machine. Als u het probleem Niet kut oplossen met de onderstaande informatie, ga dan waar www.gaggia.com of www.gaggia.it voor een lijst met veelgestelde vragen of neem contact op met het Customer Service Center of met de dealers in uw land.
| Probleem | Oorzaak | Oplossing |
| De machine gaat nicht aan. | De machine is nicht aangesloten. | Controller of de voedingskabel correct ingestoken is. |
| De toets ON/OFF verbend nicht genoeg ingedrukt. | Houd de toets ON/OFF een pauar seconden ingedrukt. | |
| Het lekbakje is snel vol. | Dit is normala. De machine gebrukt water om het intern circuit en de zetgroep te spoelen. Een deel van het water stroomd door het interne systeem direct in het lekbakje. | Leeg het lekbakje wanner de rode indicator uit het rooster steekt. We raden aan een kopje onder de koffietuit teplaatsen om het spoelwater op te vangen |
| Het display geeft constant het pictogram "koffieresidreservoir vol"eer. | Het koffieresidreservoir werk geleegd wanner de machine uitgeschakeld was. | Leeg het koffieresidreservoir steeds wanner de machine ingeschakeld is. Indien het koffieresidreservoir geleegd worden wanner de machine uitgeschakeld is, worden de teller van de koffiecycliet Niet op nul gezet. In dit geval toont het display het pictogram ook wanner het reservoir Niet vol is. |
| Het koffieresidreservoir werk te snel teruggeplaatst. | Wacht steeds 5 seconden wanner het koffieresidreservoir zich weir op+zijnplaats zet. Zo stelt de teller zich weir in op nul. | |
| De machine vraagt u om het koffieresidreservoir leeg te make, ook als het reservoir Niet vol is. | De machine heeft de teller Niet geset nadat het koffieresidreservoir de LASTste keer geleegd werk. | Wacht steeds 5 seconden wanner het koffieresidreservoir zich weir op+zijnplaats zet. Zo stelt de teller van het kofferesidu zich weir in op nul. |
| Leeg het koffieresidreservoir steeds wanner de machine ingeschakeld is. Indien het koffieresidreservoir geleegd worden wanner de machine uitgeschakeld is, worden de teller van de koffiecycliet Niet op nul gezet. | ||
| Het koffieresidreservoir is te vol en het icoon "koffieresidreservoir vol" wordt Niet weergegeven | Het lekbakje is verwijderd zonder het koffieresidreservoir te legen. | Wanner u het lekbakje verwijdert, maak dan ook het koffieresidreservoir leeg, ook als dit bijna leeg is. Zo stelt de teller van de koffieresidu zich一周 in op nul en begint hij de kofferesidu opnieuw correct te tellen. |
| Onmogelijk de zetgroep te verwijderen. | De zetgroep befindt zich nicht in de correcte positie. | Sluit de servicedeur. Schakel de machine uit en weeer aan. Wacht tot het display de melding voor machine gereed weergeeft, verwijder dan de zetgroep. |
Nederlandds
| Probleem | Oorzaak | Oplossing |
| De zetgroep kan nicht geplaatst worden. | De zetgroep befindt zich nicht in de correcte positie. | De zetgroep werk nicht in positie geplaatst alvorens hij terug gespositioneerd werk. Zorg ervoor dat de hendel contact maakt met de basis van de zetgroep en dat de haak van de zetgroep in de juiste positie staat. Zie het hoofdstuk "Herplaatsing van de zetgroep". |
| Om de machine waar in te stellen: herplaats het lekbakje met het koffieresidureservoir. Plaats de zetgroep Niet. Sluit de servicedeur, ontkoppel de voedingskabel enplaats deze opnieuw. Probeer dan opnieuw de zetgroep teplaatsen en schakel de machine opnieuw in. | ||
| De koffie heeft weinig room of is waterig. | De koffiemolen is ingesteld op een grove maling. | Stel de koffiemolen in op een fijnere maling. |
| De machine voert de zelfregulatie UIT. | Zet enkele koffiekopjes zodate de machine de zelfregulatie uitvoert. | |
| De koffieleiding is geblokkeerd. | Reinig de koffieleiding met een lepeltje zoals beschreiben in het hoofdstuk "Reiniging van de zetgroep onder stromend water". | |
| De koffie is nicht warm genoeg. | De temperatuur is te laag ingesteld. Ga de instelleningen van het menu na. | Stel de temperatuur van het menu in op "MAX". |
| De machine maalt de koffiebonen, maar er worden geen koffie afgegeven. | De koffiemolen is ingesteld op een te fijne maling. | Stel de koffiemolen in op een grovere maling. |
| De kofflietuit is verstocht. | Zet een Voorgemalen slappe koffie, zonder de Voorgemalen koffie toe te voegen. | |
| De koffietuien zijn verstocht. | Reinig de koffietuien met eenklein borsteltje. | |
| De koffie stroom langzaam of druppelsgewijs UIT de machine | De koffiemolen is ingesteld op een te fijne maling. | Stel de koffiemolen in op een grovere maling. |
| De koffietuien zijn verstocht. | Reinig de koffietuien met eenklein borsteltje. | |
| Het circuit van de machine is door kalkaanslag geblokkeerd. | Voer de ontkalking UIT. | |
| De melk maakt geen schuim. | Het Capp in Cup-systeme is vies of is nicht correct aangebrachte. Ofwel werden nicht alle delen van het systeme correct gemonteerd. | Reinig het Capp in Cup-systeme volgens het hoofdstuk "Intense reiniging onder stromend water van het Capp in Cup-systeme" en herplaats het correct. |
| Verzeker u ervan dat alle onderden correct gemonteerd zich. | ||
| Het gebruikte type melk is Niet geschikt om schuim te makeen. | Al naargelang het type melk, verkrijgt men een andere hoeveelheid en kwaliteit van schuim. | |
| Het filter "INTENZA+" kan Niet geplaatst worden. | U要去 de luchtuit het filter laten gaan. | Laat de luchtbellenuit het filter+komen. |
| Het reservoir bevat nog water. | Leeg het waterreservoir alvorens het filter te installeren. | |
| De rubberen afdichting is Niet op het filter "INTENZA+" geplaatst. | Controleer de verpakking en plaats de afdichting op het filter "INTENZA+". | |
| Het filter "INTENZA+" kan Niet ingeschakeld worden | Er is reeds een filter actief | De machine geeft het door het filter gebruikte percentage aan. Als men toch een neue filter wilt activeren vòr de vervaldatum van het in gebruik zijnde filter,要去 dit eerst gedexeerd worden zoals beschreiben in de paragraf "Vervanging van het INTENZA+ waterfilter" |
| Er is water onder de machine aanwezig. | Het lekbakje is te vol en is overgelopen. | Leeg het lekbakje wonneer de indicator door het bakje steekt. Leeg altijd het lekbakje alvorens de ontkalkingsprocedure te starten. |
| Het apparaat bevindt zich in de DEMO-modus. | Bij het inschakenen van het apparaat, heeft U op een combinatie van knappen gedrukt (HOME - CLEAN/SET - HOME - CLEAN/SET) | Schakel het apparaatuit en weeer in met die ON/OFF toets op het contropaneel. |
Accessoires GAGGIA
De koffie en de accessoires zijn beschikbaar in de erkende centra (Italiè), of bij de dealers van uw land.

Ontkalkingsoplossing
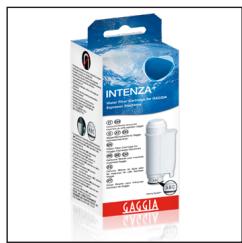
Waterfilter INTENZA+
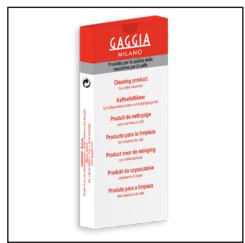
Koffieolieverwijderingstabletten

Milk circuit cleaner (Philips)







Beschikbaar assortment koffie in bonen en poeder: 100% Arabica / Intens / Cafeinevrij
Technische gegevens
| Nominale spanning - Nominal vermogen - Voeding | Zieplaatje aan de binnenkant van de servicedeur |
| Material behuizing | Thermoplast |
| Afmetingen | 224 x 357 x 435 mm |
| Gewicht | 7,7 kg |
| Kabellenge | 1200 mm |
| Bedieningspaneel | Front |
| Waterreservoir | 1,8 liter - Uitneembaar |
| Inhoud koffiebonenreservoir | 250 g |
| Inhoud koffiediklade | 15 |
| Pompdruk | 15 bar |
| Waterketel | RVS ketel |
| Veiligheidsnrichtingen | Thermozekering |
Spis tresci
Głowne elementy urzadzenia (Rys. 2) 62
Panel sterowania i wyświetlacz 63
Glowne elementy panelu sterowania (Rys. 1) 63
Przyciski wielofunkcyjne 63
Pierwsza instalacja 64
Reczny cykl plukania 64
Pomiar twardoSci wody 65
Filtr wody INTENZA+ 65
Instalacja filtra wody INTENZA+ 66
Wymiana filtra wody INTENZA+ 66
Rodzaje napojow 67
68
Parzenie kawy 68
Parzenie kawy na bazie kawy ziarnistej 68
Parzenie kawy na bazie kawy wstepnie zmielonej 69
Przygotowywanie napojów na bazie kawy i spienionego mleka 70
Jak zmontowa system Capp in Cup 70
Nalewanie napojow na bazie kawy i spienionego mleka 70
Nalewaniegoracej wody 72
Indywidualne ustawenia napojów i zapisywanie ustawien (MEMO) 72
Indywidualne ustawientia napojow 72
Regulacja stopnia mielenia 74
Czyszczenie i konserwacja 75
75
Czyszczenie systemu Capp in Cup 76
Czyszczenie bloku zaparzajacego 77
Smarowanie bloku zaparzajacego 80
Odwapnianie 81
Procedura odwapniania 81
Co robic w przypadku przerwania procedury odwapniania 82
Ustawienia rozne 82
Jęczyk 82
83
Czas czuwania 83
Jednostki miary 83
Twardosc wody 83
Licznik napojow 83
Dzwiek przycisków 83
Ustawienia fabryczne 83
Znaczenia kodow blgodow 84
Rozwiazywanie problemów 84
Akcesoria GAGGIA 88
Dane techniczne 88
62 Polski
Głowne elementy urzadzenia (Rys. 2)
| 1 | Panel sterowania | 17 | Taca ociekowa |
| 2 | Regulowany dozownik kawy | 18 | Kratka ociekowa |
| 3 | Pokrywa zbiornika na wodę | 19 | Espresso tray |
| 4 | Pokrywa pojemnika na kawe zziarnista | 20 | Uchwyt systemu Capp in Cup |
| 5 | Pojemnik na kawe wstepnie zmielenoga | 21 | Rurka wylotu pary |
| 6 | Gniaźdo do kabla zasilajacjaco | 22 | Szklany dzbanek na mleko |
| 7 | Szczelina na espresso tray | 23 | Pokrywka szklanego dzbanka na mleko |
| 8 | Wskȩznik pełnej tacy ociekowej | 24 | Dozownik systemu Capp in Cup |
| 9 | Zbiornik na wodę | 25 | Rurka zasysajća mleko |
| 10 | Pokrywka do utrzymania aromatu kaw | 26 | Korpus środkowy systemu Capp in Cup |
| 11 | Pokrętło regulacje miłynka | 27 | Tester twardość wody |
| 12 | Pojemnik na kawe ziarnista | 28 | Filtr wody |
| 13 | Blok zaparżość | 29 | Miarka do kawy wstepnie zmielonej |
| 14 | Drzewiczki serwisowe | 30 | Smar |
| 15 | Kasetka na resztki kawy | 31 | Kabel zasilajacja |
| 16 | Pokemnik na fusiy |
Panel sterowania i wyświetlacz
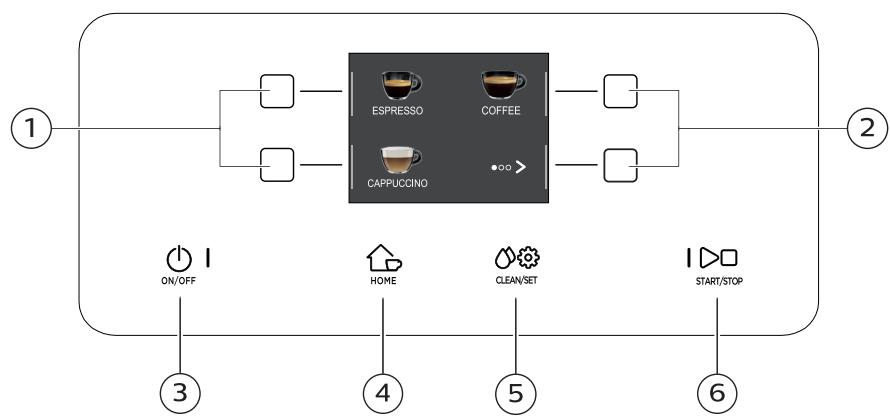
01
Głowne elementy panelu sterowania (Rys. 1)
| 1/2 | Przyciski WIELOFUNKCYJNE | Aby wybrać funkcję wskazaną na wyświetlaczu. |
| 3 | Przycisk ON/OFF | Aby wączyć lub wyłączyć urzemdenie,;naleź przytrzymać przyczysk przyez kilka sekund. |
| 4 | Przycisk HOME | Aby wejsć do menu napojów. |
| 5 | Przycisk CLEAN/SET | Aby wejsć do menu czyszczenia iustawiéń. |
| 6 | Przycisk START/STOP | Aby uruchomicź/zatrzymać;nalewaniewybranego napoju lub uruchomic/zatrzymać proceduţe wskazanova wyświetlaczu. |
Wazne: przyciski HOME, CLEAN/SET działaja równie są przyciski ESC. Można wyjsć z ekranów, naciskajć jedem z tych dwóch przycisków, króre powoduź powróć do menu pouchtkowej. Nie jest to"Justakość,;będź w obrębie danej funkcjji lub programu.
Przyciski wielofunkcyjne
Przyciski wielofunkcyjne po bokach wyświetlacza są za do wybierania funkcjji lub napoju, do któraj odnoszo są one w danym momencie.
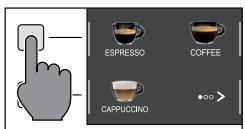
Wañne: aby ułatwoćczytanie ninięszej instrukcjbi, polecenie <
64 Polski
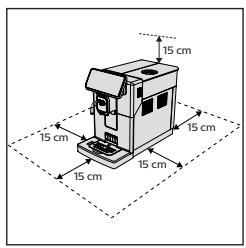
Pierwsza instalacja
Przed uzyciem urzadzenia nalezy przystrzegać kilku prostych wskazówek wyraźnie opisanych w skroconej instrukcji na początku niniejszego podręcznika, gdzie zamieszczono ilustracje objasniece.
Wañne: aby kawa smakowa lepiej, zalecamy przygotowanieśćtkowo 5 fližanek kawy, aby urzadzenia wykonało automatyczna regulacja.
Ręczny cykl plukania
Podczas pierwiszej instalacji lub po污染防治 okresie niedziania urzadzenia nalezy wykonać cykl pluktania ręcznégo.
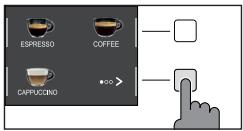
1 Umieść pojemnik pod dozownikiem kawy, przywność poszȩgólne strony i wybrać „ESPRESSO LUNG".
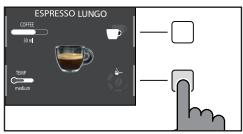
2 Nacisnac przycisk „ö“, „až do wybrania „ö“, „bez dodawania kawy wstepnie zmielonej.
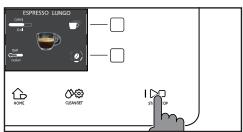
3 Nacisnac przycisk START/STOP l w celu rozpoczecia nalewania. Urzadzenie zacznie naewac goracwode.
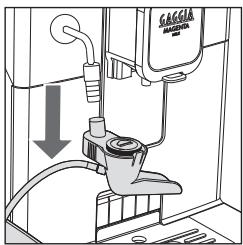
4 Oproznić pojemnik i wyjac system Capp in Cup z turki wylotu pary.
5 Ustawic pajomnik pod urkay wylotu pary i wybrac napoj ,GORACA WODA".
6 Nacisnac przycisk START/STOP l w celu Rozpoczecia nalewania.
7 Opróznico pojemnik i powtorzyc czynnosci z punktów od 5 do 7, dopóki zbiornik na wodeNie bedzie pusty.
8 Po zakoczeniu napelnic ponownie zbiornik na wode do poziomu MAX. Urzadzenia jest gotowe do pracy.
Pomiar twardosci wody
Podczas pierwszej instalacji naleź ustawic twardosć wody.
Wyjac z opakowania pasek testowy do pomiaru twardosci wody i postepować zgodnia z instrukcjami widnejęcymi na wyświetlaczu podczas fazy instalacji. Aby zmienić twardosci wody w innym momencie, naleź ynescź przyczisk CLEAN/SET
wybrać „USTAWIENIA" i w menu ustawien wybrać „TWARDOSĆ WODY".
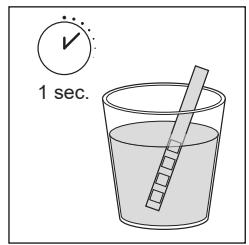
1 Na 1 sekunde zanurzyć pasek testowy do pomiaru twardosci wody w szkiance z woda. Wyjać pasek testowy do pomiaru twardosci wody i poczekAAC 1 minute.
2 Sprawdzić, ile kwadracików zmienito kolor na czerwony.
3 Uzyc zielonych przycisków „✔" i „✔", aby wybrać wartosci twardosci do ustawienia zgodnia z poniższa tabela, a nastepnie potwierdzić za pomocamy przycisku „✔".
| Liczba czerwonych kwadracików | Wartosci do ustawienia | Twardosci wody | INTENZA+ |
| ■□□□ | 1 | woda bardzo miękka | A |
| ■□□□ | 2 | woda miękka | A |
| ■□□□ | 3 | woda twarda | B |
| ■□□□ | 4 | woda bardzo twarda | C |
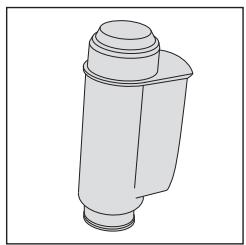
Filtr wody INTENZA+
Zaleca sie zainstalowanie filtra wody INTENZA+, aby ogranicyc tworzenie sie kamienia. Zapewni to dluszsa trwaosc urzadzenia i lepszy aromat kawy w miare upywu czasu.
Woda jest podstawowy składnikiem kazdej kawy. Bardzo wąznaj jest zatem jej odpowiednia filtracja, w profesjonalny spośob.
Filtr wody INTENZA+ zapobiega tworzeniu sie osadów mineralnych, poprawiajacść wody.
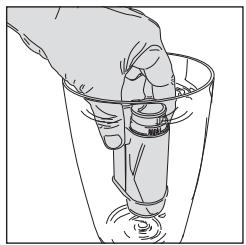
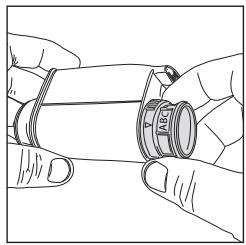
Instalacja filtra wody INTENZA+
Zanurzyć filtr wody INTENZA+ w zimnej wodzie w pozycji pionowej (otworem ku górze) i nacinność delikatnie na brzej, aby wypuplesć pescherzykigowiatrza.
Wyjac filtr wody INTENZA+ z wody i ustawic go zgodnie ze stwierdzona twardoscią wody (patrz Rozdziel „Pomiar twardosci wody") i okreslic przy podstawie filtra poziom twardosci:
A = woda.miękka - 1 lub 2 kwadraciki
B = woda twarda (standard) - 3 kwadraciki
C = woda bardzo twarda - 4 kwadraciki
Włoźyc filtr INTENZA+ do zbiornika na wodę, upewniajać sie,重点领域 y jest prawidławowo. Napelnić ponownie zbiornik na wodę włoźyc go na sąsce.
1 Nacisnac przycisk CLEAN/SET a nastepnie przycisk "USTAWIENIA".
2 Wybrać „FILTR WODY" i nacinność przycisk „√".
3 Wybrać „AKTYWUJ" i postepować zgodnia z instrukcjami widnejącymi na wyświetlaczu, aby uaktywnic prawidłowo filtr.
Wazne: procedure aktywaci filtra:noza przerwać, nacziskajc przycisk START/ STOP ▷. Aby wznowic procedure aktywaci filtra, naleź ponownie nacisnocyprzycisk START/STOP ▷.
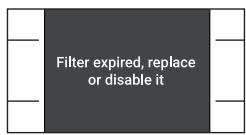
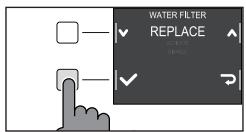
Wymiana filtra wody INTENZA+
Gdy filtr wody INTENZA+ zuzyje sie, na wyświetlaczu pojawi są komunikat ostrzejagawczy.
1 Dokonać wymiany lub bezaktywacje, naciskajć przycisk CLEAN/SET , a nastepnie przycisk „USTAWIENIA".
2 Wybrać „FILTR WODY" i nacisné przycisk „√".
3 Wybrać „WYMIEN", aby wymienić filtr lub „WYŁAÇZ", sąsiNie zamierza sie uzywać filtra. Potwierdzić przyciskiem „√".
Postepowac zgodnie z instrukcjami na wyświetlaczu, aby prawidłowo uaktywnic filtr.
Rodzaje napojów
| Oryginalna receptura | Opis | ||
| Ristretto | Kawa | 30 ml | Mocna kawa, serwowana w malej filizance: to espresso, krórego CZas dozowania jest krótszy w porównaniu z czasem dozowania klasycznegopresso, czego efektem jest kawa w mniejszej ilosci i mniej bogata wkofeine. |
| Espresso | Kawa | 40 ml | Espresso znane jest na calymŚwiecie jak prawdziwa „kawa we włoskim stylu". Serwowane jest w malej filizance, a"Myo typowymi cechami są bogaty i intensywny aromat oraz warstwa naturalnej, zwartej piani. Taki napój jest efektem procesu zaparzania ciśnieniowych z uzyciem goracej wody, krórego pomysłodawcą byt w 1938 roku Achille Gaggia. |
| Duża kawa espresso | Kawa | 80 ml | Duża kawa espresso to espresso, krórego CZas zaparzania jest nieco dlustrszy.Jest bardziej Rozcieńca, cechuje są inną intensywność aromatu i wyȩSZAZawARTOZCI Kofeiny. Serwowane jest w srednej filizance. |
| Kawa | Kawa | 120 ml | Kawa to napój przygotowywany zȩka ŚlOciary wody w porównaniu z espresso. Ma delikatniejszy aromat i serwowana jest w srednio-dujej filizance. |
| Kawa po amerykański | Kawa | 40 ml | Kawa po amerykański to mniew intensitywana duža kawa, przygotowywana jak espresso, ale z dodatkiem goracej wody. |
| Woda | 110 ml | ||
| Cappuccino | Mleko | 120 ml | Cappuccino to jedem z majbardziej lubianych na calym Świecie klasyczny wloski napój. Przygotowuje są je, wykonujć espresso z dodatkiem mleka i piani kmeka, tkóra powinna mięc co najmnej 1 cm wysokość. Serwuje są je w duzej filizance. |
| Kawa | 40 ml | ||
| Café au lait | Kawa | 90 ml | Café au lait jest to napój składajcy są z kawy i mleka w równych czȩciach.Obecnie möglich go również wzbogAACdelikatnia warstwa piani kmeka.Serwuje są je w duzej filizance. |
| Mleko | 90 ml | ||
| Spienione mleko | Mleko | 180 ml | Spienione mleko wykorystwyane jest do przygotowywania cappuccino, latte macchiato i wielu innych napojów. W efekcie powstaje zwarta i Jednolita warstwa piani kmeka. |
| Goręca woda | Woda | 150 ml | Goręcej wody(CCMA) uzywać do szydkBiego przygotowania herbaty, naparów ziołowych i innych napojów rozpuszczalnych. |
Wazne: W oryignalnych recepturach wszystkie napoje są ustawione na srednia temperature i srednia intensywnosc aromatu.

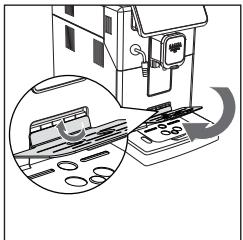
Espresso tray
Niniejsze urzadzenia zaprojektowano z myślą o przyrzȩdžaniu doskonale smakujacych napojów, od tradycyjniego espresso po licNZne inné dostepné napoje. Jesli pragniesz zasmakować włoskiego espresso zgodnie z tradycja przyrzȩdžania tego rodzaju napoju, z delikatna warstwa naturaNiej piani na powierzchni, zachecamy Cię do korzystania ze specjalnie opracowanej podstawi „Espresso Tray". Podstawka ta pozwala na korzystanie z tradycyjniych filizanjek do).[es]
majc zawsze pewnosć,źootera poziom;będzie idealny,by powstała Jednolita, Zwarta pianta iź przy seinen zaoparzaniu otoczenia pozostanie nieskazitelnie czyste.
Podnieść Espresso Tray nad kratkę tacy ociekowej i wędzyc do przywidzianejsczeliny, jak pokazano na rysunku.
Parzenie kawy
Parzenie kawy na bazie kawy ziarnistej
Uwaga: uzywać wyłącznia kawy ziarnistej do espresso. Nie wsypwać do pojemnika na kawe zziornista kawy niedpalonej, kawy liofilizowanej lub rozpuszczalnej, poniewaź mogłyby one uszkodzic urzadzenia.
Wskazówka: aby kawa bya cieplejsza, nalezy podgrzać filizanki goracwoda.
1 Ustawic Espresso Tray, umiecić filizanké pod dozownikiem kawy, podnieszć lub obnižyc dozownik kawy w zaleznosci od rozmiaru uzywanej filizanki. Nacisnac przycisk HOME aby wejsć do menu napojów.
2 Przewinac poszczegolne strony, aby znalec i wybrac zadany napoj.
3 Po wybraniu zădaneano napoju:noza przygotowej dwie filizanki równoczesnej za pomoczą przycisku „ Д " (nie dotyczy kawy po amerykański).

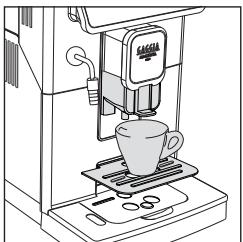
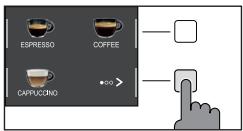
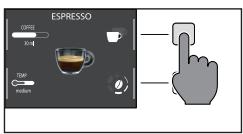
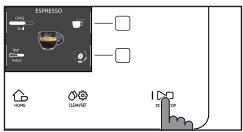
4 Nacisnac przycisk START/STOP l w celu Rozpoczecia nalewania.
Wañne: nalewanie maya przerwać w dowolnym momencie, naciskajć przycisk START/STOP ▷□.
Jesli zamierza sie dostosowoć ustawenia napoju, naleź ysie zapoznać z rodziazem „Indywidualne ustawenia napojów".

Parzenie kawy na bazie kawy wstepnie zmielonej
Za pomocę spezialnej dołaczonej miarki wsypȩ prawidłową doźć do pojemnika na kawe wstepnie zmielona.
1 OtworzyćPokrywkepojemnika na kawe wstepnie zmielona i wsypac jederagna miarke kawy wstepnie zmielonej.
Uwaga: nie wsypywać innych substancji nied kawa wstepnie zmielona, abyNie uszkodzić urzadzenia.
2 Umieść filizanke pod dozownikiem kawy i wybrać zędany napoj.
3 Naciskać przyczisk „ ±b_ ", ^a do wybrania ^a .

Wazne: funkacja „kawy wstepnie zmielonej" wyklucza möglichość parzenia dwoch filizanek kawy rownoczesnie, a takze ustawienia aromatu, co jest mözliwe wyłącznia w przypadku kawy ziarnistej.
4 Nacisnac przycisk START/STOP l ,aby uruchomic parzenie kawy.
Jesli zamierza sie dostosowac ustawienia napoju, nalezy sie zapoznać z rodzdiafem „Indywidualne ustawienia napojów".
Wañne: nalewanie möglich przerwać w dowolnym momencie, naciskajć przycisk START/STOP ▷□.

70 Polski
Przygotowywanie napojów na baziekawy i spienionego mleka
Jak zmontowac system Capp in Cup
Wañne: przygotowaniem jakiegokolwiek napoju na bazie mleka nalezy sie upewnico, ze system Capp in Cup jest prawidtowo zamontowy w urzadzeniu.
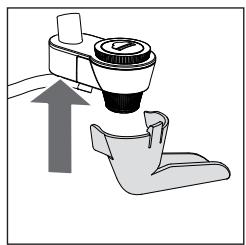
1 Zmontowáć dozownik z korpusemŚrodkowyym systemu Capp in Cup.
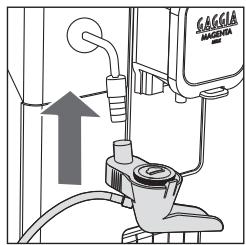
2 Wlozyc system Capp in Cup do uchwytu gumowego na turce wylotu pary do momentu zablokowania go w pozycji.
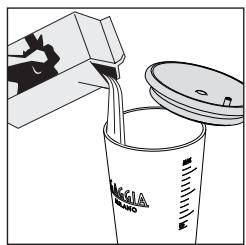
Nalewanie napojów na bazie kawy i spienionego mleka
Wskazowka: uzywać zimnégo mleka (o temperaturze okło 5^ ) o zawartosci tuszczu przyznajmiej 3% w celu zapewniaż opptymalnej pianki. Można stosowania zarówno mleko pełnot)—jak i mleko czȩciwo odźuszczzone. Ponadto można stosowania mleko odźuszczone, sojowe lub mleko bez laktozy.
1 Podnieszek podkrywke dzbanka i wlac do niego mleko: mleko powinno zawierać sie pomiedź yzażnaczonymi na dzbankuminimalnym poziomami (MIN) i (MAX).
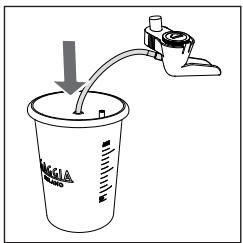
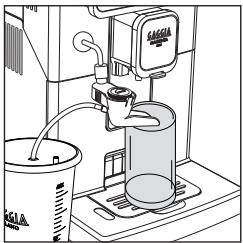
2 Włoźyc turke zasysajća korpusu srodkowej systemu Capp in Cup do dzbanka na mleko, dopóki nie znajdie sie ona na dnie dzbanka.
3 Umieść filizankę lub szklanke pod dozownikiem kawy i systemem Capp in Cup.
4 Nacisnac przycisk HOME i wybrać napoj z menu.
- Nacisnac przycisk zădanego napoju.
- Nacisnac przycisk START/STOP aby Rozpoczć dozowanie wybranego napoju.
5 Urzadzenie nalewa do filizanki lub do szklanki okreslona ilosc spienionego mleka i kawy. W zaleznosci od wybranego napoju;będzie dozowana njpierw kawa lub njpierw spiensione mleko.
Jesli zamierza sie dostosowostawienia napoju, nalezy sie zapoznać z rodziazem „Indywidualne ustawienia napojów".
6 Po kaźdym przygototwaniu napojów na bazie kawy i spienionego mleka w ciagu 10 sekund;będzie można wykonac procedure szybkiego czyszczenia obwudu mleka.Procedurę tę;będzie można{jednak wykonac w innym momencie, wchodzac do menu czyszczenia za pomocz przycisku CLEAN/SET Nacisnac przycisk "CZYSZCZENIE" i wybrać funkcjé,SZYBKIE CZYSZCZENIE" oraz nacisnac przycisck. Nastepnie postepowa zgodnia z instrukcjami na wyświetlaczu.
Wañne: Procedure szybkiego czyszczenia naležy wykonywać przyznajmiej raz Dziennie, myjac pod bieȩć wód dozownik systemu Capp in Cup.
Nacisnac przycisk START/STOP w celu potwierdzenia lub przycisk, aby wykonac ja poźniaj.

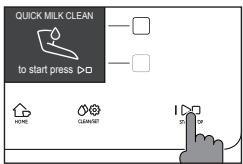
72 Polski
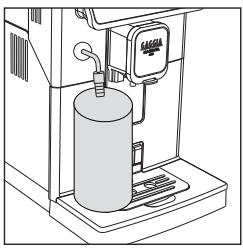
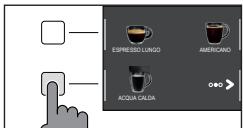
Nalewanie goracej wody
Uwaga: podczas etapu przygotowywnia z turki wylotu pary są wydostawac para i goraca woda.
1 Wyjać system Capp in Cup i umieść pojemnik pod rurka wylotu pary.
2 Nacisnac przycisk HOME, przywinać poszczególne ekrany za pomoczą zielonego przyciscu, i wybrać gorąca wode.
3 Nacisnac przycisk "GORACA WODA". Nastepnie nacisnac przycisk START/ STOP w celu Rozpoczecia nalewania.
Wañne: nalewanie można przerwać w dowolnym momencie, nacziskąć przycisk START/STOP ▷□.
Jesli zamierza sie dostosowo ustawienia napoju, nalezy sie zapoznać z rodziazem „Indywidualne ustawienia napojów".
Indywidualne ustawenia napojów i zapisywanie ustawien (MEMO) —
Niniejsze urzadzenie pozwala na zmianę ustawien napojwu wazoleński od własnych preferenci je oraz zapisanie ich (MEMO), nadpisujuć nimiwczesniejsze ustawietenia.
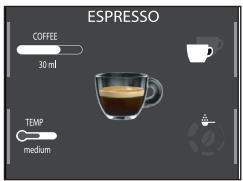
Indywidualne ustawieten napojów
1 Nacisnac przycisk HOME
2 Wybrać swoj napoj.
3 Na ekranie wyświetlane są wzystkie ustawuminium, króre można dostosowej i/ lub wybrać wazoleńność od wlasnych preferenciji. Wazoleńość od typu napojmu矫na dostosowej i/lub wybrać:
- objętość mlecka i kawy;
- temperature kawy;
- nalewanie do dwóch filizanek na raz;
- uzycie kawy wstepnie zmielonej;
- intensywnosc aromatu (tylko podczas uzywania kawy ziarnistej);
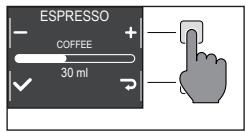
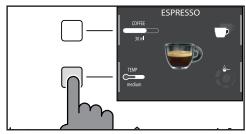
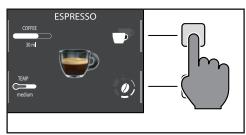
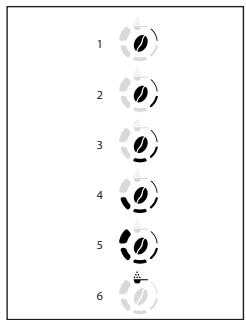
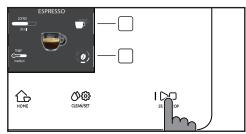
4 Po naciśćci przycisku „ KAWA —“ lub przycisku „ MLEKO —“ uzyć zielonych przycisków „ +“ i „ -, aby ustawić zȩdania objętość. Natestepnie nacisność przycisk „ ✔“, aby potworȩcie i powróćć do poprzesnejgo ekranu, na tkórym;będzie wyświetlana nowa ustawiona ilość.
5 Nacisnac kilkukrotnie przycisk „TEMP 一 ”, aby zmienic temperature napoju, wybierajac spośród dostepnych opcj:
- niska;
- srednia;
- wysoka.
6 Nacisnac przycisk „ „, aby przygotownik dwie filizanki lub przycisk „ „, aby przygotownik tylko einzaj filizanke. Ilustracja napoju naŚrodku wyświetlacza wskości liczbę wybranych filizanek.
Wañne: z funkcjtiøj nie nożna korzystać w przyypadku napojów z mlekiem, opcje AMERICANO i GORACA WODA.
8 Aby zmienci intensywnosc aromatu lub wybrac kawe wstepnie zmielona, nalezy nacinacja przycisk „ ”). Można wybrac spośród 5 roźnych poziomów intensywnosci. Przy kaźdorazowym nacinśću przycisku „ ”) intensywnosc zmienia są o jeder poziom. Na wyświetlaczu widnejcie wybrany poziom intensywnosci lub wybor kawy wstepnie zmielonej.
1 Bardzo lekki
2 Lekki
3 Regularny
4 Mocny
5 Bardzo mocny
6 Kawa wstepnie zmielona.
Wazne: funkcja Kawa wstepnie zmielona pozwala na zaparzenie tylko jedernej kawy na raz.
9 Po dostosowani napoju zgodnie z wlasnymi preferencjami smakwymi).. .. noza uruchomic是一款,... naciskajc przycisk START/STOP
10 W przypadku zmiany jakiegokolwiek parametru spośród wymienionych powyzej po zakończeniu nalewania povjawi sie zapytanie,czy zamierza są zapisać recepture z wpwadzonymi zmianami.
Uwaga: nowe zapisane ustawientia nadpisza te z poprzednej receptury.
Wañne: aby przywrócić fabrzcie ustawenia poszczegrólnych receptur, naleź y ponownie wpwadzić i zapisć ustawenia wskazane w punkcie „Rodzaj napoju".
74 Polski
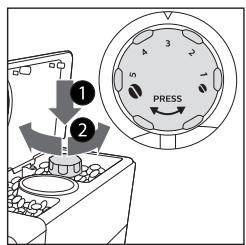
Regulacja stopnia mielenia
Stopien mielenia można regulować za pomoczaPokretłdo regulacji stopnia mielenia w posta w pojemniku na kawe ziarnista. Mlynek ceramicczny zapewnia idealne i jegnolite mielenie ziaren niedbędnych przy przygotowywaniu kaźdej fliżanki kawy. Zachowywny jest wówczas aromat, któr zapewnia zawsze doskonały smak.
Wazne: stopiej mielenia要去 regulowac yedynie wówczas, kiedy urzadzenia mieli kawe ziarnista. Roznicew smaku;będzie要去 dostrzech po zaparzeniu 2 - 3 fliżanek kawy.
Uwaga: aby uniknac uszkodzenia mlynka, nie nalezy obracać Pokretlem wyboru mielenia wiecej niz o jeder pozycje na raz.
1 Ustawic filizanké pod dozownikiem kawy.
2 OtworzycPokrywkopejemnika na kawe ziarnista.
3 Przygotowejpresso, jak opisano w rozdziale „Parzenie kawy na bazie kawy ziarnistej".
4 Gdy urzadzenie mieli kawe, nacisnacPokretto regulaCi stopnia mielenia w pojemniku na kawe ziarnista i obrcic je o jakno poTozenie na raz w sprawo lub w lewo.
5 Dosteptych jest 5 rożnych stopni mielenia. Im niższy wskaznik, tym smak kawy;będzie silniejszy i pełmiejszy.
Wazne:
- Mielennie grube: lzejszy smak, przyznaczony do mieszanek ziaren kawy palonych w sposob ciemny (3-5);
- Mielenie drobine: bardziej intensywny smak, do mieszanek ziaren kawy palonych jasno (1-3);
Czyszczenie i konserwacja
Reguläre czyszczenei i konserwacja pozwalaja na urczymanie urzadzenia w optymalnym stanie i gwarantuju zawsze doskonały smak kawy, stały przyptyw kawy oraz doskonała pianke mlecka. Zapoznać są z ponieszność tabela, aby dowiedzieć są, kiedy i jak czyszcie wzystkie wyjmowane czȩci urzadzenia. W celu uzyskania bardziej szczegołowych informacijni sązy przyȩzytać odpowiednia roździaly.
Tabela czyszczenia
| Opis częsci | Kiedy czȩcić | Jak czȩcić |
| System Capp in Cup | Po użyciu | Urchomić cykl „SZYBKIEGO CZYSZCZENIA" zgodnia z instrukcjami widocznych na wyświetlaczu. Wymontować i umyć dozownik systemu Capp in Cup pod bieźća woda. |
| Codziennie | Umyć dzbanek na mleko lub umieść go w lodówce, ustawiać rurę zasysȩć zmeły, jak pokazano na rysunku. Mnżna równość umyć ten element w zmywarce. | |
| Co miȩsiąc | Urchomić cykl „CZYSZCZENIE OBWODU" zgodnia z instrukcjami opisanymi w rozdziale „Czyszczenie systemu Capp in Cup". W przypadku untocy cykLU czyszczeniaNSEUzyć produktu do czyszczenia obwodu mleka marki Philips „Milk Circuit Cleaner". Nastepnie zdemontować system Capp in Cup i umyć wszystkie为其 componenty pod bieźća woda. | |
| Blok zarapazacja | Co tydzień | Wyłąć bloc zarapazacja i umyć go pod bieźća woda. |
| WazoleśćSci od spoosobu uzytkowania | Patrz rozdziel „Czyszczenie i smarowania bloku zarapzarȩciego". | |
| Co miȩsiąc | WycZYscić bloc zarapzarȩcy za pomoczą pastylek odtruszczȩćych Gaggia do usuwania oleistych pozostaluSci po kawie | |
| Taca ociekowa pełna | Kiedy SPECIALny czerwoy wskaqunik wystaje poza krátę tacy ociekowej | Oprózniec tace ociekowa i wyczyscić są pod bieźća woda. |
76 Polski
| Opis częsci | Kiedy czȩscić | Jak czȩscić |
| Pojemnik na fusiy | Kiedy wymaga untożdzenie | Oprózniczej podemnik na fusi y wyczyȩcić go pod bieźȩc woda. Upewnić są, są podczas tej czynnosci urzadzenia jest wączone, są zeciwnym razie podemnik na fusi nożsianie zresetowy. |
| Zbiornik na wodę | Co tydzień | Wyczyȩcić go pod bieźȩc woda. |
| Komora kawy wstepnie zmielonej/ przewód wylotowy kawy | Co tydzień | Wyczyȩcić górną czȩć uzychtem tymzyki, są pokazano poniȩjej. |
| Espresso tray | Wazoleżnosci od sposobu uzytkowania | Wyjać Espresso Tray i wyczyȩcić pod bieźȩc woda. Mnżna równej umyć ten element w zmywarce, w gornym koszu. |
Czyszczenie systemu Capp in Cup
Programy czyszczenia systemu Capp in Cup
Urzadzenia posiada dwa programy czyszczenia systemu Capp in Cup: szybkie czyszczenia i czyszczenia obwodu. Oba programy mayna wybrać za pomocą przycisku CLEAN/SET, nasciJKLM, naciskajć nastepnie przycisk „CZYSZCZENIE". Szybkie czyszczenia jest proponowane po zakończenu nalewania napojów na bazie mlecka. Postępowac w przypadku obu programów zgodnia z instrukcjami na wyświetlaczu.
- Program szybkiego czyszczenia
Program szybkiego czyszczenia przywiduje czyszczenie obwudu mlekaGORa woda.
- Program czyszczenia obwodu
Program czyszczenia obwodu systemu Capp in Cup przy uzyciu produktu do czyszczenia obwów mleka Philips „Milk Circuit Cleaner".
Czyszczenie systemu Capp in Cup pod bieZNa woda
Uwaga: turka wylotu parybove goraca po uzyciu.
1 Wyjace system Capp in Cup z turki wylotu pary (Rys. 23).
2 Zdjacgumowyuchwyzturki wylotu pary (Rys.24).
3 Wyjáć dozownik z systemu Capp in Cup (Rys. 25).
4 Wyjć turke zasysajća mleko z korpusuŚrodkowyego systemu Capp in Cup (Rys. 26).
5 Aby wymontowac korpus srodkowy, nalezy: - scisnag go na wskazanych stronach (Rys. 27); - pociagnac i wysunac lewa czescj, jakPokazano na rysunku (Rys. 28);
6 Wyjać gumowa pokrywke (Rys. 29).
Wyjać szklany dzbanek na mleko (Rys. 30).
8 Umyc wzystkie componenty pod biezacwoda.
9 Po ukończeniu czyszczenia zmontowaźwystkie komponenty, wykonujć to są procedurę w odwrotnej kolejność.
Czyszczenie bloku zaparzajęcego
Uwaga: nie myc bloku zaparzajęcego w zmywarce i nie uzywać pląnów do mycia naczyń lub innych detergentów, poniewaź mogłyby one spowodowej nieprawidłowedzie sątomie bloku zaparzajęcego, co mogłyby być odczuwalne w smaku kawy.
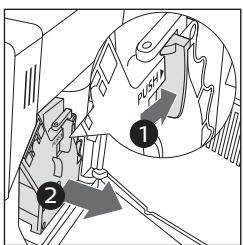
Wyjmowanie bloku zaparzajacego
1 Wylaczyc urzadzenie i odlaczyc kabel zasilajacy.
2 Wyjać tace ociekowa z pojemnikiem na fusiy.
3 Otorworyc drzwickz serwisowe.
4 Nacisná dzwignie PUSH (pchnij) (1) i pociagnć uchwyt bloku zaparzajçego (2), aby wyjac go z urzadzenia.
78 Polski
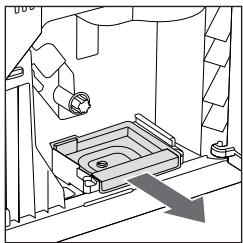
5 Wyjać kasetkę na resztki kawy.
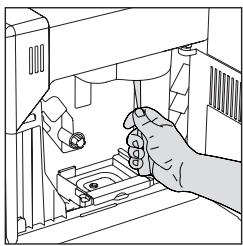
Czyszczenie bloku zaparzajęcgo pod bieźća woda
1 Wyczyscić dokladnie przywod wylotowy kawy uchytem lyżeczki lub innym zaokraglonym przyrzadem kuchennym.
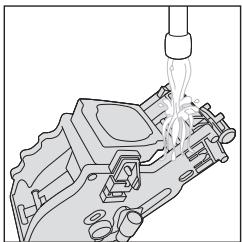
2 Przejukac obficie ciepla woda blok zaparzajcy i kasetke na resztki kawy. Umyc dokladnie gorny filtr.
3 Pozostawic bloc zaparzajcy do samoczynnego wyschniecia.

Wañne: nie suszyc bloku zaparacjaćeo szmatkami, aby unikné nagromadzenia sie w是我的 wétrtu wókien.

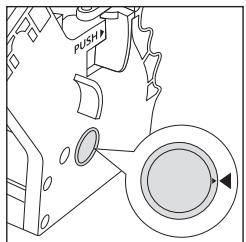
Władanie bloku zaparzajęcego na sąjeść
1 Przed wlozeniem bloku zaparzajacego do urzadzenia nalezy sie upewnić, ze dwa zólte znaki odniesienia na częsci bocznejPokrywaja sie. Gdyby tak nie byto, nalezy:
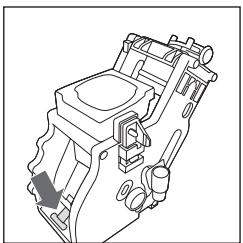
Upewnić sie, ze dzwignia styka sie z podstawă bloku zaraprzȩçego.
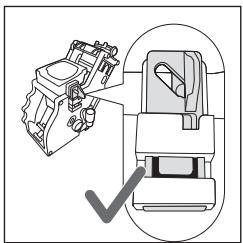
2 Upewnić sie, ze zóły zaczep blokujacy bloku zaparzajęcego znajduje są w sprawidowej pozycji.
Aby prawidłowo ustawic zaczep, naleź pchnić go do góry aź do maksymalnej OSIAGALnej pozycji.
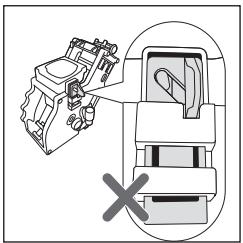
Jesli zaczep jest nadal w pozycji dolnej, oznacza to, ze nie jest on ustawiony prawidlowo.
3 Wlozyć na.), kasetkę na resztki kawy.
4 Włoźyc bloc zaporzacje do urzadzenia wzdłusz prowadnic umieszczonych po bokach, dopóki nie zestanie on zablokowywn w Pozycji, o czym;będzie swiadczyk klikniść.
Uwaga: nie naciskać dzwigni PUSH.
5 Zamknac drzwickzki serwisowe.
Czyszczenie bloku zaporzajęcego za pomocapi pastylek do usuwania oleistych pozkostość po kawie
Uwaga: do czyszczenia stosowac wyłucznie pastylki Gaggia do usuwania oleistych pozostałość po kawie.
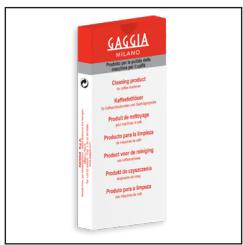
1 Umieść pojemnik pod dozownikiem kawy.
2 Nacisnac przycisk CLEAN/SET i wybrać widoczny na wyświetlaczu przycisk „CZYSZCZENIE".
3 Wybrać „CZYSZCZ. BLOKU ZAP" i nacznęc przyczisk „✓", a nastepnie nacznȩ przyczisk START/STOP >□ w celu Rozpoczewsia procedury czyszczenia.
4 Postepowac zgodnie z instrukcjami na wyswietlaczu, aby prawidlowo wczysci bloc zaparzajacy.
5 Procedura ta potrwa okofo 5 minut, a zeby ja zwiesic i uruchomic ponownie,UNCTIUPROD
Smarowanie bloku zaparzajęcego
Aby zapewnic opymalne dzialanie urzadzenia, nalezy smarować blok zaraprzejcy.
Z czestotliwość smarowaniaość są zapoznać w ponieszciej tabeli.
| Częstotliwość uzytkowania | Liczbawnapojłowoprzymy pręzycznych codziennie | Cȩstotliwość smarowania |
| Niska | 1 - 5 | Co 4 miesiare |
| Normalna | 6 - 10 | Co 2 miesiare |
| Wysoka | > 10 | Co miesiare |
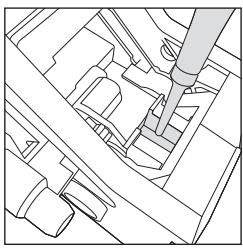
1 Wylączyć urzadzenia i odźczyć kabel zasilajacy.
2 Wyjać bloc zarapzajć y przytepluća go letnia woda (patrz rozdziaf „Czyszczenie bloku zarapzajęcego pod bieźac woda").
3 Naniesc cienka warstw smaru z wyposazenia wokot sworznia wpwadzajacego w czeci dolnej bloku zaparzajacego.
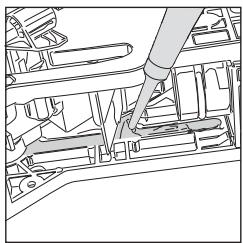
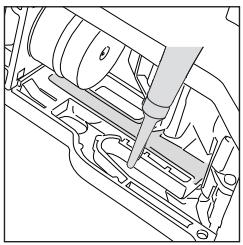
4 Naniesc cienka warstwe smaru na prowadnice, po obu stronach (patrz rysunek).
5 Włoźyc bloc zakarzajczy na sąjeść (patrz rozdzią „Wóladanie bloku zaporzajćego na sąjeść").
Wazne: tubki ze smarem mozna uzywać kilkukrotnie.
Odwapnianie
Procedura odwapniania
Gdy wymagaengo urzadzenie, nalezy wykonacantiago odwapnienie.
Stosować wyłącznie rozwtor odwapniajacency Gaggia, który opracowanow w celu zapewniania optymalné dzialania urzadzenia. Stosowanie innych produktów要去 spowodować uzzkodzenia urzadzenia i obecność ich resztek w wodzie. Brak odwapniazia urzadzenia spowoduje utrata gwarancji.
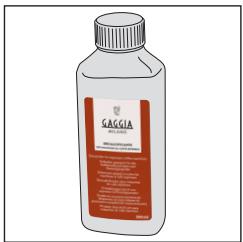
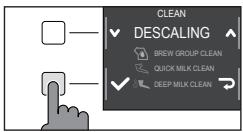
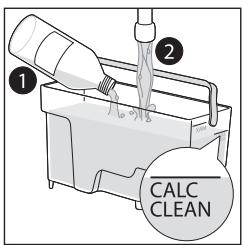
1 Wyjać system Capp in Cup, jestli jest zamontowany w urzadzeniu.
2 Nacisnac przycisk CLEAN/SET i wybrać widoczny na wyświetlaczu przycisk „ CZYSZCZENIE".
- Wybrać „ODWAPNIANIE" i- po potwierdzeniu przyciskiem „✔" - nacinność przycisk START/STOP □, aby uruchomici ten proces.
3 Wyjác tace ociekowa z pojemnikiem na fusi, opróznic je i umieszci ponownie w urzadzeniu.
4 Wyjáć o proznić zbiornik na wode. Nastepnie wyjáć filtr INTENZA+, jestli wystepuje.
5 Wlac cala butelke roztworu odwapniajacego Gaggia do zbiornika na wode, a nastepnie wypehnico go woda az do poziomu CALC CLEAN. Nastepnie wfozyc go z powrotem do urzadzenia.
6 Umieść duzy pijemnik (1,5 l) pod rurka wylotu pary i dozownikiem kawy.
7 Postępowaczgodnia z instrukcjami na wyświetlaczu, aby uruchomic Procedure odwapniania. Procedura ta trwa okło 25 minut, a polega na cyklu odwapniania i cyklu plłukania, podczas krórych w regularnych odstepach czasu nastepuje wylewanie wody.
8 Po ukończeniu cyklu odwapniania nalezy przypełukac zbiornik i obwó d wody, postępuć zgodnia z instrukcymi na wyświetlaczu.
9 Wlozyć ponownie filtr INTENZA+ do zbiornika na wode.
Wazne: procedure是用来w Dowolnym momencie przerwać i wzniewic ponownie, naciskajczyszczek START/STOP ▷□.
Uwaga: gdy aktywna jest procedura odwapniania, nie:noyna wyjmować bloku zaparzajćego. Poczeká na zakońcenie procesu odwapniania, a nastepnie wyjadćblok zaparzajćy.
82 Polski
Co robić w przyypadku przerwania procedury odwapniania
Z procesu odwapniania月至a wyjsc przytrzymujac przykak sekund przycisk ON/OFF 念 na panelu sterowania. Gdyby procedura odwapniania zostafa przerwana przy ukończeniem jej, nalezy:
1 Opróznic zbiornik na wode i dokladnie go umyć.
2 Napelnić zbiornik na wode bieźąc woda do poziomu CALC CLEAN i ponownie uruchomic urzadzenia. Urzadzenia Rozgrzeje sie i wykona automatyczny cykl plukania.
3 Przed przyrzadzeniem jakiegokolwiek napoju nalezy wykonac ręczny cykl plukania, jak opisano w odpowiednim roździale.
Wazne:gressive procedure.
Wazne: the most aggressive procedure.
Wazne: the most aggressive procedure.
Wazne: the most aggressive procedure.
Wazne: the most aggressive procedure.
Ustawenia rożne
Po naciśću przycisku CLEAN/SET i wybraniu "USTAWIENIA" na wyświetlaczu;biedzie można przywróci lub zmieńcie niedźome parametry urzadzenia, takie jak:
jezyk;
- filtr wody;
- czas czuwania;
- Jednostki miary;
-twardosc wody;
- licznik napojów;
- dzwiek przycisków,
- ustawienia fabryczne.
Język
Po wybrani ikony ustawiania jejztków otworzy sie lista dostepnych jejztków.
| Dostepline sązyki | ||
| POLSKI | DUÑSKI | CZESKI |
| ANGIELSKI | GRECKI | SLOWACKI |
| NIEMIECKI | POLSKI | LITEWSKI |
| FRANCUSKI | ROSYJSKI | JAPOŚNSKI |
| HISZPAÑSKI | RUMUÑSKI | KOREAÑSKI |
| PORTUGALSKI | WęGIERSKI | CHÍNSKI (TRADYCJNY) |
| NIDERLANDZKI | BUŁGARSKI | CHÍNSKI (UPROSZCZONY) |

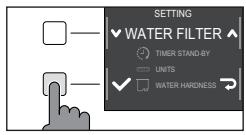
Filtr wody
Po wybraniu opcji „FILTR WODY" postepować zgodnie z instrukcjami na wyświetlaczu i z opisem w rozdziele „Instalacja filtra wody INTENZA+“ oraz w roździale „Wymiana filtra wody INTENZA+".
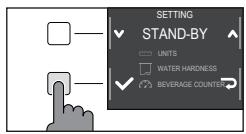
Czas czuwania
Po wybraniu opci „CZAS CZUWANIA"doğan ustawić regulator czasowy na:
- 15min
- 30 min
- 60 min
- 180 min

Jednostki miary
Wybierajc opcje „JEDNOSTKI MIARY":
można ustawić jegnstóke miary w „ml“ lub „uncjach".
Twardosc wody
Po wybraniu opcji „TWARDOSÇ WODY" postepowac zgodnie z instrukcjami na wyświetlaczu i z opisem w rozdzieale „Pomiar twardeosci wody".
Licznik napojów
Dla kazdego napojuUNCTA wyswietlic liczbe filizanek od momentu pierwszego uruchomienia urzadzenia. Danych tych nie noza zresetowac.
Dzwiek przycisków
Jesli przyszkadz dzwiek przycisków, można go wyłaczyć, nacziskAAC "OFF".
Ustawenia fabryczne
Ustawienia urzadzenia przywróci do wartosci fabrycznych. Urzadzenia zaȩda podwojné potwierdzenia, zanim;będzie można przyzejść dalej.
84 Polski

Znaczenia kodów będów
Ponizej wymieniono niedtore kody bledow, jakie moga sie pojawiac na wyswietlaczu, ich znaczenia oraz instrukcje rozwiazania problemów. Jesli wskazane rozwiazania okaza sie nieskuteczne, poniewa z na wyswietlaczu nadal bedzie wyswietlana ikona kodu bledu i urzadzenia nie zaćznie dziatracy prawidtowo, lub gdyby pojawity sie innate kody bledu, nalezy sie skontaktowac z autoryzowanym centrum obstugi klienatub z dystrybutorami w swoim kraju. Dane podano na stronie www.gaggia.com lub www.gaggia.it.
| Kod bjędu | Problem | Przyczyna | Mozliwe rozwȩzanie |
| 01 | Młynek jest zablokowy. | Przewód wylotowy kawy jest zablokowy. | Wyȩć kabel zasilajacja i bloc zarabẑćy. Wyczyśćcć dokladnie przywoły wylotowy kawy uchwytemardy. Ponownie wączyć ur.§źdenie. |
| 03 - 04 | Wystapił problem z blokiem zarapaz(jj)ym. | Blok zarapaz(jj)ym jest zabrudzony lub nieprawidłowono nasmarowy. | Wymiarczyć ur.§źdenie. Wyȩć bloc zarapaz(jj)ym dokladnie go wyczyśćcć. (Patrz roźdwiar, „Czyszczuminium bloku zarapaz(jj)ym") |
| Blok zarapaz(jj)ym jest ustawiony prawlów. | Wyymiarczyć ur.§źdenie. Wyȩć bloc zarapaz(jj)ym wymiarczyć go ponownie. Przed wymiarczyć bloku zarapaz(jj)ym upeelnić sie, ze znajdujie są on w prowidłowoj poźycji. Patrz roźdwiar „Wóladyanie bloku zarapaz(jj)ym na几点". | ||
| 05 | Wystapił problem w obwodzie wody. | W obwodzie wody znajdujie są powietrze. | Wyȩć i wymiarczyć ponownie zbiornik do ur.§źdenia, kilkukrotnie. Upeelnić sie o wymiarciu go prowidłowo do ur.§źdenia. Sprawdzić,czy komora zbiornika na wod jest czysta. |
| W przypadku korzystania z filtra „INTENZA+”: wyȩć filtrze z zbiornika na wodę i potrzejność nim, aby usnoopć z filtra calne powietrze. NatestPNie wymiarczyć ponownie filtr „INTENZA+” do zbiornika na wodę. | |||
| 14 | Urzadzenia jest przyegrzane. | PrzyczynMZe bojny bojny bojny bojny bojny bojny bojny bojny bojny bojny bojny bojny bojny bojny bojny bojny bojny bojny bojny bojny bojny bojny bojny bojny bojny bojny bojny bojny bojny bojny bojny bojny bojny bojnybojny bojny bojny bojny bojny bojny bojny bojny bojny bojny bojny bojny bojny bojny bojny bojny bojny bojny bojny bojny bojny bojny bojny bojny bojny bojny bojny bojny bojny bojny bojny bojny bojny bojalny bojny bojny bojny bojny bojny bojny bojny bojny bojny bojny bojny bojny bojny bojny bojny bojny bojny bojny bojny bojny bojny bojny bojny bojny bojny bojny bojny bojny bojny bojny bojny bojny bojNY bojny bojny bojny bojny bojny bojny bojny bojny bojny bojny bojny bojny bojny bojny bojny bojny bojny bojny bojny bojny bojny bojny bojny bojny bojny bojny bojny bojny bojny bojny bojny bojny bojny BOJNOZcću zdo zdo zdo zdo zdo zdo zdo zdo zdo zdo zdo zdo zdo zdo zdo zdo zdo zdo zdo zdo zdo zdo zdo zdo zdo zdo zdo zdo zdo zdo zdo zdo zdo zdo zdo zdo zdo zdo zdo zdo zdo zdo zdo zdo zdo zdo zdo zdo zdo zdo z-do zdo z-do z-do z-do z-do z-do z-do z-do z-do z-do z-do z-do z-do z-do z-do z-do z-do z-do z-do z-do z-do z-do z-do z-do z-do z-do z-do z-do z-do z-do z-do z-do z-do z-do z-do z-do z-do z-do z-do z-do z-do z-do z-do z-do z-do z-do z-do z-do z-do z-do z-do z"Do z-do z-do z-do z-do z-do z-do z-do z-do z-do z-do z-do z-do z-do z-do z-do z-do z-do z-do z-do z-do z-do z-do z-do z-do z-do z-do z-do z-do z-do z-do z-do z-do z-do z-do z-do z-do z-do z-do z-do z-do z-do z-do z-do z-do z-do z-do z-do z-do z-do zido z-do z-do z-do z-do z-do z-do z-do z-do z-do z-do z-do z-do z-do z-do z-do z-do z-do z-do z-do z-do z-do z-do z-do z-do z-do z-do z-do z-do z-do z-do z-do z-do z-do z-do z-do z-do z-do z-do z-do z-do z-do z-do z-do z-do z-do z-do z-do z-do z-do z/do z-do z-do z-do z-do z-do z-do z-do z-do z-do z-do z-do z-do z-do z-do z-do z-do z-do z-do z-do z-do z-do z-do z-do z-do z-do z-do z-do z-do z-do z-do z-do z-do z-do z-do z-do z-do z-do z-do z-do z-do z-do z-do z-do z-do z-do z-do z-do z-do z-do z-{do z-do z-do z-do z-do z-do z-do z-do z-do z-do z-do z-do z-do z-do z-do z-do z-do z-do z-do z-do z-do z-do z-do z-do z-do z-do z-do z-do z-do z-do z-do z-do z-do z-do z-do z-do z-do z-do z-do z-do z-do z-do z-do z-do z-do z-do z-do z-do z-do z-do ZDOZcću zdo zdo zdo zdo zdo zdo zdo zdo zdo zdo zdo zdo zdo zdo zdo zdo zdo zdo zdo zdo zdo zdo zdo zdo zdo zdo zdo zdo zdo zdo zdo zdo zdo zdo zdo zdo zdo zdo zdo zdo zdo zdo zdo zdo zdo zdo zdo z-do z-do z-do z-do z-do z-do z-do z-do z-do z-do z-do z-do z-do z-do z-do z-do z-do z-do z-do z-do z-do z-do z-do z-do z-do z-do z-do z-do z-do z-do z-do z-do z-do z-do z-do z-do z-do z-do z-do z-do z-do z-do z-do z-do z-do z-do z-do z-do z-{dozdo z-do z-do z-do z-do z-do z-do z-do z-do z-do z-do z-do z-do z-do z-do z-do z-do z-do z-do z-do z-do z-do z-do z-do z-do z-do z-do z-do z-do z-do z-do z-do z-do z-do z-do z-do z-do z-do z-do z-do z-do z-do z-do z-do z-do z-do z-do z-do z-do z-do.z-do z-do z-do z-do z-do z-do z-do z-do z-do z-do z-do z-do z-do z-do z-do z-do z-do z-do z-do z-do z-do z-do z-do z-do z-do z-do z-do z-do z-do z-do z-do z-do z-do z-do z-do z-do z-do z-do z-do z-do z-do z-do z-do z-do z-do z-do z-do z-do z-do z-do ZDQZcću zdo zdo zdo zdo zdo zdo zdo zdo zdo zdo zdo zdo zdo zdo zdo zdo zdo zdo zdo zdo zdo zdo zdo zdo zdo zdo zdo zdo zdo zdo zdo zdo zdo zdo zdo zdo zdo zdo zdo zdo zdo zdo zdo zdo zdo zdo zdo z do zdo z-do z-do z-do z-do z-do z-do z-do z-do z-do z-do z-do z-do z-do z-do z-do z-do z-do z-do z-do z-do z-do z-do z-do z-do z-do z-do z-do z-do z-do z-do z-do z-do z-do z-do z-do z-do z-do z-do z-do z-do z-do z-do z-do z-do z-do z-do z-do z-do zido zdo zdo zdo zdo zdo zdo zdo zdo zdo zdo zdo zdo zdo zdo zdo zdo zdo zdo zdo zdo zdo zdo zdo zdo zdo zdo zdo zdo zdo zdo zdo zdo zdo zdo zdo zdo zdo zdo zdo zdo zdo zdo zdo zdo zdo zdo zdo zdo zdo z do zdo z-{dozdo z-do z-do z-do z-do z-do z-do z-do z-do z-do z-do z-do z-do z-do z-do z-do z-do z-do z-do z-do z-do z-do z-do z-do z-do z-do z-do z-do z-do z-do z-do z-do z-do z-do z-do z-do z-do z-do z-do z-do z-do z-do z-do z-do z-do z-do z-do z-do ZDQZcµc µc µc µc µc µc µc µc µc µc µc µc µc µc µc µc µc µc µc µc µc µc µc µc µc µc µc µc µc µc µc µc µc µc µc µc µc µc µc µc µc µc µc µc µc µc µc µc µc µc µc umuziye bojny bojny bojny bojny bojny bojny bojny bojny bojny bojny bojny bojny bojny bojny bojny bojny bojny bojny bojny bojny bojny bojny bojny bojny bojny bojny bojny bojny bojny bojny bojny bojny bojny BoJNUZcµc µc µc µc µc µc µc µc µc µc µc µc µc µc µc µc µc µc µc µc µc µc µc µc µc µc µc µc µc µc µc µc µc µc µc µc µc µc µc µc µc µc µc µc µc µc µc µc µCZUZcµc µc µc µc µc µc µc µc µc µc µc µc µc µc µc µc µc µc µc µc µc µc µc µc µc µc µc µc µc µc µc µc µc µc µc µc µc µc µc µc µc µc µc µc µc µc µc µc µс µc µc µc µc µc µc µc µc µc µc µc µc µc µc µc µc µc µc µc µc µc µc µc µc µc µc µc µc µc µc µc µc µc µc µc µc µc µc µc µc µc µc µc µc µc µc µc µc µc µCZUZZcµc µc µc µc µc µc µc µc µc µc µc µc µc µc µc µc µc µc µc µc µc µc µc µc µc µc µc µc µc µc µc µc µc µc µc µc µc µc µc µc µc µc µc µc µc µc µc µc µc umuzìye bojny bojny bojny bojny bojny bojny bojny bojny bojny bojny bojny bojny bojny bojny bojny bojny bojny bojny bojny bojny bojny bojny bojny bojny bojny bojny bojny bojny bojny bojny bojny bojny bojNy bojny bojny bojny bojny bojny bojny bojny bojny bojny bojny bojny bojny bojny bojny bojny bojny bojny bojny bojny bojny bojny bojny bojny bojny bojny bojny bojny bojny bojny bojny bojny bojny bojnyBoZUZZcµc µc µc µc µc µc µc µc µc µc µc µc µc µc µc µc µc µc µc µc µc µc µc µc µc µc µc µc µc µc µc µc µc µc µc µc µc µc µc µc µc µc µc µc µc µc µc µCZUZZcμc µc µc µc µc µc µc µc µc µc µc µc µc µc µc µc µc µc µc µc µc µc µc µc µc µc µc µc µc µc µc µc µc µc µc µc µc µc µc µc µc µc µc µc µc µc µc µc µc µc μc µc µc µc µc µc µc µc µc µc µc µc µc µc µc µc µc µc µc µc µc µc µc µc µc µc µc µc µc µc µc µc µc µc µc µc µc µc µc µc µc µc µc µc µc µc µc µc µc µcumzùdʒzúzijská do zdo zdo zdo zdo zdo zdo zdo zdo zdo zdo zdo zdo zdo zdo zdo zdo zdo zdo zdo zdo zdo zdo zdo zdo zdo zdo zdo zdo zdo zdo zdo zdo zdo zdo zdo zdo zdo zdo zdo zdo zdo zdo zdo zdo zdo zdo zdo zdo zdo z.do ZDQZcµc µc µc µc µc µc µc µc µc µc µc µc µc µc µc µc µc µc µc µc µc µc µc µc µc µc µc µc µc µc µc µc µc µc µc µc µc µc µc µc µc µc µc µc µc µc µc umzùdʒzúzijská do zdo zdo zdo zdo zdo zdo zdo zdo zdo zdo zdo zdo zdo zdo zdo zdo zdo zdo zdo zdo zdo zdo zdo zdo zdo zdo zdo zdo zdo zdo zdo zdo zdo zdo zdo zdo zdo zdo zdo zdo zdo zdo zdo zdo ZDQZcµc µc µc µc µc µc µc µc µc µc µc µc µc µc µc µc µc µc µc µc µc µc µc µc µc µc µc µc µc µc µc µc µc µc µc µc µc µc µc µc µc µc µc µc µc µc µcµc µc µc µc µc µc µc µc µc µc µc µc µc µc µc µc µc µc µc µc µc µc µc µc µc µc µc µc µc µc µc µc µc µc µc µc µc µc µc µc µc µc µc µc µc µc µc µc µcµc µc µcµc µc µc µc µc µc µc µc µc µc µc µc µc µc µc µc µc µc µc µc µc µc µc µc µc µc µc µc µc µc µc µc µc µc µc µc µc µc µc µc µc µc µc µc µc µc µc umzùdʃzúzijská do zdo zdo zdo zdo zdo zdo zdo zdo zdo zdo zdo zdo zdo zdo zdo zdo zdo zdo zdo zdo zdo zdo ZDQZZcµc µc µc µc µc µc µc µc µc µc µc µc µc µc µc µc µc µc µc µc µc µc µc µc µc µc µc µc µc µc µc µc µc µc µc µc µc µc µc µc µc µc µc µc µc µc µc µc µCZEUZZcµc µc µc µc µc µc µc µc µc µc µc µc µc µc µc µc µc µc µc µc µc µc µc µc µc µc µc µc µc µc µc µc µc µc µc µc µc µc µc µc µc µc µc µc µc µc µc µc umzùdʒzüzijská do zdo zdo zdo zdo zdo zdo zdo zdo zdo zdo zdo zdo zdo zdo zdo zdo zdo zdo zdo ZDQZZcµc µc µc µc µc µc µc µc µc µc µc µc µc µc µc µc µc µc µc µc µc µc µc µc µc µc µc µc umzùdʃzúzijská do zdo zdo zdo zdo zdo zdo zdo zdo zdo zdo zdo zdo zdo zdo zdo ZDQZZcµc µc µc µc µc µc µc µc µc µc µc µc µc µc µc µc µc µc µc µc µc µc µc µc µc µc µc µc µc µc µc µc umzùdʃzúzijská do zdo zdo zdo zdo zdo zdo zdo zdo zdo zdo zdo ZDQZZcµc µc µc µc µc µc µc µc µc µc µc µc µc µc µc µc µc µc µc µc µc µc µc µc µc µc µc µc µc µc µc µc µc µc µc µc umzùdʃzúzijská do zdo zdo zdo zdo zdo zdo zdo zdo ZDQZZcµc µc µc µc µc µc µc µc µc µc µc µc µc µc µc µc µc µc µc µc µc µc µc µc µc µc µc µc µc µc umzùdʃzúzijská do zdo zdo zdo zdo zdo zdo zdo zdo ZDQZZcµc µc µc µCZUZZCµc µc µCZUZZCµc µCZUZZCµc µCZUZZCµc µCZUZZCµc µCZUZZCµc µCZUZZCµc µCZUZZCµc µCZUZZCµc µCZUZZCµc µCZUZZCµc µCZUZZCµc µCZUZZCµc µCZUZZCµc µCZEUZZCµc µCZEUZZCµc µCZEUZZCµc µCZEUZZCµc µCZEUZZCµc µCZEUZZCµc µCZEUZZCµc µCZEUZZCµc µCZEUZZCµc µCZEUZZCµc µCZEUZZCµc µCZEUZZCµc µCZEUZZC³µCZUZZCµCZUZZCµCZUZZCµCZUZZCµCZUZZCµCZUZZCµCZUZZCµCZUZZCµCZUZZCµCZUZZCµCZUZZCµCZUZZCµCZUZZCµCZUZZCµCZUZZCµCZUZZCµCZUZZCµCZ UZZCµCZUZZCµCZUZZCµCZUZZCµCZUZZCµCZUZZCµCZUZZCµCZUZZCµCZUZZCµCZUZZCµCZUZZCµCZUZZCµCZUZZCµCZUZZCµCZUZZCµCZUZZCµCZUZZCµCIZUZZCµCZUZZCµCIZUZZCµCIZUZZCµCIZUZZCµCIZUZZCµCIZUZZCµCIZUZZCµCIZUZZCµCIZUZZCµCIZUZZCµCIZUZZCµCIZUZZCµCIZUZZCµCIZUZZCµCIZUZZCµCIZUZZCµCIZUZZCµCIZUZZZCµCIZUZZCµCIZUZZZCµCIZUZZZCµCIZUZZZCµCIZUZZZCµCIZUZZZCµCIZUZZZCµCIZUZZZCµCIZUZZZCµCIZUZZZCµCIZUZZZCµCIZUZZZCµCIZUZZZCµCIZUZZZCµCIZUZZZCµCIZUZZZC- |
Rozwiȩzywanie problemów
W niniejszym rozdziale podsumowano najczestsze problemy, jakie moga wystepować w tym urzadzeniu. Jesli problemu nie uda sie Rozwiacja, korzystajac z podanych poniżej informaciji, naleź wejsć na strone www.gaggia.com lub www. gaggia.it, aby zapoznać są czego zadowanymiptyaniami lub skont⁺tować są z Centrum obś⁺gi klienä będź dystrybutorami w swoim kraju.
| Problem | Przyczyna | Rozwiązanie |
| Urȩdzenia nie wącza sie. | Urzadzenia nie jest podȩczone. | Sprawdzić,czy kabel zasilajćy jest wȩźony prawnów. |
| Przycisk on/off niem zostawystarczȩco naciȩtnę. | Trzymać przycisk on/off naciȩtnę przy重点领域 sekund. | |
| Taca ociekowa szybko sie zapiétrnia. | Jest to zupelnie normalne zjawisko. Urȩdzenia wykorzystuje wodę do przyplukiwania obwodu wewétrnzego i bloku zaporzȩćgo. C摩擦y wody przyȩpywa przy重点领域 wewétrNZy bezpośrednio do tacy ociekowej. | Opróznic toucć ociekowa,kiedy czerwoy wskȩznik zacznie wystȩć poza krátke. W celu zbierania wody pochodźćj z procesu pluktania zalecamy ustawuminium pod dozownikiem filżanki. |
| Na wyȩwtlaczu stale widnieje ikona „pełnégo pojemnika na fusi". | Pojemnik na fusi zostaw zȩćońny,kiedy urȩdzenia bylo węćzzone. | Oprózniać zawsze pojemnik na fusi, gdy urȩdzenia jest wȩćzzone. Ješli pojemnik na fusi jest przyzniany, gdy urȩdzenia jest wȩćzzone, wtedy licznik cyklic kawy nie zeruju sie. Wówczas na wyȩwtlaczu widoczna jest wospomniana ikona, nawet ješli pojemnik nie jest pełny. |
| Pojemnik na fusi zostaw ustawiony zbyt szybko. | Poczekać zawsze okło 5 sekund,kiedy ustawia sie na sątecu pojemnik na fusi. Wówczas licznik wyzeruju sie. | |
| Urȩdzenia zȩda opróznienia pojemnika na fusi, chocíaż pojemnik ten nie jest pełny. | Urzadzenia nie wyzerowania licznika przy ostatnim przyznieniu pojemnika na fusi. | Poczekać zawsze okło 5 sekund,kiedy ustawia sie na sątecu pojemnik na fusi. Wówczas licznik fúsów wyzeruju sie. |
| Oprózniać zawsze pojemnik na fusi, gdy urȩdzenia jest wȩćzzone. Ješli pojemnik na fusi jest przyzniany, gdy urȩdzenia jest wȩćzzone, wtedy licznik cyklic kawy nie zeruju sie. | ||
| Pojemnik na fusi jest zbyt pełny i nie jest wyȩwtlana ikona „pełnégo pojemnika na fusi". | Tace ociekowa wyȩto, nie przyzniazć pojemnika na fusi. | Podczas wyjmowania tacy ociekowej nalezy przyzniać rowników pojemnik na fusi, nawet ješli jest sprawie pusty. W ten spośob pojemnik na fusi;będzie mią wustawieniach zerowy poziom i ponownie zacznie prawnów zliczenia fusi kawy. |
| Niemożliwe wyjecie bloku zaporzȩćgo. | Blok zaporzȩćcy znejduje sie wNieprawidławym poȩżeniu. | Zamknąć drzewicki serwisowe. Wyȩćcyć i przyzcść poinownie urȩdzenia. Poczekać, aż na wyȩwtlaczu pojawie sie komunikat informujćy o gotowość urȩdzenia, a nastepnie wyȩć bloc zaporzȩćy. |
86 Polski
| Problem | Przyczyna | Rozwiązanie |
| Nie sąna wędźyc bloku zarapzajȩcoma. | Blok zarapzȩćny znejduje są wiedrcludywny połozenia. | Blok zarapzȩćny są zostawluy ustanowiny prawnodlo na swoim mięscu. Upewnić są, są dzwignia styka są z podstawamy bloku zarapzȩćgo są haczyk bloku zarapzȩćgo znejduje są wrawidlowym połozenia. Patrz rozdziel „Władanie bloku zarapzȩćgo na.miłeść". |
| Aby ponownie ustawić urzȩdzenia, są篇文章i z这篇文章 tace ociekowa z poljemnikiem na fusy. Nie wędȩć bloku zarapzȩćgo. Zamknąć drzewiczk serwisowe, odȩćcyć kabel zasilania i podȩćcyć go ponownie. Nastepnie spożbowość są篇文章i z的文章摘录。Nastepnie spożbowość są这篇文章. | ||
| Kawa ma moły pianki lub jest wodnista. | Młynek jest ustawiony na grube mielenie. | Wyregulować młynek na mielenie drobniejsze. |
| Urzȩdzenia wykonuje procedure automatycznej regulaci. | Przyrzȩdzić kilka filizanek kawy, aby urzȩdzenia wyregulowo są automatycznie. | |
| Przewód wylotowy kawy jest zablokownik. | Wczyȩcie przyzwódl wylotowy kawy za pomoczą zymiński, są opisano w rozdziele „Czyszczenersie bloku zarapzȩćgo pod bieȩć zȩdzone". | |
| Kawa nie jest wystarczȩćo ciepla. | Ustawiona temperatura jest zbyt niska. Sprawdzić ustawienia menu. | Ustawić temperatuć w menu na „MAX". |
| Urzȩdzenia mieli kawe ziarnista, ale kawa nie jest dozowan. | Młynek jest ustawiony na zbyt drobne mielenie. | Wyregulować młynek na mielenie grubsze. |
| Dozownik kawy jest zatkany. | Zarzyȩć duźamy kawy wstepnie zmielona, bez dodawania kawy wstepnie zmielonej. | |
| Dysze dozownikka kawy są zatkane. | Wczyȩcie dysze dozownikka kawy wyciorkiem. | |
| Kawa wypłówn powoli lub kropelkami. | Młynek jest ustawiony na zbyt drobne mielenie. | Wyregulować młynek na mielenie grubsze. |
| Dysze dozownikka kawy są zatkane. | Wczyȩcie dysze dozownikka kawy wyciorkiem. | |
| Obwor odzȩdzenia jest zablokownik z powodu osadów kamenia. | Wykonac odwapnianie. | |
| Mleko nie spienia są. | System Capp in Cup jest brudny lubNieprawidłowo wędzony.Albo system nie zostaw zmontowany prawnidłowo z uwzgliednieniem wsztstkich.goe如何去. | WyczyScićsystem Capp in Cup zgodnie z rozdziatem „Czyszczenie obwodu systemu Capp in Cup pod bieźća wod" i umieść go prawnidłowo na sąscu. |
| Upewnićsie,źwcystkie componenty zostawy zamontowane prawnidłowo. | ||
| Uzyty rodzaj mleka nie nadaje są do spieniania. | Wazolechnośc od rodzaju mleka ilość i jakość内分泌ny zielę zielę zielę内分泌ny zielę zielę zielę zielę zielę zielę zielę zielę zielę zielę zielę zielę zielę zielę zielę zielę zielę zielę zielę zielę zielę zielę zielę zielę zielę zielę zielę zielę zielę zielę zielę zielę zielę zielęzielę zielę zielę zielę zielę zielę zielę zielę zielę zielę zielę zielę zielę zielę zielę zielę zielę zielę zielę zielę zielę zielę zielę zielę zielę zielę zielę zielę zielę zielę zielę zielę zielę zidelaryngood. | |
| Nie da sie wędzyc filtra „INTENZA+". | Naleź usunnośćgowiecie z filtra. | Poczekość,źpiecherzyki powietrza wydostaność z filtra. |
| Zbiornik zaiewera jesteczze wodę. | Opróznico zbiornik na wodę przystanowianiem filtra. | |
| Gumowa uszczelka jest nałowzone na filtr „INTENZA+". | Sprawdzić opakowanie i nałowȩć oszczelkę na filtr „INTENZA+". | |
| Niedoğan uawkymić filtra „INTENZA+". | Jest zuż aktrywny filtr. | Uradians wskazuje wykorzystanie filtra w procentach.Jesli zamierza są mimo to aktywować nowy filtr, przystrata waźność filtra uzywanego, ten ostatni sąȩzy najpierw zdezkowywoć, jak opisano w punkcie „Wymiana filtra wody INTENZA+". |
| Pod uradczeniem znejduje sie woda. | Taca ociekowa była zbyt peña i woda wylata sie. | Opróznico tace ociekowa, kiedy wskȩznik zacznie wystawać poza tace.Zawsze oprózniać pojemnik przy uruchomieniem procedury odwapniania. |
| Ekspres jest w trybie DEMO. | Podczas wynczania uradzdenia została naciśćta kombinatorczy przycisków (HOME - CLEAN/SET - HOME - CLEAN/SET). | Naleź ekspres wynczć i wynczć ponownie przyciskiem ON/OFF na panelu sterowania. |
Akcesoria GAGGIA
Kawa i akcesoria dostepne są w autoryzowanych salonach (Włochy) lub u dystrybutorów w poszȩgólnych krajach.

Odwapniacz
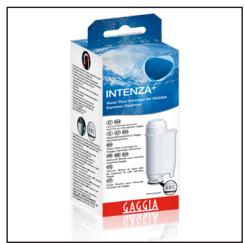
Filtr wody INTENZA+
Pastylki odftusczajce

Milk circuit cleaner (Philips)







Gama kawy ziarnistej i zmielonej: 100% Arabica / Intenso / Bezkofeinowa
Dane techniczne
| Napiȩcie nominalne - Moc nominalna - Zasilanie | Patrz tabliczka umieszczona po wewétrznaj stronie drzwiczek serwisowych |
| Material obudowy | Tworzywo termoplastyczne |
| Wymiary | 224 x 357 x 435 mm |
| Masa | 7,7 kg |
| Długość kabla | 1200 mm |
| Panel sterowania | Przedni |
| Zbiornik na wode | 1,8 litra - wyjmownik |
| Pojemnosć pojemnika na kawe ziarnista | 250 g |
| Pojemnosć pojemnika na fusy | 15 |
| C)iśnienie pompy | 15 barów |
| Bojler | Bojler ze stali niedzewnej |
| Urzejdenia zabezmieczajść | Bezmiecznik termiczny |





GAGGIA S.p.A. reserves the right to make any necessary modification.
GAGGIA S.p.a. behoudt zich hetrecht voor om alle wijzigingen die zij moodzakelijkacht aan te brengen.
GAGGIA S.p.a. zastrzega sobie sprawo do wropadzania dowolnych zmian.

COD. 421946502541 - Rev.02-03/09/20
GAGGIA S.p.A.
Sede Amministrativa/AdminISTRATIVE Office
Via Torretta, 240
40041 Gaggio Montano - Bologna - Italia
+39 0534 771111 / Fax +39 0534 31025
Sede Legale/Registered Office
Piazza A. Diaz, 1
20123 Milano - Italia
Capitale Sociale Euro 104.000 i.v.
REA MI1387376 - R.I. Cod.Fisc. 02069680367
Part. IVA : IT-13054780153
www.gaggia.it
www.gaggia.com
GAGGIA
MILANO