MODE D'EMPLOI CADORNA PRESTIGE GAGGIA
GAGGIA
MILANO
ENGLISH
NEDERLANDS
POLSKI
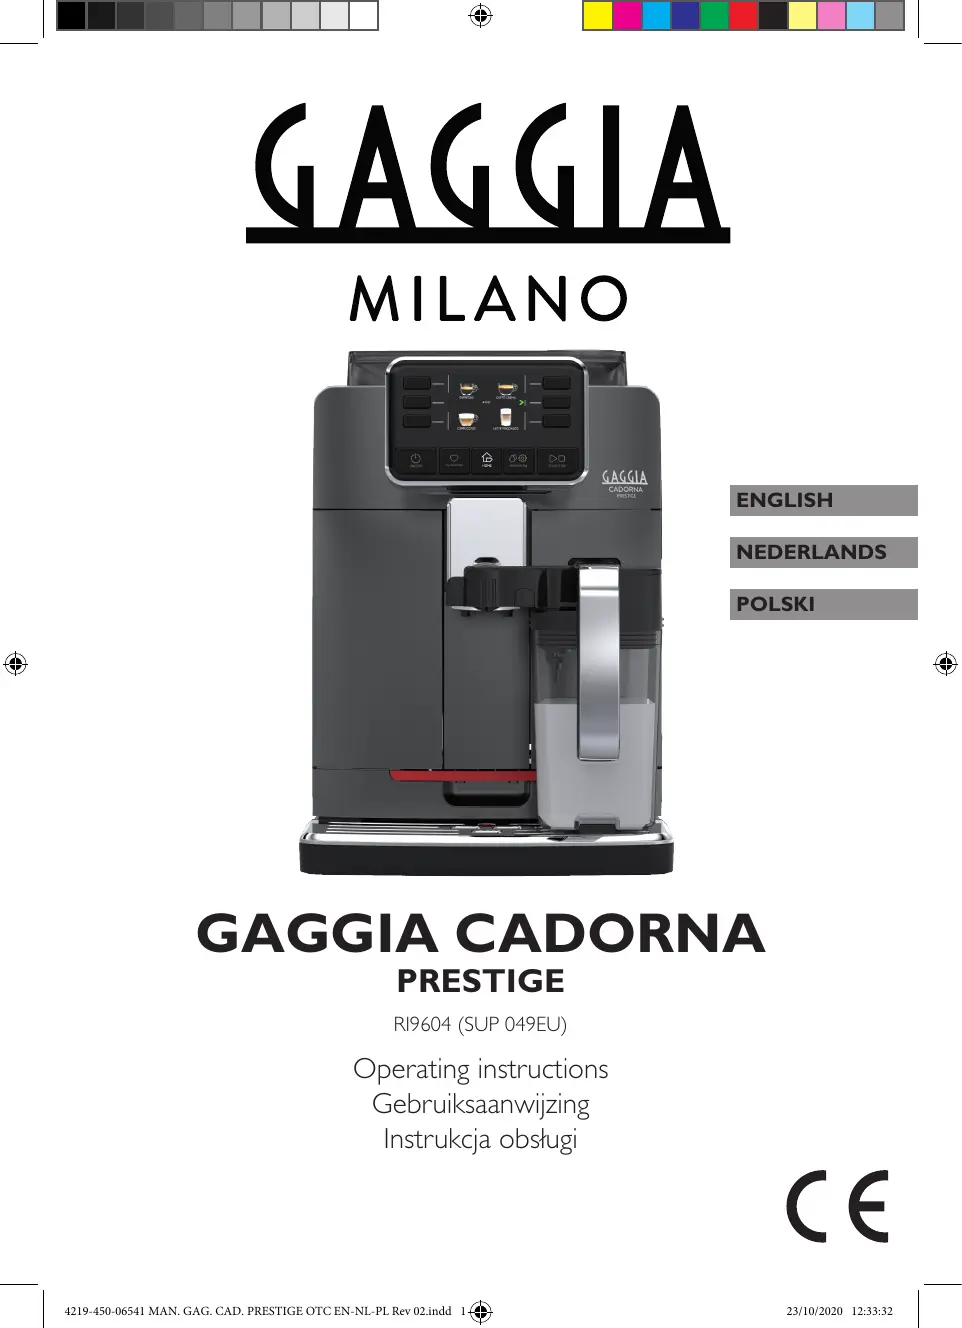
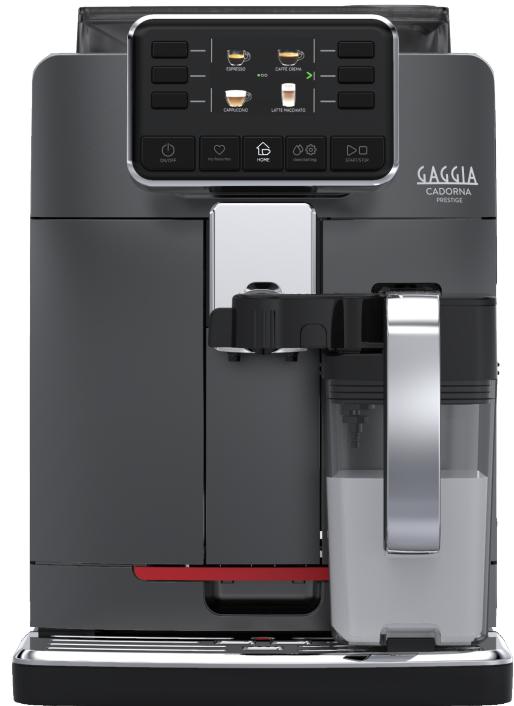
GAGGIA CADORNA
PRESTIGE
RI9604 (SUP 049EU)
Operating instructions
Gebruiksaanwijzing
Instrukcja obslugi
CE
Control panel / Controlepaneel / Panel sterowania
Ristretto
Coffee / Koffie / Kawa 30 ml
Espresso
Coffee / Koffie / Kawa 40 ml
Espresso lungo
Coffee / Koffie / Kawa 80 ml
Coffee / Koffie / Kawa
Coffee / Koffie / Kawa 120 ml
Americano
Coffee / Koffie / Kawa 40 ml
Water / Water / Woda 110 ml
Cappuccino
Milk / Melk / Mleko 120 ml
Coffee / Koffie / Kawa 40 ml
Cappuccino XL
Milk / Melk / Mleko 180 ml
Coffee / Koffie / Kawa 70 ml


Cortado
Coffee / Koffie / Kawa 40 ml
Milk / Melk / Mleko 30 ml

Flat white
Coffee / Koffie / Kawa 40x2 ml
Milk / Melk / Mleko 80 ml


Café au lait
Coffee / Koffie / Kawa 90 ml
Milk / Melk / Mleko 90 ml


Latte macchiato
Milk / Melk / Mleko 240 ml
Coffee / Koffie / Kawa 40 ml

Latte macchiato XL
Milk / Melk / Mleko 300 ml
Coffee / Koffie / Kawa 50 ml

Frothed milk / Opgeschuimde melk /
Spienione mleko
Milk / Melk / Mleko 180 ml

Hot water / Heet water / Goraca woda
Water / Water / Woda 150 ml

02
First installation / Eerste installment / Pierwsza instalacja
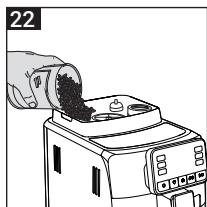
Milk carafe / Melkkan / Dzbanek na mleko
ENGLISH
Congratulations on purchasing the Gaggia Cadorna Prestige!
This easy-to-use machine guarantees excellent coffee drinks, every day. With its intuitive interface, you can choose from among 14 beverages, customise them and save them to the 4 available profiles, where they can be instantly brought up whenever you want.
Before being packed, each of our high-quality machines undergoes rigorous testing in our laboratories to ensure it works perfectly. Because real coffee is used during testing, some residue may remain. This does not compromise the integrity of the product: it is a brand new machine.
Please read the whole manual carefully before you install, use or clean your machine. Before using it for the first time, please read carefully the safety manual provided separately and store it for future use.
NEDERLANS
Van harte gelukgewenst met de aanschaf van een Gaggia Cadorna Prestige!
Met deze machine zal u op eenvoudige wijze steedsuitstekende resultaten verkrijgen. Dankzij de intuitive interface kut u kiezen uit 14 dranken, ze aanpassen en opslaan in de 4 beschikbare profielen, om ze bij elk gebruik terug te vinden.
Alvorens verpakt te worden, ondergaat elke machine strenge tests in once laboratoria om de hoge kwaliteit en correcte werkung ervan te garanderen. Er wordt ookijd den het testen koffie gebruikt, dus het is möglichk dat er wat residu achechterblijft. Dit doet geen afbreuk aan de integriteit van het product: het is een volledigarendige machine.
In deze handleiding zult u alle nodige informatie vinden om uw machine te installeren, te gebruiken, schoon te makeen en te ontkalken. Lees de parte veiligheidsbrochure zorgvuldig door voordat u ze voor het eerst gebruikt en bewaar deze voor toekomstig gebruik.
POLSKI
Gratuljemy zakupu urzadzenia Gaggia Cadorna Prestige!
Dzieki temu urzadzeniu zawsze bedziesz cieszyc sie doskonałymi rezultatami, o tkró w tym przypadku nie trudno. Za sprawy intuicyjnégo interfejsu moźysz wybrać spośród 14 napojów, dostosowej je do swoich potrzeb i zapisić je wAMI pAMI 4 dostepnych profili, aby odnaleźć je przy kazdym użciu urzadzenia.
Przed zapakowaniem kaźde urzadzenia przechodzi szereg rygorystycznych testów w naszych laboratoriach, aby zapewnić ich wysoka jakość i sprawlłowe dziatanie.
Podczas odbioru urzadzenia testujemy je przy użyciu kawy, dlatoi go mogą pozostć w nim jej pozostalusci. Nie zakłoca to"Justak integralnosci produktu: jest to urzadzenia calkowicie nowe.
W niniejszej instrukcjz zawarto wszelkie informacione niezbedne do zainstalowania, uzytkowania, czyszczenia i odwapniania urzadzenia. Przed了我的 pierwszym uzyciem zapoznej sie uwaznie z dostarczonag somebody broszuradyotyczabezpieczenstwa i zachowaj ja w razie potrzeby skorzystania z niece w przyszlosci.
Table of Contents
Machine Overview (Fig.2) 7
Control Panel and Display 8
Control panel overview (Fig. 1) 8
Multifunction buttons 8
First Installation 9
Manual rinse cycle 9
Measuring water hardness 10
INTENZA+ Water Filter 10
Installing the INTENZA+ water filter 11
Replacing the INTENZA+ water filter 11
Types of Beverage 12
Espresso tray 13
Brewing Coffee 13
Brewing coffee from whole coffee beans 13
Brewing coffee using pre-ground coffee 14
Dispensing Frothed Milk-based Coffee Beverages 14
Filling the milk carafe 14
Inserting the milk carafe 15
Removing the milk carafe 15
Dispensing frothed milk-based coffee beverages 16
Dispensing Hot Water 16
Beverage Customisation and Profile Creation 17
Customisation 17
Creating a profile 18
Coffee Grind Settings 19
Cleaning and Maintenance 20
Cleaning table 20
Cleaning the milk carafe 21
Cleaning the brew group 22
Lubricating the brew group 25
26
26
What to do if the descending process is interrupted 27
Various Settings 27
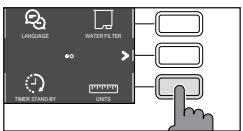
Language 27
Water filter 28
Timer stand-by 28
Water hardness 28
Measurement units 28
Prepared beverages counter 28
Restore factory settings 28
Error Code Key 29
Troubleshooting 30
GAGGIA Accessories 32
Technical Specifications 33

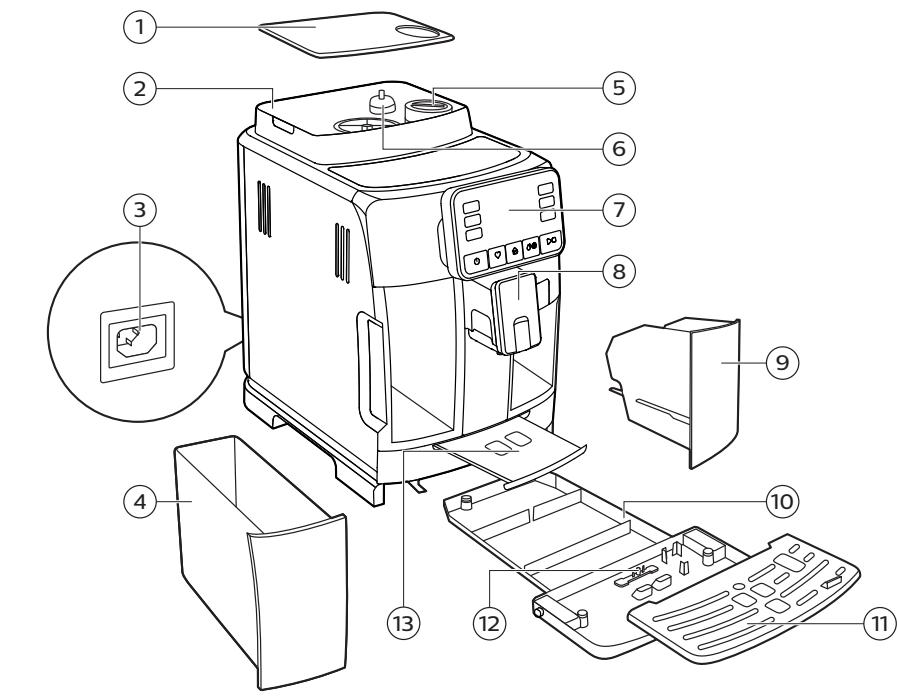
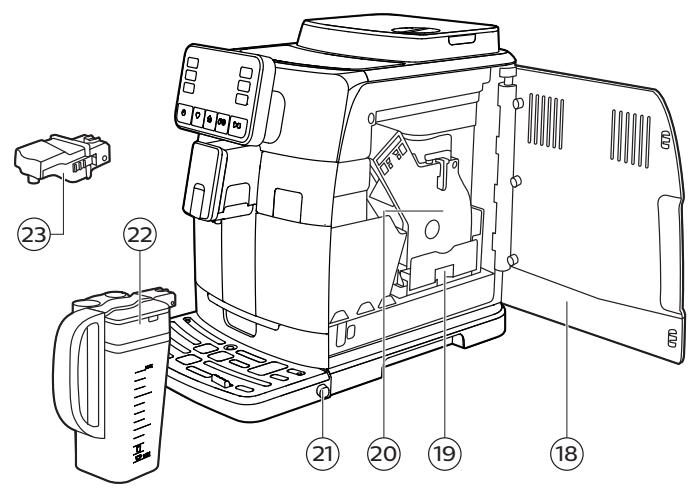
Machine Overview (Fig.2)
| 1 | Coffee bean container lid | 13 | Espresso tray |
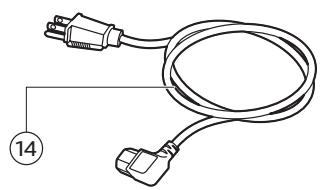
| 2 | Coffee bean container | 14 | Power cord |
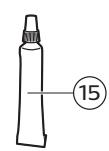
| 3 | Power cord socket | 15 | Lubricant |
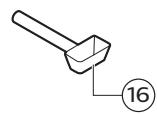
| 4 | Water tank | 16 | Pre-ground coffee measuring scoop |
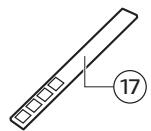
| 5 | Pre-ground coffee compartment | 17 | Water hardness tester |
| 6 | Coffee grinder adjustment knob | 18 | Service door |
| 7 | Control panel | 19 | Coffee residues drawer |
| 8 | Adjustable coffee dispensing spout | 20 | Brew group |
| 9 | Coffee pucks container | 21 | Drip tray release buttons |
| 10 | Drip tray | 22 | Milk carafe |
| 11 | Drip tray grid | 23 | Water dispensing spout |
| 12 | "Full drip tray" indicator | | |
8 English
Control Panel and Display
This coffee machine features an easy-to-use, intuitive display. Please see below for an in-depth explanation of each button.
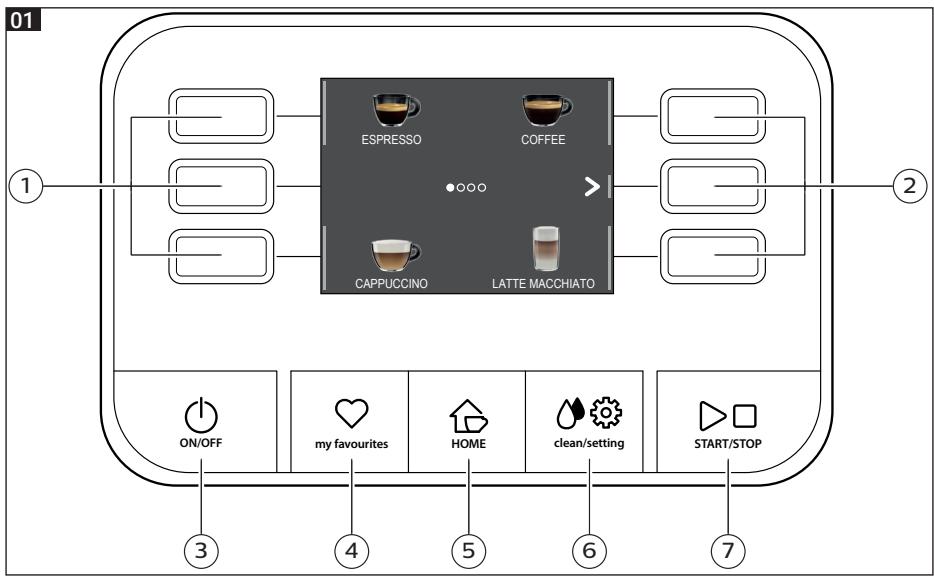
Control panel overview (fig. 1)
| 1/2 | MULTIFUNCTION buttons | Selects the function shown on the display. |
| 3 | ON/OFF button | To switch the machine on or off. |
| 4 | MY FAVOURITES button | Opens the personal profiles menu. |
| 5 | HOME button | Opens the beverage menu. |
| 6 | CLEAN/SETTING button | Opens the cleaning and settings menu. |
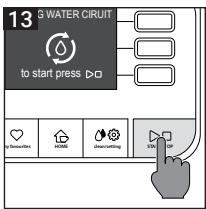
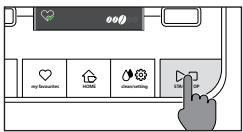
| 7 | START/STOP button | Starts/stops the dispensing of the selected beverage, or starts/stops the procedure indicated on the display. |
Note: the MY FAVOURITES 心 , HOME 心 , CLEAN/SETTING 心 buttons are also ESC buttons. You can exit any screen shown on the display at any time by pressing one of these buttons, which will then bring you back to their initial menu.
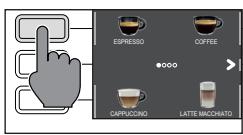
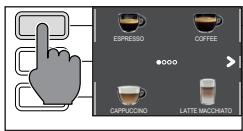
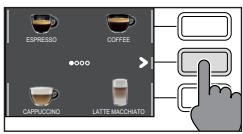
Use the multifunction buttons at the sides of the display to select the feature or beverage indicated on the screen.
Note: To make the reading of this manual easier,<> means <>>.
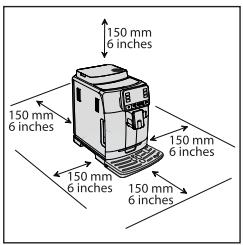
First Installation
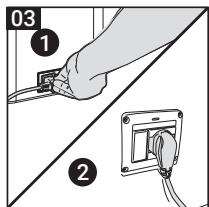
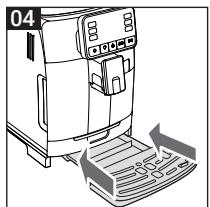
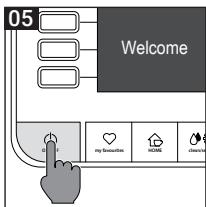
Before using the machine, it is essential to follow a few simple steps, clearly described in the explanatory drawings found in the quick guide at the beginning of this instruction manual.
Note: To make the best-tasting coffee, you should brew 5 coffees initially to allow the machine to complete its self-adjustment.
Manual rinse cycle
When first installing the machine or after a long period of its inactivity, it is necessary to prime the water circuit through the manual rinse cycle.
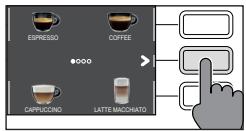
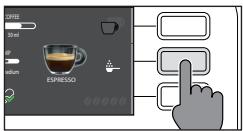
1 Place a container under the coffee dispensing spout, browse through the pages and select "ESPRESSO LUNGO".
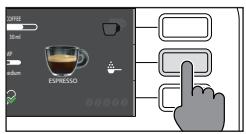
2 Press the " " button without adding pre-ground coffee.
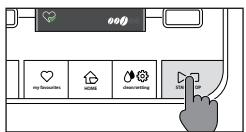
3 Press the START/STOP button to start dispensing, the machine will dispense hot water.
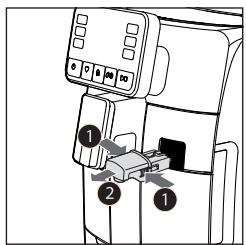
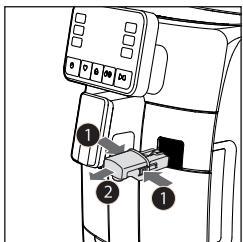
4 Empty the container and make sure the water dispensing spout is installed.
5 Place the container under the water dispensing spout and select the "HOT WATER" beverage.
6 Press the START/STOP button to commence dispensing.
7 Empty the container and repeat steps 6 to 7, until the water tank is empty.
8 At the end of this operation, fill the water tank again up to the MAX level. The machine is now ready for use.
10 English
Measuring water hardness
You'll need to set the water hardness when you install your machine.
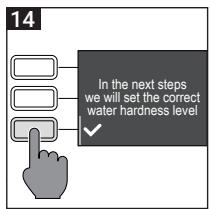
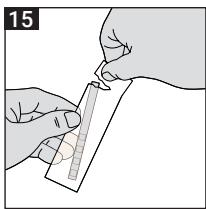
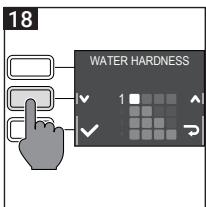
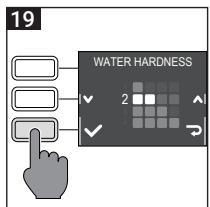
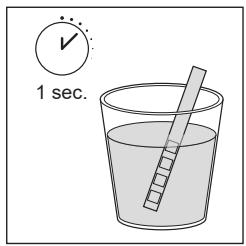
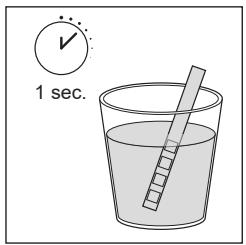
Take the water hardness measuring strip that you find in the box and follow the steps shown on the display during installation. To adjust the water hardness setting later, press the CLEAN/SETTING button, select " SETTINGS", and then "WATER HARDNESS" from the settings menu.
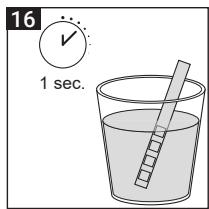
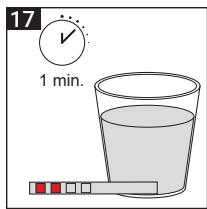
1 Immerse the water hardness measuring strip in a glass of water for 1 second. Remove the strip from the water and wait 1 minute.
2 Note how many squares turn red.
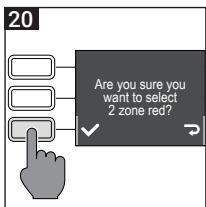
3 Use the green "✔" and "▲" buttons to select the water hardness according to the table below. Confirm the setting by pressing "✔".
| Small red squares | Value to set | Water hardness | INTENZA+ |
| □□□□ | 1 | very soft water | A |
| □□□□ | 2 | soft water | A |
| □□□□ | 3 | hard water | B |
| □□□□ | 4 | very hard water | C |
INTENZA+ Water Filter
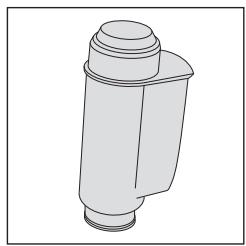
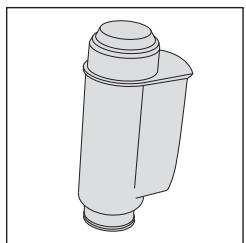
We recommend using the INTENZA+ water filter to limit the formation of limescale. This ensures the machine will last longer and the aroma of your coffee will be better.
Water is an essential element in brewing coffee: it is therefore extremely important to ensure it is always filtered adequately.
The INTENZA+ water filter prevents the formation of mineral deposits, improving the quality of the water.
Installing the INTENZA+ water filter
Remove the small white filter from the water tank and store it in a dry place.
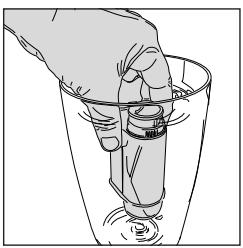
Immerse the INTENZA+ water filter vertically (with the opening pointing up) in cold water and gently press its sides to let any air bubbles out.
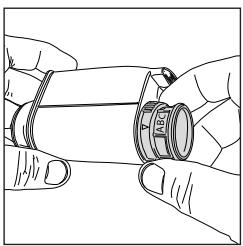
Remove the INTENZA+ water filter from the water. Set the machine according to the detected water hardness (see the "Measuring water hardness" chapter) and the letters found on the filter base:
A = soft water - 1 or 2 small squares
B = hard water (standard) - 3 small squares
C = very hard water - 4 small squares
Place the INTENZA+ filter in the water tank, ensuring it is correctly in place. Refill the water tank and place it in its compartment.
Press the CLEAN/SETTING button, select " SETTINGS", and then "WATER FILTER" from the settings menu.
Follow the instructions shown on the display to activate the filter.
Note: you can pause the filter activation procedure by pressing the START/STOP button. To resume the procedure, press the START/STOP button again.
Replacing the INTENZA+ water filter
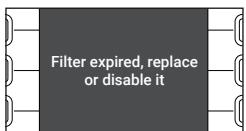
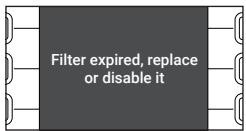
When the INTENZA+ water filter runs out, the display will show a warning message.
1 Replace or disable by pressing the CLEAN/SETTING button, and then the " SETTINGS" button.
2 Select the "WATER FILTER" button.
3 Select "REPLACE" to change the filter or "DISABLE" if you do not intend to use the filter. Confirm with the "√" button.
Follow the instructions shown on the display to activate the filter correctly.
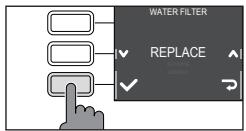
Note: If you do not want to replace the filter, select "DISABLE" to disable it.
12 English
Types of Beverage
| Beverage name | Description |
| Ristretto | A ristretto, served in a small cup, is an espresso whose brewing time is shorter than a regular espresso. As such, a ristretto is a shorter shot and lower in caffeine. |
| Espresso | The espresso is known around the globe as true "Italian coffee". Served in a small cup, its unmistakable characteristics are a full and intense aroma and a top layer of compact, natural crema. It is the result of the hot-water pressurised extraction process invented by Achille Gaggia in 1938. |
| Espresso lungo | An espresso lungo is an espresso shot with a longer extraction time. It is more diluted, with a different aromatic intensity and a higher caffeine content. It is served in a medium-sized cup. |
| Coffee | Coffee is a beverage prepared with a greater quantity of water than an espresso shot. It has a lighter aroma and is served in a medium-large cup. |
| Americano | An Americano is a long, less intense coffee drink prepared by combining hot water and espresso. |
| Cappuccino | The cappuccino is an Italian classic, among the most loved in the world. It is prepared with espresso, milk and a milk froth, which must be no less than 1 cm thick. It is served in a large cup. |
| XL Cappuccino | An XL cappuccino is a cappuccino prepared with a greater quantity of espresso and milk. |
| Cortado | The cortado is an Argentinian beverage, consisting of an espresso shot with a small quantity of milk. It is usually served in a small glass and is popular in Spain, Portugal, and Latin America. |
| Flat white | A flat white is a beverage of Australian origin which has a strong, dominant coffee flavour. It is composed of a double espresso and milk, toped with a light layer of velvety foam. |
| Café au lait | A café au lait is a beverage composed of equal parts coffee and milk. This can even be enriched by a thin layer of milk froth. It is served in a large cup. |
| Latte macchiato | A latte macchiato is prepared with hot milk, one part milk froth and a small quantity of espresso. It is served in a tall, transparent glass to allow the separation of the three different layers to be seen. |
| XL latte macchiato | An XL latte macchiato is a latte macchiato prepared with a greater quantity of milk. It is served in a tall, transparent glass. |
| Frothed milk | Frothed milk is used to make cappuccinos, latte macchiatos and several other beverages. The result is a compact, homogeneous layer of milk froth. |
| Hot water | Hot water can be used to prepare hot teas, infusions and instant beverages. |
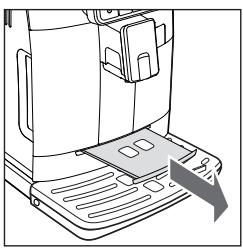
Espresso tray
This machine was designed to guarantee flawless results, from a traditional espresso to a number of different beverages. If you wish to try a traditional Italian espresso, with a delicious layer of natural crema on the surface, we recommend using the "Espresso Tray", which has been specifically designed for and integrated into the machine. This tray makes it possible to use traditional espresso cups, ensuring the perfect height from the spout for compact, homogeneous crema and dispensation without messy splashes.
Brewing coffee
Brewing coffee from whole coffee beans
Warning: always use whole coffee beans when making espresso. Do not put any pre-ground, unroasted, freeze-dried or instant coffee in the coffee bean container, as they may damage the machine.
Tip: Preheat the cups with hot water to enjoy a hotter coffee.
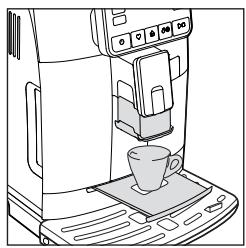
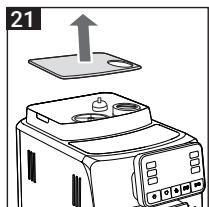
1 Remove the espresso tray, place an espresso cup beneath the coffee dispensing spout, raising or lowering it according to the size of the cup being used.
Press the HOME button to bring up the beverage menu.
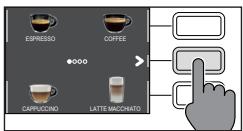
2 Browse the various pages to find and select the desired beverage.
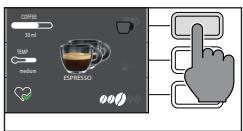
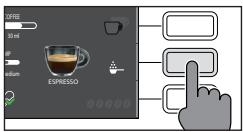
3 Once the beverage is selected, it is possible to prepare two cups at the same time using the " " button, except the "AMERICANO".
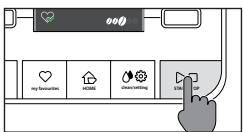
4 Finally, press the START/STOP button to begin dispensing the coffee.
Note: you can interrupt the brewing at any time by pressing the START/STOP button.
If you wish to customise the settings of a specific beverage, please refer to the "Beverage customisation" chapter.
14 English
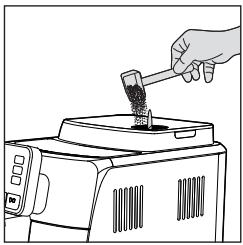
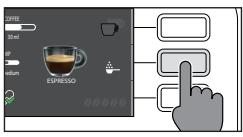
Brewing coffee using pre-ground coffee
Use the measuring scoop provided to insert the correct dose in the pre-ground coffee compartment.
1 Lift the lid of the pre-ground coffee compartment and add one level measuring scoop of pre-ground coffee.
Warning: do not insert anything other than pre-ground coffee in the pre-ground coffee compartment, for not damage the machine.
2 Place a cup under the coffee dispensing spout and select the desired beverage.
3 Press the " 一 " button.
Note: the "pre-ground coffee" function cannot dispense two cups of coffee at the same time, and it disables the aroma setting, both of which are possible with coffee beans only.
Note: this function is not available for FLAT WHITE
4 Press the START/STOP button to start dispensing the coffee.
If you wish to customise the settings of a specific beverage, please refer to the "Beverage customisation" chapter.
Note: you can interrupt the brewing at any time by pressing the START/STOP button.
Preparation of frothed-milk based coffee beverages
Filling the milk carafe
Note: Before using the milk carafe, clean it thoroughly as described under the "Cleaning the milk carafe" chapter.
The milk carafe can be filled before or during use.
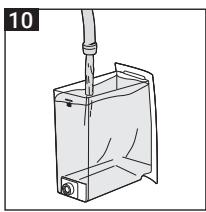
1 Lift the lid like in the figure (milk carafe).
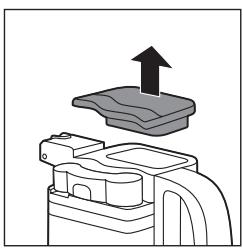
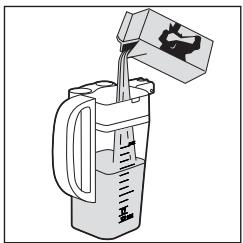
2 Pour the milk into the carafe. The milk level must be between the minimum (MIN) and the maximum (MAX) notches on the carafe. Replace the lid.
Inserting the milk carafe
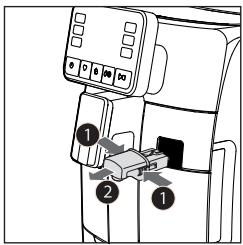
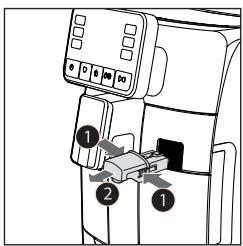
Remove the water dispensing spout (if installed):
1 Press the two side buttons to unlock the dispensing spout (1) and lift it slightly. Pull the water dispensing spout to remove it (2).
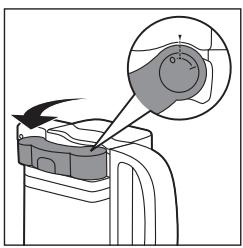
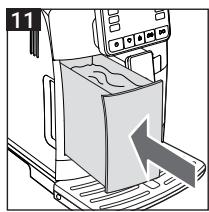
2 Position the milk carafe's dispensing spout in the "I" position.
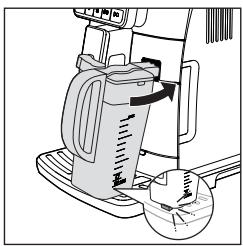
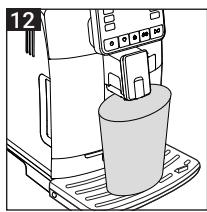
3 Tilt it slightly and slide it completely into the machine's guides until it hooks onto the drip tray.
Note: do not force the carafe while inserting it.
Removing the milk carafe
Rotate the carafe upwards until it is naturally released from the insert in the drip tray. Then remove it.

16 English
Dispensing frothed milk-based coffee beverages
Tip: Preheat the cups with hot water to enjoy a hotter beverage.
Tip: use cold milk (at a temperature of around 5^ ) with a protein content of at least 3% to ensure optimum results for the froth. You can use either whole milk or semi-skimmed milk. You can also use skimmed milk, soy milk or lactose-free milk.
1 Press the HOME button and choose the desired beverage from the menu.
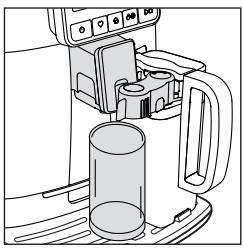
- Press the button for the beverage desired and place a suitable cup or glass beneath the coffee dispensing spout and the carafe dispensing spout.
- Press the START/STOP button to start brewing the selected beverage.
2 The machine will dispense a predefined amount of frothed milk into the cup or glass. The coffee or the frothed milk may be dispensed first, depending on the beverage selected.
If you wish to customise the beverage before dispensing, refer to the "Beverage customisation" chapter.
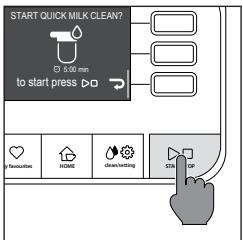
3 After dispensing your frothed milk-based coffee beverages, it is best to complete the quick cleaning procedure of the carafe within 10 seconds. However, the procedure can also be carried out at a later time by opening the cleaning menu via the CLEAN/SETTING button. Follow the instructions shown on the display. The cleaning procedure can be carried out with milk in the carafe.
Note: We recommend cleaning the machine via the quick clean procedure at least once a day.
Press the START/STOP button to confirm, or " " to carry out the procedure at a later time.
Dispensing Hot Water
Warning: when the machine starts preparing hot water, the hot water dispensing spout may spray steam and hot water. Wait until the end of the preparation before removing the hot water dispensing spout.
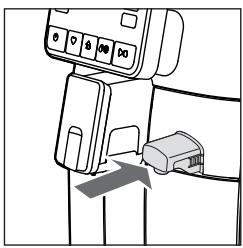
1 Insert the hot water dispensing spout.
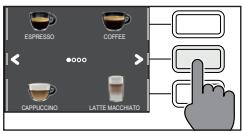
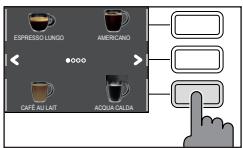
2 Press the HOME button and browse the various screens using the green " < "and" > "and select "HOT WATER".
Warning: only select " HOT WATER " from the HOME screen when the hot water dispensing spout is installed.
3 Press the " HOT WATER " button. Finally, press the START/STOP button to commence dispensing.
Note: you can interrupt the brewing at any time by pressing the START/STOP button.
If you wish to customise the volume of water before you begin, please refer to the "Beverage customisation" chapter.
Beverage Customisation and Profile Creation
This machine makes it possible to modify the settings of a beverage according to your preferences and save it to one of four available profiles.
Customisation
1 Press the HOME button.
2 Select your beverage.
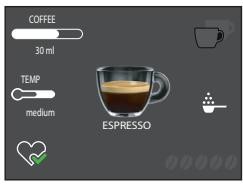
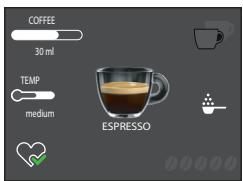
3 All the settings that can be adjusted and/or selected are displayed on the screen. Based on the type of beverage, you can adjust and/or select:
- the amount of coffee and milk;
- the temperature of the coffee;
- the dispensing of two cups at the same time;
- the use of pre-ground coffee;
- the intensity of the aroma (only when using coffee beans);
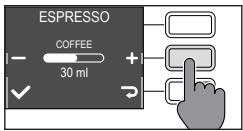
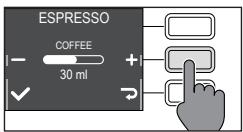
4 Once the "COFFEE" or "MILK" button has been pressed, use the green " ^+ " and " ^- " buttons to select the desired amount.
Press "√" to confirm and return to the previous screen, where the new quantity will be displayed.
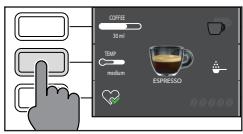
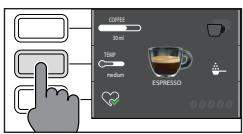
5 Press the "TEMP" button several times to adjust the temperature of the beverage from among the following options:
low;
medium;
- high;

18 English

6 Press "▶" to prepare two cups, or "▶" to prepare a single cup. The picture of the beverage in the centre of the display will indicate the number of cups selected.
Note: this function is not available for beverages with milk, AMERICANO and HOT WATER.
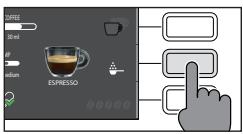
7 Press the " " button to activate the use of pre-ground coffee.
Note: this function only allows the dispensing of one coffee at a time.
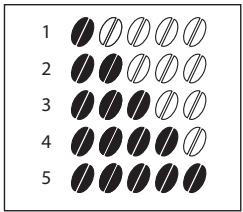
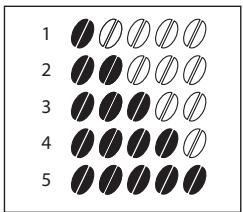
8 To adjust the aroma intensity, press "0000". Each time you press the button, the aroma intensity changes by one degree. The display shows the chosen intensity.
1 Very light
2 Light
3 Normal
4 Strong
5 Very strong
Note: this function is not available for pre-ground coffee.
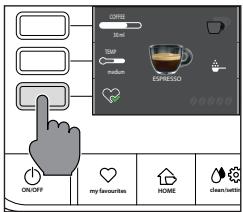
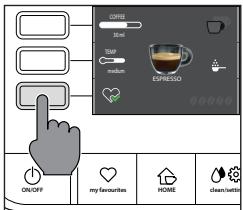
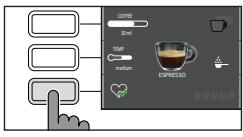
9 Once the drink has been customised, you can save it in a specific profile by pressing the "♥" button.
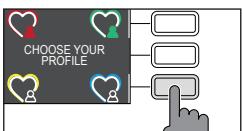
10 Choose the profile where you wish to save the beverage from the 4 available.
Creating a profile
There are two ways to create a profile:
Using the HOME button, as described in the "Beverage customisation" chapter, points 9 and 10;
Using the MY FAVOURITES button, as follows:
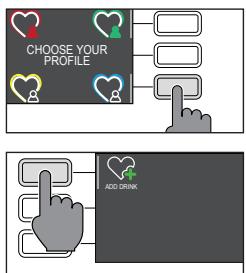
1 Press the MY FAVOURITES button.
2 Select your preferred profile colour.
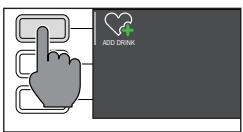
3 Press the "ADD DRINK" button.
4 The beverage screens will be displayed. Select the beverage that you want to save to your profile and customise it by following steps 3 to 8 in the "Beverage customisation" chapter.
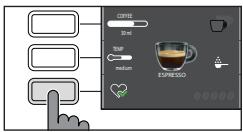
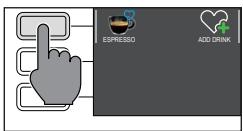
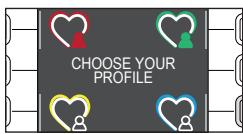
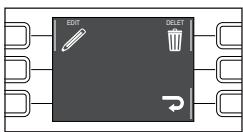
5 Press "♥" to save the customised beverage to your profile. At this point, you can dispense the beverage or exit the menu by pressing one of the ESC buttons (HOME, MY FAVOURITES, CLEAN/SETTING).
The saved beverage is now present in the list of your preferences and marked with a small heart in the same colour as the selected profile.
Note: Once used, the " " profile icon will change colour.
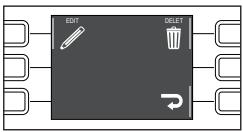
6 The beverage saved in the profile can be modified using the "EDIT" button, or deleted using the "DELETE" button.
Note: It is not possible to save the beverage from the HOME menu via the MY FAVOURITES button. Instead, use the "♥" button, otherwise you will lose the settings you have just applied.
Coffee Grind Settings
You can adjust the grind setting using the grinder adjustment knob on the coffee bean container. The ceramic coffee grinder guarantees perfect, even grinding for the preparation of every cup of coffee. The aroma is thus preserved, ensuring the perfect flavour every time.
Note: you can only adjust the grind setting while the machine is grinding the coffee beans. The difference in flavour will be noticeable after 2-3 cups of coffee have been brewed.
Warning: to avoid damaging the coffee grinder, do not rotate the grinder adjustment knob more than one notch at a time.
1 Place a cup under the coffee dispensing spout.
2 Remove the lid of the coffee bean container.
3 Prepare an espresso as described in the "Brewing coffee from coffee beans" chapter.
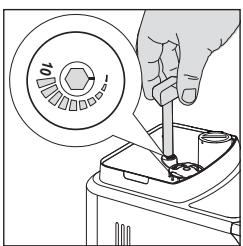
4 While the machine is grinding the coffee, place the end of the handle of the pre-ground coffee measuring scoop on the coffee grinder adjustment knob, located in the coffee bean container. Use the handle of the measuring scoop to press and rotate the knob to the left or right, one notch at a time.
20 English
5 You can select from 10 grinding settings, from fine to course. The smaller the notch, the stronger and richer the coffee.
Note:
- Coarse grind: lighter taste, for dark roasted coffee blends (5-10);
- Fine grind: stronger taste, for light roasted coffee blends (1-5);
Cleaning and Maintenance
Regular cleaning and maintenance keep the machine in perfect condition and ensure perfect coffee flavour, a constant coffee flow and excellent milk froth. Please refer to the following table to know when and how to clean the removable parts of the machine. For more detailed information, please read the relevant chapters.
Cleaning table
| Part description | When to clean | How to clean the cycle |
| Milk carafe | After use | After preparing a milk-based beverage, start the " QUICK CLEAN " process as indicated on the machine. |
| Daily | Clean the milk container and the milk suction tube as described in the "Cleaning the milk carafe under running water" chapter, following the first 4 points and point 11. |
| Weekly | Disassemble the milk carafe and clean all its parts under running water. |
| Monthly | Start the " DEEP CLEANING " process as indicated on the machine. For this cleaning cycle, use the Philips "Milk circuit cleaner" to clean the milk circuits. |
| Brew group | Weekly | Remove the brew group and clean it under running water. |
| Depending on usage | See the "Cleaning and lubricating the brew group" chapter. |
| Monthly | Clean the brew group with the Gaggia coffee oil remover to remove any oily coffee residue |
| Drip tray full | When the red indicator emerges from the grid of the drip tray | Empty the drip tray and clean it under running water. |
| Coffee pucks container | Whenever the machine requires it | Empty the coffee pucks container and clean it under running water. Ensure that the machine is switched on during this procedure, or the coffee pucks container will not reset. |
| Water tank | Weekly | Clean it under running water. |
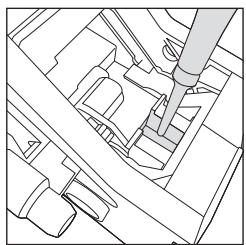
| Pre-ground coffee compartment/coffee outlet duct | Weekly | Clean the upper part using the handle of a spoon, as shown below. |
| Espresso tray | Depending on usage | Remove the espresso tray and clean it with running water. It can also be washed in the upper tray of a dishwasher. |
Cleaning the milk carafe
Milk carafe cleaning programmes
The machine has two programmes for cleaning the milk carafe: quick clean and deep clean. Both programmes can be selected using the CLEAN/SETTING button then pressing the "CLEAN" button.
Quick clean is also proposed after dispensing a milk-based beverage. For both programmes, follow the instructions shown on the display.
The quick clean programme includes the cleaning of the milk dispensing spout. The cleaning procedure can be carried out with milk in the carafe.
- Deep clean programme for the carafe
The deep clean programme for the carafe includes the careful cleaning of the whole milk circuit using the Philips "Milk circuit cleaner" product.
22 English
Accurate cleaning of the milk carafe under running water
To carefully clean the milk carafe, you must disassemble it completely and wash it under running water, following these steps:
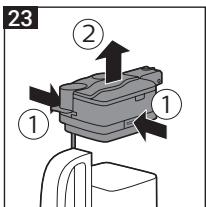
1 Press the release buttons to remove the lid (fig. 23).
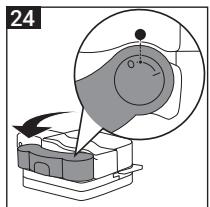
2 Rotate the milk carafe's dispensing spout to the "●" position (fig. 24).
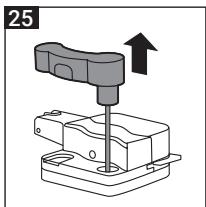
3 Lift the milk dispensing spout from the lid (fig. 25).
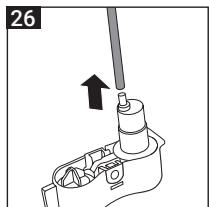
4 Remove the milk suction tube (fig. 26).
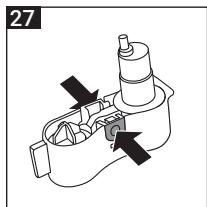
5 Press the button indicated by an arrow to unblock the cover of the milk dispensing spout (fig. 27).
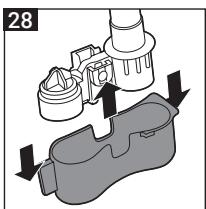
6 To remove the cover, press lightly on the sides of the dispenser and pull the cover upwards to remove it from the dispenser (fig. 28).
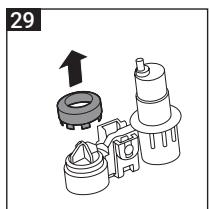
7 Remove the ring from the milk carafe dispenser (fig. 29).
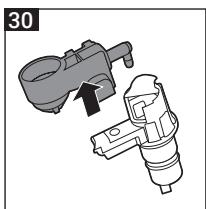
8 Pull the milk froth unit upwards (fig. 30).
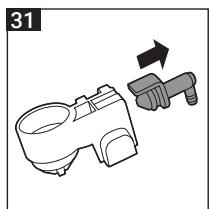
9 Pull the support away from the milk froth unit (fig. 31).
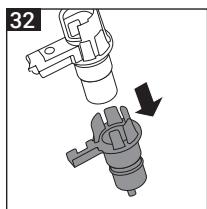
10 Pull the support outwards and separate it from the remaining part (fig. 32).
11 Clean all parts with warm water.
12 Reassemble all the parts in the reverse order.
Cleaning the brew group
Warning: do not wash the brew group in the dishwasher and do not use dishwashing detergents, since they may cause the malfunctioning of the brew group and alter the coffee flavour.
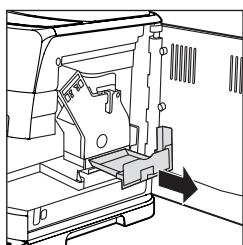
Removing the brew group
1 Turn off the machine and disconnect the power cord.
2 Remove the coffee pucks container and open the service door.
3 Remove the coffee residues drawer.
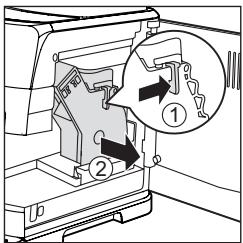
4 Press the PUSH lever (1) and pull the handle of the brew group (2) to remove it from the machine.
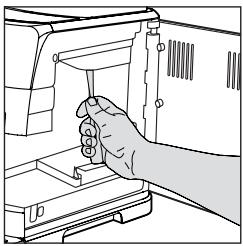
Cleaning the brew group under running water
1 Clean the coffee outlet duct thoroughly with a spoon handle or with another round-tipped kitchen utensil.
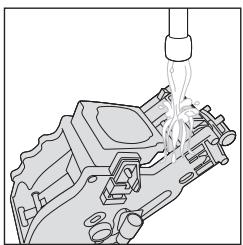
2 Thoroughly rinse the brew group using lukewarm water. Carefully wash the upper filter.
3 Let the brew group air dry.
Note: to avoid the build-up of fibres in its interior, do not dry the brew group with cloth.
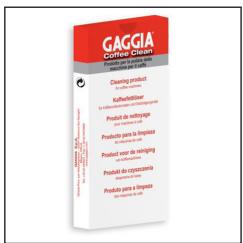
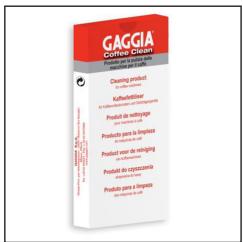
Cleaning the brew group with coffee cleaning tablets -
Warning: use only Gaggia tablets for removing oily coffee residue.
1 Place a container under the coffee dispensing spout.
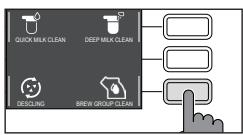
2 Press the CLEAN/SETTING button and select the "CLEAN" button shown on the display.
3 Select "BREW GROUP CLEANING" and press the START/STOP button to launch the cleaning procedure.
4 Follow the instructions shown on the display to correctly clean the brew group.
5 The procedure will take approximately 5 minutes. The START/STOP button can be used to suspend and then resume the procedure.
24 English
Reinserting the brew group
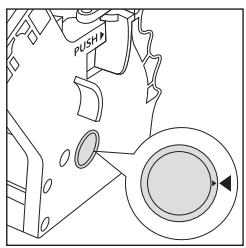
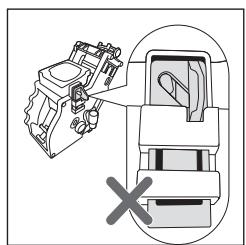
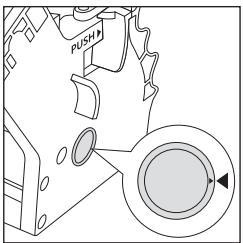
1 Before reinserting the brew group into the machine, ensure that the two yellow reference indicators on the side coincide. If this is not the case, perform the following step:
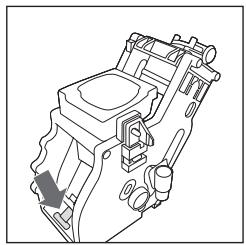
Make sure that the lever is in contact with the base of the brew group.
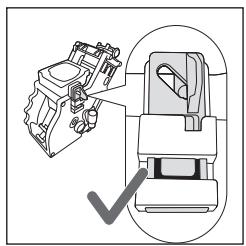
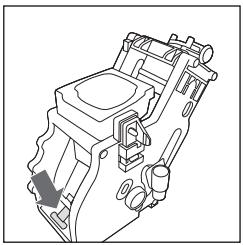
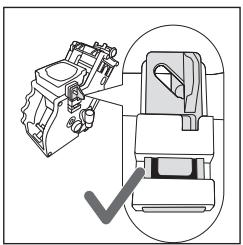
2 Make sure that the yellow locking hook of the brew group is in the right position.
To correctly position the hook, push it upwards to the highest possible position.
If the hook is still in the lower position, this means it has not been correctly positioned.
3 Reinsert the brew group in the machine along the side guides until it locks in the right position with a click.
Warning: do not press the PUSH lever.
4 Close the service door.
Lubricating the brew group
In order to ensure the perfect performance of the machine, it is necessary to lubricate the brew group. Refer to the following table for the frequency of lubrication.
| Frequency of use | Number of beverages prepared daily | Frequency of lubrication |
| Low | 1-5 | Every 4 months |
| Regular | 6-10 | Every 2 months |
| High | >10 | Every month |
1 Turn off the appliance and disconnect the power cord.
2 Remove the brew group and rinse it using lukewarm water (see the "Cleaning the brew group under running water" chapter).
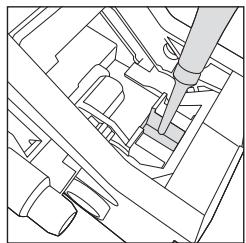
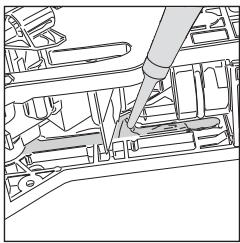
3 Apply a thin layer of the lubricant provided around the inserting pin on the lower part of the brew group.

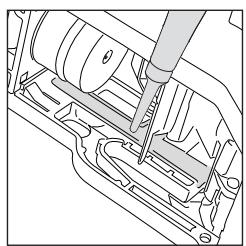
4 Apply a thin layer of lubricant to the guides, on both sides (see figure).
5 Reinsert the brew group (see the "Reinserting the brew group" chapter).
Note: you can use the lubricant tube multiple times.
Descaling
Descaling procedure
Dscaling needs to be carried out when the machine signals it.
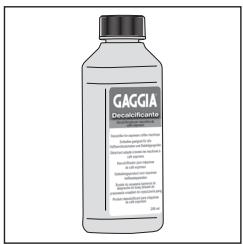
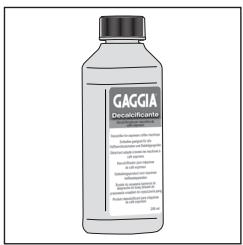
Use only the Gaggia descending solution designed to guarantee the machine's excellent performance. The use of other products could damage the machine and leave residue in the water. Failure to descale the machine will void the warranty.
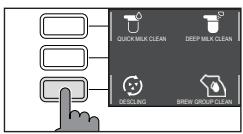
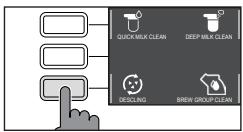
1 Press the CLEAN/SETTING button and select the "CLEAN" button shown on the display.
- Press the "DESCALING" button, then press the START/STOP button.
2 Remove the drip tray and the coffee pucks container, empty them, and insert them in the machine again.
3 Remove the water tank and empty it. Remove the INTENZA+ filter, if present.
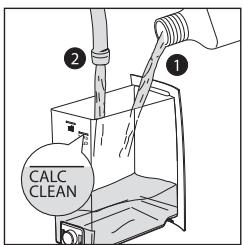
4 Empty the entire bottle of Gaggia descending solution into the water tank and fill the tank with water up to the CALC CLEAN notch. Reinsert it in the machine.
5 Fill the milk carafe halfway with water and insert it in the machine.
6 Follow the instructions shown on the display to launch the descending procedure. This procedure lasts approximately 25 minutes and consists of a descending cycle and a rinse cycle, carried out with dispensing at regular intervals.
7 Once the descending cycle is complete, rinse the water tank, carafe and water circuit, following the instructions shown on the display.
8 Replace the INTENZA+ filter into the water tank.
Note: it is possible to pause and resume the procedure at any time by pressing the START/STOP button.
Warning: when the descending procedure is active, the brew group cannot be removed. Wait for the descending process to end, then remove the brew group.
What to do if the descending process is interrupted
You can exit the descending procedure by pressing the ON/OFF button on the control panel. If the descending procedure is interrupted before its completion, proceed as follows:
1 Empty the water tank and wash it thoroughly.
2 Fill the water tank with fresh water up to the CALC CLEAN notch and switch the machine on again. The machine will warm up and perform an automatic rinse cycle.
3 Before preparing any beverage, perform a manual rinsing cycle as described in the specific chapter.
Note: if the procedure has not been completed, it will be necessary to carry out another descaling procedure as soon as possible.
Various Settings
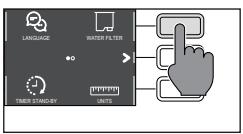
By pressing the CLEAN/SETTING button and selecting " SETTINGS" on the display, it is possible to reset or modify several machine parameters including:
Language
- Water filter
- Timer stand-by
Water hardness
Measurement units
- Beverage counter
-Restore factory settings
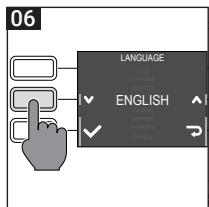
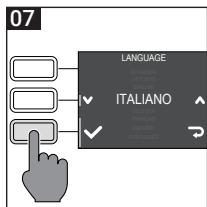
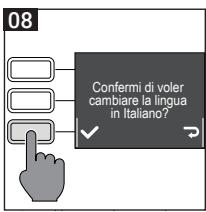
Language
When the language setting icon is selected, the list of available languages will be displayed.
| Languages available |
| ITALIAN | DUTCH | HUNGARIAN |
| ENGLISH | DANISH | BULGARIAN |
| GERMAN | GREEK | CZECH |
| FRENCH | POLISH | SLOVAK |
| SPANISH | RUSSIAN | LITHUANIAN |
| PORTUGUESE | ROMANIAN | |
Water filter
When "WATER FILTER" is selected, follow the instructions on the display and those described under the "Installing the INTENZA+ water filter" and "Replacing the INTENZA+ water filter" chapters.
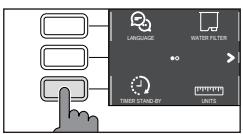
Timer stand-by
When "TIMER STAND-BY" is selected, the timer can be set to:
- 15 min
- 30 min
- 60 min
- 180 min
Water hardness
With "WATER HARDNESS" selected, follow the instructions on the display and those described under the "Measuring water hardness" chapter.
Measurement units
By selecting "MEASUREMENT UNITS":
it is possible to set the measurement units to "ml" or "oz".
Beverage counter
It is possible to display the number of cups of each beverage that have been dispensed since the first operation of the machine. These numbers cannot be reset.
Restore factory settings
It is possible to restore the machine to the default factory settings. The machine will require a secondary confirmation before proceeding. All the parameters will be reset except those relating to the profiles (MY FAVOURITES) and the beverage counter.
Error Code Key

The list below reports the error codes that the display can show, their meanings and how to solve the problem. If the indicated solutions are ineffective (the display keeps showing the error code icon and the machine does not function correctly), or if further error codes are displayed, please contact an authorised service centre or a distributor center or yur local vendor.
The contact info is listed on www.gaggia.com and www.gaggia.it.
| Error code | Problem | Cause | Possible solution |
| 01 | The coffee grinder is clogged. | The coffee outlet duct is clogged. | Remove the power cord and remove the brew group. Clean the coffee outlet duct thoroughly using a spoon handle. Switch the appliance on again. |
| 03 - 04 | A problem occurred in the brew group. | The brew group is dirty or not well lubricated. | Switch off the machine using the power button. Remove the brew group and clean it thoroughly. (Refer to the "Cleaning the Brew Group" chapter) |
| The brew group is not positioned correctly. | Switch off the machine using the power button. Remove the brew group and reinsert it. Ensure that the brew group is in the correct position before inserting it. Refer to the "Reinserting the brew group" chapter. |
| 05 | A problem occurred in the water circuit. | There is air in the water circuit. | Remove and reinsert the tank in the machine a couple of times. Make sure you insert the tank correctly in the machine. Check that the water tank seat is clean. |
| If you use an "INTENZA+" filter: pull out the filter from the water tank and shake it to remove all air from the filter. Then reinsert the "INTENZA+" filter into the water tank. |
| 14 | The machine is overheated. | There may be multiple causes. | Switch off the machine and switch it on again after 30 minutes. Perform this operation 2 or 3 times. |
Troubleshooting
This chapter summarises the most common problems you may encounter while using the machine. If you are unable to resolve the problem using the information given below, visit the FAQ sections on www.gaggia.com or www.gaggia.it or contact the Customer Service Centre in your country.
| Problem | Cause | Solution |
| The machine does not switch on. | The machine is not connected. | Check that the power cord has been inserted correctly. |
| The drip tray fills quickly. | This is normal. The machine uses water to rinse the internal circuit and the brew group. Part of the water flows through the internal system directly into the drip tray. | Empty the drip tray when the red indicator emerges from the grid of the drip tray.
Tip: Place a cup under the dispensing spout to gather the rinse water. |
| The display continuously shows the "coffee pucks container full" icon. | The coffee pucks container has been emptied when the machine was off. | Always empty the coffee pucks container when the machine is on. If you empty the coffee pucks container when the machine is off, the coffee cycle counter does not reset. In this case, the display shows the icon even if the container is not full. |
| The coffee pucks container has been put back too quickly. | Always wait about 5 seconds when you replace the coffee pucks container. This way, the counter will reset to zero. |
| The machine says to empty the coffee pucks container even if the container is not full. | The machine has not reset the counter last time the coffee pucks container has been emptied. | Always wait about 5 seconds when you replace the coffee pucks container. This way, the coffee grounds counter will reset to zero. |
| Always empty the coffee pucks container when the machine is on. If you empty the coffee pucks container when the machine is off, the coffee cycle counter does not reset. |
| Impossible to remove the brew group. | The brew group is not in the correct position. | Close the service door. Switch the machine off and then back on. Wait for the display to show the ready message, then remove the brew group. |
| The coffee pucks container has not been removed. | Remove the coffee pucks container before removing the brew group. |
| The brew group cannot be inserted. | The brew group is not in the correct position. | The brew group has not been positioned correctly before being placed back. Ensure that the lever is in contact with the base of the brew group and that the hook of the brew group is in its correct position. See the "Reinserting the brew group" chapter. |
| To reset the machine: put the coffee pucks container back in place. Do not insert the brew group. Close the service door with the coffee pucks container inserted, then unplug and plug in the power cord. Then try to reinsert the brew group and switch on the machine. |
| The espresso does not have enough crema or it is watery. | The coffee grinder is set to a coarse grinding. | Adjust the coffee grinder to a finer setting. |
| The machine is performing the self-adjustment. | Dispense several cups of coffee so that the machine regulates itself automatically. |
| The coffee outlet duct is clogged. | Clean the coffee outlet duct with a spoon as described in the "Cleaning the brew group under running water" chapter. |
| The coffee dispensed is not hot enough. | The set temperature is too low. Check the menu settings. | Set the menu temperature to "MAX". |
| The machine grinds the coffee beans, but the coffee is not dispensed. | The coffee grinder is set to a too fine grinding. | Adjust the coffee grinder to a coarser setting. |
| The coffee dispensing spout is blocked. | Dispense a long coffee from pre-ground coffee but without actually adding pre-ground coffee. |
| The nozzles of the coffee dispensing spout are blocked. | Clean the nozzles of the coffee dispensing spout with a small bottlebrush. |
| Coffee is dispensed slowly or by drips. | The coffee grinder is set to a too fine grinding. | Adjust the coffee grinder to a coarser setting. |
| The nozzles of the coffee dispensing spout are blocked. | Clean the nozzles of the coffee dispensing spout with a small bottlebrush. |
| The machine circuit is clogged by limescale. | Descale the machine. |
| The milk does not froth. | The milk dispensing spout is dirty or the carafe has not been inserted correctly, or the milk carafe has not been assembled with all its parts. | Clean the carafe according to the "Accurate cleaning of the milk carafe under running water" chapter and ensure that it is positioned and inserted correctly. |
| Ensure that all components have been correctly assembled. |
| The type of milk used is not suitable for foaming. | The amount and the quality of froth vary depending on the type of milk. |
32 English
| Problem | Cause | Solution |
| The "INTENZA+" filter cannot be inserted. | Remove the air from the filter. | Let the air bubbles flow out of the filter. |
| The tank still contains some water. | Empty the water tank before installing the filter. |
| The rubber seal is not inserted on the "INTENZA+" filter. | Check the packaging and insert the seal on the "INTENZA+" filter. |
| There is some water under the machine. | The drip tray is too full and has spilled over. | Empty the drip tray when red indicator emerges from the grid of the drip tray. Always empty the drip tray before starting the descaling procedure. |
GAGGIA Accessories
Coffee and accessories are available through authorised centres (Italy), or distributors in your country.
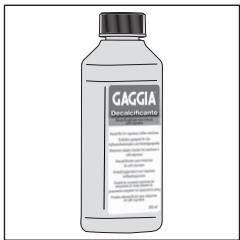
Dscaling product
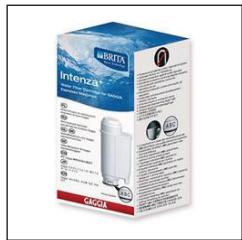
INTENZA+ water filter
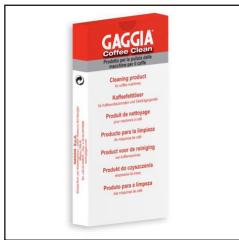
Coffee oil remover

Milk circuit cleaner (Philips)
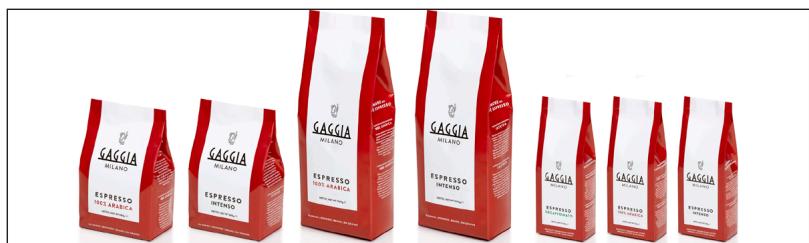
Range of coffee available in beans and pre-ground: 100% Arabica / Intense / Decaffeinated
Technical Specifications
| Nominal voltage - Power rating - Power supply | See data plate on the inside of the service door |
| Housing material | Thermoplastic type |
| Dimensions | 260 x 380 x 440 mm |
| Weight | 7.5 kg |
| Power cord length | 1200 mm |
| Control panel | Front panel |
| Cup size | Up to 150 mm |
| Water tank | 1.8 litres - Removable type |
| Coffee bean container capacity | 250 g |
| Coffee pucks container capacity | 10 |
| Pump pressure | 15 bar |
| Boiler | Stainless steel boiler |
| Safety devices | Thermal Fuse |

34 Nederlands
Inhoudsopgave
Overzicht van de machine (afb. 2) 35
Bedieningspaneel en display 36
Overzicht van het contropaneel (afb. 1) 36
Multifunctietaetsen 36
Eerste installment 37
Handmatige spoelcylclus 37
Meting van de waterhardheid 38
Waterfilter INTENZA+ 38
Installatie van het waterfilter INTENZA+ 39
Vervanging van het waterfilter INTENZA+ 39
Type drank 40
Espresso-lade 41
Koffieafgiffe 41
Afgithe van koffie met koffiebonen 41
Afgifte van de koffie met voorgemalen koffie 42
Bereiding van dranken op basis van koffie en opgeschuiimde melk 42
Vullen van de melkkan 42
Plaatsing van de melkkan 43
Verwijdering van de melkkan 43
Afgifte van de dranken op basis van koffie en opgeschuiimde melk 44
Afgifte van heet water 44
Aanpassing van de dranken en creatie van de profielen 45
Aanpassing van de dranken 45
Een nieuw profiel aanmaken 46
Instelling van de maalfijnheid 47
Reiniging en onderhoud 48
Reinigungstabel 48
eiginig van de melkkan 50
eiginig van de zetgroep 51
vetten van de zetgroep 53
ntkalking 54
Frequentie van de ontkalking 54
Wat te doen in geval van onderbreking van de ontkalkingsprocedure 55
Verschillende instellungen 56
Taal 56
Waterfilter 56
Timer stand-by 56
Waterhardheid 57
Meeteenheid 57
Drankenteller 57
Fabrieksinstellungen herstellen 57
Betekenis van de foutdcodes 58
Oplossing van problemen 58
Accessoires GAGGIA 61
Technische gegevens 62

Overzicht van de machine (afb. 2)
| 1 | Deksel van de koffiebonenreservoir | 13 | Espresso-lade |
| 2 | Koffiebonenreservoir | 14 | Voedingskabel |
| 3 | Aansluiting voor voedingskabel | 15 | Smeervet |
| 4 | Waterreservoir | 16 | Maatlepel voor voorgemalen koffie |
| 5 | Compartment voorgemalen koffie | 17 | Tester van de waterhardheid |
| 6 | Afstelknop van de koffiemolen | 18 | Servicedeur |
| 7 | Controlepaneel | 19 | Koffieopvanglade |
| 8 | Afstelbare koffietuit | 20 | Zetgroep |
| 9 | Koffieresidureservoir | 21 | Toetsen uitvoer lekbakje |
| 10 | Lekbakje | 22 | Melkkan |
| 11 | Deksel lekbakje | 23 | Schenkinrichting voor water |
| 12 | Indicator lekbakje vol | | |
Bedieningspaneel en display
Deze koffiemachine heeft een intuitief en gebruiksvriendelijk display. Lees de volgende paragrafen voor een better begrip van de toetsen.
Overzicht van het contrôlepaneel (afb. 1)
| 1/2 | MULTIFUNCTIETOETSEN | Om de op het display aangegeven functie te selecteren. |
| 3 | Toets ON/OFF ⊙ | Om de machine aan of uit te schakelen. |
| 4 | Toets MY FAVOURITES♥ | Voor toegang tot het menu van de persoonlijke profielen. |
| 5 | Toets HOME ⊙ | Voor toegang tot het drankenmenu. |
| 6 | Toets CLEAN/SETTING ⊙ | Voor toegang tot het menu van de reiniging en de instelleningen. |
| 7 | Toets START/STOP ☐ | Om de afgifte van de geselecteerde drank te starten/stappen, of de op het display weergegeven procedure te starten/stappen. |

Opmerking: de toetsen MY FAVOURITES 心 , HOME 心 , CLEAN/SETTING 心 , zich ook toetsen voor ESC. Het is op elk moment möglich om het weergegeven scherm te verlaten door op een van deze toetsen te drukken die maar hun oorspronkelijke menu terugbrengen.

Multifunctietoetsen
De multifunctionele toetsen aan de zijkanten van het display dienen om de functie of de drank te selecteren waarnaar ze op dat moment verwijzen.
Opmerking: om het lezen van deze handleiding te vergemakkelijken, waar u leest <> bedoelt men <>.
Eerste installment
Voordat u de machine gebrukt, is het van essentieel belang dat u een paar eenvoudige stappen volgt, duidelijk beschreiben in de beknopte handleiding aan het begin van deze handleiding met verklarende tekeningen.
Opmerking: om een nog hebelijkere koffie te verkrijgen, raden we u aan eerst 5 kopjes koffie te zetten zodate machine de zelf-afstelling kanuitvoeren.
Handmatige spoelcyclus
Tijdens de eerste installmentie of na een lange periode van inactiviteit van de machine, moet er een handmatige spoelcylus uitgevoerd worden.
1 Plaats een bak onder de koffietuit, blader door de verschillende paging's en selecteer een "ESPRESSO LUNG".
2 Druk op de toets " ", zonder voorgemalen koffie toe te voegen.
3 Druk op de toets START/STOP om de afgithe te starten, de machine begint heet water te verstrekken.
4 Leeg de houder en verzeker u ervan dat de schenkinrichting voor heet water geinstalleerd is.
5 Plaats een houder onder de schenkinrichting voor heet water en kies de drank " HOT WATER".
6 Druk op de toets START/STOP om de afgifte te starten.
7 Leeg de houder en herhaal de stappen van 5 tot 7, tot het waterreservoir leeg is.
8 Vul na beeindig het waterreservoir opnieuw tot het MAX niveau. De machine is nu maar voor gebruik.
Meting van de waterhardheid
Tijdens de eerste installmentie, moet de waterhardheid ingesteld worden. Neem het meetstrookje van de waterhardheid uit de verpakking en volg de stappen die op het display weergegeven worden tijdens de installmentiefase. Om de waterhardheid later te veranderen, drukt u op de CLEAN/SETTING 山 -knop, selecteert u "INSTELLINGEN" en selecteert u eenmaal in het instelleningenmenu "WATERHARDHEID".
1 Dompel de strook voor de meting van de waterhardheid gedurende 1 seconde in een glas water. Haal de strook uit het water en wacht 1 minuut.
2 Controller hooveel vierkantjes rood geworden zijn.
3 Gebruik de groene toetsen "✔" en "▲" om de waarde te kiezen van de hardheid die ingesteld要去 worden volgens de hierna volgende tabel, en bevestig dan met de toets "✔".
| Aantal rode vierkantjes | In te stellen waarde | Waterhardheid | INTENZA+ |
| ■□□□ | 1 | zeer zacht water | A |
| ■□□□ | 2 | zacht water | A |
| ■□□□ | 3 | hard water | B |
| ■□□□ | 4 | zeer hard water | C |
Waterfilter INTENZA+
Het is aangeraden het waterfilter INTENZA+ te installereren, om de vorming van kalksteen te beperken. Dit verzekert een langere duur van de machine en een better aroma van de koffie in de loop van dearend.
Water is een heel belangrijk bestanddeel bij het zetten van koffie: waarom is het heel belangrijk dit.altijd professioneel te filtreren.
Het waterfilter "INTENZA+," voorkomt de vorming van mineraalafzettingen, door de kwaliteit van het water te verbeteren.
Installatie van het waterfilter INTENZA+
Verwijder het witte filtertje dat zich in het waterreservoir bevindt en bewaar het op een drogeplaats.
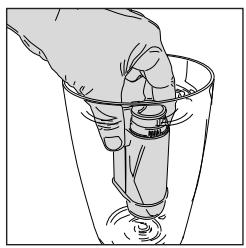
Dompel het waterfilter INTENZA+ in verticale positie (met de opening maar boven) in koud water en druk zachtjes op de zijkanten om de luchtballetjes eruit te lately komen.
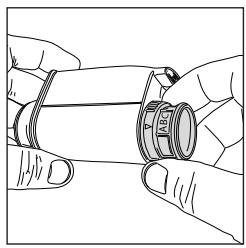
Verwijder het INTENZA+ waterfilter UIT het water en stel het in op basis van de gedetecteerde hardheid van het water (zie het hoofdstuk "Meting van de waterhardheid") en gespecificeerd aan de onderkant van het filter:
A = zacht water - komt overeen met 1 of 2 vakjes
B = hard water (standaard) - komt overeen met 3 vierkantjes
C = zeer hard water - komt overeen met 4 vierkantjes
Plaats het filter INTENZA+ in het waterreservoir en verzeker u ervan dat het correct geplaatst is. Vul het waterreservoir enplaats het in het compartment.
Drukt u op de CLEAN/SETTING -knop, selecteert u "INSTELLINGEN" en selecteert u eenmaal in het instellingenmenu "WATERHARDHEID".
Volg de aanwijzingen op het display om het filter correct in te schakelen.
Opmerking: de activeringsprocedure van het filter kan onderbroken worden door te drukken op de knop START/STOP . Om de activeringsprocedure van het filter opnieuw te starten, drukt u opnieuw op de toets START/STOP
Vervanging van het waterfilter INTENZA+
Wanneer het waterfilter INTENZA+ op is, verschijnt het waarschuwingsbericht op het display.
1 Vervang of schakel het filter UIT door te drukken op de toets CLEAN/SETTING , en verrolgens op de toets " INSTELLINGEN".
2 Selecteer de toets "WATERFILTER".
3 Kies VERVANGEN of UITSCHAKELEN en bevestig met de toets " ✓".
Volg de aanwijzingen op het display om het filter correct in te schakelen.
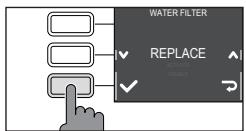
Opmerking: Kies " UITSCHAKELEN " om het filter uit te schakelen, indien u deze Niet verrangt.
40 Nederlands
Type drank
| Naam van de drank | Beschrijving |
| Ristretto | De ristretto, geserveerd in een Klein kopje, is een espresso met een kortere afgiftetijd in vergelijkming met de klassieke espresso, wat resulteert in een kortere en minder caffeinehoudende koffie. |
| Espresso | De espresso is in heel de wereld gekend als de echte "Italiaanse koffie". Hij wordt geserveerd in een Klein kopje, met als onmiskenbare kenmerken een volledig en intens aroma en een toplaag van compacte,ATURELijke room. Ditresultaat in het kopje is het resultaat van een drukextractieproces met heet water, uitgevonden door Achille Gaggia in 1938. |
| Espresso lungo | De espresso lungo is een espresso met een langere extractietijd. Hij is meer verdund, met een andere aromatische intensiteit en een hoger caffeinegethalte.Deze koffie worden in een middelgroot kopje geserveerd. |
| Koffie | Koffie is een drank gemaakt met een grotere hoeveelheid water dan de espresso. Hij heeft eenichter aroma en wordt in een middelgroot tot groot kopje geserveerd. |
| Americano | De americano is een minder intense slappe koffie, Voorbereid met een espresso的那一aaan heet water wordt toegevoegd. |
| Cappuccino | De cappuccino is een van de meest geliefde Italiaanse klassiekers ter wereld. Hij wordt voorbereid met espresso, melk en melkschuim, dat minstens 1 cm dik要去+zijn. Deze wordt in een groot kopje geserveerd. |
| Cappuccino XL | De Cappuccino XL is een cappuccino die gemaakt worden met een grotere hoeveelheid espresso en melk. |
| Cortado | De cortado is een drank van Argentijnse oorsprong, namelijk een espresso waar eenkleine hoeveelheid melk aan toegevoegd wordt. Hij wordt over het algemeen in een Klein glas geserveerd en is populair in Spanje en Portugal, evenals in Latijns-Amerika. |
| Flat white | De flat white is een drank van Australische herkomst met een sterke dominantie van koffie. Hij is samengestelduit een dubbele espresso en melk met een lichte laag van fluweelachtig schuim. |
| Café au lait | De café au lait is een drankje dat bestaat uittgelijke delen koffie en melk.. Hij kan nu ook verwijk worden met een lichte laag melkschuim. Deze wordt in een groot kopje geserveerd. |
| Latte Macchiato | De Latte Macchiato is een drank die wordt bereid met warmelmk, een deel melkschuim en eenkleine hoeveelheidpresso. Hij wordt geserveerd in een groot, transparant glas waarin men de drie verschillende lagen die zich vormen, kan oneselfiden. |
| Latte Macchiato XL | Latte Macchiato XL is een Latte Macchiato bereid met een grotere hoeveelheid melk, geserveerd in een hoog en transparent glas. |
| Opgeschuiimde melk | De opgeschuiimde melk wordt gebruikt voor de Voorbereiding van de cappuccino, Latte Macchiato en talrijke andere dranken. Het resultaat is een laag compact en homogenen melkschuim. |
| Heet water | Het heet water kan gebruikt worden voor de bereiding van thee, kruidenthee en oplosproducten. |
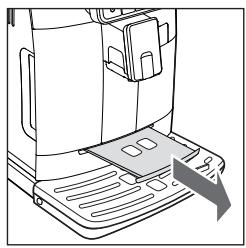
Espresso-lade
Deze machine is ontworpen om onberispelijke resultaten in het kopje te garanderen, van de traditionele espresso tot tal van andere beschikbare dranken. Als u een Italiaanse espresso wilt proeven zoals de traditie vereist, met een heerlijke laag naturuurlijke room op het oppervlak, raden we aan de "Espresso-lade" te gebruiken, special ontworpen en geintegreerd in de machine. Met dit vlak kunt u traditionele effssokopjes gebruiken, zodat de perfecte hoogte worden bereikt voor een compacte en homogene room en een afgithe zonder spatten.
Koffieafgifte
Afgithe van koffie met koffiebonen
Let op: gelebruik enkel koffiebonen voor espresso. Plaats geen gemalen koffie, ongebrande koffie of oploskoffie in de koffiebonencontainer, waar dat deze de machine konnen beschaden.
Raad: verwarm de kopjes voor met heet water om een warmere koffie te krijgen.
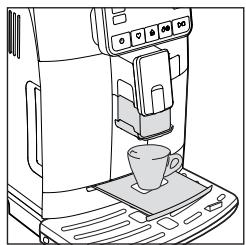
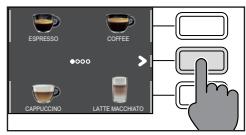
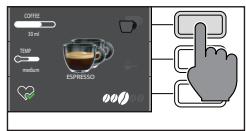
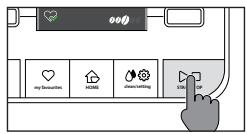
1 Verwijder de espresso tray,plaats een kopje onder de koffietuit, verplaats de koffietuit omhoog of omlaag, afhankelijk van het formaat van het gebruikte kopje.
Druk op de toets HOME voor toegang tot het drankenmenu.
2 Doorloop de verschillende paging's om de gewenste koffie te vinden en te selecteren.
3 Eens de gewenste koffie geseleed is, kan men twee kopjes tegelijkkertijd zetten aan de hand van de toets " ", behalve de AMERICANO.
4 Druktenslotte op de toets START/STOP l om de afgithe te starten.
Opmerking: de afgifte kan op eender welt moment onderbroken worden, door op de toets START/STOP te drukken.
Indien u deinstallingen van de drank wenst aan te passen, zie dan hoofdstuk "Aanpassing van de dranken".
42 Netherlands
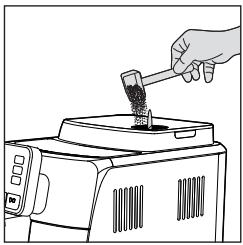

Afgithe van de koffie met voorgemalen koffie
Gebruik de speciale meegeleverde maatlepel en voeg de juiste dosis in het compartment voor voorgemalen koffie.
1 Open het deksel van het reservoir voor voorgemalen koffie en voeg een afgestreken maatlepel voorgemalen koffie toe.
Let op: voeg geen andere stoffen in dan de voorgemalen koffie om de machine nicht te beschadigen.
2 Plaats een kopje onder de koffietuit en selecteer de gewenste drank.
3 Druk op de toets "
Opmerking: de functie "voorgemalen koffie" sluit de möglichkheid uit om twee kopjes koffie tegetelijk te zetten en het aroma in te stellen, wat alleen möglichk is met koffiebonen.
Opmerking: deze functie kan nicht gebruikt worden met de FLAT WHITE.
4 Druk op de toets START/STOP om de koffieafgifte te starten.
Indien u deinstallingen van de drank wenst aan te passen, zie dan hoofdstuk "Aanpassing van de dranken".
Opmerking: de afgifte kan op eender werk moment onderbroken worden, door op de toets START/STOP te drukken.
Bereiding van dranken op basis van koffie en opgeschuimde melk —
Vullen van de belkkan
Opmerking: Voordat men de melkkan gebruikt, dient men deze eerst zorgvuldig te reinigen, zoals beschreiben in het hoofdstuk "Reiniging van de melkkan".
De melkkan kan voor tijdens het gebruik bevuld worden.
1 Til het deksel van de eenheid voor afgifte van melk op.
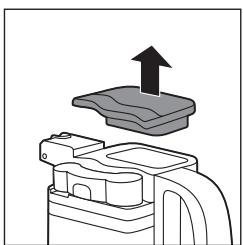
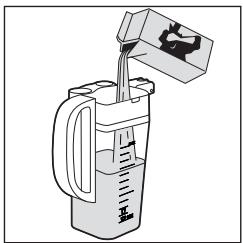
2 Schenk de melk in de kan: de hoeveelheid melk dientussen het minimumniveau (MIN) en het maximumniveau (MAX) aangeduid op de melkkan te liggen. Plaats de dekel opniew.
Plaatsing van de melkkan
Indien voorzien, verwijder de schenkinrichting voor water:
1 Druk op de twee toetsen aan de zijkant om de schenkinrichting (1) los te makes en til deze eenklein beetje op. Trek aan de schenkinrichting voor water om deze te verwijderen (2).
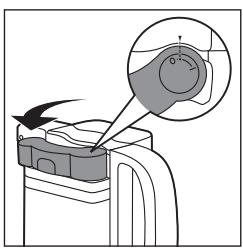
2 Plaats de schenkinrichting van de melkkan op positie "I".
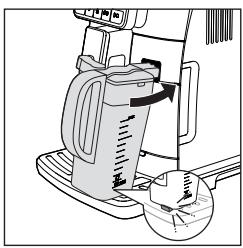
3 Kantel het iets enplaats het volledig in de geleiders van de machine, totdat het aan het lekbakje is vastgehaakt.
Opmerking:plaats de kan Niet met kracht.
Verwijdering van de melkkan
Draai de kan maar boven totdat deze soepel UIT de inzet op het lekbakje loskomt. Verwijder ze cervolgens.

44 Nederlands
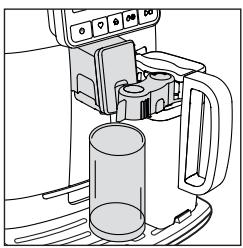
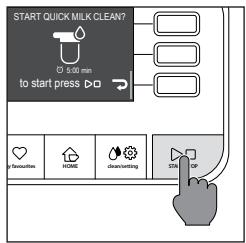

Afgithe van de dranken op basis van koffie en opgeschuimde melk
Raad: verwarm de kopjes voor met heet water om een warmer product te krijgen.
Raad: gebruik koude melk (aan een temperatuur van ongeveer 5^ ) met een gehalte aan proteinen van minstens 3% om een optimaal resultaat te garanderen voor het schuim. U kan zowel volle als halfvolle melk gebruiken. U kan, bovendien, afgeroomde melk, sojamelk en lactosevrijne melk gebruiken.
1 Druk op de toets HOME en kies uw drank op het menu.
- Druk op de toets van de gewenste drank enplaats een kopje of beker met de juiste afmetingen onder de kofflietuit en de schenkinrichting van de kan.
- Druk op de toets START/STOP om de afgifte van de gekozen drank te starten.
2 De machine geeft een vooraf bepaald volume opgeschuiimde melk en koffie af in het kopje of in de beker. Afhankelijk van de gekozen drank, worden eerst de koffie of eerst de opgeschuiimde melk afgegeven.
Indien u de drank voor de afgiffe wenst aan te passen, zie dan hoofdstuk "Aanpassing van de dranken".
3 Na elke voorbereiding van dranken op basis van koffie en opgeschuiimde melk, kan men binnen de 10 seconden de procedure voor snelle reiniging van de kan uitvoeren. De procedure kan in ieder geval ook later uitgevoerd worden, vanuit het menu van de reiniging aan de hand van de toets CLEAN/SETTING Volg de instructies op het display. De reinigingsprocedure kan ook uitgevoerd worden met melk in de kan.
Opmerking: voer de procedure voor snelle reiniging minstens een keer per dag UIT.
Druk op de toets START/STOP om te bevestigen, of op de toets " " om ze later uit te voeren.
Afgithe van heet water
Let op: wanneer de Voorbereiding begint, kan de schenkinrichting voor heet water stoom en heet water afspuiten. Alvorens de schenkinrichting van het heet water te verwijderen,要去 u wachten tot de voorbereiding voltooid is.
1 Plaats de schenkinrichting voor heet water.
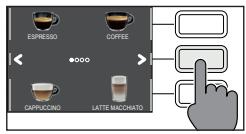
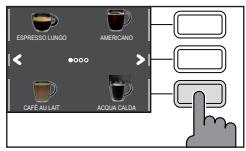
2 Druk op de toets HOME, doorloop de verschillende schermen met de groene toetsen 一 en 一 , en kies "HEET WATER".
Let op: kies de drank "HEET WATER" op het scherm HOME enkel wonneer de schenkinrichting van het heet water geinstalleerd is.
3 Druk op de toets van het "HEET WATER". Druk verzolgens op de toets START/ STOP om de afgithe te starten.
Opmerking: de afgifte kan op eender welt moment onderbroken worden, door op de toets START/STOP te drukken.
Indien u het volume van het water voor de afgifte wenst aan te passen, zie dan hoofdstub "Aanpassing van de dranken".
Aanpassing van de dranken en creatie van de profielen
Met deze machine=kunt u de instellingen van een drank aanpassen aan uw voorkeuren en de gewijzigde drank opslaan in een van de 4 beschikbare profielen.
Aanpassing van de dranken
1 Druk op de toets HOME
2 Kies uw drank.
3 Op het scherm worden alle instellenen weergegeven die u kunt aanpassen en/ of selectoren op basis van uw voorkeuren. Al naargelang het type drank, kan u de volgende waarden afstellen of selectoren:
- het volume van de koffie en van de melk;
- de temperatuur van de koffie;
- de afgifte van twee kopjes tegelijkkertijd;
- het gebruik van voorgemalen koffie;
- de intensiteit van het aroma (enkel bij gebruik van koffiebonen);
4 Na te toets " KOFFIE " of " MELK ", ingedrukt te—hebben, gebruikt u de groene toetsen " + " en " -, om het gewenste volume in te stellen.
Druk verwolgens op de knop " √ " om te bevestigen en terug te keren maar het vorige scherm, waar de nieuwe ingestelde hoeveelheid weergegeven worden.
5 Druk de toets "TEMP" meerdere malen in om de temperatuur van de drank te wijzigem met de volgende opties:
laag;
gemidd.;
- hoog;

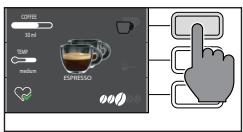
6 Druk op de toets "P" om twee kopjes te zetten, of op de toets "P" om slechts een kopje te zetten. Het beeld van de drank in het midden van het display geeft het gekozen,aantal kopjes weeer.
Opmerking: deze functie kan nicht gebruikt worden voor de dranken met melk, de AMERICANO en heet water.
7 Druk op de toets " om het gebruik van voorgemalen koffie in te schakelen.
Opmerking: met deze functie kan men slechts een koffie per keer verstrekken.
8 Druk op de toets " 0000" om de intensiteit van het aroma te wijzigen. Bij elke druk, worden de intensiteit van het aroma met een graad gewijzigd. Het display geeft de gekozen intensiteit wee.
1 Zeer mild
2 Mild
3 Normaal
4 Sterk
5 Zeer sterk
Opmerking: deze functie kan nicht gebrukt worden met de voorgemalen koffie.
9 Nadat u de drank aan uw smoak hebt aangepast, kutu het in een profiel opslaan door te drukken op de toets "
10 Kies verwolgens het profiel waar u de drank wilt opslaan,uit de 4 beschikbare profielen.
Een neueu profiel aanmaken
Men kan op twee wijzen een profiel aanmaken:
- Met de toets HOME, zoals beschreiben in het hoofdstuk "Aanpassing van de dranken" onder punt 9 en 10;
- Met de toets MY FAVOURITES♥, als volgt:
1 Druk op de toets MY FAVOURITES
2 Kies de kleur van het profiel die u verkiest.
3 Druk op de toets "DRANK TOEVOEGEN
4 De schermen van de dranken worden weergegeven. Selecteer de drank die u wilt opslaan in uw profiel en pas het aan door stap 3 tot 8 van het hoofdstuk "Aanpassing van de dranken"uit te voeren.


5 Druk op de toets "♥" om de aangepaste drank in uw profiel op te slaan. Nu kan u de drank zetten of het menu verlaten met een van de toetsen ESC (HOME, MY FAVOURITES, CLEAN/SETTING).
De opgeslagen drank is nu aanwezig in de lijst met uw favorieten en worden gemarkeerd door het hartje in de kleur die overeenkomt met het gekozen profil.
Opmerking: Na gebruik worden het pictogram van het profiel " " gekleurd.
6 De drank opgeslagen in uw profiel kan worden gewijzigd met behulp van de knop "WIJZIGEN of worden verwijderd met de knop "WISSEN
Opmerking: Als u in HOME bent, kurz u het drankje Niet opslaan met de toets MY FAVORITES , maar alleen met de toets " " anders verliest u de zojuist ingestelde instelleningen.
Installing van de maalfijnheid
U kurz de maalfijnheid aanpassen met de instelknop voor de maalfijnheid die zich in de koffiebonencontainer bevindt. De keramische koffiemolen garandeert een perfecte en homogene maling voor de bereiding van elk kopje koffie. Zo worden het aroma bewaard, om algijd een perfecte smaak te garanderen.
Opmerking: de maalfijnheid kan enkel afgesteld worden terwijl de machine de koffiebonen maalt. Het verschil in smaak za na de afgithe van 2-3 koffiekopjes geproofd worden.
Let op: om beschadiging van de koffiemolen te voorkomen, draai de selectieknop van de maalfijnheid Niet meer dan een klik tegelijk.
1 Plaats een kopje onder de koffietuit.
2 Open het deksel van het koffiebonenreservoir.
3 Zet een espresso zoals beschreiben in het hoofdstuk "Afgithe van een koffie met koffiebonen".
4 Terwijl de machine de koffie maalt, plaatst u het uiteinde van het handvat van de maatlepel voor voorgemalen koffie op de instelknop van de koffiemolen die in het koffiebonenreservoir is geplaatst. Gebruik de hendel van de maatlep om de knop aan te drukken en maar links of rechts te draaien, een klik per keer.
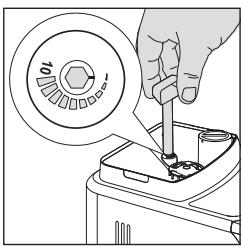
5 Er zijn 10 verschillende graden van maalfijnheid beschikbaar waartussen men kan kiezen. Hoekleiner het streepje,des te sterker en rond de koffie.
Opmerking:
- Grove maling: mildere smaak, voor koffiemelanges met donkere branding (5-10);
- Fijne maling: intensere smaak, voor Lichtgebrande koffiemelanges (1-5);
Reiniging en onderhoud
Regelmatige reiniging en onderhoud houden de machine in optimale staat en garanderen een constante, uiststekende koffie, constante toevoer en uiststekend melkschuim. Raadpleeg de onderstaande tabel om te weten wanner en hoe u alle verwijderbare delen van de machine要去 reinigen. Lees de desbetreffende hoofdstukken voor meer gedetailleerde informatie.
Reinigungstabel
| Beschrijving deel | Wonneer reinigen | Hoe reinigen |
| Melkkan | Na gebruik | Start, na de Voorbereiding van een drank op basis van melk, de cyclus voor "SNELLE REINIGING" in functie van wat aangegeven worden door de machine zelf. |
| Dagelijks | Reinig de houder van de melk en het aanzuigbuisje van de melk zoals beschreiben in het hoofdstuk "Grondige reiniging van de melkkan onder stromend water", volgens de eerste 4 punten en het punt 11. |
| Wekelijks | Demonteer de melkkan en reinig alle delen onder stromend water. |
| Maandelijks | Start de cyclus "GRONDIGE REINIGING" volgens de instructies beschreiben in het hoofdstuk "Grondige reiniging van de melkkan onder stromend water". Gebruik voor deze reinigungscyclus het product voor de reiniging van de melkcircuits "Milk circuit cleaner", van Philips. |
| Zetgroep | Wekelijks | Verwijder de zetgroep en reinig hem onder stromend water. |
| In functie van het type gebruik | Zie het hoofdstuk "Reiniging en smering van de zetgroep". |
| Maandelijks | Reinig de zetgroep met de koffieolieverwijdingstabetten Gaggia om de olieachtige resten van de koffie te verwijdenen |
| Beschrijving deel | Wanner reinigen | Hoe reinigen |
| Lekbakje vol | Wanner de speciale rode indicator uit het rooster van het lekbakje kommt | Leeg het lekbakje en reinig het onder stromend water. |
| Koffieresidreservoir | Wanner de machine dit vereist | Leeg het koffieresidreservoir en reinig het onder stromend water. Verzeker u ervan dat de machine ingeschakeld isijdens deze werkzaamheid, anders worden het koffieresidreservoir Niet op nul gezet. |
| Waterreservoir | Wekelijks | Reinig het onder stromend water. |
| Compartment van de voorgemalen koffie/koffieleding | Wekelijks | Reinig het bovenste deel met de steel van een lepel Zoals hierna aangegeven. |
| Espresso-lade | In functie van het type gebruik | Verwijder de espresso tray en reinig deze met stromend water. U kan deze ook in de bovenste mand van de vaatwasser reinigen. |
Reiniging van de melkkan
Reinigingsprogramma's van de melkkan
De machine heeft twee programma's om de melkkan te reinigen, de snelle reiniging en de grondige reiniging. Beide programma's hunnen gekozen worden met de toets CLEAN/SETTING en doorervoigens op de toets " REINIGING " te drukken.
De snelle reiniging worden ook aan het einde van de afgithe van dranken op basis van melk voorgesteld. Volg voor beiden programma's de instructies weergegeven op het display.
- Programma voor de snelle reiniging
Hetprogramma voor snelle reiniging voorziet de reiniging van de schenkinrichting voor melk. Tijdens de reinigingsprocedure kan u de melk ook in de kan lately.
- Programma voor de grondige reiniging van de kan
Het programme voor de grondige reiniging van de kan voorziet een zorgvuldige reiniging van het hele melkircuit met gebruik van het product voor de reiniging van de melkcircuits van Philips "Milk Circuit Cleaner".
Grondige reiniging van de belkkan onder stromend water
Om de melkkan zorgvuldig te reinigen, moet u ze volledig demonteren en onder stromend water wassen, volgens de volgende stappen:
1 Druk op de ontgrendelingsknoppen om de deksen te verwijderen (afb. 23).
2 Verdraai de schenkinrichting van de melkkan op positie (afb. 24).
3 Til de schenkinrichting van de melk op van het deksel (afb. 25).
4 Verwijder het melkaanzuigbuisje (afb. 26).
5 Druk op de toets aangegeven door een pijtje om het deksel van deschenkinrichting van de melk te ontgrendelen (afb. 27).
6 Om het deksel te verwijderen, drukt u zachtjes op de zijkanten van de koffietuit en trekt u het deksel maar boven om het van de koffietuit te verwijderen (afb. 28).
7 Verwijder de ring uit de schenkinrichting van de melkkan (afb. 29).
8 Trek de eenheid van het melkschuim waar boven (afb. 30).
9 Trek de steun waar buiten ten opzichte van de eenheid van het melkschuim (afb. 31).
10 Trek de steun waar buiten en scheid hem van het resterende deel (afb. 32).
11 Reinig alle delen met lauw water.
12 Assembleer alle delen opnieuw in de omgekeerde volgorde.

Reiniging van de zetgroep
Let op: reinig de zetgroep Niet in de vaatwasmachine en gebruik geen afwasmiddelen voor afwas- of reinigingsmiddelen, waar dit de zetgroep kan beschadigen en de smaak van de koffie kan beinvloeden.
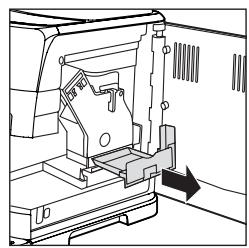
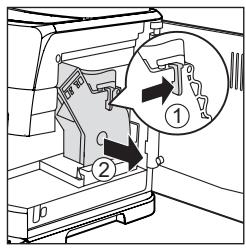
Verwijdering van de zetgroep
1 Schakel de machine uit en koppel de voedingskabel los.
2 Verwijder het koffieresidureservoir en open de servicedeur.
3 Verwijder de koffieopvanglade.
4 Druk op de PUSH-hendel (indrukken) (1) en trek aan de hendel van de zetgroep (2) om deze uit de machine te halen.
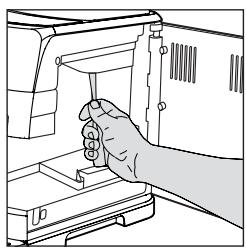
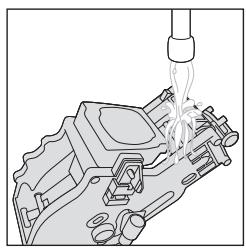
Reiniging van de zetgroep onder stromend water
1 Reinig de koffieleding grondig met de steel van een lepeltje of met een ander afgerond keukengereedschap.
2 Spoel de zetgroep grondig met lauw water. Reinig het bovenste filter zorgvuldig.
3 Laat de zetgroep aan de lucht drogen.
Opmerking: droog de zetgroep Niet af met doeken om de ophoping van stofvezels erin te vermijden.
52 Netherlands
Reiniging van de zetgroep met tabletten om de olieachtige resten van de koffie te verwijderen
Let op: Gebruik voor het schoonmaken alleen Gaggia-tabletten om olieachtige resten van de koffie te verwijderen.
1 Plaats een houder onder de koffietuit.
2 Druk op de toets CLEAN/SETTING en selecteer de toets "REINIGING" die op het display weergegeven worden.
3 Kies "REINIGING ZETGROEP" en druk op de toets START/STOP om de reinigingsprocedure te starten.
4 Volg de aanwijzingen op het display om de zetgroep correct te reinigen.
5 De procedure duurt onceveer 5 Minutes en u kan de toets START/STOP gebruiken om ze te onderbreken en verrolgens weeher verdter te latent gaan.
Herplaatsing van de zetgroep
1 Voordat u de zetgroep opnieuw in de machine staat, moet u ervoor zorgen dat de twee gele referentietekens aan de zichkant overeenkomen. Indien dit nicht zo is, doet u als volgt:
Zorg ervoor dat de hendel in aanraking komt met de basis van de zetgroep.
2 Verzeker u ervan dat de gele ontgrendelhaak van de zetgroep op de correcte positie is.
Om de haak correct teplaatsen, duwt u hem omhoog tot de maximaal bereikbare positie.
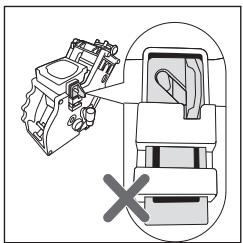
Indien de haak nog onderaan is, betekent dit dat hij Niet correct gespositioneer is.
3 Plaats de zetgroep opnieuw in de machine langs de geleiders aan derijkanten totdat.Deze op+zijn plaats blokkeert met een klik.
Let op: druk Niet op de hendel PUSH.
4 Sluit de servicedeur
Invetten van de zetgroep
Voor optimale machineprestaties要去 de zetgroep gesmeerd worden. Raadpleeg de volgende tabel voor de freiouctie voor invetten.
| Frequentie van gezruik | Dagelijks,aantal bereide dranken | Frequentie voor invetten |
| Laag | 1-5 | Om de 4 maanden |
| Normaal | 6-10 | Om de 2 maanden |
| Hoog | >10 | Elke maand |
1 Schakel het apparaat uit en koppel de voedingskabel los.
2 Verwijder de zetgroep en spoel deze af met warm water (zie het hoofdstuk "Reiniging van de zetgroep onder stromend water").
3 Breng een dunne laag van het meegeleverde smeervet aan rond de pin die in de machine gestoken worden, onderaan de zetgroep.
54 Netherlands
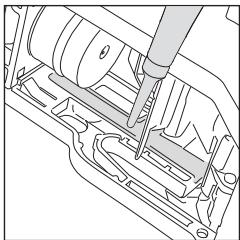
4 Breng een dunne laag smeervet aan op de geleiders, aan beiden kanten (zie afbeelding).
5 Plaats de zetgroep opnieuw (zie het hoofdstuk "Herplaatsing van de zetgroep").
Opmerking: u=kunt de tube smeervet meertere keren hergebruiken.
Ontkalking
Frequentie van de ontkalking
Wonneer de machine dit vereist,要去 de ontkalking van de machine uitgevoerd worden.
Gebruik alleen de ontkalkingsoplossing van Gaggia die ontworpen is om optimale prestaties van de machine te garanderen. Het gebruik van andere producten zouschade aan de machine hun verroorzaken en resten in het water achefterlaten. Indien de ontkalking van de machine Niet uitgevoerd worden, vervalt de garantie.
1 Druk op de toets CLEAN/SETTING en selecteer de toets "REINIGING" die op het display weergegeven worden.
- Druk op de toets "ONTKALKING" en druk verzolgens op de toets START/STOP ▷□.
2 Verwijder het lekbakje en het koffieresidureservoir, leeg ze enplaats ze terug in de machine.
3 Verwijder het waterreservoir en leeg het. Verwijder verrolgens, indien aanwezig, het filter INTENZA+.

4 Giet de hele fles ontkalkingsoplossing Gaggia in het waterreservoir en vul met water tot u het niveau van CALC CLEAN bereikt. Plaats het verrolgens wee in de machine.
5 Vul de melkkan voor de helft met water enplaats ze in de machine.
6 Volg de aanwijzingen die weergegeven worden op het display om de ontkalkingsprocedure te starten. Deze procedure duurt ongeveer 25 minutes en bestaat UIT een ontkalkingscylus en een spoelcylus, uitgevoerd met regelmatige afgiftes.
7 Als de ontkalkingscyclus voltooid is, moet u het reservoir, de kan en het watercircuit spoelen volgens de instructies op het display.
8 Plaats het filter INTENZA+ weer in het waterreservoir.
Opmerking: de activeringsprocedure van het filter kan onderbroken worden door te drukken op de toets START/STOP
Let op: wonneer de ontkalkingsprocedure actief is, is het Niet möglichk om de zetgroep te verwijderen. Wacht tot het ontkalkingsproces voltooid is en verwijder dan de zetgroep.
Wat te doen in geval van onderbreking van de ontkalkingsprocedure
U kan de ontkalkingsprocedure verlaten door op de toets ON/OFF op het contropaneel te drukken. Als de ontkalkingsprocedure worden onderbroken voordat deze is voltooid, voert u het volgende UIT:
1 Leeg het waterreservoir en reinig het zorgvuldig.
2 Vul het waterreservoir met vers water tot aan de individatie van het CALC CLEAN niveau en schakel de machine opnieuw in. De machine worden voorverwarmd en voert een automatische spoelcylus UIT.
3 Voer, voordat u eender welke drank klaarmaakt, een handmatige spoelcclusuit zoals beschreiben in het betreffende hoofdstuk.
Opmerking: als de procedure Niet voltooid is, moet er zo snel möglich een neue ontkalkingsprocedure uitgevoerd worden.
Verschillende instellingen
Door op de toets CLEAN/SETTING te drukken en "INSTELLINGEN" op het display te selecteren, können sommige machineparameters hersteld of gewijzigd worden, zoals:
- Taal
Waterfilter
- Timer stand-by
Waterhardheid
- Meeteenheid
- Drankenteller
- Fabrieksinstellungen herstellen
Taal
Nadat het pictogram voor de taalinstelling geselecteerd is, worden de lijst met beschikbare talen geopend.
Beschikbare talen
| ITALIAANS | NEDERLANDS | HONGAARS |
| ENGELS | DEENS | BULGAARS |
| DUITS | GRIKS | TSJECHISCH |
| FRANS | POOLS | SLOWAAKS |
| SPAANS | RUSSISCH | LITOUWS |
| PORTUGEES | ROEMEENS | |
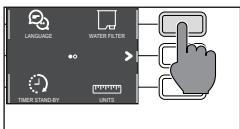
Waterfilter
Nadat "WATERFILTER" is geseleerd, volgt u de instructies op het display en zoals beschreiben in het hoofdstuk "Installatie waterfilter INTENZA" en in het hoofdstuk "Vervanging waterfilter INTENZA+".
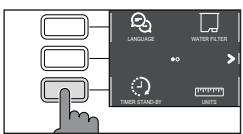
Timer stand-by
Na "TIMER STAND-BY" geselecteerd te hebben, kan de timer ingesteld worden op:
- 15 min.
- 30 min.
- 60 min.
- 180 min.
Waterhardheid
Nadat "WATERHARDHEID" is geselecteerd, volgt u de instructies op het display en zoals beschreiben in het hoofdstuk "Meting van de waterhardheid".
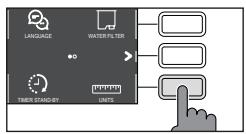
Meeteenheid
Door "MEETEENHEID" te selecteren:
kan men de meeteenheid instellen in "ml" of "oz".
Drankenteller
Het is möglichk om voor elke drank het aantal kopjes waar te gehen dat afgegeven werk sinds de eerste keer dat de machine werk gebruikt. Deze gevevens konnen nicht geseset worden.
Fabrieksinstellungen herstellen
De machine kan werk op de fabriekswaarden ingesteld worden. De machine zal een dubbele bevestiging vragen alvorens verder te gaan. Alle parameters worden geset behalte die gerelateerd aan de profielen (MY FAVOURITES ♥ ) en de drankenteller.


Betekenis van de foutcodes
Hieronder staan een,aantal boutcodes die het display kan weergeven, hun beteken is en hoe het probleem op te lossen. Als de aangegeven oplossingen nicht zouden werken en het display het pictogram van de boutcode blijft weergeven en de machine Niet correct werkt, of als er andere boutcodes worden weergeveen, moet u contact opnemen met een erkend servicecentrum of met de dealers in uw land. U vindt de contactgegevens op de website www.gaggia.com of www.gaggia.it.
| Foutcode | Probleem | Oorzaak | Mogelijk oplossing |
| 01 | De koffiemolen is geblokkeerd | De koffieleiding is geblokkeerd | Verwijder de voedingskabel en verwijder de zetgroep. Reinig de koffieleiding grondig met de steel van een lepel. Schakel het apparaat opnieuw in. |
| 03 - 04 | Er heeft zich een probleem vooragedaan met de zetgroep. | De zetgroep is vuil of Niet goed gesmeerd. | Schakel de machine uit met de hoofdschakelaar. Verwijder de zetgroep en reinig hem zorgvuldig. (Raadpleeg het hoofdstuk "Reiniging van de zetgroep") |
| De zetgroep is Niet correct geplaatst. | Schakel de machine uit met de hoofdschakelaar. Verwijder de zetgroep enplaats hem terug. Verzeker u ervan dat de zetgroep op de juiste positie is alvorens deze teplaatsen. Raadpleeg het hoofdstuk "Herplaatsing van de zetgroep". |
| 05 | Er is een probleem in het watercircuit. | Er is lucht aanwezig in het watercircuit. | Haal het reservoir enkele keren uit de machine enplaats het opnieuw. Zorg ervoor dat het correct in de machine geplaatst worden. Controller of de ruimte van het waterreservoir schoon is. |
| Als u een "INTENZA+" filter gezruikt: verwijder het filter uit het waterreservoir en schud het om alle lucht uit het filter te verwijderen. Plaatservolgens het filter "INTENZA+" waar in het waterreservoir. |
| 14 | De machine is oververhit | Er zijn meerere mogelijk oorzaken. | Schakel de machine uit en schakel ze na 30 minutes opnieuw in. Doe dit 2 of 3maal. |
Oplossing van problemen
Dit hoofdstuk vat de meest voorkomende problemen samen die u kutantreffen bij de machine. Als u het probleem Niet kut oplossen met de onderstaande informatie, ga dan waar www.gaggia.com of www.gaggia.it voor een lijst met veelgestelde vragen of neem contact op met het Customer Service Center of de dealers in uw land.
| Probleem | Oorzaak | Oplossing |
| De machine gaat nicht aan. | De machine is nicht aangesloten | Controleer of de voedingskabel correct ingestoken is. |
| Het lekbakje is snel vol. | Dit is normal. De machine gebrukt water om het intern circuit en de zetgroep te spoelen. Een deel van het water stroomt door het interne systeme direct in het lekbakje. | Leeg het lekbakje wanner de rode indicator door het rooster steekt (we raden aan een kopje onder de koffietuit teplaatsen om het spoelwater op te vangen). |
| Het display geeft constant het pictogram "koffieresidreservoir vol"eer. | Het kofferesidreservoir werk geleegd wanner de machine uitgeschakeld was. | Leeg het kofferesidreservoir steeds wanner de machine ingeschakeld is. Indien het kofferesidreservoir geleegd worden wanner de machine uitgeschakeld is, wordt de teller van de koffiecycli Niet op nul gezet. In dit geval toont het pictogram ook wanner het reservoir Niet vol is. |
| Het kofferesidreservoir werk te snel teruggeplaatst. | Wacht steeds 5 seconden wanner het kofferesidreservoir zich weir op+zijnplaats zet. Zo stelt de teller zich weir op nul in. |
| De machine vraagt u om het koffieresidreservoir leeg te makeen, ook als het reservoir Niet vol is. | De machine heeft de teller nicht gereset de LASTe keer dat het kofferesidreservoir geleegd werk. | Wacht steeds 5 seconden wanner het kofferesidreservoir zich weir op+zijnplaats zet. Zo wordt de teller van het kofferesidu op nul gezet. |
| Leeg het kofferesidreservoir steeds wanner de machine ingeschakeld is. Indien het kofferesidreservoir geleegd worden wanner de machine uitgeschakeld is, wordt de teller van de koffiecycli Niet op nul gezet. |
| Onmogelijk de zetgroep te verwijderen. | De zetgroep bevindt zich Niet in de correcte positie. | Sluit de servicedeur Schakel de machine UIT en waar aan. Wacht tot het display de melding voor machine gereed weergeeft, verwijder dan de zetgroep. |
| Het kofferesidreservoir werk Niet verwijderd. | Verwijder het kofferesidreservoir alvorens de zetgroep te verwijderen. |
60 Netherlands
| Probleem | Oorzaak | Oplossing |
| De zetgroep kan nicht geplaatst worden. | De zetgroep befindt zich nicht in de correcte positie. | De zetgroep werk nicht in positie geplaatst alvorens hij terug gespositioneerd werk. Zorg ervoor dat de hendel contact maakt met de basis van de zetgroep en dat de haak van de zetgroep in de juiste positie staat. Ze het hoofdstuk "Herpositionering van de zetgroep". |
| Om de machine waar in te stellen: herplaats het koffieresidreservoir. Plaats de zetgroep Niet. Sluit de servicedeur verwijl het koffieresidreservoir geplaatst is, ontkoppel de voedingskabel enplaats deze opnieuw. Probeer dan opnieuw de zetgroep teplaatsen en schakel de machine opnieuw in. |
| De koffie heeft weinig room of is waterig. | De koffiemolen is ingesteld op een grove maling. | Stel de koffiemolen in op een fijnere maling. |
| De machine voert de zelfregulatieuit. | Zet enkele koffiekopjes zodat de machine de zelfregulatieuitvoert. |
| De koffieleiding is geblokkeerd | Reinig de koffieleding met een lepeltje zoals beschreiben in het hoofdstuk "Reinigung van de zetgroep onder stromend water". |
| De koffie is nicht warm genoeg. | De temperatuur is te laag ingesteld. Ga deinstallingen van het menu na. | Stel de temperatuur van het menu in op "MAX". |
| De machine maalt de koffiebonen, maar er wordt geen koffie afgegeven. | De koffiemolen is ingesteld op een te fijnne maling. | Stel de koffiemolen in op een grovere maling. |
| De koffietuit is verstopt. | Zet een voorgemalen slappe koffie, zonder de voorgemalen koffie toe te voegen. |
| De koffietuinen zijn verstopt. | Reinig de koffietuinen met een Klein borsteltje. |
| De koffie stroomt langzaam of druppelsgewijs uit de machine | De koffiemolen is ingesteld op een te fijnne maling. | Stel de koffiemolen in op een grovere maling. |
| De koffietuitenঃn verstopt. | Reinig de koffietuiten met een Klein borsteltje. |
| Het circuit van de machine is door kalkaanslag geblokkeerd. | Voer de ontkalkinguit. |
| De melk maakt geen schuim. | De schenkinrichting van de melk is vuil of de kan is net goed geplaatst of Niet alle onderdelen van de melkkan werden gemonteerd. | Reinig de kan volgens het hoofdstuk "Grondige reiniging van de melkkan onder stromend water" en zorg ervoor dat ze correct gespositioneerd en geplaatst worden. |
| Verzeker u ervan dat alle onderdelen correct gemonteerd+zijn. |
| Hetgebruikte type melk is Niet geschikt om schuim te makeen. | Al naargelang het type melk, verkrijgt men een andere hoeveelheid en kwaliteit van schuim. |
| Het filter "INTENZA+"
kan nicht geplaatst
worden. | U要去 de lucht uitt het filter laten
gaan. | Laat de luchtbellen uitt het filter komen. |
| Het reservoir bevat nog water. | Leeg het waterreservoir alvorens het filter te
installeren. |
| De rubberen Abdichting is Niet op
het filter "INTENZA+" geplaatst. | Controler de verpakking en plaats de
abdichting op het filter "INTENZA+. |
| Er is water onder de
machine aanwezig. | Het lekbakje is te vol en is
overgelopen. | Leeg het lekbakje wanner de indicator door
het bakje steekt. Leeg altijd het lekbakje
alvorens de ontkalkingsprocedure te starten. |
Accessoires GAGGIA
De koffie en de accessoires zijn beschikbaar in de erkende centra (Italiè), of bij de dealers van uw land.

Ontkalkingsoplossing
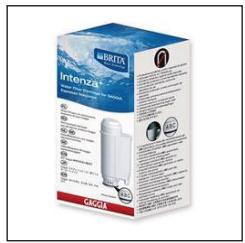
Waterfilter INTENZA+
Koffielieverwijderings-tabletten

Milk circuit cleaner (Philips)

Beschikbaar assortment koffie in bonen en poeder: 100% Arabica / Intens / Cafeinevrij
62 Netherlands
Technische gegevens
| Nominale spanning - Nominaal vermogen - Voeding | Zieplaatje aan de binnenkant van de servicedeur |
| Materiala behuizing | Thermoplast |
| Afmetingen | 260 x 380 x 440 mm |
| Gewicht | 7,5 kg |
| Kabellenge | 1200 mm |
| Bedieningspaneel | Front |
| Afmetingen kopjes | Tot 150 mm |
| Waterreservoir | 1,8 liter - Uitneembaar |
| Inhoud koffiebonenreservoir | 250 g |
| Inhoud koffiediklade | 10 |
| Pompdruk | 15 bar |
| Waterketel | RVS ketel |
| Veiligheidsinrichtingen | Thermozekering |


64 Polski
Spis tresci
Głowne elementy urzadzenia (Rys. 2) 65
Panel sterowania i wysshietlacz 66
Glowne elementy panelu sterowania (rys. 1) 66
Przyciski wielofunkcyjne 66
Pierwsza instalacja 67
Reczny cykl plukania 67
Pomiar twardoSci wody 68
Filtr wody INTENZA+ 68
Instalacja filtrawody INTENZA+ 69
Wymiana filtra wody INTENZA+ 69
Rodzaje napojow 70
Espresso tray 71
Parzenie kawy 71
Parzenie kawy na bazie kawy ziarnistej 71
Parzenie kawy na bazie kawy wstepnie zmielonej 72
Przygotowywanie napojów na bazie kawy i spienionego mleka 72
Napelnianiedzbanka na mleko 72
Wkladanie dzbanka na mleko 73
Wyjmowanie dzbanka na mleko 73
Nalewanie napojów na bazie kawy i spienionego mleka 74
Nalewaniegoracej wody 74
Indywidualne ustawientia napojow itworzenie profili 75
Indywidualne ustawienia napojow 75
Tworzenie profilu 76
Regulacja stopnia mielenia 77
Czyszczenie i konserwacja 78
78
Czyszczenie dzbanka na mleko 79
Czyszczenie bloku zaparzajacego 81
Smarowanie bloku zaparzajacego 83
Odwapnianie 84
Procedura odwapniania 84
Co robic w przypadku przerwania procedury odwapniania 85
Ustawienia rozne 86
Jęczyk 86
Filtr wody 86
Timer stand-by 86
Twardosc wody 87
Jednostki miary 87
Licznik napojów 87
Przywracanie ustawien fabrycznych 87
Znaczenia kodow blgodow 88
Rozwiazywanie problemów 89
Akcesoria GAGGIA 91
Dane techniczne 92

Głowne elementy urzadzenia (Rys. 2)
| 1 | Pokrywka pojemnika na kawe ziarnista | 13 | Espresso tray |
| 2 | Pojemnik na kawe ziarnista | 14 | Kabel zasilajncy |
| 3 | Gniazdo do kabla zasilajçego | 15 | Smar |
| 4 | Zbiornik na wode | 16 | Miarka do kawy wstepnie zmielonej |
| 5 | Pojemnik na kawe wstepnie zmielenoga | 17 | Tester twardość wody |
| 6 | Pokrętło regulacje mlynka | 18 | Drzewiczki serwisowe |
| 7 | Panel sterOWANIA | 19 | Kasetka na resztki kawy |
| 8 | Regulowany dozownik kawy | 20 | Blok zaporzajncy |
| 9 | Pojemnik na fusiy | 21 | Przyciski do odłowczania tacy ociekowej |
| 10 | Taca ociekowa | 22 | Dzbanek na mleko |
| 11 | Pokrywa tacy ociekowej | 23 | Dozownik wody |
| 12 | Wskaznik pełnej tacy ociekowej | | |

Panel sterowania i wyświetlacz
Niniejszy ekspres do kawy posiada intuicyjny i latwy w obsłudze wyświetlacz. Aby lepiej zapoznać są z poszczególnych przyciskami,{naleź przyȩczytań ponijsze paragrafy.
Głowne elementy panelu sterowania (rys. 1)
| 1/2 | Przyciski WIELOFUNKCYJNE | Aby wybrać funkcję wskazanine na wyświetlaczu. |
| 3 | Przycisk ON/OFF ↑ | Aby wączyć lub wyłączyć urzemdenie. |
| 4 | Przycisk MY FAVOURITES♥ | Aby wejsć do menu profili osobistych. |
| 5 | Przycisk HOME | Aby wejsć do menu napojów. |
| 6 | Przycisk CLEAN/SETTING | Aby wejsć do menu czyszczenia i ustawieu. |
| 7 | Przycisk START/STOP ▷□ | Aby uruchomić/zatrzymać wytwarzanie wybranego napoju lub uruchomić/zatrzymać procedȩ wskazanine na wyświetlaczu. |
Wazne: przyciski MY FAVOURITES 心 , HOME 心 , CLEAN/SETTING 心 sa rownikę przyciskami ESC. W dowolnym momencie要去 wyjsć z wyświetlanego ekranu, naciskąć jeder z tych przycisków, kró powodują przyejść do ich menu pouchłowego.
Przyciski wielofunkcyjne
Przyciski wielofunkcyjne po bokach wyświetlacza są za do wybierania funkcjji lub napoju, do któraj odnoszo są one w danym momencie.
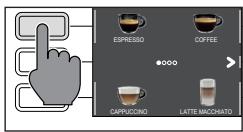
Wañne: aby ułatwoćczytanie ninięszej instrukcjji, instrukcjä <> powinna byc Rozumiana jako <>.
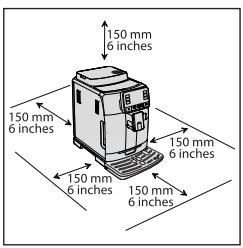
Pierwsza instalacja
Przed uzyciem urzadzenia nalezy przystrzegać kilku prostych wskazówek wyraźnie opisanych w skroconej instrukcji na początu niniejszego podręcznika, gdzie zamieszczono ilustracje objasniażcie.
Wañne: aby kawa smakowa lepiej, zalecamy przygotowanieśćtkowo 5 fližanek kawy, aby urzadzenia wykonało automatyczna regulacja.
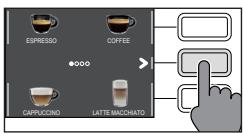
Ręczny cykl plukania
Podczas pierwssszej instalacji lub po dlugim okresie niedzywnia urzadzenia nalezy wykonac cykl plukania ręcznego.
1 Umieść pojemnik pod dozownikiem kawy, przywność poszczególne strony i wybrać „ESPRESSO LUNG".

2 Nacisnac przycisk, nie dodajc kawy wstepnie zmielonej.
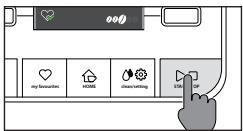
3 Nacisnac przycisk START/STOP l w celu Rozpoczecia nalewania. Urzadzenia zacznie naewać goracā wode.
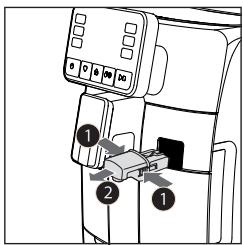
4 Opróznico pewemnik i upewnić sie, ze dozownik goracej wody jest zainstalowy.
5 Ustawić pojemnik pod dozownikiem goracej wody i wybrać napoj „HOT WATER".
6 Nacisnac przycisk START/STOP l w celu Rozpoczecia nalewania.
7 Opróznico pojemnik i powtorzyc czynnosci z punktów od 5 do 7, dopóki zbiornik na wodeNie bedzie pusty.
8 Po zakończeniu napelnić ponownie zbiornik na wode do poziomu MAX. Urzadzenia jest gotowe do pracy.
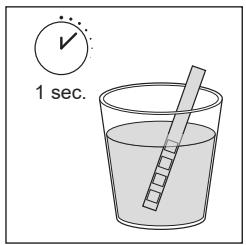
Pomiar twardosci wody
Podczas pierwsssaj instalacji nalezy ustawic twardosc wody. Wyjac z opakowania pasek testowy do pomiaru twardosci wody i postepowa zgodnie z instrukcjami widnejczymi na wyświetlaczu podczas fazy instalacji. Aby zmieNIC twardosc wody w innym momencie, nalezy nacisnac przycisk CLEAN/ SETTING 已 , wybra,c "USTAWIENIA", a nastepnie w menu ustawien wybrac TWARDOSC WODY".
1 Na 1 sekunde zanurzyć pasek testowy do pomiaru twardosci wody w szkiance z woda. Wyjać pasek testowy do pomiaru twardosci wody i poczekić 1 minute.
2 Sprawdzić, ile kwadracików zmieniło kolor na czerwony.
3 Uzyc zielonych przycisków „✔" i „✔", aby wybrać wartosci twardosci do ustawienia zgodnia z poniższa tabela, a nastepnie potwierdzić za pomocamy przycisku „✔".
| Liczba czerwonych kwadracików | Wartosci do ustawienia | Twardosci wody | INTENZA+ |
| ■□□□ | 1 | woda bardzo miękka | A |
| ■□□□ | 2 | woda miękka | A |
| ■□□□ | 3 | woda twarda | B |
| ■□□□ | 4 | woda bardzo twarda | C |
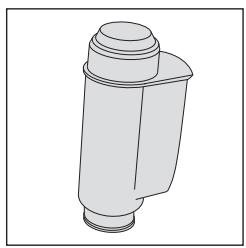
Filtr wody INTENZA+
Zaleca sie zainstalowanie filtra wody INTENZA+, aby ogranicyc tworzenie sie kamienia. Zapewni to dluszsa trwaosc urzadzenia i lepszy aromat kawy w miare upywu czasu.
Woda jest podstawowy składnikiem kaźdej kawy. Bardzo wąznia jest zatem jej odpowiednia filtracja, w profesjonalny spośob.
Filtr wody INTENZA+ zapobiega tworzeniu sie osadów mineralnych, poprawiajacność wody.
Instalacja filtra wody INTENZA+
Wyjac mań biały filtr znajduźcy są w zbiorniku na wode. Przechowywać go w suchym przyscu.
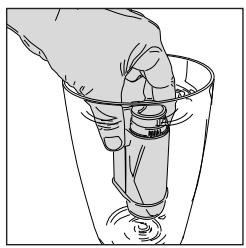
Zanurzyć filtr wody INTENZA+ w zimnej wodzie w pozycji pionowej (otworem ku górze) i nacinność delikatnie na brzej, aby wypuplesć pecherzykigowiatra.
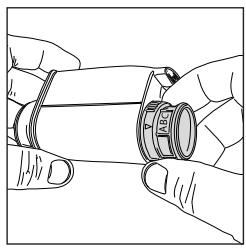
Wyjac filtr wody INTENZA+ z wody i ustawic go zgodnie ze stwierdzona twardoscią wody (patrz Rozdziel „Pomiar twardosci wody") i okreslic przy podstawie filtra poziom twardosci:
A = woda.miękka - 1 lub 2 kwadraciki
B = woda twarda (standard) - 3 kwadraciki
C = woda bardzo twarda - 4 kwadraciki
Włoźyc filtr INTENZA+ do zbiornika na wode, upewniajac sie, ze włoźony jest prawidławowo. Napelnić zbiornik na wode i właźyc go najejscze.
Nalezy nacinacja przycisk CLEAN/SETTING, wybrac „USTAWIENIA“, a nastepnia w menu ustawien wybrac „FILTR WODY".
Postepowac zgodnie z instrukcjami na wyświetlaczu, aby sprawidłowo uaktywnic filtr.
Wazne: procedure aktywaci filtra:noza przerwać, nacziskajc przycisk START/ STOP ▷. Aby wznowic procedure aktywaci filtra, naleź ponownie nacisnocyprzycisk START/STOP ▷.
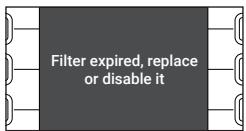
Wymiana filtra wody INTENZA+
Gdy filtr wody INTENZA+ zuzyje sie, na wyświetlaczu pojawi są komunikat ostrzejagawy.
1 Dokonać wymiany lub bezaktywacje, naciskajć przycisk CLEAN/SETTING a,..., a nastepnie przycisk „USTAWIENIA".
2 Wybrać przyczicism „FILTR WODY".
3 Wybrać WYMIEN lub WYLACZ i potwierdzić przyciskiem „√".
Postepowac zgodnie z instrukcjami na wyświetlaczu, aby prawidłowo uaktywnic filtr.
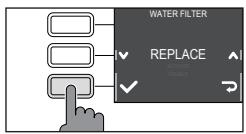
Wañne:;)Siéni Nie zostanie przyprowadzona wymiana filtra, aby wyćczy filtr, naleźwybrać opcję „WYŁACZ".
70 Polski
Rodzaje napojów
| Nazwa napoju | Opis |
| Ristretto | Mocna kawa, serwowana w małej filizance, to espresso, krórego CZas dozowania jest krótszy w porównaniu z czasem dozowania klasycznego espresso, czego efektem jest kawa w mniejszej ilosci i mniew bogata w kofeine. |
| Espresso | Espresso znane jest na calymŚwiecie jak prawdziwa „kawa w wloskim stylu". Serwowane jest w małej filizance, a"Myo typowymi cechami są bogaty i intensywny aromat oraz warstwa naturalnej, zwartej piantki. Taki napoj jest efektem procesu zaparzania ciśnieniwoego z uzyciem goracej wody, krórego pomysłodawcą byt w 1938 roku Achille Gaggia. |
| Espresso lungo | Duża kawa espresso to espresso, krórego CZas zaparzania jest nieco dlustrszy. Vestardziej rozcieńca, cechuje są innaj intensywność aromatu i wyźstaw zawartość kofeiny. Serwowane jest w srednej filizance. |
| Kawa | Kawa to napoj przygotowywany z więsza Ślolly wody w porówniuniu z espresso. Ma delikatniejszy aromat i serwowana jest w srednio-dujej filizance. |
| Americano | Kawa po amerykański to mniew intensywna duża kawa, przygotowywana jak).[expresso, ale z dodatkiem goracej wody.] |
| Cappuccino | Cappuccino untozn z majbardziej lubianych na calym Świecie klasyczny wloski napoj. Przygotowuje są je, wykonujac espresso z dodatkiem mleka i piantki mleka, która powinnamie co najmiec 1 cm wysokość. Serwuje są je w dlustrzej filizance. |
| Cappuccino XL | Cappuccino XL to cappuccino przygotowane z więska Ślolly wody.[expresso i mleka.] |
| Cortado | Cortado to napoj pochodźcy z Argentyny, króym jest espresso z dodatkiem niewielkie ilosci mleka. Na ogól serwowane jest w niewielkie szklANCE. Najbardziej Popularne jest w Hiszpanii i Portugalii, a sąze w Ameryce Łacińskiej. |
| Flat white | Flat white to napoj pochodźcy z Australii, w króym kawa odgrywa role dominujacja. Składa są na noego podwǒjne espresso i mleko z delikatnia warstwa aksamitnej piantki. |
| Café au lait | Café au lait jest to napoj składajcy są z kawy i mleka w równych;cieciach. Obecnie są za go również wzbogacać delikatnia warstwa piantki mleka. Serwuje są je w dlustrzej filizance. |
| Latte macchiato | Latte macchiato jest to napoj przygotowywany z goracego mleka, z odrobiną piantki mleka i niewielka Ślolly wody.[expresso. Serwowany jest w wysokiej, przyżroczystej szkalance, dla krótej idealnie widać trzy rzone tworzyste go warstwy. |
| Latte macchiato XL | Latte macchiato XL jest to latte macchiato przygotowane z więska Ślolly mleka, serwowane w wysokiej, przyżroczystej szkalance. |
| Spienione mleko | Spienione mleko wykorzystwyane jest do przygotowywania cappuccino, latte macchiato i freiwill innych napojów. W efekcie powstajezwarta i Jednilita warstwa piantki mleka. |
| Góra消费品 woda | Góra消费品 wodaMZno uzywać do szybkiego przygotowania herbaty, naparów ziołowych i innych napojów Rozpuszcjalnych. |
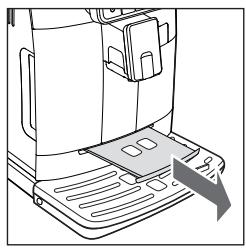
Espresso tray
Niniejsze urzadzenia zaprojektowano z myśl o przyrzadzniu doskonale smakujacych napojów, od tradcyjngo espresso po licnzne innate dostepné napoje. Ješli pragniesz zasmakować włoskiego espresso zgodnia z tradycja przyrzadznia tego rodzaju napuju, z delikatna wastw自然界nj piani na powierzchni, zachecamy Cię do korzystania z „Espresso Tray“, podstawki specjalnie opracowanej i dostosowanej do tego urzadzenia. Podstawka ta pozwalna korzystanie z tradcyjnych filizanek do espresso, majac zawsze pewnosć,ź jejego poziom;będzie idealny,by powstała Jednolita,zwarta pianka iź przyiership zaraparzaniu otoczenia pozostanie nieskazitelnie czyste.
Parzenie kawy
Parzenie kawy na bazie kawy ziarnistej
Uwaga: uzywać wyłacznie kawy ziarnistej do espresso. Nie wsypywać do pojemnika na kawe zziornista kawy niedpalonej, kawy liofilizowanej lub rozpuszczalnej, poniewaź mogłyby one uszkodzic urzadzenia.
Wskazówka: aby kawa bya cieplejsza, nalezy podgrzac flizanki goracwoda.
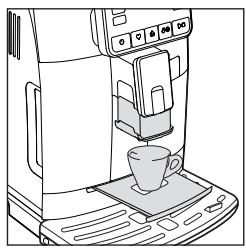
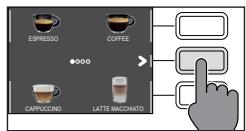
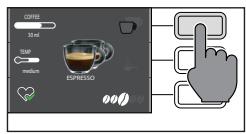
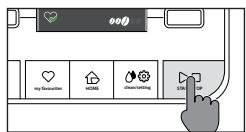
1 Wyjać espresso tray, umieść filizankę pod dozownikiem kawy, podniać lub obniżyć dozownik w zaleźnosci od Rozmiaru uzywanej filizanki.
Nacisnac przycisk HOME aby uzyskać dostep do menu napojów.
2 Przewinac poszczegolne strony, aby znalec i wybrac zadany napoj.
3 Po wybraniu zădaneano napoju:noza przygotowej dwie filizanki równoczesnej za pomoczą przycisku „ Д “ (nie dotyczny kawy typu AMERICANO).
4 Nacisnac przycisk START/STOP l w celu Rozpoczecia nalewania.
Wañne: nalewanie maya przerwac w dowolnym momencie, nasciskajc przycisk START/STOP
Jesli zamierza sie dostosowac ustawenia napoju, nalezy sie zapoznać z rodzialem „Indywidnalne ustawenia napojów".
72 Polski
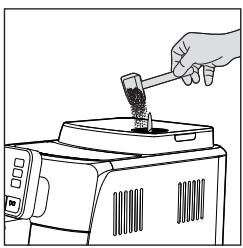
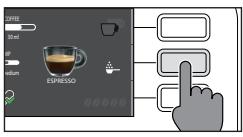
Parzenie kawy na bazie kawy wstepnie zmielonej
Za pomocę spezialnej dołaczonej miarki wsypć prawidłową porcie do pojemnika na kawe wstepnie zmielona.
1 OtworzyćPokrywkepojemnika na kawe wstepnie zmielona i wsypac jederagna miarke kawy wstepnie zmielonej.
Uwaga: nie wsypywać innych substancji nied kawa wstepnie zmielona, abyNie uszkodzić urzadzenia.
2 Umiesić filizanké pod dozownikiem kawy i wybrac zadany napoj.
3 Nacisnac przycisk
Wazne: funkacja „kawy wstepnie zmielonej" wykluczama最容易 parzenia dwoch filizanek kawy rownoczesnie, a takze ustawienia aromatu, co jest最容易 wyłącznia w przypadku kawy ziarnistej.
Wazne: z funkcjji juices nozna korzysta c w FLAT WHITE.
4 Nacisnác przycisk START/STOP aby uruchomić parzenie kawy.
Jesli zamierza sie dostosowac ustawenia napoju, nalezy sie zapoznać z rodzialem „Indywidualne ustawenia napojów".
Wañne: nalewanie maya przerwac w dowolnym momencie, nasciskajc przycisk START/STOP
Przygotowywanie napojów na baziekawy i spienionego mleka
Napehnianie dzbanka na mleko
Wañne: przydziem dzbanka na mleko naležy go dokladnie wycyszcie zgodnia z opisem w rozdzie „Czyszczenie dzbanka na mleko".
Dzbanek na mleko można napelnić wczȩść lub podczas użycia.
1 PodniaśćPokrywke zespołu dozowania mleka.
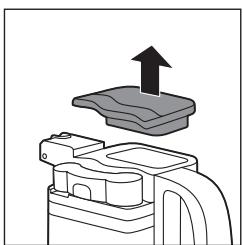
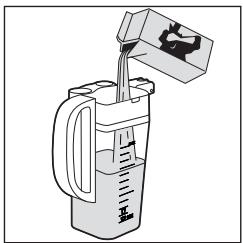
2 Wlac mleko do dzbanka: mleko musi znajdować sie między poziomem minimnym (MIN) i poziomem maksymalnym (MAX) oznaczonym na dzbanku. Załozyć Pokrywke.
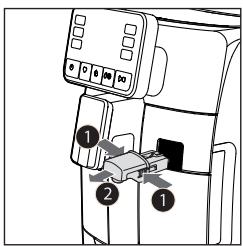
Władanie dzbanka na mleko
Jesli jest zainstalowany, wyjac dozownik wody:
1 Nacisnac dwa przyciski boczne, aby oblokowac dozownik (1) i lekko go podniaśc. Pociągnac za dozownik wody, aby go wyjac (2).
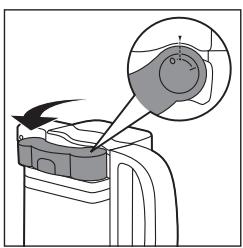
2 Ustawic dozownik dzbanka na mleko w połozeniu „I".
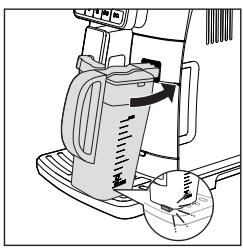
3 Pochylic go delikatnie i wlozyc calkowicie do prowadnic urzadzenia, az zostanie zamocowy na tacy ociekowej.
Wazne: nie wciskać dzbanka na silę.
Wyjmowanie dzbanka na mleko
Obrócić dzbanek do góry, AZ odczepi sie od wóladyk imieszczonej w tacy ociekowej. Nastepnie wyjać go.

74 Polski
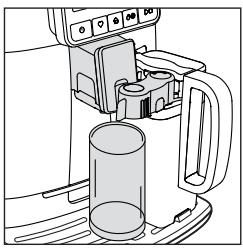
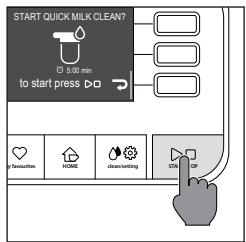
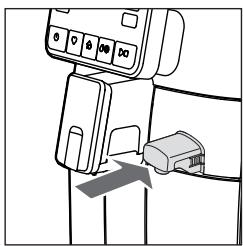
Nalewanie napojów na bazie kawy i spienionego mleka
Wskazówka: aby napoj byt cieplejszy, nalezy podgrzać filizanki goręcā woda.
Wskazowka: uzywać zimnégo mlecka (o temperaturze okło 5^ ) o zawartosci tłuszczu przyznajmiej 3% w celu zapewnienia optymalnej pianki. Można stosować zarówno mlecko pełnotluste, jak i mlecko czȩciowo odtluszczzone. Ponadto można stosować mlecko odtluszczone, sojowe lub mlecko bez laktozy.
1 Nacisnac przycisk HOME i wybrać napój z menu.
- Nacisnac przycisk ządanego napoju i umieść filizankę lub szklanke o odpwiednich rozmiarach pod dozownikiem kawy i dozownikiem dzbanka.
- Nacisnac przycisk START/STOP aby Rozpoczć dozewanie wybranego napoju.
2 Urzadzenie nalewa do filizanki lub do szklanki okreslona ilosc spienionego mleka i kawy. W zaleznosci od wybranego napoju;będzie dozowana najpierw kawa lub majpierw spiendonie mleko.
Jesli zamierza sie dostosowac ustawienia napoju przydawe nalewaniem, nalezy sie zapozna z rozdzialem „Indywidualne ustawienia napojów".
3 Po kaźdym przygotowaniu napojów na bazie kawy i spienionego mleka w ciagu 10 sekund;będzie można wykonac procedu szybkiego czyszczenia dzbanka. Procedurę to;będzie można jakn wykonac poźniaj, wchodź do menu czyszczenia za pomoczą przycisku CLEAN/SETTING 公 Postepowa zgodnie z instrukcjami na wyświetlaczu. Procedurę czyszczenia można rowników wykonac, kiedy w dzbanku znajduje sie mleko.
Wañne: wykonywać procedure szybkiego czyszczenia przyznajmiej raz Dziennie.
Nacisnac przycisk START/STOP w celu potwierdzenia lub przycisk ,aby wykonac ja poźniaj.
Nalewanie goracej wody
Uwaga: podczas etapu przygotowywnia z dozownika goracej wody są wydostawac para i goraca woda. Przed wyjeciem dozownika goracej wody sązy poczeka na zakońcenie etapu przygotowywnia.
1 Włoźyc dozownik goracej wody.
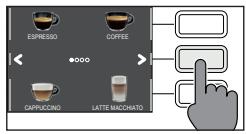
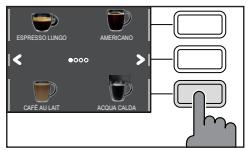
2 Nacisnac przycisk HOME, przywinać poszȩgólne ekrany za pomoczy zielonych przycisków „i“, a nastepnie wybrać „GORACA WODA".
Uwaga: wybrać napój „GORACA WODA" na ekranie HOME wyłącznie wówczas, kiedy zaintalowany jest dozownik goracej wody.
3 Nacisnac przycisk „GORACA WODA". Nastepnie nacisnac przycisk START/ STOP ▷□ wCEELO Rozpoczecia nalewania.
Wañne: nalewanie möglich przerwać w dowolnym momencie, naciskajć przycisk START/STOP ▷□.
Jesli zamierza sie dostosowac ilosc napoju przyd nalewaniem, nalezy sie zapozna z rozdzialem. "Indywidualne ustawienia napojów".
Indywidualne ustawientia napojów i tworzenie profili
Niniejsze urzadzenie pozwala nazmianę ustawien napojw wazoleńsci od wlasnych preferencji oraz zapisanie zmodyfikowanego napojw w jedernym z 4 dostepnych profili.
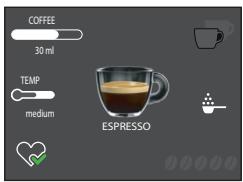
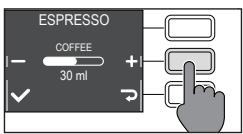
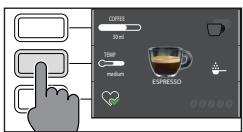
Indywidualne ustawienia napojów
1 Nacisnac przycisk HOME
2 Wybrać swoj napoj.
3 Na ekranie wyświetlane są wzystkie ustawienia, króre moins dostosowej i/ lub wybrać w zależnosci od wlasnych preferencji. W zależnosci od typu napoju moins dostosowej i/lub wybrać:
- objętość mleka i kawy;
temperature kawy;
- nalewanie do dwóch filizanek na raz;
- užycie kawy wstepnie zmielonej;
- intensywnosc aromatu (tylkó podczas uzywania kawy ziarnistej);
4 Po naciśćci przycisku „KAWA“ lub „MLEKO“ „użyc zielonych przycisków“, „i“, „aby ustawić zędaną objętość.
Nastepnie nacisć przyczisk „√“, aby potwierdzić i powrócić do poprzedniago ekranu, na ktorym;będź wyświetlana nowa ustawiona ilosc.
5 Nacisnac kilkukrotnie przycisk „TEMP 一 = "aby zmienic temperature napoju, wybieraju spośród dostepnych opcj:
76 Polski
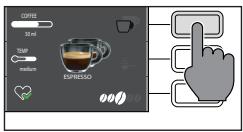
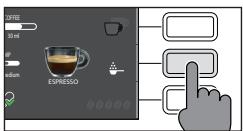
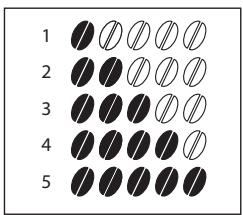
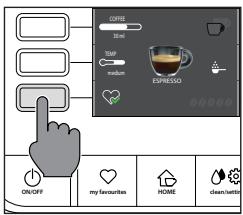
6 Nacisnac przycisk „", aby przygotowania dwie filizanki lub przycisk „", aby przygotowania tylko einzaj filizanke. Ilustracja napoju na srodku wyświetlacza wskawe liczbę wybranych filizanek.
Wañne: z funkcjji tej nie:noza korzystać w przypadku napojów AMERICANO i goręca woda.
7 Nacisnac przycisk, aby uruchomic uzywanie kawy wstepnie zmielonej.
Wañne: ta funkća pozwala na zaparzanie tylko jedernej kawy na raz.
8 Aby zmienić intensywnosć aromatu, naleź ynocisné przyczisk „оооо". Przy kaźdorazowym naciśćci przycisku intensywnosć aromatu zmienia są o jeder stopié. Na wyświetlaczu pojawia są wybrana intensywnosć.
1 Bardzo lekki
2 Lekki
3 Regularny
4Mocny
5 Bardzo mocny
Wañne: z funkcjji tej nie:noża korzystać w przypadku kawy wstepnie zmielonej.
9 Po dostosowani napoju zgodnie z wlasnymi preferencjami smakowymi ]. na zapisac go w profilu, naskajac przycisk.
10 Nastepnie wybrać profil, w ramach krórego zamierza są zapisić napoj, spośród 4 dostepnych profili.
Tworzenie profilu
Istnieja dwa sposoby na utworzenia profilu:
- Za pomocaprzycisku HOME , jak opisano w rozdziale "Indywidualne ustawienia napojow", w punktach 9 i 10;
- Za pomocę przycisku MY FAVOURITES, w nas三点puczyc sposób:
1 Nacisnac przycisk MY FAVOURITES
2 Wybrać jeder z kolorów profilu.
3 Nacisnac przycisk, DODAJ NAPOJ
4 Zostana wyświetlone ekrany napojów. Wybrać napoj, tkóry zamierza sie zapisać w swoim profilu i dostosowej go zgodnia z punktami od 3 do 8 w rozdźiale „Indywidualne ustawenia napojów".

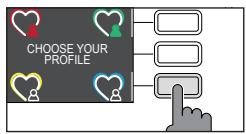
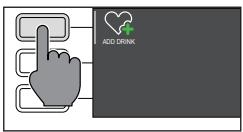
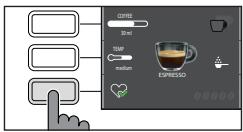
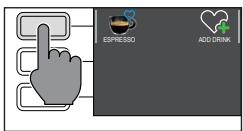
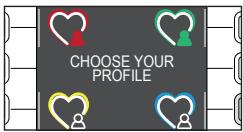
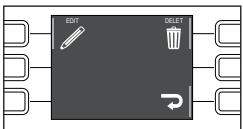
5 Nacisnac przycisk „♥", aby zapisać dostosowany napoj w swoim profilu. W tym momencie można naluć napoj lub wyjsć za pomocąaddresses z przycisków ESC (HOME , MY FAVOURITES , CLEAN/SETTING).
Zapisany napój jest w tym momencie widocznych na liisce ulubionych napojów i zaznaczony serduszkiem w kolorze odpowiadajycm wybranemu profilowy.
Wañne: Po zastosowaniu ikona profilu „"zmieni kolor.
6 Napoj zapisany we wlasnym profilu bedzie mozza zmodyfikowac za pomocag przycisku EDYTUJ lub usunac za pomocag przycisku USUN
Wañne: Na HOME nie:noza zapisć napoju za pomocaprzycisku MY FAVOURITES , a jedynie przyciskiem " , w przyciwnym razie zapisane ustawientia dostaná utracone.
Regulacja stopnia mielenia
Stopien mielenia möglich regulowa z pomoc国家标准 do regulazioni stopnia mielenia w posta w pojemniku na kawe ziarnista. Mlynek ceramiczny zapewnia idealne i jegnolite mielenie ziaren niedbędnych przy przygotowywniu kaźdej filizanki kawy. Zachowywny jest wówczas aromat, ktory zapewnia zawsze doskonały smak.
Wazne: stopiej mielenia można regulować{jednie wówczas, kiedy urzadzenia mieli kawe ziarnista. Róznice w smaku;będzie można dostrzech po zaparzeniu 2 - 3 filizanek kawy.
Uwaga: aby uniknac uszkodzenia mlynka, nie nalezy obracaćPokretlem wyboru mieleniawipej nz o jeder pozycje na raz.
1 Ustawic filizanké pod dozownikiem kawy.
2 OtworzycPokrywkopejemnika na kawe ziarnista.
3 Przygotowejpresso, jak opisano w rozdziale „Parzenie kawy na bazie kawy ziarnistej".
4 Gdy urzadzenia mieli kawe, ustawic koncwoe uchwytu miarki do kawy wstepnie zmielonej na Pokretle regulaci mlynka w pojemniku na kawe ziarnista. Uzyc uchwytu miarki, aby nacisnac i obracutecPokretlem w lewo lub w pravo, o jederno pozycje na raz.
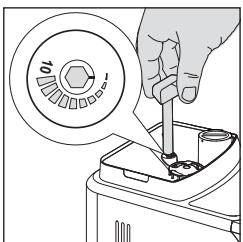
78 Polski
5 Dosteptych jest 10 roźnych stopni mielenia do wyboru. Im mniejszy wskaźnik, tym smak kawy bedzie silniejszy i pęniewszy.
Wazne:
- Mielennie grube: lzejszy smak, do mieszanek kawy prażonych na ciemno (5 - 10);
- Mielennie drobine: bardziej intensywny smak, do mieszanek kawy prażonych na jasno (1 - 5).
Czyszczenie i konserwacja
Regularne czyszczenie i konserwacja pozwalaja na utrzymanie urzadzenia w optymalnym stanie i gwarantuju zawsze doskonały smak kawy, stały przywykawy oraz doskonała pianke mlecka. Zapoznać są z ponieszność tabela, aby dowiedzieć są, kiedy i jak czyszcie wzystkie wyjmowane czȩci urzadzenia. W celu uzyskania bardziej szczegółowych informaciNJ alezy przyczytać odpowiednie rozdziały.
Tabela czyszczenia
| Opis czȩsci | Kiedy czȩscić | Jak czȩscić |
| Dzbanek na mleko | Po użyciu | Po przygotowaniu napoju na bazie mleka sąȩzy uruchomicé cykł „SZYBKIEGO CZYSZCZENIA" zgodnia ze wskazaniami urȩdzenia. |
| Codziennie | Czyȩcić pojemnik na mleko i rurę zasysajność mleko, jak podano w opisie w rozdziale „Dokjadne czyszczenie dzbanka na mleko pod bieść woda", zgonie z pierwszymi 4 punktami i punktem 11. |
| Co tydzień | Wymontować dzbanek na mleko i wyczyȩscić wszystkie为其ego czȩci pod bieść wodą. |
| Co miesić | Uruchomicé cykł „CZYSZCZENIE OBWODU" zgodnia z instrukcjam opisanymi w rozdziale „Dokjadne czyszczenie dzbanka na mleko pod bieść woda". W przypadkukiego cykku czyszczenia sąȩzy użć produktu do czyszczenia obwodów mleka, „Milk circuit cleaner", marki Philips. |
| Blok zaraprzȩcy | Co tydzień | Wyȩć bloc zaraprzȩć y umyć go pod bieść wodą. |
| Wazoleśćsci od sposobu użtykowsania | Patrz roździat „Czyszczenie i smarowania bloku zaraprzȩcego". |
| Co miesić | Wyczyȩscić bloc zaraprzȩć za pomoczą pastylek odtruszczajnośćch Gaggia do usuwania oleistych pozostałoSci po kawie |
| Opis częsci | Kiedy czȩscić | Jak czȩscić |
| Taca ociekowa pełna | Kiedy spejalny czerwony wskości wystaje poza kartę tacy ociekowej | Opróznic tace ociekowa i wyczyscić są pod bieźȩca woda. |
| Pojemnik na fusy | Kiedy wymaga untożdzenia | Opróznic pewemnik na fusi y wyczyscić go pod bieźȩca woda. Upewnić są, są podczas tej czynnosci urzadzenia jest wączone, są zeciwnym razie pewemnik na fusi nożstanie zresetowy. |
| Zbiornik na wodę | Co tydzień | Wyczyscić go pod bieźȩca woda. |
| Komora kawy wstepnie zmielonej/ przewód wylotowy kawy | Co tydzień | Wyczyscić górną czȩć uchwytem lyźki, są pokazano poniȩjej. |
| Espresso tray | Wazoleżnosci od spoosobu uzytkowania | Wysunność espresso tray i wyczyscić pod bieźȩca woda. Można równej umyć ten element w zmywarce, w gornym koszu. |
Czyszczenie dzbanka na mleko
Programy czyszczenia dzbanka na mleko
Urzadzenia posiada dwa programy czyszczenia dzbanka na mleko, szybkie czyszczenie i czyszczenie obwodu. Oba te programy mayna wybrać za pomocamy przycisku CLEAN/SETTING naciskąnascimento przycisk „CZYSZCZENIE". Szybkie czyszczenie jest proponowane po zakończenu nalewania napojów na bazie mlecka. Postepować w przypadku obu programów zgodnia z instrukcjami na wyświetlaczu.
- Program szybkiego czyszczenia
Program szybkiego czyszczenia przywiduje czyszczenie dozownika mleka. Podczas procedury czyszczenia dla bezostawic mleko w dzbanku.
80 Polski
- Program dokländego czyszczenia dzbanka
Program dokladnego czyszczenia dzbanka przybewiduje dokladne wyczyszczenie calego obwodu mleka przy uzyciu produktu do czyszczenia obwów mleka marki Philips „Milk Circuit Cleaner".
Dokladne czyszczenie dzbanka na mleko pod biezacag woda
Aby dokladnie wyczyscić dzbanek na mleko, naleź zdemontowć poszȩgólne.goje czȩci i umyć je pod bieźća woda w nastepujczy sposób:
1 Nacisnac przyciski zwalniajace, aby zdjacPokrywke (rys. 23).
2 Przekrecić dozownik dzbanka na mleko w połozenia „ ●" (rys. 24).
3 Podnieszć dozownik mleka pozaPokrywkę (rys.25).
4 Wyja rurkezasajsajcmaleko (rys. 26).
5 Nacisnac przycisk zaznaczony strzałka, aby odkłowac sukrywo dozownika mleka (rys. 27).
6 Aby wyjacPokrywke, nalezy nacisnac delikatnie na dwa boki dozownika i pociagnacPokrywke do gory,aby ja wyjac z dozownika (rys.28).
Wyjác pierscien z dozownika dzbanka na mleko (rys. 29).
8 Pociagnac zespof pianki mleka do gory (rys. 30).
9 Pociagnac wspornik na zewnatrz w stosunku do zespoTu pianki mleka (rys. 31).
10 Pociagnac wspornik na zewnatriz oddzielic go od pozostajej czeci (rys. 32).
11 Wyczyscic wszystkie czeci letnia woda.
12 Zmontowacze soba wzystkie czeci w odwrotnej kolejnosci.
Czyszczenie bloku zaparzajęcego
Uwaga: nie myc bloku zaparzajęcego w zmywarce i nie uzywać pląnów do mycia naczyn lub innych detergentów, poniewaź mogłyby one spowodowej nieprawidłowed dzialanie bloku zaparzajęcego, co mogłowby być odczuwalne w smaku kawy.
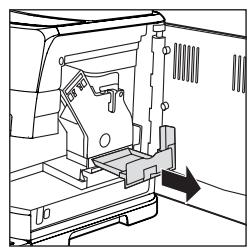
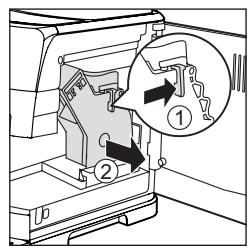
Wyjmowanie bloku zaparzajęcego
1 Wylaczyc urzadzenie i odlaczyc kabel zasilajacy.
2 Wyjać pojemnik na fusi y otworzyc drzewiczki serwisowe.
3 Wyjać kasetkę na resztki kawy.
4 Nacisnac dzwignie PUSH (pchnij) (1) i pociagnac uchwyt bloku zarpzajacego (2), aby wyjac go z urzadzenia.
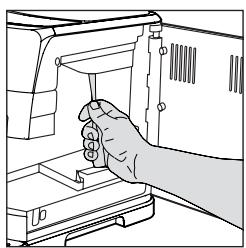
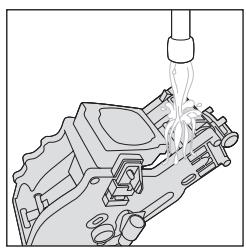
Czyszczenie bloku zaparzajęcgo pod bieźac woda
1 Wyczyscić dokladnie przywod wylotowy kawy uchwytem lyżeczki lub innym zaokraglonym przyrzadem kuchennym.
2 Przeplukac dokladnie bloc zarparzajcy letnia woda. Umyc dokladnie gorny filtr.
3 Pozostawic bloc zaparzajcy do samoczynnego wyschniecia.
Wañne: nie suszyc bloku zaparazinge szmatkami, aby uniknac nagromadzenia sie w seinem wétrtu wókien.
82 Polski
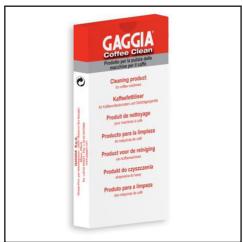
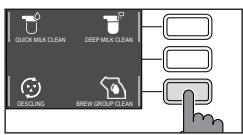
Czyszczenie bloku zaporzajęcego za pomocą pastylek do usuwania oleistych pożostaność po kawie
Uwaga: do czyszczenia stosowac wyłucznie pastylki Gaggia do usuwania oleistych pozostañosci po kawie.
1 Umiescić pojemnik pod dozownikiem kawy.
2 Nacisnac przycisk CLEAN/SETTING i wybrać na wyświetlaczu przycisk „CZYSZCZENIE".
3 Wybrać, CZYSZCZ. BLOKU ZAP" i nacinność przycisk START/STOP >□ w celu rozpoczecia procedury czyszczenia.
4 Postepowac zgodnie z instrukcjami na wyswietlaczu, aby sprawlowo wczysci bloc zakarzajacy.
5 Procedura ta potrwa okofo 5 minut, a zeby ja zwiesic i uruchomico ponownie,UNCTIUP

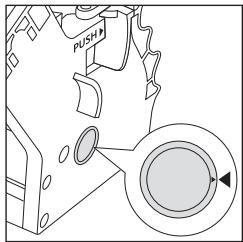
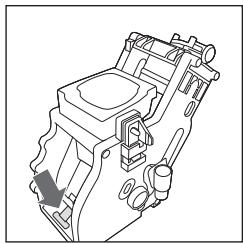
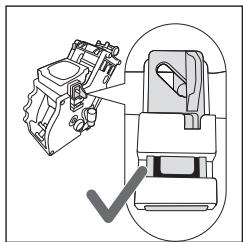
Władanie bloku zaparzajęcgo nazychcie
1 Przed wtozeniem bloku zaparzajacego do urzadzenia nalezy sie upewnico, ze dwa zoIte znaki odniesienia na czeci bocznej Pokrywaja sie. Gdyby tak nie bylo, nalezy:
Upewnici, ze dzwignia styka sie z podstawa bloku zarapzajacego.
2 Upewnic sie, ze zóttzy zaczep blokujacy bloku zaparzajęcego znajduje sie w prawidowej pozycji.
Aby prawidłowo ustawic zaczep, naleź pchnęc go do góry aż do maksymalnej OSIAGALnej pozycji.
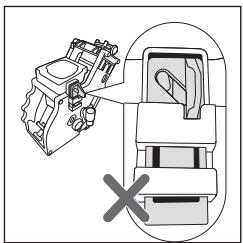
Jesli zaczep jest nadal w pozycji dolnej, oznacza to, ze nie jest on ustawiony prawidłowo.
3 Włoźyc bloc zaporzacje do urzadzenia wźdlusz prowadnic umieszczonych po bokach, dopóki nie zestanie on zablokowy w poźycji, o czym;będzie swiadczyk klikniść.
Uwaga: nie naciskać dzwigni PUSH.
4 Zamknac drziczki serwisowe.
Smarowanie bloku zaparzajęcego
Aby zapewnic optymalne dzialanie urzadzenia, nalezy smarowa bloc zarapazajcy.
Z czestotliwość smarowania sąna sie zapoznać w ponieszsej tabeli.

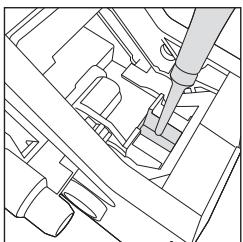
| Częstotiwość uzytkowania | Liczbabapojjów przygotowywnych codziennie | Cȩstotiwość smarowania |
| Niska | 1 - 5 | Co 4 miesiȩce |
| Normalna | 6 - 10 | Co 2 miesiȩce |
| Wysoka | >10 | Co miesiȩc |
1 Wylączyć urzadzenia i odłączyć kabel zasilajacy.
2 Wyjać bloc zaraprzajć y przytepluktac go letnia woda (patrz rozdziaf „Czyszczenie bloku zaraprzajęcego pod bieźac woda").
3 Nanieśc cienka warstwo smaru z wyposaźenia wokóf sworznia wropyadzajęcego w czȩci dolnej bloku zarparzajćego.
84 Polski
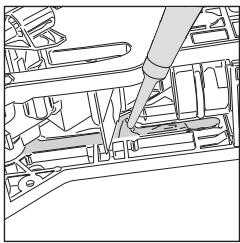
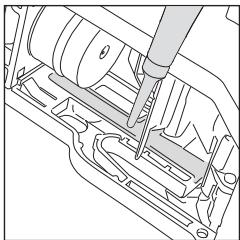
4 Naniesc cienka warstw smaru na prowadnice, po obu stronach (patrz rysunek).
5 Włoźyc bloc zakarzajczy na sąjeść (patrz rozdzią „Wkładanie bloku zaporzajćego na sąjeść").
Wazne: tubki ze smarem mozna uzywać kilkukrotnie.
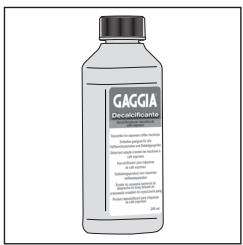
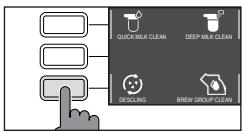
Odwapniaie
Procedura odwapniania
Gdy wymagaengo urzadzenie,nalezy wykonacantiago odwapnienie.
Stosować wyłącznie roztwor odwapniajacency Gaggia, ktor y opracowano w celu zapewniania optymalnego dzialania urzadzenia. Stosowanie innych produktów要去 spowodowauc uszkodzenia urzadzenia i obecność ich resztek w wodzie. Brak odwapniania urzadzenia spowoduje utratę gwarancji.
1 Nacisnac przycisk CLEAN/SETTING i wybrać na wyświetlaczu przycisk „CZYSZCZENIE".
- Nacisnac przycisk "ODWAPNIANIE", a nastepnie przycisk START/STOP ▷□.
2 Wyjac tace ociekowa i pojemnik na fusiy, oproznic je i umiesci ponownie w urzadzeniu.
3 Wyjac i opróznic zbiornik na wode. Nastepnie wyjac filtr INTENZA+, jestli wystepuju.
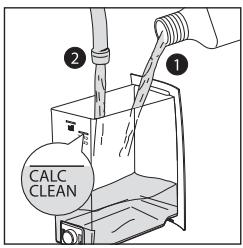
4 Wlac cala butelke roztworu odwapniajacego Gaggia do zbiornika na wode, a nastepnie wypebnic go woda az do poziomu CALC CLEAN. Nastepnie wlozyc go z powrotem do urzadzenia.
5 Wypełnić dzbanek na mleko do połowy wodą i wędźyc go do urzadzenia.
6 Postepowac zgodnie z instrukcjami na wyswietlaczu, aby uruchomic procedure odwapniania. Procedure ta trwa oko 25 minut, a polega na cyklu odwapniania i cyklu plukania, podczas ktorych w regularnych odstepach czasu nastepuje wylewanie wody.
7 Po ukończeniu cyklu odwapniania naleź przy przyteplukać zbiornik, dzbanek i obwod wody, postepujacz ggodnie z instrukcjami na wyświetlaczu.
8 Wlozyć ponownie filtr INTENZA+ do zbiornika na wode.
Wazne: Procedure to wodolnym momencie przerwać i wzniewic ponownie, naciskajcz przycisk START/STOP
Uwaga: gdy aktywna jest procedura odwapniania, nie:noyna wyjmować bloku zaparzajęcego. Poczekć na zakończenie procesu odwapniania, a sątpnie wyjadć blok zaparzajćy.
Co robić w przyypadku przerwania procedury odwapniania
Z procedury odwapniania można wyjsć, nacziskajć przycisk ON/OFF ① na panelu sterowania. Gdyby procedura odwapniania została przyerwana przyd ukończeniem jej, naleź:
1 Opróznic zbiornik na wode i dokladnie go umyć.
2 Napelnić zbiornik na wode świeść woda do poziomu CALC CLEAN i ponownie uruchomic urzadzenia. Urzadzenia rozgrzeje są wykona automatyczny cykl plukania.
3 Przed przyrzadzeniem jakiegokolwiek napoju nalezy wykonac ręczny cykl plukania, jak opisano w odpowiednim rozdziale.
Wăgne:gressive procedure.
Wăgne:leaving procedure.
Wăgne:leaving procedure.
Wăgne:leaving procedure.
Wăgne:leaving procedure.
Ustawenia rożne
Naciskjacz przycisk CLEAN/SETTING i wybierajuac na wyswietlaczu "USTAWIENIA", besteht przywrocic lub zmienić niedróte parametry urzadzenia, między innymi:
- Jezyk
- Filtr wody
- Timer stand-by
Twardosc wody
- Jednostki miary
- Licznik napojów
- Przywracanie ustawien fabrznych
Język
Po wybraniuk yonstawianja języków otworzy sie lista dostepnych sązyków.
Dostepej jezyki
| WŁOSKI | NIDERLANDZKI | WęGIERSKI |
| ANGIELSKI | DUÑSKI | BULGARSKI |
| NIEMIECKI | GRECKI | CZESKI |
| FRANCUSKI | POLSKI | SLOWACKI |
| HISZPAÑSKI | ROSYJSKI | LITEWSKI |
| PORTUGALSKI | RUMUÑSKI | |
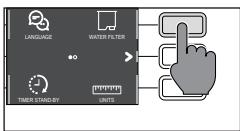
Filtr wody
Po wybraniu opcji „FILTR WODY" postepować zgodnie z instrukcjami na wyświetlaczu i z opisem w rozdziale „Instalacja filtra wody INTENZA+“ oraz w roździale „Wymiana filtra wody INTENZA+".
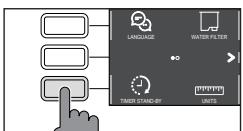
Timer stand-by
Po wybraniu opcjı „TIMER STAND-BY" möglich uzwartć timer na:
- 15 min
- 30 min
- 60 min
- 180 min
Twardosc wody
Po wybraniu opcj, TWARDOSC WODY" postepowac zgodnie z instrukcjami na wyswietlaczu i z opisem w rozdziale, Pomiar twardosci wody".
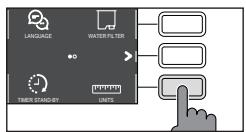
Jednostki miary
Wybierajc opcj "JEDNOSTKI MIARY".
można ustawić jegnestkę miary w „ml“ lub „oz".
Licznik napojów
Dla kaczdego napoju myznawyswiwtiec liczbe filizanek od momentu pierwszego uruchomienia urzadzenia. Danych tych nie myznaw zresetować.
Przywracanie ustawien fabrycznych
Ustawienia urzadzenia przywróci do wartosci fabrycznych. Urzadzenie zażadc podwojné potworidzenia, zanim;będzie mozza przyzejść dalej. Zostaną zresetowane wzystkie parametry poza tymi zwiagini z profilami (MY FAVOURITES i z licznikiem napojów.


Znaczenia kodów będów
Ponizej wymieniono niedtore kody bledow, jakie moga sie pojawiac na wyswietlaczu, ich znaczenia oraz instrukcje rozwiazania problemów. Jesli wskazane rozwiazania okaza sie nieskuteczne (na wyswietlaczu nadal bedzie wyswietlana ikona kodu bledu i urzadzenie nie zacznie dziatracy prawidto), lub gdyby pojawity sie innate kody bledu, nalezy sie skontaktoa c autoryzowanym centrum obstugi klienla lub z dystrybutorami w swoim kraju. Dane podano na stronie www.gaggia.com lub www.gaggia.pl.
| Kodblaędu | Problem | Przyczyna | Mozliwe rozw)ianzie |
| 01 | Młynek jest zablokowy | Przewód wylotowy kawy jest zablokowy. | Wyjać kabel zasilajcy i bloc zarapzajcy. WyczyScić dokladnie przywość wylotowy kawy uchwym tych. Ponownie wączyc urzadzenia. |
| 03 - 04 | Wystapił problem z blokiem zarapzaj)cym. | Blok zarapzajcy jest zabrudzony lub nieprawidłowon nasmarowy. | Wyȩczyć urzadzenia za pomocamy wymiarcznika glównego. Wyjać bloc zarapzajcy i dokladnie go wyczyScić. (Patrz rozdziel „Czyszczenie bloku zarapzajcęgo") |
| Blok zarapzajcy nie jest ustawiony prawnów. | Wyȩczyć urzadzenia za pomocamy wymiarcznika glównego. Wyjać bloc zarapzajcy i wȩzyć go ponownie. Przed wymiarczniem bloku zarapzajcęgo upewnić sie,źznajduje są on w prowidłowej pozycji. Patrz rozdziel „Wkładanie bloku zarapzajcęgo na sąsce". |
| 05 | Wystapił problem w obwodzie wody. | W obwodzie wody znejduje są powietrze. | Wyjać i wȩzyć ponownie zbiornik do urzadzenia, kilkukrotnie. Upewnić są o wymiarcni go prowidłowo do urzadzenia. Sprawdzić,czy komora zbiornika na wode jest czysta. |
| W przypadku korzystania z filtra „INTENZA+”: wyjać filtrz ze zbiornika na wode i potrzasnć nim, aby usunć z filtra calę powietrze. NatestPNie wȩzyc ponownie filtr „INTENZA+” do zbiornika na wode. |
| 14 | Urzadzenia jest przyegrzane. | PrzyczynMZebyc wiele. | Wymiarczyć urzadzenia i wymiarczyć je ponownie po 30 minutach. Wykonac tę czynnosć 2 lub 3 razy. |
Rozwiȩzywanie problemów
W niniejszym rodziale podsumowano njczęstszpe problemy, jakie mogą wystepować w tym urzadzeniu. Ješli problemu nie uda sie rozwȩĆ, korzystañć z podanych poniżej informaciji,NSEwy wejsć na strone www.gaggia.com lub www. gaggia.pl, aby zapoznać siege z czestrez odawanymi pytaniami lub skontaktować siege z Centrum obślugu klienata będź dystrybutorami w swoim kraju.
| Problem | Przyczyna | Rozwiązanie |
| Urȩdzenia nie wącza sie. | Urȩdzenia nie jest podȩczone. | Sprawdzić,czy kabel zasilajćy jest wȩźony prawnidwo. |
| Taca ociekowa szybko sie zapiłnia. | Jest to zupełnie normalne zjawisko. Urȩdzenia wykorzystuje wodę do przypełukiwania obwodu wewétrznego i bloku zaporzȩcoma. C摩擦 s wody przypełwyba przyez system wewétrzny bezpośrednio do tacy ociekowej. | Opróznic tace ociekowa, kiedy przyze krátke wychodzi czerwony wskaźnik (zalecamy umieść fili anzękę pod dozownikiem w celu zbierania wody podczas procesu przypełukiwania). |
| Na wyȩwtlaczu stale widnieje ikona „pełnégo pojemnika na fusi". | Pojemnik na fusi zostaw oprożniony, kiedy urȩdzenia było wyplaźzone. | Oprózniać zawsze pojemnik na fusi, gdy urȩdzenia jest wȩczone. Jeśli pojemnik na fusi jest oprożniany, gdy urȩdzenia jest wyplaźzone, wtedy licznik cykli kawy nie zeruju sie. Wówczas na wyȩwtlaczu widoczna jest wospomniana ikona, nawe jeśli pojemnik nie jest peły. |
| Pojemnik na fusi zostaw ustawIONy zbyt szybko. | Poczekić zawsze okato 5 sekund, kiedy ustawia sie na sąmycu pojemnik na fusi. Wówczas licznik wyzeruju sie. |
| Urȩdzenia zȩda opróznienia pojemnika na fusi, chociź pojemnik ten nie jest pełny. | Urȩdzenia nie wyzerowyto licznika przy ostatnim oprożnieniu pojemnika na fusi. | Poczekić zawsze okato 5 sekund, kiedy ustawia sie na sąmycu pojemnik na fusi. Wówczas licznik fów wyzeruju sie. |
| Oprózniać zawsze pojemnik na fusi, gdy urȩdzenia jest wȩczone. Jeśli pojemnik na fusi jest oprożniany, gdy urȩdzenia jest wyplaźzone, wtedy licznik cykli kawy nie zeruju sie. |
| Niemozgliwe wyjecie bloku zaporzȩcoma. | Blok zaporzȩćny znejduje sie wNieprawidłowym połozeniu. | Zamknć drzewczki serwisowe. Wyȩczyć i wȩczyć ponownie urȩdzenia. Poczekić, aż na wyȩwtlaczu pojawi sie komunikat informujćy o gotowość urȩdzenia, a nastepnie wyȩć bloc zarparzȩćy. |
| Pojemnik na fusi noż wólty. | Wyȩć pojemnik na fusi przyded wyȩcielem bloku zaporzȩcoma. |
90 Polski
| Problem | Przyczyna | Rozwiązanie | | |
| Nie sąna wędźyc bloku zaporzajȩcego. | Blok zarapaz(jjćny znajduje sie w nieprawidlowym położeni. | Blok zarapaz(jjćny zęstówustawiony prawnodwo na swoim mięscu. Upewnićsie, ze dzwignia styka sie z podstawabloku zarapaz(jjćego i ze haczyk bloku zaporzajȩcego znajduje sie w prawnidlowym położeni. Patrz rozdziel „Wkładanie bloku zarapaz(jjćego na.mięsce". | | |
| Aby ponownie ustawić urzędzenia, należy:ustawić na mięscu poljemnik na fusy. Niewkładc bloku zarapaz(jjćego. Zamknąćdrzewiczki serwisowe przy wędzonympoljemniku na fusy, odźacZYć kabel zasil)—y i podźacZYć go ponownie. NatestPNie spróbow)—wędźć na mięsce blok zarapaz)—y i ponownieuruchomico urzędzenia. | | |
| Kawa ma mały piantklub jest wodnista. | Młynek jest ustawiony na grube mielenie. | Wyregulować młynek na mielenie drobniejsze. | | |
| Urzbędzenia wykonuje procedure automatycznej regul)—j. | Przyrzadzić kilka filiz)—kawy, aby urz)—dzenie wyregulowo tosi automatycznie. | | |
| Przewód wylotowy kawy jest zablokowyany. | Wczy)—przewód wylotowy kawy za pomoc)—y,—ki, jak opisano w rozkiale „Czyszcz)—no Bloku zarapaz)—jęco"—pod bę)—w)—d—. | | |
| Kawa nie jest wystarcz)—co cie)—a. | Ustawiona temperatura jest zbyt niska. Spraw)—ustawienia menu. | Ustawić temperatuń w menu na „MAX". | | |
| Urz)—dzenie mieli kW)—ziarnista, ale kawa nie jest dozowana. | Młynek jest ustawiony na zbyt drobne mielenie. | Wyregulować młynek na mielenie grubsze. | | |
| Dz)—dozwnik kawy jest zatkany. | Zarop)—du)—kawy wstep)—zmielona, bez dodawania kawy wstep)—nzmiel)—j. | | |
| Dysze doz)—wnika kawy są zatkane. | Wczy)—dysze doz)—wnika kawy wyc)—kiemium. | | |
| Kawa wyp)—wa powoli lub kropelkami. | Młynek jest ustawiony na zbyt drobne mielenie. | Wyregul)—młynek na mielenie grubsze. | | |
| Dysze doz)—wnika kawy są zatkane. | Wczy)—dysze doz)—wnika kawy wyc)—kiemium. | | |
| Ob)—dʒ)—wnika jest zablok)—wnicy.—doz)—mik)—mik.—. | Wykonáć od)—pap)—nianie. | | |
| Mleko nié spienia s)—. | Dz)—wnika mleka jest zabrud)—yni lub dz)—wnika jest zob)—yni w)—yni w)—yni w)—yni w)—yni w)—yni w)—yni w)—yni w)—yni w)—yni w)—yni w)—yni w)—yni w)—yni w)—yni w)—yni w)—yni w)—yni w)—yni w)—yni w)—yni w)—yni w)—yni w)—yni w)—yni w)—yni W)—yni w)—yni w)—yni w)—yni w)—yni w)—yni w)—yni w)—yni w)—yni w)—yni w)—yni w)—yni w)—yni w)—yni w)—yni w)—yni w)—yni w)—yni w)—yni w)—yni w)—yni w)—yni w)—yni w)—yni w)—yni y.—do z)—yn)—m)—m)—m)—m)—m)—m)—m)—m)—m)—m)—m)—m)—m)—m)—m)—m)—m)—m)—m)—m)—m)—m)—m)—m)—m)—m)—m)—m)—m)—m)—m)—m)—m)—m)—m)—m)—m)—m)—m)—m)—m)—m)—m)—m)—m)—m)—m)—m)—m)—m)—n)—m)—m)—m)—m)—m)—m)—m)—m)—m)—m)—m)—m)—m)—m)—m)—m)—m)—m)—m)—m)—m)—m)—m)—m)—m)—m)—m)—m)—m)—m)—m)—m)—m)—m)—m)—m)—m)—m)—m)—m)—m)—m)—m)—m)—m)—m)—m)—m)—m)—c)
Uzy)—doz)—wnika nié nad)—s do spleniania. | W ziele)—no"—ci od rob)—z—we"—i"—j—"no"—p"—j"—p"—j"—p"—j"—p"—j"—p"—j"—p"—j"—p"—j"—p"—j"—p"—j"—p"—j"—p"—j"—p"—j"—p"—j"—p"—j"—p"—j"—p"—j"—p"—j"—p"—j"—p"—j"—p"—j"—p"—j"—p"—j"—p"—j"—p"—j"—p"—j"—p"—p"—j"—p"—j"—p"—j"—p"—j"—p"—j"—p"—j"—p"—j"—p"—j"—p"—j"—p"—j"—p"—j"—p"—j"—p"—j"—p"—j"—p"—j"—p"—j"—p"—j"—p"—j"—p"—j"—p"—j"—p"—j"—p"—j"—p"—j"—p"—j"—p"—J"—p"—j"—p"—j"—p"—j"—p"—j"—p"—j"—p"—j"—p"—j"—p"—j"—p"—j"—p"—j"—p"—j"—p"—j"—p"—j"—p"—j"—p"—j"—p"—j"—p"—j"—p"—j"—p"—j"—p"—j"—p"—j"—p"—j"—p"—j"—p"—j"—p"—l"—m"—m"—m"—m"—m"—m"—m"—m"—m"—m"—m"—m"—m"—m"—m"—m"—m"—m"—m"—m"—m"—m"—m"—m"—m"—m"—m"—m"—m"—m"—m"—m"—m"—m"—m"—m"—m"—m"—m"—m"—m"—m"—m"—m"—m"—m"—m"—m"—m"—m"—n"—m"—n"—n"—n"—n"—n"—n"—n"—n"—n"—n"—n"—n"—n"—n"—n"—n"—n"—n"—n"—n"—n"—n"—n"—n"—n"—n"—n"—n"—n"—n"—n"—n"—n"—n"—n"—n"—n"—n"—n"—n"—n"—n"—n"—n"—n"—n"—n"—n"—n"—n"—m"—m"—m"—m"—m"—m"—m"—m"—m"—m"—m"—m"—m"—m"—m"—m"—m"—m"—m"—m"—m"—m"—m"—m"—m"—m"—m"—m"—m"—m"—m"—m"—m"—m"—m"—m"—m"—m"—m"—m"—m"—m"—m"—m"—m"—m"—m"—m"—m"—c)
Uzy)—doz)—wnika nié nad)—s do spleniania. | W ziele)—no”—ci od rob)—z—we”—i”—j”—o”—s"—p"—j”—p”—s”—p”—j”—p”—j”—p”—j”—p”—j”—p”—j”—p”—j”—p”—j”—p”—j”—p”—j”—p”—j”—p”—j”—p”—j”—p”—j”—p”—j”—p”—j”—p”—j”—p”—j”—p”—j”—p”—j”—p”—j”—p”—j”—p”—j”—p”—j”—p”—j”—p”—j”—p”—i”—j”—p”—j”—p”—j”—p”—j”—p”—j”—p”—j”—p”—j”—p”—j”—p”—j”—p”—j”—p”—j”—p”—j”—p”—j”—p”—j”—p”—j”—p”—j”—p”—j”—p”—j”—p”—j”—p”—j”—p”—j”—p”—j”—p”—j”—p”—j”—p”—j”—P”—j”—p”—j”—p”—j”—p”—j”—p”—j”—p”—j”—p”—j”—p”—j”—p”—j”—p”—j”—p”—j”—p”—j”—p”—j”—p”—j”—p”—j”—p”—j”—p”—j”—p”—j”—p”—j”—p”—j”—p”—j”—p”—j”—p”—j”—p”—j”—p”—j”—j”—p”—j”—p”—j”—p”—j”—p”—j”—p”—j”—p”—j”—p”—j”—p”—j”—p”—j”—p”—j”—p”—j”—p”—j”—p”—j”—p”—j”—p”—j”—p”—j”—p”—j”—p”—j”—p”—j”—p”—j”—p”—j”—p”—j”—p”—j”—p”—j”—c
Uzy)—doz)—wnika nié nad)—s do spleniania. | W ziele)—no”—ci od rob)—z—we”—i”—j”—o”—s”—p”—j”—p”—j”—p”—j”—p”—j”—p”—j”—p”—j”—p”—j”—p”—j”—p”—j”—p”—j”—p”—j”—p”—j”—p”—j”—p”—j”—p”—j”—p”—j”—p”—j”—p”—j”—p”—j”—p”—j”—p”—j”—p”—j”—p”—j”—p”—j”—c
Up)—d)—d)—d)—d)—d)—d)—d)—d)—d)—d)—d)—d)—d)—d)—d)—d)—d)—d)—d)—d)—d)—d)—d)—d)—d)—d)—d)—d)—d)—d)—d)—d)—d)—d)—d)—d)—d)—d)—d)—d)—d)—d)—d)—d)—d)—d)—d)—d)—d)—d)—c
Up)—d)—d)—d)—d)—d)—d)—d)—d)—d)—d)—d)—d)—d)—d)—d)—d)—d)—d)—d)—d)—d)—d)—d)—d)—d)—d)—d)—d)—d)—d)—d)—d)—d)—d)—d)—d)—d)—d)—d)—d)—d)—d)—d)—d)—d)—d)—d)—d”—d)—d)—d)—d)—d)—d)—d)—d)—d)—d)—d)—d)—d)—d)—d)—d)—d)—d)—d)—d)—d)—d)—d)—d)—d)—d)—d)—d)—d)—d)—d)—d)—d)—d)—d)—d)—d)—d)—d)—d)—d)—d)—d)—d)—d)—d)—d)—d)—d)—d”—d)—c
Up)—d)—d)—d)—d)—d)—d)—d)—d)—d)—d)—d)—d)—d)—d)—d)—d)—d)—d)—d)—d)—d)—d)—d)—d)—d)—d)—d)—d)—d)—d)—d)—d)—d)—d)—d)—d)—d)—d)—d)—d)—d)—d)—d)—d)—d)—d)—d”—d)—d)—c
Up)—d)—d)—d)—d)—d)—d)—d)—d)—d)—d)—d)—d)—d)—d)—d)—d)—d)—d)—d)—d)—d)—d)—d)—d)—d)—d)—d)—d)—d)—d)—d)—d)—d)—d)—d)—d)—d)—d)—d)—d)—d)—d)—d)—d)—d)—d”—d)—d)—d)—c
Up)—d)—d)—d)—d)—d)—d)—d)—d)—d)—d)—d)—d)—d)—d)—d)—d)—d)—d)—d)—d)—d)—d)—d)—d)—d)—d)—d)—d)—d)—d)—d)—d)—d)—d)—d)—d)—d)—d)—d)—d)—d)—d)—d)—d)—d”—d)—d)—d)—d)—c
Up)—d)—d)—d)—d)—d)—d)—d)—d)—d)—d)—d)—d)—d)—d)—d)—d)—d)—d)—d)—d)—d)—d)—d)—d)—d)—d)—d)—d)—d)—d)—d)—d)—d)—d)—d)—d)—d)—d)—d)—d)—d)—d)—d)—d”—d)—d)—d)—d)—d)—c
Up)—d)—d)—d)—d)—d)—d)—d)—d)—d)—d)—d)—d)—d)—d)—d)—d)—d)—d)—d)—d)—d)—d)—d)—d)—d)—d)—d)—d)—d)—d)—d)—d)—d)—d)—d)—d)—d)—d)—d)—d)—d)—d)—d”—d)—d)—d)—d)—d)—d)—c
Up)—d)—d)—d)—d)—d)—d)—d)—d)—d)—d)—d)—d)—d)—d)—d)—d)—d)—d)—d)—d)—d)—d)—d)—d)—d)—d)—d)—d)—d)—d)—d)—d)—d)—d)—d)—d)—d)—d)—d)—d)—d)—d”—d)—d)—d)—d)—d)—d)—d)—c
Up)—d)—d)—d)—d)—d)—d)—d)—d)—d)—d)—d)—d)—d)—d)—d)—d)—d)—d)—d)—d)—d)—d)—d)—d)—d)—d)—d)—d)—d)—d)—d)—d)—d)—d)—d)—d)—d)—d)—d)—d)—d”—d)—d)—d)—d)—d)—d)—d)—d)—c
Up)—d)—d)—d)—d)—d)—d)—d)—d)—d)—d)—d)—d)—d)—d)—d)—d)—d)—d)—d)—d)—d)—d)—d)—d)—d)—d)—d)—d)—d)—d)—d)—d)—d)—d)—d)—d)—d)—d)—d)—d”—d)—d)—d)—d)—d)—d)—d)—d)—d)—c
Up)—d)—d)—d)—d)—d)—d)—d)—d)—d)—d)—d)—d)—d)—d)—d)—d)—d)—d)—d)—d)—d)—d)—d)—d)—d)—d)—d)—d)—d)—d)—d)—d)—d)—d)—d)—d)—d)—d)—d”—d)—d)—d)—d)—d)—d)—d)—d)—c
Up)—c—I—I—I—I—I—I—I—I—I—I—I—I—I—I—I—I—I—I—I—I—I—I—I—I—I—I—I—I—I—I—I—I—I—I—I—I—I—I—I—I—I—I—I—I—I—I—I—I—I—I—I—I—I—I—I—I—I—I—I—I—I—I—I—I—I—I—I—I—I—I—I—I—I—I—I—I—I—I—I—I—I—I—I—I—I—I—I—I—I—I—I—I—I—I—I—I—I—I—I—I-I—I—I—I—I—I—I—I—I—I—I—I—I—I—I—I—I—I—I—I—I—I—I—I—I—I—I—I—I—I—I—I—I—I—I—I—I—I—I—I—I—I—I—I—I—I—I—I—I—I—I—I—I—I—I—I—I—I—I—I—I—I—I—I—I—I—I—I—I—I—I—I—I—I—I—I—I—I—I—I—I—I—I—I—I—I—I—I—I—I—I—I—I—I—I—I—I—I—I—I:I—I—I—I—I—I—I—I—I—I—I—I—I—I—I—I—I—I—I—I—I—I—I—I—I—I—I—I—I—I—I—I—I—I—I—I—I—I—I—I—I—I—I—I—I—I—I—I—I—I—I—I—I—I—I—I—I—I—I—I—I—I—I—I—I—I—I—I—I—I—I—I—I—I—I—I—I—I—I—I—I—I—I—I—I—I—I—I—I—I—I—I—I—I—I—I—I—I—I—I(I) |
| Problem | Przyczyna | Rozwiązanie |
| Nie da są wędźyc filtru „INTENZA+”. | Naleź wyunȩć powietrze z filtra. | Poczekość, aż pęcherzykigowietrza wydostaność z filtra. |
| Zbiornik zawiera jesteczowe wodę. | Opróznicy zbiornik na wodę przy事业发展wiatłowaniem filtra. |
| Gumowa uszczelka jest nałozone na filtr „INTENZA+”. | Sprawdzić opakowanie i nałoźycuszczelność na filtr „INTENZA+”. |
| Pod urzysteniem znejduje są woda. | Taca ociekowa była zbyt piñe i woda wylata są. | Opróznicy tace ociekowa, kiedy wyskaźnik zacznie wystawać poza tace. Zawsze oprózniać pewemnik przy uruchomieniem procedury odwapniania. |
Akcesoria GAGGIA
Kawa i akcesoria dostepne są w autoryzowanych salonach (Wlochy), lub u dystrybutorów w poszczejólnych krajach.
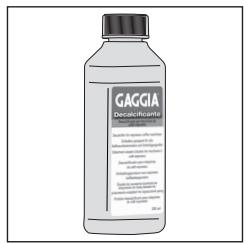
Odwapniacz
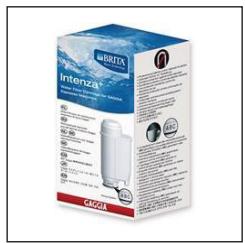
Filtr wody INTENZA+
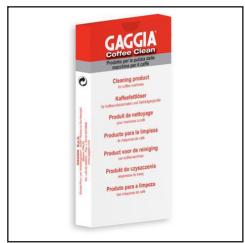
Pastylki odtluszczajace

Milk circuit cleaner (Philips)

Gama kawy ziarnistej i zmielonej: 100% Arabica / Intenso / Bezkofeinowa
92 Polski
Dane techniczne
| Napiȩcie nominale - Moc nominalna - Zasilanie | Patrz tabliczka umieszczona po wewnétrznej stronie drzewiczek serwisowych |
| Material obudowy | Tworzywo termoplastyczne |
| Wymiary | 260 x 380 x 440 mm |
| Ciezar | 7,5 kg |
| Długość kabla | 1200 mm |
| Panel sterowania | Przedni |
| Rozmiar filżanek | Do 150 mm |
| Zbiornik na wode | 1,8 litra - Wyjmowany |
| Pojemnosć pijemnika na kawe ziarnista | 250 g |
| Pojemnosć pijemnika na fusy | 10 |
| Ci东南ienie pompny | 15 barów |
| Bojler | Bojler ze stali niedzewnej |
| Urędzenia zabeepieczajace | Bezmiecznik termiczny |


GAGGIA S.p.A. reserves the right to make all the necessary changes.
GAGGIA S.p.a. behoudt zich hetrecht voor om alle wijzigingen die zij noedzakelijkacht aan te brengen.
GAGGIA S.p.a. zastrzega soste sprawo do wpwadzania dowolnych zmian.

COD. 421945006541 - Rev.01 - 23/10/20
GAGGIA S.p.A.
Administrative Office
Via Torretta, 240
40041 Gaggio Montano - Bologna - Italy
+39 0534 771111 / Fax +39 0534 31025
Registered Office
Piazza A. Diaz, 1
20123 Milan - Italy
Social Capital: 104,000 euros fully paid up
REA MI1387376 - RI Tax code 02069680367
VAT.No.:IT-13054780153
www.gaggia.it
www.gaggia.com
GAGGIA
MILANO