
RCR-22 - Radio portable SANGEAN - Notice d'utilisation et mode d'emploi gratuit
Retrouvez gratuitement la notice de l'appareil RCR-22 SANGEAN au format PDF.


| Type de produit | Radio numérique portable |
| Caractéristiques techniques principales | Réception DAB/DAB+/FM, écran LCD rétroéclairé, tuner numérique |
| Alimentation électrique | Adaptateur secteur et batterie rechargeable |
| Dimensions approximatives | 210 x 130 x 80 mm |
| Poids | 1,2 kg |
| Compatibilités | Compatible avec les stations DAB et FM |
| Type de batterie | Batterie lithium-ion rechargeable |
| Tension | 5 V |
| Puissance | 2 W |
| Fonctions principales | Réveil, minuterie, réglage de l'alarme, recherche automatique des stations |
| Entretien et nettoyage | Essuyer avec un chiffon doux, éviter les produits chimiques |
| Pièces détachées et réparabilité | Disponibilité limitée des pièces, consulter le service après-vente |
| Sécurité | Ne pas exposer à l'humidité, utiliser uniquement avec l'adaptateur fourni |
| Informations générales utiles | Vérifier la compatibilité des stations DAB dans votre région avant l'achat |
FOIRE AUX QUESTIONS - RCR-22 SANGEAN
Questions des utilisateurs sur RCR-22 SANGEAN
0 question sur cet appareil. Repondez a celles que vous connaissez ou posez la votre.
Poser une nouvelle question sur cet appareil
Téléchargez la notice de votre Radio portable au format PDF gratuitement ! Retrouvez votre notice RCR-22 - SANGEAN et reprennez votre appareil électronique en main. Sur cette page sont publiés tous les documents nécessaires à l'utilisation de votre appareil RCR-22 de la marque SANGEAN.
MODE D'EMPLOI RCR-22 SANGEAN
SANGEAN
User Manual
RCR-2
IMPORTANT SAFETY INSTRUCTIONS
- Read these instructions.
- Keep these instructions.
- Heed all warnings.
- Follow all instructions.
- Do not use this apparatus near water.
- Clean only with dry cloth.
- Do not block any ventilation openings. Install in accordance with the manufacturer's instructions.
- Do not install near any heat sources such as radiators, heat registers, stoves, or other apparatus (including amplifiers) that produce heat.
-
Do not defeat the safety purpose of the polarized or grounding-type plug. A polarized plug has two blades with one wider than the other. A grounding type plug has two blades and a third grounding prong. The wide blade or the third prong are provided for your safety. If the provided plug does not fit into your outlet, consult an electrician for replacement of the obsolete outlet.
-
Protect the power cord from being walked on or pinched particularly at plugs, convenience receptacles, and the point where they exit from the apparatus.
- Only use attachments/accessories specified by the manufacturer.
- Use only with the cart, stand, tripod, bracket, or table specified by the manufacturer, or sold with the apparatus. When a cart is used, use caution when moving the cart/apparatus combination to avoid injury from tip-over.
- Unplug this apparatus during lightning storms or when unused for long periods of time.
- Refer all servicing to qualified service personnel. Servicing is required when the apparatus has been damaged in any way, such as power-supply cord or plug is damaged. liquid has been spilled or objects have fallen into the apparatus, the apparatus has been exposed to rain or moisture, does not operate normally, or has been dropped.
- To Reduce the Risk of Fire or Electric Shock, Do not Expose This Appliance To Rain or Moisture.
- The Shock Hazard Marking and Associated Graphical Symbol is provided on the bottom panel of unit.
- Apparatus shall not be exposed to dripping or splashing and no objects filled with liquids, shall not be placed on the apparatus.
GB
Main features
(1) 14 station memories (7 each on AM/FM bands)
(2) Digital radio controlled clock with date display Date and time displays are checked and if necessary corrected daily with an exact radio controlled time antenna signal
(3) Nap timer Adjustable from 10-120 minutes
( 4 ) Alarm with Humane Wake System ( HWS )The alarm begins quietly and gradually becomes louder beforeset switched off ( buzzer alarm only )
(5) Radio alarm Woken up by the favorite station
(6) Two independent alarm functions
(7) Alarm week day selection
(8) Adjustable alarm level (buzzer alarm only)
(9) Headphone jack
(10) Time Zone adjustment (PST, MST, CST, EST)
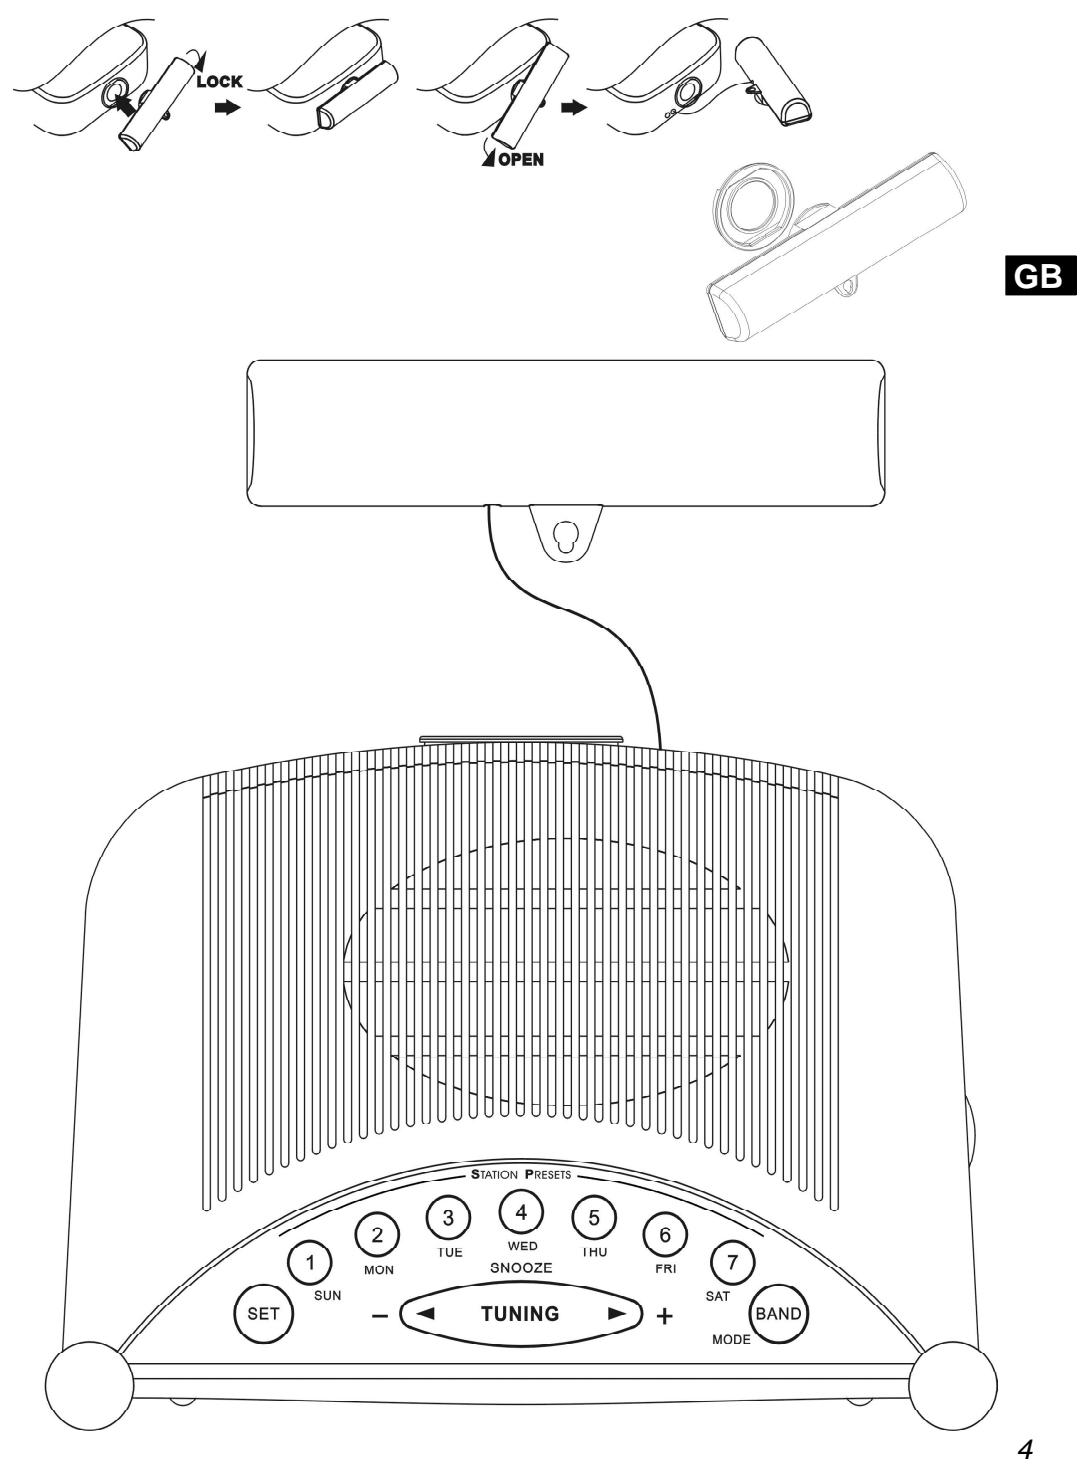
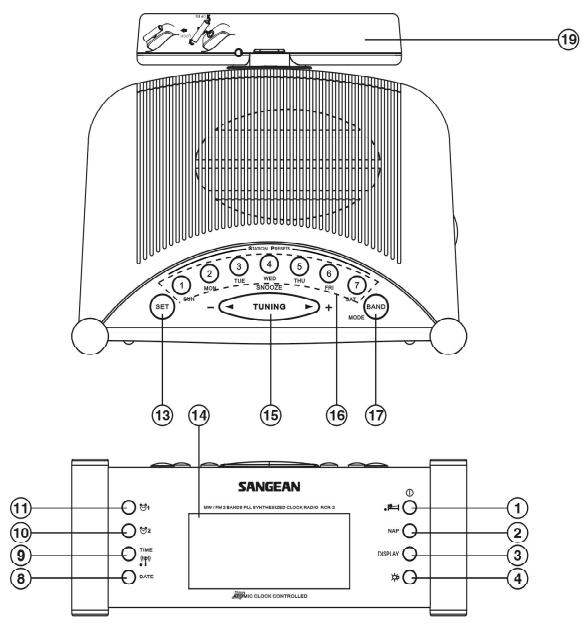
Controls
(1) Power on/off and Sleep timer
② Nap timer
③ Display button to display time and radio frequency
④ Display backlight on/off button
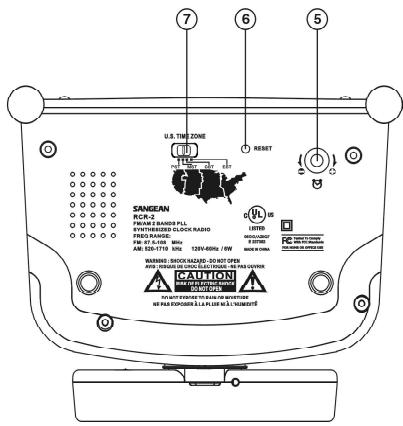
(5) Buzzer alarm level adjustment
(6) RESET
⑦ Time zone adjustment
⑧ Date adjustment
⑨ Time adjustment
10 Alarm 2 button
1 Alarm 1 button
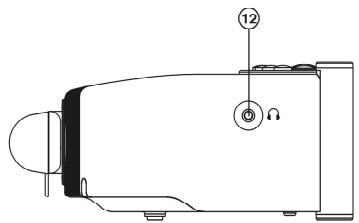
12 Headphones socket
⑬ Time/Date/Alarm set button
14 LCD display
Tuning Up/Down and Snooze button
16 Station memories and alarm week days selection
⑰ AM/FM band and alarm mode selection also Daylight Saving Time (D.S.T.) set.
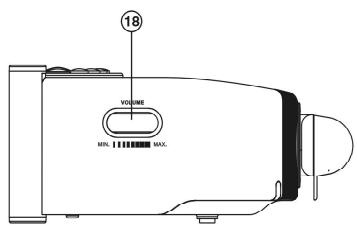
Volume control
19 External Antenna for radio controlled clock
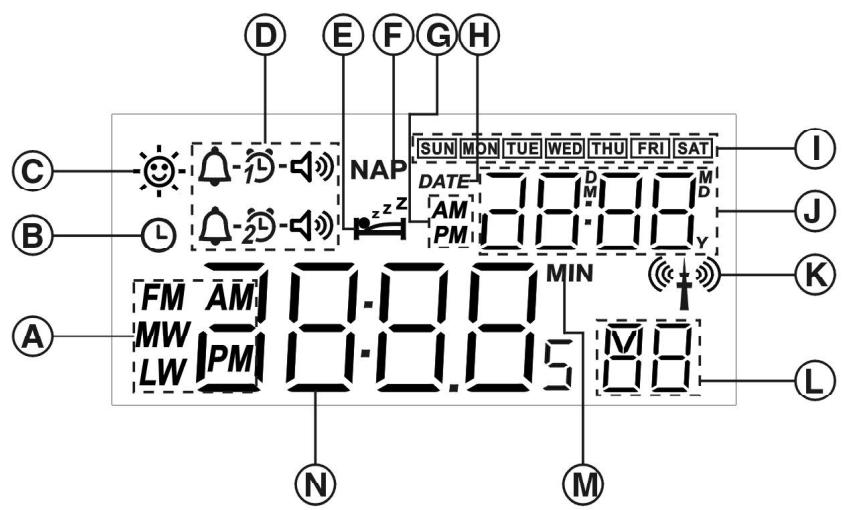
LCD display
Radio band and a.m./p.m. display
B Time set
Daylight Saving Time (D.S.T.)
Alarm indicator
⑥ Sleep timer
F Nap timer
Alarm a.m./p.m. indicator
Date
① Week day
Month/Date/Year/alarm time
Radio controlled symbol
(1) Station memory number and second indicator
⑧ Minute ( for Nap and Sleep timer )
Frequency/Time display
Notes on safety
Only operate this appliance with a power supply of 110-120 Volt/50-60 Hz. If you intend not using the appliance for a longer period of time (eg. Holidays), pull the plug out of the mains socket to ensure a complete separation from the power supply.
GB
Protect the appliance from heat and moisture.
Do not open the appliance and if it should require servicing, please refer to a licensed electrical workshop.
Operation
Atomic clock operation
The Sangean RCR 2 consists of a crystal controlled clock movement which includes a very special AM radio receiver that is tuned to receive the 60kHz WWVB time signal broadcast from the U.S. Government's Atomic Clock in Boulder, Colorado. The signal is an AM radio signal and as such is susceptible to weather conditions, electrical interferences, solar conditions and the position of the clock's antenna all of which effects the receiver's reception. As a general rule, best reception is at night and just before or after sunrise or sunset. Although the clock can work in most locations the number of times that it adjusts itself to the U.S. Atomic Clock's time signal may depend on its location. Under certain weather conditions or in areas of poor reception it may take 48 hours or more to receive a signal for the correct time. In some cases it may be necessary to seek another location in order to receive a useable time signal.
Set time Zone Switch [7] located on bottom of clock to your correct zone as illustrated.
After the ATS program completes the AM/FM frequency set up the following display —: — will appear and the symbol will blink indicating the radio is searching for the radio controlled signal.
Once the radio receives the radio controlled signal the correct time and date will be set automatically. Once the correct time and date have been set, the symbol will stop blinking but the symbol will remain on the display indicating that the time and date have been set utilizing the radio controlled signal. The analog clock will follow the radio controlled signal.
Manual time setting
TIME
Press TIME button, display will flash and previous allocated time. Press SET button, the Hour digits in the time display begin to blink with a beep.
- Adjust the hour with key + or - .
- Press the SET button once again to confirm the hour, now the minute digits in the time display begin to blink.
Adjust the minutes just as you adjusted the hour:
- Set the minutes with key + or -.
- Press the TIME button once again to confirm the time setting with a beep.
The second starts to count. The symbol will appear indicating this is not radio controlled time.
Note:
If there is Daylight Saving Time ( D.S.T.) system in your place, after pressing SET button, press Mode button once will advance one hour on time setting, Display will show D.S.T. symbol indicating the time is under D.S.T. status.
DATE
Press DATE button, display DATE will blink. Press SET button, display will blink year with a beep and a small Y (year) will appear,
- Set the year with key + or -.
- Press SET button again and follow the setting of year to set the month and date.
- Confirm DATE setting by pressing DATE button again.
Now the display will show time, date, week day, second and symbol.
You can always adjust the time manually whenever is required by following above procedures.
Radio operation
Turn on the radio with the Power on/off key 1.
Tune into desired stations
Manual station selection
- With the key 15 Tuning + and -, you can tune into the frequency of your desired stations.
- Scanning tuning
Press and hold key 15+ or - for more than 0.5 seconds and release, the radio will search for the next station.
Storing the preset stations
Tune into the stations.
Select a memory preset button and press for more than 2 seconds until a confirmed beep sounds and display M stops blinking. The station is now stored.
Note:
When you store a new station in a memory slot, the station previously in that slot is automatically erased.
Recall the station memories
Recall the station memories, simply select the required bands and press required station memory slot buttons 1-7.
Volume
You can select the required volume by adjusting the Volume control button 18.
Alarm Clock
Alarm setting can be done while the appliance power is during on or off position.
The alarm clock is equipped with two alarm systems which can be operated independently of each other either with Human Wake System buzzer or with a radio (radio alarm clock).
GB
Alarm with radio
- Select the desired station by station memory button 1-7 or simply tune the radio station.
- Set the desired radio alarm volume.
- Select alarm system 1 or 2 by pressing the alarm 1 or 2 button. Display will blink selected alarm system symbol.
- Press alarm SET button 13, display will blink both alarm hour and alarm mode with a beep.
- Press alarm Mode button 17 to select alarm radio mode until display shows 12 - 13 .
- Press + or - to adjust required alarm hour then press SET button again, display minute digits will blink. Press + or - button to adjust required alarm minute.
- Press week day selection 1-7 ( Sunday – Saturday ) to select required alarm week day. Display will show the days of the week on which you wish to be woken by the alarm.
- Press alarm button 1 or 2 to confirm all the alarm set with a beep. Display will show indicating radio alarm is set.
Note:
If the alarmed week day(s) or alarm mode is not selected, display will blink all the week days or show for a few seconds indicating the alarm is not set and disappear, the alarm will not be activated.
Note:
If you like to be awoken by the radio station you are listening, press Alarm system 1 or 2 for more than 2 seconds, the appliance will store the radio alarm station, then follow above procedures 2-8 to set radio alarm.
Alarm with HWS alarm buzzer
- Select alarm system 1 or 2 by pressing the alarm 1 or 2 button (11 or 10). Display will blink selected alarm system symbol.
- Press alarm SET button 13, display will blink both alarm hour and alarm mode with a beep.
- Press alarm mode button 17 to select alarm buzzer mode until display shows
- Press + or - to adjust required alarm hour then press SET button again, display minute digits will blink. Press + or - button to adjust required alarm minute.
- Press week day selection 1-7 ( Sunday – Saturday ) to select required alarm week days. Display will show the days of the week on which you wish to be woken by the buzzer alarm.
- Press alarm button 1 or 2 to confirm all the alarm set with a beep. Display will show indicating HWS buzzer alarm is set.
Note:
If the alarm week day (s) is not selected, display will blink all the week days and ^L , the alarm will not be activated.
Cancel alarm setting.
If you do not wish to be woken up at the alarm time you have set, you can cancel the alarm function.
- Select alarm system 1 or 2 by pressing the alarm 1 or 2 button (key 11 or 10).
- Press SET button, the alarm mode symbol will blink with a beep.
- Press alarm MODE button 17 one or two times (depending you were in alarm radio or alarm buzzer status) till display blink
- Press alarm 1 or 2 button again to confirm alarm cancellation. The symbol will stay on the display for around 2 seconds and disappear.
Note:
You may also select days of the week which you wish to be or not to be woken after pressing SET button while display is blinking days of the week. Press 1- 7 ( Sunday – Saturday ) of button 16 for selection.
Snoopze
To interrupt the alarm signal ( radio or beep tone/HWS), press the Snooze button 15. The alarm stops and begins again with interval of 5 minutes. The alarm will continue for an hour if not being interrupted.
Stop the alarm signal
To stop the alarm signal totally, press button 1 Power on/off.
Nap timer
With key 2, you can select the period for the short term alarm in 10 minutes steps from 10-120 minutes.
The Nap timer starts when you release the key. NAP will appear on display. The alarm signal sounds after the period of time which you have set.
If you wish to turn off the Nap timer before the time is up, simply adjust the number of minutes by pressing NAP key to OFF and release. NAP will disappear from display.
When Nap timer signal is on, turn off the timer signal by pressing key 1 Power on/off.
You can also activate the snooze function as described above.
SLEEP – auto shut off
Continuously pressing the Power button 1 will activate the sleep function, the radio will switch off automatically in 15 minutes step from 15-120. The Sleep control begins when you release the key and display will appear. After the minutes which selected, the radio turns itself off automatically. If you wish to turn off the radio beforehand, press Power on/off button 1.
Headphones
The radio provides a Headphones socket to connect the headphones set. When plug in the headphones, the speaker is disconnected.
Alarm level adjustment
With alarm level adjustment switch 5, you may select required alarm signal level.
Note:
Alarm level adjustment works only for buzzer alarm.
GB
Display backlight on/off
Key 4 provides you to select whether you require to illuminate the display.
Time zone switch
Time Zone Switch [7] should be set to zone where clock/radio is to be used.
Troubleshooting /RESET
If the radio fails to operate correctly or some digits on the display are missing or incomplete, carry out the following procedures.
- With the aid of a suitable implement (the end of a paper clip), press the RESET button 6 for a few seconds, this will reset the microprocessor, clock time and clear all the stations stored in preset memory.
Technical data
Power supply 110-120 Volt/50-60 Hz
Output Power 800 mW max
Power consumption 7W (max.).
Frequency coverage FM 87.50 - 108 .0 MHz
AM 520 - 1710 kHz
Technical data subject to changes without prior notice.

381J412A