
ND52000 - Serveur informatique COMET LABS - Notice d'utilisation et mode d'emploi gratuit
Retrouvez gratuitement la notice de l'appareil ND52000 COMET LABS au format PDF.
| Type de produit | Serveur de stockage en réseau (NAS) 4 baies |
| Marque | COMET LABS |
| Modèle | ND52000 |
| Baies de disques durs | 4 baies SATA hot-swap |
| Capacité maximale | 2,0 To (4 disques de 500 Go chacun) |
| Niveaux RAID pris en charge | RAID 0, RAID 1, RAID 5, Linéaire, Disque simple |
| Interfaces réseau | 2 ports Gigabit Ethernet avec basculement et équilibrage de charge |
| Panneau avant | Écran LCD pour affichage des informations système et configuration IP |
| Ports USB | 1 port USB 2.0 avant (pour sauvegarde CD/DVD) |
| Interface de sauvegarde | SCSI pour lecteur de bande (optionnel) |
| Protocoles réseau | Microsoft Networking (SMB/CIFS), AppleTalk, NFS, FTP, WebDAV |
| Systèmes d'exploitation clients | Windows, macOS, Linux |
| Gestion | Interface web (IE6+), Assistant d'installation rapide, panneau LCD |
| Fonctions de sauvegarde | NetBak Replicator (client Windows), réplication distante, sauvegarde sur bande/CD/DVD |
| Antivirus intégré | Oui (optionnel, nécessite code d'activation) |
| Alimentation | Redondante optionnelle (second bloc en option) |
| Support UPS | Oui, via port USB |
| Format | Rack 2U (montage en baie) |
| Dimensions (L x P x H) | 430 x 450 x 88 mm |
| Poids (sans disques) | Environ 15 kg |
| Consommation électrique | Environ 250 W (estimation) |
| Entretien et nettoyage | Dépoussiérer régulièrement, vérifier les ventilateurs, sauvegarder les données avant maintenance |
| Sécurité | Mot de passe administrateur, contrôle d'accès par utilisateur/groupe, support AD/NT Domain |
FOIRE AUX QUESTIONS - ND52000 COMET LABS
Questions des utilisateurs sur ND52000 COMET LABS
0 question sur cet appareil. Repondez a celles que vous connaissez ou posez la votre.
Poser une nouvelle question sur cet appareil
Téléchargez la notice de votre Serveur informatique au format PDF gratuitement ! Retrouvez votre notice ND52000 - COMET LABS et reprennez votre appareil électronique en main. Sur cette page sont publiés tous les documents nécessaires à l'utilisation de votre appareil ND52000 de la marque COMET LABS.
MODE D'EMPLOI ND52000 COMET LABS
User Manual
ND-52000
User Manual (Version: 1.0.0)

Copyright 2005. Comet Labs, Inc. All Rights Reserved.
December 8, 2005
TRADEMARKS
COMET LABS® is a registered trademark of Comet Labs, Inc. Microsoft®, Windows® and Internet Explorer® are registered trademarks of Microsoft Inc. All other brand or product names are trademarks of their respective companies or organizations.
LIMITED WARRANTY
In no event shall the liability of Comet Labs, Inc. (COMET LABS) exceed the price paid for the product from direct, indirect, special, incidental, or consequential software, or its documentation. COMET LABS offers no refunds for its products. COMET LABS makes no warranty or representation, expressed, implied, or statutory, with respect to its products or the contents or use of this documentation and all accompanying software, and specifically disclaims its quality, performance, merchantability, or fitness for any particular purpose. COMET LABS reserves the right to revise or update its products, software, or documentation without obligation to notify any individual or entity.

CAUTION
- Back up your system periodically to avoid any potential data loss. COMET LABS disclaims any responsibility of all sorts of data loss or recovery.
- Should you return any components of ND-52000 package for refund or maintenance, make sure they are carefully packed for shipping. Any form of damages due to improper packaging will not be compensated.
Table of Contents
Chapter 1 Overview of ND-52000
1.1 Introduction 6
1.2 Package Contents 6
1.3 System Overview 7
Chapter 2 Install ND-52000 8
2.1 Install Hard Disk 8
2.2 Connect ND-52000 to Office Network 12
Chapter 3 Use LCD Panel. 14
Chapter 4 Quick Install Wizard. 18
Chapter 5 Start to Enjoy the Services of ND-52000 22
5.1 File Server 22
5.2 FTP Server 22
5.3 Backup Server 23
Chapter 6 Administer ND-52000. 24
6.1 Access Administration Page 25
6.2 Server Administration 27
6.3 Quick Configuration 28
6.4 System Settings 34
6.4.1 Server Name 34
6.4.2 Date & Time 35
6.4.3 Language Setting 37
6.4.4 View System Settings 37
6.5 Network Settings 38
6.5.1 TCP/IP Configuration 38
6.5.2 Microsoft Networking 44
6.5.3 Apple Network 46
6.5.4 Linux (NFS) Service 46
6.5.5 WebFileManager 47
6.5.6 FTP Service 47
6.5.7 View Network Settings 48
6.6 Disk Configuration

6.6.1 Create Disk Volume 50
6.6.2 Delete Disk Volume 52
6.6.3 Examine Disk Volume 53
6.6.4 Format Disk Volume 54
6.6.5 View Disk & Volume Status 54
6.7 User Management

6.7.1 Users 55
6.7.2 User Groups 57
6.7.3 Quota 62
6.8 Network Share Management

6.8.1 Create 65
6.8.2 Property 66
6.8.3 Access Control 66
6.8.4 Delete 67
6.9 System Tools

6.9.1 SNMP Settings 68
6.9.2 Alert Notification 69
6.9.3 Restart/Shutdown 69
6.9.4 Hardware Settings 70
6.9.5 UPS 71
6.9.6 System Update. 73
6.9.7 Change Logo 75
6.9.8 Tape Backup 76
6.9.9 Remote Replication 79
6.9.10 Anti-virus Configuration 82
Installing Virus Scan Agent
··
Enabling Virus Scan Support.
.
Viewing Details of Infected Files.
.
6.9.11 Backup/Restore/Reset Settings 88
6.9.12 USB CD/DVD Backup/Restore 89
6.10 Statistics & Logs

6.10.1 Active Users 93
6.10.2 Event Logs 93
6.10.3 DHCP Logs 93
Chapter 7 Access ND-52000 94
7.1 By Microsoft Windows 94
7.2 By Apple MAC OS 96
7.3 By Linux OS 102
7.4 By Web Browser 102
7.5 By File Transfer Protocol (FTP) 103
Chapter 8 NetBak Replicator 106
Chapter 9 ND-52000 Maintenance 121
9.1 Restart/ Shut down Server 121
9.2 Reset Administrator Password and Network Settings 122
5.1 Disk Failure or Malfunction 123
5.2 Power Outage or Abnormal Shutdown 123
Appendix A Web File Manager 124
Appendix B Configuring AD Authentication 129
Appendix C Messages of Hard Disk and Disk Configuration Status..... 139
Technical Support 140
Chapter 1 Overview of ND-52000
1.1 Introduction
Thank you for choosing ND-52000. This product has the following key features:
- Simple installation, 5 minutes configuration and user-friendly management interface for SMB users.
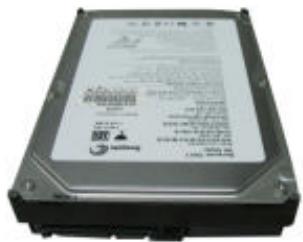
- High speed SATA HDD, supports hotswap, maximum capacity up to 2.0TB.
- Dual Gigabit ports for load balance, fail over and standalone settings.
- LCD panel for instant display of IP address and important system info; IP settings can be configured directly without access to PC.
- Built-in anti-virus mechanism. Simply enter activation code to enable antivirus function without extra installation. Supports instant online virus scan to protect data (optional).
Supports redundant power supply to increase system reliability. - Provides various practical backup mechanisms.
✓ Professional remote replication to remote NAS
USB 2.0 interface for CD/DVD data burning
SCSI interface for tape backup
- Provides backup software for Windows users, instant and scheduled backup can be performed without IT professional assistance
1.2 Package Contents
Your ND-52000 package contains:
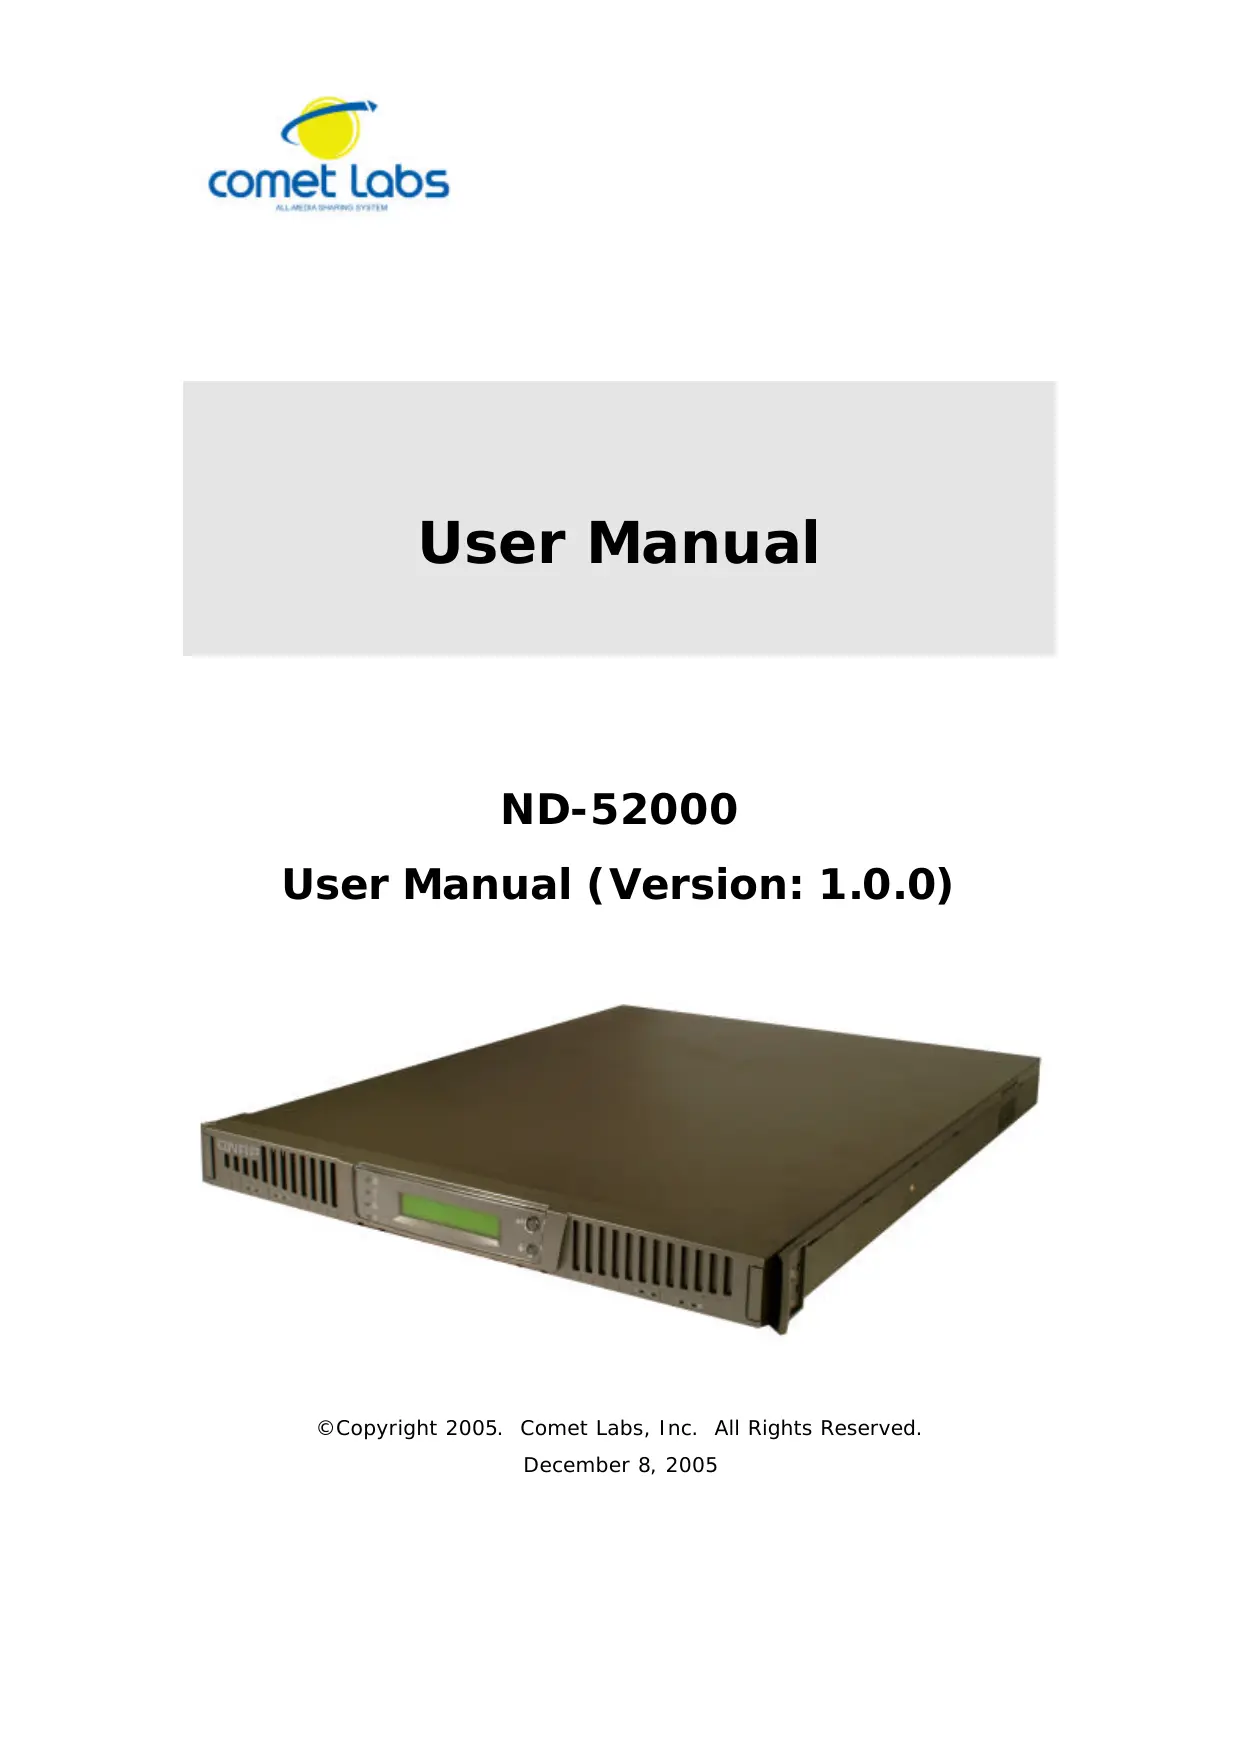
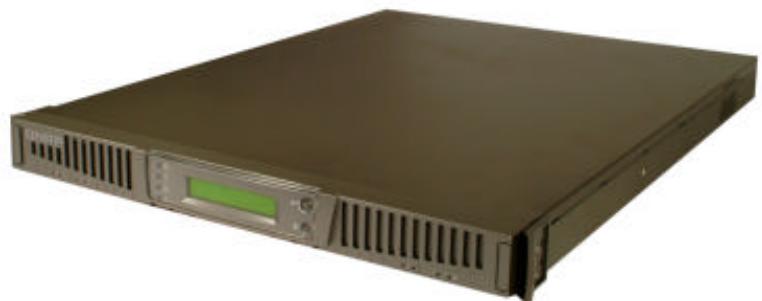
- ND-52000
- Power cord
- CD-ROM (user manual, Quick Install Wizard and software inclusive)
- Quick Installation Guide
- Ethernet cable x 2
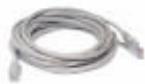
- Mount kit x 6
- Flat head screws x 16
- Round head screws x 35
- Hard disk lock x 4
1. ND-52000

2. Power cord

3. CD-ROM

4. QIG
5. Ethernet Cable
6. Mount kit

7. Flat head screw

8. Round head screw
9. Hard disk lock
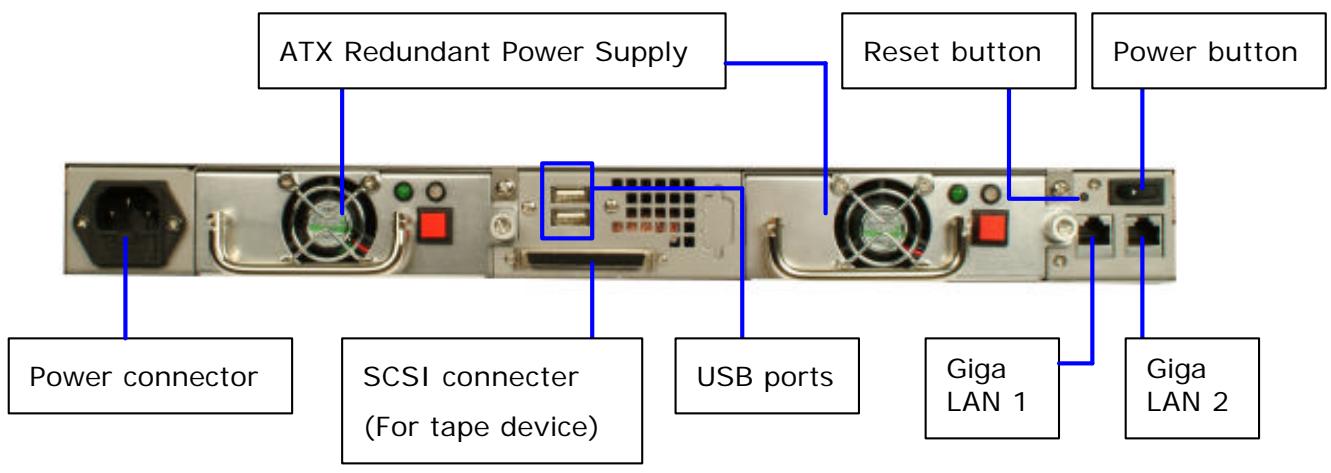
1.3 System Overview
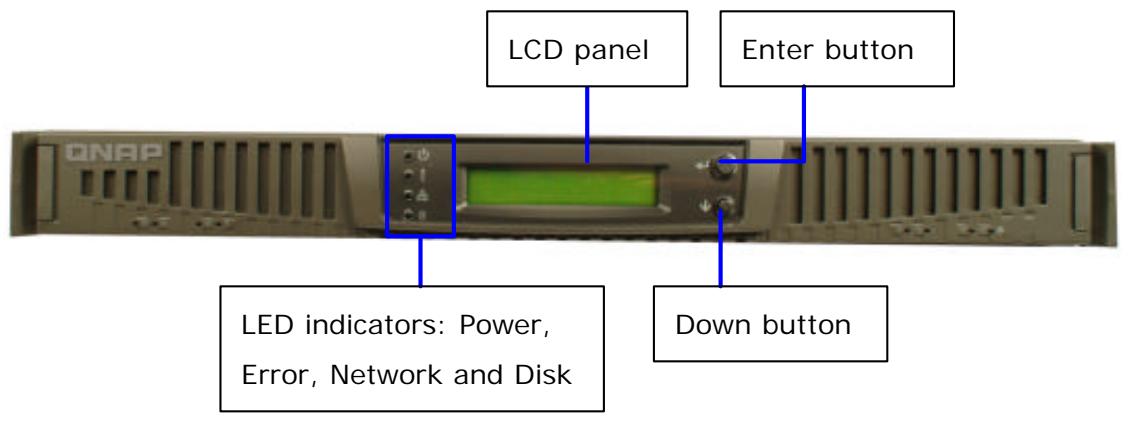
Front View
Rear View
Power Rear View
Chapter 2 Install ND-52000
2.1 Install Hard Disk
To install hard disks to ND-52000, please make sure you have the following items in place.
ND-52000
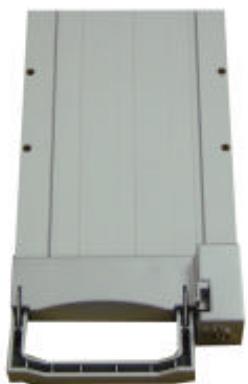
HDD tray x 4 (included in ND-52000)


Flat head screw (included in ND-52000)
Round head screws (included in ND-52000)

Mount kit (included in ND-52000)
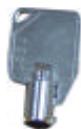

7 Hard disk lock
Screw driver (not included)
Hard Disk Installation Procedure

It is highly recommended that you install disks of the same brand and same size on ND-52000. The server may function improperly if disks of different brands and size are installed. Please refer to Chapter Erreur! Source du renvoi introuvable. for hard disk recommendation list.
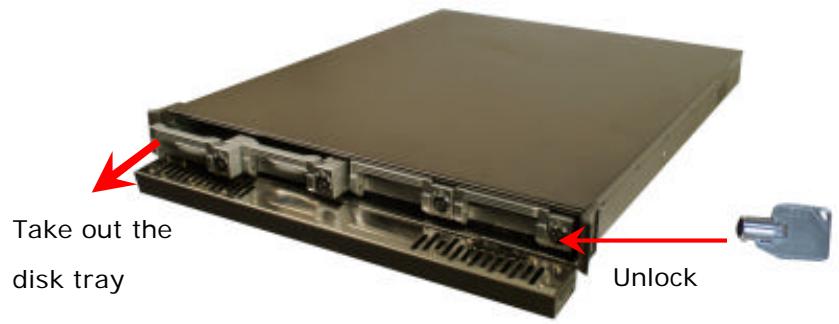
- Push the side locks in the front of ND-52000 and then pull forwards to open the front panel.


- Unlock the disk tray with hard disk lock and take out the hard disk tray.
- Place a hard disk in a hard disk tray.
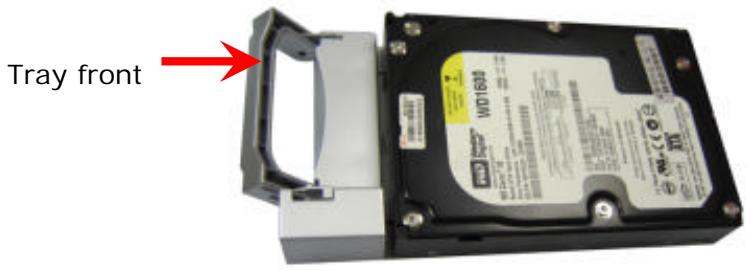
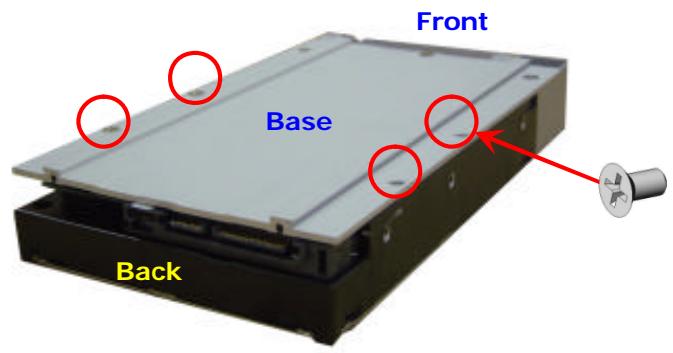
- Turn over the disk tray. Make sure the disk holes match the holes at the base of the tray. Fasten the disk with four flat head screws.
- Insert the hard disk tray to ND-52000. Then lock the tray with the hard disk lock. (You can install 4 disks at maximum.)

- When finished, close the front panel of ND-52000. Note that all disks should be inserted in order from right to left (HDD1~HDD4).

Note: You can install 1~4 hard disks depending on the type of disk configuration you select for ND-52000. If less than 4 disks are installed and the server is turned on, the system will beep continuously. In such case, please go to Hardware Settings in System Tools (refer to Chapter 6.9.4) and disable the buzzer. You can then continue to use ND-52000.
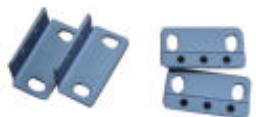
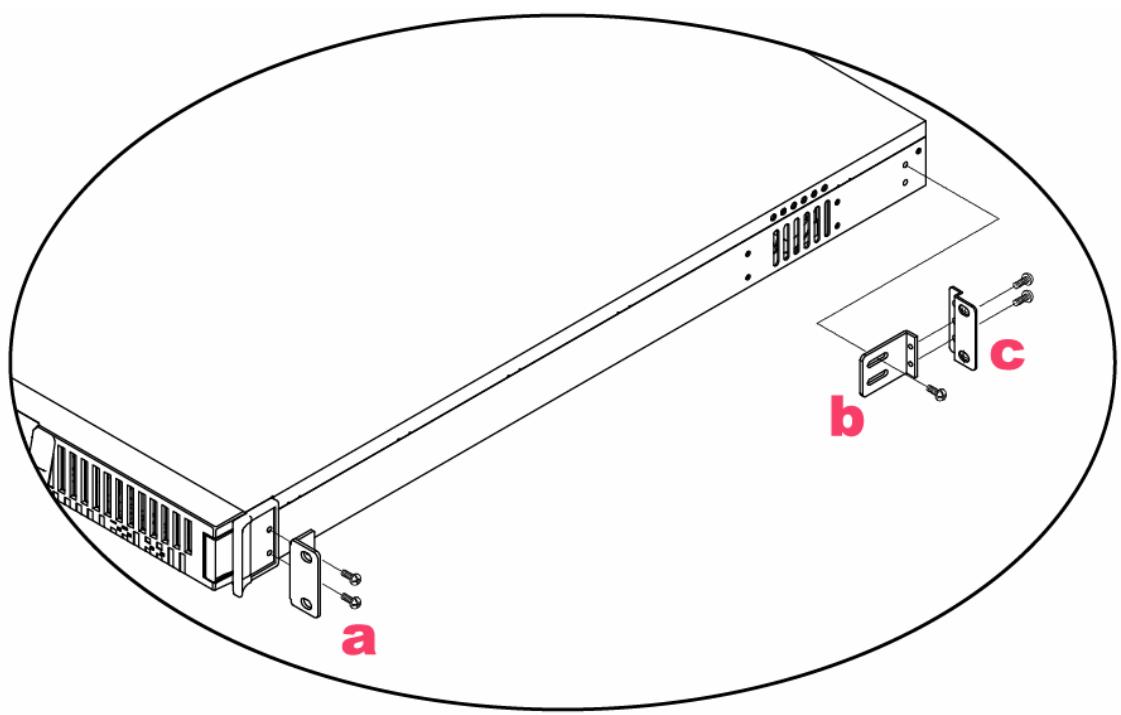
Install Rackmount Kit
Please follow the steps below to install the rackmount kit of ND-52000.
- Attach brackets (a) to both sides of ND-52000 in the front.
- Lock the brackets (b) to ND-52000. Then attach and fasten z-shape brackets (c).
- Push ND-52000 into the rack.
- Fasten the screws to fix the position of ND-52000.

Important Notice: Please back up your disk data periodically to avoid data
loss due to improper operation or disk failure of ND-52000. COMET LABS is not
responsible for any data loss or recovery.
2.2 Connect ND-52000 to Office Network
When connecting ND-52000 to office network: 1. It is recommended to install
ND-52000 in LAN with DHCP server. 2. You can use any PC in the same subnet to
connect to the server by IE browser. 3. You may also connect a tape drive or USB
CD/DVD burner to ND-52000 for data backup and restore.
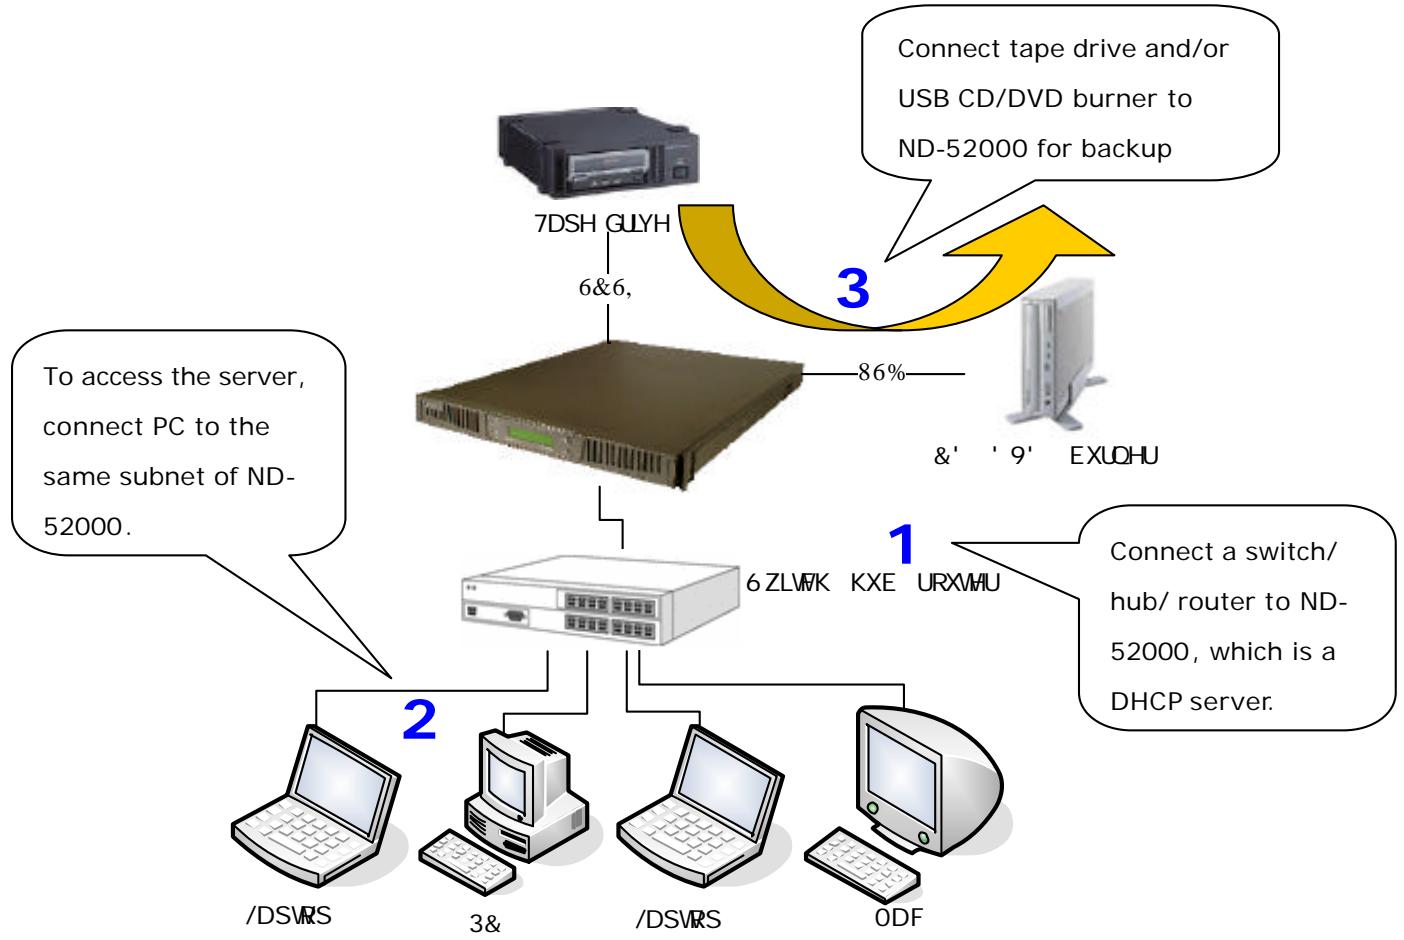
To install ND-52000 in office network, please follow the steps: a, b, c, d, e below.
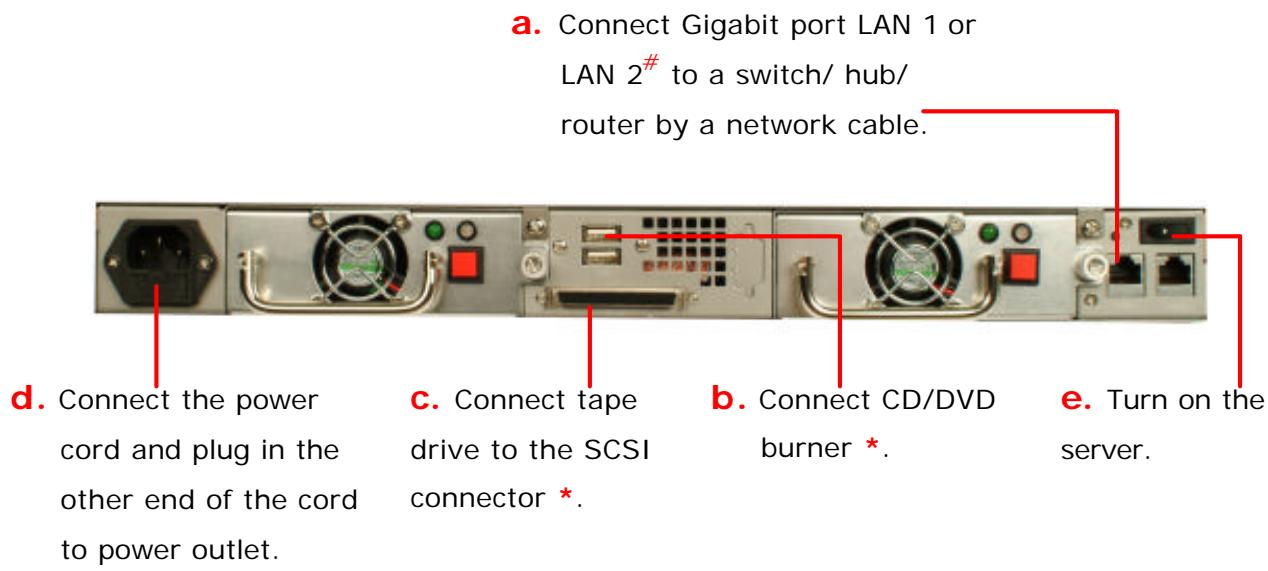
To use fail over or load balance function, please connect both LAN 1 and LAN 2 to switch/ hub/ router. For further details, please refer to Chapter 6.5.1.
- Optional step. You can skip this step if you are not using CD/DVD backup/restore or tape backup service.

Note: To connect ND-52000 to a PC, please use a network cable to connect the PC to LAN 1 or LAN 2 of ND-52000. For further details about accessing ND-52000, please refer to Chapter 6.
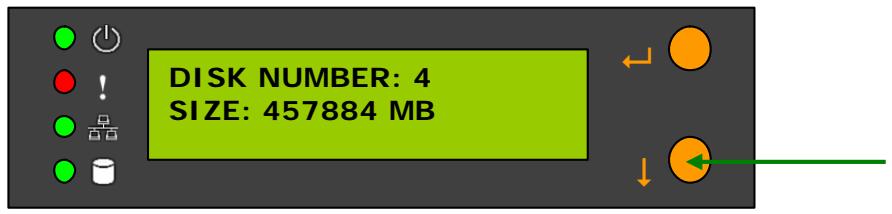
Chapter 3 Use LCD Panel
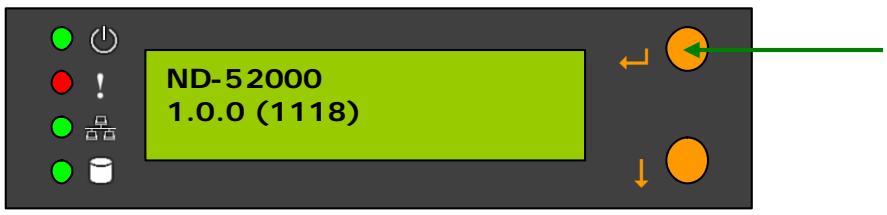
When ND-52000 is turned on, the server name, IP address, date, and time will be shown.
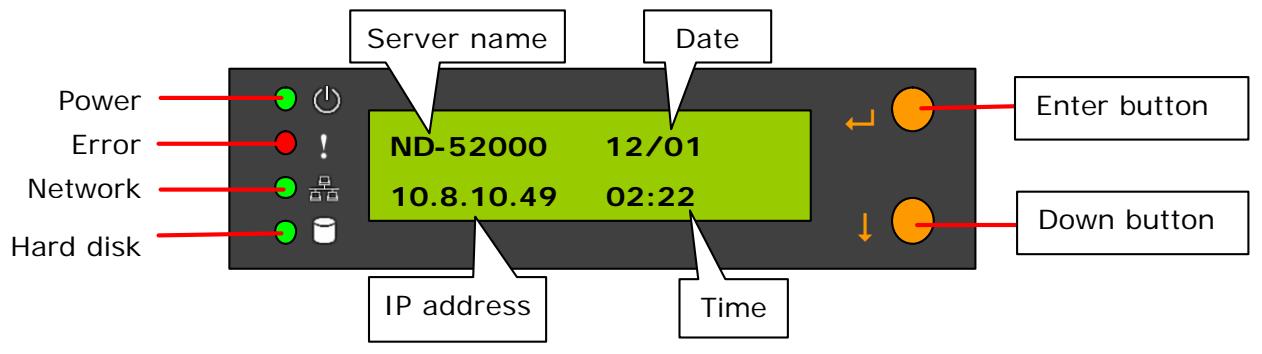
Check System Information
- Press Down button to view disk information, i.e. number of disks and disk size. Note that the disk size displayed is the total size of all installed disks but may not be the actual disk size you can use. If you configure the disks as RAID 1 disk volume, the actual disk size you can use is smaller than the displayed disk size on the panel.
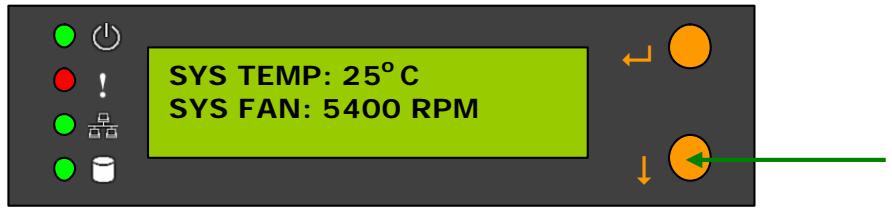
- Press Down button again to view system temperature and system fan speed.
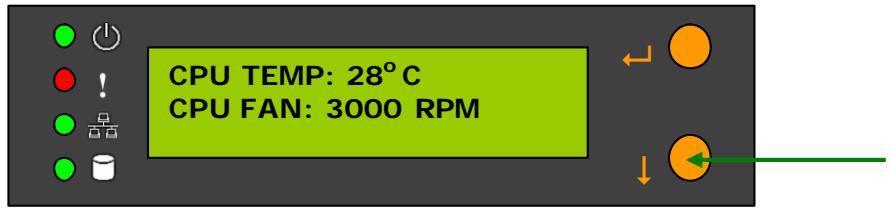
- Press Down button again to view CPU temperature and CPU fan speed.
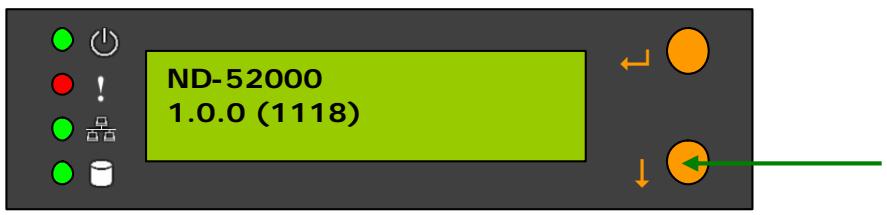
- Press Down button again to view model number and version information.
System Setting Function
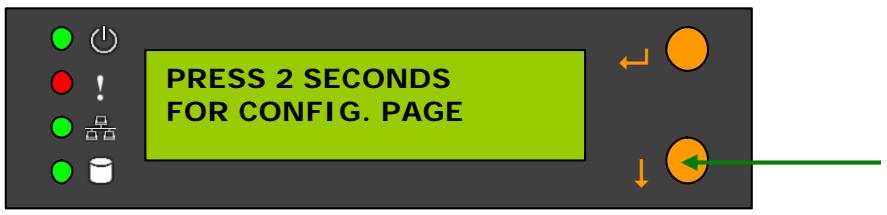
- Press Enter button for two seconds to enter configuration page.
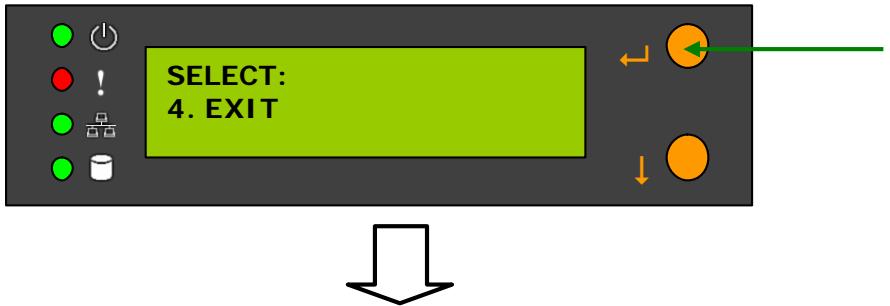
- Press Down button to select an item: NETWORK SETTINGS, POWER DOWN, REBOOT SYSTEM, and EXIT.
Network Settings
Enter NETWORK SETTINGS configuration page and press Down button to select one of the following options.
DHCP
DHCP will obtain IP address automatically.
STATIC IP
Press Enter button to select STATIC IP. Then configure the IP address.
i. SETSTATICIP
Press Down button to enter 0~255 and press Enter button to set the next number for the IP address.
ii. SET NETMASK
Follow the above procedure to set the netmask address.
iii. SET GATEWAY
Follow the above procedure to set the gateway address.
iv. SELECT STATIC IP
Press Down button to select YES or NO. When YES is selected, you will be asked to restart the system.
- EXIT
To return to the previous menu.
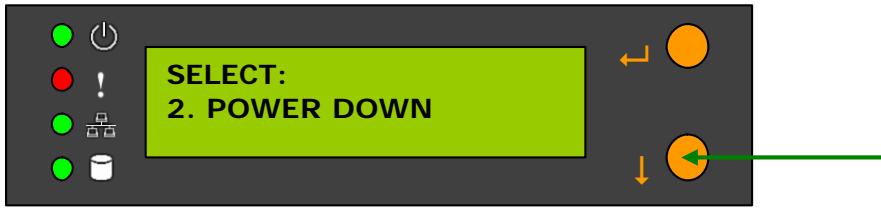
POWER DOWN
Press Down button to select POWER DOWN and press Enter button to confirm shutting down ND-52000.
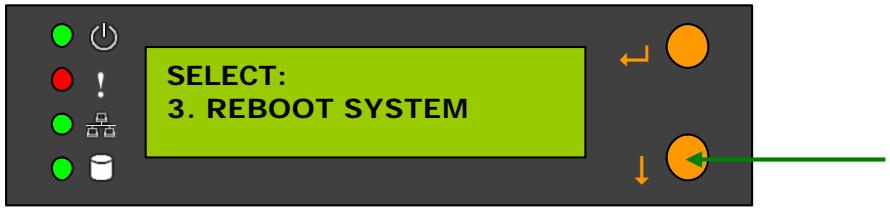
REBOOT SYSTEM
Press Down button to select REBOOT SYSTEM and press Enter button to confirm restarting the system.
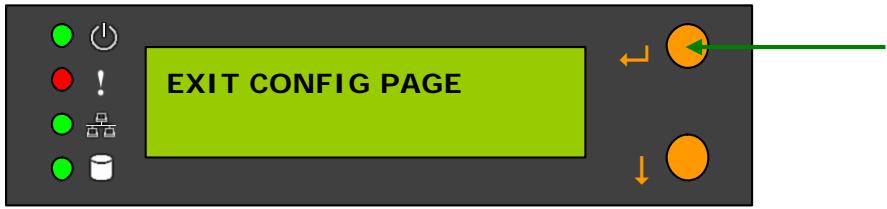
Exit Configuration Page (EXIT)
Press Enter button and select EXIT, then press the button again to confirm exiting the configuration page.
Chapter 4 Quick Install Wizard
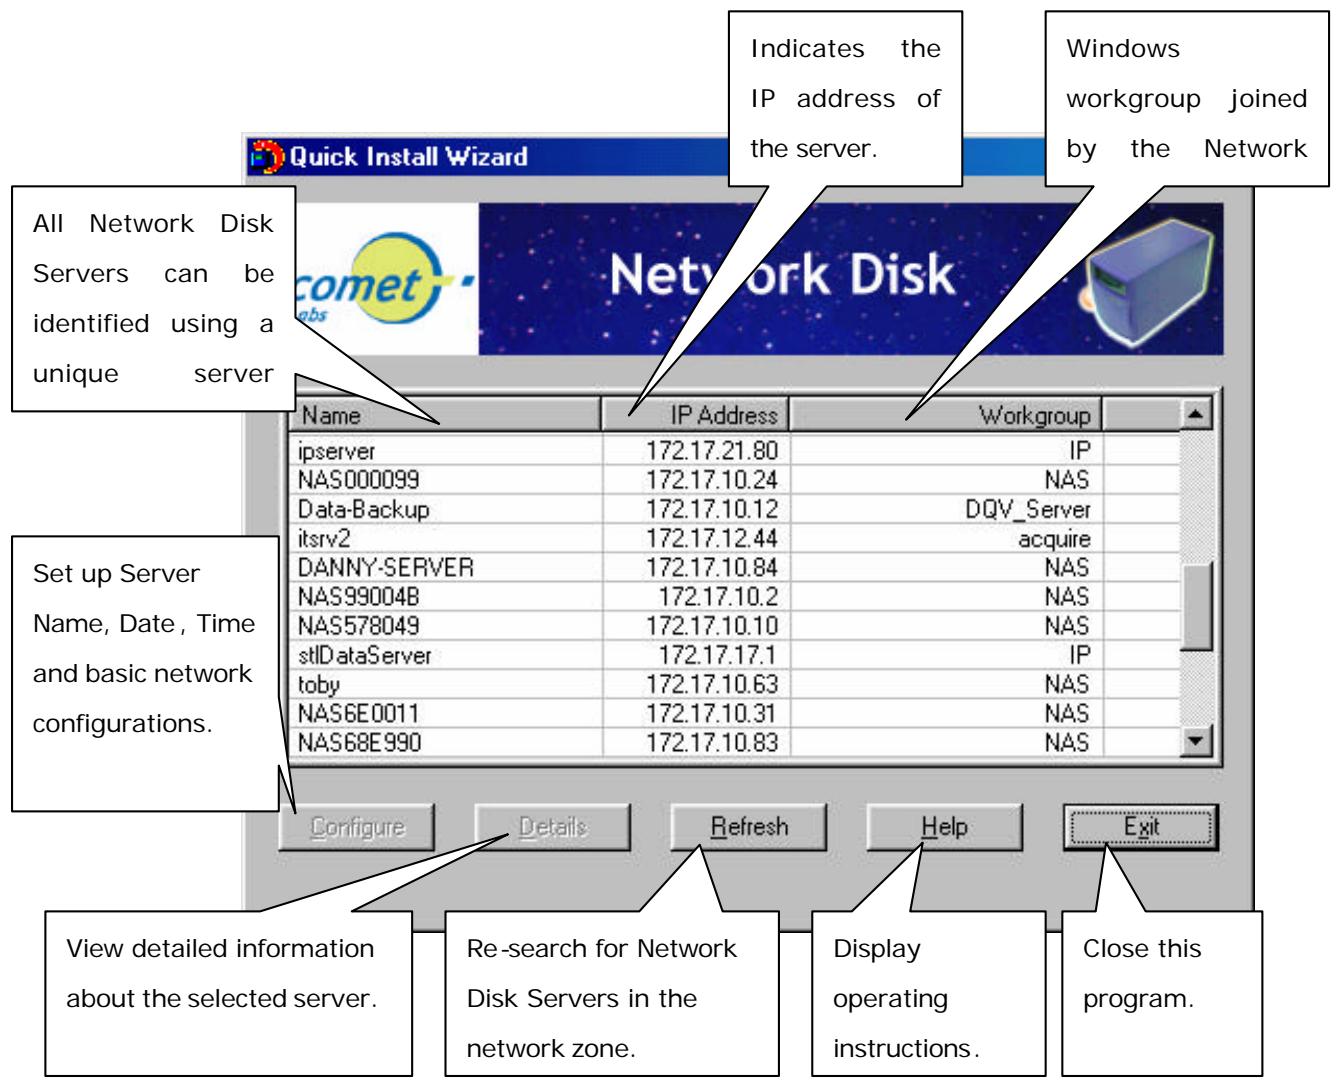
Quick Install Wizard enables you to search for all available ND-52000 within the local network, and view the server name, IP address, and workgroup etc. You can also configure the disk name, date and time, etc. via Quick Install Wizard.
To use Quick Install Wizard, run ND-52000 CD-ROM in your PC and install the program.
Run Quick Install wizard shortcut on the desktop, the following screen will be shown.
Operation
1. Configure ND-52000
Select a ND-52000 displayed on Quick Install Wizard and click Configure.
Enter the administrator password.
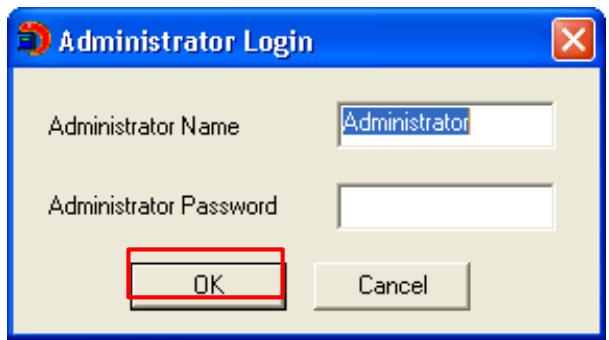
Upon successful login, the following screen will appear. Enter the configuration values and click OK.
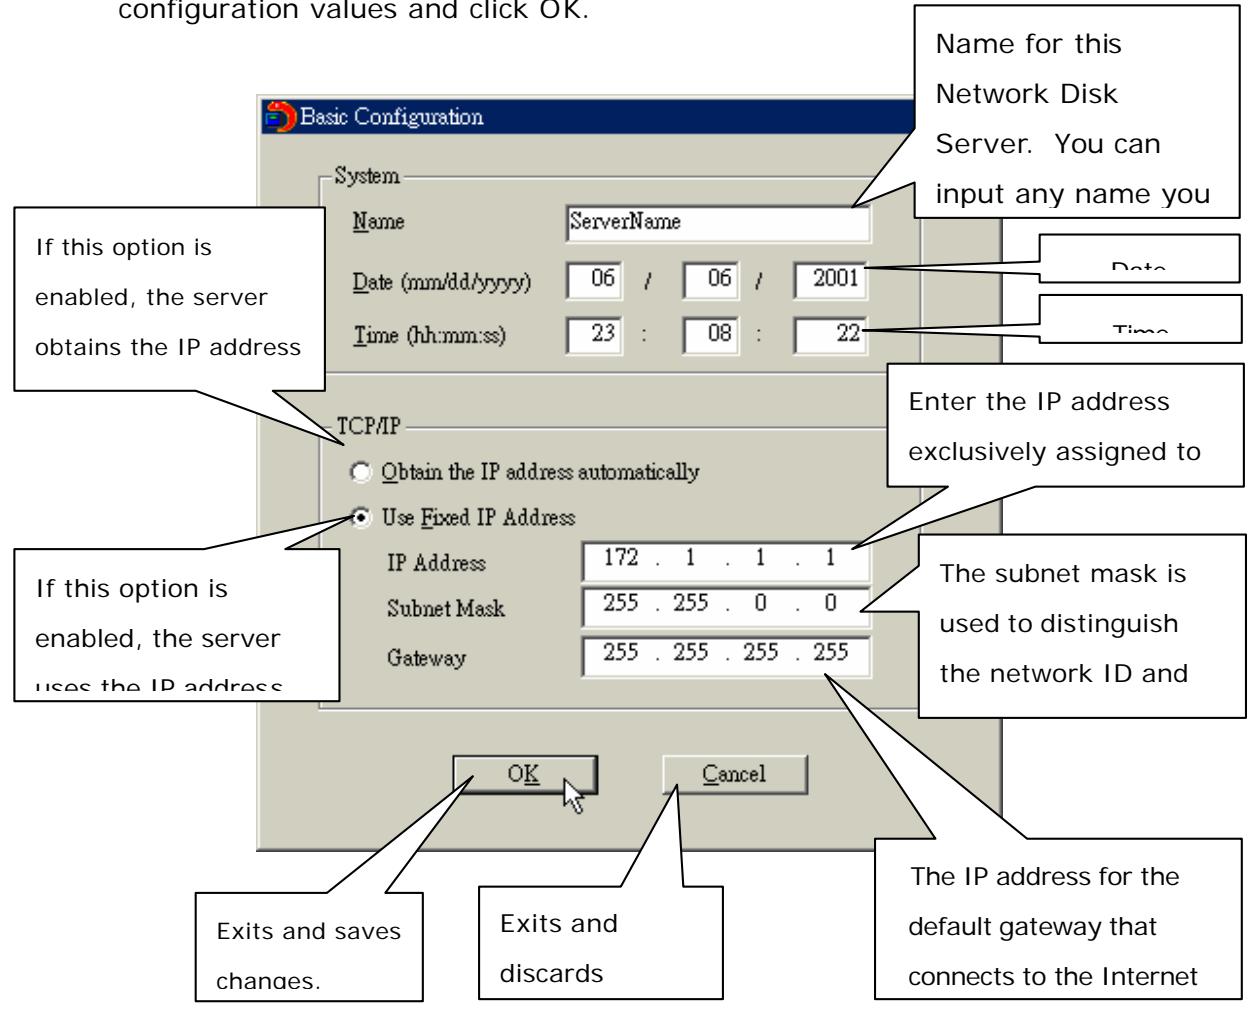
For further configuration of the system, please login the administration page of ND-52000 via web browser.

Note: You may have to restart ND-52000 after changing the network configuration.
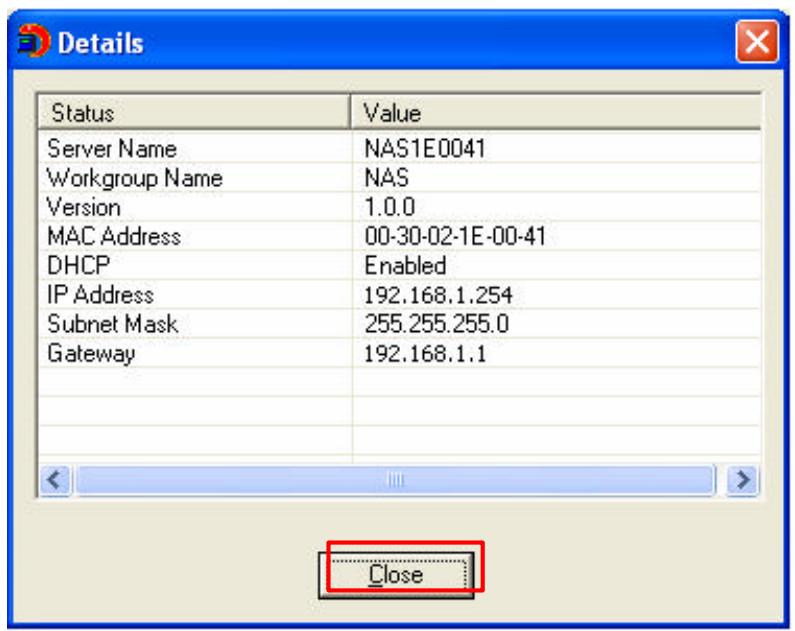
2. View ND-52000 details
Select a ND-52000 available on Quick Install Wizard and click Details. The following screen will be shown:
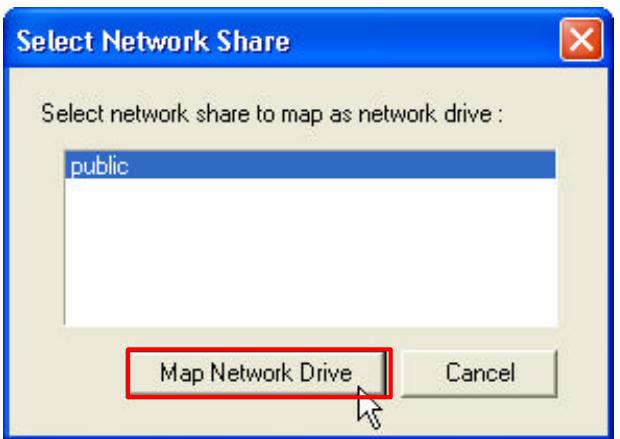
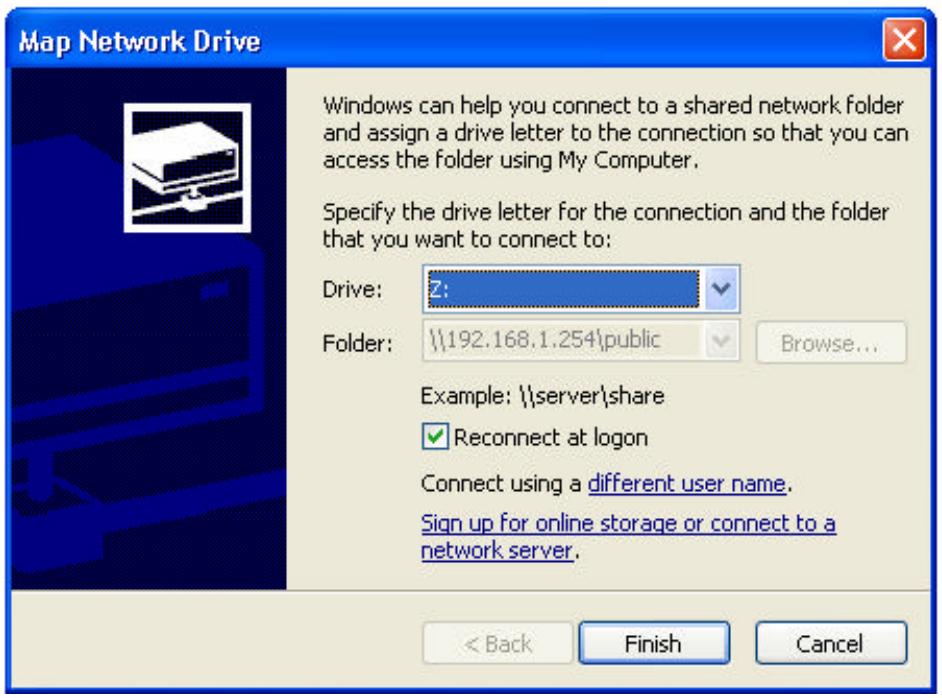
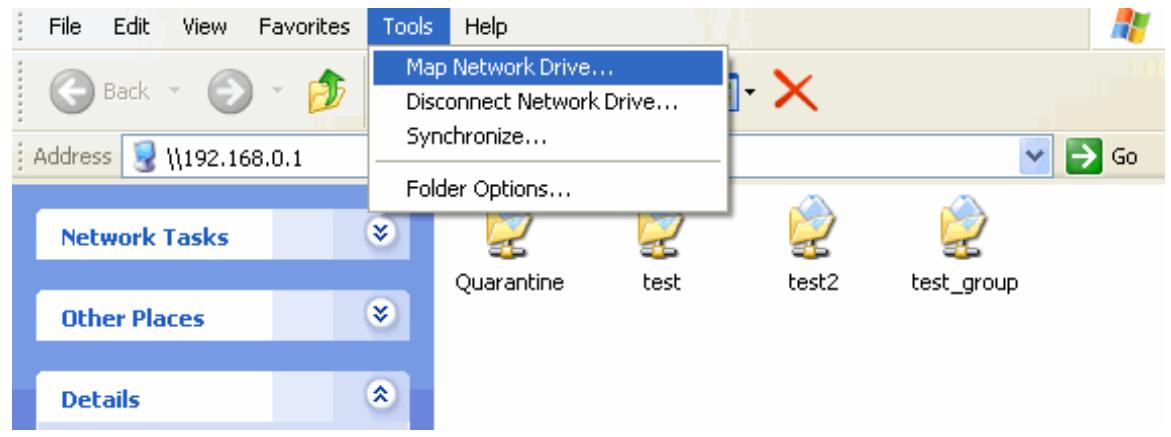
3. Map drive
a. Select a ND-52000 and click Map Drive.
b. Select the correct network share and click Map Network Drive. Then select the drive letter for the connection.
c. Enter the user name and password for the network drive.
- Search for all available ND-52000 again.
To refresh the search results, click Refresh to display all available servers within the network.
- Help
If you have any enquiries about Quick Install Wizard when using the program, you can click the Help button to view the help text.
- Enter the homepage of ND-52000
Double click on ND-52000 to enter the administration page.
Chapter 5 Start to Enjoy the Services of ND-52000
ND- 52000 provides the following powerful services and applications
5.1 File Server
You can make use of the following means to access and share the folders of ND-52000 easily:
a. By Quick Install Wizard: By the Map Drive function of Quick Install Wizard, you can configure the share folders on ND-52000 as a drive of your PC quickly. For further information, please refer to Chapter 4.
b. By samba: ND-52000 supports Microsoft, MAC and Linux (NFS) OS for data sharing to enable you to share data across different platforms, please refer to Chapter 7.1-7.3.
c. By Web File Manager: ND-52000 provides a simple-to-use web administration interface for you to access share folders, upload and download files from ND-52000, please refer to Chapter Appendix A.
5.2 FTP Server
ND-52000 supports FTP file transfer. You can use the following methods to access share files by FTP:
a. By IE browser or
b. By Web File Manager
For further information, please refer to Chapter 7.5.
5.3 Backup Server
ND- 52000 provides versatile backup mechanisms to help you back up or restore disk data completely to enhance more efficient and secure system management. The backup/ restore applications are listed below:
a. NetBak Replicator
NetBak Replicator is a powerful backup software dedicated to Windows users. You can back up your PC data to ND-52000 easily by the user-friendly interface. Please refer to Chapter 8.
b. Remote Replication
Remote replication is a built-in backup feature of ND-52000. You can set up instant or scheduled backup to replicate the data of ND-52000 to another COMET LABS NAS server. Please refer to Chapter 6.9.9.
c. USB CD/DVD Restore/ Backup
You can connect USB CD/DVD burner to the high speed USB 2.0 transfer interface of ND-52000 and enjoy data backup and restore functions to and fro ND-52000 and CD/DVD. Please refer to Chapter 6.9.12.
d. Tape Backup
You can use tape backup function of ND-52000 to perform backup and restore jobs by a tape drive for secure data protection. Please refer to Chapter 6.9.8.
Chapter 6 Administrator ND-52000
When you have installed ND-52000 and connected it to the network or PC, you can manage the server via web browser. It is recommended to use Microsoft Internet Explorer 6.0 or above to access ND-52000.
ND-52000 Network Configuration for the First Time of Use
By factory default, ND-52000 will search the network via DHCP (Dynamic Host Configuration Protocol) to detect IP address settings automatically. If your network does not support DHCP protocol, ND-52000 will use the default settings as below:
IP Address: 192.168.0.1
Subnet Mask: 255.255.255.0
When ND-52000 boots up, the LCD panel will display current IP address settings. If your network does not support DHCP protocol, you must configure your ND-52000 to proper LAN settings before using it for the first time. If you are not sure about the LAN settings, please contact your network administrator.
You can change the network settings of ND-52000 by the following ways:
- Use the LCD panel to change the network settings. For more information, please refer to Chapter 3. OR
- Use Quick Install Wizard in the CD-ROM to change the network settings. For more information, please refer to Chapter 4.
6.1 Access Administration Page
You can access ND-52000 administration page by the following means:
- Launch the web browser. Enter the IP address of ND-52000 to access the administration page. You can check the IP address of ND-52000 on the LCD panel (see Chapter 3). OR
- Install and Quick Installation Wizard (see Chapter 4). Search for ND-52000 in the network and double click the server name on the list.
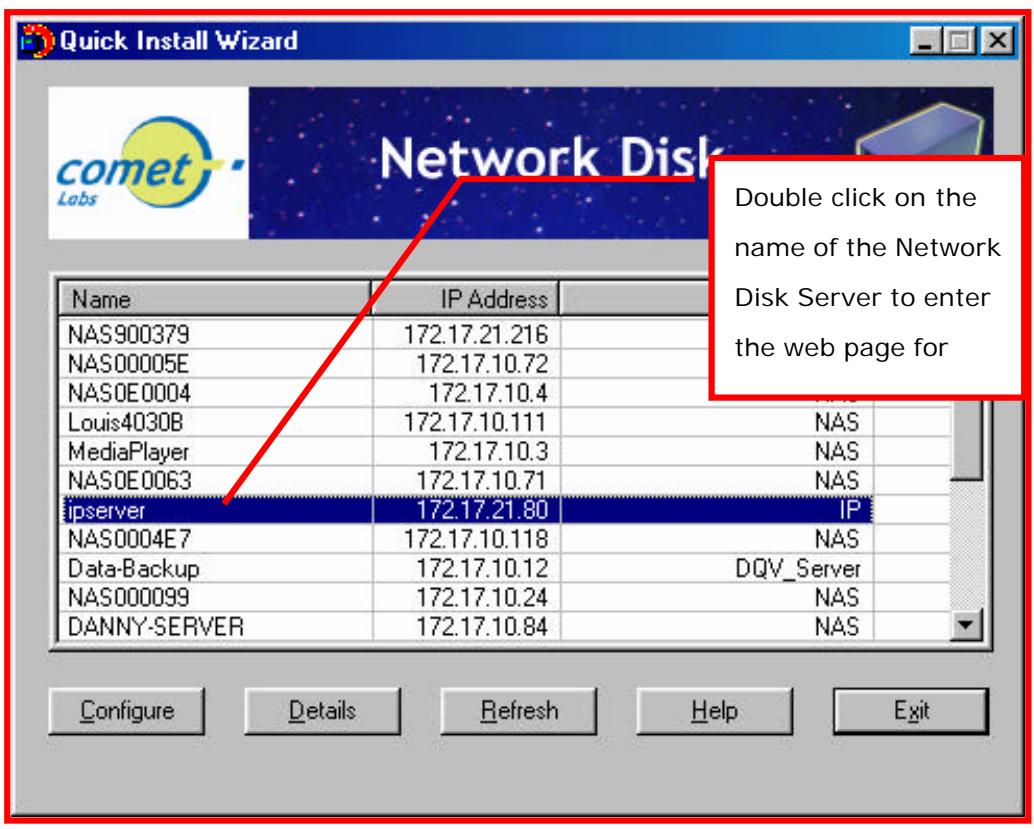
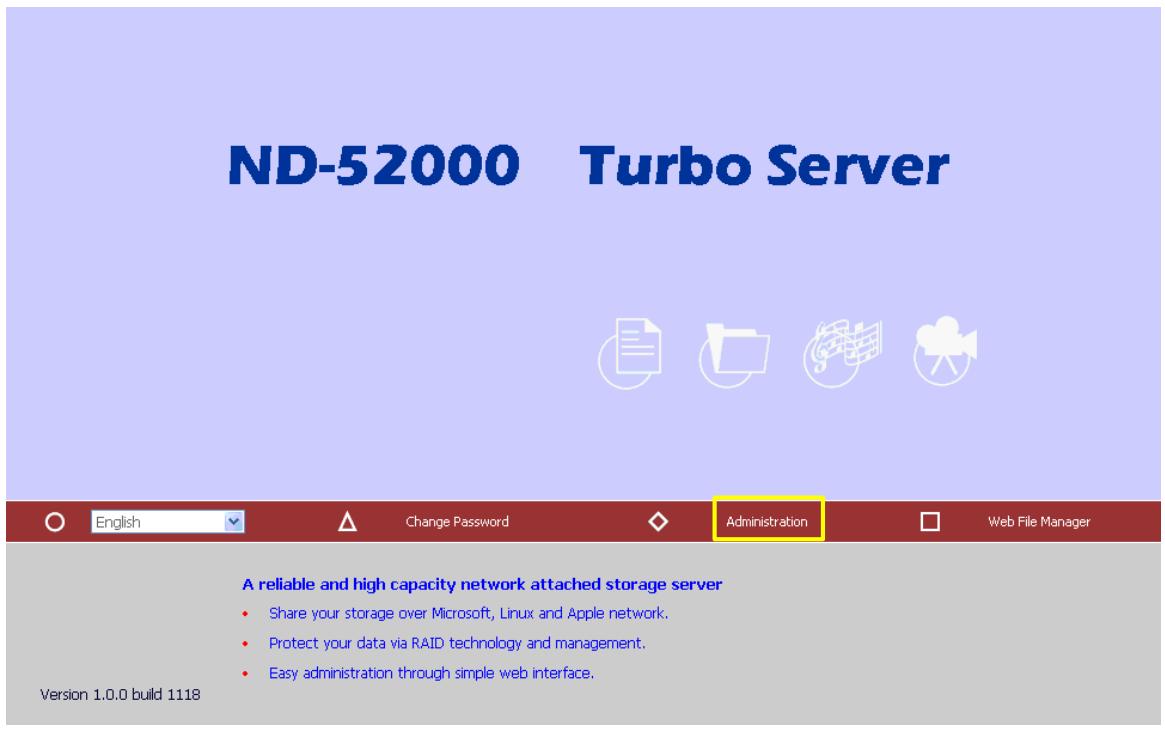
- When the administration page is shown, click Administration.
- Enter the user name and password to login.
Default user name: administrator
Password: admin
The first time you login ND-52000, Quick Configuration page will be shown. Please refer to 6.3 Quick Configuration for more details.
To connect ND-52000 by MAC, open a web browser in MAC and enter the IP address of ND-52000. Login the server and continue the software configuration. Please use the built-in browser in MAC-Safari for browsing.
6.2 Server Administration
There are eight main sections in server administration:
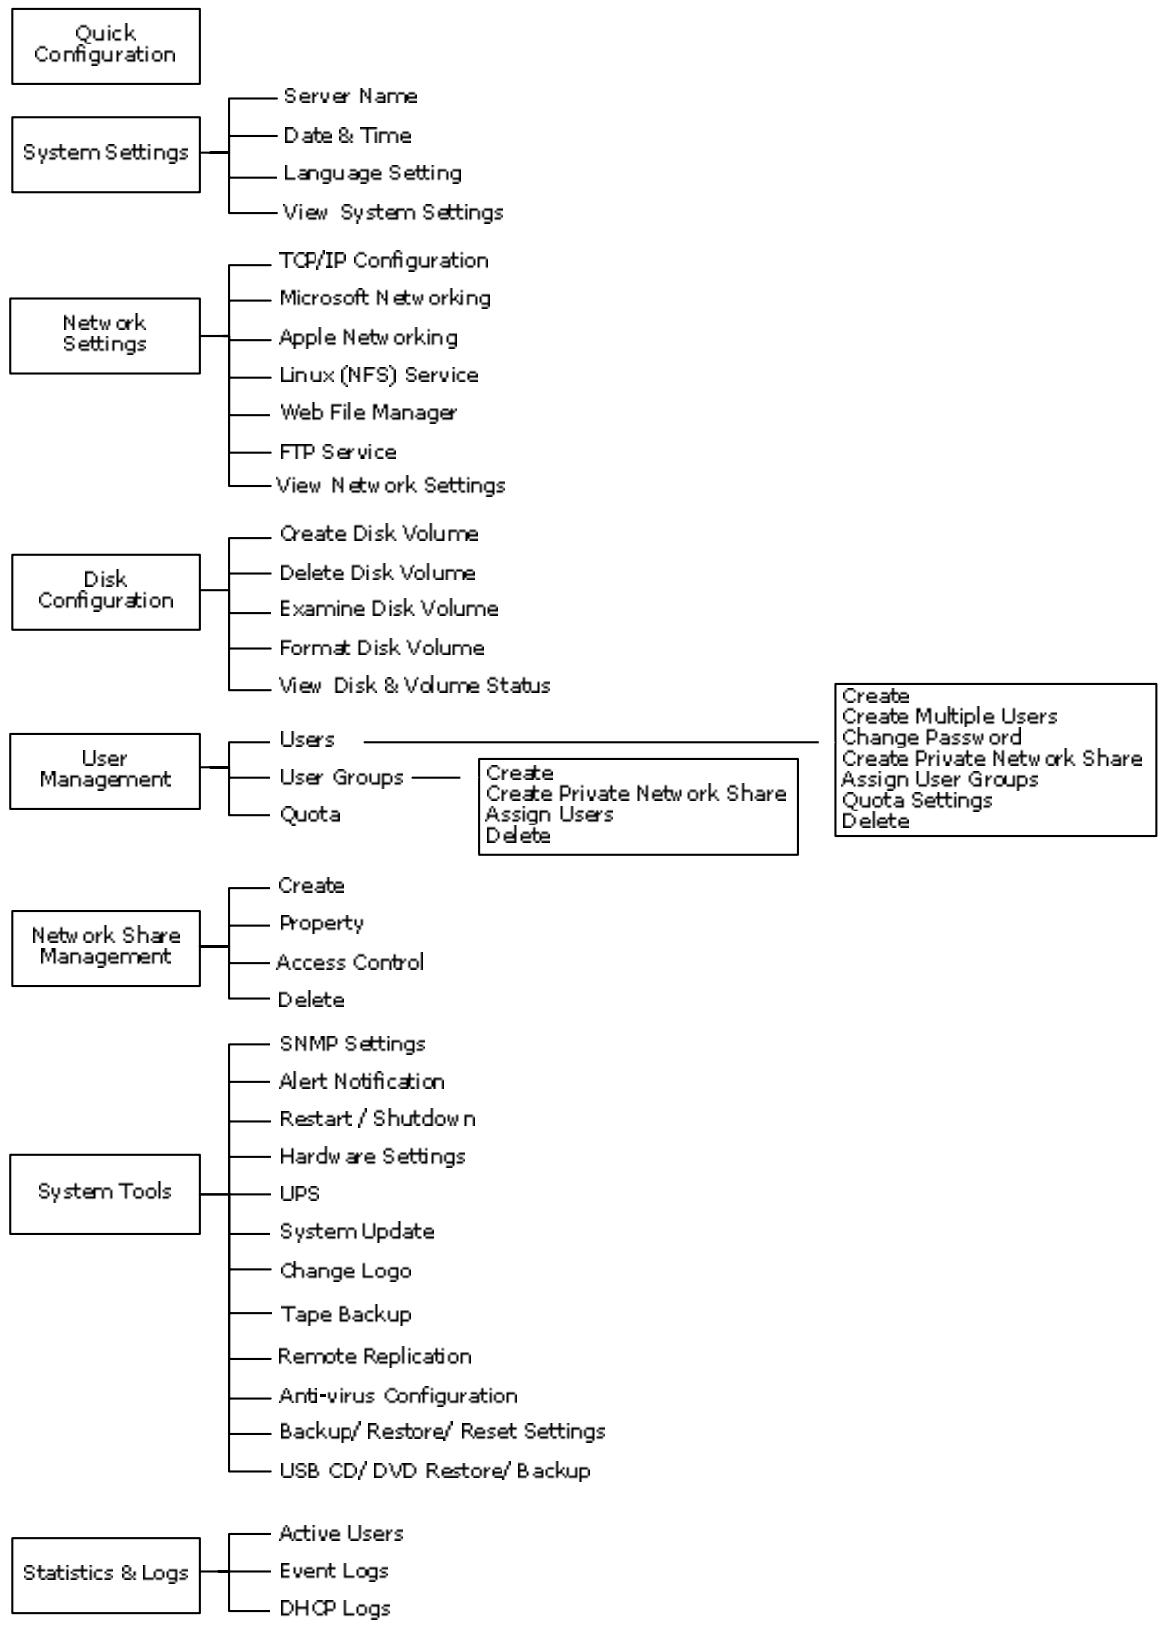
6.3 Quick Configuration

Please follow the step-by-step guide in Quick Configuration to complete the settings of ND-52000. If you have any questions during web administration, please click the help button on the top right hand corner of the page. Other buttons are described as below:
: Return to previous page
: Return to home page
:Logout system
NAS1E0028
Quick Configuration
Welcome
Step 1
Step 2
Step 3
Step 4
Step 5
Step 6
Step 7
Step 8
Step 9
Step 10
Finish
Welcome
Welcome to the quick configuration wizard. This wizard will guide you through the following steps to configure this system quickly:
1. Enter the name for this server.
2. Change the administrator password.
3. Enter the date, time and time zone for this server.
4. Select the language that this server will use for file names.
5. Enter the IP address, subnet mask and default gateway for this server.
6. Select the network file services that you want to provide on this server.
7. Configure disk volume on this server.
8. Configure the method of user authentication.
9. Manage users and user groups for this server.
10. Manage network shares on this server.

Next
Step 1. Enter the server name.
-
- Enter the name for this server.
Server Name :
NAS0E0054

Back

Next
Step 2. Change the administrator password or select to use the original password.
-
- Change the administrator password.
Password :
Verify Password :

Use the original password
Note: If you select "Use the original password", the administrator password will not be changed.

Back

Next
Step 3. Enter the date, time and select the time zone for the server.
-
- Enter the date, time and time zone for this server.
Time Zone :
(GMT) Greenwich Mean Time : Dublin, Edinburgh, Lisbon, London
Current date and time:
2004/9/9 AM 10:04:12

Change the server's time and date as below:
Date:


(mm dd, yyyy)


(hh:mm:ss)

Back

Next
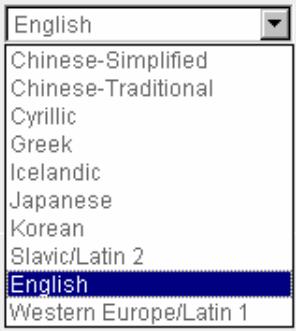
Step 4. Select the language the server uses to display files and directories. The default setting is English.
FOR CONTINENTAL EUROPE USAGE (INCLUDING FRANCE, ITALY, SPAIN AND GERMANY), USE WESTERN EUROPE/LATIN 1
-
- Select the language that this server will use for file names.
Language:

Back

Next
Step 5. Enter the IP address, subnet mask and default gateway for the server. Select network interface configuration: fail over or load balance.
-
- Enter the IP address, subnet mask and default gateway for this server.
Obtain TCP/IP settings automatically via DHCP
Use the following settings
IP Address:
Subnet Mask:
Default Gateway:


Configuration of Network Interfaces


Note: If you don't need a default gateway for this server, please enter "0.0.0.0".

Back

Next
Step 6. Select the network file services to provide on the server.
-
- Select the network file services you want to provide on this server.
Enable File Service for Microsoft Networking
Enable AppleTalk File Service for Apple Networking
Enable Linux (NFS) Service
Enable Web File Manager
Enable FTP Service

Back

Next
Step 7. Configure disk volume on the server.
- 7. Configure disk volume on this server.
You can click on the disk volume you want to configure on the New Disk Volume Configuration list. The Current Disk Volume Configuration list shows the current disk volume configuration of this server.
New Disk Volume Configuration
Single Disk Volume
Create single disk volume(s).
RAID 1 Mirroring Disk Volume
Create mirroring disk volume (s).
RAID 0 Striping Disk Volume
Create one striping disk volume.
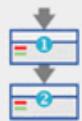
Linear Disk Volume
Create one linear disk volume.
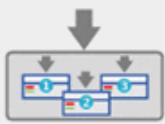
RAID 5 Disk Volume
Create one RAID 5 disk volume.
Current Disk Volume Configuration
| Volume | Total Size | Free Size | Status |
| Striping Disk Volume: Drive 1 2 | 304685.00 MB | 296874.00 MB | Ready |


Step 8. Configure the method of user authentication. Please refer to Chapter 6.5.2 for further information.
- 8. Configure the method of user authentication.
Enable file service for Microsoft networking
Standalone Server
NT Domain Member
AD Domain Member
Server Description
Workgroup
AD Server Name
Domain Name
NAS Server
NAS


DomainUsername
Password


Back

Next
Step 9. Manage users and user groups of this server.
- 9. Manage users of this server.
To add a user, enter the user information in the following fields, then click Add. To remove an existing user, click on the user name on the left list and click Remove. You can remove multiple users at a time.
Andrew
Bella
Cynthiaia
Derek
administratior

Add
Remove
User Name
Password
Verify Password


Note: For increased security, password should be at least 6 characters.

Back

Next
- 9.1 Set user groups of this server.
To add a user group, enter the group name in the box below. Select the user(s) to add to the group from the list on the right, then click Add. To remove a user group, select the group name on the left list, and click Remove. You can remove multiple user groups at a time.
administrators everyone

Add
Remove
User Group Name
Andrew
Bella
Cynthiaia
Derek
administrator
You can choose one or more users to add into the user group from the above field.

Back

Next
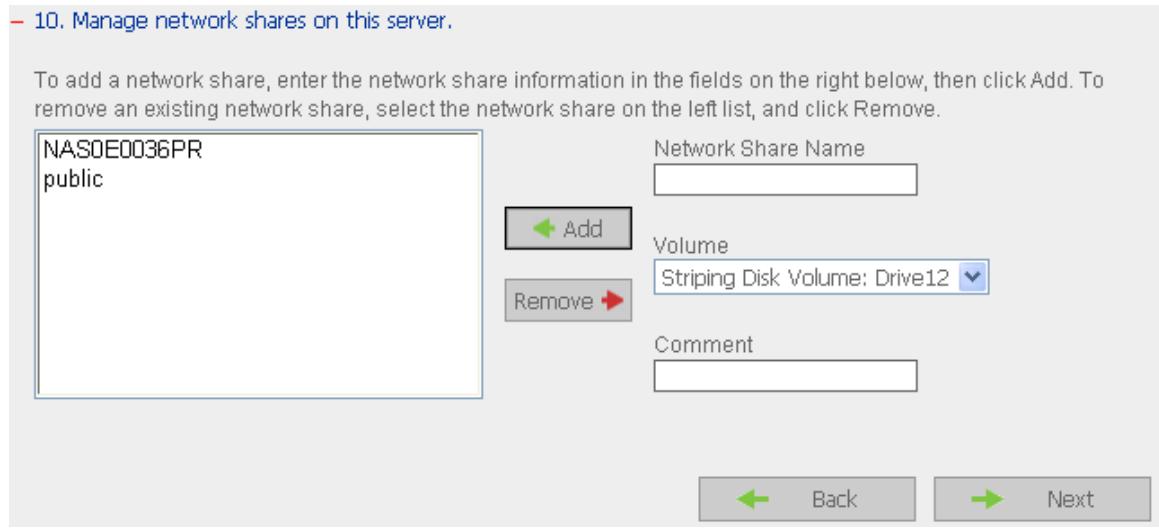
Step 10. Manage network shares on this server.
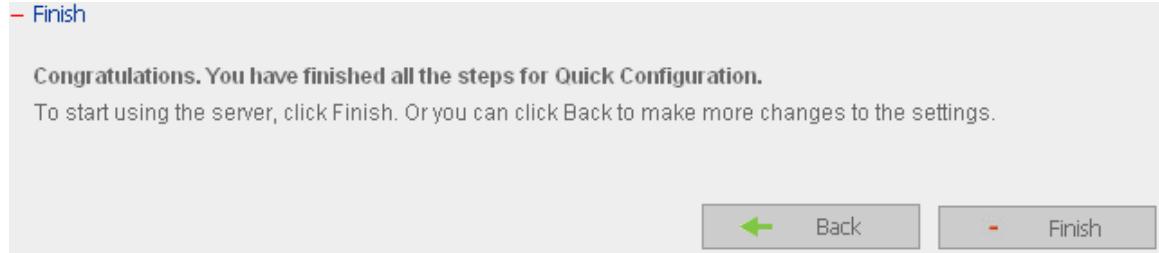
Step 11. Finish. It may take several to tens of minutes to complete Quick Configuration, depending on your system settings.
6.4 System Settings

Basic system settings include the server name, date, time, and view system settings.

6.4.1 Server Name
Enter the name of ND-52000. The server name can be 14 characters long at maximum, which can contain alphabets, numbers and hyphen (-). The server does not accept names with space, period (.), or names in pure numbers.

6.4.2 Date & Time
Set the date, time, and time zone according to your location. If the settings are incorrect, the following problems may occur:
- When using a web browser to access or save a file, the display time of the action will be incorrect.
- The system event log time will be incorrect compared to the actual time when an action occurs.
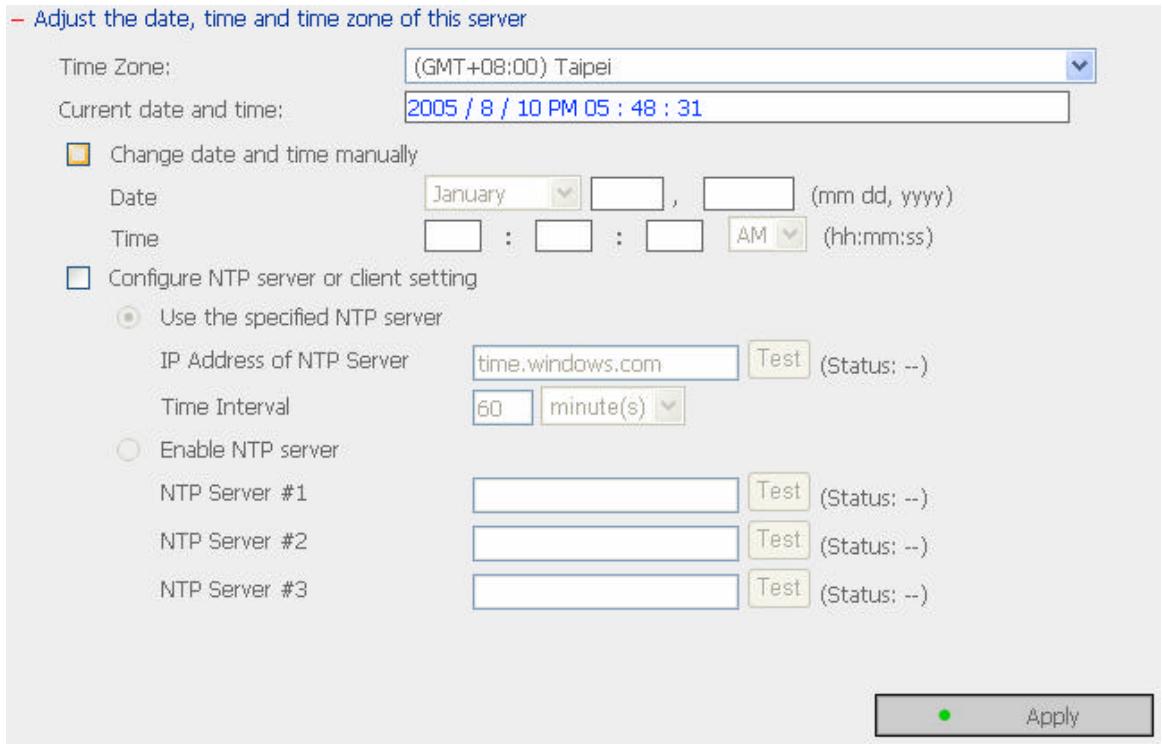
NTP Server
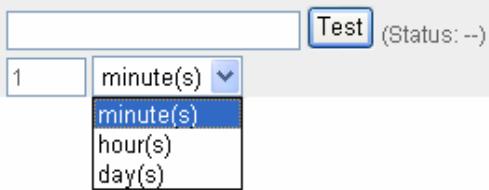
You can enable or use specified NTP (Network Time Protocol) server to update the date and time of the system automatically. To enable NTP server, please enable Configure NTP server or client setting and enter the IP address or domain name of the NTP server, e.g. time.nist.gov, time.windows.com in Use the specified NTP server field. Then enter the time interval for adjusting the time (minimum value is 1 minute and maximum value is 99 days).
Configure NTP server or client setting
Use the specified NTP server
IP Address of NTP Server
Time Interval
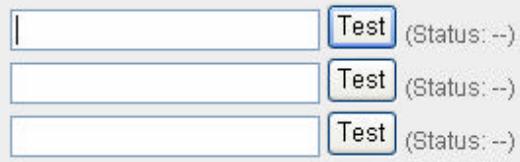
To enable multiple NTP servers, you can select Enable NTP server and enter the IP address or domain name of the servers. You can enter 3 NTP servers at maximum. If the system fails to connect to the first NTP server, it will try to connect the second one automatically, so on so forth.
You can click Test to try to connect to the NTP server. If there is no specified IP address for the NTP server, the system will refer to internal clock for date and time settings.
Enable NTP server
NTP Server#1
NTP Server#2
NTP Server#3
Apply

Note: The first time you enable NTP server, it may take several minutes for time synchronization before the time is correctly adjusted.
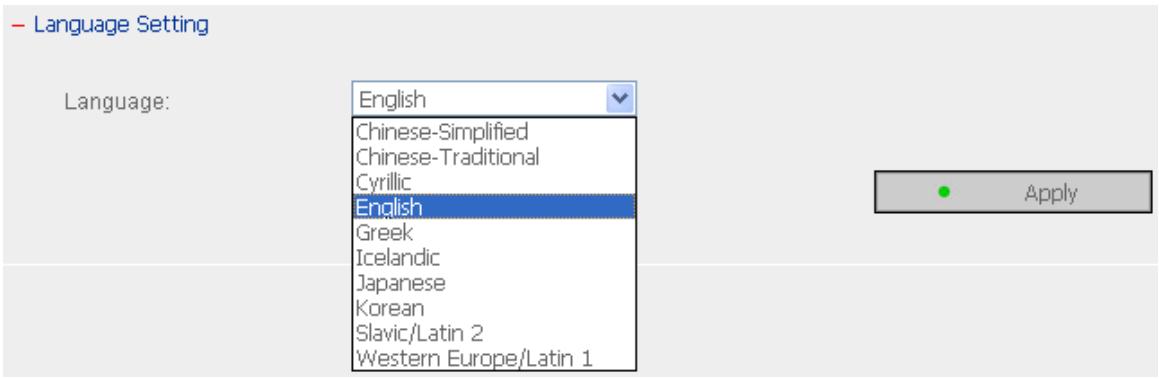
6.4.3 Language Setting
Select the language ND-52000 uses to display files and directories.

Note: All files and directories on ND-52000 will be created using Unicode encoding. If your FTP clients or PC does not support Unicode, e.g. Windows 95, 98, ME OS is used, select the language the same as the language of your OS in order to view the files and directories on the server properly.
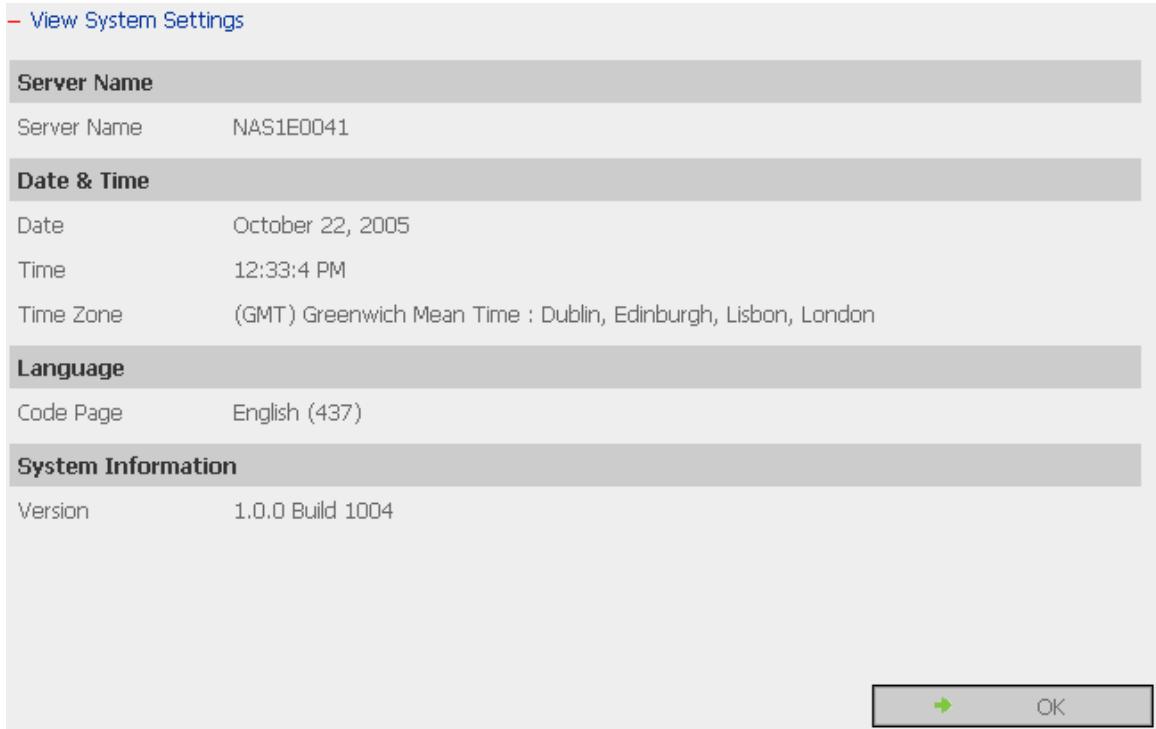
6.4.4 View System Settings
You can view all current system settings, e.g. server name, on this page.
6.5 Network Settings

6.5.1 TCP/IP Configuration
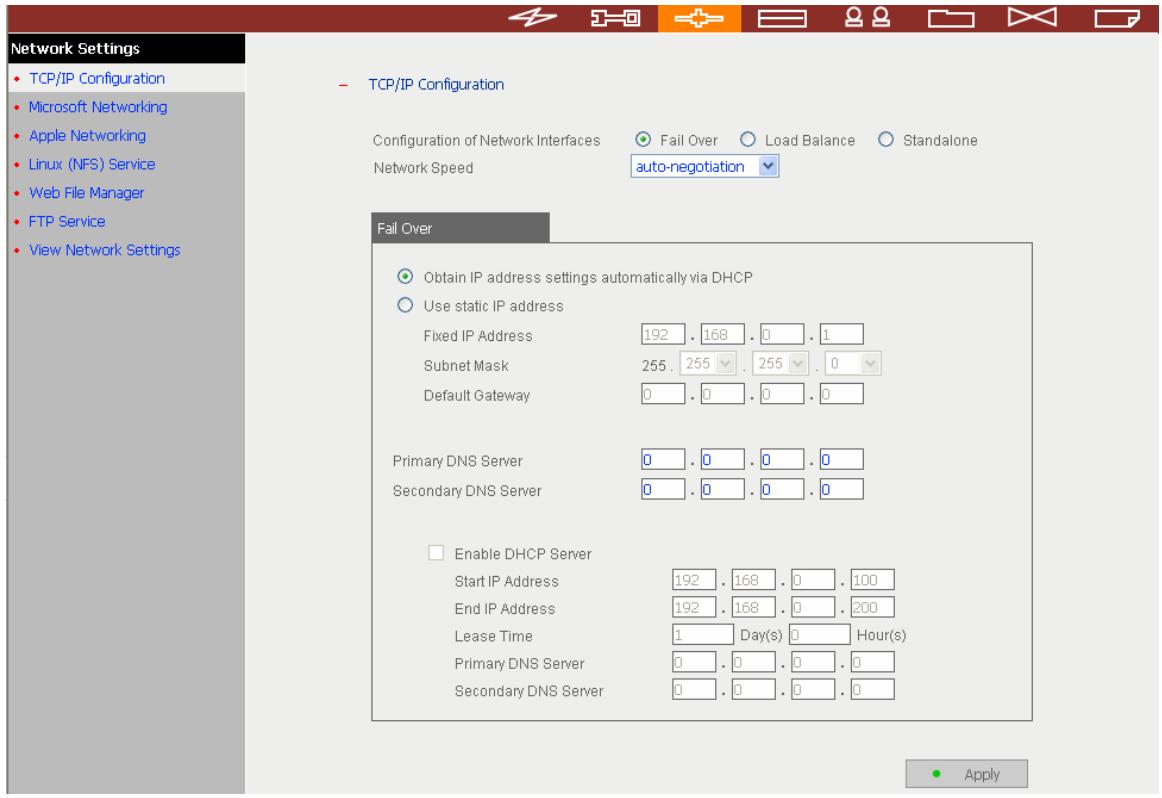
Configuration of Network Interfaces
Fail Over (Default)
The system supports the configuration of multiple network interfaces, which enables you to perform Fail Over or Load Balance functions. Fail over ensures server availability to the network. If the primary port is disconnected due to a hardware or cable problem, the secondary port will replace its network identity. If the failed port resumes the network connection, it will also resume the role as the primary interface.
Fail Over
Obtain IP address settings automatically via DHCP
Use static IP address
Fixed IP Address
Subnet Mask
Default Gateway
172.17 28 .126
-
-
- 0
-
0.0.0.0
Primary DNS Server
Secondary DNS Server
10.8 2 11
0.0.0.0
Enable DHCP Server
Start IP Address
End IP Address
Lease Time
Primary DNS Server
Secondary DNS Server
172.17 .10 .100
172.17 .10 .200
1 Day(s) Hour(s)
0.0.0.0
□ □ □
√ Load Balance
In load balance* mode, the transmission load is distributed among aggregated network ports.
Load Balance
Obtain IP address settings automatically via DHCP
Use static IP address
Fixed IP Address
Subnet Mask
Default Gateway


Primary DNS Server
Secondary DNS Server


Enable DHCP Server
Start IP Address
End IP Address
Lease Time
Primary DNS Server
Secondary DNS Server


- An intelligent software adaptive agent will repeatedly analyze the traffic flow from the server and distribute the packets based on the destination address. Load balance can only occur on Layer 3 routing protocols (IP or NCP IPX). Multicast/Broadcast and non-routing protocols, such as NetBEUI and Microsoft IPX, are transmitted over the primary port.
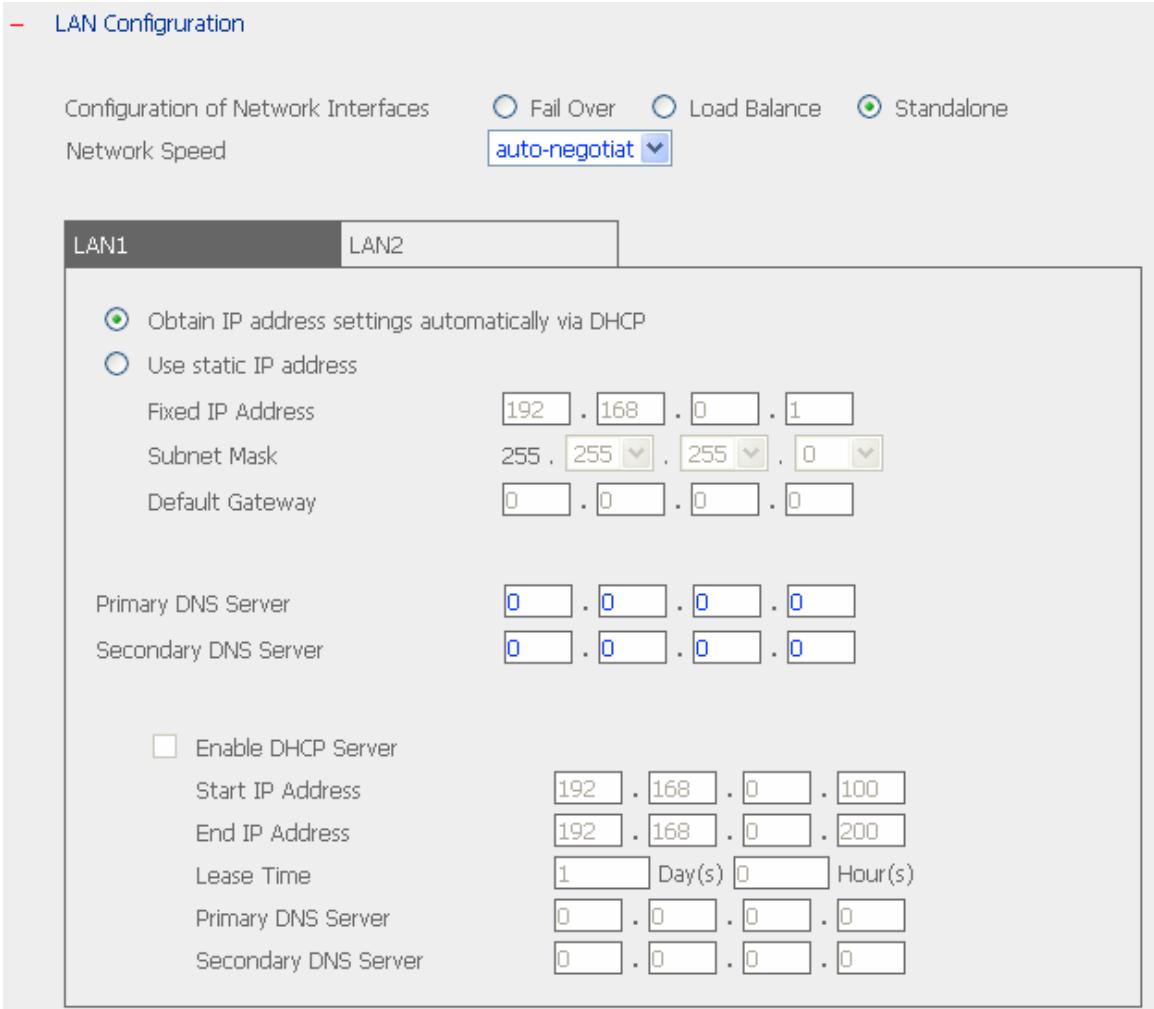
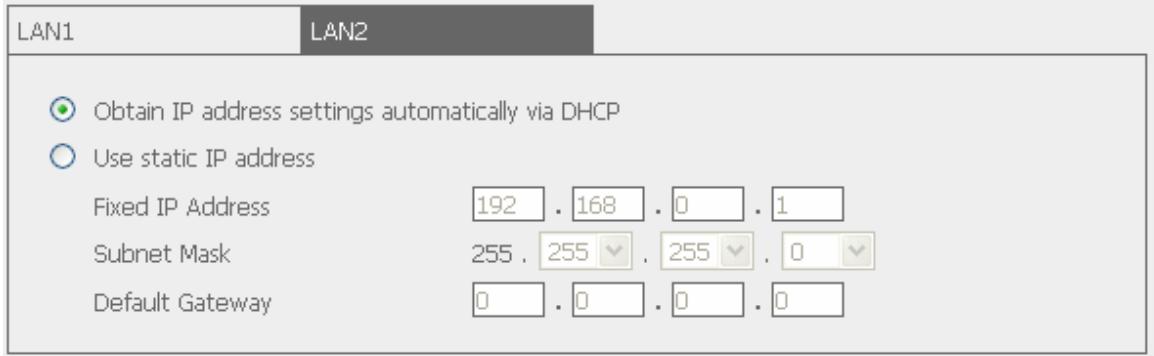
✓ Standalone
Standalone settings enable each port to have a unique IP, which allows users on different network areas to share one ND-52000 and maintain their independence from one another in the network. When using this mode, fail over cannot be used and only LAN 1 can be configured as DHCP server.
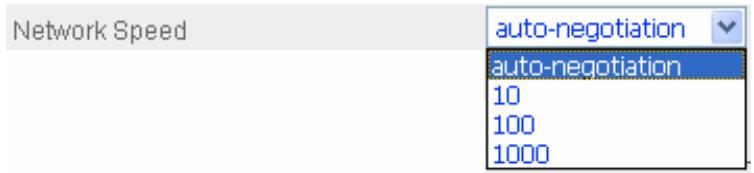
Network Speed
Network speed settings provide an advanced option for configuring network speed. You can select auto-negotiation (default), 10 Mbps, 100 Mbps, or 1000 Mbps. It is recommended to use the default setting that the server will determine network speed automatically.
- Obtain IP address settings automatically via DHCP
If your network supports DHCP, ND-52000 will automatically use DHCP protocol to retrieve the IP address and related information.
Obtain IP address settings automatically via DHCP
Use static IP address
To use fixed IP address for network connection, enter fixed IP address, subnet mask and default gateway.

Primary DNS Server: Enter the IP address of primary DNS server that provides DNS service for ND-52000 in external network.
Secondary DNS Server: Enter the IP address of secondary DNS server that provides DNS service for ND-52000 in external network.
| Primary DNS Server | 10 | 8 | 2 | 11 |
| Secondary DNS Server | 0 | 0 | 0 | 0 |
You can also configure the following settings:
Enable DHCP server
If there is no DHCP server on your network, you can enable this option to provide IP address settings to the clients.
Start IP address
The first IP address to be dynamically allocated for DHCP service.
End IP address
The last IP address to be dynamically allocated for DHCP service.
Lease time
Define the lease time for the dynamic IP address.
Primary DNS server
When the system allocates an IP address to your computer, the primary DNS server address is also specified to it.
Secondary DNS Server
When the system allocates an IP address to your computer, the secondary DNS server address is also specified to it.
| □ Enable DHCP Server | ||
| Start IP Address | 172 . 17 . 10 . 100 | |
| End IP Address | 172 . 17 . 10 . 200 | |
| Lease Time | 1 Day(s) 0 Hour(s) | |
| Primary DNS Server | 0 . 0 . 0 . 0 | |
| Secondary DNS Server | 0 . 0 . 0 . 0 | |
6.5.2 Microsoft Networking
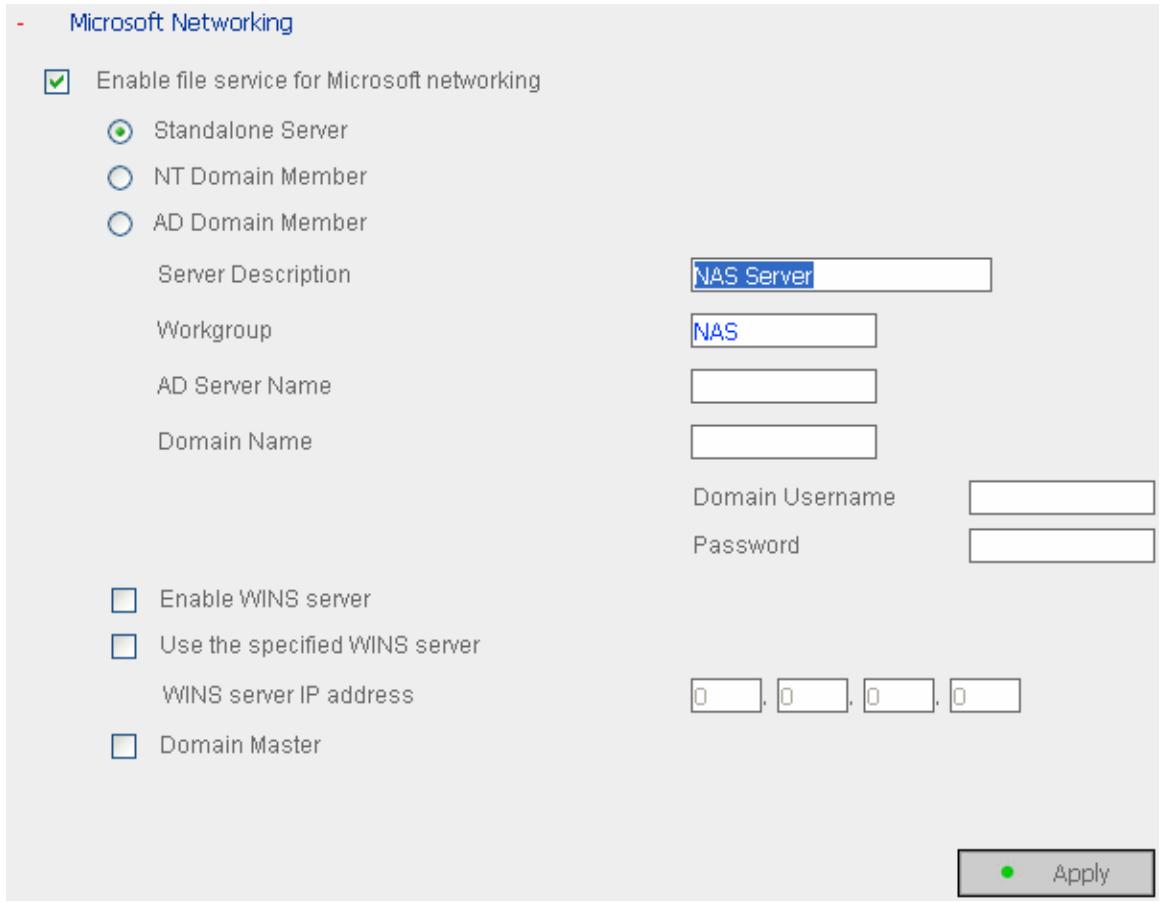
Enable file service for Microsoft networking: If you are using Microsoft
Windows, enable this service to access the files on network share folders. Assign a workgroup name.
✓ Standalone Server
Use local users for user authentication.
NT Domain Member
Use Microsoft NT domain for user authentication.
AD Domain Member
ND- 52000 supports Windows 2003 AD (Active Directory) to provide quick and direct import of user accounts to the existing AD server available in your network. This function helps you to save time and effort on creating user accounts and passwords and lowers IT maintenance cost by automatic configuration procedure.
Server Description: Describe ND-52000 for users to identify the server. To use ND-52000 on the Microsoft Windows OS, you must enable
Microsoft Network Services.
Workgroup: Specify the workgroup ND-52000 belongs to. The workgroup is a computer group unit in Microsoft Windows network for network sharing.
AD Server Name: Enter the name of the AD server when AD domain is selected for authentication.
Domain Name: Microsoft domain name. Enter the domain name when you select NT domain or AD domain.
WINS server
If the local network has a WINS server installed, specify the IP address. ND-52000 will automatically register its name and IP address with WINS service. If you do not want to enable WINS server support, or you do not have a WINS server on your network, enter 0.0.0.0 in the field for WINS server IP address.
Enable WINS server
Use the specified WINS server
WINS server IP address

Domain Master
There is a unique Domain Master Browser for collecting and recording resources and services available for each PC in the network or workgroup of Windows. When a domain master browser (Windows NT/ 200x/ XP PC) exists already in the network, there is no need to configure ND-52000 as the domain master.
When you find the waiting time for accessing Network Neighborhood too long, it may due to failure of an existing master browser, or there is no master browser available. If the reason is the latter one, you can check the box Domain Master in this section to configure ND-52000 as the master browser to enhance the speed of accessing information on Network Neighborhood.
Domain Master
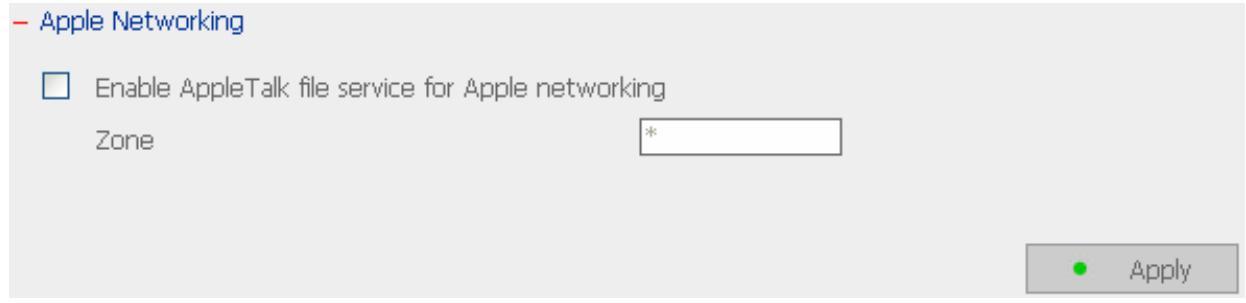
6.5.3 Apple Network
To use ND-52000 on Apple MAC operating system, enable AppleTalk network support.
If your AppleTalk network uses extended networks, and is assigned with multiple zones, assign a zone name to ND-52000. If you do not want to assign a network zone, enter an asterisk (*) to use the default setting. This setting is disabled by default.
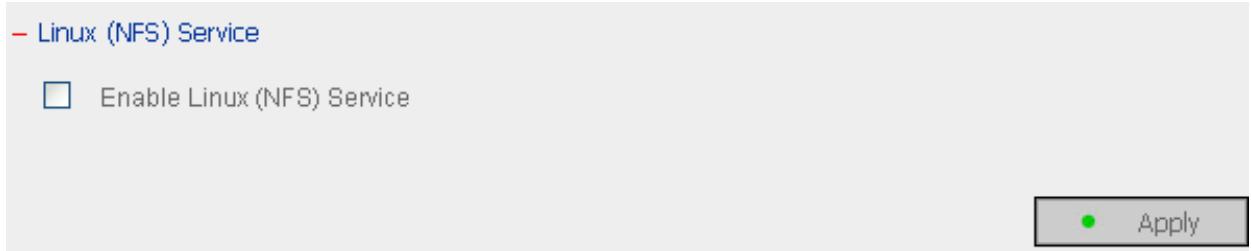
6.5.4 Linux (NFS) Service
To use ND-52000 on Linux OS computer or server, enable Linux (NFS) service. ND-52000 supports NFS version 2.0 and 3.0. This setting is disabled by default.
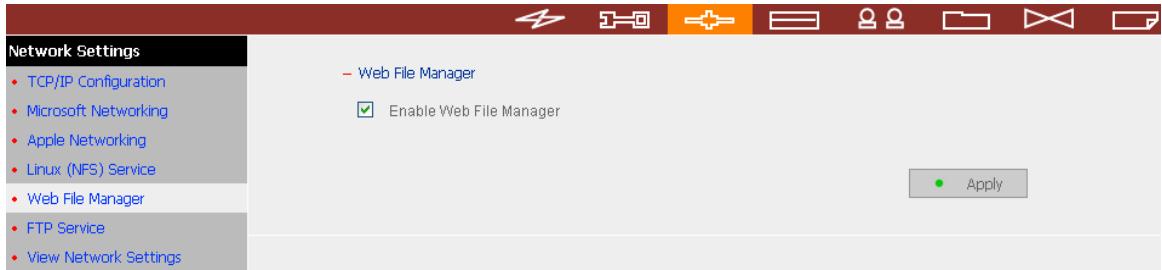
6.5.5 Web File Manager
To access files on ND-52000 via web browser, enable Web File Manager. If ND-52000 is connected to the Internet and uses a valid IP address, you can access files on the server by web browser from anywhere. For further details, please refer to Appendix A.
Web Service

Enable Web File Manager

Apply
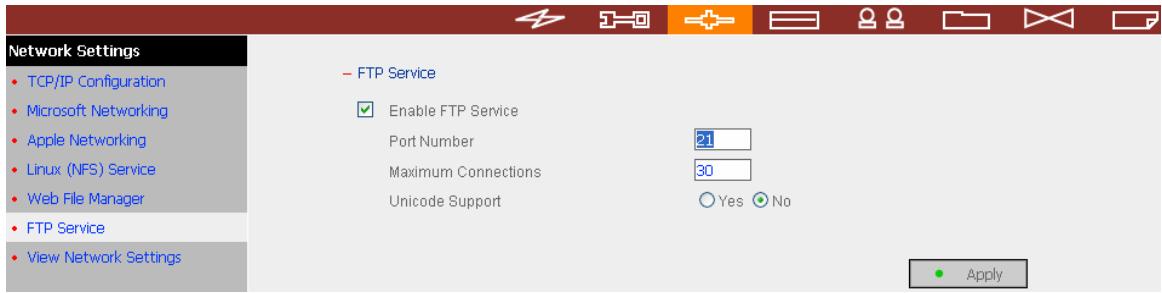
6.5.6 FTP Service
Select to enable or disable Unicode Support. The default setting is No. As most FTP clients do not support Unicode currently, it is recommended that you disable Unicode support and select a language the same as your OS in "System
Settings—Language Setting" page (refer to Chapter 6.4.3) so that the folders and files on FTP can be properly shown.
FTP Service

Enable FTP Service
Port Number
Maximum Connections
Unicode Support
21

Yes No

6.5.7 View Network Settings
You can view current network settings and status in this section.
| Network | Network File Services | Miscellaneous |
| Connection Type | ||
| Connection Type | DHCP | |
| IP Address | 10.8.10.126 | |
| Subnet Mask | 255.255.255.0 | |
| Default Gateway | 10.8.10.1 | |
| MAC Address | 00:30:02:0E:00:30 | |
| Connection Status | Ready | |
| Configuration of Network Interfaces | Fail Over | |
| DHCP Service | ||
| Enabled | No | |
| Address Range | 172.17.10.100 - 172.17.10.200 | |
| Lease Time | 1 Day(s) 0 Hour(s) | |
View Network Settings
| Network | Network File Services | Miscellaneous |
| Microsoft Networking | ||
| Enabled | Yes | |
| Server Type | Standalone Server | |
| Workgroup | NAS | |
| WINS server Enabled | No | |
| Domain Master Enabled | No | |
| Apple Networking | ||
| Enabled | No | |
| Apple Zone Name | * | |
| Linux (NFS) Service | ||
| Enabled | No | |
| Web File Manager | ||
| Enabled | Yes | |
| FTP Service | ||
| Enabled | Yes | |
| Port Number | 21 | |
| Max Connections | 30 | |
| Unicode Support | Yes | |
View Network Settings
| Network | Network File Services | Miscellaneous |
| Printer Service | ||
| Enabled | Yes | |
| Printer Name | NAS0E0036PR | |
| Printer Comment | USB port on NAS | |
| - | ||
| Close | ||
6.6 Disk Configuration

In the section, you can create, delete, examine and format disk volume, as well as view disk and volume status of ND-52000.
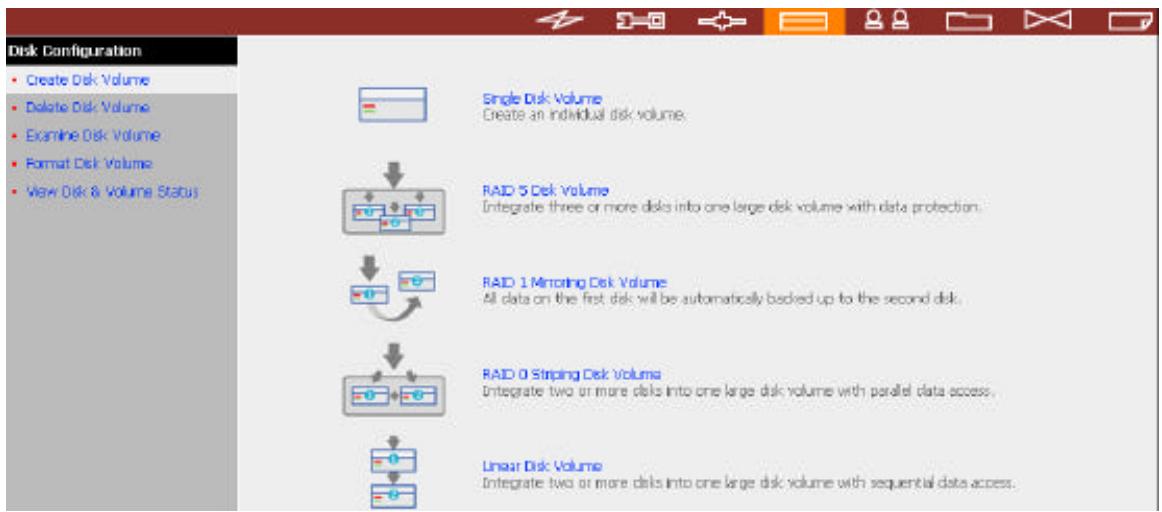
6.6.1 Create Disk Volume
ND-52000 can accommodate four disks at maximum. You can set the disk volume to the following configurations by clicking on the icons on Create Disk Volume page:
a. Single Disk Volume
You can create an individual disk volume. In case of disk crash, all data will be lost.

Single Disk Volume Create an individual disk volume.
b. RAID 5 Disk Volume
Three or more hard disks can be integrated to form RAID 5 disk volume.
Data will be distributed and stored among the disks. If a disk fails, you can
replace a new disk with the damaged one, and the system will restore the
data to the new disk. You can also use three disks for RAID 5 and a fourth
disk as a backup disk. If a disk of RAID 5 volume is damaged, the spare disk
can replace that damaged disk, which enhances server stability and
efficiency.

RAID 5 Disk Volume
Integrate three or more disks into one large disk volume with data protection.

Note: When configuring RAID 5 disk volume, at least 3 disks are required.
c. RAID 1 Mirroring Disk Volume
Mirroring Disk protects your data by automatically backing up the contents of one disk onto the second disk of a mirrored pair. This protects your data if one of the disks fails. However, the storing capacity is equal to a single disk, as the second disk is used to automatically back up the first one.
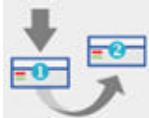
RAID 1 Mirroring Disk Volume
All data on the first disk will be automatically backed up to the second disk.
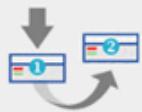
d. RAID 0 Striping Disk Volume
Striping disk combines two or more disks into one larger disk. It offers the
fastest disk access but does not have any protection of your data if the
striped array fails. The disk capacity equals the number of disks in the array
times the size of the smallest disk.
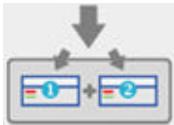
RAID O Striping Disk Volume
Integrate two or more disks into one large disk volume with parallel data access.
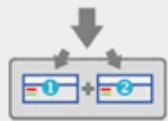
e. Linear Disk Volume
You can combine two or more disks into one larger disk. Files will be saved on physical disks sequentially but does not have a disk failure file protection function. The overall capacity of linear disk is the sum of all disks.
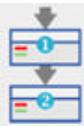
Linear Disk Volume
Integrate two or more disks into one large disk volume with sequential data access.
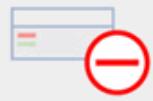
6.6.2 Delete Disk Volume
To delete a disk volume, select the disk volume to remove and click OK.
-Delete Disk Volume
Please select the disk volume you want to remove and click OK.
Warning: All data and network shares on the disk volume you select will be deleted. The connection of all active users on this volume will be terminated.
Note: To view all shares and active users on the volume you have selected, click Show Shares.
| Volume | Total Size | Free Size | Status | |
| © | RAID 5 Disk Volume: Drive 1 2 3 4 | 233632.50 MB | 224784.51 MB | Ready |


Show Shares
6.6.3 Examine Disk Volume
To examine a disk volume, select the disk volume to examine and click OK. You can check the Fix errors box and the server will fix errors automatically during disk checking.
-Examine Disk Volume
Please select the disk volume you want to examine and click OK. You can check the Fix errors option to resolve errors automatically.
Warning: All active users on this disk volume will be terminated.
Note: To view all shares and active users on the volume you have selected, click Show Shares.
| Volume | Total Size | Free Size | Status | |
| © | RAID 5 Disk Volume: Drive 1 2 3 4 | 233632.50 MB | 224784.51 MB | Ready |
Fix errors


Disk Volume Operation Report
After click OK on Examine Disk Volume page, a page like below will display to show the current status and information of disk volume operation.
Disk Volume Operation Report
| Operation Type | Format Disk Volume |
| Source Disk Volume | Mirroring Disk Volume: Drive 1 2 |
| Target Disk Volume | -- |
| Snapshot Settings | Disabled |
| Status | Formatting... |
| Result | -- |
| Comment | This operation may take several minutes to hours, depending on the disk capacity. |
| Note: This page will automatically refresh every 5 seconds. Click Close to exit this page. You can choose to view the operation result later on the View Disk & Volume Status page. | |

Close
6.6.4 Format Disk Volume
To format disk volume, select the disk volume to format and click OK.
Format Disk Volume
Please select the disk volume you want to format and click OK.
Warning: All data and network shares on the disk volume you select will be deleted. The connection of all active users on this volume will be terminated.
Note: To view all shares and active users on the volume you have selected, click Show Shares.
| Volume | Total Size | Free Size | Status | |
| © | RAID 5 Disk Volume: Drive 1 2 3 4 | 233632.50 MB | 224784.51 MB | Ready |


6.6.5 View Disk & Volume Status
You can view details of physical disks and logical volumes in the section.
| Physical Disks | |||
| Disk | Model | Capacity | Status |
| Drive 1 | Maxtor 6Y120L0 | 117246.94MB | Ready |
| Drive 2 | Maxtor 6Y120L0 | 117246.94MB | Ready |
| Drive 3 | Maxtor 6Y120L0 | 117246.94MB | Ready |
| Drive 4 | Maxtor 6Y120L0 | 117246.94MB | Ready |
| Logical Volumes | |||
| Volume | Total Size | Free Size | Status |
| Striping Disk Volume: Drive 1 2 3 4 | 467878.12 MB | 460403.27 MB | Ready |


Note: When configuring disk volume, make sure there are no active users connecting to ND-52000 to avoid any potential damage to the disks. You can check all currently active users in Statistics & Logs—Active Users (refer to Chapter 6.10.1) and inform those users to logout before configuring disk volume.
6.7 User Management

The files on ND-52000 can be shared among multiple users. For easier management and better control of users' access right, you have to organize users, user groups and their access right control.
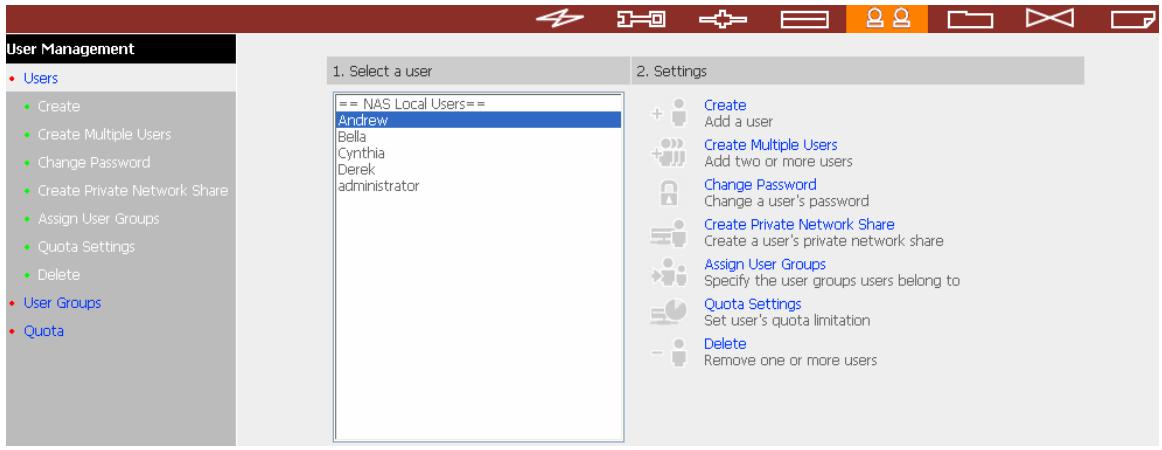
6.7.1 Users
The system has created the following users by default:
1 Administrator
By default, administrator has access to system administration and cannot be deleted.
Guest
This is a built-in user and will not be displayed on User Management page. When you use a non-registered user name to login, the server will recognize the user as a guest and will allow limited access. A guest does not belong to any user group.
3 Anonymous
This is a built-in user and will not be displayed on User Management page. When you connect to the server by FTP service, you can use this name to login as a guest.
512 users can be created at maximum (including system default users). You can create a new user according to your needs. The following information is required to create a new user:
√User name
The user name must not exceed 32 characters. It is case-insensitive and can contain double-byte characters, such as Chinese, Japanese, and Korean except:
$$ " / \backslash [ ] :; | = , + * ? < > ^ {\prime} $$
Password
The password is case-sensitive and can be 16 characters long at maximum. It is recommended to use a password of at least 6 characters.
You can perform the following settings for users:

6.7.2 User Groups
User group is a collection of users with the same access right to files or folders.
ND-52000 has created the following user groups by default:
1 Administrators
All members in this group have administration right. You cannot delete this group.
2 Everyone
All registered users belong to everyone group. You cannot delete this group.
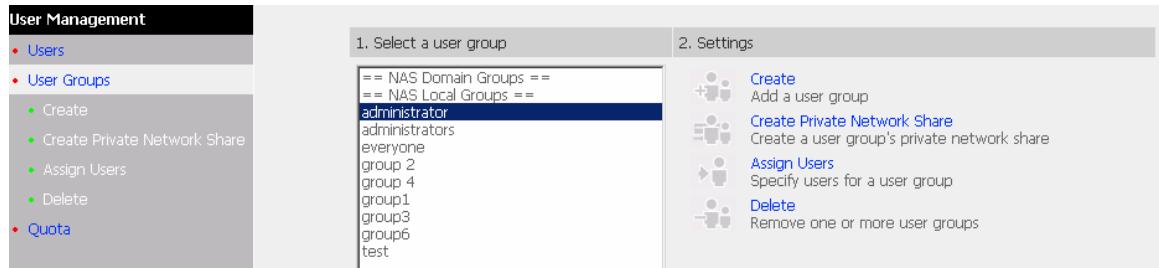
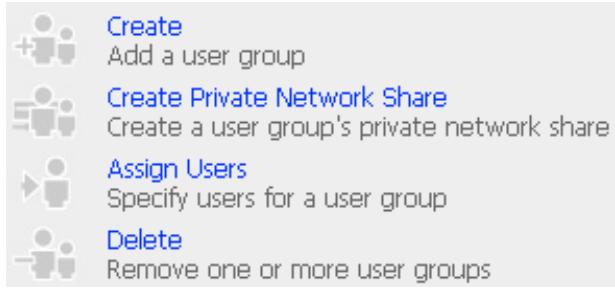
You can manage user groups with the following options:
User groups name must not exceed 256 characters. It is case-insensitive and can contain double-byte characters, such as Chinese, Japanese, and Korean, except the following ones:
$$ " / \backslash [ ] :; | = , + * ? < > ^ {\prime} $$
To properly manage security, it is very important to manage users and user groups. You may set the share access parameters of each user or user group accordingly.
Create Users and Assign Users to User Group
The following example demonstrates how to create new users and assign users to a user group.
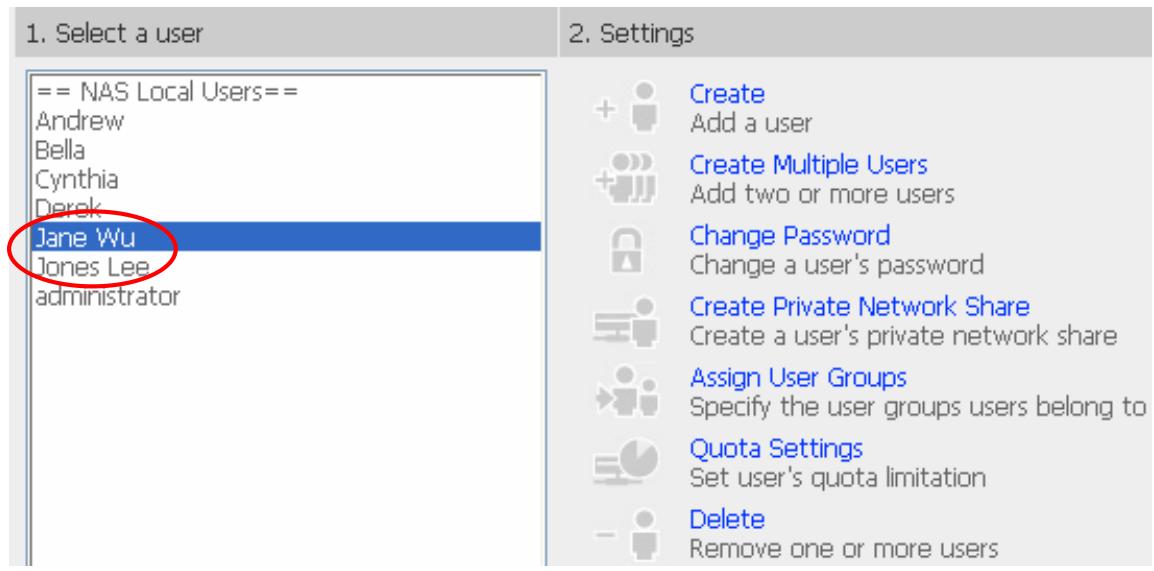
ABC Co. has recently recruited two employees Mr. Jones Lee for Administration Department and Ms. Jane Wu for Sales Department. The IT Department therefore needs to create two user accounts for them to access company data on ND-52000.
i. To create a user account, go to User Management-Users. Click Create.
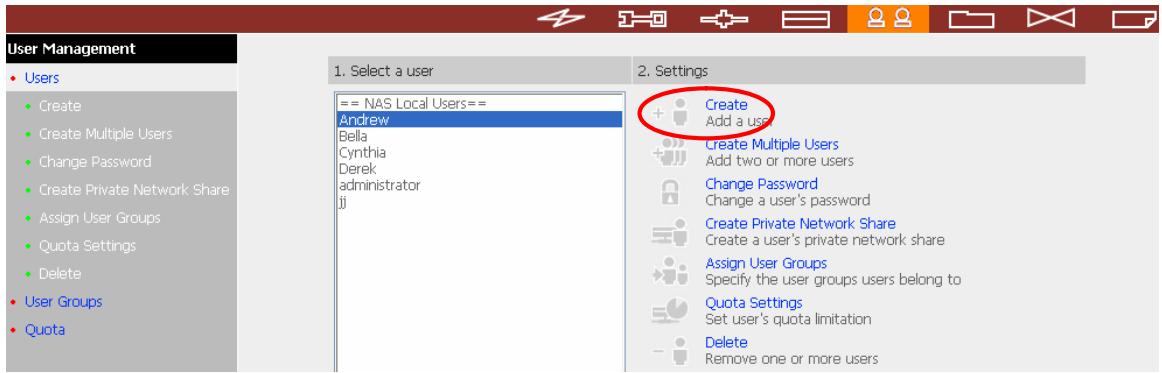
ii. Enter the user name (Jones Lee/ Jane Wu) and password. Check the box "Continue to set the user groups to which this user belongs" and click OK.
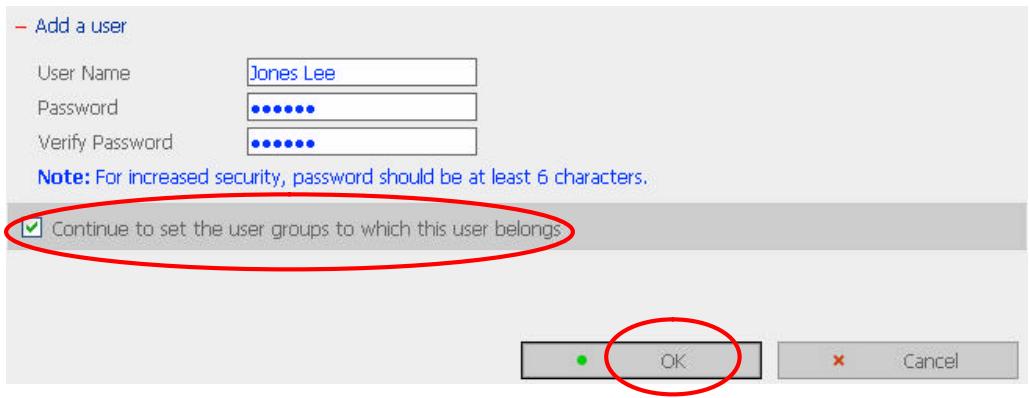
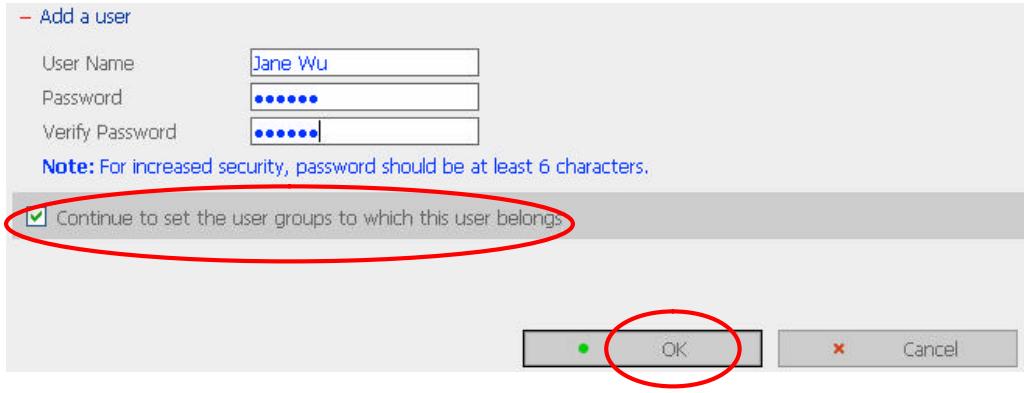
iii. Select the user groups the users belong to on the right list, i.e. Mr. Jones Lee for Administration Dept and Ms. Jane Wu for Sales Dept, and click Add. Then click Close.
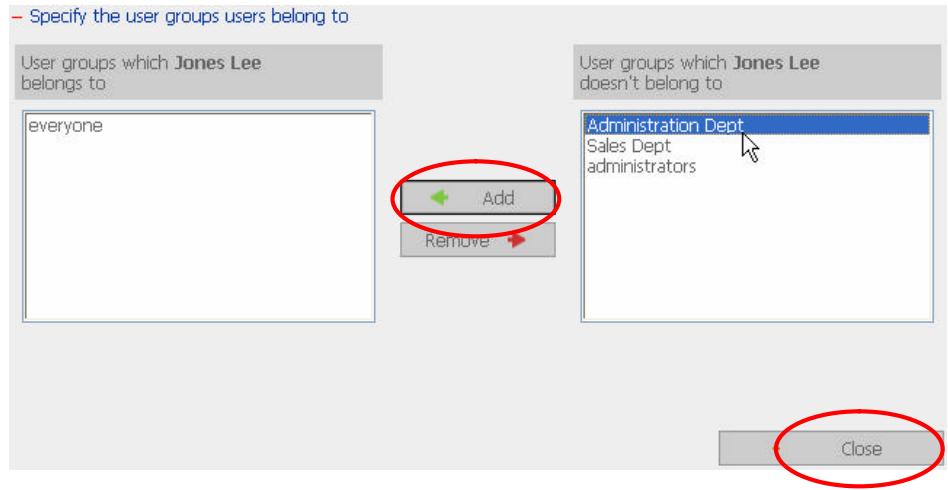
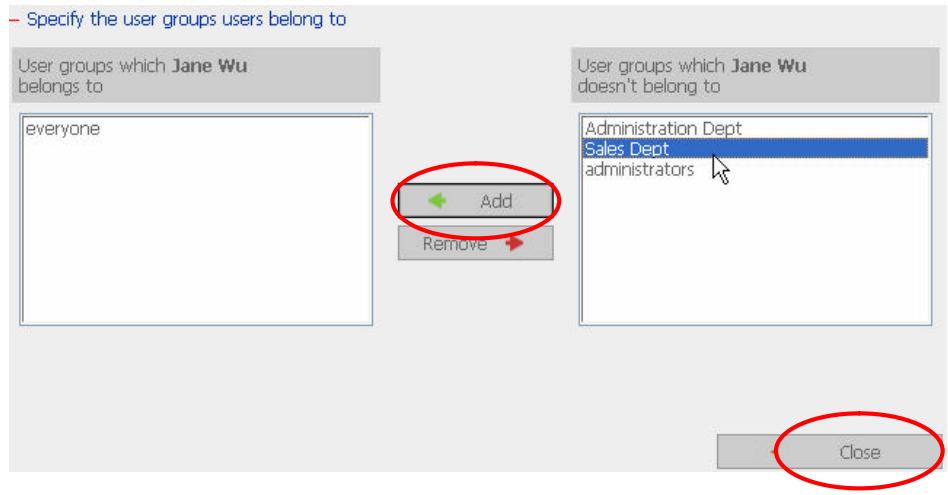
iv. After creating the users, the users will appear on the list on Create User Page.
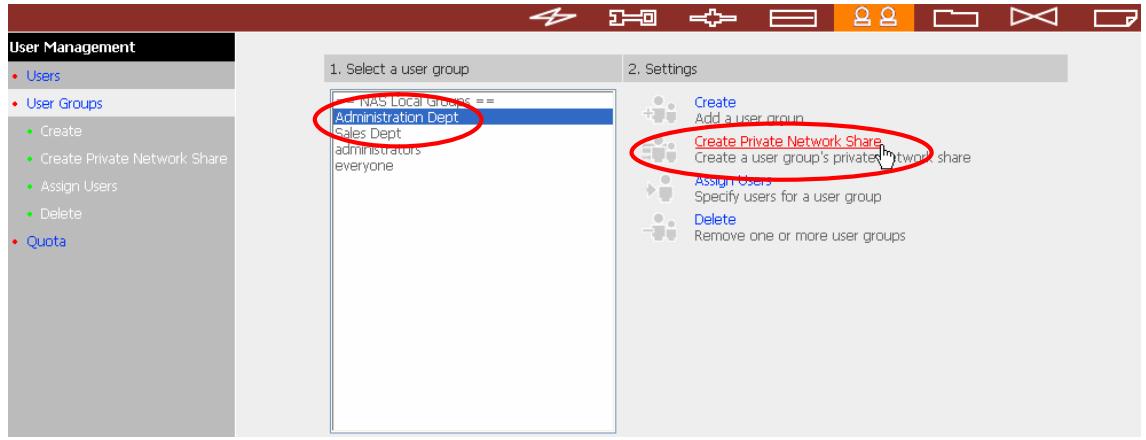
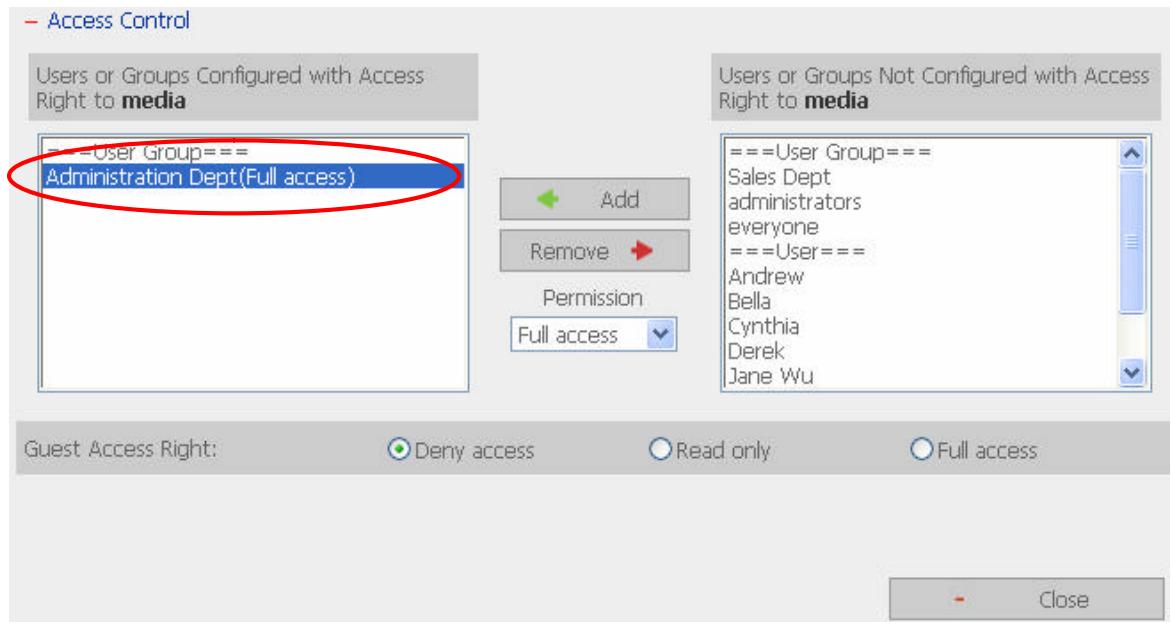
Create Private Network Share for User Groups
You can create particular network share for each user group. The procedure is described as below:
- To create a network share called media accessible by Administration
Department only, please go to "User Management—User Groups" page.
Select the user group Administration Dept and click Create Private Network
Share on the right.
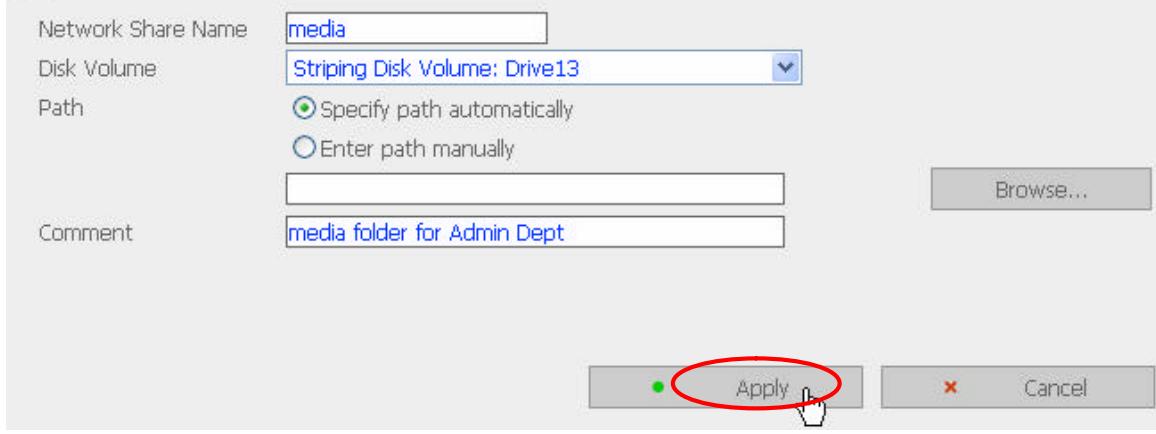
- Enter the network share name media. Select to disk volume that the share will be created in and specify the path automatically or manually. Enter the comment for the network share, e.g. media folder for Admin Dept and click
Apply.
Enter new network share's name, volume and path. Only users that are the members of Administration Dept user group can access this network share.
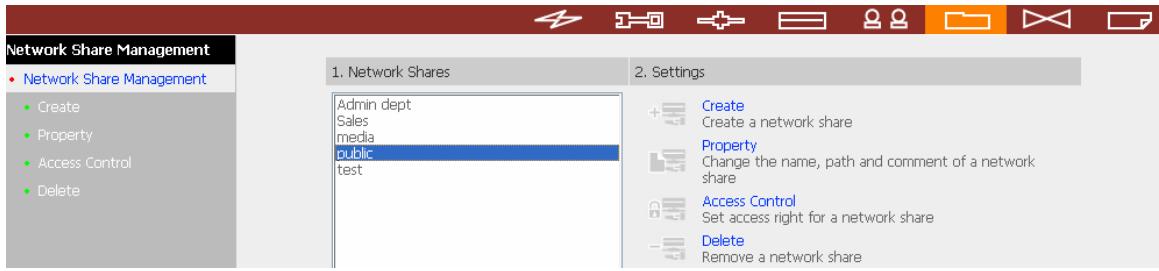
- You can see the folder media in Network Share Management page.
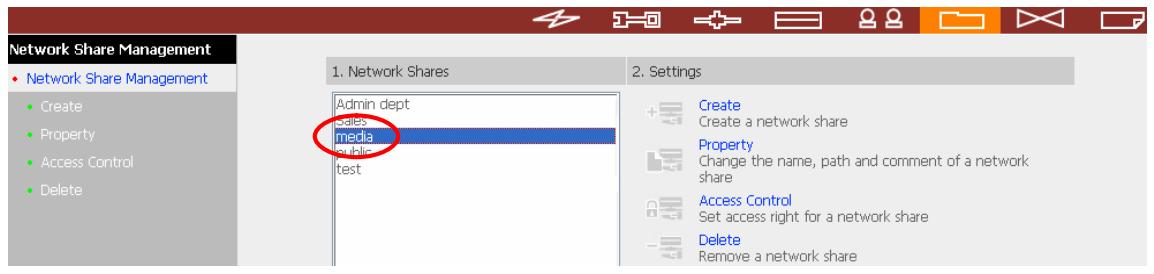
- Enter Access Control. You can see that only Administration Dept has full access right to the folder.
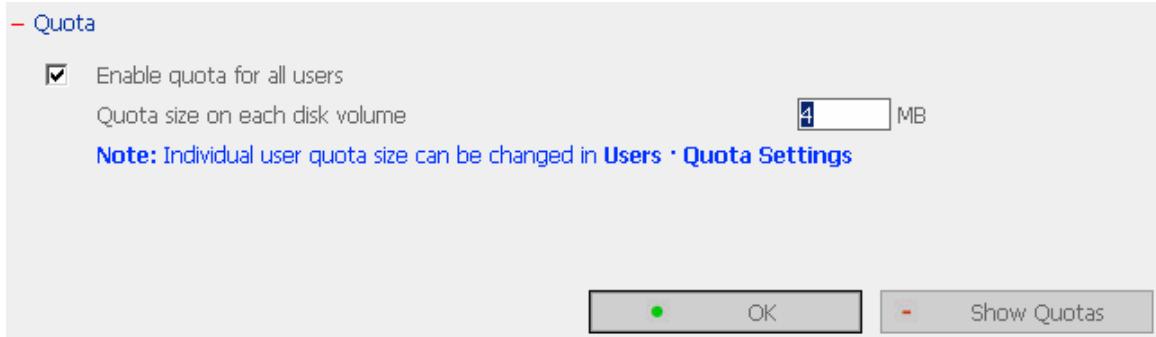
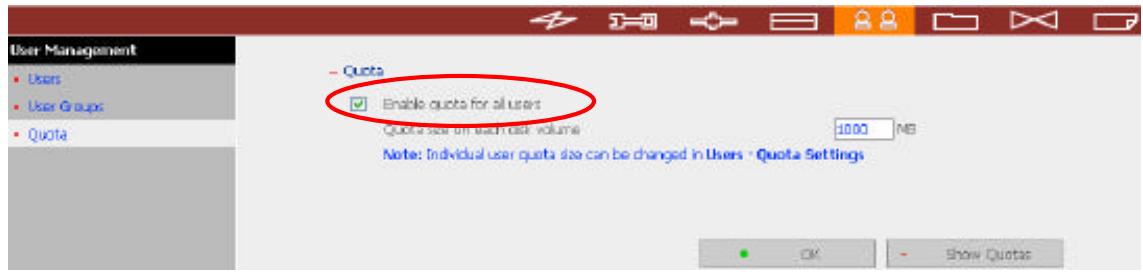
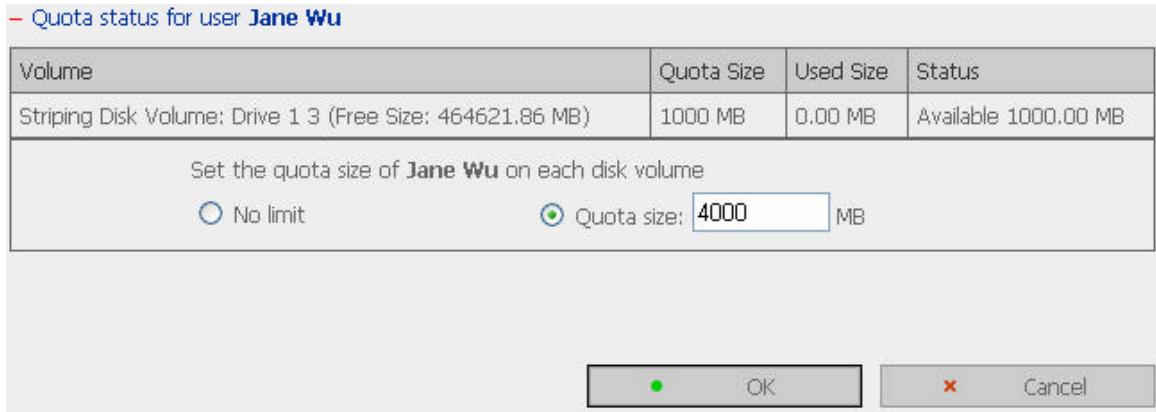
6.7.3 Quota
To allocate disk volume efficiently, you can specify the quota that can be used by each user. When this function is enabled and a user has reached his/her disk quota, he/she cannot upload data to the server anymore. By default, no limitations are set for users. You can modify the following two options:
i. Enable quota for all users
ii. Quota size on each disk volume
Please refer to the following example to configure the quota setting of users:
The IT department is planning to set the disk quota of Mr. Jones Lee from
Administration Department and Ms. Jane Wu from Sales Department on ND-
-
The disk quota is 2000MB for Mr. Jones Lee and 4000MB for Ms. Jane Wu.
-
Please go to Quota page in User Management to enable quota for all users.
Enter the quota size on each disk volume, e.g. 1000MB. The quota for individual user can be modified later.
- Select Jones Lee on User page and click Quota Settings on the right.

- Enter the quota size 2000MB and click OK.
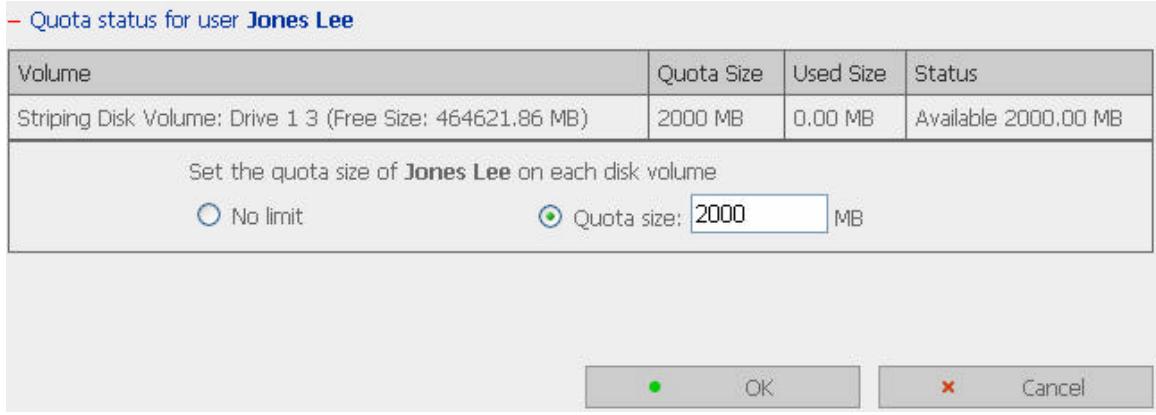
- Follow the same steps and enter the quota size 4000MB for Jane Wu and click OK. The quota setting is successfully applied.
6.8 Network Share Management

The primary purpose of network storage is file sharing. In a standard operation environment, you can create different network share folders for various types of files, or provide different file access rights to users or user groups.
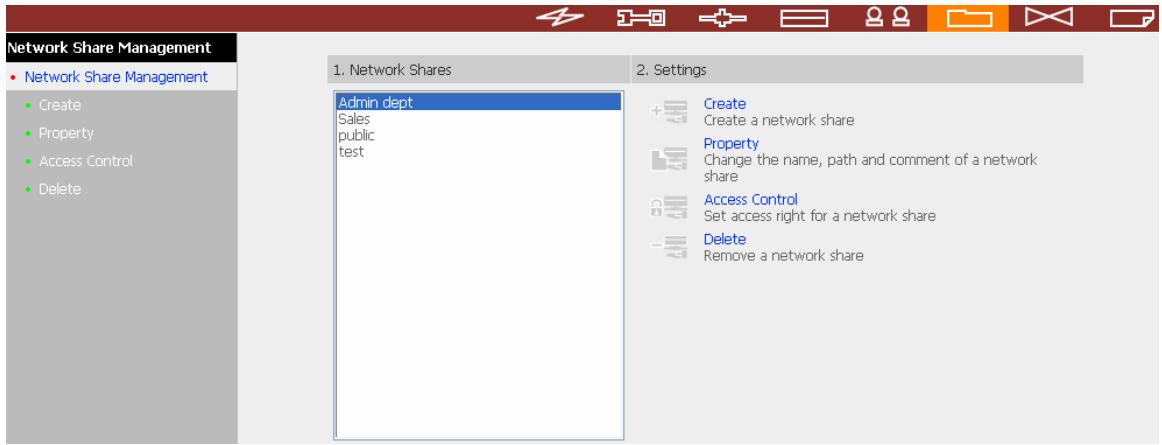
There are four options in Network Share Management:

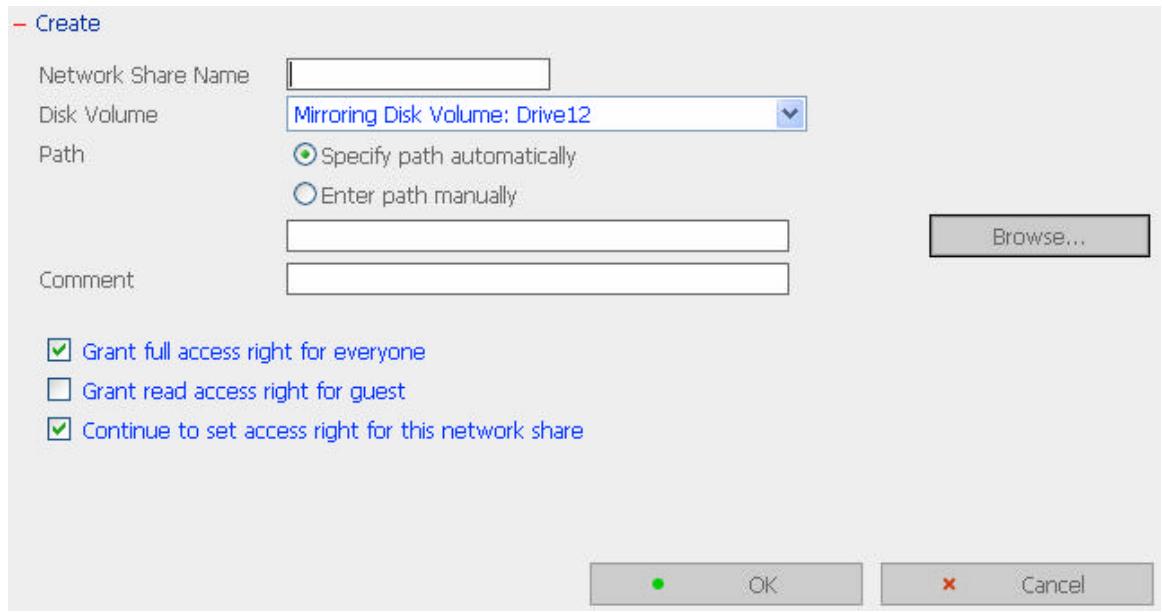
6.8.1 Create
To create a network share, enter the following information:
Network share name
The share name must not exceed 12 characters and cannot contain the following characters:
$$ ''. + = / \backslash : | * ? < >; [ ] \% $$
✓ Disk volume
This area shows the disk volume status.
Path
All data are stored under the assigned path onto the disk volume. You can select "Specify path automatically" or assign a path manually. The path cannot exceed 256 characters and cannot contain the characters below:
$$ ''. + = \backslash : | * ? < >; [ ] \% $$
Comment
Enter a brief description for the share folder. The comment cannot exceed 128 characters.
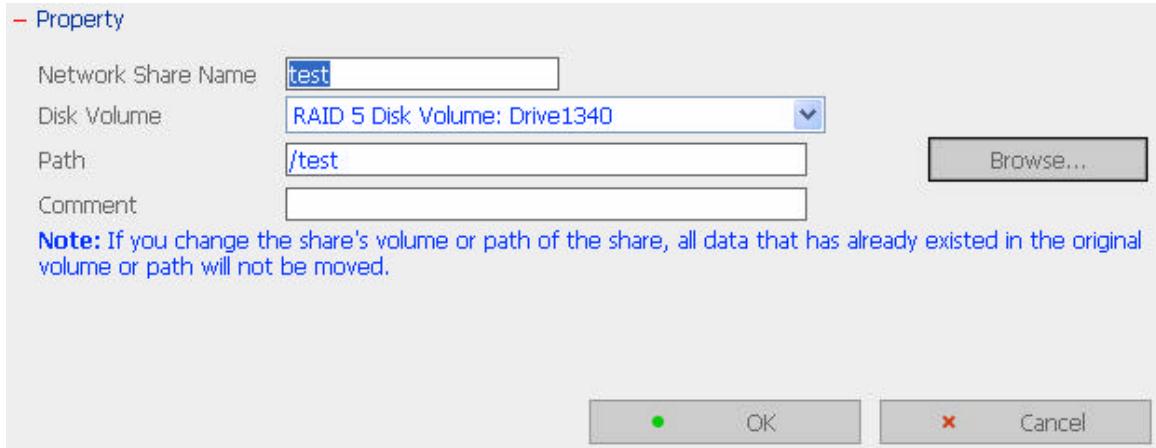
6.8.2 Property
To edit the property of an existing network share, select a share and click Property. You can then edit the content of that share.
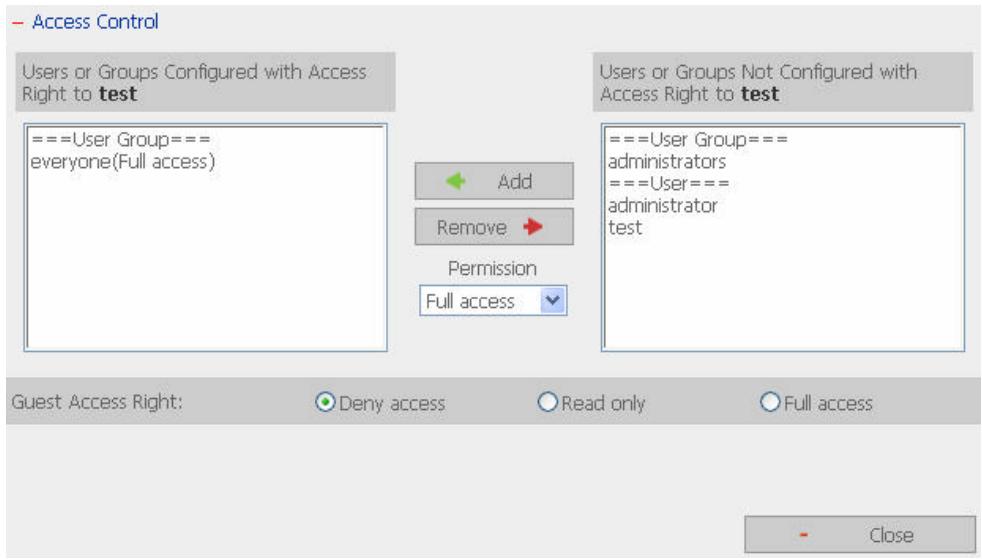
6.8.3 Access Control
Once the network share is created, you can assign access rights to users or user groups:
Deny access
Access to the network share will be denied when this option is selected.
Read only
Users can read the files only on the network share when read only is assigned.
Full access
Users with full access are allowed to read, write, create, or delete files and folders on the network share.
6.8.4 Delete
Select a share and click delete. Click OK to confirm.
Please make sure you want to delete network share test.
Note: All active users who are currently using this network share will be disconnected.
OK
X Cancel
6.9 System Tools

System Tools enable you to optimize the maintenance and management of ND-52000.
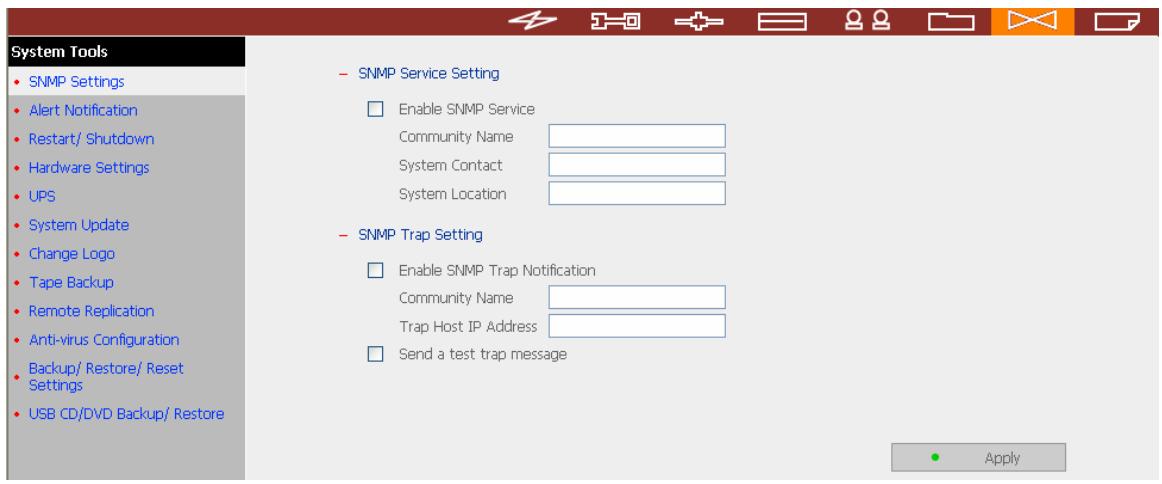
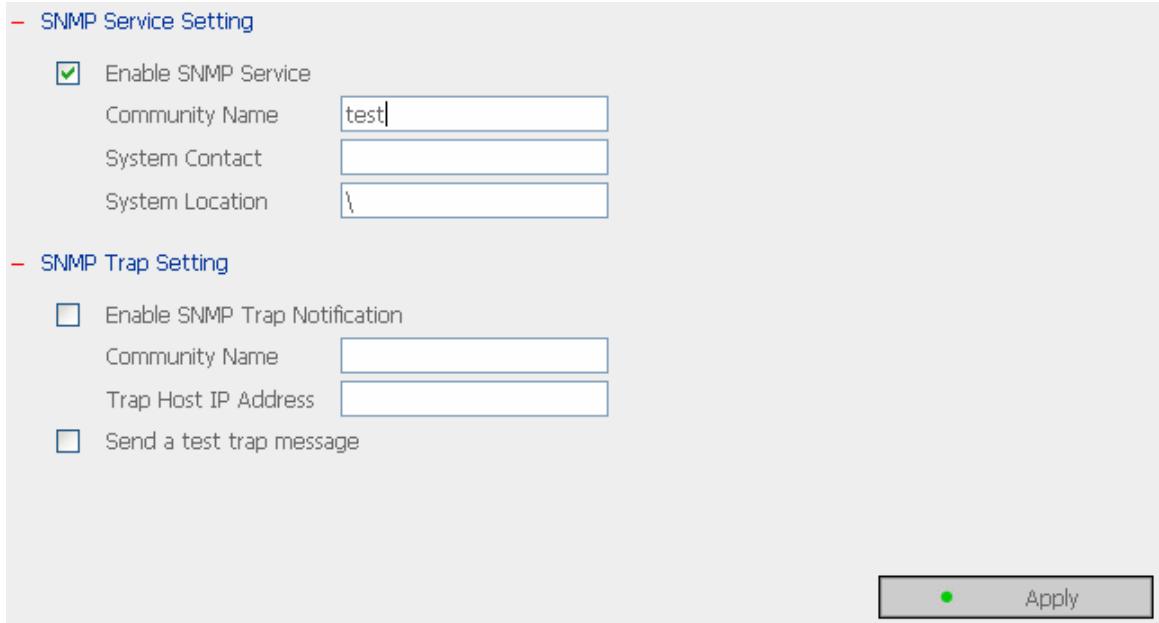
6.9.1 SNMP Settings
Enable SNMP (Simple Network Management Protocol) service and complete all necessary settings to manage network components of the server by SNMP. When enabling SNMP Trap Notification, a message will be sent to a specified trap host when an error occurs.
6.9.2 Alert Notification
Enter the e-mail address of administrator and SMTP server IP address. In case of warning or malfunction, e.g. CPU fan fails, a disk drive fails or is unplugged, an email will be sent to the administrator automatically. You can refer to Event Logs section in Statistics & Logs (refer to Chapter 6.10.2) to check all happened errors and warnings.
If your mailbox requires SMTP authentication, enter the user name and password.

Note: It is recommended to send a test e-mail to make sure you can receive the alert mails.
Alert Notification
Alert level:
High: Send e-mails on any errors or warning events
Medium: Send e-mails only on critical errors
Low: No alert e-mails will be sent
E-mail (SMTP) server IP address:

Enable SMTP Authentication
UserID :
Password :
E-mail address 1:
E-mail address 2:
Send a test e-mail


6.9.3 Restart/Shutdown
Select to restart or shut down ND-52000.
- Restart/Shutdown
To restart the server, click Restart.
To shut down the server, click Shut Down.
Restart
Shut Down
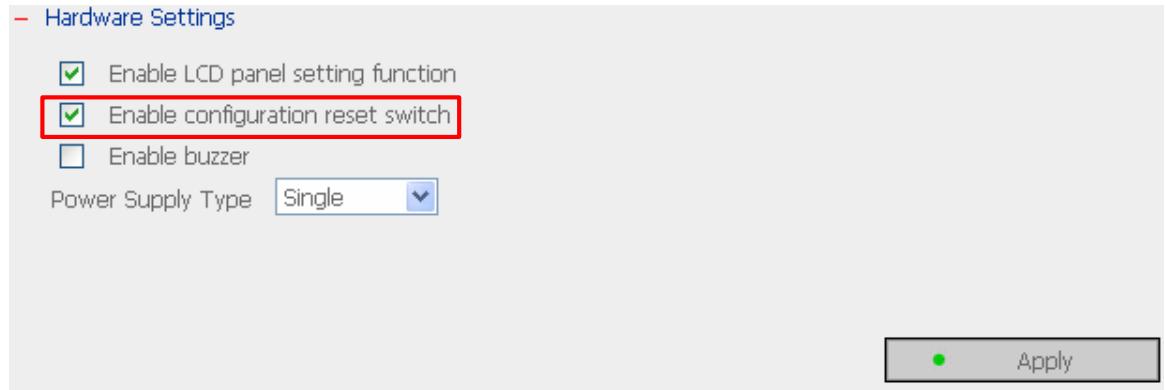
6.9.4 Hardware Settings
You can enable or disable the hardware functions of ND-52000.
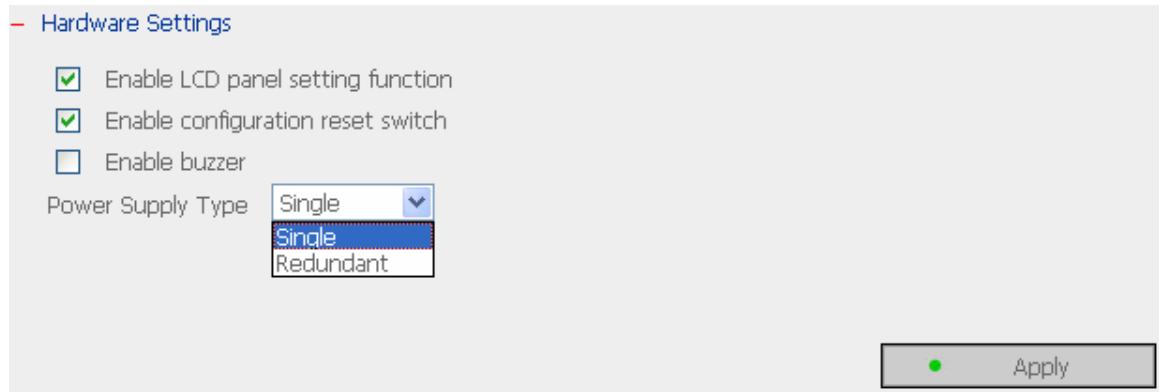
i. Enable LCD panel setting function
To enable users to configure TCP/IP settings via the LCD panel.
ii. Enable configuration reset switch
By enabling this option, you can press the reset button for a few seconds to reset the administrator password and system settings to default.
iii. Enable buzzer
When buzzer is enabled, an alert sound will be played in case of system error.
iv. Power Supply Type
Select power supply type. There is one power supply by default. Do NOT change the position of default power supply. To use a second power supply, you can purchase from the distributor.
To use two power supplies, follow the steps below:
- Set power supply type as Redundant.

- Shut down the system properly.
- Insert the second power supply and turn on the system.
If a power supply fails, the system will send an alert notification to the administrator.
6.9.5 UPS
If your UPS device provides USB interface, you can enable UPS (uninterruptible power supply) support to protect your system from abnormal system shutdown caused by power outage. In case of utility power failure, the system will shut down automatically by probing the power status of the connected UPS unit.
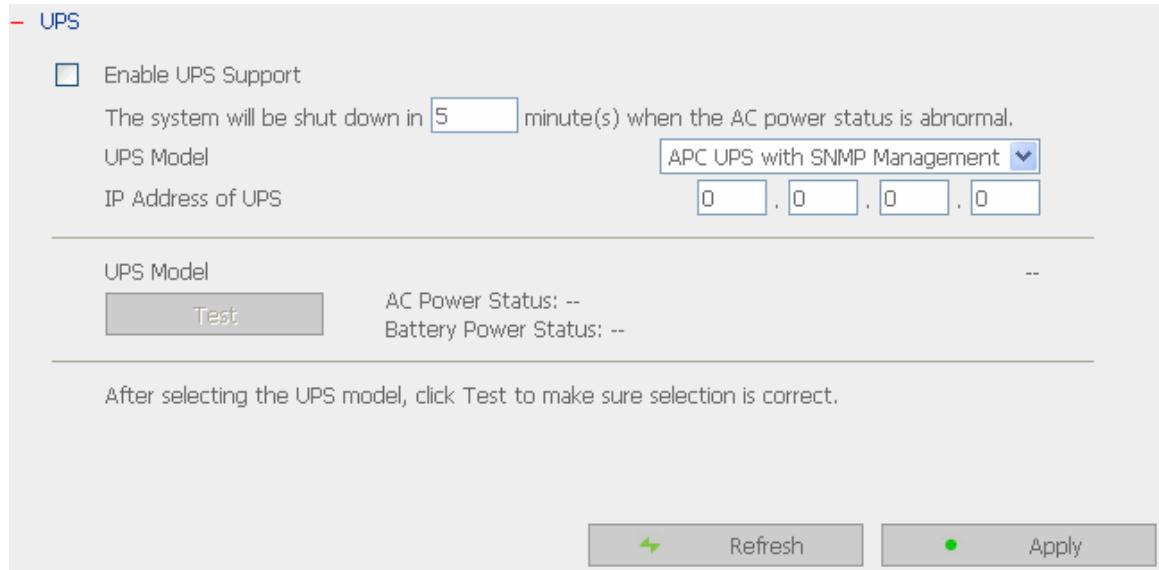
Enable UPS support
To activate the UPS support, you can select this option. You can set the shutdown timer to turn off the system automatically after the system detects the AC power is abnormal. In general, the UPS can keep supplying the power for the system for about 5~10 minutes, depending on the maximum load of the UPS and the number of the loads connected to it.
UPS Model
Select the UPS model from the list. If the UPS model you are using is not available on the list, please contact our technical support.
IP Address of UPS
If you have selected APC UPS with SNMP for UPS model, enter the IP address of the UPS.


Note: When UPS support is not enabled, the Test button will not function.
6.9.6 System Update

Note: If the system is running properly, you do not need to update the firmware.
Before updating system firmware, please make sure the product model and firmware version are correct. Follow the steps below to update firmware:
Step 1: Download the release notes of the same version as the firmware from COMET LABS website http://www.CometLabs.com.tw/. Read the release notes carefully to make sure you need to upgrade the firmware.
Step 2: Before upgrading system firmware, back up all disk data on the server to avoid any potential data loss during system update.
Step 3: Click the [Browse...] button to select the correct firmware image for system update. Click Update System to update the firmware.
Note: System update may take tens of seconds to several minutes to complete depending on the network connection status. Please wait patiently. The system will inform you when system update is completed.
System Update
Note: If the system is running properly, you do not need to update the firmware.
Current firmware version: 1.0.0 Build 1118
Before updating system firmware, please make sure the product model and firmware version are correct. Follow the steps below to update firmware:
Step 1: Download the release notes of the same version as the firmware from QNAP website http://www.qnap.com.tw/ Read the release notes carefully to make sure you need to upgrade the firmware.
Step 2: Before upgrading system firmware, back up all disk data on the server to avoid any potential data loss during system update.
Step 3: Click the [Browse...] button to select the correct firmware image for system update. Click the [Update System] button to update the firmware.
Note: System update may take tens of seconds to several minutes to complete depending on the network connection status. Please wait patiently. The system will inform you when system update is completed.
Browse...

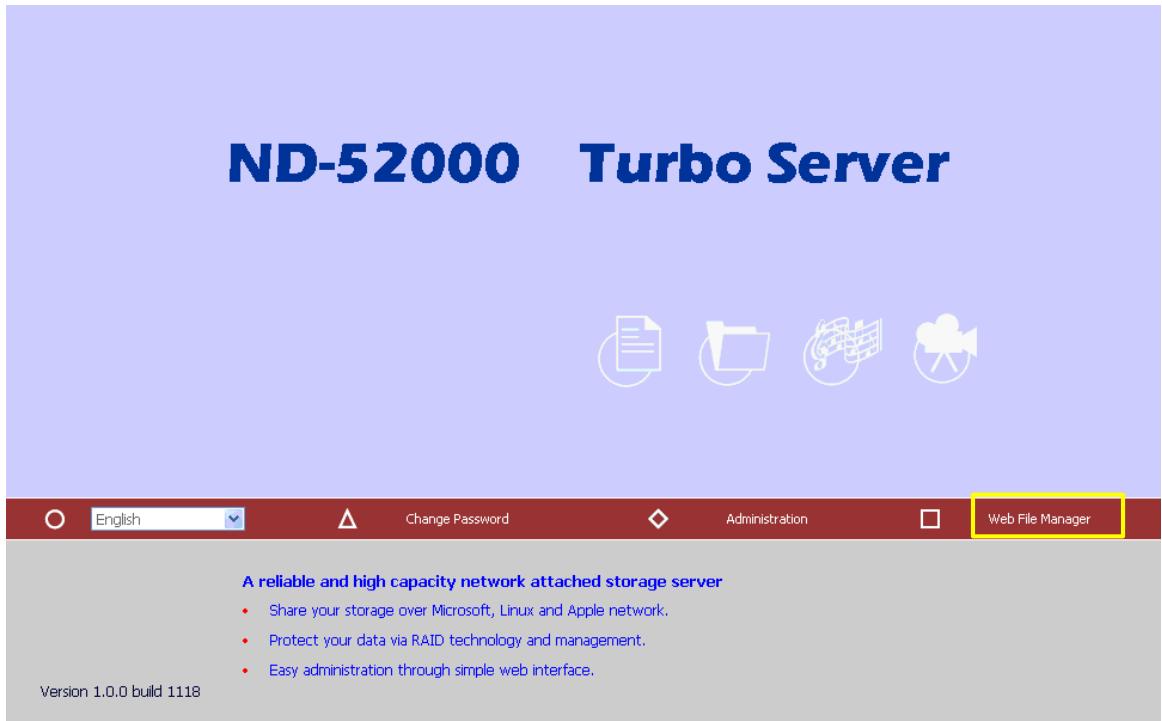
ND-52000 Turbo Server


English

Change Password

Administration

Web File Manager
Version 1.0.0 build 1118
A reliable and high capacity network attached storage server
Share your storage over Microsoft, Linux and Apple network.
- Protect your data via RAID technology and management.
Easy administration through simple web interface.
TS-411U firmware version
6.9.7 Change Logo
You can choose a personal picture to display on the login page of ND-52000. The size of the picture cannot exceed 20K bytes.
Change Logo
Please select an image from the To be displayed pull-down menu. Then click Apply to confirm the change.
To upload your own image, click Browse to select the image. Then click Upload to upload the image.
To replace an image, select an appropriate image from the To be replaced to pull-down menu and click Apply.
Downloaded image:
To be replaced to:
To be displayed:
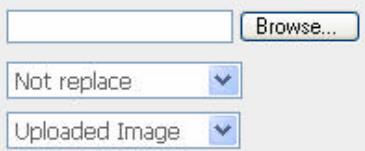


Image 1

Image 2

Downloaded Image

Image 3

Image 4

Current Logo Image
Note: For the best image effect, the recommended size for the image is 100 x 100 pixels.
Apply
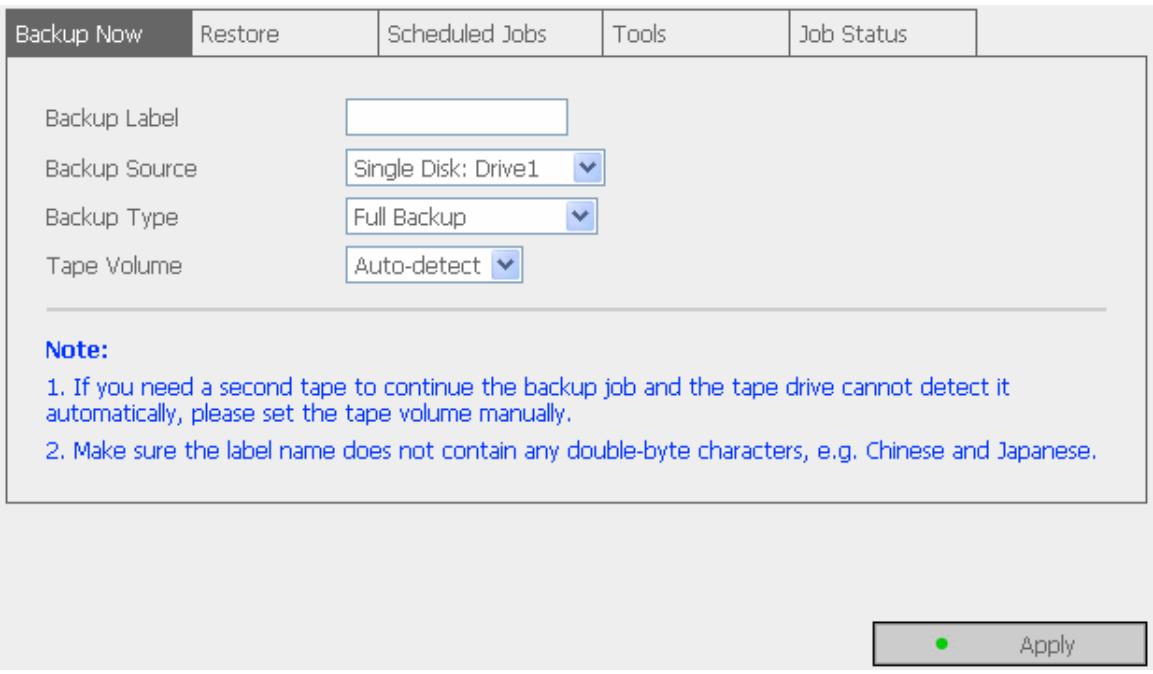
6.9.8 Tape Backup
Tape backup enables you to perform backup or restoration jobs by a tape drive. ND-52000 supports full backup and incremental backup. By full backup, all source files will be backed up. By incremental backup, only modified or new files after last backup will be backed up.
Backup Now
To back up files to the tape drive immediately.
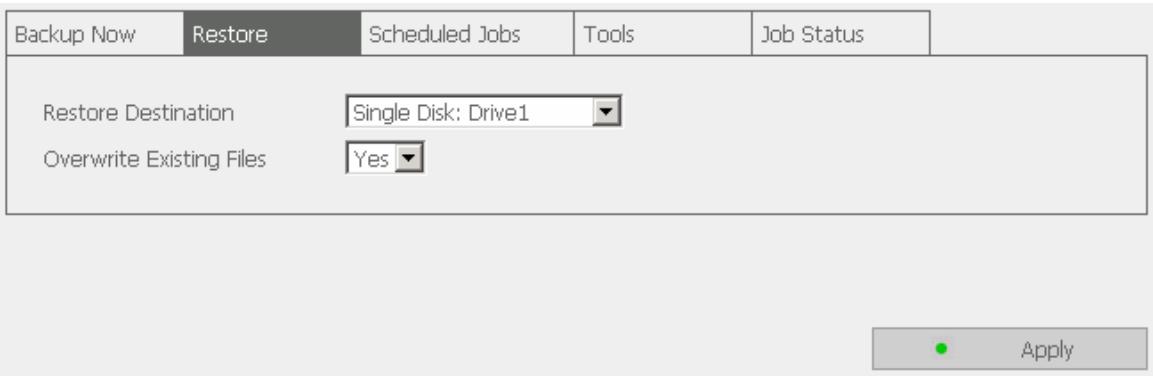
✓ Restore
To restore data from the previously backup tape. Select the restore destination and whether or not to overwrite existing files.
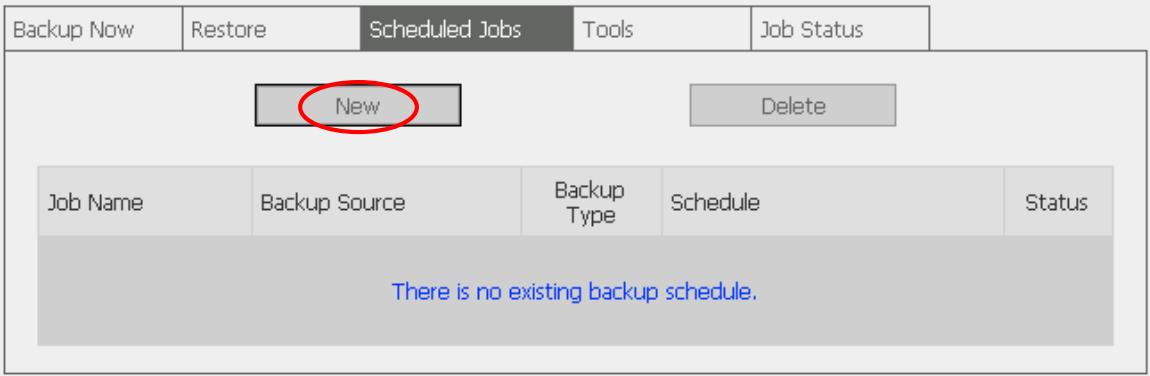
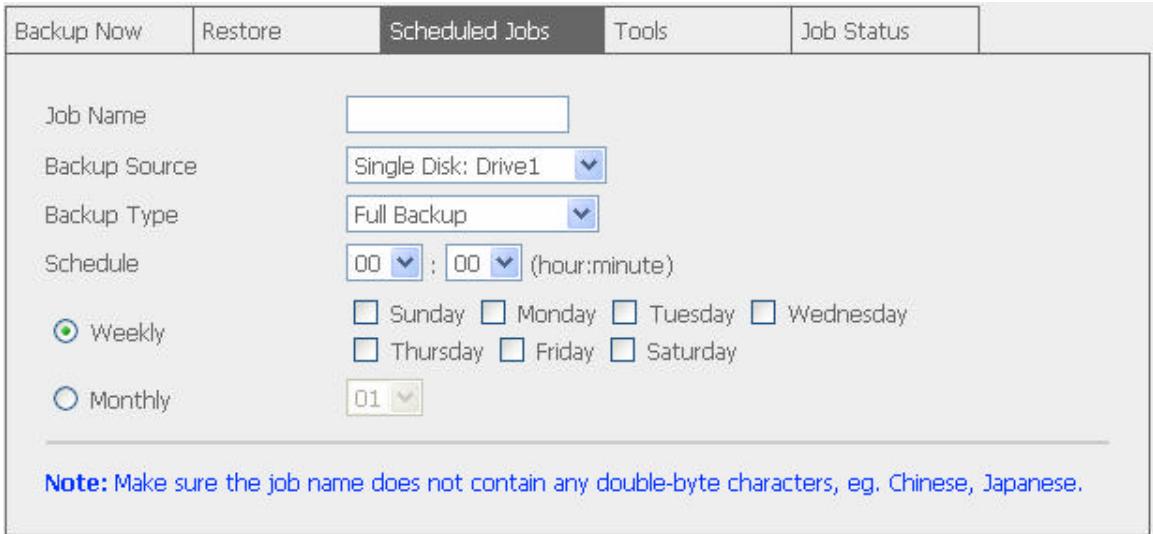
✓ Scheduled Jobs
You can schedule a backup job to be executed automatically. Click New and define the job name, backup source, backup type, and schedule.


Tools
There are several useful tape functions to operate on the tape drive. For example, you can rewind, eject or erase the tape here. Click Apply to execute the action.
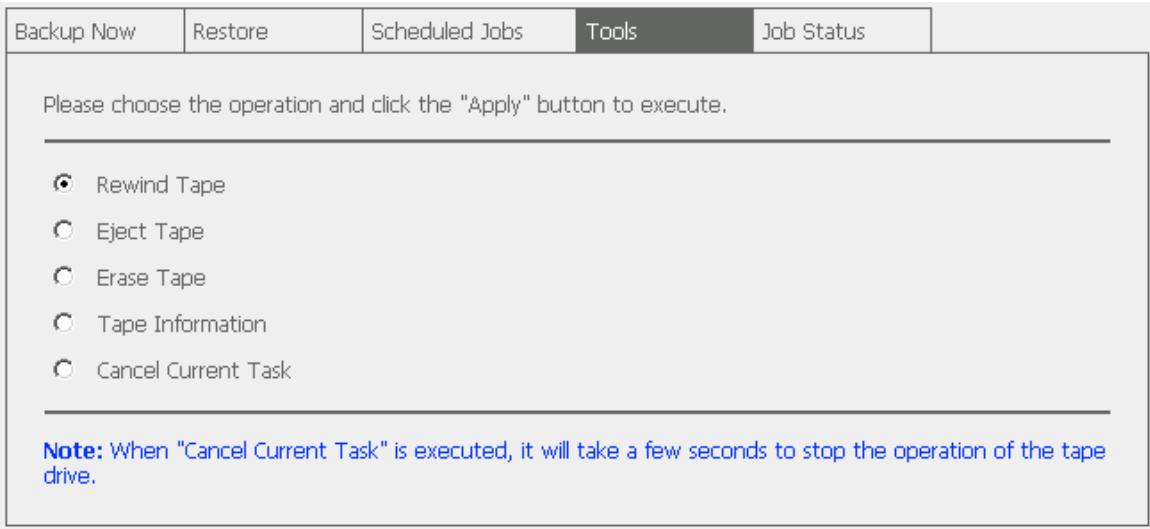

Apply
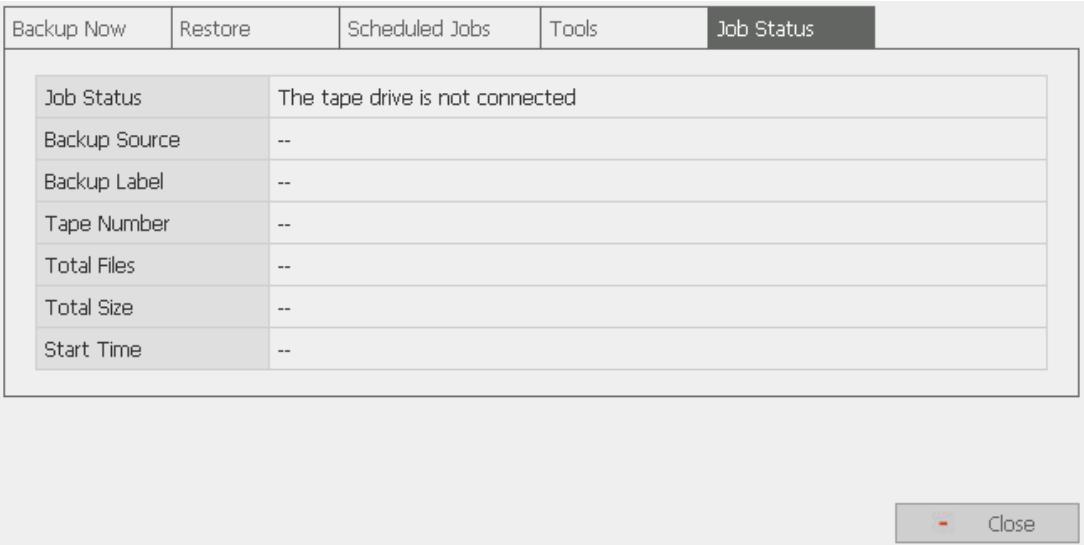
Job Status
You can view the status of backup or restore job.

Note:
- The SCSI tape drive has to be properly connected and turned on before starting up ND-52000 for proper detection.
- HVD (High Voltage Differential) SCSI tape drive is not supported.
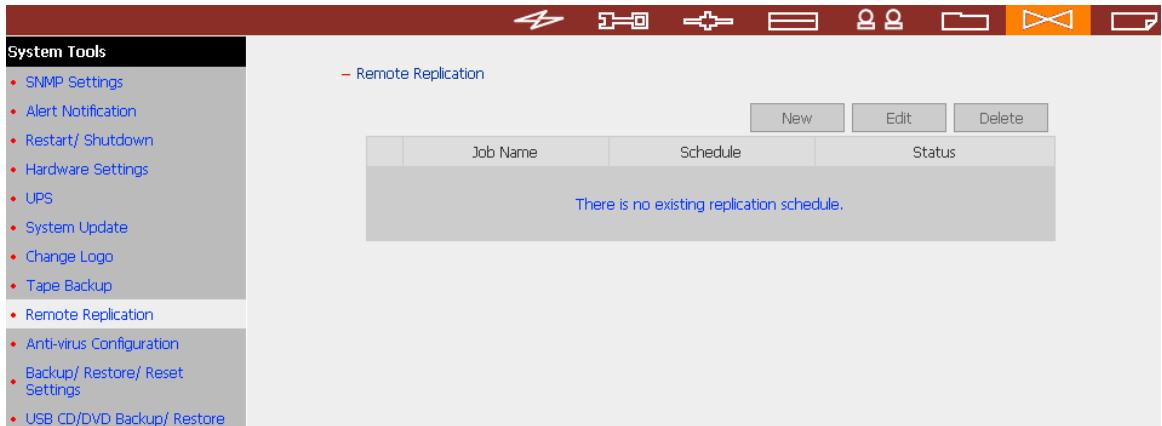
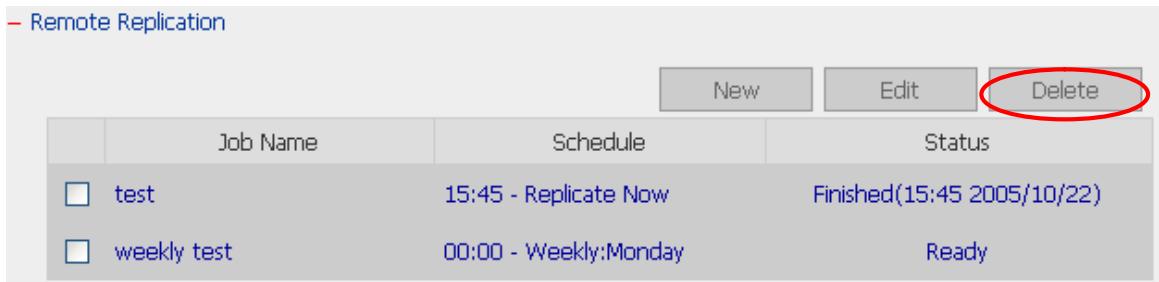
6.9.9 Remote Replication
Remote Replication enables you to replicate local files to remote folders on another server. The files will be compressed before the replication process in order to save time for data transfer. Make sure a network share is created before creating a remote replication job.
Using Remote Replication
Login ND-52000, go to Remote Replication in System Tools.
i. New
a. Click New to enter the following page.
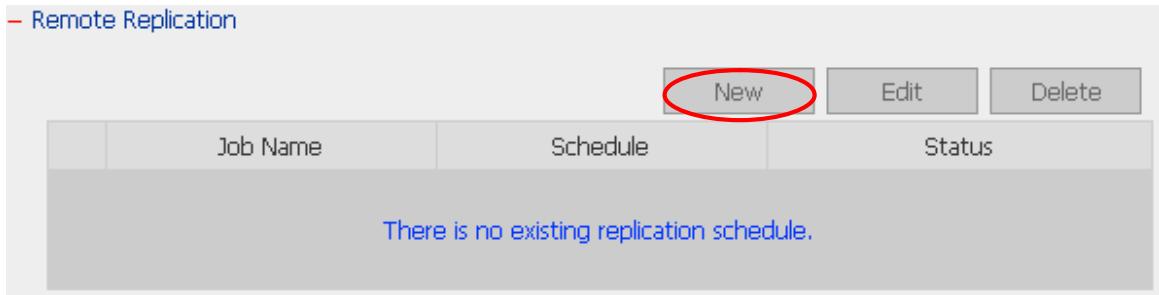
b. Complete all settings and click OK to save or Cancel to quit.
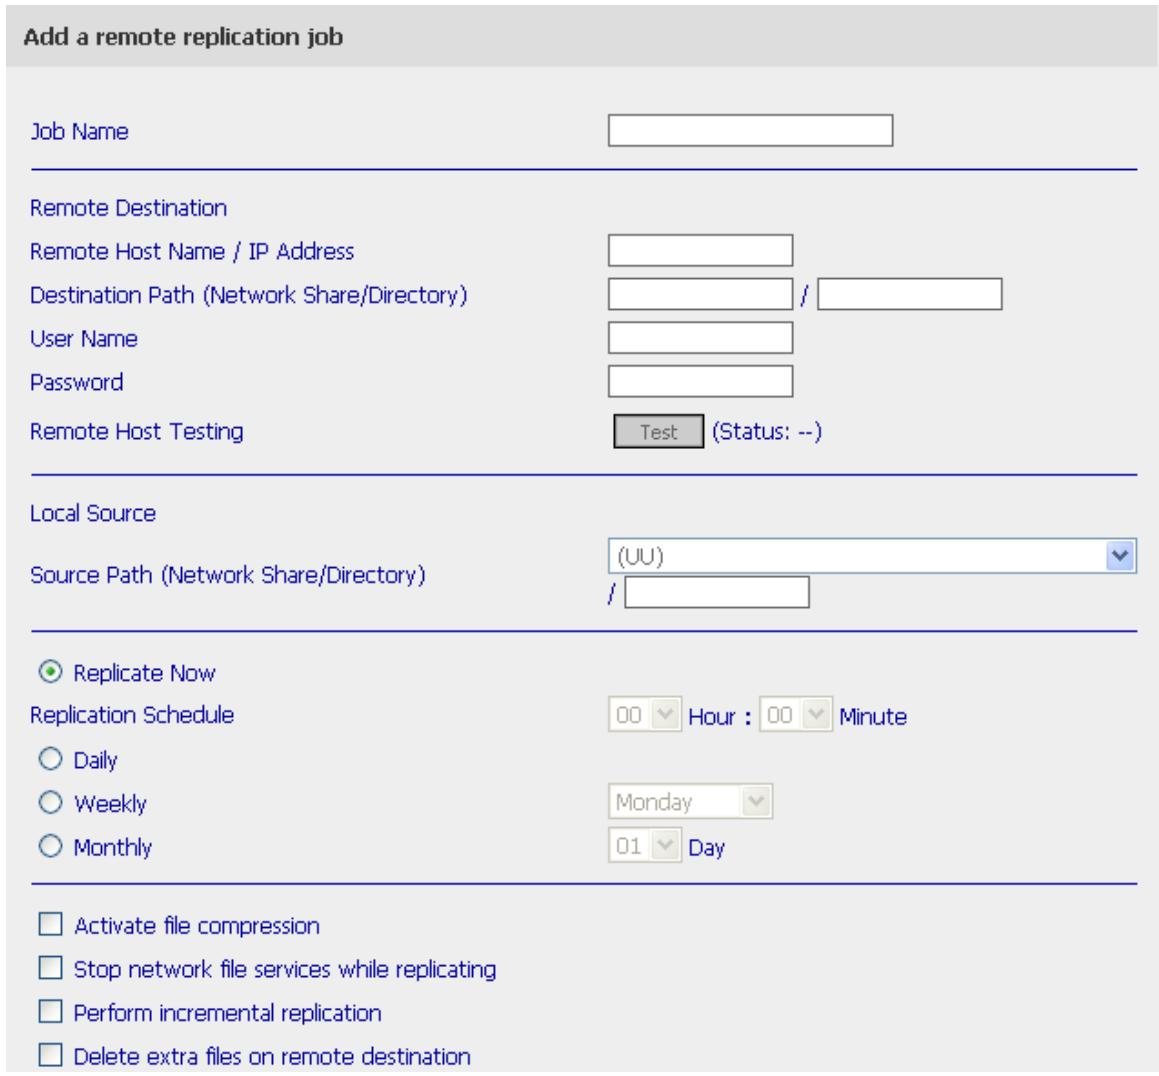

Note: To use remote replication, enable Microsoft Networking service, make sure the destination network share and directory have been created, and the user name and password are valid to login the destination folder.
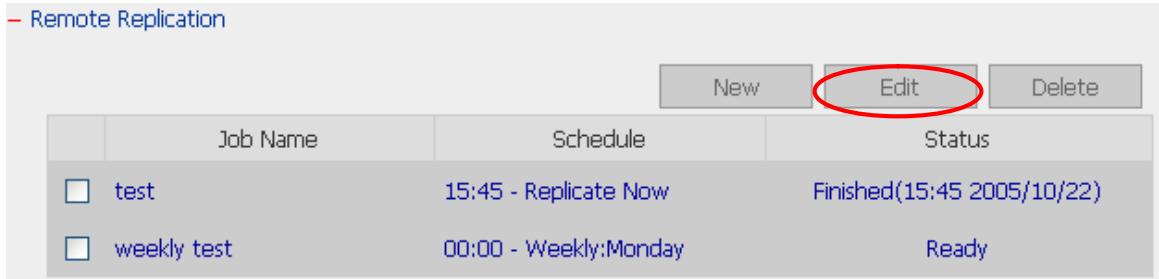
ii. Edit
a. Select the job to be edited.
b. Click Edit.
c. Modify the settings.
d. Click OK to save or Cancel to quit.
iii. Delete
a. Select the job to be deleted.
b. Click Delete.
6.9.10 Anti-virus Configuration
A network share may not be able to detect a virus without an automatic virus scan function when there is a transfer of infected files. The user computer may have been infected in this situation. To prevent virus infection of the user computers, the system provides a virus scan program to comprehend with available virus scan agent for the best data protection.
In System Tools, enter the IP address of the network share and setup the user account and password for the virus scan agent. Specify the IP address of the virus scan agent. When there is a file transfer, the virus scan agent will notify the virus scan software on the system to scan the file.
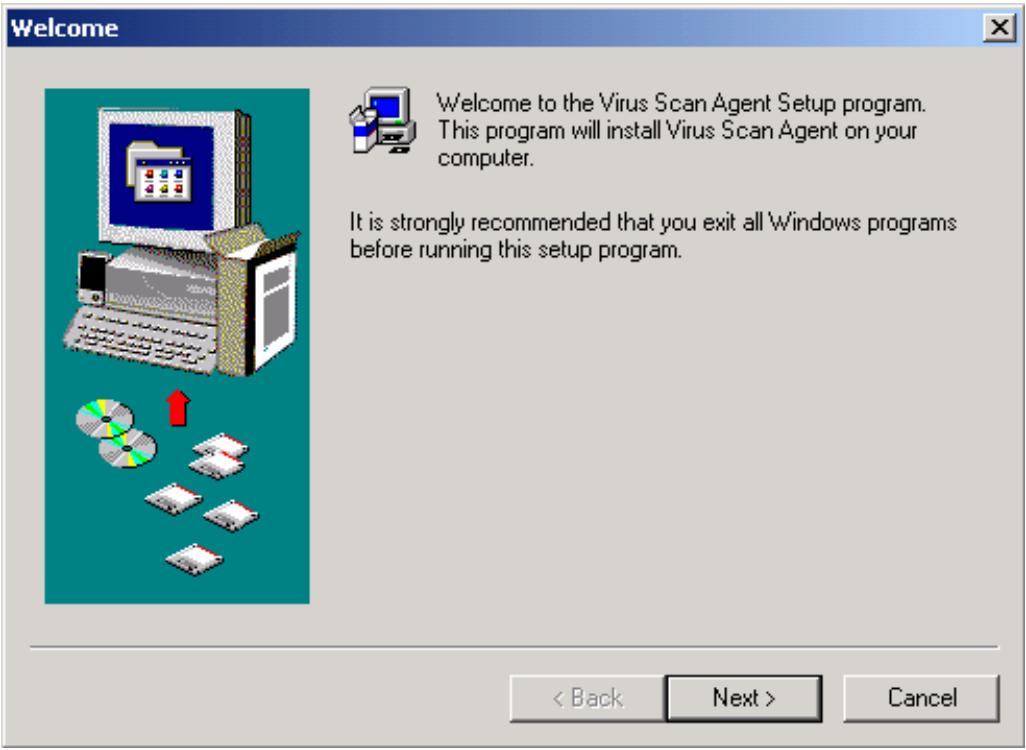
Installing Virus Scan Agent
Make sure the virus scan agent and software are installed on the same computer that performs virus scanning before activating the agent.
Follow the following steps to installing Virus Scan Agent:
-
Run the CD-ROM enclosed in the Network Disk Server package. When the following screen appear, click Install Virus Scan Agent.
-
Click Next to continue the Virus Scan Agent Setup.
Setup is ready to begin installation. Click Back to review or change the current configuration. If the current configuration is correct, click Next to begin installation.
Current Configuration:
Product: Virus Scan Agent
Version: 1.0.3.5
<Back
Next>
Cancel
- Click Finish to complete the Setup.
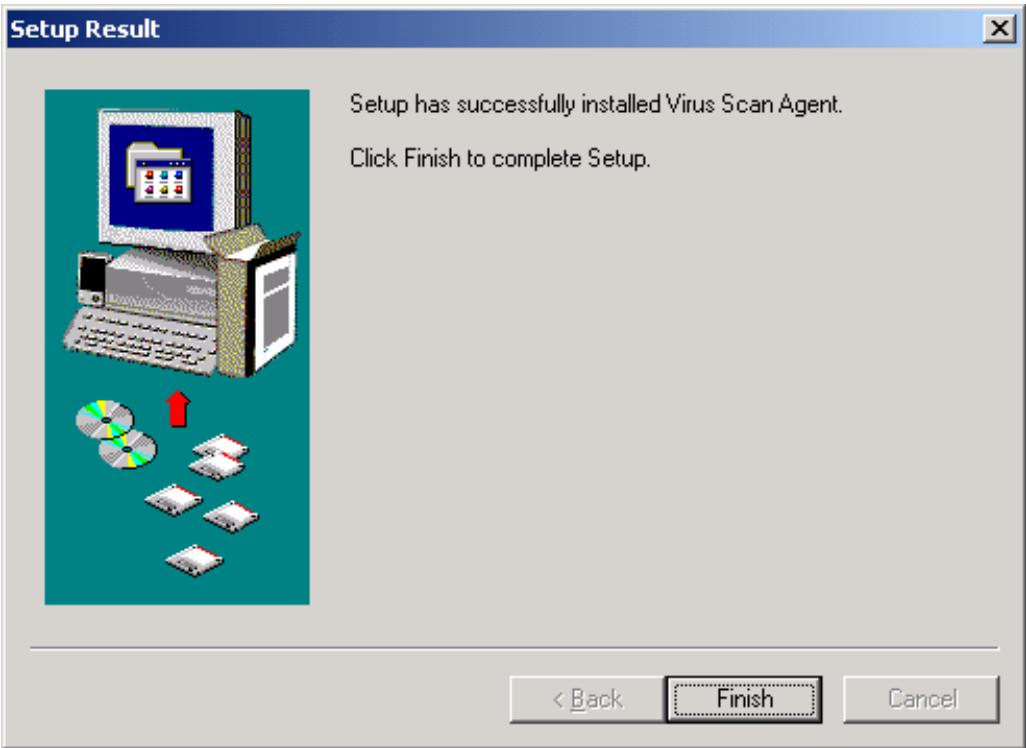
A screen will pop up to show the system information the first time you have successfully installed the virus scan agent.
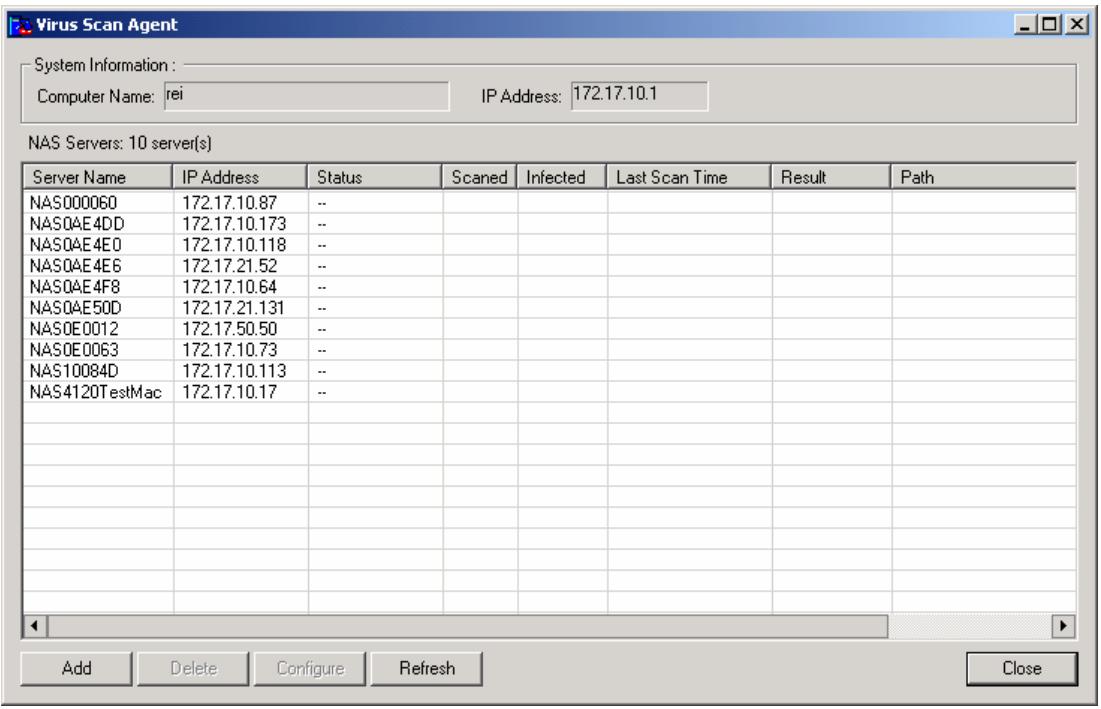
The description of the fields is as below:
| Fields | Description |
| Server Name | Name of the network share under the protection of virus scan agent |
| IP Address | The IP address of the network share |
| Status | Connection status of the host network share with the virus scan agent: • Disconnect: Not connected to the network • Idle: Connection has been enabled but there is no file transfer for three minutes or more. • Ready: Connection has been enabled and ready to be scanned • ---: User name and password have not been set up |
| Infected | Number of infected files |
| Last Scan Time | Date and time of the most recent virus scanning job |
| Result | Scanning result: OK: No files are infected • Virus Found: Virus is found. The name of the infected file(s) may not be displayed due to the scanning of other files. Go to the administration page to view the name and location of the infected file(s). • Access Denied: Access to the server is denied. • Authentication Failed: The login user ID is not authorized to access the folder of the network share. |
| Path | The file location on the network share |
Enabling Virus Scan Support
Go to Virus Scan of System Tools. To enable virus scan support, tick the box Enable Virus Scan Support. Enter the IP address of the virus scan server and click Apply.
Virus Scan

Enable Virus Scan Support
IP Address of Virus Scan Server


Apply
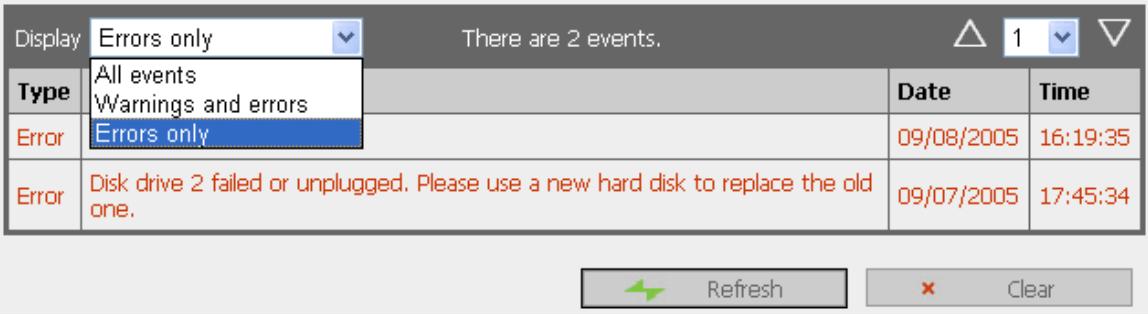
Viewing Details of Infected Files
To view the details of infected files of the network share, go to Event Logs of Statistics & Logs. A warning message will be shown in the table.


Refresh

Clear
6.9.11 Backup/Restore/Reset Settings
To backup the setting(s), select the appropriate option(s) and click Backup. To restore a backup settings file, click Browse to select the file and click Restore. To reset the setting(s) to factory default(s), select the appropriate option and click Reset.
- Backup/Restore/Reset Settings
To restore a backup settings file, click Browse to choose the backup settings file. Then click Restore.
To back up the setting(s), select the appropriate option(s) and click Backup.
To reset the setting(s) to factory default(s), select the appropriate option and click Reset.
User/User Group Settings
Disk Configuration
Share Volume Settings
□ Hardware Settings
System Settings
Network Configuration
All Settings


Restore

Backup

Reset
6.9.12 USB CD/ DVD Backup/ Restore
USB Backup/Restore function enables you to back up local data to CD/DVD discs via USB CD/DVD burner, and CD/DVD data to local disk.
Using USB Backup/Restore
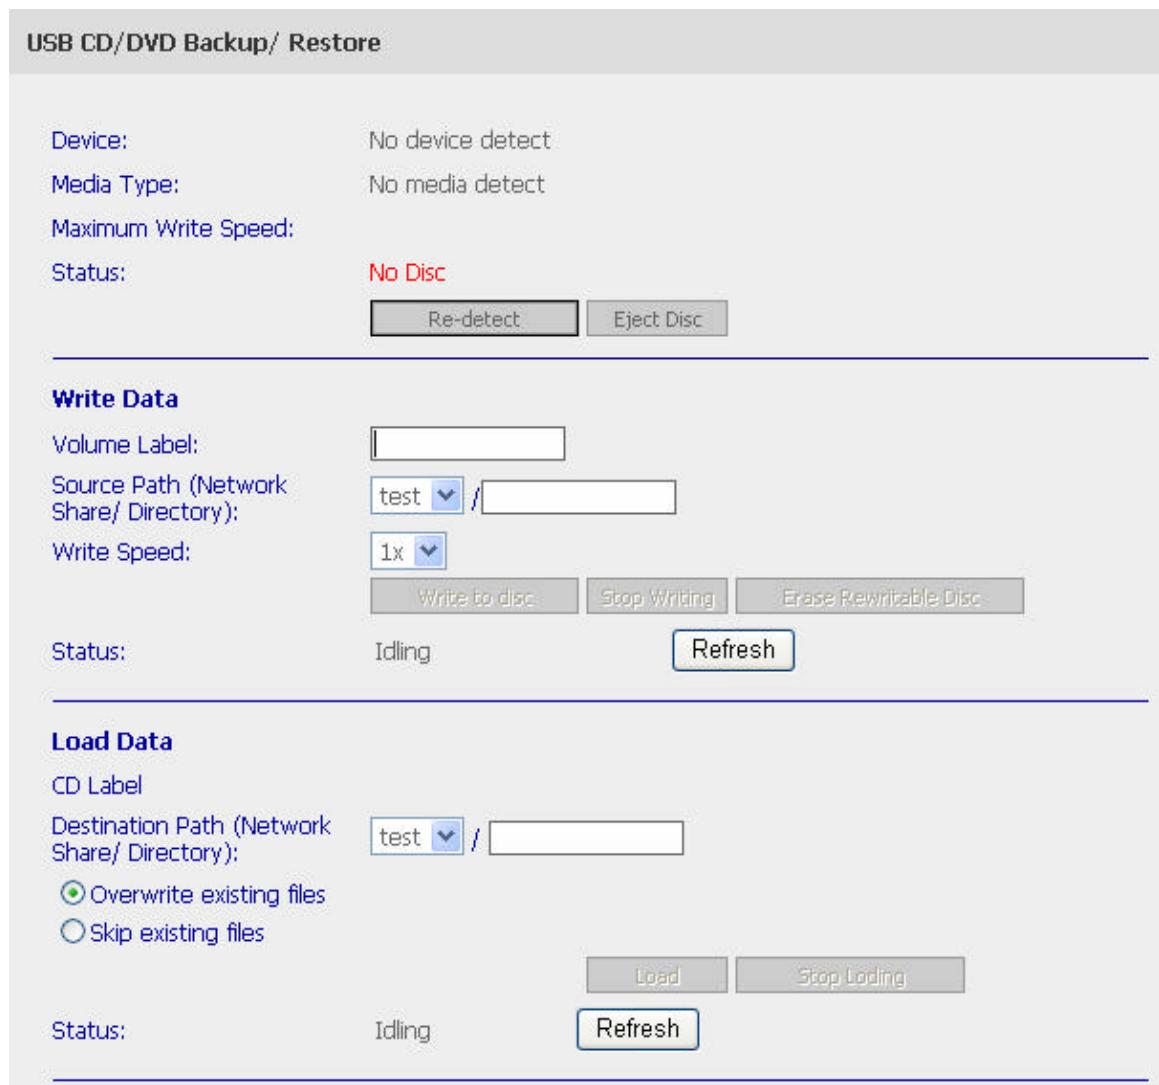
i. USB CD/DVD Detection
a. Connect USB burner to ND-52000. Turn on the burner and input a writable disc.
b. Click Re-detect. The system will display information of the detected burner.
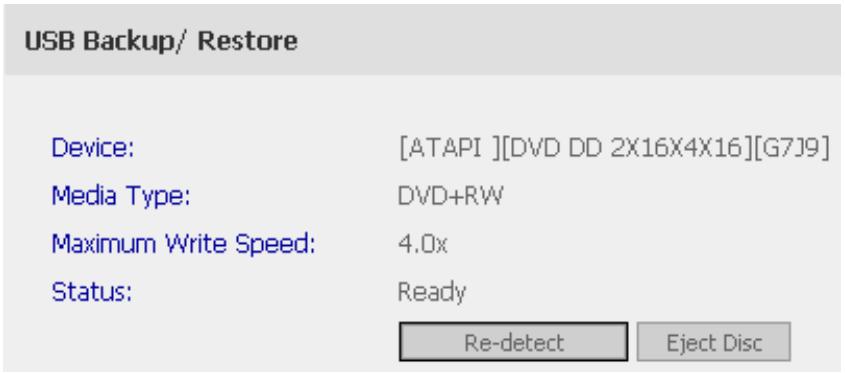
c. Click Eject Disc to eject the disc from the burner.
d. Insert the disc again and click Re-detect and continue to use writing and loading functions.
ii. Write data
a. To write data from ND-52000 to disc, enter the volume label name.
b. In Source Path (Network Share/Directory), select a network share from the drop-down menu and enter a directory name. You can also use stroke to indicate multiple directories, e.g. sales/jenny.
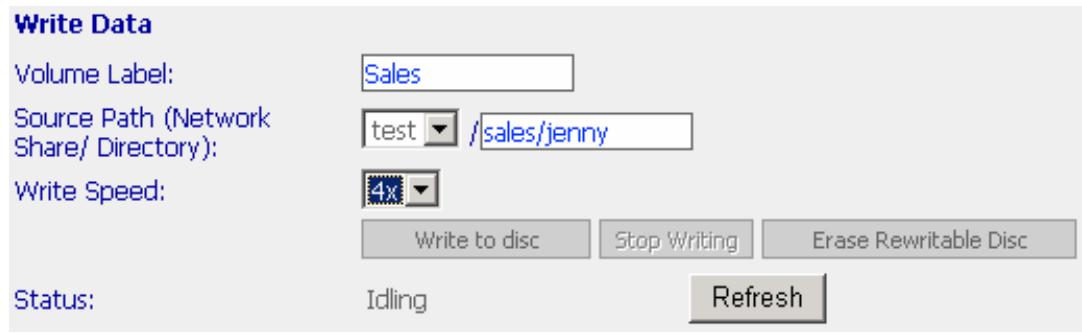
c. Select Write Speed.
d. Click Write to disc to write data to the disc. To view updated writing status, click Refresh.
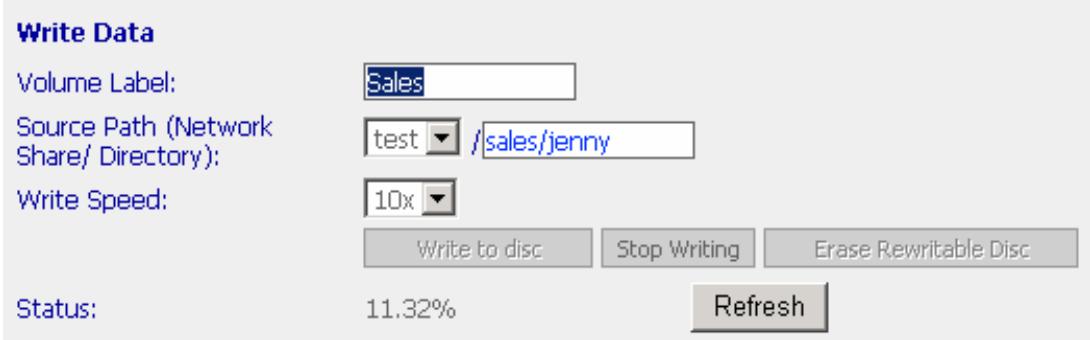
e. The disc will be ejected after burning.
iii. Load data
a. Insert the disc for loading data to ND-52000 network share. The volume label is shown in CD Label.
b. In Destination Path (Network Share/Directory), select a network share from the drop-down menu and enter a directory name. You can also use stroke to indicate multiple directories, e.g. sales/jenny.
c. Select Overwrite existing files to overwrite existing files in the directory or Skip existing files to skip loading files that have existed in the directory during loading process.
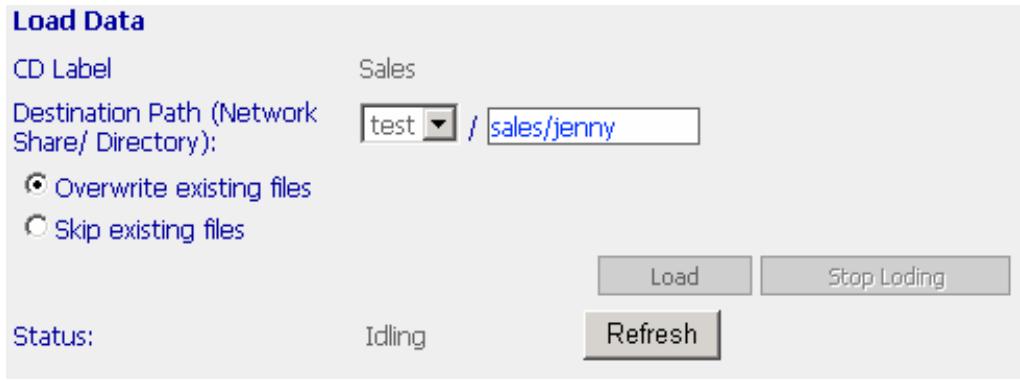
d. Click Load to load data to destination path.

e. The disc will be ejected after loading.
6.10 Statistics & Logs

You can view the event logs of all currently online users on ND-52000 for system monitoring.
6.10.1 Active Users
This page shows all users that are currently logged on to Web File Manager.

6.10.2 Event Logs
ND-52000 can store thousands of recent event logs, including warning, error and information messages. In case of system malfunction, event logs can be retrieved to analyze system problems.
6.10.3 DHCP Logs
When DHCP service is enabled, you can refer to DHCP logs to monitor all assigned dynamic addresses, client MAC addresses and other information.
Chapter 7 Access ND-52000
7.1 By Microsoft Windows
- You can access ND-52000 in Windows OS by the following ways:
a. By Quick Install Wizard. For further information, please refer to Chapter 4.
b. You may also search for ND-52000 within the Network Neighborhood. Locate the workgroup and find the name of your ND-52000. When the server is found, double-click on the server name to connect.
c. You may also use "Search for Computers" function to look for your ND-52000 in Windows. Under Windows OS, please follow these steps:
i. Open "My Network Places".
ii. Under the tool bar, click Search.
iii. Enter the name of ND-52000 in Computer Name field.
iv. Click Search.
When ND-52000 is found, double click the item to access the server.
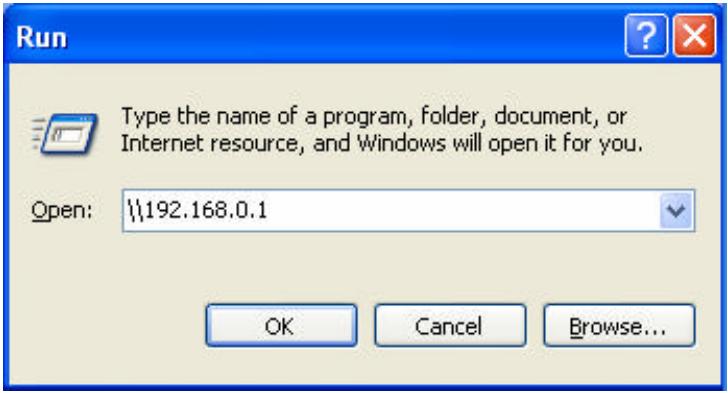
d. Use Run function in Windows. Type [server name] or [server IP] to access share folder on ND-52000.
- Once the connection to ND-52000 is successful, all listing on your available network share will be displayed. Use the option Map Network Drive to map the folder(s) as your network drive.
7.2 By Apple MAC OS
If you are an Apple MAC user, you can access ND-52000 by the following ways:
1. Using Network Browser
a. Choose "Network Browser" in Apple menu.
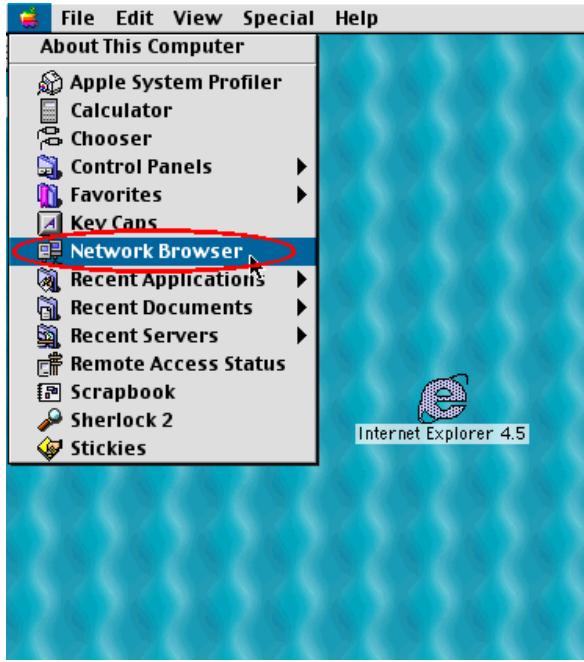
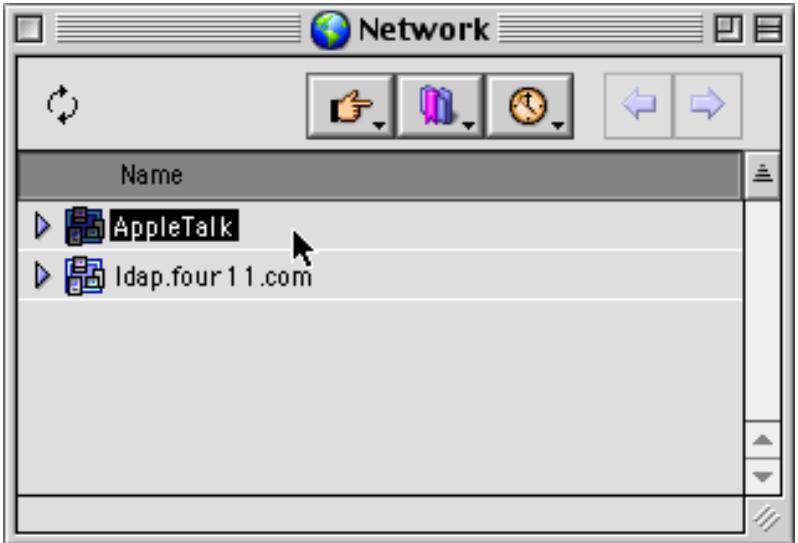
b. In "Network Browser", choose AppleTalk. A list of computers on the AppleTalk network will appear. Select ND-52000.
c. Enter the login name and password, or use “Guest” to enter. Click Connect.
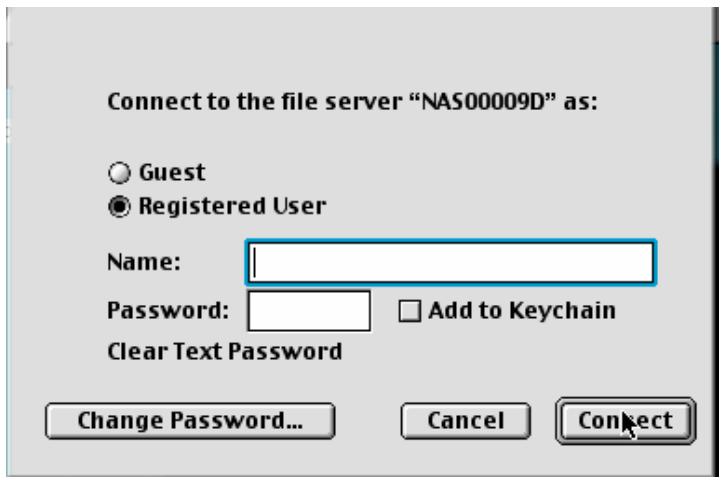
d. When ND-52000 is connected, all network shares will be shown.
e. Choose a network share to connect. The network share will appear on the desktop.
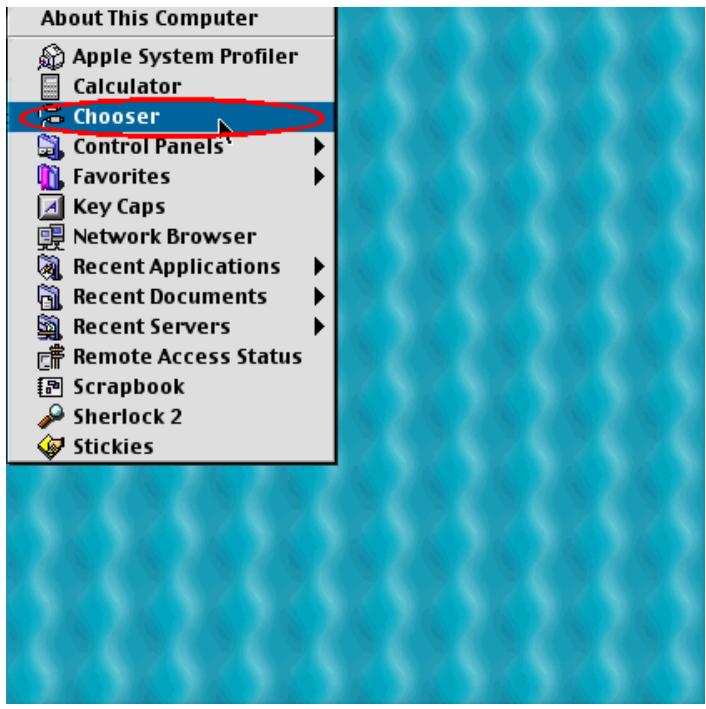
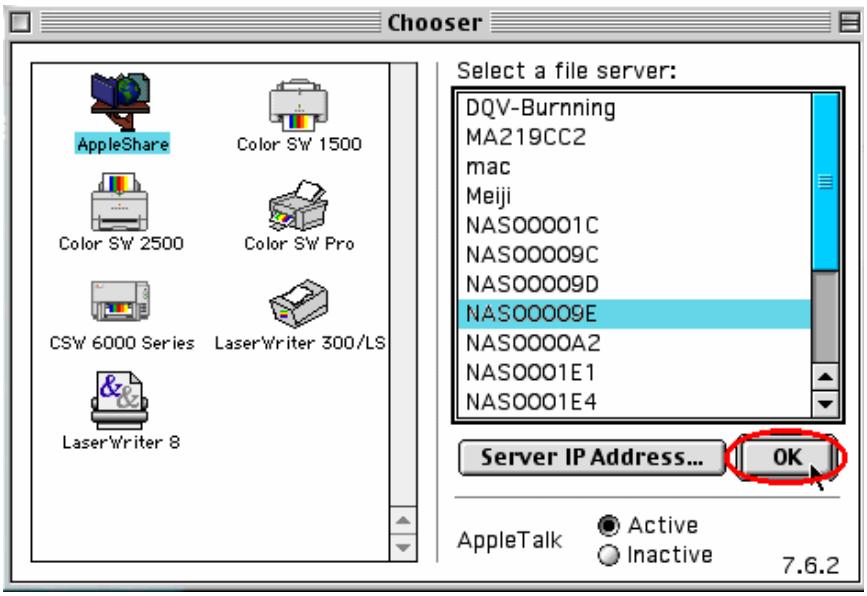
2. Using Chooser
a. Select Chooser on Apple menu bar.
b. Click on AppleShare. The name of ND-52000 will appear on the right side of the window.
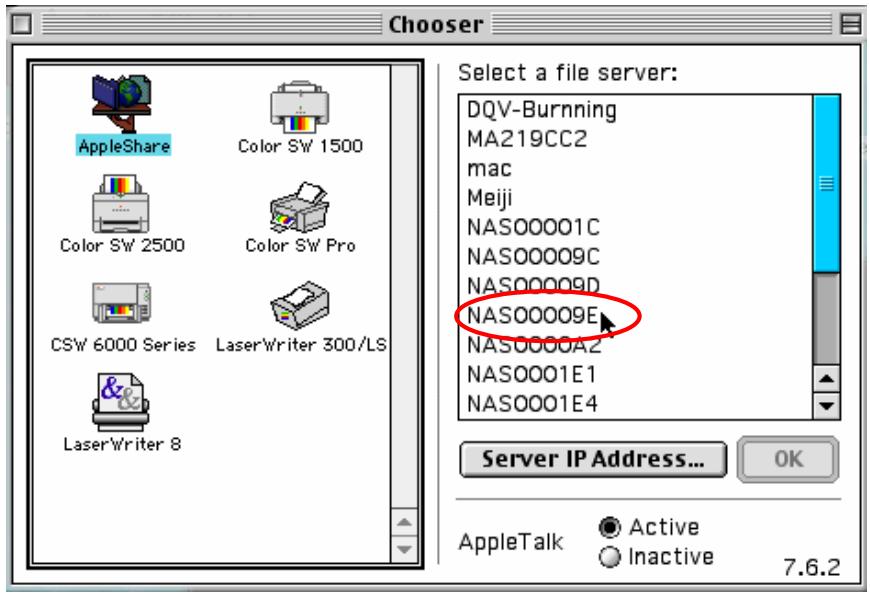
c. Use the mouse to highlight ND-52000 and click OK.
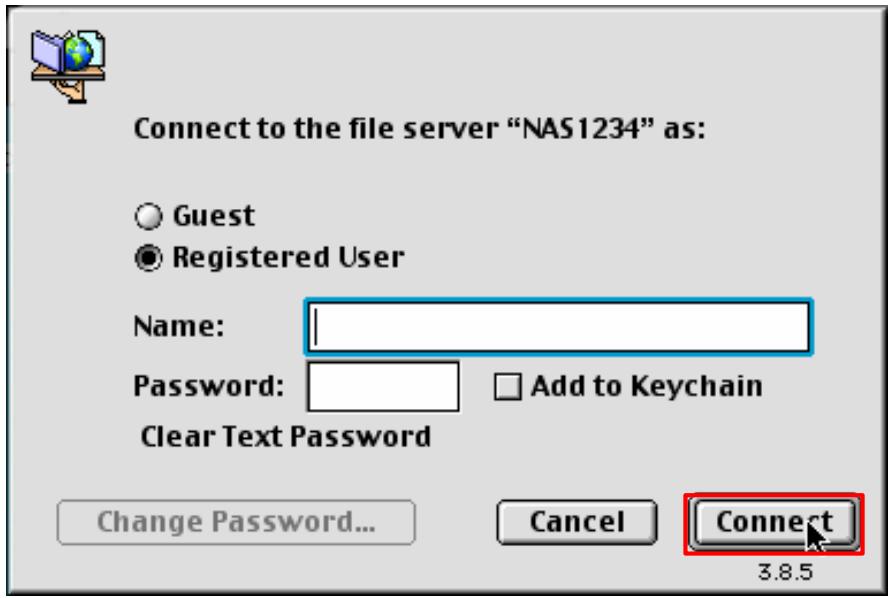
d. Enter the correct login name and password or use “Guest” to login, and then click Connect.
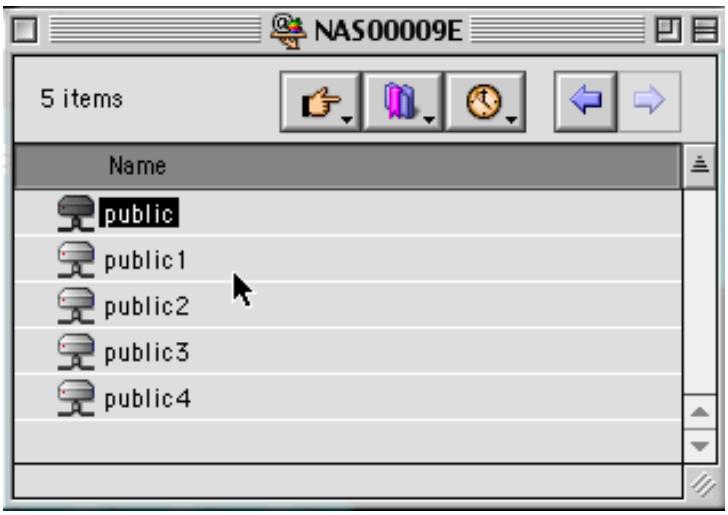
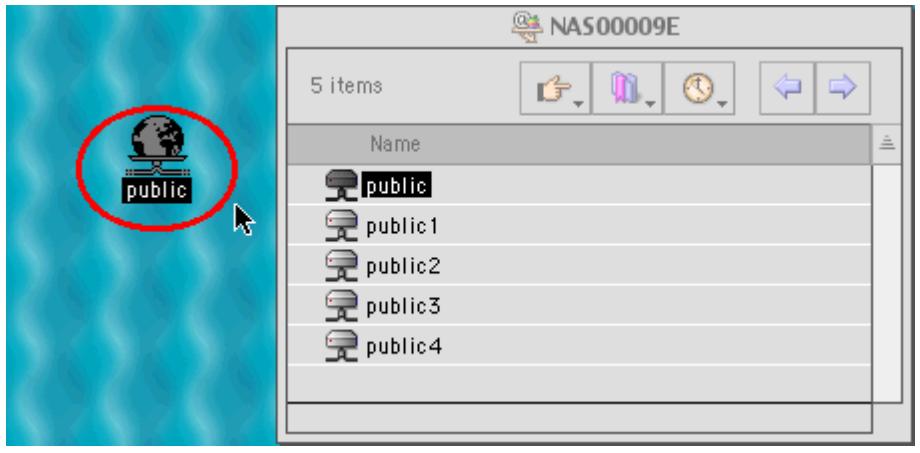
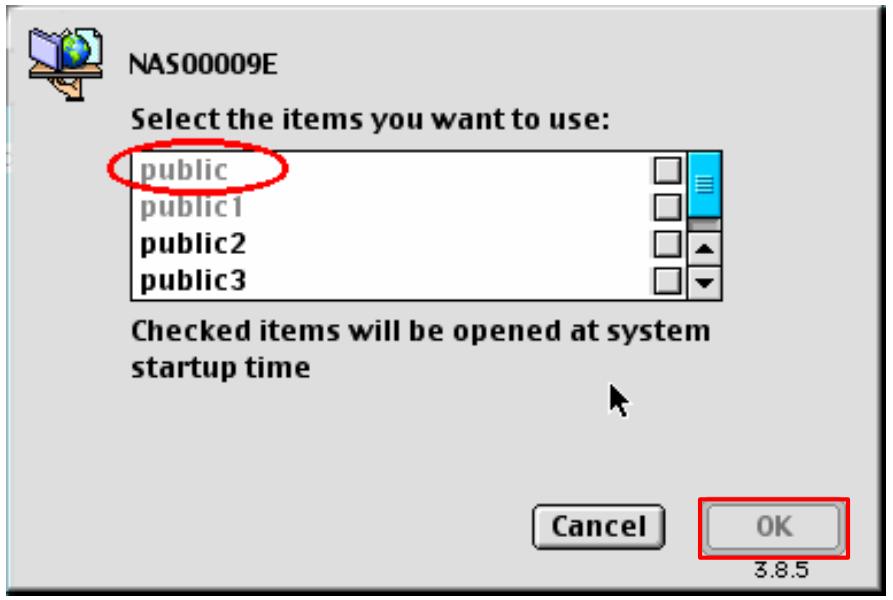
e. All available network shares will be listed. Select a network share and click OK.
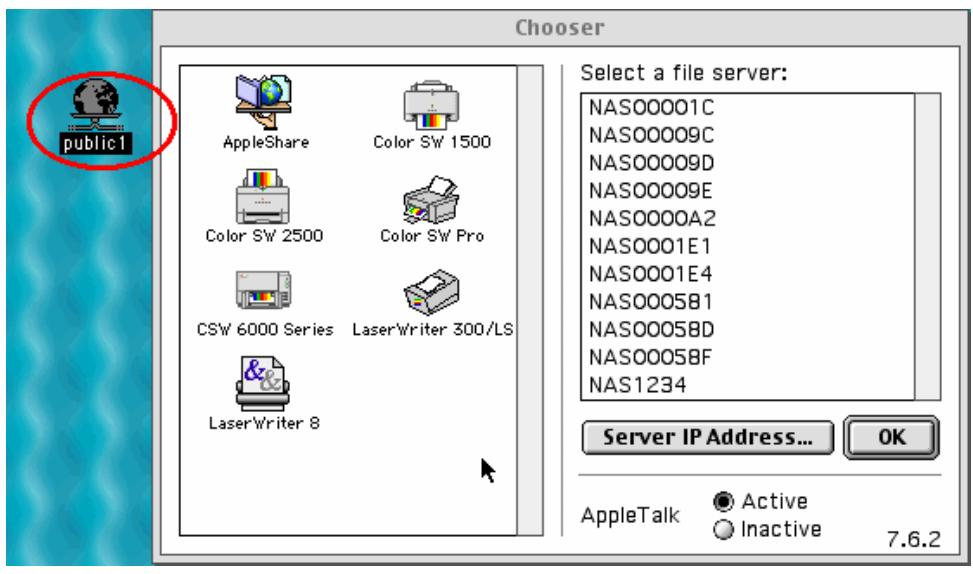
f. Close the Chooser program. Double click on the icon on the desktop to access the files.
7.3 By Linux OS
In addition to Microsoft and MAC OS, ND-52000 also supports Linux systems through the NFS service:
- On Linux, run the following command:
mount -t nfs
For example, if the IP address of your ND-52000 is 192.168.0.1 and you want to link the network share folder "public" under the /mnt/pub directory, use the following command:
mount -t nfs 192.168.0.1:/public /mnt/pub

Note: You must login as "root" user to initiate the above command.
- Login as the user id you define, you can use the mounted directory to access your network share files.
7.4 By Web Browser
Other than OS support, your ND-52000 also provides a convenient web file management interface that allows using a standard web browser to access your data. If you link ND-52000 to the Internet and use a public IP address, you can access the files on the server anywhere. For more information, please refer to Appendix A.
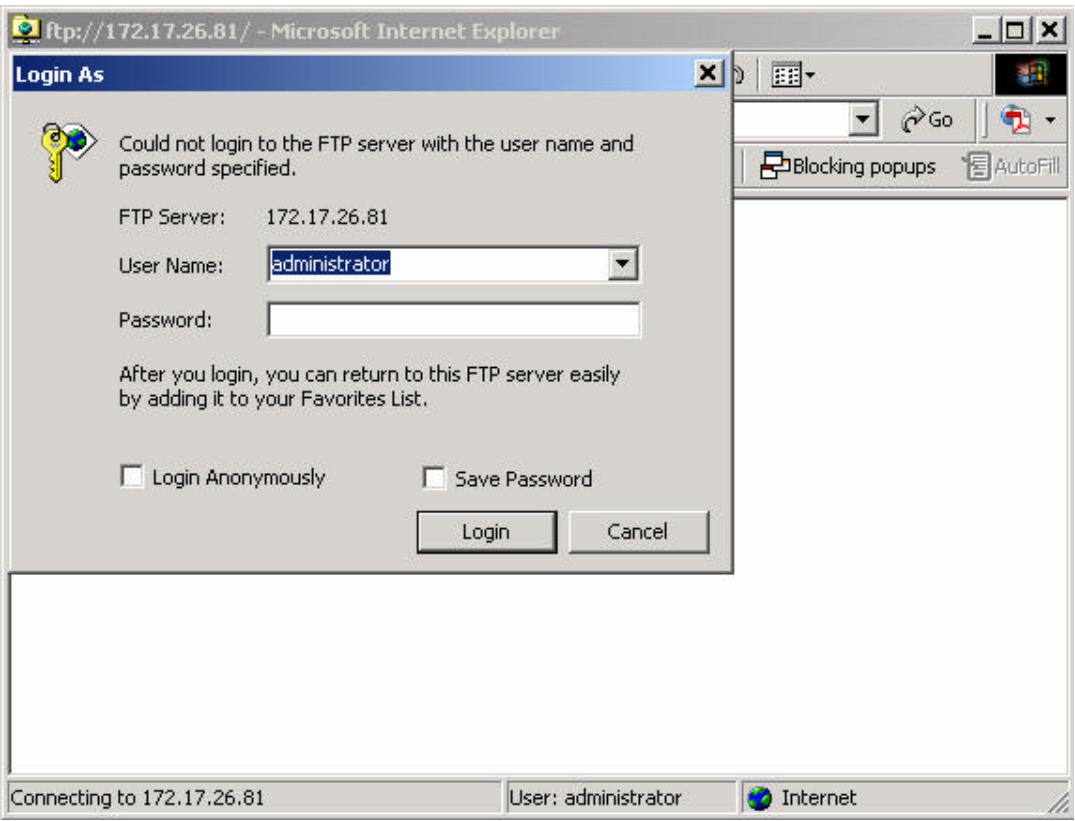
7.5 By File Transfer Protocol (FTP)
In addition to working with multiple operating systems, ND-52000 also supports connection via FTP. Enter the correct user name and password to connect the server or access the public share folders as guest.
Please go to Network Settings—FTP service and enable FTP service before using FTP service.
Follow the steps below to use FTP service:
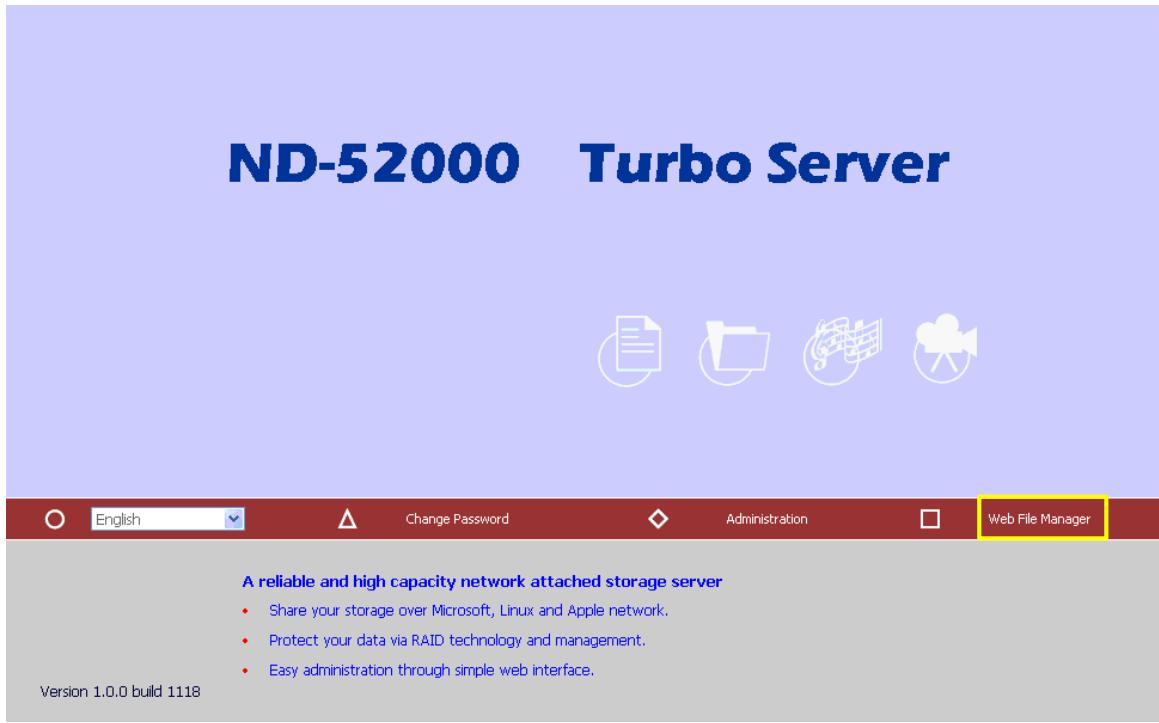
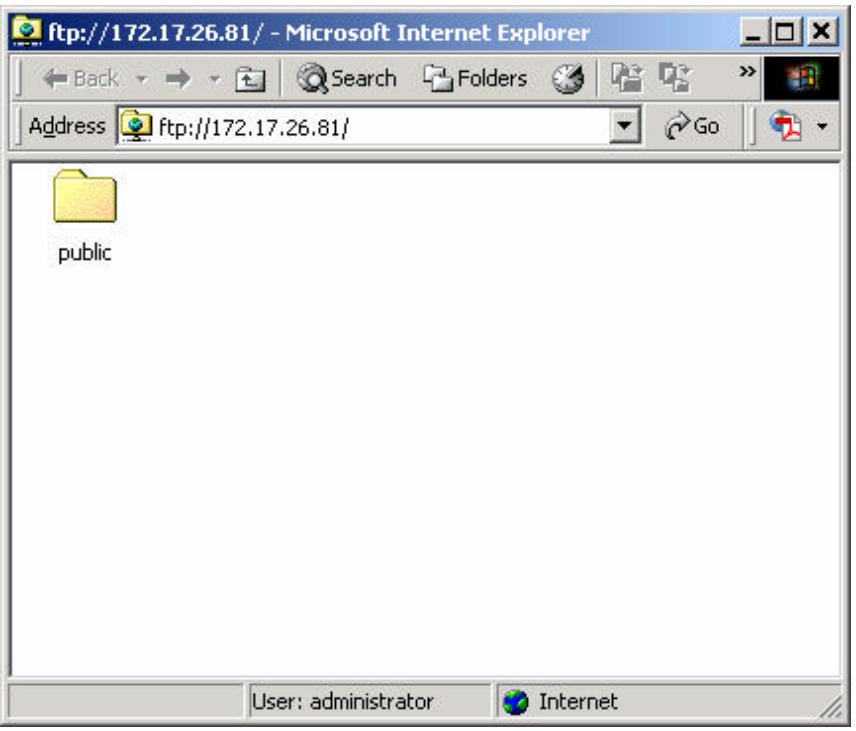
- Open an IE browser and type ftp://[server IP] or ftp://[server name]. OR
- By Web File Manager of ND-52000.
a. Go the ND-52000 administration and click Web File Manager. Enter user name and password to login ND-52000.
b. Click the share folder in FTP section.
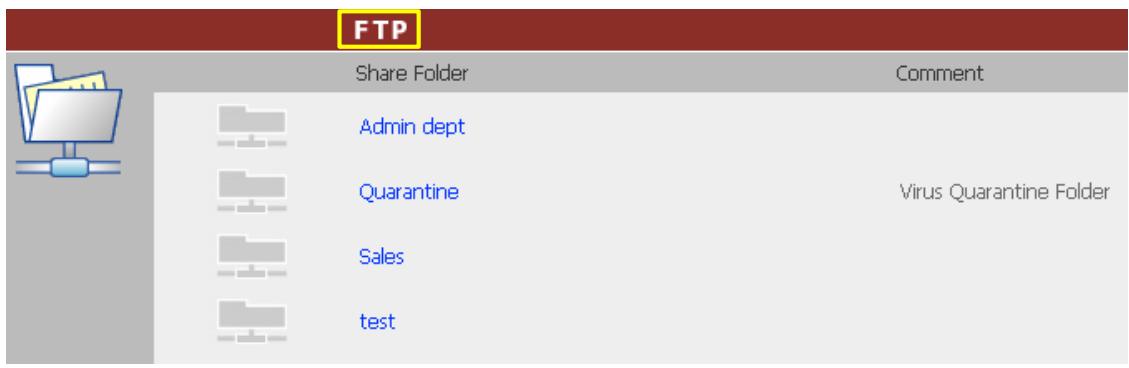
c. When the ftp folder is shown, enter user name and password.
d. The share folder will be shown. You can then manage the folder by dragging and dropping files to it, as well as rename or delete the files.
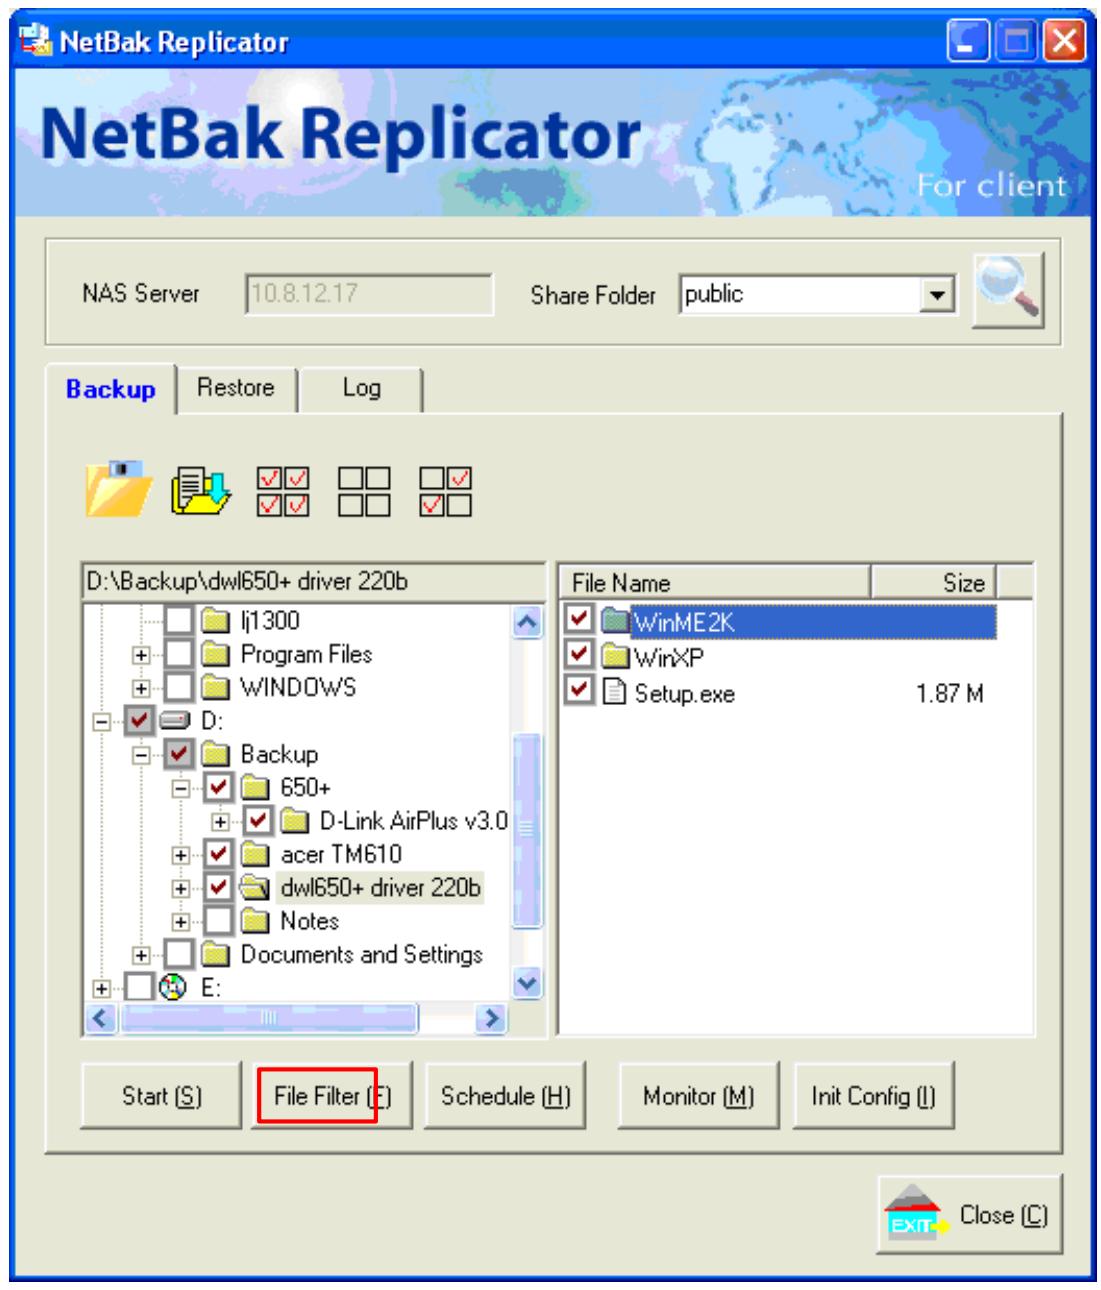
Chapter 8 NetBak Replicator

NetBak Replicator is a powerful program installed in user's system (Windows OS only) for data backup. You can back up any files or folders on local PC to specified share folder on ND-52000 by LAN or WAN.
Main Functions
1. Backup
- Instant Backup
You can select files and folders on local PC and back up files to specified network share folder on ND-52000 immediately.
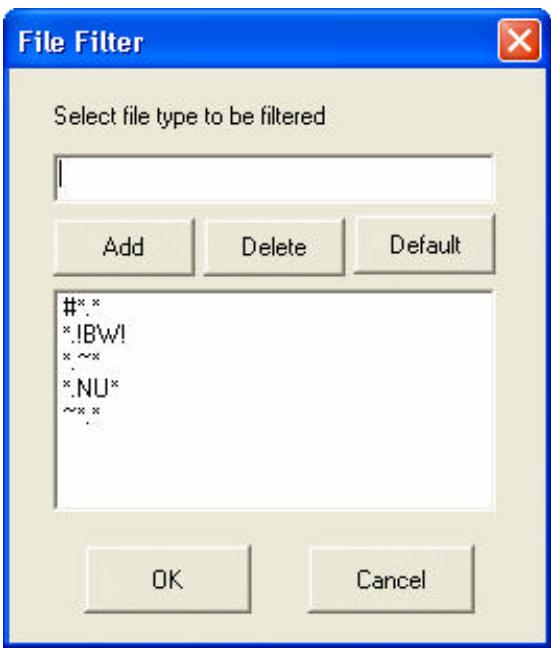
- File Filter
You can select particular file types to be excluded from backup. The system will filter all files belonging to these file types when backing up data.
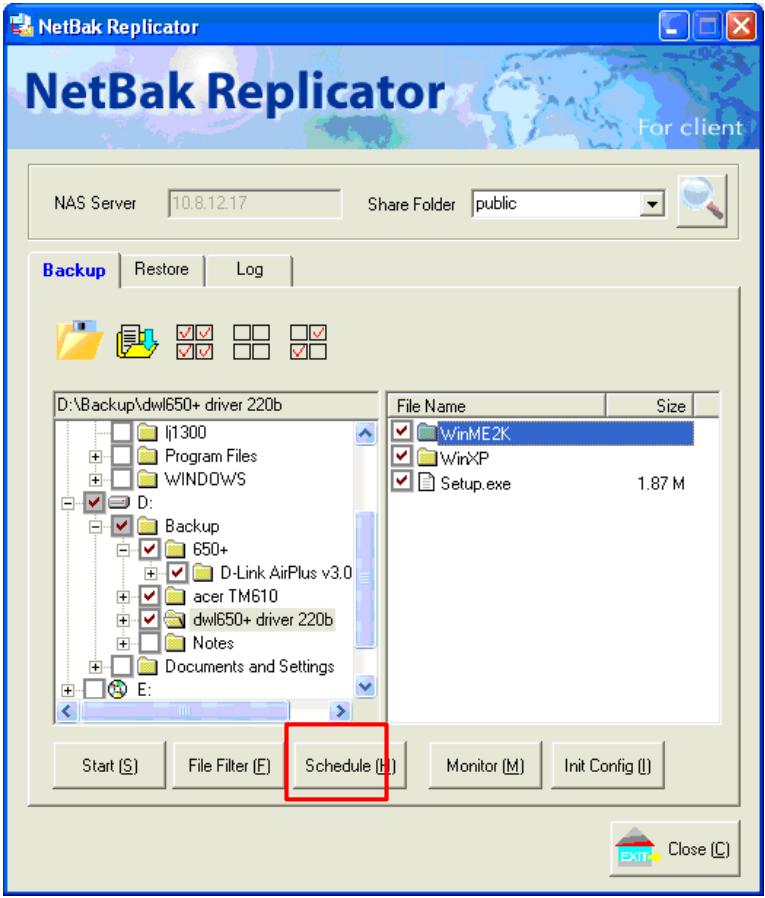
Schedule
You can specify a schedule for backing up data with this option, e.g. 12:00 every day or 05:00 every Saturday.
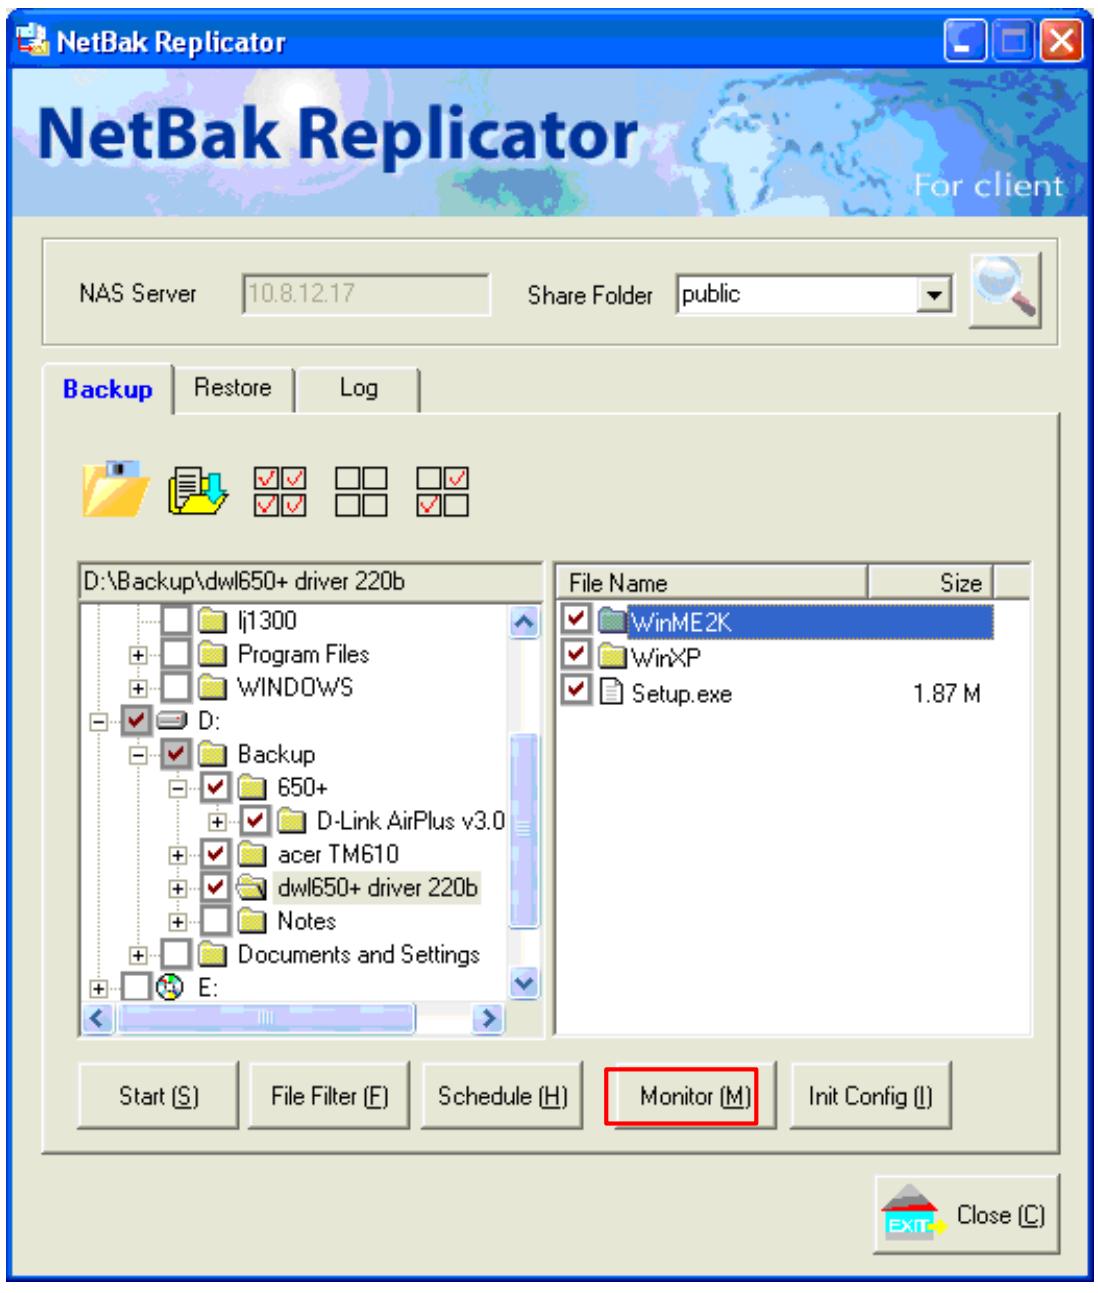
Monitor
When this option is enabled, the system will upload all files or folders to the server instantly for backup when the files or folders are modified.
2. Restore
Select this option to restore backed up data to the original location of the file or to a new directory.
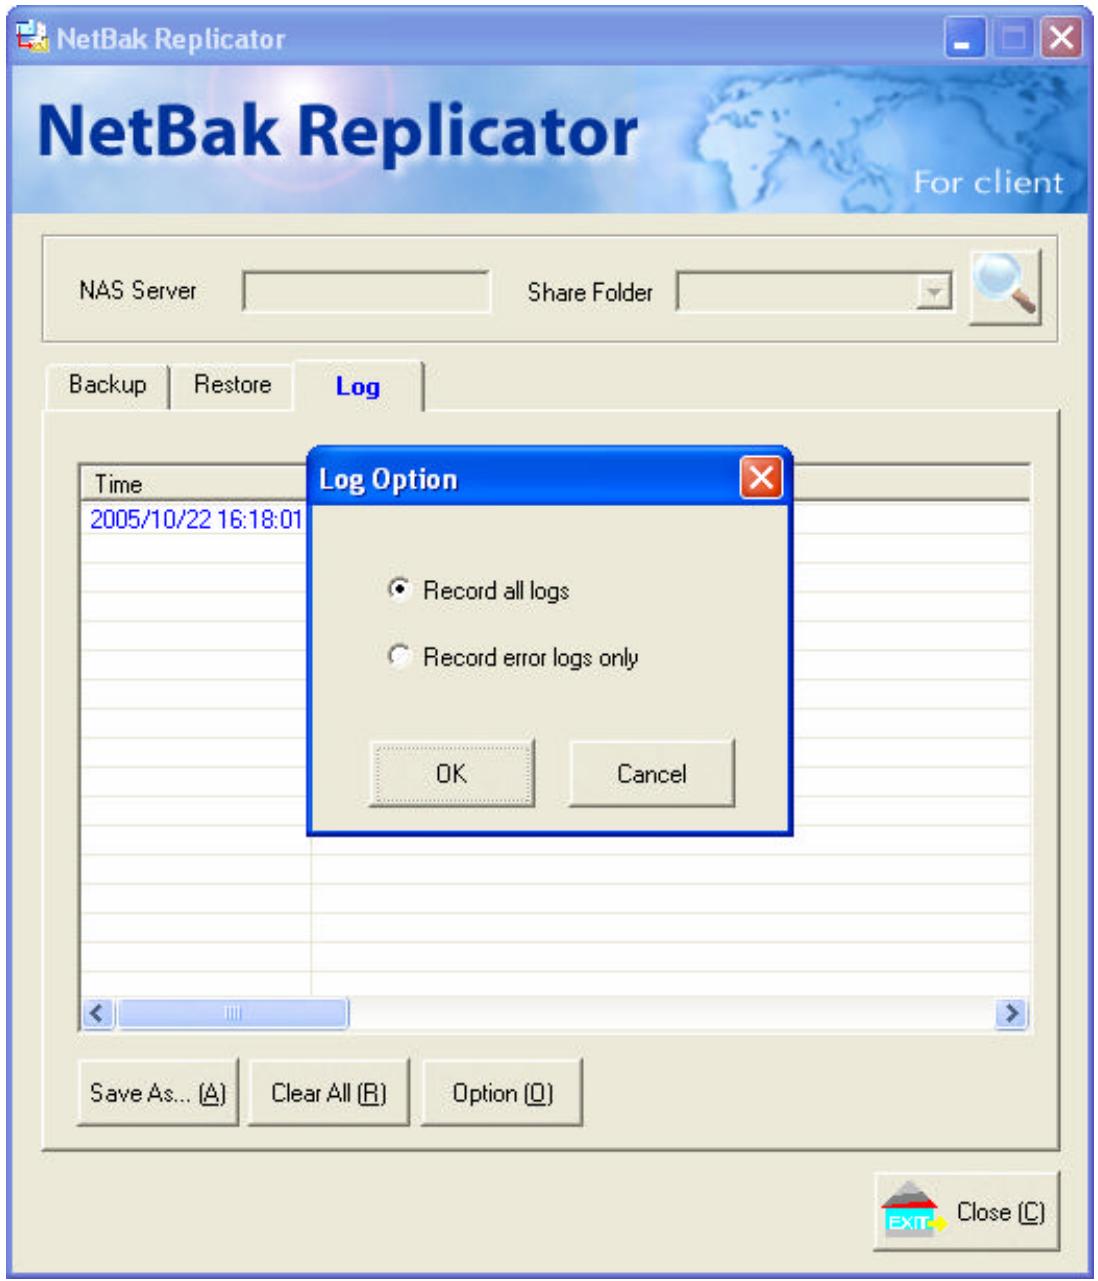
3. Log
Enable this option to record events of NetBak Replicator, e.g. the time when NetBak Replicator starts and terminates, Restore and Monitor, backup time and original location of all files, etc.
Installing NetBak Replicator
- Run Install NetBak Replicator in the CD-ROM.
- Follow the steps to install NetBak Replicator.
- Upon successful installation, a shortcut icon NetBak will be shown on the Desktop.
Using NetBak Replicator
- Before using NetBak Replicator, please login ND-52000 administration and go to Network Share Management to create a share folder for backup.
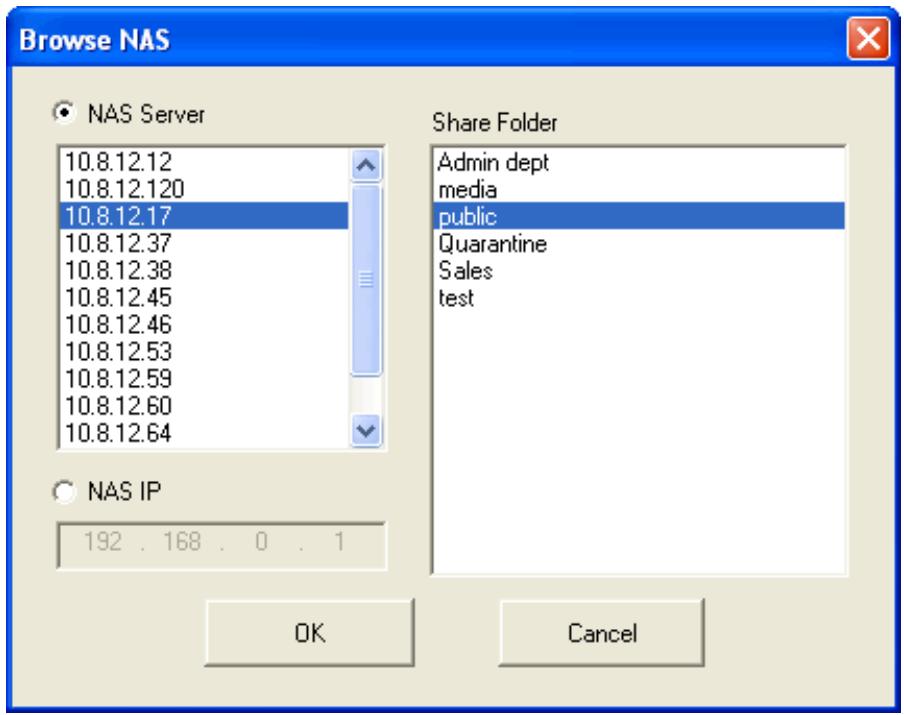
- Run NetBak Replicator. Click All ND-52000 and their share folders within the network will be displayed.
- When the following window appears, ND-52000 connected to the LAN will appear on the left list. Select a server and a share folder on the right. NetBak Replicator also supports backup via WAN, you can enter the IP address of ND-52000 for data backup directly and select a share folder. Then click OK.
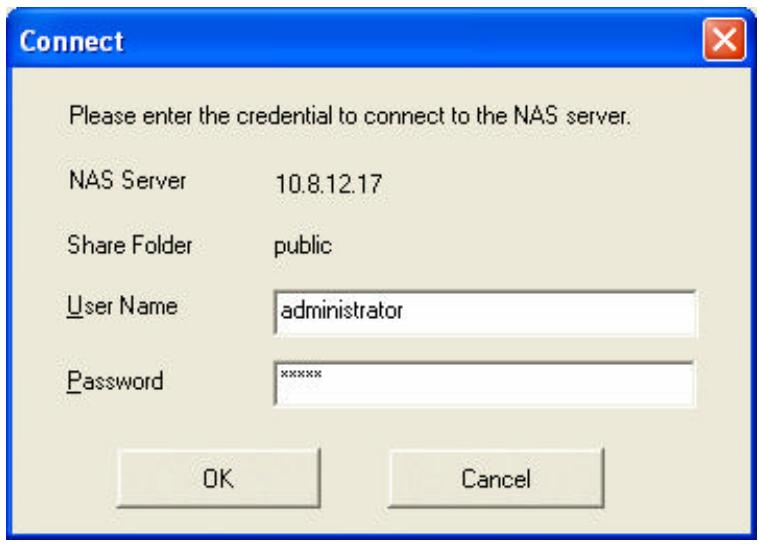
- Enter the user name and password to login the server.
Description of Buttons on NetBak Replica
| Open Configuration: Open a previously saved NetBak Replicator configuration. | |
| Save Configuration: Save the settings on NetBak Replicator. The file will be named as *.rpr | |
| Select All: Select all folders. The column on the left shows all available folders and the right column shows the files in the folders. | |
| Clear All: Clear selection of all folders. | |
| Select My Document: Select all folders in My Document. | |
| Close When clicking this button, NetBak Replicator window will minimize and an icon will be displayed in system tray. To restore or exit the program, right click the icon and select Restore or Exit. |
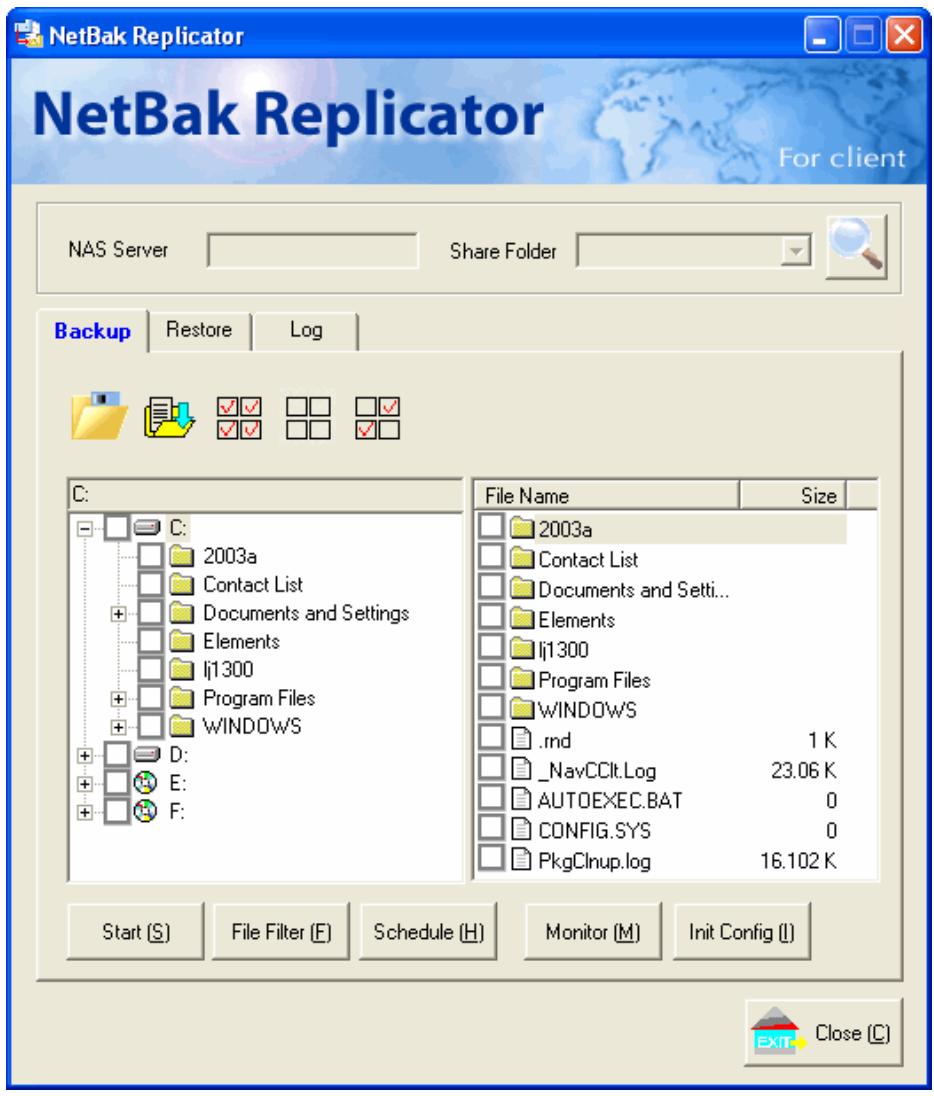
- You can start the backup procedure upon successful connection to the ND-52000.
- Backup
Select files and folders for backup.
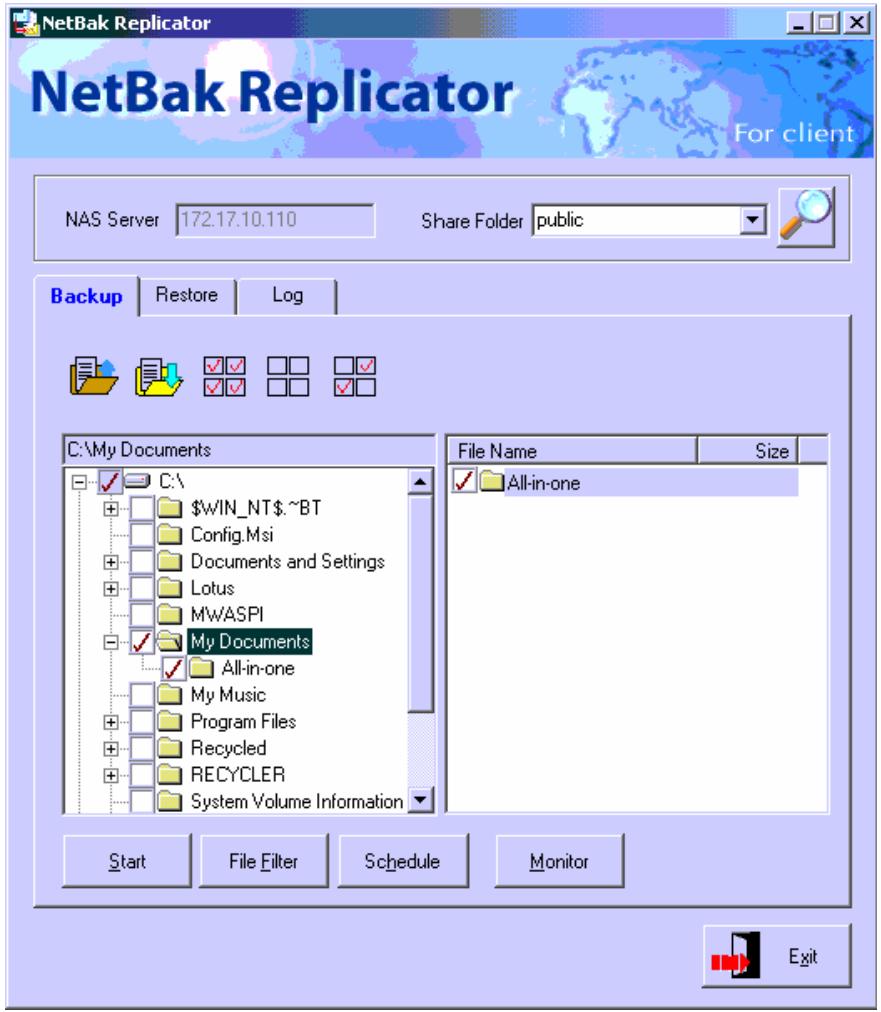
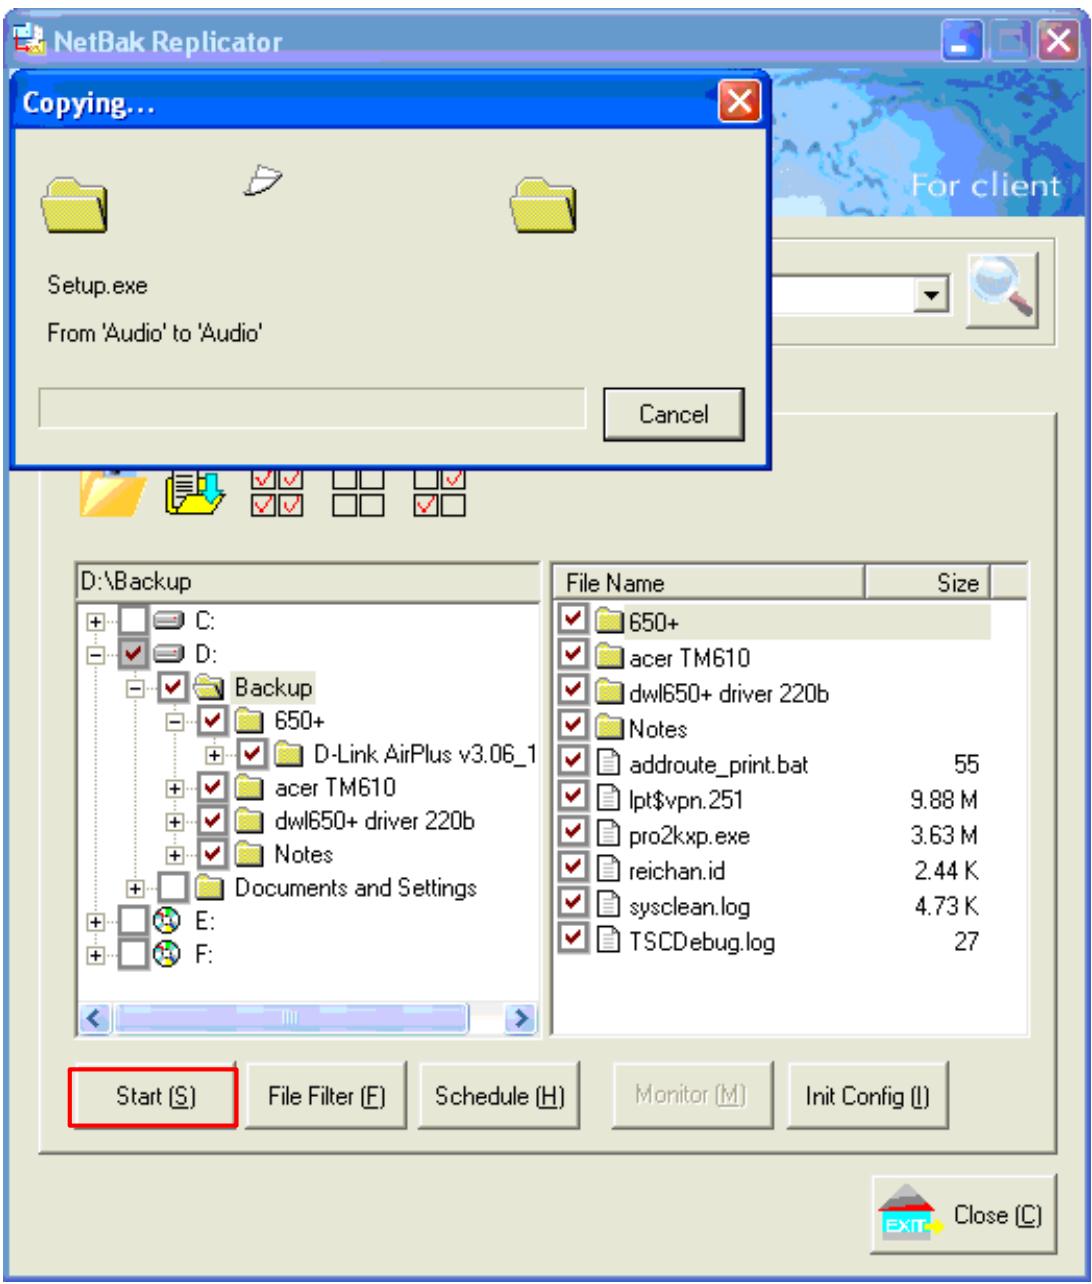
Start
When you have selected the files for backup to ND-52000, click Start on NetBak Replicator. The program will start to copy the selected files to the specified share folder on ND-52000.
√ File Filter
Click File Filter on NetBak Replicator main page to select file format to be skipped from backup. Then click OK.
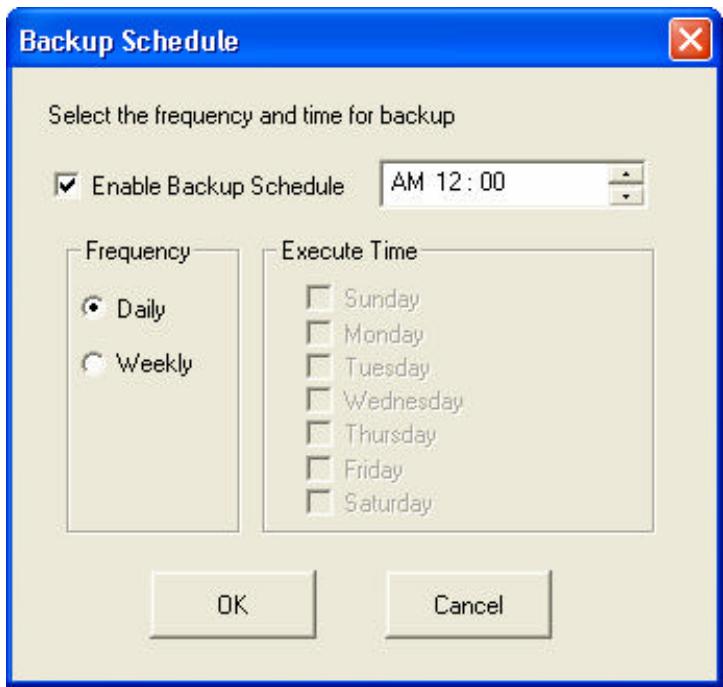
✓ Schedule
Click Schedule on NetBak Replicator main page. Then check the box "Enable Backup Schedule" and select the frequency and time for backup. Click OK to confirm.
Monitor
Select a folder for monitoring. When this option is enabled, the system will upload all files or folders to the server instantly for backup when the files or folders are modified. Other files will be gray and cannot be selected. Click Monitor again to cancel monitoring. An icon will appear on task bar of Windows when monitoring is in process.
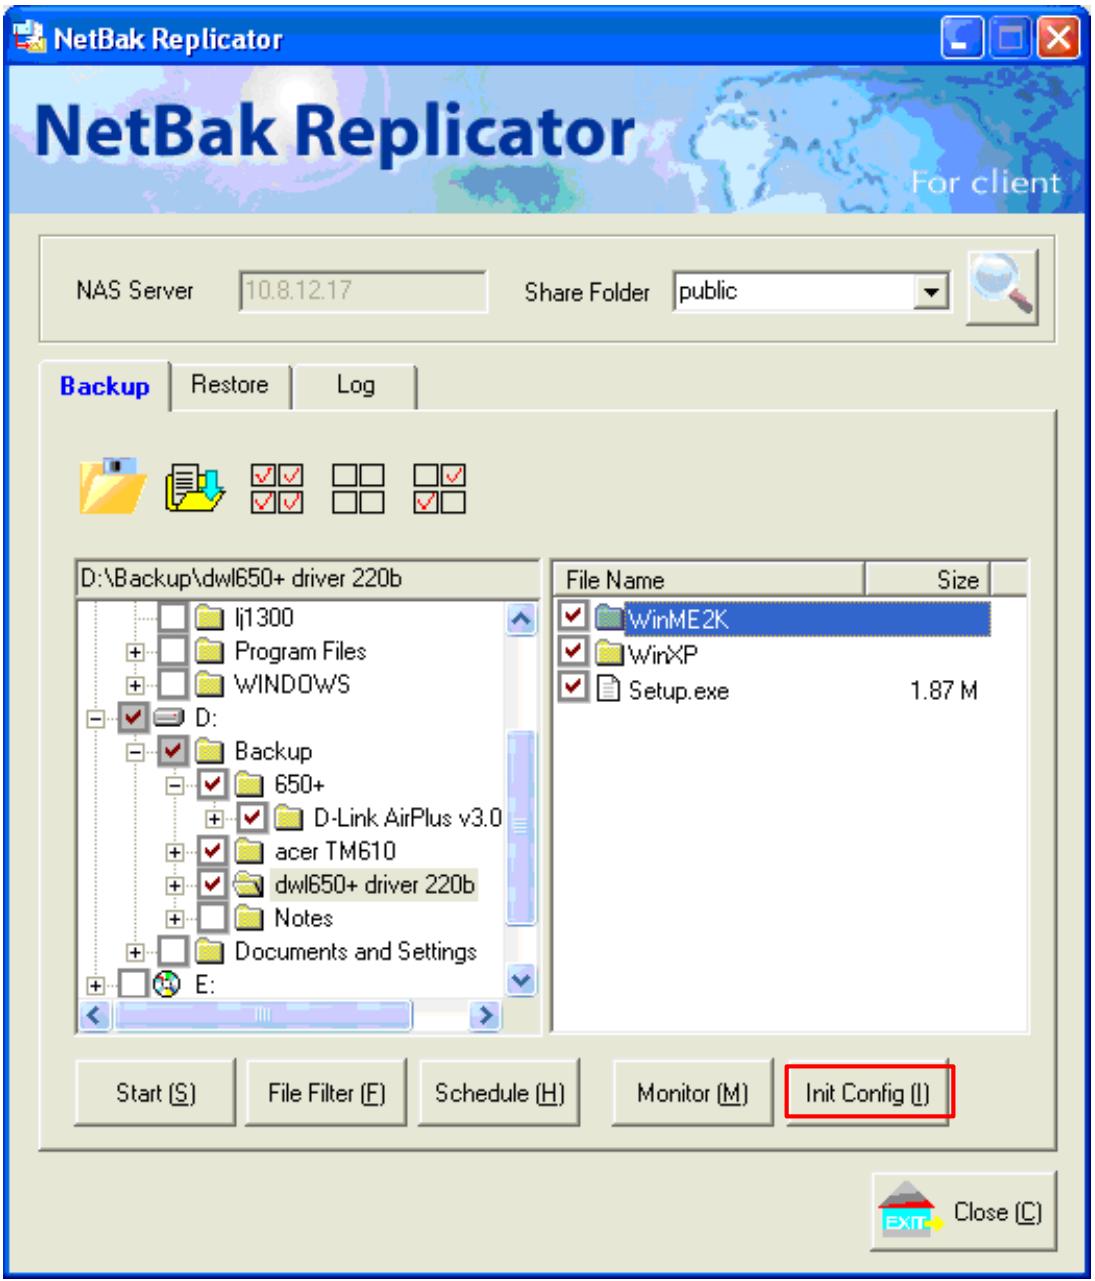
Initialize Configuration
When using this function, NetBak Replicator will record all current settings of the user, including whether or not monitor function is enabled. When the user login again, this program will load the previous recorded settings for users to manage data backup.
- Restore
Please follow the steps below to restore files from ND-52000 to your PC.
a. Restore to original position: Select the location that the data will be restored to.
b. Select new restore position: Click to select the directory to restore data to or select a previously chosen location from the drop-down menu.
c. Select the folder(s) and sub folder(s) for restoring data on the right list and click Start.
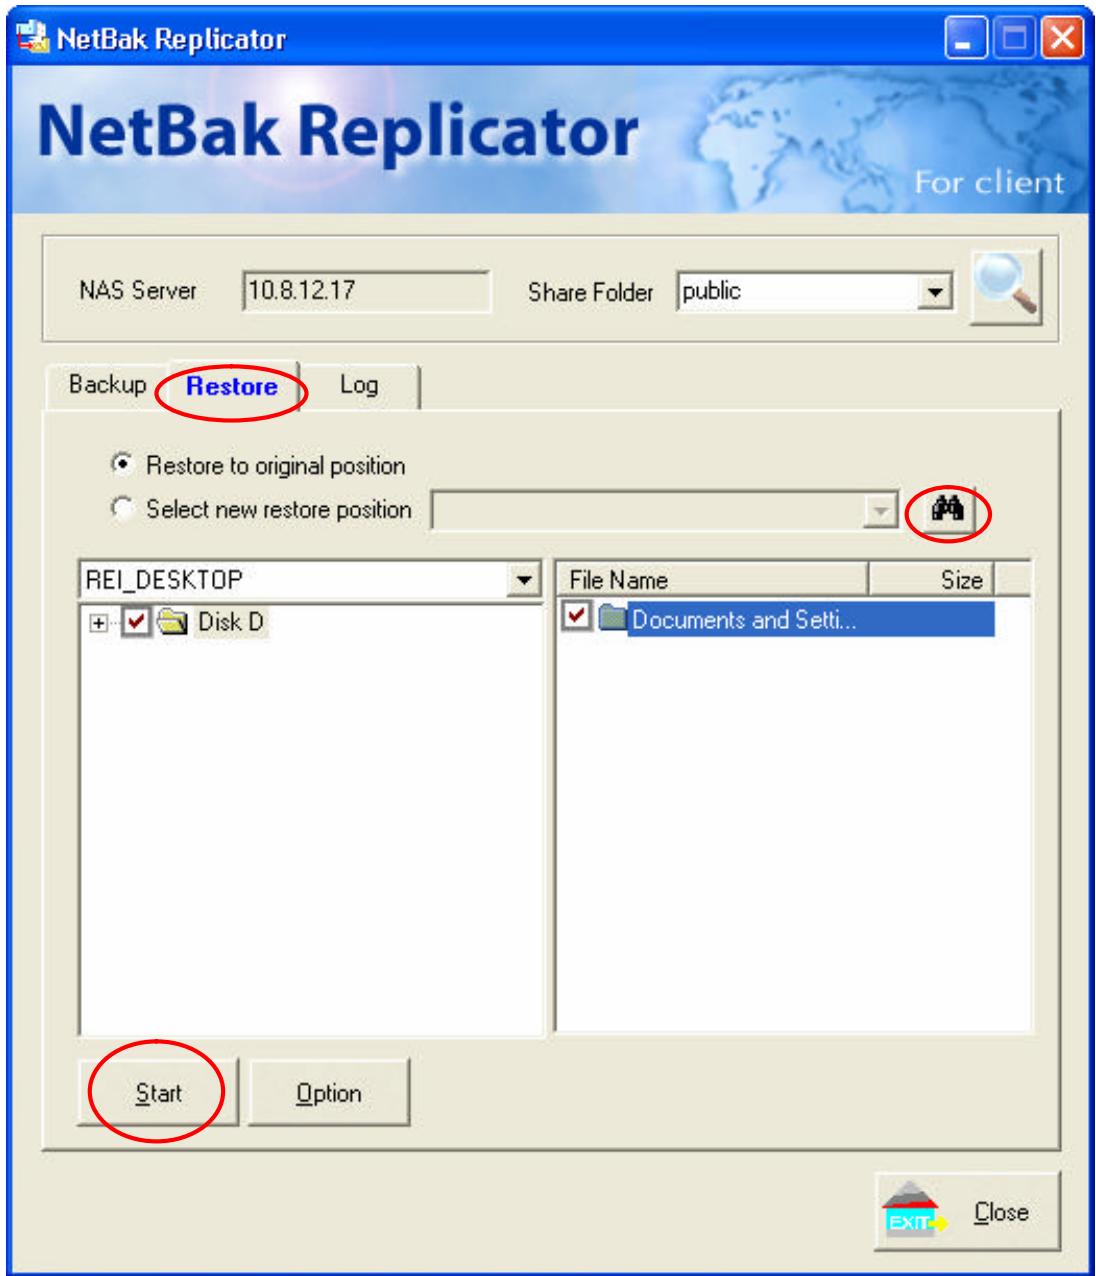
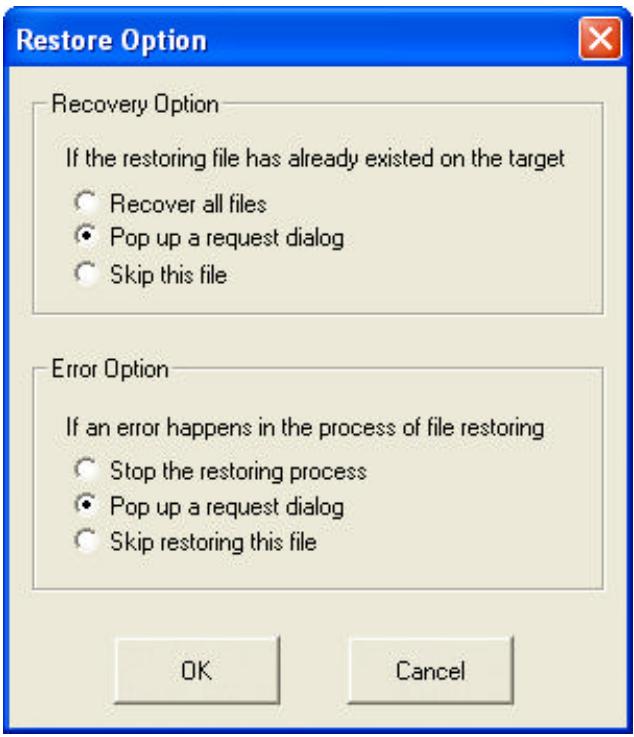
d. Option: Select recovery option and error option.
If the restoring file has already existed on the target folder, you can select to:
Recover all files
Pop up a request dialog
Skip this file
If an error happens in the process of file restoring, you can select to:
Stop the restoring process
Pop up a request dialog
Skip restoring this file
Log
a. Save As....: To save all logs on NetBak Replicator, click this button. All logs will be saved as text file.
b. Clear All: Click this button to clear all logs.
c. Option: Select the type of logs to be recorded? "Record all logs" or "Record error logs only".
Chapter 9 ND-52000 Maintenance
ND-52000 is specially designed to run 24x7 and be ready at all times against system crash caused by power outage. This section provides a general overview on system maintenance.
9.1 Restart/ Shut down Server
Follow the steps below to restart or shut down ND-52000.
- Ask all active users of ND-52000 to save their files and disconnect from the server.
- Enter the administration page and select Restart/ Shutdown in System Tools.
-
Click Restart to reboot the server or Shut Down to turn off the server. You can perform these actions by the LCD panel.
-
Restart/Shutdown
To restart the server, click Restart.
To shut down the server, click Shut Down.

Restart

Shut Down
9.2 Reset Administrator Password and Network Settings
To reset the administrator password and network settings of ND-52000,
- Press the reset button of ND-52000 for a few seconds. A beep sound will be heard.
- Login ND-52000 with the default user name and password:
Default user name: administrator
Password: admin

Note: To reset the system by the reset button, the option "Enable configuration reset switch" in Hardware Settings must be activated.
5.1 Disk Failure or Malfunction
When you encounter disk malfunction or failure, please do the following:
- Record the malfunction status or error messages.
- Stop using the failed ND-52000 and turn off the server.
- Contact customer service for technical support.

Note: Your ND-52000 must be repaired by professional technicians, please do not try to repair the server yourself.
Please back up any important files or folders to avoid potential data loss due to disk crash.
5.2 Power Outage or Abnormal Shutdown
In case of power outage or improper shutdown of ND-52000, the system will resume to the state before it is shut down. If your server does not function properly after restart, please do the following:
- If the system configuration is lost, configure the system again.
- In the event of abnormal operation of the server, contact customer service for technical support.
To avoid the above situations, please back up your data periodically and make sure you have done the following:
- Follow the instructions described in Chapter 9.1 to restart or shut down the server.
- If there is an anticipated power outage, back up all important data and turn off the server properly until power supply is resumed.
Appendix A Web File Manager
Using Web File Manager
To use Web File Manager, enable Web File Manager in Network Settings first.
Launch the web browser and go to ND-52000 home page. Select Web File
Manager and enter the correct login name and password. You may also enter
"guest" in the login name field with no password to access the network shares on
ND- 52000 as an anonymous guest.

Note: Make sure a network share has been created before using Web File Manager.
Select an existing network share for management.
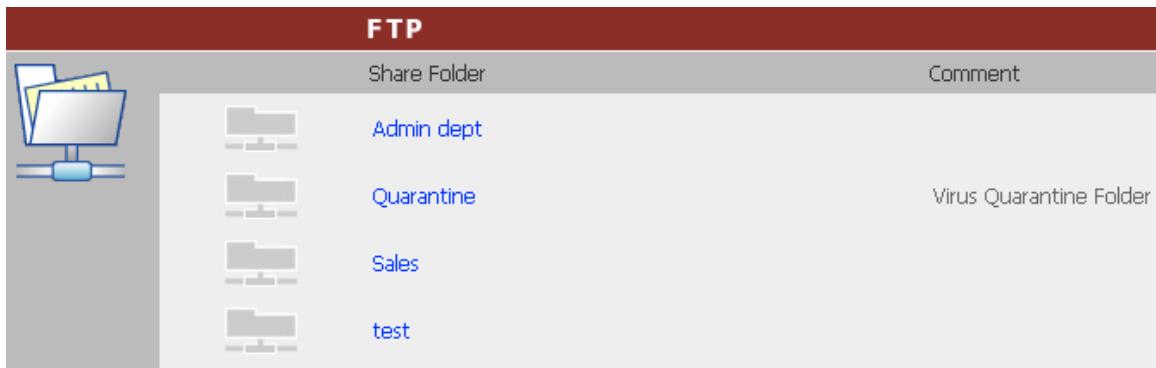
You can organize network share folders of ND-52000. With Web File Manager, you can upload, rename, or delete files and folders in the network shares.

View files online
Click on a file displayed on the web page. The information of the file will be displayed. If your browser does not support the file format, the download window pops up automatically. Once the file is downloaded, you can open it on your computer.
Create folder
i. Select a network share or folder in which you want to create a new folder.
ii. Click

(Create Folder) on the toolbar.
iii. Enter the name of the new folder and click OK.
Rename file or folder
i. Select a file or folder to rename.
ii. Click (Rename) on the toolbar.
iii. Enter the new file or folder name and click OK.
Delete file or folder
i. Select a file or folder to delete.
ii. Click (Delete) on the toolbar.
iii. Confirm to delete the file or folder.
To delete all files and folders, click (Select All) and then (Delete).
Upload file
i. Open the folder to upload file to.
ii. Click Browse to select the file.
iii. Click Upload.
Download file
i. Select a file to download.
ii. Right click the mouse and select "Save Target As" to save the file.
Logout
To exit Web File Manager, click (Logout).
Viewing Files Named in Chinese
To view files named in Chinese, you may have to configure the browser settings. Take Internet Explorer as an example, follow the steps below to configure the settings.
- Click on Tools in IE browser.
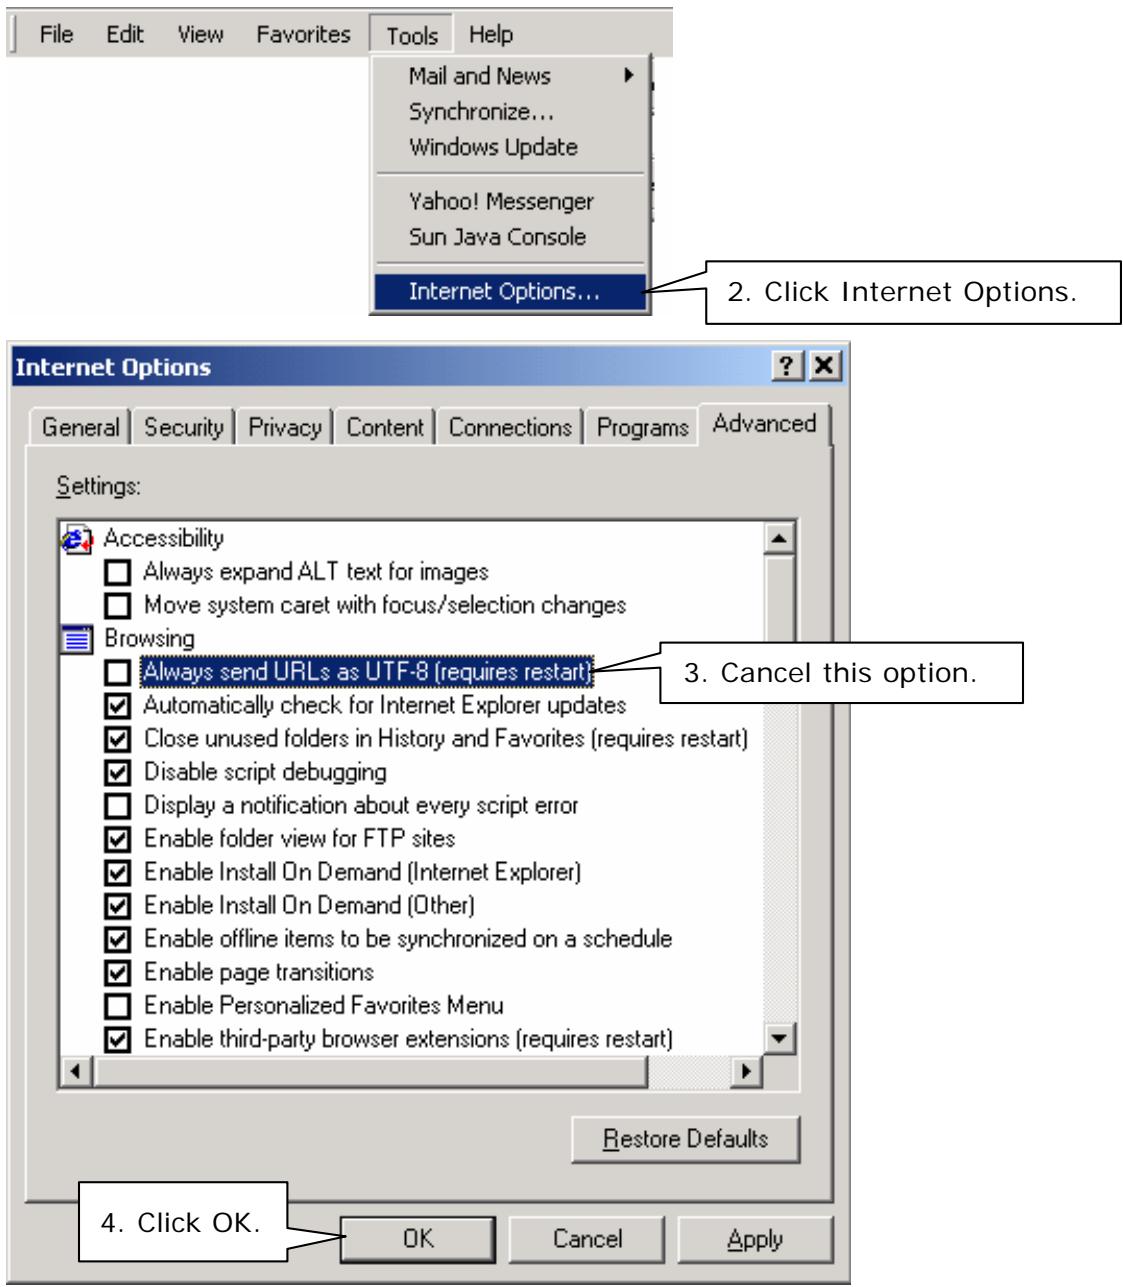
- Restart the browser.
Web File Manager Icons
| Icon | Description |
| ← | Up-return to the parent folder |
| → | Refresh-reload the current page |
| Home-return to network share list home page | |
| Create folder | |
| Rename file or folder | |
| Delete file or folder | |
| Select all | |
| Cancel selection | |
| Logout | |
| Full access network share folder | |
| Read-only network share folder | |
| Malfunction network share folder | |
Appendix B Configuring AD Authentication
AD environment mixed mode can be supported by ND-52000. For example, qatest.com.tw and sub2.qatest.com.tw are domains controlled by Windows 2003 server, and sub1.qatest.com.tw domain is controlled by Windows 2000 server.
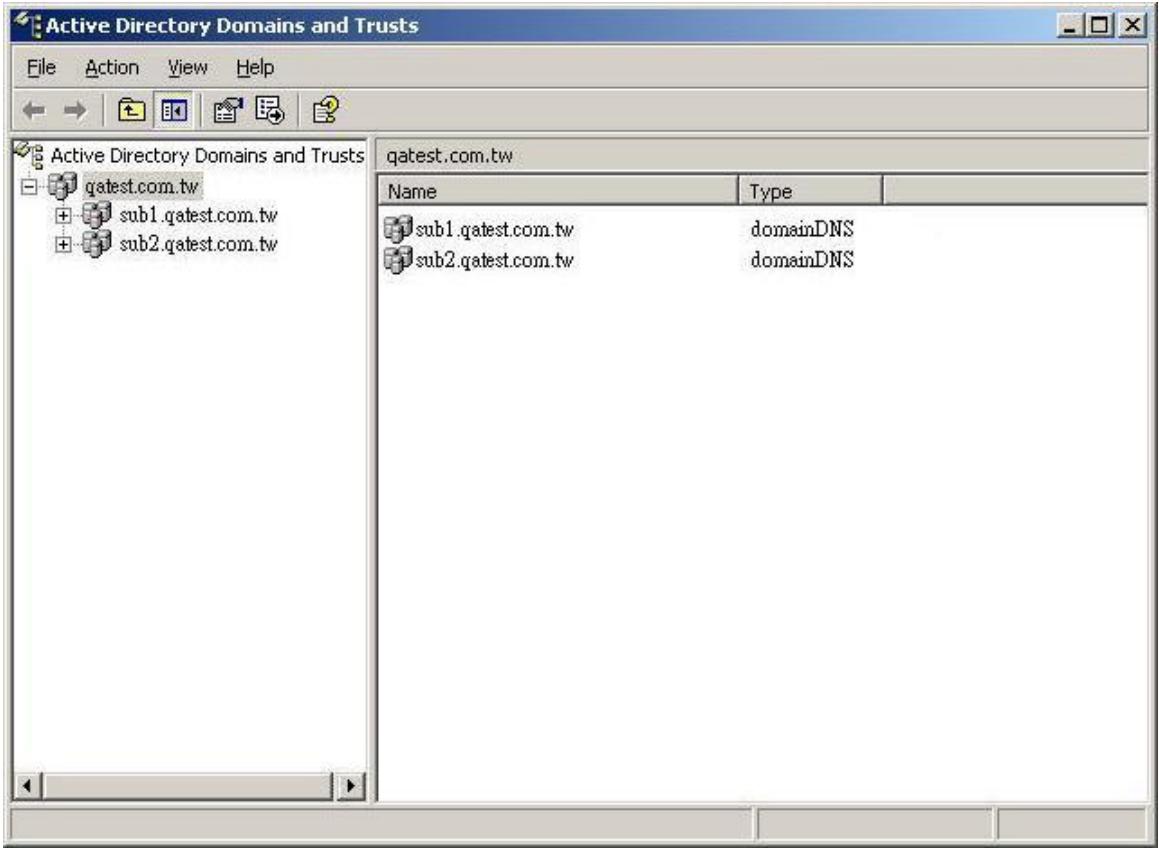
Please make sure you have enabled the Active Directory Service on the Windows Server and check the following items:
- DNS Server setting on ND-52000 has to be directed to AD server.
- ND-52000 and AD server can synchronize only if their time difference is less than 5 minutes.
- ND-52000 and AD server will synchronize each 5 minute. To configure the settings manually, ND-52000 has to be set as standalone mode and then added to AD domain.
- When adding ND-52000 to AD domain, please login by domain_name\Username. ND-52000 local user cannot login AD domain.
- Inter-network segments can be used.
- If you are using NT Domain, please select standalone mode when you want to upgrade the system, then join AD domain.
- It is suggested to use Windows 2000 Service Pack 4, or Windows 2003 Service Pack 1.
- When ND-52000 is added to AD domain, the authority of "everyone" will not work, "everyone" is the original account of ND-52000, but doesn't include AD. Therefore the authority has to be reset.
- The DNS setting on Windows 2000 server should be added as "Active Directory DNS", the server should be rebooted after DNS setting is set.
- You should use the full domain name on the AD setting of ND-52000. For example, if your FQDN name of AD server is "ad.test.com.tw", you should use "test.com.tw" as the ad domain setting on ND-52000.
- The DNS setting on AD server should have the IP of AD server itself.
- You must change the password of "administrator" after you create "Active Directory" service on AD server.
- The DNS server on the AD Server should have two records on it.
For example, AD Server Name: 2003tc.testad.com
DNS record on DNS Server
2003tc.testad.com A 192.168.1.100
testad.com A 192.168.1.100
One is "A record" for AD server, and the other is the domain "A record" for DNS queries.
- Go to TCP/IP Configuration in Network Settings. Enter the IP address of primary DNS server. You can inquire AD domain via this DNS server.
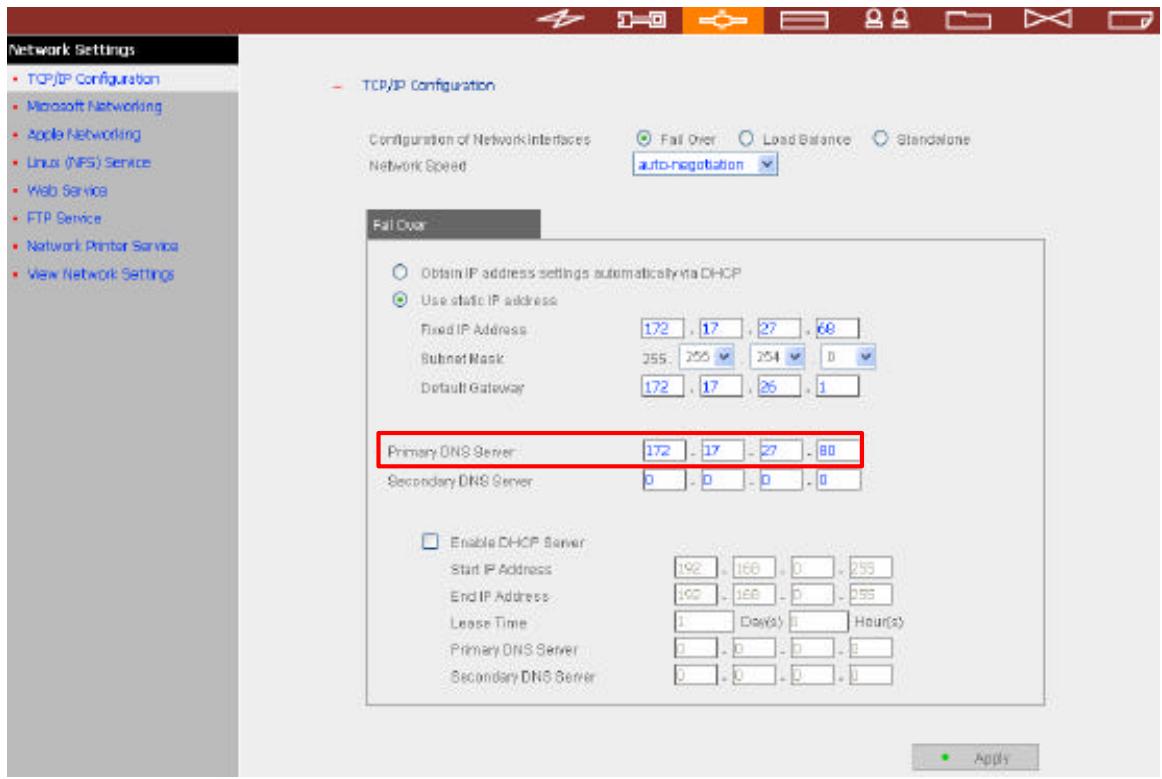
- Go to Microsoft Networking of Network Settings. Enable AD Domain Member, and enter the domain name and the user name with administrator access right to that domain.
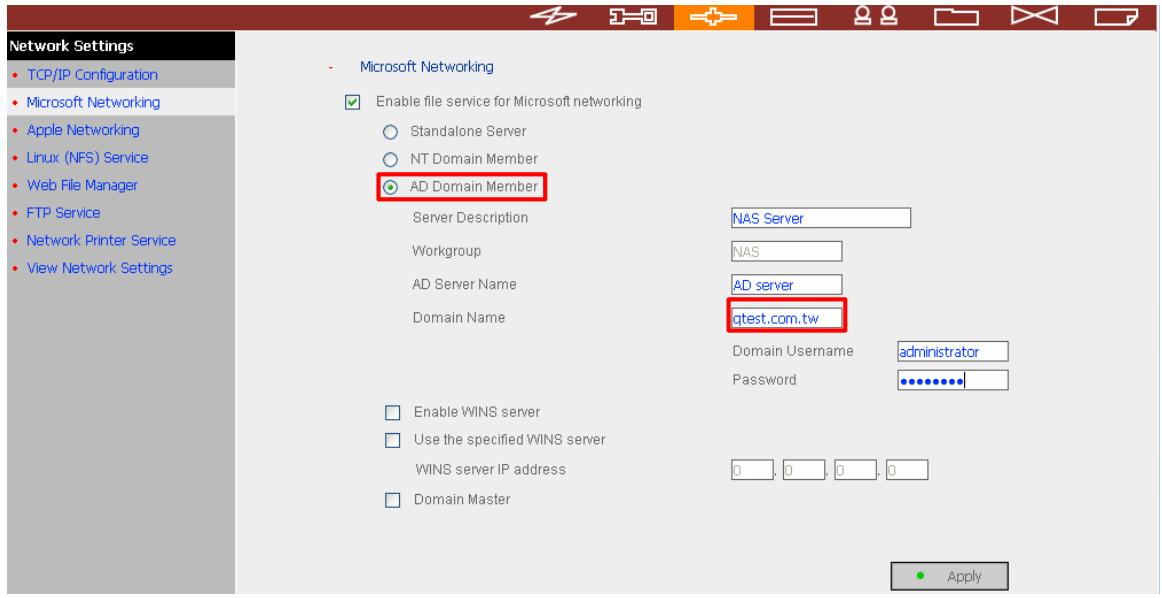

Note:
a. Make sure that a fully qualified domain name such as qatest.com.tw has been filled in.
b. Make sure the user name with administrator access right to that domain.
- When the following message appears after applying the settings in step 2, check the DNS IP.

Microsoft Networking
Microsoft Networking configured failed. Please check the DNS server settings.

Back
When the following message appears after applying the settings in step 2, domain name, domain user name, and the password.

Microsoft Networking
Microsoft Networking configured failed. Please check the domain / username / password settings.

Back
When the following message appears after applying the settings in step 2, check the time zone settings. Make sure the difference of your time and that of AD server is less than 5 minutes. If the time difference is larger than 5 minutes, you will not be able to add the domain member.

Microsoft Networking
Microsoft Networking configured failed. Please synchronize time with Windows server.

Back
- Upon successful adding of domain member, you can view the list for domain users and local users in User Management.

- Go to Access Control in Network Share Management to configure the access control right of AD users for all available network shares.
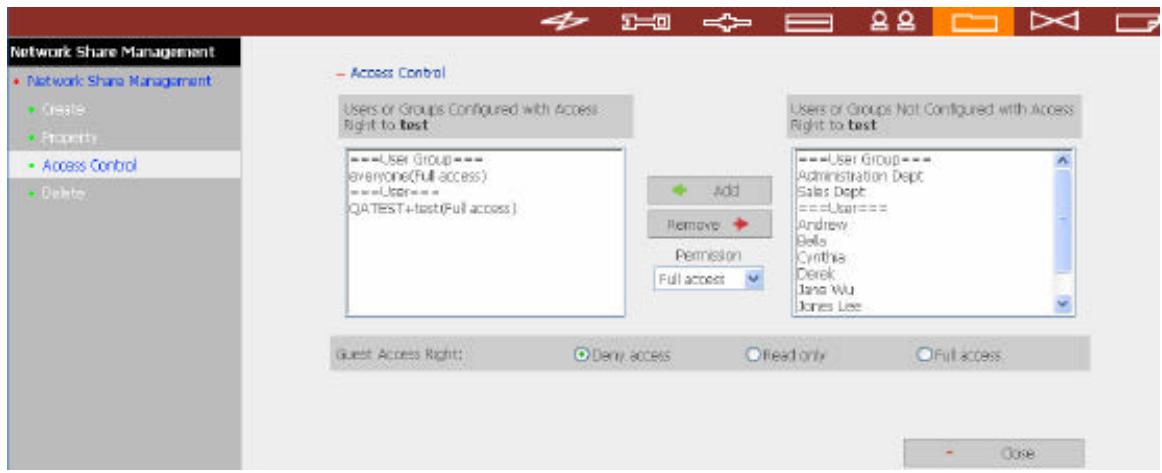
Using AD users to access services
To access services like FTP, Network Neighborhood, or Apple Talk with an AD user account, add DomainName\ before the user name when logging in.
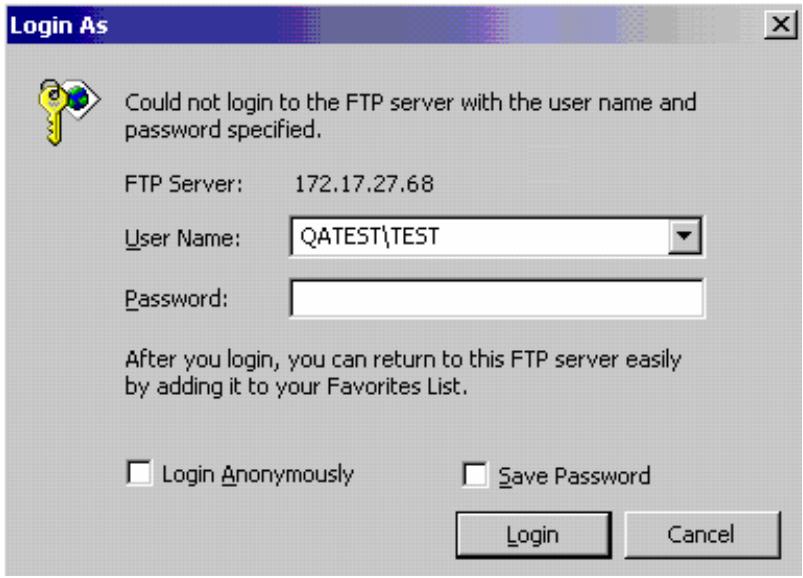
- Go to Microsoft Networking to enable NT Domain member and then enter the domain name such as sub1 and the user who has administrator access right for identification.
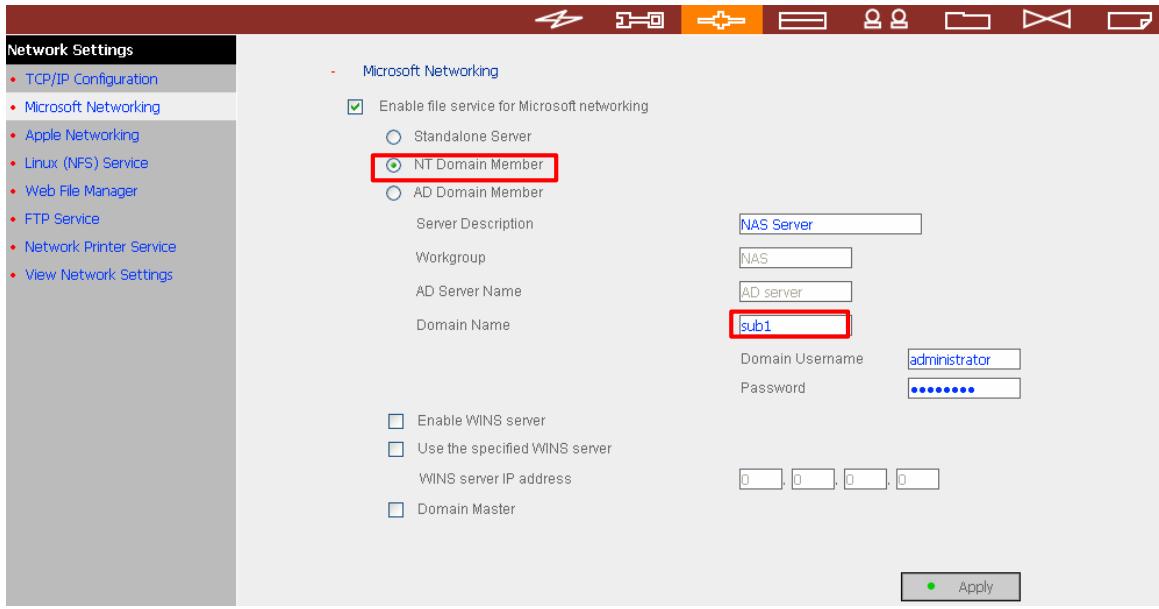

Note:
a. Please notice that ND-52000 and Windows 2000/2003 server must be in the same section or the system will show the following error message.
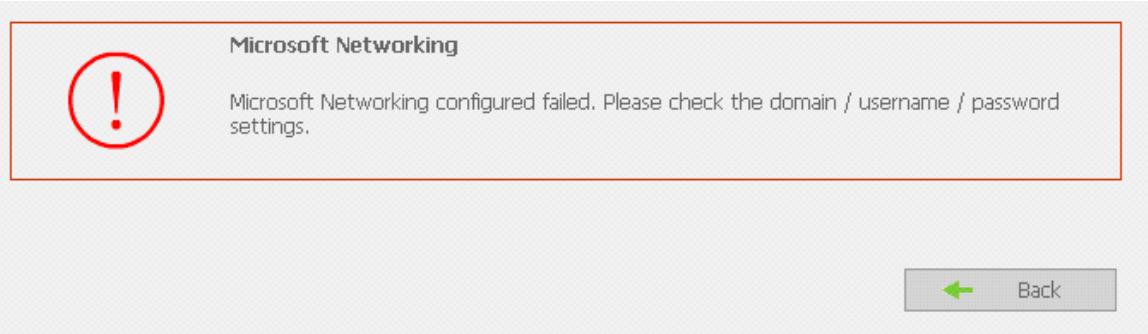
b. Make sure that a domain name such as sub1 has been filled in.
c. Make sure the user name with administrator access right to that domain.
- When the following message appears after applying the settings in step 1, check the domain name, domain user name, and the password.

Microsoft Networking
Microsoft Networking configured failed. Please check the domain / username / password settings.

Back
When the following message appears after applying the settings in step 2, check the time zone settings. Make sure the difference of your time and that of AD server is less than 5 minutes. If the time difference is larger than 5 minutes, you will not be able to add the domain member.

Microsoft Networking
Microsoft Networking configured failed. Please synchronize time with Windows server.

Back
- Upon successful adding of domain member, you can view the list for domain users and local users in User Management.
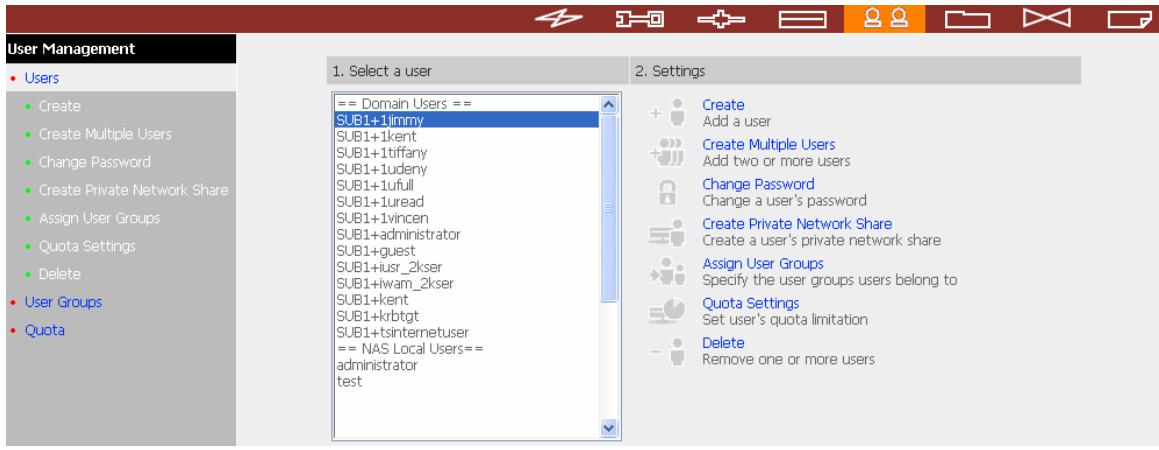
- Go to Access Control in Network Share Management to configure the access control right of domain users for all available network shares.
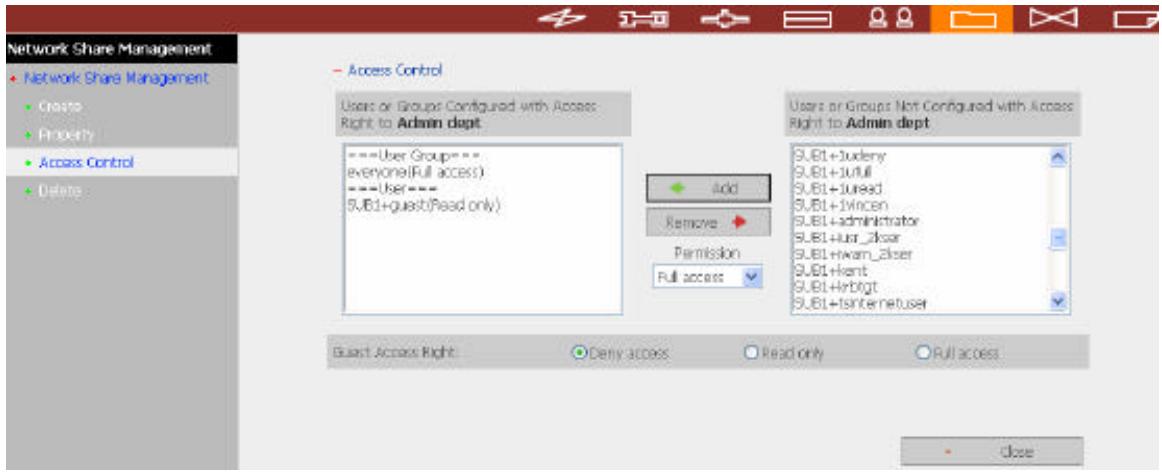
Using domain users to access services
To access services like FTP, Network Neighborhood, or Apple Talk with a domain user account, add DomainName\ before the user name when logging in.
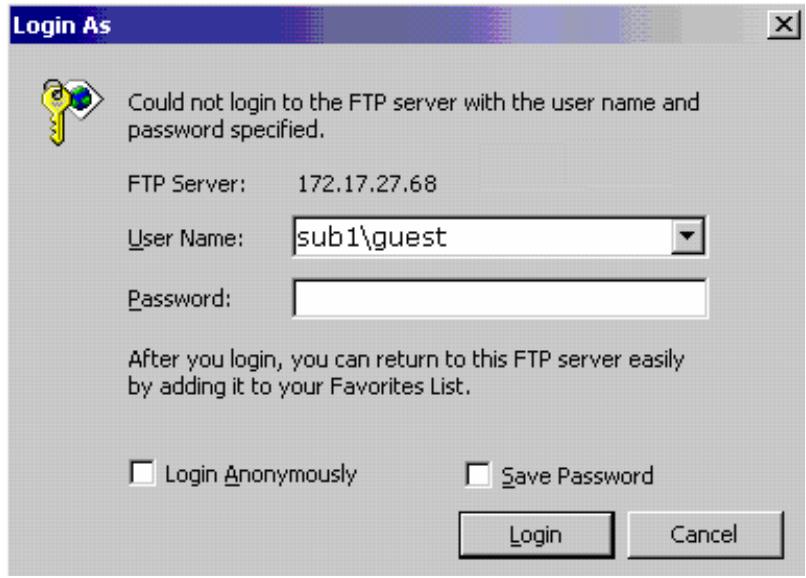

Note: To join AD domain again, set ND-52000 as standalone server in Microsoft Networking section. Make sure all domain users are removed in User Management before joining ND-52000 to AD domain.
Appendix C Messages of Hard Disk and Disk Configuration Status
Hard Disk
| English Display | Status Description |
| Ready | The hard disk status is normal |
| No disk | No disk currently ✓ Disk tray is not installed or there is main board error. Users can check disk tray. If there is main board error, please contact COMET LABS customer service. |
| Invalid | Indicates the disk does not have a record on ND-52000 ✓ The disk is used on ND-52000 the first time, or the disk on the same ND-52000 model is used. Users can re-configure disk volume. |
| R/W error | Disk fails ✓ When R/W error is shown, users should back up data immediately and replace the failed disk. |
Disk Configuration/ RAID Configuration
| English Display | Status Description |
| Initializing | Initializing disk |
| Formatting | Formatting disk |
| Creating | Creating RAID configuration |
| Removing | Removing RAID configuration |
| Rebuilding | Rebuilding RAID configuration |
| Checking | Error checking on hard disk or disk configuration in process ✔ ND-52000 will check disk automatically if it is shut down improperly |
Disk Configuration/ RAID Configuration
| English Display | Status Description |
| Ready | The status of current disk or disk configuration is normal |
| Unmounted | Hard disk is not installed or hard disk configuration is not configured |
| Not Active | RAID configuration is damaged and cannot be enabled ✓ When this message is shown, users should back up disk data immediately and replace the failed disk. |
| Uninitialized | Initialization fails ✓ Single disk does not support hot swap. If the hard disk is unplugged when ND-52000 is turning on, disk configuration will be damaged and will lead to data loss. |
| In degraded mode | A disk of RAID 1 or RAID 5 configuration is unplugged or fails. RAID data protection mechanism fails. ✓ In this situation, users should back up disk data immediately and replace the failed disk to rebuild RAID configuration. |

Note:
- When R/W error is displayed for hard disk status, or "Not active" or "In degraded mode" is displayed for RAID configuration, please replace the hard disk immediately to ensure RAID data protection can work properly. COMET LABS is not responsible for any data loss caused by delay in replacing failed disks in a RAID configuration by users intentionally or unintentionally.
- Comet Labs, Inc. guarantees that all ND-52000 (ND-52000) released have passed strict and complete QA test and can operate properly in normal condition. COMET LABS offers conditional and limited maintenance for ND-52000 within warranty period. However, COMET LABS disclaims the responsibility for any data loss or damage, or business loss of users. In no event shall the liability of COMET LABS exceed the price paid for the product from direct, indirect, special, incidental, or consequential software, or its documentation.
Technical Support
COMET LABS provides dedicated online support and customer service via instant messenger. You can contact us by the following means:
Online Support: www.Comet
Labs.com
E-mail: support@comet Labs.com