UF - Clavier musical électronique CME - Notice d'utilisation et mode d'emploi gratuit
Retrouvez gratuitement la notice de l'appareil UF CME au format PDF.

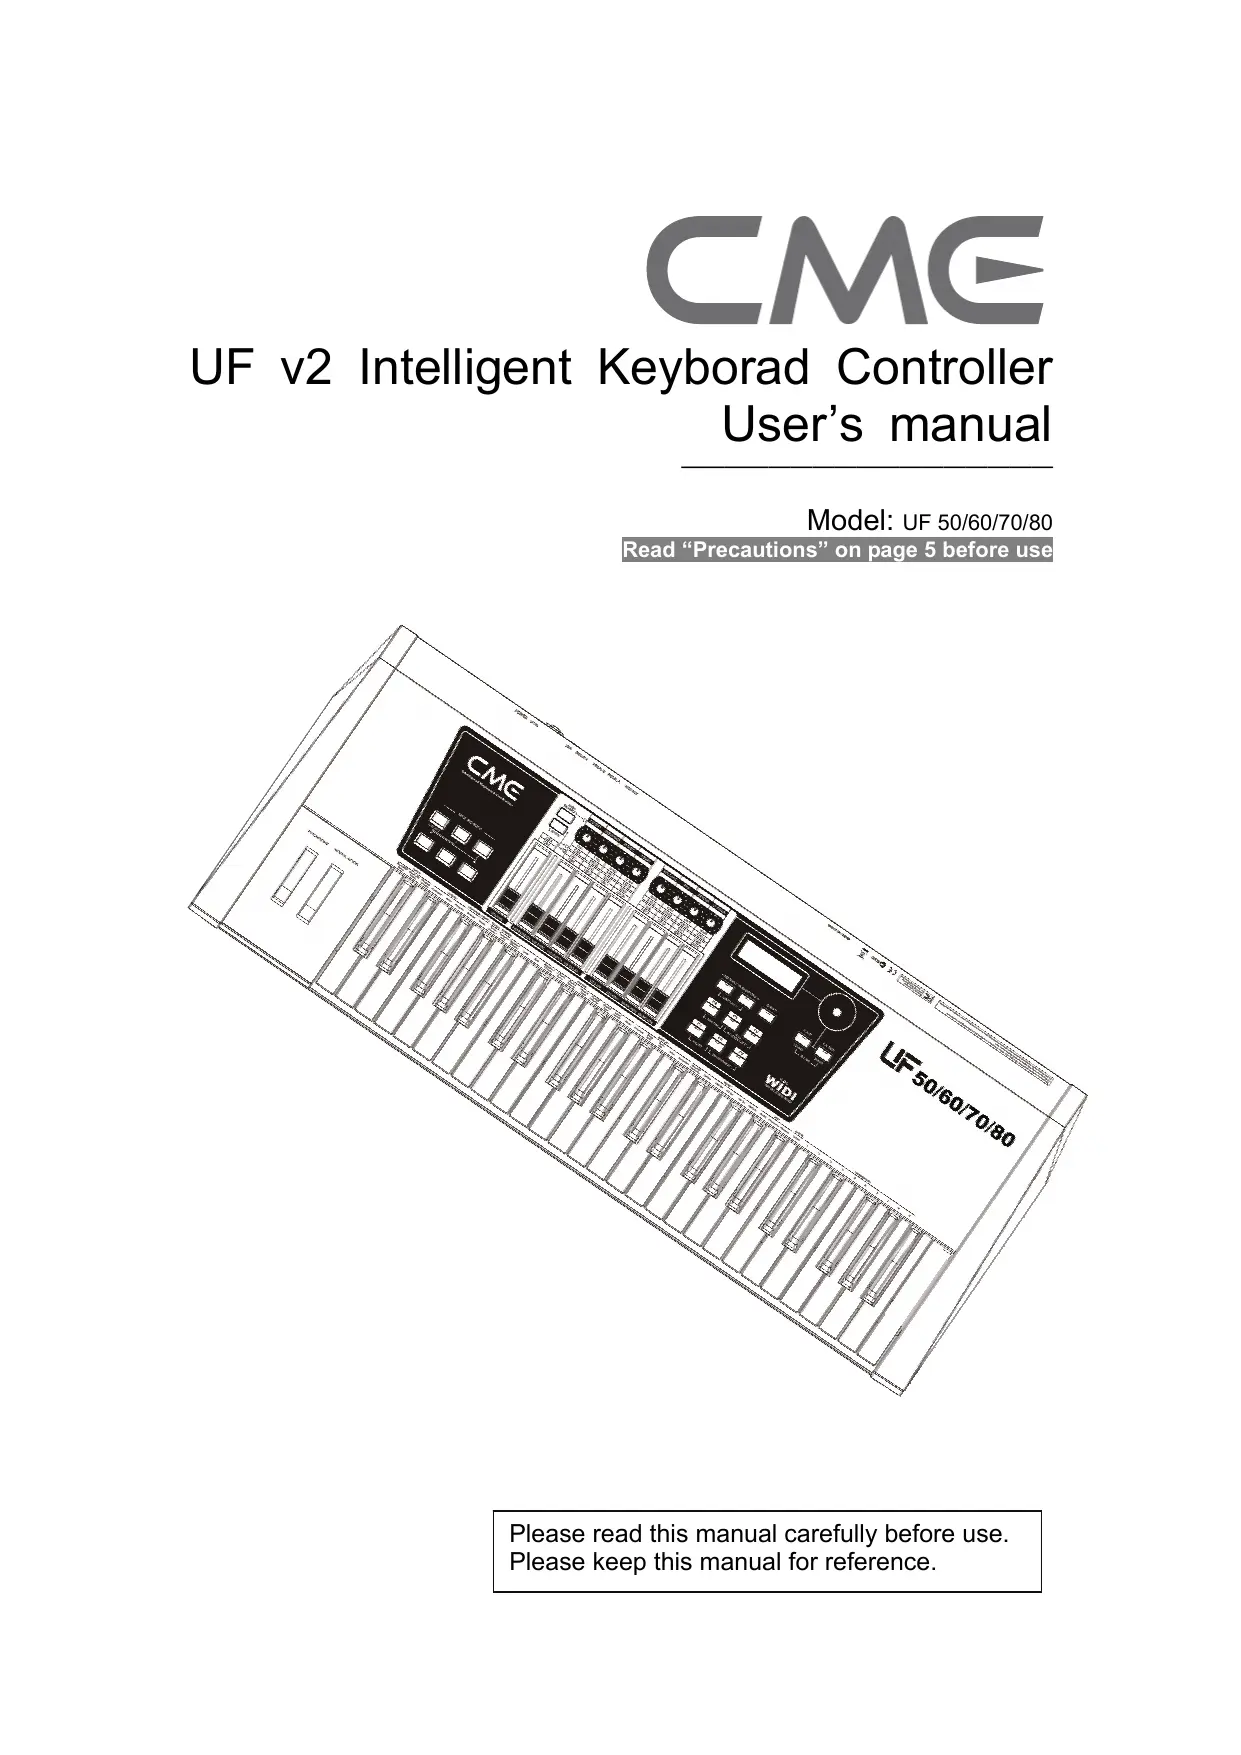

| Type d'appareil | Clavier musical électronique |
| Nombre de touches | Non précisé |
| Modèles disponibles | UF 50, UF 60, UF 70, UF 80 |
| Fonctions principales | Contrôle intelligent, modulation, pitch bend |
| Affichage | Écran LCD |
| Contrôles | Faders, boutons, molette de modulation |
| Connectivité MIDI | Oui |
| Alimentation | Adaptateur secteur (non précisé) |
| Dimensions | Non précisé |
| Poids | Non précisé |
| Polyphonie | Non précisé |
| Effets intégrés | Non précisé |
| Compatibilité | Compatible avec divers logiciels de musique |
| Langue du manuel | Anglais |
| Utilisation recommandée | Performance et production musicale |
FOIRE AUX QUESTIONS - UF CME
Questions des utilisateurs sur UF CME
0 question sur cet appareil. Repondez a celles que vous connaissez ou posez la votre.
Poser une nouvelle question sur cet appareil
Téléchargez la notice de votre Clavier musical électronique au format PDF gratuitement ! Retrouvez votre notice UF - CME et reprennez votre appareil électronique en main. Sur cette page sont publiés tous les documents nécessaires à l'utilisation de votre appareil UF de la marque CME.
MODE D'EMPLOI UF CME
CME
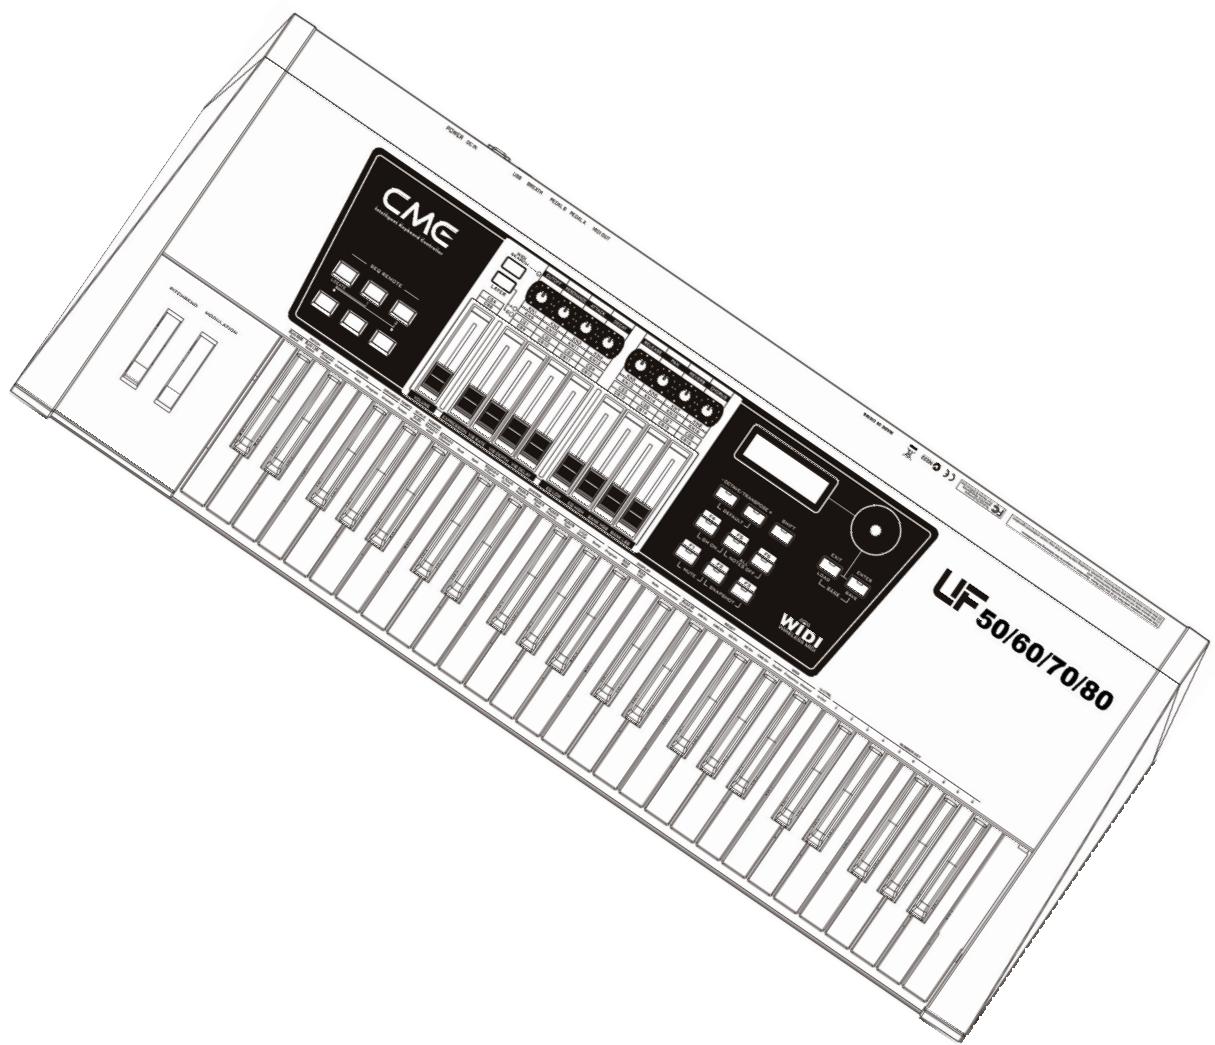
UF v2 Intelligent Keyborad Controller User's manual
Model: UF 50/60/70/80
Read "Precautions" on page 5 before use
Please read this manual carefully before use.
Please keep this manual for reference.
Thank you for choosing CME UF v2 — Intelligent Keyborad Controller
Please keep all the important information here
Attach your invoice or receipt here
for reference
Purchase date
Serial(on the back of the keyboard)
Dealer's name and addr.
Dealer's tel.
Warning:
- Improper connection may cause damage to the device.
Copyright
Copyright of the manual belongs to Central Music Co. Anyone must get a written permission from Central Music Co. before copying any part of the manual to any kind of media.
© Central Music Co. 2007
Package list
Please check all the items in your VX keyboard package:
- USB MIDI Master keyboard 1 pcs
USB cable 1 pcs - User's manual 1 pcs
WIDI-XU wireless MIDI transmitter/receiver 1ps
Special Message Section
This product utilizes batteries or an external power supply (adapter). Do NOT connect this product to any power supply or adapter other than one described in the manual, on the product, or specifically recommended by CME.
WARNING: Do not place this product in a position where anyone could walk on, trip over, or roll anything over power or connecting cords of any kind. The use of an extension cord is not recommended! If you must use an extension cord, make sure that the cord has the ability to handle maximum current needed by this product. Please consult a local electrician when possible.
This product should be used only with the components supplied or recommended by CME. When used with any components, please observe all safety markings and instructions that accompany the accessory product.
SPECIFICATIONS SUBJECT TO CHANGE:
The information contained in this manual is believed to be correct at the time of printing. However, CME reserves the right to change or modify any of the specifications without notice or obligation to update existing units.
This product, either alone or in combination with an amplifier and headphones or speaker(s), may be capable of producing sound levels that could cause permanent hearing loss. Do NOT operate for long periods of time at a high volume level or at a level that is uncomfortable. If you experience any hearing loss or ringing in the ears, you should consult an audiologist.
IMPORTANT: The louder the sound, the shorter the time period before damage occurs.
Some CME products may have stands and/or accessory mounting fixtures that are either supplied with the product or as optional accessories. Some of these items are designed to be dealer assembled or installed. Please make sure that stands are stable and any optional fixtures (where applicable) are well secured BEFORE using.
Stands supplied by CME are designed for the respect products only. No other uses are recommended.
NOTICE:
Service charges incurred due to a lack of knowledge relating to how a function or effect works (when the unit is operating as designed) are not covered by the manufacturer's warranty, and are therefore the owners responsibility. Please study this manual carefully and consult your dealer before requesting service.
ENVIRONMENTAL ISSUES:
CME strives to produce products that are both user safe and environmentally friendly. We sincerely believe that our products and the production methods used to produce them, meet these goals. In keeping with both the letter and the spirit of the law, we want you to be aware of the following:
Battery Notice:
This product MAY contain a small non-rechargeable battery which (if applicable) is soldered in place. The average life span of this type of battery is approximately five years. When replacement becomes necessary, contact a qualified service representative to perform the replacement.
This product may also use "household" type batteries. Some of these may be rechargeable. Make sure that the battery being charged is a rechargeable type and that the charger is intended for the battery being charged.
When installing batteries, do not mix batteries with new, or with batteries of different type. Batteries MUST be installed correctly. Mismatches of incorrect installation may result in overheating and battery case rupture.
Warning:
Do not attempt to disassemble, or incinerate any battery. Keep all batteries away from children. Dispose of used batteries promptly and as regulated by the laws in your area. Note: Check with any retailer of household type batteries in your area for battery disposal information.
Disposal Notice:
Should this product become damaged beyond repair, or for some reason its useful life is considered to be at an end, please observe all local, state, and federal regulations that relate to the disposal of products that contain lead, batteries, plastics, etc. If your dealer is unable to assist you, please contact CME directly.
FCC INFORMATION (U.S.A)
1. IMPORTANT NOTICE: DO NOT MODIFY THIS UNIT!
This product, when installed as indicated in the instructions contained in this manual, meets FCC requirements. Modifications not expressly approved by CME may void your authority, granted by the FCC, to use the product.
-
IMPORTANT: When connecting this product to accessories and/or another product use only high quality shielded cables. Cable(s) supplied with this product MUST be used. Follow all installation instructions. Failure to follow instructions could void your FCC authorization to use this product in the USA.
-
NOTE: This product has been tested and found to comply with the limits for a Class B Digital device, pursuant to Part 15 of the FCC Rules. These limits are designed to provide reasonable protection against harmful interference in a residential environment. This equipment generates, uses and can radiate radio frequency energy and, if not installed and used according to the instructions found in the users manual, may cause interference harmful to the operation of other electronic devices. Compliance with FCC regulations does not guarantee that interference will not occur in all installations. If this product is found to be the source of interference, which can be determined by turning the unit “OFF” and “ON”, please try to eliminate the problems by using one of the following measures:
Relocate either this product or the device that is being affected by the interference.
Utilize power outlets that are on different branch (circuit breaker or fuse) circuits or install AC line filter(s).
In the case of radio or TV interference, relocate/reorient the antenna. If the antenna lead-in is 300 ohm ribbon lead, change the lead-in to co-axial type cable.
If these corrective measures do not produce satisfactory results, please contact the local retailer authorized to distribute this type of product. If you cannot locate the appropriate retailer, please contact CME.
The above statements apply ONLY to those products distributed in the USA.
PRECAUTIONS
IMPORTANT
Always follow the basic precautions listed below to avoid the possibility of serious injury or even death from electrical shock, damages, fire or other hazards. These precautions include, but are not limited to, the follows:
-
Read and understand all the instructions.
-
Always follow the instructions on the instrument.
-
Before cleaning the instrument, always remove the electric plug from the outlet as well as the USB cable. When cleaning, use a soft and dry cloth. Do not use gasoline, alcohol, acetone, turps or any other organic solutions; do not use liquid cleaner, spray cleaner or too wet cloth.
-
Do not use the instrument near water or moisture, such as bathtub, washbasin, washing poor in the kitchen or similar places.
-
Do not place the instrument in an unstable position where it might accidentally fall over.
-
Do not jam sinks or holes of the instrument; those sinks of holes are used for air circulation to prevent the instrument from overheating. Do not place the instrument near heat sink or any places with poor air circulation.
-
Do not place anything on the power cord. Make sure the power cord is set on a safe place, so nobody will step on it and no body will trip over it.
-
Do not overload the outlet and the AC cable to avoid fire or electrical shock.
-
Do not insert anything in the instrument, which may cause fire or electrical shock. Do not splash any kind of liquid to the instrument.
-
Do not disassemble the instrument in case of accidental electrical shock.
-
Always take the instrument to a qualified service center in need of repair. You will cause yourself in danger if you open or remove the cover, and improper assembly may cause electrical shock in the future use.
-
Unplug all the connectors and take the instrument to a qualified service center if anything in the below listed happens:
A. The power cord or connector get hurt or worn out.
B. Any liquid get in the instrument.
C. The instrument gets rain or water splash.
D. The instrument does not work properly after following all the instructions regarding to the trouble shootings.
E. The instrument falls down or gets broken.
F. The instrument functions poorly.
- Do not use the instrument when thundering; otherwise the thundering may cause long-distance electrical shock.
- Do not use the instrument when there is a gas leak nearby.
- Switch off the product when inside or near aircraft. The use of RF product in aircraft is illegal. It may be dangerous to the operation of the aircraft
- Do not use the product on the ground without the permission of the ground crew in the airport.
- Observe 'Turn off the RF communication device such as Mobile Phone' signs, such as those near stores of fuel, chemicals or explosives
- The operation of some medical electronic devices, such as hearing aids and pacemakers, may be affected if the product is used next to them. Observe any warning signs and manufacturer's recommendations.
- Please do not use the product near any precision instrument, which may cause noise or abnormal operation to the instrument.
- Switch off the product at a refueling point, such as a petrol station, even if you are not refueling your own car.
- Do not store or carry flammable or explosive materials in the same compartment where a radio transmitter, such as the product, is placed.
- Electronic vehicle systems, such as anti-lock brakes, speed control and fuel injection
systems are not normally affected by radio transmissions. The manufacturer of such equipment can advise if it is adequately shielded from radio transmissions. If you suspect vehicle problems caused by radio transmissions, consult your dealer and do not switch on the product until it has been checked by qualified approved installers.
Efficient Use
For optimum performance with minimum power consumption, note the following:
The product has an internal antenna. Do not cover part of the internal antenna of the product with your hands. This affects communication quality, may cause the product to operate at a higher power level than needed and may shorten communication and standby times.
Radio Frequency Energy
The product is a low-power radio transmitter and receiver. When it is turned on, it intermittently receives and transmits radio frequency (RF) energy (radio waves). The system that handles the communication controls the power level at which the product transmits.
Exposure to Radio Frequency Energy
The product is designed not to exceed the limits for exposure to RF energy set by national authorities and international health agencies. * These limits are part of comprehensive guidelines and establish permitted levels of radio wave exposure for the general population. The guidelines were developed by independent scientific organizations such as ICNIRP (International Commission on Non-Ionizing Radiation Protection) through periodic and thorough evaluation of scientific studies. The limits include a substantial safety margin designed to assure the safety of all persons, regardless of age and health, and to account for any variations in measurements.*Examples of radio frequency exposure guidelines and standards that the product is designed to conform to:
■ ICNIRP, "Guidelines for limiting exposure to time-varying electric, magnetic, and electromagnetic fields (up to 300 G Hz)-International Commission on Non-Ionizing Radiation Protection (ICNIRP)". Health Physics, vol. 74. pp, 494-522. April 1998.
99/519/EC Council Recommendation on the limitation of exposure to the general public to electromagnetic fields 0 Hz-300 GHz, Official Journal of the European Communities. July 12, 1999.
ANSI/IEEE C95.1-1992. "Safety levels with respect to human exposure to radio frequency electromagnetic fields, 3kHz to 300 GHz". The Institute of Electrical and Electronics Engineers Inc., New York, 1991.
FCC Report and Order, ET Docket 93-62, FCC 96-326, Federal Communications Commission (FCC), August 1996.
■ Radio communications (Electromagnetic Radiation Human Exposure) Standard 2003, MediaAuthority.
Keep this manual in safe place
CAUTION:
Setting up
Do not connect the instrument when thundering.
Do not set up the cord or outlet to a moist place, except for that the outlet is specially designed for moist places.
When the power cord is connected to the AC outlet, do not touch the naked part of the cord or the connector.
Always follow the instructions carefully when setting up the product.
Avoid using any extending USB cable with poor quality or too long extending USB cable.
Do not use USB HUB to connect the product.
Make sure the computer USB port has adequate power supply, otherwise the product does not work properly.
WARNING:
- Do not expose the instrument to rain or moisture, to avoid fire or electrical shock.
Other precautions:
- Keep the instrument away from electrical interface sources, such as fluorescent light and electrical motors.
- Keep the instrument away from dust, heat and vibration.
- Do not expose the instrument to sunlight.
- Do not place heavy objects on the instrument; do not place containers with liquid on the instrument.
- Do not touch the connectors with wet hands
- Central Music Co. is not responsible for any damage or data loss caused by improper operation to the instrument.
- All the pictures and the LED display in the manual are used for demonstration; they may be different from the real product.
Trade marks
CME, UF, WIDI are CME trade marks. Other brands and names belong to the respective owners.
Features
UF 50/60/70/80 “UF v2” series
Professional semi-weighted keyboard with aftertoun for UF 50/60/70
Professional weighted Hammer Effect Keyboard with aftertoun for UF 80
- Multi-function expansion slot for firewire expansion, sound module expansion,etc.
9 faders
11 function buttons
8 multi-function knobs
Built-in wireless MIDI interface
- Various temperaments and scales.
U-CTRL function by CME, so you can press one key for the software remote control
- USB plug and play
- Firmware upgradable via USB
Content
1 General view 10
1.1 Front panel 10
1.2 Rear panel 12
2 Installation guide 13
2.1 Power supply 13
2.2 Power on order 13
3 Connections 14
4 Basic operation 15
5 Turning on 17
5.1 Normally turning on 17
5.2 Driver installation 17
5.3 Turning on with initilizing 17
6 Basic functions 18
6.1 Selecting a voice.. 18
6.2 Transpose and octave shift 18
6.3 Using knobs and faders 19
6.4 Using remote buttons 19
6.5 Using function shortcut buttons 19
6.6 Pitch wheel and modulation wheel 19
6.7 Pedal 19
6.8 Breath controller 20
6.9 Aftertouch 20
6.10 Bank selecting and program change(PATCH) 20
6.10.1 Bank MSB Select 20
6.10.2 Bank LSB Select 20
6.10.3 Program Change 21
6.11 Keyboard Channel 21
7 Advanced functions 22
7.1 Dual mode 22
7.2 Split mode 22
7.3 Scale 22
7.4 Temperament 23
7.5 DRAWBAR 23
7.6 TEMPO 23
7.7 MIDI RESET message 23
8 ASSIGNING 24
8.1 Assigning Controllers 24
8.2 Assigning Notes 24
8.3 Assigning Program changes 24
9 SYSTEM settings 25
9.1 Keyboard V.Curve 25
9.2 A.Touch V.Curve 25
9.3 Pedal Polarity 25
9.4 Pedal A Type 26
9.5 Pedal B Polarity 26
9.6 Pedal B Type 26
9.7 Local On/Off 26
9.8 Data Dump 26
10 DISPLAY 27
10.1 Program display 27
10.2 Bank MSB display 27
10.3 Bank LSB display 27
10.4 Note display 27
10.5 Controller display 27
11 WIDI (wireless MIDI) 28
11.1 Searching for a MIDI device 28
11.2 WIDI On/Off 28
11.3 Setting Frequency 28
11.4 Selecting Channel 28
12 U-CTRL mode 30
13 BANK access 31
14 Firmware UPDATE 31
15 EXPANSION 31
16 Appendix 32
16.1 Initial status 32
16.2 Assignable controllers list 34
16.3 GM voice list 38
16.4 Scale list 39
16.5 Note list 44
16.6 Temperament list 45
16.7 Velocity curve list 46
16.8 After touch curve list 47
16.9 MIDI route 48
17 Troubleshooting 49
18 Specifications 50
19 MIDI Implementation Chart 52
1 General view
1.1 Front panel
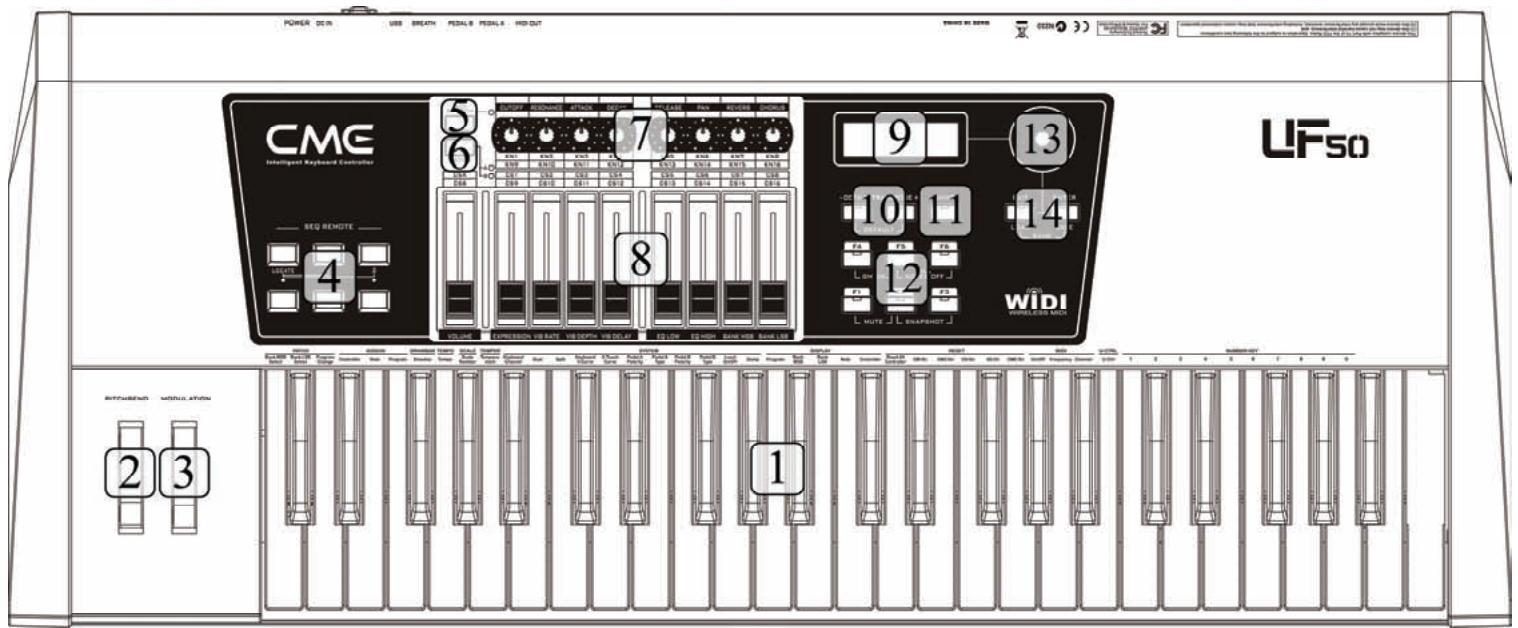

The keyboard
There are four models for the UF v2 series, including UF 50(49 keys), UF 60(61 keys), UF 70(76 keys) and UF 80(88 keys). All the keyboards in the UF v2 series are equipped with velocity response and aftertouch.
Velocity response means when you play the keyboard, it will respond to the initial force used to strike the keys.
Aftertouch means after you press and hold a key, it will continue to respond to additional pressure applied to the keys.

The pitchbend wheel:
It can change the pitch up and down, and when released it will automatically return to the center position.

The modulation wheel:
It will make the sound vibrant, and when released it will be at the current position.

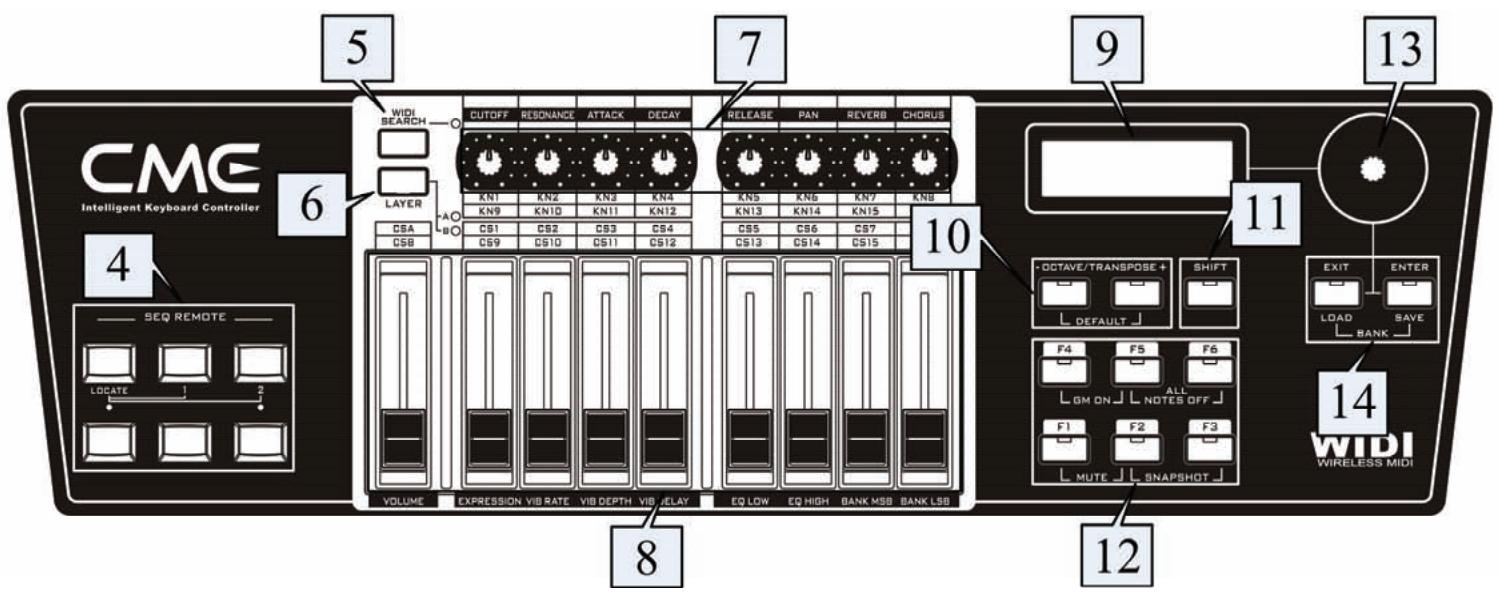
SEQ TRANSPORT:
They are used for sequence control or remote control.

WIDI search:
Use this button to search for another WIDI (wireless MIDI) device.

The layer switch button:
This button will switch the function layers for faders and knobs, so you can control many things conveniently.

The knobs(KN 1-8):
They are used to send continuous control change data.

The faders(CS 1-9):
They are used to send continuous control change data.

The DISPLAY:
You will see all the information here.

The OCTAVE/ TRANSPOSE buttons:
They are used to change the keyboard pitches.

The SHIFT button:
It is used with other control parts for more functions.

The function shortcut buttons (F1-F6):
They are used for fast function select or to send user-defined parameters.

The DATA dial:
Use it to change the value quickly.

The EXIT/ENTER buttons:
Use them to confirm or cancel data changes, and use them for bank operation.
1.2 Rear panel

- The expansion board slot: it is used for an expansion board, such as an firewire expansion board or an sound module expansion board, etc.
The mainland terminals: All the connector ports and switches are located here.
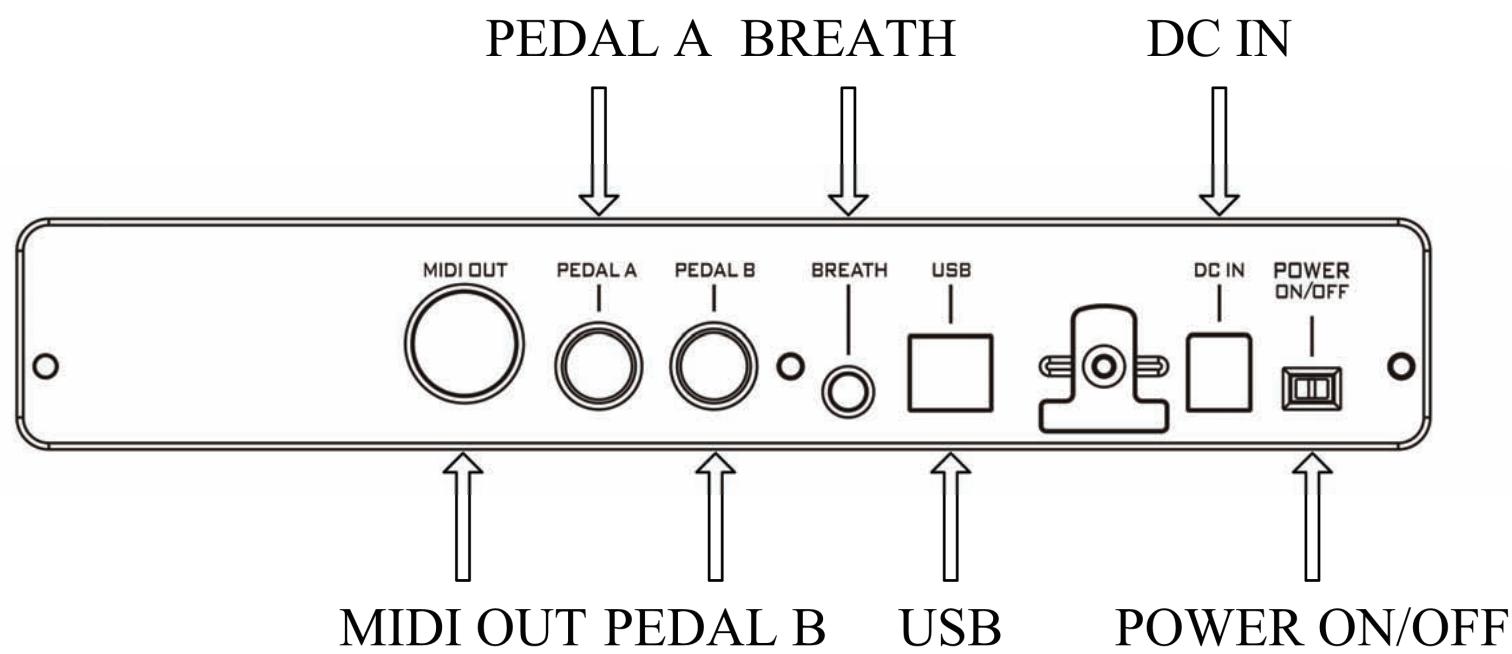
- MIDI OUT port x1
- PEDAL A jack: 1 / 4" TRS x1, can be used for volume or sustain pedal.
PEDAL B jack: 1 / 4'' TRS x1, can be used for volume or sustain pedal. - BREATH (Breath control or BC) jack: 1 / 8" TRS x1, compatible with YAMAHA BC3.
- USB port: to make computer connection for MIDI data transfer and get the USB bus power
DC IN(AC adaptor power in port): connect the AC adaptor here - POWER ON/OFF switch: Use it to turn the instrument on/off.
2 Installation guide
2.1 Power supply
- Make sure the power switch is set to OFF.
- Connect the AC adaptor to the POWER IN port in the rear panel.
- Make sure the AC requirement of the AC adaptor is compliant with the local AC supply, then connect the AC adaptor to the power supply outlet.



Make sure the AC requirement of the AC adaptor is compliant with the local AC supply, otherwise it will cause severe damage to the AC adaptor or the instrument, and it may cause electrical shock!
Only the AC adaptor designed for this product should be used. If you cannot find the right adaptor or the adaptor does not work, please contact local CME dealers. The usage of an improper adaptor may cause fire or electrical shock!
The AC adaptor varies from country to country. If you take the product from one country to another, please make sure your AC adaptor compliant with the local power supply. If you are not sure about the technical information for the power supply or the adaptor, you can consult a qualified local electrical engineer.
2.2 Power on order
When you have this product connected to a system, please set all the volume to minimum then follow the proper order to turn all the devices on: master MIDI device (which sends out MIDI data), slave MIDI device (which receives MIDI data), audio devices (mixer, amplifier, speakers). When you follow this order, all the signals (MIDI and audio) will go properly from the beginning to the end. If you will turn off the system, please follow the reverse order (turn off audio devices first, then MIDI devices).
3 Connections

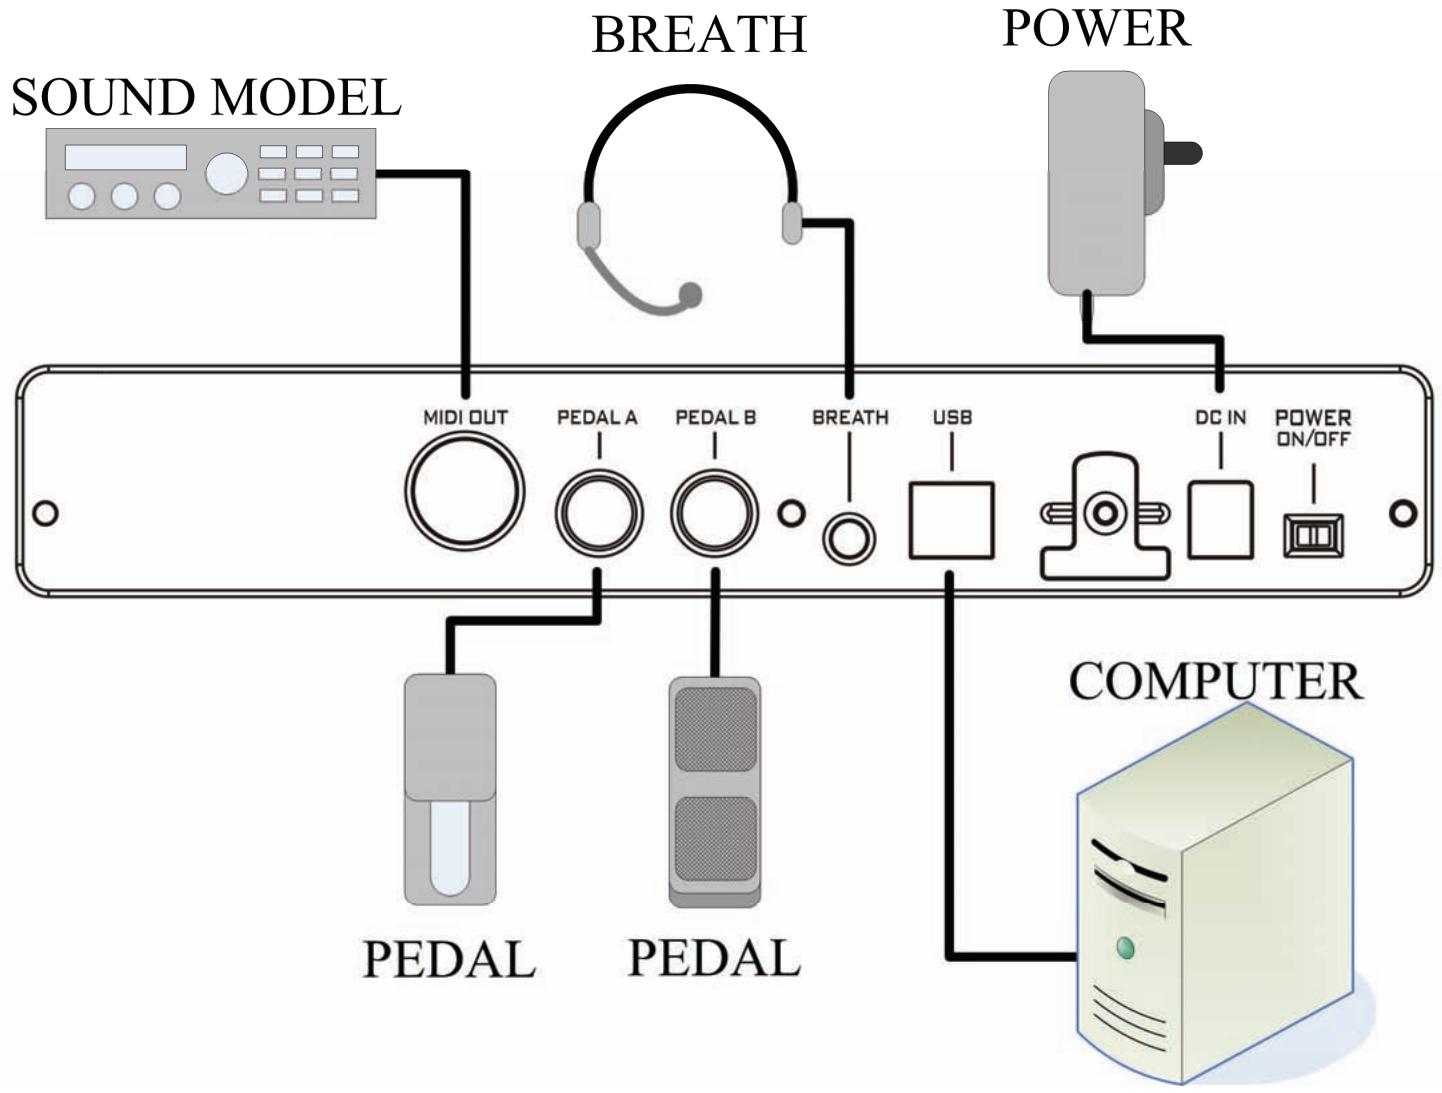
Before you make these connections, please turn off all devices to avoid possible damage.
Please refer to the fig. below to make connections:
4 Basic operation
The【SHIFT】button:
-OCTAVE/TRANSPOSE+
SHIFT
L DEFAULT J
- Press and hold the 【SHIFT】 button then press the 【OCTAVE/TRANSPOSE】 button for the transpose function.
- Press the 【SHIFT】 button to make it light on, the keyboard is switched to the keyboard function mode.
【Data dial】and the【EXIT/ENTER】button:
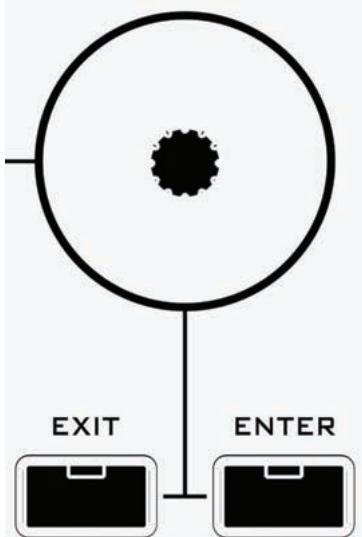
- By default the data dial is used to change the voice#. When you reached the desired voice#, press【ENTER】 to send the MIDI data. You can also press【EXIT】 to cancel the voice# change.
- In the keyboard function mode, you can also use【Data dial】and【EXIT/ENTER】 to change the parameters.
The【LAYER】button:
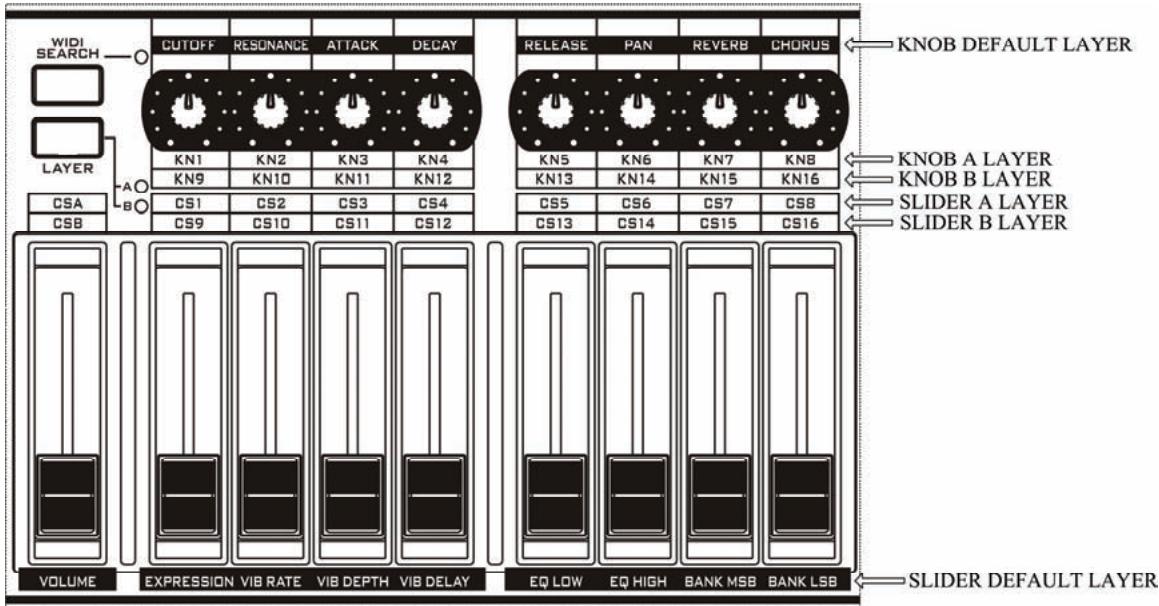
Use this button to switch to the function layers for knobs, faders and buttons. There are three layers for knobs, faders and buttons, and you can see the current layer from the right layer indicators: both indicator A and B off - the default layer; only indicator A on - layer A; only indicator B on - layer B.
5 Turning on
5.1 Normally turning on
Set the power switch on the rear panel to ON to turn on this product.
5.2 Driver installation
After you connect this product to your computer via USB and turn the product on, the computer will find it device and install the driver automatically.
You can plug and play this product on WINDOWS XP or Mac OSX.
- When the driver installation is finished, this product will be recognized as the "USB Audio Device".
The MIDI driver offers 2 USB INs and 2 USB OUTs.

Sometimes you may need to restart your computer during the driver installation. Please follow the on-screen instructions.
5.3 Turning on with initializing
If you press and hold both 【OCTAVE-】 and 【OCTAVE+】 buttons while turning on this product, it will enter the initialization process and return to the normal mode after the initializing is finished.

The initializing operation will clear all the user settings, please be careful !
6 Basic functions
6.1 Quickly selecting a voice
- Rotate the data dial to find the voice# them press the 【ENTER】 button the send the MIDI data, or press the 【EXIT】 button to cancel the operation.
This operation will send the program change message to select the voice.
Voice# range in some sound module is 0-127 instead of 1-128 in this product.
6.2 Transpose and octave
- Octave shift
You can shift the keyboard pitch in octaves by using the Octave function.
When the octave is shifted, the related button indicator will be on.
The octave shift range is -03 00 03 . Press the two octave buttons at the same time will set the octave shift to 00, and the indicator will be off.
- Transpose
You can shift the keyboard pitch in semi-notes by using the Transpose function.
- When the transpose value is changed, the related button indicator will flash slowly.
The transpose range is -12 00 12 semi-notes. Press the two transpose tuoins at the same time will set the transpose to 00, and the indicator will be off.
- When both octave and transpose values are changed, the related buttons will flash quickly.
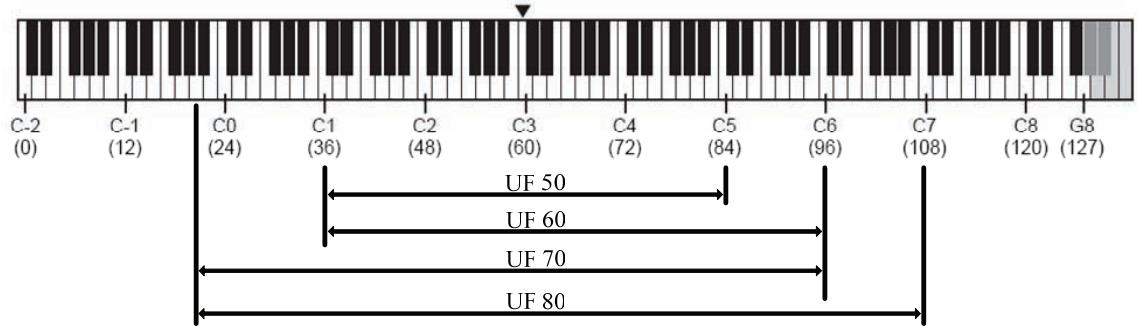
The default keyboard ranges of UF 50/60/70/80 are listed below:
The Pitch and key# (note#) list:
| OCTAVE# | C | C# | D | D# | E | F | F# | G | G# | A | A# | B |
| -1 | 0 | 1 | 2 | 3 | 4 | 5 | 6 | 7 | 8 | 9 | 10 | 11 |
| 0 | 12 | 13 | 14 | 15 | 16 | 17 | 18 | 19 | 20 | 21 | 22 | 23 |
| 1 | 24 | 25 | 26 | 27 | 28 | 29 | 30 | 31 | 32 | 33 | 34 | 35 |
| 2 | 36 | 37 | 38 | 39 | 40 | 41 | 42 | 43 | 44 | 45 | 46 | 47 |
| 3 | 48 | 49 | 50 | 51 | 52 | 53 | 54 | 55 | 56 | 57 | 58 | 59 |
| 4 | 60 | 61 | 62 | 63 | 64 | 65 | 66 | 67 | 68 | 69 | 70 | 71 |
| 5 | 72 | 73 | 74 | 75 | 76 | 77 | 78 | 79 | 80 | 81 | 82 | 83 |
| 6 | 84 | 85 | 86 | 87 | 88 | 89 | 90 | 91 | 92 | 93 | 94 | 95 |
| 7 | 96 | 97 | 98 | 99 | 100 | 101 | 102 | 103 | 104 | 105 | 106 | 107 |
| 8 | 108 | 109 | 110 | 111 | 112 | 113 | 114 | 115 | 116 | 117 | 118 | 119 |
| 9 | 120 | 121 | 122 | 123 | 124 | 125 | 126 | 127 |
6.3 Using knobs and faders
- When you adjust a knob or a fader, it will send specific MIDI data to change related parameter.
- When you adjust a knob or a fader, you will see related information on the DISPLAY.
- Please refer to the appendix
for more information.
You can customize the MIDI data to be sent using the 【 ASSIGN】function (8.1).
6.4 Using SEQ control buttons
- Press the SEQ control buttons to send specific MIDI data.
- Please refer to the appendix
for more information.
You can customize the MIDI data to be sent using the 【 ASSIGN】function (8.1).
6.5 Using function shortcut buttons
- Press the function shortcut button F1~F6 to send specific MIDI data.
- Please refer to the appendix
for more information.
You can customize the MIDI data to be sent using the 【ASSIGN】function (8.1-8.3).
6.6 Pitch wheel and modulation wheel
- Use the pitch wheel to send the pitch bend data by default, and the pitch bend range is up one semi-note and down one semi-note.
- Use the modulation wheel to send the modulation data.

You can customize the MIDI data to be sent using the 【 ASSIGN】function (8.1).
6.7 Pedal
- For the two pedal jacks, each one can be used for continuous pedal (e.g volume pedal) or switch pedal (e.g sustain pedal).
-
By default, PEDAL A is for sustain pedal and send CC#64 message, the data value is either 0 or 127(switch data); PEDAL B is for volume pedal and send CC#11 message, the data range is 0-127(continulus data).
-
To change pedal type or polarity, please use the system settings function (9.3-9.6).
You can customize the MIDI data to be sent using the 【ASSIGN】function (8.1).
6.8 Breath controller
- Use the breath control jack for a breath controller such as YAMAHA BC3 and send out the MIDI data.

You can customize the MIDI data to be sent using the 【ASSIGN】function (8.1).
By turning the gain and fine tune knobs in the breath controller, get a good breath feeling and data range.
6.9 Aftertouch
- After pressing a key, you can continue applying force to send channel after touch data.
- You can adjust the data sending rate or turn off those MIDI data (9.2).
- Please refer to the appendix
.
You can customize the MIDI data to be sent using the 【ASSIGN】function (8.1).
6.10 Bank selecting and program change (PATCH)
6.10.1 Bank MSB Select
Operation:【SHIFT】 C1【Bank MSB Select】 【Set value】 【ENTER】
- MIDI message sent: CC#0 + CC#32 + Program
Default value: 0
Value range: 0-127
6.10.2 Bank LSB Select
Operation:【SHIFT】 C#1【Bank LSB Select】 【Set value】 【ENTER】
- MIDI message sent: CC#0 + CC#32 + Program
Default value: 0
Value range: 0-127
6.10.3 Program Change
Operation:【SHIFT】 D1【Program Change】 【Set value】 【ENTER】
- MIDI message sent: CC#0 + CC#32 + Program
Default value: 1
Value range: 1-128
You can finish setting all the three values then press【ENTER】to send the data.
6.11 Keyboard Channel
Operation:【SHIFT】 A#1【Keyboard Channel】 【Set value】 【ENTER】
Default value: 1
Value range: 1-16
The keyboard channel settings only affect the keyboard, pitch wheel, modulation wheel, BC and pedals. The channels of faders, knobs and buttons will not be changed. To set the channels of faders, knobs or buttons, please use the 【ASSIGN】 function (8.1).
7 Advanced functions
7.1 Dual mode
- When the dual mode is enabled, all the notes played will be sent to two MIDI channels, so the sound will be doubled.
- In the dual mode, Transpose, Octave, and keyboard channel will only work for the second MIDI channel. However, the pitch wheel, modulation wheel, BC and pedals work for both the two MIDI channels.
Operation:【SHIFT】 B1【Dual】 【ENTER】
Default value: Off
Value range: Off、On

The dual and split functions can not be used at the same time.
7.2 Split mode
- When the split mode is enabled, the keyboard is deided to two regions (the left reigon and the right reigon). The two regions have independent settings such as MIDI channel, voice settings, transpose and octave. The original settings work for the left reigon.
- In the split mode, transpose and octave settings only work for the right reigon. However, the pitch wheel, modulation wheel, BC and pedals work for both the two reigons.
Operation:【SHIFT】 C2【Split】 【Set value】 【ENTER】
Default value: Off、54
Value range: Off、36-84
The dual and split functions can not be used at the same time.
7.3 Scale
The default scale type is 12 equal tones. However, you can chage the scale type to meet your music style.
Operation:【SHIFT】 G#1【Scale】 【Set value】 【ENTER】
Default value: 000
Value range: 000-041
- Please refer to the appendix
The Scale and Temperament functions can not be used at the same time.

If you set the scale other than the default one, the keyboard will be in the mono mode.
7.4 Temperament
- You can change the temperament other than the default equal one.
Operation:【SHIFT】 A1【Temperament】 【Set value】 【ENTER】
Default value: 000
Value range: 000-012 - Please refer to the appendix
for more information.
The Scale and Temperament functions can not be used at the same time.
When the temperament function is enabled, the keyboard will be in the mono mode.
7.5 DRAWBAR
- While playing a organ voice, you can use the DRAWBAR function to make the 9 faders work as the organ drawbars (data value will be sent reversely), so you can control the organ voice conveniently.
Operation:【SHIFT】 F#1【Drawbar】 【Setvalue】 【ENTER】
Default value: Off
Value range: Off、On
7.6 TEMPO
- By using the TEMPO function, you can send the TEMPO change data to control the TEMPO of the external sequencer.
Operation:【SHIFT】 G1【Tempo】 【Setvalue】 【ENTER】 - Default value: Off
Value range: Off, 30-250
If the external sequencer does not accept the Tempo change data, or it is not properly configured, the TEMPO function will not work.
7.7 MIDI RESET message
- You can reset the external MIDI device by sending a MIDI reset message.
| 名称 | 键位 | MIDI message sent |
| Reset All Control | D3 | CC#121 |
| GM On | D#3 | F0 7E 7F 09 01 F7 |
| GM2 On | E3 | F0 7E 7F 09 03 F7 |
| GS On | F3 | F0 41 10 42 12 40 00 7F 00 41 F7 |
| XG On | F#3 | F0 43 10 4C 00 00 7E 00 F7 |
| CME On | G3 | F0 00 20 63 00 00 00 00 7F F7 |

Please make sure your MIDI device support the related MIDI reset message before using this function.
8 ASSIGNING
8.1 Assigning Controllers
- You can use the ASSIGN function to re-define a control parts by data type and MIDI channel.
- Operation:【SHIFT】 D#1【Assign Controller】 【Locate a control part】 【Set value】 【ENTER】 【Assign Channel】 【Set value】 【ENTER】
- In the above assigning operation, to 【Locate a control part, please move a control part. For example, you can move a fader or rotate a knob, etc.】
- Controller value range: 0-171
- Channel value range: 1-16
- Please refer to the appendix
for more information.
There are two values for the cc#144 RPN and cc#145 NRPN in
In
To assign the keyboard aftertouch to other controller, please use the below key function assigning.
【SHIFT】 A#4【AssignA.Touch】 【Setvalue】 【ENTER】
8.2 Assigning Notes
- You can assign the function shortcut button F1-F6 to note on/off message and set the MIDI channel.
- Operation:【SHIFT】 E1【Assign Note】 【Locate a part】 【Set value】 【ENTER】 【Assign Channel】 【Set value】 【ENTER】
- In the above operation, please press a button from F1-F6 to【Locate a part】.
The note velocity is fixed to 127.
Note value range: 0-127 - Channel value range: 1-16
8.3 Assigning Program changes
- You can assign the function shortcut button F1-F6 to program change message and set the MIDI channel.
- Operation:【SHIFT】 F1【Assign Program】 【Locate a part】 【Set value】 【ENTER】 【Assign Channel】 【Set value】 【ENTER】
- In the above operation, please press a button from F1-F6 to【Locate a part】.
Voice value range: 1-128 - Channel value range: 1-16
Refer to the appendix
9 SYSTEM settings
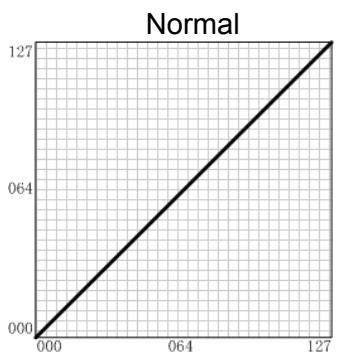
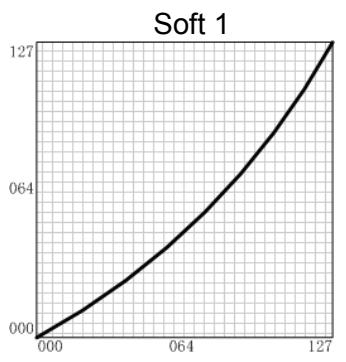
9.1 Keyboard V.Curve
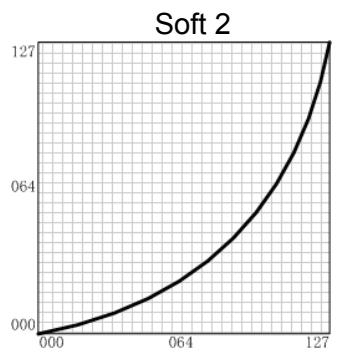
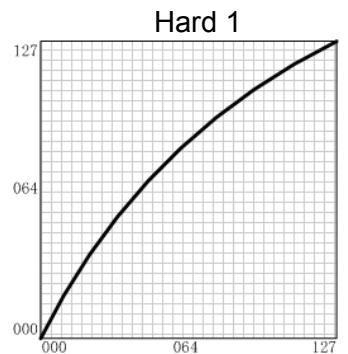
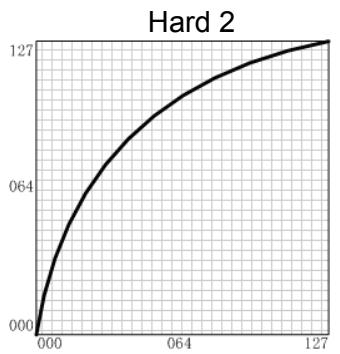
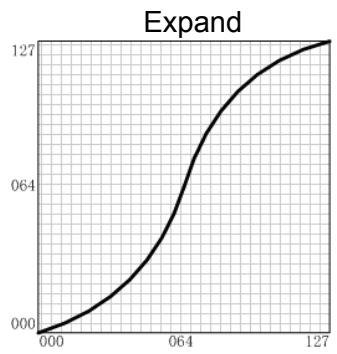
- You can try different velocity curves to find your favorite one and get the best touch response for the voice being played.
- Please refer to the appendix
for more information.
Operation:【SHIFT】 C#2【Keyboard V.Curve】 【Set value】 【ENTER】
Default value: 01
Value range: 00-09
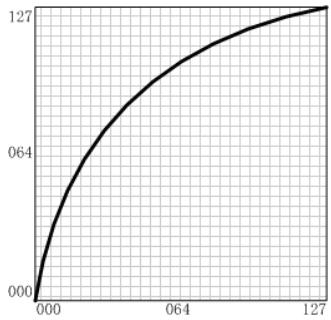
| Curve# | Name | Description |
| 00 | Normal | Straight line |
| 01 | Soft 1 | Down curve |
| 02 | Soft 2 | Down curve |
| 03 | Hard 1 | Up curve |
| 04 | Hard 2 | Up curve |
| 05 | Expand | Down then up |
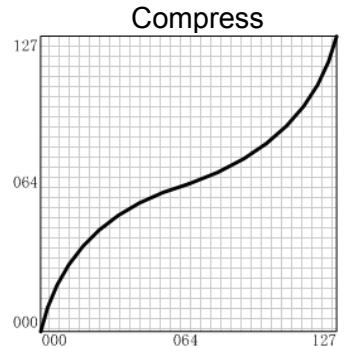
| 06 | Compress | Up then down |
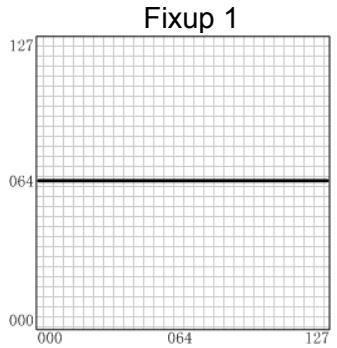
| 07 | Fixup 1 | Velocity value fixed at 64 |
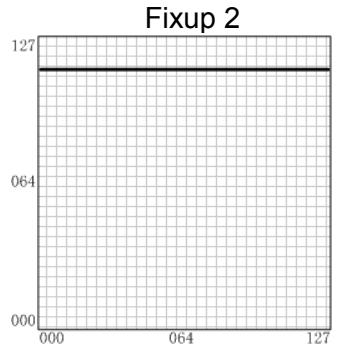
| 08 | Fixup 2 | Velocity value fixed at 100 |
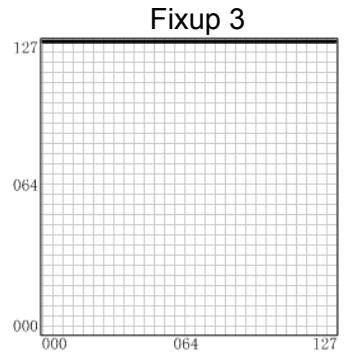
| 09 | Fixup 3 | Velocity value fixed at 127 |
9.2 A.Touch V.Curve
- Press and hold a key then change the pressure to send afttouch data. You can try different afttouch types to find your favorite one.
- Please refer to the appendix
for more information.
Operation:【SHIFT】 D2【Keyboard V.Curve】 【Set value】 【ENTER】 - Default value: Off
Value range: Off, 01-07
| A.Touch Curve# | Name | Description |
| Off | None | Aftertouch disabled |
| 01 | Normal | Straight line |
| 02 | Soft 1 | Down curve |
| 03 | Soft 2 | Down curve |
| 04 | Hard 1 | Up curve |
| 05 | Hard 2 | Up curve |
| 06 | Expand | Down then up |
| 07 | Compress | Up then down |
9.3 Pedal A Polarity
- You can set the pedal A polarity to make it work properly.
Operation:【SHIFT】 D#2【Pedal Polarity】 【Set value】 【ENTER】
Default value: 1
Value range: 1-2
9.4 Pedal A Type
- If you change pedal A type from switch to continuous or vice versa, please set the proper pedal type.
Operation:【SHIFT】 E2【Pedal Polarity】 【Set value】 【ENTER】 - Default value: 1(switch)
Value range: 1-2
9.5 Pedal B Polarity
- You can set the pedal B polarity to make it work properly.
Operation:【SHIFT】 F2【Pedal Polarity】 【Set value】 【ENTER】
Default value: 1
Value range: 1-2
9.6 Pedal B Type
- If you change pedal B type from switch to continuous or vice versa, please set the proper pedal type.
Operation:【SHIFT】 F#2【Pedal Polarity】 【Set value】 【ENTER】 - Default value: 2(continuous)
Value range: 1-2
9.7 Local On/Off
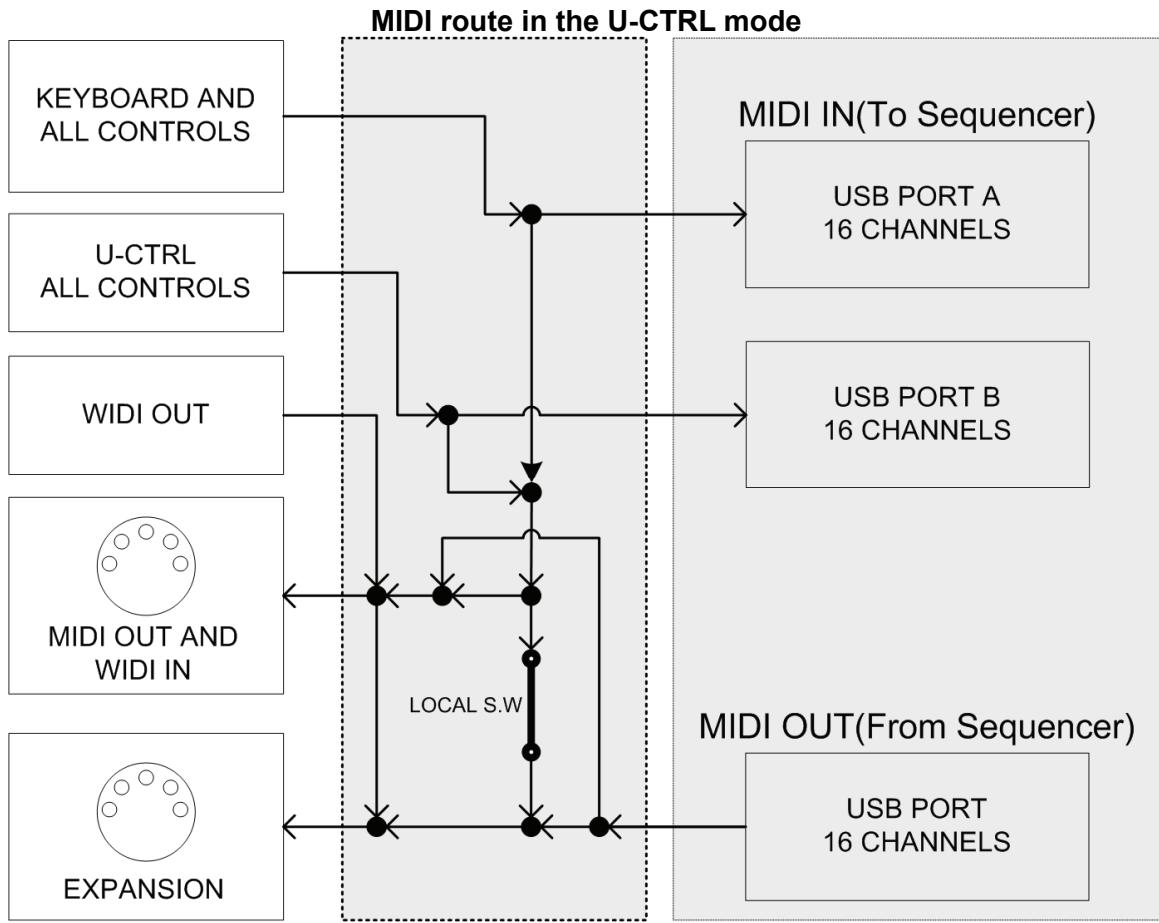
- The local control decides if the MIDI data will be sent to the expansion board.
- Please refer to the appendix
.
Operation:【SHIFT】 G2【Local On/Off】 【Set value】 【ENTER】
Default value: On
Value range: On, Off
9.8 Data Dump
- Use this function to dump the instrument settings by system exclusive messages, so you can quickly save and restore the settings.
Operation:【SHIFT】 G#2【Dump】 【ENTER】 - MIDI message sent: F0 00 20 63......F7
10 DISPLAY
- You can choose the contents to display, so you will see the information you want.
10.1 Program display
- To display the voice#:
Operation:【SHIFT】 A2【Program】 【ENTER】
Value range: 1-128
10.2 Bank MSB display
- To display the bank MSB:
Operation:【SHIFT】 A#2【Bank MSB】 【ENTER】
Value range: 0-127
10.3 Bank LSB display
To display the bank LSB:
Operation:【SHIFT】 B2【Bank LSB】 【ENTER】
Value range: 0-127
10.4 Note display
To display the note#:
Operation:【SHIFT】 C3【Note】
Value range: 0-127
10.5 Controller display
To display the cc#:
Operation:【SHIFT】 C#3【Controller】
Value range: 0-127
By default, the cc# is displayed.
11 WIDI (wireless MIDI)
- This product has a built-in bi-directional wireless MIDI system (WIDI-EK), and this WIDI-EK work as a wireless MIDI interface to transmit or receive MIDI data with another WIDI-compatible device, such as CME WIDI X8, CME WIDI XU, or another UF v2 product, etc.
- The built-in WIDI-EK system will get MIDI data from the UF v2 product and convert the data to radio signal to transmit, and will receive the radio signal then convert it to MIDI data for the UF v2 product.
- Please refer to the appendix
.
11.1 Searching for a MIDI device
- When the UF v2 product is turned on, the WIDI-EK will automatically find another free WIDI device and establish the radio communication.
- To search another WIDI device again, please press the【WIDI SEARCH】button in the front panel.
A "Free WIDI device" is an available WIDI device that is not in use with another one.
11.2 WIDI On/Off
- You can enable or disable the built-in WIDI system.
Operation:【SHIFT】 G#3【WIDI On/Off】 【Set value】 【ENTER】 - Default value: On
- Value range: On(F0 00 20 63 00 07 01 02 10 6F F7), Off(F0 00 20 63 00 07 01 02 10 60 F7)
11.3 Setting Frequency
Operation:【SHIFT】 A3【WIDI Frequency】 【Set value】 【ENTER】
Default value: 1
Value range: 0-1(F0 00 20 63 00 07 01 02 10 5F F7)
11.4 Selecting a radio Channel
- The WIDI-EK system supports 64 radio channels. You can use up to 32 pairs of WIDI devices at the same place, and each pair uses a exclusive channel.
- You can select the radio channel to make your UF v2 product work at the same radio channel with another WIDI device.
Operation:【SHIFT】 A#3【WIDI Channel】 【Set value】 【ENTER】
Default value: 1 - Value range: 1-64(F0 00 20 63 00 07 01 02 10 nn F7)nn=00H-40H
Please make sure the same pair of WIDI devices use the same radio channel, and different parts use different channels for proper communication.

Up to 32 pairs of WIDI devices can be used at the same place. When many pairs of the WIDI devices are used at the same place, please keep the channel settings within 1-32 for best communication quality.

Please try your best to avoid obstacles or interference.

In case of the following events, the WIDI-EK will automatically send "All Notes Off" and "All Sound Off" to stop the sound module: poor signal with data loss; the transmitter is switched off; radio channel is changed.
12 U-CTRL mode
Notes for the U-CTRL mode:
- You can control popular computer software in the U-CTRL mode. In this mode, knobs, faders and buttons will send out preset control data.
Operation:
- 【SHIFT】 B3【U-CTRL】, then the indicators around the data knobs will be in the U shape to show the U-CTRL mode. Repeat the operation again to quit from the U-CTRL mode.
- Launch your computer software, and follow the software's manual to load the MackieControl template.
-
Set the remote control port in the template as "USB AUDIO DEVICE (2)" (Device name for the instrument)
-
Please refer to the list below regarding the MackieControl function map:
| UF v2 part | MCU part |
| Fader 1-9 | Fader 1-9 |
| Knob 1-8 | Knob 1-8 |
| Data dial | Data dial |
| Button F1-F6 | REC/RDY 1-6 |
| Shift+Button F1-F6 | Mute 1-6 |
| Load | Left |
| Save | Right |
| Shift+Dec | Add |
| Shift+Inc | Next |
| Rtz | Rtz |
| Rew | Rew |
| Ff | Ff |
| Stop | Stop |
| Play | Play |
| Rec | Rec |
13 Registration BANK access
- You can save all the instrument settings to the registration BANK.
-
There are about 10 registration BANKs in the instrument. If you need save more registrations, you can use the data dump function to save the registration data to your computer (9.8).
-
Saving the settings to a registration BANK:
Press the 【LOAD】 button and the 【SAVE】 button at the same time, and the BANK# will flash.
Use the data dial to locate the needed BANK#, then press the 【SAVE】 button to save.
- Loading the settings from a registration BANK:
Press the 【LOAD】 button and the 【SAVE】 button at the same time, and the BANK# will flash.
Use the data dial to locate the needed BANK#, then press the 【LOAD】 button to load.

The loaded data will override the current settings without notification. If the current settings are not saved, after the loading operation the original settings will lost.
14 Firmware UPDATE
About the UPDATE function:
- With the UF Brain program, you can update the program and data of the instrument via USB connection. To get the newest UF Brain program, please visit www.cme-pro.com
15 EXPANSION
- You can use the expansion slot to connect an expansion board, such as a firewire expansion board, a sound module expansion board, etc.
- Please read the expansion board user's manual carefully and follow the instructions to install and use the expansion board.
- Please visit www.cme-pro.com for more information.
16 Appendix
16.1 Initial status
| Status | Contral part | Panel text | Function |
| all layers | Pitch wheel | PITCHBEND | Pitchbend |
| all layers | Modulation | MODULATION | CC#1-Modulation |
| all layers | Pedal A | SUSTAIN | CC#64-Sustain |
| all layers | Pedal B | CONTROLLER | CC#11-Expression |
| all layers | Breath control | BREATH | CC#2-Breath |
| all layers | Return to zero | (RTZ) | CC#115 |
| all layers | Rewind | (REW) | CC#116 |
| all layers | Fast forward | (FF) | CC#117 |
| all layers | Record | (REC) | CC#114 |
| all layers | Stop | (STOP) | CC#118 |
| all layers | Play | (PLAY) | CC#119 |
| all layers | Locate 1 | LOCATE1 | CC#112 |
| all layers | Locate 2 | LOCATE2 | CC#113 |
| all layers | Button F1+F2 | MUTE | MUTE |
| all layers | Button F2+F3 | SNAPSHOT | SNAPSHOT |
| all layers | Button F4+F5 | GM ON | GM ON |
| all layers | Button F5+F6 | ALL NOTES OFF | CC#123 |
| default layer (indicator A+B off) | Knob 1 | CUTOFF | CC#74-CUTOFF |
| default layer (indicator A+B off) | Knob 2 | RESONANCE | CC#71-RESONANCE |
| default layer (indicator A+B off) | Knob 3 | ATTACK | CC#73-ATTACK |
| default layer (indicator A+B off) | Knob 4 | DECAY | CC#75-DECAY |
| default layer (indicator A+B off) | Knob 5 | RELEASE | CC#72-RELEASE |
| default layer (indicator A+B off) | Knob 6 | PAN | CC#10-PAN |
| default layer (indicator A+B off) | Knob 7 | REVERB | CC#91-REVERB |
| default layer (indicator A+B off) | Knob 8 | CHORUS | CC#93-CHORUS |
| default layer (indicator A+B off) | Fader 1 | VOLUME | CC#07-VOLUME |
| default layer (indicator A+B off) | Fader 2 | EXPRESSION | CC#11-EXPRESSION |
| default layer (indicator A+B off) | Fader 3 | VIB RATE | CC#76-VIB RATE |
| default layer (indicator A+B off) | Fader 4 | VIB DEPTH | CC#77-VIB DEPTH |
| default layer (indicator A+B off) | Fader 5 | VIB DELAY | CC#78-VIB DELAY |
| default layer (indicator A+B off) | Fader 6 | EQ LOW | EQ Low |
| default layer (indicator A+B off) | Fader 7 | EQ HIGH | EQ High |
| default layer (indicator A+B off) | Fader 8 | BANK MSB | CC#00-BANK MSB |
| default layer (indicator A+B off) | Fader 9 | BANK LSB | CC#32-BANK LSB |
| default layer (indicator A+B off) | Button F1 | F1 | Program#01 |
| default layer (indicator A+B off) | Button F2 | F2 | Program#06 |
| default layer (indicator A+B off) | Button F3 | F3 | Program#17 |
| default layer (indicator A+B off) | Button F4 | F4 | Program#26 |
| default layer (indicator A+B off) | Button F5 | F5 | Program#49 |
| default layer (indicator A+B off) | Button F6 | F6 | Program#62 |
| Layer A (indicator A on) | Knob 1 | KN1 | CC#10-PAN,CH1 |
| Layer A (indicator A on) | Knob 2 | KN2 | CC#10-PAN,CH2 |
| Layer A (indicator A on) | Knob 3 | KN3 | CC#10-PAN,CH3 |
| Layer A (indicator A on) | Knob 4 | KN4 | CC#10-PAN,CH4 |
| Layer A (indicator A on) | Knob 5 | KN5 | CC#10-PAN,CH5 |
| Layer A (indicator A on) | Knob 6 | KN6 | CC#10-PAN,CH6 |
| Layer A (indicator A on) | Knob 7 | KN7 | CC#10-PAN,CH7 |
| Layer A (indicator A on) | Knob 8 | KN8 | CC#10-PAN,CH8 |
| Layer A (indicator A on) | Fader 1 | CSa | MASTER VOLUME |
| Layer A (indicator A on) | Fader 2 | CS1 | CC#07-VOLUME,CH1 |
| Layer A (indicator A on) | Fader 3 | CS2 | CC#07-VOLUME,CH2 |
| Layer A (indicator A on) | Fader 4 | CS3 | CC#07-VOLUME,CH3 |
| Layer A (indicator A on) | Fader 5 | CS4 | CC#07-VOLUME,CH4 |
| Layer A (indicator A on) | Fader 6 | CS5 | CC#07-VOLUME,CH5 |
| Layer A (indicator A on) | Fader 7 | CS6 | CC#07-VOLUME,CH6 |
| Layer A (indicator A on) | Fader 8 | CS7 | CC#07-VOLUME,CH7 |
| Layer A (indicator A on) | Fader 9 | CS8 | CC#07-VOLUME,CH8 |
| Layer A (indicator A on) | Button F1 | F1 | CC#50 |
| Layer A (indicator A on) | Button F2 | F2 | CC#51 |
| Layer A (indicator A on) | Button F3 | F3 | CC#52 |
| Layer A (indicator A on) | Button F4 | F4 | CC#53 |
| Layer A (indicator A on) | Button F5 | F5 | CC#54 |
| Layer A (indicator A on) | Button F6 | F6 | CC#55 |
| Layer B (indicator B on) | Knob 1 | KN1 | CC#10-PAN,CH9 |
| Layer B (indicator B on) | Knob 2 | KN2 | CC#10-PAN,CH10 |
| Layer B (indicator B on) | Knob 3 | KN3 | CC#10-PAN,CH11 |
| Layer B (indicator B on) | Knob 4 | KN4 | CC#10-PAN,CH12 |
| Layer B (indicator B on) | Knob 5 | KN5 | CC#10-PAN,CH13 |
| Layer B (indicator B on) | Knob 6 | KN6 | CC#10-PAN,CH14 |
| Layer B (indicator B on) | Knob 7 | KN7 | CC#10-PAN,CH15 |
| Layer B (indicator B on) | Knob 8 | KN8 | CC#10-PAN,CH16 |
| Layer B (indicator B on) | Fader 1 | CSb | MASTER VOLUME |
| Layer B (indicator B on) | Fader 2 | CS9 | CC#07-VOLUME,CH9 |
| Layer B (indicator B on) | Fader 3 | CS10 | CC#07-VOLUME,CH10 |
| Layer B (indicator B on) | Fader 4 | CS11 | CC#07-VOLUME,CH11 |
| Layer B (indicator B on) | Fader 5 | CS12 | CC#07-VOLUME,CH12 |
| Layer B (indicator B on) | Fader 6 | CS13 | CC#07-VOLUME,CH13 |
| Layer B (indicator B on) | Fader 7 | CS14 | CC#07-VOLUME,CH14 |
| Layer B (indicator B on) | Fader 8 | CS15 | CC#07-VOLUME,CH15 |
| Layer B (indicator B on) | Fader 9 | CS16 | CC#07-VOLUME,CH16 |
| Layer B (indicator B on) | Button F1 | F1 | CC#56 |
| Layer B (indicator B on) | Button F2 | F2 | CC#57 |
| Layer B (indicator B on) | Button F3 | F3 | CC#58 |
| Layer B (indicator B on) | Button F4 | F4 | CC#59 |
| Layer B (indicator B on) | Button F5 | F5 | CC#60 |
| Layer B (indicator B on) | Button F6 | F6 | CC#61 |
16.2 Assignable controllers list
| Controller# | Name |
| 000 | Bank Select |
| 001 | Modulation wheel |
| 002 | Breath control |
| 003 | Undefined |
| 004 | Foot controller |
| 005 | Portamento time |
| 006 | Data Entry |
| 007 | Channel Volume |
| 008 | Balance |
| 009 | Undefined |
| 010 | Pan |
| 011 | Expression |
| 012 | Effect control 1 |
| 013 | Effect control 2 |
| 014 | Undefined |
| 015 | Undefined |
| 016 | General Purpose #1 |
| 017 | General Purpose #2 |
| 018 | General Purpose #3 |
| 019 | General Purpose #4 |
| 020 | Undefined |
| 021 | Undefined |
| 022 | Undefined |
| 023 | Undefined |
| 024 | Undefined |
| 025 | Undefined |
| 026 | Undefined |
| 027 | Undefined |
| 028 | Undefined |
| 029 | Undefined |
| 030 | Undefined |
| 031 | Undefined |
| 032 | Bank Select |
| 033 | Modulation wheel |
| 034 | Breath control |
| 035 | Undefined |
| 036 | Foot controller |
| 037 | Portamento time |
| 038 | Data entry |
| 039 | Channel Volume |
| 040 | Balance |
| 041 | Undefined |
| 042 | Pan |
| 043 | Expression |
| 044 | Effect control 1 |
| 045 | Effect control 2 |
| 046 | Undefined |
| 047 | Undefined |
| 048 | General Purpose #1 |
| 049 | General Purpose #2 |
| 050 | General Purpose #3 |
| 051 | General Purpose #4 |
| 052 | Undefined |
| 053 | Undefined |
| 054 | Undefined |
| 055 | Undefined |
| 056 | Undefined |
| 057 | Undefined |
| 058 | Undefined |
| 059 | Undefined |
| 060 | Undefined |
| 061 | Undefined |
| 062 | Undefined |
| 063 | Undefined |
| 064 | Damper pedal |
| 065 | Portamento on/off |
| 066 | Sustenuto on/off |
| 067 | Soft pedal on/off |
| 068 | Legato Footswitch |
| 069 | Hold 2 |
| 070 | Sound Variation |
| 071 | Timbre/Harmonic Intens. |
| 072 | Release Time |
| 073 | Attack Time |
| 074 | Brightness |
| 075 | Decay Time |
| 076 | Vibrato Rate) |
| 077 | Vibrato Depth |
| 078 | Vibrato Delay |
| 079 | Sound Cont. |
| 080 | General Purpose #5 |
| 081 | General Purpose #6 |
| 082 | General Purpose #7 |
| 083 | General Purpose #8 |
| 084 | Portamento Control |
| 085 | Undefined |
| 086 | Undefined |
| 087 | Undefined |
| 088 | Undefined |
| 089 | Undefined |
| 090 | Undefined |
| 091 | Reverb Send Level |
| 092 | Tremolo Depth |
| 093 | Chorus Send Level |
| 094 | Celeste/Detune Depth |
| 095 | Phaser Depth |
| 096 | Data entry +1 |
| 097 | Data entry -1 |
| 098 | NRPN LSB |
| 099 | NRPN MSB |
| 100 | RPN LSB |
| 101 | RPN MSB |
| 102 | Undefined |
| 103 | Undefined |
| 104 | Undefined |
| 105 | Undefined |
| 106 | Undefined |
| 107 | Undefined |
| 108 | Undefined |
| 109 | Undefined |
| 110 | Undefined |
| 111 | Undefined |
| 112 | Undefined |
| 113 | Undefined |
| 114 | Undefined |
| 115 | Undefined |
| 116 | Undefined |
| 117 | Undefined |
| 118 | Undefined |
| 119 | Undefined |
| 120 | All Sound Off |
| 121 | Reset All Controllers |
| 122 | Local control on/off |
| 123 | All notes off |
| 124 | Omni mode off |
| 125 | Omni mode on |
| 126 | Poly mode off |
| 127 | Poly mode on |
| 128 * | Pitch Bend Sensitivity |
| 129 * | Fine Tuning |
| 130 * | Coarse Tuning |
| 131 * | Vibrato Rate |
| 132 * | Vibrato Depth |
| 133 * | Vibrato Delay |
| 134 * | Low Pass Filter Cutoff Frequency |
| 135 * | Low Pass Filter Resonance |
| 136 * | High Pass Filter Cutoff Frequency |
| 137 * | EQ Low Gain |
| 138 * | EQ High Gain |
| 139 * | EQ Low Frequency |
| 140 * | EQ High Frequency |
| 141 * | EG Attack Time |
| 142 * | EG Decay Time |
| 143 * | EG Release Time |
| 144 * | RPN |
| 145 * | NRPN |
| 146 * | Channel Pressure |
| 147 * | Master Volume |
| 148 * | Master Balance |
| 149 ** | CME ON |
| 150 ** | GM ON |
| 151 ** | XG ON |
| 152 ** | GS ON |
| 153 ** | GM2 ON |
| 154 * | Tempo |
| 155 ** | Start |
| 156 ** | Continue |
| 157 ** | Stop |
| 158 ** | System Reset |
| 159 ** | Stop |
| 160 ** | PLAY |
| 161 ** | DEFERRED PLAY |
| 162 ** | FORWARD |
| 163 ** | REWIND |
| 164 ** | RECORD STROBE |
| 165 ** | RECORD EXIT |
| 166 ** | RECORD PAUSE |
| 167 ** | PAUSE |
| 168 ** | EJECT |
| 169 ** | CHASE |
| 170 ** | COMMAND ERROR RESET |
| 171 ** | MMC RESET |
| 172* | Pitch Bend |
- Those controllers cannot be assigned to buttons, Seq or sustain pedal.
** Those controllers cannot be assigned to pitch wheel, modulation wheel, aftertouch, breath control, faders or knobs.
16.3 GM voice list
| Voice# | Name | Voice# | Name | Voice# | Name | Voice# | Name |
| 001 | GrandPno | 033 | Aco.Bass | 065 | SprnoSax | 097 | Rain |
| 002 | BritePno | 034 | FngrBass | 066 | Alto Sax | 098 | SoundTrk |
| 003 | El.Grand | 035 | PickBass | 067 | TenorSax | 099 | Crystal |
| 004 | HnkyTonk | 036 | Fretless | 068 | Bari.Sax | 100 | Atmosphr |
| 005 | E.Piano1 | 037 | SlapBas1 | 069 | Oboe | 101 | Bright |
| 006 | E.Piano2 | 038 | SlapBas2 | 070 | Eng.Horn | 102 | Goblins |
| 007 | Harpsi. | 039 | SynBass1 | 071 | Bassoon | 103 | Echoes |
| 008 | Clavi | 040 | SynBass2 | 072 | Clarinet | 104 | Sci-Fi |
| 009 | Celesta | 041 | Violin | 073 | Piccolo | 105 | Sitar |
| 010 | Glocken | 042 | Viola | 074 | Flute | 106 | Banjo |
| 011 | MusicBox | 043 | Cello | 075 | Recorder | 107 | Shamisen |
| 012 | Vibes | 044 | Contrabs | 076 | PanFlute | 108 | Koto |
| 013 | Marimba | 045 | Trem.Str | 077 | Bottle | 109 | Kalimba |
| 014 | Xylophon | 046 | Pizz.Str | 078 | Shakhchi | 110 | Bagpipe |
| 015 | TubulBel | 047 | Harp | 079 | Whistle | 111 | Fiddle |
| 016 | Dulcimer | 048 | Timpani | 080 | Ocarina | 112 | Shanai |
| 017 | DrawOrgn | 049 | Strings1 | 081 | SquareLd | 113 | TnkIBell |
| 018 | PercOrgn | 050 | Strings2 | 082 | Saw Lead | 114 | Agogo |
| 019 | RockOrgn | 051 | Syn Str1 | 083 | CaliopLd | 115 | SteelDrm |
| 020 | ChrchOrg | 052 | Syn Str2 | 084 | Chiff Ld | 116 | WoodBlok |
| 021 | ReedOrgn | 053 | ChiorAah | 085 | CharanLd | 117 | TaikoDrm |
| 022 | Acordion | 054 | VoiceOoh | 086 | Voice Ld | 118 | MelodTom |
| 023 | Harmnica | 055 | SynVoice | 087 | Fifth Ld | 119 | Syn Drum |
| 024 | TangoAcd | 056 | Orch.Hit | 088 | Bass&Ld | 120 | RevCymbl |
| 025 | NylonGtr | 057 | Trumpet | 089 | NewAgePad | 121 | FretNoiz |
| 026 | SteelGtr | 058 | Trombone | 090 | Warm Pad | 122 | BrthNoiz |
| 027 | Jazz Gtr | 059 | Tuba | 091 | PolySyPd | 123 | Seashore |
| 028 | CleanGtr | 060 | Mute Trp | 092 | ChoirPad | 124 | Tweet |
| 029 | Mute.Gtr | 061 | Fr. Horn | 093 | BowedPad | 125 | Telephone |
| 030 | Ovrdrive | 062 | BrasSect | 094 | MetalPad | 126 | Helicptr |
| 031 | Dist.Gtr | 063 | SynBrss1 | 095 | Halo Pad | 127 | Applause |
| 032 | GtrHarmo | 064 | SynBrss2 | 096 | SweepPad | 128 | Gunshot |
16.4 Scale list
| Scale No. | Pitch name | C | C# | D | D# | E | F | F# | G | G# | A | A# | B |
| Note number: | 1 | 2 | 3 | 4 | 5 | 6 | 7 | 8 | 9 | 10 | 11 | 12 | |
| 001 | Major Scale | C | C | D | D | E | F | F | G | G | A | A | B |
| 002 | Pentatonic Major Scale | C | C | D | D | E | E | E | G | G | A | A | A |
| 003 | Blues Major Scale | C | C | D# | D# | F | F | F# | G | G | A | A | A |
| 004 | Minor Scale | C | C | D | D# | D# | F | F | G | G# | G# | A# | A# |
| 005 | Melodic Minor Scale | C | C | D | D# | D# | F | F | G | G | A | A | B |
| 006 | Harmonic Minor Scale | C | C | D | D# | D# | F | F | G | G# | A | A | B |
| 007 | Pentatonic Minor Scale | C | C | D# | D# | D# | F | F | G | G | A# | A# | A# |
| 008 | Blues Minor Scale | C | C | D# | D# | D# | F | F# | G | G | A# | A# | A# |
| 009 | Augmented Scale | C | C | D# | D# | E | E | G | G | G# | G# | B | B |
| 010 | Be-Bop Scale | C | C | D | D | E | F | F | G | G | A | A# | B |
| 011 | Whole-Half Scale | C | C | D | D# | D# | F | F# | F# | G# | A | A | B |
| 012 | Half-Whole Scale | C | C# | C# | D# | E | E | F# | G | G | A | A# | A# |
| 013 | Whole Tone Scale | C | C | D | D | E | E | F# | F# | G# | G# | A# | A# |
| 014 | Augmented fifth Scale | C | C | D | D | E | F | F | G | G# | A | A | B |
| 015 | Algerian Scale | C | C | D | D# | D# | F# | F# | G | G# | G# | B | B |
| 016 | Arabian Scale | C | C | D | D | E | F | F# | F# | G# | G# | A# | A# |
| 017 | Balinese Scale | C | C# | C# | D# | D# | D# | G | G | G# | G# | G# | G# |
| 018 | Bartok Scale | C | C | D | D | E | E | F# | G | G | A | A# | A# |
| 019 | Byzantine Scale | C | C# | C# | E | E | F | F | G | G# | G# | B | B |
| 020 | Egyptian Scale | C | C | D | D | F | F | F | G | G | G | A# | A# |
| 021 | Enigmatic Scale | C | C# | C# | E | E | E | F# | F# | G# | G# | A# | B |
| 022 | Spanish Scale | C | C# | C# | E | E | F | F | G | G# | G# | A# | A# |
| 023 | Spanish 8 Tone Scale | C | C# | C# | D# | E | F | F# | F# | G# | G# | A# | A# |
| 024 | Gypsy Scale | C | C# | C# | E | E | F | F | G | G | A | A# | A# |
| 025 | Hungarian Gypsy Scale | C | C | D | D# | D# | F# | F# | G | G# | G# | A# | A# |
| 026 | Hindu Scale | C | C | D | D | E | F | F | G | G# | G# | A# | A# |
| 027 | Iwato Scale | C | C# | C# | C# | F | F | F# | F# | F# | A# | A# | A# |
| 028 | Japanese Scale | C | C# | C# | C# | F | F | F | G | G# | G# | G# | G# |
| 029 | Javanese Scale | C | C# | C# | D# | D# | F | F | G | G | A | A# | A# |
| 030 | Hawaiian Scale | C | C | D | D# | D# | F | F | G | G | A | A | B |
| 031 | Hirajoshi Scale | C | C | D | D# | D# | D# | G | G | G# | G# | G# | G# |
| 032 | Hungarian Minor Scale | C | C | D | D# | D# | F# | F# | G | G# | G# | B | B |
| 033 | Hungarian Major Scale | C | C | D# | D# | E | E | F# | G | G | A | A# | A# |
| 034 | Leading Whole Tone Scale | C | C | D | D | E | E | F# | F# | G# | G# | A# | B |
| 035 | Mohammedan Scale | C | C | D | D# | D# | F | F | G | G# | G# | B | B |
| 036 | Mongolian Scale | C | C | D | D | E | E | G | G | G | A# | A# | A# |
| 037 | Neapolitan Minor Scale | C | C# | C# | D# | D# | F | F | G | G# | G# | B | B |
| 038 | Neapolitan Major Scale | C | C# | C# | D# | D# | F | F | G | G | A | A | B |
| 039 | Oriental Scale | C | C# | C# | E | E | F | F# | F# | A | A | A# | A# |
| 040 | Pelog Scale | C | C# | C# | D# | D# | D# | G | G | G | A# | A# | A# |
| 041 | Persian Scale | C | C# | C# | E | E | F | F# | F# | G# | G# | B | B |
001-Major Scale

002-Pentatonic Major Scale

003-Blues Major Scale

004-Minor Scale

005-Melodic Minor Scale

006-Harmonic Minor Scale

007-Pentatonic Minor Scale

008-Blues Minor Scale

009-Augmented Scale

010-Be-Bop Scale

011-Whole-Half Scale

012-Half-Whole Scale

013-Whole Tone Scale

014-Augmented fifth Scale

015-Algerian Scale

016-Arabian Scale

017-Balinese Scale

018-Bartok Scale

019-Byzantine Scale

020-Egyptian Scale

021-Enigmatic Scale

022-Spanish Scale

023-Spanish 8 Tone Scale

024-Gypsy Scale

025-Hungarian Gypsy Scale

026-Hindu Scale

027-Iwato Scale

028-Japanese Scale

029-Javanese Scale

030-Hawaiian Scale

031-Hirajoshi Scale

032-Hungarian Minor Scale

033-Hungarian Major Scale

034-Leading Whole Tone Scale

035-Mohammedan Scale

036-Mongolian Scale

037-Neapolitan Minor Scale

038-Neapolitan Major Scale

039-Oriental Scale

040-Pelog Scale

041-Persian Scale

16.5 Note list
| Note # | Name |
| 000 | C-2 |
| 001 | C#-2 |
| 002 | D-2 |
| 003 | D#-2 |
| 004 | E-2 |
| 005 | F-2 |
| 006 | F#-2 |
| 007 | G-2 |
| 008 | G#-2 |
| 009 | A-2 |
| 010 | A#-2 |
| 011 | B-2 |
| 012 | C-1 |
| 013 | C#-1 |
| 014 | D-1 |
| 015 | D#-1 |
| 016 | E-1 |
| 017 | F-1 |
| 018 | F#-1 |
| 019 | G-1 |
| 020 | G#-1 |
| 021 | A-1 |
| 022 | A#-1 |
| 023 | B-1 |
| 024 | C0 |
| 025 | C#0 |
| 026 | D0 |
| 027 | D#0 |
| 028 | E0 |
| 029 | F0 |
| 030 | F#0 |
| 031 | G0 |
| Note # | Name |
| 032 | G#0 |
| 033 | A0 |
| 034 | A#0 |
| 035 | B0 |
| 036 | C1 |
| 037 | C#1 |
| 038 | D1 |
| 039 | D#1 |
| 040 | E1 |
| 041 | F1 |
| 042 | F#1 |
| 043 | G1 |
| 044 | G#1 |
| 045 | A1 |
| 046 | A#1 |
| 047 | B1 |
| 048 | C2 |
| 049 | C#2 |
| 050 | D2 |
| 051 | D#2 |
| 052 | E2 |
| 053 | F2 |
| 054 | F#2 |
| 055 | G2 |
| 056 | G#2 |
| 057 | A2 |
| 058 | A#2 |
| 059 | B2 |
| 060 | C3 |
| 061 | C#3 |
| 062 | D3 |
| 063 | D#3 |
| Note # | Name |
| 064 | E3 |
| 065 | F3 |
| 066 | F#3 |
| 067 | G3 |
| 068 | G#3 |
| 069 | A3 |
| 070 | A#3 |
| 071 | B3 |
| 072 | C4 |
| 073 | C#4 |
| 074 | D4 |
| 075 | D#4 |
| 076 | E4 |
| 077 | F4 |
| 078 | F#4 |
| 079 | G4 |
| 080 | G#4 |
| 081 | A4 |
| 082 | A#4 |
| 083 | B4 |
| 084 | C5 |
| 085 | C#5 |
| 086 | D5 |
| 087 | D#5 |
| 088 | E5 |
| 089 | F5 |
| 090 | F#5 |
| 091 | G5 |
| 092 | G#5 |
| 093 | A5 |
| 094 | A#5 |
| 095 | B5 |
| Note # | Name |
| 096 | C6 |
| 097 | C#6 |
| 098 | D6 |
| 099 | D#6 |
| 100 | E6 |
| 101 | F6 |
| 102 | F#6 |
| 103 | G6 |
| 104 | G#6 |
| 105 | A6 |
| 106 | A#6 |
| 107 | B6 |
| 108 | C7 |
| 109 | C#7 |
| 110 | D7 |
| 111 | D#7 |
| 112 | E7 |
| 113 | F7 |
| 114 | F#7 |
| 115 | G7 |
| 116 | G#7 |
| 117 | A7 |
| 118 | A#7 |
| 119 | B7 |
| 120 | C8 |
| 121 | C#8 |
| 122 | D8 |
| 123 | D#8 |
| 124 | E8 |
| 125 | F8 |
| 126 | F#8 |
| 127 | G8 |
16.6 Temperament list
| No. | Type | C | C# | D | D# | E | F | F# | G | G# | A | A# | B |
| 0 | EQUAL | △ | △ | △ | △ | △ | △ | △ | △ | △ | △ | △ | △ |
| 1 | ARABIC | △ | △ | △ | △ | ▲ | △ | △ | △ | △ | △ | △ | ▲ |
| 2 | ARABIC | △ | ▲ | △ | △ | △ | △ | △ | △ | △ | △ | △ | △ |
| 3 | ARABIC | △ | △ | △ | △ | △ | △ | ▲ | △ | △ | △ | △ | ▲ |
| 4 | ARABIC | △ | ▲ | △ | △ | △ | △ | ▲ | △ | △ | △ | △ | △ |
| 5 | ARABIC | △ | △ | ▲ | △ | △ | △ | △ | ▲ | △ | △ | △ | △ |
| 6 | ARABIC | △ | △ | ▲ | △ | △ | △ | △ | △ | △ | ▲ | △ | △ |
| 7 | ARABIC | △ | △ | △ | ▲ | △ | △ | △ | △ | ▲ | △ | △ | △ |
| 8 | ARABIC | △ | ▲ | △ | △ | △ | △ | △ | △ | ▲ | △ | △ | △ |
| 9 | ARABIC | △ | ▲ | △ | △ | △ | △ | △ | △ | △ | △ | ▲ | △ |
| 10 | ARABIC | △ | △ | △ | △ | ▲ | △ | △ | △ | △ | △ | △ | △ |
| 11 | ARABIC | △ | △ | △ | △ | △ | △ | △ | △ | △ | ▲ | △ | △ |
| 12 | ARABIC | △ | △ | △ | △ | △ | △ | △ | △ | △ | △ | △ | ▲ |
Note: = Normal pitch, = Changed pitch
16.7 Velocity curve list
16.8 After touch curve list
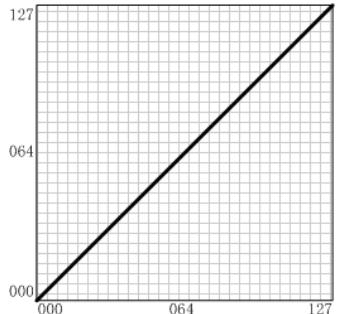
Off
None
Normal
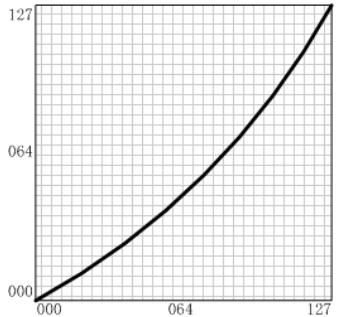
Soft 1
Hard 1
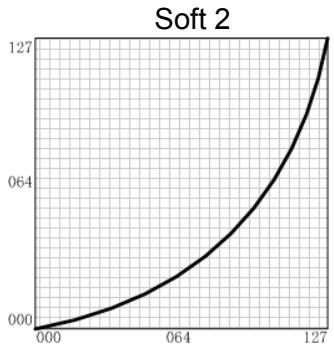
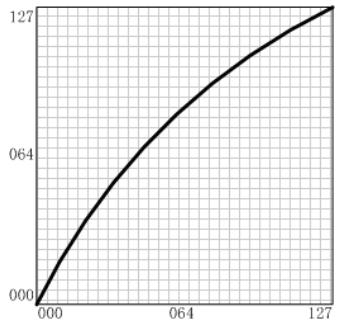
Hard 2
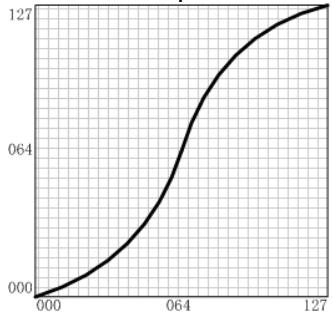
Expand
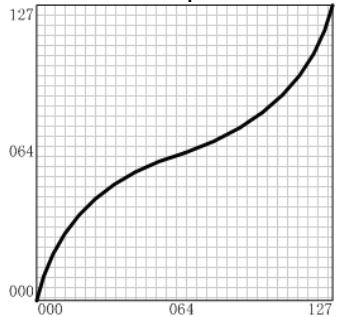
Compress
16.9 MIDI route
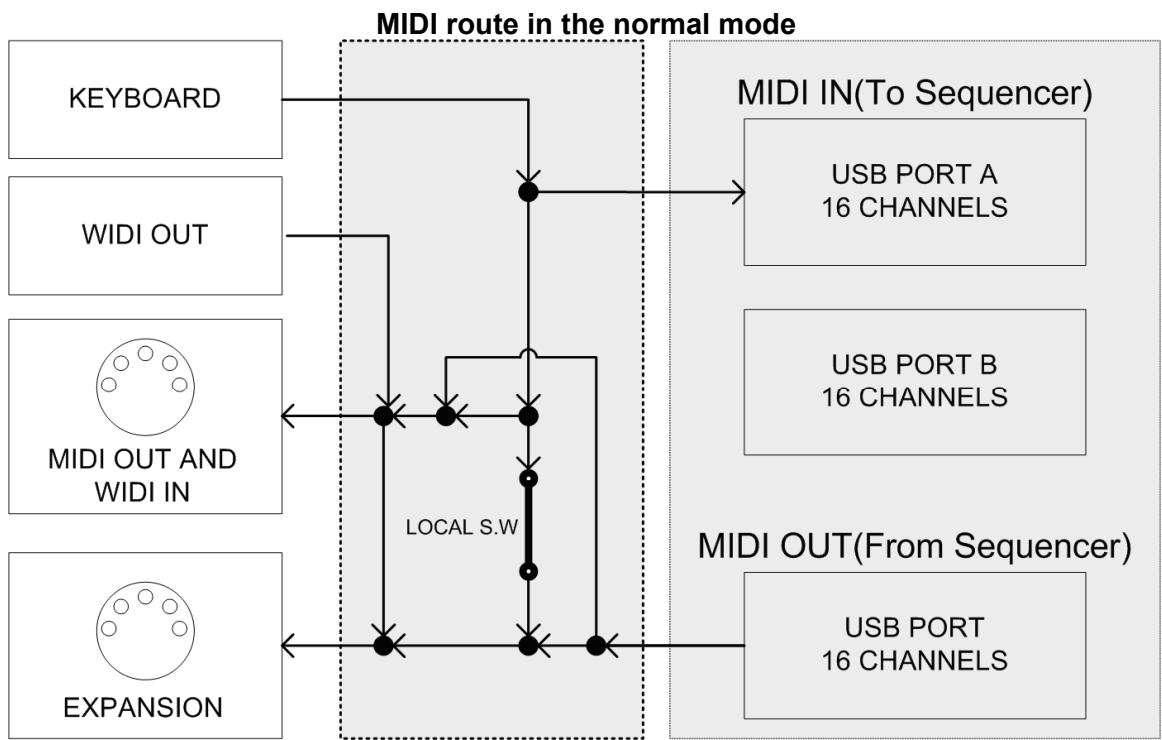
17 Troubleshooting
Trouble with possible reasons and solution
After turning on the power switch, the instrument is not powered on:
- Make sure the USB connection is made the the computer is on.
- Make sure the power connector is firmly connected to the power outlet.
- Check the power connectors.
No sound when playing the instrument
- Check the volume settings of the tone generator and speaker system
- Check the MIDI connection and the audio cable
- Check Master and Channel Volume faders
- Check Channel Expression Knobs
- Check the attack time of the filter
- Make sure you have the right settings in you music software
- Check the MIDI route settings
- Check the Controller Pedal position
Continuous long sound:
- Check Sustain pedal (Damper pedal)
- Check the release time of the filter
-
Use All notes off or Reset
-
Improper voice
-
Tone generator not set properly, please Initialize or Reset..
-
Improer MIDI routing, please check connections and settings.MIDI
-
Wrong pitch
-
Check the transpose or octave settings.
- MIDI pitch is tuned.
- Pitch bend message not returned to default, please reset.
-
Check the scale or temperament settings.
-
Tempo knob does not work
Make sure your sequencer software supports this function with the right settings (Refer to the Sync section of your software manual)
Some functions do not work
- Check the parts assigning.
- It is possible that your tone generator or music software does not support those functions
You hear two sounds when playing one key:
Disable the dual function.
Cannot select voice
Read the data list of your tone generator for voice select detail, and properly set the tone BANK MSB and LSB
18 Specifications
- Keyboard
UF50: 49 keys(C1 - C5), (velocity sensitive and aftertouch)
UF60: 61 keys(C1 - C6), (velocity sensitive and aftertouch)
UF70: 76 keys(A-1 - C6), (velocity sensitive and aftertouch)
UF80: 88 keys(A-1 - C7), (Professional Hammer Action Keyboard, velocity sensitive and aftertouch)
- Functions
Basic functions: USB MIDI, Octave shift, Transpose, Pitch bend wheel, Modulation wheel, Pedals, Breath control, MIDI OUT, Faders, Knobs
MIDI Data: Sequence control, MIDI clock, bank select, Program change, GM System On, GS System on, XG System On, Control change, All Notes Off, etc.
Parameters: Transose, Octave, MIDI out channels, Velocity curve, Pitch bend, Breath control, Moulation, Brightness, Aftertouch, Aftertouch curve, etc.
- Panel Controls and Indicators
Function shortcut buttons with light x 6
Potentiometer knobs x 8, Faders x 9
Data dial x 1, Switch button with light x 1, Exit/Enter button x2
Seq transport buttons x 6, (two with light)
Octave/Transpose buttons with light x 2
- Display
3 digs,7-segmentLEDdisplay
- Input/Output Terminals
POWER ON/OFF switch x 1
POWER IN connector x 1
USB port x1
PEDAL jack x 2
BREATH Control jack x 1
MIDI OUT port x 1
Power Supply
USB bus power or AC Power Adaptor (Optional)
AC Power Adaptor requirement: 12V 1.5A DC

- Dimensions (W x D x H) and Weight:
UF 50: 859 × 348 × 113 mm, 8.2 kg
UF 60: 1022 × 348 × 113 ~mm, 9.8 ~kg
UF 70: 1232 × 348 × 113 ~mm, 11.8 ~kg
UF 80: 1408 × 372 × 150 mm , 23.5 kg
- Wireless MIDI system (WIDI):
The working band is 2.4GHz ISM.
Bi-directional MIDI data transfer.
64 radio channels for MIDI data transfer, with manual or automatic radio channel setting mode.
Manual switching for one-to-multi communication (auto finding and selecting).
Compatible with WIDI series product such as WIDI-XU
Low power consumption, high speed, powerful error correction with automatic notes-off and on-line detection.
Maximum wireless transfer distance is 80m(262 feet) without obstacle.
19 MIDI Implementation Chart
CME UF v2(MIDI KEYBOARD)
Model: UF v2
Ver: 1.0
MIDI Implementation chart
| Function | Transmitted | Recognized | |
| Basic Channel | Default | 1 | X |
| Changed | 1~16 | ||
| Mode | Default | X | X |
| Messages | X | ||
| Altered | ********** | ||
| Note Number: | True voice | 0~127 | X |
| ********** | |||
| Velocity | Note ON | ○v=0~127 | X |
| Note OFF | ○v=0~127 | X | |
| Aftertouch | Key's | X | X |
| Ch's | ○ | X | |
| Pitch Bend | ○ | X | |
| Control Change | 0~127 | X | |
| Prog Change: | True # | ○ | X |
| ********** | |||
| System Exclusive | ○ | ○ | |
| System Real Time | Clock | ○ | X |
| Commands | ○ | X | |
| System command | Song position | X | X |
| Aux Messages | Active Sense | X | X |
:Yes X:No
- CME is continually improving its products, and every attempt is made to ensure the information in the user's manual is current and accurate. However, CME will not be responsible for possible discrepancies between the manual and the real product.
CME
2007-04
Central Music Co.
Tel: +86-10-8580 1115
Fax: +86-10-8580 1114
Web: www.cme-pro.com
E-mail for support: support@cme-pro.com