
RTGR328N - Station Météo OREGON - Notice d'utilisation et mode d'emploi gratuit
Retrouvez gratuitement la notice de l'appareil RTGR328N OREGON au format PDF.

| Type d'appareil | Station météo |
| Mesures | Température, humidité, pression atmosphérique |
| Affichage | Écran LCD |
| Alimentation | Piles |
| Transmission sans fil | Oui |
| Portée de transmission | Jusqu'à 100 mètres |
| Capteurs | Externe et interne |
| Précision température | ±1°C |
| Précision humidité | ±5% |
| Fonction prévision météo | Oui |
| Alarmes | Température haute/basse |
| Horloge intégrée | Oui |
| Format heure | 12/24 heures |
| Dimensions | Non précisé |
| Poids | Non précisé |
| Matériau boîtier | Plastique |
| Langues disponibles | Multilingue |
FOIRE AUX QUESTIONS - RTGR328N OREGON
Questions des utilisateurs sur RTGR328N OREGON
0 question sur cet appareil. Repondez a celles que vous connaissez ou posez la votre.
Poser une nouvelle question sur cet appareil
Téléchargez la notice de votre Station Météo au format PDF gratuitement ! Retrouvez votre notice RTGR328N - OREGON et reprennez votre appareil électronique en main. Sur cette page sont publiés tous les documents nécessaires à l'utilisation de votre appareil RTGR328N de la marque OREGON.
MODE D'EMPLOI RTGR328N OREGON
Oregon
SCIENTIFIC
Model : RTGR328N
USER MANUAL
ABOUT THIS GUIDE
Congratulations on your selection of the RTGR328N, Oregon Scientific™ Wireless Outdoor Temperature, Humidity, and RF clock sensor. This can be used with new Oregon Scientific receiver units, for example:
• BAR998HG
• BAR321HG
- AWS888
NOTE The RTGR328N works as an RF clock receiver for the models listed above or newer, but it does not work for previous models.
If you want to purchase additional remote sensors, select a model that does not include the RF clock sensor:
THGR228N / THGR238N (3-channel sensor)
THGR328N (5-channel sensor)
Keep this manual handy as you use your new product. It contains practical step-by-step instructions, as well as technical specifications and warnings you should know.
PRODUCT OVERVIEW
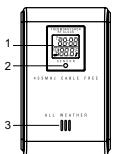
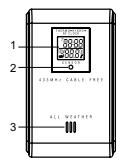
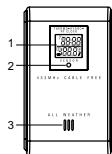
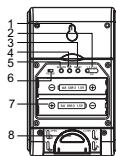
FRONT VIEW
-
LCD display
-
LED status indicator
-
Ventilation duct
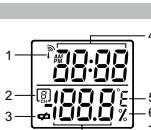
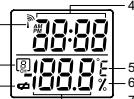
LCD
-
Reception
-
Channel n
-
Low battery indicator
-
Time
-
Temperature (°C or °C)
-
Relative hu
-
Temperature / Humidity reading
BACK VIEW
-
Wall mount (recess hole)
-
Channel switch
-
Reset
-
°C/°F switch
-
Search button
-
EU / UK radio signal format
switch
-
Battery compartment
-
Fold-out stand
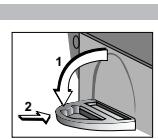
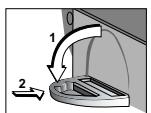
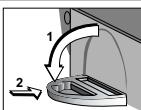
FOLD-OUT STAND
The Ground Truth image displays a single, solid horizontal line. According to Rule 2 (UNDERSCORE & LINE RULES), this is a stylistic or background line, not a placeholder underscore. Therefore, the OCR result must ignore it and output nothing or only meaningful text. The provided OCR content is "\_\_\_\_", which consists of four underscores. This is an incorrect interpretation of the line as a placeholder, violating the rule that stylistic lines must be ignored. The OCR has hallucinated underscores where none should exist based on the GT's visual context. Hence, the OCR result is inconsistent with the Ground Truth.
-
Fold-out the stand
-
Lock it into place
GETTING STARTED
This product can receive and transmit radio-controlled clock signals, outdoor temperature and humidity then relay it back to the main (indoor) unit.
It can be used with up to 4 other remote thermo-hygro units to transmit data to the main unit. The measurement unit (°C or °F) and channel number (1,2,3,4 or 5) switches are located in the battery compartment, and should be set prior to installation.
NOTE Additional remote units that measure temperature and humidity are sold separately. If you are using more than one remote unit, be sure to select a different channel number for each unit.
SET UP
-
Place remote unit as close as possible to the main unit.
-
Remove the battery compartment lid by using a Philips screwdriver to loosen the screws.
-
Assign a channel number. If you are using more than one remote unit,
select a different channel number for each unit.
-
Set the radio signal format for the automatic clock set feature.
-
Insert the batteries. Match the polarity, as shown in the battery compartment
-
Press RESET with the point of a blunt object (such as a ball point pen)
-
Press RESET with the poli
-
Set the measurement unit
-
Replace the battery compartment lid. Secure
-
Position the remote unit using either the rece
-
Position the remote unit using either the recess hold on the back of the unit or the included stand. For best results:
- Place the unit away from electrical or mechanical objects.
• Place the unit out of direct sunlight and moisture.
• Do not place the remote unit more than 100 metres (328 feet) from the
main (indoor) unit.
- Position the unit so that it faces the main (indoor) unit. Minimize obstructions such as doors, walls, and furniture.
such as doors, walls, and furniture.
You may need to experiment with various locations to get the best reception.
- Once the batteries are in place, the sensor will transmit signals every 1 minute. The readings shown on the main unit depend on which remote
minute. The readings shown on the main unit depend on which remote sensor (1.2.3.4 or 5) is selected. Refer to the Main Unit user manual for
more information.
NOTE The sensor range is 100 metres (328 feet) with no obstructions, but if
the main unit has a shorter range than the sensor, you may have to move the
sensor closer to
CLOCK
This remote unit can automatically synchronize the date and time with official
time-keeping organizations in Frankfurt (Germany) and Rugby (England). When the unit is within 1500 km (932 miles) of a RF signal, the reception icon will
the unit is within 1500 km (932 miles) of a RF signal, the reception icon will blink during reception.
Bark Baying 12
SET RADIO SIGNAL FORMAT
The RADIO SIGNAL FORMAT switch is located inside the battery
compartment. Select EU (DCF) or UK (MSF). Press RESET.
Reception takes 2 - 10 minutes to complete. Once complete, the icon will
stop blinking. If the RF signal is weak, it can take up to 24 hours to get a valid RF signal reception.
| STRONG SIGNAL | WEAK SIGNAL | NO SIGNAL |
NOTE For best results, place it away from metallic or electrical objects, and in a location with a clear view to the sky.
Press SEARCH to manually activate search for radio-controlled clock signal. The tower icon will blink until the clock signal is found or the search period times out.
TALAWAR SAVVANI
CHANGE CHANNEL Repeat the Set Up procedure. In Step 3, select a different channel number
Repeat the Set Up procedure. In Step 3, select a different channel number.
LOW BATTERY WARNING
The low battery indicator is shown on the main unit when the battery is low for the selected remote unit. Replace the batteries whenever the low battery signal 📄 shows.
NOTE Do not use rechargeable batteries. Properly dispose used batteries
NOTE: By notice recharges settlement Property, disposal costs balance by taking them to an authorized disposal station.
[Non-Text]
RESET SYSTEM
The RESET button is located in the battery compartment. Press it whenever
The RESET button is located in the battery compartment. Press it whenever you change the batteries, or whenever performance is not behaving as
expected (e.g., unable to establish radio frequency link with main unit). Refer to the User Manual of the main unit for more information.
[Non-Text]
SAFETY AND CARE
Wash the unit with a slightly damp cloth and mild detergent. Avoid dropping
wasn the unit with a slightly damp cloth and mild detergent. Avoid dropping the unit or placing it in a high-traffic location.
Do not expose the unit to direct sunlight since this may affect the accuracy of
measurements.
[Non-Text]
WARNINGS
This product is designed to give you years of service if handled properly.
Observe the following guidelines:
- Never immerse the unit in water. This can cause electrical shock and damage the unit
- damage the unit. Do not subject the main unit to extreme force, shock, or fluctuations in
Do not subject the main unit to extreme force, shock, or fluctuations in temperature or humidity.
Do not tamper with the internal components.
Do not mix new and old batteries or batteries of different types. Do not
use rechargeable batteries with this product.
- Remove the batteries if storing this product for a long period of time.
Do not scratch the LCD display.
Do not make any changes or modifications to this product. Unauthorized
changes may void your right to use the product.
The contents of this user manual are subject to change without notice. Images not drawn to scope
Images not drawn to scale.
TROUBLESHOOTING
TROUBLESHOOTING
Check here before contacting our customer service department.
| PROBLEM | SYMPTOM | REMEDY |
| Temp | Main unit shows | Temperature is out of range |
| Remote unit | Cannot locate main unit | Check batteries |
| Check location | ||
| Clock | Cannot auto-sync | Manually activate auto- |
The Ground Truth image displays a single, solid horizontal line. According to Rule 2 (UNDERSCORE & LINE RULES), if the GT contains lines used for stylistic emphasis or as background (like ruled paper), the OCR result must ignore them. The line in the GT is clearly a stylistic or background line, not a placeholder for text. Therefore, the OCR should not have output any underscores. Outputting \`\_\_\_\_\` constitutes an error under Rule 2, as it hallucinates placeholder symbols where none are semantically intended. Hence, the OCR result is inconsistent with the Ground Truth.
SPECIFICATION
Dimensions
L×W×H
Weight
weight
Temperature
Unit
Range
Resolution
Relative humidity
Relative num Range
Resolution
-
Frequency RE frequency
RF frequency Range
Transmission
The Ground Truth image displays a single, solid horizontal line. According to Rule 2 (UNDERSCORE & LINE RULES), this is a stylistic or background line, not a placeholder underscore. Therefore, the OCR result must ignore it. The provided OCR content is "____", which consists of four underscores. This is an incorrect interpretation of the line as a placeholder, violating the rule that stylistic lines must be ignored. The OCR has hallucinated text (underscores) where none should exist. Hence, the result is inconsistent with the Ground Truth.
Channel No. Unit
Unit Power
Power
[Non-Text]
ABOUT OREGON SCIENTIFIC
15.4
Visit our web: Scientific and
Scientific prod learning prod
weather station
contact inform
reach us, as v
W. 1
We hope you
you're in the Care departm
www2.oregon
2017年1月1日
OR
Call 949-608-2848
Call 549-000-2640
For internatio
international
EC DEGLAR
EC-DECLAR
Hereby, Orec
Thermo-Hygi
compliance w
Directive 1999
A copy of the
A copy of the request via ou
Request No 20
[Non-Text]
[Non-Text]
[Non-Text]
[Non-Text]
[Non-Text]
[Non-Text]
[Non-Text]
[Non-Text]
[Non-Text]
[Non-Text]
[Non-Text]

COUNTRIES RTHE APPROVAL COMPLIED All FC counties, Switzerland (CH)
All EC counties, Switzerland ① and Norway ②
and Norway Ⓝ
Modello : RTGR328N
Manuale d'uso
m = 311
IT
“
MANUALE DI ISTRUZIONI
Complimenti per aver scelto il Sensore Wireless Oregon Scientific RTGR328N
di Temperatura e Umidità Esterna con Orologio RF. L'unità può essere utilizzata
con le nuove unità di ricezione Oregon Scientific:
BAR998HG
BAR321HG
- AWS888
NOTA RTGR328N funziona come ricevitore di Orologio RF per i modelli
sopraelencati o più recenti, ma non funziona con i modelli precedenti.
Se si desidera acquistare sensori remoti supplementari, scegliere un modello
che non includa l'orologio RF:
THGR228N / THGR238N (sensore a 3 canali)
• THGR328N (sensore a 5 canali)
Durante l'uso del nuovo prodotto, tenere questo manuale a portata di mano.
Contiene le istruzioni di come adoperare il Sensore Wireless Oregon Scientific
RTGR328N di Temperatura e Umidità Esterna con Orologio RF, le caratteristiche tecniche e le avvertenze di cui dovreste essere a conoscenza.
technici e le "a"vertenza di cui dovosto essere a consistenza.
PANORAMICA DEL PRODOTTO
PANORAMICA DEL PRODOTTO
VISTA ANTERIORE
-
Display LCD
-
Display EOD
-
Indicatore di
-
Indicatore di stato LED
-
Fare di crezione
-
Forto di an
LCD
The Ground Truth image displays a single, solid horizontal line. According to Rule 2 (UNDERSCORE & LINE RULES), this is a stylistic or background line, not a placeholder underscore. Therefore, the OCR result must ignore it and output nothing or only meaningful text. The provided OCR content is "\_\_\_\_", which consists of four underscores. This is an incorrect interpretation of the line as a placeholder, violating the rule that stylistic lines must be ignored. The OCR has hallucinated underscores where none should exist based on the GT's visual context. Hence, the OCR result is inconsistent with the Ground Truth.
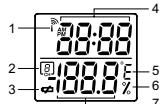
| 1. | Stato di ricezione | 4 |
| 2. | N. canale | 5 |
| 3. | Indicatore di batteria scarica | 6 |
| 4. | Ora | 7 |
| 5. | Temperatura (°C o °F) | 8 |
| 6. | Umidità relativa | 9 |
| 7. | Lettura di temperatura/umidità | 10 |
[Non-Text]
VISTA POSTERIOR
The Ground Truth image displays a single, solid horizontal line. According to Rule 2 (UNDERSCORE & LINE RULES), this is a stylistic or background line, not a placeholder underscore. Therefore, the OCR result must ignore it and output nothing or only meaningful text. The provided OCR content is "\_\_\_\_", which consists of four underscores. This is an incorrect interpretation of the line as a placeholder, violating the rule that stylistic lines must be ignored. The OCR has hallucinated underscores where none should exist based on the GT's visual context. Hence, the OCR result is inconsistent with the Ground Truth.
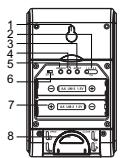
| 1. | Fissaggio a parete (foro di aggancio) |
| 2. | Selettor canale |
| 3. | Reset |
| 4. | Selettor °C/°F |
| 5. | Tasto di ricerca |
| 6. | Selettor di formato segnale orario RF per EU/JK |
| 7. | Vano batterie |
| 8. | Appoggio estraibile |
APP
APPO
1
- Estraine rappoggio,
-
Bloccarlo in posizioni
-
Biocano in posizione.
APP
APPO
1
- Estraine rappoggio,
- Bloccarlo in posizioni
[Non-Text]
PROCEDURE PRELIMINARI
| Questo prodotto può ricevere e ritrasmettere segnali orari e rilevamenti di temperatura e umidità esterne e riferirli poi all'unità principale. |
| I selettori dell'unità di rilevamento (°C o °F) e dei numeri di canale (1,2,3,4 o 5) sono situati nel vano batterie e vanno impostati prima dell'installazione. |
| NOTA Ulteriori unità esterne per la misurazione di temperatura e umidità sono disponibili separatamente. Se si usa più di una unità esterna, accertarsi di selezionare un numero di canale differente per ciascuna unità. |
[Non-Text]
m = 311
SETU
-
Posizionare l'unità esterna il più vicino possibile all'unità principale.
-
Rimuovere il conerchio del vano batterie allentando le relative viti con un
cacciavite per viti con taglio a stella
- Assegnare un canale. Se si usa più di un'unità esterna, selezionare un
canale differente per ciascuna unità.
- Impostare il formato del segnale orario RF per la regolazione automatica
dell'orologio.
-
Inserire le batterie osservando la polarità indicata nel relativo vano.
-
Premere RESET con un oggetto appuntito (come una penna a sfera)
-
Impostare l'unità di misura.
-
Riporre il coperchio del vano batterie. Fissare in posizione.
-
Posizionare l'unità esterna tramite il foro di aggancio sul retro dell'unità o il eovallette. Posi risultati attimali:
1
- Posizionare l'unità lontano da apparecchiature elettriche o
[Non-Text]
- Posizionare l'unità lontano dalla luce diretta del sole o da fonti d'umidità.
“
(Interna). - Recizionare l'unità in modo che sia rivalto verso l'unità principale o
- Posizionare l'unità in modo che sia rivolta verso l'unità principale e che il segnale non venga ostacolato da oggetti quali pareti o muri in
ore il segnato non venga estabiliato da oggetti quali pareti o mail in cemento armato.
Prima di ottenere la ricezione migliore può essere necessario sperimentare
Prima di ottenere la riscuzione migliore può essere necessario operimentare varie posizioni.
- Una volta inserite le batterie, il sensore trasmetterà segnali ogni minuto. I
rilevamenti mostrati sull'unità principale dipendono dal sensore remoto
selezionato (1,2,3,4 o 5). Per maggiori informazioni, consultare la guida utanto dell'altà principale.
L
NOTA il sensore ha un raggio di ricezione di 100 metri (328 piedi) senza
oggetti ostacolanti, ma se l'unità principale ha un raggio di ricezione inferiore, si devrà guvicipare il concere per favorirna la ricezione.
s1 do
The Ground Truth image displays a single, solid horizontal line. According to Rule 2 (UNDERSCORE & LINE RULES), if the GT contains lines used for stylistic emphasis or as background (like ruled paper), the OCR result must ignore them. The line in the GT is clearly a stylistic or background line, not a placeholder for text. Therefore, the OCR should not have output any underscores. Outputting \`\_\_\_\_\` constitutes an error under Rule 2, as it hallucinates placeholder symbols where none are semantically intended. Hence, the OCR result is inconsistent with the Ground Truth.
OROLOGIO
Questa unità esterna può sincronizzare automaticamente la data e l'ora dei
centri ufficiali di time-keeping di Francoforte (Germania) e Rugby (Inghilterra).
Quando l'unità rientra in un raggio di 1500 km di un segnale RF, l'icona di ricezione lampeggerò durante la ricezione.
ncezi
FORMATO
FORMATO DEL SEGNALE ORARIO RF
Il selettore del FORMATO DEL SEGNALE ORARIO RF si trova all'interno vano batterie. Selezionare ELL (DCE) o UK (MSE). Premere RESET
Vallo Batterie: Selezionare EU (DGP) 6 OR (MSP). Piemere RESET.
Per completare la ricezione occorrono dai 2 ai 10 minuti. Al termine, l'icona
cessera di lampeggiare. Se il segnale RF e debole, potrebbe essere necessario attendere fino a 24 ore per ottenere una valida ricezione del segnale RF
| SEGNALE FORTE | SEGNALE DEBOLE | NESSUN SEGNALE |
NOTA Per risultati migliori, posizionare l'unità lontano da oggetti metallici o elettrici e con una visione libera del cielo.
Premere SEARCH per attivare la ricerca manuale del segnale orario a radiofrequenza. L'icona a forma di torre lampeggia fino a trovare il segnale orario e fino alla scadenza del periodo di ricorso.
crano o fine alla scadenza del periodo di ricerca.
MODIFICA DEL CANALE
Ripetere la procedura di Setup. Al Punto 3, selezionare un numero di canale
differente.
INDICAZIONE DI BATTERIA SCARICA
INDICAZIONE DI BATTERIA SCARICA Il base livello di carico dalla batteria dell'unità esterna colorianoato viano
Il basso livello di carica della batteria dell'unità esterna selezionata viene segnalato sull'unità principale. Le batterie vanno sostituite ogni volta che
appare il simbolo.
NOTA Non usare batterie ricaricabili. Eliminare correttamente le batterie
presso un centro di smaltimento autorizzato.
The Ground Truth image displays a single, solid horizontal line. According to Rule 2 (UNDERSCORE & LINE RULES), this is a stylistic or background line, not a placeholder underscore. Therefore, the OCR result must ignore it and output nothing or only meaningful text. The provided OCR content is "____", which consists of four underscores. This is an incorrect interpretation of the line as a placeholder, violating the rule that stylistic lines must be ignored. The OCR has hallucinated underscores where none should exist based on the GT's visual context. Hence, the OCR result is inconsistent with the Ground Truth.
RESET DEL SISTEMA
RESET DEE SICHEMA Il testo RESET si trava nel vano batteria. Promersi anni volta che ri
Il tasto RESET si trova nel vano batterie. Premerio ogni volta che si sostituiscono le batterie o quando l'unità non opera a livelli ottimali (per es
quando non riesce a stabilire una connessione di radiofrequenza con l'unità
principale). Per maggiori informazioni, consultare la Guida utente dell'unità
principale.
The Ground Truth image displays a single, solid horizontal line. According to Rule 2 (UNDERSCORE & LINE RULES), if the GT contains lines used for stylistic emphasis or as background (like ruled paper), the OCR result must ignore them. The line in the GT is clearly a stylistic or background line, not a placeholder for text. Therefore, the OCR should not have output any underscores. Outputting `____` constitutes an error under Rule 2, as it hallucinates placeholder symbols where none are semantically intended. No punctuation mismatch or formatting transformation applies here because the content is purely symbolic and not textual.
SICUREZZA E MANUTENZIONE
Pulire l'unità con un panno leggermente inumidito e con detergente neutro.
Modelo : RTGR328N
Instrucciones de Funcionamiento

ACERCA DE ESTA GUÍA
Felicitaciones por haber elegido el modelo RTGR328N de sensor termohigrómetro con reloj RF exterior inalámbrico de Oregon. Este producto puede
ser utilizado con nuevas unidades de recepción de Oregon Scientific, como por ejemplo:
BAR998HG
• BAR321HC • AWS888
NOTA El modelo RTGR328N funciona como un reloj RF de recepción para los modelos que se indican más abajo o posteriores, pero no funciona con
Los modelos que se indican más decaja o postenores, para no renarla con modelos anteriores. Si Ud. desea adquirir sensores remotos adicionales, escoja un modelo que no incluya el sensor con reloj RF:
THGR228N / THGR238N (sensor de 3 canales)
THGR328N (sensor de 5 canales)
Conserve a mano este manual cuando utilice su producto nuevo. El mismo contiene instrucciones prácticas paso a paso, así como también especificaciones técnicas y precauciones que debe conocer.
DESCRIPCIÓN DEL PRODUCTO
VISTA FRONTAL
-
Pantalla LCD
-
Indicador LED de estado
-
Conducto de ventilación

-
Recepción de señal
-
Número de canal
-
Indicador de batería descargada
-
Hora
-
Temperatura (°C o °F)
-
Humedad relativa
-
Lectura de temperatura / humeda

-
Fijación para pared (orificio)
-
Botón cambio de canal
-
Reset (reinicio)
-
Ratio de °C/°F
-
Botón de °C/°F
-
Botón de Search (rastreo)
-
Botón de selección de formato de
señal de radio EU/UK
- Compartimento para baterías

- Extraiga el sonorte
GUÍA RÁPIDA
Este producto puede recibir y transmitir señales de reloj radio controladas, temperatura y humedad exterior y luego retransmitirlas a la unidad principal (interior).
Se puede utilizar con hasta 4 sensores remotos para transmitir información a la unidad principal. Los botones de selección de unidad de medición (°C o °F) y de número de canal (1,2,3,4 o 5) están ubicados en el compartimento para baterías, y deben configurarse antes de la instalación de las mismas.
NOTA Las unidades remotas adicionales para medición de temperatura y humedad se venden de forma separada. Si utiliza más de una unidad remota, asegúrese de escoger un número de canal diferente para cada unidad.
CONFIGURACIÓN
-
Coloque la unidad remota lo más cerca posible de la unidad principal.
-
Quite la tapa del compartimento para baterías utilizando un destornillador tipo Philips para aflojar los tornillos.
-
Asigne un número de canal. Si utiliza más de una unidad remota, seleciones un número de canal diferente pero cada unidad.
-
Configure el formato de señal de radio para establecer el modo automático
del relo
-
Inserte las baterías. Haga coincidir los polos según se indica en el compartimento para baterías.
-
Presione RESET con la punta de un objeto con punta afilada.
-
Configure la unidad de medición.
-
Coloque nuevamente la tapa del compartimento para baterías. Ajuste la misma.
-
Ubique la unidad remota utilizando el orificio para fijar a la pared o bien el Corporado por Bagua de abreuca. Para abtenas mejores resultados:
soporte para apoyo de sobremesa. Para obtener mejores resultados: • Ubique la unidad lejos de objetos eléctricos o mecánicos.
• Ubique la unidad lejos de la luz solar y la humedad.
- No ubique la unidad remota a más de 100 metros (328 pies) de la unidad principal (interior).
• Ubique la unidad de
Reduzca al mínimo las obstrucciones tales como puertas, paredes y muebles.
Posiblemente deba probar varias ubicaciones para obtener la mejor recepción.
- Una vez colocadas las baterías, el sensor transmitirá señales cada 1 minuto. Las lecturas que aparecen en la unidad principal dependerán del
minuto. Las lecturas que aparecen en la unidad principal dependeran del sensor remoto (1,2,3,4 o 5) que haya sido seleccionado. Sírvase consultar el manual del yavacia para abozen más información, sobra la Unidad
el man Principa
NOTA El radio de alcance para el sensor es de 100 metros (328 pies), sin ninguna obstrucción, pero si la unidad principal tuviese un radio de alcance inferior al anterior, usted tendrá que acercar el sensor para la recepción.

Esta unidad remota puede sincronizar en forma automática la fecha y hora con las organizaciones oficiales de horario en Frankfurt (Alemania) y Rugby
¿Com las organizaciones oficiales de horario en la habitar (demaria) y Rogoy (Inglaterra). Cuando la unidad se encuentra dentro de los 1500 Km. (932 millas) de una señal RE, el icono de recención parnadeará durante la recención
de una señal R1, en inicio de recepción parpadeala durante la recepción.
CONFIGURACIÓN DEL FORMATO DE SENAL DE RADIO El hatén: FORMATO DE SEÑAL DE RADIO está quien
El botón FORMATO DE SENAL DE RADIO esta ubicado dentro del compartimento para baterías. Seleccione EU (DCF) o UK (MSF). Presione
RESET.
La recepción tardará de 2 a 10 minutos en completarse. Una vez finalizada, el icono dejará de parpadear. Si la señal de RF es débil, puede tardarse hasta 24
horas en obtener una señal de RF válida.
| SEÑAL FUERTE | SEÑAL DÉBIL | SIN SEÑAL |
NOTA Para obtener mejores resultados, coloque el sensor lejos de objetos metálicos o eléctricos, y orientado hacia el exterior.
Presione SEARCH (RASTREAR) para activar en forma manual la señal de reloj radio controlada. El icono parpadeará hasta que se encuentre la señal del reloj o finalice el período de búsqueda.
CAMBIO DE CANAL
Repita el procedimiento de Configuración. En el Paso 3 seleccione un número diferente de canal.
AVISO DE BATERÍA DESCARGADA
El indicador de batería descargada puede observarse en la unidad principal cuando las baterías están bajas en la unidad remota seleccionada. Reemplace las baterías cuando aparezca la señal de batería descargada.
NOTA No utilice baterías recargables. Disponga adecuadamente de las baterías agotadas llevándolas a una estación de reciclaje autorizada.
SISTEMA DE RESET (REINICIO)
El botón RESET está ubicado en el compartimento para baterías. Deberá presionarlo al cambiar las baterías, cuando el rendimiento del equipo no es el esperado (por ejemplo cuando no se puede establecer un vínculo de frecuencia de radio con la unidad principal). Sirvase consultar con el Manual del Usuario para obtener más información sobre la unidad principal.
SEGURIDAD Y CUIDADOS
Limpie la unidad con un paño levemente húmedo y detergente suave. Evite la caída de la unidad o su ubicación en un lugar con mucho tránsito.
No exponga la unidad a los rayos directos del sol ya que pueden afectar la precisión en las mediciones.
PRECAUCIONES
Este producto ha sido diseñado para brindarle muchos años de servicio si se utiliza de forma adecuada. Observe las siguientes recomendaciones:
No sumerja nunca la unidad en agua, ya que esto puede provocar un cortocircuito y dañar la unidad.
No someta la unidad principal a fuerza, choque o fluctuaciones extremas de temperatura o humedad.
- No manipule indebidamente los componentes internos.
No mezcle baterías agotadas con nuevas ni baterías de diferentes tipos. No utilice baterías recargables con este producto.
- Extraiga las baterías si el producto permanecerá guardado por un largo período.
No raspe la pantalla LCD.
- No realice cambios ni modificaciones en este producto. Los cambios no autorizados pueden invalidar su derecho a utilizar el producto.
Los contenidos de este manual están sujetos a modificaciones sin previo aviso.
Las imágenes no están reproducidas a escala.
SOLUCIÓN DE PROBLEMAS
Verifique los siguientes pasos antes de comunicarse con nuestro departamento de atención al cliente.
BROKTIWA
PROBLEMA SINTOMA SOLUCION
temp En la unidad principal aparece "LLL" o "HHH" La temperatura esta fuera del rango
Unidad remota No puede localizar la unidad Verifique baterías
principal Verifique ubicación
Reloj No puede activar auto-sync Active en forma manual auto-
(sincronización automática) sync
ESPECIFICACIONES
Longitud x Ancho x Alto 70 x 24,5 x 116mm (2,76 x 0,96 x 4,57 pulgadas) Peso 156 gramos (0,34lb.) con baterías
Temperatura
Unidad °C o °F Bango 30 °C
Rango -20 °C a 60 °C (-4° P a 140°F) Resolución 0,1 °C (0,2 °F)
Humedad relativa
Rango 25 % a 95 % Resolución 1%
Frecuencia
Frecuencia RF 433 MHz
Rango Transmisión Hasta 100 metros (328 pies) sin obstrucciones 1 minuto aprox.
No. de canal
Unidad °C o °F Fuente 2 baterías alcalinas X UM-3 (AA) 1.5V
SOBRE OREGON SCIENTIFIC
Visite nuestra página web (www.oregonscientific.com) para conocer más sobre los productos de Oregon Scientific tales como: Reproduzione MP3
sobre los productos de Oregon Scientific tales como. Reproductores MP3, juegos y productos de aprendizaje electrónico para niños, relojes de
proyección, productos para la salud y el deporte, estaciones meteorológicas y teléfonos digitales y de conferencia. La página web
también incluye información de contacto de nuestro departamento de Atención al Cliente, en caso de que necesite contactar con nosotros, a la
Atención al Cliente, en caso de que necesario contractual con hicetros, a la vez que Preguntas Frecuentes y Descargas de los programas y controladores necesarios para nuestros productos.
Esperamos que encuentre toda la información que necesite en nuestra página web. En cualquier caso, si necesita contactar con el departamento
de Atención al Cliente directamente, por favor visite www.oregonscientific.
es la sección "Contacterios" o llame al 902 338 368. Los residentes en EEUU pueden visitar www2.oregonscientific.com/service/support o llamar
DECLARACIÓN DE CONFORMIDAD CE
Por medio de la presente Oregon Scientific declara que el Sensor temohigrémetro remoto con reloi radiocontrolado de 5 caplos (inclómbrio)
Nigrometro remoto con reloj radiocontrolado de 5 canales(inalambrico) modelo RTGR328N cumple con los requisitos esenciales y cualquier otras
disposiciones aplicables o exigibles de la Directiva 1999/5/CE Tiene a su disposición una copia firmada y sellada de la Declaración de
Conformidad, solicitela al Departamento de Atención al Cliente de Oregon Scientific.

Modelo : RTGR328N
Manual do Utilizador

UAI
Parabéns pela sua escolha do RTGR328N, Sensor Remoto, Sem Fios, de Temperatura e Umidade Exterior, com Relógio Rádio Controlado, da Oregon Scientific. Pode ser usado com novos aparelhos de recepção da Oregon Scientific, como por exemplo:
BAR998HG
· BAR321HG
- AWS888
NOTA O RTGR328N funciona como um transmissor de temperatura e umidade somente para os modelos acima indicados ou mais recentes, mas
amidade somente para os modelos daima indicados ou mais recentos, mais não funciona com modelos mais antigos.
Se desejar adquirir outros sensores remotos, selecione um modelo que não
incida o sensor do radio relogio -controlado. : THGR228N / THGR238N (sensor de 3 canais)
THGR328N (sensor de 5 canais)
Conserve este manual à mão quando utilizar este novo produto. Ele contém
instruções práticas e detalhadas, bem como especificações técnicas e advertências das quais deve ter conhecimento.
VISÃO GERAL DO PRODUTO
VISTA FRONTAL
-
Tela LCD (Tela de Cristais Líquidos)
-
Indicador de estado
-
Passagem de ventilação


-
Instalação de parede (orifício de encaixe)
-
Seletor de canal
-
Botão de reinicialização
-
Seletor C/F
-
Butted
-
Botão de busca
- Seletor do formato de sinal de rádio
EU/UK (RU-Reino Unido)
-
Compartimento das pilhas
-
Apoio desdobráv


- Trave-o no lugar ce
。

INSTRUÇÕES PRELIMINARES
Este produto recebe e transmite sinais do rádio relógio controlado, temperatura e umidade exteriores que depois transmite à unidade principal (interior).
o umidade exteriores que depois transmito a unidade principal (interior). Pode ser usado com até 4 outros outros sensores remotos para transmitir
informação à unidade principal. Os seletores de unidades de medida (°C ou °E) e do número de canal (1, 2, 3, 4 ou 5) estão localizados no comportimento
1) e do número de canal (1,2,3,4 ou 6) estão localizados no compartimento das pilhas e devem ser ajustados antes da instalação.
NOTA Outros aparelhos remotos que medem a temperatura e a umidade eão vendidos senprodamento. Se activer utilizando mais de um aparelho
sao vendidos separadamente. Se estiver utilizando mais de um aparecido remoto, selecione um número de canal diferente para cada unidade.
CONFIGURAÇÃO
-
Posicione a unidade remota o mais perto possível da unidade principal.
-
Retire a tampa do compartimento das pilhas com uma chave adequada com retire ao camílias.
para retirar os paraíusos. 3. Escolha um número de canal. Se estiver utilizando mais de uma unidade
remota, selecione um número de canal diferente para cada unidade.
-
Ajuste o formato do sinal de radio para a função de ajuste do relogio automático.
-
Introduza as pilhas e verifique se estão de acordo com a polaridade indicada no comportimento dos pilhos.
-
Pressione RESET (REINICIALIZAÇÃO) com um objeto de ponta redonda
(uma esferográfica, por ex.).
- Ajuste a unidade de medição
-
Volte a colocar a tampa do co
-
Voite a colocal a tampa do compartimento das plinas. Aperte
- Posicione a unidade remota usando o orifício de encaixe na p
do aparelho ou o apoio incluído. Para melhores resultados:
• Coloque o aparelho afastado de objetos elétricos ou mecânicos.
- Coloque o apareirno alastado da luz direta do sore da umidade. - Não coloque a unidade remota a mais de 100 metros (328 pés) da unidade
principal (interior).
- Posicione o aparelho de modo que que fique de frente para a unidade principal (interior). Minimize obstáculos, como portas, paredes e mobília.
Pode ser necessário tentar várias localizações para obter uma melhor
recepção.
- Quando as pilhas forem colocadas, o sensor transmitira sinais de minuto a minuto. As leituras apresentadas na unidade principal dependem do
canal remoto selecionado (1,2,3,4 ou 5). Consulte o Manual do Usuário da Unidade Principal para mais informações.
NOTA O alcance do sensor é de 100 metros (328 pés) sem obstruções,
mas se a unidade principal tiver um alcance menor que o sensor, deve-se colocar o sensor mais próximo para uma boa recepção.
RELÓGIO
Esta unidade remota sincroniza a data e hora automaticamente através dos organismos oficiais reguladores da hora em Frankfurt (Alemanha) e Rugby
(Inglaterra). Quando o aparelho estiver a 1500 km (932 milhas) dentro do
espaço de ação de um sinal RF, o icone de recepção piscara de forma intermitente durante a recepção.
AJUSTE DO FORMATO DO SINAL DE RÁDIO
O seletor do FORMATO DO SINAL DE RÁDIO está localizado no interior do comprimento dos pilhos. Calejana EU (RGE) ou UK (RU-Boire Urida) (MSE)
compartimento das plinas. Selectione EÚ (DOF) ou OR (RO-Relino Chido) (MOR). Pressione RESET (Reinicializar).
A recepção leva entre 2-10 minutos para ser completada. Uma vez completa,
talvez demore 24 horas para se obter uma recepção de sinal de RF válida.
| SINAL FORTE | SINAL FRACO | SEM SINAL |
NOTA Para melhores resultados coloque o aparelho afastado de objetos metálicos ou elétricos e localizado em campo aberto.
Pressione SEARCH (Busca) para ativar a busca manual do sinal do sensor remoto. O ícone de torre pisca de forma intermitente até que seja encontrado o sinal do relógio ou quando o período de busca termine.
MURADO CANAL
Repita os mesmos procedimentos que utilizou para Configuração. No passo 3, selecione um número de canal diferente.
AVISO DE RATERIA FRASA
O indicador de pilhas fracas é apresentado na unidade principal sempre que o
sinal de pilha fraca aparece.
NOTA Não use pilhas recarregáveis. Retire adequadamente as pilhas usadas, levando-as em uma coleta de lixo autorizada.
SISTEMA DE REINICIALIZAÇÃO [RESET]
O botão de Reinicialização [RESET] está localizado no compartimento das
pilhas. Pressione-o sempre que mudar as pilhas, ou sempre que o desempenho não esteja conforme as expectativas (por ex. incapacidade de estabelecer a ligação de frequência rádio com o aparelho principal).
Consulte o Manual da da unidade principal para mais informações.
SEGURANÇA E CUIDADOS A TER
Lavar o aparelho com um pano ligeiramente úmido e detergente suave. Evite deixar cair o aparelho ou colocá-lo num local de intensa circulação.
Não exponha o aparelho à luz direta do sol, pois pode afetar a precisão das
medições.
ADVERTÊNCIAS
Este produto foi criado para lhe dar anos de bons serviços se houver uma
utilização correta do mesmo. Siga os seguintes procedimentos: : Nunca coloque o aparelho em contato com a água. Pode causar choques
elétricos e danificar o aparelho.
- Não sujeite o aparelho principal a impactos, utilização violenta ou grandes variações de temperatura e.
- Não altere os componentes internos do aparelho.
- Não misture pilhas novas com pilhas usadas ou pilhas de diferentes tipos. Não use pilhas recarregáveis neste aparelho
- Retire as pilhas quando não utilizar o aparelho durante um longo período
de tempo. Nº para: 101, LCP
- Não ariahne a tela LCD. - Não faca modificações ou alterações neste produto. Modificações não
autorizadas podem anualr a garantia do aparelho.
- O conteúdo deste manual pode ser alterado sem aviso previo - As imagens não estem em escala
No imagens hao estam em escola.
SOLUÇÃO DE PROBLEMAS
Antes de contactar o nosso departamento de apoio ao cliente consulte esta
SEÇÃO. PROPRIEMA SINTOMA SOLUÇÃO
PROBLEMA SINTOMA SOLEÇÃO Temp O aparelho principal index A temperature ultrapressor
temp "LLL" ou "HHH" A temperatura ultrapassa os limites máximo e mínimo
Unidade remota Não consegue localizar a Verifique as pilhas
unidade principal Verifique a localização
Relógio Não faz a sincronização Ative manualmente a
automatica sincronização automatica
[Non-Text]
ESPECIFICAÇÕES
Dimensoes C x L x A 70 x 24.5 x 116mm (2.76 x 0.96 x 4.57
polegadas) Peso 156 gramas (0.34lb.) com pilhas
7.1
Temperatura Aparelho °C ou°F
Limites Máximo e Mínimo -20 °C até 60 °C (-4 °F até 140 °F) Resolução 0,1 °C (0,3 °F)
Accumulated
Umidade relativa
Limites Máximo e Mínimo 25 % até 95 % Resolução 1%
Ereguiêneia
Frequência RF 433 MH
Range Alcance Transmissão Ate 100 metros (328 pes) sem obstruções Aprox. 1 minuto
(3) 1.2.1. (4)
Número do Canal 1,2,3,4 ou 5 Unidade de Medicão °C ou °F
da Temperatura
Alimentação 2 pilhas alcalinas UM-3 (AA) de 1.5V
SOBRE A OREGON SCIENTIFIC
Visite nosso site (www.oregonscientific.com.br) para aprender mais sobre
nossos outros produtos, tais como Câmeras Digitais; Produtos de Aprendizagem: Relógios de Projeção: Equipamentos de Esporte e Saúde:
Aprobiagem, Navigues de Projetos, Equipamentos de Esportes e Dados, Estações Meteorológicas. O nosso site possui também dados para contato
com nosso SAC, assim como perguntas e respostas mais recentes e downloads.
Esperamos que você encontre todas as informações que necessitar
entretanto se você quiser entrar em contato direto com nosso SAC, ligue para 55.11.2161-6180
DECLARAÇÃO DE CONFORMIDADE-CE
Por meio da presente declaração Oregon Scientific declara que este
term-rigrometro, controlado por radio com sensor com 3-canais de transmissão sem fios com relógio incorporado model RTGR328N está e
conformidade com os requisitos essenciais e outras provisões da Diretri 1999/5/CF.
Uma cópia assinada e datada da Declaração de Conformidade está disponível para requisições através do nosso SAC.
Superior para requisições dos e meses 2018.
[Non-Text]
[Non-Text]
•
[Non-Text]
[Non-Text]
[Non-Text]
[Non-Text]
[Non-Text]
CE
[Non-Text]
PAÍSES SUJEITOS Á NORMA R&TTE
Todos os países da União Européia, Suíça CH
e Noruega N
AJUSTE DO FORMATO DO SINAL DE RÁDIO
O seletor do FORMATO DO SINAL DE RÁDIO está localizado no interior do comprimento dos pilhos. Calejana EU (RGE) ou UK (RU-Boire Urida) (MSE)
compartimento das plinas. Selectione EÚ (DOF) ou OR (RO-Relino Chido) (MOR). Pressione RESET (Reinicializar).
A recepção leva entre 2-10 minutos para ser completada. Uma vez completa,
o icone deixa de piscar de forma intermitente.Se o sinal de RF estiver Iraco,


Model: RTGR328N
Handleiding

OVER DEZE HANDLEIDING
Gelukgewenst met uw keuze van de RTGR328N, Oregon Scientific™ draadloze buitenhuis temperatuur, vochtigheid en HF klok sensor. Dit toestel kan gebruikt worden met nieuwe Oregon Scientific™ ontvangsttoestellen, zoals:
BAR998HG
BAR321HG
AWS888
BELANGRIJK De RTGR328N werkt als een HF klok ontvanger voor de hierbovenvermelde of nieuwere modellen, maar het werkt niet voor oudere modellen.
Indien u bijkomende sensoren wenst te kopen, kies dan een model dat geen HF teik oansen heeft.