
AR 663 CD - Appareil audio CLATRONIC - Notice d'utilisation et mode d'emploi gratuit
Retrouvez gratuitement la notice de l'appareil AR 663 CD CLATRONIC au format PDF.

| Type de produit | Autoradio avec lecteur CD |
| Marque | CLATRONIC |
| Modèle | AR 663 CD |
| Alimentation | DC 13,8 V |
| Consommation maximale | 15 A |
| Puissance de sortie | 4 × 35 W PMPO |
| Plage de fréquences FM | 87,6 - 108,0 MHz |
| Sensibilité FM | 3 µV |
| Fréquence intermédiaire | 10,7 MHz |
| Sortie CD | max. 1200 mV |
| Système CD | Lecteur CD pour CD/CD-R/CD-RW |
| Rapport signal/bruit | 50 dB (1 kHz) |
| Réponse en fréquence | 20 – 100 Hz ≤ 5 dB / 10 – 20 kHz ≤ 5 dB |
| Canaux | 2 canaux stéréo |
| Dimensions (L × H × P) | 178 × 50 × 165 mm |
| Fonctions RDS | AF, PTY, TA, EON, REG |
| Égaliseur | Préréglages POP, ROCK, CLASS, FLAT |
| Entretien | Nettoyer le CD avec un chiffon doux et sec |
| Sécurité | Utiliser uniquement sur batterie 12 V à masse négative |
| Garantie | 24 mois |
FOIRE AUX QUESTIONS - AR 663 CD CLATRONIC
Questions des utilisateurs sur AR 663 CD CLATRONIC
0 question sur cet appareil. Repondez a celles que vous connaissez ou posez la votre.
Poser une nouvelle question sur cet appareil
Téléchargez la notice de votre Appareil audio au format PDF gratuitement ! Retrouvez votre notice AR 663 CD - CLATRONIC et reprennez votre appareil électronique en main. Sur cette page sont publiés tous les documents nécessaires à l'utilisation de votre appareil AR 663 CD de la marque CLATRONIC.
MODE D'EMPLOI AR 663 CD CLATRONIC
Bedienungsanleitung/Garantie
Gebruksaanwijzing/Garantie • Istruzioni per l'uso/Garanzia Instruction Manual/Guarantee • Instrukcja obslugi/Gwarancja
Autoradio mit CD-Player
Autoradio met CD-speler · Autoradio conlettore CD Car radio with CD player Radio samochodowe z odtwarzaczem CD
AR 663 CD
C
Inhalt
Inhoud · Indice · Contents · Spis tresci
D Übersicht Bedienelemente . 3
Bedienungsanleitung . 4
Garantie 18
NL Overzicht bedieningseinlementen 3
Gebruiksaanwijzing 19
Garantie 33
I Descrizione dei singoli peszzi . 3
Istruzioni per l'uso 34
Garanzia 49
GB Control element overview Page 3
Instruction Manual 50
Guarantee 64
PL Przeglad elementów obstrugi Strona 3
Instrukcja obslugi Strona 65
Gwarancja 80
Übersicht der Bedienelemente
Overzicht van de bedieningselementen · Elementi di lavoro
Overview of the Components • Przejglad elementów oblsugi
D
Allgemeine Sicherheitshinweise
Um das Risiko von Feuer oder einem elektrischen Schlag zu vermeiden, sollen den Sie das Gerät nicht Regen oder Feuchtigkeit aussetzen. Das Gerät nicht in unmittelbarer Höhe von Wasser betreiben (z.B. Badezimmer, Schwimmbecken, feuchte Keller).
Verwenden Sie das Gerät nur für den vorgesehenen Zweck.
Das Görtät ausschließlich an eine vorschrifsmäßig instellierte Steckdose anschließen. Achten Sie darauf, dass die angegebene Spannung mit der Spannung der Steckdose übereinstimmt.
Bei Verwendung von externen Netzeleinen auf die richtige Polarität und Spannung achten, Batterien stets richtigerum einlagen.
Das Gerät so aufstellen, dass vorhandene Lüftungsöffnungen nicht verdeckt werden.
Niemals das Gehäuse des Gerätes öffnen. Durch unsachgemäße Reparaturen konnen erhebliche Gefahren für den Benutzer entstehen. Bei Beschäftigung des Gerätes, insbesondere des Netzkabels, das Gerät nicht mehr in Betrieb nehmen, sondern von einem Fachmann reparieren lessen. Netzkabel regelmäßig auf Beschäftigungen prufen.
Ein defektes Netzkabelarf nur vom Hersteller, unserem Kundendienst oder einerähnlich qualifizierten Person durch ein gleichwertiges Kabel ersetzt werden, umGefährungen zu vermeiden.
Benutzen Sie das Gerät langere Zeit nicht, ziehen Sie den Netzstecker aus der Steckdose, bzw. entnahmen Sie die Batterien.
These Symbole können sich ggfs. auf dem Gerät befinden und sollen Sie auf folgenden hinweisen:

Das Blitz-Symbol soll den Benutzer auf Teile im Inneren des Gerätes hinweisen, die gefährlich hohe Spannungen führen.

Das Symbol mit Ausrufezeichen soll den Benutzer auf wichtige Bediennungs- oder Wartungs-Hinweise in den Begleitpapieren hinweisen.

Geräte mit dieser Symbol arbeiten mit einem „Klasse 1-Laser“ zur Abtastung der CD. Die eingebauten Sicherheitsschalter sollen verhinnern, dass der Benutzer gefährlichem, für das menschliche Auge nicht sightbarem Laserlicht ausgesetzt wird, wenn das CD-Fach geöffnet ist.
These Sicherheitsschafter sollen auf keine Fall überbruckt oder manipuliert werden, sonst besteht die Gefahr, dass Sie sich dem Laser-Licht aussetzen.
Installation
Montieren Sie das Radiogerät gemäß folgender Darstellungen.
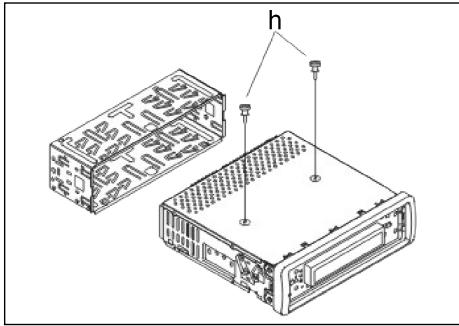


Achtung
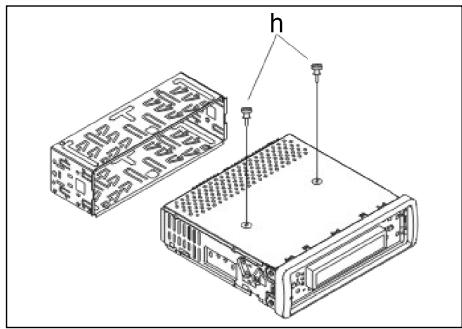
h Schrauben der Transportsicherung (Bitte vor der Montage entnahmen)
a Mutter
b Federscheibe
c Unterlegscheibe
d Schraube
e Montagewinkel
f Einschubgehause
g Bedienblende
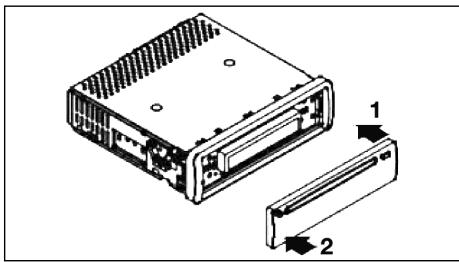
Setzen Sie die Bedienblende erst an derrechten Seite an undrasten Sie, sie dann aufder linken Seite ein.

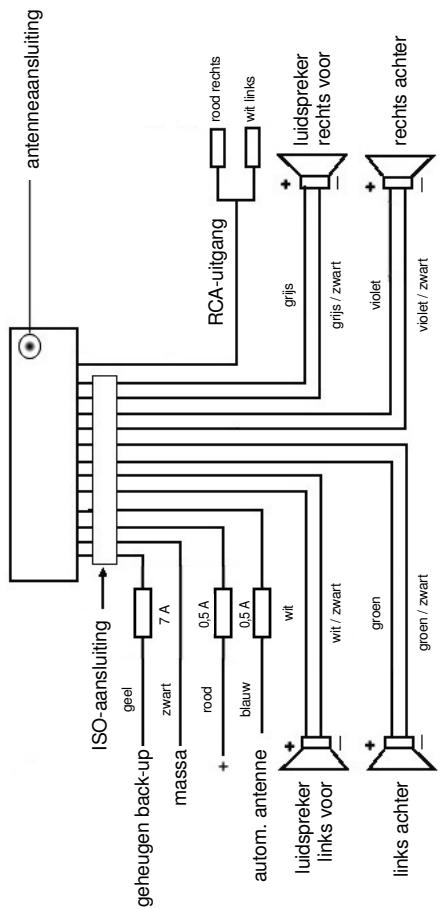
Anschluss
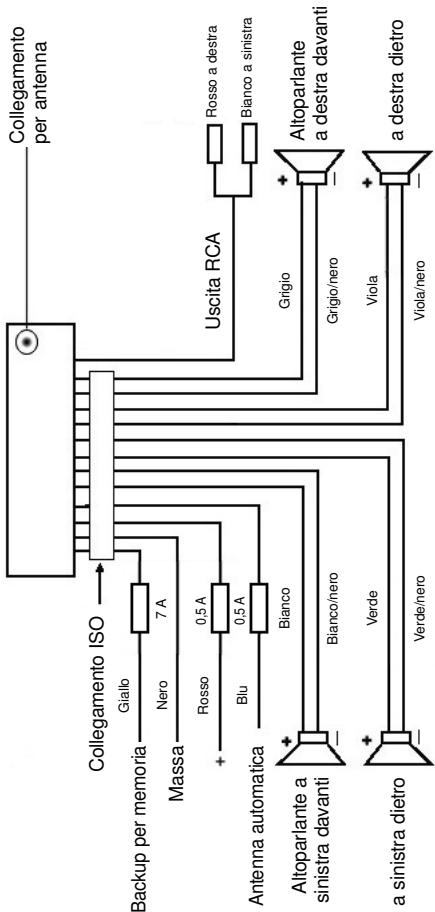
Stellen Sie die Anschlüsse gemäß des Schaubildes her.
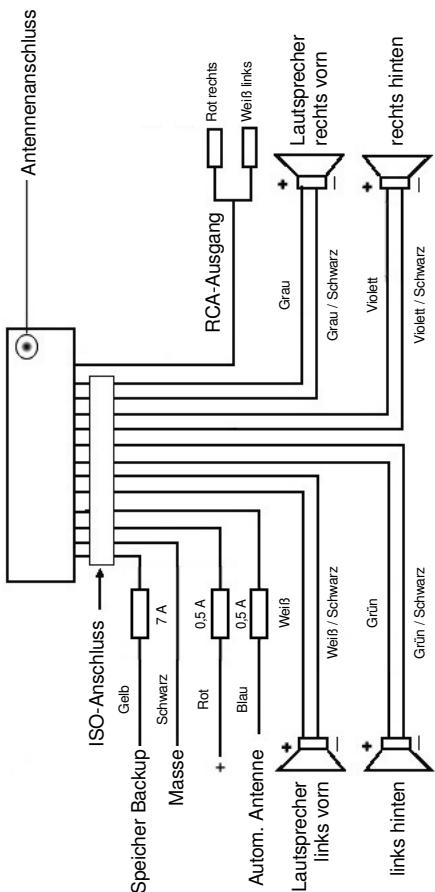
Achtung:
D
- Setzen Sie das abnehmbare Bedienfeld erst nach dem Anschluss der Kabel auf.
- Verwenden Sie Laufsprecher mit einer Impedanz von 4 Ohm.
Wichtige Zusatzinformation zum Einbau Ihr's Autoradios!
- Bitte beachten Sie beim Einbau/Anschluss Ihr Gerätes, dass Ihr Auto über einen originalen "ISO Anschluss" verfügt. Dieser ist das Gegenstück zu dem am Geräteausgang vorhandenen Stecker (ISO Anschluss).
Bei der Belegung des "Dauer +" (Backup) kann es je nach Fahrzeugtyp zu Abweichungen kommt.
Wenden Sie sich in diesen Fälleitte an eine autorisierte KFZ Werkstatt, da eine permanente/dauerhafte Stromversorgung Ihres Radios sonst nicht gewährleistet ist. (These is yetoch fur die Speicherung Senderstationen notwithstanding).
- Je nach Fahrzeugtyp konnen in Ausnahmefällen Störgeräische im Radio/ CD Betrieb auftreten. Diese halten sich mit einem zusätzlichen Entstörfilter entsprechend beseitigen. Ihr Gerät ist bereits seriennig mit einem Entstörfilter ausgerüstet. Trotzem kann es fahrzeugbedingt zu Beeinträchtigungenkommen.
Entstörfilter erhalten Sie im Autozubehörhandel und/oder bei ihrer KFZ Werkstatt.
Bei technischen Fragen wenden Sie sichitte an unsere Hotline.
Vorsichtsmaßnahmen und Wartung
- Die Schrauben (h) der Transportsicherungitte vor der Montage entfer- nen, da sonst die CD nicht eingezogen werden kann.
- Das Gerät ist für den Minuspol der Batterie ausgelegt, der an die Fahrzeugkarosserie angeschlossen sein muss. Diesitte vor Installation überprüfen.
- Wenn die vordere Bedientafel während des Radio- oder CD-Betriebs abgenommen wird, wird das Gerät automatisch ausgeschaltet.
- Fehlfungk. Nach dem Wiedereinsetzen der vorderen Bedientafel kann es zu einer Fehlermeldung (ERROR) im Display kommt. Drücken Sie mit Hilfe eines Drahtes o.ä. die Taste RESET (24), um die Elektronik wieder zusückzstellen (RESETEN). Diese Taste finden Sie bei abgenommenem Bedienfeld rechts besoin dem Display.
- Wenn das Fahrzeuginnere extrem heißt ist, z. B. nach einer längeren Parkdauer in praller Sonne, den Player nicht einschalten, bis das Fahrzeug nach einer kurzen Fahrzeit im Inneren etwas abgekühlt ist.
- Um das abnehmabare Bedienteil sicher aufzubewahren, stets die davon vorge-sehene Schutzhülle verwenden.
D
Bedienung
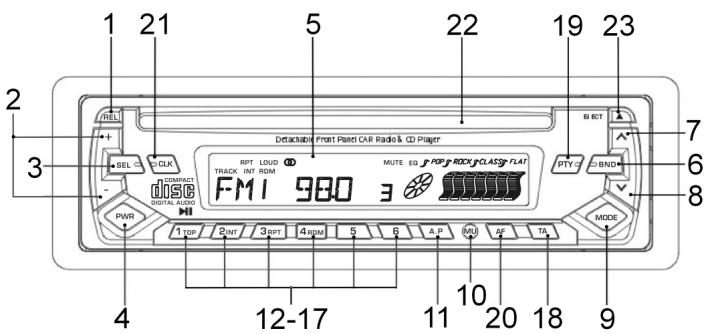
1. REL-Taste
Drucken Sie die REL-Taste zum Herausnehmen des vorderen Bedienfeldes.
2. +/-Tasten
Im normalen Spielbetrieb dienen die Tasten zur Einstellung der Lautstärke. In Verbindung mit der zuvor gedrückten SEL-Taste konnen Änderungen in Menus z. B. dem Schallmodus vorgenommen werden.
3. SEL-Taste (Auswahl)
a) Drücken Sie die SEL-Taste kurz, um in das Auswahlmenü des Schallmodus zu gelangen. Im Display erscheidt „VOL“ zur Einstellung der Lauststärke. Durch wiederholtes Drücken der SEL- Taste konnen Sie nun die einzelnen Menupunkte wie VOLUME, BASS, TREBLE, BALANCE und FADER anwahlen. Sie ändern die Einstellungen der einzelnen Menupunkte mit Hilfe der „+“- oder „-“-Taste.
Hinweis: Sind unter DSP Equalizeinstellungen wie z. B. POP, ROCK gewählt, können BASS und TREBLE nicht eingestellt werden.
b) Drücken Sie die SEL-Taste lang, um in das Auswahlmenu TA SEEK/TA ALARM, MASK DPI/MASK ALL, DSP OFF, LOUD ON/OFF, BEEP ON/OFF, SEEK1/2, STERO/MONO; LOCAL/DX; VOL LAST/ADJ zu gelangen. Im Display erscheidt „TA SEEK".
Durch wiederholtes Drücken der SEL-Taste konnen Sie nun die einzelnen Menupunkte anwahlen. Sie ändern die Einstellungen der einzelnen Menupunkte mit Hilfe der "+"-oder "-"Taste.
TA SEEK-MENU (Verkehrsfung-Sendersuche)
Wahlen Sie TA SEEK, wenn bei der Wahl der TA- Funktion automatisch ein Verkehrsfunk sender gesucht werden soll.
Wahlen Sie TA ALARM, erhalten Sie eine Warnmeldung im Display, sobald Sie unter der TA Funktion einen Sender eingestellt haben, der keine Verkehrsfunkeninformationen übermittelt.
- MASK DPI/ALL
Verbergen von Alternativfrequenzen (AF) während deruche nach einer ProgrammKennung (PI).
MASK DPI: Srecht das Gerät nach der Programmkennung (PI) eines Senders bleiben die Alternativfrequenzen mit anderer Programmkennung im Verborgen.
MASK ALL: Bei der Sueche nach einer Programmkennung (PI) bleiben Altemativfrequen mit anderer Programmkennung und Sender mit starkem Signalpegel ohne RDS Signal im Verborgenen.
DSP
Im DSP konnen Sie die Equalizereinstellungen POP M; ROCK M, CLASS M und FLAT M wahlen. Wahlen Sie DSP OFF um eigene Einstellungen vorzunehmen. Siehe auch Pkt. 3a.
- LOUD ON/LOUD OFF
Ein- und Ausschalten der LOUDNESS-Funktion, Im niedrigen Lautstärkebereich wird mit der Funktion LOUDNESS (LOUD) das Klangbild erweitert. Hohen und Basse werden angehoben.
BEEP ON/OFF Bestätigungston
Den Bestätigungston beim Tastendruck konnen Sie in zwei Arten wahren.
BEEP ON: Der Bestätigungston erfolgt bei jedem Tastendruck.
BEEP OFF: der Bestätigungston ist abgeschallt.
- SEEK 1, SEEK 2 (Nur im Radiobetrieb wahlbar)
Suchfunktion mit den /V -Tasten im Radiobetrieb
SEEK 1: Halten Sie die /V -Tasten gedruckt und das Radio wird bei der nachsten erreichbaren Sendestation stoppen.
SEEK 2: Solange Sie die /V -Taston gedrück gehen wird der Suchlauf im Frenzband weiter gefuhrt.
STEREO/MONO Umschaltung (Nur im Radiobetrieb wahlbar)
- LOCAL/DX (Nur im Radiobetrieb wahlbar)
Ihr Radio kann RDS EON Daten empfangen. Unter EON verstehen man die Übermittlung von zusätzlichen Senderinformationen innerhalb einer Senderkette z. b. des WDR. Im Falle einer Verkehrs durchsage (TA) wird innerhalb einer Senderkette von einem Nicht-Verkehrsfunk sender auf den entspruchenden Verkehrsfunk sender der Senderkette umgeschältet. Der Empfang dieser Sendedaten wird durch das EON Zeichen im Display angezeigt. Sie können zwischen dem EONTA LOCAL bzw. EONTA DISTANCE-Modus für den lokalen oder den Fernverkehrsfunkempfang wahren. Der Zweck dieser Funktion besteht darin, ein unerwünsches Umschalten auf eine EON-TA-Verkehrsansage zu unterträcken. Liegt ein EON Sender sehr welt entfern, so konnen z. T. trotzdem EON TA-Information von dieser Station empfangen werden. Das Radio schaltete zu dieser EON-Verbindungsstation um und versucht die Verkehrsinformationen zu empfangen. Der Signalpegel ist aber zu schwach und der Empfang ist schlecht, da diese EON-Verbindungsstation zuweit außerhalb lag.
Deshalb schaltet das Radio dann auf den zuvor eingestelltten Sender zurück. Bei der oben beschriebenen Betriebsart hört der Anwender für eine kurze Zeitspanne ein falsches Programm oder überhaupt nichts.
EONTA LOCAL:
Durch diese Funktion wird ein Umschalten zu einer EON-Verbindung mit zu schwachem Signalpegel vermieden.
Das Radio schaltet nicht auf diesen Sender um und der Hörer nimmt kaum Störungen wahr.
EON TA-DISTANCE-Modus:
In this modus versucht die EON TA Schaltung die EON TA Informationen von einem erreichbaren Sender zu erhalten und so die Empfangsqualität zu verbessern.
D
VOL LAST/VOL ADJ
Mit Hilfe der + - und - Tasten wahlen Sie eine der Einstellungen aus:
VOL LAST: Das Radio schaltet sich mit der zuletzt tatsächlich eingestillten Lautstärke ein.
VOL ADJ: a) Drücken Sie erneut die SEL-Taste. Im Display erscheidt „A-VOL".
b) Mit Hilfe der + - und - Tasten wahlen Sie eine gleichbleibende Einschaltlautstärke vor.
4. POWER-Knopf
Zum Ein- bzw. Ausschalten des Gerätes diese Taste drucken. Zum Einschalten drucken Sie diese Taste kurz, zum Ausschalten halten Sie die Taste gedrückt.
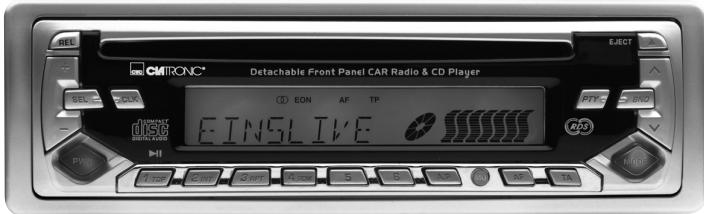
5. LCD-Display (Flüssigkristallanzeige)
6. BAND-Taste
Drücken Sie kurz die BAND-Taste, um zwischen den drei FM- (UKW) Ebenen umzuschalten. Die Bezeichnung der entsprechenden Ebene FI, F2, F3 wird in der LCD-Anzeige angezeigt.
7./8. / -Tasten TUNE, SEEK, TRACK, SKIP UP/DOWN
a) Im Radiodimus: Drücken Sie kurz die -oder V-Taste, um manuell einen gewündchten Radiosender einzustellen. Halten Sie die oder V-Taste gedrückt, um die Suche nach einem Radiosender zu starten. Siehe auch die Funktion SEEK 1 / SEEK 2.
b) Im CD-Modus: Zum Vor- bzw. Rückwärtspringen die Taste ∧ bzw. ∨ kurz drücken. Zum Spulen von Titeln die Pfeiltaste ∧ bzw. ∨ gedrückt halten.
9. MODE-Taste
Drucken Sie diese Taste zur Auswahl des CD-Player- bzw. Radio-Modus.
10. MUTE-Taste
Drücken Sie die MUTE-Taste, um die Lautsprecher für kurze Zeit stumm zu schalten. Drücken Sie diese Taste erneut, um diese Funktion wieder aufzuheiten.
11. AP-Taste (Automatische Senderspeicherung)
Im Radio-Modus:
a) Speicherfunktion:
Drücken Sie die AP-Taste länger als eine Sekunde, um die automatische Senderspeicherung zu aktivieren.
Das Gerätucht innerhalb des aktuellen Freqenzbandes z. B. FM 1 nach den größten Signalstarkepegel bis der Suchzyklus abgeschlossen wird.
Die sechs stärksten Sender werden den entsprechenden Speicherplatzen zugeordnet.
Die nun gespeicherten Sender werden jeweils ca. 5 sek. lang angespielt und danach wird der Sender des ersten Speicherplatzes eingestellt.
Möchten Sie noch weitere Sender im FM-Band suchen drucken Sie die BAND-Taste um auf das FM2 bzw. FM3 Band zu wechseln. Drucken Sie die AP-Taste erneut länger als eine Sekunde, um die weitere Sueche zu starten.
b) Anspielfung:
Nach kurzem Drücken der AP-Taste spiel das Radio alle voreingestellten Sender des Freqenzbandes an.
Hinweis: Die Anspielfungtion endet automatisch wieder bei dem Speicherplatz von dem aus sie gestartet wurde.
12-17.als Stationstasten (1-6) vorgewähler Sender und als 1TOP-, 2INT-, 3 RPT-, 4 RDM-Tasten im CD Betrieb
a) Radio-Betrieb
Durch kurzes Drücken wird über diese Tasten ein voreingestelter Radio-sender direkt angewählt. Werden diese Tasten länger als eine Sekunden gedrückt, wird der aktuell eingestellte Sender unter der gewährten Stations-taste gespeichert.
b) CD-Betrieb
- Drucken Sie die 1TOP-Taste, um das Abspielen der CD zu unterbrechen (Pausenfunktion). Drucken Sie diese Taste erneut, um diese Funktion wieder aufzuheben.
- Drucken Sie die 21NT-Taste. Jeder Titel der CD wird jeweils 10 Sekunden lang angespielt. Drucken Sie diese Taste erneut, um die Suche abzubrechen. Der aktuell angewählte Titel wird abgespielt.
- Drücken Sie die 3RPT-Taste. Der aktuelle gespiefte Titel wird wieder holt. Drücken Sie diese Taste erneut um diese Funktion wieder aufzuheiten.
-
Drücken Sie die 4RDM-Taste. Die CD Titel werden in zufälliger Reihenfolge abgeschelt. Drücken Sie diese Taste erneut um diese Funktion wieder aufzueheben.
-
TA Traffic Announcement (Vorrangschaltung für Verkehrsfunk)
Die TA-Funktion wird durch kurzes Drücken der TA-Taste aktiviert und durch ein TA-Zeichen im Display angezeigt. Beim Radiobetrieb in einem FM Frequeenzband beginnnt automatisch die Suche nach einem Verkehrs Funksender (TA SEEK).
Wenn ein FM-Sender empfangen wird, der periodisch die neuesten Verkehrsfunkinformationen ausstrahlt, leuchtet die TP-Anzeige im Display auf.
Bei eingeschalteter TA-Funktion unterbrechen die FM Verkehrsfunkinformationen automatisch den CD Betrieb. Der Lautstärkepegel wird auf den Mindestswert für die Übertragung von Verkehrsnahmachten angehoben.
Nach Beendigung der Verkehrsfunkinformationen setzen das vorher eingestellte Programm wieder ein.
Unterbrechung der TA-Funktion:
Möchten Sie die aktuelle Verkehrsnachricht unterbrechen, Drücken Sie kurz die TA-Taste. Der TA-Modus wird hierdurch nicht ausgeschaltet.
D
19. PTY-Taste Wahl des Programmtypes
Neben dem Sendername übermitteln eine FM-Sender auch Informationen über den Programmtyp ihres Programms. Diese Informationen konnen von Ihr Automotario angezeigt werden.
Solche Programmtypen können z.B. sein:
SPORT
NEWS
POP
CLASSICS
Mit der PTY-Funktion konnen Sie gezielt Sender eines bestimmten Programm-types auswahlen.
Drucken Sie die PTY-Taste 1X um in die PTY Musikgruppe zu gelangen.
Im Display erscheint das Zeichen „PTY".
Mit Hilfe der Stationstasten 1-6 konnen Sie nun wie folgt eine Auswahl treffen.
| 1X drücken | 2X drücken | |
| Stationstaste 1 | POP M | ROCK M |
| Stationstaste 2 | EASY M | LIGHT M |
| Stationstaste 3 | CLASSICS | OTHER M |
| Stationstaste 4 | JAZZ | COUNTRY |
| Stationstaste 5 | NATION M | OLDIES |
| Stationstaste 6 | FOLK M |
Drücken Sie die PTY-Taste 2X um in die PTY Sprachgruppe zu gelangen. Mit Hilfe der Stationstasten 1-6 konnen Sie nun wie folgt eine Auswahl treffen.
| 1X drücken | 2X drücken | 3X drücken | |
| Stationstaste 1 | NEWS | AFFAIRS | INFO |
| Stationstaste 2 | SPORT | EDUCATE | DRAMA |
| Stationstaste 3 | CULTURE | SCIENCE | VARIED |
| Stationstaste 4 | WEATHER | FINANCE | CHILDREN |
| Stationstaste 5 | SOCIAL | RELIGION | PHONEIN |
| Stationstaste 6 | TRAVEL | LEISURE | DOCUMENT |
Drücken Sie die PTY-Taste 3X um in die Funktion wieder auszuschalten.
Wenn PTY angewählt wird, startet das Radiogerät die Suche nach entspruchenden PTY-Informationen und stoppt, wenn die gesuchte PTY-Information gefunden wurde.
Wird der gesuchte Programmtyp nicht gefunden erscheint im Display „NONE PTY".
Wenn die gesuchte PTY-Information nicht mehr besteht, schaltet sich die PTY-Funktion automatisch auf normalen Modus um.
20. AF (Alternative Frenzen) REG-Funktion
a) AF ist eine Funktion die mit Hilfe des RDS (Radio Data System) arbeitet und nur bei FM Sendern genutzt werden kann. Das Görtät sicht im Hintergrund die am besten zu empfangene Freqenz des eingestellen Senders. Wenn die AF-Funktion angewählt wird, prüft das Radio laufend die Signalstarke der AF-Frequency. Das Prüfinterval für jeder AF-Frequency
hängt von der Signalstarke des aktuellen Senders ab und variiert von ein paar Minuten im Fall eines starken Senders bis zu ein paar Sekunden bei schwachen Sendern. Jedes Mal, wenn die neue AF-Frequency stärker ist, als die aktuell eingestellte Station, schaltet das Gerät für kurze Zeit auf diese Freqenz um und es wird ein bis zwei Sekunden lang die Meldung „NEW FREQUENCY" angezeigt. Da die Stummzeit beim Freqenzwchsel bzw. der Prüfzeit sehr kurz ist, ist dies während des normalen Programms fast nicht hörbar.
Die AF Funktion wird durch kurzes Drücken der AF-Taste aktiviert und der Status der AF Funktion wird durch ein AF-Zeichen im Display angezeigt.
- Erscheint das AF Zeichen im Display ist die AF-Funktion eingeschaltet und es werden RDS-Sendedaten empfangen.
- Blinkt das AF Zeichen im Display, ist die AF-Funktionzar angewählt es kann jedergerade kein RDS-Sendesignempfangen werden.
- Betätigten Sie die AF-Taste erneut, um diese Funktion wieder auszuschalten. Das AF Zeichen im Display erlischt.
b) REG-Funktion
Einige Sender teilen zu bestimmten Zeiten ihr Programm in Regionalprogramme mit entsprechlichem Inhalt auf.
- REG ON: Durch langes Drücken der AF-Taste wird der regionale Modus eingeschaltet. Im Display erscheint weniger Sekunden lang die Meldung „REG ON".
Hinweis: Die Anzeigekapazität des Displays ist begrenzt. Es ist möglich, dass im doppelten Anzeigemodus einzeln Segmente des Displays gelöscht sind.
Mit der Funktion REG ON wird verhindert, dass das Radio zu Alternativfrequenzen wechselt, die einen anderen regionalen Programminhalt haben.
- REG OFF: Durch erneutes langes Drücken der AF-Taste wird der regionale Modus ausgeschaltet. Im Display erscheint weniger Sekunden lang die Meldung „REG OFF".
Die ProgrammKennung (PI) des Regionalsendeprogramms wird bei der Sachue nach einer Alternativfrequenz (AF) oder einer Programmkennung (PI) ignorant.
21. CLK-Taste
Durch kurzes Drucken dieser Taste werden verschiedene Informationen im LCD-Display dargestellt.
Beim Empfang eines RDS-Senders erhalten Sie:
Im Radio-Modus:
Sendernamen Frequenz Uhrzeit Programmtyp
- Im CD-Player-Modus:
→Titelnummer/Laufzeit → Sendernamen → Frequenz → Uhrzeit → Programmtyp →
Hinweis: Wenn keine Uhrzeit- oder Programtyp -Information empfangen werden, zeit das Display „NO CLOCK“ bzw. „NO PTY“ an.
D
Strahlt der empfangene Sender keine zusätzlichen RDS-Informationen aus erhalten Sie:
im Radio-Modus:
NO CLOCK Frequenz NO PTY
im CD-Player-Modus:
→ Titelnummer/Laufzeit → Uhrzeit → Frequenz → NO PTY →
22. CD-Schlitz
23. Auswurftaste (EJECT)
Zum Auswerfen der CD diese Taste drucken.
24. Blinkende LED-Anzeige (ohne Abbildung)
Beim Abnehmer der vorderen Bedientafel blinkt diese Anzeige.
25. RESET-Knopf (ohne Abbildung)
Zum Wiederherstellen des gestörten Programms diese Taste drucken. Diese
Taste finden Sie bei abgenommenem Bedienfeld rechts besoin dem Display.
Technische Daten
Allgemeines
Netzspannung
DC 13,8 V
Stromverbrauch
15 A Max.
Leistung
4×35WPMPO
FM-Bereich
Frequenzbereich
87,6 MHz bis 108,0 MHz
Nutzbare Empfindlichkeit
3 V
I.F. Freqenz
10,7 MHz
Ausgangsleistung (Wahlweise)
Ausgang
bei CD max. 1200mV
CD-Player
System
CD-Gerät
Verwendbare CDs
CD/CDR/CDRW Disks
Anzahl der Quantizierungsbits
1 bit.
Signalformat
Musterfrequenz 44,1 kHz
Frequenzcharakteristika
20-100 Hz≤5dB
Signal-Rausch-Verhältnis
10 - 20kHz ≤ 5 dB
Anzahl der Kanäle
50 dB (1 kHz)
Gehäuseabmessungen
2 Stereo-Kanäle
178 B x 50 H x 165 T
Störungsbehebung
D
Bevor Sie die Checkliste durchgehen,itte zunachst den Anschluss fertig stellen. Wenn nach erfolgtem Durchprüfen der Checkliste immer noch Fragen offen sind, wenden Sie sichitten an ihre nachstgelegene Kundendienstelle.
| Fehlersymptom | Grund | Lösung |
| CD's werden nur bis zur Hälfte in den CD Schacht eingezogen. | Die Schrauben der Transportsicherung sind nicht entfern't worden. | Entfernen Sie die Schrauben der Transportsicherung. |
| Nach Einlagen in das Gerätläuft die CD oder Kassette nicht. | Der Lautstärkeregler ist zu leise eingeselt. | Den Lautstärkeregler höher einstellen. |
| Die Anschlüsse sind nicht korrekt ausgeführrt. | Den +12V- sowie den Masseanschluss überprüfen. | |
| Der Ton des CD-Players hupft. | Die Straβenoberfläche ist rauh. | Zum Abspielen der CD warten, bis die Straße glatter wird. |
| Das Gerät ist nicht fest eingebaut. | Das Gerät fest einbauern. Sicherstellen, dass die hin-tere Befestigung verwendet wird, wenn das Fahrzeug keine geeignete Aufnahme für den hinteren Gerätsteil bietet. | |
| Die CD ist defekt. | Eine andere CD auspro-bieren. Wenn diese korrekt lauft, ist die erstige CD wahr-scheinlich beschädigt. | |
| Die CD ist verschmutzt. | Die CD reinigen. | |
| Kein Strom. | Die Zündung ist ausge-schaltet. | Den Zündschlüssel auf „ON“ oder „ACC“ rehen. |
| Die Sicherung ist durch-gebrannt. | Die Sicherung durch eine andere 15A-Sicherung ersetzen. | |
| Das Gerät faktioniert nicht richtig (EJECT, LOAD, PLAY). | Der Mikrocomputer wurde durch elektramagnetische Felder gestört. | Die CD oder Kassette Herausnahmen und wieder einlagen. Das Gerät aus- und dann wieder einschalten. |
| Kein Radioempfang. | Das Antennenkabel ist nicht angeschlossen. | Das Antennenkabel fest in die Antennenbuchse des Gerätes stecken. |
D
| Im automatischen Such-modus stoppt das Radio bei keiner Sondestation. | Die Sendesignale sind zu schwach. | Manuell eine Sondestation einstehen. |
| Die CD wirdzarwege-zogen und im Display wird auch ein Track angezeigt, es ist aber nur rauschen oder gar kein Ton zu hören. | CDs und CDRs im MP3 Format!Das Gerät ist nicht MP3 fällig. Die CD beginnztwar zu drehen, der Ton kann aber nicht wiederergegeben werden. | Überprüfen Sie die auf der CD gespeicherten Formate. |
| Hinweis: Die Wiedergabe anwendereitig erstellter CD kann durch die Vielzahl der verfügbaren Software und CD-Medien nicht garantiert werden. | ||
Abspielen einer CD
D

Reinigen der CD
Vor dem Abspielen, die CD mit einem sauberen, staubfrei Reinigungstuch abwischen. Die CD in Pfeilrichtung abziehen.
Hinweis: Keine Lösungsmittel wie Benzin oder Verdünner verwenden. Die allgemein erhälliche Reinigungsmittel oder Anti-Statiksprays beschädig den Gerät.
Einlagen der CD
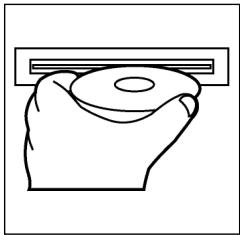
Wenn die CD mit dem Aufdruck nach unten einge- legt wird, kann das Gerat beschadigt werden. CD immer mit dem Label nach offen einlegen.
Hinweis: Wenn sich bereits eine CD im CD-Schlitz befindet, nicht versuchen, eine weitere CD einzulegen. Dies kann zu Schäden am Gerät führen.
Anfassen der CD
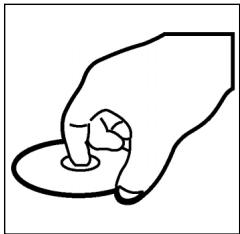
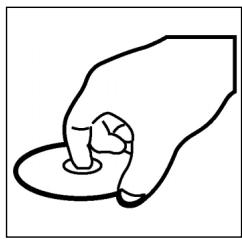
Die CD stets am Rand anfassen. Um die CD sauber zu halten, nicht an der Oberfläche anfassen.
- Keine Aufkleber oder Klebeband auf die CD kleben.
Die CD nicht direkter Sonneneinstrahlung oder Wärmequellen wie Heizungsröhren aussetzen und sie auch nicht im Auto halten, wenn这点 in prälser Sonne geparkt wird, da dies zu einem betrachtlichen Temperaturanstieg führt.
Dieses Gerat wurde nach allen zuteffenden, aktuellen CE-Richtlinien geprüft, wie z.B. elektromagnetische Verträglichkeit und Niederspannungsdirektive und wurde nach den neuesten Sicherheitstechnischen Vorschriften gebaut.
Technische Änderungen vorbehalten!
Bitte führen Sie das ausgediente Gerät einer umweltgerechten Entsorgung zu.
D
Garantie
Wir übernehmen für das von uns vertriebene Gerät eine Garantie von 24 Monaten ab Kaufdatum (Kassenbon).
Innerhalb der Garantiezeit beseitigen wir unentgeltlich die Mängel des Gerätes oder des Zubehörns*, die auf Material- oder Herstellungsehler beruhen, durch Reparatur oder, nach unseren Ermessen, durch Umtausch. Garantieleistungen bewirken:weder eine Veränderung der Garantiefrist, noch beginnnt dadurch ein Anspruch auf eine neue Garantie!
Als Garantienachweis gilt der Kaufbeleg. Ohne diesen Nachweis kann ein kostenloser Austausch oder eine kostenlose Reparatur nicht erfolgen.
Im Garantiefall geben Sieitte das komplette Gerät in der Originalverpackung zusammen mit dem Kassenbon an ihren Handler.
*) Schäden an Zubehörteilen führen nicht automatisch zum kostenlosen Umtausch des kompletten Gerätes. Wenden Sie sich in thisem Fallitte an unsere Hotline! Glasbruchschäden bzw. Brüche von Kunststoffteilen sind grundsätzlich kostenpflichtig!
Sowohl Defekte an Verbrauchszubehör bzw. Verschleißteilen (z.B. Motorkohlen, Knethaken, Antriebsriemen, Ersatzfernbedienung, Ersatzzzahnbürsten, Sägebli-ttern usw.), als auch Reinigung, Wartung oder der Austausch von Verschleißteilen, fallen nicht unter die Garantie und sind deshalb kostenpflichtig!
Die Garantie erlischt bei Fremdeingriff.
Nach der Garantie
Nach Ablauf der Garantiezeit können Reparaturen kostenpflichtig vom entspruchenden Fachhandel oder Reparaturservice ausgeführten werden.
Algemene veiligheidsinstructies
NL
Voorkom risico's voor brand en elektrische schokken en stel het apparaat Niet bloot aan regen von vocht. Gebruik het apparaat Niet in de directe nabijeheid van water (bijv. badkamer, zwembad, vochtige kelder).
Gebruik het apparaat uitsluitend voor het waarvoortestemde doel.
Sluit het apparara uitsluiert aan op een correct gefinstalleerde contactdoos. Let op dat de aangegeven spanning overeenstemt met de spanning van de contactdoos.
Let bij het gebruik van externe adapters op de juiste polariteit en spanning enplaats batterijen altiijd in de juiste richting.
Plaats het apparaat zodenig dat de aangebrachte luchtopeningen nicht worden afgedekt.
Open nooit de behuizing van het apparaat. Door ondeskundige reparations können aanzienlijke bevaren voor de gebruiker ontstaan. Neem het apparaat Niet更是 in gebruik wanner het apparaat - en in het bijzonder de kabel - beschadigingen vertoont, maar het eerst door eenvakman repareren. Controllerer de kabel regelmatin op beschadigingen.
Een defecte kabel mag alleen door de fabrikant, once technische dienst of een soortgelijk gekwalificeerd persoon worden verrangen. Alleen zo konnen bevaren vermeden worden.
Onderbreek de stroomtoevoer of verwijder de batterijen wanner u denkt, het apparaat langerearend Niet te gebruiken.
Volgende symbolen können op uw apparaat+zijn aangebracht. Zij hebden de volgende betekenis:

Het bliksemsymbol wijst de gebruiker op onderdelen in het inwendige van het apparaat die gevaarlijk hove spanning voeren.

Het symbol met het uitroepteken verwijst maar belangrijke bedienings- en onderhoudsinstructies in de begeleidende documentatione.

Apparaten met dit symbol Werken met een „Klasse 1-laser_, voor de afstavg van de CD. De ingebouwde veilighheidsschakelaars要去en voorkomen dat de gebruiker worden blootgesteld aan gevaartlijke, voor het menselijk oog onzichtbaar laserlicht wonneer het CD-vak geopend is.
Deze veiligheidsschakelaars mogen in geen geval overbrugd of gemanipuleerd worden,ondat u anders gevaar loopt, aan het laserlicht te worden blootgesteld.
NL
Installatie
Monteer het radioapparaat volgens de onderstaande afbeeldingen
Let op!
h Schroeven van de transportbevelling (a.u.b. vór de montage verwijderen)

a Moer
b Veerring
c Onderlegplaatje
d Schroef
e Montagehoek
f Inschuifbehuzing
g Bedieningselement

Zet het bedieningselement eerst aan tegen de rechtzerijde en klik het verzolvgens aan de linkerzerijde in.
Aansluting
Breng de aansluiting tot stand volgens de afbeelding.
NL
NL
Opgelet
- Plaats het verwijdberbare bedieningselement pas na de aansluiting van de kabels.
- Gebruik luidsprekers met een impedantie van 4 Ohm.
Belangrijke aanvullende informatiek voor de montage van uw autoradio!
- Let bij de montage/aansluiting van uw apparaat op dat uw auto over een originele „ISO-aansluiting"要去 beschikken. Deze aansluiting is de tegenhanger van de aan de apparaatui tung aangebrachte steker (ISO-aansluiting).
Bij de toewijzing van de Tijdsduur ^+ (back-up) konnen darüber al naargelang het voertuigtype afwijkingen optreden.
Neem in deze gezallen a.u.b. contact op met een geauthoriseerde autogarage waar dat een permanente/constante stroomverzorging van uw radio anders Niet gewaarborgd is. (Dit is darüberoodzekelijk voor de opslag van de zenderstations).
- Al naargelang het voertuigtype kutnen in uitzonderingsgevallen stoorgeluiden in de radio/CD-modus optreden. Deze kutnen worden verholpen met een extra ontstoorfilter. Uw apparaat is standardaard reeds uitergerust met een ontstoorfilter. Desondanks kutnen er afhankelijk van het voertuigtype storingen optreden.
Ontstoorfilters়ijn verkrijgbaar Aunt in een zaak voor autotoebehoren en/of bij uw garage.
Veiligheidsmaatregelen en onderhoud
- Verwijder vór de montage a.u.b. de schroeven (h) van de transportbeveiliging ompdat in het andere geval de CD Niet kan worden geladen.
- Het apparaat is geconcipcieerd voor de minpool van de accu die aan de carrosserie van het voertuig dient te zich aangesloten. U dient dit voor de installment te controleren.
- Wanner het voorste bedieningselementijdens de radio- en CD-modus worden verwijderd, worden het apparatus automatisch uitgeschakeld.
- Functiestoring. Na het terugplaatsen van het voorste bedieningselement kan een foumtelding (ERROR) op het display verschijnen. Druk met behulp van een draad of ets dergelijkde toets RESET (24) in om de elektronica waar terug te zieten (RESETTEN). Deze toets kut u bij verwijdert bedieningsveld rechts naast het display vinden.
- Wanneer het extreem heet in het voertuig is, bijv. nadat de auto gedurende een langereijd in de zon geparkeerd stond, dient u de CD-speler pas in te schakenen nadat het na een korte rijduur een beetje is afgekoeld.
- Gebruik steeds de voorhanden beschermhoes om het afneembare bedieningselement veilig te bewaren.
22
Bediening
NL
1. REL-Taste
Druk op de REL-toets om het voorste bedieningselement te verwijderen.
2. + / - - toetsen
In de normale spelimmodus zijn deze toetsen bedoeld voor het instellenen van de geluidssterkte. In combinatie met de tevoren ingedrukte SEL-toets hunnen veranderingen in menu's, bijv. de klangmodus, worden uitgevoerd.
3. SEL-toets (selectie)
a) Druk kort op de SEL-toets om maar het selecti菜单 van de klankmodus te schaken. Op het display beschijt „VOL“ voor de instelling van de geluidssterkte. Door herhaaldelijk op de SEL-toets te drukken kunt u nu de afzonderlijke menupunten zoals VOLUME, BASS, TREBLE, BALANCE en FADER selectoren. U kut den instelleningen van de afzonderlijke menupunten veranderen met behulp van de „+“- of „-“-toets.
Opmerking: wanneer onder DSP equalizerinstallingen zoals bijv. POP, ROCK geselecteerd zich, können BASS en TREBLE nicht worden ingesteld.
b) Druk lang op de SEL-toets om maar het selectienu menu TA SEEK/TA ALARM, MASK DPI/MASK ALL, DSP OFF, LOUD ON/OFF, BEEP ON/OFF, SEEK1/2,STEREO/MONO;LOCAL/DX;VOL LAST/ADJ te schakelen.
Op het display verschijnt „TA SEEK".
Door herhaaldelijk op de SEL-toets te drukken kutn u nu de afzonderlijke menupunten selecteren. U kutn de instellening van de afzonderlijke menupunten veranderen met behulp van de ,+of ,-toets.
TA SEEK-menu (verkeersberichten-zenderzoekfunctie)
Selecteer TA SEEK wanneer bij de selectie van de TA-functie automatisch een zender met verkeersberachten gezocht dient te worden.
Wanneer u TA ALARM selecteert, ontvangent u een waarschuwing op het display, zodia u onder de TA-functionie een zender hebt ingesteld die geen verkeersberichten uitzendt.
- MASK DPI/ALL
Verbergen van alternatively frequencies (AF)ijdens het zoekenaar een programme-identificatie (PI).
MASK DPI: wonneer het apparaat waar de programma-identificatie (PI) van een zender zoekt, blijven de alternative frequencies met een andere programma-identificatie verzorgen.
MASK ALL: bij het zoekenaar eenprogramma-identificatie (PI) blijven alternatieve frequencies met een andere programma-identificatie en zenders met een sterke signaalniveau zonder RDS-signaal verborgen.
DSP
In het DSP kunt de equalizerinstallingen POP M, ROCK M, CLAAS M en FLAT selecteren. Selecteer DSP OFF om eigien instellingen UIT te voeren. Zie hiervoort ook punt 3a.
NL
- LOUD ON/LOUD OFF
Aan- en uitschakelen van de LOUDNESS-functie.
In het lagere volumebereik worden door middel van de functie LOUDNESS (LOUD) het geluidsbeeld uitgebreed. Hoogten en bassen worden versterkt.
BEEP ON/OFF bevestigingsgeluid
Voor het bevestigingsgeluid bij het indrukken van toetsen hebt u twee keuzemogelijkheden.
BEEP ON: het bevestigingsgeluid klinkt na iedere druk op de toets.
BEEP OFF: het bevestigingsgeluid isuitgeschakeld.
- SEEK 1, SEEK 2 (kan alléén in radiomodus worden geselecteer)
Zoekfunctie met de /V -toetsen in radiomodus
SEEK 1: houd de /V -toetsen ingedrukt en de radio stopt bij het volgende ontvangbare zenderstation.
SEEK 2: houd de /V -toetsen ingedrukt totdat de Zoekfunctie in de frequentieband worden voortgezet.
STEREO/MONO-omschakeling (alleén selecteerbaar in radiomodus).
- LOCAL/DX (alleen in radiomodus selecteerbaar)
Uw radio kan RDS EON-gegevens ontvangen. Met EON worden de overdracht van extra zenderinformatie binnen een zenderketen, bijv. de WDR, bedoeld. In geval van een verkeersbericht (TA) worden binnen een zenderketen van een Niet-verkeerszender overgeschakeld aan de desbetreffende verkeerszender van de zenderketen. De ontvangst van deze zendergeveens worden door middel van het EON-teken op het display weergeven. U kuntkiezen uit de EONTA LOCAL- resp. EONTA DISTANCE-modus voor de lokale of de langeafstandsverkeersberichten.
Het doel voor deze functie bestaat daarin, een ongewenst overschakelen maar een EON-TA-verkeersbericht te onderdrukken. Wanner een EON-zender zeer ver weg Light, kutn u gedeelelijk/toch EON TA-informatie van dit station ontvangen. De radio schakelt over maar dit EON-verbindingsstation en probeert de verkeersinformatie te ontvangen. Het signaal is beschter te zwak en de ontvangst is slecht omdat dit EON-verbindingsstation te ver buitten het bereik ligt.
Daarom schakelt de radio terug maar de tevoren ingestelde zender.
Bij de hierboven beschreiben bedrijfsmodus hoog de gebruiker gedurende een korteijd een verkeerd programma of helemaal niets.
EONTA LOCAL:
door middel van deze functie worden omschakenaar een EON-ver-binding met een te zwak signaal vermeden.
De radio schakelt Niet overaar deze zender en de luisteraar neemt de storing nauwelijks waar.
EON TA-DISTANCE-modus:
in deze probeert de EON TA-schakeling de EON TA-informatie van een bereikbare zender te ontvangen en de ontvangstkwaliteit op deze wijze te verbeteren.
VOL LAST/VOL ADJ
Met behulp van de "+"- en "-"toetsen=kunt u een instelling selecteren.
VOL LAST: de radio schakelt in met de op hetIRST ingestelde geluidssterkte
VOL ADJ: a) Druk opniew op de SEL-toets. Op het display verschijnt „A-VOL".
b) Met behulp van de +- en -toetsen kut u een geldelijkblijvende geluidssterkte vooraf instellen.
4. POWER-knop
Druk op deze toets om het apparaat in- of uit te schaken. Druk kort op deze toets om het apparaat in te schakenen en houd de toets ingedrukt om het uit te schakenen.
5. LCD-display (vloeibaar-kristaldisplay)
6. BAND-toets
Druk kortstondig op de BAND-toets omussen de drie FM- (UKW) niveaus—heen en meer te schaken. De benaming van de desbetreffende niveaus FI, F2, F3 worden op het LC-display weergevegen.
7.8. / -toetsen TUNE, SEEK, TRACK, SKIP UP/DOWN
a) In de radiomodus: druk kortstondig op de of V-toets om een radio-zender handmatig in te stellen. Houten de of V-toets ingedrukt om het zoeken aan een radiozender te starten.
Zie hiervoor ook de functie SEEK 1/SEEK2.
b) In de CD-modus: druk kortstondig op de toetsen of V om voorruit ofchteruiet te springen. Om titels voorruit ofchteruiet te spoelen houdt u de pijtoeiten of V ingedrukt.
9. MODE-toets
Druk op deze toets om de CD-speler- of de radiomodus te selecteren.
10. MUTE-toets
Druk op de MUTE-toets om de luidspekers kortstandig uit te schakelen. Druk de toets opniew in om de functie wee ter deactiveren.
11. AP-toets (automatische zenderopslag)
In de radiomodus:
a) Opslagfunctie: druk langer dan 1 seconde op de AP-toets om de automatische zenderops-lag te activeren.
Het apparaat zoekt binnen de actuèle frequentieband bijv. FM 1aar de grootste sigmaalsterktepegel totdat de Zoekcyclus wordt gestopt. De ces sterkste zenders worden toegewezen aan de dienovereenkomstige geheugenplaatsen.
De nu opgeslagen zenders worden telkens ca. 5 seconden lang aangespeeld en daarna worden de zender van de eerste geheugenplaats ingesteld.
NL
Indien u nog meer zenders op de FM-band wilt zoeken, drukt u op de BAND-toets om maar de FM2-of FM3-band over schakelen. Druk opnieuw langer dan 1 Seconde op de AP-toets om verder te zoeken.
b) Aanspeelfunctie:\ nadat u de AP-toets kort hebt ingedrukt, speelt de radio alle Vooringestelde zenders van de freiorentieband aan.\ Opmerking: de aanspeelfunctie eindigt automatisch weeR bij de geheugenplaats waarop deze werden gestart.
12-17. als stationstoetsen (1-6) van voorgeselecteerde zenders en als 1TOP-, 2INT-, 3RPT-, 4RDM-toetsen in de CD-modus
a) Radio-modus
Door kortstandig indrukken sunt u via deze toetsen een voorgeseleeteerde radiozender direct selecteren. Wonneer u deze toetsen langer dan eén seconde indrukt, worden de actuel ingestelde zender onder de geselecteer de stationstoets opgeslagen.
b) CD-modus
- Druk op de 1TOP-toets om het afspelen van de CD te onderbreken (pauzefunctie). Druk de toets opnieuw in om de functie wee te deactiveren.
- Druk op de 2INT-toets. Iedere titel van de CD worden gedurende 10 seconden afgespeeld. Druk opnieuw op deze toets om de Zoekfunctie af te breken. De actueel geseleerde titel worden afgespeeld.
- Druk op de 3RPT-toets. De actuelle titel worden herhaald. Druk de toets opnieuw in om de functie weeer te deactiveren.
- Druk op de 4RDM-toets. De CD-titels worden in willekeurige volgorde afgespeeld. Druk de toets opniew in om de functie weir te deactive-ren.
18. TA traffic announcement (voorrangschakeling voor verkeersberichten)
De TA-fuCNTie worden door het kort indrukken van de TA-toets geactiveerd en door het TA-symbol op het display weergeveen. In de radiomodus in een FM-frequentieband begint het zoeken aan een verkeersberichtzender (TA SEEK) automatisch.
Wanner een FM-zender worden ontvangen die periodiek de{nieuwste verkeers-informatie uitzendt,brandt de TP-weergave op het display.
Wanneer de TA-functione is insgeschakeld, onderbrenke de FM verkeersberichen automatisch de CD-modus. De geluidssterkte worden opgevoerd maar de minimale waarde voor de overdracht van de verkeersberichten.
Na afloop van de verkeersinformatie worden het tevoren ingestelde programma voortgezet.
Onderbreking van de TA-functie:
wonneer u de weergave van de actuèle verkeersberichten wilt onderbreken, drukt u kort op de TA-toets. De TA-modus worden hierdoor Niet uitgeschakeld.
19. PTY-toets selectie van het programmatype
Naast de naam van de zender gezven sommige FM-zenders ook informatie over het programmatype van hun programme. Deze informatie kan door uw autoradio worden weergegeven.
Deze programmatypes konnen bijv.:
SPORT
NEWS
POP
CLASSICS
zijn.
Met de PTY-functie kurz u doelgericht zenders uitkiezen van een bepaald programmatype.
Druk 1x op de PTY-toets om maar de PTY-muziekgroep te schakelen.
Op het display verschijnt het teken "PTY".
Met behulp van de stationstoetsen 1-6(Int) u nu de volgende selectie treffen.
| 1X indrukken | 2X indrukken | |
| Stationstoets 1 | POP M | ROCK M |
| Stationstoets 2 | EASY M | LIGHT M |
| Stationstoets 3 | CLASSICS | OTHER M |
| Stationstoets 4 | JAZZ | COUNTRY |
| Stationstoets 5 | NATION M | OLDIES |
| Stationstoets 6 | FOLK M |
Druk 2x op de PTY-toets om maar de PTY-taalgroep te schakelen. Met behulp van de stationstoetsen 1-6=kunt u nu de volgende selectie treffen.
| 1X indrukken | 2X indrukken | 3X indrukken | |
| Stationstoets 1 | NEWS | AFFAIRS | INFO |
| Stationstoets 2 | SPORT | EDUCATE | DRAMA |
| Stationstoets 3 | CULTURE | SCIENCE | VARIED |
| Stationstoets 4 | WEATHER | FINANCE | CHILDREN |
| Stationstoets 5 | SOCIAL | RELIGION | PHONEIN |
| Stationstoets 6 | TRAVEL | LEISURE | DOCUMENT |
Druk 3x op de PTY-toets om de functie weeur uit te schakelen.
Wanneer u PTY hebt gekozen, start de radio de Zoekfunctie waar dienovereenkomstige PTY-informatie en stopt, zodra de gezochtte PTY-informatie werdenGVonden.
Wanner het gezochtte programmatype Niet werden gezonden, verschijnt op het display "NONE PTY".
Wanneer de gezochte PTY-informatie Niet meer bestaat, schakelt de PTY-functie automatisch over maar de normale modus.
20. AF (alternatieve frequencies) REG-function
a) AF is een functie die met behulp van het RDS (Radio Data System) werkert een alleen bij FM-zenders kan worden gebruikt. Het apparata Zoekt op de!」
achtergrond de Beste te ontvangen frequencies van de ingestelde zenders.
NL
NL
Wanner de AF-functie worden geseleerd, contrôleert de radio voortdurend de signalsterkte van de AF-frequente. Het controle-interval voor iedere AF-frequente is afhankelijk van de signalsterkte van de actuèle zender en varieert van eenaar minuten in geval aan een sterke zender tot eenaar seconden bij zwakke zenders. Iedere keer wanneer de neue AF-frequente sterker is dan het actueel ingestelde station, schakelt het apparaat voor een korte tijd waar deze frequente over en er wordt geduren deen tot twee seconden de melding weergegeven "NEW FREQUENCY". Omdat de geluidloze overschakelingstijdijdens de frequentiewissel resp. de controlijd zeer kort is, is ditijdens het normale programma nauwelijks hoortbaar.
De AF-functie worden door kort indrukken van de AF-toets geactiveerd en de status van de AF-functie worden door een kort AF-teken op het display weergegeven.
- Wonneer het AF-teken op het display verschijnt, is de AF-functie ingeschakeld en worden RDS-zendgegevens ontvangen.
- Wanneer het AF-teken op het display knippert, is de AF-functionie weliswaar ingeschakeld, maar kan geen RDS-zendsignaal worden ontvangen.
- Druk opnieuw op de AF-toets om de functie weeer uit te schakelen. Het AF-teken op het display dooft.
b) REG-functie
Sommige zenders spreiden hun programma's op bepaaldeijdstippen in regionale programma's met verschillende inhoud.
- REG ON: door lang indrukken van de AF-toets worden de regionale modus ingeschakeld. Op het display verzuchtig gestaduren enkele seconden de melding "REG ON".
Opmerking: de weergavecapaciteit van het display is beperkt. Het is waarom möglichk dat in de dubbele weergavemodus enkele segmenten van het display gewist+zijn.
Met de functie REG ON worden vermeden dat de radio overschakelt maar alternatieve frequenties die een andere regionale programma-inhoud—hebben.
- REG OFF: door het opnieuw lang indrukken van de AF-toets worden de regione modus uitzeschakeld. Op het display verschijnt gedurende enkele seconde de melding "REG OFF".
De programme-identificatie (PI) van het regionale zendprogramma wordenijdens het zoeken aan een alternatieve freuagentie (AF) of een programma-identificatie (PI) geneeerd.
21. CLK-toets
Wanner u de toets kort indukt, verschijnt informatatie op het LCD-display. Bij ontvangst van een RDS-zender ontvangt u:
in deradiomodus:
zendernaam frequente tijd programmatype
- in de CD-spelermodus: titelnummer/afspeelduur zendernaam frequentie tijd programmatype Opmerking: wanner geenijd- of programmatype-informatie worden ontvangen, verschijnt op het display "NO CLOCK" of "NO PTY".
Wanneer de ontvangen zender bovendien geen RDS-informatie uitzendt, ontvangt u:
in de radiomodus: NO CLOCK frequentie NO PTY
- in de CD-spelermodus: titelnummer/afspeelduur ijd frequentie NO PTY
22 CD-sleuf
23. Uitwerptoets (EJECT)
Druk op deze toets om de CD uit te werpen.
- Knipperende LED-weergave (zonder afbeelding)
Deze weergave knippert wanner u het voorste bedieningselement verwijdert. - RESET-toets (zonder afbeelding)
Druk op dietoets om een storende zender te herstellen. Deze toets kunt u bij verwijdend bedieningsveld rechtns naast het display vinden.
Technische gegevens
Algemeen
| Netspanning | DC 13,8 V |
| Stroomverbruik | 15 A Max. |
| Stroomverbruik | 4 x 35 W PMPO |
FM-bereik
| Frequentiebereik | 87,6 MHz tot 108,0 MHz |
| Effective gevoeligheid | 3 μV. |
| IF-frequente | 10,7 MHz |
Uitgangsvermogen (selecteerbaar)
Uitgang bij CD max. 1200mV
NL
CD-speler
Systeme
Afspeelbare CD's
Aantal kwantificeringsbits
Signaalformulaat
Frequentiekarakteristiek
Signaal-ruis-verhouding
Aantal kanalen
Apparaatbehuiizing
CD-apparaat
CD/CDR/CDRW disks
1 bit.
Monsterfrequentie 44,1 kHz
20-100 Hz≤5dB
10 - 20kHz≤ 5dB
50 dB (1kHz)
2 stereokanalen
178 B x 50 H x 165 D
Verhelpen van storingen
Voer eerst alle aansluitingen uit voordat u de checklist doorloopt. Wanner u na controle an de hand van de checklist nog steeds vragen hebt, neem dan a.u.b. contact op met de dichtstbijzijnde klantenservice.
| Storingssymptom | Reden | Oplossing |
| CD's worden maar tot de helft in de CD-sleuf getrokken. | De schroeven van de transportbeveiliging werden verwijderd. | Verwijder de schroeven van de transportbeveiliging. |
| Na hetplaatsen in het apparaat loopt de CD of de cassette Niet. | De volumeregelaar is te zicht ingesteld. | Stel de volumeregelaar hoger in. |
| De aansluitingen zijn nicht correct uitgevoerd. | Controler de +12V- en de massa-aansluiting. | |
| Het geluid van de CD-spe-ler springt. | Het wegdek is ruw. | Wacht met het afspelen van de CD totdat het wegdek vlakker worden. |
| Het apparaat is nicht vast gemonteerd. | Bouw het apparaat vast in. Waarborg dat dechterste bevestiging worden gebruikt wanneer het voertuig Niet over een geschikte opname voor het achterste apparaatgedeelte beschikt. | |
| De CD is defect. | Probeer een andere CD. Wanner.Deze correct fonctioneert is de eerste CD waarschijnlijk beschadigd. | |
| De CD is verontreinigd. | Reinig de CD. | |
| Geen stroom. | De ontsteking is uitgeschakeld. | Draai ontstekingsstreutel naar de stand „ON“ of „ACC“. |
| De zekering is doorge- brand. | Vervang de zekering door een andere 15 A-zekering. | |
| Het apparaat functioneel niet correct (EJECT, LOAD,PLAY). | De microcomputer werd door elektramagnetische velden gestoord. | Verwijder de CD of casset- te en plaats dezeeer. Schakel het apparaat uiten weer in. |
| Geen radio-ontvangst. | De antennekabel is nicht aangesloten. | Stek de antennekabel vast in de antennebus van het apparaat. |
| In de automatische gezek- modus stopt de radio net bij zenderstation(s). | De zendersignalen zijn te zwak. | Stel het zenderstation handmatig in. |
| De CD worden wel inge- trokken en op het display wordt ook een track weergegeven, maar er is slechts een ruisen of zichs helemaal geen geluid te horen. | CD's en CDR's in MP3- formaat! Belangrijke opmerking over CD's en CDR's in MP3-formaat! Dit apparaat is Niet geschikt voor MP3. De CD begint weliswaart te draaien, maar er kan geen geluid worden weerge- geven. | Controler de op de CD opgeslagen formaten. |
| Opmerking: de weergave van een door de gebruiker gemaaakte CD kan op grond van de vele beschikbare programme's en CD-media net worden gegardeendr. | ||
NL
NL


Afspelen van een CD
Reinigen van de CD
Reinig de CD vór het afspelen met een schone, stofvrijne reinigingsdoek. Verwijder het stof van de CD in pijrichting.
Opmerking: gebruik gelein oplosmiddelen zoals benzine of verdunner. De algemeen verkrijgbare reinigingsmiddelen of antistatische sprays beschaden het apparaat.
Plaatsen van de CD
Wanneer de CD met de opdruk waar beneden wordt geplaatst, kan het apparaat beschadigd worden.
Plaats de CD alkijd met het label maar boven.
Opmerking: tracht nicht, een Cd teplaaten wannerezich reeds een CD in de CD-sleuf befindt. Hierdoor kan het apparaat worden beschadigd.
Vastpakken van de CD
Grijp de CD allijd aan de rand vast. Om de Cd schoon te houden, mag u deze Niet aan het oppervlak vastpakken.
- Plak geen papier of plakband op de CD.
Stel de CD Niet bloot aan directe zoninstraling of warmtebronnen zoals verwarmingsbuizen en laat de CD ook Niet in de auto liggen wannerdeze in die zon geparkeerd staat waar dit eenaanzienlijke temperatuurstijing tot gevolg heeft.
Dit apparaat is gekeurd conform de op dit moment van toepassing+zijnde CE-richtlijnen zoals bijvoorbeeld elektromagnetische compatibiliteit en laagsspanningsvoorschriften en is geconstruerd volgens de niedwste verilgheidstechnische voorschriften.
Technische wijzigingen voorbehonden!
Garantie
NL
Voor het door ons geleverde apparaat verlenen wij een garantie van 24 maanden vanaf koopdatum (kassabon).
Eventuele gebreaken aan het apparaat of aan het toebehoren*) die zich ontstaan door productie- of materiaalfouten verhelpen wij binnen dezeperiode kosteloos door middel van reparatie of, maar ons oordeel, door verranging. Eventuele garantiegevallen verlungen noch ons geldigheidsduur van de garantie, noch begint dadoor een十几年e garantieperiode!
Het koopbewijs geldt als garantiebewijs. Zonder dit bewijs kan geen kostenoze reparatie of verranging plaatsvinden.
Geef in garantiegevallen het complete apparaat in de originele verpakking samen met de kassabon af bij uw handelaar.
*) Schade aan onderdelen leidt Niet automatisch tot koselozervevanging van het complete aparaat. Neem in dit geval contact op met once hotline! De reparatie van glasbreuk of breuk van kunststofonderdelen worden alsijd berekend!
Niet defecten aan de hulpstukken of aan de slijtende onderdelen (bijv. koolborstels, deeghaken, drijfiemen, reserveafstandsbediening, reservoirandenborstels, zaagbladen enz.), maar ook reiniging, onderhoud of de verranging van slijtende delen vallen nicht onder de garantie en geschieden altijd gegen berekening! Bij ingrepen door derden kommt de garantierverlening te verrallen.
Na de garantieperiode
Na afloop van de garantieperiode konnen reparaties gegen berekening worden uitgevoerd door de betreffende vakhandelaar of de technische Dienst.
1
Avvertenze generali per la sicurezza
Per evitare il rischio di incendio o di scosse, non si deve mai tenere l'apparecchio sulla pioggia o in ambienti umidi. Quindi non usare l'apparecchio nelle immeditate vicinanze di acqua, per esempio in prossimità di una vasca, di una piscina o in una cantina umida.
Utilizzato l'apparecchio solo per l'uso previsto.
Collegare l'apparecchio esclusivamente ad una presa installata a norma. Fare attenzione a che la tensione indica corrisponda alla tensione della presa. Se si impiegano alimentatori esterni, fare attenzione all'esattezza di polarità e di tensione, insereire le batterie sempre correttamente.
Collocare l'apparecchio in modo che le aperture per l'asperazione esistenti non vengano coperte.
Non togliere mai la protezione dell'apparecchio. Riparazioni non a regola d'arte possono causare notevoli pericoli per l'utente. Se l'apparecchio presenta danni, soprattutto nella zona del cavo di collegamento, non metterlo più in funzione, ma farlo riparare prima da un esperto. Esaminare regolarmente il cavo di collegamento alla rete per verificare che non ci siano danni.
Un cavo di collegamento difettoso può essere sostituito con un cavo equivalente solo dal produttore, dello lavoro assistenza o da persona similmente qualificale, al fine di evitare pericoli.
Se l'apparecchio non viene usato per un periodo di tempo prolongato, togliere il blocchetto alimentatore alla presa ovvero estrarre le batterie.
Questi significi possono trovarsi eventualmente sull'apparecchio e rimandano ai seguenti elementi:

Il significato del lampo fa presente all'utente la presenza di pezzi all'interno dell'apprecchio che sono produrre alte tensioni pericolose.

Il significato con il punto esclamativo fa presente all'utente la presenza di importanti averventenze per l'uso e la manutenzione nei fogli di accompagnamento dell'apparechio.

Gli apparecchi dotati di questo significano lavorano con un „Laser classe 1" per riproduire i CD. Gli interruttitori di sicurezza integrati hanno lo scopo di impedire che l'utente venga esposto alla luce non visibile del laser, pericolosa per l'occhio umano, agliendo lo scomparto per i CD.
Questi interruttori di sicurezza non devono mai essere cavallottati né manipolati perché altrimenti sussiste il rischio di esposizione alla luce del laser.
Installazione
Montare la radio operando conformamente alle illustrazioni seguenti


Attenzione!
h Viti delsystemadi sicurezza per iltrasporto(da rimuovere prima del montaggio)
a Dado
b Rosetta elastica
c Rondella
d Vite
e Squadra di montaggio
f Alloggiamento inserimento
g Pannello di controllo
Appoggiare prima il frontalino con i comandi sul lato destro e poi innestarlo in posizione sul lato sinistro.
1
Allacciamento
Realizzare l'allcianto conformmente a quanto indicato dal grafico.
Attenzione
1
- Il pannello di lavoro rimovibile delve essere montato soltanto dopo aver effettuato l'allacciamento del cavo.
- Si consiglia di utilizzato altoparlanti con un'impedenza para a 4 ohm.
Informazioni importanti per il montaggio della vostra autoradio!
- Tenete presente che durante nella fase di montaggio/smontaggio del vosto apparecchio la sua macchina deve disponre di un „Collegamento ISO " originale. Questa è la controparte alla spina presente all'uscita dell'apparecchio (Collegamento ISO).
Nel caso di backup Durata +", a seconda del tipo di veicolo possono esserci differenze.
In questo caso rivolgetevi ad un'officina autorizzata perché un'alimentazione permanente della vostra radio altrimenti non è garantita. (Qesto è necessario per memorizzare le stazioni emittenti).
- A seconda del tipo di veicolo in casi eccezionali possono presentarsi disturbi nel funzionamento Radio/CD. Questi si possono eliminare con unrello antidisturbo supplementare. Malgrado il vostro apparecchio CD sua giornata in series di unrello antidisturbo, possono esserci ugualmente limiti dovuti alla vettura.
Potete ave甚么过滤nei nego di accessori auto e/o presso la vostra officina di fiducia.
Misure di prevenzione e manutenzione
- Le viti della sicura di trasporto (h) devono essere rimoso prima del montaggio altrimenti il CD non entra.
- L'apparecchio è configurato per il polo negativo della batteria, il quale deve essere collegato alla carrozza del veicolo. Accertarsene prima di procedere all'installazione.
- Nel caso in cui il quadro comandi anteriore venga rimioso durante il funzionamento della radio o dellettore CD, l'apparecchio si disattiva automaticamente.
- Funzione errata. Dopo l'insertione del pannello anteriore, è possile che venga indicate un erre sul display (ERROR). Con l'auto di un filo di ferro o simili premere il tasto RESET (24), per ripartire l'elettronica dello stato ori-ginale. (RESETTEN). Questo tasto si trova sul Campo di lavoro staccato a destra'accanto al display.
- Nel caso in cui la temperatura all'interno dell'abitacolo del veicolo sua particolaremente elevata, per esempio quando il veicolo sua rimasto parcheggiatto a lungo al sole, si consiglia di non attivare illettore finché la temperatura dell'abitacolo non sua diminuita in seguito a un breve periodo di marcia.
- Affinché pannello di dato rimovibile possa essere conservato in condizioni di sicurezza, si consiglia di utilizzare a tale scopo l'involucro protettivo appositamente previsto allo scopo.
1
Funzionamento
1. Pulsante REL
Premere il tasto REL per staccare il Campo di lavoro anterioe.
2. Pulsanti +/-
Durante il funzionamento dell'apparecchio, quosti pulsanti servono ai fini della regolazione del volume. Azionati in abbinamento al pulsante SEL, a sua volta premuto, è possibile effettare modifiche nei menu, per esempio per quando concerne la modalità acustica.
3. Pulsante SEL (selezione)
a) Premere brevamente il pulsante SEL per aprire il menu di selezione della modalità acustica. Sul display viene visualizzato ,VOL" ai fini dell'impostazione del volume. Azionando ripetutamente il pulsante SEL, è quindi possibile selezioneare the singole opzioni di menu quali, per esempio, VOLUME, BASS, TREBLE, BALANCE e FADER. Per poter modificare le impostazioni delle varie opzioni di menu, è sufficiente serviri dei pulsanti "+" oppure "-" Nota: se sono state selezione impostazioni dell'equalizzatore in DSP, p.e. POP, ROCK, non si possono impostare BASS e TREBLE.
b) Tenere premuto a lungo il pulsante SEL per aprir il menu di selezione TA SEEK/TA ALARM, MASK DPI/MASK ALL, DSP OFF; LOUD ON/OFF, BEEP ON/OFF, SEEK1/2, STEREO/MONO; LOCAL/DX; VOL LAST/ADJ. Sul display viene visualizzato il messaggio „TA SEEK".
Azionando ripeturamente il pulsante SEL, è quindi possibile selezioneare le varie opzioni di menu. Per poter modificare le impostazioni delle varie opzioni di menu, è sufficiente serviri dei pulsanti "+"oppure "."
- Menu TA SEEK
(ricerca dell'emittente di notiziari sulle condizioni del traffico)
Qualora si desideri che durante la funzione TA venga ricercata automaticamente un'emittente di notiziari sulle condizioni del traffico, è necessario selezionare TA SEEK.
Nel caso in cui se selezioni TA ALARM, il display visualizza un messaggio di avvertenza non appena sua stato impostata, durante la funzione TA, una stazione radio che non trasmette informazioni in materia di traffico.
- MASK DPI/ALL
Oscuramento delle frequenze alternative (AF) durante la ricerca di un codice identificativo di programma (PI).
MASK DPI: quando l'apparecchio ricerca il codice identificativo di programmata (PI) relativo a una data emittente, le frequenze alternative caratterizzate da un codice identificativo di programmata differente non vengono visualizzate.
MASK ALL: durante la ricerca del codice identificativo di programma (PI), le frequence alternative caratterizzate da un codice identificativo di programma differente e le emittenti aventi un forte livello del segnale alla segnale RDS non vengono visualizzate.
DSP
In DSP si possono selezione are impostazioni dell'equalizzatore POP M; ROCK M, CLASS M e FLAT M. Per inseire impostazioni personali selezionare DSP OFF. V.anche il punto 3a.
- LOUD ON/LOUD OFF
Accendere e spegnere della funzione LOUDNESS.
Con la funzione LOUDNESS (LOUD) si espando le cattratteristiche del suono quando il volume è basso; si augmentanoosi gli alte e bassi.
BEEP ON/OFF segnale acustico di conferma
Si cui selezionare il segnale di conferma in due modi premendo i tasti.
BEEP ON: il segnale acustico di conferma viene genrato igniqualvolta si azioni un pulsante.
BEEP OFF: il segnale acustico di confirma è disattivato.
SEEK 1, SEEK 2 (seLECTIONabile solo nella modalità radio)
Funzione di ricerca con i tasti / V nella modalità radio.
SEEK 1: tenendo premuti i tasti / e la radio, si raggiunge la prima stazione emittente raggiungible.
SEEK 2: finché si tengono premuti i tasti / V , la ricerca nella banda di frequenza continua.
STEREO/MONO commutazione
(selezionabile solo nel funzionamento radio)
- LOCAL/DX (selezionabile solo nel funzionamento radio)
La radio può ricevere dati RDS EON. Con l'espressione „EON" si intende la trasmissione di ulteriori informazioni in merito all'emittente nell'ambito di una catena di stazioni radio, come nel caso di WDR. Nel caso specifico di un annuncioc sul traffico (TA) nell'ambito di una catena di stazioni radio, si passa da una emittente che non trasmette notiziari radiofonici sul traffico alla corrispondente stazione radio con trasmissione di notiziari sul traffico della catena di stazioni radio stesse.
La ricezione di quosti dati è segnalata sul display attraverso il symbolo EON. Per la ricezione delle informazioni sul traffico urbano o interurbano si cui scagliere tra la modalità EONTA LOCAL ovvero EONTA DISTANCE. Scopo di但这a funzione è sopprimene una commutazione indesiderata a un'informazione sul traffico EON-TA indesiderata.
Nel caso in cui un'emittente EON si trovi molto distante, restsa ciononostante in parte possibile ricevere informazioni EON TA da parte di esta stazione. La radio si sintonizza su quella stazione di trasmissione EON e
1
tenta di ricevere le informazioni sul traffico. Tuttavia, il livello del segnale è troppo debole e la qualità della ricezione cattiva, in quanto esta stazione di trasmissione EON è troppo distante.
Di seguenza, la radio si sintonizza nuovamente sull'emittente precedentemente impostata.
Nel caso della modalità sopra descrietta, l'utente sente per un dato intervallo di tempo un programma sbagliato oppure non ode nulla.
EONTA LOCAL:
Attraverso esta funzione si evita la sintonizzazione su un collegamento EON caratterizzato da un livello di segnale troppo debole.
La radio non si sintonizza su questa emittente e l'utente non avverte alcun disturbo.
Modalità EONTA DISTANCE:
in esta modalità, la commutatione di tipo EONTA tenta di ricevere le informazioni EONTA da un'emittente raggiungibile e di ottimizzato, in quello modo, la qualità della ricezione.
VOL LAST/VOL ADJ
Tramite i tasti + e - , si pud scegliere una delle impostazioni:
VOL LAST: la radio si accende con il volume impostato per ultimo.
VOL ADJ: a) Premere nuovamente il tasting SEL. Nel display apparé "A-VOL".
b) con l'aiuto dei tasti +e -si selezione un volume d'accensione permanente.
4. Pulsante POWER
Premere quello pulsante per attivare e disattivare l'appareccchio. Per accende- re premere brevamente quello tasting, per spagnere tenere premuto il tasting.
5. Display LCD (display a cristalli liquidi)
6. Pulsanti BAND
Premere per un attimo il tasting BAND per passare tra i tre livelli FM (UKW). La denominazione del corrispettivo piano F1, F2, F3iene visualizzata nel display LCD.
7.8. Pulsanti / TUNE, SEEK, TRACK, SKIP UP/DOWN
a) Nella modalità radio:
Premere per un attimo i tasti or V per impostare manualmente una stazione emittente a scelta.
Tenere premuto il tasting o v per dare avvio alla ricerca di un'emittente radio.
V.anche la funzione SEEK1/SEEK2.
b) Nella modalità CD: per avanzare o tornare indietro, premere breve, vomente il pulsante oppure V. Per poter scorrere i titoli, tenero premuto il tasto direzionale oppure V.
9. Pulsante MODE
Premere quello pulsante per selezionare illettore CD o la modalità radio.
1
10. Tasto MUTE
Premere il tasto MUTE per disattivare il volume per un breve lasso di tempo.
Premere di nuovo quello tasto per ripristinare il volume.
11. Pulsante AP (memorizzazione automatica dell'emittente)
Nella modalità radio:
a) Funzione di memoria:
Per attivare la funzione di memorizzazione automatica dell'emittente, è necessario premere il pulsante AP per più di un secondo.
L'apparecchio ricerca il livello di segnale con maggiore intensità all'interno della banda di frequenza corrente, per esempio FM 1, sino alla conclusione del ciclo di ricerca stesso. Le sei emittenti caratterizzate da segnale a intensità più elevata vengono abbinate alle correspondenti posizioni di memoria.
Le emittenti ora memorizzate vengono avviare per ca. 5 secondi e poi viene impostata l'emittente della prima posizione di memoria.
Se si desidera cercare ancora altre emittenti nella banda FM, premere il tasto BAND per passare a FM 2 o FM 3. Tenere di nuovo premuto per più di un secondo il tasto AP per dare avvio alla successiva ricerca.
b) Funzione Intro-Scan:
Dopo aver premuto per un attimo il tasto AP, la radio d'avvio a tutte le emittenti pre-impostate della banda di frequenza attuale.
Nota: la funzione Intro-Scan termina automaticamente alla posizione di memoria da cui si è partiti.
12-17. Tasti di stazione (1-6). Emittente preselezionata e pulsanti 1TOP, 2INT, 3RPT, 4RDM in modalità conlettore CD
a) Modalità radio
Azionando brevamente quosti pulsanti è possibile selezionare direttamente una stazione radio precedenteamente impostata. Qualora quosti pulsanti vengano premuti per più di un secondo, l'emittente correntemente impostata viene memorizzata in corrispondenza del tasto di stazione selezionato.
b) Modalità CD/MP3
- Premere i pulsante 1TOP allo scopo di interrornepere la riproduzione del CD (funzione di pausa). Per avviare nuovamente la riproduzione del CD, azionare nuovamente questo pulsante.
- Premere il pulsante 2INT. Ognuno dei brani del CD viene riprodotto per 10 secondi. Per interrimpere la ricerca, azionare nuovamente quello pulsante. Viene in quello modo riprodotto il brano corrispondente al titolo currente selezionato.
- Premiere il pulsante 3RPT. Il brano correspondente al titolo presente viene ripetuto. Per annullare esta funzione, premere nuovamente quello pulsante.
1
- Premere il pulsante 4RDM. I brani corrispondenti ai titoli del CD vengono riprodotti in una sequenza casuale. Per annullare esta funzione, premere nuovamente quello pulsante.
18. TA Traffic Announcement
commutazione prioritaria per le informazioni radiofoniche sul traffico)
La funzione TA viene attivata premendo brevamente il pulsante TA ed è segnata sul displayattraverso il symbolo TA correspondente. Nel caso della modalità radio in una banda di frequenza FM, ha inizio automaticamente la ricerca di un'emittente di notiziari sulle condizioni del traffico (TA SEEK).
Quando si riceve un'emittente FM che trasmette periodicamente informazioni aggiornate sulle condizioni del traffico, il symbolo TP si illumina sul display.
Nel caso in cui la funzione TA sua attivata, la trasmissione delle informazioni sul traffico FM interrompe automaticamente la modalità CD. Il livello del volume viene incrementato sino al valore minimo necessario ai fini della trasmissione dei notiziani sul traffico. Una volta terminata la diffusione delle informazioni sul traffico,iene ripreso il programma impostato in precedenza.
Interruzione della funzione TA:
Qualora si decide interrompere l'ascolto delle informazioni attuali sulle condizioni del traffico, azionare brevamente il pulsante TA. La modalità TA restà tuttavia attiva
19. Pulsante PTY – Sezione del tipo di programma
Oltre al nome dell'emittente alcune emittenti FM trasmettonoanche informazioni in merito al tipo di programma in oggetto. Queste informazioni sonoessere visualizzate alla propria autoradio.
Questi tipi di programma possono essere, per esempio, i seguenti:
SPORT
NEWS
POP
CLASSICS
Mediating the funzione PTY è possible selezionare in modo mirato delle emittenti relative a un determinato tipo di programma.
Premere il pulsante PTY 1X per visualizzare il gruppo musicale PTY. Nel display appara il carattere „PTY". Servendosi dei tasti di stazione 1-6, è possible effettuate una selezione conformmente a quanto indicate di seguito.
| Premere 1X | Premere 2X | |
| Tasto di stazione 1 | POP M | ROCK M |
| Tasto di stazione 2 | EASY M | LIGHT M |
| Tasto di stazione 3 | CLASSICS | OTHER M |
| Tasto di stazione 4 | JAZZ | COUNTRY |
| Tasto di stazione 5 | NATION M | OLDIES |
| Tasto di stazione 6 | FOLK M |
Premiere il pulsante PTY 2X per aprir il gruppo linguistico PTY. Servendosi dei tasti di stazione 1-6, è possible effettuire una selezione conformmente a quanto indicate di seguito.
| Premere 1X | Premere 2X | Premere 3X | |
| Tasto di stazione 1 | NEWS | AFFAIRS | INFO |
| Tasto di stazione 2 | SPORT | EDUCATE | DRAMA |
| Tasto di stazione 3 | CULTURE | SCIENCE | VARIED |
| Tasto di stazione 4 | WEATHER | FINANCE | CHILDREN |
| Tasto di stazione 5 | SOCIAL | RELIGION | PHONEIN |
| Tasto di stazione 6 | TRAVEL | LEISURE | DOCUMENT |
Premere il pulsante PTY 3X per disattivare nuovamente la funzione.
Quando si selezione PTY, la radio avvia la ricerca delle corrispondenti informazioni PTY. Questa operazioni continua finché sudette informazioni PTY non vengano effettamente trovate.
Nel caso in cui il tipo di programma ricercato non venga trovato, il display visualizza il messaggio „NONE PTY".
Qualora l'informatazione PTY ricercata non sia più disponibile, la funzione PTY passa automaticamente alla modalità normale.
20. AF (frequenze alternative) - Funzione REG
a) AF è una funzione che opera con l'ausilio del sistema RDS (Radio Data System) e può essere utilizzata esclusivamente per le emittenti FM.
L'apparecchio ricerca in background la frequenza dell'emittente impostanza che può essere ricevuta nel modo migliorie.
Quando si sleziona la funzione AF, la radio controlla costamente l'intensità del segnale della frequence AF. L'intervallo di prova per agli frequenza AF dipende dall'intensità del segnale"Thisi dell'emittente corrente e poi variate tra i due minuti rilevabili nel caso di emittenti con segnale intenso e i due secondi nel caso di emittenti dal segnale debole.
Ogniquvalvolta la nuova frequenza AF abbia un segnale più forte rispetto a quello della stazione impostata, l'apparecchio si sintonizza per un breve intervallo di tempo su questa frequenza, e sul display viene visualizzato il messaggio „NEW FREQUENCY" per uno o due secondi. Poiché il tempo della commutation silenziosa durante il cambio di frequenza e il tempo di controlio sono molto brevi,QLA sua operazione non viene pressoché percepita durante il normale programmà.
La funzione AF viene attivata premendo brevamente il pulsante AF, nella stato della funzione AF è visualizzato sul displayattraverso un symbolo AF.
- Se il symbolo AF viene visualizzato sul display, la funzione AF è attiva e vengono ricevuti dati RDS.
- Se il symbolo AF lampeggia sul display, la funzione AF è selezionata, ma non è possible ricevere alcun segnale RDS.
- Per disattivare nuovamente esta funzione, azionare più una volta il pulsante AF. Il simbolo AF presente sul display si spelne.
b) Funzione REG
In determinati momenti alcune emittenti ripartiscono il programma in programmi regionali con diverso contento.
- REG ON: premendo a lungo il pulsante AF, si attiva la modalità regiore. Per alcuni secondi nel display appara la segnalazione „REG ON".
Avvertenza: il display ha una capacité limitata. Puito pertanto accadere che nella modalità di visualizzazione doppi singoli segmenti del display siano cancellati. Attraverso la funzione REG ON si impedisce la radio si sintonizzi su frequence alternative che abbiano un altro contento di programma regionale.
- REG OFF: premendo nuovamente a lungo il pulsante AF, si disattiva la modalità regionale. Per alcuni secondi nel display appeare la segnalazione „REG OFF".
Il codice identificativo di programma (PI) del programma regionale viene incontrato durante la ricerca di una Frequenza alternativa (AF) o di un codice identificativo di programma (PI).
21 Pulsante CLK
Azionando brevemente quello pulsante, è possible visualizzare diverse informazioni sul display LCD.
Allorché si riceve un'emittente RDS, si ottengono le seguenti informazioni:
- Nella modalità radio:
nome dell'emittente frequenza ora tipo di programma - Nella modalità conlettore CD:
→ numero del titolo/durata della riproduzione → nome dell'emittente → frequenza → ora → tipo di programma →
Avverenza: nel caso in cui non si riceva alcuna informazione in merito all'ora o al tipo di programma, il display visualizza rispettamente i messaggi „NO CLOCK“ e „NO PTY".
Nel caso in cui l'emittente radiofonica non trasmetta alcuna ulteriore informazione RDS, si ottengono i seguenti dati:
- Nella modalità radio:
NO CLOCK frequenza NO PTY - Nella modalità conlettore CD:
→ numero del titolo/durata della riproduzione → ora → frequenza → NO
PTY →
22 Apertura per CD
- Pulsante di espulsione (EJECT)
Premere quello pulsante per estrarre il CD.
- Display luminoso (LED) lampeggiante (senza imagine)
Allorché si rimuove il quadro comandi anteriore, quello display lampeggia.
- Pulsante RESET (senza imagine)
Premere quello pulsante per ripristinare il programma disturbato. Dopo aver smontato il pannello, si cui trovare il tasto a destra del display.
Dati tecnici
1
Generalità
Tensione di rete
DC 13,8 V
Consumo di corrente
15 A Max.
Potenza
4×35WPMPO
Ambito FM
Ambito di frequenza
87,6 MHz - 108,0 MHz
Sensibilità utile
3 V
Frequenza I.F.
10,7 MHz
Potenza d'uscita
Uscita
per CD max. 1200mV
Lettore CD
Sistema
Apparecchio CD
CDutilizzabili
CD/CDR/CDRW Disk
Numero di bit di quantificazione
1 bit.
Formato del segnale
Frequenza modello 44,1 kHz
Caratteristica di frequenza
20-100 Hz≤5dB
Rapporto segnale-disturbo
10 - 20kHz≤ 5 dB
Numero di canali
50 dB (1 kHz)
Dimensioni dell'alloggiamento
2 canali stereo
178 L x 50 H x 165 P
Eliminazione delle anomalie
Prima de esaminare la lista di risconto, completare en primo luogo l'allacciamento. Nel caso in cui vi siano alla range d'adveno alla verifica sulla base della lista di risconto, si consiglia di rivolversi a centro di assistenza tecnia più vicino.
| Anomalie | Causa | Soluzione |
| I CD's vengono inserti solo sono a metà nel vano CD. | Le viti e la sicura per il trasporto non sono stati rimossi. | Rimuovere le viti e la sicura per il trasporto. |
| In seguito all'insertimento nell'apparechio, il CD o la cassetta non funziona. | Il regolatore del volume è impo-stato su un valore troppo basso.Gli allacciamenti non sono stati effettuali in modo corretto. | Impostare un valore più elevato per il regolatore del volume.Controllare il collegamento da +12V e il collegamento di massa. |
| Il tono dellettore CD tremola. | La superficie della strada aspra. | Prima di mettere in funzione il CD attendere che la strada diventi piania. |
| L'apparechio non è stato monta-to in modo saldo. | Montare l'apparechio salute-mente.Accertarsi che venga utilizzato ilsystema di fissaggio posteriori nel caso in cui il veicolo non dispon-ga di supporti appropriati per la parte posteriore dell'apparechio. | |
| Il CD è difettoso. | Provarare con un'alto CD.Qualora quest'ultimo non presenti anomalie, il CD precedente èprobabilmente danneggiato. | |
| Il CD è sporco. | Pulire il CD. | |
| Assenza di corrente. | Il systemadi accensione è disattivato. | Ruotare la chiave di accensione su „ON“ oppure „ACC“. |
| Il dispositivo di sicurezza è bruciato. | Sostituire il dispositivo di sicurez-za con un'alto da 15A. | |
| L'apparechio non funziona correttamente (EJECT, LOAD, PLAY). | Il microcomputer è stato disturbato da campi elettromagnetic. | Estrarre il CD o la cassetta in oggetto, quindi effettuare nuova-mente l'inserimento.Disattivare l'apparechio e riattivarlo nuovoamente. |
| Non vi è alcuna ricezione radio. | Il cavò dell'antenna non è collegato. | Inserire correttamente il cavò dell'antenna nella presa corris-pondente dell'apparechio. |
| Nella modalità di ricerca auto-matica la radio non si arrosta su alcuna stazione radiofonica. | I segnali di emissione sono troppo deboli. | Impostare una stazione radiofoni-ca manually. |
| Benchè il cd saïs inserti e nel display venga indicato il brano, si sente unicamente un rumore frusciente oppure non si riesce a sentire nessun tono. | CDs e CDRs in formato MP3!! Prestare attenzione a但这a averenza per la riproduzione di CD e CDR in formato MP3! L'apparecchio non è adatto a MP3. Sebbene il CD inizi a girare, non è possible riproduire la funzione audio. | Verificare i formati memorizzati sul cd. |
| Note: a causa della moltechipità di software disponibili e di media CD, la riproduzione di CD creati dall'utente non più essere garantita. | ||
1
Riproduzione di un CD
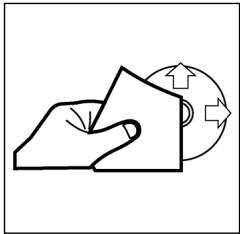
Pulizia dei CD
Prima di attivare illettore CD, pulire il CD con un panno pulito e privo di polvere. Tirare il CD nel senso indicate alla freccia.
Avvertenza: non utilizzare solventi quali la benzina o diluenti. I comuni detergenti o gli spray antistatici dannegiano l'apparechio.

Insetamento CD
Se si inserisce il CD con le scritte rivolte verso il basso, l'apparecchio pousoessere danneggiato.
Inserire sempre i CD con l'etichetta rivolta verso l'alto.
Avvertenza: nel caso in cui nell'apposita aperture per CD sua è presente un CD, si raccomanda di non tentare di inseire un ulteriore CD. In caso contrario, si potrebbe danneggiare l'apparechio.

Toccare il CD
I CD devono essere afterati sempre sul bordo. Afinché i CD possano mantenersi puliti, non afterrari sulla superficie.
Non incollare etichette o nastri adesivi sui CD.
Non esporre i CD ai raggi solari o a fonti di calore quali, per esempio, i tubi di riscalda-mentation. Non lasciarli inoltre in auto, quando quest's ultima è parcheggiata al sole, poiché si potrebbe verificare un considerevole aumento della temperatura.
Questo apparecchio è stato controllato sulla base di tutte le direttive CE attuali in vigore in quello settore, quali per esempio la normalità in materia di compatibilità elettromagnetica e la direttiva in materia di bassa tensione, ed è stato costruito conformmente alle norme di sicurezza più moderne.
Con riserva di apportare modifiche tecniche.
Garanzia
Per l'apparecchio da moiMESSO in commercio ci assumiamo una garanzia di 24 mesi alla data di acquisso (scontrino).
Durante la garanzia nei ci impeggiamo ad eliminare Gratisamente i guasti dell'apparecchio o degli accessori ^* ), dovuti a difetti di materiale o di fabbricazione, riparandi o, a sua discrezione, sostituendoli. Le prestazioni in garanzia danno luogo a una preroga della garanzia né danno dirito ad una nuova garanzia!
Per la garanzia è sufficiente lo scontrino di acquisso. Senza quello scontrino non sussiste il diritto né ad una sostuzione né ad una riparazione gratuite.
Nel caso si ricorra alla garanzia, restituire al rivenditore l'apparecchio completo in agli sua parte, nell'imballaggio originale unitamente allo scontrino.
*) Danniagliaccessori non giustificano automaticamente lo scambio Gratisodell'apparecchio completo. Si prega di mettersi in contatto con la sua stercatetelefonica.Dannali alle parti dovetro oppure fratture ai pezzi di materia plastica sonoobligatoriamente a spese del cliente.
La riparazione di pezzi d'uso ovvero soggetti a logoramento (cursori, ganci impastatori, cinghie di trasmissione, telemandi di ricambio, spazzolini di ricambio, lame di seghe ecc.) come ancche operazioni di pulizia e manutenzione o la sostituzione di pezzi soggetti a logoramento non rientrano nella garanzia e quindi sono a pagamento!
La garanzia si annulla nel caso di intervento da parte di terzi.
Dopo la garanzia
Al termine della garanzia le riparazioni possono essere eseguite dietro lavoro dal corrispettivo negotio specializzato o servizio riparazioni.
GB
General safety instructions
To avoid the risk of fire or an electric shock, you should not expose the device to rain or moisture. Consequently, do not use the device in the immediate vicinity of water - for example near a bath tub, a swimming pool or in a damp cellar.
Use the device only for the intended purpose.
Only connect the device at a properly installed plug socket. Pay attention that the specified voltage corresponds to the voltage of the plug socket.
When using external mains supply, pay attention to the correct polarity and voltage. Always place the batteries in the correct direction.
Assemble the device in such a way that the available ventilation openings are not covered.
Never open the housing of the device. Incorrect repairs can constitute a considerable risk for the user. Should the device become damaged, in particular the mains supply cable, do not operate the device any longer, but rather have it repaired by an expert. Check the mains supply cable regularly for damage.
For safety reasons a broken or damaged mains lead may only be replaced by an equivalent lead from the manufacturer, our customer service department or a similar qualified person.
If the device is not used for a longer period, remove the plug connector from the plug socket or take out the batteries.
These symbols may be found on the machine and are intended to indicate the following:

The lightning symbol should advise the user of parts in the inside of the device which carry dangerously high voltage levels.

The symbol with an exclamation mark should advise the user of important operation or maintenance instructions in the accompanying documentation.

Devices bearing this symbol work with a „class 1 laser“ for tracing the CD. The built-in safety switches should prevent the user being exposed to dangerous laser light, which is invisible to the human eye, when the CD compartment is opened.
Under no circumstances should these safety switches be bypassed or manipulated, as this could result in a danger of exposure to the laser light.
Installation
Please install the car radio as shown below

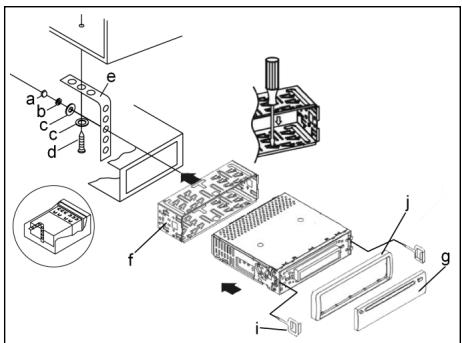

GB
Note:
h Retaining screws during transport (please remove before installation)
a Nut
b Spring washer
c Plain washer
d Screw
e Mounting bracket
f Slide-in housing
g Control Panel
First place the operating panel in position on the right-hand side and then lock it into place on the left.
Connection
Connect the device as shown in the diagram.
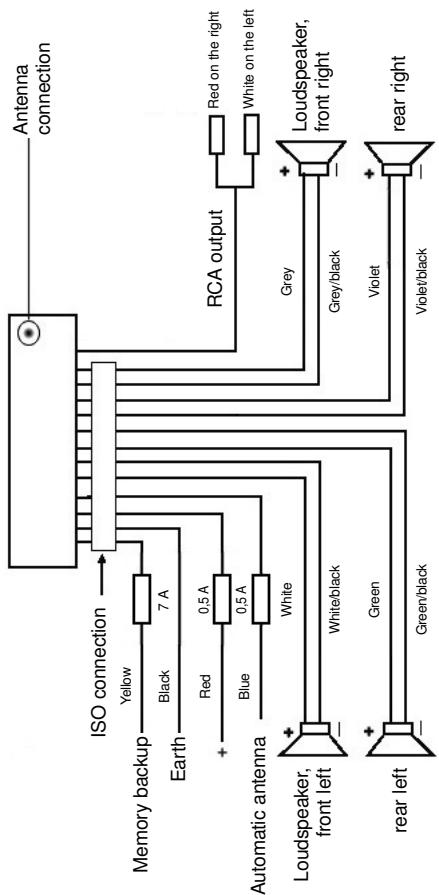
Note
GB
- Do not attach the removable control panel until after connection of the cables.
- Please use loudspeakers with an impedance of 4 ohm.
Important Information for installing your carradio!
- For proper instalment of your car radio, please make sure that your car provides an original „ISO jacket". This is prepared as the counter part of the „ISO jacket" of your car radio.
Depending on the specific car type, different wiring connection of the Backup wire are available.
In these case please contact your authorized car dealer. (However, this is necessary for storing the radio stations).
- Depending on the specific car type, interferences can be possibly arise during radio/CD operation. These interferences can avoided easily with an additional Interferences filter. (Your car radio is originally prepared with an Interference Filter already).
In these case, please contact your authorized car dealer.
Precautionary Measures and Maintenance
- The screws (h) of the transport locking device should be removed before installation, as otherwise the CD cannot be inserted.
- The device is designed for the minus pole of the battery, which must be connected to the body of the vehicle. Please check this before installation.
- If the front control panel is removed while the radio or CD is on, the device is automatically switched off.
- Error. After the front control panel has been reinserted an error message (ERROR) may appear in the display. Use a piece of wire or similar item to press the RESET button (24) in order to return the electronics to its original state. When the operating panel is removed this button is to be found on the right next to the display.
- If the interior of the vehicle becomes very hot, for example after standing in direct sunlight for a prolonged period, do not switch on the player until the inside of the vehicle has cooled down a little after you have been driving for a few minutes.
- In order to keep the removable control panel in a safe place you should always use the protective case provided.
GB
Operation
1. REL Button
Press the REL button to remove the front operating panel.
2. +/- Button
During normal playback these buttons are used to set the volume. If the SEL button has been pressed beforehand these buttons can be used to make changes to the menus, for example the sound mode.
3. SEL Button (Select)
a) Press the SEL button briefly to access the selection menu of the sound mode. The letters „VOL“ appear in the display for setting the volume. By repeatedly pressing the SEL button you can now select the individual menu items such as VOLUME, BASS, TREBLE, BALANCE and FADER. The settings of the individual menu items are changed using the „+“ or „-“ button.
Note: If equaliser settings such as POP and ROCK have been selected under DSP it is not possible to adjust the BASS and TREBLE.
b) Press the SEL button for a longer time to access the selection menu TA SEEK/TA ALARM, MASK DPI/MASK ALL, DSP OFF, LOUD ON/OFF, BEEP ON/OFF, SEEK1/2, STEREO/MONO: LOCAL/DX: VOL LAST/ADJ.
The letters ,TA SEEK" appear in the display. Repeatedly pressing of the SEL button now brings up the individual menu items. The settings of the individual menu items are changed using the ,+ or ,- button.
A SEEK Menu (Traffic Announcement Station Search)
Select TA SEEK if you would like the radio to automatically search for a traffic announcement station when you select the TA function.
Select TA ALARM to bring up a warning message in the display as soon as you have set a station under the TA function which does not transmit traffic announcements.
- MASK DPI/ALL
This hides alternative frequencies (AF) during the search for a programme identification (PI).
MASK DPI: When the device is searching for the programme identification (PI) of a station the alternative frequencies with a different programme identification remain hidden.
MASK ALL: In the search for a programme identification (PI) alternative frequencies with a different programme identification and stations with a strong signal level without an RDS signal remain hidden.
DSP
In DSP mode you can select the equaliser settings POP M, ROCK M, CLASS M and FLAT M. Select DSP OFF to carry out your own adjustments. See also section 3a.
- LOUD ON/LOUD OFF
Switching the LOUDNESS function on and off.
When the volume is low the LOUDNESS function (LOUD) expands the sound characteristics by increasing the treble and bass sounds.
BEEP ON/OFF Confirmation Beep
You can select two types of confirmation beep when a button is pressed.
BEEP ON: The confirmation beep is heard whenever a button is pressed.
BEEP OFF: The confirmation beep is switched off.
- SEEK 1, SEEK 2 (only available during radio operation)
Seek function with the / V buttons during radio operation.
SEEK 1: Keep the / V buttons pressed down and the radio will stop at the next station that is reached.
SEEK 2: As long as the / V buttons are pressed down the search function will continue in the frequency band.
STEREO/MONO switching (only possible during radio operation)
- LOCAL/DX (only available during radio operation)
Your radio can receive RDS EON data. The term „EON“ signifies the transmission of additional station information within a station chain, e.g. WDR. If a traffic announcement (TA) is made within a station chain, the radio switches from a station which does not transmit traffic announcements to one that does within the same station chain. Reception of this station data is shown in the display by the EON symbol. You can choose between the EONTA LOCAL and EONTA DISTANCE mode for local or long-distance traffic news. The purpose of this function is to prevent the radio switching unnecessarily to an EON-TA traffic news item. If an EON station is a long distance away, it may be that in some cases EON TA information can still be received from the station. The radio then switches to this EON station and tries to receive the traffic announcements. The signal is too weak, however, and reception is poor as this EON station is too far away. Therefore the radio switches back to the station that was set previously.
During the type of operation described above the listener hears the wrong programme for a short time or nothing at all.
EONTA LOCAL:
This function prevents switching to an EON station whose signal is too weak. The radio does not switch to this station and the listener does not hear any interference.
EONTA DISTANCE Mode:
In this mode the EONTA circuitry tries to receive the EONTA information from any available transmitter and thus improve reception quality.
GB
VOL LAST/VOL ADJ
With the help of the +- and - buttons you can select one of the settings: VOL LAST: The radio switches on at the actual volume it had when it was last switched off.
VOL ADJ: a) Press the SEL button again. "A-VOL" appears in the display.
b) Using the + and - buttons you can pre-select a constant switch-on volume.
4. POWER Button
Press this button to switch the device on and off. To switch on press this button briefly; to switch off keep it pressed down.
- LCD (liquid crystal display)
6. BAND button
Press the BAND button briefly to switch between the three FM levels. The designation of the corresponding level - F1, F2 and F3 - is shown in the LCD.
7.8. / Buttons TUNING, SEEK, TRACK, SKIP UP/DOWN
a) In radio mode:
Press the or button briefly to tune into a radio station manually.
Keep the or V button pressed down in order to start searching for a radio station.
See also the function SEEK 1 / SEEK 2.
b) In CD mode: Press the or button briefly to jump forwards or backwards. If you would like to scroll the titles of the tracks keep the or arrow button pressed.
9. MODE Button
Press this button to select the CD player or radio mode.
10. MUTE Button
Press the MUTE button to switch off the loudspeakers for a short time. Press this button again to cancel this function.
- AP Button (Autostore - Automatic Station Storage)
In radio mode:
a) Memory function :
Press the AP button for longer than one second to activate automatic station storage. The radio searches within the current frequency band, e.g. FM 1, for the strongest signal level until the search cycle has finished. The six strongest stations are then allocated to the corresponding storage locations.
The stations that have now been stored are played for approximately
5 seconds each and then the station of the first storage location is set.
If you would like to search for more stations in the FM band, press the BAND button in order to change to the FM 2 or FM 3 band. Press the AP button again for more than one second in order to start the continued search.
b) Scan Function:
After the AP button has been pressed briefly the radio plays all the pre-set stations in the current frequency band for a short time.
Note: The scan function ends automatically when it reaches the storage location from which it started.
12-17. Station buttons (1-6) of preselected stations and as
1TOP, 2INT, 3RPT and 4RDM buttons during CD operation
a) Radio Operation
Pressing these buttons briefly directly selects a preset radio station. If these buttons are pressed for more than one second, the station currently being listened to is stored under the selected station button.
b) CD/MP3 Operation
- Press the 1TOP button to interrupt playback of the CD (pause function). Press this button again to continue listening to the CD/MP3.
- Press the 2INT button. Each track on the CD is played for 10 seconds. Press this button again to stop searching. The currently selected track is played.
- Press the 3RPT button. The track currently being played is repeated. Press this button again to cancel this function.
-
Press the 4RDM button. The CD tracks are played at random. Press this button again to cancel this function.
-
TA Traffic Announcement (Priority for Traffic Information)
The TA function is activated by pressing the TA button briefly. The TA symbol appears in the display. During radio operation in one FM frequency band the search for a traffic announcement station is started automatically (TA SEEK). If an FM station is being received which transmits the latest traffic announcements from time to time, the TP display lights up.
When the TA function is switched on, the FM traffic announcements automatically interrupt CD operation. The volume level is increased to the minimum value for the transmission of traffic announcements. After the traffic announcement has finished, the programme that was previously running is resumed.
Interruption of the TA Function:
If you would like to interrupt the current traffic announcement, press the TA button briefly. This does not switch off the TA mode.
- PTY Button - Selection of the Programme Type
Besides the station name, some FM stations also transmit information on the type of programme. This information can be displayed by your car radio.
Examples of such types of programme are:
SPORT
NEWS
POP
CLASSICS
With the PTY function you can specifically select stations transmitting a particular type of programme.
GB
Press the PTY button once to access the PTY music group. The symbol „PTY“ appears in the display. Using the station buttons 1-6 you can now make a selection as follows:
| Press once | Press twice | |
| Station button 1 | POP M | ROCK M |
| Station button 2 | EASY M | LIGHT M |
| Station button 3 | CLASSICS | OTHER M |
| Station button 4 | JAZZ | COUNTRY |
| Station button 5 | NATION M | OLDIES |
| Station button 6 | FOLK M |
Press the PTY button twice to access the PTY language group. Using the station buttons 1-6 you can now make a selection as follows:
| Press once | Press twice | Press three times | |
| Station button 1 | NEWS | AFFAIRS | INFO |
| Station button 2 | SPORT | EDUCATE | DRAMA |
| Station button 3 | CULTURE | SCIENCE | VARIED |
| Station button 4 | WEATHER | FINANCE | CHILDREN |
| Station button 5 | SOCIAL | RELIGION | PHONEIN |
| Station button 6 | TRAVEL | LEISURE | DOCUMENT |
Press the PTY button three times to switch this function off again.
When PTY has been selected the radio starts searching for corresponding PTY information and stops when the PTY information has been found.
If the programme type being searched for is not found, "NONE PTY" appears in the display.
If the PTY information being searched for no longer exists, the PTY function automatically switches to normal mode
20. AF (Alternative Frequencies) REG Function
a) AF is a function that works with the help of RDS (Radio Data System) and can only be used with FM stations. The radio searches in the background for the best frequency reception of the station that has been tuned into. If the AF function has been switched on, the radio continuously tests the signal strength of the AF frequency. The test interval for each AF frequency depends on the signal strength of the current station and varies from a few minutes in the case of a strong signal to a few seconds in the case of weak signals. Whenever the new AF frequency is stronger than the station that is currently tuned in, the radio switches to this frequency for a short time and the message „NEW FREQUENCY“ is displayed for one to two seconds. As the mute time during the frequency change and the test time is very short, this is almost inaudible during the normal programme.
The AF function is activated by briefly pressing the AF button and the status of the AF function is shown in the display by an AF symbol.
- If the AF symbol appears in the display, the AF function is switched on and RDS transmission data is being received.
- If the AF symbol flashes in the display, the AF function is selected but no RDS signal can be received at the moment.
- Press the AF button again to switch off this function. The AF symbol in the display goes off.
b) REG Function
At certain times some stations divide up their programmes into regional programmes with varying content.
- REG ON: If the AF button is pressed for a longer time the regional mode is switched on. The message „REG ON" appears in the display for a few seconds.
Note: The display capacity is limited. It is possible that in the double display mode some segments of the display are deleted.
The function REG ON prevents the radio from switching to alternative frequencies which have a different regional programme content.
- REG OFF: Pressing the AF button again for a longer time switches off the regional mode. The message „REG OFF" appears in the display for a few seconds.
The programme identification (PI) of the regional programme is ignored during the search for an alternative frequency (AF) or a programme identification (PI).
21 CLK Button
When this button is pressed briefly, various information appears in the LCD. During reception of an RDS station you see:
In radio mode:
station name frequency time program type
In CD player mode:
track number/running time station name frequency time program type
Note: If no time or program type information is being received, the display shows „NO CLOCK" and „NO PTY".
If the station being received does not transmit any additional RDS information you see:
In radio mode:
NO CLOCK frequency NO PTY
In CD player mode:
track number/running time time frequency NO PTY
22 CD Slit
23. Eject Button (EJECT)
Press this button to eject the CD.
24. Flashing LED (not shown)
When the front control panel is removed this display flashes.
GB
25. RESET Button (not shown)
Press this button to reset the programme on which there is interference. With the control panel removed the button is to be found on the right next to the display.
Technical data
General
Supply voltage
Power consumption
Power
DC 13.8 V
max. 15 A
4×35WPMPO
FM band
Frequency range
Effective sensitivity
I.F. frequency
87.6 MHz to 108.0 MHz
3 V
10.7 MHz
Output Power
Output
at CD max. 1200mV
CD player
System
Suitable CDs
Number of quantising bits
Signal format
Frequency characteristics
CD device
CD/CDR/CDRW disks
1 bit
Sampling frequency 44.1 kHz
20-100 Hz≤5dB
10 - 20kHz≤ 5 dB
Signal-to-noise ratio
Number of channels
Housing dimensions
50 dB (1 kHz)
2 stereo channels
178 × 50 × 165 (W × H × D)
Troubleshooting
GB
Before going through the checklist please make all the connections first. If you still have questions after going through the checklist, please consult your local customer service representative.
| Fault Symptoms | Cause | Solution |
| CDs are drawn only half way into the CD tray. | The transport screws have not been removed. | Remove the transport screws. |
| After being inserted into the device the CD or cassette does not turn. | The volume control is set too low. | Turn up the volume. |
| The device has not been correctly connected. | Check the +12V and earth connection. | |
| The sound of the CD player „jumps“. | The surface of the road is uneven. | Wait until the road becomes smoother before playing the CD. |
| The device is not firmly installed. | Install the device firmly. Ensure that the rear attachment is used if the vehicle does not have any suitable retainer for the rear section of the device. | |
| The CD is damaged. | Try another CD. If this works correctly, the first CD is probably damaged. | |
| The CD is dirty. | Clean the CD. | |
| There is no power. | The ignition is switched off. | Turn the ignition key to “ON” or “ACC”. |
| The fuse has blown. | Replace the fuse by another 15A fuse. | |
| The device does not work correctly (EJECT, LOAD, PLAY). | The microcomputer has been interfered with by electromagnetic fields. | Remove the CD or cassette and reinsert it. Switch the device off and on again. |
| No radio reception. | The antenna cable is not connected. | Insert the antenna cable firmly into the antenna socket of the device. |
| In automatic search mode the radio does not stop at a transmitting station. | The transmission signals are too weak. | Tune in to a radio station manually. |
GB
Although the CD is drawn in and a track is shown in the display, only hissing or no sound at all is heard.
CDs and CDRs in MP3 format!
Please note these instructions for playing back CDs and CDRs in MP3 format! The device is not able to play back MP3 files. The CD begins to turn, but the sound cannot be heard.
Check the formats stored on the CD.
Note: Playback of CDs produced by the user cannot be guaranteed due to the large variety of software and CD media available.


Playing a CD
Cleaning the CD
Before playing a CD, wipe it off with a clean, dust-free cleaning cloth. Pull out the CD in the direction of the arrow.
Note: Do not use any solvents such as petrol or thinning agents. Commercially available cleaning substances or antistatic sprays will damage the device.
Inserting the CD
If the CD is inserted with the printed side facing downwards, the device may be damaged.
Always insert the CD with the label facing upwards.
Note: If there is already a CD in the CD slit, do not try to insert a second CD. This may damage the device.
Touching the CD
Always hold CDs by the edge. In order to keep the CD clean do not touch the surface.
- Do not attach any stickers or adhesive tape to the CD.
- Do not expose the CD to direct sunlight or sources of heat such as heating pipes. Do not leave CDs in the car if it is parked in direct sunlight as this will lead to a considerable rise in the temperature inside the car.
This device has been tested according to all relevant current CE guidelines, such as electromagnetic compatibility and low voltage directives, and has been constructed in accordance with the latest safety regulations.
Subject to technical changes without prior notice!
GB
Guarantee
The device supplied by our Company is covered by a 24 month guarantee starting on the date of purchase (receipt).
During the life of the guarantee any fault of the device or its accessories *) ascribable to material or manufacturing defects will be eliminated free of charge by repairing or, at our discretion, by replacing it. The guarantee services do not entail an extension of the life of the guarantee nor do they give rise to any right to a new guarantee!
Proof of the guarantee is provided by the proof of purchase. Without proof of purchase no free replacement or repair will be carried out.
If you wish to make a claim under the guarantee please return the entire machine in the original packaging to your dealer together with the receipt.
*) Damage to accessories does not mean automatic free replacement of the whole machine. In such cases please contact our hotline. Broken glass or breakage of plastic parts are always subject to a charge.
Defects to consumables or parts subject to wearing (e.g. motor pistons, kneading blades, drive shafts, spare remote control, spare toothbrushes, saw blades, etc.) as well as cleaning, maintenance or the replacement of said parts are not covered by the guarantee and hence are to be paid!
The guarantee lapses in case of unauthorized tampering.
After the expiry of the guarantee
After the expiry of the guarantee repairs can be carried by the competent dealer or repair service against the payment of the ensuing costs.
Ogólne wskazówki zwiazane z bezpieczna obstuga
PL
Urzejdtieno chronie nalezy przed deszczem i wilgocia, aby zapobiec grozbie pozarlu lub porazeniu pradem. Nie nalezy go wie uzywać w povlbu wody, a wie przyk现代农业 w povlbu wanny, basenu lu w zawilgocone pijnicy.
Urzadzenie nalezy uzywać tylko zgodnie z seinen przyznaczenia.
Urzadzenie nalezy podlaczyc tlyko i wylacznie do przysepisode zamontowanego gniażdka. Proszewróci uwage na to, zdehy podane napiecie zgadzalo sie z napieciem w gniażdku.
W przypadyku uzywania oddzielnych zasiłaczy nalezy zworci uwage na biegunowość i napiecie, baterie musza zostac wozone do urzadzenia zgodnia z oznaczona biegunowość.
Urzadzenie nalezy w taki sposob ustawic, zeby istniejace otwory wentylacyjne nie zostaly przykryte.
Nigdy nie wolno owierać obudowy urzadzenia. Niefachowo przypoprowadzone naprawy moga byc grożne w skutkach dla uzytkownika. Przy uszkodzeniu urzadzenia, w szczególnosci kabla sieciowego, urzadzenia nie maye bye uzywane dopóki nie zostanie naprawione przy czobź wymaganymi uprawnieniami. Przewód zasilajczyNSE regularnie sprawdzać, czy nie jest uszkodzony.
W razie awari prosze nie naprawić urzadzenia samemu lecz skorzystać z pomocy autoryzowanego spezialisty. Ježeli przywod zasilajacy niedoizaczny ulegnie uzzkodzeniu, to powinien onby wyemioniyu wytworcy lub w spezialny zakladzie naprawczym albo przy czwykalifikowaną osobé w celu unikićcia zagrozenia.
Ježeli urzadzenie nie bedzie przy dluzszy czas uzywane, naleź wymiąć wtyczkte z gniazdka lub wyjac baterie.
Ponizsze symbole moga znajdować sie na urzadzeniu i major zwracać Państwa uwage na:

Symbol blyskawicy ma zworci owage uzytkownika na znajdujace sie we wnetrzu urzadzenia czeci, ktore są pod niebezpiecznie wysokim napieciem.

Symbol z wykrzynikiem ma zwroćic uwage uzytkownik na znajdujace s w załazonych dokumentach sągne wskazowej z obłowag konserwacja urzadzenia.

Urzadzenia z tym symbolism uwywaja do odczytywania dzwieku z plyty kompaktowej „Lasera klasy A". Wbudowany wylącznik bezpieczenstwa ma zapobiec temu, zeby uzytkownik w czasie otworiania kieszeni odtrwarzacza plyt kompaktowych zostal poddany niebepieczernemu dla ludzkich oczu oddzialywniu niewidocznego swiatla lasera.
Wylacznikakiego ne sie nały w zadnym wypaduk zmostkował lub teź przy nim manipulować, poniewaź grozi to niebepezciezistwem, ze uzytkownik poddani zostanie oddzialywni niebepezconego dl udzkich oczu niewidocznego swiatla lasera.
PL
Instalacja
Radioodbiornik nalezy zamontowac zgodnie z ponijsza ilustracja
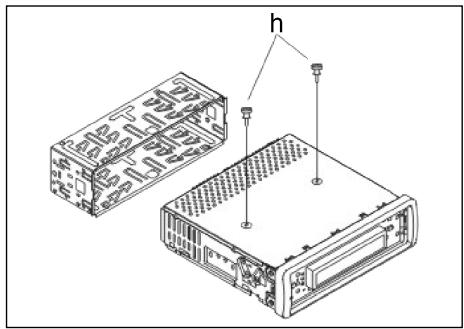
Uwaga!
h s Ruby zabezmieczajace na czas transportu (przed montazech usunanc)

a nakretka
b podkladka spreźysta
c podkladka
d sruba
e kątownik montaźowy
f wsuwana obudowa
g panel sterowania
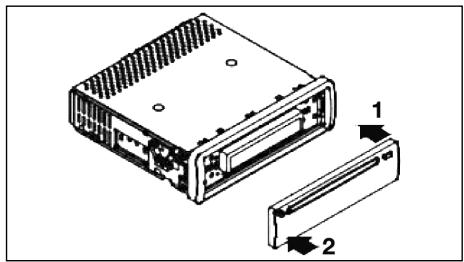
Zaslepke panelu sterowania proszpe przylozyc napjierw po prawej stronie i wcisnac ja, az zaskoczyc po stronie lewej.
Podlaczenie
PL
Wykonac połaczenia zgodnie ze schematem.
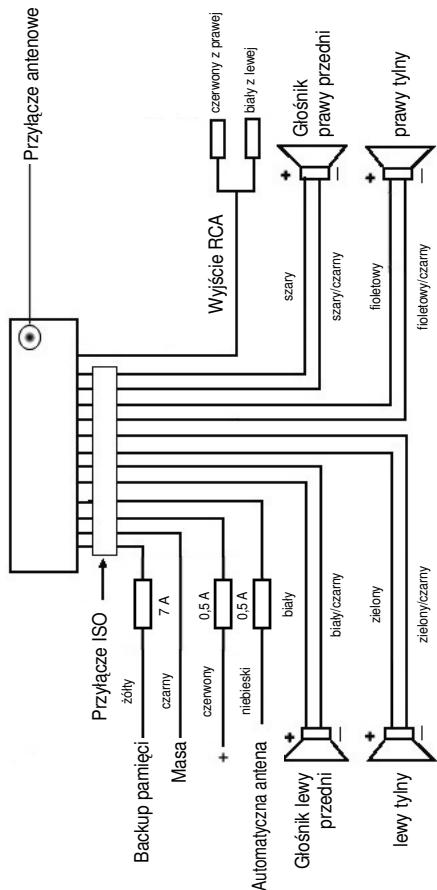
PL
Uwaga
- Zdejmowany panel obstugi nalezy załyć dopiero po podlączeniuk kabli.
- Naleź stosowej glówno impedancji 4 ohm.
Wañne informações dodatkowe, dotyczade instalazioni Waszego radiooediornika samochodowo!
- Podczas instalacji / przyłączenia urzadzenia prosze zworćić uwage na to, zeby Wasz samochód dysponowal oryginalnym polacznieniem „ISO Podȩczenia".
Jest on opadowiednikiem wtyczki znejdujoucej są na wyjsciu aparatu (ISO Podȩczenia).
Przy zajęciu Czas trwania + " (Backup), w zależnosci od typu pojazdu, sądojsć do odchylen.
W tych przypadkach prosze sie zwracać do autoryzowanego warsztatu samochodowo, gdyż inaczej nie jest zagwarantowane ciagie/ stale zasilanie przemwęgo radia (Potrzebne"Justak do zapisywania staci nadawczych do pamięci).
- Wazoleński od typu pojazdu w wyjatkowych sytuacjach moga wystapić szumy zaktecaję w trybie RADIO/CD. Mnza je odpowiednio usunarę przyez dodatkowy filtr przyciwzikócienowy. Mimo togo, ze Wasz aparat juź seryjnie wyposaźony jest w filtr przyciwzikócienowy, to wazoleński od pojazdu sądość do pogorszonego odbioru.
Otrzymaję je Państwo w handlu z akcesoriami samochodowych i/lub w Waszym warsztacie samochodwym.
Środko astrozość i konserwacja
- Šruby (h) zabezieczajace w transporcie prosze usunac przy montazem, gdyż inaczej CD nie bedzie wciagana.
- Urzadzenie dostosowane jest do podłaczenia do ujemné go bieguna akumulatora, ktymi sąby podłaczony do karoserii pojazdu. Prosimy o sprawdzieńego przyżęst instalacja.
- Ježeli podczas przy w trybie radia lub CD zestanie zdjęty panel przydni, nastapi automatyczne wychędzie urzadzenia.
- Wadliwe dzialanie. Po powrotnym zalożeni przykBediej tablicy sterownikzej w wyswietlaczu要去 pojawc sie meldunek o usterce (ERROR). Przy pomocy drucika lub podobnego przydmiotu prosze wciśnac przycisk RESET (24), by elektroniki sprowadzdo stanu wyjsciwogo (ZRESETOWAC). Ten przyciskznajda Państwo po zdęciu panelu sterowania z prawej strony obok wyswietlacza.
- Ježěi wⁿétrze pojádu jestardo nagrzane, np. na skutek dṛluszego parkowania w moćn naslonecznionm mistręcu, to nie sąȩwy wówczas wączać odtwarzacza CD, do momentu ochchodzenia sie wⁿétrza w trackie jazdy.
- W celu bezpiecznego przechowywnia panela przydnoego, naleź stosowej przyeznaczone do tego celu etui.
Obstega
PL
1. Przycisk REL
Prosze wcisnac przycisk REL w celu wyjecia przyedniego panelu sterowania.
2. Przyciski +/-
Podczas normalego trybu odztwarania przyciski te sluza do ustawiania glosnosci. W polaczeniu w ciarsniemtym przyszkiem SEL mozza wropyadza zmiany w menu np. w zakresie charakterystyki dzwieku.
3. Przycisk SEL (wybr):
a) Aby otworzyc menu charakterystyki dzwieku, nalezy krto knescnac przycisc SEL. Kiedy na wyswieltlaczu LCD pojawi sie „VOL" mozym ustawic glosność. Ponomwe naciśmieczie przyciscu SEL pozwala nam na wybranie jegnedo z punktow menu, jak: VOLUME, BASS, TREBLE, BALANCE i FA-DER. Ustawienie poszcęgólnych punktow menu zmiezenia sie za pomocamy przyciscu „+“ lub „.”
Wskazówka: Jeźeli pod DSP wybrane zostaly ustawienia korektora czestotliwość, takie jak np.: POP, ROCK, to nie pozna ustawic BASS i TREBLE.
b) Poprzej naciść i przytrzymanie przycisku SEL otwieramy menu wyboru TA SEEK/TA ALARM, MASK DPI/MASK ALL, DSP OFF, LOUD ON/OFF, BEEP ON/OFF, SEEK1/2, STEREO/MONO; LOCAL/DX; VOL LAST/ADJ. Na wyświetlaczu pojawia sie „TA SEEK". Po ponownym naciśću przycisku SEL要去 wyjbierać poszȩgólne punktymi menu. Zmiany w zakresie poszȩgólnych punktów menu wyprowadźamy za pomoczą przycisku „+“ lub „-”.
- Menu TA SEEK (wyszukiwanie informaci o ruchu)
Ježeli wybor faktcji TA ma spowodowo automatyczne wyszukanie staci nadajacej informacja o ruchu,NSEK.
Jezeli wyibierzemy fumkcje TA ALARM, to woczcas, w przypadku ustawienia staci ji ne nadajcej informaci o ruchu, na wyswietlaczu pojawi sie odpowiednie ostrzezenia.
- MASK DPI/ALL
Ukrywanie czestotliwość alternatywnych (AF) podczas wyszukiwania identifikacji programu (PI).
MASK DPI: jezeli odbiornik wyszukije wg identifikaci programu (PI) danej staci, to wowczas czestotliwość alternatywno odnej identifikacja programu pozostaj ukrtey.
MASK ALL: podczas wyszukiwania identifikacji programu (PI) czestotliwość alternatywnze z inna identifikacja programu oraz nadajniki o silnym sygnale bez RDS-u pozostaj ukrYTE.
PL
DSP
W DSP moga. Państwo wybrać ustawienia korektora czestotiwość: POP M; ROCK M; CLASS M i FLAT M. Prosze wybrać DSP OFF, by dokonac wlasnych ustawień. Patrz równeż Pkt. 3a.
- LOUD ON/LOUD OFF
Wlacznie i wylacznie funkci LOUDNESS.
W niskim przy uzyci fungcji LOUDNESS (LOUD) poszerza sie obrad zwięku. Tony wysokie i niskie dostaja podwyźzone.
- BEEP ON/OFF bzwiek potwierdzenia.
Ton potwierdzajacy przy wciȩnięciu klawiszma myza wybrać w dwóch rodzajach:
BEEP ON: dzwiek potwierdzenia pojawia sie przy kaźdym naciśću przycisku.
BEEP OFF: dzwiek potwierdzenia jest wyłaczony.
SEEK 1, SEEK 2 (do wyboru tylko w trybie „radio")
Funkcja szukania przyciskami / V w trybie „radio"
SEEK1: Prosze trzymać wcińskiropy przycisk /V a radio zatrzyma sie na najblźsej odbieranej staci.
SEEK2: Póki trzymajpa Państwo wciȩne przyciski / V , odbywa siedalsze szukanie staci w danym pismie czestotliwość.
- Przelączanie STEREO/MONO (do wyboru tylko w trybie „radio")
- LOCAL/DX (do wyboru tylko w trybie „radio")
Wasze radioMZe odbieraC dane RDS EON. Pod pojeciem EON Rozumemy mozliwoSc odbioru dodatkwyh informaciw ramach danej sieci staci np.WDR.W przypadku komunikatu oruchu (TA) w ramach danej sieci staci radiowych nastapi automatyczne prezlaczenie ze staci nie nadajacej informaciO ruchu na odpwiednia staje nadajcak taie informace w danej sieci staci. OODBiorze tego typu danych informuje znaczek EON na wyswietlaczu odbiornika.Moga PaNStwo wybieraC miedzy trybem EONTA LOACAL lub EONTA DISTANCE celed odbioru lokalnyk komunikatow drogowych lub meldunkow radiowych dlrauchu dalekobieznego.Sens tej funkcj polega na zatrzymaniu neipozadanedo prezlaczania na meldunko drogowe EON-TA.Jezeli stacia EON jest bardzo daleko, to czeciwo i tak moga byc odbierane informace EON TA z tej staci. Radio przelaczy sie na te stacie EON i spróbuje odebraC informace o ruchu. Jednak poziom sygnalu jest slyby a odbior zly, poniewa dana stacia EON polożona jest zbyt daleko.Dlatego radio ponownie prezlacza sie na uprzednio wybrana stacie.
Przy powyyszym trybie przy uzytkownik uslyszy przyez chwie inny program niz wybrany lub nastapi chwilowa cisza.
EONTA LOCAL:
Dziegi tej funkci unikamy przyelaczania na stacie EON o slabym sygnale. RadioNie przylacza sie na te stacja a sluchacz nie zauwa za jakichkolwiek zaklocen.
Tryb EONTA DISTANCE
W tym trybie funkcja EONTA próbuje uzyskac informacja EONTA zosiagalnej staci i w ten spośob poprawić jakość odbioru.
VOL LAST/VOL ADJ
Przy pomocy przycisków +- i - wybieraja Państwo jeder z ustawien:
VOL LAST: Radioość zostatinio ustawionfaktcznaglosnoscia.
VOL ADJ: a) Prosze ponownie wcisnac klawisz SEL. W wyswietlaczu pojawia sie „A-VOL".
b) Przy pomocy klawisz „+” i „-“ ustawiaja Państwo gólność niedziemna przy w��czaniu.
4. Przycisk POWER
Do wączenia/wyȩczania odbiornika. Celem wączenia prosze krótko wciść ten klawisz, zaś by wyȩczyć urzadzenia, prosze przytrzymAAC ten przycisk wciśniety.
- Wyswietlacz LCD (wyswietlacz cieklokrystaliczny)
6. Przyciski BAND
Prosze wcisnac krto przycisk BAND, by przeloczyn na inny (jeden spostr od trzech) poziom FM (UKF). Oznaczenia opdowiedniago poziomu F1, F2, F3 uzakujie sie w wyswietlaczu ciekłocrystaliznym.
7.8. Przyciski / TUNE, SEEK, TRACK, SKIP UP/DOWN
a) W trybie „radio":
Prosze wcisnć krótko przycisk ∧ lub V, by ustawic ręcznie pożadano stacje radiowa.
Prosze trzymać wcińskiropy przycisk ∧ lub V, by Rozpoczamy szukanie staci radiowych.
Patrz tez fungcja SEEK1/SEEK2.
b) W trybie CD: w celu przeskoczenia do przodu lub do tylu nalezy nacinacja przymciszʌ lub V. W celu przemijania utworow nalezy nacinacja i przytrzymaco przyczyskze ze strzalka;ʌ lub V.
- Przycisk MODE (tryb)
Nacisnac w celu dokonania wyboru pracy w trybie radia lub CD.
10. Przycisk MUTE
Prosze wcisnac przycisk MUTE, by wyciszyc na krótko glosniki. Prosze po nownie wcisnac ten przycisk, by powyszka funkcję z powrotem skasowej.
PL
11. Przycisk AP (automatyczne zapamietywanie staci)
W trybie radia:
a) Funkcja paminsci:
aby aktywować automatyczny tryb zapamietywania staci,NSEy nacisnac i przytrzymać przycisk AP przydzej niedej sekunde.. Odiornik -w ramachactualnego paśma czestotliwośćnp. FM 1-wyszuka staje o najwyższym poziomie sygnalu.Sześć staci o najniliejszym sygnale zostanie zapamietyanych w kolejnosci rosnących czestotliwość i zostano im przypisane kolejne numery.
Teraz kazda zapisana doemieci stacja wącza sie na ok. 5 sekund, a为进一步 wybrana dostaje stacja utrwalona na pierwSzej poźycji wemieci.
Jezeli ccha Państwo szuća dalszych staci w zakresie FM, to prosze wcisⁿć przyczisk BAND, by przejć do FM2 lub FM3. Prosze ponniewiczniesz przyczys AP na dluzej niż sekunde, by Rozpoczⁿć dalsze szukanie.
b) Funkcja krótkiego wączania stacja:
Po krótkim wciśnocy przechyskie AP radio wącza na krótko wzystkie ustawione stacjaactualné gośpna czestotiwość.
Wskazówka: Funkcja krótkiego w��czania staci konczy sie automatycznie zchwila dojscia do pozycji wAMIci, z ktorej zostafa wystartowan.
12-17.Przyciski (1-6) zapisanych staci oraz jako przyciski 1TOP, 2INT, 3RPT, 4RDM w trybie CD.
a) Tryb radia
Króttie naciśćcie tych przycisków spowoduje bezpośredni wyborwcześćnej zapisanej staci radiowej. Jeźeli dany przycisk zostanie przytrzymany dlżej nz 1 sekunde, to wównas do danego przycisku zostanie przypisaniactualnie ustawiona staacja.
b) Tryb CD
- W celu przerwania odtwarzania CD nacinacja przycisk 1TOP (pauza). Ponowne nacinśćkiego przyciku wznowy odtwarzanie plyt.
- Nacisnac przycisk 2INT. Kaźdy tylu Bedfordzie odwrzany przyze 10 sekund. Ponowne naciść przyciscu oznaca przerwanie procesu wyszukiwania i odworzony zostanie aktuarnie wybrytram uzwor.
- Nacisnac przycisk 3RPT. Aktualnie odtwarzany utwor zostanie powtó-zony. Ponowne naciśćtieideo przycisku spowodu uniewaźniazenia tej funkcj.
- Nacinność przyczysk i 4RDM. Utwory besteht odztwarzne w przypad-kowej kolejnosci. Ponowne naciśćte goźprzysiku spowoduje uniewaNienie jej fungchi.
18. TA Traffic Announcement
(uklad priorytetu dla radiowych komunikatów drogowych)
FunkcjE TA załuczamy poprzej krótkie nacinść przycisku TA, a o jej uakytniewniem informujme znaczek TA na wyswietlaczu. W trybie radia w danym zakresie czestotliwość FM Rozpoczne sie automatycznwe wyszukwanie staci nadajacej informacja o ruchu (TA SEEK).
Ježeli odbierana bestehtacia, kóra co pewien CZas nadaje najswiejsze informacja o ruchu, to woczas na wyświetlaczu zapali sie wskaznik TP.
Przy zalaczonej funkcj TA informacja o ruchu nadawane na FM spowoduja automatyczne przerwanie odztwarzania pty CD. Głosność automatycznie zwiekszy są dominimalnégo poziumu wȩciwoego dla transmisji informacja o ruchu. Po zakończeniu informacja o ruchu nastapi powróć do wczesnej ustawionego programu.
Przerwanie funkcjTA:
Ježeli chcemy przerwaćactualnie nadawanie informacji o ruchu, naleź na krótko nacisnám przyczisk TA. Nie spowoduje to wylączenia trybu TA.
19. Przycisk PTY - wybor rodzaju programu
Niektoře stace FM oprocz na wybrné przekazuji równej informacja na temat typu emitowanych przyze nie programów. Wasz odiornik samochodowy要去pokazwoć te informacja na swoim wyswietlaczu.
Moga to byc nastepujace typy programów np.:
SPORT
NEWS
POP
CLASSICS
Za pomocę funkcjki PTY możemy wybrać stacje nadajność przyez nas typ programu. Aby wegrć do grupy robzajów muzyki w trybie PTY naleź y 1X nacinȩć przechić zMY. W wyświetlaczu pojawie sąznak „PTY". Za pomocą przechȩć zaskości 1-6 możymi dokonać nastepujacego wyboru.
| 1 X nacisnám | 2 X nacisnám | |
| przycisk staci 1 | POP M | ROCK M |
| przycisk staci 2 | EASY M | LIGHT M |
| przycisk staci 3 | CLASSICS | OTHER M |
| przycisk staci 4 | JAZZ | COUNTRY |
| przycisk staci 5 | NATION M | OLDIES |
| przycisk staci 6 | FOLK M |
W celu wejscia do grupy rodzajow audycji mowionych nalezy 2X nacisnac przycisk PTY. Za pomocza przycisków staci 1-6 mozyme dokonac nastepujacego wyboru.
| 1 X nacisjacć | 2 X nacisjacć | 3 X nacisjacć | |
| przycisk staci 1 | NEWS | AFFAIRS | INFO |
| przycisk staci 2 | SPORT | EDUCATE | DRAMA |
| przycisk staci 3 | CULTURE | SCIENCE | VARIED |
| przycisk staci 4 | WEATHER | FINANCE | CHILDREN |
| przycisk staci 5 | SOCIAL | RELIGION | PHONEIN |
| przycisk staci 6 | TRAVEL | LEISURE | DOCUMENT |
W celu ponownego wyłaczenia tej funkcjne sąȩzy 3X nacinść przycisck PTY.
Ježeli wybrany jest tryb PTY radioodbiornik Rozpoczyna wyszukwanie odpo-wiednich informaci PTY i zatrzymuje sie, ježeliznajdie poźadne przyż nas informacja PTY.
PL
Ježeli poszukiwany typ programu nie zestanie znaleziony, to wówczas na wyświetlaczu pojawi są informacja „NONE PTY".
Ježeli poszukiwana informacja PTY juices nie istnieje, to funkacja PTY automatycznych przyłączy są zwykły tryb odbioru.
20. AF (częstotliwość alternatywne) funkćja REG
a) AF jest funkacja wykorztyszȩca RDS (Radio Data System) i wykorztystywna jest tylko przysteczne FM. Urzadzenia wyszukuje w tle sączestotiwość natestawioneji staci (sledzenia sieci).
Ježeli wybierzemy funkcję AF to radioobdiornik bedzie na bieźćo kontrłowość sile syngnalu danej czestotliwość AF. Czejstotiwość przy prowadzania tych kontroli zaleź do sily syngnalu zactualnej staci i miesci są w zakresie od kilki minut w przypadku silngo syngnalu do kilku sekund przy slasym nadajnik. Za kazdym razem, gdy nowa czestotliwość AF jest silniejsza, niedzialnie nastawiona stacja, to wówczas odiornik na krótko przyłącza są na te czestotliwość i przy bez 1 do 2 sekund na wyświetlaczu pojawia sie informacja „NEW FREQUENCY". PoniewaN czas wycsiszenia przy zmieanie czestotliwość wzgl. czas kontról jest bardzo krótki, to w trakcie odbioru programu jest to sprawie nieslyszalance.
Funkcja AF aktywowana jest poprzej krótkie naciść przyczisku AF, a o jej wyborze informuje znaczek AF na wyświetlaczu radia.
- Ježeli na wyświetlaczu znajduje są zaczek AF oznacja to, ze zaȩczona jest fungacja AF i odzierane są dane emitowej w systemie RDS.
- Ježeli na wyświetlaczu znaczek AF miga, to Funkcja AF jest wadowskie wybrana, ale w danym momencie nie moga być odzierane sygnaly nadawane w systemie RDS.
- Ponowne naciśćcie przyciscu AF spowoduje wylączenia funkcj. Na wyświetlaczu gaźnie znaczek AF.
b) Funkcja REG
Niekótre stace o okreslonych godzinach dane są swoj program na programy regionalne o zróznicowanej tresci.
- REG ON: naciść i dluzsze przytrzymanie przyczysiku AF spowoduje wączenia trybu regionalno. W wyświetlaczu pojawia są na kilkaweuk indmudnek „REG ON".
Uwaga:移动端的移动客户端,可以提供移动客户端和移动客户端之间的连接。
Mozliwe, ze w podwojnym trybie wskazań poszczególne segmenty wyswietlacza zostana wygaszone.
Funkija REG ON zapobiega przeloczaniu sie radioodbiornika na czestotliwość alternatywne, na kórsych nadawane są programy regionalne o内在е tresci.
- REG OFF: Ponowne naciśćc i dluszne przytrzymanie przycisku AF wylacja tryb regionny. W wyświetlaczu pojawia są na kilka sekund meldunek „REG OFF".
Podczas wyszukwania czestotlwość alternatywnych (AF) lub identifikaci programów (PI) ignorowska jest identifikacja programów (PI) z programu nadawanego przystępie stȩje regionalna.
21 Przycisk CLK
Krátkie naciśćte goźyciku pozwala na prezentacja na wyświetlaczu rożnych informacji.
W przypadku odbioru ze staci RDS uzyskamy:
- w trybie radia:
nazwa staci czestotliwość godzina typ programu - w trybie odtwarzacza CD
numer utworu/czas odtwarzania nazwa staci czestotliwośc godzina typ programu
Uwaga: gezeli niè moga byc odbierane informacie dotyczé godziny lub typu programu, to wówczas na wyswietlaczu pojawia sie „NO CLOCK" lub „NO PTY".
Ježeli odbierana stacja nie wysyla zadnych dodatkowych informacji RDS, to吞噬zas pojawia są nastepujace zgloszenia
- w trybie radia:
NO CLOCK czestotliwośc NO PTY - w trybie odtwarzacza CD
→ numer utworu/czas odtwarzania → godzina → czestotliwośc → NO PTY →
22 Otwör na plyty CD
23. Przycisk wysuwania (EJECT)
Aby wysunac plye CD nalezy nacisnac ten przycisk.
24. Migajaca dioda LED (bez ilustracji)
Dioda ta miga przy zdejmowaniu panela przydniego.
25. Przycisk RESET (bez ilustracji)
Welu przywrocenia zakloconego programu nalezy nacisnac ten przycisk. Po produkti przydngie paanelu przycisk ten moza znalez z sprawej strony obok wyswietlacza.
PL
Dane techniczne
Ogólne
napiecie zasilania
DC 13,8 V
pobór pradu
15 A max.
moc
4×35WPMPO
Zakres FM
zakres czestotliwość
87,6 MHz do 108,0 MHz
czuñosc uzywalna
3 V
cẑestotiwośc posrednia
10,7 MHz
Moc na wyjsciu
wyjscie
W przypadku CD maks. 1200 mV
Odtwarzacz CD
system
odtwaracz CD
czytane formaty
phyt CD/CDR/CDRW
ilosc bitow kwantowania
1 bit.
format sygnalu
44.1 kHz
cechy charakterystyczne czestotliwość
20 - 100Hz ≤ 5 dB
stosunek sygnalu do szumów
10 - 20kHz≤ 5 dB
ilosckanalow
50 dB (1 kHz)
wymiaru obudowy
2kanaly stereo
178 szer. x 50 wys. x 165 ggeb.
Usuwanie usterek
PL
Przed skorzystaniem z listy kontrlnej aleznaj powradyci,czy urzadzionie jest w的战略性支撑。Jezeli spo sprawdzeniu calej listy kontrlnej uterka nie zostanie w pelni usunieta, naleznaj skonsultowac sie z najbilszymn punktem serwisowym.
| Oznaki usterki | Powód | Sposob usuniecia usterki |
| Plyty kompaktowe wciagane są do otworu na CD tymko do polowy. | Śruby zabezmieczajce w transporcie nie zostaly usunięte. | Prosze usunć Śruby zabezmieczajce w transporcie. |
| Brak odtrwarzania po włożeni do odtrwarzacza pplyt CD lub kasety. | Za maly poziom glówność ustawionej na regulatorze. | Zȩkszyść poziom glówność. |
| Nieprawidłow wykonane przyłącza. | Sprawdzic przyłącze +12V i masy. | |
| Dźwię odtrwarzacza CD przeskakuje. | Powierzchnia drogi jest nierowania. | Welu odtrworzenia CD zaczekaćźdroga stanie sie bardẑiej równa. |
| Urzadzenia nie jest za-montowane na stałe. | Zabadowej urzadzenia na stałe. Upewnić są,źewypodsku, gdy pojawźne ireruje odpowiedniego podparcia dla tymnej czȩsci urzadzenia, zastosowano tymne mocowanie. | |
| Uszkodzona pplyta CD. | Sprawdzic inna pplyte CD. Jeźeli;będzie ona działać prawniodowo, to być要去 poprzedzenia CD jest uszkodzona. | |
| Brudna pplyta CD. | WyczyScić CD. | |
| Brak zasilania. | Wączony zapłon. | Obrácić kluczymi zapłonu w Pozcęje „ON“ lub „ACC“. |
| Spalony bezpiecznik. | Wymienić bezpiecznik na inny bezpiecznik 15A. | |
| Urzadzenia nie dzilała prawnidlowo (EJECT, LOAD, PLAY). | Nastapilo zlokocenie mi-krokomputera przyizzliesielektromagnetyczne. | Wyplać i ponownie wȩżyć CD lub kasety. Wyczyść i ponownie przy转移到 obdionnik. |
| Brak odbioru radiowego. | Niepodź学习成绩 kabel antenowy. | Mocno wetakność kabel antenowy w zȩcie ante-nowe na udrzejzeniu. |
| W trybie wyszukiwania automatyczné radio-odbiornik nie zatrzymuju sie przy zȩdnej staci. | Nadawane sygnaly są zbyt szabe. | Wybrać stȩgo w trybie ręcznym. |
PL
Wprawdzie plyta CD
zostaje wciagnieta, a w
wyswietlaczu pojawia
sie scezenia zapisu, lecz
slycha tylko szumy lub
nie slycha zadnego
dzwieku.
Dyski CD i CDR w forma-cie MP3!
Prosze uwzględnic ta
wskazowej odnosnie odl-
warzania plyt CD i CDR w
formacie MP3! Uradzadenie
to nie oblsuguje formatu
MP3. Wrawdzie plyta
kompaktowa zaczyna sie
krećic, jakdnek dzwiek Nie jest odwtarzany.
Prosze sprawdzić formaty zapisane na CD.
Uwaga: ze względu na duza ilość dostepnégo oprogramwomania i robźajów nośników, nie gwarentujemy prawidlowego odwarzania plyty CD, nagrzej przy uzytkownika.

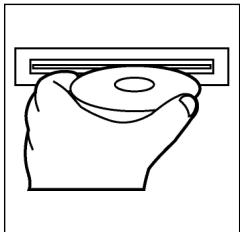

Odtwarzanie CD
Czyszczenie CD
Przed odtworzeniem, płyte CD nalezy przyPTRzec czysta, niedzakurzonachusteczka do czyszczenia.
Uwaga: nie stosowac zadnych rozpusczalników jak benzyny lub subiecte rozienczaję. Powszechnie dostepne sądki czyszczace lub spraye antystatyczne powodujuszkodzenia urzadzenia.
Wkladanie plyty CD
Wlozenia plyty CD zadrukowan stronda do dolu\ moze spowodowa uzzkodzenie urzadzenia.
CD nalezy zawsze wkladac etykieta zwrocona do góry.
Uwaga: gezeli w kieszeni CD znajduje sie juz plyta, nie nalezy usilowa wkladać tam kolejnej plyta, ponieważ要去 spowodowa uszkodzenia urzadzenia.
Chwytanie plyty CD
Plyty CD nalezy zawsze chwytać za krawędzie.
Aby zapewnić czystość plyty, nie nalezy dotykać jej powierzchni.
- Nie naklejac na plytach CD zadnych naklejek, ani taśm klejacych.
- Nie wystawiać plyt CD na bezposrednia dzialanie promiensi slonecznych lub zrödelciepla jak rury grzewcze oraz nie pozostawiać ich w samochodzie, jeźeli pojadź jest parkowany w sącieu naslonecznionym, poniewaz powoduje to znaczny wroz temparuty..
Niniejsze urzadzenie odppiada wymaganiom normy bezpieczneistwa uzytkowania oraz spelnia wymagania dyrektywy niskonapięciowej i kompatybilnosci elektromagnetycznej.
Zastrzega sieRAWo dozmian technicznych!
PL
WARUNKI GWARANCJI
Przyznajemy 24 mieszpie gwarancji na produkt liczac od DATy zakupu.
W tym okresie bedziemy bezplatnie usuwac w terminie 14 dni od Daty dostarczenia wadiwego sprzetu z karta gwarancjna do.), uzaku wszystkie uzkodzenia powstale w tym urzadzeniu na skutek wady materialow lub wadiwego wykonania, naprawiacz oraz wymiieniag wadiwie czeci lub (jesli uznamy za stosowne) wymiieniajc cale urzadzenie na nowe.
Sprzêt do naprawy powinien byc dostarczony w komplecie wraz z dowodem zakupu oraz z wazna karta gwarancjna do sprezdawcy w miarozylwocki w oryignalm opakowani lub innym odpownim dla zabezpieczenia przyzeduszkideniam. W razie braku kompletné opokaniania fabrzćnégo, przyzek uz-kodzenia sprzȩtu podczas transporte do i zjejmeska zakupu ponsi reklamujucy.
Naprawa gwarancjna nie dotyczy czynosci przywidzianych w instrukcji oblsugi, do wykonania ktorych zobowiazny jest uzytkownik we wlasnym zakresie i na wlasny koszt.
Gwarancja nie obejmuye:
- mechanicznych, termicznych, chemicznych uszkodzen sprzętu i wywołych nimi wad,
- uzskodzeń powstalych w wyniku dzialania sil zewnetrznych takich jak wyladowania atmossferyczne, zmiana napiecia zasilania i innych zdarzen losowych,
- nieprawidlowego ustawientia wartosci napięcia elektrycznych, zasilanie znieodpowsiedniago gniazda zasilania,
sznurów połaczeniowych, sieciowych, zarowek, baterii, akumulatorów, - uszkodzeń wyrobu powstalych w winiku niewlasciwego lub niedzgodnego z instrukacja.go uzytkowania, przechowywnia, konserwaczji, samowolné zrywnian plomb oraz welszkich przerobek i zmian konstrukcyjnych dokonanych przyez uzytkownika lub osoby niedpowolane,
roszczen z tytulu parametrów technicznych wyrobu, o ile są one zgodne z podanymi przyez produventa, - prawidlowego zuźycia i uszkodzen, króre majaNieistotny wplyw na wartosć lub dzialanie tego urzadzenia.
Karta gwarancyjna bez pieczatki sklepu, daty sprezedazy, nie wypelniona, zle wypelniona, ze sladami poprawek, niedzelytna wskutek zniszczenia, bez moziwość ustalenia+</nieważna.
Korzystanie z uslug gwarancyjych nie jest möglich po uplywie daty waznosci gwarancji. Gwarancja na czeci lub cale urzadzenie, ktore są wymieniane konczy sie, wraz z koricem gwarancj na to urzadzenie.
Wszystiekine innozsczenia, wicczajac w to odszkodowania są wykloczone chyba,违法犯罪e zucchane zucchane zucchane zucchane zucchane zucchane zucchane zucchane zucchane zucchane zucchane zucchane zucchane zucchane zucchane zucchane zucchane zucchane zucchane zucchane
Gwarancja na sprzedany towar konsumpcjny nie wyłacza, nieogranoica ani nie zawiesza uprawnien kupujacego winikajacych z niedgodnosci towaru z umowa.
Gwarancja oraz zawarte w nied warunki obowiazuju na terenie Rzekzpospolitej Polskiej.

CIATRONIC
INTERNATIONAL GMBH
D-47906 Kempen/Germany · Industriering Ost 40
Telefon 02152/2006-666
Internet: http://www.clatronic.de·email: info@clatronic.de
- Bedienungsanleitung/Garantie
- Autoradio mit CD-Player
- Inhalt
- Übersicht der Bedienelemente
- D
- Allgemeine Sicherheitshinweise
- Installation
- Achtung
- Anschluss
- Achtung:
- Wichtige Zusatzinformation zum Einbau Ihr's Autoradios!
- Vorsichtsmaßnahmen und Wartung
- Bedienung
- REL-Taste
- +/-Tasten
- SEL-Taste (Auswahl)
- - MASK DPI/ALL
- DSP
- - LOUD ON/LOUD OFF
- BEEP ON/OFF Bestätigungston
- - SEEK 1, SEEK 2 (Nur im Radiobetrieb wahlbar)
- STEREO/MONO Umschaltung (Nur im Radiobetrieb wahlbar)
- - LOCAL/DX (Nur im Radiobetrieb wahlbar)
- EONTA LOCAL:
- VOL LAST/VOL ADJ
- POWER-Knopf
- LCD-Display (Flüssigkristallanzeige)
- BAND-Taste
- 7./8. / -Tasten TUNE, SEEK, TRACK, SKIP UP/DOWN
- MODE-Taste
- MUTE-Taste
- AP-Taste (Automatische Senderspeicherung)
- 12-17.als Stationstasten (1-6) vorgewähler Sender und als 1TOP-, 2INT-, 3 RPT-, 4 RDM-Tasten im CD Betrieb
- PTY-Taste Wahl des Programmtypes
- SPORT
- NEWS
- POP
- CLASSICS
- AF (Alternative Frenzen) REG-Funktion
- b) REG-Funktion
- CLK-Taste
- CD-Schlitz
- Auswurftaste (EJECT)
- Blinkende LED-Anzeige (ohne Abbildung)
- RESET-Knopf (ohne Abbildung)
- Technische Daten
- Allgemeines
- FM-Bereich
- Ausgangsleistung (Wahlweise)
- CD-Player
- Störungsbehebung
- Abspielen einer CD
- Reinigen der CD
- Einlagen der CD
- Anfassen der CD
- Garantie
- Nach der Garantie
- Algemene veiligheidsinstructies
- NL
- Installatie
- Let op!
- Aansluting
- Opgelet
- Belangrijke aanvullende informatiek voor de montage van uw autoradio!
- Veiligheidsmaatregelen en onderhoud
- Bediening
- + / - - toetsen
- SEL-toets (selectie)
- BEEP ON/OFF bevestigingsgeluid
- - SEEK 1, SEEK 2 (kan alléén in radiomodus worden geselecteer)
- - LOCAL/DX (alleen in radiomodus selecteerbaar)
- POWER-knop
- LCD-display (vloeibaar-kristaldisplay)
- BAND-toets
- / V -toetsen TUNE, SEEK, TRACK, SKIP UP/DOWN
- MODE-toets
- MUTE-toets
- AP-toets (automatische zenderopslag)
- 12-17. als stationstoetsen (1-6) van voorgeselecteerde zenders en als 1TOP-, 2INT-, 3RPT-, 4RDM-toetsen in de CD-modus
- TA traffic announcement (voorrangschakeling voor verkeersberichten)
- PTY-toets selectie van het programmatype
- AF (alternatieve frequencies) REG-function
- b) REG-functie
- CLK-toets
- CD-sleuf
- Uitwerptoets (EJECT)
- Technische gegevens
- Algemeen
- FM-bereik
- Uitgangsvermogen (selecteerbaar)
- CD-speler
- Verhelpen van storingen
- Afspelen van een CD
- Reinigen van de CD
- Plaatsen van de CD
- Vastpakken van de CD
- Na de garantieperiode
- 1
- Avvertenze generali per la sicurezza
- Installazione
- Attenzione!
- Allacciamento
- Attenzione
- Informazioni importanti per il montaggio della vostra autoradio!
- Misure di prevenzione e manutenzione
- Funzionamento
- Pulsante REL
- Pulsanti +/-
- Pulsante SEL (selezione)
- - Menu TA SEEK
- BEEP ON/OFF segnale acustico di conferma
- STEREO/MONO commutazione
- Pulsante POWER
- Display LCD (display a cristalli liquidi)
- Pulsanti BAND
- Pulsanti / TUNE, SEEK, TRACK, SKIP UP/DOWN
- Pulsante MODE
- Tasto MUTE
- Pulsante AP (memorizzazione automatica dell'emittente)
- 12-17. Tasti di stazione (1-6). Emittente preselezionata e pulsanti 1TOP, 2INT, 3RPT, 4RDM in modalità conlettore CD
- TA Traffic Announcement
- Pulsante PTY – Sezione del tipo di programma
- AF (frequenze alternative) - Funzione REG
- Dati tecnici
- Generalità
- Ambito FM
- Potenza d'uscita
- Lettore CD
- Eliminazione delle anomalie
- Riproduzione di un CD
- Pulizia dei CD
- Insetamento CD
- Toccare il CD
- Garanzia
- Dopo la garanzia
- GB
- General safety instructions
- Note:
- Connection
- Note
- Important Information for installing your carradio!
- Precautionary Measures and Maintenance
- Operation
- REL Button
- +/- Button
- SEL Button (Select)
- BEEP ON/OFF Confirmation Beep
- POWER Button
- BAND button
- MODE Button
- MUTE Button
- 12-17. Station buttons (1-6) of preselected stations and as
- 1TOP, 2INT, 3RPT and 4RDM buttons during CD operation
- AF (Alternative Frequencies) REG Function
- b) REG Function
- CLK Button
- CD Slit
- Eject Button (EJECT)
- Flashing LED (not shown)
- RESET Button (not shown)
- Technical data
- General
- FM band
- Output Power
- CD player
- Troubleshooting
- Playing a CD
- Cleaning the CD
- Inserting the CD
- Touching the CD
- Guarantee
- After the expiry of the guarantee
- Ogólne wskazówki zwiazane z bezpieczna obstuga
- PL
- Instalacja
- Uwaga!
- Podlaczenie
- Uwaga
- Wañne informações dodatkowe, dotyczade instalazioni Waszego radiooediornika samochodowo!
- Środko astrozość i konserwacja
- Obstega
- Przycisk REL
- Przyciski +/-
- Przycisk SEL (wybr):
- - BEEP ON/OFF bzwiek potwierdzenia.
- SEEK 1, SEEK 2 (do wyboru tylko w trybie „radio")
- - Przelączanie STEREO/MONO (do wyboru tylko w trybie „radio")
- - LOCAL/DX (do wyboru tylko w trybie „radio")
- Przycisk POWER
- Przyciski BAND
- Przycisk MUTE
- Przycisk AP (automatyczne zapamietywanie staci)
- 12-17.Przyciski (1-6) zapisanych staci oraz jako przyciski 1TOP, 2INT, 3RPT, 4RDM w trybie CD.
- Przycisk PTY - wybor rodzaju programu
- AF (częstotliwość alternatywne) funkćja REG
- b) Funkcja REG
- Przycisk CLK
- Otwör na plyty CD
- Przycisk wysuwania (EJECT)
- Migajaca dioda LED (bez ilustracji)
- Przycisk RESET (bez ilustracji)
- Dane techniczne
- Ogólne
- Zakres FM
- Moc na wyjsciu
- Odtwarzacz CD
- Usuwanie usterek
- Odtwarzanie CD
- Czyszczenie CD
- Wkladanie plyty CD
- Chwytanie plyty CD
- WARUNKI GWARANCJI
Marque : CLATRONIC
Modèle : AR 663 CD
Catégorie : Appareil audio