
G2 - Pédale d'effet pour guitare ZOOM - Notice d'utilisation et mode d'emploi gratuit
Retrouvez gratuitement la notice de l'appareil G2 ZOOM au format PDF.

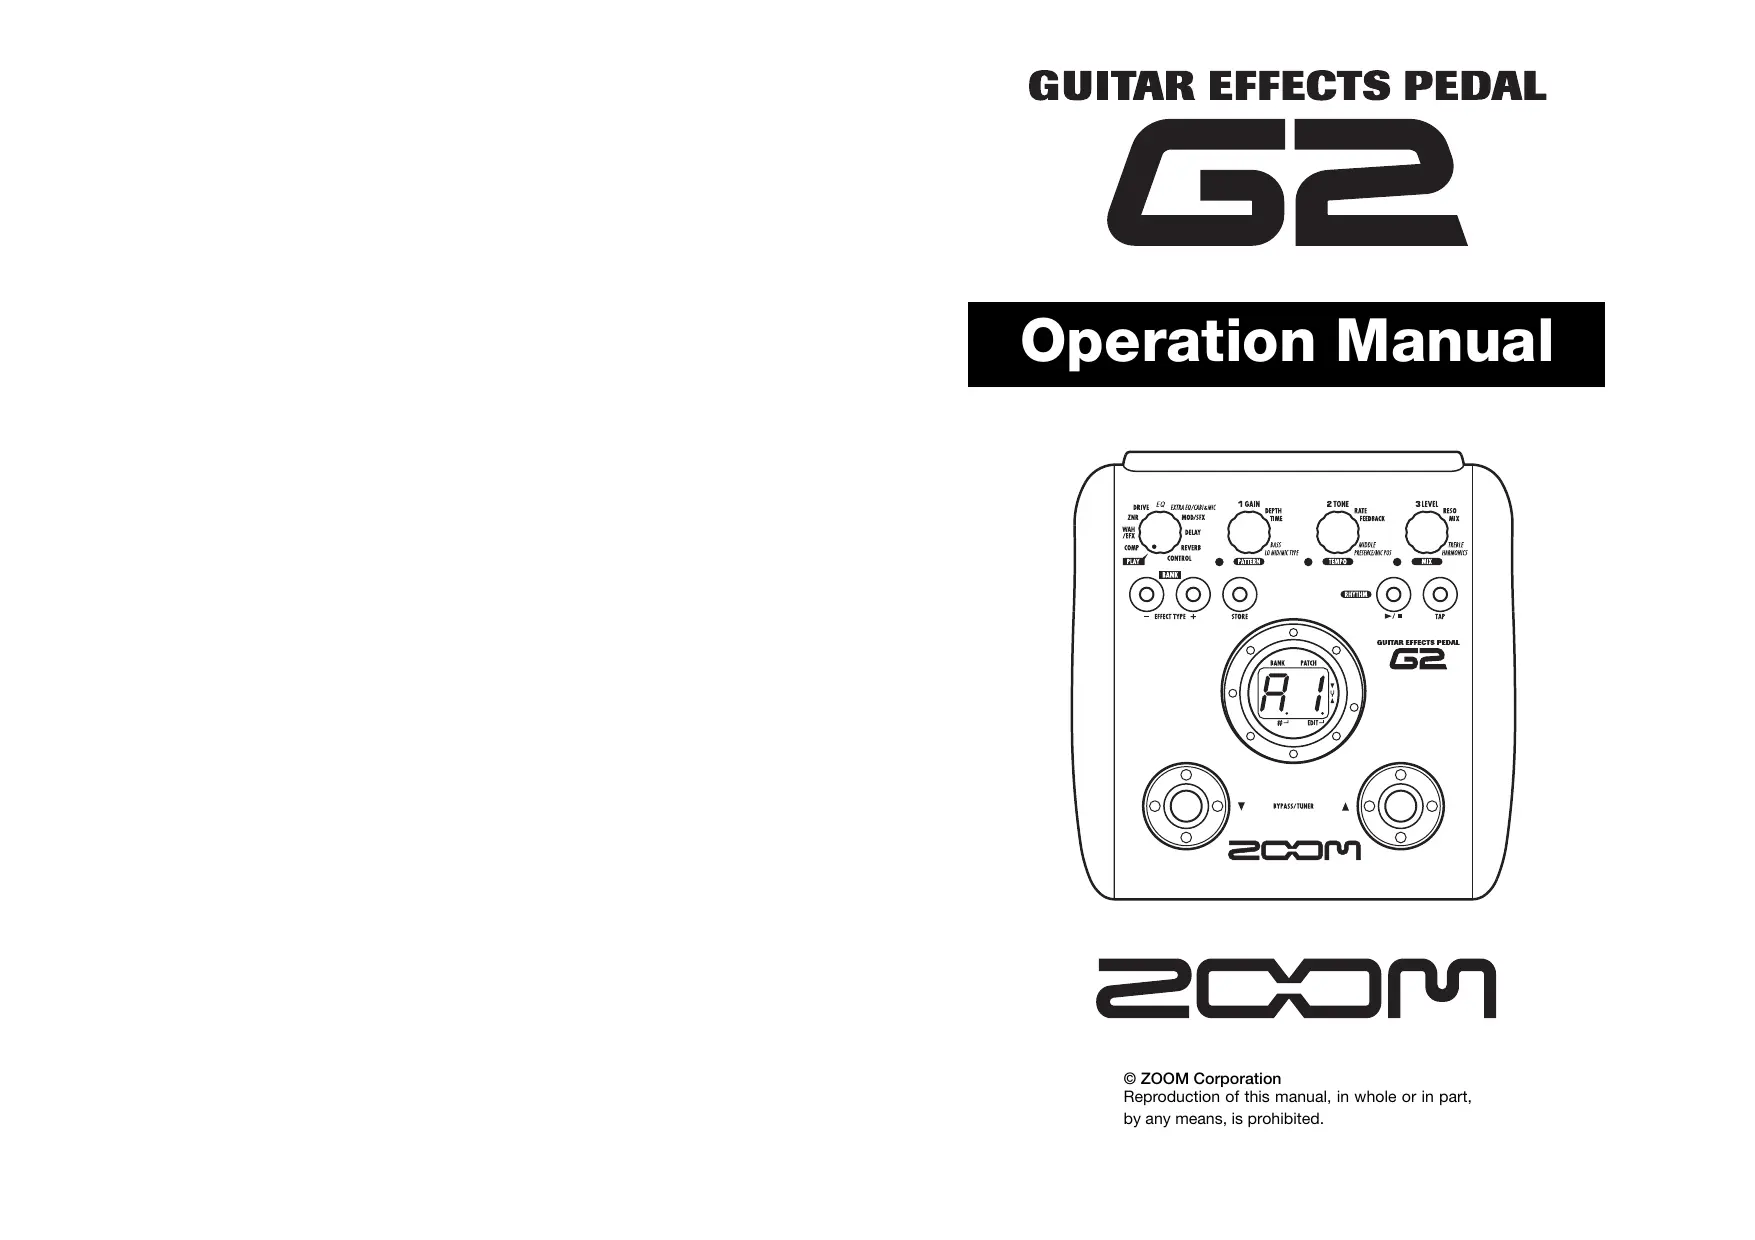

| Type de produit | Multi-effet pour guitare |
| Marque et modèle | ZOOM G2 |
| Dimensions | 162 mm (profondeur) x 156 mm (largeur) x 65 mm (hauteur) |
| Poids | 700 g (sans piles) |
| Alimentation | Adaptateur secteur 9 V CC, 300 mA (centre négatif) ou 4 piles alcalines LR6 (AA) |
| Autonomie sur piles | Environ 7,5 heures avec piles alcalines |
| Nombre d'effets | 54 types d'effets |
| Modules simultanés | Jusqu'à 9 modules (dont ZNR) |
| Patches mémoire | 80 patches (40 utilisateur, 40 préréglages) organisés en 8 banques |
| Fréquence d'échantillonnage | 96 kHz |
| Conversion A/N et N/A | 24 bits, suréchantillonnage 64 fois et 128 fois |
| Traitement interne | 32 bits |
| Réponse en fréquence | 20 Hz - 40 kHz (+1 dB / -3 dB) |
| Impédance d'entrée | 1 MΩ |
| Sortie | Jack stéréo standard (ligne et casque) |
| Niveau de sortie max | +5 dBm (ligne), 20 mW + 20 mW (casque 32 Ω) |
| Fonctions principales | 54 effets, jusqu'à 9 simultanés, 40 motifs rythmiques, accordeur chromatique intégré, édition intuitive, pédale d'expression et footswitch en option, liaison d'effets |
| Entretien et nettoyage | Nettoyer avec un chiffon doux et sec, légèrement humecté si nécessaire. Ne pas utiliser de solvants ou de produits abrasifs. |
| Sécurité | Utiliser exclusivement l'adaptateur spécifié. Ne pas exposer à l'humidité, à la chaleur excessive, à la poussière ou aux chocs. Débrancher l'adaptateur en cas d'orage. |
| Accessoires en option | Pédale d'expression FP01/FP02, Footswitch FS01 |
FOIRE AUX QUESTIONS - G2 ZOOM
Questions des utilisateurs sur G2 ZOOM
0 question sur cet appareil. Repondez a celles que vous connaissez ou posez la votre.
Poser une nouvelle question sur cet appareil
Téléchargez la notice de votre Pédale d'effet pour guitare au format PDF gratuitement ! Retrouvez votre notice G2 - ZOOM et reprennez votre appareil électronique en main. Sur cette page sont publiés tous les documents nécessaires à l'utilisation de votre appareil G2 de la marque ZOOM.
MODE D'EMPLOI G2 ZOOM
GUITAR EFFECTS PEDAL
62
Operation Manual
200
© ZOOM Corporation
Reproduction of this manual, in whole or in part,
by any means, is prohibited.
SAFETY PRECAUTIONS Usage Precautions
SAFETY PRECAUTIONS
In this manual, symbols are used to highlight warnings and cautions for you to read so that accidents can be prevented. The meanings of these symbols are as follows:

This symbol indicates explanations about extremely dangerous matters. If users ignore this symbol and handle the device the wrong way, serious injury or death could result.

This symbol indicates explanations about dangerous matters. If users ignore this symbol and handle the device the wrong way, bodily injury and damage to the equipment could result.
Please observe the following safety tips and precautions to ensure hazard-free use of the G2.

Power requirements
Since power consumption of this unit is fairly high, we recommend the use of an AC adapter whenever possible. When powering the unit from batteries, use only alkaline types.
[AC adapter operation]
- Be sure to use only an AC adapter which supplies 9 V DC, 300mA and is equipped with a "center minus" plug (Zoom AD-0006). The use of an adapter other than the specified type may damage the unit and pose a safety hazard.
- Connect the AC adapter only to an AC outlet that supplies the rated voltage required by the adapter.
- When disconnecting the AC adapter from the AC outlet, always grasp the adapter itself and do not pull at the cable.
- During lightning or when not using the unit for an extended period, disconnect the AC adapter from the AC outlet.
[Battery operation]
- Use four conventional IEC R6 (size AA) batteries (alkaline).
- The G2 cannot be used for recharging.
- Pay close attention to the labelling of the battery to make sure you choose the correct type.
- When not using the unit for an extended period, remove the batteries from the unit.
- If battery leakage has occurred, wipe the battery compartment and the battery terminals carefully to remove all remnants of battery fluid.
While using the unit, the battery compartment cover should be closed.
![ZOOM G2 - [Battery operation] - 1](/content/2025/01/152180/images/8e256ed94eae5ec70fcd16f7a3b7eb241529fc1dd8e802bcc627e1cdb8e2aa3c.jpg)
Environment
To prevent the risk of fire, electric shock or malfunction, avoid using your G2 in environments where it will be exposed to:
- Extreme temperatures
- Heat sources such as radiators or stoves
High humidity or moisture
- Excessive dust or sand
- Excessive vibration or shock

Handling
- Never place objects filled with liquids, such as vases, on the G2 since this can cause electric shock.
- Do not place naked flame sources, such as lighted candles, on the G2 since this can cause fire.
- The G2 is a precision instrument. Do not exert undue pressure on the keys and other controls. Also take care not to drop the unit, and do not subject it to shock or excessive pressure.
- Take care that no foreign objects (coins or pins etc.) or liquids can enter the unit.

Connecting cables and input and output jacks
You should always turn off the power to the G2 and all other equipment before connecting or disconnecting any cables. Also make sure to disconnect all connection cables and the power cord before moving the G2.

Alterations
Never open the case of the G2 or attempt to modify the product in any way since this can result in damage to the unit.

Volume
Do not use the G2 at a loud volume for a long time since this can cause hearing impairment.
Usage Precautions
Electrical interference
For safety considerations, the G2 has been designed to provide maximum protection against the emission of electromagnetic radiation from inside the device, and protection from external interference. However, equipment that is very susceptible to interference or that emits powerful electromagnetic waves should not be placed near the G2, as the possibility of interference cannot be ruled out entirely.
With any type of digital control device, the G2 included, electromagnetic interference can cause malfunctioning and can corrupt or destroy data. Care should be taken to minimize the risk of damage.
Cleaning
Use a soft, dry cloth to clean the G2. If necessary, slightly moisten the cloth. Do not use abrasive cleanser, wax, or solvents (such as paint thinner or cleaning alcohol), since these may dull the finish or damage the surface.
Please keep this manual in a convenient place for future reference.
Contents
SAFETY PRECAUTIONS Usage Precautions 2
SAFETY PRECAUTIONS 2
Usage Precautions 2
Features 4
Terms Used in This Manual 5
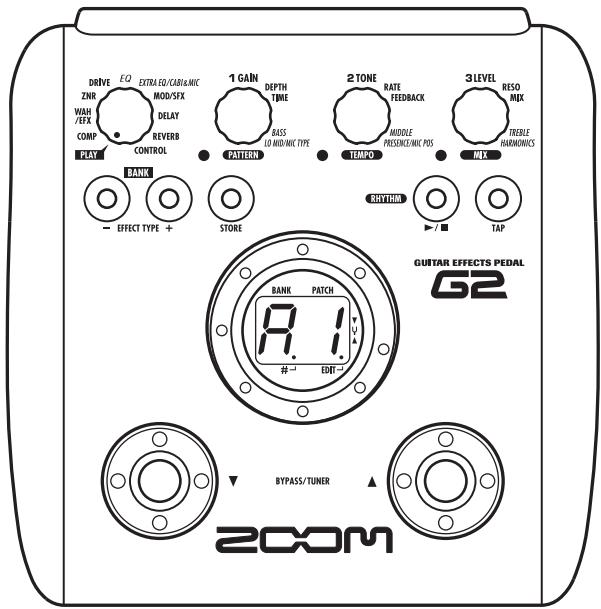
Controls and Functions / Connections 6
Selecting a Patch 8
Using the Tuner 10
Using the Rhythm Function 12
Editing a Patch. 14
Storing/Copying Patches 16
Using an Optional Foot Switch or Pedal 18
Using the foot switch (FS01) 18
Using the expression pedal (FP01/FP02) 19
Restoring Factory Defaults 20
Linking Effects 21
Switching between live sound and direct recording sound ....21
Effect Types and Parameters 22
How to read the parameter table 22
COMP 23
WAH/EFX 23
ZNR 24
DRIVE 25
EQ 26
EXTRA EQ/CABI&MIC 26
MOD/SFX 26
DELAY 29
REVERB 29
CONTROL 30
Specifications 31
Troubleshooting 31
G2 Preset Pattern .Back cover
The FCC regulation warning (for U.S.A.)
This equipment has been tested and found to comply with the limits for a Class B digital device, pursuant to Part 15 of the FCC Rules. These limits are designed to provide reasonable protection against harmful interference in a residential installation. This equipment generates, uses, and can radiate radio frequency energy and, if not installed and used in accordance with the instructions, may cause harmful interference to radio communications. However, there is no guarantee that interference will not occur in a particular installation. If this equipment does cause harmful interference to radio or television reception, which can be determined by turning the equipment off and on, the user is encouraged to try to correct the interference by one or more of the following measures:
- Reorient or relocate the receiving antenna.
- Increase the separation between the equipment and receiver.
- Connect the equipment into an outlet on a circuit different from that to which the receiver is connected.
- Consult the dealer or an experienced radio/TV technician for help.
Features
Thank you for selecting the ZOOM G2 (hereafter simply called the "G2"). The G2 is a multi effect processor with the following features and functions.
- Latest processing technology for outstanding performance
96 kHz / 24 bit sampling (with 32 bit internal processing) assures excellent sound quality. Frequency response remains flat up to 40kHz , and input-converted signal-to-noise ratio is an amazing 120dB , demonstrating the high level of performance achieved by the G2.
- Versatile palette of effects including new creations
Out of a total of 54 effects, up to nine (including ZNR) can be used simultaneously. The high-quality choices provided by the G2 include distortion effects that simulate the tones of famous amps and effects pedals, 6-band guitar EQ and delay effects with "hold" controlledoperated by foot switch.
- Great for live performances and direct recording
The distortion effect module provides two different algorithms for each of its 17 effect types, one for live performance and one for direct recording. Depending on the on/off setting of the CABINET & MIC effect which simulates amp cabinet sound and mic characteristics, the most suitable algorithm is automatically selected, giving you the best sound for any application.
- Integrated rhythm functions and auto-chromatic tuner
A number of rhythm patterns using realistic PCM drum sounds are provided. This is convenient for use as a metronome during individual practice or to provide a simple rhythm part for a quick session. An auto-chromatic tuner for guitar is also built right into the unit, allowing you to easily tune your instrument also at home or on stage.
- Sophisticated user interface
The combination of a rotary type selector and three parameter knobs make the effect editing process intuitive and quick. The mute interval when switching patches has been reduced to less than 5 milliseconds. Seamless patch changing is now a reality.
- Dual power supply principle allows use anywhere
The G2 can be powered from four IEC R6 (size AA) batteries or an AC adapter. Continuous operating time on batteries is approximately 7.5 hours with alkaline batteries.
- Easy operation with foot switch and expression pedal
An optional foot switch (FS01) or expression pedal (FP01/FP02) can be connected to the CONTROL IN jack. The foot switch is convenient for quickly switching effect programs, setting the tempo for the rhythm function, or switching delay hold on and off. The expression pedal can be used to adjust the volume or the tonal quality of an effect in real time.
Please take the time to read this manual carefully so as to get the most out of the unit and to ensure optimum performance and reliability.
Terms Used in This Manual
This section explains some important terms that are used throughout the G2 documentation.
IN COMP-WAH/EFX-ZNR-DRIVE-EQ-EXTRA EQ/CABI&MIC-MOD/SFX-DELAY-REVERB>OUT
■ Effect module
As shown in the illustration above, the G2 can be thought of as a combination of several single effects. Each such effect is referred to as an effect module. In addition to modules comprising compressor effects (COMP), amp simulator/distortion effects (DRIVE), and modulation/special effects (MOD/SFX), the G2 also provides a module for ZNR (ZOOM Noise Reduction). Parameters such as effect intensity can be adjusted for each module individually, and modules can be switched on and off as desired.
■ Effect type
Within some effect modules, there are several different effects which are referred to as effect types. For example, the modulation/SFX effect module (MOD/SFX) comprises chorus, flanger, pitch shifter, delay, and other effect types. Only one of these can be selected at a time.
■ Effect parameter
All effect modules have various parameters that can be adjusted. These are called effect parameters. In the G2, effect parameters are adjusted with the parameter knobs 1 - 3. Similar to the knobs on a compact effect, these change aspects such as tonal character and effect intensity. Which parameter is assigned to each knob depends on the currently selected effect module and effect type.
Patch
In the G2, effect module combinations are stored and called up in units referred to as patches. A patch comprises information about the on/off status of each effect module, about the effect type used in each module, and about effect parameter settings. The internal memory of the G2 holds up to 80 patches (including 40 patches which allow read/write).
■ Bank and area
A group of ten patches is called a bank. The memory of the G2 comprises a total of eight banks, labelled A to d and 0 to 3. Banks A - d form the user area which allows read/write. Banks 0 to 3 are the preset area containing read-only patches.
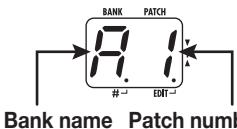
The patches within each bank are numbered 0 through 9. To specify a patch of the G2, you use the format "A1" (patch number 1 from bank A), "06" (patch number 6 from bank 0), etc.
Play mode/edit mode
The internal status of the G2 is referred to as the operation mode. The two major modes are "play mode" in which you can select patches and use them for playing your instrument, and "edit mode" in which you can modify the effects. The module selector serves for switching between the play mode and edit mode.
Operating the G2 on batteries
-
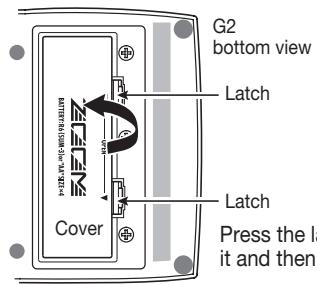
Turn the G2 over and open the cover 2 of the battery compartment on the bottom.
-
Insert four fresh IEC R6 m. (size AA) batteries.
-
Close the cover of the battery compartment. Push the cover in until the latch audibly snaps into place.
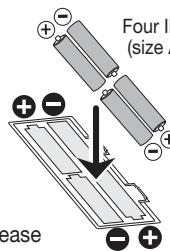
Insert batteries facing in alternate directions.
Use four IEC R6 (size AA) batteries.
When the batteries are getting low, the indication "bt" appears on the display.
Controls and Functions / Connections
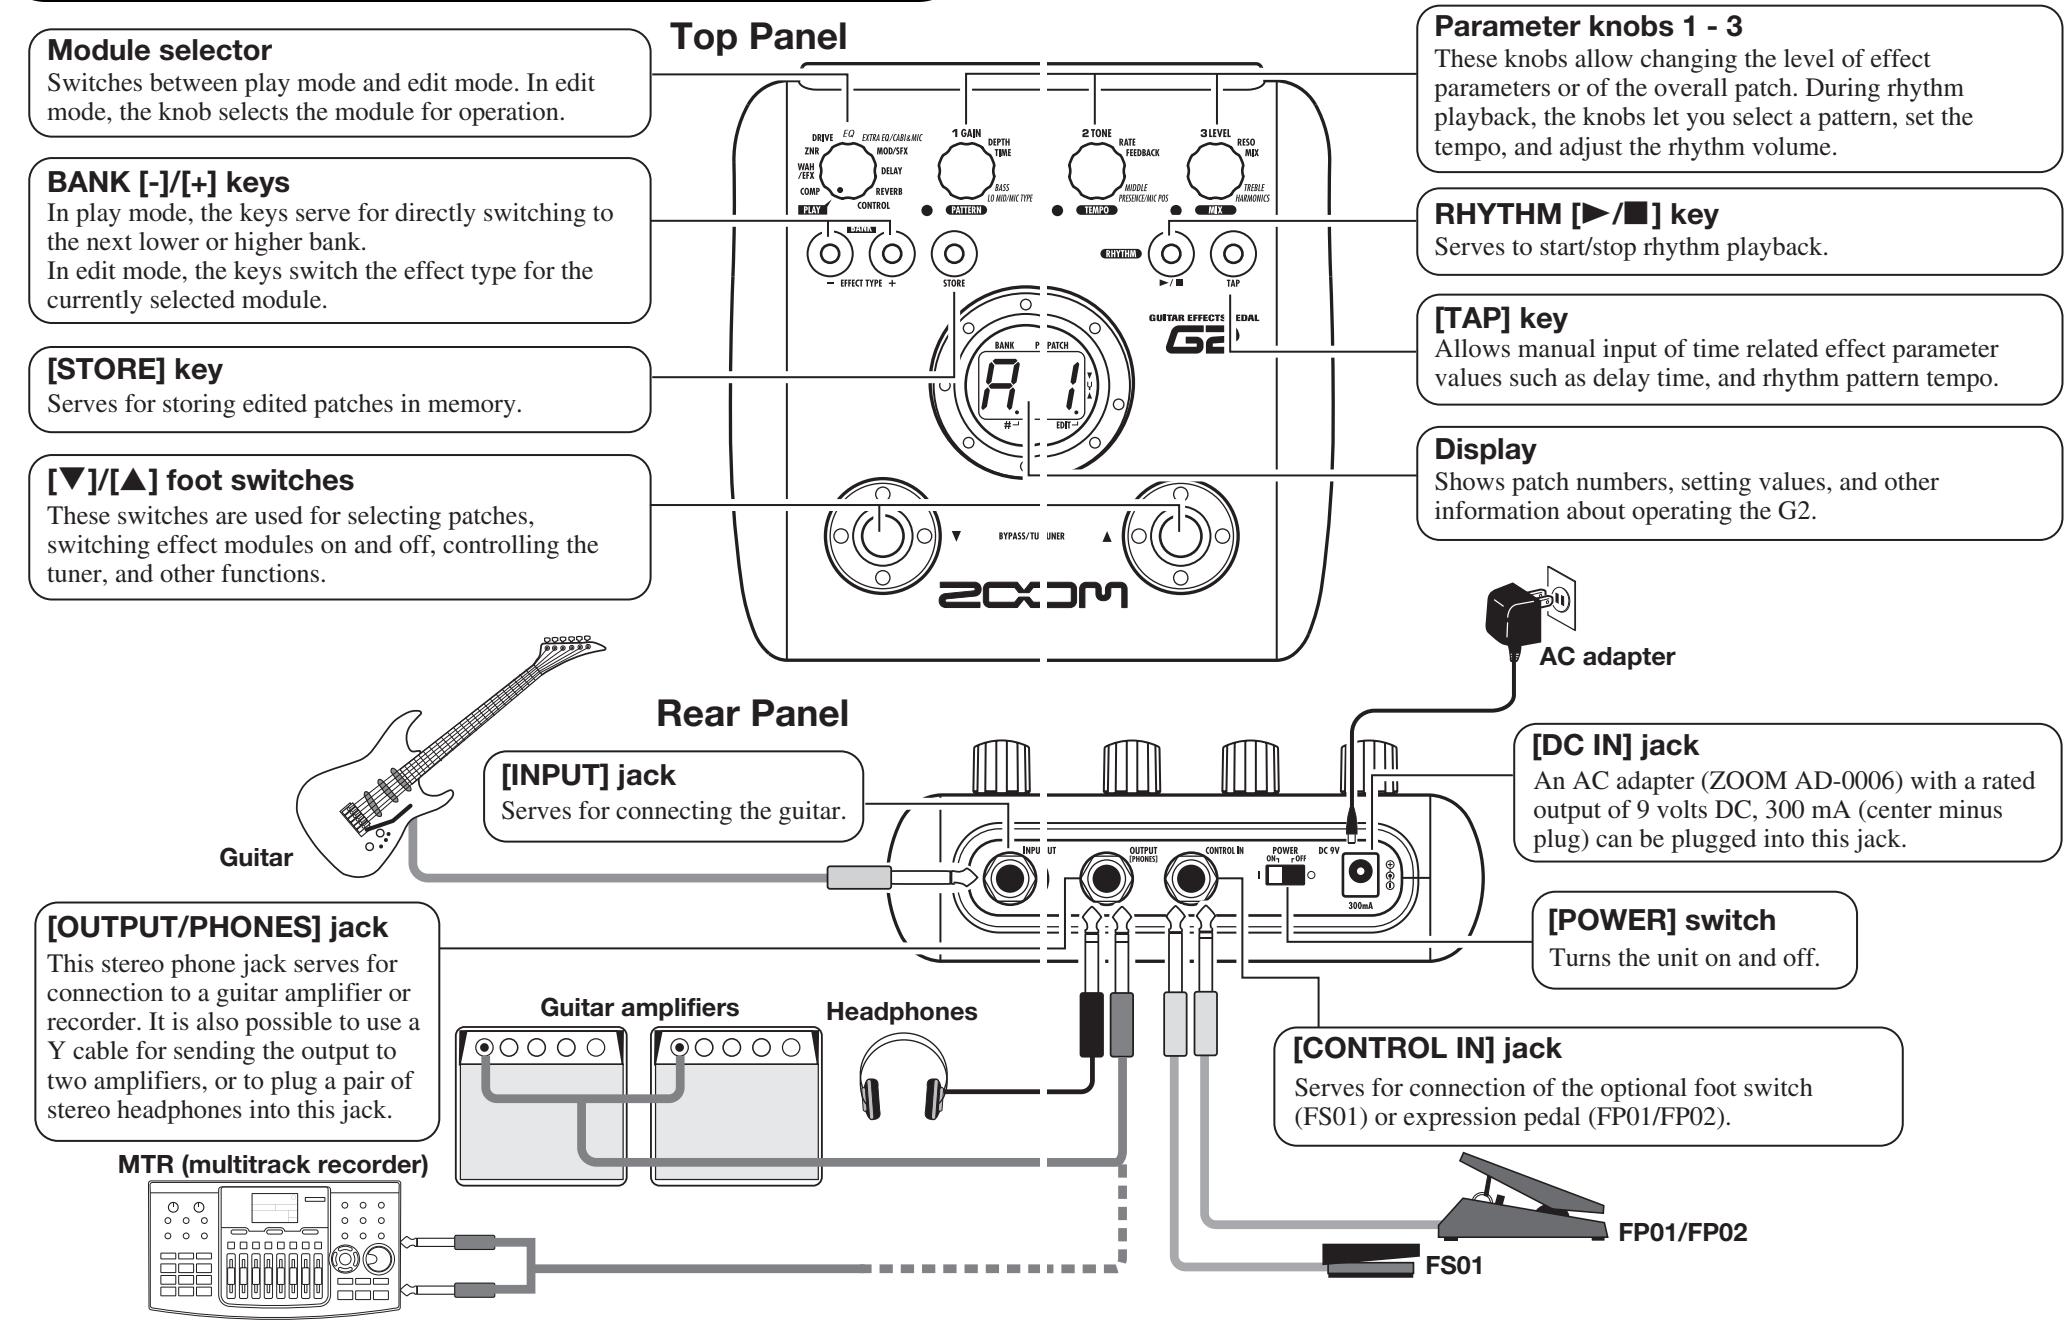
Selecting a Patch
To try out the various effects of the G2, we recommend that you simply play your instrument while switching patches.
1 Turn power on
- Use a monaural shielded cable to connect the guitar to the [INPUT] jack of the G2.
- When using the G2 with the AC adapter, plug the adapter into the outlet and plug the cable from the adapter into the [DC IN] jack on the G2.
- Set the [POWER] switch on the rear panel of the G2 to ON.
- Turn the guitar amplifier on and adjust the volume to a suitable position.
2 Set the G2 to play mode
- If the Module selector is set to a position other than "PLAY", set it to "PLAY".
The bank and patch that were selected when the power was last turned off will appear on the display.
HINT
Immediately after turning the G2 on, the unit will be in play mode, even if the Module selector is set to a position other than "PLAY".
3 Select a patch
- To switch the patch, press one of the [] / [] foot switches.
Pressing the [] foot switch calls up the next lower patch, and pressing the [] foot switch calls up the next higher patch.
Repeatedly pressing one foot switch cycles through patches in the order A0 - A9 ... d0 - d9 00 - 09 ... 30 - 39 A0 , or the reverse order.
Adjust tone and volume
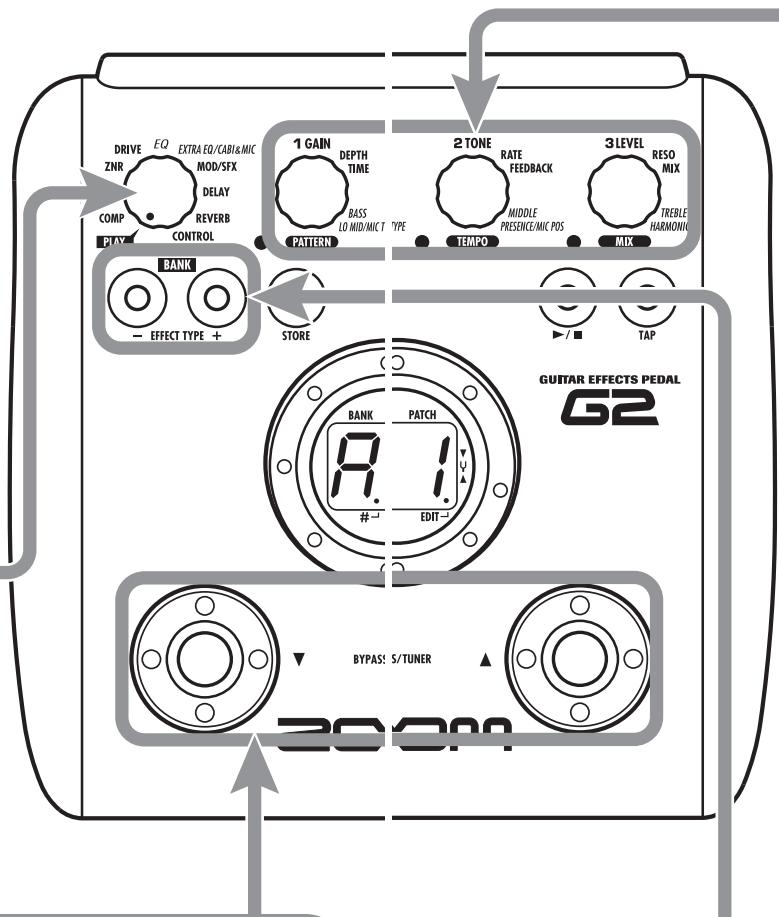
- To adjust the effect sound and volume levels in play mode, the Parameter knobs 1 - 3 can be used. Each knob controls a specific parameter.
Parameter knob 1
Adjusts the GAIN parameter of the DRIVE module (mainly distortion depth).
Parameter knob 3
Adjusts the PATCH LEVEL parameter (output level of the entire patch).
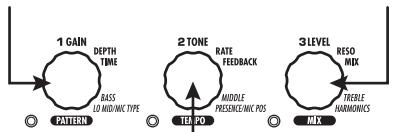
Parameter knob 2
Adjusts the TONE parameter of the DRIVE module (mainly distortion sound character).
When you turn a Parameter knob, the corresponding LED lights up and the display briefly shows the current value of the respective parameter.
NOTE • If the DRIVE module is set to OFF for the currently selected module (display shows "oF"), Parameter knobs 1 and 2 have no effect.
- Changes made here are temporary and will be lost when you select another patch. To retain the changes, store the patch in the user area.
- The master level in common to all patches is set in edit mode ( p. 30).
4 Directly selecting a bank
- To select the banks A - d, 0 - 3 directly, use the BANK [-]/[+] keys.
Pressing the BANK [-] key calls up the next lower bank, and pressing the BANK [+ ] key calls up the next higher bank.
Using the Tuner
The G2 incorporates an auto-chromatic tuner. To use the tuner function, the built-in effects must be bypassed (temporarily turned off) or muted (original sound and effect sound turned off).
Switch to bypass or mute
- Setting the G2 to the bypass state
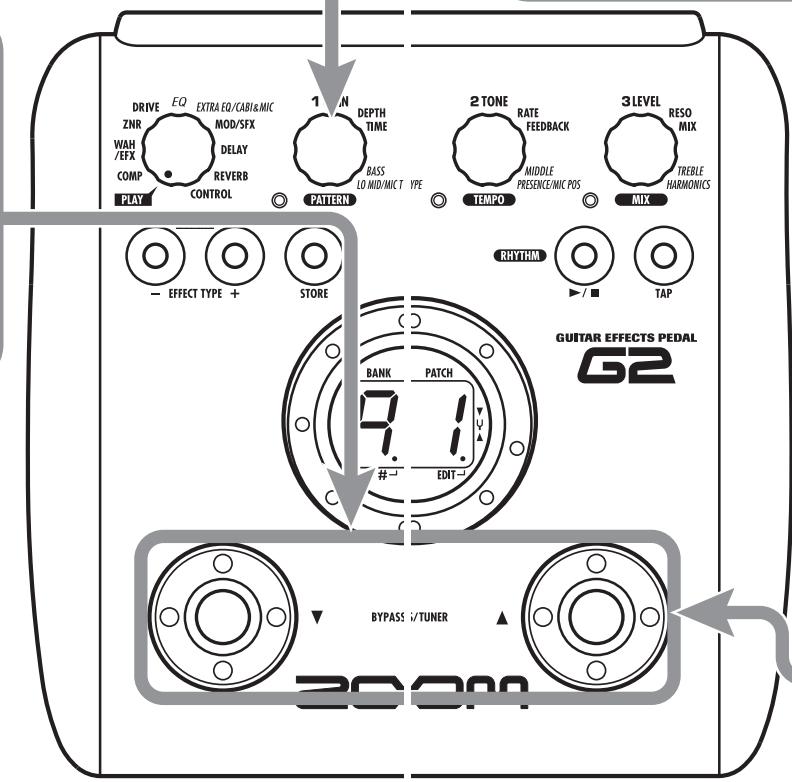
In play mode, press both [] / [] foot switches together briefly and release.
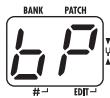
- Setting the G2 to the mute state
In play mode, press both [] / [] foot switches together and hold for at least 1 second.
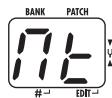

Patch change at bypass/mute
When you press both [ ] / [ ] foot switches together while playing your instrument, the bypass/mute condition is activated. However, the sound may change momentarily just before the condition is activated. This is because the G2 switches to the next higher or lower patch when one of the foot switches is pressed slightly earlier. (When you cancel the bypass/mute condition, the original patch number will be active again.)
This kind of behavior is not a defect. It is due to the very high speed at which the G2 responds to patch switching. To prevent the sound change caused by the above condition, do not produce sound with your instrument until the bypass/mute condition is fully established.

Adjusting the reference pitch of the tuner
If required, you can fine-adjust the reference pitch of the G2 tuner. The default setting after power-on is center A = 440Hz .
- Turn Parameter knob 1.
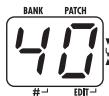
The current reference pitch is shown.
The adjustment range is 35 - 45 (center A = 435 to 445Hz
- While the reference pitch value is shown, turn Parameter knob 1 to adjust it.
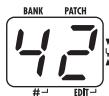
When you release the Parameter knob, the display indication will return to the previous condition after a while.
NOTE
When you turn the G2 off and on again, the reference pitch setting will be reset to 40 (center A = 440Hz ).

Return to play mode
- Press one of the [] / [] foot switches.

Play the string to tune
- Play the open string to tune, and adjust the pitch.
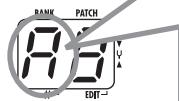
The left side of the display shows the note which is closest to the current pitch.
A D = G=
A^# = D^# = .G^# = .
B = E =
C = F =
C^# = · . F^# =
The right side of the display shows a symbol that indicates by how much the tuning is off.
Pitch is high
Pitch is correct Pitch is low
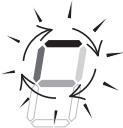

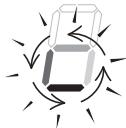
Indication turns faster the more the pitch is off
Using the Rhythm Function
The G2 has a built-in rhythm function that plays realistic drum sounds in various patterns. The rhythm function is available in play mode or in the bypass/mute condition.
1 Set the G2 to play mode
- If the Module selector is set to a position other than "PLAY", set it to "PLAY".
2 Start the rhythm function
To start the rhythm function, press the RHYTHM [▶/■] key.
NOTE During rhythm playback, the REVERB module is OFF.
3 Select a rhythm pattern
The G2 has 40 built-in rhythm patterns. For more information on the pattern contents, see the back cover of this manual.
- To continuously switch rhythm patterns, turn Parameter knob 1.
To select the next higher or next lower rhythm pattern, press one of the BANK [-]/[+] keys.
When the above steps are carried out, the current rhythm pattern number (01 - 40) is briefly shown on the display.
4 Adjust the rhythm volume
- To adjust the rhythm volume, turn Parameter knob 3.
When you turn the Parameter knob, the current setting (0 - 30) is shown on the display.
Adjust the tempo
The rhythm pattern tempo can be adjusted in the range of 40 - 250 BPM (beats per minute).
- To continuously change the rhythm tempo, turn Parameter knob 2.
- To manually specify the rhythm tempo, hit the [TAP] key at least three times in the desired interval.
At the first push of the [TAP] key, the current tempo value is shown on the display. The G2 then automatically detects the interval for the second and subsequent keystresses and sets the tempo accordingly.
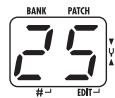
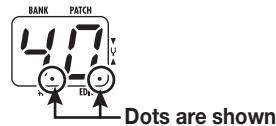
While the above steps are carried out, the current tempo value (40 - 250) is shown on the display. For values in the range from 100 to 199, a dot is shown after the first digit. For values of 200 and above, dots are shown after the first and second digits.
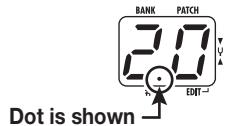
Tempo = 120 BPM
Tempo =240 BPM
Stop the rhythm
- To stop the rhythm, press the RHYTHM [▶/■] key.
The G2 returns to the previous condition.
Editing a Patch
The patches of the G2 can be freely edited by changing the effect parameter settings. Try editing the currently selected patch to create your own sound.
1 Select the effect module
- Turn the Module selector to select the effect module to edit. The following settings are available.
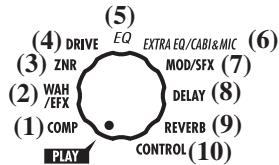
(1) COMP module
(2) WAH/EFX module
(3) ZNR module
(4) DRIVE module
(5) EQ module
(6) EXTRA EQ/CABI&MIC module
(7) MOD/SFX module
(8) DELAY module
(9) REVERB module
(10) Pedal/foot switch related parameters
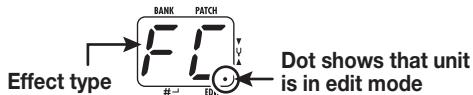
When you switch to a different module, the effect type currently selected for that module is shown on the display. While the G2 is in edit mode, a dot appears in the bottom right of the display.
To switch an effect module on and off
- To switch the selected module between ON and OFF, press one of the []/[] foot switches.
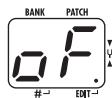
The indication "oF" appears on the display. When you press one of the foot switches again, the indication returns to the previous condition.
5 Terminate the edit mode
- To terminate the edit mode and return to the play mode, set the Module selector to the "PLAY" position.
NOTE When you return to play mode and select another patch, the changes you have made in edit mode will be lost unless you store the patch first. To retain the changes, store the patch as described on page 16.
4 Change the parameter value
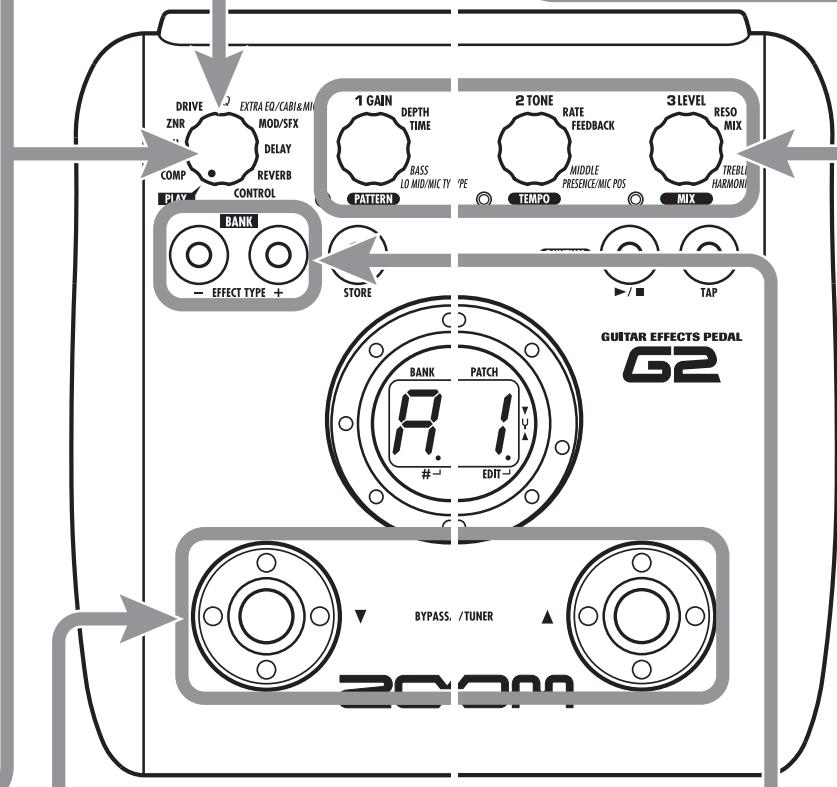
- To change the setting value of effect parameters, use the Parameter knobs 1 - 3.
Which parameter is assigned to a knob depends on which effect module/effect type is selected. For information on parameters for effect modules/effect types, see page 23 - 30.
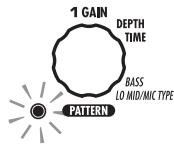
When you turn a Parameter knob, the corresponding LED lights up and the display briefly shows the current value of the respective parameter.
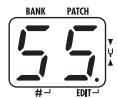
NOTE When a module that is set to OFF is selected, the display will show "oF".
3 Select the effect type
- To switch the effect type of the selected module, use the BANK [-] / [+] keys.
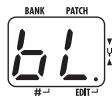
NOTE
If you press the BANK [-]/[+] keys for a module that is set to OFF, the module will be turned ON.
For modules that have only one effect type, pressing the BANK [-]/[+] keys has no effect.
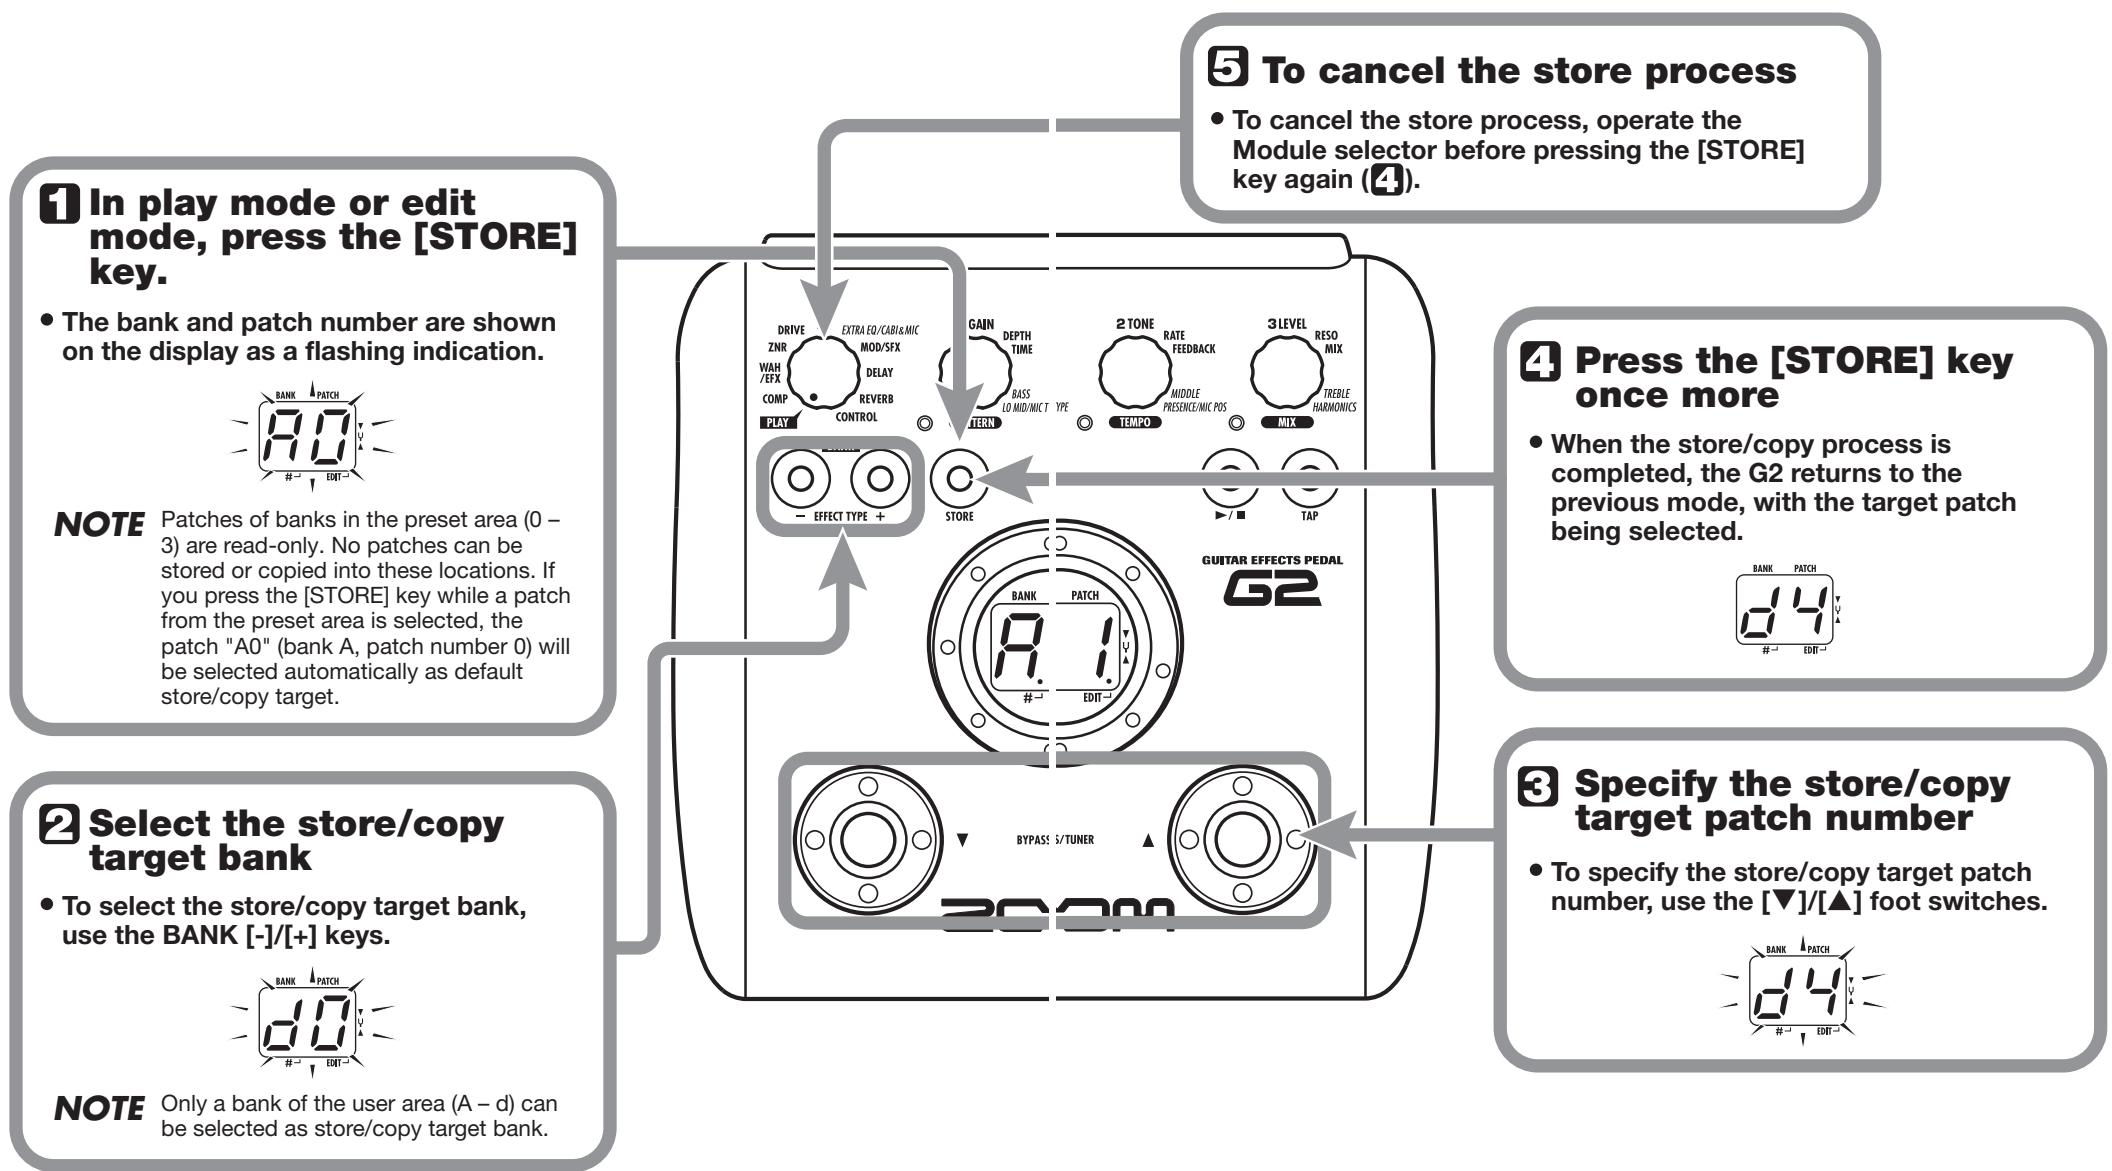
Storing/Copying Patches
An edited patch can be stored in a bank of the user area (A - d). It is also possible to store an existing patch in another location to create a copy.
Using an Optional Foot Switch or Pedal
The G2 is equipped with a [CONTROL IN] jack designed for connection of an optional foot switch or expression pedal. This section explains how to use these accessories.
Using the foot switch (FS01)
Connecting the optional foot switch FS01 to the [CONTROL IN] jack allows changing banks with the foot switch while the unit is in play mode. It is also possible to switch bypass/mute on and off, control the tap tempo function, or perform other functions with the foot switch.
- Plug the cable from the FS01 into the [CONTROL IN] jack, and then turn the G2 on.
- Set the Module selector to the "CONTROL" position.
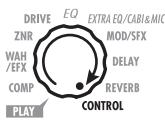
The G2 goes into edit mode. You can now make settings for the expression pedal and foot switch.
3. Turn Parameter knob 2 to select one of the following functions for the foot switch.
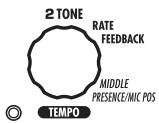
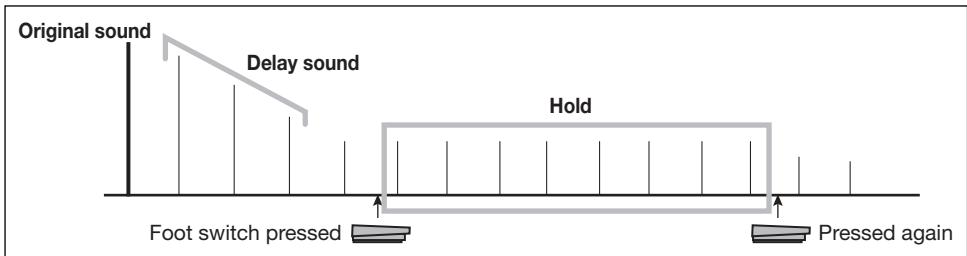
dM (delay input mute)
Switches the delay module input muting between on and off.
HINT
- For information on effect parameters supporting the tap function, see pages 23 - 29.
- To use the hold function, an effect type that supports the hold function must be selected in the patch. For details, see pages 23 - 29.
-
While the delay module is set to hold or mute, the dot in the center of the display flashes.
-
Select the patch in play mode and operate the foot switch.
The selected function will be activated. This function applies to all patches.
Using the expression pedal (FP01/FP02)
Connecting an expression pedal (FP01/FP02) to the [CONTROL IN] jack allows using it as a volume pedal or for adjusting an effect parameter in real time.
The function selection for the expression pedal is saved for each patch individually.
For information on parameters that can be adjusted with the expression pedal, please refer to pages 23 - 29.
- Plug the cable from the expression pedal into the [CONTROL IN] jack, and then turn the G2 on.
- Select the patch for which you want to use the expression pedal.
- Set the Module selector to the "CONTROL" position.
The G2 goes into edit mode. - Turn Parameter knob 1 to select one of the following modulation targets for the expression pedal (see page 30).
oF
Pedal is inactive.
- VL
Volume
WU, Wd, WH, WL
WAH/EFX module
GU, Gd, GH, GL
DRIVE module
MU, Md, MH, ML
MOD/SFX module
dU, dd, dH, dL
DELAY module
rU,rd,rH,rL
REVERB module
HINT
- Which parameter changes when the expression pedal is operated depends on the selected module. For details, see pages 23 - 29.
-
The pattern in which the expression pedal alters the parameter can be selected in edit mode. There are four choices ( p. 30).
-
If necessary, save the patch.
The expression pedal setting is saved as part of the patch.
6. Select the patch in play mode and operate the expression pedal.
The selected function will be activated.
In the bypass condition, the expression pedal always operates as a volume pedal, regardless of the setting made in step 4.
Restoring Factory Defaults
In the factory default condition, the patches of the user area (A0 - d9) contain the same settings as the patches of the preset area (00 - 39). Even after overwriting the user patches, their original content can be restored in a single operation ("All Initialize" function).
- Turn the G2 on while holding down the [STORE] key.
The indication "AL" appears on the display.
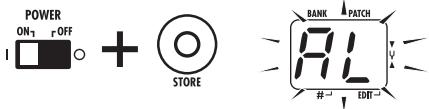
- To carry out the All Initialize function, press the [STORE] key once more.
All patch settings are returned to the factory default condition, and the unit switches to play mode. To cancel All Initialize, press the RHYTHM [▶/■] key instead of the [STORE] key.
NOTE
When you carry out All Initialize, any newly created patches that were stored in the user area will be deleted (overwritten). Perform this operation with care to prevent losing any patches that you want to keep.
Linking Effects
The patches of the G2 consist of nine serially linked effect modules, as shown in the illustration below. You can use all effect modules together or selectively use certain modules by setting them to on or off.
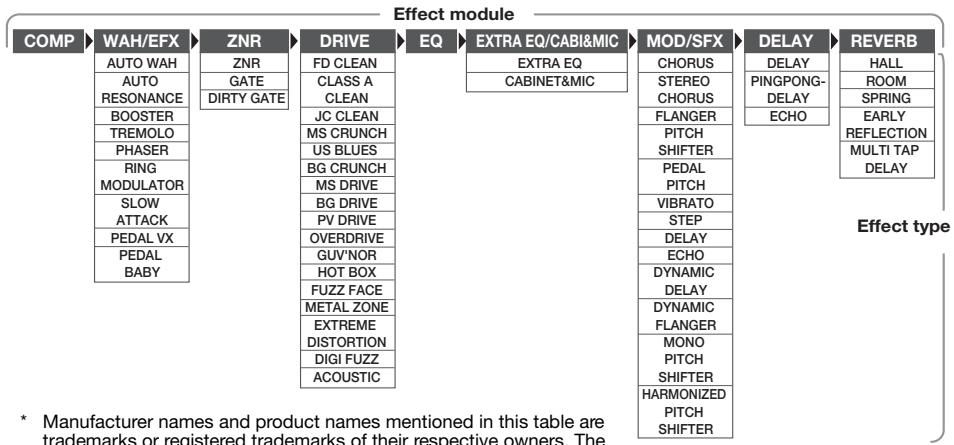
* Manufacturer names and product names mentioned in this table are trademarks or registered trademarks of their respective owners. The names are used only to illustrate sonic characteristics and do not indicate any affiliation with ZOOM CORPORATION.
For some effect modules, you can select an effect type from several possible choices. For example, the MOD/SFX module comprises CHORUS, FLANGER, and other effect types. The REVERB module comprises HALL, ROOM, and other effect types from which you can choose one.
Switching between live sound and direct recording sound
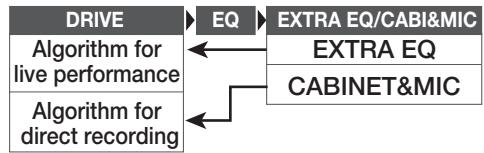
In the above illustration, the DRIVE module is shown as having 17 effect types. But each effect type has two algorithms (one for live performance and one for direct recording) for each of its 17 effect types, so that there are actually 34 effect types that can be used.
The two algorithms are switched according to the effect type selected for the EXTRA EQ/CABI & MIC module, as follows.
- EXTRA EQ is selected
The algorithm for live performance is selected at the DRIVE module. This is recommended when using the G2 for playing via a guitar amplifier.
CABINET & MIC is selected
The algorithm for direct recording is selected at the DRIVE module. This is recommended when the G2 is directly connected to a recorder, or to a hifi system or other audio device.
Effect Types and Parameters
How to read the parameter table
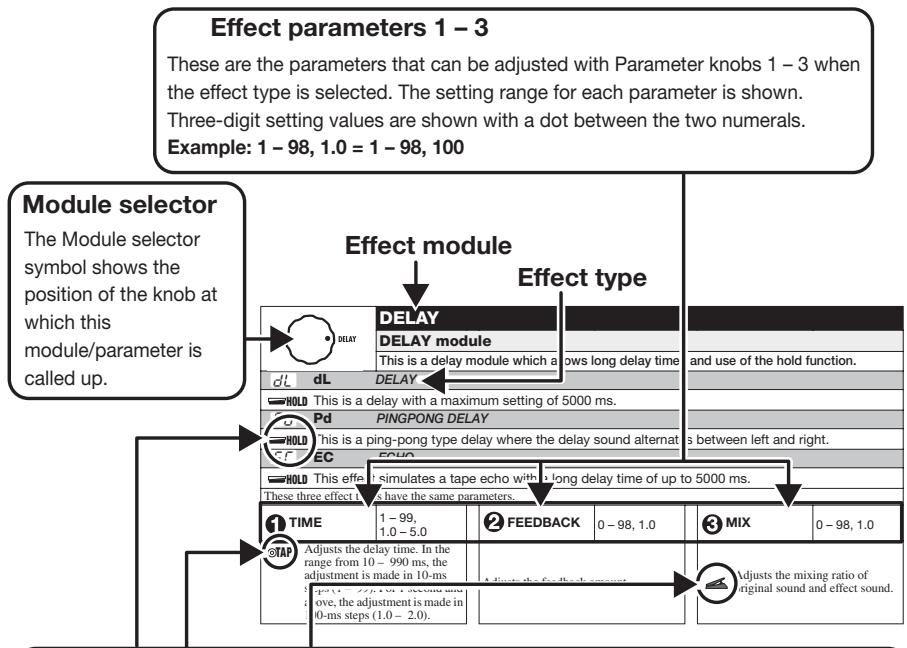
Expression pedal
A pedal icon ( ) in the listing indicates a parameter that can be controlled with the expression pedal (FP01/FP02).
Specify the respective module as modulation target for the expression pedal ( p. 19), and then select the respective effect type of the module. The parameter can then be controlled in real time with a connected expression pedal.
Tap
A [TAP] key icon (©TAP) in the listing indicates a parameter that can be set by hitting the [TAP] key.
In edit mode, when the respective module/effect type is selected, repeatedly hitting the [TAP] key will set the parameter according to the key press interval (modulation cycle, delay time, etc.). In play mode, if the DELAY module is ON for the currently selected patch, repeatedly hitting the [TAP] key will temporarily change the parameter.
Hold
A foot switch icon (HOLD) in the listing indicates an effect type for which hold can be turned on and off with the foot switch (FS01).
Set the foot switch function to "dH" (delay hold) ( p. 18) for the respective patch. When this patch is then selected in play mode, the hold function can be switched on and off by pressing the foot switch.
| COMP | COMP | ||||
| COMP (Compressor) module | |||||
| Attenuates high-level signal components and boosts low-level signal components, thereby keeping the overall signal level within a certain range. | |||||
| 1 sense | 0-10 | 2 ATTACK | FS, SL | 3 LEVEL | 2-98, 1.0 |
| Adjusts the compressor sensitivity. Higher setting values result in higher sensitivity. | Selects compressor attack speed in two levels. Available settings are "FS" (fast) and "SL" (slow). | Adjusts the signal level after passing the module. | |||
| WAH/EFX | WAH/EFX | ||||
| WAH/EFX (Wah/Effects) module | |||||
| Comprises wah and filter effects as well as VCA type effects. | |||||
| RH AW AUTO WAH | |||||
| This effect varies wah in accordance with playing intensity. | |||||
| Rr Ar AUTO RESONANCE | |||||
| This effect varies the frequency band of the resonance filter according to the picking intensity. | |||||
| The two effect types above have the same parameters. | |||||
| 1 POSITION | bF, AF | 2 SENSE | -10 -- 1, 1 - 10 | 3 RESONANCE | 0 - 10 |
| Selects the connection position of the WAH/EFX module. Available settings are "bF" (before DRIVE module) and "AF" (after EQ/EXTRA EQ module). | 4 Adjusts the effect sensitivity. | Adjusts the resonance of the sound. | |||
| BS | bS | BOOSTER | ||||
| Raises signal gain and creates a dynamic sound. | ||||||
| 1 RANGE | 1-5 | 2 TONE | 0-10 | 3 LEVEL | 2-98, 1.0 | |
| Selects the frequency band that is boosted. | Adjusts the sound quality. | 4 Adjusts the signal level after passing the module. | ||||
| Lr TR TREMOL0 | |||||
| This effect periodically varies the volume. | |||||
| 1 DEPTH | 0-98, 1.0 | 2 RATE | 0-50 | 3 WAVE u0-u9, d0-d9, t0-t9 | |
| Adjusts the modulation depth. | 4 TAP Adjusts the effect rate. | Allows selection of the modulation waveform. Available settings are "u" (rising sawtooth), "d" (falling sawtooth), and "t" (triangular). Higher setting values result in more clipping of wave peaks, which reinforces the effect. | |||
| PH PH PHASER | |||||
| This effect produces sound with a pulsating character. | |||||
| 1 POSITION | bF, AF | 2 RATE | 0-50 | 3 COLOR | 1-4 |
| Selects the connection position of the WAH/EFX module. Available settings are "bF" (before DRIVE module) and "AF" (after EQ/EXTRA EQ module). | 4 TAP Adjusts the modulation rate. | Adjusts the type of sound. | |||
| rG rG RING MODULATOR | |||||
| This effect produces a metallic ringing sound. Adjusting the FREQUENCY parameter results in a drastic change of sound character. | |||||
| 1 POSITION | bF, AF | 2 FREQUENCY | 1-50 | 3 MIX | 0-98, 1.0 |
| Selects the connection position of the WAH/EFX module. Available settings are "bF" (before DRIVE module) and "AF" (after EQ/EXTRA EQ module). | Adjusts the frequency that is used for modulation. | Adjusts the level of the effect sound mixed to the original sound. | |||
| SL SL SLOW ATTACK | |||||
| This effect reduces the attack rate of the sound, resulting in a violin playing style sound. | |||||
| 1 POSITION | bF, AF | 2 TIME | 1-50 | 3 CURVE | 0-10 |
| Selects the connection position of the WAH/EFX module. Available settings are "bF" (before DRIVE module) and "AF" (after EQ/EXTRA EQ module). | Adjusts the attack time. | Adjusts the attack volume change curve. | |||
| PU PV PEDAL VX | |||||
| Simulates a vintage pedal wah sound. | |||||
| 1 POSITION | bF, AF | 2 FREQUENCY | 1-50 | 3 LEVEL | 2-98, 1.0 |
| Selects the connection position of the WAH/EFX module. Available settings are "bF" (before DRIVE module) and "AF" (after EQ/EXTRA EQ module). | Adjusts the frequency that is emphasized. When no expression pedal is used, the effect is the same as with a half-raised pedal. | Adjusts the signal level after passing the module. | |||
| Pb PdAL BABY | |||||
| Simulates a vintage pedal wah sound. | |||||
| 1 POSITION | bF, AF | 2 FREQUENCY | 1-50 | 3 LEVEL | 2-98, 1.0 |
| Selects the connection position of the WAH/EFX module. Available settings are "bF" (before DRIVE module) and "AF" (after EQ/EXTRA EQ module). | Adjusts The frequency that is emphasized. When no expression pedal is used, the effect is the same as with a half-raised pedal. | Adjusts the signal level after passing the module. | |||
| ZNR ZNR (ZOOM Noise Reduction) module | |||||
| This module serves for reducing noise during playing pauses. It offers a choice between noise reduction (reduction of noise components) and noise gate (muting during pauses). | |||||
| nr nr ZNR (ZOOM Noise Reduction) | |||||
| ZOOM original noise reduction which reduces noise in playing pauses without affecting the overall tone. | |||||
| Gt GATE | |||||
| This is a noise gate which cuts off the sound during playing pauses. | |||||
| dG DIRTY GATE | |||||
| This is a vintage type gate with special closing characteristics. | |||||
| All above effect types have the same parameters. | |||||
| THRESHOLD | 1-16 | ||||
| Adjusts the sensitivity. For maximum noise reduction, set the value as high as possible without causing the sound to decay unnaturally. | |||||
| DRIVE | DRIVE | ||||
| DRIVE module | |||||
| This module provides 16 types of distortion and an acoustic simulator. Each effect type of the module has two modeling algorithms (for live performance and direct recording). These algorithms are switched automatically according to the on/off condition of the CABINET & MIC effect (→ p. 21). | |||||
| FC | FC | FD CLEAN | CR | CA | CLASS A CLEAN |
| The rich, clean sound of a classic 1965 Fender Twin Reverb | Clean sound of the Vox AC-30 combo amp, operating in Class-A | ||||
| JC | JC | JC CLEAN | NC | MC | MS CRUNCH |
| Clean sound of Roland JC series with built-in chorus which gives a wide, clear tone. | Big sound of a Marshall stack running between clean and crunch | ||||
| BL | bL | US BLUES | BC | bC | BG CRUNCH |
| Crunch sound of a Fender Tweed Deluxe '53 | Fat sound of the Mesa Boogie MkIII combo amp | ||||
| Md | Ms DRIVE | bG | bG | BG DRIVE | |
| The High gain sound of a Marshall JCM2000-driven stack | High gain sound of Mesa Boogie Dual Rectifier amp channel 2 (vintage mode). | ||||
| PV | PV DRIVE | ad | Od | OVERDRIVE | |
| The high gain sound of the classic Peavey 5150 | Simulation of the classic Boss OD-1 overdrive pedal | ||||
| GV | GUV'NOR distortion | Hb | Hb | HOT BOX | |
| Simulation of the Guv'nor distortion effect from Marshall. | Simulation of the drive channel of a Hot Box tube amp. | ||||
| FF | FF FUZZ FACE | NT | Mt | METAL ZONE | |
| Simulation of the original classic British fuzz pedal | Simulation of the classic Boss Metal Zone pedal famous for long sustain and midrange | ||||
| Ed | Ed EXTREME DISTORTION | dF | dF | DIGI FUZZ (digital fuzz) | |
| Intense super-high gain distortion | High gain fuzz attack | ||||
| All above effect types have the same parameters. | |||||
| GAIN | 0 - 98, 1.0 | TONE | 0 - 10 | LEVEL | 2 - 98, 1.0 |
| Adjusts the distortion intensity. | Adjusts the sound quality. | Adjusts the signal level after passing the module. | |||
*Manufacturer names and product names mentioned in this table are trademarks or registered trademarks of their respective owners. The names are used only to illustrate sonic characteristics and do not indicate any affiliation with ZOOM CORPORATION.
| AC ACOUSTIC | |||||
| This effect makes an electric guitar sound like an acoustic guitar. | |||||
| TOP | 0-10 | BODY | 0-10 | LEVEL | 2-98, 1.0 |
| Adjusts the special string tone that is characteristic for an acoustic guitar. | Adjusts the degree of body resonance. | Adjusts the signal level after passing the module. | |||
| EQ | EQ | |||||
| EQ (Equalizer) module | ||||||
| Allows adjusting the three main bands (BASS, MIDDLE, TREBLE) of the six-band equalizer. | ||||||
| 1 BASS | ±12 160Hz | 2 MIDDLE | ±12 800Hz | 3 TREBLE | ±12 3.2kHz | |
| Adjusts the low frequency range level. | Adjusts the mid frequency range level. | Adjusts the high frequency range level. | ||||
| EXTRA EQ/CABI&MIC | EXTRA EQ/CABI&MIC | |||
| EXTRA EQ/CABINET & MIC module | ||||
| This module allows adjusting the three remaining bands of the six-band equalizer. In addition, the module contains a cabinet simulator that produces sound suitable for direct recording on a MTR or for reproduction via headphones or a studio monitor. | ||||
| Et Et EXTRA EQ | ||||
| Adjusts the three remaining bands of the six-band equalizer. The HARMONICS control allows adjustment of the harmonics frequency range level. | ||||
| 1 LO MID | ±12 400Hz | 2 PRESENCE | ±12 6.4kHz | 3 HARMONICS ±12 12kHz |
| Adjusts the mid-low frequency range level. | Adjusts the extremely high frequency range level. | Adjusts the harmonics frequency range level. | ||
| Cb CABINET & MIC | |||
| This effect type simulates amplifier cabinet sound and mic directional characteristics, suitable for direct recording on a multi-track recorder. The cabinet characteristics are automatically set either to Combo (12" x 1, 12" x 2) or to Stack (12" x 4), depending on the selected drive type. The on/off condition of this effect in turn automatically switches the modeling algorithm of the DRIVE module (→ p. 21). | |||
| MIC TYPE | dy, Co | MIC POSITION | 0-2 |
| Selects the mic type. "dy" simulates the frequency response of a dynamic mic and "Co" simulates the frequency response of a condenser mic. | Lets you select different microphone characteristics according to sound pickup position. The following settings are available.0: Mic pointed at speaker center1: Mic pointed halfway between speaker edge and center2: Mic pointed at speaker edge | ||
| MOD/SFX | MOD/SFX | ||||
| MOD/SFX(Modulation/SFX) module | |||||
| Comprises modulation and delay effects such as chorus, pitch shifter, delay, and echo. | |||||
| CH CH CHORUS | |||||
| This effect mixes a variable pitch-shifted component to the original signal, resulting in full-bodied resonating sound. | |||||
| 1 DEPTH | 0-98, 1.0 | 2 RATE | 1-50 | 3 MIX | 0-98, 1.0 |
| Adjusts the modulation depth. | 4 Adjusts the modulation rate. | Adjusts the level of the effect sound mixed to the original sound. | |||
| SC STEREO CHORUS | |||||
| This is a stereo chorus with clear sound. | |||||
| 1 DEPTH | 0-98, 1.0 | 2 RATE | 1-50 | 3 MIX | 0-98, 1.0 |
| Adjusts the modulation depth. | 4 Adjusts the modulation rate. | Adjusts the level of the effect sound mixed to the original sound. | |||
| FL FL FLANGER | |||||
| This effect produces a resonating and strongly undulating sound. | |||||
| 1深度 | 0-98, 1.0 | 2RATE | 0-50 | 3RESONANCE | -10--1,0,1-10 |
| Adjusts the modulation depth. | 4TAP Adjusts the modulation rate. | Adjusts the modulation resonance intensity. | |||
| Pt Pitch SHifter | |||||
| This effect shifts the pitch of the original sound up or down. | |||||
| 1 SHIFT | -12 - -1, dt, 1 - 12, 24 | 2 TONE | 0 - 10 | 3 MIX | 0 - 98, 1.0 |
| Adjusts the pitch shift amount in semitones. Selecting "dt" gives a detuning effect. | Adjusts the sound quality. | 4 Adjusts the level of the effect sound mixed to the original sound. | |||
| PP PP PEDAL PITCH | |||||
| This effect allows using a pedal to shift the pitch in real time. | |||||
| 1 COLOR | See Table 1 | 2 MODE | UP, dn | 3 TONE | 0 - 10 |
| Selects the type pitch change type effected by the pedal. | Selects the direction of the pitch change. | Adjusts the sound quality. | |||
| 1 | UP dn | -100 cent Original sound only | Original sound only -100 cent | 5 | UP dn | -1 octave + DRY +1 octave + DRY | +1 octave + DRY -1 octave + DRY |
| 2 | UP dn | DOUBLING Detune + DRY | Detune + DRY DOUBLING | 6 | UP dn | -700 cent + DRY 500 cent + DRY | 500 cent + DRY -700 cent + DRY |
| 3 | UP dn | 0 cent +1 octave | +1 octave 0 cent | 7 | UP dn | -∞ (0 Hz) + DRY +1 octave | +1 octave -∞ (0 Hz) + DRY |
| 4 | UP dn | 0 cent -2 octaves | -2 octaves 0 cent | 8 | UP dn | -∞ (0 Hz) + DRY +1 octave + DRY | +1 octave + DRY -∞ (0 Hz) + DRY |
| Ub Vb VIBRATO | |||||
| Effect with automatic vibrato. | |||||
| 1深度 | 0-98, 1.0 | 2RATE | 0-50 | 3MIX | 0-98, 1.0 |
| Adjusts the modulation depth. | 4TAP Adjusts the modulation rate. | Adjusts the level of the effect sound mixed to the original sound. | |||
| ST STEP | |||||
| Special effect that changes the sound in a staircase pattern. | |||||
| 1 DEPTH | 0-98, 1.0 | 2 RATE | 0-50 | 3 RESONANCE | 0-10 |
| Adjusts the modulation depth. | 4 TAP Adjusts the modulation rate. | Adjusts the modulation resonance intensity. | |||
| DL DELAY | |||||
| This is a delay with a maximum setting of 2000 ms. | |||||
| 1 TIME | 1-99,1.0-2.0 | 2 FEEDBACK | 0-98,1.0 | 3 MIX | 0-98,1.0 |
| ©TAP Adjusts the delay time. In the range from 10-990 ms, the adjustment is made in 10-ms steps (1-99). For 1 second and above, the adjustment is made in 100-ms steps (1.0-2.0). | Adjusts the feedback amount. | 4 Adjusts the level of the effect sound mixed to the original sound. | |||
| tE tape ECHO | |||||
| This effect simulates a tape echo. | |||||
| 1 TIME | 1-99, 1.0-2.0 | 2 FEEDBACK | 0-98, 1.0 | 3 MIX | 0-98, 1.0 |
| @TAP Adjusts the delay time. In the range from 10-990 ms, the adjustment is made in 10-ms steps (1-99). For 1 second and above, the adjustment is made in 100-ms steps (1.0-2.0). | Adjusts the feedback amount. | 4 Adjusts the level of the effect sound mixed to the original sound. | |||
| dd DYNAMIC DELAY | |||||
| This is a dynamic delay where the effect volume changes depending on the input signal level. With positive settings, the effect volume increases at higher input signal levels. With negative settings, the effect volume increases at lower input signal levels. | |||||
| TIME | 1-99, 1.0-2.0 | AMOUNT | 0-10 | SENSE | |
| TAP Adjusts the delay time. In the range from 10-990 ms, the adjustment is made in 10-ms steps (1-99). For 1 second and above, the adjustment is made in 100-ms steps (1.0-2.0). | Adjusts the level of the effect sound mixed to the original sound | Adjusts the effect sensitivity. | |||
| DF DYNAMIC FLANGER | |||||
| This is a dynamic flanger where the effect volume changes depending on the input signal level. With positive settings, the effect volume increases at higher input signal levels. With negative settings, the effect volume increases at lower input signal levels. | |||||
| DEPTH | 0-98, 1.0 | 2 RATE | 0-50 | 3 SENSE | -10--1, 1-10 |
| Adjusts the modulation depth. | 4 TAP Adjusts the modulation rate. | Adjusts the effect sensitivity. | |||
| MP MONO PITCH SHifter | |||||
| This is a monophonic pitch shifter with low sound modulation, suitable for single-note playing. | |||||
| SHIFT | -12 - -1, dt, 1 - 12, 24 | TONE | 0 - 10 | MIX | 0 - 98, 1.0 |
| Adjusts the pitch shift amount in semitones. Selecting "dt" gives a detuning effect. | Adjusts the sound quality. | Adjusts the level of the effect sound mixed to the original sound. | |||
| HP HP HARMONIZED PITCH SHifter | |||||
| This is an intelligent pitch shifter that automatically generates harmonies according to a preset key and scale. | |||||
| 1 SCALE | -6, -5, -4, -3, -m, m, 3, 4, 5, 6 | 2 KEY | C, Co, d...b | 3 MIX | 0 - 98, 1.0 |
| Determines the interval for the pitch shifted sound (see Table 2). | Determines the tonic for the scale used for pitch shifting (see Table 3). | Adjusts the level of the effect sound mixed to the original sound. | |||
| Table 2 | Table 3 | ||||||||
| Setting | Type of scale | Interval | Setting | Type of scale | Interval | Setting | Tonic | Setting | Tonic |
| -6 | Major scale | Sixth down | 3 | Major scale | Third up | C | C | Fo | F# |
| -5 | Fifth down | 4 | Fourth up | Co | C# | G | G | ||
| -4 | Fourth down | 5 | Fifth up | d | D | Go | G# | ||
| -3 | Third down | 6 | Sixth up | do | D# | A | A | ||
| -m | Minor scale | Third down | E | E | Ao | A# | |||
| m | Third up | F | F | b | B | ||||
| DELAY | DELAY | ||||
| DELAY module | |||||
| This is a delay module which allows long delay times and use of the hold function. | |||||
| dL dL DELAY | |||||
| HOLD This is a delay with a maximum setting of 5000 ms. | |||||
| Pd Pd PINGPONG DELAY | |||||
| HOLD This is a ping-pong type delay where the delay sound alternates between left and right. | |||||
| EC EC ECHO | |||||
| HOLD This is a warm sounding long delay of up to 5000 ms duration. | |||||
| These three effect types have the same parameters. | |||||
| 1 TIME | 1-99,1.0-5.0 | 2 FEEDBACK | 0-98,1.0 | 3 MIX | 0-98,1.0 |
| ±TAP Adjusts the delay time. In the range from 10-990 ms, the adjustment is made in 10-ms steps (1-99). For 1 second and above, the adjustment is made in 100-ms steps (1.0-5.0). | Adjusts the feedback amount. | 4 Adjusts the level of the effect sound mixed to the original sound. | |||
| REVERB | REVERB | ||||
| REVERB module | |||||
| This module comprises various reverb functions such as hall reverb, early reflection, and multi-tap delay. | |||||
| HL HL HALL | |||||
| This reverb simulates the acoustics of a concert hall. | |||||
| rH rM ROOM | |||||
| This reverb simulates the acoustics of a room. | |||||
| SP SPRING | |||||
| This effect simulates a spring-type reverb. | |||||
| The above three effect types have the same parameters. | |||||
| 1 DECAY | 1-30 | 2 TONE | 0-10 | 3 MIX | 0-98, 1.0 |
| Adjusts the duration of the reverb. | Adjusts the sound quality. | 4 Adjusts the level of the effect sound mixed to the original sound. | |||
| Er ER EARLY REFLECTION | |||||
| This effect isolates only the early reflection components of the reverb. | |||||
| 1 DECAY | 1-30 | 2 SHAPE | ±10 | 3 MIX | 0-98, 1.0 |
| Adjusts the duration of the reverb. | Adjusts the envelope of the effect sound. In the negative range, the envelope is reversed. At 0, the effect is a gate reverb. In the positive range, the envelope is a decay-type envelope. | 4 Adjusts the mixing ratio of original sound and effect sound. | |||
| Md MULTI TAP DELAY | |||||
| This effect produces several delay components with different delay times. | |||||
| 1 TIME | 1-99, 1.0-3.0 | 2 PATTERN | 1-8 | 3 MIX | 0-98, 1.0 |
| ©TAP Adjusts the delay time. In the range from 10-990 ms, the adjustment is made in 10-ms steps (1-99). For 1 second and above, the adjustment is made in 100-ms steps (1.0-3.0). | Selects the combination pattern for the taps. The selection ranges from rhythmical to random patterns. | 4 Adjusts the mixing ratio of original sound and effect sound. | |||
| CONTROL | |||||
| CONTROL module | |||||
| Serves for making pedal settings and lets you control the foot switch function and master level setting applying to all patches. | |||||
| RTM DESTINATION | See Table 4 | FS | See Table 5 | MASTER LEVEL | 0-98,1.0 |
| When an expression pedal (FP01/FP02) is connected to the [CONTROL IN] jack, this selects the modulation target module for the RTM function (See Table 4). | When a foot switch (FS01) is connected to the [CONTROL IN] jack, this selects the function that can be operated with the foot switch (See Table 5). The function selected here applies to all patches. | Adjusts the master level for all patches. | |||
Table 4
| Setting | Modulation target |
| oF | OFF |
| VL | Volume |
| WU, Wd, WH, WL | WAH/EFX module (*) |
| GU, Gd, GH, GL | DRIVE module (*) |
| MU, Md, MH, ML | MOD/SFX module (*) |
| dU, dd, dH, dL | DELAY module (*) |
| rU, rd, rH, rL | REVERB module (*) |
Table 5
| Setting | Function |
| bP | Bypass/Mute |
| tP | Tap tempo |
| bU | Bank up |
| rH | Rhythm function on/off |
| dH | Delay hold |
| dM | Delay mute |
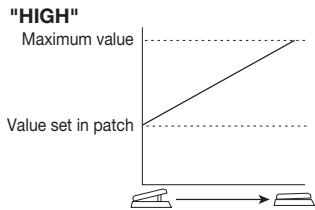
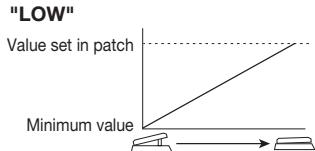
The operation of modules denoted by (^) changes as follows, according to the letter at right.

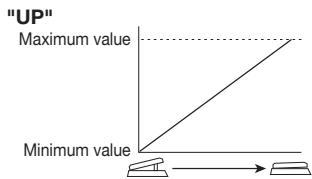
UP
The parameter is at minimum when the pedal is fully raised and at maximum when the pedal is fully pushed down.

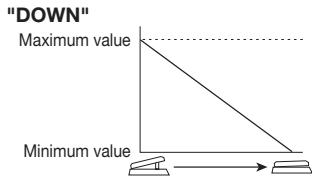
DOWN
The parameter is at maximum when the pedal is fully raised and at minimum when the pedal is fully pushed down.

HIGH
When the pedal is fully raised, the parameter is at the value set in the patch. When the pedal is fully pushed down, the parameter is at maximum.

LOW
When the pedal is fully raised, the parameter is at minimum. When the pedal is fully pushed down, the parameter is at the value set in the patch.
Specifications
Effect types
54
Effect modules
Max. 9 simultaneous modules
Patches
User area: 10 patches x 4 banks
Sampling frequency
Preset area: 10 patches x 4 banks
A/D converter
96 kHz
D/A converter
24 bit, 64 times oversampling
Signal processing
24 bit, 128 times oversampling
Frequency response
32 bit
Display
20Hz - 40kHz + 1 dB-3 dB (with 10 kilohms load)
Input
2-digit 7-segment LED
Rated input level
Parameter LEDs
Input impedance
Standard mono phone jack
Output
-20 dBm
Maximum output level
1 megohm
Standard stereo phone jack (doubles as line and headphone jack)
Line: +5 dBm (output load impedance 10 kilohms or more)
Phones: 20mW + 20mW (into 32 ohms load)
Control input
For FP02/FS01
Power requirements
AC adapter
9 V DC, 300mA (center minus plug) (ZOOM AD-0006)
Batteries
Four IEC R6 (size AA) batteries,
Approx. 7.5 hours continuous operation (alkaline batteries)
Dimensions
162mm (D) x 156~mm (W) x 65~mm (H)
Weight
700g (without batteries)
Options
Expression pedal FP02/ Foot switch FS01
- 0 dBm = 0.775 Vrms
- Design and specifications subject to change without notice.
Troubleshooting
No power
Refer to "Turn power on" on page 8.
- Reverb effect does not operate
While a rhythm pattern is playing, the reverb effect is not available. Stop the rhythm pattern first ( p. 12).
High level of noise
Is ZOOM AC adapter being used? Be sure to use only adapter for 9VDC 300~mA with center minus plug (ZOOM AD-0006).
- Battery life is short
Are manganese batteries being used? The use of alkaline batteries is recommended.
G2 Preset Pattern
| # | PatternName | TimSig |
| 1 | 8beat_1 | 4/4 |
| 2 | 8beat_2 | 4/4 |
| 3 | 8beat_3 | 4/4 |
| 4 | 8shuffle | 4/4 |
| 5 | 16beat_1 | 4/4 |
| 6 | 16beat_2 | 4/4 |
| 7 | 16shuffle | 4/4 |
| 8 | ROCK | 4/4 |
| 9 | HARD | 4/4 |
| 10 | METAL_1 | 4/4 |
| 11 | METAL_2 | 4/4 |
| 12 | THRASH | 4/4 |
| 13 | PUNK | 4/4 |
| 14 | DnB | 4/4 |
| 15 | FUNK_1 | 4/4 |
| 16 | FUNK_2 | 4/4 |
| 17 | HIPHOP | 4/4 |
| 18 | R'nR | 4/4 |
| 19 | POP_1 | 4/4 |
| 20 | POP_2 | 4/4 |
| # | PatternName | TimSig |
| 21 | POP_3 | 4/4 |
| 22 | DANCE_1 | 4/4 |
| 23 | DANCE_2 | 4/4 |
| 24 | DANCE_3 | 4/4 |
| 25 | DANCE_4 | 4/4 |
| 26 | 3per4 | 3/4 |
| 27 | 6per8 | 3/4 |
| 28 | 5per4_1 | 5/4 |
| 29 | 5per4_2 | 5/4 |
| 30 | LATIN | 4/4 |
| 31 | BALLAD_1 | 4/4 |
| 32 | BALLAD_2 | 3/4 |
| 33 | BLUES_1 | 4/4 |
| 34 | BLUES_2 | 3/4 |
| 35 | JAZZ_1 | 4/4 |
| 36 | JAZZ_2 | 3/4 |
| 37 | METRO_3 | 3/4 |
| 38 | METRO_4 | 4/4 |
| 39 | METRO_5 | 5/4 |
| 40 | METRO | |
G2 Patch List Please use patches "for Live" when you use guitar amp, and use patches "for Recording" when you connect your guitar directly to a recorder.
| Name of patches | Descriptions | Key effect | |
| for Live | for Recording | ||
| RECTIFYING | This patch is modeled after the powerful sound which uses the silicone rectifier section of that popular amplifier. You may want to play riffs and solos with this sound valued by heavy rock guitarists. Referenced album: "Hybrid Theory" by Linkin Park (2001) | BG DRIVE | |
| R0 | C0 | ||
| LUSH LIFE | This sound features the high-quality sound of our G2's signal processing technology with a clean and lush chorus plus delay patch. Try to use it for accompaniments in pop music, or solo music with your favorite guitar. | CHORUS | |
| The Pie | We have already started to call this sound of the UK rock band "traditional". This patch is modeled after the punchy sound of the overdriven JCM 800 amplifier and thus it is suitable also for the hard plucking of modern punk rock guitar style. This is the sound of Humble Pie in later years with Dave Clemson as its guitar player. Referenced album: "Smokin'" by Humble Pie (1972) | MS CRUNCH | |
| SynthDaze | We took advantage of a newly developed fast tracking pitch shift algorithm and created this simulated synthesizer sound. We hope you will come up with great solos using this sound reminiscent of Jan Hammer's exciting trades with Jeff Beck. Referenced album: "Wired" by Jeff Beck (1976) | METAL ZONE | |
| FENDER CLEAN | This patch is a straightforward modeling of the sound of that black-face Fender Twin Reverb and provides a clean sound that is indispensable for the ensemble. With the EFX module switched on, you can add that unique tremolo effect to get retro-sound instantly. We have selected a room ambience as default to make this patch suitable for current musical style but, of course, you can replace it with the spring reverb simulation. | FENDER CLEAN | |
| R4 | C4 | ||
| Mr. Fripp | This wildly fat sound with infinite sustain is modeled truthfully after the sound created by the combination of MXR's Dyna Comp and Dallas' Fuzz Face. Designed for using your guitar's front pick-up. Referenced album: "In The Court Of The Crimson King" by King Crimson (1969) | FUZZ FACE | |
| FUNK PLANET | This patch is suitable for the funky chording. The most popular effects for the funk guitar sound are the wah-wah pedals but here we have chosen the phase shifter to create a unique feel. We have also refreshed the flavor of this vintage stomp box sound to fit more modern styles. Referenced album: "Ship Aoy" by O'Jays (1973) | PHASER | |
| NUANCE DRIVE | This patch is the simulation of the legendary tone of the BOSS OD-1 that is considered the de-facto standard for the overdrive stomp box. The patch can provide high playability and retains the nuances of the guitarists' touches. The addition of the chorus effect will enable the guitar players to adapt to virtually any musical situations. | OD1 | |
| C MAJOR HARMONY | This patch provides a mild lead sound accompanied by the harmonies based on the C major scale and makes our G2 the world's first effective device in the class that features the HPS (harmonized pitch shifter) function. You can select the key and the scale according to the phrase you play. | PV DRIVE | |
| R8 | C8 | ||
| ACOUSTIK | With this patch selected, your electric guitar will start to sound like an acoustic electric guitar. We would recommend you to combine this patch with the single-coil type front pick-up. You can also use this patch actively to create the clean ensemble effect. | ACOUSTIC SIM | |
| R9 | C9 | ||
| POWERED BY | Even if you are the type of guitar player who is proud of wailing solos, you may sometimes want to use thrash power chords (with some muting-technique on the bridge). The distorted sound of this patch provides the best playability for that purpose. Referenced album: "Dookie" by Green Day (1994) | PV DRIVE | |
| BREATH YOU TAKE | This patch provides you with a clean sound with effective use of the compressor. If you add the delay effect with delay time set to synchronize with the 8th notes, you will get Andy Summers' signature sound for arpeggios. Referenced album: "Synchronicity" by the Police (1983) | JC CLEAN | |
| SANTANA | Many people through the years have favored Carlos Santana's guitar sound. This patch is modeled specifically after his wailing lead sound with sweet distortion. Any of his hits like "Black Magic Woman", "Europe" or "Adouma" will sound pleasant if you make use of this patch. Referenced album: "Amigos" (1976) and "Shaman" (2002) by Santana | BG CRUNCH | |
| B2 | d2 | ||
| ORANGE CRUSH | This patch provides the jet sound from the good old days created by the combination of the edgy vintage distortion stomp box and the flanger. We have rearranged that sound to give a hybrid tone that is retro sounding and refreshing at the same time by combining the dry distortion, flanging jet-effect and lush reverb. Referenced album: "Barracuda" by Heart (1972) | GUVNOR | |
| B3 | d3 | ||
| AC CLEAN | This patch is modeled after the classical Brit clean sound of the VOX AC series guitar amps operated in the class A without the negative feedback. The sound of those amps became enormously popular in the British musical industry of the 1960s, continued through many famous British groups in the 1970s and has remained popular to this day. Referenced album: "1962-1966...Red Album" by the Beatles | CLASS A CLEAN | |
| B4 | d4 | ||
| BIG WALL | This powerful sound is the result of the deepest distortion ever created by any multi-effect pedals. The overwhelming presence of the power chords in lower registers and the smooth responses to the tapping technique will be favored by the connoisseurs of the high-gain sound. | BG DRIVE | |
| B5 | d5 | ||
| VibroCrunch | This patch is modeled after the sound that utilizes the so-called Leslie effect for its vibrato-like character and it is popular among the American blues-rock players like the late S.R.V. It is suitable for crisp rhythm playing or the dynamic chording. Referenced album: "Texas Flood" by Stevie Ray Vaughan (1983) | VIBRATO | |
| B6 | d6 | ||
| 1984 | Recently E.V.H. is known as the user of the 5150 amps but in the past he used to create that big crunchy sound with his specially modified Marshall amp. This patch is the consummate simulation of that E.V.H. sound from his early years. The name of this patch is, of course, borrowed from that greatest album of V. H. with David Lee Roth. Referenced album: "1984" by Van Halen (1984) | MS DRIVE | |
| The SPY who loved me (or Spaghetti Western) | The sound will remind you of the soundtracks of the James Bond series or Spaghetti Western movies. Referenced album: The soundtracks from "007, Dr. No" (1962) | FENDER CLEAN | |
| HEAD LONG | This sound is ZOOM'S original that became a favorite of the guitarist Brian May. The patch has a very strong character but you can hear how it is effectively used in his actual recordings. If you are big-fan of Brian May, you may also want to try the sound with the "step" turned "off" and the "delay" turned "on". You will be transported to the world of "Brighton Rock" with that incredible guitar orchestration. With the additional use of the HPS set to the minor 3rd in the key of E, you will be able to perfect the simulation!! Referenced album: "Innuendo" by Queen (1991) | STEP | |
Note 1 : The default patches stored in the pre-set area from the bank No. 0 to No. 3 are the same as those stored in the banks from A to d.
Note 2 : We recommend you to adjust the parameter for the noise reduction according to your guitars and amps.
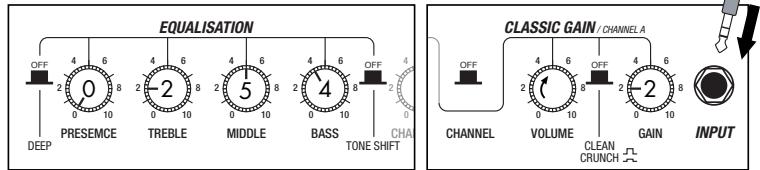
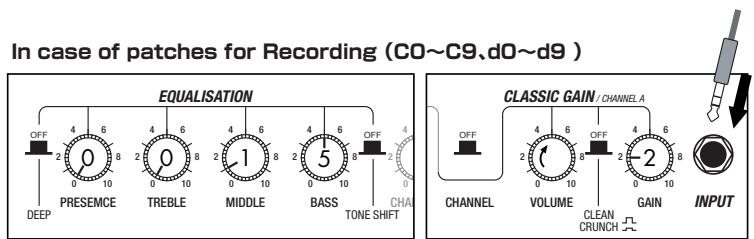
Setting recommendation on popular guitar amps
Marshall JCM-2000
In case of patches for Live (A0~A9,b0~b9)
Fender Twin Reverb
In case of patches for Live (A0~A9,b0~b9)
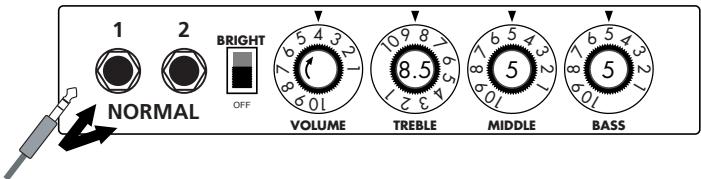
In case of patches for Recording (C0~C9,d0~d9)
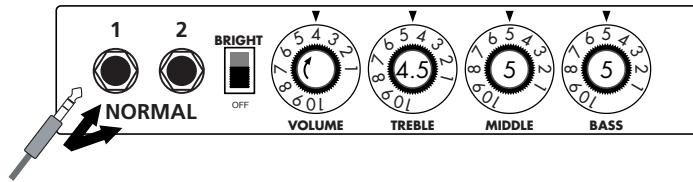
Roland JC-120
In case of patches for Live (A0~A9,b0~b9)
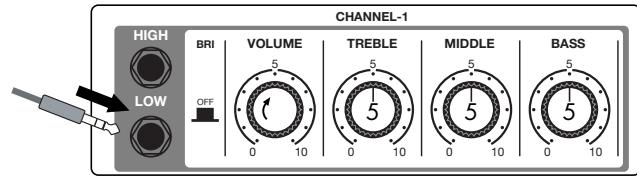
In case of patches for Recording (C0~C9,d0~d9)
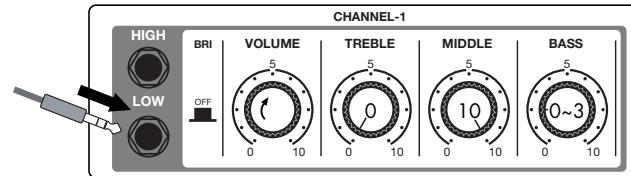
When you use guitar amp for recording patches, not only intended modeling sound will not existing, but also you hear harsh-sounding sometimes. Please adjust guitar amp setting as above reference.
Introduction for newly developed effects
Early Reflection
Early Reflection is the component of the reverb sound that reaches to the listener first after the original sound has bounced off the wall. The reverb sound consists of this early reflection and the late reflection, and the former characterizes the size of the room. The early reflection effect extracted from the whole reverb sound has been quite popular among the rack-mounted signal processors but we have arranged this effect on the G series especially for the guitar. To get the most popular type of this effect, you can set the "SHAPE" parameter to the plus value (decaying effect) and adjust the "DECAY" parameter to decide the size of the simulated room. If you would like a wild effect, set the "SHAPE" parameter to the extreme minus value and you will get the special effect that sounds like the tape machine played in reverse.

EXTRA EQ
In addition to the frequency ranges of 160Hz , 800Hz and 3.2kHz (LOW, MID and TREBLE respectively,) controlled by the normal EQ module, you can boost or cut the ranges of 400Hz , 6.4kHz and 12kHz using the LOW MID, PRESENCE and HARMONICS controls respectively in the EXTRA EQ module. These frequency ranges are rarely controllable with other effect devices made for guitars. With "PRESENCE" you can adjust the high frequency range that affects the projection of the sound and with "HARMONICS" you can tweak the overtone contained in the clipped sound. The overdriven sound of tube amplifiers is rich in overtone and this EXTRA EQ module is indispensable for the simulation of this aspect of the sound.

Multi Tap Delay
With this effect, you can utilize up to eight independent delay lines whose delay times can be set separately to make rhythmical patterns. We also provided eight practical settings ranging from the constant rhythmic pattern to the random one. Try pattern 2 for example: the played notes are fed back like rhythmical patterns that will inspire you to come up with various phrases one after another. You could apply this effect to your solo performances as something different from the sound-on-sound effect. This effect is programmed as a stereo ping-pong delay and thus we strongly recommend you to try it using headphones. The delay time can be set to 3 sec. maximum.

Dynamic Delay/Dynamic Flanger
This is the so-called ducking effect: the mix balance of the dry signal and the effect signal of a delay or a flanger is controlled by the envelope of the original signal of the guitar.
In the Dynamic Delay section, you can set the "SENSE" parameter to the minus value to get the ducking delay effect: the feedback component in the delayed signal is not put out while there is an input signal and the feedback component arises as soon as the input signal is muted. This effect is very handy when, for example, you play fast phrases on the guitar and the feedback component gets in the way. On the other hand, you can set the "SENSE" parameter to the plus value and you will have the feedback component while you are playing the guitar and you can cut off the feedback as soon as you mute the guitar, which should be very handy in the break of a song where you want to mute all of the sound.
The same thing goes with the "Dynamic Flanger": you can set the "SENSE" parameter to the minus value and you will get no flanging effect while the input signal is high and you will get flanging effect when you lower the signal level of the input. You can get a unique effect like a long note that is completely dry at the beginning and then the flanging effect is gradually added as the signal level of the note decreases. On the other hand, you can have the flanging effect only when you play loud if you set the "SENSE" parameter to the plus value. This effect works great when you want to embellish the accents in your arpeggios and riffs or to add a hidden flavor to your lead guitar sound.
Such as product names and company names are all (registered) brand names or trade marks of each respective holders, and Zoom Corporation is not associated or affiliated with them. All product names, explanation and images are used for only purpose of identifying the specific products that were referenced during product development.
Modeling Description ... Reference for drive effect types and its original models.
O M E S I
/BOOGIE Mark III
EFFECT TYPE:BC CRUNCH

Fender Tweed Deluxe '53
EFFECT TYPE:US BLUES

The origin of the MESA/BOOGIE amplifier was the modified Fender Princeton. Randall Smith, an amp tech in San Francisco, souped up those small guitar amps to put out 100w power and sold them. The first model was called "Mark I". Carlos Santana tried one and said, "Shit man, that little thing really Boogies! -which gave the amplifier the brand name "BOOGIE."
The second model "Mark II" had lead and rhythm channels and a 4-band equalizer to give wider variety to the guitar tone. The special feature of this model was an accomplished simul- power circuitry (the operation could be switched between class A and class AB). The power amplifier section had six power tubes. When the class A operation is selected, two EL34 power tubes are activated and the amp puts out a really smooth sound. When the class AB operation is selected, these two EL34s and other four 6L6GC power tubes are all activated and the amplifier puts out its full potential power.
Until the model Mark II, MESA/BOOGIE amps were quite expensive, hand-made amplifiers, but the next model "Mark III" was more affordable. It has one 10" loudspeaker and 60w output power but retains all of the classic BOOGIE features; simul-power circuitry, the graphic EQ, and three (Rhythm1, Rhythm2 and Lead) separate channels. With this Zoom G series, you can select the modeling of the combo type of this "Mark III."
The very first Fender amplifier was developed by Leo Fender and his trusty partner, the engineer Doc Kaufman in 1945-46. Actually, the earliest models were not made under the "Fender" brand but the "K&F Manufacturing Corporation" named after the Initials of the two. The first amplifier using the "Fender" brand was the "Model 26" in 1947. In 1949, the entry models called "Champion 400/600" series followed. The so-called "Tweed Amps" covered literally with tweeds all over were developed during the 1950s and the 1960s. In these years, the company put out various tweed models like the "Bassman" or the "Bandmaster". The program of this G series is modeled after, among others, the most representative "Tweed Deluxe" aka the "Wide Panel" from 1953. This amplifier has a 12AY7 and a 2AX7 pre-tubes, two 6V6GT power-tubes, a 5Y3GT rectifier tube and a 12" Jensen loudspeaker and its output power is 10w. Recently the original amplifier is priced quite highly and is very difficult to find in good condition. This amp has two inputs but one is the input for a microphone. It has just one tone knob for treble control. Therefore, it is advisable to use this program on the G series with a flat tone setting except for the treble parameter so that you can enjoy the characteristic sound in the lower registers and the unique sound in the higher registers of the original Fender amp.
O
MESA/BOOGIE Dual Rectifier
EFFECT TYPE: BG DRIVE

The "Rectifier" model has the improved simul-power circuitry (see the "Mark III" section) and the increased gain in the preamp section. This amp puts out 100w power and has five 12AX7 tubes for the pre-amp and four 6L6GC tubes for the power-amp. As opposed to the "Mark" series, the Rectifier has its tone control circuit after the volume circuit for better effect on the sound. Since this amp had been introduced, the brand image of MESA/BOOGIE has changed from being the premiere amp manufacturer for fusion music to that for heavy metal music.
The most prominent feature of this amp is its rectifier circuitry after which it was named. The "Dual Rectifier" employs, as its name suggests, two different rectifier circuits: one uses silicon diodes and another uses tubes. When the diodes are selected, the amp gives you tight and highly powerful sound. When the tube rectifier circuit is selected, you will get a warmer sound. This program is modeled after the combination of a four-12" BOOGIE cabinet and the Dual Rectifier head using the vintage channel and the silicon-diode rectifier circuit.
O
ender Twin Reverb '65
EFFECT TYPE : FD CLEAN

In the later half of 1965, a reverb unit was added to the "Twin" amp, which was the birth of the "Twin Reverb" model. In 1965, Fender company was sold to CBS because of Leo Fender's health problem. The program on this G series is modeled after the pre-CBS "Twin Reverb" from 1965 aka "Black Panel". This amp has four 7025 (12AX7), a 12AX7 and two 12AT7 pre-tubes, four 6L6GC power-tubes and silicon diodes for the rectifier circuit. The diode rectifier is believed to give a tighter sound to the amplifier than the tube rectifier does, which should be the key to the characteristic glittering sound of this "Twin Reverb". This guitar amplifier has two 12" loudspeakers by Jensen and pus out 80w power. On the program in this G series, you can have the sound with the "Bright" switch on by tweaking the "Harmonics" parameter in the "EXTRA EQ" section. When you turn the reverb effect on, you will get that "Twin Reverb" sound you have been longing for.
O
Roland JAZZ CHORUS
EFFECT TYPE:JC CREAN

Simply put, the Roland "JC-120" is the most familiar guitar amplifier among both professionals and amateurs. Released in 1975 from Roland, this amp became known as "portable", "loud" and "almost trouble-free" (which are the very characteristics Japanese products are known for!). You are pretty sure to find one in any live houses or studios all over the world. The key to that sound of "JC-120" is its unique chorus effect: the slightly delayed vibrato sound comes from one of two 12^ loudspeakers and the dry sound from another and both sounds are combined in the air, which creates that distinctive spacey mood. This effect became very popular which is why Roland decided to release the chorus circuit independently as the "CE-1" pedal. Incidentally, the chorus effect on the G series is modeled after its follower "CE-2". Another unique feature of JC-120 is its "Bright" switch. This function is not included in this modeling program but you can approximate the effect of this switch by tweaking the "Harmonics" parameter in the "Extra EQ" section.
O
EAVEY 5150 STACK
EFFECT TYPE : PV DRIVE

The "5150" and the "5150 MkII" were very famous guitar amplifiers originally developed as the signature models for Eddie Van Halen. Unfortunately, he doesn't use it anymore because of the expiration of the endorsement contract. The program on this G series is modeled after the first version of the "5150". This amplifier has two (Rhythm and Lead) channels and puts out 120w power using five 12AX7 pre-tubes and four 6L6GC power-tubes. The rectifier circuit employs silicon diodes. The uniqueness of the sound of this amplifier is characterized by its sharp attack, deep and smooth tone, fine distortion and fat and clinging low registers. The program is modeled after the combination of the Lead channel of the 5150 head and a "5150SL", a four-12" cabinet. Just crank up the gain and play one of Van Halen's hit "Top Of The World!"
#
VOX AC30/6TB
EFFECT TYPE : CLASS A CLEAN

The long history of the VOX company harks back to the foundation of "Jennings Musical Instruments" (JMI) in 1958. Originally, this company made amplifiers with 10-15w output power but the musical trend required more powerful amplification, which resulted in the birth of the revered "AC30" guitar amp. The very original AC30 had two Celestion 12" loudspeakers using alnico magnets, EF86 pre-tubes, EL84 power-tubes and a GZ34 rectifier tube. The Shadows and the Beatles used this model and their influence helped this amp become popular among many guitarists. Later, as the musical trend required amplifiers with even more gain, the company developed an add-on device called "Top Boost Unit". The "AC30-6TB", which this program in our G series is modeled after, is the later version of the AC30 with an integrated "Top Boost Unit". After the JMI had sold the VOX brand, the sales of the amplifier regrettably began to decline. However, the KORG Inc. acquired the VOX name recently and rejuvenated the brand by starting to manufacture truthful reissue models. In this G series, the program is modeled after the sound using the Hi input of the normal channel that will give you that clean guitar sound of the Beatles and the Shadows, which are the best examples of the distortion-free sound of the class-A operated amplifiers.
O
Jarshall JCM2000
EFFECT TYPE:MS DRIVE

"JCM2000" is based on the reputed "Plexi" amp (aka Old Marshall) whose rich overtones and powerful sound were legendary. It has very flexible sound and can produce the traditional Marshall sound, modern heavy metal sound or sounds suitable for any musical genre. It has the modern Marshall's standard circuit with four ECC83 pre-tubes and four EL34 power-tubes. It is an all-tube amplifier that can produce clean or heavily distorted sound and you can use it in all kinds of music. The sound is rather grainy but the response is fast and the guitar sound cuts through very well. "JCM2000" series has two different models: the TSL and the DSL. The program on the G series is modeled after the simply designed "DSL-100". As with the modeling of the "JCM800", we combined the head with a "1960A" cabinet and used the Lead channel that has more distortion.
EFFECT TYPE:MS CRUNCH

EFFECT TYPE: GUV'NOR
Marshall has continued to produce great amplifiers for up-to-date musical trends in cooperation with the musicians. This brand started with its "JTM- 45 (stands for Jim&Terry Marshall)" in 1962 and now its products are indispensable items in the modern Rock scene. Marshall seems to have been experimenting with different circuit designs of amplifiers but 1981 was the most prolific year for the brand because it released many new models like the "1959" and "1987" with four inputs, "2203" and "2204" with master volumes. In 1983, Marshall added the "2210" and "2205" with two (Normal and Boost) channels as well as effect send/return connectors to its lineup. These models also carried the collective designation "JCM (stands for Jim&Charles Marshall) 800". They had three ECC83 pre-tubes and four EL34 power-tubes. The tone control circuit was placed after the pre-amp section and this design seems to have become the standard for the modern Marshall amplifiers. For the modeling on this G series, we selected the "2203" with a master volume and it is quite easy to get the distortion. By today's standards, the amplifier's distortion is rather moderate, but the sound is very fat, the low-end is quite tight and, above all, the sound cuts through very well. When higher gain is required, this amplifier is often combined with overdrive or booster pedals. For the modeling, we used the head with a "1960A" cabinet that has four 12" loudspeakers and works very well with the "2203".
EFFECT TYPE : OVERDRIVE

O
Marshall Guv'nor
The initial sales talk for this serious distortion pedal "Guv'nor" bearing the Marshall brand was that you could get the distortion sound of the Marshall amps with this small stomp box. Depending on which guitar amps you combine, you can actually get the Marshall amps distortion. There are two different versions of the Guv'nor: the Britain-made ones from 1988 and the Korean-made ones from 1998. The program on this G series is modeled after the original version from 1988. The Guv'nor's characteristic feature is the frequency point you can tweak using the "TREBLE" control. Even if you lower this parameter value, the sound will get fat instead of getting dullish. As you raise the value, the sound will get sweeter and clearer.
BOSS OD-1
The "OD-1" released by BOSS in 1977 was originally developed for the simulation of the natural overdrive sound of tube amplifiers, but this stomp box turned out to be popular as the booster unit to connect to the input of the real tube amplifier to get tighter and more punchy sound with the increased gain. The "OD-1" employs the asymmetrical "clipper" section in its circuit design that uses three diodes to create the overdrive sound that is mild and rich in nuances. The pedal had been in production from 1977 to 1985, but now it is unexpectedly difficult to even find a used one. And if you could locate one, it would be astonishingly expensive. There have been many stomp boxes known as overdrive units. The most famous one is probably the "Tube Screamer" but we chose this very original overdrive pedal "OD-1". If you are lucky enough to use the real "OD-1", we invite you to try blind test to turn off all of the effect module except the "OD-1" on the G series and compare the sound of the modeling and that of the real one. We think that you will not hear any difference.
EFFECT TYPE : METAL ZONE

O
MATCHLESS HOT BOX
EFFECT TYPE: HOT BOX

The "HOT BOX" was released as a pedal preamp bearing the MATCHLESS brand. It uses two 12AX7A tubes for the truthful reproduction of the sound of the "MATCHLESS" guitar amplifiers. It has the compressed sound and the quick response, which are distinctive characteristics of tube amps. Its sound is fat and cuts through very well, too. Even if you crank up the gain to get a distorted sound, you will retain the nuances of the original guitar sound. Although it is categorized as preamp, the ideal way to get the best possible sound is to connect it, like usual stomp boxes, to the input of your guitar amp. Its design is also attractive: the case is polished like a mirror and the "MATCHLESS" logo lights up when you turn it on. This "Hot Box" is literally a magic box: you can get the signature sound of the "MATCHLESS" amps regardless of the guitar amplifier you connect it to.
BOSS MT-2
The "MT-2" ("METAL ZONE") has the strongest distortion. Its unique distortion sound has very fat mid to low range and it has a parametric EQ in addition to the Hi and Low EQs, which is the key to the scooped metal sound. This stomp box is reputed for its flexibility in sound because you can not only get that scooped metal sound by cutting the mid range and boosting the high and low range but also the overdrive sound by reducing the gain and boosting the mid range. This is one of the best-selling stomp boxes among many of the popular line-ups of BOSS products. Once connected, the Strat or the Les Paul will have the "MT-2" sound regardless of the types of guitar pickups. It was first introduced in 1991 and is still in the BOSS's catalog; a truly a long-seller!

O
ZOOM Extreme Disto
EFFECT TYPE : EXTREME DISTORTION

This distortion program is developed especially for the G series. We deliberately made use of the characteristics of digital devices and even emphasized the edge of the digital sound to get the distortion to the maximum. The "TM-01" (Tri Metal) was the pedal that had the deepest distortion sound among the stomp boxes from ZOOM but was discontinued. It had as much as three diode-clipping stages and had very high gain. The "Extreme Distortion" is programmed to get the gain even higher. It raises the signal level to the maximum at the input stage and gets the wild distortion sound at the clipping stage. In fact, you won't change the distortion rate even if you lower the volume on your guitar! Its distortion is that deep. Contrary to the usual distortion effects whose sound gets thinner as you raise the gain, this "Extreme Distortion" won't lose the fatness and tightness of the sound.
Dallas-Arb
"FUZZ FACE" was originally released from the Dallas-Arbiter company in 1966 encased in a uniquely designed housing that literally looked like a face. It is also famous as legendary guitarist Jimi Hendrix's favorite gear. He combined this "FUZZ FACE" with his Marshall amps because it was hard to get distorted sound from them at that time, and created avant-garde tones. The heavy and fat low end and the fuzz sound with long sustain are the characteristics of this effective device. The earliest model used two PNP germanium transistors and was very different in sound from the later models using silicon transistors. The theory of creating distorted sound is simple. Have you tried to connect the guitar to a microphone input on your radio cassette recorder to emulate that sound? You cannot go too wrong if you think that the circuitry of this device is similar to that. The program on this G series is modeled after this earliest version most satisfactorily.
EFFECT TYPE: FUZZ FACE
O
ZOOM Digital Fuzz
EFFECT TYPE: DIGI FUZZ

Forty years ago, my fellow guitar player used to crank up his amp trying to distort his guitar sound and make other guys of the band virtually deaf at the end of the rehearsal. When it was difficult to get the distorted sound out of the amplifiers like in those days, some guys made cuts in the cone loudspeakers to make the sound distorted, which was the origin of the sound of fuzz effects. The fuzz pedals were developed to reproduce that distortion-like sound. In other words, the trick of fuzz effect is to simulate the dirty distortion and that "broken" feel. This "Digital Fuzz" has the very effect described above. Its drastic distortion, relentless cut-offs and noises in the decay are the characteristics that one could simply describe as "broken". Its fat and tight sound can be seriously recommended for the fuzz maniacs to try. This is literally the Digital Dirty Fuzz that is only possible in the digital domain (are you brave enough to make cuts in your loudspeakers?).
- GUITAR EFFECTS PEDAL
- 62
- Operation Manual
- 200
- SAFETY PRECAUTIONS Usage Precautions
- SAFETY PRECAUTIONS
- Power requirements
- [AC adapter operation]
- [Battery operation]
- Environment
- Handling
- Connecting cables and input and output jacks
- Alterations
- Volume
- Usage Precautions
- Electrical interference
- Cleaning
- Contents
- The FCC regulation warning (for U.S.A.)
- Features
- - Latest processing technology for outstanding performance
- - Versatile palette of effects including new creations
- - Great for live performances and direct recording
- - Integrated rhythm functions and auto-chromatic tuner
- - Sophisticated user interface
- - Dual power supply principle allows use anywhere
- - Easy operation with foot switch and expression pedal
- Terms Used in This Manual
- ■ Effect module
- ■ Effect type
- ■ Effect parameter
- Patch
- ■ Bank and area
- Play mode/edit mode
- Operating the G2 on batteries
- Controls and Functions / Connections
- Selecting a Patch
- Turn power on
- Set the G2 to play mode
- HINT
- Select a patch
- Adjust tone and volume
- Parameter knob 1
- Parameter knob 3
- Parameter knob 2
- Directly selecting a bank
- Using the Tuner
- Switch to bypass or mute
- - Setting the G2 to the bypass state
- - Setting the G2 to the mute state
- Patch change at bypass/mute
- Adjusting the reference pitch of the tuner
- - Turn Parameter knob 1.
- - While the reference pitch value is shown, turn Parameter knob 1 to adjust it.
- NOTE
- Return to play mode
- Play the string to tune
- Pitch is high
- Pitch is correct Pitch is low
- Using the Rhythm Function
- Set the G2 to play mode
- Start the rhythm function
- Select a rhythm pattern
- Adjust the rhythm volume
- Adjust the tempo
- Stop the rhythm
- Editing a Patch
- Select the effect module
- To switch an effect module on and off
- Terminate the edit mode
- Change the parameter value
- Select the effect type
- Storing/Copying Patches
- Using an Optional Foot Switch or Pedal
- Using the foot switch (FS01)
- Using the expression pedal (FP01/FP02)
- Restoring Factory Defaults
- Linking Effects
- Switching between live sound and direct recording sound
- - EXTRA EQ is selected
- CABINET & MIC is selected
- Effect Types and Parameters
- How to read the parameter table
- Expression pedal
- Tap
- Hold
- UP
- DOWN
- HIGH
- LOW
- Specifications
- Effect types
- Effect modules
- Patches
- Sampling frequency
- A/D converter
- D/A converter
- Signal processing
- Frequency response
- Display
- Input
- Output
- Control input
- Dimensions
- Weight
- Options
- Troubleshooting
- No power
- - Reverb effect does not operate
- High level of noise
- - Battery life is short
- G2 Preset Pattern
- G2 Patch List Please use patches "for Live" when you use guitar amp, and use patches "for Recording" when you connect your guitar directly to a recorder.
- Setting recommendation on popular guitar amps
- Marshall JCM-2000
- Fender Twin Reverb
- Roland JC-120
- Introduction for newly developed effects
- Early Reflection
- EXTRA EQ
- Multi Tap Delay
- Dynamic Delay/Dynamic Flanger
- Modeling Description ... Reference for drive effect types and its original models.
- O M E S I
- /BOOGIE Mark III
- Fender Tweed Deluxe '53
- O
- MESA/BOOGIE Dual Rectifier
- ender Twin Reverb '65
- Roland JAZZ CHORUS
- EAVEY 5150 STACK
- #
- VOX AC30/6TB
- Jarshall JCM2000
- Marshall Guv'nor
- BOSS OD-1
- MATCHLESS HOT BOX
- BOSS MT-2
- ZOOM Extreme Disto
- Dallas-Arb
- ZOOM Digital Fuzz
Marque : ZOOM
Modèle : G2
Catégorie : Pédale d'effet pour guitare