6824N - Outils électriques MAKITA - Notice d'utilisation et mode d'emploi gratuit
Retrouvez gratuitement la notice de l'appareil 6824N MAKITA au format PDF.

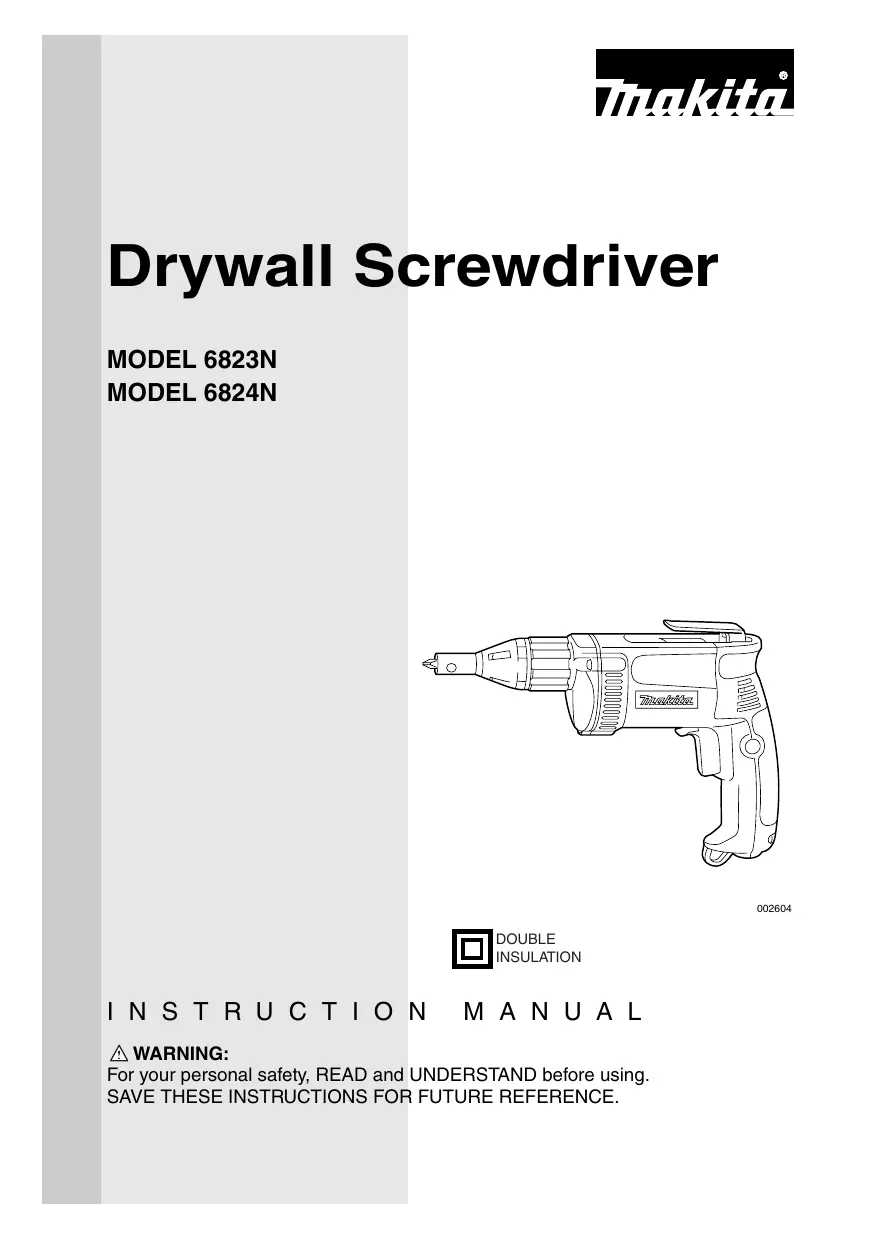

| Type de produit | Perceuse-visseuse sans fil |
| Caractéristiques techniques principales | Vitesse à vide : 0-600 tr/min, couple maximal : 30 Nm |
| Alimentation électrique | Batterie Li-ion 12 V |
| Dimensions approximatives | Longueur : 210 mm, Hauteur : 200 mm |
| Poids | 1,4 kg |
| Compatibilités | Compatible avec les batteries Makita 12 V |
| Type de batterie | Li-ion |
| Tension | 12 V |
| Puissance | Max 300 W |
| Fonctions principales | Perçage, vissage, dévissage |
| Entretien et nettoyage | Nettoyer régulièrement le filtre à air, vérifier les charbons |
| Pièces détachées et réparabilité | Disponibilité des pièces détachées via le service après-vente Makita |
| Sécurité | Utiliser des lunettes de protection, ne pas dépasser la capacité de la batterie |
| Informations générales utiles | Garantie de 3 ans sur les outils Makita, poids léger pour un usage prolongé |
FOIRE AUX QUESTIONS - 6824N MAKITA
Questions des utilisateurs sur 6824N MAKITA
0 question sur cet appareil. Repondez a celles que vous connaissez ou posez la votre.
Poser une nouvelle question sur cet appareil
Téléchargez la notice de votre Outils électriques au format PDF gratuitement ! Retrouvez votre notice 6824N - MAKITA et reprennez votre appareil électronique en main. Sur cette page sont publiés tous les documents nécessaires à l'utilisation de votre appareil 6824N de la marque MAKITA.
MODE D'EMPLOI 6824N MAKITA
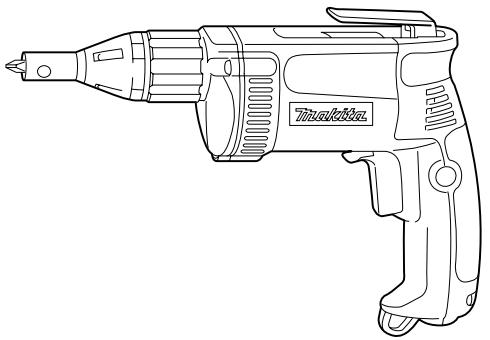
Drywall Screwdriver
MODEL 6823N
MODEL 6824N
002604

INSTRUCTION MANUAL
WARNING:
For your personal safety, READ and UNDERSTAND before using.
SAVE THESE INSTRUCTIONS FOR FUTURE REFERENCE.
SPECIFICATIONS
| Model | 6823N | 6824N | |
| Capacities | Self drilling screw | 6 mm (1/4") | 6 mm (1/4") |
| Drywall screw | 6 mm (1/4") | 5 mm (3/16") | |
| No load speed (RPM) | 0 - 2,500/min. | 0 - 4,500/min. | |
| Overall length | 301 mm (11-7/8") | 290 mm (11-3/8") | |
| Net weight | 1.5 kg (3.4 lbs) | 1.4 kg (3.1 lbs) | |
- Manufacturer reserves the right to change specifications without notice.
- Specifications may differ from country to country.
GENERAL SAFETY RULES
USA002-2
(For All Tools)
WARNING:
Read and understand all instructions. Failure to follow all instructions listed below, may result in electric shock, fire and/or serious personal injury.
SAVE THESE INSTRUCTIONS
Work Area
- Keep your work area clean and well lit. Cluttered benches and dark areas invite accidents.
- Do not operate power tools in explosive atmospheres, such as in the presence of flammable liquids, gases, or dust. Power tools create sparks which may ignite the dust or fumes.
- Keep bystanders, children, and visitors away while operating a power tool. Distractions can cause you to lose control.
Electrical Safety
-
Double insulated tools are equipped with a polarized plug (one blade is wider than the other.) This plug will fit in a polarized outlet only one way. If the plug does not fit fully in the outlet, reverse the plug. If it still does not fit, contact a qualified electrician to install a polarized outlet. Do not change the plug in any way. Double insulation eliminates the need for the three wire grounded power cord and grounded power supply system.
-
Avoid body contact with grounded surfaces such as pipes, radiators, ranges and refrigerators. There is an increased risk of electric shock if your body is grounded.
- Do not expose power tools to rain or wet conditions. Water entering a power tool will increase the risk of electric shock.
- Do not abuse the cord. Never use the cord to carry the tools or pull the plug from an outlet. Keep cord away from heat, oil, sharp edges or moving parts. Replace damaged cords immediately. Damaged cords increase the risk of electric shock.
- When operating a power tool outside, use an outdoor extension cord marked "W-A" or "W". These cords are rated for outdoor use and reduce the risk of electric shock.
Personal Safety
- Stay alert, watch what you are doing and use common sense when operating a power tool. Do not use tool while tired or under the influence of drugs, alcohol, or medication. A moment of inattention while operating power tools may result in serious personal injury.
- Dress properly. Do not wear loose clothing or jewelry. Contain long hair. Keep your hair, clothing, and gloves away from moving parts. Loose clothes, jewelry, or long hair can be caught in moving parts.
- Avoid accidental starting. Be sure switch is off before plugging in. Carrying tools with your finger on the switch or plugging in tools that have the switch on invites accidents.
- Remove adjusting keys or wrenches before turning the tool on. A wrench or a key that is left attached to a rotating part of the tool may result in personal injury.
-
Do not overreach. Keep proper footing and balance at all times. Proper footing and balance enables better control of the tool in unexpected situations.
-
Use safety equipment. Always wear eye protection. Dust mask, non-skid safety shoes, hard hat, or hearing protection must be used for appropriate conditions. Ordinary eye or sun glasses are NOT eye protection.
Tool Use and Care
- Use clamps or other practical way to secure and support the workpiece to a stable platform. Holding the work by hand or against your body is unstable and may lead to loss of control.
- Do not force tool. Use the correct tool for your application. The correct tool will do the job better and safer at the rate for which it is designed.
- Do not use tool if switch does not turn it on or off. Any tool that cannot be controlled with the switch is dangerous and must be repaired.
- Disconnect the plug from the power source before making any adjustments, changing accessories, or storing the tool. Such preventive safety measures reduce the risk of starting the tool accidentally.
- Store idle tools out of reach of children and other untrained persons. Tools are dangerous in the hands of untrained users.
- Maintain tools with care. Keep cutting tools sharp and clean. Properly maintained tools with sharp cutting edges are less likely to bind and are easier to control.
- Check for misalignment or binding of moving parts, breakage of parts, and any other condition that may affect the tools operation. If damaged, have the tool serviced before using. Many accidents are caused by poorly maintained tools.
- Use only accessories that are recommended by the manufacturer for your model. Accessories that may be suitable for one tool, may become hazardous when used on another tool.
SERVICE
-
Tool service must be performed only by qualified repair personnel. Service or maintenance performed by unqualified personnel could result in a risk of injury.
-
When servicing a tool, use only identical replacement parts. Follow instructions in the Maintenance section of this manual. Use of unauthorized parts or failure to follow Maintenance instructions may create a risk of electric shock or injury.
USE PROPER EXTENSION CORD: Make sure your extension cord is in good condition. When using an extension cord, be sure to use one heavy enough to carry the current your product will draw. An undersized cord will cause a drop in line voltage resulting in loss of power and overheating. Table 1 shows the correct size to use depending on cord length and nameplate ampere rating. If in doubt, use the next heavier gage. The smaller the gage number, the heavier the cord.
Table 1: Minimum gage for cord
| Ampere Rating | Volts | Total length of cord in feet | ||||
| 120 V | 25 ft. | 50 ft. | 100 ft. | 150 ft. | ||
| More Than | Not More Than | AWG | ||||
| 0 | 6 | 18 | 16 | 16 | 14 | |
| 6 | 10 | 18 | 16 | 14 | 12 | |
| 10 | 12 | 16 | 16 | 14 | 12 | |
| 12 | 16 | 14 | 12 | Not Recommended | ||
SPECIFIC SAFETY RULES
USB004-2
DO NOT let comfort or familiarity with product (gained from repeated use) replace strict adherence to screwdriver safety rules. If you use this tool unsafely or incorrectly, you can suffer serious personal injury.
- Hold tool by insulated gripping surfaces when performing an operation where the cutting tool may contact hidden wiring or its own cord. Contact with a "live" wire will make exposed metal parts of the tool "live" and shock the operator.
- Always be sure you have a firm footing. Be sure no one is below when using the tool in high locations.
- Hold the tool firmly.
-
Keep hands away from rotating parts.
-
Do not touch the bit or the workpiece immediately after operation: they may be extremely hot and could burn your skin.
SAVE THESE INSTRUCTIONS
WARNING:
MISUSE or failure to follow the safety rules stated in this instruction manual may cause serious personal injury.
SYMBOLS
USD201-2
The followings show the symbols used for tool.
V . volts
no load speed
A . amperes
回 .Class II Construction
Hz .........hertz
.../min.......revolutions or reciprocation per minute
...alternating current
FUNCTIONAL DESCRIPTION
002612
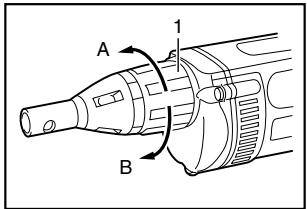
1. Locking sleeve
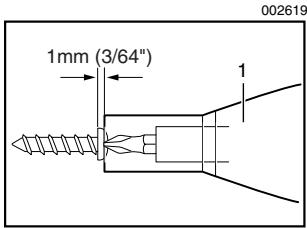
1. Locator
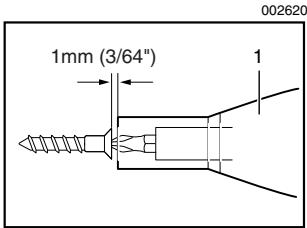
1. Locator
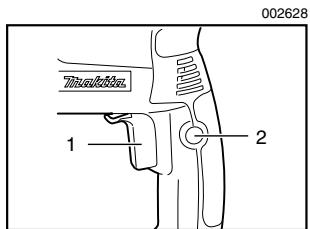
1. Switch trigger
2. Lock button
CAUTION:
- Always be sure that the tool is switched off and unplugged before adjusting or checking function on the tool.
Depth adjustment
The depth can be adjusted by turning the locking sleeve. Turn it in "A" direction for less depth and in "B" direction for more depth. One full turn of the locking sleeve equals 1.5 mm (1/16") change in depth.
Adjust the locking sleeve so that the distance between the tip of the locator and the screw head is approximately 1 mm (3/64") as shown in the figures. Drive a trial screw into your material or a piece of duplicate material. If the depth is still not suitable for the screw, continue adjusting until you obtain the proper depth setting.
Switch action
CAUTION:
- Before plugging in the tool, always check to see that the switch trigger actuates properly and returns to the "OFF" position when released.
To start the tool, simply pull the switch trigger. Tool speed is increased by increasing pressure on the switch trigger. Release the switch trigger to stop.
For continuous operation, pull the switch trigger and then push in the lock button.
To stop the tool from the locked position, pull the switch trigger fully, then release it.
NOTE:
- Even with the switch on and motor running, the bit will not rotate until you fit the point of the bit in the screw head and apply forward pressure to engage the clutch.
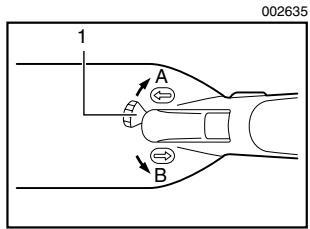
1. Reversing switch lever
Reversing switch action
This tool has a reversing switch to change the direction of rotation. Move the reversing switch lever to the position (A side) for clockwise rotation or the position (B side) for counterclockwise rotation.
CAUTION:
Always check the direction of rotation before operation.
- Use the reversing switch only after the tool comes to a complete stop. Changing the direction of rotation before the tool stops may damage the tool.
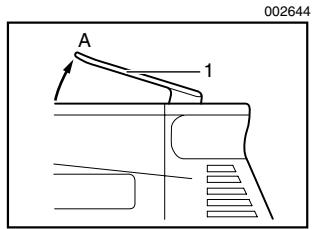
1. Hook
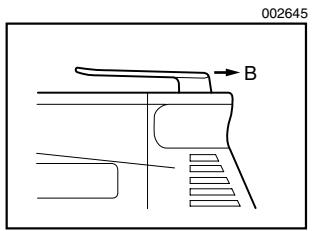
Hook
The hook is convenient for temporarily hanging the tool.
When using the hook, pull it out in A direction and then push it in B direction to secure in place.
When not using the hook, return it back to its initial position by following the above procedures in reverse.
ASSEMBLY
CAUTION:
- Always be sure that the tool is switched off and unplugged before carrying out any work on the tool.
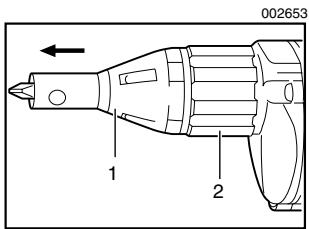
1. Locator
2. Locking sleeve
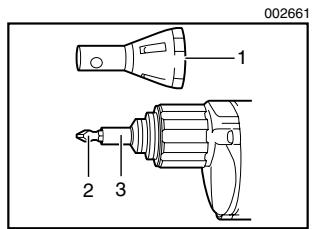
1. Locator
2. Bit
3. Magnetic bit holder
Installing or removing the bit
To remove the bit, first pull the locator out of the locking sleeve. Then grasp the bit with a pair of pliers and pull the bit out of the magnetic bit holder. Sometimes, it helps to wiggle the bit with the pliers as you pull.
To install the bit, push it firmly into the magnetic bit holder. Then install the locator by pushing it firmly back onto the locking sleeve.
OPERATION
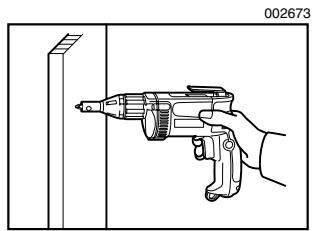
Fit the screw on the point of the bit and place the point of the screw on the surface of the workpiece to be fastened. Apply pressure to the tool and start it. Withdraw the tool as soon as the clutch cuts in. Then release the switch trigger.
CAUTION:
- When fitting the screw onto the point of the bit, be careful not to push in on the screw. If the screw is pushed in, the clutch will engage and the screw will rotate suddenly. This could damage a workpiece or cause an injury.
- Make sure that the bit is inserted straight in the screw head, or the screw and/or bit may be damaged.
- Do not continue unnecessary clutching operation.
MAINTENANCE
CAUTION:
- Always be sure that the tool is switched off and unplugged before attempting to perform inspection or maintenance.
To maintain product SAFETY and RELIABILITY, repairs, carbon brush inspection and replacement, any other maintenance or adjustment should be performed by Makita Authorized or Factory Service Centers, always using Makita replacement parts.
ACCESSIONS
CAUTION:
- These accessories or attachments are recommended for use with your Makita tool specified in this manual. The use of any other accessories or attachments might present a risk of injury to persons. Only use accessory or attachment for its stated purpose.
If you need any assistance for more details regarding these accessories, ask your local Makita service center.
- Insert bits
Magnetic bit holder - Locator
Memo
Memo
Memo

Stamp Timbre
Makita Canada Inc.
1950 Forbes Street,
Whitby, Ontario
L1N 7B7
Your answers to the following questions are appreciated.
1. This product was purchased from?
Hardware/lumber Store
Industrial Supply
Tool Distributor
□ Other ( )
3. How did you first learn of Makita Power Tools?
Magazine/Newspaper
Catalog
From dealer
□ Other ( )
Store display
2. Use of the product is intended for?
Construction trade
Home maintenance
□Industrial maintenance
□ Other ( )
4. Most favored points are?
Design
Makita Brand
□ Features
Power
Size
□ Other ( )
Price
5. Any comments?
Certificate of Warranty Mail to Makita
Date Purchased
Month
Day

Year 20
Model No.
Serial No.
Initial Last Name
Postal Code
AGE:

Under 19

20-29

30-39

40-49

Over 50
Occupation:
Dealer's Name & Address:
Factory Service Centres
| Head Office: | 1950 Forbes St., Whitby, Ontario, L1N 7B7 (905) 571 - 2200 | 1-800-263-3734 |
| Regional Office: | 11771 Hammersmith Way, Richmond B.C. V7A 5H6 | (604) 272 - 3104 |
| Regional Office: (Montreal) | 6389 boul, Couture, St. Leonard, Quebec H1P 3J5 | (514) 323 - 1223 |
| Dartmouth: | 202 Brownlow Avenue Dartmouth, N.S., B3B 1T5 | (902) 468 - 7064 |
| Ville St. Laurent: (Montreal) | 1140 Rue Bégin, Ville St. Laurent, Quebec H4R 1X1 | (514) 745 - 5025 |
| Les Saules: (Quebec) | 1200 St. Jean Baptiste, Unit 106, Les Saules, Quebec, G2E 5E8 | (418) 871 - 5720 |
| Nepean: (Ottawa) | 203 Colonnade Road, Unit #6, Nepean, Ontario K2E 7K3 | (613) 224 - 5022 |
| Whitby: | 1950 Forbes St., Whitby, Ontario, L1N 7B7 (905) 571 - 2200 | 1-800-263-3734 |
| London: | 317 Adelaide St. S., Unit 117, London, Ontario, N5Z 3L3 | (519) 686 - 3115 |
| Mississauga: | 6350 Tomken Rd., Unit 8, Mississauga, Ontario, L5T 1Y3 | (905) 670 - 7255 |
| Calgary: | #8-6115 Fourth St. S.E., Calgary Alberta, T2H 2H9 | (403) 243 - 3995 |
| Edmonton: | 11614-149 Street, Edmonton, Alberta, T5M 3R3 | (780) 455 - 6644 |
| Richmond: | 11771 Hammersmith Way, Richmond, B.C., V7A 5H6 | (604) 272 - 3104 |
| Coquitlam: | 2131 Hartley Ave., #103 Coquitlam, B.C. V3K 2Z3 | (604) 525 - 7434 |
| Winnipeg: | 1670 St. James Street, Winnipeg, Manitoba, R3H 0L3 | (204) 694 - 0402 |
| Saskatoon: | 206A-2750 Faithful Avenue Saskatoon, Saskatchewan, S7K 6M6 | (306) 931 - 0111 |
For the authorized service centre nearest you please refer to the local yellow pages directory under "tools" or contact our customer service department (Tel) 1-800-263-3734
When you need service...
- Explain the problem in a letter
- Enclose the letter with the tool
- Package carefully and send prepaid to the nearest Makita factory or authorized service centre
CUSTOMER RECORD
DATE
PURCHASED:
DEALER'S NAME
&ADDRESS:
MODEL NO.:
SERIAL NO.:
MAKITA LIMITED ONE YEAR WARRANTY
Warranty Policy
Every Makita tool is thoroughly inspected and tested before leaving the factory. It is warranted to be free of defects from workmanship and materials for the period of ONE YEAR from the date of original purchase. Should any trouble develop during this one year period, return the COMPLETE tool, freight prepaid, to one of Makita's Factory or Authorized Service Centres. If inspection shows the trouble is caused by defective workmanship or material, Makita will repair (or at our option, replace) without charge.
This Warranty does not apply:
where normal maintenance is required,
- repairs have been made or attempted by others,
- the tool has been abused, misused or improperly maintained,
- alterations have been made to the tool.
IN NO EVENT SHALL MAKITA BE LIABLE FOR ANY INDIRECT, INCIDENTAL OR CONSEQUENTIAL DAMAGES FROM THE SALE OR USE OF THE PRODUCT. THIS DISCLAIMER APPLIES BOTH DURING AND AFTER THE TERM OF THIS WARRANTY.
"The Makita Warranty is the only and the entire written warranty given by Makita for the Makita tools. No dealer or his agent or employee is authorized to extend or enlarge upon this warranty by any verbal or written statement or advertisement."
MAKITA DISCLAIMS LIABILITY FOR ANY IMPLIED WARRANTY INCLUDING IMPLIED WARRANTYES OF "MERCHANTABILITY" AND FITNESS FOR A SPECIFIC PURPOSE," AFTER THE ONE YEAR TERM OF THIS WARRANTY.
"This Warranty gives you specific rights. The provisions contained in this warranty are not intended to limit, modify, take away from, claim or exclude any warranties set forth in any provincial legislation. To the extent required by law, the provisions in any provincial or federal legislation with respect to warranties take precedence over the provisions in this warranty."
Makita Corporation
Anjo, Aichi, Japan
Made in China
Nan Zi Road, Kunshan Export Processing Zone Jiangsu, P.R. China