
C7200-MARKETINGEDITION - Imprimante numérique OKI - Notice d'utilisation et mode d'emploi gratuit
Retrouvez gratuitement la notice de l'appareil C7200-MARKETINGEDITION OKI au format PDF.

| Type de produit | Imprimante numérique |
| Marque | OKI |
| Modèle | C7200-MARKETINGEDITION |
| Technologie d'impression | LED couleur |
| Résolution maximale | 1200 x 1200 dpi |
| Vitesse d'impression couleur | Jusqu'à 26 pages par minute |
| Capacité papier standard | 640 feuilles |
| Impression recto-verso | Automatique |
| Connectivité | USB 2.0, Ethernet 10/100/1000 |
| Stockage interne | Disque dur 5,0 Go (optionnel) |
| Poids | Environ 60 kg |
| Dimensions (L x P x H) | 650 x 660 x 420 mm |
| Alimentation | 220-240 V CA, 50/60 Hz |
| Consommation électrique (max.) | 1200 W |
| Niveau sonore | Environ 52 dB (impression) |
| Systèmes d'exploitation supportés | Windows, Mac OS |
| Fonctions principales | Impression couleur, gestion du papier, disque dur pour stockage des travaux |
| Entretien et nettoyage | Nettoyage des rouleaux, remplacement des cartouches toner et tambour |
| Sécurité | Arrêt d'urgence, verrouillage du panneau de commande |
| Pièces détachées et réparabilité | Disque dur, cartouches toner, tambour, unité de fusion |
| Garantie limitée | 1 an (pièces et main-d'œuvre) |
| Informations générales | Notice disponible en téléchargement gratuit, assistance via le site OKI |
FOIRE AUX QUESTIONS - C7200-MARKETINGEDITION OKI
Questions des utilisateurs sur C7200-MARKETINGEDITION OKI
0 question sur cet appareil. Repondez a celles que vous connaissez ou posez la votre.
Poser une nouvelle question sur cet appareil
Téléchargez la notice de votre Imprimante numérique au format PDF gratuitement ! Retrouvez votre notice C7200-MARKETINGEDITION - OKI et reprennez votre appareil électronique en main. Sur cette page sont publiés tous les documents nécessaires à l'utilisation de votre appareil C7200-MARKETINGEDITION de la marque OKI.
MODE D'EMPLOI C7200-MARKETINGEDITION OKI
OKI 70037301 Hard Disk Drive Installation Instructions
Every effort has been made to ensure that the information in this document is complete, accurate, and up-to-date. Oki Data assumes no responsibility for the results of errors beyond its control. Oki Data also cannot guarantee that changes in software and equipment made by other manufacturers and referred to in this guide will not affect the applicability of the information in it. Mention of software products manufactured by other companies does not necessarily constitute endorsement by Oki Data.
Copyright 2001 by Oki Data Americas, Inc. All rights reserved.
Written and produced by the Oki Data Training & Publications Dept. Please address any comments on this publication
by mail to:
Training & Publications Dept.
Oki Data Americas, Inc.
2000 Bishops Gate Blvd.
Mt. Laurel, NJ 08054-4620
or by email to: pubs@okidata.com
For the latest information, we welcome you to visit our multilingual web site:
http://www.okidata.com
OKI, R/MD/MR Oki Electric Industry Company, Ltd. Adobe & PostScript, TM Adobe Systems, Inc. which may be registered in certain jurisdictions. Macintosh, TM Apple Computer, Inc., registered in the U.S. and other countries. Windows & Windows NT, R or TM Microsoft Corporation in the U.S. and other countries.
Prepare The Printer
1 Turn the printer off and unplug the power cord.
2 Detach the interface cable from the back of the printer.
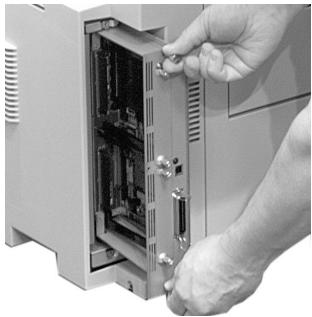
3 Remove and save the thumbscrews (1) at the top and bottom which hold the control board in place.
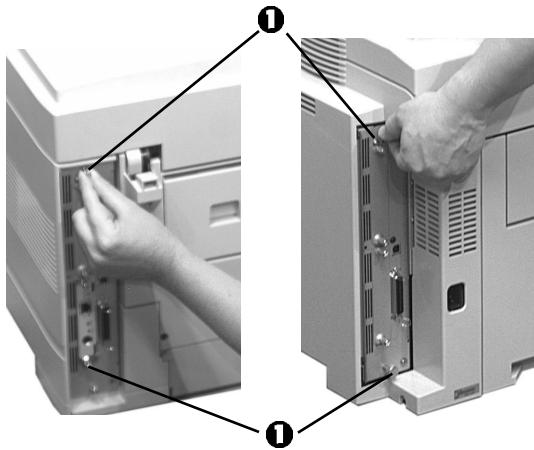
C7000 Series
C9000 Series
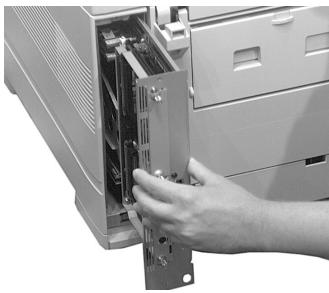
4 Grasp the control board and loosen it by wiggling it back and forth, then slide it out of the printer.
C7000 Series
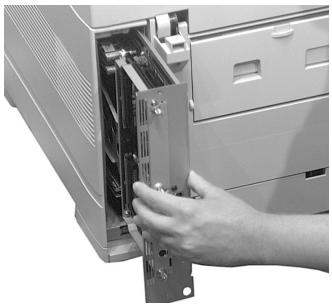
C9000 Series
Install the Hard Disk Drive (HDD)
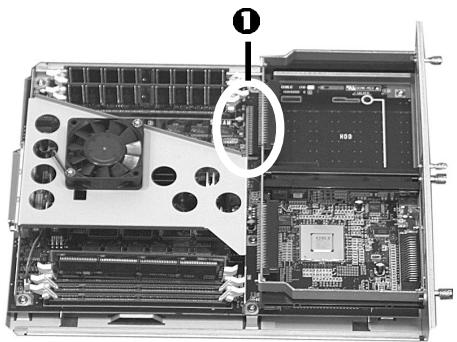
1 Locate the drive connector (1) on the control board:
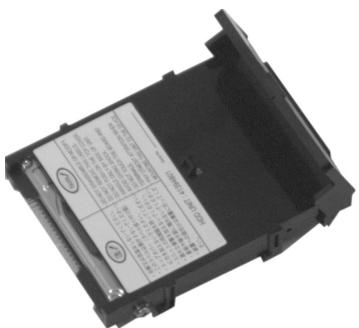
2 Remove the HDD from its shipping package.
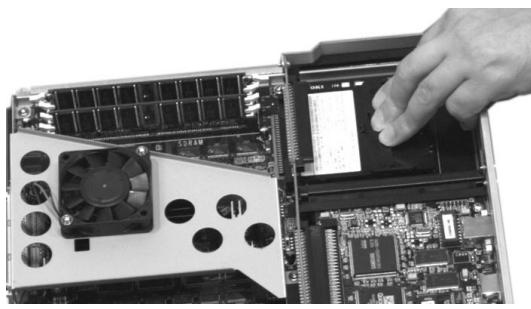
3 Lift the handle on the HDD and lower it onto the control board.
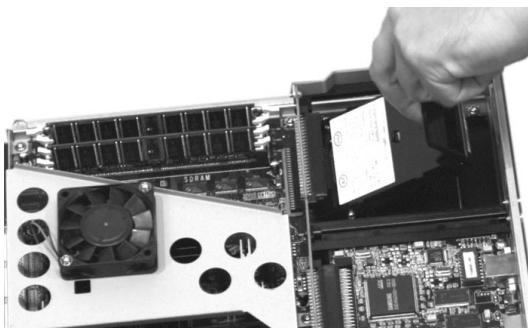
4 Insert the board firmly into the connector and press down on the handle to lock it in place.
Complete the Installation
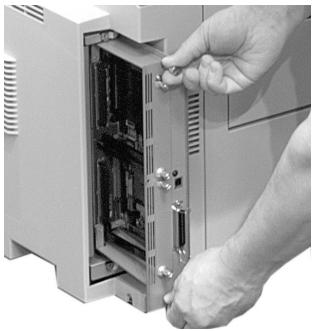
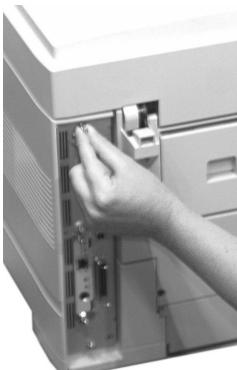
1 Align the bottom of the control board with the track in the printer and slide it back into place.
C7000 Series
C9000 Series
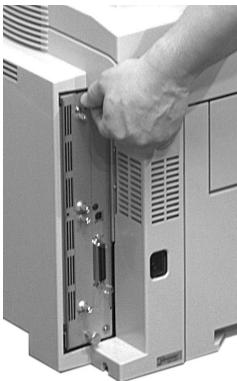
2 Reinstall the screws at the top and bottom of the board.
C7000 Series
C9000 Series
3 Reattach the interface cable, then plug the power cord into the power outlet and turn the printer on.
Check for Proper Installation
1 On the printer control panel, press MENU once or twice until INFORMATION MENU appears on the display.
2 Press SELECT. PRINT MENU MAP appears on the display.
3 Press SELECT. The MenuMap prints.
4 Check the MenuMap printout:
- At the top of the printout you should see "HDD:5.00 GB"
- In the right column you should see a new menu section entitled DISK MAINTENANCE
5 If you do not see these, remove the control board, lift the hard drive handle and check to be sure that the hard drive is firmly inserted in the connector. Then reinstall the control board and print the MenuMap again.
Activate the Hard Disk in the Driver
Windows® PCL Driver
1 Click Start Settings Printers. The Printers dialog box opens.
2 Right click the OKI PCL driver icon, then click Printing Preferences, Properties or Document Defaults, depending on the Windows system.
3 In the Paper tab, click Device options.
4 Click Printer hard disk to select it, then click OK.
5 Click OK, then close the Printers dialog box.
Windows Adobe® PostScript® Driver
1 Click Start Settings Printers. The Printers dialog box opens.
2 Right click the OKI PostScript driver icon, then click Properties.
3 Change the setting:
Windows 2000 and NT 4.0:
a Click the Device Settings tab.
b Scroll down to Installable Options and click Hard Disk.
c Under Change 'Hard Disk' Setting, click Installed.
Windows Me, 98 and 95:
a Click the Device Options tab.
b Click Hard Disk.
c Under Change setting for: Hard Disk, click Installed.
4 Click OK, then close the Printers dialog box.
Macintosh® Driver
1 Activate Chooser from the Apple menu.
2 Select LaserWriter 8.
3 Click Printer Setup.
4 Click Configure.
5 Change the Hard Disk setting to Installed.
6 Click OK twice, then close Chooser.
Limited Warranty: United States
Oki Data Americas, Inc. (Oki Data) warrants this OPTION to be free from defect in material and workmanship and will remedy any such defect according to the terms of this Limited Warranty.
Oki Data will repair (or at its option, replace) at no charge, any defective part(s) of the OPTION for one (1) year from the date of purchase. This Limited Warranty extends to the original purchaser only.
To make request or claim for service under this Limited Warranty the original purchaser must return the Oki Data product, shipping prepaid, in the original shipping container or equivalent, to Oki Data or an authorized Oki Data service center and assume the risk of loss or damage in transit. A written receipt for the product, showing the date of purchase, dealer's name, and item purchased must accompany any request or claim for work to be performed under this Limited Warranty.
This Limited Warranty shall not apply if the product has been damaged due to abuse, misuse, misapplication, accident, or as a result of service or modification by any other than an authorized Oki Data service center.
THERE ARE NO EXPRESS WARRANTY OTHER THAN THOSE ON THE FACE HEREOF AND DESCRIBED ABOVE. NO WARRANTY WHEHER EXPRESS OR IMPLIED, INCLUDING, BUT NOT LIMITED TO, ANY IMPLIED WARRANTY OF MERCHANTABILITY OR FITNESS FOR A PARTICULAR PURPOSE, SHALL EXTEND BEYOND THE RESPECTIVE WARRANTY PERIOD DESCRIBED ABOVE OF ONE (1) YEAR. Some states do not allow limitations on how long an implied warranty lasts, so the above limitation may not apply to you.
OKI DATA SHALL NOT BE RESPONSIBLE OR LIABLE FOR ANY SPECIAL, INCIDENTAL OR CONSEQUENTIAL DAMAGES OR LOSS ARISING FROM THE USE OF THIS PRODUCT.
Some states do not allow the exclusion or limitation of incidental or consequential damages, so the above exclusion may not apply to you.
Additional information on obtaining service under this Limited Warranty is available by contacting the Oki Data dealer from whom the product was purchased, by contacting Oki Data directly at 1-800-OKI-DATA (U.S. and Canada), or by contacting one of the service depots listed on the next page.
This Limited Warranty applies to this Oki Data Option. However, the procedure for obtaining service may vary outside the continental United States. Contact your Oki Data dealer for such warranty service information.
This warranty gives you specific legal rights, and you may also have other rights which vary from state to state.
For the most comprehensive, up-to-date listing of Oki Data authorized Service Centers, go to http://www.okidata.com and click on Dealer Locator or call 1-800-OKI-DATA (1-800-654-3282).
Oki Data Service Depot Information
UNITED STATES
Oki Data Americas, Inc.
2020 Bishops Gate Blvd.
Mt Laurel, NJ 08054
Tel: 1-800-654-3282 Fax: 1-856-222-5247
CANADA
Oki Data Americas, Inc.
2735 Matheson Blvd. East, Unit 1
Mississauga, Ontario
Canada L4W 4MB
Tel: 800-654-3282 Fax: 905-238-4427
MEXICO
Oki Data de Mexico, S.A. de C.V.
Mariano Escobedo No. 748 - 8 Piso
Col Anzures, e.p. 11590
Mexico, DF
Tel: (525) 263-8780 Fax: (525) 263-8785
BRAZIL
Oki Data do Brasil, Ltda.
Rua Alexandre Dumas, 2220 - 8 andar
Chácara Sto Antonio
São Paulo 04717-004, Brasil
Tel: 55 11-3444-3500 Fax: 55 11-3444-3501
Oki Data Americas, Inc.
2000 Bishops Gate Blvd.
Mt. Laurel, NJ 08054-4620
Tel: (800) 654-3282
FAX: (856) 222-5320
http://www.okidata.com
- OKI 70037301 Hard Disk Drive Installation Instructions
- http://www.okidata.com
- Prepare The Printer
- C7000 Series
- C9000 Series
- Install the Hard Disk Drive (HDD)
- Complete the Installation
- Check for Proper Installation
- Activate the Hard Disk in the Driver
- Windows® PCL Driver
- Windows Adobe® PostScript® Driver
- Windows 2000 and NT 4.0:
- Windows Me, 98 and 95:
- Macintosh® Driver
- Limited Warranty: United States
- Oki Data Service Depot Information
- UNITED STATES
- CANADA
- MEXICO
- BRAZIL
Marque : OKI
Modèle : C7200-MARKETINGEDITION
Catégorie : Imprimante numérique