
CTK-810 - Clavier numérique CASIO - Notice d'utilisation et mode d'emploi gratuit
Retrouvez gratuitement la notice de l'appareil CTK-810 CASIO au format PDF.


| Type de produit | Clavier numérique avec 61 touches (CTK-810) ou 76 touches (WK-110) |
| Alimentation | 6 piles AA ou adaptateur secteur AD-5 (vendu séparément) |
| Nombre de sonorités | 515 timbres intégrés incluant piano, cordes, synthés, etc. |
| Rythmes | 120 rythmes différents (rock, pop, jazz, latino, etc.) |
| Morceaux intégrés | 100 morceaux prêts à jouer (classiques, folk, etc.) |
| Système d'apprentissage | Leçon en 3 étapes avec évaluation des progrès |
| Polyphonie | 32 notes (maximum) |
| Accompagnement automatique | Casio Chord, Fingered, Full Range Chord |
| Mémoire d'enregistrement | 2 pistes d'enregistrement, capacité totale de 12 000 notes |
| Mémoire de configuration | Mémoire de registration : 32 configurations (4 x 8 banques) |
| Effets | Reverb (hall, room) et Chorus |
| Connectique | Prise casque/sortie, prise sustain/assignable, port USB |
| Fonction piano | Bouton Piano Setting optimisant le clavier pour le piano |
| Métronome | Intégré, réglable de 0 à 6 temps par mesure |
| Autres fonctions | Layer, Split, transposition, accord fin, touch response |
| Extinction automatique | Oui (environ 6 min sur piles, désactivable) |
| Nettoyage | Débrancher l'adaptateur, nettoyer avec un chiffon sec |
| Sécurité | Utiliser uniquement l'adaptateur AD-5 ; ne pas démonter ; tenir à l'écart des enfants de moins de 3 ans |
FOIRE AUX QUESTIONS - CTK-810 CASIO
Questions des utilisateurs sur CTK-810 CASIO
0 question sur cet appareil. Repondez a celles que vous connaissez ou posez la votre.
Poser une nouvelle question sur cet appareil
Téléchargez la notice de votre Clavier numérique au format PDF gratuitement ! Retrouvez votre notice CTK-810 - CASIO et reprennez votre appareil électronique en main. Sur cette page sont publiés tous les documents nécessaires à l'utilisation de votre appareil CTK-810 de la marque CASIO.
MODE D'EMPLOI CTK-810 CASIO
CTK-810 WK-IIO
GUIDE DE L'UTILISATEUR
DIRECTIVES ÉTABLIES PAR LES RÈGLES DE LA FCC POUR L'UTILISATION DE L'APPAREIL AUX ÉTATS-UNIS (non applicables dans d'autres régions).
AVIS
Cet équipement a été testé et déclaré conforme aux limites d'un appareil numérique de classe B, conformément à la partie 15 des règles de la FCC. Ces limites sont conçues pour fournir une protection raisonnable contre les interférences nuisibles dans une installation résidentielle. Cet équipement génère, utilise et peut émettre de l'énergie radiofréquence et, s'il n'est pas installé et utilisé conformément aux instructions, peut causer des interférences nuisibles aux communications radio. Cependant, il n'y a aucune garantie que des interférences ne se produiront pas dans une installation particulière. Si cet équipement provoque des interférences nuisibles à la réception radio ou télévision, ce qui peut être déterminé en éteignant et en allumant l'équipement, l'utilisateur est encouragé à essayer de corriger les interférences par une ou plusieurs des mesures suivantes :
Réorienter ou déplacer l'antenne de réception. - Augmenter la distance entre l'équipement et le récepteur. - Connecter l'équipement à une prise sur un circuit différent de celui auquel le récepteur est connecté. - Consulter le revendeur ou un technicien radio/TV expérimenté pour obtenir de l'aide.
AVERTISSEMENT FCC
Les changements ou modifications non expressément approuvés par la partie responsable de la conformité pourraient annuler le droit de l'utilisateur à utiliser l'équipement.
Déclaration de conformité
Numéro de modèle : CTK-810/WK-110
Nom commercial : CASIO COMPUTER CO., LTD.
Partie responsable : CASIO, INC.
Adresse : 570 MT. PLEASANT AVENUE, DOVER, NEW JERSEY 07801
Numéro de téléphone : 973-361-5400
Cet appareil est conforme à la partie 15 des règles de la FCC. Son fonctionnement est soumis aux deux conditions suivantes :
(1) Cet appareil ne doit pas causer d'interférences nuisibles, et (2) il doit accepter toute interférence reçue, y compris celles pouvant entraîner un fonctionnement indésirable.
Important !
Veuillez noter les informations importantes suivantes avant d'utiliser ce produit.
- Avant d'utiliser l'adaptateur secteur optionnel AD-5 pour alimenter l'appareil, vérifiez d'abord que l'adaptateur secteur n'est pas endommagé. Inspectez soigneusement le cordon d'alimentation pour détecter toute cassure, coupure, fil exposé ou autre dommage grave. Ne laissez jamais les enfants utiliser un adaptateur secteur gravement endommagé.
- Ne tentez jamais de recharger des piles.
- N'utilisez pas de piles rechargeables.
- Ne mélangez jamais des piles usagées avec des piles neuves.
- Utilisez les piles recommandées ou des types équivalents.
- Assurez-vous toujours que les pôles positif (+) et négatif (-) sont orientés correctement, comme indiqué près du compartiment à piles.
- Remplacez les piles dès que possible après tout signe de faiblesse.
- Ne court-circuitez pas les bornes des piles.
- Ce produit n'est pas destiné aux enfants de moins de 3 ans.
- Utilisez uniquement l'adaptateur CASIO AD-5.
- L'adaptateur secteur n'est pas un jouet.
- Assurez-vous de débrancher l'adaptateur secteur avant de nettoyer le produit.
Cette marque s'applique uniquement dans les pays de l'UE.

CASIO Europe GmbH Bornbarch 10, 22848 Norderstedt, Allemagne
Félicitations pour votre choix de l'instrument de musique électronique CASIO.
- Avant d'utiliser l'instrument, assurez-vous de lire attentivement les instructions contenues dans ce manuel.
- Veuillez conserver toutes les informations pour référence future.
Symboles
Divers symboles sont utilisés dans ce guide de l'utilisateur et sur le produit lui-même pour garantir une utilisation sûre et correcte du produit, et pour prévenir les blessures de l'utilisateur et d'autres personnes ainsi que les dommages matériels. Ces symboles et leur signification sont indiqués ci-dessous.

DANGER
Ce symbole indique des informations qui, si elles sont ignorées ou appliquées incorrectement, créent un danger de mort ou de blessures graves.

AVERTISSEMENT
Cette indication stipule des questions qui présentent un risque de mort ou de blessures graves si le produit est utilisé incorrectement en ignorant cette indication.

ATTENTION
Cette indication stipule des questions qui présentent un risque de blessures ainsi que des questions pour lesquelles il y a une probabilité de dommages physiques uniquement si le produit est utilisé incorrectement en ignorant cette indication.
Exemples de symboles

Ce symbole triangulaire () signifie que l'utilisateur doit être prudent. (L'exemple à gauche indique une mise en garde contre les chocs électriques.)

Ce cercle barré (O) signifie que l'action indiquée ne doit pas être effectuée. Les indications à l'intérieur ou à proximité de ce symbole sont spécifiquement interdites. (L'exemple à gauche indique que le démontage est interdit.)

Le point noir (●) signifie que l'action indiquée doit être effectuée. Les indications à l'intérieur de ce symbole sont des actions spécifiquement recommandées. (L'exemple à gauche indique que la fiche d'alimentation doit être débranchée de la prise électrique.)
DANGER
Piles alcalines
Effectuez immédiatement les étapes suivantes si du liquide s'échappant de piles alcalines entre en contact avec vos yeux.
- Ne vous frottez pas les yeux ! Rincez-les à l'eau.
- Contactez immédiatement votre médecin. Laisser du liquide de pile alcaline dans les yeux peut entraîner une perte de la vue.

AVERTISSEMENT
Fumée, odeur étrange, surchauffe
Continuer à utiliser le produit alors qu'il émet de la fumée, une odeur étrange ou de la chaleur crée un risque d'incendie et de choc électrique. Suivez immédiatement les étapes suivantes.
- Éteignez l'appareil.
- Si vous utilisez l'adaptateur secteur, débranchez-le de la prise murale.
- Contactez votre revendeur d'origine ou un prestataire de services agréé CASIO.
Adaptateur secteur
- Une mauvaise utilisation de l'adaptateur secteur crée un risque d'incendie et de choc électrique. Assurez-vous toujours de respecter les précautions suivantes.
- Veillez à n'utiliser que l'adaptateur secteur spécifié pour ce produit.
- Utilisez uniquement une source d'alimentation dont la tension est conforme à la valeur nominale indiquée sur l'adaptateur secteur.
- Ne surchargez pas les prises électriques et les rallonges.
- Une mauvaise utilisation du cordon d'alimentation de l'adaptateur secteur peut l'endommager ou le casser, créant un risque d'incendie et de choc électrique. Veillez toujours à respecter les précautions suivantes.
- Ne placez jamais d'objets lourds sur le cordon et ne l'exposez pas à la chaleur.
- N'essayez jamais de modifier le cordon ni de le plier excessivement.
- Ne tordez jamais le cordon et ne l'étirez pas.
- Si le cordon d'alimentation ou la fiche est endommagé, contactez votre revendeur d'origine ou un centre de service agréé CASIO.


- Ne touchez jamais l'adaptateur secteur avec les mains mouillées.
Cela créerait un risque de choc électrique.
- Utilisez l'adaptateur secteur dans un endroit où il ne sera pas éclaboussé par de l'eau. L'eau présente un risque d'incendie et de choc électrique.
- Ne placez pas de vase ou tout autre récipient contenant du liquide sur l'adaptateur secteur. L'eau présente un risque d'incendie et de choc électrique.
Piles
Une mauvaise utilisation des piles peut provoquer une fuite, entraînant des dommages aux objets environnants, ou une explosion, présentant un risque d'incendie et de blessures. Assurez-vous toujours de respecter les précautions suivantes.
- N'essayez jamais de démonter les piles ou de les court-circuiter.
- N'exposez jamais les piles à la chaleur et ne les jetez pas au feu.
- Ne mélangez jamais des piles usagées avec des piles neuves.
- Ne mélangez jamais des piles de types différents.
- Ne rechargez pas les piles.
- Assurez-vous que les bornes positive (+) et négative (-) des piles sont orientées correctement.
N'incinérez pas le produit.
Ne jetez jamais le produit au feu.
Cela pourrait provoquer une explosion, présentant un risque d'incendie et de blessures.
Eau et corps étrangers
L'eau, d'autres liquides et des corps étrangers (tels que des morceaux de métal) pénétrant dans le produit présentent un risque d'incendie et de choc électrique. Prenez immédiatement les mesures suivantes.
- Coupez l'alimentation.
- Si vous utilisez l'adaptateur secteur, débranchez-le de la prise murale.
- Contactez votre revendeur d'origine ou un centre de service agréé CASIO.
Démontage et modification
N'essayez jamais de démonter ce produit ou de le modifier de quelque manière que ce soit. Cela présente un risque de choc électrique, de brûlure ou d'autres blessures. Confiez toute inspection, tout réglage et toute maintenance internes à votre revendeur d'origine ou à un centre de service agréé CASIO.


Chute et impact
L'utilisation continue de ce produit après qu'il a été endommagé par une chute ou un impact violent présente un risque d'incendie et de choc électrique. Prenez immédiatement les mesures suivantes.
- Coupez l'alimentation.
- Si vous utilisez l'adaptateur secteur, débranchez-le de la prise murale.
- Contactez votre revendeur d'origine ou un centre de service agréé CASIO.
Sacs en plastique
Ne placez jamais le sac en plastique dans lequel le produit est livré sur votre tête ou dans votre bouche. Cela présente un risque d'étouffement.
Une attention particulière à cette précaution est requise en présence de jeunes enfants.
Ne montez pas sur le produit ou le support.*
Monter sur le produit ou le support peut le faire basculer ou l'endommager. Une attention particulière à cette précaution est requise en présence de jeunes enfants.
Emplacement
Évitez d'installer le produit sur un support instable, sur une surface inégale ou tout autre emplacement instable. Un emplacement instable peut faire tomber le produit, créant un risque de blessure.


ATTENTION
Adaptateur secteur
- Une mauvaise utilisation de l'adaptateur secteur présente un risque d'incendie et de choc électrique. Assurez-vous toujours de respecter les précautions suivantes.
- Ne placez pas le cordon électrique près d'une cuisinière ou d'autres sources de chaleur.
- Ne tirez jamais sur le cordon pour débrancher la prise électrique. Saisissez toujours l'adaptateur secteur pour débrancher.
- Une mauvaise utilisation de l'adaptateur secteur présente un risque d'incendie et de choc électrique. Assurez-vous toujours de respecter les précautions suivantes.
- Insérez l'adaptateur secteur dans la prise murale jusqu'au bout.
- Débranchez l'adaptateur secteur de la prise murale pendant les orages ou avant de partir en voyage ou en cas d'absence prolongée.
- Pour éviter l'accumulation de poussière entre les broches de la fiche d'alimentation, débranchez-la de la prise de courant et utilisez un chiffon sec ou un aspirateur pour enlever la poussière au moins une fois par an.
- N'utilisez jamais de détergent pour nettoyer le cordon d'alimentation, en particulier la fiche et les connecteurs.
Déplacement du produit
Avant de déplacer le produit, débranchez toujours l'adaptateur secteur de la prise murale et déconnectez tous les autres câbles et cordons de connexion. Laisser les cordons connectés présente un risque de dommages aux cordons, d'incendie et de choc électrique.
Nettoyage
Avant de nettoyer le produit, débranchez toujours l'adaptateur secteur de la prise murale. Laisser l'adaptateur secteur branché présente un risque de dommages à l'adaptateur, d'incendie et de choc électrique.
Piles
Une mauvaise utilisation des piles peut provoquer des fuites, entraînant des dommages aux objets environnants, ou une explosion, créant un risque d'incendie et de blessures. Assurez-vous toujours de respecter les précautions suivantes.
- Utilisez uniquement les piles spécifiées pour ce produit.
- Retirez les piles du produit si vous ne prévoyez pas de l'utiliser pendant une longue période.


Connecteurs
Connectez uniquement les appareils et équipements spécifiés aux connecteurs du produit. La connexion d'un appareil ou équipement non spécifié présente un risque d'incendie et de choc électrique.
Emplacement
Évitez les emplacements suivants pour ce produit. Ces emplacements présentent un risque d'incendie et de choc électrique.
- Zones soumises à une humidité élevée ou à de grandes quantités de poussière.
- Dans les zones de préparation des aliments ou autres zones exposées aux fumées d'huile.
- À proximité d'équipements de climatisation, sur un tapis chauffant, dans des zones exposées à la lumière directe du soleil, à l'intérieur d'un véhicule garé au soleil, ou dans tout autre endroit soumettant le produit à des températures élevées.
Écran d'affichage
- Ne poussez jamais sur le panneau LCD de l'écran d'affichage et ne lui faites pas subir de chocs violents. Cela pourrait fissurer le verre du panneau LCD, entraînant un risque de blessure.
- Si le panneau LCD se fissure ou se brise, ne touchez jamais le liquide à l'intérieur du panneau. Le liquide du panneau LCD peut provoquer une irritation cutanée.
- Si du liquide de panneau LCD pénètre dans votre bouche, rincez-vous immédiatement la bouche avec de l'eau et contactez votre médecin.
- Si du liquide de panneau LCD entre en contact avec vos yeux ou votre peau, rincez à l'eau claire pendant au moins 15 minutes, puis contactez un médecin.
Volume sonore
N'écoutez pas de musique à des volumes très élevés pendant de longues périodes. Une attention particulière doit être portée à cette précaution lors de l'utilisation d'écouteurs. Des réglages de volume élevés peuvent endommager votre audition.
Objets lourds
Ne placez jamais d'objets lourds sur le produit.
Cela pourrait rendre le produit instable, provoquant son basculement ou la chute de l'objet, entraînant un risque de blessure.


Assemblage correct du support*
Un support mal assemblé peut basculer, provoquant la chute du produit et créant un risque de blessure.
Assurez-vous d'assembler correctement le support, en suivant les instructions d'assemblage fournies avec celui-ci. Assurez-vous de monter correctement le produit sur le support.
- Le support est disponible en option.

IMPORTANT !
Lors de l'utilisation de piles, assurez-vous de les remplacer ou de passer à une source d'alimentation alternative dès que vous remarquez l'un des symptômes suivants.
- Voyant d'alimentation faible
- L'instrument ne s'allume pas.
- Affichage faible ou difficile à lire
- Volume anormalement faible du haut-parleur/casque, distorsion de la sortie sonore
- Interruption occasionnelle du son lors de la lecture à volume élevé
- Coupure soudaine de l'alimentation lors de la lecture à volume élevé
- Assombrissement de l'affichage lors de la lecture à volume élevé
- Sortie sonore continue même après avoir relâché une touche
- Un son totalement différent peut se faire entendre
- Lecture anormale des motifs rythmiques et des morceaux de démonstration
Les noms de sociétés et de produits utilisés dans ce manuel peuvent être des marques déposées d'autres sociétés.
515 tonalités
Une large sélection de sonorités comprend des pianos stéréo et des sons synthétisés, des kits de batterie et bien plus encore.
D'autres caractéristiques incluent des effets numériques qui contrôlent les caractéristiques acoustiques des sonorités.
Bouton PIANO SETTING
Une simple pression sur un bouton optimise la configuration du clavier pour le jeu pianistique.
Système de leçon en 3 étapes
- Système de leçon en 3 étapes : vous pouvez maintenant apprendre pas à pas les parties qui composent les morceaux intégrés du clavier et les données SMF que vous téléchargez sur Internet. Les conseils affichés à l'écran vous guident sur le chemin de la maîtrise musicale.
- Système d'évaluation : le clavier peut être configuré pour évaluer votre progression dans les leçons en 3 étapes. Vous pouvez même faire afficher vos points, à la fois en cours de leçon et à la fin.
100 morceaux intégrés
120 rythmes
Une sélection de rythmes couvre le rock, la pop, le jazz et pratiquement tout autre style musical imaginable.
Accompagnement automatique
Jouez simplement un accord et les parties de rythme, de basse et d'accords correspondantes jouent automatiquement. Les préréglages One Touch rappellent instantanément les réglages de sonorité et de tempo les plus adaptés au rythme que vous utilisez.
Mémoire d'enregistrement
Les configurations du clavier peuvent être stockées en mémoire pour être rappelées plus tard et appliquées instantanément quand vous en avez besoin. Jusqu'à 32 configurations (4 configurations × 8 banques) peuvent être stockées dans la mémoire d'enregistrement.
□ Enregistrement et lecture
Avec l'enregistrement de leçon, vous pouvez enregistrer votre jeu pendant que vous jouez avec les morceaux intégrés pour une lecture ultérieure.
L'enregistrement de performance vous permet d'enregistrer vos performances, y compris l'accompagnement automatique, en temps réel.
Stockage et lecture des données de morceaux transférées depuis votre ordinateur
Vous pouvez connecter votre clavier à un ordinateur, utiliser un logiciel de conversion spécial CASIO pour convertir des données SMF que vous achetez ou créez au format CASIO, puis les transférer vers le clavier.
Sommaire
Précautions de sécurité. E-1
Caractéristiques principales E-5
Guide général. E-8
Fixation du pupitre E-12
Référence rapide. E-13
Pour jouer du clavier. E-13
Alimentation E-15
Utilisation des piles E-15
Utilisation de l'adaptateur secteur. E-16
Mise hors tension automatique E-17
Contenu de la mémoire. E-17
Connexions E-18
Prise casque/borne de sortie E-18
Connexion à un ordinateur ou autre
équipement E-18
Prise sustain/assignable. E-19
Accessoires et options E-19
Opérations de base. E-20
Pour jouer au clavier. E-20
Sélection d'un son. E-20
Utilisation des effets sonores E-21
Bouton PIANO SETTING E-21
Lecture d'un morceau intégré...... E-22
Pour lire un morceau de la banque de chansons .E-22
Réglage du tempo. E-23
Pour mettre la lecture en pause E-23
Pour effectuer un retour rapide E-23
Pour effectuer une avance rapide E-23
Bouclage d'une phrase musicale. E-24
Pour changer le timbre de la mélodie. E-24
Pour jouer tous les morceaux en succession. E-24
Leçon en 3 étapes......E-25
Mode d'évaluation E-26
Utilisation des fonctions de leçon et
Mode d'évaluation E-26
Étape 1 - Maîtrisez le rythme. E-27
Étape 2 - Maîtrisez les notes. E-27
Étape 3 – Jouez à vitesse normale. E-28
Évaluation de votre jeu au clavier. E-28
Guide de doigté vocal. E-29
Utilisation du métronome. E-29
Accompagnement automatique ...... E-30
Sélection d'un rythme E-30
Lecture d'un rythme. E-31
Réglage du tempo. E-31
Utilisation de l'accompagnement automatique E-31
Utilisation d'un motif d'intro E-35
Utilisation d'un motif de remplissage. E-35
Utilisation d'une variation de rythme. E-35
Utilisation d'un motif de remplissage avec une variation
Rythme E-35
Démarrage synchro de l'accompagnement avec
Lecture du rythme E-35
Terminer avec un motif de fin E-36
Utilisation du préréglage One-touch E-36
Mémoire d'enregistrement ......... E-37
Fonctions de la mémoire d'enregistrement. E-37
Pour sauvegarder une configuration dans la mémoire
d'enregistrement E-38
Pour rappeler une configuration depuis la mémoire
d'enregistrement E-38
Enregistrement et lecture... E-39
Parties et pistes E-39
Enregistrement en jouant avec un
morceau intégré E-40
Lecture d'un enregistrement de leçon .... E-41
Enregistrement d'une performance . E-41
Lecture d'une performance
enregistrée E-43
Superposition d'une performance
Enregistrement E-44
Suppression d'une partie/piste spécifique. E-44
Réglages du clavier E-45
Utilisation du Layer E-45
Utilisation du Split E-45
Utilisation de Layer et Split ensemble E-46
Transposition du clavier E-47
Réglage de l'accompagnement et
Volume de la banque de chansons E-47
Utilisation de la réponse au toucher E-48
Accordage du clavier E-48
Connexion à un
ordinateur E-49
Connexion à un ordinateur E-49
Élargir les sélections dans le
Song Bank Tunes E-50
Utilisation des données SMF sur le CD-ROM fourni E-51
CD-ROM E-51
Son General MIDI E-51
Modification des réglages E-51
Dépannage E-54
Spécifications E-56
Précautions d'utilisation E-57
Annexe A-1
Liste des sons A-1
Liste d'affectation des percussions A-5
Tableau des accords FINGERED A-7
Liste des rythmes A-8
Liste des morceaux A-9
Messages MIDI pouvant être envoyés et reçus via le port USB
CTK-810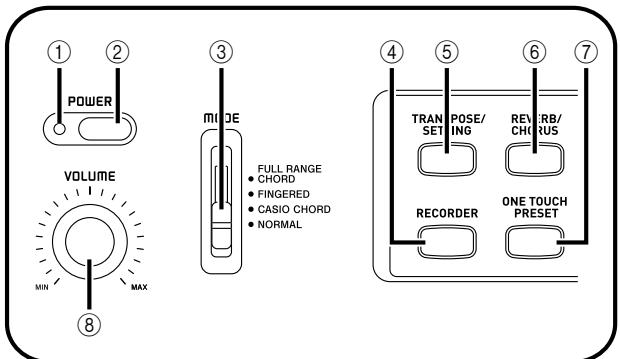
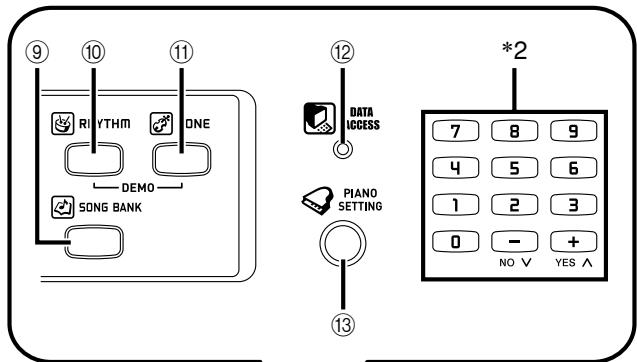
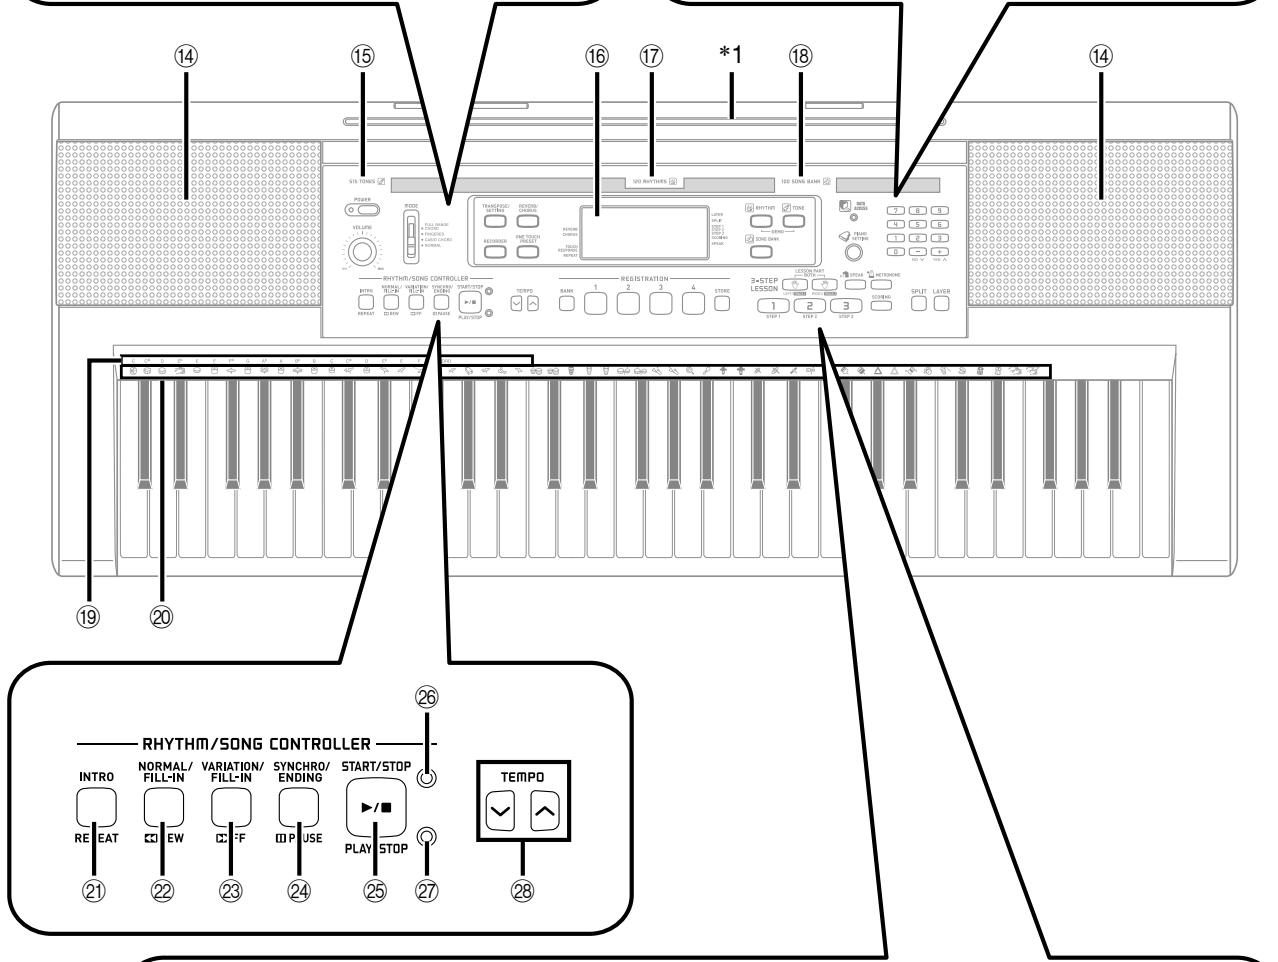
① Témoin d'alimentation ② Bouton POWER ③ Commutateur MODE ④ Bouton REORDER ⑤ Bouton TRANSPOSE/SETTING ⑥ Bouton REVERB/CHORUS ⑦ Bouton ONE TOUCH PRESET ⑧ Bouton VOLUME ⑨ Bouton SONG BANK ⑩ Bouton RHYTHM ⑪ Bouton TONE ⑫ Témoin DATA ACCESS ⑬ Bouton PIANO SETTING ⑭ Haut-parleur ⑮ Liste des TONE ⑯ Écran ⑰ Liste des RHYTHM ⑱ Liste des SONG BANK ⑲ Noms des accords fondamentaux ⑳ Liste des instruments de percussion
- CONTRÔLEUR RYTHME/CHANSON
Bouton INTRO, bouton REPEAT ② Bouton NORMAL/FILL-IN, bouton REW ③ Bouton VARIATION/FILL-IN, bouton FF ④ Bouton SYNCHRO/ENDING, bouton PAUSE ⑤ Bouton START/STOP, bouton PLAY/STOP ⑥ Témoin du contrôleur de rythme ⑦ Témoin du contrôleur de chanson
⑧ Boutons TEMPO ⑨ Bouton BANK ⑩ Boutons REGISTRATION ⑪ Bouton STORE
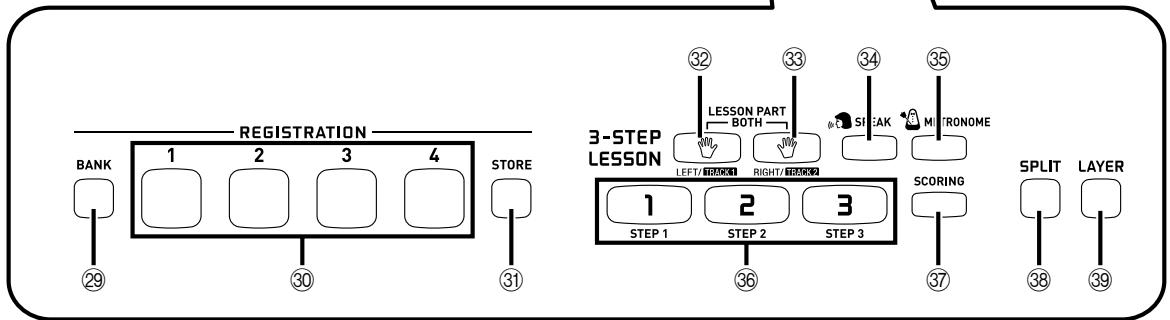
SYSTÈME DE LEÇON EN 3 ÉTAPES
⑫ Bouton LEFT/TRACK 1, bouton RIGHT/TRACK 2, bouton SPEAK ⑬ Bouton METRONOME ⑭ Boutons STEP 1 à 3 ⑮ Bouton SCORING
Bouton SPLIT ⑯ Bouton LAYER
■ WK-110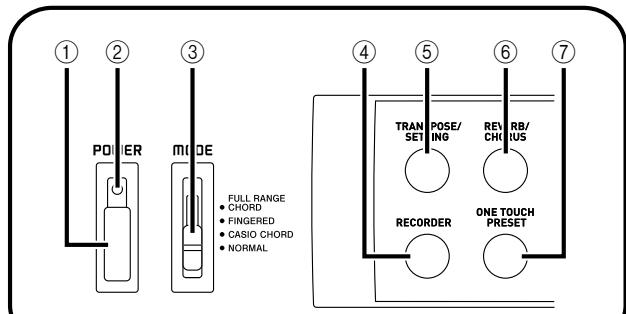
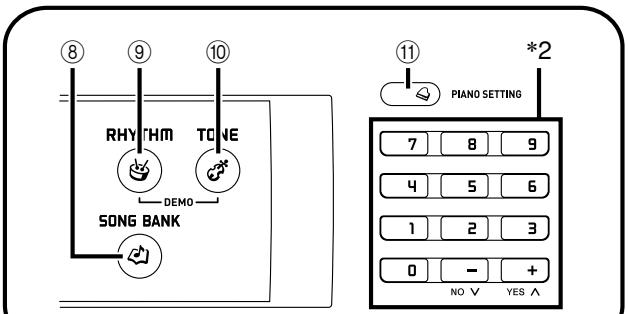
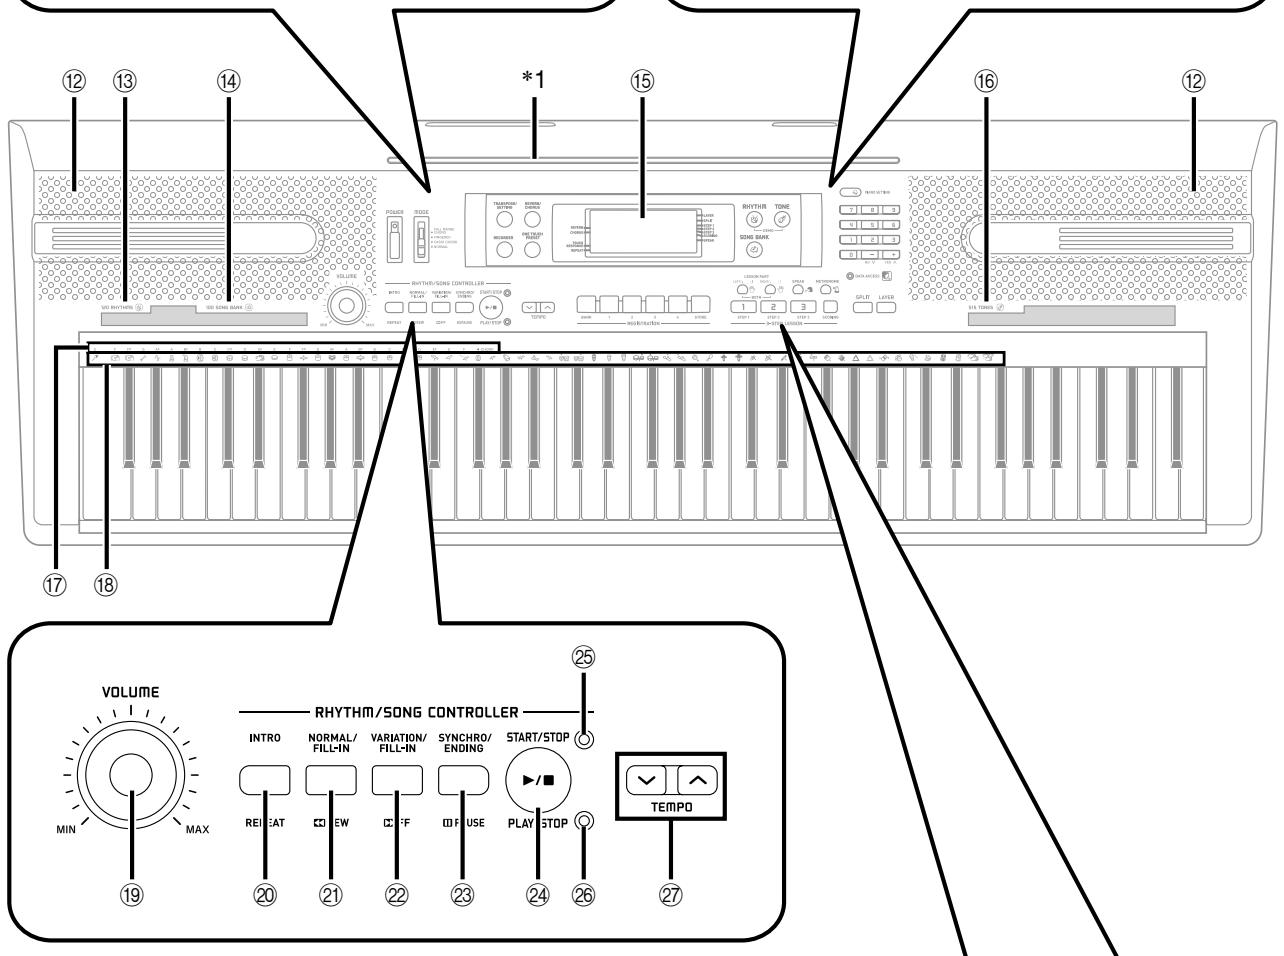
① Bouton POWER ② Témoin d'alimentation ③ Commutateur MODE ④ Bouton REORDER ⑤ Bouton TRANSPOSE/SETTING ⑥ Bouton REVERB/CHORUS ⑦ Bouton ONE TOUCH PRESET ⑧ Bouton SONG BANK ⑨ Bouton RHYTHM ⑩ Bouton TONE ⑪ Bouton PIANO SETTING ⑫ Haut-parleur ⑬ Liste des RHYTHM ⑭ Liste des SONG BANK ⑮ Écran ⑯ Liste des TONE ⑰ Noms des accords fondamentaux ⑱ Liste des instruments de percussion ⑲ Bouton VOLUME
- CONTRÔLEUR RYTHME/CHANSON
Bouton INTRO, bouton REPEAT ⑳ Bouton NORMAL/FILL-IN, bouton REW ㉑ Bouton VARIATION/FILL-IN, bouton FF ㉒ Bouton SYNCHRO/ENDING, bouton PAUSE ㉓ Bouton START/STOP, bouton PLAY/STOP ㉔ Témoin du contrôleur de rythme ㉕ Témoin du contrôleur de chanson
㉖ Boutons TEMPO ㉗ Bouton BANK ㉘ Boutons REGISTRATION ㉙ Bouton STORE
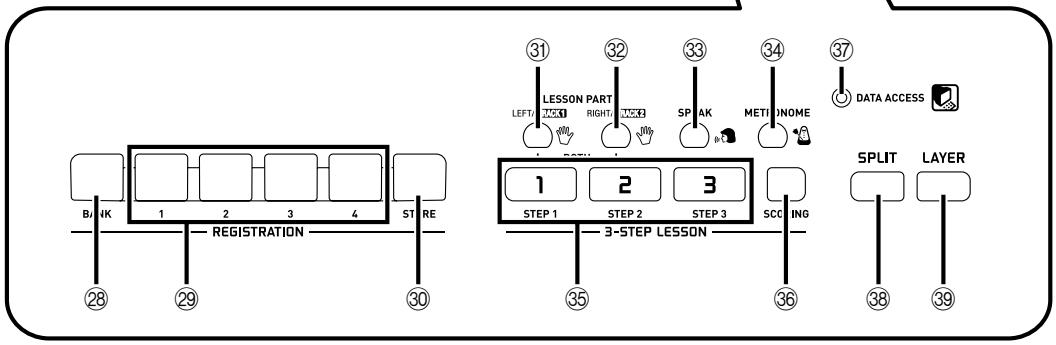
SYSTÈME DE LEÇON EN 3 ÉTAPES
㉚ Bouton LEFT/TRACK 1, bouton RIGHT/TRACK 2, bouton SPEAK ㉛ Bouton METRONOME ㉜ Boutons STEP 1 à 3 ㉝ Bouton SCORING
Bouton DATA ACCESS, bouton SPLIT 39, bouton LAYER
REMARQUE
- Les illustrations de ce guide de l'utilisateur montrent le WK-110.
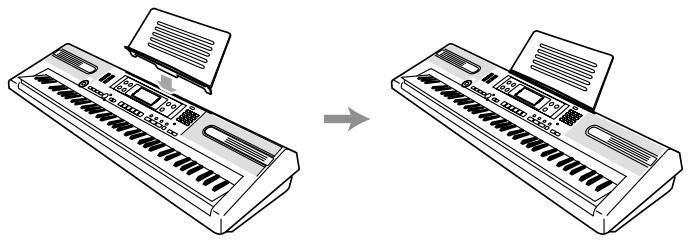
*1 Fixation du pupitre
Insérez le pupitre dans la fente située en haut du clavier, comme indiqué sur l'illustration.
*2
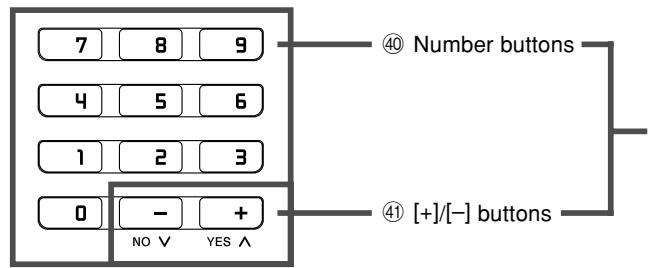
- Pour saisir des nombres afin de modifier un nombre ou un réglage affiché.
- Les valeurs négatives ne peuvent pas être saisies à l'aide des boutons numériques. Utilisez plutôt [+] (augmenter) et [-] (diminuer).
Panneau arrière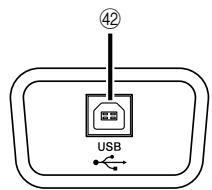
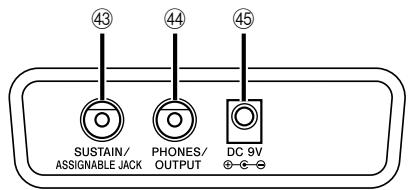
④ Port USB, borne SUSTAIN/ASSIGNABLE 44, borne PHONES/OUTPUT ⑤ prise DC 9V
Voyants du contrôleur
Voyant du contrôleur de rythme (CTK-810 : ⑧, WK-110 : ⑧)
Appuyer sur le bouton RHYTHM pour entrer en mode Rythme allume le voyant du contrôleur de rythme. Cela indique que les boutons ② à ⑤ (WK-110 : ② à ④) fonctionnent actuellement comme boutons de contrôle du rythme.
Voyant du contrôleur de morceau (CTK-810 : ⑦, WK-110 : ⑧)
Appuyer sur le bouton SONG BANK, ou appuyer simultanément sur les boutons RHYTHM et TONE pour lancer la lecture du morceau de démonstration, allume le voyant du contrôleur de morceau. Cela indique que les boutons ② à ⑤ (WK-110 : ⑩ à ④) fonctionnent actuellement comme boutons de contrôle de lecture.
NOTE
- Les exemples d'affichage présentés dans ce guide de l'utilisateur sont fournis à titre d'illustration uniquement. Le texte et les valeurs réels qui apparaissent à l'écran peuvent différer des exemples présentés dans ce guide de l'utilisateur.
- Le fait de regarder un écran à cristaux liquides sous un angle peut modifier l'apparence du contraste de l'affichage. Le contraste de l'affichage de ce clavier est réglé pour permettre une lecture facile à une personne assise sur une chaise devant le clavier. Notez que le contraste de l'affichage est fixe et ne peut pas être réglé.
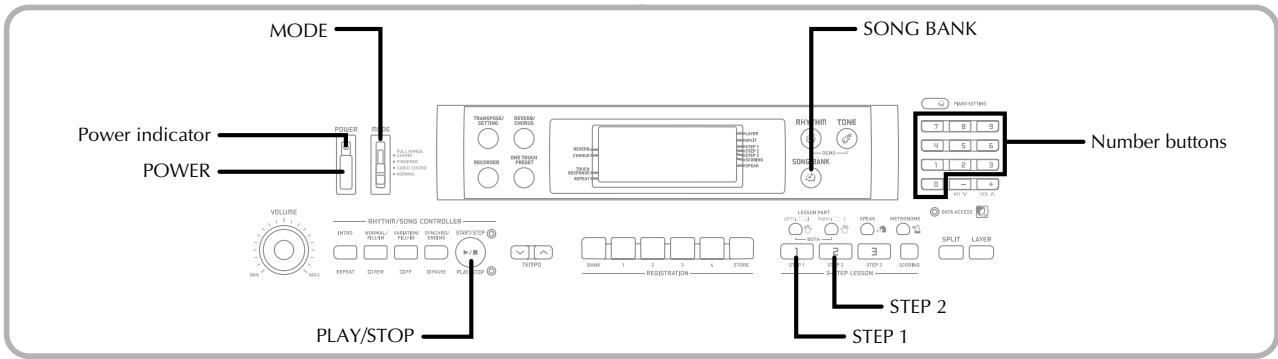
Cette section fournit un aperçu rapide du fonctionnement du clavier à l'aide des étapes une et deux de la fonction de leçon en 3 étapes.
Avec la fonction de leçon en 3 étapes, les touches du guide du clavier à l'écran s'allument pour montrer la note suivante de l'air.
Pour jouer du clavier
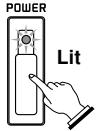
Appuyez sur le bouton POWER pour mettre sous tension.
- Cela allume le témoin d'alimentation.
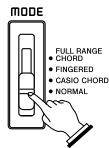
2 Réglez le commutateur MODE sur NORMAL.
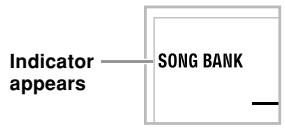
Appuyez sur le bouton SONG BANK.
4 Trouvez l'air que vous voulez jouer dans la liste SONG BANK, puis utilisez les touches numériques pour saisir son numéro à trois chiffres.
- Voir la page A-9 pour la liste SONG BANK.
Exemple : Pour sélectionner "047 ALOHA OE", saisissez 0, 4 puis 7.

5 Appuyez sur le bouton STEP 1 ou STEP 2. - Le clavier émet un battement de comptage et attend que vous jouiez quelque chose sur le clavier. Les touches que vous devez appuyer en premier clignotent à l'écran. 6 Jouez la mélodie en même temps que l'accompagnement de l'air sélectionné. - Jouez conformément aux touches du clavier, aux doigtés et aux notes qui apparaissent à l'écran.
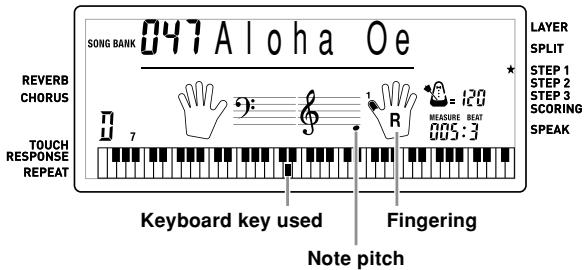
Si vous avez sélectionné la leçon Étape 1
- Jouez les notes sur le clavier.
- L'accompagnement (partie de la main gauche) joue en rythme avec les notes.
- Avec l'étape 1, la bonne note de mélodie est jouée quelle que soit la touche du clavier que vous appuyez.
Si vous avez sélectionné l'étape 2 de la leçon
- Jouez les bonnes notes sur le clavier.
- Pendant qu'une touche du guide clavier à l'écran est allumée, appuyez sur la touche correspondante du clavier réel. Dans le cas d'un morceau à deux mains, l'indication du guide clavier s'éteint lorsque vous appuyez sur une touche du clavier, et la touche du guide clavier à l'écran s'allume pour la note suivante à jouer.
- L'accompagnement (partie de la main gauche) joue en rythme avec les notes, tant que vous appuyez sur les bonnes touches du clavier.

Pour arrêter la lecture à tout moment, appuyez sur le bouton PLAY/STOP.
Ce clavier peut être alimenté par le courant d'une prise murale domestique standard (en utilisant l'adaptateur secteur spécifié) ou par des piles. Assurez-vous toujours d'éteindre le clavier lorsque vous ne l'utilisez pas.
Utilisation des piles
Assurez-vous toujours d'éteindre le clavier avant d'insérer ou de remplacer les piles.
REMARQUE
- Le clavier peut ne pas fonctionner correctement si vous insérez ou remplacez les piles alors qu'il est allumé. Si cela se produit, éteignez le clavier puis rallumez-le pour rétablir les fonctions.
Pour insérer les piles
1 Retirez le couvercle du compartiment à piles.
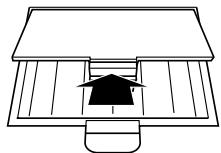
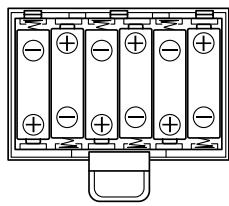
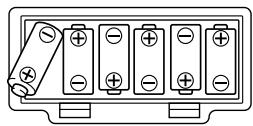
2 Insérez 6 piles de taille AA dans le compartiment à piles.
- Assurez-vous que les extrémités positive (+) et négative (-) sont orientées correctement.
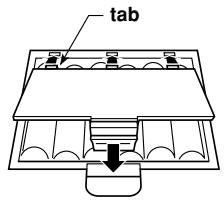
3 Insérez les languettes du couvercle du compartiment à piles dans les trous prévus et fermez le couvercle.
1 Retirez le couvercle du compartiment à piles.
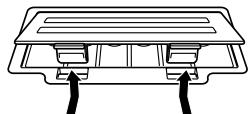
2 Insérez six piles de taille D dans le compartiment à piles.
- Assurez-vous que les extrémités positive (+) et négative (-) sont orientées correctement.
3 Insérez les languettes du couvercle du compartiment à piles dans les trous prévus et fermez le couvercle.
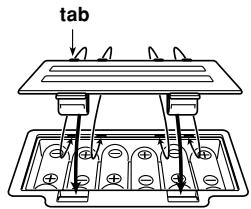
Informations importantes sur les piles
La durée de vie approximative des piles est la suivante. Piles alcalines : 2,5 heures. Piles au manganèse : 0,6 heure.
La valeur ci-dessus correspond à la durée de vie standard des piles à température normale, avec le volume du clavier réglé sur moyen. Des températures extrêmes ou un volume très élevé peuvent réduire la durée de vie des piles.

AVERTISSEMENT
Une mauvaise utilisation des piles peut provoquer des fuites, endommager les objets à proximité, ou provoquer une explosion, créant un risque d'incendie et de blessures. Respectez toujours les précautions suivantes.
- Ne démontez jamais les piles et ne les mettez jamais en court-circuit.
- N'exposez jamais les piles à la chaleur et ne les jetez pas au feu.
- Ne mélangez jamais des piles usagées avec des piles neuves.
- Ne mélangez jamais des piles de types différents.
- Ne chargez pas les piles.
- Assurez-vous que les extrémités positive (+) et négative (-) des piles sont orientées correctement.

ATTENTION
Une mauvaise utilisation des piles peut provoquer une fuite, entraînant des dommages aux objets environnants, ou une explosion, créant un risque d'incendie et de blessures. Assurez-vous toujours de respecter les précautions suivantes.
- Utilisez uniquement les piles spécifiées pour ce produit.
- Retirez les piles du produit si vous ne prévoyez pas de l'utiliser pendant une longue période.
REMARQUE
- N'utilisez pas de pile oxyride ou tout autre type de pile primaire à base de nickel avec ce produit. L'incompatibilité entre ces piles et les spécifications du produit peut entraîner une durée de vie plus courte des piles et un dysfonctionnement du produit.
Utilisation de l'adaptateur secteur
Assurez-vous d'utiliser uniquement l'adaptateur secteur spécifié pour ce clavier.
Adaptateur secteur spécifié : AD-5
[Panneau arrière]
![CASIO CTK-810 - [Panneau arrière] - 1](/content/2025/01/129580/images/f3bc83a58c0ad2be68aebac76ac85bc9affe3d03e92ca9a97e3b445c365e4928.jpg)
Respectez les précautions importantes suivantes pour éviter d'endommager le cordon d'alimentation.
Pendant l'utilisation
- Ne tirez jamais sur le cordon avec une force excessive.
- Ne tirez jamais sur le cordon à plusieurs reprises.
- Ne tordez jamais le cordon à la base de la fiche ou du connecteur.
- Le cordon d'alimentation ne doit pas être tendu pendant son utilisation.
Pendant le déplacement
- Avant de déplacer le clavier, assurez-vous de débrancher l'adaptateur secteur de la prise de courant.
Pendant le stockage
- Enroulez et attachez le cordon d'alimentation, mais ne l'enroulez jamais autour de l'adaptateur secteur.
IMPORTANT !
- Assurez-vous que le clavier est éteint avant de brancher ou de débrancher l'adaptateur secteur.
- L'utilisation prolongée de l'adaptateur secteur peut le faire chauffer au toucher. C'est normal et n'indique pas un dysfonctionnement.
Arrêt automatique
Lorsque vous utilisez la batterie, le clavier s'éteint automatiquement si vous le laissez allumé sans effectuer aucune opération pendant environ 6 minutes. Dans ce cas, appuyez sur le bouton POWER pour le rallumer.
REMARQUE
- L'arrêt automatique est désactivé (il ne fonctionne pas) lorsque vous utilisez l'adaptateur secteur pour alimenter le clavier.
Pour désactiver la mise hors tension automatique
Maintenez enfoncé le bouton TONE tout en allumant le clavier pour désactiver la mise hors tension automatique.
REMARQUE
- Lorsque cette fonction est désactivée, le clavier ne s'éteint pas automatiquement, quelle que soit la durée pendant laquelle il reste sans aucune opération.
- La mise hors tension automatique est réactivée lorsque vous éteignez manuellement l'appareil puis le rallumez.
Contenu de la mémoire
Le contenu de la mémoire de registration, le contenu de la mémoire de l'enregistreur et les données de la banque de morceaux que vous transférez depuis un ordinateur vers la mémoire du clavier sont tous conservés lorsque le clavier est éteint, soit en appuyant sur le bouton d'alimentation, soit par la mise hors tension automatique.
Alimentation électrique
Le contenu de la mémoire décrit ci-dessus est conservé tant que le clavier est alimenté en électricité. Débrancher l'adaptateur secteur alors qu'aucune pile n'est installée ou que les piles sont déchargées coupe l'alimentation électrique du clavier. Cela efface toutes les données stockées en mémoire.
Exigences d'alimentation
Notez les précautions suivantes chaque fois que vous voulez vous assurer que le contenu actuel de la mémoire n'est pas perdu.
- Assurez-vous que le clavier est alimenté via l'adaptateur secteur avant de remplacer ses piles.
- Avant de débrancher l'adaptateur secteur, assurez-vous que des piles neuves sont installées dans le clavier.
Assurez-vous que l'alimentation du clavier est coupée avant de remplacer les piles ou de débrancher l'adaptateur secteur.
Borne Phones/Output
PRÉPARATION
- Avant de brancher un casque ou un autre équipement externe, assurez-vous d'abord de baisser le volume du clavier et de l'équipement connecté. Vous pourrez ensuite régler le volume au niveau souhaité une fois les connexions terminées.
[Panneau arrière]
![CASIO CTK-810 - [Panneau arrière] - 1](/content/2025/01/129580/images/8c5a72ddb9d02447094569c136aa1d50770a5916555c1d6e1c9d2b07d3719c66.jpg)
Connexion d'un casque (Figure 1)
La connexion d'un casque coupe la sortie des haut-parleurs intégrés du clavier, vous pouvez donc jouer même tard le soir sans déranger personne.
Équipement audio (Figure 2)
Connectez le clavier à un équipement audio à l'aide d'un câble de connexion disponible dans le commerce, avec une fiche standard à une extrémité et deux fiches PIN à l'autre extrémité. Notez que la fiche standard que vous connectez au clavier doit être une fiche stéréo, sinon vous ne pourrez sortir qu'un seul des canaux stéréo. Dans cette configuration, vous réglez normalement le sélecteur d'entrée de l'équipement audio sur la borne (généralement marquée AUX IN ou similaire) où le câble du clavier est connecté. Consultez la documentation fournie avec votre équipement audio pour plus de détails.
Amplificateur d'instrument de musique (Figure 8)
Utilisez un câble de connexion disponible dans le commerce pour connecter le clavier à un amplificateur d'instrument de musique.
REMARQUE
- Assurez-vous d'utiliser un câble de connexion avec une fiche stéréo standard à l'extrémité que vous connectez au clavier, et un connecteur qui fournit une entrée à deux canaux (gauche et droite) à l'amplificateur auquel vous vous connectez. Un mauvais type de connecteur à l'une ou l'autre extrémité peut entraîner la perte d'un des canaux stéréo.
Lorsqu'il est connecté à un amplificateur d'instrument de musique, réglez le volume du clavier à un niveau relativement bas et effectuez les réglages de volume de sortie à l'aide des commandes de l'amplificateur.
Exemple de connexion
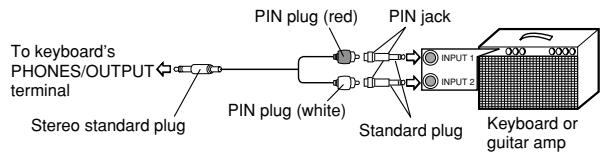
Connexion à un ordinateur ou à un autre équipement
Vous pouvez également connecter le clavier à un ordinateur. Voir "Connexion à un ordinateur" à la page E-49 pour plus de détails.
Terminal SUSTAIN/ASSIGNABLE
Vous pouvez connecter une pédale de sustain en option (SP-3 ou SP-20) à la borne SUSTAIN/ASSIGNABLE pour activer les fonctions décrites ci-dessous.
Pour plus de détails sur la sélection de la fonction de pédale souhaitée, voir « SUSTAIN/ASSIGNABLE JACK (Défaut : SUS) » à la page F-53.
Borne SUSTAIN/ASSIGNABLE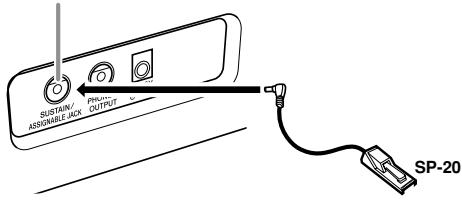
Pédale de sustain
- Avec les sonorités de piano, l'enfoncement de la pédale prolonge les notes, comme la pédale forte d'un piano.
- Avec les sonorités d'orgue, l'enfoncement de la pédale fait durer les notes jusqu'au relâchement de la pédale.
Pédale de sostenuto
- Comme pour la fonction de pédale de sustain décrite ci-dessus, l'enfoncement de la pédale de sostenuto prolonge les notes.
- La différence entre une pédale de sostenuto et une pédale de sustain réside dans le moment d'utilisation. Avec une pédale de sostenuto, vous appuyez sur les touches puis enfoncez la pédale avant de relâcher les touches.
- Seules les notes qui sonnent lorsque la pédale est enfoncée sont prolongées.
Pédale douce
L'enfoncement de la pédale adoucit le son des notes jouées.
Pédale de démarrage/arrêt du rythme
Dans ce cas, la pédale remplit les mêmes fonctions que le bouton START/STOP.
Accessoires et options
Utilisez uniquement les accessoires et options spécifiés pour ce clavier. L'utilisation d'articles non autorisés présente un risque d'incendie, de choc électrique et de blessure.
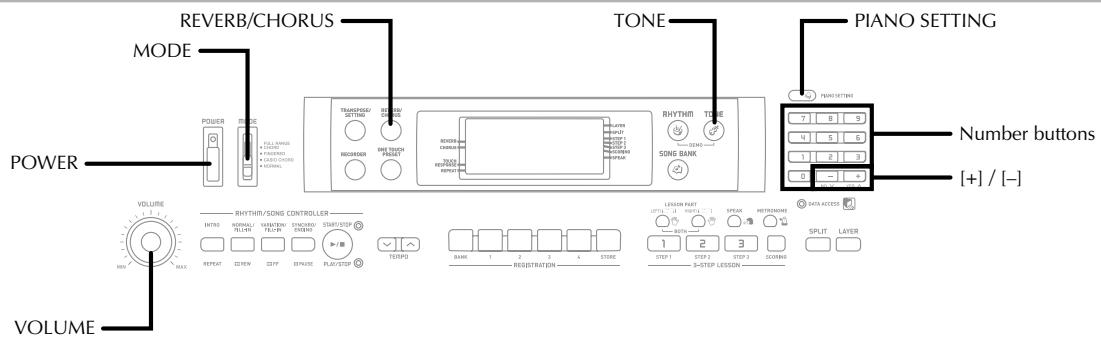
Cette section fournit des informations sur l'exécution des opérations de base du clavier.
Pour jouer du clavier
Appuyez sur le bouton POWER pour allumer le clavier. 2. Réglez le commutateur MODE sur NORMAL. 3. Utilisez le bouton VOLUME pour régler le volume à un niveau relativement bas. 4. Jouez quelque chose sur le clavier.
Sélection d'un son
Ce clavier est équipé de 515 sons intégrés. Utilisez la procédure suivante pour sélectionner le son souhaité.
Pour sélectionner un son
1. Trouvez le son que vous souhaitez utiliser dans la liste des sons et notez son numéro. - Tous les sons disponibles ne sont pas affichés sur la liste des sons imprimée sur la console du clavier. Pour une liste complète, consultez la "Liste des sons" à la page A-1. Appuyez sur le bouton TONE.
3. Utilisez les boutons numériques pour saisir le numéro à trois chiffres du son que vous souhaitez sélectionner.
Exemple : Pour sélectionner "111 ACOUSTIC BASS", saisissez 1, 1 puis 1.
TONE
111Acous.Bs
REMARQUE
- Saisissez toujours les trois chiffres du numéro de son, y compris les zéros de tête (le cas échéant). Si vous saisissez un ou deux chiffres et vous arrêtez, l'affichage effacera automatiquement votre saisie après quelques secondes.
- Vous pouvez également incrémenter le numéro de tonalité affiché en appuyant sur [+] et le décrémenter en appuyant sur [-].
- Lorsqu'un des kits de batterie est sélectionné (numéros de tonalité 501 à 515), chaque touche du clavier est assignée à un son de percussion différent. Voir page A-5 pour plus de détails.
Polyphonie
Le terme polyphonie fait référence au nombre maximal de notes que vous pouvez jouer en même temps. Le clavier a une polyphonie de 32 notes, ce qui inclut les notes que vous jouez ainsi que les rythmes et motifs d'accompagnement automatique joués par le clavier. Cela signifie que lorsqu'un rythme ou un motif d'accompagnement automatique est joué par le clavier, le nombre de notes (polyphonie) disponible pour le jeu au clavier est réduit. Notez également que certains sons n'offrent qu'une polyphonie de 16 notes.
- Lorsque le rythme ou l'accompagnement automatique joue, le nombre de sons joués simultanément est réduit.
Utilisation des effets sonores
Réverbération : fait résonner vos notes
Chœur : ajoute plus d'ampleur à vos notes
Appuyez sur le bouton REVERB/CHORUS pour parcourir les réglages d'effet comme indiqué ci-dessous.
- Vous pouvez connaître le réglage d'effet actuel en regardant les indicateurs REVERB et CHORUS.
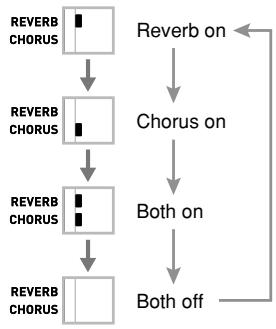
Après avoir activé l'effet souhaité, utilisez les boutons numériques ou les boutons [+]/[-] pour sélectionner le type d'effet souhaité.
- Notez que vous devez sélectionner un type d'effet avec les boutons numériques ou les boutons [+]/[-] dans les quelques secondes qui suivent l'activation d'un effet. Si vous ne le faites pas, l'écran quittera l'écran de réglage.
Liste des effets
| Reverb | 1: Room 1 |
| 2: Room 2 | |
| 3: Hall 1 | |
| 4: Hall 2 | |
| Chorus | 1: Chorus 1 |
| 2: Chorus 2 | |
| 3: Chorus 3 | |
| 4: Chorus 4 |
Bouton PIANO SETTING
Appuyer sur ce bouton modifie la configuration du clavier pour l'optimiser pour le jeu de piano.
Réglages
Numéro de son : "001"
Numéro de rythme : "101"
Couche : Désactivée
Split : Désactivé
Réverbération : Activée (Type 3)
Chœur : Désactivé
Transposition : 00
Réponse au toucher :
Désactivée : revient aux valeurs par défaut initiales
Activée : aucun changement
Prise assignable : SUS
Contrôle local : Activé
Pour optimiser les réglages du clavier pour le jeu pianistique
1 Réglez le commutateur MODE sur NORMAL. 2 Appuyez sur le bouton PIANO SETTING. 3 Essayez maintenant de jouer quelque chose sur le clavier.
- Les notes que vous jouez sonneront avec un son de piano.
- Si vous voulez jouer avec un accompagnement rythmique, appuyez sur le bouton START/STOP. Un rythme optimisé pour le piano commencera à jouer.
- Pour arrêter la lecture du rythme, appuyez à nouveau sur le bouton START/STOP.
REMARQUE
- Appuyer sur le bouton PIANO SETTING pendant la lecture d'un rythme arrête la lecture du rythme puis change la configuration du clavier.
- La configuration du clavier ne change pas si vous appuyez sur le bouton PIANO SETTING lorsque l'une des conditions suivantes existe.
- Pendant l'enregistrement en temps réel de la mémoire de morceaux, pendant la lecture de la démo.
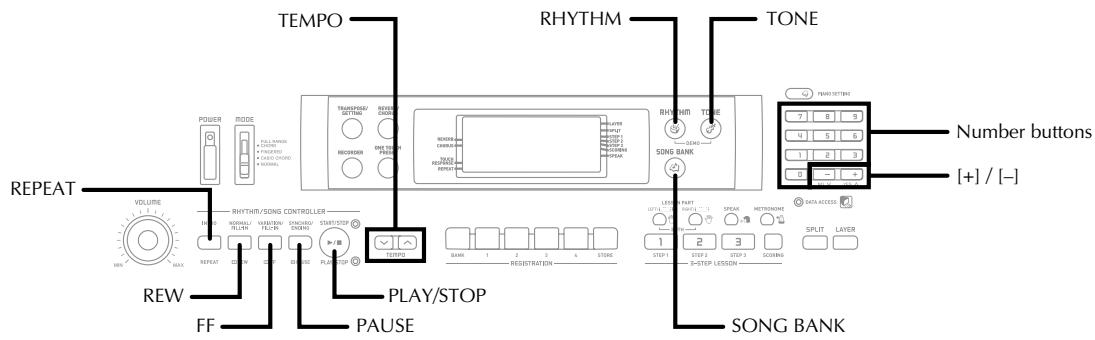
Votre clavier est livré avec un total de 100 morceaux intégrés. Vous pouvez lire les morceaux intégrés pour votre plaisir d'écoute, ou les utiliser pour vous entraîner. Les morceaux intégrés sont divisés en deux groupes décrits ci-dessous.
| Tune Numbers | Left-hand Part | Right-hand Part | |
| Auto-accompaniment Tunes | <CTK-810>001, 004 through 050 <WK-110> 003 through 050 | Auto-accompaniment (percussion, bass, chords) | Melody |
| Two-hand tune | <CTK-810>002, 003, and 051 through 100 <WK-110> 001, 002, and 051 through 100 | Left-hand notes | Right-hand notes |
En plus des morceaux intégrés, vous pouvez également lire les morceaux que vous téléchargez sur Internet (page E-50).
Pour lire un morceau de la banque de morceaux
PRÉPARATION
- Réglez le volume principal (page E-20).
1 Trouvez le morceau que vous voulez jouer dans la liste SONG BANK, et notez son numéro. - Voir page A-9 pour la liste SONG BANK. Appuyez sur le bouton SONG BANK pour entrer dans le mode Song Bank.
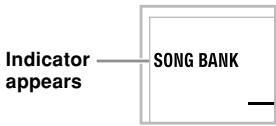
3 Utilisez les boutons numériques pour saisir le numéro à trois chiffres du morceau.
Exemple : Pour sélectionner "047 ALOHA OE", saisissez 0, 4 puis 7.
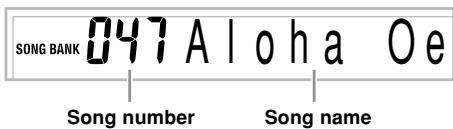
NOTE
- Le numéro de morceau 001 est le réglage initial par défaut de la banque de morceaux lorsque vous allumez le clavier.
- Vous pouvez également augmenter le numéro de morceau affiché en appuyant sur [+] et le diminuer en appuyant sur [-].
4 Appuyez sur le bouton PLAY/STOP pour lancer la lecture du morceau.
Appuyez sur le bouton PLAY/STOP pour arrêter la lecture du morceau de la banque de morceaux.
- Le morceau que vous sélectionnez continue de jouer jusqu'à ce que vous l'arrêtiez.
Réglage du tempo
Chaque morceau a un tempo par défaut prédéfini (battements par minute) qui est réglé automatiquement lorsque vous sélectionnez un morceau. Pendant la lecture du morceau, vous pouvez modifier le tempo à une valeur comprise entre 30 et 255.
Pour régler le tempo
Utilisez les boutons TEMPO pour régler le tempo.
∧ : Augmente la valeur du tempo. ∨ : Diminue la valeur du tempo.
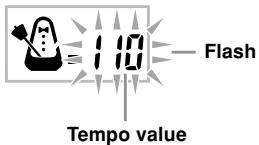
NOTE
- Pendant que la valeur du tempo clignote, vous pouvez également utiliser les boutons numériques ou [+] et [-] pour saisir une valeur à trois chiffres. Notez que vous devez saisir les zéros initiaux, donc 90 doit être saisi comme 090.
- Appuyer simultanément sur les boutons TEMPO ∧ et ∨ ramène automatiquement le tempo du rythme sélectionné à sa valeur par défaut.
Pour mettre en pause la lecture
Appuyez sur le bouton PAUSE pendant la lecture d'un morceau pour le mettre en pause. Appuyez à nouveau sur le bouton PAUSE pour reprendre la lecture à partir du point où elle a été interrompue.
Pour revenir en arrière rapidement
Pendant la lecture ou la pause d'un morceau, maintenez enfoncé le bouton REW pour reculer rapidement.
- L'opération de retour rapide recule d'une mesure à la fois.
- Les numéros de mesure et de temps à l'écran changent pendant l'opération de retour rapide.
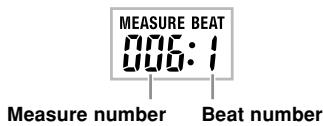
Relâcher le bouton REW démarre la lecture du morceau à partir de la mesure dont le numéro est affiché à l'écran.
REMARQUE.
- Le retour rapide ne fonctionne pas lorsque la lecture du morceau est arrêtée.
Pour avancer rapidement
Pendant la lecture ou la pause d'un morceau, maintenez enfoncé le bouton FF pour avancer rapidement.
- L'opération d'avance rapide avance d'une mesure à la fois.
- Les numéros de mesure et de temps à l'écran changent pendant l'opération d'avance rapide.
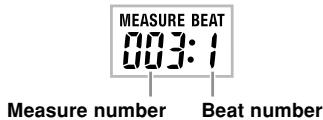
Relâcher le bouton FF démarre la lecture du morceau à partir de la mesure dont le numéro est affiché à l'écran.
REMARQUE
- L'avance rapide ne fonctionne pas lorsque la lecture du morceau est arrêtée.
Bouclage d'une phrase musicale
Vous pouvez sélectionner une ou plusieurs mesures et les "boucler", ce qui signifie qu'elles se rejouent encore et encore jusqu'à ce que vous arrêtiez la lecture.
1 Pendant que l'air joue, appuyez sur le bouton REPEAT pendant que la mesure à partir de laquelle vous voulez commencer est en cours de lecture.
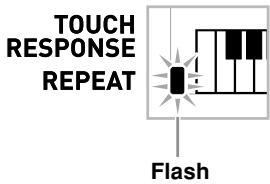
Lorsque la lecture se trouve dans la mesure que vous voulez spécifier comme fin de la boucle, appuyez à nouveau sur le bouton REPEAT.
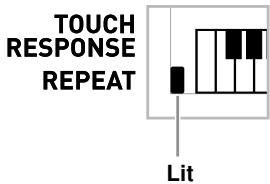
- Pour annuler la lecture en boucle, appuyez à nouveau sur le bouton REPEAT afin que l'indicateur de répétition ne soit plus affiché.
Pour changer le timbre de la mélodie
Appuyez sur le bouton TONE.
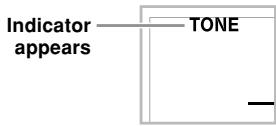
2 Trouvez le timbre souhaité dans la liste TONE, puis utilisez les touches numériques pour saisir son numéro à trois chiffres.
Exemple : Pour sélectionner "131 VIOLIN", saisissez 1, puis 3, puis 1.
- Vous pouvez sélectionner n'importe lequel des timbres intégrés du clavier.

REMARQUE
- Vous pouvez également utiliser les boutons [+] et [-] pour changer les timbres de la mélodie.
- Spécifier le numéro de l'air pour le même air actuellement sélectionné ramène le timbre de la mélodie au réglage par défaut pour cet air.
Pour jouer tous les airs en succession
Appuyez simultanément sur les boutons RHYTHM et TONE. - La lecture démarre à partir du numéro d'air 001 de la banque de chansons. Pour arrêter la lecture de l'air, appuyez sur le bouton PLAY/STOP.
NOTE
- Pendant la lecture d'un morceau, vous pouvez utiliser les boutons numériques ou [+ et [-] pour passer à un autre morceau.
- Vous pouvez jouer en même temps que les morceaux sur le clavier.
Avec le système de leçon en 3 étapes, vous pouvez vous entraîner sur les morceaux intégrés et les données SMF téléchargées sur Internet, et même suivre vos progrès grâce aux points d'évaluation que le clavier vous attribue.
- Voir "Élargir la sélection des morceaux de la banque de morceaux" à la page E-50 pour plus d'informations sur les données SMF que vous téléchargez sur Internet.
Progression de la leçon
Étape 1 Étape 2 Étape 3 Évaluation
Leçon en 3 étapes
La fonction de leçon en 3 étapes vous guide à travers les trois étapes distinctes décrites ci-dessous pour vous aider à apprendre à jouer des morceaux sur le clavier.
Étape 1 - Maîtrisez le rythme.
Étape 2 - Maîtrisez les notes.
Étape 3 - Jouez à vitesse normale.
Parties de la leçon
La leçon en 3 étapes vous permet de vous entraîner sur la partie de la main droite, la partie de la main gauche, ou les parties des deux mains.
Affichage pendant la leçon en 3 étapes
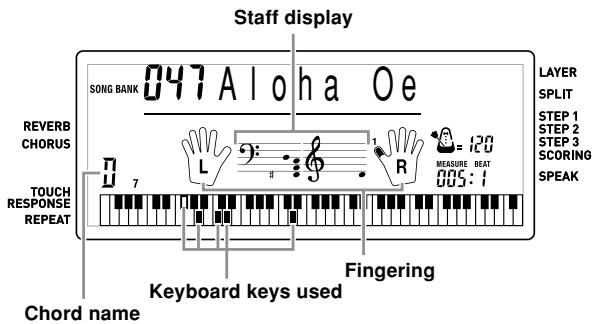
Lorsque vous sélectionnez un air d'accompagnement automatique pour la leçon en 3 étapes, le guide du clavier à l'écran et la portée musicale indiquent la note à jouer et sa durée. Le guide du clavier à l'écran montre également les notes que vous jouez sur le clavier. Voici les informations qui apparaissent à l'écran.
Hauteur de note
La touche à enfoncer s'allume sur le guide du clavier à l'écran, tandis que la hauteur réelle de la note apparaît dans la zone de portée musicale de l'écran. Les doigtés à utiliser pour jouer les notes sont également affichés à l'écran.
Durée de note
La touche reste allumée sur le guide du clavier à l'écran aussi longtemps que la note doit être tenue. La portée musicale et les doigtés restent également affichés pendant la durée de la note.
Note suivante
Une touche du guide du clavier à l'écran clignote pour indiquer la note suivante à jouer, tandis qu'un numéro apparaît à l'écran près du doigt à utiliser pour jouer la note suivante.
Série de notes de même hauteur
La touche du guide du clavier à l'écran s'éteint momentanément entre les notes, puis se rallume pour chaque note successive. La portée musicale et les doigtés s'éteignent et se rallument également.
Exemple : lorsque le jeu nécessite d'appuyer sur les touches avec les doigts 3, 2, puis 1
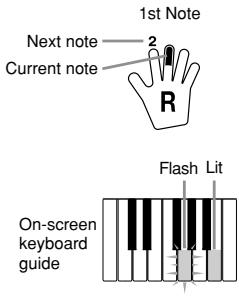
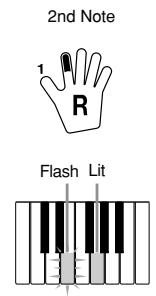
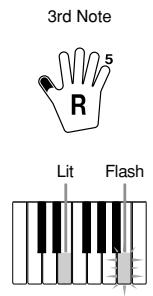
REMARQUE
- La durée des notes n'est pas indiquée lorsque vous utilisez des airs à deux mains avec les étapes 1 et 2 de la leçon en 3 étapes. Dès que vous appuyez sur une touche allumée sur le guide du clavier à l'écran, elle s'éteint et la touche suivante à enfoncer commence à clignoter.
- La durée des notes est indiquée par le guide du clavier à l'écran lorsque vous utilisez des airs à deux mains avec l'étape 3. Dans ce cas, la touche suivante à enfoncer ne clignote pas lorsque vous appuyez sur une touche allumée.
- Pendant l'étape 3, le numéro du doigt suivant n'apparaît pas à l'écran. Seul le numéro du doigt actuel est affiché.
Réglage du tempo de la leçon en 3 étapes
Utilisez la procédure décrite dans « Réglage du tempo » à la page E-23 pour régler le tempo pour la lecture de la leçon en 3 étapes.
Mode d'évaluation
Le clavier peut être configuré pour évaluer vos progrès dans la leçon en 3 étapes. Un score parfait est de 100. Vous pouvez même faire afficher vos points par le piano, à la fois en cours de leçon et à la fin de celle-ci.
Affichage du mode d'évaluation
Indicateur de niveau (9 niveaux) : Cet indicateur montre l'évaluation de votre performance actuelle en un coup d'œil. Plus il y a de segments, plus vos points sont élevés.
Exemple : 50 points
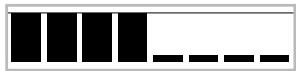
Indicateur de synchronisation : En mode d'évaluation, la configuration de l'étoile change à chaque note pour vous indiquer votre synchronisation. Plus il y a d'étoiles, meilleure est votre synchronisation.



Utilisation du guide de tonalité
Lorsque le clavier détecte que votre synchronisation est incorrecte, il vous le fait savoir en changeant les notes que vous jouez en une tonalité différente de celle que vous avez sélectionnée actuellement.
Résultats de l'évaluation
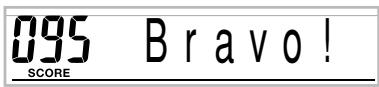
Après avoir terminé de jouer, le clavier calcule une évaluation de votre performance globale, du début à la fin, et affiche votre score total sur l'écran du moniteur.
Messages d'affichage du rang d'évaluation
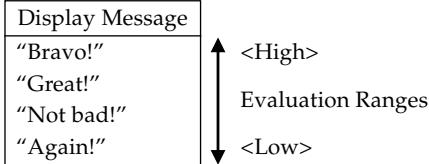
" * *" : indique que le mode d'évaluation a été quitté avant qu'un résultat d'évaluation puisse être obtenu.
Utilisation des fonctions de leçon et du mode d'évaluation
Effectuez les étapes suivantes pour maîtriser vos morceaux préférés.

Étape 1 – Maîtrisez le rythme.
1 Sélectionnez le morceau que vous voulez utiliser. Appuyez sur le bouton DROITE/PISTE 2 ou sur le bouton GAUCHE/PISTE 1 pour spécifier la partie que vous voulez travailler. - Un indicateur apparaît à l'écran pour indiquer quelle partie est sélectionnée pour le travail.
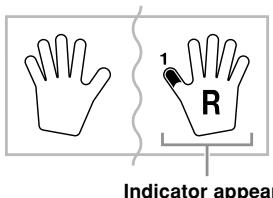
- Si vous voulez travailler les deux mains, appuyez sur les deux boutons en même temps.
3 Appuyez sur le bouton ÉTAPE 1 pour démarrer la lecture de l'étape 1.
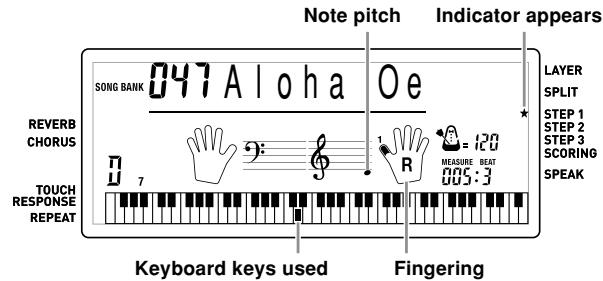
- Après un compte, le clavier se met en attente et attend que vous jouiez la première note du morceau.
- Le guide de doigté vocal utilise une voix humaine simulée pour énoncer les numéros de doigté pendant le travail d'une partie à une main. Voir « Guide de doigté vocal » à la page F-29 pour plus de détails.
4 Appuyez sur n'importe quelle touche du clavier pour jouer les notes.
- La touche correspondant à la note suivante à jouer clignote sur le guide de clavier à l'écran et le clavier attend que vous la jouiez. Lorsque vous appuyez sur une touche pour jouer la note, la touche à l'écran reste allumée pendant que la note est jouée.
- L'accompagnement (partie de la main gauche) attend que vous appuyiez sur une touche pour jouer une note.
- Si vous appuyez accidentellement sur plusieurs touches successivement, l'accompagnement est joué pour le nombre de notes correspondant.
- Appuyer sur plusieurs touches en même temps compte comme une seule note. Appuyer sur une touche alors qu'une autre est maintenue enfoncée compte comme deux notes.
5 Pour arrêter la lecture à tout moment, appuyez sur le bouton ÉTAPE 1 ou LECTURE/ARRÊT.
Étape 2 - Maîtrisez les notes.
1 Sélectionnez le morceau que vous voulez utiliser. Appuyez sur le bouton DROITE/PISTE 2 ou sur le bouton GAUCHE/PISTE 1 pour spécifier la partie que vous voulez travailler.
- Un indicateur apparaît à l'écran pour indiquer quelle partie est sélectionnée pour le travail.
- Si vous souhaitez pratiquer les deux mains, appuyez sur les deux boutons en même temps.
Appuyez sur le bouton STEP 2 pour démarrer le jeu de l'étape 2.
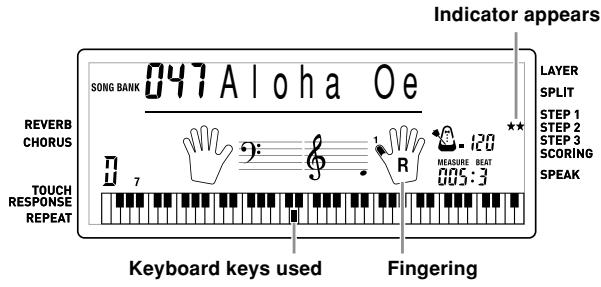
- Après un compte, le clavier se met en attente et attend que vous jouiez la première note de l'air.
- Le guide de doigté vocal utilise une voix humaine simulée pour énoncer les numéros de doigté pendant la pratique d'une partie à une main. Voir "Guide de doigté vocal" à la page E-29 pour plus de détails.
Jouez les notes comme indiqué par le guide du clavier à l'écran.
- La touche de la note suivante à jouer clignote sur le guide du clavier à l'écran et le clavier attend que vous la jouiez. Lorsque vous appuyez sur une touche pour jouer la note, la touche à l'écran reste allumée pendant que la note joue.
- Si plusieurs touches s'allument sur le guide du clavier à l'écran lorsque vous utilisez un air à deux mains, cela signifie que vous devez appuyer sur toutes les touches allumées.
Pour arrêter la lecture à tout moment, appuyez sur le bouton STEP 2 ou PLAY/STOP.
Étape 3 – Jouez à vitesse normale.
1 Sélectionnez l'air que vous voulez jouer.
Appuyez sur le bouton RIGHT/TRACK 2 ou LEFT/TRACK 1 pour spécifier la partie que vous voulez pratiquer.
- Un indicateur apparaît sur l'écran pour la partie sélectionnée pour la pratique.
- Si vous souhaitez pratiquer les deux mains, appuyez sur les deux boutons en même temps.
Appuyez sur le bouton STEP 3 pour démarrer le jeu de l'étape 3.
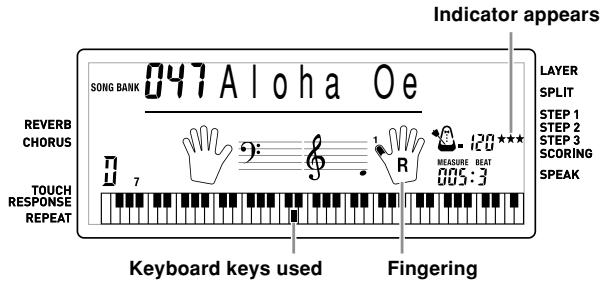
- L'accompagnement (partie de la main gauche) commence à jouer à vitesse normale.
Jouez les notes comme indiqué par le guide du clavier à l'écran.
5 Pour arrêter la lecture à tout moment, appuyez sur le bouton STEP 3 ou PLAY/STOP.
Évaluation de votre jeu au clavier
Appuyez sur le bouton SCORING.
- Cela fait apparaître l'indicateur SCORING sur l'écran.
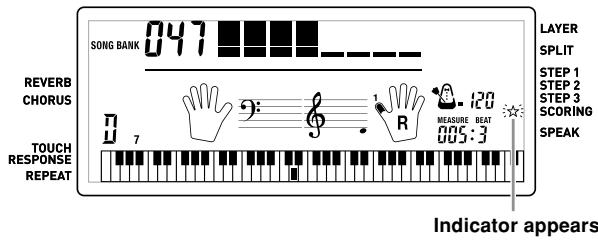
- Un battement de comptage retentit puis le mode d'évaluation démarre.
2 Jouez conformément aux indications sur l'écran du moniteur.
- Pour arrêter l'évaluation, appuyez sur le bouton PLAY/STOP. Cela affiche uniquement les points accumulés jusqu'à ce moment.
Après avoir terminé de jouer, votre résultat d'évaluation apparaît sur l'écran.
- Pour plus d'informations sur les rangs d'évaluation, voir "Résultats d'évaluation" à la page E-26.
- Appuyer sur le bouton SONG BANK ramène à l'écran de sélection des morceaux.
Guide de doigté vocal
Le guide de doigté vocal utilise une voix humaine simulée pour énoncer les numéros de doigté pendant la pratique à une main des étapes 1 et 2. Si vous devez appuyer sur une touche avec votre pouce, par exemple, le guide de doigté vocal dit "Un !" Dans le cas d'un accord à jouer avec le pouce, le majeur et l'auriculaire, le guide de doigté vocal dit "Un, trois, cinq !"
Le guide de doigté vocal n'énonce les doigtés que lorsque vous n'appuyez pas sur la bonne touche au moment où vous le devriez.
Guide de doigté vocal
Un : pouce, Deux : index, Trois : majeur, Quatre : annulaire, Cinq : auriculaire
Pour activer ou désactiver le guide de doigté vocal
Appuyez sur le bouton SPEAK pour activer ou désactiver le guide de doigté vocal (l'indicateur du guide de doigté vocal s'affiche lorsqu'il est activé, et ne s'affiche pas lorsqu'il est désactivé).
REMARQUE
- Notez que le guide de doigté vocal est désactivé en mode Évaluation.
- La sortie du mode Évaluation restaure automatiquement le réglage du guide de doigté vocal qui était en vigueur avant l'entrée dans le mode Évaluation.
Utilisation du métronome
La fonction métronome de ce clavier produit un son de cloche pour le premier temps de chaque mesure, suivi de clics pour chaque temps successif de la mesure. C'est l'outil idéal pour s'entraîner à jouer des morceaux sans accompagnement (rythme).
Pour démarrer le métronome
Appuyez sur le bouton METRONOME pour démarrer le métronome.
- Cela fait apparaître « Beat » à l'écran. Effectuez l'étape 2 dans les cinq secondes suivant l'apparition de « Beat ».
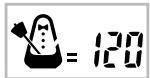
Utilisez les boutons numériques ou [+] et [-] pour modifier le nombre de temps par mesure.
- Vous pouvez spécifier 0, ou une valeur de 2 à 6 comme nombre de temps par mesure.
6 temps
REMARQUE
- La cloche (indiquant le premier temps d'une mesure) ne sonne pas lorsque 0 temps par mesure est spécifié. Tous les temps sont indiqués par un clic. Ce réglage vous permet de vous entraîner avec un battement régulier, sans vous soucier du nombre de temps dans chaque mesure.
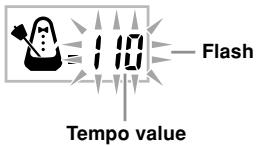
3 Utilisez les boutons TEMPO pour régler le tempo.
- Appuyez sur pour augmenter le tempo (le rendre plus rapide) ou sur pour le diminuer (le rendre plus lent).
REMARQUE
- Pendant que la valeur du tempo clignote, vous pouvez également utiliser les boutons numériques ou [+] et [-] pour saisir une valeur à trois chiffres. Notez que vous devez saisir les zéros initiaux, donc 90 est saisi comme 090.
- Appuyer simultanément sur les boutons TEMPO et ramène automatiquement le rythme ou l'air sélectionné à son tempo par défaut.
Pour désactiver le métronome, appuyez sur le bouton METRONOME.
REMARQUE
- Le métronome est désactivé lorsque vous utilisez l'étape 1 ou l'étape 2 de la leçon en 3 étapes.
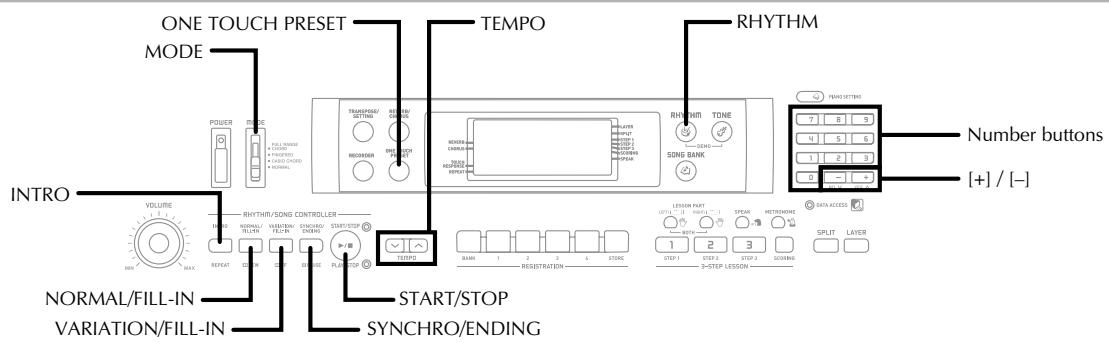
Ce clavier joue automatiquement les parties de basse et d'accords en fonction des accords que vous jouez. Les parties de basse et d'accords sont jouées avec des sons et des tonalités automatiquement sélectionnés en fonction du rythme utilisé. Tout cela signifie que vous obtenez des accompagnements complets et réalistes pour les notes de mélodie que vous jouez avec la main droite, créant ainsi l'ambiance d'un ensemble à une seule personne.
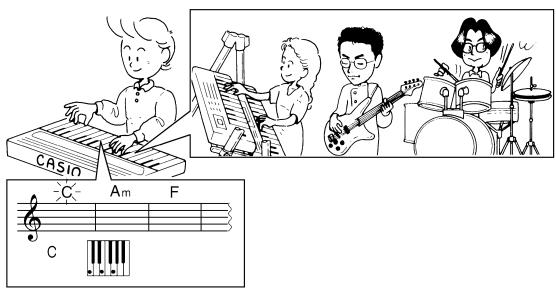
Sélection d'un rythme
Ce clavier vous propose 120 rythmes passionnants que vous pouvez sélectionner en suivant la procédure ci-dessous.
Pour sélectionner un rythme
1 Trouvez le rythme que vous souhaitez utiliser dans la liste des rythmes et notez son numéro de rythme. - Tous les rythmes disponibles ne sont pas affichés sur la liste des rythmes imprimée sur la console du clavier. Pour une liste complète, voir la "Liste des rythmes" à la page A-8. Appuyez sur le bouton RHYTHM pour entrer en mode Rythme.
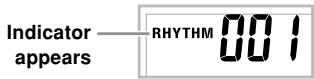
3 Utilisez les boutons numériques pour saisir le numéro de rythme à trois chiffres du rythme que vous souhaitez sélectionner. Exemple : Pour sélectionner "095 HAWAIIAN", saisissez 0, 9 puis 5.

NOTE
- Vous pouvez également incrémenter le numéro de rythme affiché en appuyant sur [+] et le décrémenter en appuyant sur [-] .
- Certains rythmes (n° 110, 112 à 120) ne comportent que des accompagnements d'accords, sans batterie ni autres instruments de percussion. Ces rythmes ne sonnent que si CASIO CHORD, FINGERED ou FULL RANGE CHORD est sélectionné comme mode d'accompagnement.
Jouer un rythme
Utilisez la procédure suivante pour démarrer et arrêter la lecture du rythme.
Pour jouer un rythme
1. Réglez le commutateur MODE sur NORMAL. Appuyez sur le bouton START/STOP pour démarrer la lecture du rythme actuellement sélectionné. 3. Pour arrêter la lecture du rythme, appuyez à nouveau sur le bouton START/STOP.
NOTE
- Toutes les touches du clavier sont des touches de mélodie lorsque le commutateur MODE est réglé sur NORMAL.
Réglage du tempo
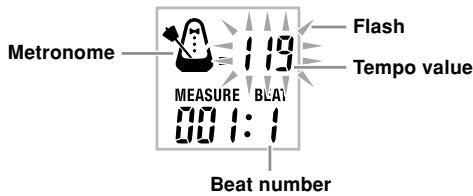
Le tempo (battements par minute) peut être réglé sur une valeur comprise entre 30 et 255. La valeur de tempo que vous définissez est utilisée pour la banque de chansons, la leçon en 3 étapes et la lecture d'accords d'accompagnement automatique, ainsi que pour la lecture depuis l'enregistreur et le fonctionnement du métronome.
Pour régler le tempo
Utilisez les boutons TEMPO pour régler le tempo.
: Augmente la valeur du tempo. : Diminue la valeur du tempo.
NOTE
- Pendant que la valeur du tempo clignote, vous pouvez également utiliser les boutons numériques ou [+] et [-] pour saisir une valeur à trois chiffres. Notez que vous devez saisir les zéros de tête, donc 90 est saisi comme 090.
- Appuyer simultanément sur les boutons TEMPO et ramène automatiquement le tempo par défaut du rythme sélectionné.
Utilisation de l'accompagnement automatique
La procédure suivante décrit comment utiliser la fonction d'accompagnement automatique du clavier. Avant de commencer, vous devez d'abord sélectionner le rythme que vous souhaitez utiliser et régler le tempo du rythme à la valeur souhaitée.
Pour utiliser l'accompagnement automatique
1 Réglez le commutateur MODE sur CASIO CHORD, FINGERED ou FULL RANGE CHORD. Appuyez sur le bouton START/STOP pour lancer la lecture du rythme sélectionné. 3 Jouez un accord.
- La procédure réelle à utiliser pour jouer un accord dépend de la position actuelle du commutateur MODE. Reportez-vous aux pages suivantes pour plus de détails sur la lecture des accords.
CASIO CHORD Page E-32
FINGERED.. Page E-33
FULL RANGE CHORD Page E-34
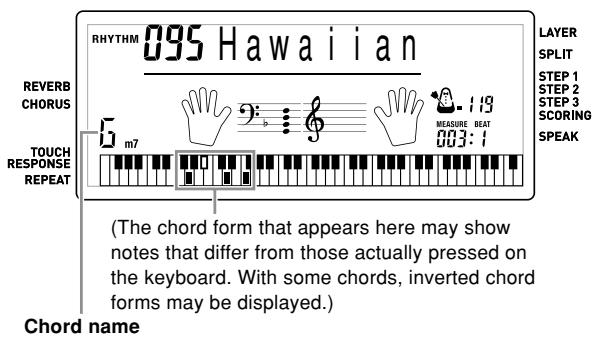
4 Pour arrêter la lecture de l'accompagnement automatique, appuyez à nouveau sur le bouton START/STOP.
REMARQUE
- Si vous appuyez sur le bouton SYNCHRO/ENDING puis sur le bouton INTRO à la place du bouton START/STOP à l'étape 2, l'accompagnement commencera avec un motif d'introduction lorsque vous effectuerez l'opération à l'étape 3. Pour plus de détails sur ces boutons, voir les pages E-35 et E-36.
- Si vous appuyez sur le bouton SYNCHRO/ENDING à la place du bouton START/STOP à l'étape 4, un motif de fin sera joué avant la fin de la lecture de l'accompagnement. Pour plus de détails sur ce bouton, voir la page E-36.
- Vous pouvez régler le niveau de volume de la partie accompagnement indépendamment du volume principal. Pour plus de détails, voir "Réglage du volume de l'accompagnement et de la banque de morceaux" à la page E-47.
CASIO CHORD
Cette méthode de jeu d'accords permet à n'importe qui de jouer facilement des accords, sans connaissances musicales préalables. Ce qui suit décrit le clavier d'accompagnement et le clavier mélodique CASIO CHORD, et explique comment jouer des accords CASIO CHORD.
Clavier d'accompagnement et clavier mélodique CASIO CHORD
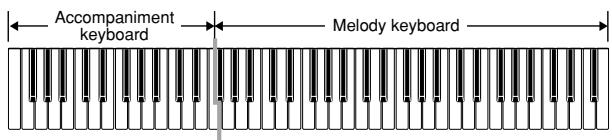
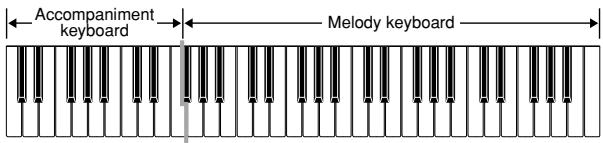
REMARQUE
- Le clavier d'accompagnement ne peut être utilisé que pour jouer des accords. Aucun son ne sera produit si vous essayez de jouer des notes de mélodie simples sur le clavier d'accompagnement.
- Le point de partage (page E-46) est le point qui sépare la zone d'accompagnement automatique et la zone mélodique du clavier. Vous pouvez modifier l'emplacement du point de partage, ce qui modifie également la taille des zones du clavier.
Types d'accords
L'accompagnement CASIO CHORD vous permet de jouer quatre types d'accords avec un doigté minimal.
| Chord Types | Example |
| Major chords Major chord names are marked above the keys of the accompaniment keyboard. Note that the chord produced when you press an accompaniment keyboard does not change octave, regardless of which key you use to play it. | C Major (C) CIDIE|F|G|A|B|C|D|E|F |
| Minor chords (m) To play a minor chord, keep the major chord key depressed and press any other accompaniment keyboard key located to the right of the major chord key. | C minor (Cm) CIDIE|F|G|A|B|C|D|E|F |
| Seventh chords (7) To play a seventh chord, keep the major chord key depressed and press any other two accompaniment keyboard keys located to the right of the major chord key. | C seventh (C7) CIDIE|F|G|A|B|C|D|E|F |
| Minor seventh chords (m7) To play a minor seventh chord, keep the major chord key depressed and press any other three accompaniment keyboard keys located to the right of the major chord key. | C minor seventh (Cm7) CIDIE|F|G|A|B|C|D|E|F |
REMARQUE
- Peu importe que vous appuyiez sur des touches noires ou blanches à droite d'une touche d'accord majeur pour jouer des accords mineurs et de septième.
FINGERED
FINGERED vous propose un total de 15 types d'accords différents. Ce qui suit décrit le clavier d'accompagnement et le clavier mélodique FINGERED, et explique comment jouer un accord de do fondamental en utilisant FINGERED.
Clavier d'accompagnement et clavier mélodique FINGERED
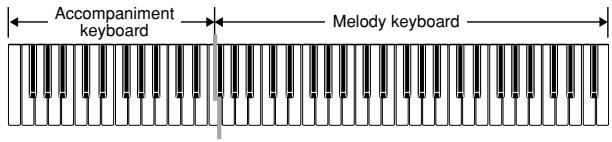
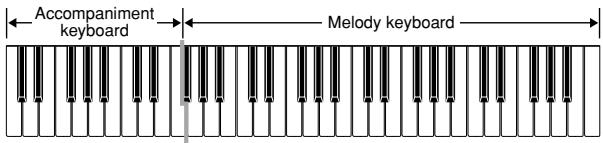
REMARQUE
- Le clavier d'accompagnement ne peut être utilisé que pour jouer des accords. Aucun son ne sera produit si vous essayez de jouer des notes de mélodie simples sur le clavier d'accompagnement.
- Le point de partage (page E-46) est le point qui sépare la zone d'accompagnement automatique et la zone de mélodie du clavier. Vous pouvez modifier l'emplacement du point de partage, ce qui change également la taille des zones du clavier.
C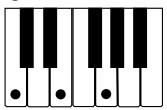
Cm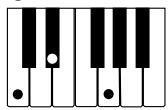
Cdim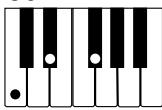
Caug*1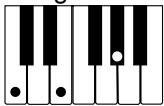
Csus4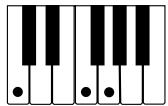
C7*2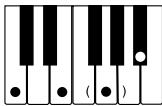
Cm7*2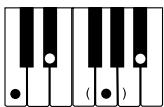
Cmaj7*2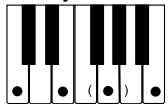
Cm75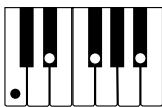
C7b5*1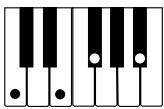
C7sus4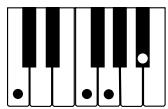
Cadd9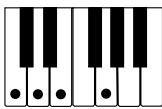
Cmadd9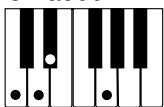
CmM7*2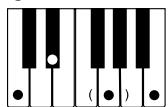
Cdim7*1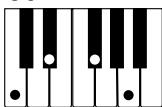
Voir le tableau des accords avec doigtés à la page A-7 pour les détails sur la façon de jouer les accords avec d'autres fondamentales.
1 : Les doigtés inversés ne peuvent pas être utilisés. La note la plus grave est la fondamentale. 2 : Le même accord peut être joué sans appuyer sur la 5e (sol).
REMARQUE
Sauf pour les accords spécifiés dans la note *1 ci-dessus, les doigtés inversés (c'est-à-dire jouer mi-sol-do ou sol-do-mi au lieu de do-mi-sol) produiront les mêmes accords que le doigté standard. - Sauf pour l'exception spécifiée dans la note *2 ci-dessus, toutes les touches qui composent un accord doivent être enfoncées. Si vous n'enfoncez pas ne serait-ce qu'une seule touche, l'accord FINGERED souhaité ne sera pas joué.
ACCORD PLEINE PORTÉE
Cette méthode d'accompagnement fournit un total de 38 types d'accords différents : les 15 types d'accords disponibles avec FINGERED plus 23 types supplémentaires. Le clavier interprète toute saisie de trois touches ou plus qui correspond à un modèle d'ACCORD PLEINE PORTÉE comme étant un accord. Toute autre saisie (qui n'est pas un modèle d'ACCORD PLEINE PORTÉE) est interprétée comme une lecture de mélodie. Pour cette raison, il n'y a pas besoin d'un clavier d'accompagnement séparé, donc tout le clavier, d'un bout à l'autre, peut être utilisé à la fois pour la mélodie et les accords.
Clavier d'accompagnement ACCORD PLEINE PORTÉE et clavier de mélodie
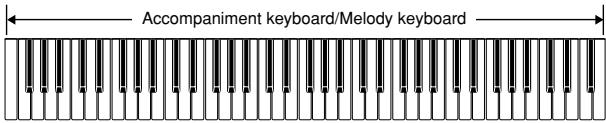
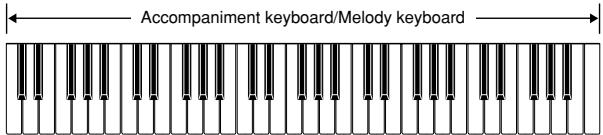
< Accords reconnus par ce clavier >
| Chord Types | Number of Types |
| Corresponding FINGERED Chord | 15 (page E-33) |
| Other Chords | 23 The following are examples of chords that use C as the bass note. C6·Cm6·C69 C#D E F G A B C D C C C C C B C #m Dm Fm Gm Am Bm Ddim A#7 F7 Fm7 Gm7 A#add9 C C C C C C |
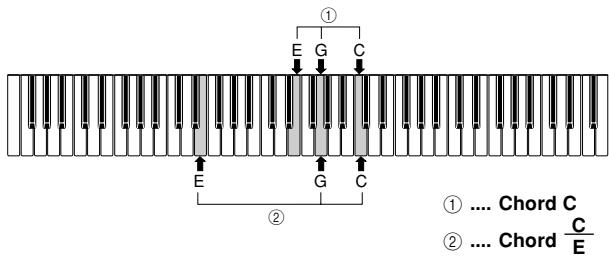
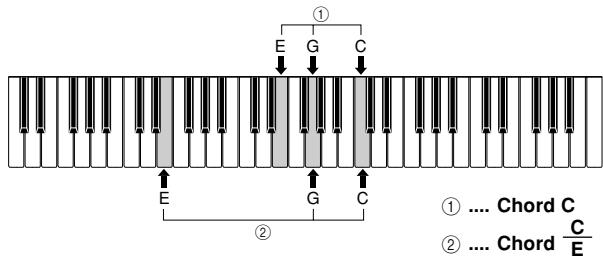
Exemple : Pour jouer l'accord de do majeur.
N'importe lequel des doigtés illustrés ci-dessous produira un do majeur.
REMARQUE
- Comme pour le mode FINGERED (page F-33), vous pouvez jouer les notes qui forment un accord dans n'importe quelle combinaison (①).
- Lorsque les notes composant un accord sont séparées par 6 notes ou plus, le son le plus grave devient la basse (②).
< Exemple musical >
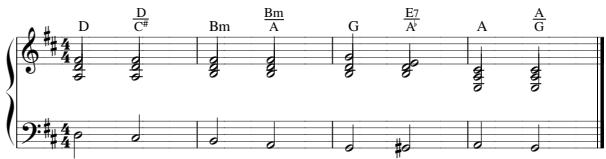
Tone: 001, Rhythm: 102, Tempo: 070
Utilisation d'un motif d'introduction
Ce clavier vous permet d'insérer une courte introduction dans un motif rythmique pour rendre le démarrage plus fluide et plus naturel.
La procédure suivante décrit comment utiliser la fonction d'introduction. Avant de commencer, vous devez d'abord sélectionner le rythme que vous souhaitez utiliser et régler le tempo.
Pour insérer une introduction
Appuyez sur le bouton INTRO pour démarrer le rythme sélectionné avec un motif d'introduction. - Avec la configuration ci-dessus, le motif d'introduction est joué et l'accompagnement automatique avec motif d'introduction démarre dès que vous jouez des accords sur le clavier d'accompagnement.
REMARQUE
- Le motif rythmique standard commence à jouer après la fin du motif d'introduction.
- Appuyer sur le bouton VARIATION/FILL-IN pendant la lecture d'un motif d'introduction fait que le motif de variation se fait entendre après la fin du motif d'introduction.
Utilisation d'un motif de remplissage
Les motifs de remplissage vous permettent de modifier momentanément le motif rythmique pour ajouter une variation intéressante à vos performances.
La procédure suivante décrit comment utiliser la fonction de remplissage.
Pour insérer un remplissage
1 Appuyez sur le bouton START/STOP pour démarrer la lecture du rythme. Appuyez sur le bouton NORMAL/FILL-IN pour insérer un motif de remplissage pour le rythme que vous utilisez.
REMARQUE
- Le motif de remplissage ne se joue pas si vous appuyez sur le bouton NORMAL/FILL-IN pendant qu'un motif d'intro est en cours de lecture.
Utilisation d'une variation de rythme
En plus du motif rythmique standard, vous pouvez également passer à un motif rythmique "variation" secondaire pour un peu de variété.
Pour insérer le motif de variation rythmique
Appuyez sur le bouton START/STOP pour démarrer la lecture du rythme. Appuyez sur le bouton VARIATION/FILL-IN pour passer au motif de variation du rythme que vous utilisez.
REMARQUE
- Pour revenir au motif rythmique standard, appuyez sur le bouton NORMAL/FILL-IN.
Utilisation d'un motif de remplissage avec un rythme de variation
Vous pouvez également insérer un motif de remplissage pendant qu'un motif de variation rythmique est en cours de lecture.
Pour insérer un remplissage dans une variation de rythme
Pendant qu'un motif de variation rythmique est en cours de lecture, appuyez sur le bouton VARIATION/FILL-IN pour insérer un motif de remplissage pour la variation de rythme que vous utilisez.
Démarrage synchronisé de l'accompagnement avec la lecture du rythme
Vous pouvez configurer le clavier pour démarrer la lecture du rythme en même temps que vous jouez l'accompagnement sur le clavier.
La procédure suivante décrit comment utiliser le démarrage synchronisé. Avant de commencer, vous devez d'abord sélectionner le rythme que vous souhaitez utiliser, régler le tempo et utiliser le commutateur MODE pour sélectionner la méthode de jeu d'accords que vous souhaitez utiliser (NORMAL, CASIO CHORD, FINGERED, FULL RANGE CHORD).
Pour utiliser le démarrage synchronisé
Appuyez sur le bouton SYNCHRO/ENDING pour mettre le clavier en mode d'attente de démarrage synchronisé.
Clignote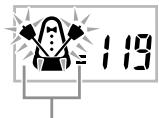
2 Jouez un accord et le motif rythmique commence à jouer automatiquement.
REMARQUE
- Si le commutateur MODE est réglé sur NORMAL, seul le rythme joue (sans accord) lorsque vous jouez sur le clavier d'accompagnement.
- Si vous appuyez sur le bouton INTRO avant de jouer quoi que ce soit sur le clavier, le rythme démarre automatiquement avec un motif d'introduction lorsque vous jouez quelque chose sur le clavier d'accompagnement.
- Appuyer sur le bouton VARIATION/FILL-IN avant de jouer quoi que ce soit sur le clavier fait démarrer la lecture avec le motif de variation lorsque quelque chose est joué sur le clavier.
- Pour annuler l'attente de démarrage synchronisé, appuyez à nouveau sur le bouton SYNCHRO/ENDING.
Terminer avec un motif de fin
Vous pouvez terminer vos performances avec un motif de fin qui donne une conclusion naturelle au motif rythmique que vous utilisez.
La procédure suivante décrit comment insérer un motif de fin. Notez que le motif de fin réel joué dépend du motif rythmique que vous utilisez.
Pour terminer avec un motif de fin
1 Pendant que le rythme joue, appuyez sur le bouton SYNCHRO/ENDING.
- Cela fait jouer le motif de fin, ce qui met fin à l'accompagnement rythmique.
Utilisation de la présélection en une touche
La présélection en une touche configure automatiquement les réglages listés ci-dessous en fonction du motif rythmique que vous utilisez.
- Sonorité du clavier
- Activation/désactivation de Layer, Split ou Layer Split
- Sonorité de superposition (lorsque Layer est activé), sonorité de division (lorsque Split est activé) ou sonorité de superposition et de division (lorsque Layer et Split sont activés)
- Tempo
- Réglages de réverbération et de chorus
Pour utiliser la présélection en une touche
1 Sélectionnez le rythme que vous souhaitez utiliser. Utilisez le commutateur MODE pour sélectionner le mode d'accompagnement souhaité. 3 Appuyez sur le bouton ONE TOUCH PRESET.
- Cela configure automatiquement les réglages de présélection en une touche en fonction du rythme sélectionné et passe en mode d'attente de démarrage synchronisé.
4 Jouez un accord. Cela fera démarrer automatiquement le motif rythmique. - L'accompagnement est joué en utilisant les réglages de présélection en une touche.
Fonctions de mémoire d'enregistrement
La mémoire d'enregistrement vous permet de stocker jusqu'à 32 configurations de clavier (4 ensembles × 8 banques) pour un rappel instantané à tout moment. Voici une liste des réglages enregistrés dans la mémoire d'enregistrement.
Réglages de la mémoire d'enregistrement
- Sonorité Rythme
- Tempo
- Layer on/off
- Split on/off
- Split point
- Effect settings
- Touch Response settings
- Assignable jack setting Synchro standby state
NOTE
Each bank of registration memory initially contains data when you first use the keyboard. Simply replace the existing data with your own data.
Setup Names
You can assign setups into one of 32 areas, which you can select using the BANK button and the four REGISTRATION buttons. Area names range from 1-1 through 8-4 as shown below.
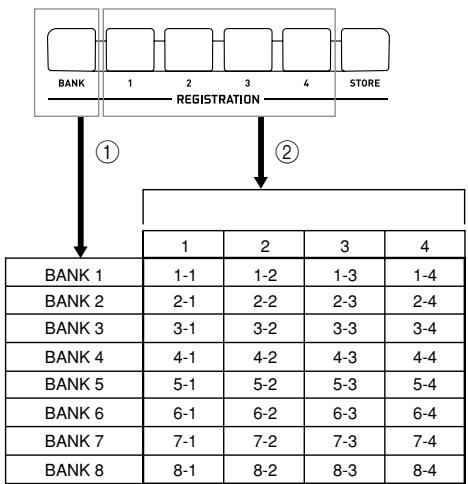
① Use the BANK button to select the bank. Each press of BANK cycles through the bank numbers from 1 to 8. ② Pressing one of the REGISTRATION buttons (1 to 4) selects the corresponding area in the currently selected bank.
NOTE
- Whenever you save a setup and assign it a setup name, any setup data previously assigned to that name is replaced with the new data.
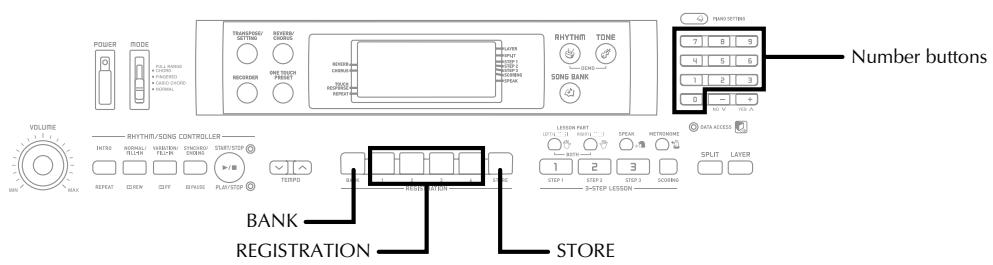
To Save a Setup in Registration Memory
1 Select a tone and rhythm, and otherwise set up the keyboard the way you want it. - See "Registration Memory Settings" on page E-37 for details on what data is stored in the registration memory. Use the BANK button or the number buttons to select the bank you want. - If you do not perform any operation for about three seconds after pressing the BANK button, the display returns to the contents in step 1, above. Bank 1 selected.

3 Tout en maintenant enfoncé le bouton STORE, appuyez sur un bouton REGISTRATION (1 à 4).
- L'écran suivant s'affiche lorsque vous appuyez sur le bouton 2.

4 Relâchez les boutons STORE et REGISTRATION.
REMARQUE
- La configuration est enregistrée dès que vous appuyez sur un bouton REGISTRATION à l'étape 3 ci-dessus.
Pour rappeler une configuration depuis la mémoire d'enregistrement
Utilisez le bouton BANK ou les boutons numériques pour sélectionner la banque.
- Si vous n'effectuez aucune opération pendant environ trois secondes après avoir appuyé sur le bouton BANK, le clavier efface automatiquement l'écran de rappel de la mémoire d'enregistrement.

Appuyez sur le bouton REGISTRATION (1 à 4) correspondant à la zone dont vous souhaitez rappeler la configuration.

- Le nom de la configuration accompagné du message "Recall" s'affiche à l'écran.
REMARQUE
- Si vous appuyez sur un bouton REGISTRATION sans avoir sélectionné de banque à l'aide du bouton BANK, le dernier numéro de banque sélectionné est utilisé.
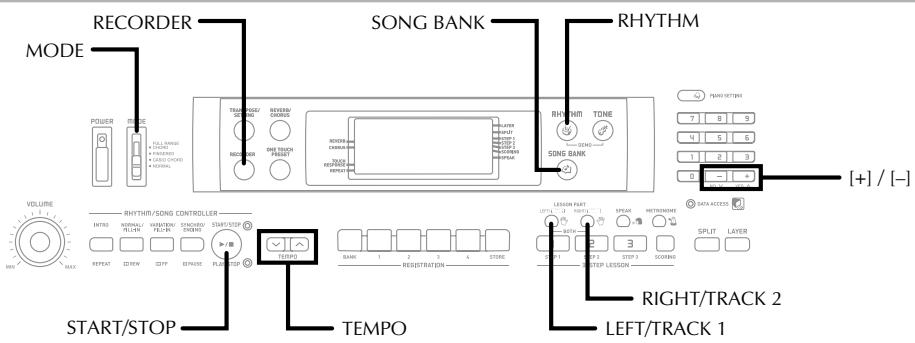
Vous pouvez enregistrer votre jeu de leçon (enregistrement de leçon) et votre jeu au clavier avec l'accompagnement automatique que vous utilisez (enregistrement de performance).
Parties et pistes
La manière dont les données sont enregistrées sur le clavier et le type de données enregistrées dépendent du type d'opération d'enregistrement : enregistrement de performance ou enregistrement de leçon.
Enregistrement de leçon
Avec l'enregistrement de leçon, vous utilisez le bouton GAUCHE/PISTE 1 et le bouton DROITE/PISTE 2 pour sélectionner l'enregistrement de la partie de la main gauche uniquement, de la partie de la main droite uniquement, ou des deux parties (main gauche et main droite).
Enregistrement de performance
Avec l'enregistrement de performance, le clavier fonctionne comme un magnétophone ou un séquenceur. Dans ce cas, vous pouvez utiliser le bouton GAUCHE/PISTE 1 et le bouton DROITE/PISTE 2 pour sélectionner la piste sur laquelle vous souhaitez enregistrer.
L'enregistrement de performance enregistre les données illustrées ci-dessous, en utilisant deux pistes mémoire.
| Track 1 | Auto Accompaniment (rhythm, bass, chords), melody |
| Track 2 | Melody |
- Chaque piste étant indépendante de l'autre, vous pouvez modifier un enregistrement en réenregistrant une seule des pistes.
Utilisation du bouton REORDER
Chaque pression sur le bouton REORDER fait défiler les options d'enregistrement dans l'ordre indiqué ci-dessous.
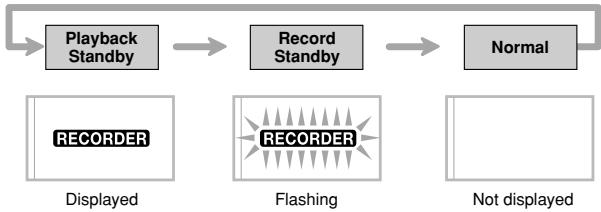
Capacité mémoire
Ce clavier peut contenir un total d'environ 12 000 notes, qui peuvent être réparties entre un enregistrement de leçon et un enregistrement de performance. Notez que vous pouvez utiliser les 12 000 notes pour l'enregistrement de leçon ou pour l'enregistrement de performance. Si vous le faites, vous ne pourrez rien enregistrer pour l'autre type d'enregistrement.
- L'enregistreur partage la même zone mémoire que la banque de morceaux utilisée pour stocker les données de morceaux transférées depuis un ordinateur. Par conséquent, il se peut que vous ne puissiez pas stocker les 12 000 notes complètes.
- Lorsque le nombre de notes restantes devient inférieur à environ 100 pendant l'enregistrement, l'indicateur RECORDER et l'indicateur de piste/partie (L, R) commencent à clignoter rapidement.
- L'enregistrement s'arrête automatiquement si la mémoire est pleine.
Si vous utilisez l'accompagnement automatique ou un rythme, ils s'arrêteront également de jouer à ce moment-là.
IMPORTANT !
- Ne coupez jamais l'alimentation du clavier pendant qu'il enregistre ou qu'il est en attente d'enregistrement. Cela entraînerait la suppression de toutes les données de morceaux actuellement stockées dans la zone utilisateur de la banque de morceaux.
Stockage des données enregistrées
- Toute donnée précédemment stockée dans le clavier est remplacée lorsque vous effectuez un nouvel enregistrement.
- Le contenu de l'enregistreur est conservé même lorsque l'alimentation est coupée, tant que le clavier est alimenté par des piles ou un adaptateur secteur. Si vous retirez les piles ou si elles sont déchargées alors que le clavier n'est pas alimenté par l'adaptateur secteur, le contenu de l'enregistreur sera supprimé. Assurez-vous d'alimenter le clavier avec l'adaptateur secteur lors du remplacement des piles.
- Éteindre le clavier pendant une opération d'enregistrement entraîne la perte du contenu de la piste en cours d'enregistrement.
CASIO COMPUTER CO., LTD. décline toute responsabilité en cas de perte ou de dommage causé à vous ou à un tiers résultant de la perte ou de la corruption de données.
Enregistrement en jouant avec un morceau intégré
Vous pouvez utiliser la procédure d'enregistrement de leçon pour enregistrer les notes que vous jouez avec l'un des morceaux intégrés du clavier. Lorsque vous démarrez un enregistrement de leçon, le clavier joue le morceau sans la ou les parties que vous avez sélectionnées comme parties d'enregistrement.
Sélection des parties
Appuyez sur le bouton partie/piste correspondant à la ou aux parties que vous souhaitez sélectionner comme parties d'enregistrement.
| To select this part: | Press this button: |
| Left-hand | LEFT/TRACK 1 |
| Right-hand | RIGHT/TRACK 2 |
| Both hands | LEFT/TRACK 1 + RIGHT/TRACK 2 |
La partie actuellement sélectionnée est indiquée par les indicateurs de partie/piste (L et R) qui apparaissent à l'écran comme décrit ci-dessous.
Indicateurs de partie/piste en attente d'enregistrement
Appuyez sur le bouton partie/piste de la partie que vous voulez jouer sur le clavier (partie d'enregistrement). Cela fait clignoter son indicateur de partie/piste.
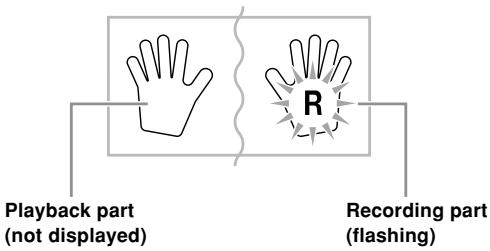
Exemple : Ce qui précède indique que la partie de la main gauche est la partie de lecture, et que la partie de la main droite est la partie d'enregistrement.
Pour enregistrer en jouant avec un morceau intégré
Appuyez sur le bouton SONG BANK pour sélectionner le mode qui inclut le morceau avec lequel vous voulez jouer.
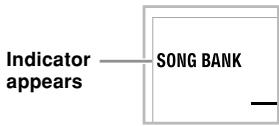
Utilisez le bouton RECORDER pour sélectionner l'attente d'enregistrement.
- Cela fait clignoter l'indicateur RECORDER sur l'écran.
3 Sélectionnez le morceau avec lequel vous voulez jouer.
- Voir "Pour lire un morceau de la banque de chansons" à la page E-22 pour plus d'informations sur la sélection des morceaux de la banque de chansons.
Utilisez le bouton LEFT/TRACK 1 ou RIGHT/TRACK 2 pour sélectionner la ou les parties (main gauche, main droite) que vous voulez couper dans la lecture du morceau intégré et jouer sur le clavier.
- Si vous voulez couper et jouer les deux parties, appuyez sur les deux boutons en même temps.
5 Configurez les réglages suivants si nécessaire.
- Tonalité (page E-20)
- Tempo (page E-23)
6 Appuyez sur le bouton START/STOP du bloc de contrôle.
Cela démarre l'enregistrement.
Jouez les notes pour la ou les parties sélectionnées à l'étape 4 sur le clavier.
L'enregistrement s'arrête automatiquement lorsque la lecture du morceau intégré est terminée.
- Pour interrompre l'enregistrement en cours de route, appuyez sur le bouton START/STOP du bloc de contrôle. Cela lira tout ce que vous avez enregistré jusqu'à ce point.
- Si vous souhaitez écouter immédiatement ce que vous avez enregistré, appuyez à nouveau sur le bouton START/STOP du bloc de contrôle.
Données d'enregistrement de leçon
En plus des notes que vous jouez au clavier et de l'accompagnement du morceau intégré sélectionné, les données suivantes sont également stockées lors d'un enregistrement de leçon.
- Réglage de la sonorité
- Réglage du tempo
- Nom du morceau
- Sélection de la partie enregistrée
- Opérations de pédale
- Réglages de calque et de partage, et leurs réglages de sonorité
- Réglage des effets
Lecture d'un enregistrement de leçon
Appuyez sur le bouton SONG BANK pour sélectionner la banque du morceau intégré que vous avez utilisé à l'origine pour enregistrer la leçon. Utilisez le bouton RECORDER pour sélectionner l'attente de lecture. 3. Appuyez sur le bouton START/STOP du bloc de contrôle.
- La lecture du contenu de l'enregistrement de leçon démarre.
- Vous pouvez ajuster le tempo à ce stade, si vous le souhaitez.
Pour arrêter la lecture, appuyez à nouveau sur le bouton START/STOP du bloc de contrôle.
Enregistrement d'une performance
Utilisez cette procédure lorsque vous souhaitez enregistrer en temps réel ce que vous jouez au clavier. L'enregistrement de performance enregistre à la fois les notes que vous jouez et les motifs d'accompagnement que vous utilisez.
Sélection d'une piste
Appuyez sur le bouton de partie/piste correspondant à la piste que vous souhaitez sélectionner.
| To select this track: | Press this button: |
| Track 1 | LEFT/TRACK 1 |
| Track 2 | RIGHT/TRACK 2 |
La piste actuellement sélectionnée est indiquée par l'indicateur de partie/piste (L ou R) qui apparaît à l'écran comme décrit ci-dessous.
Indicateurs de partie/piste en veille de lecture
Chaque pression sur un bouton de partie/piste active (indicateur affiché) ou désactive (indicateur non affiché) la lecture de cette piste.
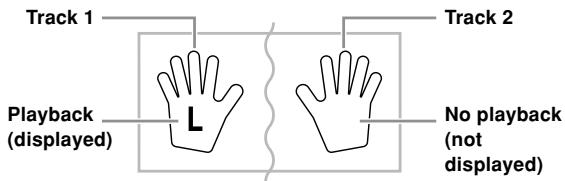
Exemple : Ceci indique que la piste 1 sera lue, tandis que la piste 2 ne le sera pas.
Indicateurs de partie/piste en veille d'enregistrement
L'indicateur de partie/piste sera affiché si sa piste contient déjà des données.
Appuyez sur le bouton de partie/piste de la piste sur laquelle vous souhaitez enregistrer (piste d'enregistrement). Cela fait clignoter son indicateur de partie/piste. L'indicateur de partie/piste de l'autre piste reste affiché (sans clignoter) pour indiquer qu'elle sera lue pendant l'enregistrement (piste de lecture).
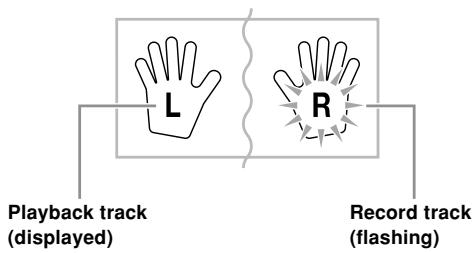
Exemple : Ceci indique que la piste 1 est la piste de lecture et la piste 2 est la piste d'enregistrement.
Pour enregistrer vos performances au clavier
IMPORTANT !
- L'enregistrement sur une piste qui contient déjà des données remplace les données existantes par votre nouvelle performance.
Appuyez sur le bouton RHYTHM pour entrer dans le mode rythme.
Utilisez le bouton REORDER pour sélectionner la mise en attente d'enregistrement. - Cela fait clignoter l'indicateur RECORDER sur l'écran. 3 Appuyez sur le bouton LEFT/TRACK 1 pour sélectionner la piste 1. - Cela fait clignoter l'indicateur L, indiquant que la piste 1 est la piste d'enregistrement.
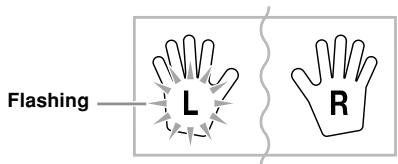
4 Configurez les réglages suivants selon vos besoins.
- Tonalité (page E-20) Rythme (page E-30)
- Réglage du commutateur MODE (page E-31)
- Utilisez un tempo plus lent si vous pensez que vous pourriez avoir du mal à jouer correctement à un tempo plus rapide (page E-23).
5 Appuyez sur le bouton START/STOP du bloc de contrôle.
- Cela démarre l'enregistrement.
6 Jouez les notes que vous voulez sur le clavier.
- En plus des notes, tous les accords que vous jouez sur le clavier sont enregistrés, ainsi que leurs motifs d'accompagnement automatique. Les notes de mélodie que vous jouez sont également enregistrées.
- Toutes les opérations de pédale que vous effectuez pendant le jeu sont également enregistrées.
Pour arrêter l'enregistrement, appuyez à nouveau sur le bouton START/STOP du bloc de contrôle.
- Si vous faites une erreur, vous devez revenir en arrière et réenregistrer à partir de l'étape 2.
- Si vous voulez immédiatement entendre ce que vous avez enregistré, appuyez à nouveau sur le bouton START/STOP du bloc de contrôle.
Données de la piste 1
Outre les notes jouées au clavier et les accompagnements d'accords, les données suivantes sont également enregistrées dans la piste 1 lors de l'enregistrement d'une performance.
- Numéro de son Numéro de rythme
- Opérations des boutons INTRO, SYNCHRO/FIN, NORMAL/REMPLI, VARIATION/REMPLI
- Opérations de la pédale
- Réglages de calque et de partage, et leurs réglages de son
- Point de partage
- Réglage du tempo
- Réglage des effets
Variations d'enregistrement de la piste 1
■Pour enregistrer sans rythme
Ignorez l'étape 5 de la procédure ci-dessus.
- L'enregistrement sans rythme commence dès que vous appuyez sur une touche du clavier.
Pour démarrer l'enregistrement avec le démarrage synchro
Au lieu de l'étape 5 de la procédure ci-dessus, appuyez sur le bouton SYNCHRO/FIN. - L'accompagnement automatique et l'enregistrement commenceront lorsque vous jouerez un accord dans la plage du clavier d'accompagnement.
Pour insérer une intro, une fin ou un remplissage dans un enregistrement
Pendant l'enregistrement, appuyez sur le bouton INTRO, le bouton SYNCHRO/ENDING, le bouton NORMAL/FILL-IN ou le bouton VARIATION/FILL-IN selon les besoins.
Pour démarrer l'enregistrement avec une intro en utilisant le démarrage synchro
Au lieu de l'étape 5 de la procédure ci-dessus, appuyez sur le bouton SYNCHRO/ENDING puis sur le bouton INTRO. - L'accompagnement automatique et l'enregistrement démarreront avec un motif d'intro lorsque vous jouerez un accord dans la plage du clavier d'accompagnement.
Pour démarrer l'accompagnement automatique en cours d'enregistrement Au lieu de l'étape 5 de la procédure ci-dessus, appuyez sur le bouton SYNCHRO/ENDING et jouez quelque chose dans la plage mélodique du clavier.
- Cela enregistre la mélodie sans aucun accompagnement. L'accompagnement automatique démarrera lorsque vous jouerez un accord dans la plage du clavier d'accompagnement.
Lecture d'un enregistrement de performance
Suivez la procédure suivante lorsque vous souhaitez lire un morceau enregistré avec l'enregistrement de performance.
Appuyez sur le bouton RHYTHM pour entrer en mode rythme.
Utilisez le bouton RECORDER pour sélectionner l'attente de lecture. 3 Appuyez sur le bouton START/STOP du bloc de contrôle.
- Cela démarre la lecture du contenu de l'enregistrement de performance. Pendant la lecture, vous pouvez appuyer sur le bouton LEFT/TRACK 1 ou RIGHT/TRACK 2 pour couper le son d'une piste et n'écouter que le contenu de l'autre piste.
- Vous pouvez ajuster le tempo à ce stade, si vous le souhaitez.
4 Pour arrêter la lecture, appuyez à nouveau sur le bouton START/STOP du bloc de contrôle.
REMARQUE
- Pendant la lecture de l'enregistrement de performance, toute la plage du clavier fonctionne comme un clavier mélodique, quel que soit le réglage du commutateur MODE. Vous pouvez jouer en même temps que la lecture de l'enregistrement de performance, si vous le souhaitez. Vous pouvez utiliser le calque et la division (pages E-45 à E-47) à ce moment pour assigner plusieurs tonalités au clavier.
- Notez que les opérations de pause, d'avance rapide et de retour rapide ne peuvent pas être effectuées pendant la lecture de l'enregistrement de performance.
- Vous pouvez envoyer la lecture du contenu d'une performance enregistrée sous forme de données MIDI.
Surimpression d'un enregistrement de performance
Vous pouvez utiliser la procédure suivante pour enregistrer une mélodie dans la piste 2 afin qu'elle se combine avec un enregistrement que vous avez précédemment effectué dans la piste 1.
Appuyez sur le bouton RHYTHM pour passer en mode rythme.
Utilisez le bouton RECORDER pour sélectionner l'attente d'enregistrement. 3. Appuyez sur le bouton RIGHT/TRACK 2 pour sélectionner la piste 2 comme piste d'enregistrement.
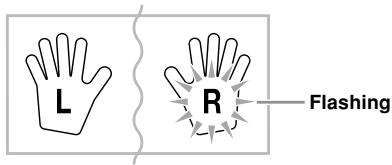
4. Sélectionnez la tonalité que vous souhaitez utiliser. Appuyez sur le bouton START/STOP du bloc de contrôle.
- Cela démarre la lecture de la piste 1 et l'enregistrement sur la piste 2.
6. Jouez les notes de la mélodie que vous souhaitez en écoutant la lecture de la piste 1. Pour arrêter l'enregistrement, appuyez à nouveau sur le bouton START/STOP du bloc de contrôle.
- Si vous faites une erreur, vous devez revenir en arrière et réenregistrer à partir de l'étape 2.
- Si vous souhaitez entendre immédiatement ce que vous avez enregistré, appuyez à nouveau sur le bouton START/STOP du bloc de contrôle.
REMARQUE
- La piste 2 est une piste de mélodie uniquement, ce qui signifie que l'accompagnement d'accords ne peut pas y être enregistré. Pour cette raison, toute la gamme du clavier devient un clavier de mélodie lors de l'enregistrement de la piste 2, quel que soit le réglage actuel du commutateur MODE.
- Si vous souhaitez enregistrer sans la lecture d'une piste enregistrée, passez en attente de lecture, désélectionnez la piste de lecture, puis passez en attente d'enregistrement. Notez toutefois que vous ne pouvez pas désactiver le rythme et l'accompagnement automatique.
Données de la piste 2
En plus des notes jouées sur le clavier, les données suivantes sont également enregistrées sur la piste 2.
- Numéro de tonalité
- Opérations de pédale
Suppression d'une partie/piste spécifique
Vous pouvez utiliser la procédure suivante pour supprimer une partie/piste spécifique d'un enregistrement de leçon ou d'un enregistrement de performance.
Préparation
■Lors de la suppression d'une partie d'enregistrement de leçon
- Appuyez sur le bouton SONG BANK.
■Lors de la suppression d'une piste d'enregistrement de performance - Appuyez sur le bouton RHYTHM.
Appuyez sur le bouton REORDER pour passer en mode d'attente d'enregistrement. 2 Sélectionnez la partie/piste que vous souhaitez supprimer en appuyant sur le bouton LEFT/TRACK 1 ou RIGHT/TRACK 2. Maintenez enfoncé le bouton RECORDER.
- Un message de confirmation apparaît à l'écran.
- Pour annuler l'opération de suppression, appuyez sur le bouton [-] (NO).
Appuyez sur le bouton [+] (YES) pour supprimer la partie/piste. - Le clavier revient en mode d'attente de lecture.
REMARQUE
- Appuyer sur le bouton REORDER pendant que l'écran de suppression de partie/piste est affiché permet de revenir en mode d'attente d'enregistrement.
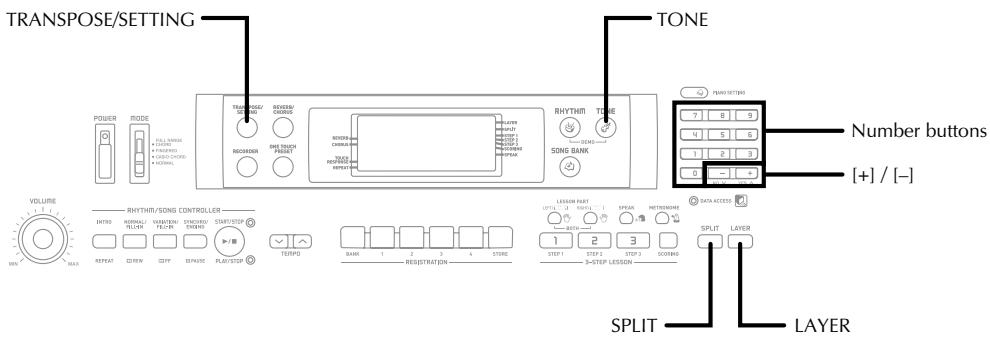
Cette section décrit comment utiliser le calque (pour jouer deux tonalités avec une seule touche) et le partage (pour assigner différentes tonalités à chaque extrémité du clavier), ainsi que comment régler la sensibilité au toucher, la transposition et l'accordage.
Utilisation de la fonction Layer
La fonction Layer vous permet d'assigner deux tonalités différentes (une tonalité principale et une tonalité superposée) au clavier, qui jouent toutes deux lorsque vous appuyez sur une touche. Par exemple, vous pouvez superposer la tonalité COR D'HARMONIE sur la tonalité CUIVRE pour produire un son riche et cuivré.
Pour superposer des tonalités
1 Sélectionnez d'abord la tonalité principale.
Exemple : Pour sélectionner "180 CUIVRE" comme tonalité principale, appuyez sur le bouton TONE, puis utilisez les boutons numériques ou les boutons ([+] et ([-]) pour saisir 1, 8 puis 0.

Appuyez sur le bouton LAYER.
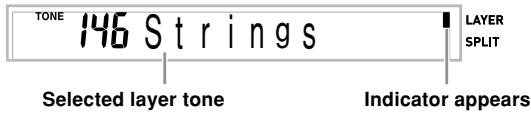
3 Sélectionnez la tonalité superposée.
Exemple : Pour sélectionner "178 COR D'HARMONIE" comme tonalité superposée, utilisez les boutons numériques ou les boutons [+] et [-] pour saisir 1, 7 puis 8.
TONE 178 Cor d'harmonie
4 Essayez maintenant de jouer quelque chose sur le clavier.
- Les deux tonalités sont jouées en même temps.
Appuyez à nouveau sur le bouton LAYER pour désactiver la superposition et revenir au clavier normal.
LAYER
Exemple : WK-110
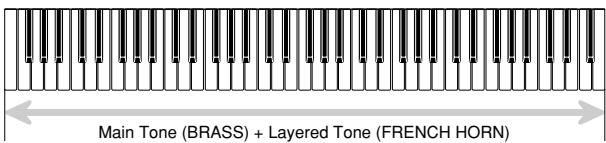
Utilisation de la fonction Split
Avec la fonction Split, vous pouvez assigner deux sonorités différentes (une sonorité principale et une sonorité de split) à chaque extrémité du clavier, ce qui vous permet de jouer une sonorité avec la main gauche et une autre avec la main droite. Par exemple, vous pouvez sélectionner STRINGS comme sonorité principale (registre aigu) et PIZZICATO STRINGS comme sonorité de split (registre grave), mettant ainsi un ensemble de cordes complet à portée de main.
La fonction Split vous permet également de spécifier le point de partage, c'est-à-dire l'emplacement sur le clavier où se produit le changement entre les deux sonorités.
Pour diviser le clavier
1 Sélectionnez d'abord la sonorité principale.
Exemple : Pour sélectionner "146 STRINGS" comme sonorité principale, appuyez sur le bouton TONE puis utilisez les boutons numériques ou les boutons [+] et [-] pour saisir 1, 4 puis 6.

Appuyez sur le bouton SPLIT.
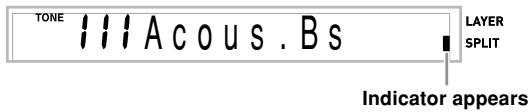
3 Sélectionnez la sonorité de split.
Exemple : Pour sélectionner "134 PIZZICATO STRINGS" comme sonorité de split, utilisez les boutons numériques ou les boutons [+] et [-] pour saisir 1, 3 puis 4.

4 Spécifiez le point de partage. Tout en maintenant enfoncé le bouton SPLIT, appuyez sur la touche du clavier où vous voulez que se trouve la touche la plus à gauche du registre aigu.
Exemple : Pour spécifier G3 comme point de partage, appuyez sur la touche G3.
G 3
5 Essayez maintenant de jouer quelque chose sur le clavier.
- Chaque touche de F#3 et en dessous est assignée à la sonorité PIZZICATO STRINGS, tandis que chaque touche de G3 et au-dessus est assignée à la sonorité STRINGS.
Appuyez à nouveau sur le bouton SPLIT pour annuler la division du clavier et revenir à la normale.
SPLIT
Exemple : WK-110
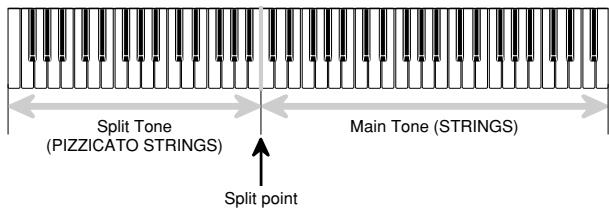
Utilisation de Layer et Split ensemble
Vous pouvez utiliser layer et split ensemble pour créer un clavier divisé en couches. Peu importe que vous superposiez d'abord les tonalités puis divisiez le clavier, ou que vous divisiez le clavier puis superposiez les tonalités. Lorsque vous utilisez layer et split en combinaison, la gamme aiguë du clavier se voit attribuer deux tonalités (tonalité principale + tonalité superposée), et la gamme grave deux tonalités (tonalité de division + tonalité de division superposée).
Pour diviser le clavier puis superposer les tonalités
Appuyez sur le bouton TONE puis saisissez le numéro de la tonalité principale.

Appuyez sur le bouton SPLIT puis saisissez le numéro de la tonalité de division.
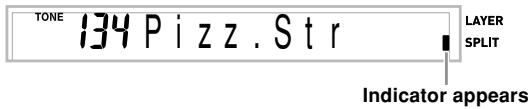
- Après avoir spécifié la tonalité de division, appuyez sur le bouton SPLIT pour annuler la division du clavier.
3 Appuyez sur le bouton LAYER puis saisissez le numéro de la tonalité superposée.
- Notez que vous pouvez inverser les étapes 2 et 3, en spécifiant d'abord la tonalité superposée puis la tonalité de division.
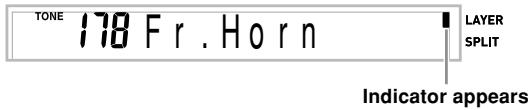
Appuyez sur le bouton SPLIT ou le bouton LAYER pour que les indicateurs SPLIT et LAYER soient tous deux affichés.
5 Saisissez le numéro de la tonalité de division superposée.

6 Spécifiez le point de partage.
- Tout en maintenant enfoncé le bouton SPLIT, appuyez sur la touche du clavier où vous voulez que se trouve la touche la plus à gauche de la gamme grave.
Jouez quelque chose sur le clavier.
- Appuyez sur le bouton LAYER pour annuler la superposition du clavier, et sur le bouton SPLIT pour annuler la division.
COUCHE SPLIT
Exemple : WK-110
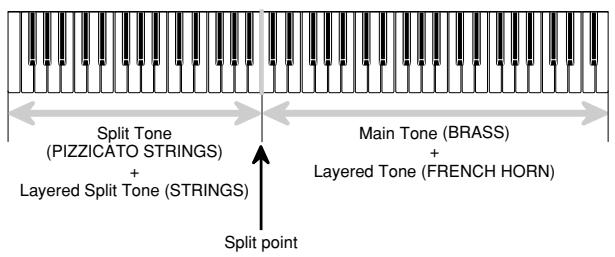
À propos du bouton TRANSPOSE/SETTING
Chaque pression sur le bouton TRANSPOSE/SETTING fait défiler les écrans de réglage. Si vous dépassez accidentellement l'écran souhaité, continuez à appuyer sur le bouton TRANSPOSE/SETTING jusqu'à ce que l'écran réapparaisse.
Transposition du clavier
La transposition vous permet d'élever ou d'abaisser la tonalité globale du clavier par demi-tons. Par exemple, si vous souhaitez jouer un accompagnement pour un chanteur dont la tonalité diffère de celle du clavier, utilisez simplement la transposition pour changer la tonalité du clavier.
Pour transposer le clavier
Appuyez sur le bouton TRANSPOSE/SETTING jusqu'à ce que l'écran de réglage de transposition apparaisse.
00 Trans.
Utilisez les boutons numériques ou les boutons [+]/[-] pour changer la tonalité du clavier.
Exemple : Pour transposer le clavier de cinq demi-tons vers le haut.
05 Trans.
REMARQUE
- Le clavier peut être transposé dans une plage de -12 (une octave vers le bas) à +12 (une octave vers le haut).
- Le réglage de transposition par défaut est "00" lorsque le clavier est mis sous tension.
- Si vous laissez l'écran de transposition affiché pendant environ cinq secondes sans rien faire, l'écran est automatiquement effacé.
- Le réglage de transposition affecte également la lecture depuis la mémoire et l'accompagnement automatique.
- Pour ramener le clavier à sa tonalité par défaut, effectuez la procédure ci-dessus et appuyez simultanément sur les boutons [+] et [-] à l'étape 2.
- L'effet d'une opération de transposition dépend de la hauteur de chaque note et du timbre que vous utilisez actuellement. Si une opération de transposition amène une note en dehors de la plage autorisée pour un timbre, la même note dans l'octave la plus proche dans la plage sera substituée.
Réglage du volume de l'accompagnement et du morceau de la banque de chansons
Vous pouvez régler le volume de l'accompagnement et des morceaux de la banque de chansons indépendamment des notes que vous jouez sur le clavier. Vous pouvez spécifier un niveau de volume dans la plage de 000 (minimum) à 127 (maximum).
Pour régler le volume de l'accompagnement
Appuyez sur le bouton TRANSPOSE/SETTING jusqu'à ce que l'écran de réglage du volume d'accompagnement apparaisse.
115 A c o m p V o l
Réglage actuel du volume d'accompagnement
Utilisez les boutons numériques ou les boutons [+]/[-] pour modifier la valeur du réglage de volume actuel. Exemple : 110
110 A c o m p V o l
REMARQUE
- La valeur actuelle du volume d'accompagnement qui apparaît à l'étape 1 s'efface automatiquement de l'écran si vous ne saisissez rien dans les cinq secondes environ.
Pour régler le volume des morceaux intégrés
Entrez dans le mode Banque de morceaux, puis effectuez la procédure décrite dans « Pour régler le volume d'accompagnement ».
- Dans ce cas, un écran de volume de morceau apparaîtra à la place de l'écran de volume d'accompagnement.
Utilisation de la réponse au toucher
Lorsque la réponse au toucher est activée, le volume relatif du son émis par le clavier varie en fonction de la pression appliquée, comme sur un piano acoustique.
La réponse au toucher offre un choix de trois réglages, décrits ci-dessous.
OFF : Ce réglage désactive la réponse au toucher. La pression sur le clavier n'a aucun effet sur les notes émises.
1 : Ce réglage fournit une réponse au toucher adaptée au jeu normal. 2 : Ce réglage augmente la réponse au toucher, de sorte qu'une pression plus forte sur le clavier a un effet plus important que le réglage « 1 ».
Appuyez sur le bouton TRANSPOSE/SETTING jusqu'à ce que l'écran TOUCH RESPONSE SELECT apparaisse.
Toucher
Utilisez les boutons [+] et [-] ou [0] et [1] pour modifier le réglage.
Exemple : Pour sélectionner la réponse au toucher 2.
Toucher
- La réponse au toucher est activée lorsque le témoin de réponse au toucher est allumé.
L'indicateur TOUCH RESPONSE REPEAT apparaît
- La réponse au toucher est désactivée lorsque l'indicateur de réponse au toucher est éteint.
TOUCH RESPONSE REPEAT
REMARQUE
- La lecture de l'enregistrement et l'accompagnement n'affectent pas le réglage de la réponse au toucher.
Accorder le clavier
Utilisez la procédure suivante pour accorder finement le clavier afin de le faire correspondre à l'accord d'un autre instrument de musique.
Pour accorder le clavier
Appuyez sur le bouton TRANSPOSE/SETTING jusqu'à ce que l'écran d'accordage apparaisse.
00 Tune
Utilisez les boutons [+] ,[-] et les boutons numériques pour ajuster la valeur d'accordage.
Exemple : Pour baisser l'accordage de 20
-20 Tune
REMARQUE
- Le clavier peut être accordé dans une plage de -50 cents à +50 cents.
- 100 cents équivaut à un demi-ton.
- Le réglage d'accord par défaut est "00" lorsque le clavier est mis sous tension.
- Si vous laissez l'écran d'accord affiché sans rien faire pendant environ cinq secondes, l'écran s'efface automatiquement.
- Le réglage d'accord affecte également la lecture depuis l'enregistreur et l'accompagnement automatique.
- Pour rétablir l'accord par défaut du clavier, effectuez la procédure ci-dessus et appuyez simultanément sur les boutons [+] et [-] à l'étape 2.
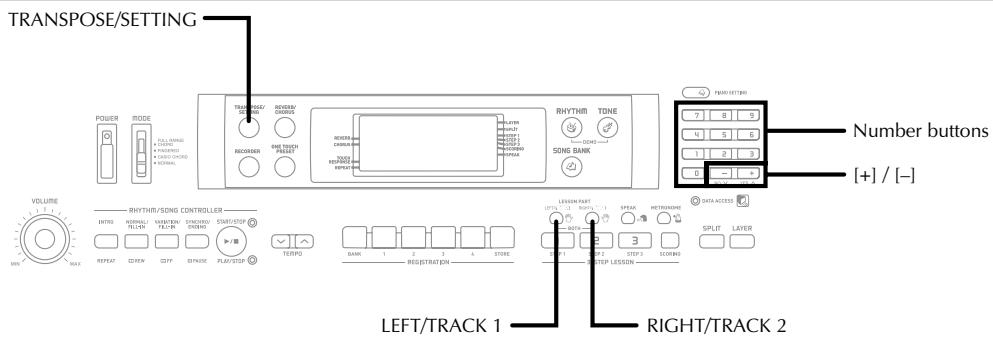
Connexion à un ordinateur
Le port USB du clavier permet une connexion rapide et simple à un ordinateur. Après avoir installé le pilote MIDI USB sur votre ordinateur à partir du CD-ROM fourni avec le clavier, vous pourrez utiliser des logiciels MIDI commerciaux sur votre ordinateur pour échanger des données entre le clavier et votre ordinateur.
Pour installer le pilote MIDI USB
Sur l'ordinateur auquel vous prévoyez de vous connecter, installez le pilote MIDI USB fourni sur le CD-ROM inclus avec le clavier. - Pour plus d'informations sur l'installation du pilote MIDI USB, consultez le "Guide de l'utilisateur du pilote MIDI USB CASIO" (manual_e.pdf) sur le "CD-ROM du manuel et du pilote USB".
REMARQUE
- Avant de commencer l'installation réelle du pilote MIDI USB, assurez-vous de lire le contenu du fichier "readme.txt" dans le dossier "English" du CD-ROM.
- Utilisez Adobe Reader ou Acrobat Reader pour accéder au guide de l'utilisateur du pilote MIDI USB.*
- Vous devez avoir Adobe Reader ou Acrobat Reader installé sur votre ordinateur pour consulter le contenu du "Guide de l'utilisateur du pilote MIDI USB CASIO" (manual_e.pdf). Si votre ordinateur n'a ni Adobe Reader ni Acrobat Reader installé, suivez la procédure ci-dessous pour l'installer.
Installation d'Adobe Reader (Acrobat Reader)
- Insérez le « CD-ROM du manuel et des pilotes USB » dans le lecteur de CD-ROM de votre ordinateur.
- Sur le CD-ROM, accédez au dossier nommé « Adobe », ouvrez le dossier nommé « English », puis double-cliquez sur « ar601enu.exe » (ou « ar505enu.exe »). Suivez les instructions qui s'affichent à l'écran pour installer Adobe Reader. Adobe Reader ne peut pas être installé sur un ordinateur fonctionnant sous Windows 98. Si votre ordinateur fonctionne sous Windows 98, double-cliquez sur « ar505enu.exe » pour installer Acrobat Reader.
Configuration système minimale requise
Systèmes d'exploitation pris en charge
Le fonctionnement est pris en charge sous Windows XP Professionnel, Windows XP Édition familiale, Windows 2000 Professionnel, Windows Me, Windows 98SE et Windows 98.
Universel
- Ordinateur compatible IBM AT
- Port USB fonctionnant normalement sous Windows
- Lecteur de CD-ROM (pour l'installation)
- Au moins 2 Mo d'espace libre sur le disque dur (hors espace requis pour Adobe Reader)
- Windows XP
- Processeur Pentium à 300 MHz ou plus
- Au moins 128 Mo de mémoire
Windows 2000
Processeur Pentium 166 MHz ou plus - Au moins 64 Mo de mémoire
- Windows Me, Windows 98SE, Windows 98
Processeur Pentium 166 MHz ou plus - Au moins 32 Mo de mémoire
REMARQUE
- Les noms de sociétés et de produits mentionnés dans ce document sont des marques déposées de leurs propriétaires respectifs.
Utilisation du port USB
Notez que vous devez acheter un câble USB disponible dans le commerce pour connecter le clavier à un ordinateur via le port USB.
Pour connecter à un ordinateur via le port USB
Utilisez un câble USB disponible dans le commerce pour connecter le clavier à l'ordinateur.
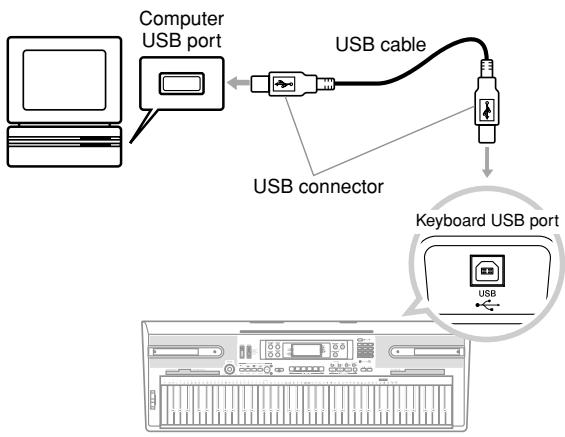
Voyant DATA ACCESS
- Le voyant DATA ACCESS s'allume lorsque le clavier échange des données avec un ordinateur connecté via un câble USB. Ne débranchez jamais le câble USB pendant que le voyant DATA ACCESS est allumé.
Élargir la sélection des morceaux de la banque de chansons
Vous pouvez transférer des données de morceaux depuis votre ordinateur vers le clavier. Vous pouvez stocker jusqu'à 5 morceaux en tant que morceaux 101 à 105 de la banque de chansons. Pour les données SMF que vous achetez ou créez, vous devez utiliser un convertisseur SMF pour les convertir au format CASIO avant de les transférer vers le clavier.
Pour installer le convertisseur SMF
Sur l'ordinateur auquel vous prévoyez de vous connecter, installez le convertisseur SMF fourni sur le CD-ROM inclus avec le clavier.
- Sur le CD-ROM, double-cliquez sur "SMFConv-e.exe", puis suivez les instructions qui s'affichent à l'écran pour installer SMF Converter.
- Avant d'installer SMF Converter, assurez-vous de lire le contenu du fichier "smfreadme.txt" dans chaque dossier de langue du CD-ROM.
Pour plus d'informations sur l'utilisation de SMF Converter, double-cliquez sur "index.html" dans le dossier [help], créé lors de l'installation de SMF Converter. Vous pouvez également accéder à la documentation utilisateur à partir du menu [Démarrer] de Windows en cliquant sur [Programmes] - [CASIO] - [SMF Converter] - [manuel].
- Un navigateur prenant en charge les cadres (comme Internet Explorer 4 ou Netscape Navigator 4.04 ou version ultérieure) est requis pour consulter le manuel de SMF Converter.
Configuration système minimale
- Système d'exploitation :
Windows 98SE
Windows Me
Windows XP Édition Familiale/XP Professionnel
Stockage
Au moins 10 Mo d'espace libre sur le disque dur
- Interface USB
- Vous pouvez également obtenir une copie du convertisseur SMF en le téléchargeant depuis la page Web indiquée ci-dessous. Après le téléchargement, installez le logiciel sur votre ordinateur.
SITE MUSICAL CASIO
http://music.casio.com/
- En plus du logiciel lui-même, le SITE MUSICAL CASIO vous fournira également des informations sur son installation et son utilisation. Vous pouvez également découvrir les dernières nouvelles concernant votre clavier et d'autres instruments de musique CASIO, et bien plus encore.
Stockage des données de morceaux
Les données de morceaux enregistrées en tant que morceaux de la banque de morceaux sont conservées même lorsque l'alimentation est coupée, tant que le clavier est alimenté par des piles ou un adaptateur secteur. Si vous retirez les piles ou si elles sont déchargées alors que le clavier n'est pas alimenté par l'adaptateur secteur, les données de morceaux seront supprimées. Assurez-vous d'alimenter le clavier avec l'adaptateur secteur lors du remplacement des piles.
REMARQUE
- Ce clavier prend en charge les données au format SMF 0 et 1.
- Le guide de doigté vocal, les indicateurs de doigté à l'écran et l'annonce vocale des points d'évaluation ne sont pas pris en charge pour les données SMF que vous achetez ou créez.
Utilisation des données SMF sur le CD-ROM fourni
Le CD-ROM fourni avec le clavier contient des démos ainsi que 25 morceaux (données SMF) que vous pouvez utiliser pour les leçons par étapes. Il contient également des fichiers au format PDF contenant les partitions des morceaux inclus. Pour une liste complète des morceaux inclus, ouvrez le fichier "List.txt" situé dans le dossier "MusicDataFolder" sur le CD-ROM. Pour chaque morceau, "List.txt" indique le nom du morceau, le nom du fichier SMF, le nom du fichier PDF de la partition et le type de leçon* pour lequel le morceau peut être utilisé.
★Un morceau marqué d'un astérisque (*) peut être utilisé pour une leçon à deux mains. Un morceau non marqué d'un astérisque peut être utilisé pour une leçon de main droite.
REMARQUE
- Vous pouvez charger des données SMF du CD-ROM vers le clavier à l'aide de l'outil convertisseur SMF (page E-50).
- Vous devez avoir Adobe Reader ou Acrobat Reader installé sur votre ordinateur pour pouvoir visualiser le contenu d'un fichier PDF de partition musicale. Si aucune de ces applications n'est installée sur votre ordinateur, reportez-vous à la section "Installation d'Adobe Reader (Acrobat Reader)" à la page E-49.
Son General MIDI
La norme General MIDI définit la séquence de numérotation des sons, la séquence de numérotation des sons de batterie, le nombre de canaux MIDI pouvant être utilisés, et d'autres facteurs généraux qui déterminent la configuration de la source sonore. Grâce à cela, les données musicales produites sur une source sonore General MIDI peuvent être lues avec des sons similaires et des nuances identiques à l'original, même lorsqu'elles sont lues sur une source sonore d'un autre fabricant.
Ce clavier est conforme aux normes General MIDI, il peut donc être connecté à un ordinateur et utilisé pour lire des données General MIDI qui ont été achetées, téléchargées depuis Internet ou obtenues de toute autre source.
Modification des réglages
Cette section vous explique comment effectuer les réglages nécessaires lors de la connexion à un ordinateur.
CANAL CLAVIER (par défaut : 1)
Le canal clavier est le canal utilisé pour envoyer des messages de ce clavier à un ordinateur. Vous pouvez spécifier un canal de 1 à 16 comme canal clavier.

Appuyez sur le bouton TRANSPOSE/SETTING jusqu'à ce que l'écran KEYBOARD CHANNEL apparaisse.
01 Keybd Ch

Utilisez les boutons [+] , [-] et les boutons numériques pour changer le numéro de canal.
Exemple : Pour spécifier le canal 4
04 Keybd Ch
CANAL DE NAVIGATION (par défaut : 4)
Lorsque des messages sont reçus d'un ordinateur pour être joués sur ce clavier, le canal de navigation est le canal dont les données de notes apparaissent à l'écran. Vous pouvez sélectionner un canal de 01 à 16 comme canal de navigation. Étant donné que ce réglage vous permet d'utiliser les données de n'importe quel canal de données SMF disponibles dans le commerce pour allumer le guide de clavier à l'écran, vous pouvez analyser comment différentes parties d'un arrangement sont jouées.
Appuyez sur le bouton TRANSPOSE/SETTING jusqu'à ce que l'écran NAVIGATE CHANNEL apparaisse.
04 Navi. Ch
Utilisez les boutons [+],[-] et les boutons numériques [0] à [9] pour changer le numéro de canal.
Exemple : Pour spécifier le canal 2
02 Navi. Ch
Pour couper des sons spécifiques avant de lire des données de morceau reçues
>
1 Pendant la lecture des données de morceau, appuyez sur le bouton RIGHT/TRACK 2.
- Cela coupe le son du canal de navigation, mais les touches de guidage du clavier à l'écran continuent de s'allumer conformément aux données du canal telles qu'elles sont reçues. Appuyez à nouveau sur le bouton RIGHT/TRACK 2 pour réactiver le canal.
< >
1 Pendant la lecture des données de morceau, appuyez sur le bouton LEFT/TRACK 1.
- Cela coupe le son du canal dont le numéro est un de moins que le canal de navigation, mais les touches de guidage du clavier à l'écran continuent de s'allumer conformément aux données du canal telles qu'elles sont reçues. Appuyez à nouveau sur le bouton LEFT/TRACK 1 pour réactiver le canal.
Exemple : Si le canal de navigation est le canal 4, l'opération ci-dessus coupe le canal 3.
LOCAL CONTROL (Par défaut : On)
oFF : Tout ce qui est joué sur le clavier est émis comme message depuis le port USB, sans être sonné par la source sonore interne.
- Notez qu'aucun son n'est produit par le clavier si le contrôle local est désactivé et qu'aucun périphérique externe n'est connecté. Appuyez sur le bouton TRANSPOSE/SETTING jusqu'à ce que l'écran LOCAL CONTROL apparaisse.
Exemple : lorsque le contrôle local est activé
on Local
Utilisez les boutons [+] et [-] ou [0] et [1] pour activer ou désactiver le réglage.
Exemple : pour désactiver le contrôle local
oFF Local
ACCOMP OUT (par défaut : désactivé)
on : L'accompagnement automatique est joué par le clavier et le message correspondant est émis par le port USB. oFF : Les messages d'accompagnement automatique ne sont pas émis par le port USB.
Appuyez sur le bouton TRANSPOSE/SETTING jusqu'à ce que l'écran ACCOMP OUT apparaisse.
Exemple : lorsque ACCOMP OUT est désactivé
oFF A c omp pO u t
Utilisez les boutons [+] et [-] ou [0] et [1] pour activer ou désactiver le réglage.
Exemple : pour activer ACCOMP OUT
on A c omp p O u t
PRISE SUSTAIN/ASSIGNABLE (par défaut : SUS)
SUS (sustain) : spécifie un effet de sustain*1 lorsque la pédale est enfoncée.
SoS (sostenuto) : spécifie un effet de sostenuto*2 lorsque la pédale est enfoncée.
SFt (soft) : spécifie une réduction du volume du son lorsque la pédale est enfoncée.
rHy (rhythm) : spécifie le fonctionnement du bouton START/STOP lorsque la pédale est enfoncée.

Appuyez sur le bouton TRANSPOSE/SETTING jusqu'à ce que l'écran SUSTAIN/ASSIGNABLE JACK apparaisse.
Exemple : lorsque le sustain est actuellement réglé
515 Jack

Utilisez les boutons [+] et [-] ou [0], [1], [2] et [3] pour modifier le réglage.
Exemple : pour sélectionner le rythme
rHY Jack
*1 Sustain
Avec les sons de piano et autres sons qui s'estompent, la pédale agit comme une pédale forte, les sons étant soutenus plus longtemps lorsque la pédale est enfoncée. Avec les sons d'orgue et autres sons continus, les notes jouées au clavier continuent de sonner jusqu'à ce que la pédale soit relâchée. Dans les deux cas, l'effet de sustain est également appliqué à toutes les notes jouées pendant que la pédale est enfoncée.
*2 Sostenuto
Cet effet fonctionne de la même manière que le sustain, sauf qu'il n'est appliqué qu'aux notes qui sonnent déjà lorsque la pédale est enfoncée. Il n'affecte pas les notes jouées après l'enfoncement de la pédale.
| Problem | Possible Cause | Action | See page |
| No keyboard sound | 1. Power supply problem. | 1. Correctly attach the AC adaptor, make sure that batteries poles (+/-) are facing correctly, and check to make sure that batteries are not dead. | Pages E-15, 16 |
| 2. Power is not turned on. | 2. Press the POWER button to turn on power. | Page E-20 | |
| 3. Volume setting is too low. | 3. Use the VOLUME knob to increase volume. | Page E-20 | |
| 4. The MODE switch is in the CASIO CHORD or FINGERED position. | 4. Normal play is not possible on the accompaniment keyboard while the MODE switch is set to CASIO CHORD or FINGERED. Change the MODE switch setting to NORMAL. | Page E-31 | |
| 5. LOCAL CONTROL is off. | 5. Turn on LOCAL CONTROL. | Page E-52 | |
| Any of the following symptoms while using battery power. | Low battery power | Replace the batteries with a set of new ones or use the AC adaptor. | Pages E-15, 16 |
| • Dim power supply indicator • Instrument does not turn on • Dim, difficult to read display • Abnormally low speaker/headphone volume • Distortion of sound output • Occasional interruption of sound when playing at high volumes • Sudden power failure when playing at high volumes • Dimming of the display when playing at high volume • Continued sound output even after you release a key • A totally different tone may sound • Abnormal rhythm pattern and demo tune play | |||
| Auto Accompaniment does not sound. | Accompaniment volume is set to 000. | Use the TRANSPOSE/SETTING button to increase the volume. | Page E-47 |
| Sound output does not change when key pressure is varied. | Touch response is turned off. | Press the TRANSPOSE/SETTING button to turn it on. | Page E-48 |
| On-screen keyboard guide keys stay on. | Keyboard is waiting for play of the correct note during Step 1 or Step 2 play. | 1. Press the lit key to continue with Step 1 or Step 2 play. 2. Press the PLAY/STOP button to quit Step 1 or Step 2 play. | Pages E-27, 28 Pages E-27, 28 |
| When playing with another instrument, keys or tunings do not match. | Transpose or tuning is set to a value other than 00. | Use the TRANSPOSE/SETTING button to display the applicable setting screens and set both transpose and tuning to 00. | Page E-47 |
| Cannot record Auto Accompaniment or rhythm. | Track other than Track 1 is selected as the recording track. | Use the track select buttons to select Track 1. (Track 2 is melody track.) | Page E-41 |
| Cannot record chord accompaniment data on a computer. | ACCOMP OUT is turned off. | Turn on ACPIMP OUT. | Page E-52 |
| After transferring song data from my computer, playback stops part way through. | Digital noise from the USB cable or power cord caused data communication between your computer and keyboard to be interrupted. | Stop playback, disconnect the USB cable from and then reconnect it to the keyboard's USB port, and then try playing back the tune again. If this does not correct the problem, exit the MIDI software you are using, and then disconnect the USB cable from and then reconnect it to the keyboard's USB port. Next, restart your MIDI software and try playback again. | Page E-50 |
| A tone's quality and volume sounds slightly different depending where it is played on the keyboard. | This is an unavoidable result of the digital sampling process,* and does not indicate malfunction. * Multiple digital samples are taken for the low range, middle range, and high range of the original musical instrument. Because of this, there may be a very slight difference in tonal quality and volume between sample ranges. | ||
| Models: | CTK-810/WK-110 | ||
| Keyboard: | CTK-810: 61 standard-size keys, WK-110: 76 standard-size keys (with touch response on/off) | ||
| Tones: | 515; with layer and split | ||
| Polyphony: | 32 notes maximum (16 for certain tones) | ||
| Auto Accompaniment | |||
| Rhythm Patterns: | 120 | ||
| Tempo: | Variable (226 steps, ↓ = 30 to 255) | ||
| Chords: | 3 fingering methods (CASIO CHORD, FINGERED, FULL RANGE CHORD) | ||
| Rhythm Controller: | START/STOP, INTRO, NORMAL/NORMAL FILL-IN, VARIATION/VARIATION FILL-IN, SYNCHRO/ENDING | ||
| Accomp Volume: | 0 to 127 (128 steps) | ||
| One Touch Presets: | Recalls settings for tone, tempo, layer, split, rever, and chorus. | ||
| 3-step Lesson: | 3 lessons (Step 1, 2, 3) | ||
| Playback: | Repeat play of a single tune | ||
| Evaluation Mode: | Scoring | ||
| Voice Fingering Guide: | On/Off | ||
| Song Bank | |||
| Number of Tunes: | Song Bank: 100, download songs: Up to 5 (Capacity: Approximately 70 KB*) * Calculated based on 1 KB = 1024 bytes. | ||
| Controllers: | PLAY/STOP, PAUSE, FF, REW, REPEAT, LEFT/RIGHT | ||
| Musical Information Function: | Tone, Auto Accompaniment, Song Bank, numbers and names; staff notation, tempo, metronome, measure and beat number, step lesson display, chord name, fingering, pedal operation, Keyboard, Voice Fingering Guide, Evaluation Mode, Recorder indicator | ||
| Metronome: | On/Off | ||
| Beat Specification: | 0, 2 to 6 | ||
| Registration Memory: | |||
| Number of Setups: | 32 (4 setups × 8 banks) | ||
| Recorder | |||
| Number of Songs: | Two (1 Lesson Recording, 1 Performance Recording) | ||
| Recorded Data: | Lesson Recording: Right-hand part, left-hand part, both-hand parts | ||
| Recording Method: | Performance Recording: Track 1 (chord accompaniment), Track 2 (melody) | ||
| Memory Capacity: | Real-time | ||
| Approximately 12,000 notes (total for two songs) | |||
| Other Functions | |||
| Transpose: | 25 steps (-12 semitones to +12 semitones) | ||
| Tuning: | 101 steps (A4 = approximatory 440Hz ±50Cents) | ||
| Terminals | |||
| USB port: | TYPE B | ||
| Sustain/Assignable Jack: | Standard jack (sustain, sustaino, soft, rhythm start/stop) | ||
| Headphone/Output Terminal: | Stereo standard jack | ||
| <CTK-810> Output Impedance: 150Ω, Output Voltage: 4.5V (RMS) MAX | |||
| <WK-110> Output Impedance: 200Ω, Output Voltage: 5.2V (RMS) MAX | |||
| Power Jack: | 9V DC | ||
| Power Supply: | |||
| Batteries: | 2-way | ||
| Battery Life: | CTK-810: 6 AA-size batteries, WK-110: 6 D-size batteries | ||
| AC Adaptor: | CTK-810: Approximately 2.5 hours continuous operation on alkaline batteries | ||
| Auto Power Off: | WK-110: Approximately 6 hours continuous operation on manganese batteries | ||
| AD-5 | |||
| Turns power off approximately 6 minutes after last key operation. Enabled under batter power only, can be disabled manually. | |||
| Speaker Output: | 2.5W + 2.5W | ||
| Power Consumption: | 9V --- 7.7W | ||
| Dimensions: | CTK-810: 94.5 × 37.3 × 13.1 cm (371/4 × 1411/16 × 51/8 inch) WK-110: 118.7 × 40.0 × 15.3 cm (463/4 × 153/4 × 6 inch) | ||
| Weight: | CTK-810: Approximately 4.8 kg (10.6 lbs)(without batteries) WK-110: Approximately 7.0 kg (15.4 lbs)(without batteries) | ||
- La conception et les spécifications sont sujettes à modification sans préavis.

Précautions d'utilisation
Veuillez lire et respecter les précautions d'utilisation suivantes.
■ Emplacement
Évitez les endroits suivants pour ce produit.
- Zones exposées à la lumière directe du soleil et à une humidité élevée
- Zones soumises à des températures extrêmes
- Près d'une radio, d'un téléviseur, d'un magnétoscope ou d'un tuner
Les appareils ci-dessus ne provoqueront pas de dysfonctionnement du produit, mais les interférences du produit peuvent provoquer des interférences audio ou vidéo sur un appareil à proximité.
■ Entretien par l'utilisateur
- N'utilisez jamais de benzène, d'alcool, de diluant ou d'autres agents chimiques pour nettoyer le produit.
- Pour nettoyer le produit ou son clavier, essuyez avec un chiffon doux imbibé d'une solution faible d'eau et d'un détergent neutre doux. Essorez tout excès d'humidité du chiffon avant d'essuyer.
■ Accessoires inclus et en option
Utilisez uniquement les accessoires spécifiés pour ce produit. L'utilisation d'accessoires non autorisés présente un risque d'incendie, de choc électrique et de blessure.
Lignes de soudure
Des lignes peuvent être visibles sur l'extérieur du produit. Ce sont des "lignes de soudure" résultant du processus de moulage du plastique. Ce ne sont ni des fissures ni des rayures.
Étiquette de l'instrument de musique
Soyez toujours conscient de votre entourage lorsque vous utilisez ce produit. Soyez particulièrement prudent lorsque vous jouez tard le soir et maintenez le volume à des niveaux qui ne dérangent pas les autres. D'autres mesures à prendre lorsque vous jouez tard le soir : fermer la fenêtre et utiliser un casque.
- Toute reproduction du contenu de ce manuel, en partie ou en totalité, est interdite. Sauf pour votre usage personnel, toute autre utilisation du contenu de ce manuel sans le consentement de CASIO est interdite en vertu des lois sur le droit d'auteur.
- EN AUCUN CAS CASIO NE SAURAIT ÊTRE TENU RESPONSABLE DE TOUT DOMMAGE QUEL QU'IL SOIT (Y COMPRIS, SANS LIMITATION, LES DOMMAGES PERTE DE PROFITS, INTERRUPTION D'ACTIVITÉ, PERTE D'INFORMATIONS) DÉCOULANT DE L'UTILISATION OU DE L'INCAPACITÉ D'UTILISER CE MANUEL OU CE PRODUIT, MÊME SI CASIO A ÉTÉ INFORMÉ DE LA POSSIBILITÉ DE TELS DOMMAGES.
- Le contenu de ce manuel est sujet à modification sans préavis.
Liste des sonorités / Lista de sonidos
1 : N° / No
4 : MSB de sélection de banque / MSB de selección de banco
Annexe / Apéndice
6 : Type de gamme / Tipo de gama
| 1 | 2 | 3 | 4 | 5 | 6 |
| 094 | STEEL STR.GUITAR 1 | 25 | 2 | 32 | C |
| 095 | STEEL STR.GUITAR 2 | 25 | 4 | 32 | C |
| 096 | 12 STR.GUITAR | 25 | 8 | 16 | C |
| 097 | JAZZ GUITAR | 26 | 2 | 32 | C |
| 098 | OCT JAZZ GUITAR | 26 | 8 | 16 | C |
| 099 | CLEAN GUITAR 1 | 27 | 2 | 32 | C |
| 100 | CLEAN GUITAR 2 | 27 | 3 | 32 | C |
| 101 | MUTE GUITAR | 28 | 2 | 32 | C |
| 102 | CRUNCH ELEC.GUITAR | 27 | 8 | 16 | C |
| 103 | OVERDRIVE GT | 29 | 2 | 32 | C |
| 104 | DISTORTION GT | 30 | 2 | 32 | C |
| 105 | POWER DIST. GT | 30 | 5 | 16 | C |
| 106 | RHYTHM DIST. GT | 30 | 4 | 16 | C |
| 107 | FEEDBACK GT | 31 | 8 | 16 | C |
| 108 | CHORUS STEEL GT | 25 | 9 | 16 | C |
| 109 | DIST.GT & BASS | 30 | 6 | 16 | C |
| 110 | STEEL GT HARMONICS | 25 | 3 | 16 | C |
| BASS | |||||
| 111 | ACOUSTIC BASS | 32 | 2 | 32 | C |
| 112 | RIDE BASS | 32 | 32 | 16 | C |
| 113 | FINGERED BASS | 33 | 2 | 32 | C |
| 114 | PICKED BASS | 34 | 2 | 32 | C |
| 115 | FRETLESS BASS | 35 | 2 | 32 | C |
| 116 | SLAP BASS | 37 | 2 | 32 | C |
| 117 | DOUBLED STRINGS BASS | 37 | 3 | 16 | C |
| 118 | SAW SYNTH-BASS | 38 | 2 | 32 | C |
| 119 | SQR SYNTH-BASS | 39 | 2 | 32 | C |
| 120 | VOCODER BASS | 38 | 3 | 32 | C |
| 121 | DIGI ROCK BASS | 39 | 1 | 32 | C |
| 122 | SOUL SYNTH-BASS | 38 | 1 | 16 | C |
| 123 | TRANCE BASS | 38 | 4 | 32 | C |
| 124 | MELLOW FINGERED BASS | 33 | 3 | 32 | C |
| 125 | BASS & KICK | 39 | 3 | 16 | C |
| 126 | CLAVI BASS | 39 | 4 | 16 | C |
| 127 | RHYTHM PICKED BASS | 34 | 3 | 32 | C |
| 128 | RHYTHM FINGERED BASS | 33 | 4 | 32 | C |
| 129 | SINE BASS | 39 | 6 | 32 | A |
| 130 | ORGAN BASS | 39 | 5 | 32 | A |
| STR/ORCHESTRA | |||||
| 131 | VIOLIN | 40 | 2 | 32 | A |
| 132 | SLOW VIOLIN | 40 | 8 | 32 | A |
| 133 | CELLO | 42 | 2 | 32 | C |
| 134 | PIZZICATO STRINGS | 45 | 2 | 32 | A |
| 135 | HARP 1 | 46 | 2 | 32 | A |
| 136 | DOUBLE VIOLIN | 40 | 1 | 16 | A |
| 137 | SLOW CELLO | 42 | 8 | 32 | C |
| 138 | VIOLIN SECTION | 40 | 4 | 16 | A |
| 139 | SLOW VIOLIN SECTION | 40 | 9 | 16 | A |
| 140 | PIZZICATO ENSEMBLE | 45 | 1 | 16 | A |
| 1 | 2 | 3 | 4 | 5 | 6 |
| 047 | VIBRAPHONE & MARIMBA | 13 | 2 | 16 | A |
| 048 | TUBULAR BELL | 14 | 2 | 16 | A |
| 049 | DULICIMER | 15 | 2 | 16 | A |
| 050 | BRIGHT CELESTA | 8 | 1 | 32 | A |
| 051 | CHORUS CELESTA | 8 | 8 | 16 | A |
| 052 | CHORUS GLOCKENSPIEL | 9 | 8 | 16 | B |
| 053 | CHORUS VIBRAPHONE | 11 | 8 | 16 | A |
| ORGAN | |||||
| 054 | DRAWBAR ORGAN 1 | 16 | 2 | 16 | A |
| 055 | DRAWBAR ORGAN 2 | 16 | 1 | 16 | A |
| 056 | DRAWBAR ORGAN 3 | 16 | 3 | 16 | A |
| 057 | ROTARY DRAWBAR | 17 | 32 | 32 | A |
| 058 | PERC.ORGAN 1 | 17 | 2 | 16 | A |
| 059 | PERC.ORGAN 2 | 17 | 3 | 16 | A |
| 060 | ELEC.ORGAN 1 | 16 | 8 | 16 | A |
| 061 | ELEC.ORGAN 2 | 16 | 4 | 16 | A |
| 062 | JAZZ ORGAN 1 | 17 | 4 | 16 | A |
| 063 | ROCK ORGAN 1 | 18 | 2 | 16 | A |
| 064 | CHURCH ORGAN | 19 | 2 | 16 | A |
| 065 | CHAPEL ORGAN | 19 | 8 | 32 | A |
| 066 | REED ORGAN | 20 | 2 | 16 | A |
| 067 | ACCORDION 1 | 21 | 2 | 16 | A |
| 068 | OCTAVE ACCORDION | 21 | 8 | 16 | A |
| 069 | BANDONEON | 23 | 2 | 16 | A |
| 070 | HARMONICA 1 | 22 | 2 | 32 | A |
| 071 | HARMONICA 2 | 22 | 8 | 16 | A |
| 072 | THEATER | 19 | 6 | 16 | A |
| 073 | OCTAVE BANDONEON | 23 | 3 | 16 | A |
| 074 | DRAWBAR ORGAN 4 | 16 | 5 | 16 | A |
| 075 | JAZZ ORGAN 2 | 17 | 6 | 16 | A |
| 076 | ROCK ORGAN 2 | 18 | 1 | 16 | A |
| 077 | DRAWBAR ORGAN 5 | 16 | 6 | 16 | A |
| 078 | JAZZ ORGAN 3 | 17 | 8 | 16 | A |
| 079 | PERC.ORGAN 3 | 17 | 1 | 16 | A |
| 080 | 8'ORGAN | 17 | 5 | 16 | A |
| 081 | ROCK ORGAN 3 | 18 | 3 | 16 | A |
| 082 | ROCK ORGAN 4 | 18 | 4 | 16 | A |
| 083 | FULL DRAWBAR | 16 | 9 | 32 | A |
| 084 | ORGAN PAD | 17 | 7 | 16 | A |
| 085 | SEQUENCE ORGAN | 7 | 16 | 16 | A |
| 086 | PIPE ORGAN 1 | 19 | 1 | 32 | A |
| 087 | PIPE ORGAN 2 | 19 | 3 | 32 | A |
| 088 | ORGAN & HARPSICHORD | 19 | 4 | 16 | A |
| 089 | PIPE ORGAN PAD | 19 | 5 | 16 | A |
| 090 | ACCORDION 2 | 21 | 3 | 32 | A |
| 091 | BANDONEON SOLO | 23 | 1 | 16 | A |
| 092 | BANDONEON & VIOLIN | 23 | 4 | 16 | A |
| GUITAR | |||||
| 093 | NYLON STR.GUITAR | 24 | 2 | 32 | C |
| 1 | 2 | 3 | 4 | 5 | 6 |
| PIANO | |||||
| 001 | STEREO GRAND PIANO | 0 | 2 | 16 | A |
| 002 | GRAND PIANO | 0 | 1 | 32 | A |
| 003 | BRIGHT PIANO | 1 | 2 | 16 | A |
| 004 | MELLOW PIANO | 0 | 3 | 16 | A |
| 005 | MODERN PIANO | 1 | 3 | 16 | A |
| 006 | DANCE PIANO | 1 | 1 | 16 | A |
| 007 | STRINGS PIANO | 0 | 8 | 16 | A |
| 008 | SYNTH-STR PIANO | 1 | 5 | 16 | A |
| 009 | HONKY-TONK | 3 | 2 | 16 | A |
| 010 | 1 OCTAVE PIANO | 3 | 9 | 16 | A |
| 011 | 2 OCTAVE PIANO | 3 | 8 | 16 | A |
| 012 | ELEC.GRAND PIANO | 2 | 2 | 16 | A |
| 013 | MODERN E.G.PIANO | 2 | 3 | 16 | A |
| 014 | STEREO PIANO | 0 | 4 | 16 | A |
| 015 | STEREO PIANO WIDE | 0 | 9 | 16 | A |
| 016 | PIANO PAD | 0 | 5 | 16 | A |
| 017 | HARPSICHORD | 6 | 2 | 32 | A |
| 018 | COUPLED HARPSICHORD | 6 | 8 | 16 | A |
| 019 | HARPSICHORD PAD | 6 | 1 | 16 | A |
| ELECTRIC PIANO | |||||
| 020 | ELEC.PIANO 1 | 4 | 2 | 32 | A |
| 021 | ELEC.PIANO 2 | 5 | 3 | 16 | A |
| 022 | FM ELEC.PIANO | 5 | 5 | 16 | A |
| 023 | DYNO ELEC.PIANO | 4 | 7 | 32 | A |
| 024 | 60'S ELEC.PIANO | 4 | 5 | 32 | A |
| 025 | CHORUS EP 1 | 4 | 9 | 16 | A |
| 026 | CHORUS EP 2 | 4 | 6 | 16 | A |
| 027 | MODERN E.PIANO | 5 | 2 | 16 | A |
| 028 | SOFT E.PIANO | 4 | 8 | 16 | A |
| 029 | E.PIANO PAD 1 | 5 | 8 | 16 | A |
| 030 | SYNTH-STR. E.PIANO | 4 | 3 | 16 | A |
| 031 | E.PIANO PAD 2 | 4 | 1 | 16 | A |
| 032 | CLEAN E.PIANO | 4 | 4 | 32 | A |
| 033 | HARPSICHORD E.PIANO | 5 | 4 | 16 | A |
| 034 | CLAVI | 7 | 2 | 32 | A |
| 035 | SOFT CLAVI | 7 | 1 | 32 | A |
| 036 | CLAVI & DRAWBAR | 7 | 3 | 16 | A |
| 037 | DETUNE CLAVI | 7 | 8 | 16 | A |
| 038 | SEQUENCE CLAVI | 7 | 9 | 16 | A |
| CHROMATIC PERC. | |||||
| 039 | CELESTA | 8 | 2 | 32 | A |
| 040 | GLOCKENSPIEL | 9 | 2 | 32 | B |
| 041 | MUSIC BOX | 10 | 2 | 16 | A |
| 042 | VIBRAPHONE | 11 | 2 | 32 | A |
| 043 | MARIMBA | 12 | 2 | 32 | A |
| 044 | GLOCKENSPIEL PAD | 9 | 3 | 16 | A |
| 045 | SYNTH-VIBRAPHONE | 11 | 3 | 16 | A |
| 046 | SYNTH-MARIMBA | 12 | 3 | 16 | A |
| 1 | 2 | 3 | 4 | 5 | 6 |
| 247 | CALLIOPE 1 | 82 | 2 | 16 | A |
| 248 | VENT LEAD | 82 | 5 | 16 | A |
| 249 | CHIFF LEAD 1 | 83 | 2 | 16 | A |
| 250 | DROP LEAD | 83 | 4 | 16 | A |
| 251 | EP LEAD | 83 | 1 | 16 | A |
| 252 | VOICE LEAD 1 | 85 | 2 | 16 | A |
| 253 | BASS+LEAD | 87 | 2 | 16 | A |
| 254 | SQUARE LEAD 2 | 80 | 3 | 16 | A |
| 255 | SLOW SQUARE LEAD | 80 | 4 | 16 | A |
| 256 | SLOW SQUARE PULSE | 80 | 6 | 16 | A |
| 257 | SEQUENCE SQUARE | 80 | 7 | 16 | A |
| 258 | SEQUENCE PULSE 1 | 80 | 16 | 16 | A |
| 259 | SQUARE LEAD 3 | 80 | 1 | 32 | A |
| 260 | SQUARE LEAD 4 | 80 | 32 | 16 | A |
| 261 | SAW LEAD 2 | 81 | 1 | 32 | A |
| 262 | SLOW SAW LEAD | 81 | 4 | 16 | A |
| 263 | PULSE SAW LEAD | 81 | 5 | 16 | A |
| 264 | SLOW SAW PULSE | 81 | 6 | 16 | A |
| 265 | FIFTH SEQUENCE | 86 | 1 | 16 | A |
| 266 | SEQUENCE PULSE 2 | 81 | 9 | 16 | A |
| 267 | SEQUENCE SAW 2 | 81 | 16 | 16 | A |
| 268 | CALLIOPE 2 | 82 | 3 | 16 | A |
| 269 | VENT SYNTH | 82 | 1 | 16 | A |
| 270 | PURE LEAD | 82 | 4 | 16 | A |
| 271 | DISTORTION LEAD | 84 | 8 | 16 | A |
| 272 | OCTAVE CHARANG | 84 | 2 | 16 | A |
| 273 | VOICE LEAD 2 | 85 | 3 | 16 | A |
| 274 | CHURCH LEAD | 85 | 4 | 16 | A |
| 275 | DOUBLE VOICE LEAD | 85 | 8 | 16 | A |
| 276 | VOICE CHOIR LEAD | 85 | 5 | 16 | A |
| 277 | EP & VOICE LEAD | 85 | 6 | 16 | A |
| 278 | SYNTH-VOICE LEAD | 85 | 7 | 16 | A |
| 279 | FIFTH SAW LEAD | 86 | 2 | 16 | A |
| 280 | FIFTH SQUARE LEAD | 86 | 3 | 16 | A |
| 281 | BASS+SAW LEAD | 87 | 1 | 16 | A |
| 282 | SYNTH-BASS+LEAD | 87 | 3 | 16 | A |
| SYNTH-PAD | |||||
| 283 | FANTASY 1 | 88 | 2 | 16 | A |
| 284 | FANTASY 2 | 88 | 3 | 16 | A |
| 285 | WARM PAD | 89 | 2 | 16 | A |
| 286 | WARM VOX | 89 | 8 | 16 | A |
| 287 | SINE PAD | 89 | 3 | 16 | A |
| 288 | POLYSYNTH 1 | 90 | 2 | 16 | A |
| 289 | POLY SAW | 90 | 8 | 16 | A |
| 290 | POLYSYNTH PAD 1 | 90 | 5 | 16 | A |
| 291 | SPACE STRINGS PAD | 91 | 3 | 16 | A |
| 292 | BOWED PAD | 92 | 2 | 16 | A |
| 293 | GLASS PAD | 92 | 3 | 16 | A |
| 294 | ETHNIC PAD | 93 | 2 | 16 | A |
| 295 | HALO PAD 1 | 94 | 2 | 16 | A |
| 296 | HALO PAD 2 | 94 | 3 | 16 | A |
| 297 | RAIN DROP 1 | 96 | 2 | 16 | A |
| 298 | SOUND TRACK 1 | 97 | 2 | 16 | A |
| 299 | RAVE | 97 | 8 | 16 | A |
| 300 | CRYSTAL | 98 | 2 | 32 | A |
| 1 | 2 | 3 | 4 | 5 | 6 |
| 194 | TUBA 2 | 58 | 3 | 32 | C |
| 195 | FRENCH HORN SOLO | 60 | 8 | 32 | C |
| 196 | MELLOW BRASS | 61 | 1 | 32 | A |
| 197 | ANALOG SYNTH-BRASS 2 | 62 | 9 | 16 | A |
| 198 | SYNTH-BRASS PAD | 63 | 3 | 16 | A |
| REED/PIPE | |||||
| 199 | SOPRANO SAX | 64 | 2 | 32 | A |
| 200 | ALTO SAX 1 | 65 | 1 | 16 | C |
| 201 | ALTO SAX 2 | 65 | 2 | 32 | C |
| 202 | BREATHY A.SAX | 65 | 8 | 16 | C |
| 203 | HARD A.SAX | 65 | 3 | 16 | C |
| 204 | RICH A.SAX | 65 | 6 | 16 | C |
| 205 | TENOR SAX 1 | 66 | 1 | 16 | C |
| 206 | TENOR SAX 2 | 66 | 2 | 32 | C |
| 207 | BREATHY T.SAX | 66 | 8 | 16 | C |
| 208 | T.SAXYS | 66 | 9 | 16 | C |
| 209 | BARITONE SAX | 67 | 2 | 32 | C |
| 210 | OBOE | 68 | 2 | 32 | A |
| 211 | CLARINET | 71 | 2 | 32 | A |
| 212 | BREATHY S.SAX | 64 | 8 | 16 | A |
| 213 | SOFT A.SAX | 65 | 5 | 32 | C |
| 214 | SOLO A.SAX | 65 | 4 | 32 | C |
| 215 | SAX SECTION | 65 | 9 | 16 | C |
| 216 | SAX SECTION SFZ | 65 | 7 | 16 | C |
| 217 | DETUNE T.SAX | 66 | 3 | 16 | C |
| 218 | SOFT T.SAX | 66 | 5 | 32 | C |
| 219 | SOLO T.SAX | 66 | 4 | 32 | C |
| 220 | SOLO OBOE | 68 | 4 | 32 | A |
| 221 | VELO.CLARINET | 71 | 4 | 32 | A |
| 222 | PICCOLO 1 | 72 | 2 | 16 | B |
| 223 | FLUTE 1 | 73 | 2 | 32 | A |
| 224 | FLUTE 2 | 73 | 1 | 16 | A |
| 225 | PURE FLUTE | 73 | 8 | 16 | A |
| 226 | PIPE SECTION 1 | 72 | 4 | 16 | A |
| 227 | RECORDER | 74 | 2 | 32 | A |
| 228 | PAN FLUTE 1 | 75 | 2 | 32 | A |
| 229 | BOTTLE BLOW | 76 | 2 | 16 | A |
| 230 | SHAKUHACHI | 77 | 2 | 16 | A |
| 231 | WHISTLE 1 | 78 | 2 | 32 | A |
| 232 | OCARINA | 79 | 2 | 32 | A |
| 233 | PICCOLO 2 | 72 | 3 | 16 | B |
| 234 | PIPE SECTION 2 | 73 | 4 | 16 | A |
| 235 | SOFT FLUTE | 73 | 5 | 16 | A |
| 236 | WHISTLE 2 | 78 | 3 | 32 | A |
| 237 | PAN FLUTE 2 | 75 | 3 | 16 | A |
| SYNTH-LEAD | |||||
| 238 | SQUARE LEAD 1 | 80 | 2 | 16 | A |
| 239 | SQUARE PULSE LEAD | 80 | 5 | 16 | A |
| 240 | SEQUENCE LEAD | 83 | 5 | 16 | A |
| 241 | SAW LEAD 1 | 81 | 2 | 16 | A |
| 242 | MELLOW SAW LEAD | 81 | 8 | 16 | A |
| 243 | SEQUENCE SAW 1 | 81 | 32 | 16 | A |
| 244 | SINE LEAD | 80 | 8 | 32 | A |
| 245 | VELO.SINE LEAD | 80 | 9 | 32 | A |
| 246 | SS LEAD | 81 | 3 | 16 | A |
| 1 | 2 | 3 | 4 | 5 | 6 |
| 141 | CELLO SECTION | 42 | 4 | 16 | C |
| 142 | OCTAVE PIZZICATO | 45 | 3 | 16 | A |
| 143 | DOUBLE VIOLA | 41 | 2 | 16 | A |
| 144 | HARP 2 | 46 | 1 | 32 | A |
| 145 | CHORUS HARP | 46 | 8 | 16 | A |
| ENSEMBLE | |||||
| 146 | STRINGS | 48 | 2 | 32 | A |
| 147 | SLOW STRINGS 1 | 49 | 2 | 32 | A |
| 148 | WIDE STRINGS | 48 | 16 | 16 | A |
| 149 | OCTAVE STRINGS 1 | 48 | 32 | 16 | A |
| 150 | CHAMBER | 48 | 3 | 16 | A |
| 151 | STRINGS SFZ | 48 | 8 | 32 | A |
| 152 | SYNTH-STRINGS 1 | 50 | 2 | 32 | A |
| 153 | SYNTH-STRINGS 2 | 51 | 2 | 32 | A |
| 154 | SYNTH-STRINGS 3 | 51 | 3 | 16 | A |
| 155 | CHOIR AAHS | 52 | 2 | 32 | A |
| 156 | CHOIRS 1 | 52 | 8 | 32 | A |
| 157 | VOICE DOO | 53 | 2 | 32 | A |
| 158 | SYNTH-VOICE 1 | 54 | 2 | 32 | A |
| 159 | SYNTH-VOICE PAD | 54 | 8 | 16 | A |
| 160 | ORCHESTRA HIT | 55 | 2 | 16 | A |
| 161 | HARP & STRINGS | 50 | 4 | 16 | A |
| 162 | FLUTE & STRINGS | 51 | 4 | 16 | A |
| 163 | ORCHESTRA STRINGS | 48 | 4 | 16 | A |
| 164 | SLOW STRINGS 2 | 49 | 3 | 32 | A |
| 165 | STRINGS VOICE | 49 | 4 | 16 | A |
| 166 | OCTAVE STRINGS 2 | 48 | 1 | 16 | A |
| 167 | FAST SYNTH STRINGS | 50 | 3 | 32 | A |
| 168 | SLOW CHOIR | 52 | 9 | 32 | A |
| 169 | CHOIR STRINGS | 52 | 3 | 16 | A |
| 170 | CHOIRS 2 | 52 | 4 | 16 | A |
| 171 | VOICE UUH | 53 | 3 | 32 | A |
| 172 | SYNTH-VOICE 2 | 54 | 1 | 32 | A |
| 173 | CHORUS SYNTH-VOICE | 54 | 9 | 16 | A |
| BRASS | |||||
| 174 | TRUMPET | 56 | 2 | 32 | A |
| 175 | TROMBONE | 57 | 2 | 32 | C |
| 176 | TUBA 1 | 58 | 2 | 32 | C |
| 177 | MUTE TRUMPET | 59 | 2 | 32 | A |
| 178 | FRENCH HORN | 60 | 2 | 16 | C |
| 179 | HORN ORCHESTRA | 60 | 16 | 16 | C |
| 180 | BRASS | 61 | 2 | 32 | A |
| 181 | BRASS SECTION 1 | 61 | 3 | 16 | A |
| 182 | BRASS SFZ | 61 | 8 | 16 | A |
| 183 | BRASS & STRINGS | 61 | 4 | 16 | A |
| 184 | HARD BRASS | 61 | 5 | 16 | A |
| 185 | BRASS SECTION 2 | 61 | 6 | 16 | A |
| 186 | ANALOG SYNTH-BRASS 1 | 62 | 8 | 16 | A |
| 187 | SYNTH-BRASS 1 | 62 | 2 | 32 | A |
| 188 | SYNTH-BRASS 2 | 63 | 2 | 16 | A |
| 189 | TRANCE BRASS | 62 | 1 | 16 | A |
| 190 | MELLOW TRUMPET | 56 | 8 | 32 | A |
| 191 | VELO.TRUMPET | 56 | 4 | 32 | A |
| 192 | VELO.TROMBONE | 57 | 4 | 16 | C |
| 193 | MELLOW TROMBONE | 57 | 1 | 32 | C |
| 409 | GM SLAP BASS 1 | 36 | 0 | 32 | A |
| 410 | GM SLAP BASS 2 | 37 | 0 | 32 | A |
| 411 | GM SYNTH-BASS 1 | 38 | 0 | 32 | A |
| 412 | GM SYNTH-BASS 2 | 39 | 0 | 32 | A |
| 413 | GM VIOLIN | 40 | 0 | 32 | A |
| 414 | GM VIOLA | 41 | 0 | 32 | A |
| 415 | GM CELLO | 42 | 0 | 32 | A |
| 416 | GM CONTRABASS | 43 | 0 | 32 | A |
| 417 | GM TREMOLO STRINGS | 44 | 0 | 32 | A |
| 418 | GM PIZZICATO | 45 | 0 | 32 | A |
| 419 | GM HARP | 46 | 0 | 32 | A |
| 420 | GM TIMPANI | 47 | 0 | 32 | A |
| 421 | GM STRINGS 1 | 48 | 0 | 32 | A |
| 422 | GM STRINGS 2 | 49 | 0 | 32 | A |
| 423 | GM SYNTH-STRINGS 1 | 50 | 0 | 32 | A |
| 424 | GM SYNTH-STRINGS 2 | 51 | 0 | 32 | A |
| 425 | GM CHOIR AAHS | 52 | 0 | 32 | A |
| 426 | GM VOICE DOO | 53 | 0 | 32 | A |
| 427 | GM SYNTH-VOICE | 54 | 0 | 16 | A |
| 428 | GM ORCHESTRA HIT | 55 | 0 | 16 | A |
| 429 | GM TRUMPET | 56 | 0 | 32 | A |
| 430 | GM TROMBONE | 57 | 0 | 32 | A |
| 431 | GM TUBA | 58 | 0 | 32 | A |
| 432 | GM MUTE TRUMPET | 59 | 0 | 32 | A |
| 433 | GM FRENCH HORN | 60 | 0 | 16 | A |
| 434 | GM BRASS | 61 | 0 | 32 | A |
| 435 | GM SYNTH-BRASS 1 | 62 | 0 | 32 | A |
| 436 | GM SYNTH-BRASS 2 | 63 | 0 | 16 | A |
| 437 | GM SOPRANO SAX | 64 | 0 | 32 | A |
| 438 | GM ALTO SAX | 65 | 0 | 32 | A |
| 439 | GM TENOR SAX | 66 | 0 | 32 | A |
| 440 | GM BARITONE SAX | 67 | 0 | 32 | A |
| 441 | GM OBOE | 68 | 0 | 32 | A |
| 442 | GM ENGLISH HORN | 69 | 0 | 32 | A |
| 443 | GM BASSOON | 70 | 0 | 32 | A |
| 444 | GM CLARINET | 71 | 0 | 32 | A |
| 445 | GM PICCOLO | 72 | 0 | 32 | A |
| 446 | GM FLUTE | 73 | 0 | 32 | A |
| 447 | GM RECORDER | 74 | 0 | 32 | A |
| 448 | GM PAN FLUTE | 75 | 0 | 32 | A |
| 449 | GM BOTTLE BLOW | 76 | 0 | 16 | A |
| 450 | GM SHAKUHACHI | 77 | 0 | 16 | A |
| 451 | GM WHISTLE | 78 | 0 | 32 | A |
| 452 | GM OCARINA | 79 | 0 | 32 | A |
| 453 | GM SQUARE LEAD | 80 | 0 | 16 | A |
| 454 | GM SAW LEAD | 81 | 0 | 16 | A |
| 455 | GM CALLIOPE | 82 | 0 | 16 | A |
| 456 | GM CHIFF LEAD | 83 | 0 | 16 | A |
| 457 | GM CHARANG | 84 | 0 | 16 | A |
| 458 | GM VOICE LEAD | 85 | 0 | 16 | A |
| 459 | GM FIFTH LEAD | 86 | 0 | 16 | A |
| 460 | GM BASS+LEAD | 87 | 0 | 16 | A |
| 461 | GM FANTASY | 88 | 0 | 16 | A |
| 462 | GM WARM PAD | 89 | 0 | 16 | A |
| 463 | GM POLYSYNTH | 90 | 0 | 16 | A |
| 1 | 2 | 3 | 4 | 5 | 6 |
| 355 | DI ZI | 72 | 16 | 32 | A |
| 356 | YANG QIN & ER HU | 111 | 8 | 16 | A |
| 357 | ZHENG | 107 | 1 | 16 | A |
| 358 | SUO NA | 111 | 32 | 32 | A |
| 359 | PI PA 1 | 105 | 32 | 32 | A |
| 360 | SHENG | 109 | 8 | 32 | A |
| 361 | KOTO PAD | 107 | 5 | 16 | A |
| 362 | SITAR 2 | 104 | 3 | 32 | A |
| 363 | TAMBRA | 104 | 8 | 16 | A |
| 364 | SITAR PAD | 104 | 4 | 32 | A |
| 365 | RABAB | 105 | 8 | 16 | A |
| 366 | PI PA 2 | 105 | 4 | 16 | A |
| 367 | SHAMISEN 2 | 106 | 3 | 16 | A |
| 368 | DETUNE KOTO | 107 | 4 | 16 | A |
| 369 | SYNTH-KOTO | 107 | 3 | 16 | A |
| 370 | SHAMISEN & TAIKO | 106 | 4 | 16 | A |
| 371 | XIAO | 77 | 32 | 16 | A |
| 372 | SANTUR | 15 | 16 | 32 | A |
| GM TONES | |||||
| 373 | GM PIANO 1 | 0 | 0 | 32 | A |
| 374 | GM PIANO 2 | 1 | 0 | 16 | A |
| 375 | GM PIANO 3 | 2 | 0 | 32 | A |
| 376 | GM HONKY-TONK | 3 | 0 | 16 | A |
| 377 | GM E.PIANO 1 | 4 | 0 | 32 | A |
| 378 | GM E.PIANO 2 | 5 | 0 | 16 | A |
| 379 | GM HARPSICHORD | 6 | 0 | 32 | A |
| 380 | GM CLAVI | 7 | 0 | 32 | A |
| 381 | GM CELESTA | 8 | 0 | 32 | A |
| 382 | GM GLOCKENSPIEL | 9 | 0 | 32 | A |
| 383 | GM MUSIC BOX | 10 | 0 | 16 | A |
| 384 | GM VIBRAPHONE | 11 | 0 | 32 | A |
| 385 | GM MARIMBA | 12 | 0 | 32 | A |
| 386 | GM XYLOPHONE | 13 | 0 | 32 | A |
| 387 | GM TUBULAR BELL | 14 | 0 | 32 | A |
| 388 | GM DULCMER | 15 | 0 | 16 | A |
| 389 | GM ORGAN 1 | 16 | 0 | 16 | A |
| 390 | GM ORGAN 2 | 17 | 0 | 16 | A |
| 391 | GM ORGAN 3 | 18 | 0 | 16 | A |
| 392 | GM PIPE ORGAN | 19 | 0 | 16 | A |
| 393 | GM REED ORGAN | 20 | 0 | 32 | A |
| 394 | GM ACCORDION | 21 | 0 | 16 | A |
| 395 | GM HARMONICA | 22 | 0 | 32 | A |
| 396 | GM BANDONEON | 23 | 0 | 16 | A |
| 397 | GM NYLON STR.GUITAR | 24 | 0 | 32 | A |
| 398 | GM STEEL STR.GUITAR | 25 | 0 | 32 | A |
| 399 | GM JAZZ GUITAR | 26 | 0 | 32 | A |
| 400 | GM CLEAN GUITAR | 27 | 0 | 32 | A |
| 401 | GM MUTE GUITAR | 28 | 0 | 32 | A |
| 402 | GM OVERDRIVE GT | 29 | 0 | 32 | A |
| 403 | GM DISTORTION GT | 30 | 0 | 32 | A |
| 404 | GM GT HARMONICS | 31 | 0 | 32 | A |
| 405 | GM ACQUSTIC BASS | 32 | 0 | 32 | A |
| 406 | GM FINGERED BASS | 33 | 0 | 32 | A |
| 407 | GM PICKED BASS | 34 | 0 | 32 | A |
| 408 | GM FRETLESS BASS | 35 | 0 | 32 | A |
| 1 | 2 | 3 | 4 | 5 | 6 |
| 301 | SOFT CRYSTAL | 98 | 1 | 16 | A |
| 302 | ATMOSPHERE | 99 | 2 | 16 | A |
| 303 | BRIGHTNESS 1 | 100 | 2 | 16 | A |
| 304 | GOBLIN | 101 | 2 | 16 | A |
| 305 | ECHO PAD | 102 | 2 | 16 | A |
| 306 | STAR THEORY 1 | 103 | 2 | 16 | A |
| 307 | SPACE PAD | 103 | 8 | 16 | A |
| 308 | NEW AGE PAD | 88 | 1 | 16 | A |
| 309 | SOFT PAD | 89 | 4 | 16 | A |
| 310 | HORN PAD | 89 | 5 | 16 | A |
| 311 | THICK PAD | 89 | 1 | 16 | A |
| 312 | POLYSYNTH 2 | 90 | 1 | 16 | A |
| 313 | OLD TAPE PAD | 89 | 6 | 16 | A |
| 314 | POLYSYNTH PAD 2 | 90 | 4 | 16 | A |
| 315 | HEAVEN | 91 | 2 | 16 | A |
| 316 | UTOPIA | 91 | 1 | 16 | A |
| 317 | SQUARE PAD | 92 | 1 | 16 | A |
| 318 | SOFT METAL PAD | 93 | 3 | 16 | A |
| 319 | HARD METAL PAD | 93 | 4 | 16 | A |
| 320 | TINE PAD | 93 | 1 | 16 | A |
| 321 | CHORUS PAD | 94 | 1 | 16 | A |
| 322 | ORGAN CHOIR PAD | 94 | 4 | 16 | A |
| 323 | SWEEP PAD | 95 | 2 | 16 | A |
| 324 | SWEEP CHOIR | 95 | 1 | 16 | A |
| 325 | CLAVI PAD | 96 | 1 | 16 | A |
| 326 | RAIN DROP 2 | 96 | 3 | 16 | A |
| 327 | SOUND TRACK 2 | 97 | 3 | 16 | A |
| 328 | SPACE VOICE | 97 | 1 | 16 | A |
| 329 | CHORAL BELL | 98 | 16 | 16 | A |
| 330 | GLOCKENSPIEL CHIME | 98 | 5 | 16 | A |
| 331 | CHRISTMAS BELL | 98 | 3 | 16 | A |
| 332 | VIBRAPHONE BELL | 98 | 8 | 16 | A |
| 333 | NYLON+EP | 99 | 5 | 16 | A |
| 334 | CELESTA PAD | 99 | 1 | 16 | A |
| 335 | BRIGHT BELL PAD | 100 | 1 | 16 | A |
| 336 | BRIGHTNESS 2 | 100 | 3 | 16 | A |
| 337 | ECHO VOICE | 102 | 1 | 16 | A |
| 338 | ECHO DROP | 102 | 3 | 16 | A |
| 339 | POLY DROP | 102 | 4 | 16 | A |
| 340 | STAR THEORY 2 | 103 | 1 | 16 | A |
| ETHNIC/CHINESE | |||||
| 341 | SITAR 1 | 104 | 2 | 16 | A |
| 342 | WARM SITAR | 104 | 1 | 16 | A |
| 343 | BANJO | 105 | 2 | 32 | A |
| 344 | MUTE BANJO | 105 | 1 | 32 | A |
| 345 | SHAMISEN 1 | 106 | 2 | 32 | A |
| 346 | TSUGARU | 106 | 1 | 32 | A |
| 347 | KOTO | 107 | 2 | 16 | A |
| 348 | THUMB PIANO | 108 | 2 | 32 | A |
| 349 | SHANAI | 111 | 2 | 32 | A |
| 350 | STEEL DRUMS | 114 | 2 | 16 | A |
| 351 | ER HU 1 | 110 | 8 | 32 | A |
| 352 | ER HU 2 | 110 | 9 | 32 | A |
| 353 | YANG QIN 1 | 15 | 8 | 32 | A |
| 354 | YANG QIN 2 | 15 | 9 | 16 | A |
a .........Gamme du clavier ..Gama del teclado b<.....Gamme disponible (en utilisant la transposition ou la réception de messages) Gama disponible (usando la transposición o recepción de mensajes) . Les notes dans ces gammes sont produites en exécutant des notes dans la gamme b qui se trouvent dans l'octave la plus proche, résultant des opérations de transposition et de réception de messages.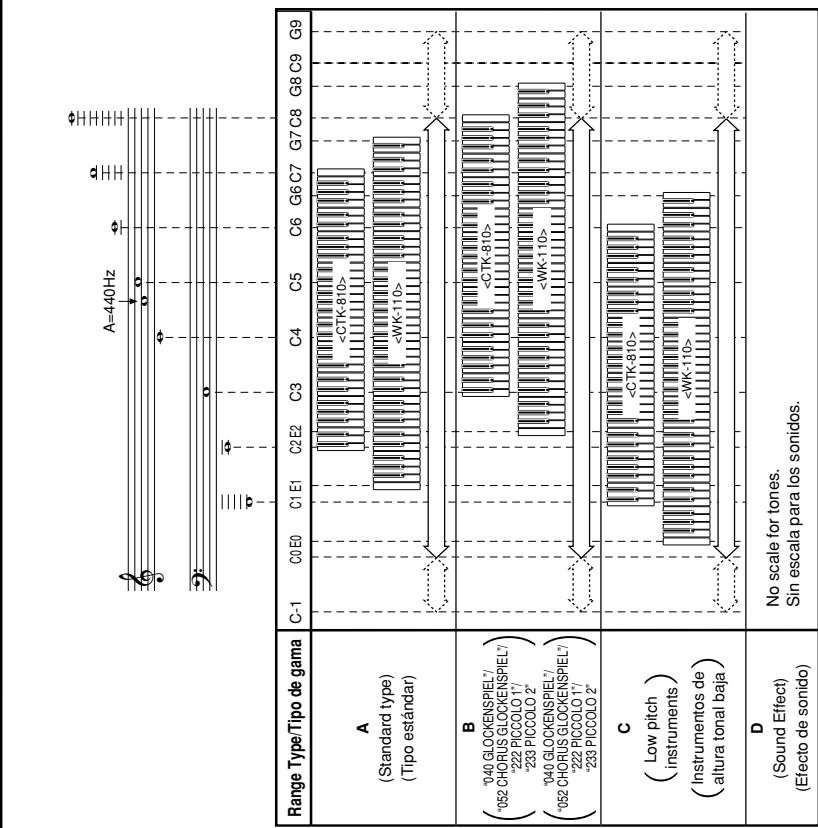
......Gamme du clavier a .Gama del teclado ⇔ Gamme disponible (en utilisant la transposition ou la réception de messages).

| NOTE |
| · The meaning of each range type is described below. |
| NOTA |
| · El significado de cada tipo de gama se describe bajo. |
| 1 | 2 | 3 | 4 | 5 | 6 |
| 464 | GM SPACE CHAIR | 91 | 0 | 16 | A |
| 465 | GM BOWED GLASS | 92 | 0 | 16 | A |
| 466 | GM METAL PAD | 93 | 0 | 16 | A |
| 467 | GM HALO PAD | 94 | 0 | 16 | A |
| 468 | GM SWEEP PAD | 95 | 0 | 16 | A |
| 469 | GM RAIN DROP | 96 | 0 | 16 | A |
| 470 | GM SOUND TRACK | 97 | 0 | 16 | A |
| 471 | GM CRYSTAL | 98 | 0 | 16 | A |
| 472 | GM ATMOSPHERE | 99 | 0 | 16 | A |
| 473 | GM BRIGHTNESS | 100 | 0 | 16 | A |
| 474 | GM GOBLINS | 101 | 0 | 16 | A |
| 475 | GM ECHOES | 102 | 0 | 16 | A |
| 476 | GM SF | 103 | 0 | 16 | A |
| 477 | GM SITAR | 104 | 0 | 16 | A |
| 478 | GM BANJO | 105 | 0 | 32 | A |
| 479 | GM SHAMISEN | 106 | 0 | 32 | A |
| 480 | GM KOTO | 107 | 0 | 32 | A |
| 481 | GM THUMB PIANO | 108 | 0 | 32 | A |
| 482 | GM BAGPIPE | 109 | 0 | 16 | A |
| 483 | GM FIDDLE | 110 | 0 | 32 | A |
| 484 | GM SHANAI | 111 | 0 | 32 | A |
| 485 | GM TINKLE BELL | 112 | 0 | 32 | A |
| 486 | GM AGOGO | 113 | 0 | 32 | A |
| 487 | GM STEEL DRUMS | 114 | 0 | 16 | A |
| 488 | GM WOOD BLOCK | 115 | 0 | 32 | D |
| 489 | GM TAIKO | 116 | 0 | 32 | D |
| 490 | GM MELODIC TOM | 117 | 0 | 32 | D |
| 491 | GM SYNTH-DRUM | 118 | 0 | 32 | D |
| 492 | GM REVERSE CYMBAL | 119 | 0 | 32 | D |
| 493 | GM GT FRET NOISE | 120 | 0 | 32 | A |
| 494 | GM BREATH NOISE | 121 | 0 | 32 | A |
| 495 | GM SEASHORE | 122 | 0 | 16 | D |
| 496 | GM BIRD | 123 | 0 | 16 | D |
| 497 | GM TELEPHONE | 124 | 0 | 32 | D |
| 498 | GM HELICOPTER | 125 | 0 | 32 | D |
| 499 | GM APPLAUSE | 126 | 0 | 16 | D |
| 500 | GM GUNSHOT | 127 | 0 | 32 | D |
| DRUM SET | |||||
| 501 | STANDARD SET 1 | 0 | 120 | D | |
| 502 | STANDARD SET 2 | 1 | 120 | D | |
| 503 | STANDARD SET 3 | 2 | 120 | D | |
| 504 | STANDARD SET 4 | 4 | 120 | D | |
| 505 | ROOM SET | 8 | 120 | D | |
| 506 | POWER SET | 16 | 120 | D | |
| 507 | ROCK SET | 65 | 120 | D | |
| 508 | HIPHOP SET | 64 | 120 | D | |
| 509 | ELECTRONIC SET | 24 | 120 | D | |
| 510 | SYNTH SET 1 | 25 | 120 | D | |
| 511 | SYNTH SET 2 | 30 | 120 | D | |
| 512 | TRANCE SET | 31 | 120 | D | |
| 513 | JAZZ SET | 32 | 120 | D | |
| 514 | BRUSH SET | 40 | 120 | D | |
| 515 | ORCHESTRA SET | 48 | 120 | D | |
Liste d'assignation de batterie / Lista de asignación de batería
| Key/Note number | DRUMS SET LIST | ||||||||||||||
| STANDARD SET 1 | STANDARD SET 2 | STANDARD SET 3 | STANDARD SET 4 | ROOM SET | POWER SET | ROCK SET | HIP-HOP SET | ELECTRONIC SET | SYNTH SET 1 | SYNTH SET 2 | TRANCE SET | JAZZ SET | BRUSH SET | ORCHESTRA SET | |
| C-1 | — | — | — | Standard Kick 1 | — | — | — | — | — | — | — | — | — | — | — |
| D-1 | — | — | — | Standard Kick 2 | — | — | — | — | — | — | — | — | — | — | — |
| E-15 | — | — | — | Standard Kick 3 | — | — | — | — | — | — | — | — | — | — | — |
| F-1 | — | — | — | Standard Kick 4 | — | — | — | — | — | — | — | — | — | — | — |
| G-17 | — | — | — | Standard Closed H-Hat 1 | — | — | — | — | — | — | — | — | — | — | — |
| H-8 | — | — | — | Standard Closed H-Hat 2 | — | — | — | — | — | — | — | — | — | — | — |
| I-10 | — | — | — | Standard Open H-Hat 1 | — | — | — | — | — | — | — | — | — | — | — |
| J-11 | — | — | — | Standard Open H-Hat 2 | — | — | — | — | — | — | — | — | — | — | — |
| K-12 | — | — | — | — | — | — | — | — | — | — | — | — | — | — | — |
| L-13 | — | — | — | — | — | — | — | — | — | — | — | — | — | — | — |
| M-14 | — | — | — | — | — | — | — | — | — | — | — | — | — | — | — |
| O-15 | — | — | — | — | — | — | — | — | — | — | — | — | — | — | — |
| P-16 | — | — | — | — | — | — | — | — | — | — | — | — | — | — | — |
| Q-17 | — | — | — | — | — | — | — | — | — | — | — | — | — | — | — |
| R-18 | — | — | — | — | — | — | — | — | — | — | — | — | — | — | — |
| S-20 | — | — | — | — | — | — | — | — | — | — | — | — | — | — | — |
| T-21 | — | — | — | — | — | — | — | — | — | — | — | — | — | — | — |
| U-22 | — | — | — | — | — | — | — | — | — | — | — | — | — | — | — |
| V-23 | — | — | — | — | — | — | — | — | — | — | — | — | — | — | — |
| W-24 | — | — | — | — | — | — | — | — | — | — | — | — | — | — | — |
| X-25 | — | — | — | — | — | — | — | — | — | — | — | — | — | — | — |
| Y-26 | — | — | — | — | — | — | — | — | — | — | — | — | — | — | — |
| Z-27 | — | — | — | — | — | — | — | — | — | — | — | — | — | — | — |
| W-29 | — | — | — | — | — | — | — | — | — | — | — | — | — | — | — |
| X-31 | — | — | — | — | — | — | — | — | — | — | — | — | — | — | — |
| X-32 | — | — | — | — | — | — | — | — | — | — | — | — | — | — | — |
| X-33 | — | — | — | — | — | — | — | — | — | — | — | — | — | — | — |
| X-34 | — | — | — | — | — | — | — | — | — | — | — | — | — | — | — |
| X-35 | — | — | — | — | — | — | — | — | — | — | — | — | — | — | — |
| X-36 | — | — | — | — | — | — | — | — | — | — | — | — | — | — | — |
| X-37 | — | — | — | — | — | — | — | — | — | — | — | — | — | — | — |
| X-38 | — | — | — | — | — | — | — | — | — | — | — | — | — | — | — |
| X-39 | — | — | — | — | — | — | — | — | — | — | — | — | — | — | — |
| X-40 | — | — | — | — | — | — | — | — | — | — | — | — | — | — | — |
| X-41 | — | — | — | — | — | — | — | — | — | — | — | — | — | — | — |
| X-42 | — | — | — | — | — | — | — | — | — | — | — | — | — | — | — |
| X-43 | — | — | — | — | — | — | — | — | — | — | — | — | — | — | — |
| X-44 | — | — | — | — | — | — | — | — | — | — | — | — | — | — | — |
| X-45 | — | — | — | — | — | — | — | — | — | — | — | — | — | — | — |
| X-46 | — | — | — | — | — | — | — | — | — | — | — | — | — | — | — |
| X-47 | — | — | — | — | — | — | — | — | — | — | — | — | — | — | — |
| X-48 | — | — | — | — | — | — | — | — | — | — | — | — | — | — | — |
| X-49 | — | — | — | — | — | — | — | — | — | — | — | — | — | — | — |
| X-50 | — | — | — | — | — | — | — | — | — | — | — | — | — | — | — |
| Key/Note number | DRUMS SET LIST | ||||||||||||||
| STANDARD SET 1 | STANDARD SET 2 | STANDARD SET 3 | STANDARD SET 4 | ROOM SET | POWER SET | ROCK SET | HIP-HOP SET | ELECTRONIC SET | SYNTH SET 1 | SYNTH SET 2 | TRANCE SET | JAZZ SET | BRUSH SET | ORCHESTRA SET | |
| F7 102 | — | — | — | — | — | — | — | — | — | — | — | — | — | — | — |
| F7 103 | — | — | — | — | — | — | — | — | — | — | — | — | — | — | — |
| G7 104 | — | — | — | — | — | — | — | — | — | — | — | — | — | — | — |
| A7 105 | — | — | — | — | — | — | — | — | — | — | — | — | — | — | — |
| A7 106 | — | — | — | — | — | — | — | — | — | — | — | — | — | — | — |
| B7 107 | — | — | — | — | — | — | — | — | — | — | — | — | — | — | — |
| B7 108 | — | — | — | — | — | — | — | — | — | — | — | — | — | — | — |
| C8 109 | One | — | — | — | — | — | — | — | — | — | — | — | — | — | — |
| C8 110 | Two | — | — | — | — | — | — | — | — | — | — | — | — | — | — |
| D8 111 | Three | — | — | — | — | — | — | — | — | — | — | — | — | — | — |
| E8 112 | Four | — | — | — | — | — | — | — | — | — | — | — | — | — | — |
| E8 113 | Five | — | — | — | — | — | — | — | — | — | — | — | — | — | — |
| F8 114 | — | — | — | — | — | — | — | — | — | — | — | — | — | — | — |
| F8 115 | — | — | — | — | — | — | — | — | — | — | — | — | — | — | — |
| G8 116 | — | — | — | — | — | — | — | — | — | — | — | — | — | — | — |
| A8 117 | — | — | — | — | — | — | — | — | — | — | — | — | — | — | — |
| A8 118 | — | — | — | — | — | — | — | — | — | — | — | — | — | — | — |
| B8 120 | Piko | — | — | — | — | — | — | — | — | — | — | — | — | — | — |
| B8 121 | — | — | — | — | — | — | — | — | — | — | — | — | — | — | — |
| C9 121 | — | — | — | — | — | — | — | — | — | — | — | — | — | — | — |
| C9 122 | — | — | — | — | — | — | — | — | — | — | — | — | — | — | — |
| D9 123 | — | — | — | — | — | — | — | — | — | — | — | — | — | — | — |
| E9 124 | — | — | — | — | — | — | — | — | — | — | — | — | — | — | — |
| E9 125 | — | — | — | — | — | — | — | — | — | — | — | — | — | — | — |
| F9 126 | — | — | — | — | — | — | — | — | — | — | — | — | — | — | — |
| F9 127 | — | — | — | — | — | — | — | — | — | — | — | — | — | — | — |
| G9 128 | — | — | — | — | — | — | — | — | — | — | — | — | — | — | — |
REMARQUE. - « ← » Indique le même son que STANDARD SET 1. NOTA - « ← » Indica el mismo sonido que STANDARD SET 1.
Tableau des accords FINGERED / Cuadro de acordes digitados
| Chord Type Root | M | m | 7 | m7 | dim7 | M7 | dim | m7-5 |
| C | ||||||||
| C#/ (D#) | ||||||||
| D | ||||||||
| (D#)/E# | ||||||||
| E | ||||||||
| F | ||||||||
| F#/ (G#) | ||||||||
| G | ||||||||
| (G#)/A# | ||||||||
| A | ||||||||
| (A#)/B# | ||||||||
| B |
| ChordTypeRoot | aug | sus4 | 7sus4 | m add9 | mM7 | 7-5 | add9 |
| C | |||||||
| C#/D# | |||||||
| D | |||||||
| (D#/E)# | |||||||
| E | |||||||
| F | |||||||
| F#/G# | |||||||
| G | |||||||
| (G#/A# | |||||||
| A | |||||||
| (A#/B# | |||||||
| B |
- Ces accords peuvent être joués si vous élargissez la zone d'accompagnement du clavier en changeant le point de partage. Pour plus de détails, voir "Utilisation de la fonction Split" à la page F-45.
- Ces accords peuvent être joués si vous élargissez la zone d'accompagnement du clavier en changeant le point de partage. Pour plus de détails, voir "Utilisation de la fonction Split" à la page F-45.
Liste des rythmes
Liste des rythmes
| 8 BEAT / 16 BEAT | |
| 001 | STRAIGHT 8 BEAT |
| 002 | MELLOW 8 BEAT |
| 003 | MODERN 8 BEAT |
| 004 | GUITAR 8 BEAT |
| 005 | 8 BEAT POP |
| 006 | 8 BEAT |
| 007 | 60'S 8 BEAT |
| 008 | 16 BEAT 1 |
| 009 | 16 BEAT 2 |
| 010 | 16 BEAT SHUFFLE 1 |
| 011 | 16 BEAT SHUFFLE 2 |
| BALLAD | |
| 012 | MODERN BALLAD |
| 013 | SLOW BALLAD |
| 014 | 16 BEAT BALLAD |
| 015 | SOUL BALLAD |
| 016 | POP BALLAD 1 |
| 017 | POP BALLAD 2 |
| 018 | 6/8 BALLAD |
| 019 | ROCK BALLAD 1 |
| 020 | ROCK BALLAD 2 |
| DANCE | |
| 021 | HIP-HOP |
| 022 | RAP POP |
| 023 | DANCE POP |
| 024 | DISCO POP |
| 025 | TECHNO POP |
| 026 | TRANCE |
| 027 | MODERN R&B 1 |
| 028 | MODERN R&B 2 |
| 029 | MODERN DANCE |
| 030 | DISCO SOUL |
| POPS | |
| 031 | POP 1 |
| 032 | POP 2 |
| 033 | POP ROCK |
| 034 | GUITAR POP |
| 035 | FAST SOUL |
| 036 | SLOW SOUL |
| 037 | 60'S SOUL |
| ROCK | |
| 038 | SHUFFLE ROCK 1 |
| 039 | SHUFFLE ROCK 2 |
| 040 | BLUES |
| 041 | SOFT ROCK |
| 042 | LATIN ROCK |
| 043 | MODERN ROCK |
| 044 | SLOW ROCK |
| 045 | NEW ORLNS R&R |
| 046 | ROCK WALTZ |
| JAZZ | |
| 047 | SLOW BIG BAND |
| 048 | MIDDLE BIG BAND |
| 049 | FAST BIG BAND |
| 050 | SWING 1 |
| 051 | SWING 2 |
| 052 | SLOW SWING |
| 053 | JAZZ WALTZ 1 |
| 054 | JAZZ WALTZ 2 |
| 055 | FOX TROT |
| 056 | QUICKSTEP |
| 057 | JAZZ COMBO 1 |
| EUROPEAN | |
| 058 | SCHLAGER |
| 059 | POLKA |
| 060 | POP POLKA |
| 061 | WALTZ 1 |
| 062 | SLOW WALTZ |
| 063 | VIENNESE WALTZ |
| 064 | FRENCH WALTZ |
| 065 | SERENADE |
| 066 | TANGO |
| 067 | MARCH 1 |
| 068 | MARCH 2 |
| LATIN | |
| 069 | BOSSA NOVA 1 |
| 070 | BOSSA NOVA 2 |
| 071 | BEGUINE |
| 072 | SAMBA 1 |
| 073 | SAMBA 2 |
| 074 | MAMBO |
| 075 | RHUMBA |
| 076 | CHA-CHA-CHA |
| 077 | MERENGUE |
| 078 | BOLERO |
| 079 | SALSA |
| 080 | REGGAE |
| 081 | POP REGGAE |
| 082 | PUNTA |
| 083 | SKA |
| VARIOUS | |
| 084 | COUNTRY 8 BEAT |
| 085 | COUNTRY BALLAD |
| 086 | COUNTRY SHUFFLE |
| 087 | BLUEGRASS |
| 088 | DIXIE |
| 089 | TEX-MEX |
| 090 | FAST GOSPEL |
| 091 | SLOW GOSPEL |
| 092 | PASODOBLE |
| 093 | FOLKLORE |
| 094 | SIRTAKI |
| 095 | HAWAIIAN |
| 096 | ADANI |
| 097 | BALADI |
| 098 | ENKA |
| 099 | SYMPHONY |
| 100 | STR QUARTET |
| FOR PIANO | |
| 101 | PIANO 8 BEAT |
| 102 | PIANO BALLAD 1 |
| 103 | PIANO BALLAD 2 |
| 104 | EP BALLAD 1 |
| 105 | EP BALLAD 2 |
| 106 | BLUES BALLAD |
| 107 | JAZZ COMBO 2 |
| 108 | JAZZ COMBO 3 |
| 109 | RAGTIME |
| 110 | PIANO ROCK & ROLL |
| 111 | BOOGIE-WOOGIE |
| 112 | ARPEGGIO 1 |
| 113 | ARPEGGIO 2 |
| 114 | ARPEGGIO 3 |
| 115 | 6/8 MARCH |
| 116 | MARCH 3 |
| 117 | STRIDE PIANO |
| 118 | WALTZ 2 |
| 119 | WALTZ 3 |
| 120 | WALTZ 4 |
REMARQUE
- Certains rythmes (n° 110, 112 à 120) ne comportent que des accompagnements d'accords, sans batterie ni autres instruments de percussion. Ces rythmes ne sonnent que si CASIO CHORD, FINGERED ou FULL RANGE CHORD est sélectionné comme mode d'accompagnement.
REMARQUE
- Certains rythmes (n° 110, 112 à 120) ne comportent que des accompagnements d'accords, sans batterie ni autres instruments de percussion. Ces rythmes ne sonnent que si CASIO CHORD, FINGERED ou FULL RANGE CHORD est sélectionné comme mode d'accompagnement.
Liste des morceaux
Liste de la banque de morceaux
Liste de la banque de morceaux
| DEMO TUNES | |
| CTK-810 | |
| 001 | GROOVEE! |
| 002 | WHATEVER WILL BE WILL BE (QUE SERA SERA) |
| 003 | ARIANFOR |
| WK-110 | |
| 001 | ARIANFOR |
| 002 | WHATEVER WILL BE WILL BE (QUE SERA SERA) |
| 003 | GROOVEE! |
| EVENT | |
| 004 | WE WISH YOU A MERRY CHRISTMAS |
| 005 | JINGLE BELLs |
| 006 | SILENT NIGHT |
| 007 | JOY TO THE WORLD |
| 008 | O CHRISTMAS TREE |
| WORLD | |
| 009 | WHEN THE SAINTS GO MARCHING IN |
| 010 | GREENSLEEVES |
| 011 | SWING LOW, SWEET CHARIOT |
| 012 | AMAZING GRACE |
| 013 | AULD LANG SYNE |
| 014 | TWINKLE TWINKLE LITTLE STAR |
| 015 | LIGHTLY ROW |
| 016 | UNDER THE SPREADINGING CHESTNUT TREE |
| 017 | COME BIRDS |
| 018 | THE MUFFIN MAN |
| 019 | LONG LONG AGO |
| 020 | DID YOU EVER SEE A LASSIE? |
| 021 | LONDON BRIDGE |
| 022 | THE FARMER IN THE DELL |
| 023 | ON THE BRIDGE OF AVIGNON |
| 024 | SIPPIN' CIDER THROUGH A STRAW |
| 025 | GRANDFATHER'S CLOCK |
| 026 | MICHAEL ROW THE BOAT ASHORE |
| 027 | ANNIE LAURIE |
| 028 | MY BONNIE |
| 029 | MY DARLING CLEMENTINE |
| 030 | HOME SWEET HOME |
| 031 | ON TOP OF OLD SMOKEY |
| 032 | I'VE BEEN WORKING ON THE RAILROAD |
| 033 | LITTLE BROWN JUG |
| 034 | AURA LEE |
| 035 | OH! SUSANNA |
| 036 | HOUSE OF THE RISING SUN |
| 037 | SHE WORE A YELLOW RIBBON |
| 038 | CAMPTOWN RACES |
| 039 | SWANEE RIVER (OLD FOLKS AT HOME) |
| 040 | JEANNIE WITH THE LIGHT BROWN HAIR |
| 041 | YANKEE DOODLE |
| 042 | RED RIVER VALLEY |
| 043 | TURKEY IN THE STRAW |
| 044 | MY OLD KENTUCKY HOME |
| 045 | HOME ON THE RANGE |
| 046 | JAMAICA FAREWELL |
| 047 | ALOHA OE |
| 048 | SAKURA SAKURA |
| 049 | SANTA LUCIA |
| 050 | WALTZING MATILDA |
| CONCERT PIECES | |
| 051 | FÜR ELISE |
| 052 | TURKISH MARCH (MOZART) |
| 053 | PIANO SONATA op.27-2 “MOONLIGHT” 1st Mov. |
| 054 | ETUDE op.10-3 “CHANSON DE L’ADIEU” |
| 055 | GYMNOPÉDIES no.1 |
| 056 | THE ENTERTainer |
| 057 | MAPLE LEAF RAG |
| 058 | HUNGARIAN DANCES no.5 |
| 059 | TRÄUMEREI |
| 060 | LA FILE AUX CHEVEUX DE LIN |
| 061 | HUMORESKE (DVONÁK) |
| 062 | PROMENADE FROM “TABLEAUX D’UNE EXPOSITION” |
| 063 | MOMENTS MUSICAUX op.94-3 |
| 064 | LE CYGNE FROM “LE CARNAVAL DES ANIMAUX” |
| 065 | FALSE op.64-1 “PETIT CHIEN” |
| 066 | CHANSON DU TOREADOR FROM “CARMEN” |
| 067 | LARGO (HÄNDEL) |
| 068 | WEDDING MARCH FROM “MIDSUMMER NIGHT’S DREAM” |
| 069 | AMERICAN PATROL |
| 070 | CSIKOS POST |
| 071 | DOLLY’S DREAMING AND AWAKENING |
| 072 | LA CHEVALERESQUE |
| 073 | PIANO SONATA K.545 1st Mov. |
| 074 | LA PRIÈRE D’UNE VIERGE |
| 075 | MARCIA ALLA TURCA |
| 076 | NOCTURNE op.9-2 (CHOPIN) |
| 077 | LIEBESTRAUME no.3 |
| 078 | MARCHE MILITAIRE no.1 |
| 079 | BLUMENLIED |
| 080 | GRANDE FALSE BRILLANTE op.18-1 |
| ETUDES | |
| 081 | MINUET IN G MAJOR |
| 082 | GAVOTTE (GOSSEC) |
| 083 | ARABESQUE (BURGMÜLLER) |
| 084 | CHOPSTICKS |
| 085 | FRÖHLICHER LANDMANN |
| 086 | INVENTIONEN no.1 |
| 087 | AVE MARIA (GOUNOD) |
| 088 | JESUS BLEIBET MEINE FREUDE |
| 089 | CANON (PACHELBEL) |
| 090 | SONATINA op.36-1 1st Mov. |
| 091 | PIANO SONATA op.13 “PATHÉTIQUE” 2nd Mov. |
| 092 | PRELUDE op.28-7 (CHOPIN) |
| 093 | JE TE VEUX |
| 094 | RÊVERIE |
| 095 | ODE TO JOY |
| 096 | SERENADE FROM “EINE KLEINE NACHTMUSIK” |
| 097 | MARCH FROM “THE NUTCRACKER” |
| 098 | GOING HOME FROM “FROM THE NEW WORLD” |
| 099 | BEAUTIFUL DREAMER |
| 100 | DANNY BOY |
| 101 - 105 | User Songs/Canciones del usuario |
Modèles CTK-810/WK-110 Version : 1.0 Messages MIDI pouvant être envoyés et reçus via le port USB
| Function ... | Transmitted | Recognized | Remarks | |
| Basic Channel | Default Changed | 1 | 1-16 | |
| 1-16 | 1-16 | |||
| Mode | Default Messages Altered | Mode 3 X | Mode 3 X | |
| ********** | ********** | |||
| Note Number: | True voice | 36 - 96 (CTK-810) | 0-127 | *1: See Tone List on page A-1. |
| 28 -103 (WK-110) | 0 - 127 *1 | *1: Vea la lista de sonidos en la pagina A-1. | ||
| ********** | ||||
| Velocity | Note ON | O 9nH v = 1-127 | O 9nH v = 1-127 | XX = no relation |
| Note OFF | X 8nH v = 64 | X 9nH v = 0, 8nH v = XX | XX = sin relacion | |
| After Touch | Key's | X | X | |
| Ch's | X | O*2 | ||
| Pitch Bender | X | O | ||
| Control Change | 0, 32 | O | O | Bank select Modulation Data entry Volume Pan Expression Hold1 Sostenuto |
| 1 | X | O*2 | ||
| 6, 38 | X | O*3 | ||
| 7 | X | O | ||
| 10 | X | O | ||
| 11 | X | O | ||
| 64 | O*4 | O | ||
| 66 | O*4 | O | ||
| 679193100, 101120121 | O*4XOXOXOX | OOOO*3O | Soft pedalReverb sendChorus sendRPN LSB, MSBAll sound offReset all controller |
| ProgramChange: True # | O 0-127********** | O 0-127********** | |
| System Exclusive | O*5 | O*5 *6 | |
| System : Song PosCommon : Song Sel : Tune | XXX | XX | |
| System : ClockReal Time : Commands | O | X | |
| Aux : Local ON/OFF: All notes OFFMessages : Active Sense: Reset | X | X | |
| O | O | ||
| X | X | ||
| Remarks | *2 Modulation and after touch for each channel are the same effect.*** FINE TUNE, COARSE TUNE receive, and PITCH BEND SENSE, RPN Null receive*4 In accordance with sustain/assignable jack setting*5 • Reverb Type [F0] [7F] [7F] [04] [05] [01] [01] [01] [01] [01] [00] [vv] [F7] vv=00: Room1, 01: Room2, 04: Hall1, 03: Hall2* Chorus Type [F0] [7F] [7F] [04] [05] [01] [01] [01] [01] [02] [00] [vv] [F7] vv=00: Chorus1, 01: Chorus2, 02: Chorus3, 03: Chorus4* Master Fine Tune [F0] [7F] [7F] [04] [03] [II] [mm] [F7]* Master Coarse Tune [F0] [7F] [7F] [04] [04] [III] [mm] [F7]* [II] indicates low-order bytes, [mm] indicates high order bytes.*6 GM on/off GM ON : [F0] [7F] [7F] [09] [01] [F7] GM OFF : [F0] [7E] [7E] [09] [02] [F7]*Master Volume [F0] [7F] [7F] [04] [01] [II] [mm] [F7]Low-order bytes [II] are assumed to be 00H. | *2 La modulación y.afteres del toque para cada canal tiene el本身就是 efecto.FINE TUNE, recepción COARSE TUNE, y PITCH BEND SENSE, recepción RPN NullDeaccurado con el ajuste de la toma asignable*5 • Tipo de reverberación [F0] [7F] [7F] [04] [05] [01] [01] [01] [01] [00] [vv] [F7]w=00: Room1, 01: Room2, 04: Hall1, 03: Hall2* Tipo de Chorus [F0] [7F] [7F] [04] [05] [01] [01] [01] [02] [00] [vv] [F7]w=00: Chorus1, 01: Chorus2, 02: Chorus3, 03: Chorus4* AlFNACINA fina maestro [F0] [7F] [7F] [04] [03] [II] [mm] [F7]* AlFNACINA approximada maestro [F0] [7F] [7F] [04] [04] [II] [mm] [F7]* [II] indica bytes de orden inferior, y [mm] indica bytes de orden superior.Activación/desactivación GM GM ACTIVADO: [F0] [7E] [7F] [09] [02] [F7]* volumen maestro [F0] [7F] [7F] [04] [01] [II] [mm] [F7]Los bytes de orden inferior [II] se supponen que son 00H. | |
| Mode 1 : OMNI ON, POLYMode 2 : OMNI ON, MONOMYesMode 3 : OMNI OFF, POLYMode 4 : OMNI OFF, MONONX : No | |||

- CTK-810 WK-IIO
- AVIS
- AVERTISSEMENT FCC
- DÉCLARATION DE CONFORMITÉ
- IMPORTANT
- SYMBOLES
- DANGER
- AVERTISSEMENT
- ATTENTION
- EXEMPLES DE SYMBOLES
- PILES ALCALINES
- FUMÉE, ODEUR ÉTRANGE, SURCHAUFFE
- ADAPTATEUR SECTEUR
- PILES
- N'INCINÉREZ PAS LE PRODUIT
- EAU ET CORPS ÉTRANGERS
- DÉMONTAGE ET MODIFICATION
- CHUTE ET IMPACT
- SACS EN PLASTIQUE
- NE MONTEZ PAS SUR LE PRODUIT OU LE SUPPORT
- EMPLACEMENT
- DÉPLACEMENT DU PRODUIT
- NETTOYAGE
- CONNECTEURS
- ÉCRAN D'AFFICHAGE
- VOLUME SONORE
- OBJETS LOURDS
- ASSEMBLAGE CORRECT DU SUPPORT
- TONALITÉS
- BOUTON PIANO SETTING
- SYSTÈME DE LEÇON EN 3 ÉTAPES
- MORCEAUX INTÉGRÉS
- RYTHMES
- ACCOMPAGNEMENT AUTOMATIQUE
- MÉMOIRE D'ENREGISTREMENT
- ENREGISTREMENT ET LECTURE
- STOCKAGE ET LECTURE DES DONNÉES DE MORCEAUX TRANSFÉRÉES DEPUIS VOTRE ORDINATEUR
- SOMMAIRE
- PRÉCAUTIONS DE SÉCURITÉ. E
- CARACTÉRISTIQUES PRINCIPALES E
- GUIDE GÉNÉRAL. E
- RÉFÉRENCE RAPIDE. E
- ALIMENTATION E
- CONNEXIONS E
- OPÉRATIONS DE BASE. E
- LECTURE D'UN MORCEAU INTÉGRÉ...... E
- LEÇON EN 3 ÉTAPES......E
- ACCOMPAGNEMENT AUTOMATIQUE ...... E
- MÉMOIRE D'ENREGISTREMENT ......... E
- ENREGISTREMENT ET LECTURE... E
- RÉGLAGES DU CLAVIER E
- CONNEXION À UN
- ORDINATEUR E
- DÉPANNAGE E
- SPÉCIFICATIONS E
- PRÉCAUTIONS D'UTILISATION E
- ANNEXE A
- MESSAGES MIDI POUVANT ÊTRE ENVOYÉS ET REÇUS VIA LE PORT USB
- CONTRÔLEUR RYTHME/CHANSON
- REMARQUE
- FIXATION DU PUPITRE
- VOYANTS DU CONTRÔLEUR
- VOYANT DU CONTRÔLEUR DE RYTHME (CTK-810 : ⑧, WK-110 : ⑧)
- VOYANT DU CONTRÔLEUR DE MORCEAU (CTK-810 : ⑦, WK-110 : ⑧)
- NOTE
- POUR JOUER DU CLAVIER
- SI VOUS AVEZ SÉLECTIONNÉ LA LEÇON ÉTAPE
- SI VOUS AVEZ SÉLECTIONNÉ L'ÉTAPE 2 DE LA LEÇON
- UTILISATION DES PILES
- POUR INSÉRER LES PILES
- INFORMATIONS IMPORTANTES SUR LES PILES
- UTILISATION DE L'ADAPTATEUR SECTEUR
- ADAPTATEUR SECTEUR SPÉCIFIÉ : AD
- [PANNEAU ARRIÈRE]
- PENDANT L'UTILISATION
- PENDANT LE DÉPLACEMENT
- PENDANT LE STOCKAGE
- ARRÊT AUTOMATIQUE
- POUR DÉSACTIVER LA MISE HORS TENSION AUTOMATIQUE
- CONTENU DE LA MÉMOIRE
- ALIMENTATION ÉLECTRIQUE
- EXIGENCES D'ALIMENTATION
- BORNE PHONES/OUTPUT
- PRÉPARATION
- CONNEXION D'UN CASQUE (FIGURE 1)
- ÉQUIPEMENT AUDIO (FIGURE 2)
- AMPLIFICATEUR D'INSTRUMENT DE MUSIQUE (FIGURE 8)
- EXEMPLE DE CONNEXION
- CONNEXION À UN ORDINATEUR OU À UN AUTRE ÉQUIPEMENT
- TERMINAL SUSTAIN/ASSIGNABLE
- PÉDALE DE SUSTAIN
- PÉDALE DE SOSTENUTO
- PÉDALE DOUCE
- PÉDALE DE DÉMARRAGE/ARRÊT DU RYTHME
- ACCESSOIRES ET OPTIONS
- SÉLECTION D'UN SON
- POUR SÉLECTIONNER UN SON
- POLYPHONIE
- UTILISATION DES EFFETS SONORES
- RÉGLAGES
- POUR OPTIMISER LES RÉGLAGES DU CLAVIER POUR LE JEU PIANISTIQUE
- POUR LIRE UN MORCEAU DE LA BANQUE DE MORCEAUX
- RÉGLAGE DU TEMPO
- POUR RÉGLER LE TEMPO
- POUR METTRE EN PAUSE LA LECTURE
- POUR REVENIR EN ARRIÈRE RAPIDEMENT
- POUR AVANCER RAPIDEMENT
- BOUCLAGE D'UNE PHRASE MUSICALE
- POUR CHANGER LE TIMBRE DE LA MÉLODIE
- POUR JOUER TOUS LES AIRS EN SUCCESSION
- PROGRESSION DE LA LEÇON
- LEÇON EN 3 ÉTAPES
- PARTIES DE LA LEÇON
- AFFICHAGE PENDANT LA LEÇON EN 3 ÉTAPES
- HAUTEUR DE NOTE
- DURÉE DE NOTE
- NOTE SUIVANTE
- SÉRIE DE NOTES DE MÊME HAUTEUR
- RÉGLAGE DU TEMPO DE LA LEÇON EN 3 ÉTAPES
- MODE D'ÉVALUATION
- AFFICHAGE DU MODE D'ÉVALUATION
- UTILISATION DU GUIDE DE TONALITÉ
- RÉSULTATS DE L'ÉVALUATION
- MESSAGES D'AFFICHAGE DU RANG D'ÉVALUATION
- UTILISATION DES FONCTIONS DE LEÇON ET DU MODE D'ÉVALUATION
- ÉTAPE 1 – MAÎTRISEZ LE RYTHME
- ÉTAPE 2 - MAÎTRISEZ LES NOTES
- APPUYEZ SUR LE BOUTON STEP 2 POUR DÉMARRER LE JEU DE L'ÉTAPE
- JOUEZ LES NOTES COMME INDIQUÉ PAR LE GUIDE DU CLAVIER À L'ÉCRAN
- POUR ARRÊTER LA LECTURE À TOUT MOMENT, APPUYEZ SUR LE BOUTON STEP 2 OU PLAY/STOP
- ÉTAPE 3 – JOUEZ À VITESSE NORMALE
- SÉLECTIONNEZ L'AIR QUE VOUS VOULEZ JOUER
- APPUYEZ SUR LE BOUTON RIGHT/TRACK 2 OU LEFT/TRACK 1 POUR SPÉCIFIER LA PARTIE QUE VOUS VOULEZ PRATIQUER
- APPUYEZ SUR LE BOUTON STEP 3 POUR DÉMARRER LE JEU DE L'ÉTAPE
- POUR ARRÊTER LA LECTURE À TOUT MOMENT, APPUYEZ SUR LE BOUTON STEP 3 OU PLAY/STOP
- ÉVALUATION DE VOTRE JEU AU CLAVIER
- APPUYEZ SUR LE BOUTON SCORING
- JOUEZ CONFORMÉMENT AUX INDICATIONS SUR L'ÉCRAN DU MONITEUR
- APRÈS AVOIR TERMINÉ DE JOUER, VOTRE RÉSULTAT D'ÉVALUATION APPARAÎT SUR L'ÉCRAN
- GUIDE DE DOIGTÉ VOCAL
- POUR ACTIVER OU DÉSACTIVER LE GUIDE DE DOIGTÉ VOCAL
- UTILISATION DU MÉTRONOME
- POUR DÉMARRER LE MÉTRONOME
- TEMPS
- SÉLECTION D'UN RYTHME
- POUR SÉLECTIONNER UN RYTHME
- JOUER UN RYTHME
- POUR JOUER UN RYTHME
- UTILISATION DE L'ACCOMPAGNEMENT AUTOMATIQUE
- POUR UTILISER L'ACCOMPAGNEMENT AUTOMATIQUE
- CASIO CHORD
- CLAVIER D'ACCOMPAGNEMENT ET CLAVIER MÉLODIQUE CASIO CHORD
- TYPES D'ACCORDS
- FINGERED
- CLAVIER D'ACCOMPAGNEMENT ET CLAVIER MÉLODIQUE FINGERED
- ACCORD PLEINE PORTÉE
- CLAVIER D'ACCOMPAGNEMENT ACCORD PLEINE PORTÉE ET CLAVIER DE MÉLODIE
- UTILISATION D'UN MOTIF D'INTRODUCTION
- POUR INSÉRER UNE INTRODUCTION
- UTILISATION D'UN MOTIF DE REMPLISSAGE
- POUR INSÉRER UN REMPLISSAGE
- UTILISATION D'UNE VARIATION DE RYTHME
- POUR INSÉRER LE MOTIF DE VARIATION RYTHMIQUE
- UTILISATION D'UN MOTIF DE REMPLISSAGE AVEC UN RYTHME DE VARIATION
- POUR INSÉRER UN REMPLISSAGE DANS UNE VARIATION DE RYTHME
- DÉMARRAGE SYNCHRONISÉ DE L'ACCOMPAGNEMENT AVEC LA LECTURE DU RYTHME
- POUR UTILISER LE DÉMARRAGE SYNCHRONISÉ
- TERMINER AVEC UN MOTIF DE FIN
- POUR TERMINER AVEC UN MOTIF DE FIN
- UTILISATION DE LA PRÉSÉLECTION EN UNE TOUCHE
- POUR UTILISER LA PRÉSÉLECTION EN UNE TOUCHE
- FONCTIONS DE MÉMOIRE D'ENREGISTREMENT
- RÉGLAGES DE LA MÉMOIRE D'ENREGISTREMENT
- SETUP NAMES
- TO SAVE A SETUP IN REGISTRATION MEMORY
- POUR RAPPELER UNE CONFIGURATION DEPUIS LA MÉMOIRE D'ENREGISTREMENT
- PARTIES ET PISTES
- ENREGISTREMENT DE LEÇON
- ENREGISTREMENT DE PERFORMANCE
- UTILISATION DU BOUTON REORDER
- CAPACITÉ MÉMOIRE
- STOCKAGE DES DONNÉES ENREGISTRÉES
- ENREGISTREMENT EN JOUANT AVEC UN MORCEAU INTÉGRÉ
- SÉLECTION DES PARTIES
- INDICATEURS DE PARTIE/PISTE EN ATTENTE D'ENREGISTREMENT
- POUR ENREGISTRER EN JOUANT AVEC UN MORCEAU INTÉGRÉ
- DONNÉES D'ENREGISTREMENT DE LEÇON
- LECTURE D'UN ENREGISTREMENT DE LEÇON
- ENREGISTREMENT D'UNE PERFORMANCE
- SÉLECTION D'UNE PISTE
- INDICATEURS DE PARTIE/PISTE EN VEILLE DE LECTURE
- INDICATEURS DE PARTIE/PISTE EN VEILLE D'ENREGISTREMENT
- POUR ENREGISTRER VOS PERFORMANCES AU CLAVIER
- DONNÉES DE LA PISTE
- VARIATIONS D'ENREGISTREMENT DE LA PISTE
- POUR ENREGISTRER SANS RYTHME
- POUR DÉMARRER L'ENREGISTREMENT AVEC LE DÉMARRAGE SYNCHRO
- POUR INSÉRER UNE INTRO, UNE FIN OU UN REMPLISSAGE DANS UN ENREGISTREMENT
- POUR DÉMARRER L'ENREGISTREMENT AVEC UNE INTRO EN UTILISANT LE DÉMARRAGE SYNCHRO
- POUR DÉMARRER L'ACCOMPAGNEMENT AUTOMATIQUE EN COURS D'ENREGISTREMENT AU LIEU DE L'ÉTAPE 5 DE LA PROCÉDURE CI-DESSUS, APPUYEZ SUR LE BOUTON SYNCHRO/ENDING ET JOUEZ QUELQUE CHOSE DANS LA PLAGE MÉLODIQUE DU CLAVIER
- LECTURE D'UN ENREGISTREMENT DE PERFORMANCE
- SURIMPRESSION D'UN ENREGISTREMENT DE PERFORMANCE
- SUPPRESSION D'UNE PARTIE/PISTE SPÉCIFIQUE
- UTILISATION DE LA FONCTION LAYER
- POUR SUPERPOSER DES TONALITÉS
- LAYER
- UTILISATION DE LA FONCTION SPLIT
- POUR DIVISER LE CLAVIER
- SÉLECTIONNEZ D'ABORD LA SONORITÉ PRINCIPALE
- APPUYEZ SUR LE BOUTON SPLIT
- SÉLECTIONNEZ LA SONORITÉ DE SPLIT
- SPÉCIFIEZ LE POINT DE PARTAGE. TOUT EN MAINTENANT ENFONCÉ LE BOUTON SPLIT, APPUYEZ SUR LA TOUCHE DU CLAVIER OÙ VOUS VOULEZ QUE SE TROUVE LA TOUCHE LA PLUS À GAUCHE DU REGISTRE AIGU
- G
- ESSAYEZ MAINTENANT DE JOUER QUELQUE CHOSE SUR LE CLAVIER
- APPUYEZ À NOUVEAU SUR LE BOUTON SPLIT POUR ANNULER LA DIVISION DU CLAVIER ET REVENIR À LA NORMALE
- SPLIT
- UTILISATION DE LAYER ET SPLIT ENSEMBLE
- POUR DIVISER LE CLAVIER PUIS SUPERPOSER LES TONALITÉS
- APPUYEZ SUR LE BOUTON TONE PUIS SAISISSEZ LE NUMÉRO DE LA TONALITÉ PRINCIPALE
- APPUYEZ SUR LE BOUTON SPLIT PUIS SAISISSEZ LE NUMÉRO DE LA TONALITÉ DE DIVISION
- APPUYEZ SUR LE BOUTON LAYER PUIS SAISISSEZ LE NUMÉRO DE LA TONALITÉ SUPERPOSÉE
- APPUYEZ SUR LE BOUTON SPLIT OU LE BOUTON LAYER POUR QUE LES INDICATEURS SPLIT ET LAYER SOIENT TOUS DEUX AFFICHÉS
- SAISISSEZ LE NUMÉRO DE LA TONALITÉ DE DIVISION SUPERPOSÉE
- SPÉCIFIEZ LE POINT DE PARTAGE
- COUCHE SPLIT
- À PROPOS DU BOUTON TRANSPOSE/SETTING
- TRANSPOSITION DU CLAVIER
- POUR TRANSPOSER LE CLAVIER
- RÉGLAGE DU VOLUME DE L'ACCOMPAGNEMENT ET DU MORCEAU DE LA BANQUE DE CHANSONS
- POUR RÉGLER LE VOLUME DE L'ACCOMPAGNEMENT
- POUR RÉGLER LE VOLUME DES MORCEAUX INTÉGRÉS
- UTILISATION DE LA RÉPONSE AU TOUCHER
- ACCORDER LE CLAVIER
- POUR ACCORDER LE CLAVIER
- CONNEXION À UN ORDINATEUR
- POUR INSTALLER LE PILOTE MIDI USB
- INSTALLATION D'ADOBE READER (ACROBAT READER)
- CONFIGURATION SYSTÈME MINIMALE REQUISE
- SYSTÈMES D'EXPLOITATION PRIS EN CHARGE
- UNIVERSEL
- WINDOWS XP
- WINDOWS
- WINDOWS ME, WINDOWS 98SE, WINDOWS
- UTILISATION DU PORT USB
- POUR CONNECTER À UN ORDINATEUR VIA LE PORT USB
- VOYANT DATA ACCESS
- ÉLARGIR LA SÉLECTION DES MORCEAUX DE LA BANQUE DE CHANSONS
- POUR INSTALLER LE CONVERTISSEUR SMF
- CONFIGURATION SYSTÈME MINIMALE
- SITE MUSICAL CASIO
- STOCKAGE DES DONNÉES DE MORCEAUX
- UTILISATION DES DONNÉES SMF SUR LE CD-ROM FOURNI
- SON GENERAL MIDI
- MODIFICATION DES RÉGLAGES
- CANAL CLAVIER (PAR DÉFAUT : 1)
- CANAL DE NAVIGATION (PAR DÉFAUT : 4)
- POUR COUPER DES SONS SPÉCIFIQUES AVANT DE LIRE DES DONNÉES DE MORCEAU REÇUES
- LOCAL CONTROL (PAR DÉFAUT : ON)
- ACCOMP OUT (PAR DÉFAUT : DÉSACTIVÉ)
- PRISE SUSTAIN/ASSIGNABLE (PAR DÉFAUT : SUS)
- SUSTAIN
- SOSTENUTO
- PRÉCAUTIONS D'UTILISATION
- ENTRETIEN PAR L'UTILISATEUR
- ACCESSOIRES INCLUS ET EN OPTION
- LIGNES DE SOUDURE
- ÉTIQUETTE DE L'INSTRUMENT DE MUSIQUE
- LISTE DES SONORITÉS / LISTA DE SONIDOS
- ANNEXE / APÉNDICE
- TABLEAU DES ACCORDS FINGERED / CUADRO DE ACORDES DIGITADOS
- LISTE DES RYTHMES
- LISTE DES MORCEAUX
- LISTE DE LA BANQUE DE MORCEAUX
Marque : CASIO
Modèle : CTK-810
Catégorie : Clavier numérique