MODE D'EMPLOI BWMD 742 HOTPOINT

English,1

Italiano,15

Espanol,29
Contents
Installation, 2-3-4-5
Unpacking and levelling
Connecting the electricity and water supplies
The first wash cycle
Technical data
Instructions for the fitter
GB
CIS
Pycckn,43
Description of the washing machine, 6-7
Control panel
Display
Running a wash cycle, 8
Wash cycles and functions, 9
Table of wash cycles
Wash functions
BWMD 742
Detergents and laundry, 10
Detergent dispenser drawer
Preparing the laundry
Special wash cycles
Load balancing system
Precautions and tips, 11
General safety
Disposal
Opening the porthole door manually
Care and maintenance, 12
Cutting off the water or electricity supply
Cleaning the washing machine
Cleaning the detergent dispenser drawer
Caring for the door and drum of your appliance
Cleaning the pump
Checking the water inlet hose
Troubleshooting, 13
Service, 14
This instruction manual should be kept in a safe place for future reference. If the washing machine is sold, transferred or moved, make sure that the instruction manual remains with the machine so that the new owner is able to familiarise himself/herself with its operation and features.
! Read these instructions carefully: they contain vital information relating to the safe installation and operation of the appliance.
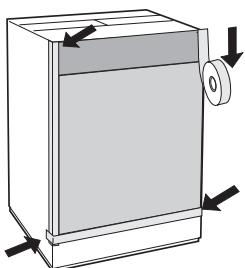
Unpacking and levelling
Unpacking
- Remove the washing machine from its packaging.
- Make sure that the washing machine has not been damaged during the transportation process. If it has been damaged, contact the retailer and do not proceed any further with the installation process.
-
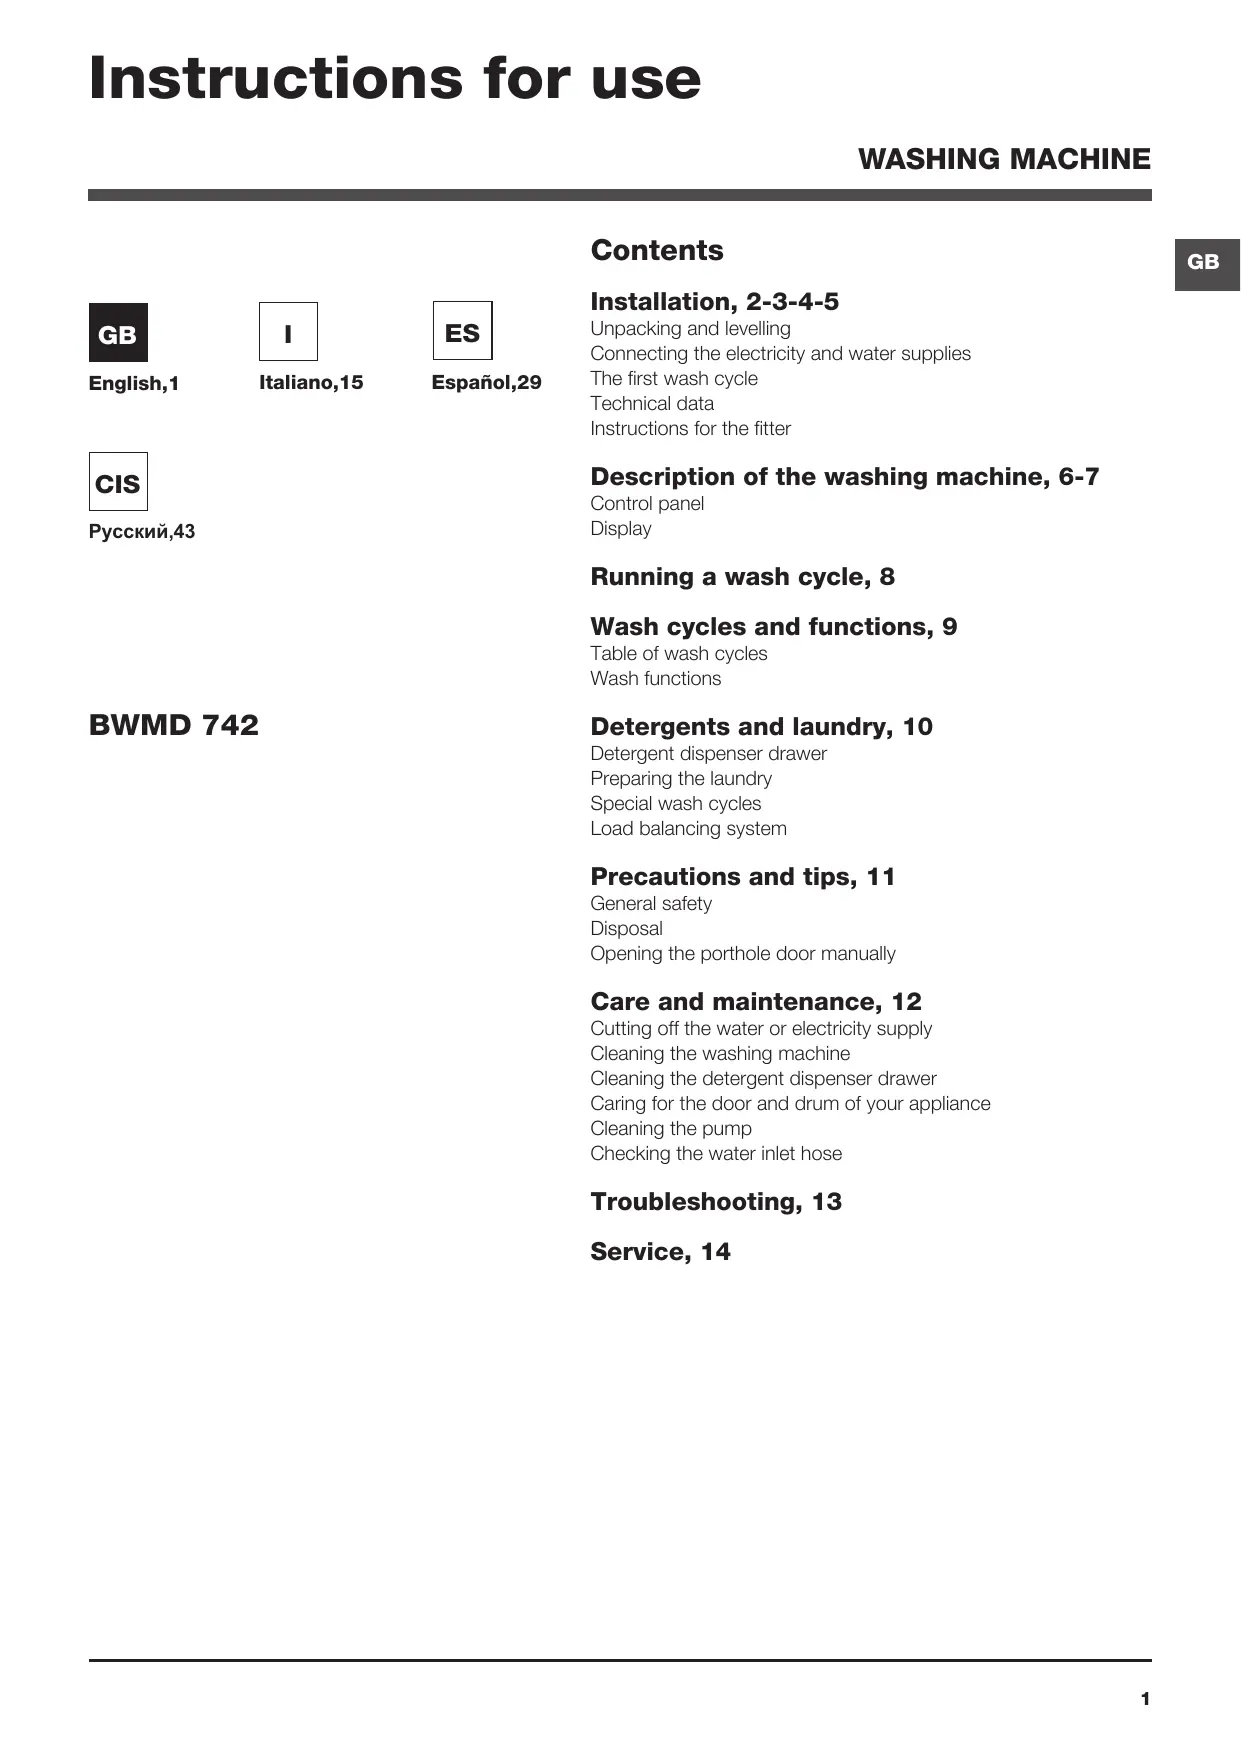
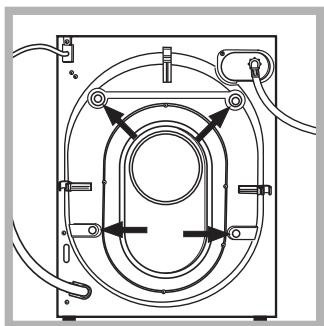
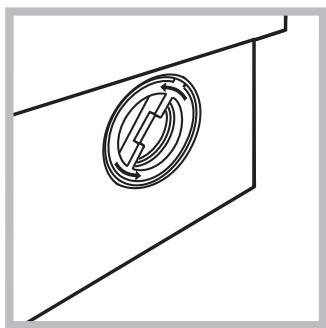
Remove the 4 protective screws (used during transportation) and the rubber washer with the corresponding spacer, located on the rear part of the appliance (see figure).
-
Close off the holes using the plastic plugs provided.
- Keep all the parts in a safe place: you will need them again if the washing machine needs to be moved to another location.
! Packaging materials should not be used as toys for children.
Levelling
- Install the washing machine on a flat sturdy floor, without resting it up against walls, furniture cabinets or anything else.
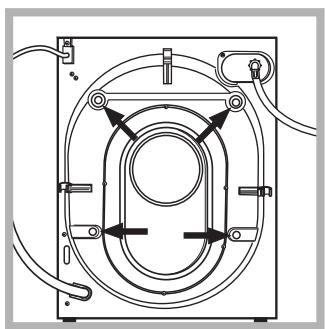
- If the floor is not perfectly level, compensate for any unevenness by tightening or loosening the adjustable front feet (see figure); the angle of inclination, measured in relation to the worktop, must not exceed 2^ .
Levelling the machine correctly will provide it with stability, help to avoid vibrations and excessive noise and prevent it from shifting while it is operating. If it is placed on carpet or a rug, adjust the feet in such a way as to allow a sufficient ventilation space underneath the washing machine.
Connecting the electricity and water supplies
Connecting the water inlet hose
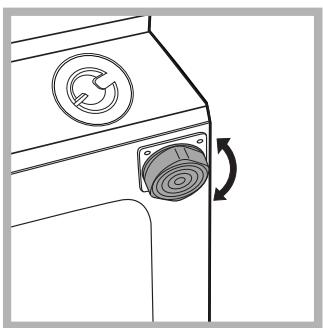
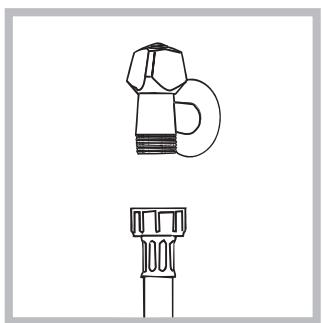
- Connect the supply pipe by screwing it to a cold water tap using a 3 / 4 gas threaded connection (see figure).
Before performing the connection, allow the water to run freely until it is perfectly clear.
-
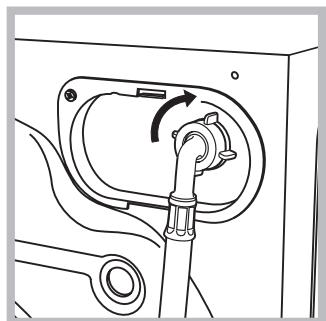
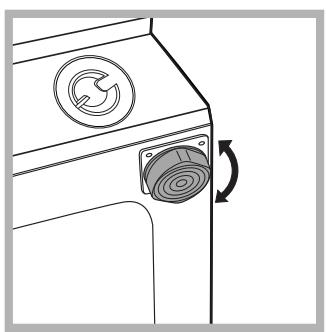
Connect the inlet hose to the washing machine by screwing it onto the corresponding water inlet of the appliance, which is situated on the top right-hand side of the rear part of the appliance (see figure).
-
Make sure that the hose is not folded over or bent.
! The water pressure at the tap must fall within the values indicated in the Technical details table (see next page).
If the inlet hose is not long enough, contact a specialised shop or an authorised technician.
! Never use second-hand hoses.
! Use the ones supplied with the machine.
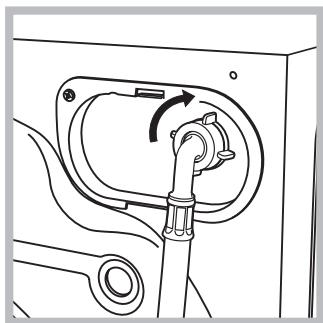
Connecting the drain hose

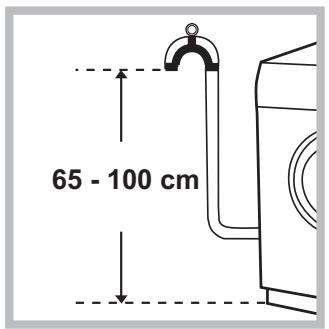
Connect the drain hose, without bending it, to a drainage duct or a wall drain located at a height between 65 and 100~cm from the floor;
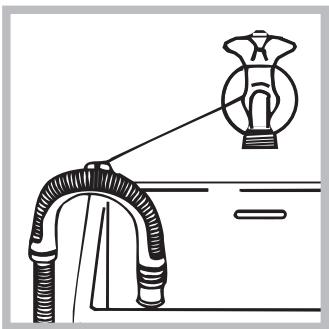
alternatively, rest it on the side of a washbasin or bathtub, fastening the duct supplied to the tap (see figure). The free end of the hose should not be underwater.
! We advise against the use of hose extensions; if it is absolutely necessary, the extension must have the same diameter as the original hose and must not exceed 150 cm in length.
Electrical connections
Before plugging the appliance into the electricity socket, make sure that:
- the socket is earthed and complies with all applicable laws;
- the socket is able to withstand the maximum power load of the appliance as indicated in the Technical data table (see opposite);
- the power supply voltage falls within the values indicated in the Technical data table (see opposite);
- the socket is compatible with the plug of the washing machine. If this is not the case, replace the socket or the plug.
! The washing machine must not be installed outdoors, even in covered areas. It is extremely dangerous to leave the appliance exposed to rain, storms and other weather conditions.
! When the washing machine has been installed, the electricity socket must be within easy reach.
! Do not use extension cords or multiple sockets.
The cable should not be bent or compressed.
The power supply cable must only be replaced by authorised technicians.
Warning! The company shall not be held responsible in the event that these regulations are not respected.
The first wash cycle
Once the appliance has been installed, and before you use it for the first time, run a wash cycle with detergent and no laundry, using the wash cycle (60°C).
| Technical data |
| Model | BWMD 742 |
| Dimensions | width 59.5 cm
height 81.5 cm
depth 54.5 cm |
| Capacity | from 1 to 7 kg |
| Electrical connections | please refer to the technical data plate fixed to the machine |
| Water connections | maximum pressure 1 MPa (10 bar)
minimum pressure 0.05 MPa (0.5 bar)
drum capacity 52 litres |
| Spin speed | up to 1400 rotations per minute |
| Test wash cycles in accordance with directives 1061/2010 and 1015/2010 | programme (60°) (1st press of the button);
Standard Cotton 60°C.
programme (40°) (2nd press of the button);
Standard Cotton 40°C. |
| CE | This appliance conforms to the following EC Directives:
- 2004/108/EC (Electromagnetic Compatibility)
- 2006/95/EC (Low Voltage)
- 2002/96/EC |
Instructions for the fitter
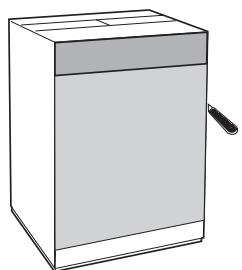
Mounting the wooden panel onto the door and inserting the machine into cabinets:
In the case where the machine must be shipped for final installation after the wooden panel has been mounted, we suggest leaving it in its original packaging. The packaging was designed to make it possible to mount the wooden panel onto the machine without removing it completely (see figures below).
The wooden panel that covers the face of the machine must not be less than 18 ~mm in thickness and can be hinged on either the right or left. For the sake of practicality when using the machine, we recommend that the panel be hinged on the same side as the door for the machine itself - the left.
A

B
C

E
Door Mounting Accessories (Fig. 1-2-3-4-5).
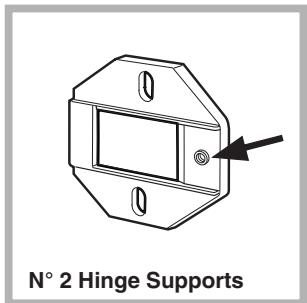
Fig. 1
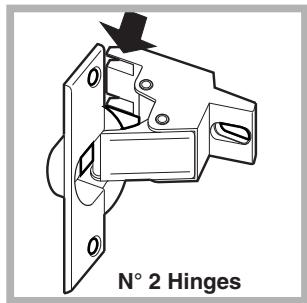
Fig. 2
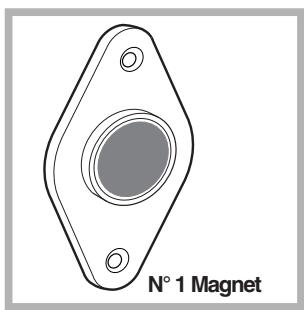
Fig. 3
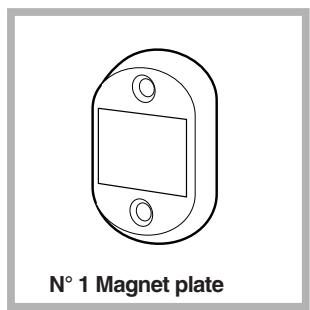
Fig. 4
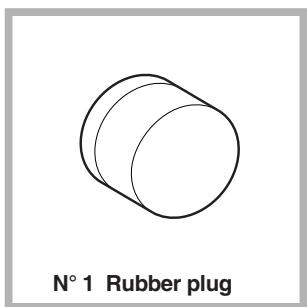
Fig. 5
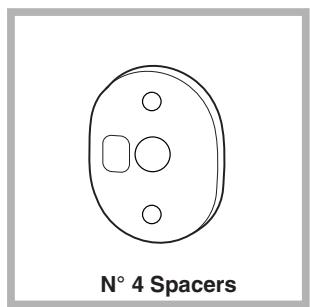
Fig. 4/B
- No. 6 type A self-threading screws, l = 13 mm.
- No. 2 type B metric, countersunk screws, l = 25 ; for fastening the magnet plate to the cabinet.
- No. 4 type C metric screws, l = 15 mm; for mounting the hinge supports to the cabinet.
- No. 4 type D metric screws, 1 = 7 ~mm ; for mounting the hinges on the supports.
Mounting the Parts onto the Face of the Machine.
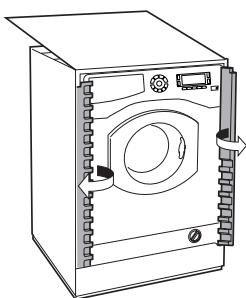
- Fit the hinge supports to the appliance front panel, positioning the hole marked with an arrow in fig. 1 so that it is on the inner side of the front panel. Fit a spacer (fig. 4/B) between the surfaces using type C screws.
- Fit the magnet plate at the top of the opposite side, using type B screws to fix two spacers (fig. 4/B) between the plate and the surface.
Using the Drilling Template.
- To trace the positions of the holes on the left-hand side of the panel, align the drilling template to the top left side of the panel using the lines traced on the extremities as a reference.
- To trace the positions of the holes on the right-hand side of the panel, align the drilling template to the top right side of the panel.
- Use an appropriately sized router to mill the holes for the two hinges, the rubber plug and the magnet.
Mounding the Parts onto the Wooden Panel (Door).
-
Insert the hinges into the holes (the movable part of the hinge must be positioned facing away from the panel) and fasten them with the 4 type A screws.
-
Insert the magnet into the top hole on the opposite side of the hinges and fasten it with the two type B screws.
- Insert the rubber plug into the bottom hole.
The panel is now ready to be mounted onto the machine.
Mounting the Panel into the machine.
Insert the nib of the hinge (indicated by the arrow in fig. 2) into the hole for the hinge and push the panel towards the front of the machine. Fasten the two hinges with the type D screws.
Fastening the plinth guide.
If the machine is installed at the end of a set of modular cabinets, mount either one or both of the guides for the base molding (as shown in fig. 8). Adjust them for depth based on the position of the base molding, and, if necessary, fasten the base to the guides (fig. 9).
This is how to assemble the plinth guide (fig. 8):
Fasten angle P using screw R , insert plinth guide Q into the special slot and once it is in the desired position, lock it in place using angle P and screw R .
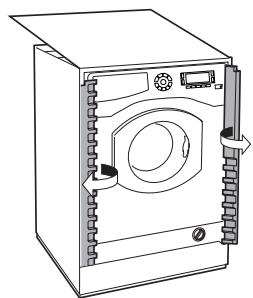
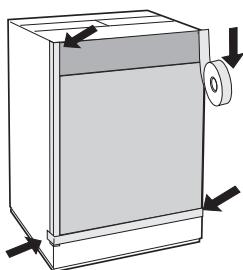
Inserting the machine into the Cabinet.
- Push the machine into the opening, aligning it with the cabinets (fig. 6).
- Regulate the adjustable feet to raise the machine to the appropriate height.
- To adjust the position of the wooden panel in both the vertical and horizontal directions, use the C and D screws, as shown in fig. 7.
Important: close the lower part of the appliance front by ensuring that the plinth rests against the floor.
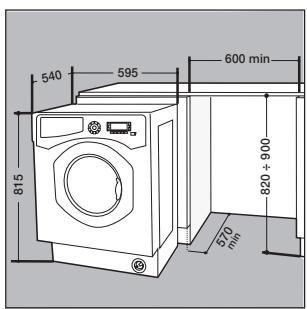
Fig. 6

Fig. 7
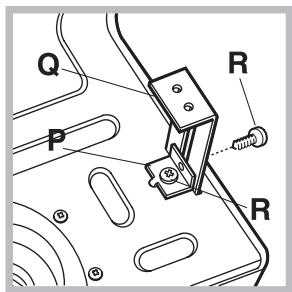
Fig. 8

Fig. 9
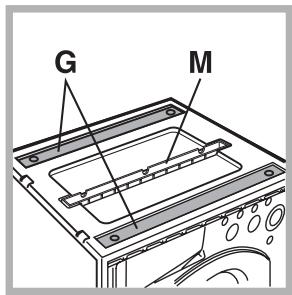
Accessories provided for the height adjustment.
The following can be found inside the polystyrene lid (fig. 10): 2 crossbars (G), 1 strip (M)
the following can be found inside the appliance drum:
4 additional feet (H)
4 screws (I),
4 screws ()
4 nuts (L)
2 plinth guides (Q)
Fig. 10
Adjusting the appliance height.
The height of the appliance can be adjusted (from 815 mm to 835 mm), by turning the 4 feet.
Should you require the appliance to be placed higher than the above height, you need to use the following accessories to raise it to up to 870 mm:
the two crossbars (G); the 4 feet (H); the 4 screws (I); the 4 nuts (L) then perform the following operations (fig. 11):
remove the 4 original feet, place a crossbar G at the front of the appliance, fastening it in place using screws I (screwing them in where the original feet were) then insert the new feet H.
Repeat the same operation at the back of the appliance.
Now adjust feet H to raise or lower the appliance from 835 mm to 870 mm.
Once you have reached the desired height, lock nuts L onto crossbar G.
To adjust the appliance to a height between 870 mm and 900 mm, you need to mount strip M, adjusting feet H to the required height.
Insert the strip as follows:
loosen the three screws N situated at the front of the Top cover of the appliance, insert strip M as shown in fig. 12, then fasten screws N .
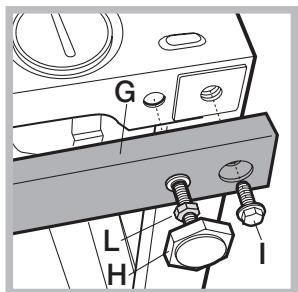
Fig. 11
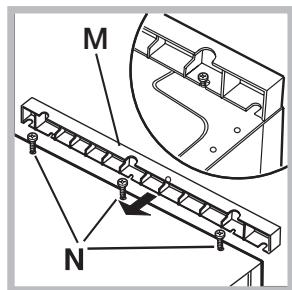
Fig. 12
Description of the washing machine
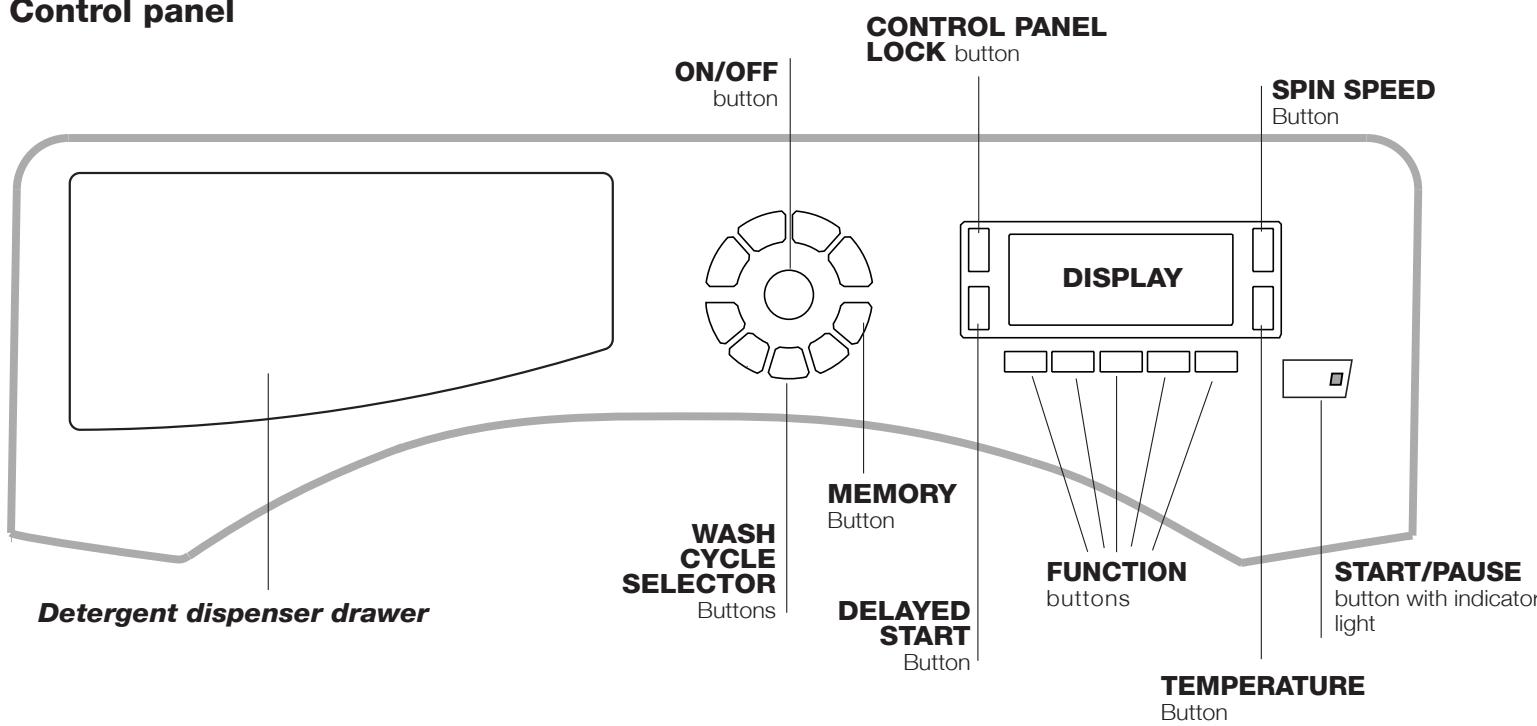
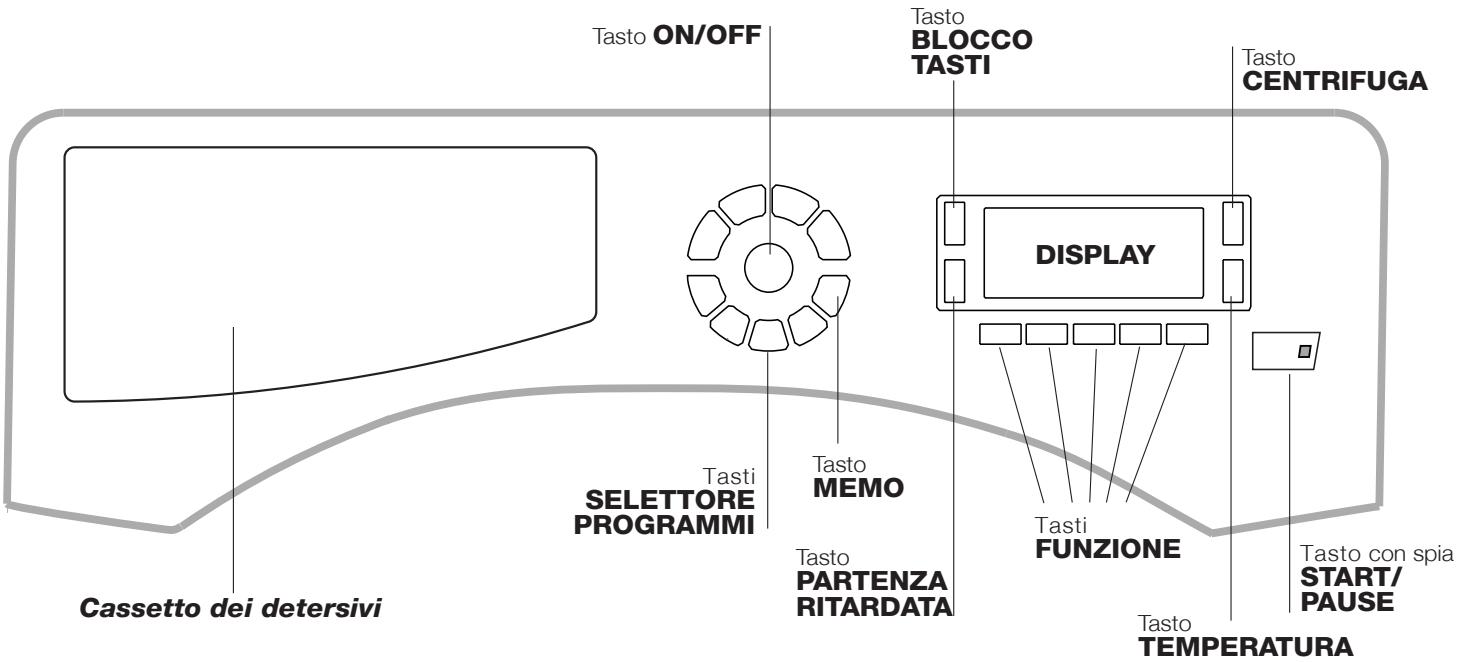
Control panel
Detergent dispenser drawer: used to dispense detergents and washing additives (see “Detergents and laundry”).
ON/OFF button: press this briefly to switch the machine on or off. The START/PAUSE indicator light, which flashes slowly in a green colour shows that the machine is switched on. To switch off the washing machine during the wash cycle, press and hold the button for approximately 2 seconds; if the button is pressed briefly or accidentally the machine will not switch off. If the machine is switched off during a wash cycle, this wash cycle will be cancelled.
WASH CYCLE SELECTOR buttons: used to set the desired wash cycle (see "Table of wash cycles").
MEMORY button: press and hold the button to store a cycle with your own set of preferences in the memory of the machine. To recall a previously stored cycle, press the MEMORY button.
FUNCTION buttons: press the button to select the desired function. The corresponding indicator light on the display will switch on.
SPIN button ⑨ : press to reduce or completely exclude the spin cycle - the value is indicated on the display.
TEMPERATURE button: press to decrease the temperature: the value will be shown on the display.
CONTROL PANEL LOCK button: to activate the control panel lock, press and hold the button for approximately 2 seconds. When the symbol is illuminated, the control panel is locked. This means it is possible to prevent wash cycles from being modified accidentally, especially where there are children in the home. To deactivate the control panel lock, press and hold the button for approximately 2 seconds.
DELAYED START button: press to set a delayed start time for the selected wash cycle. The delay time will be shown on the display.
START/PAUSE button with indicator light: when the green indicator light flashes slowly, press the button to start a wash cycle. Once the cycle has begun the indicator light will remain lit in a fixed manner. To pause the wash cycle, press the button again; the indicator light will flash in an orange colour. If the symbol 0 is not illuminated, the door may be opened. To start the wash cycle from the point at which it was interrupted, press the button again.
Standby mode
This washing machine, in compliance with new energy saving regulations, is fitted with an automatic standby system which is enabled after about 30 minutes if no activity is detected. Press the ON-OFF button briefly and wait for the machine to start up again.
Consumption in off-mode: 0,5 W
Consumption in Left-on: 0,5 W
Display
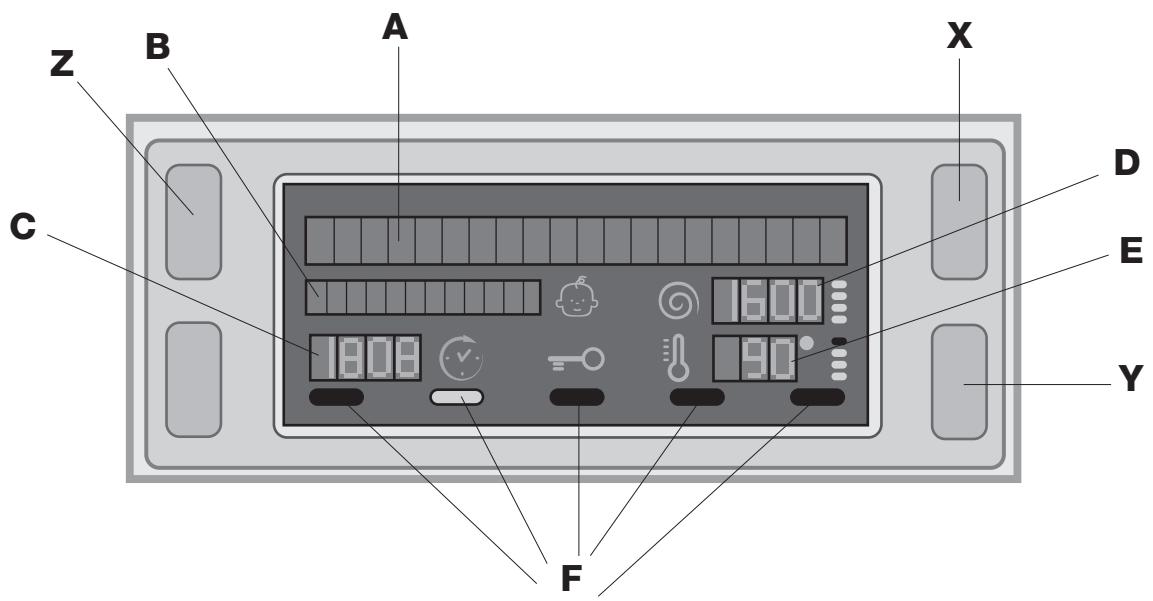
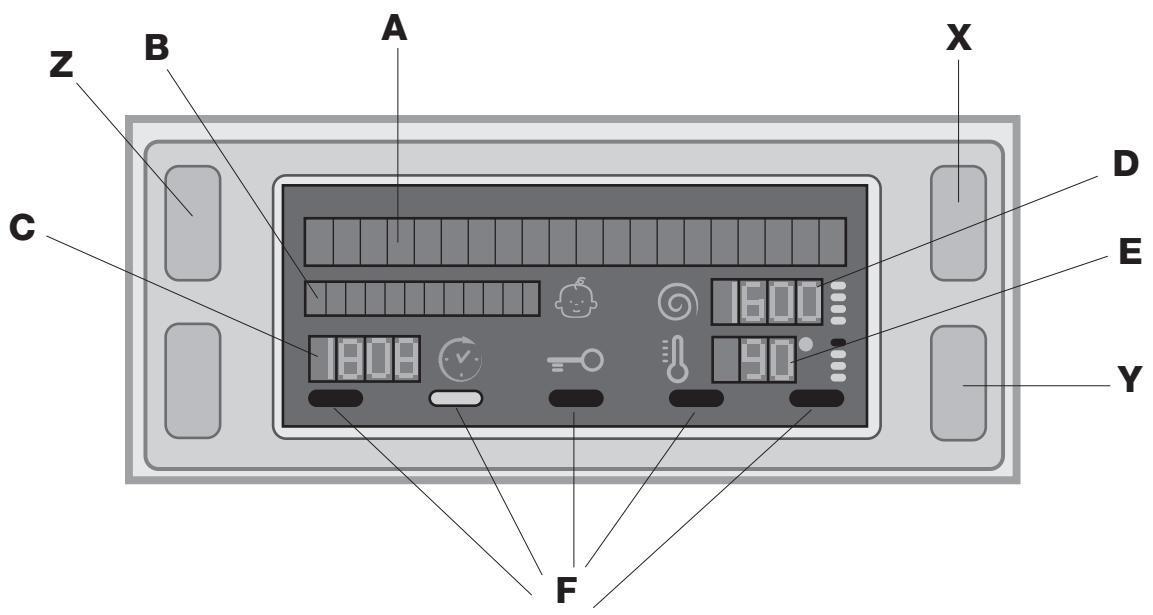
The display is useful when programming the machine and provides a great deal of information.
The two upper strings A and B provide details of the wash cycle selected, the wash cycle phase in progress and all information relating to the progress status of the wash cycle.
String C shows the time remaining until the end of the wash cycle in progress and, if a DELAYED START has been set, the time remaining until the start of the selected wash cycle.
String D shows the maximum spin speed value (this depends on the selected wash cycle); if the wash cycle does not include a spin cycle, the string remains unused.
String E shows the maximum temperature value which may be selected (this depends on the wash cycle used); if the temperature of the wash cycle cannot be modified, the string remains unused.
Indicator lights F correspond to the functions and light up when the selected function is compatible with the set wash cycle.
Door locked symbol 0
If the symbol is lit, this indicates that the washing machine door is blocked to prevent it from being opened accidentally. To prevent any damage from occurring, wait for the symbol to switch itself off before opening the appliance door.
N.B.: if the DELAYED START function has been activated, the door cannot be opened; pauses the machine by pressing the START/PAUSE button if you wish to open it.
The first time the machine is switched on, you will be asked to select the language and the display will automatically show the language selection menu.
To select the desired language press the X and Y buttons; to confirm the selection press the Z button.
To change the language switch off the machine and press buttons X, Y, Z simultaneously until an alarm is heard: the language-selection menu will be displayed again.
- SWITCH THE MACHINE ON. Press the button; the text HELLO will appear on the display and the START/PAUSE indicator light will flash slowly in a green colour.
- LOAD THE LAUNDRY. Open the porthole door. Load the laundry, making sure you do not exceed the maximum load value indicated in the table of programmes on the following page.
- MEASURE OUT THE DETERGENT. Pull out the detergent dispenser drawer and pour the detergent into the relevant compartments as described in "Detergents and laundry".
4. CLOSE THE DOOR.
- SELECT THE WASH CYCLE. Press one of the WASH CYCLE SELECTOR buttons to select the required wash cycle; the name of the wash cycle will appear on the display. A temperature and spin speed is set for each wash cycle; these may be adjusted. The duration of the cycle will appear on the display.
- CUSTOMISE THE WASH CYCLE. Use the relevant buttons:
Modifying the temperature and/or spin speed. The machine automatically selects the maximum temperature and spin speed set for the selected wash cycle; these values cannot therefore be increased. The temperature can be decreased by pressing the button, until the cold wash "OFF" setting is reached. The spin speed may be progressively reduced by pressing the button, until it is completely excluded (the "OFF" setting). If these buttons are pressed again, the maximum values are restored.
!Exception:if the 60^ 1st press of the button) programme is selected, the temperature can be increased up to a value of 90^
Setting a delayed start.
To set a delayed start for the selected programme, press the corresponding button repeatedly until the required delay period has been reached. When this option is enabled, the symbol lights up on the display. To remove the delayed start function press the button until the text "OFF" appears on the display.
Modifying the cycle settings.
- Press the button to enable the function; the indicator light corresponding to the button will switch on.
- Press the button again to disable the function; the indicator light will switch off.
! If the selected function is not compatible with the programmed wash cycle, the indicator light will flash and the function will not be activated.
If the selected function is not compatible with another function which has been selected previously,
the indicator light corresponding to the first function selected will flash and only the second function will be activated; the indicator light corresponding to the enabled function will remain lit.
The functions may affect the recommended load value and/or the duration of the cycle.
- START THE PROGRAMME. Press the START/ PAUSE button. The corresponding indicator light will become green, remaining lit in a fixed manner, and the door will be locked (the DOOR LOCKED O symbol will be on). During the wash cycle, the name of the phase in progress will appear on the display. To change a wash cycle while it is in progress, pause the washing machine using the START/PAUSE button (the START/ PAUSE indicator light will flash slowly in an orange colour); then select the desired cycle and press the START/PAUSE button again.
To open the door while a cycle is in progress, press the START/PAUSE button; if the DOOR LOCKED O symbol is switched off the door may be opened. Press the START/PAUSE button again to restart the wash cycle from the point at which it was interrupted.
- THE END OF THE WASH CYCLE. This will be indicated by the text "END OF CYCLE" on the display; when the DOOR LOCKED symbol switches off the door may be opened. Open the door, unload the laundry and switch off the machine.
If you wish to cancel a cycle which has already begun, press and hold the button. The cycle will be stopped and the machine will switch off.
Wash cycles and functions
Table of wash cycles
| Wash cycles | Description of the wash cycle | Max. temp.(°C) | Max. speed(rpm) | Detergents | Max. load(kg) | Residual dam-press % | Energy consumption kWh | Total water ht | Cycle duration |
| Prewash | Wash | Fabric softener | Bleach |
| 14 | Anti Stain | 40° | 1400 | ● | ● | ● | ● | 4 | - | - | - | 180' |
| 2 | Standard Cotton 60° (1) (1st press of the button): heavily soiled whites and delicate colours. | 60°(Max. 90°) | 1400 | ●(3) | ● | ● | ● | 7 | 53 | 1,1 | 58 | 190' |
| 3 | Standard Cotton 40° (2) (2nd press of the button): lightly soiled whites and delicate colours. | 40° | 1400 | - | ● | ● | ● | 7 | 53 | 0,99 | 82 | 185' |
| 4 | Standard Cotton 20° (3rd press of the button): lightly soiled whites and delicate colours. | 20° | 1400 | - | ● | ● | ● | 7 | - | - | - | 170' |
| 5 | Synthetics Resistant (1st press of the button): heavily soiled resistant colours. | 60° | 800 | ● | ● | ● | ● | 3 | 44 | 0,93 | 47 | 110' |
| 6 | Synthetics Resistant (4) (1st press of the button): lightly soiled resistant colours. | 40° | 800 | ● | ● | ● | ● | 3 | 44 | 0,57 | 46 | 95' |
| 7 | Synthetics Delicate (2nd press of the button): lightly soiled resistant colours. | 40° | 800 | ● | ● | ● | ● | 3 | - | - | - | 70' |
| 8 | Fastwash 60' (1st press of the button): to refresh normal soiled garments quick-ly (not suitable for wool, silk and clothes which require washing by hand). | 60° | 1400 | - | ● | ● | - | 3,5 | 53 | 0,81 | 40 | 60' |
| 9 | Fastwash 30' (2nd press of the button): to refresh lightly soiled garments quick-ly (not suitable for wool, silk and clothes which require washing by hand). | 30° | 800 | - | ● | ● | - | 3 | 71 | 0,15 | 35 | 30' |
| M | My Cycle: allows for any wash cycle to be stored. |
| 10 | Anti Allergy | 60° | 1400 | - | ● | ● | - | 4 | - | - | - | 195' |
| 11 | Woolmark Platinum (Wool): for wool, cashmere, etc. | 40° | 800 | - | ● | ● | - | 1,5 | - | - | - | 70' |
| 12 | Delicates | 30° | 0 | - | ● | ● | - | 1 | - | - | - | 80' |
| 13 | Spin (1st press of the button) | - | 1400 | - | - | - | - | 7 | - | - | - | 16' |
| 14 | Rinse (2nd press of the button) | - | 1400 | - | - | ● | ● | 7 | - | - | - | 36' |
| 15 | Pump out (3rd press of the button) | - | 0 | - | - | - | - | 7 | - | - | - | 2' |
The length of cycle shown on the display or in this booklet is an estimation only and is calculated assuming standard working conditions. The actual duration can vary according to factors such as water temperature and pressure, the amount of detergent used, the amount and type of load inserted, load balancing and any wash options selected.
1) Test wash cycle in compliance with directive 1061/2010: set wash cycle 60^ (1st press of the button). This cycle is designed for cotton loads with a normal soil level and is the most efficient in terms of both electricity and water consumption; it should be used for garments which can be washed at 60^ . The actual washing temperature may differ from the indicated value.
2) Test wash cycle in compliance with directive 1061/2010: set wash cycle 40^ (2nd press of the button).
This cycle is designed for cotton loads with a normal soil level and is the most efficient in terms of both electricity and water consumption; it should be used for garments which can be washed at 40^ . The actual washing temperature may differ from the indicated value.
3) At 60^ the "Prewash" function cannot be selected.
For all Test Institutes:
2) Long wash cycle for cottons: set wash cycle 40^ (2nd press of the button).
4) Long wash cycle for synthetics: set wash cycle 60^ (1st press of the button); temperature of 40^ (press TEMPERATURE button).
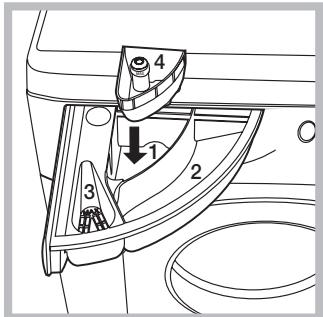
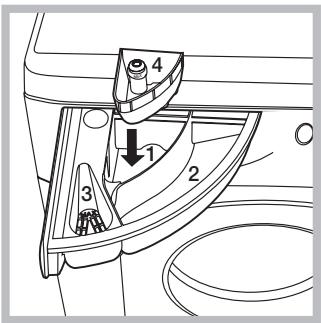
Wash functions
Super Wash
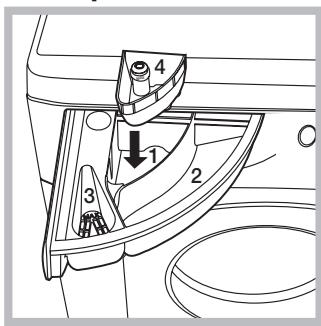
This option offers a high-performance wash due to the greater quantity of water used in the initial phase of the cycle, and due to the increased wash cycle duration, is particularly useful for the removal of stubborn stains. It can be used with or without bleach. If you desire bleaching, insert the extra tray compartment (4) into compartment 1. When pouring in the bleach, be careful not to exceed the "max" level marked
on the central pivot (see figure). To bleach laundry without carrying out a full wash cycle, pour the bleach into the extra compartment 4, select the "Rinse" cycle and activate the "Super Wash" option.
! The use of extra compartment 4 excludes the "Pre-wash" function.
! It cannot be used with the 心 , 心 , 心 , "Spin", "Pump out".
By selecting this option, the efficiency of the rinse is increased and optimal detergent removal is guaranteed. It is particularly useful for sensitive skin.
! It cannot be used with the "Fastwash 30", , , "Spin", "Pump out".
Easy Iron
By selecting this function, the wash and spin cycles will be modified in order to reduce the formation of creases. At the end of the cycle the washing machine will perform slow rotations of the drum; the EASY IRON and START/PAUSE indicator lights will flash (orange) and the text "END OF CYCLE" will appear on the display. To end the cycle, press the START/PAUSE button or the EASY IRON button. To drain the water so that the laundry may be removed, press the START/PAUSE button or the EASY IRON button.
It cannot be used with the "Fastwash 30", ⌒, ⌒.
P Prewash
If this function is selected, the pre-wash cycle will run; this is useful for removing stubborn stains.
N.B.: put the detergent in the relevant compartment.
It cannot be used with the, 一 _ 1 ^ 一 , 一 _ 2 ^ 一 , 一 _ 3 ^ 一 (60^), (40^)
Eco Wash
The Eco Wash function saves energy by not heating the water used to wash your laundry – an advantage both to the environment and to your energy bill. Instead, intensified wash action and water optimisation ensure great wash results in the same average time of a standard cycle.
For the best washing results we recommend the usage of a liquid detergent.
! It cannot be used with the , , , , ,
Detergent dispenser drawer
Good washing results also depend on the correct dose of detergent: adding too much detergent will not necessarily result in a more efficient wash, and may in fact cause build up on the inside of your appliance and contribute to environmental pollution.
! Use powder detergent for white cotton garments, for pre-washing, and for washing at temperatures over 60^ C .
! Follow the instructions given on the detergent packaging.
! Do not use hand washing detergents because these create too much foam.
Open the detergent dispenser drawer and pour in the detergent or washing additive, as follows.
compartment 1: Pre-wash detergent (powder)
Before pouring in the detergent, make sure that extra compartment 4 has been removed.
compartment 2: Detergent for the wash cycle (powder or liquid)
Liquid detergent should only be poured in immediately prior to the start of the wash cycle.
compartment 3: Additives (fabric softeners, etc.)
The fabric softener should not overflow the grid.
Preparing the laundry
- Divide the laundry according to:
- the type of fabric/the symbol on the label
- the colours: separate coloured garments from whites
- Empty all garment pockets and check the buttons.
- Do not exceed the listed values, which refer to the weight of the laundry when dry:
Durable fabrics: max. 7 kg
Synthetic fabrics: max. 3 kg
Wool: max. 1,5 kg
Silk: max. 1 kg
How much does your laundry weigh?
1 sheet 400-500 g
1 pillow case 150-200 g
1 tablecloth 400 - 500g
1 bathrobe 900-1200 g
1 towel 150-250 g
Special wash cycles
Anti Stain: this programme is suitable to heavily-soiled garments with resistant colours. It ensures a washing class that is higher than the standard class (A class). When running the programme, do not mix garments of different colours. We recommend the use of powder detergent. Pre-treatment with special additives is recommended if there are obstinate stains.
Standard Cotton 20^ : ideal for heavily soiled cotton loads. The effective performance levels achieved at cold temperatures, which are comparable to washing at 40^ , are guaranteed by a mechanical action which operates at varying speed, with repeated and frequent peaks.
Anti Allergy: use programme to remove major allergens such as pollen, mites, cat's and dog's hair.
Wool: the wool wash cycle on this Hotpoint/Ariston machine has been tested and approved by The Woolmark Company for washing wool garments labelled as hand washable provided that the garments are washed according to the instructions on the garment label and those issued by the manufacturer of this washing machine. Hotpoint/Ariston is the first washing machine brand to be approved by The Woolmark Company for Apparel Care- Platinum for its washing performance and consumption of energy and
water. (M1126)


Delicates: use programme to wash very delicate garments with decorative features, such as diamantes and sequins.
We recommend turning the garments inside out before washing and placing small items into the special bag for washing delicates. Use liquid detergent on delicate garments for best results.
To wash Silk garments and Curtains, select cycle 和 and then function 一 (in this case it will also be possible to enable the "Extra Rinse" function); the machine will end the cycle while the laundry is soaking and the indicator light will flash. To drain the water so that the laundry may be removed, press the START/PAUSE button or the 一 button.
Load balancing system
Before every spin cycle, to avoid excessive vibrations and to distribute the load in a uniform manner, the drum rotates continuously at a speed which is slightly greater than the washing rotation speed. If, after several attempts, the load is not balanced correctly, the machine spins at a reduced spin speed. If the load is excessively unbalanced, the washing machine performs the distribution process instead of spinning. To encourage improved load distribution and balance, we recommend small and large garments are mixed in the load.
This washing machine was designed and constructed in accordance with international safety regulations. The following information is provided for safety reasons and must therefore be read carefully.
General safety
- This appliance was designed for domestic use only.
- This appliance is not intended for use by persons (including children) with reduced physical, sensory or mental capabilities, or lack of experience and knowledge, unless they have been given supervision or instruction concerning use of the appliance by a person responsible for their safety. Children should be supervised to ensure that they do not play with the appliance.
- Do not touch the machine when barefoot or with wet or damp hands or feet.
- Do not pull on the power supply cable when unplugging the appliance from the electricity socket. Hold the plug and pull.
- Do not open the detergent dispenser drawer while the machine is in operation.
- Do not touch the drained water as it may reach extremely high temperatures.
- Never force the porthole door. This could damage the safety lock mechanism designed to prevent accidental opening.
- If the appliance breaks down, do not under any circumstances access the internal mechanisms in an attempt to repair it yourself.
- Always keep children well away from the appliance while it is operating.
- The door can become quite hot during the wash cycle.
- If the appliance has to be moved, work in a group of two or three people and handle it with the utmost care. Never try to do this alone, because the appliance is very heavy.
- Before loading laundry into the washing machine, make sure the drum is empty.
Disposal
- Disposing of the packaging materials: observe local regulations so that the packaging may be re-used.
- The European Directive 2002/96/EC on Waste Electrical and Electronic Equipment, requires that old household electrical appliances must not be disposed of in the normal unsorted municipal waste stream. Old appliances must be collected separately in order to optimise the recovery and recycling of the materials they contain and reduce the impact on human health and the environment. The crossed out "wheeled bin" symbol on the product reminds you of your obligation, that when you dispose of the appliance it must be separately collected. Consumers should contact their local authority or retailer for information concerning the correct disposal of their old appliance.
Opening the porthole door manually
In the event that it is not possible to open the porthole door due to a powercut, and if you wish to remove the laundry, proceed as follows:
- remove the plug from the electrical socket.
- make sure the water level inside the machine is lower than the door opening; if it is not, remove excess water using the drain hose, collecting it in a bucket as indicated in the figure.
- pull outwards using the tab as indicated in the figure, until the plastic tie-rod is freed from its stop position; pull downwards and open the door at the same time.

Cutting off the water and electricity supplies
- Turn off the water tap after every wash cycle. This will limit wear on the hydraulic system inside the washing machine and help to prevent leaks.
- Unplug the washing machine when cleaning it and during all maintenance work.
Cleaning the washing machine
The outer parts and rubber components of the appliance can be cleaned using a soft cloth soaked in lukewarm soapy water. Do not use solvents or abrasives.
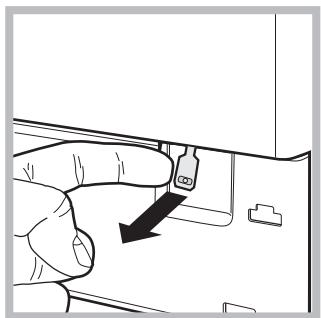
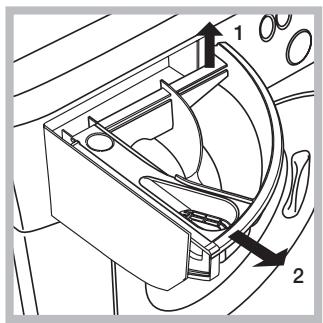
Cleaning the detergent dispenser drawer
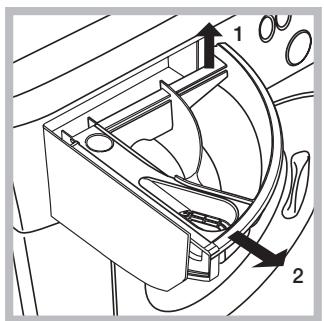
Remove the dispenser by raising it and pulling it out (see figure).
Wash it under running water; this operation should be repeated frequently.
Caring for the door and drum of your appliance
- Always leave the porthole door ajar in order to prevent unpleasant odours from forming.
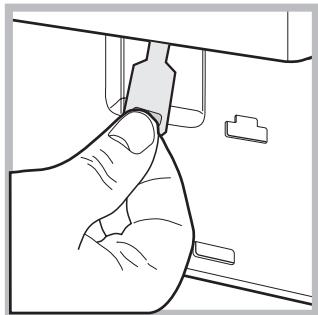
Cleaning the pump
The washing machine is fitted with a self-cleaning pump which does not require any maintenance. Sometimes, small items (such as coins or buttons) may fall into the pre-chamber which protects the pump, situated in its bottom part.
! Make sure the wash cycle has finished and unplug the appliance.
To access the pre-chamber:
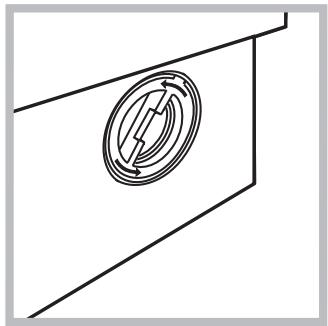
-
unscrew the lid by rotating it anti-clockwise (see figure): a little water may trickle out. This is perfectly normal;
-
clean the inside thoroughly;
- screw the lid back on;
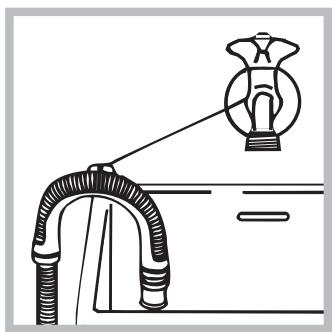
Checking the water inlet hose
Check the inlet hose at least once a year. If there are any cracks, it should be replaced immediately: during the wash cycles, water pressure is very strong and a cracked hose could easily split open.
! Never use second-hand hoses.
Your washing machine could fail to work. Before contacting the Technical Assistance Centre (see "Assistance"), make sure that the problem cannot be solved easily using the following list.
| Problem: | Possible causes / Solutions: |
| The washing machine does not switch on. | · The appliance is not plugged into the socket fully, or is not making contact.
· There is no power in the house. |
| The wash cycle does not start. | · The washing machine door is not closed properly.
· The ON/OFF button has not been pressed.
· The START/PAUSE button has not been pressed.
· The water tap has not been opened.
· A delayed start has been set (see “Running a wash cycle”). |
| The washing machine does not take in water (the text “NO WATER, CHECK SUPPLY” appears on the display). | · The water inlet hose is not connected to the tap.
· The hose is bent.
· The water tap has not been opened.
· There is no water supply in the house.
· The pressure is too low.
· The START/PAUSE button has not been pressed. |
| The washing machine continuously takes in and drains water. | · The drain hose is not fitted at a height between 65 and 100 cm from the floor (see “Installation”).
· The free end of the hose is under water (see “Installation”).
· The wall drainage system is not fitted with a breather pipe.
If the problem persists even after these checks, turn off the water tap, switch the appliance off and contact the Assistance Service. If the dwelling is on one of the upper floors of a building, there may be problems relating to water drainage, causing the washing machine to fill with water and drain continuously. Special anti-draining valves are available in shops and help to avoid this inconvenience. |
| The washing machine does not drain or spin. | · The wash cycle does not include draining: some wash cycles require the drain phase to be started manually (see “Wash cycles and functions”).
· The EASY IRON function has been activated: To complete the wash cycle, press the START/PAUSE button (see “Wash cycles and functions”).
· The drain hose is bent (see “Installation”).
· The drainage duct is clogged. |
| The washing machine vibrates a lot during the spin cycle. | · The drum was not unlocked correctly during installation (see “Installation”).
· The washing machine is not level (see “Installation”).
· The washing machine is trapped between cabinets and walls (see “Installation”). |
| The washing machine leaks. | · The water inlet hose is not screwed on properly (see “Installation”).
· The detergent dispenser drawer is blocked (for cleaning instructions, see “Care and maintenance”).
· The drain hose is not fixed properly (see “Installation”). |
| The machine is locked and the display flashes, indicating an error code (e.g. F-01, F-..). | · Switch off the machine and unplug it, wait for approximately 1 minute and then switch it back on again.
If the problem persists, contact the Technical Assistance Service. |
| There is too much foam. | · The detergent is not suitable for machine washing (it should display the text “for washing machines” or “hand and machine wash”, or the like).
· Too much detergent was used. |
Before calling for Assistance:
- Check whether you can solve the problem alone (see "Troubleshooting");
- Restart the programme to check whether the problem has been solved;
- If this is not the case, contact an authorised Technical Assistance Centre using the telephone number provided on the guarantee certificate.
! Always request the assistance of authorised technicians.
- the type of problem;
the appliance model (Mod.);
the serial number (S/N).
This information can be found on the data plate applied to the rear of the washing machine, and can also be found on the front of the appliance by opening the door.

Italiano
Summario
Installazione, 16-17-18-19
Disimballo e livellamento
Collegamenti idraulici ed elettrici
Primo ciclo di lavaggio
Dati tecnici
Istruzioni per l'installatore
Descrizione della lavabiancheria, 20-21
Pannello di controllo
Display
Come effettuare un ciclo di lavaggio, 22
Programmi e funzioni, 23
Tabella dei programmi
Funzioni di lavaggio
BWMD 742
Detersivi e biancheria, 24
Cassetto dei detersivi
Preparare la biancheria
Programmi particulari
Sistema bilancimiento del carico
Precauzioni e consigli, 25
Sicurezza generale
Smaltimento
Apertura manuale della porta oblo
Manutenzione e cura, 26
Escludere acqua e corrente elettrica
Pulire la lavabiancheria
Pulire il cassetto dei detersivi
Curare oblo e cestello
Pulire la pompa
Controllare il tubo di alimentazione dell'acqua
Anomalie erimedi, 27
Assistenza, 28
Assistenza Attiva 7 giorni su 7
!È importante conservare quello libretto per poterlo consultare in agli momento. In caso di vendita, di cessione o di trasloco, assicurarsi che resti insieme alla lavabiancheria per informare il nuovo proprietario sul funzionamento e sui relativi avvertimenti.
! Leggere attendamente le istruzioni: ci sono importanti informazioni sull'installazione, sull'uso e sulla sicurezza.
Disimballo e livellamento
Disimballo
- Disimballare la lavabiancheria.
- Controllare che la lavabiancheria non abbia subito danni nel trasporto. Se fosse danneggiata non collegarla e contattare il rivenditore.
-
Rimuovere le 4 viti di protezione per il trasporto e il gommino con il relativo distanziale, posti nella parte posteriore (vedi figura).
-
Chiudere i fori con i tappi di plastica in dotazione.
- Conservare tutti i pezzi: qualora la lavabiancheria debba essere trasportata, dovranno essere rimontati.
Gli imballaggi non sono giocattoli per bambini.
Livellamento
- Installare la lavabiancheria su un pavimento piano e rigido, alla appoggiarla a muri, mobili o altri.
- Se il pavimento non fosse perfettamente orizzontale, compensare le irregularità svitando o avvitando i piedini anteriors (vedi figura); l'angelo di inclinazione, misurato sul piano di lavoro, non deve superare i 2^ .
Un accurato livellamento dà stabilità alla macchina ed evita vibrazioni, rumori e spostamenti durante il funzionamento. In caso di moquette o di un tappeto, regolare i piedini in modo da conservare quello la lavabiancheria uno spazio sufficiente per la ventilazione.
Collegamenti idraulici ed elettrici
Collegamento del tubo di alimentazione dell'acqua
- Collegare il tubo di alimentazione avvitandolo a un rubinetto d'acqua fredda con bocca filettata da 3/4 gas (vedi figura). Prima di allacciare, far scorrere l'acqua finché non sia limpida.
-
Collegare il tubo di alimentazione alla lavabiancheria avvitandolo all'apposita presa d'accua, nella parte posteriore in alto a destra (vedi figura).
-
Fare attenuatione che nel tubo non ci siano né pieghe né strozzature.
! La pressione idrica del rubinetto deve essere compresa nei valori della tabella Dati tecnici (vedi pagina a fianco).
! Se la lunghezza del tubo di alimentazione non fosse sufficiente, rivolgersi a un negotio specializzato o a un technique autorizzato.
! Nonutilzzaremai tubi gia usati.
! Utilizzare quelli in dotazione alla macchina.
Collegamento del tubo di scarico
Collegare il tubo di scarico,enza piegarlo,a una conduttura di scarico o a uno scarico a muro posti tra 65 e 100 cm da terra;
oppure appoggiarlo al bordo di un lavandino o di una vasca, legando la guida in dotazione al rubinetto (vedi figura). L'estremità libera del tubo di scarico non deve rimanere immersa nell'acqua.
! è sconsigliato usare tubi di prolunga; se indispensableabile, la prolunga delve ave lo stesso diametro del tubo originale e non superare i 150 cm.
Collegamento elettrico
Prima di inseire la spina nella presa della corrente, accertarsi che:
- la presa abbia la messa a terra e sua normali di legge;
- la presa sia in grado di sostortare il carico massimo di potenza della macchina,indicato nella tabella Dati tecnici (vedi a fianco);
- la tensione di alimentazione sia compresa nei valori indicati nella tabella Dati tecnici (vedi a fianco);
- la presa sia compatibile con la spina della lavabiancheria. In caso contrario sostituire la presa o la spina.
! La lavabiancheria non va installata all'aperto, nemmeno se lo spazio è riparato, perché è molto pericoloso lasciar-la esposta a pioggia e temporali.
!A lavabiancheria installata, la presa della corrente deve essere facilemente raggiungibile.
! Non usare prolonghe e multiple.
! Il cavo non deve subire piegature o compressioni.
! Il cavo di alimentazione deve essere sostituito solo da tecnici autorizzati.
Attenzione! L'azienda declina agli responsabilità qualora queste norme non vengano rispetto.
Primo ciclo di lavaggio
Dopo l'installazione, prima dell'uso, effettuare un ciclo di lavaggio con detersivo e alla biancheria impostando il programma (60°C).
| Dati tecnici |
| Modello | BWMD 742 |
| Dimensioni | larghezza cm 59,5
altezza cm 81,5
profondità cm 54,5 |
| Capacità | da 1 a 7 kg |
| Collegamenti elettrici | Vedi targhetto caratteristiche tecniche applicata sulla macchina |
| Collegamenti idrici | pressione massima 1 MPa (10 bar)
pressione minima 0,05 MPa (0,5 bar)
capacità del cesto 52 litri |
| Velocità di cen-trifuga | sino a 1400 giri al minuto |
| Programmi di prova secondo la direttive 1061/2010 e 1015/2010 | programma (60°) (1° pressione del tasting);
Cotone standard 60°C.
programma (40°) (2° pressione del tasting);
Cotone standard 40°C. |
| CE | Questa apparecchiatura è conforme alle seguenti Diretive Comunitarie:
- 2004/108/CE (Compatibility Elettromagnetica)
- 2006/95/CE (Bassa Tensione)
- 2002/96/CE |
Istruzioni per l'installatore
Applicazione del pannello in legno alla porta e inserimento della macchina nei mobili:
Nel caso in cui, après il montaggio del pannello in legno, si necessario spedire la macchina per l'installazione finale, consigliamo di lasciarla nel suo imballo originale. A quello scopo l'imballo è stato realizzato in modo da permettere il montaggio del pannello di legno sulla macchina perché disimballare completamente il prodotto (vedi figure sottostanti). Il pannello di legno che copre la facciata non deve essere di spessore inferiore a 18 mm e può essere incernierato sua sul lato destro che sinistro. Per ragioni di praticità d'uso della macchina consigliamo lo stesso senso di aperture dell'oblo con le cerniere applicate sul lato sinistro.
A

B
C

D
E
Accessorimontaggioportina(Fig.1-2-3-4-5).
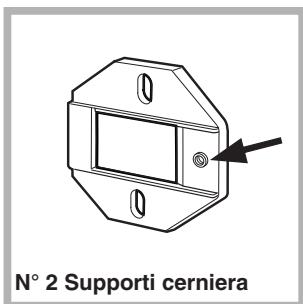
Fig. 1

Fig. 2
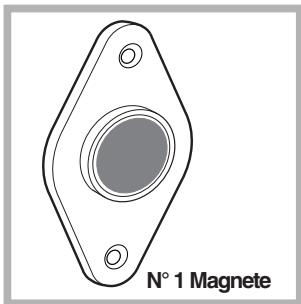
Fig. 3
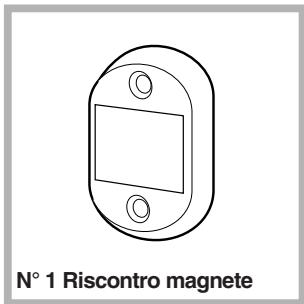
Fig. 4
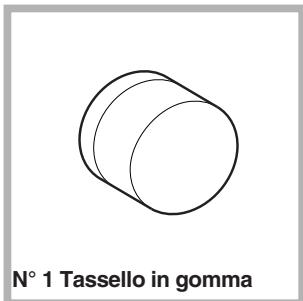
Fig. 5
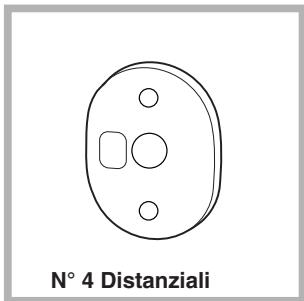
Fig. 4/B
- n^ 6 viti autoflettanti I = 13 mm "tip A".
- n^2 viti metriche testa svasata l = 25mm "tipo B"; per il fissaggio del risconto magnete al mobile.
- n^4 viti metriche l = 15mm "tipoc";per il montaggio dei supporti cerniera al mobile.
- n^4 viti metriche l = 7mm "tipod";per il montaggio delle cerniere ai supporti.
Montaggio dei particolari sulla facciata della macchina.
- Montare i supporti cerniera alla facciata posizionando il foro indicate da una freccia nella fig. 1 versus l'interno della facciata interponendo un distanziale (fig. 4/B), utilizzando le viti tipo C.
- Montare il risconto magnete alla parte opposta in alto interponendo due distanziali (fig. 4/B) utilizzando le due viti tipo B.
Uso della maschera di foratura.
- Per tracciare le posizioni dei fori sul lato sinistro del pannello, allinerare la maschera di foratura al lato superiore e sinistro del pannello facendo riferimento alle linee tracciate alle estremità.
- Per tracciare le posizioni dei fori sul lato destro del pannello, allinerare la maschera di foratura al lato superiore e destro del pannello.
- Con una fresa di adeguate dimensioni realizzare le quattro sedi che dovranno alloggiare le due cerniere, il tassello di gomma e il magnete.
Montaggio dei particolari sul pannello di legno (Antina).
- Inserire le cerniere nelle sedi predisipoeste (la parte mobile della cerniera deve trovarsi verso l'esterno del pannello) e fissarle con 4 viti del tipo A.
- Inserire il magnete nella sede in alto alla parte oppostale alle cerniere e fissarlo con due viti tipo B.
- Inserire il tassello in gomma nella sede in basso. Il pannello è ora pronto per essere montato sulla macchina.
Montaggio del pannello alla macchina.
Inserire il nasello della cerniera indicate alla freccia nella fig. 2 nella sede del supporto cerniera spingere il pannello verso la facciata della macchina e fissare le due cerniere con le due viti tipo D.
Fissaggio della guida zoccolo.
Se la macchina è installata ad una estremità della cucina componibile montare una o entrambre le guide zoccolo come indicato in fig. 8, regolandone la profondità in funzione della posizione dello zoccolo e se necessario fissarlo alle stesse (fig. 9).
Per montare la guida zoccolo agire cone segue (fig. 8): Fissare la squadretta P con la vite R, infrilare la guida zoccolo Q nell'apposita asola e una volta posizionata nel punto desiderato bloccarla alla squadretta P con la vite R.
Inserimento della macchina nei mobili.
- Spingere l'apparecchio nell'apertura allineandola con gli altri mobili (fig. 6).
- Agire sui piedini di regolazione per portare la macchina all'altezza desiderata.
- Per regolare la posizione del pannello in legno in senso verticale ed orizzontale, agire sulle viti C e D come indicato in fig. 7.
Importante: chiudere la parte inferiore della facciata con lo zoccolo a battuta sul pavimento.
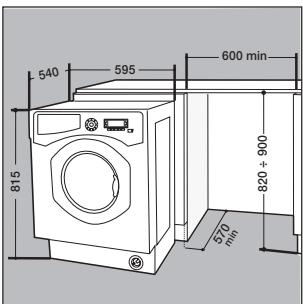
Fig. 6
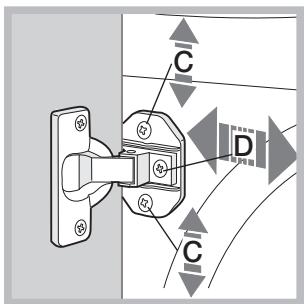
Fig. 7
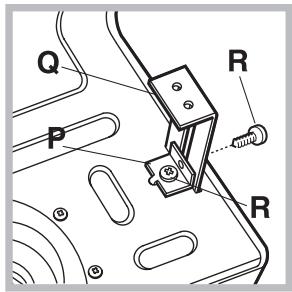
Fig. 8
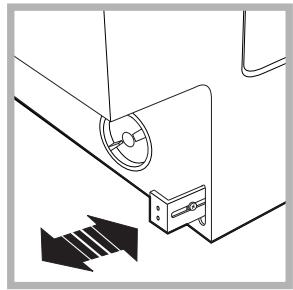
Fig. 9
Accessorini dotazione per la regolazione in altezza.
Alloggiate nel coperchio di polistirolo (fig. 10) si trovano: 2 traverse (G); 1 listello (M)

Fig. 10
all'interno del cestello si trovano:
4 piedini supplementari (H)
4 viti (I)
4 viti (R)
4 dadi (L)
2 guide zoccolo (Q)
Regolazione in altezza della macchina.
La macchina può essere regolata in altezza (da 815 mm a 835 mm) agli uomini sui 4 piedini.
Se si desidera portarla ad un'altezza superiore a quella soprain-dicata, arrivando fino a 870 mm, occorre utilizzato i seguenti accessori:
le 2 traverse (G); i 4 piedini (H); le 4 viti (I); i 4 dadi (L), quandi agire come segue (fig. 11):
togliere i 4 piedini originali, posizionare una traversa G nella parte anteriore della macchina, fissarla con le viti I (avvitandole nei fori dove erano montati i piedini originali) quindi insere i nuovi pedini H.
Ripetere la stessa operazione nella parte posteriore della macchina.
A Anything toregolandoipiediniHa macchinapuo essere abbassata o alzata da 835mm a 870 mm.
Una volta raggiunta l'altezza desiderata bloccare i dadi L alla traversa G.
Per regolare la macchina ad un'altezza compresa tra 870 mm e 900 mm occorre montare il listello M regolando i piedini H fino all'altezza desiderata. Per inserire il listello agire come segue: allentare le tre viti N poste nella parte anteriore della copertura Top, inserire il listello M come indicato nella fig. 12, quando bloccare le viti N.
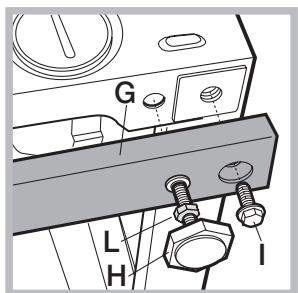
Fig. 11

Fig. 12
Descrizione della lavabiancheria
Pannello di controllo
Cassetto dei detersivi: per caricare detersivi e additivi (vedi "Detersivi e biancheria").
Tasto ON/OFF: preme brevamente il tasto per accendere o spegnere la macchina. La spia START/PAUSE che lampeggia lentamente di colore verde indica che la macchina è accesa. Per spegnere la lavabiancheria durante il lavaggio è necessario tenere premuto il tasto più a lungo, circa 2 sec.; una pressione breve o accidentale non permetterà lo spegnimento della macchina.
Lo spegnimento della macchina durante un lavaggio in corso annulla il lavaggio stesso.
Tasti SELETTORE PROGRAMMI: per impostare il programma desiderato (vedi "Tabella dei programmi").
Tasto MEMO: tenere premuto il tasting per memorizzare un ciclo e le proprie personalizzazioni preferite. Per richiamare un ciclo precedentemente memorizzato premere il tasting MEMO.
Tasti FUNZIONE: premere il tasting per selezionare la funzione desiderata. Sul display si illuminerà la spia relativa.
Tasto CENTRIFUGA: premere per ridurre o escludere del tutto la centrifuga; il valore viene indicatoro nel display.
Tasto TEMPERATURA (6): premere per ridurre la temperatura; il valore viene individato nel display.
Tasto Blocco TASTI: per attivare il blocco del pannello di controllo, tenere premuto il tasto per circa 2 secondi. Il significato accesso indica che il pannello di controllo è bloccato. In quello modo si impediscono modifiche accidentali dei programmi, soprattutto se in casa ci sono dei bambini.
Per disattivare il blocco del pannello di controllo, tenere premuto il tasto per circa 2 secondi.
Tasto PARTENZA RITARDATA: premere per impostare una partenza ritardata del programma prescelto; il ritardo viene indicate nel display.
Tasto con spia START/PAUSE: quando la spia verde lampeggia lentamente, premere il tasto per avviare un lavaggio. A ciclo avviato la spia diventa fissa. Per mettere in pausa il lavaggio, premere nuovamente il tasto; la spia lampeggerà con colore arancione. Se il significolo non è illuminato, si può aprire l'oblo. Per far ripartire il lavaggio dal punto in cui è stato interrotto, premere nuovamente il tasto.
Modalità di stand by
Questa lavatrice, in conformità alle nuove normative legate al risparmio energetico, è dotata di un sistema di autospegnimento (stand by) che entra in funzione dopo circa 30 minuti nel caso di non utilizzato. Premere brevamente il tasto ON/OFF e attendere che la macchina si riattivi.
Consumo in off-mode: 0,5 W
Consumo in Left-on: 0,5 W
Display
Il display è utile per programmare la macchina e fornisce molteplici informazioni.
Nelle due stringhe superiore A e B vengono visualizzati il programma di lavaggio selezionato, la fase di lavaggio in corso e tutte leindicazioni relative allo stato d'avanzamento del programma.
Nella stringa Ciene visualizzato il tempo residuo alla fine del ciclo di lavaggio in corso e nel caso fosse stata impostata una PARTENZA RITARDATA, il tempo mancante all'avvio del programma selezionato.
Nella stringa Diene visualizzato il valore massimo della velocità della centrifuga che la macchina può effettuare in base al programma impostato; se il programma non prevede la centrifuga la stringa resta spenta.
Nella stringa E viene visualizzato il valore massimo della temperatura che si può selezionare in base al programma impostato; se il programma non preveDE l'impostazione della temperatura la stringa resta spenta.
Le spie F sono relative alle funzioni e si accendono quando la funzione selezionata è compatible con il programma impostato.
Simbolo Oblo bloccato O
Il symbolo acceso indica che l'oblo è bloccato per impedire aperture accidentali. Per evitare danni è necessario attendere che il symbolo si spenga prima di aprire l'oblo.
N.B.: se è attiva la funzione PARTENZA RITARDATA l'oblo non si può aprire, per aprirlo mettere la macchina in pausa premendo il tasting START/PAUSE.
! Alla prima accensione verrà richiesto di selezionare la lingua ed il display entrè automaticamente nel menu di selezione lingua.
Per scegliere la lingua desiderata premere i tasti X e Y, per confermare la scelta premere il tasto Z.
Se si vuoleambiare lingua, spagnere la macchina, premere contemporaneamente i tasti X, Y, Z sino a sentire un segnale acustico, verrà visualizzato di nuovo il menu di selezione lingua.
Come effettuare un ciclo di lavaggio
- ACCENDERE LA MACCHINA. Premere il tasto (1), sul display comparirà la scritta BENVENUTI; la spia START/ PAUSE lampeggerà lentamente di colore verde.
- CARICARE LA BIANCHERIA. Apriere la porta oblo. Caricare la biancheria facendo attenzione a non superare la quantità di caricoindicata nella tabella programmi della pagina seguente.
- DOSARE IL DETERSIVO. Estrarre il cassetto e versare il detersivo nelle apposite vaschette come spiegato in "Detersivi e biancheria".
- CHUIDERE L'OBLO'.
- SCEGLIERE IL PROGRAMMA. Premere uno dei tasti del SELETTORE PROGRAMMI per selezionare il programma desiderato; il nome del programma comparirà sul display; adesso è associata una temperatura e una velocità di centrifuga che possono essere modificate. Sul display comparirà la durata del ciclo.
- PERSONALIZZARE IL CICLO DI LAVAGGIO.
Agire sugli appositi tasti:
Modificare la temperatura e/o la centrifuga. La macchina selezione automaticamente la temperature e la centrifuga massime previste per il programma impostato e non possono pertanto essere aumento. Premendo il tasto si riduce progressivement la temperature sino al lavaggio a freddo "OFF". Premendo il tasto si riduce progressively la centrifuga sino alla sua esclusione "OFF". Un'ulteriore pressione dei tasti riportere i valori a quelli massimi previsti.
! Eccezione: selezionando il programma (60°C)
(1° pressione del tasto) la temperatura può essere portata sino a 90°.
Impostare una partenza ritardata.
Per impostare la partenza ridadata del programma prescelto, premere il tasto relativo fino a raggiungere il tempo di ritardo desiderato. Quando tale opzione è attiva, sul display si illumina il significolo. Per rimuovere la partenza ridadata premere il tasto fino a che sul display compare la scritta "OFF".
Modificare le caratteristiche del ciclo.
- Premere il tasto per attivare la funzione; la spia corrispondente al pulsante si accenderà.
- Premere nuovamente il tasting per disattivare la funzione; la spia si spegnerà.
! Se la funzione selezionata non è compatibile con il programma impostato, la spia lampeggerà e la funzione non verrà attivata.
! Se la funzione selezionata non è compatibile con un'altra precedentemente impostata, la spia relativa alla prima funzione selezionata lampeggerà e verrà
attivata solo la seconda, la spia della funzione attivata si illuminerà.
! Le funzioni possono variare il carico raccommando e/o la durata del ciclo.
- AVVIARE IL PROGRAMMA. Premere il tasto START/PAUSE. La spia relativa si illuminerà di colore verde fisso e l'oblo si bloccherà (simpolo OBLO'BLOCCATO -0 ingresso). Durante il lavaggio, sul display comparirà il nome della fase in corso. Per cancellare un programma什么意思 un ciclo è in corso, mettere la lavabiancheria in pausa premendo il tasto START/PAUSE (la spia START/PAUSE lampeggerà lentamente di colore arancione); selezionare quando il ciclo desiderato e premere nuovamente il tasto START/ PAUSE.
Per aprire la porta perché un ciclo è in corso premere il tasting START/PAUSE; se il symbolo OBLO'BLOCCATO è spenta sare possibile aprire l'oblò. Premere nuovamente il tasting START/PAUSE per far ripartire il programma dal punto in cui era stato interrotto.
- FINE DEL PROGRAMMA. Viene individata alla scritta "FINE CICLO" sul display, quando il symbolo OBLO'BLOCCATO si spegnerà sare possibile aprire l'oblo. Aprire l'oblo, scaricare la biancheria e spegnere la macchina.
! Se si desidera annullare un ciclo già avviato, premere a lungo il tasting. Il ciclo verrà interrotto e la macchina si spegnerà.
Tabella dei programmi
| Programmi | Descrizione del Programma | Temp. max. (°C) | Velocità max. (gir al minuto) | Detersivi | Carico max. (Kg) | Uridità residua % | Consumo energia kWh | Acqua totale ft | Durata cilio |
| Prelavagio | Lavaggio | Ammobiente | Candeggina | |
| Antimacchia | 40° | 1400 | ● | ● | ● | ● | 4 | - | - | - | 180' |
| Cotone standard 60° (1) (1° pressione del tasto): bianchi e colorati resistenti molto sporchi. | 60° (Max. 90°) | 1400 | ●(3) | ● | ● | ● | 7 | 53 | 1,1 | 58 | 190' |
| Cotone standard 40° (2) (2° pressione del tasto): bianchi e colorati delicati poco sporchi. | 40° | 1400 | - | ● | ● | ● | 7 | 53 | 0,99 | 82 | 185' |
| Cotone standard 20° (3° pressione del tasto): bianchi e colorati delicati poco sporchi. | 20° | 1400 | - | ● | ● | ● | 7 | - | - | - | 170' |
| Sintetici Resistenti (1° pressione del tasto): colori resistenti molto sporchi. | 60° | 800 | ● | ● | ● | ● | 3 | 44 | 0,93 | 47 | 110' |
| Sintetici Resistenti (4) (1° pressione del tasto): colori resistenti poco sporchi. | 40° | 800 | ● | ● | ● | ● | 3 | 44 | 0,57 | 46 | 95' |
| Sintetici Delicati (2° pressione del tasto): colori resistenti poco sporchi. | 40° | 800 | ● | ● | ● | ● | 3 | - | - | - | 70' |
| Rapidò 60' (1° pressione del tasto): per rinfrescare rapidamente capi normalmente (non indicato per lana, seta e capi da lavare a mano). | 60° | 1400 | - | ● | ● | - | 3,5 | 53 | 0,81 | 40 | 60' |
| Rapidò 30' (2° pressione del tasto): per rinfrescare rapidamente capi poco (non indicato per lana, seta e capi da lavare a mano). | 30° | 800 | - | ● | ● | - | 3 | 71 | 0,15 | 35 | 30' |
| M | Memo: permette di memorizzare un qualsiasi ciclo di lavaggio. |
| Antialleryge | 60° | 1400 | - | ● | ● | - | 4 | - | - | - | 195' |
| Woolmark Platinum (Lana): per lana, cachemire, ecc. | 40° | 800 | - | ● | ● | - | 1,5 | - | - | - | 70' |
| Delicati | 30° | 0 | - | ● | ● | - | 1 | - | - | - | 80' |
| Centrifuga (1° pressione del tasto) | - | 1400 | - | - | - | - | 7 | - | - | - | 16' |
| Risciacquo (2° pressione del tasto) | - | 1400 | - | - | ● | ● | 7 | - | - | - | 36' |
| Scarico (3° pressione del tasto) | - | 0 | - | - | - | - | 7 | - | - | - | 2' |
La durat del ciclo indica sul display o sul liberto e a stima calcolata in base a condizioni standard. Il tempo effettivo pou variare in base a numeroi fattori quali la temperatura e la pressione dell'acqua in ingresso, la temperature ambiente, la quantità di detersivo, la quantità ed il tipo di carico, il bilancimiento del carico, le opzioni aggiuntive selezione.
1) Programma di controllo secondo la direttiva 1061/2010: impostare il programma a 60^ ( 1^ pressione del tasting).
t temperaturee effetiva de lavaggio pucu differire da quella indica.
2) Progammadis controla seconda la direttiva 1061/2010:impostare il programma a 40^ (2^ pressione del tasto).
t temperaturee effetiva di lavaggio potiore differire da quella indicata.
3) Alla temperatura di 60^ la funzione "Prelavaggio" non può essere attivata.
Per tutti Test Institutes:
2) Programma cotone lungo: impostare il programma a 40^ (2° pressione del tasting).
4) Programma sintetico lungo: impostare il programma a 60^ ( 1^ pressione del tasting); temperaura di 40^ (premere il tasting TEMPERATURA).
Funzioni di lavaggio
Super Wash
Questa opzione garantisce un lavaggio di alte prestazioni grazie all'utilizzo di una maggiord Quantità d'acqua nella fase iniziale del ciclo e alla maggiordurata del programma ed è utile per eliminare le macchie piùresistenti. Puede sereutilizzata con o sanza candeggina. Se si desidera effettuareanche il candeggio insire la vaschetta aggiuntiva 4, in dotazione, nella vaschetta 1. Nel dosare la candeggina non superare il livello
"max" indicato sul perno centrale (vedi figura). Se si desidera solo candeggiare essere effettuare il lavaggio completo, versare la candeggina nella vaschetta aggiuntiva 4, impostare il programma "Risciacquo" e attivare l'opzione "Super Wash".
! L'utilizzo della vaschetta aggiuntiva 4 esclude il prelimavaggio.
!Nonéattivabile sui programmi, 已 ,,,,"Centrifuga”, "Scarico".
Selezionando esta opzione si aumento l'efficacia del risciacquo, e si assicura la massima rimozione del detersivo. E' utile per pelli particolarmente sensibili.
!Non è attivabile sui programmi "Rapido 30", Centrifuga", "Scarico".
Stira facile
Selezionando esta funzione, il lavaggio e la centrifuga saranno opportunamente modificati per ridurre la formazione di pieghe. Al temine del ciclo la lavabiancheria effettuerà delle lente rotazioni del cestello; Il spia della funzione STIRA FACILE e quella di START/PAUSE lampeggeranno (arancione) e la scritta "FINE CICLO" apparirà su display. Per terminare il ciclo si dovrè premèl tasto START/PAUSE o il tasto STIRA FACILE. Per scaricare l'acqua e poter rimuovere il bucato sare è necessario premèl tasto START/PAUSE o il tasto STIRA FACILE.
!Non è attivabile sui programmi , "Rapidò 30", , ,
P Prelavaggio
Selezionando esta funzione si effettua il prelimavaggio, utile per rimuovere macchie ostinate.
N.B.: Aggiungere il detersivo nell'apposto scomparto.
! Non è attivabile sui programmi , , , , , (60°), (40°), 20.
Eco wash
La funzione Eco Wash contribuisce al risparmio energetico non riscaldando l'acqua utilizzata per lavare il bucato - un vantageglio sa per l'ambiente, sua per la bolletta elettrica. Infatti, l'azione rafforzata e il consumo ottimizzato dell'acqua garantiscono ottimi risultati nella stessa durata media di un ciclo standard. Per ottenere i migliorari risultati di lavaggio, si consiglia l'uso di un detersivo liquido.
!Non èattivabile sui programmi , , , , , ,
Cassetto dei detersivi
Il buon risultato del lavaggio dipendeanche dal corretto dosaggio del detersivo: eccedendo non si lava in modo più efficace e si contribuisce a incrostare le parti interne della lavabiancheria e a inquinare l'ambiente.
! Usare detersivi in polvere per capi in cotone bianchi e per il prelimavaggio e per lavaggi con temperatura superiore a 60^ .
!Seguire leindicazioni riportate sulla confezione di deter-. sivo.
! Non usare detersivi per il lavaggio a mano, perché formano troppa schiuma.
Estrarre il cassetto dei detersivi e inserire il detersivo o l'additivo come segue.
vaschetta 1: Detersivo per prelimavaggio (in polvere)
Prima di versare il detersivo verificare che non sia inserta la vaschetta aggiuntiva 4.
vaschetta 2: Detersivo per lavaggio (in polvere o liquido)
Il detersivo liquido va versato solo prima dell'avvio.
vaschetta 3: Additivi (ammorbidente, ecc.)
L'ammorbidente non deve fuoriuscire alla griglia.
vaschetta aggiuntiva 4: Candeggina
Prepare la biancheria
- Suddividere la biancheria secondo:
- il tipo di tessuto / il symbolo sull'etichetta.
- i colori:分开 are i capi colorati da quelli bianchi.
- Vuotare le tasche e controllare i bottoni.
- Non superare i valori indicati, riferiti al peso della biancheria asciutta:
Tessuti resistenti: max 7 kg
Tessuti sintetici: max 3 kg
Lana: max 1,5 kg
Seta: max 1 kg
Quanto pesa la biancheria?
1 lenzuolo 400-500 gr.
1 federa 150-200 gr.
1 tovaglia 400-500 gr.
1 accappatoio 900-1200 gr.
1 asciugamano 150-250 gr.
Programmi particulari
Antimacchia: il programma è adatto al lavaggio di capi molto sporchi, con colori resistenti. Il programma garantisce una classe di lavaggio superiore alla classe standard (classe A). Non eseguire il programma me-scolando capi di colore diverso. Si consiglia l'utilizzo di detersivo in polvere. Per macchie ostinate è consigliato il pretrattamento con additivi specifici.
Cotone standard 20^ : ideale per carichi in cotone sporchi. Le buone performanceanche a freddo, comparabili con un lavaggio a 40^ , sono garantite da un'azione meccanica che lavora con variazione di velocità a picchi ripetuti e rav vicinati.
Antiallergy:utilizzare il programma 念 per la rimozione dei principali allergeni come polline, acari, peli del gatto e cane.
Lana: Il ciclo di lavaggio "Lana" di questa lavatrice Hotpoint-Ariston è stato testato e APPROVATO alla Woolmark Company per il lavaggio di capi in lana classificati come "lavabili a mano", perché il lavaggio venga eseguito nel rispetto delle istruzioni riportate sull'etichetta dell'indumento e delleindicazioni fornite dal produttore dell'elettrodomestico. Hotpoint-Ariston è la primamarca di lavatrici ad aver ottenuto alla Woolmark Company la certificazione Woolmark Apparel Care - Platinum per le sue prestazioni di lavaggio e il consumo di
acqua ed energia. (M1126)


Delicati: utilizzare il programma per il lavaggio dei capi molto delicati, che presentano applicazioni quali strass o paillettes.
Si raccomanda di rovesciare i capi prima del lavaggio e di inseire gli indumenti piccoli nell'apposto sacchetto per il lavaggio dei capi delicati.
Per risultati migliorisi si raccomanda l'utilizzo del detersivo liquido per capi delicati.
Per il lavaggio dei capi in seta e tende, selezionare il ciclo e attivare la funzione (in quello caso la funzione "Extra Risciacquo" sare attiva); la macchina terminerà il
ciclo con la biancheria in ammollo e la spia della funzione lampeggerà. Per scaricare l'acqua e poter rimuovere il bucato sare necessario premere il tasto START/PAUSE o il tasto .
Sistema bilanciamento del carico
Prima di anni centrifuga, per evitare vibrazioni eccessive e per distribuire il carico in modo uniforme, il cestello effettua delle rotazioni ad una velocità leggermente superiore a quella del lavaggio. Se al termine di ripetuti tentativi il carico non fosse alcora correttamente bilanziato la macchina effettua la centrifuga ad una velocità inferiore a quella prevista.
In presenza di excessivo sbilanciamento la lavabiancheria effettua la distribuzione anzichè la centrifuga. Per favore una migliorie distribuzione del carico e il suo corretto bilanciamento si consiglia di mescolare capi grandi e piccoli.
! La lavabiancheria è stata progettata e costruita in conformità alle norme internazionali di sicurezza. Queste avventenze sono fornite per ragioni di sicurezza e devono essere lette attentamente.
Sicurezza generale
- Questo appearecchio è stato concepito escludamente per un uso di tipo domestico.
- L'apparecchio non deve essere utilizzato da persone (bambini compresi) con disponà fisiche, sensoriali o mentali ridotte e con esperenze e conoscenze insufficienti, a meno che tale utilizzo non avenga sotto la supervisione o le istruzioni di una persona responsabile della loro sicurezza. I bambini devono essere sorvegliati per garantire che non giochino con l'apparecchio.
Non toccare la macchina a piedi nudi o con le mani o piedi bagnati o umidi.
- Non staccare la spina dalla presa della corrente tirando il cavo, bensi afferrando la spina.
Non après il cassetto dei detersivi quando la macchina è in funzione.
Non toccare l'acqua di scarico, che puo raggiungere temperature elevate.
Non forzare in nessun caso I'oblo: potrebbe danneggiarsi il meccanismo di sicurezza che protege da aperture accidentali.
- In caso di guasto, in nessun caso accedere ai meccanismi interni per tentare una riparazione.
- Controllare sempre che i bambini non si avvicinino alla macchina in funzione.
- Durante il lavaggio I'oblò tende a scaldarsi.
- Se dev'essere spostata, lavorare in due o tre persona con la massima attenzione. Mai da soli perché la macchina è molto pesante.
- Prima di introdurre la biancheria controlling che il cestello sia vuoto.
Smaltimento
- Smaltimento del materiale di imballaggio: atteneri alle norme locali,osi gli imballaggi potranno essere riutilizzati.
- La direttiva Europea 2002/96/CE sui rifiuti di apparecchiature elettriche ed elettroniche, prevede che gli elettrodomestici non debbano essere smaltiti nel normale flusso dei rifiuti solidi urbani. Gli apparecchi dismessi devono essere raccolti separatamente per ottimizzato il tasso di recupero e riciclaggio dei materiali che li compongono ed impedire potenziali danni per la salute e l'ambiente. Il simbolo del cestino barrato è riportato su tutti i prodotti per ricordare gli obblighi di raccolta separata. Per ulteriori informazioni, sulla corretta dismissione
degli elettrodomestici, i detentori potranno rivolgersi al servizio pubblico preposto o ai rivenditori.
Apertura manuale dell'oblio
Nel caso non sia possibile apriere l'oblò a causa della mancanza di energia elettrica e volete stendere il bucato, procedere come segue:
- togliere la spina alla presa di corrente.
- verificate che il livello dell'acqua all'interno della macchina sia inferiore rispetto all'apertura dell'oblio; in caso contrario togliere l'acqua in eccedenza attraverso il tubo di scarico raccogliendola in un secchio.
- utilizzando la linguettaindicata in figura tirare versuso l'esterno fino a liberare il tirante in plastica dal fermo; tirarlo successivement versuso il basso e contemporaneamente apriere la porta.

Escludere acqua e corrente elettrica
- Chiudere il rubinetto dell'acqua dopo agli lavaggio. Si limita così l'usura dell'impianto idraulico della lavabiancheria e si elimina il pericolò di perdite.
- Staccare la spina della corrente quando si pulisce la lavabiancheria e durante i lavori di manutenzione.
Pulire la lavabiancheria
La parte esterna e le parti in gomma possono essere puliti con un panno imbevuto di acqua tiepida e sapone. Non usare solventi o abrasivi.
Pulire il cassetto dei detersivi
Sfilare il cassetto sollevandolo e tirandolo verso l'esterno (vedi figura). Lavarlo molto l'acqua corrente; esta pulizia va effettuata frequentlymente.
Curare oblo e cestello
- Lasciare sempre socchiuso l'oblò per evitare che si formino cattivi odori.
Pulire la pompa
La lavabiancheria è dotata di una pompa autopulente che non ha bisogno di manutenzione. Può perché succedere che piccoli oggetti (monete, bottoni) cadano nella precamera che protegge la pompa, situata nella parte inferiore diessa.
Assicurarsi che il ciclo di lavaggio sia terminato e staccare la spina.
Per accedere alla precamera:
-
svitare il coperchio
ruotandolo in senso
antiorario (vedi figura): è normale che fuoriesca un po' d'acqua;
-
pulire accuramente l'interno;
- riavvitare il coperchio;
Controllare il tubo di alimentazione dell'acqua
Controllare il tubo di alimentazione almeno una volta all'anno. Se presenta screpolature e fessure va sostituito: durante i lavaggi le forti pressioni potrebbero provocare improvwise spaccature.
! Nonutilizzare mai tubi già usati.
Può accadere che la lavabiancheria non funzioni. Prima di Telefonare all'Assistenza (vedi "Assistenza"), controllare che non si tratti di un problema facilemente risolvibile aiutandosi con il seguente elenco.
Anomalie:
La lavabiancheria non si accende.
Il ciclo di lavaggio non inizia.
La lavabiancheria non carica ac-qua (nel display apparirà la scitta "MANCA L'ACQUA, APRI IL RUBI-NETTO").
La lavabiancheria carica e scarica acqua di continuo.
La lavabiancheria non scarica o non centrifuga.
La lavabiancheria vibramolto durante la centrifuga.
La lavabiancheria perde acqua.
La macchina è bloccata, il display lampeggia e segnala un codice di anomalia (es.: F-01, F-.).
Si forma troppa schiuma.
Possibili cause / Soluzione:
- La spina non è inserita nella presa della corrente, o non abbastanza da fareicontatto.
In casa non c'é corrente.
L'oblò non è ben chiuso.
- Il tasting ON/OFF non è stato premuto.
- Il tasting START/PAUSE non è stato premuto.
Il rubinetto dell'acqua non è aperto.
- Si è impostato un ritardo sull'ora di avvio.
Se dopo que stesse verifiche il problema non si risolve, chiudere il rubinetto dell'acqua, spegnere la lavabiancheria e chiamare l'Assistenza. Se I'abitazione si trovagli ultimi piani di un edificio, è possibile che si verifichino fenomeni di sifonaggio, per cui la lavabiancheria carica e scarica acqua di continuo. Per eliminare l'inconveniente sono disponibili in commercio apposite valvole anti-sifonaggio.
- Il programma non precede lo scarico: con alcuni programmi occorre avviarlo manualmente.
- É attiva la funzione STIRA FACILE: per completeness il programma premere il tasto START/PAUSE ("Programmi e funzioni").
- Il tubo di scarico è piegato (vedi "Installazione").
-
La conduttura di scarico è ostruita.
-
Il cestello, al momento dell'installazione, non è stato sbloccato correttamente (vedi "Installazione").
- La lavabiancheria non è in piano (vedi "Installazione").
-
La lavabiancheria è stretta tra mobili e muro (vedi "Installazione").
-
Il tubo di alimentazione dell'acqua non è ben avvitato (vedi "Installazione").
- Il cassetto dei detersivi è intasato (per pulirlo vedi "Manutenzione e cura").
-
Il tubo di scarico non è fissato bene (vedi "Installazione").
-
Specnere la macchina e togliere la spina alla presa, attendere circa 1 minu-to quindi riaccenderla.
Se I'anomalia persistsite, chiamare I'Assistenza.
- Il detersivo non è specifico per lavabiancheria (deve esserci la dicitura "per lavatrice", "a mano e in lavatrice", o simili).
- Il dosaggio è stato eccessivo.
Prima di contattare l'Assistenza:
- Verificare se l'anomaliacouldesereeseresolta da soli (vedi "Anomalie erimedi");
- Riaviare il programma per controllare se l'inveniente è stato oviato;
- In caso negativo, contattare ilNumero Unico 199.199.199*.
! Non ricorrere mai a tecnici non autorizzati.
Comunicare:
- il tipo di anomalia;
- il modello della macchina (Mod.);
- il numero di serie (S/N).
Queste informazioni si trovano sulla targhetta applicata nella parte posteriore della lavabiancheria e nella parte anteriore aprendo l'oblò.
Assistenza Attiva 7 giorni su 7

In caso di necessità d'intervento chiamare ilNumero Unico Nazionale 199.199.199*.
Un operatore sera a completeness per fissare un appuntamento con il Centro Assistenza Tecnico
Autorizzato più vicino al luogo da cui si chiama.
É Attivo 7 giorni su 7, sabato e domenica compresi, e non lascia mai inascoltata una richiesta.
- Al costo di 14,25 centesi di Euro al minuto (iva inclusa) dal Lun. al Ven. dalle 08:00 alle 18:30, il Sab. delle 08:00 alle 13:00 e di 5,58 centesi di euro al minuto (iva inclusa) dal Lun. al Ven. dalle 13:30 alle 08:00, il Sab. delle 13:30 alle 08:00 e i giorni festivi, per chi chiama da Telefono fisso. Per chi chiama da radiomobile le tariffe sono legate al piano tariffario dell'operaatore Telefonico utilizzato.
Le suddette tariffe potrebbero essere soggette a variazione da parte dell'operaatore Telefonico; per maggiori informazioni consultare il site www. aristonchannel.com.

Espanol
Sumario
Instalación, 30-31-32-33
Desembalaje y nivelacion
Conexiones hidrálicas y electricas
Primer ciclo de lavado
Datasétécnicos
Instrucciones para el instalador
Descripción de la lavadora, 34-35
Panel de control
Pantalla
Cómeffectuar un ciclo de lavado,36
Programas y/DD, 37
Tabla de programas
Funciones de lavado
BWMD 742
Detergentes y ropa, 38
Contenor de detergentes
Preparar la ropa
Programas particulares
Sistema de equilibrado de la energia
Precauciones y consejos, 39
Seguridad general
Eliminaciones
Apertura manual de la puerta
Mantenimiento y@cuidados, 40
Interrumpir el agua y la corriente electrica
Limpiar la lavadora
Limpiar el contentedor de detergentes
Cuidar la puerta y el cesto
Limpiar la bomba
Controlar el tubo de alimentación de agua
Anomalías y soluciones, 41
Asistencia, 42
! Es importante conservar este manual para poder consul-. tarlo enequalquiermomento.En caso deventa,decesion o detraslado,verifique que permanezca+junto con la lavadora para informar al nuevo propietario sobre el functonacionmiento y brindar las correspondentes advertencias.
! Lea atentamente las instrucciones: ellas contienen importante información sobre la instalación, el uso y la seguridad.
Desembalaje y nivelación
Desembalaje
- Desembale la lavadora.
- Controle que la lavadora no haya sufrido danos durante el transporte. Si estuviera dañada no la connecte y llame al revendedor.
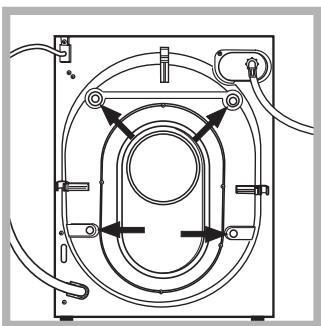
-
Quite los 4 tornillos de proteccion para el transporte y la arandela de goma con el correspondiente distanciador ubicados en la parte posterior (ver la figura).
-
Cubra los orificios con los tapones de plástico suministrados con el aparato.
- Conserve todas las piezas: cuando la lavadora deba ser transportada;nuevamente,deferanvolveracolocarse.
! Los embalajes no son juguetes para los niños.
Nivelación
- Instale la lavadora sobre un piso plano y rígido, sin apoyoarla en las paredes, muebles ni en ningún除外o aparato.
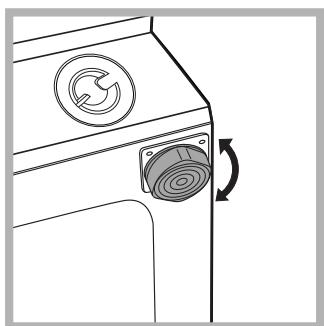
- Si el piso no está perfectamente horizontal, compense las irregularidades desenroscando o enroscando las patas delanteras (ver la figura); el ángulo de inclínación medido sobre la superficie de trabajo, no debe superar los 2^ .
Una cuidadasa nivelacion brinda estabilitad a laquina y evita vibraciones, ruidos y desplazimientos durante el funcionamento. Cuando se instala sobre moquetas o alfombras, regule los pies para conservar debajo de la lavadora un espacio sufiente para la ventilacion.
Conexiones hidráulicas y electricas
Conexión del tubo de alimentación de agua
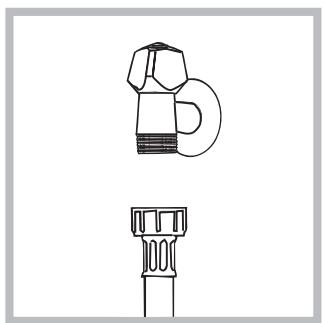
- Conectar el tubo de tubo enroscándolo a un grifo de agua fria con la boca roscada de 3/4 gas (ver la figura). Antes de conectarlo, haga correr el agua hasta que está limpida.
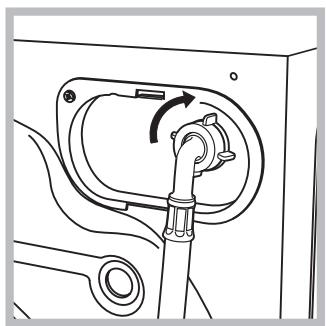
-
Conecte el tubo de alimentacion a la lavadora enroscandolo en la toma de agua correspondiente ubicada en la parte posterior derecha (arriba) (ver la figura).
-
Controle que en el tubo no hayan pliegues ni estrangulaciones.
! La presión de agua del grifo debe estar comprendida bajo el centro de los values contentsados en la tabla de Datos先进技术 (ver la páginacorrespondiente).
! Si la longitud del tubo de alimentacion no es la suficiente, dirjase a unUGCIO especializzato o a un tncico autorizado.
! No utilise nunca tubos ya usados.
! Utilice los suministrados con laquina.
Conexión del tubo de descarga
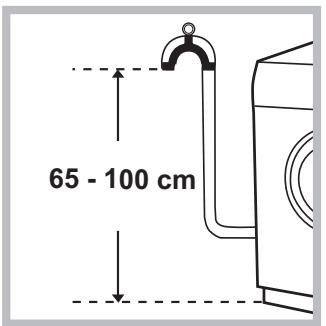
Conecte el tubo de descarga, sin plegarlo, a una tuberia de descarga o a una descarga de pared colocadas a una.altura del piso entre 65 y 100 cm;
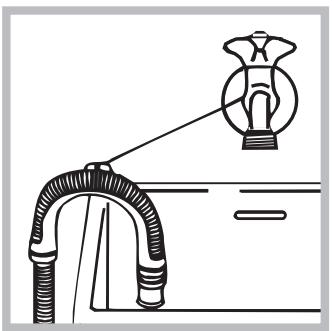
o apóyelo en el borde de un lavamanos o de una banera, uniendo la guía suministrada con el aparato, al grifo (ver la figura). El extremo libre del tubo de descarga no debe permanecer sumergido en el agua.
! No se aconseja utiliser tubos de prolongación, si fuera indisponible hacerlo, la prolongaciónDebe tener el mismodiametro del tubo original y no superar los 150 cm.
Conexión electrica
Antes de enchufar el aparato, verifique que:
- la tomaonga la connexion a tierra y haya sido hecha según las normas legales;
- la toma sea capaz de soportar la energia maxima de potencia de laquina indicada en la tabla de Datos技术和icos (ver al costo);
- la tensión de alimentación está comprendida dentro de los values indicados en la tabla de Datos技术和s (ver al costo);
- la toma sea compatible con el enchufe de la lavadora. Si no es asi, sustituya la toma o el enchufe.
! La lavadora no debe ser instalada al aire libre, ni siquiera si el lugar está reparado, ya que es muy peligiosodeerla expuesta a la lluvia o a las tormentas.
! Una vez instalada la lavadora, la toma de corriente debe ser fácilmente accesible.
! No utilise prolongaciones ni conexiones multíques.
! El cable no debe estar plagado ni sufir compresiones.
! El cable de alimentación debe ser sustituido solo por技术和oranzados.
jAtencion! LaEmpresa fabricante declina toda responsabilitad en caso de que estas normas no Sean respetadas.
Primer ciclo de lavado
Después de la instalación y antes del uso, realice un ciclo de lavado con detergente y sin ropa, selecciónando el programa (60°C).
| Datas tíncinos |
| Modelo | BWMD 742 |
| Dimensiones | ancho 59,5 cm.
altura 81,5 cm.
profundidad 54,5 cm. |
| Capacidad | de 1 a 7 kg. |
| Conexiones electricas | ver la plac de caracteristicas tíncicas aplicada en laquina |
| Conexiones hidricas | presión Tmaxima 1 MPa (10 bar)
presión minima 0,05 MPa (0,5 bar)
capacidad del cesto 52 litres |
| Velocidad decentrifugado | máxima 1400 r.p.m. |
| Programas decontrol segúnlas directivas1061/2010 y1015/2010 | programa (60°) (1º vez que se presiona el botón);
Algodón normal 60°C.
programa (40°) (2º vez que se presiona el botón);
Algodón normal 40°C. |
| CE | Estaevinca cumple con lo establecido por lassiguientes Directivas de la Comunidad:
- 2004/108/CE (Compatible Electromagnética)
- 2002/96/CE
- 2006/95/CE (Baja Tensión) |
Instrucciones para el instalador
Aplicación del panel de madera en la puerta e introducción de laquina en los muebles:
En el caso en que, après del montaje del panel de ma-dera, sea necessitieso trasladar laquina para su instalacion final, aconsejamosdeerla en su embalaje original. Debido a ello, el embalaje hasido realizado en modo tal que permita el montaje del panel de madera en laquina sin desembalar completenessl el producto (ver las figuras seguides).
El panel de madera que cubre la parte delantera debe ser de un espesor mayor de 18 mm y pueda ser embisagrado ya sea a la derecha o a la izquierda. Por motivos de praticidad en el uso de laquina, se aconteja el myself sentido de aperture de la portilla, o sea con las bisagras aplicadas a la izquierda.
A

B
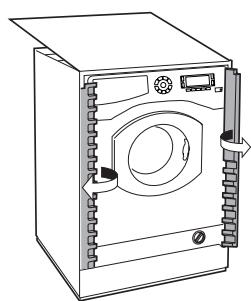
C
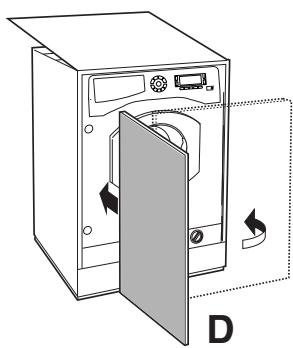
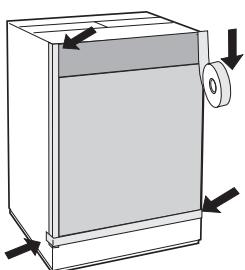
E
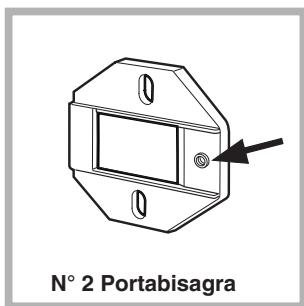
Accesorios montaje puerta (Fig. 1-2-3-4-5).
Fig. 1
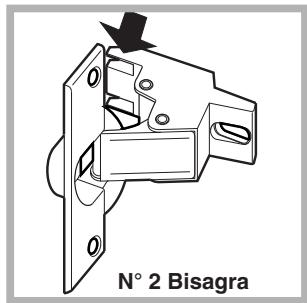
Fig. 2
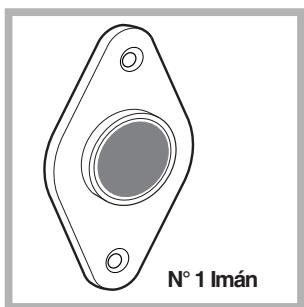
Fig. 3
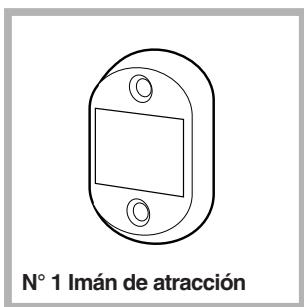
Fig. 4
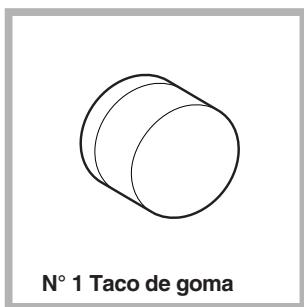
Fig. 5
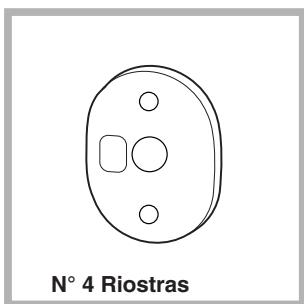
Fig. 4/B
- n^ 6 tornillos de autoenroscado l = 13 ~mm "tip A".
- n^2 tornillos metricos de cabeza avellanada l = 25 mm
"tipob";para la fijacion, al mueble, del iman de atracción.
- n^4 tornillos metricos l = 15mm "como C"; para el montaje de los portabisagra en el mueble.
- n^4 tornillos metricos l = 7 mm "tipod"; para el montaje de las bisagras en los portabisagra.
Montaje de las piezas en la parte delantera de laquina.
- Montar los soportes cremallera en la parte frontal posicionando el orificio indicado con una flecha en la fig. 1 hacia adentro de la cara interponiendo una riogra (fig. 4/B), empleando los tornillos tipo C.
- Montar el tope magneto de la parte opuesta arriba interponiendo dos riocras (fig. 4/B) utilizing los dos tornillos tipo B.
Uso de la guía para taladrar.
- Para marcar las posiciones de los orificios en la parte izquierda del panel, alinear el patrón de perforación en la parte superior e izquierda de dicho panel, tomando como referencia las lineas trazadas en los extremos.
- Para marcar las posiciones de los orificios en la parte derea che del panel, alinear el patron de perforacion en la parte superior y derecha de dicho panel.
- Con una fresa de las dimensiones adecuadas realizar los quatre orificos que deleberan algojar las dos bisagras, el taco de gomay y el imén.
Montaje de las piezas en la puerta.
- Introducir las bisagras en los orificios correspondentes (la parte móvil de la bisagra deben encontrarse hacer el exterior del panel) y fijarlas con 4 tornillos de tipo A.
- Introducir el imán en el orificio ubicado arriba en la parte opuesta a las bisagras y fjarlo con dos tornillos de tipo B.
- Introducir el taco de goma en el orificio ubicado abajo.
A partir de este momento, el panel está lista para ser montado en laquina.
Montaje del panel en laquina.
Introducir la punta de la bisagra, indicada por la flecha en la fig. 2 en el orificio del portabisagra, empujar el panel hacía la parte delantera de laquina y fjjar las dos bisagras con los dos tornillos de tipo D.
Fijación de la guía del zócalo.
Si laquina ha sido instalada en un extremo de los muebles de la cucina, montar una o ambas guías del zócalo como se indica en la fig. 8, regularando su profundidad en función de la posición del zócalo y si esnecessary fjarlo a las mismas (fig. 9). Para instalar la guía del zócalo realice las siguientes operaciones (fig. 8):
Fije la escuadra P con el tornillo R, introduzca la guía del zócalo Q en la ranura correspondiente y una vez ubicada en el punto deseado, fije la escuadra P con el tornillo R.
Colocacion de laquina en los muebles.
- Empujar laquina en el espacio destinado a el alineandola con los otherm muebles (fig. 6).
- Acionar las patitas de regulacion para hacer laquina a la alta deseada.
- Para regular la posicion del panel de madera en sentido vertical y horizontal, acontecer los tornillos C y D como se indica en la fig. 7.
Importante: cierre la parte inferior del frente con el zócalo apoyado en el piso.

Fig. 6
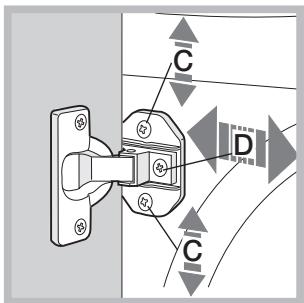
Fig. 7
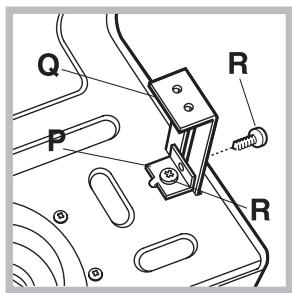
Fig. 8
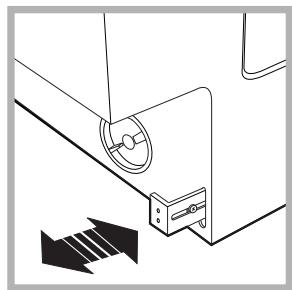
Fig. 9
Accesorios suministrados con la lavadora para regular la alta.
Ubicados en la tapa de poliestireno (fig. 10) se encuentran: 2 travescamos (G); 1 listón (M)
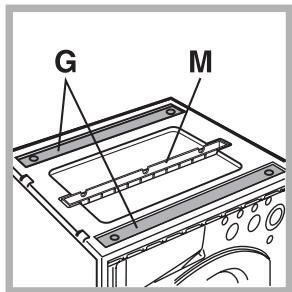
dontrolcesto seencuentran:
4 patas adiconiales (H),
4 tornillos (I),
4 tornillos (R),
4 tuercas (L),
2 guías para el zócalo (Q)
Fig. 10
Regulación de la alta de la lavadora.
Se peutesregulare la altitude de la lavadora (de 815 mm a 835 mm) mediante las4 patas.
Si se desea instalar a una.altura superior a la indicada precedente, hasta 870 mm, esnecessaryutilizar lossigueres accessories:
- los 2 travesaños (G); las 4 patas (H); los 4 tornillos (I); las 4 tuercas (L), actuando delsignificante modo (fig. 11):
extraer las 4 patas originales, colocar un travesano G en la parte delantera de la lavadora, fijarlo con los tornillos I (enroscándolos en los orificios donde estarban montadas las patas originales), bajo introducir las新品as patas H.
Repetir la misma operation en la parte posterior de la lavadora. A continuación, regularando las新品as patas H, la lavadora se pueda bajo o levantar de 835 mm a 870 mm.
Una vez alcanzada la alta deseada, bloquear las tuercas L al travesano G. Para regular la lavadora a una alta comprendida entre 870 mm y 900 mm., es besoino montar el liston M regulando las patas H hasta la alta deseada.
Para instalar el listón, realice las siguientes operaciones: aflóje los tres tornillos N ubicados en la parte delantera de la cubierta Top, introduzca el listón M como se indica en la fig. 12, bajo aprete los tornillos N.
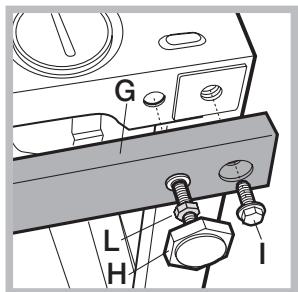
Fig. 11

Fig. 12
Descripción de la lavadora
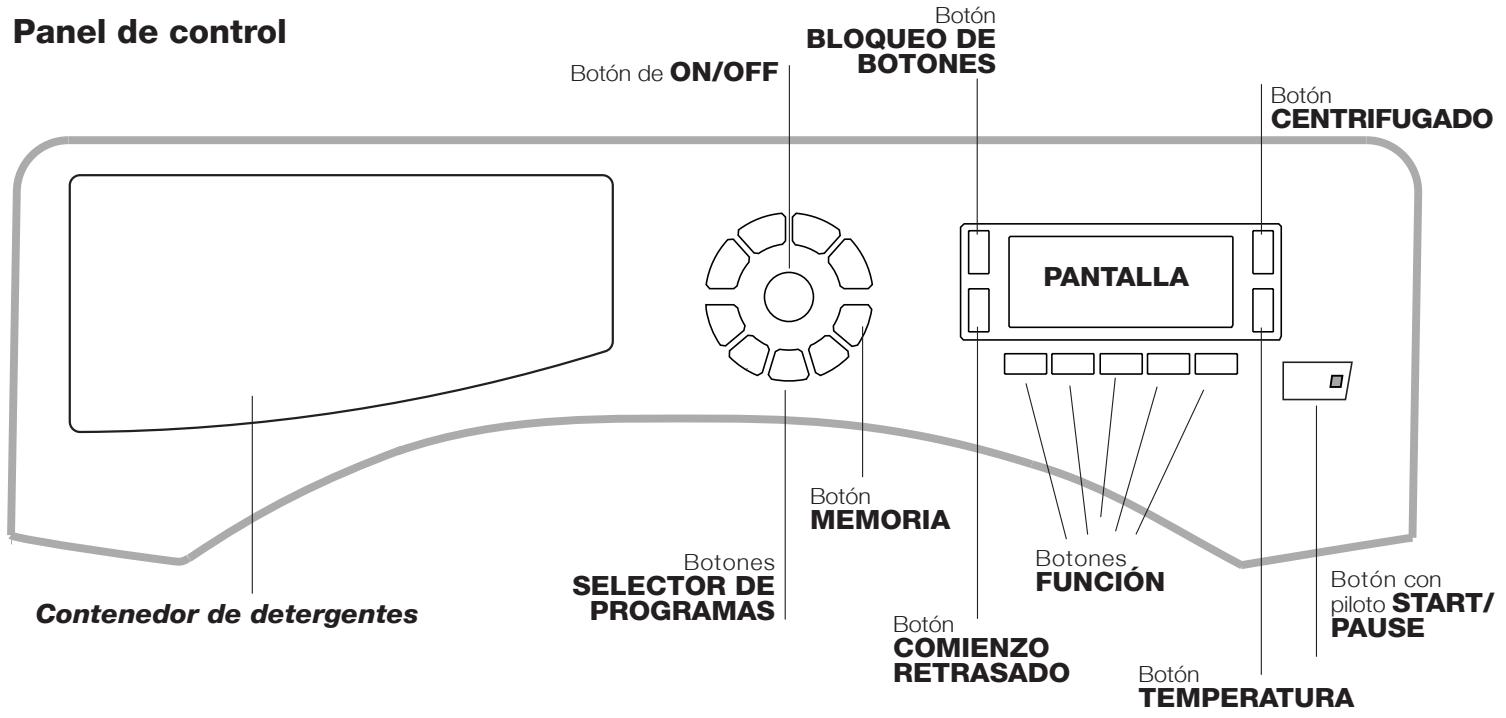
Contenor de detergentes: para cargar detergentes y aditivos (ver "Detergentes y ropa").
Botón ON/OFF: presione brevamente el botón para encender o apagar laquina. El piloto START/PAUSE que centellea lentamente de color verde indica que laquina está encendida. Para apagar la lavadora durante el lavado, es necesario tener presionado el botón durante más tiempo, aproximamente 2 seg.; si se presiona en forma más breve o accidental, laquina no se apagará. Si laquina se apaga durante un lavado en bajo, dicho lavado se anulará.
Botones SELECTOR DE PROGRAMAS: para seleccionar el programa deseado (ver "Tabla de programas").
Botón MEMORIA: mantenga presionado el botón para memorizar un ciclo y las personalizaciones deseadas. Para llamar un ciclo precedentemente memorizzato, presione el botón MEMO.
Botones FUNCION: presione el botón para selectionar la funciona deseada. En la pantalla se iluminará el piloto correspondiente.
Botón CENTRIFUGADO: presiónelo para disminuir o excluir totalmente el centrifugado - el valor se indica en la pantalla.
Botón TEMPERATURA (b): presiónelo para disminuir la temperatura: el valor se indica en la pantalla.
Botón BLOQUEO DE BOTONES: paraactivar elbloqueo del panel de control,mantenga presionado el botón durante 2segundosapproximadamente.El symbolo encendido indica que el panel de control estábloqueado.De este modo,se evitan modifications accidentalesde losprogramas,sobre todo si en la casa hay niños Para desactivar elbloqueo del panel de control,mantenga presionado el botón durante 2 segundosapproximadamente.
Botón COMIENZO RETRASADO: presiónelo para selección ar comienzo retraso del programalegantido. El retraso se indica en la pantalla.
Botón con piloto START/PAUSE: cuando el piloto verde centellea lentamente, presione el botón para que comience el lavado. Una vez que el ciclo ha begundo, el piloto se mantiene fijo. Para poder en停下a el lavado, presione nuevomente el botón; el piloto centelleará con un color anaranjado. Si el síbolo no está iluminado, se podráAbrir la puerta. Para que el lavado se reanude a partir del momento en el which was interruptido, presione nuevomente el botón.
Modalidad de stand by
Esta lavasecadora está en conformidad con las cuales normativas vinculadas al ahora energetico. Está dotada de un sistema de auto-apagado (stand by) que, en caso de no funciona,[2] se activa pasados aproximamente 30 horas. Presionar brevemente el botón ON/OFF y esperar que laquina se active.
Consumo en off-mode: 0,5 W
Consumo en Left-on: 0,5 W
Pantalla
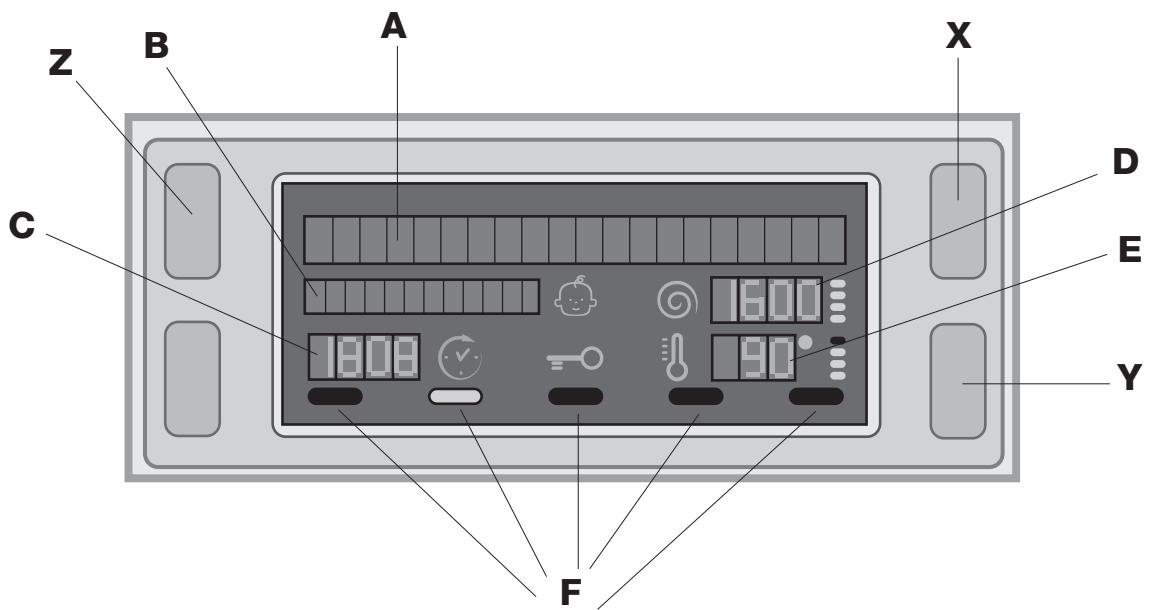
La pantalla esutil para programar laquina y brinda multiple informacion.
En las dos series superiores A y B se visualizan el programa de lavado seleccionado, la fase de lavado en bajo y todas lasindicaciones correspondentes al estado de avance del programa.
En la série C se visualiza el tiempo que falta para que finalice el ciclo de lavado en bajo y, si se hubiera fijado un COMIENZO RETRASADO, el tiempo que falta para que comience el programa selectionado.
En la série D se visualiza el valor máximo de velocidad decentrifugado que laquina可以选择arrellag segun el programa seleccionado; si el programa no prevé el centrifugado, la series permanece apagada.
En la série E se visualiza el valor máximo de temperatura que se pueda fjar según el programa selecciónado; si el programa no prevé la selección de temperatura, la série permanece apagada.
Las series F corresponden a las functions y se encienden cuando la funciona seleccionada es compatible con el programalegantido.
Simbolo Puerta bloqueada O
El symbolo encendido indica que la puerta está bloqueada para impeder aperturas accidentales. Para evaporar daños, se debe esperar que el symbolo se apague, antes de partir la puerta.
Note: si la funciona COMIENZO RETRASADO está activada, la puerta no se可以选择 abrir, paraAbrirla se debeponer en pausa laquina presionando el botón START/PAUSE.
! La primera vez que se enciende, se solicitará la elección del idioma y, paraarlo, la pantalla entrada automatically en el menu de selección de idioma.
Para elegir el idioma deseado, presione los botones X y Y, para confirmar la elección, presione el botón Z. Si desea�能ar elidioma,apague laquina,pulse simultaneamente los botonesX,Y,Zhaasta escharuna senal sonora. Se visualizarad e nuevo el menu de seleccion del idioma.
como efectuar un ciclo de lavado
4. CERRAR LA PUERTA.
- ENCENDER LA MAQUINA. Presione el botón (♂), en la pantalla aparecerá la palabra BIENVENIDO; el piloto START/PAUSE centelleará lentamente de color verde.
- CARGAR LA ROPA. Abra la puerta. Cargue la ropa, cuidando no superar la cantidad de cargo indicada en la tabla de programas de la página",[6]
- DOSIFICAR EL DETERGENTE. Extraiga el conteditor y vierta el detergente en las cubetas correspondientes como se explicía en "Detergentes y ropa".
- ELEGIR EL PROGRAMA. Presione uno de los botones del SELECTOR DE PROGRAMAS para seleccionar el programa deseado; el nombre del programa aparecerá en la pantalla; a dicho programa se le asociará una Temperatura y una velocidad decentrifugado que se pueda modifier. En la pantalla aparecerá la duración del ciclo.
- PERSONALIZAR EL CICLO DE LAVADO. Utilice los botones correspondientes:

Modificar la temperatura y/o el centrifugado.
Laquina selección automática la temperatura y el centrifugadoolestimosprevistos para el programa seleccionadoy,por lo tanto,no se pueda aumento. Presionando el boton 已 se disminuye progresivamente la temperatura hastalegar allavado en frío“OFF”. Presionando el boton 已 se disminuye progresivamente el centrifugadohastra exclusiono"OFF".Si se presionan una vez mas los botones,se volverá a los valuesolestimosprevistos.
! Exceptación: cuando se selección el programa (60°C) (1' vez que se presiona el botón), la temperatura se puedaacularly hasta 90°.

Seleccionar un comienzo retraso.
Para seleccionar el comienzo retraso del programa
elegant, presione el boton correspondiente hasta
alcanzar el tiempo de retraso deseado. Cuando dicha
opacion está activada, en la pantalla aparece el symbolo
V. Para eliminar el comienzo retraso, presione el
boton hasta que aparezca el mensaje OFF.
Modificar las caracteristicas del ciclo.
- Presione el botón para activar la función; el piloto correspondiente al botón se encenderá.
- Presione-Newamente el botón para desactivar la funciona; el piloto se apagará.
! Si la funciona selecciónada no es compatible con el programa elegido, el piloto centelleará y la funciona no seactivará.
! Si la funciona elegida no es compatible con另一a seleccionadaprecedentemente, el piloto correspondiente a la prima direccion seleccionada.
centelleará y seactivará sólo lasegunda,el piloto de lafunciónactivada se iluminará.
! Las unidades peuvent variar la energia recommendada y/o la duración del ciclo.
- PONER EN MARCHA EL PROGRAMA. Presione el botón START/PAUSE. El piloto correspondiente se iluminará de color verde fijo y la puerta se bloqueará (simpilo PUERTA BLOQUEADA =0 encendido). Durante el lavado, en la pantalla aparecerá el nombre de la fase en bajo. Paraonian un programa cuando un ciclo está en bajo, ponga la lavadora en pausa presionando el botón START/PAUSE (el piloto START/ PAUSE centelleará lentamente de color anaranjado); luego selección el ciclo deseado y presione-Newamente el botón START/PAUSE. Para和睦la puerta cuando un ciclo está en bajo, presione el botón START/PAUSE; si el simbolo PUERTA BLOQUEADA =0 está apagado, sera possible和睦la puerta. Presione-Newamente el botón START/PAUSE para reanudar el programa a partir del momento en el que se había interrupcido.
- FIN DEL PROGRAMA. En la pantalla aparecerá el mensaje "FIN DEL CICLO", cuando el símbolo PUERTA BLOQUEADA se apague, está possible abideir la puerta. Abra la puerta, descargue la ropa y apague laquina.
! Si deseña anular un ciclo que ya ha comenzado, presione más tiempo el botón Ⓞ. El ciclo se interrupirá y laquina se apagará.
Programas y unidades
Tabla de programas
| Programas | Descripción del Programa | Temp. max. (°C) | Velocidad max. (r.p.m.) | Detergents | Carga max. (Kgs) | Humedad resi-dual % | Consumo de energia kWh | Aguía total lt | Duración del ciclo |
| Prelavado | Lavado | Suavi-zante | Blanque-ador |
| Antimanchas | 40° | 1400 | ● | ● | ● | ● | 4 | - | - | - | 180' | |
| Algodón normal 60° (1) (1° vez que se presiona el botón): blancos y colores resistentes muy sucios. | 60° (Max. 90°) | 1400 | ● (3) | ● | ● | ● | 7 | 53 | 1,1 | 58 | 190' | |
| Algodón normal 40° (2) (2° vez que se presiona el botón): blancos y colores delica-dos poco sucios. | 40° | 1400 | - | ● | ● | ● | 7 | 53 | 0,99 | 82 | 185' | |
| Algodón normal 20° (3° vez que se presiona el botón): blancos y colores delica-dos poco sucios. | 20° | 1400 | - | ● | ● | ● | 7 | - | - | - | 170' | |
| Sintéctico Resistente (1° vez que se presiona el botón): colores resistentes muy sucios. | 60° | 800 | ● | ● | ● | ● | 3 | 44 | 0,93 | 47 | 110' | |
| Sintéctico Resistente (4) (1° vez que se presiona el botón): colores resistentes poco sucios. | 40° | 800 | ● | ● | ● | ● | 3 | 44 | 0,57 | 46 | 95' | |
| Sintéctico Delicado (2° vez que se presiona el botón): colores resistentes poco sucios. | 40° | 800 | ● | ● | ● | ● | 3 | - | - | - | 70' | |
| Lavado Rápido 60° (1° vez que se presiona el botón): para refrescar rápidamente prendas susias (no se aconseja utiliser para lana, seda y prendas para lavar a mano). | 60° | 1400 | - | ● | ● | - | 3,5 | 53 | 0,81 | 40 | 60' | |
| Lavado Rápido 30° (2° vez que se presiona el botón): para refrescar rápidamente prendas poco mucias (no se aconseja utiliser para lana, seda y prendas para lavar a mano). | 30° | 800 | - | ● | ● | - | 3 | 71 | 0,15 | 35 | 30' | |
| Memoria: permitte memorizarequalquier tipo de lavado. |
| Antialergico | 60° | 1400 | - | ● | ● | - | 4 | - | - | - | 195' | |
| Woolmark Platinum (Lana): para lana, cachemira, etc. | 40° | 800 | - | ● | ● | - | 1,5 | - | - | - | 70' | |
| Delicados | 30° | 0 | - | ● | ● | - | 1 | - | - | - | 80' | |
| Centrifugado (1° vez que se presiona el botón) | - | 1400 | - | - | - | - | 7 | - | - | - | 16' | |
| Aclarado (2° vez que se presiona el botón) | - | 1400 | - | - | ● | ● | 7 | - | - | - | 36' | |
| Descarga (3° vez que se presiona el botón) | - | 0 | - | - | - | - | 7 | - | - | - | 2' | |
La duración del ciclo que se indica en el visor o en el manual es una estimación calculada en base a conditiones estandora, el tiempo efectivo可以选择 variar en configuración de datos. La temperature y la presión del agua de entrada, la temperature ambiente, la calidad de detergente, la calidad y el equilbrado de la hora lasptiones adiconiales seleciones.
1) Programa de control según la directiva 1061/2010: selección el programa a 60^ (1° vez que se presiona el botón).
Eeste cado a limpar a carga de algodon normalmente sue, es el mas eficient en lo que se refiere al consumo combinado con la energia y la cantidad de agua y se usa con prendas lavables a 60^ La temperatura efectiva de lavado quod diferir de la indicada.
2) Programa de control según la directiva 1061/2010: selección el programa a 40^ (2° vez que se presiona el botón).
Este cico aedupi a raga d algonmalne su, es m as ficien to le se reire al consumo combinado con la enrgia y la cantidad de agua y se uca on prendas livables a 40^ La temperatura efectiva de lavado podc diferir de la indicada.
3) A la temperatura de 60^ no se pueda activar la funciona "Prelavado".
Para todos los Test Institutes:
2) Programa algodón largo: selección el programaa a 40^ (2° vez que se presiona el botón).
4) Programa sintetico长大o: selecione el programa a 60°C (1° vez que se presiona el botón); temperatura de 40°C (pulse el botón TEMPERATURA).
Funciones de lavado
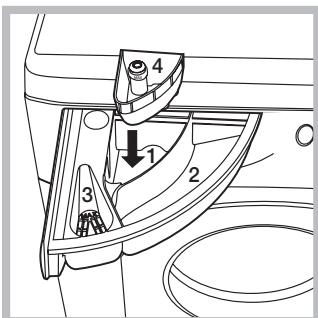
Super Wash
Gracias al uso de una mayorcantidad de agua en la faseinicial del ciclo y a la mayorduración del programa, estaoption garantiza un lavadoconolestimosresultados,ésutil para eliminar las manchasmasresistentes.Puedeemplearse con osin lejía.Sise DEA efectuar tambiénel blanqueado introducir lacubeta adiconcial 4 en dotacion, enla cubeta 1.Al dosificarllesblanqueador,no supere el
nivel "max" indicado en el perno central (ver la figura). Para realizar solo el blanqueo, sin realizar un lavado completo, verte el blanqueador en la cubeta adicional 4, seleccionar el programa "Aclarado" y activar la option "Super Wash".
El uso de la cubeta adicional 4 excluye el prelimvado.
! No se pueda activar con los programas 品 _ 品 ^ 品 , 1,
"Centrifugado", "Descarga".
Aclarado Extra
Al elegir esta optación aumento la eficacidia del aclarado y se asegurará la Tmaxima eliminación del detergente. Esutil para pieles particulamente sensibles.
! No se pueda activar con los programas “Lavado Rápido 30”,
, , Centrifugado", "Descarga".
Fácil Planchado
Cuando se selección esta funciona, el lavado y el centrugado se modificará的概率mente para disminuir la formación de arrugas. Al finalizar el ciclo, la lavadora realizará lentas rotaciones del cesto; el indicator de función FÁCIL PLANCHADO y el de ON/OFF centellearán (naranja) y el mensaje "FIN DEL CICLO" aparecería en la pantalla. Para finalizar el ciclo se deben presionar el botón START/PAUSE o el botón FÁCIL PLANCHADO. Para descargar el agua y poder sacar la ropa, es necessario presionar el botón START/PAUSE o el botón FÁCIL PLANCHADO.
!No se pueda activar con los programas , "Lavado Rápido 30",
P Prelavado
Selecciónando esta funciona, se realiza el prelimavado, muy fácil para eliminar manchas dificiles.
Nota: agregue el detergente en el compartmento correspondiente.
! No se pueda activar con los programas 已 ,,,,, ⑨ 1 (60^),(40^,)
Eco Wash
La función Eco Wash contribuye al ahorro energetico porque no calienta el agua realizada para lavar la ropa,esto constituya una ventaja tanto para el ambiente como para la factura de electricidad. La mayor potencia y el consumo optimazo del agua, garantizaronianestados para la misma duracion promedio de un ciclo estandar Para Obtener los mejores resultados de lavado, se aconseja el uso de un detergente liquido.
No se pueda activar con los programas , , , , ,
Contenor de detergentes
El bien的结果 del lavado depende también de la cor-recta dosificacion del detergente: si se excede lacantidad, no se lava de manos más eficaz, sino que se contribuye a encostrar las partes internas de la lavadora y a contaminar el medio ambiente.
! Utilice detergentes en polvo para prendas de algodón blancas, para el prelimvado y para lavados con una temperatura mayor que 60^ .
Respete lasindicaciones que seencuentran en elenvase de detergente.
! No use detergentes para el lavado a mano porque producen demasiada espuma.
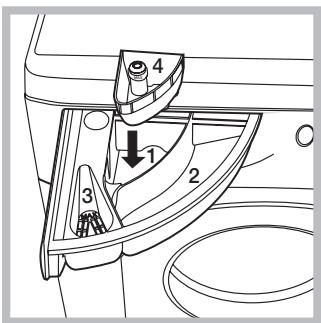
Extraiga el contentedor de detergentes e introduzca el detergente o el aditivo de la?siguementeforma:
cubeta 1: Detergente para prelimado (en polvo)
Antes de verteer el detergente, verifique que no este colocada la cubeta adicular 4.
cubeta 2: Detergente para lavado (en polvo o liquido)
El detergente liquido se debe verte solo antes de la puesta en marcha.
cubeta 3: Aditivos (suavizante, etc.)
El suavizante no se debe volcar fuera de la rejilla.
cubeta adicional 4: Blanqueador
Preparar la ropa
-
Subdivida la ropa según:
-
el tipo de tejido / el símbolo en la etiqueta.
-
los colores: separe las prendas de color y las blancas.
-
Vacie los botsillos y controle los botones.
- No supere los values indicados, referidos al peso de la ropa seca:
Tejidos resistentes: max 7 kg.
Tejidos sintéticos: max 3 kg.
Lana: max 1,5 kg.
Seda: max 1 kg.
Cuánto pesa la ropa?
1 sábana 400/500 g
1 funda 150/200 g
1 mantel 400/500 g
1 albornoz 900/1200 g
1 toalla 150/250 g
Programas particulares
Antimancha: el programa esADEUADO para el lavado de prendas muy sucias, con-coloredores resistentes. El programa garantiza una clase de lavado superior a la clase estandar (clase A). No execute el programa mezclando prendas de distinctos-coloredes. Se aconseja el uso de detergente en polvo. Si las manchas son dificiles de eliminar, realice un pretratimiento con aditivos especialicos.
Algodón normal 20^ : ideal para cargas de prendas de algodón suscas. Los buens rendimientos aun en frío, comparables con los de un lavado a 40^ , está garantadas por unaacular que trabaja con variación de velocidad con picos repetitiones y cercanos.
Antialergico: utilise el programa para la eliminación de los principales alérgenos como polen, ácaros,Pelos de gato y de perro.
Lana: el ciclo de lavado “Lana” de esta lavadora Hotpoint-Ariston ha sido probado y aprobado por la Woolmark Company para el lavado de prendas de lana clasificadas como “lavables a mano”, siempre que el lavado se realice respetando las instrucciones contentsas en la etiqueta de la prenda y lasindicaciones suministradas por el fabricante del electrodomestico. Hotpoint-Ariston es la prima marca de lavadoras que ha obtenido de la Woolmark Company la certifications Woolmark Apparel Care - Platinum por sus prestaciones de lavado y por el Consumo de agua
y energia. (M1126)

Delicados: utilise el programa para el lavado de las prendas muy delicadas que tienen aplicaciones como strass o lentejuelas.
Se recomiendavoltearlasprendasantesdellavadoe introducirlasmaspequeñasenlabolsa paraelavado deprendas delicadas.
Para Obtenerelines resultados,se recomienda el uso de detergente liquido para prendas delicadas.
Para el lavado de las prendas de Seda y Cortinas, selección el ciclo y active la funciona (en este caso también está possible activar la funciona "Aclarado Extra"); aquina terminará el ciclo dejoando la ropa en remojo y el piloto centelleará. Paradescendingar el agua y poder sacar la ropa, es necesario presionar el botón START/ PAUSE o el botón.
Sistema de equilibrado de la energia
Antes de cada centrifugado, para evitar vibraciones excessivas y para distribuir la energia de modo uniforme, el cesto realiza rotaciones a una velocidad ligeramente superior a la del lavado. Si antes de variedes intentos, la energia永远不会 no estar correctamente equilibrada, laamina realiza el centrifugado a una velocidad inferior a la prevista. Cuando existe un excessivo desequilibrio, la lavadora realiza la distribución antes que el centrifugado. Para Obtener una mejor distribución de la energia y su correcto equilibrado, se aconseja mezclar prendas grandes y pequeñas.
Precauciones y consejos
! La lavadora fue proyectada y fabricada en conformidad con las normas internzonales de segundad. Estas advertencias se suministran por razones de segundad y deben ser leidas atentamente.
Seguridad general
- Este aparato ha sido fabricado para un uso de tipo dométrico exclusivamente.
- El aparato no debe ser empleado por personas (ninos inclusos) con capacities fisicas, sensoriales o men-tales reducidas y con experiencias y conocimientos insuficientes, a menos queDICHO uso no se realize bajo la superviSON o las instrucciones de una persona respon-sable de su seguridad. Los ninos deben ser vigilados para asegurarse que no juguen con el aparato.
- No toque laquina con los pies desnudos ni con las manos o los pies mojados o humedes.
- No desenchufe laquina tirando el cable, sino tomando el enchufe.
- No abra el contentedor de detergentes cuando laquina está en funciona bajo.
- No toque el agua de descarga porque pueda alcantar temperatas elevadas.
- En ningún caso fuercé la puerta: podrá dañarse el mecanismo de seguridad que la protege de apertureas accidentales.
- En caso de avería, no acceda nunca a los mecanismos internos para intentar una reparación.
- Controle siempre que los niños no se acerquen a laquina cuando está en funciona.
- Durante el lavado, la puerta Tiende a calentarse.
- Si debe ser trasladada,deferan intervenir dos o mas personas,procediendo con el maximo cuidado.Laquina no debe ser desplazada nunca por una sola persona ya que es muy pesada.
- Antes de introducir la ropa contrôle que el cesto está葳imiento.
Eliminaciones
- Eliminación del material de embalaje: respete las normas locales, de este modo, los embalajes PODRAN volver a ser realizados.
- En base a la Norma europea 2002/96/CE de Residuos de aparatos Eléctricos y Electrónicos, los electrodométricos viejos no peuvent ser arrojados en los contendedores Municipales habituales; tener que ser recogidos selectivement para optimizar la recuperación y reciclado de los componentes y materiales que los constituyen, y reducir el impacto en la salute humana y el medioambiente. El símbolo del cubo de basura tachado se marca sobre todos los productos para recordar al consumidor la obligación deSeparatedlos para la recogida selectiva. El consumidor debe contactar con la autoridad local o con el vendedor para informarse en relacion a la correc-ta eleminación de su electrodométrico viejo.
Apertura manual de la puerta
Si deseña SACAR la ropa de la lavasecadora y no es posible abrir la puerta debido a un corte de energia electrica, proceda del suiviente modo:
- desenchufe laquina.
- verifique que el nivel de agua en el interior de laquina sea inferior al hueco de la puerta; si no es asi, extraiga el agua en excesso utilizing el tubo de descarga y recogiendola en un balde.
- utiliser la lengüeta indicada en la figura, tire hacía fuera hasta liberar la varilla de plástico del retén; posteriormente tire hacía abajo y simultanamente abra la puerta.
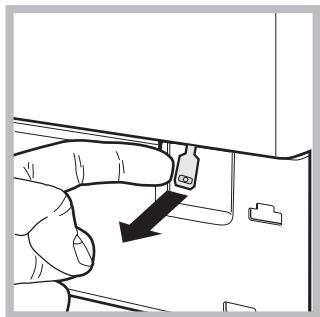
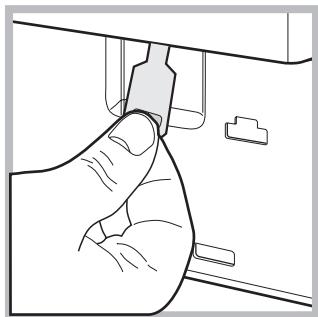
Mantenimiento y@cuidados
Interrumpir el agua y la corrente electrica
- Cierre el grifo de agua afterwards de cada lavado. De este modo se limita el desgaste de la instalación hidráulica de la lavadora y se elimina el peligro de perdidas.
- Desenchufe laquina cuando laDebe limpiar y durante los problemas de mantenimiento.
Limpiar la lavadora
La parte externa y las partes de goma se pueda limpar con un paño embarbido en agua tibia y jabón. No use solventa ni productos abrasivos.
Limpiar el contentedor de detergentes
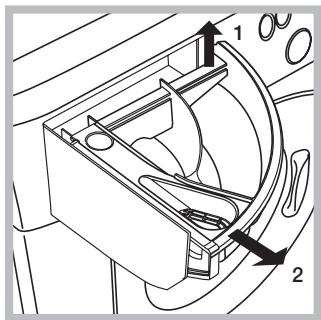
Extraiga el contentedor levantándolo y tirándolo hacía fauna (ver la figura). Lávelo bajo del agua corriente, esta limpieza se debe realizar frecmente.
Cuidar la puerta y el cesto
- Deje siempre semicerrada la puerta paraatar que se formen malos olores.
Limpiar la bomba
La lavadora posee una bomba autolimpiente que no necesita mantenimiento. Pero puede succeeder que objetos pequeños (monedes, botones) caigan en la precamara que protege la bomba, situada en la parte inferior de la misma.
! Verifique que el ciclo de lavado haya terminado y desenchufe laquina.
Para acceder a la precamara:
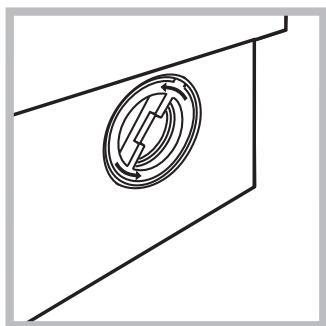
-
desenosque la tapa girandola en sentido antihorario (ver la figura): es normal que se vuelque un poco de agua;
-
limpie con cuidado el interior;
- vuelva a enroscar la tapa.
Controlar el tubo de alimentación de agua
Controle el tubo de alimentacion al menos una vez al año. Si presenta gritas o rajaduras deben ser sustituido: durante los lavados, las fuertes presiones podrijan provocar roturas imprevistas.
! No utilise nunca tubos ya usados.
Anomalías y soluciones
Puede sueder que la lavadora no funciona. Antes de llamar al Servicio de Asistencia Técnica (ver "Asistencia"), controle que no se trate de un problema de fácil solución utilizing lasuma lista.
Anomalías:
Posibles causas / Solución:
La lavadora no se enciende.
- El enchufe no está introducido en la toma de corriente, o no hace contacto.
- En la casa no hay corrente.
El ciclo de lavado no comienza.
- La puerta no está correctamente cerrada.
- El botón ON/OFF no ha sido presionado.
- El botón START/PAUSE no ha sido presionado.
- El grifo de agua no está abierto.
- Se fijió un retraso de la hora de puesta en marcha.
La lavadora noarga agua (En la pantalla apareceré el mensaje "Sin agua, revisar suministro").
- El tubo de alimentación de agua no está connectado al grifo.
- El tubo estáPEGado.
- El grifo de agua no está abierto.
- En la casa no hay agua.
- No hay suficiente presión.
- El botón START/PAUSE no ha sido presionado.
La lavadoraonga y descarga agua continuamente.
- El tubo de descarga no está instalado entre los 65 y 100 cm. del sueño (ver "Instalacion").
- El extremo del tubo de descarga está sumergido en el agua (ver "Instalación").
- La descarga de pared no posee un respiradoro.
Si après de estas verificaciones, el problema no se resuelve, ciderre el grifo de agua, apague la lavadora y llama a la Asistencia. Si la vivienda se enquiryra en uno de los ultimos picos de un edificio, es posible que se verifiquen fenomenos de sifonaje, por ello la lavadora cargo y descarga agua de modo continuo. Para eliminar este inveniente se encontrartran disponibles en el commercio valvulas especiales que permiten evaporar el sifonaje.
La lavadora no descarga o no centrifuga.
- El programa no prevé la descarga: con algunos programas es Neededo ponera en marchamanualmente("Programas y functions").
- Se pueda usar la funciona FÁCIL PLANCHADO: para completar el programa, pulse el botón START/PAUSE ("Programas y unidades").
- El tubo de descarga estáPLEgado (ver "Instalacion").
- El conductor de descarga está obstruido.
La lavadora vibra是多么 durante la centrifugación.
- El cesto, en el momento de la instalación, no fue desbloqueado correctamente (ver "Instalación").
- Laquina no está instalada en un lugar plano (ver "Instalación").
- Existe muy poco espacio entre laquina, los muebles y la pared (ver "Instalación").
La lavadora pierde agua.
- El tubo de alimentación de agua no está bien enroscado (ver "Instalación").
- El contentedor de detergentes está obstruido (para limpiarlo ver "Mantenimiento y;cuidados").
- El tubo de descarga no está bien fjado (ver "Instalación").
Laística estábloqueada,la pantalla centellea e indica un@código de anomalía (porej.:F-01,F-.).
- Apane lamaids y desenchufela, espere aproximadamente 1 minuto y bajo eluego vuelva a encenderla.
Si la anomía persiste, llame al Servicio de Assistance Técnica.
Se forma demasiada espuma.
- El detergente no es spécifique para la lavadora (debe CONTENER algunos de las frases "para lavadora", "a mano o en lavadora" o similares).
- La dosificacion fue excessiva.
Antes de Ilamar al Servicio de Asistencia Técnica:
- Verifique si la anomália la pourrait resolver Ud. solo (ver "Anomalías y soluciones");
- Vuelva aponer en marcha el programa para controlar si el inconveniente fue resuelto;
- Si no es asi, llame al Servicio de Asistencia的技术a autorizo, al número de téléphone indicado en el certificado de garantía.
No recurar nunca a技术和 no autorizados.
Comunique:
- el tipo de anomalía;
- el modelos de laMahonia (Mod.);
- el número de série (S/N).
Esta informacion se encuentra en la placaplicada en la parte posterior de la lavadora y en la parte delantera abriendo la puerta.
Para Others Paises de parler hispana consulte a su vendedor.
Ampliación de garantía
Llame al 902.363.539 y le informaremos sobre el fantástico plan de ampliación de garantía hasta 5 años.
Consiga una cobertura total adicional de
- Piezas y componentes
- Mano deteachers
- Desplazamente a su domicilio de los先进技术
Y NO PAGUE AVERIAS NUNCA MAS
Servicio de assistencia的技术ica (SAT)
Llame al 902.133.133 y nuestros技术和 intervén con rapidez y eficacia, devolviendo el electrodomestico a sus conditiones optimas de configuracion.
En el SAT encontrará recambios, accesos y productos espécíficos para la limpieza y mantenimiento de su electrodoméstico aPRECOS competisos.
ESTAMOS A SU SERVICIO
CIS
Pycckn
Copepkanhe
YcTaHOBka 44-45-46-47
PacnaKOBka HINBeJInpOBka
IopKIOUHeHKe BOOpPoBOHOuN 3JeKtpueeckO cTeN
PepBbIy zukn CTnpKn
TexHHueckne xapaKTePnCTnKN
IHCtpyKuINI MoTaxy OobopyoBaHnA
Onncahne cTnpaJIbHoi MaunHbl, 48-49
Pahenb ynpablenia
Ducnnei
Iopraok BbINOJIHeHna cIKNa cTnpKn, 50
PpOrpaMbI nФункци, 51
Tablina nporpamM
Функци CTnIPKIN
BWMD 742
CTnpaIbHbIe BeIeCtBa I Tnbl 6JIb, 52
PacnpedeIeITeIb MOIOxN cpeIcTB
IodrotOBka 6eBja
CneuaJIbHbIe nporpaMMbl
CnCTema 6aJIaHcnpOBKn 6eJIbIa
PpeOocToPOXHOCTn I peKOMeHdaaun, 53
Obuine Tpe6oBaHnK 6e3oNaChOCTN
YtJnI3aIy
AbarHoe OTKpbTne JIOka
Texnueckoe o6cnykmbaHne u yxo, 54
Öklnüchene Bɔdbyi 3JIeKtpnueckoro Toka
YXoI3aCTnpaJIbHOIMaSHINHOI
Yxoid3a pacnpedeIeIeM MOIOux CpeIDCTB
YXoI 3aJIIOKOMI6apabahOM
YxO3aHacocOM
Поберka ВODОпровODнOrо Шанга
HencnpaBHOCTN MeToDbI nx yctpaHeHn, 55
CepBnchoe o6cnyxNbHne, 56
! CoxpaHnTe daHHoe pyKOBOcTBO. OHO doJXHO 6bITb B KOMnIeKTe CO CTnpaJIbHOm MaunHOB B cnyae npOdaJN, Ipepeaun o6OpyIOBaHn IIN pni nepee3De Ha HObyIO KBapTpy, YTObI HObI BJaJeNeU o6OpyIOBaHn MO 03HaKOMMTbcra C npaBnAmn erO fYHKUOHpOBaHn I 06CnJyKBaHn.
!BnMaTeIbHo npOuHTaTe pyKOBoDCTBO:B HEM COePkaTcB BaxHbIe CBeDeHnI NO yCTaHOBKe I 6e3OpacHOJ KcNpyataun CTnpaJIbHO MaUNHbI.
PacnaKOBka N BbIpaBnBaHne
PacnaKOBka
- PacnakyIte CtnpaJIbHyO MaShInHy.
- YbEaTeScb, yTO o6OpUoBaHne He 6bIIO NOBpeXeHO BO Bpemr TpaHcnpTnPoBKn. Ppr O6hApUxKeHn IOBpeXeHn - He NODKJIouaYte MaunHy-CBJXtEcB CIOCTaBUnkOM HMeDJIeHNO.

3.YdaJInteYeTbIpe TpaHCnOpTnPoBOUHbIX BInHTaN pe3INHOBbie np6Kn C npOKJaKamn, paCNoJIOKeHHbIe B 3aDHei qactn CTnpaJIbHoM MaunHbI (CM.pUC.).
4.3akpoTe OTBepCTn npuIarauOUMNCn PnlaCTNKOBbIMN 3aflnyuKamn.
5. CoxpanyIe BCE deTani: OHI Bam noHaIO6aTc npi nocJeDyuOe TpaHcnpOpTnPoBKe CTnpaJIbHOI MaunHbl.
!He pa3pewaIte DeTm nIrpTaB C ypaKOBOHyIMMaTePnAJaMn.
BbipabHbHne
- UctaHOBInTe CTnpaIbHyIO MaunHy Ha POBHom IN npOCHOM NOny, TAK YTObI OHa He Kacanacb CTeH, Me6eN IN npOuNX PpeDMeTOB.
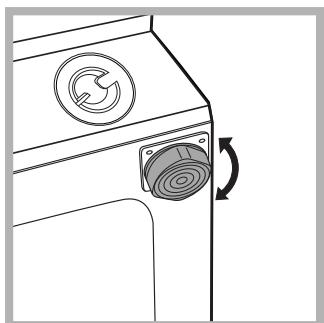
2.После установки
Машинь на мосто
OTPERУПИРУЛТЕ ee
yctоичное положени
пуtem врашени пeredнix
ножек (см. рUC.). Дя
этOTO сочада осябte
Контравки, полес
Завершени ретулировки
Контравки 3атянITE.
После установки машинь на
MecTo npOBepbTe No ypOBHIO rOpN3OHTaJIbHOcTb BepXHei KpbIuKn KopnyCa, OTKNoHEHne rOpN3OHTaJIn DoJxHo 6blTb He 6oJee 2^
IpaBnIbHoe BbIpaBnBaHne OobpyObaHna NOMoKet n36eKaTb Wyma, Bn6paUmN CMeUeHm BO BpeM pa60tbl MaunHbl.
Ecni CtipaJIbHa MaIINHa CTOnT Ha nOly, NOKpbITOM KOBpOM, y6eIntecb, YTO ee OCHOBAHne BO3BbIaETCa HAD KOBpOM. B IpOTnIBHom cIyuae BeHTnJIaCn 6ydet 3aTpUdHeHa IIn IOBc HeBO3MOxHa.
ПоДКЛЮЧЕНС K BOДОПРОВОДHOИ 3ЛЕКТРИЧЕСКО CETN
IopcoeHHeHne 3aJIbHOro 7HaHra
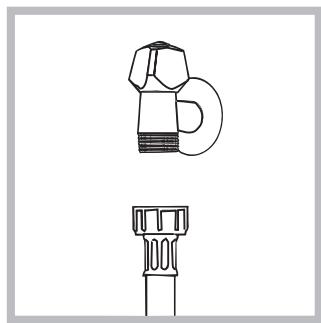
1.Пикртугшланг
пождчн К краунхолоноь
Вовы с рзьбовьIM
OTверстим 3/4 ra3 (см.
Схему).
Перед поюсыненьей
OTКрочь ВОДОПРОВДны
Краз ДTo tex nop, пoka ИЗ
Нero He NOTeET YIcTa
ВODa.
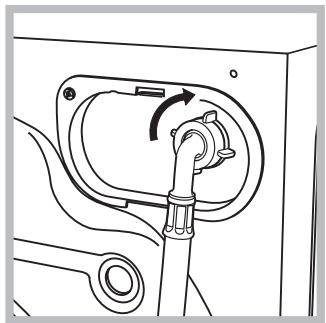
2.ПОДСоЕДИНTE 3aJIbHNoI ShlaHr K CTnpaJIbHOi MaShInHe, HABnHTNBEro Ha BOdOpiMeMHNK, paCNoJIoXeHHbI B 3aDHeB BepxHeY qaCTn Cnpaba (CM.puc.).
- Y6eIntecb, yTo IJIaHr He nepeKpyeH n He nepeXkaT.
!Давпене Воры Должно 6ыть В п dedлax 3начени, уka3aHHbIXВ tabииce TexHnuecknxХapakTeprncTik (cM. c. 3).
!EcnIДиHa BOJOpBOJHO Ro ⅢaHra OKaKeTcA HeIOCTaTOUHoi,OBpaNTecbVBABTopu3OBAHHbI cepBnCHbI ueHTp.
HnkOrda He nCnOJIb3yIte 7JnaHr,6bIBuHe ByynoTpe6JeHm.
PoiCoeHHeHne CInBHoro IJnHaIra
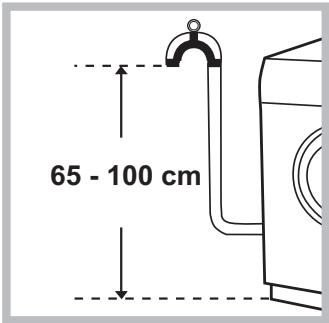
IoDCoeDINHTe CInBHOJ
UHaHr, He nepeRn6a erO,
K CInBHOJ TpyBe Nn K
HaCTeHHOMy CInBHOMy
OTBepCTNIO, paCNILOXKeHHOMy
Ha BbICote OT 65 do 100 cm
OT POnA,
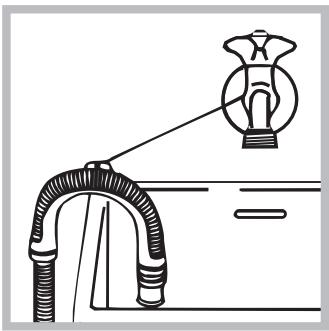
IIN NOMECTNTe ⅢaHr B
paKOBnHy IIN B BaHHy,
3aKpeINB npInaratoOuocn
HaipabJIHOUIO K KpaHy (CM.
cxemy). CBo6oHNbIK OHeuC
CINBHOrO ⅢaHra He DoJKeH
6bItb NorpyKeH B BodY.
!He pekomehnyetcnaOpnb3oBaTb ydInHnTeIbHbIe IaHn. Pnp HeobxOIMOCtN ydInHeHne DoJXHO IMeTb TAKO JNe dNaMeTp, YTO n OpRHaJIbHbIy IJHaHr, N erO dIIHa HdoJXHa pReBbIwaTb 150 cm.
IopKJIoueHne K 3JIeKTPocetn
IpepeBkJIuOHeHemn3dJIeNBApo3eTKy3JIeKTPocETn Heo6xOIMNO pnoBepntb CneDyUouee:
3a3eMJIIOUHKOHTAKDByXNIOJIOCHOPO3ETKIN OJIXeH6bITb COEHNHEc 3a3eMJIeHNEM I COOTBETCTBOBAtB HOpMaTnBAM;
- po3eTka 3JIeKTPocetTu DOnJXHa 6bIb paCHTaHa Ha MaKcImaJIbHyIO MOUHOCtB CTnpaJIbHOi MaUINHbl, yKa3aHHyU B Ta6Nuce TexHnueCKne daHHbIe (cM. ma6nucy c6Oky);
- HaprajkeHne 3JIeKTPocETn DOJNXHO COOTBeTCTBOBaTb 3NaueHnM, yKa3aHHbIM B Ta6nIe TexHnYeCKne daHHbIe (cM. ma6nucy c6oky);
3Jektpnuecka po3eTka n 7TeNceIbHa BUnKa CTnpaIbHO MaunHb IOnKhb6bITb OndHO TnPa. B npOTNBOM cnyae HeoXoDIMO 3aMeHHTb po3eTKy.
!3anpeaetaCyaTaHaBnBaTbCTnpaIbHyoMaunHy Ha yInue,daKe NOD HABecOM,TAK KAc ONaCHO NOBepraTbe BO3deNCTBNU DOJXI Irpo3bl.
!CtnpaJIbHaMaIINHa DoJIXHa 6bITb paCnOIOXeHa TaKIM O6pa3OM, YTO6bI DOCTyN K PO3ETke 3JIeKTPocETn OCTaBaJIcR CBO6OHNbIM.
!He nCnoJIb3yIte ydIINHITeJI n TpoIHNKn.
!CeteboKaBeIbN3dJIeNHe DoJKeH 6bItb CoHyt NIm Cxat.
!3aMeHa ceteBoro Ka6eJMy MoKeT OcyuIeCTBnAToTOLbKO yNoNHomOueHHbIMN cepBnCHbIMN ueHTpa
BhimaHne!ΦnpMa CHImaET C Ce6B BCaKyO OTBeTCTBeHHoCTb B Cnyuae HecobJIOHeNn BblIeONNCaHHbIX PpaBnI.
PepBbI zHKJI cTnpKn
По завершени установки, пераим началом诫кплуатуни
небхODIMО пОНЗВЕСТИОДИН ZIKКЛ CTINРКИ CO CTINPAJIHBIM
поршkom, ho 6e3 6eJья, по погаммe (60° C).
| Текнистору ДаднIBLE |
| МODEЛь | BWMD 742 |
| Стран-
из�овитель | Итaliaя |
| ГабарNTьIE
размерbl | ШирINA 59,5 CM.
Бысota 81,5 CM.
глублиа 54,5 CM. |
| Вмостимоctь | OT 1 до 7 кr |
| HOMINAJIbHoe
Знчени
Наряжени
Зл ektrponітань
Ил.IДиапазон
Наряжени | 220-240 V ~ |
| Ус�овhoe
обочачени рара
Зл ektrочescкого тoka
Ил.HOMINAJIbHа
Частота
пераMuHORO тoka | 50 Hz |
| Клас 3ашпы
ot порожени
Зл ektrочescknIM
ТOKOM | Клас 3ашпы I |
| В overdорвогд Hoe
покседене | Мakсималб hoe давлене 1 МПа (10 6ap)
Минимальhoe давлене 0,05 MПа (0,5 6ap)
емковъ барабая 52 Литра |
| Сkopocstь OTЖIMа | do 1400 оборотов в минуту |
| Прогамblу
уnpавлени B
COOTBETCTBIM C
ДиеркTGВОI
EN 60456 | Прогамma(¯)(1 нажамue Кногки);
Температура 60°C;
при загузке do 7 кr. |
| AIO 77
KZ O.02 O361 | Данноe Изделie COOTBETCTBуetting
следуцим ДиеркTGВamЕврейский
Соobшесва:
- 2004/108/CE (Зл ektrpopогнITHая
Соевмостимоctь);
- 2006/95/CE (Изк toeногд)
- 2002/96/CE |
| Стениь 3aшпы OT порадамя TVERдьх части и Влаги,
обecheesчевамя 3aшпуновдд
низковOLTьTHOTO obopudobavenя, не лиму оце 3aшпы OT
Влаги: IPX04 |
| Дату поиЗвodstва
дан hoу Т教职工и
Можно пolyчть n3
серий Номера,
pacnoюжени
посадуцим Homepy Meça за,
(S/N XXXXXX), cledoуositym
образом | - 1-aя сифра в S/N COOTBETCTBуetting
посnéдень сифpe рoda,
- 2-aя n 3-aя сифры в S/N -
порадковуhomepy meça за,
- 4-aя n 5-aя сифры в S/N - DeHB |
| Клasc
Знегонотравлия | A++ |
Hnctpykunno MoHTaKy
YctaHObKa DepeBAAHOn NaHeNHa DBepy N BCTpaBAAHne MaINHbIB MoyIb KxOHHO Me6eJIH
B cnyuae, kOrda cTnpaJIbHaMaIINHa dOJnxHa 6bITb nepeBe3eHa dIy OOKHcATEJIbHOY cTaHOBKn NocTe TOrO, KaK DepeBAAHnA NaHeNb yKe 6blNa HabeUeHa, Mbl npEJaRaem oCTaBnTb MaINHy B ee opRInHaJIbHOY uNakOBKe. KOHcTpyKzIg YNAKOBKn N03BOJnEe HABecNTb DepeBAAHNo NaHeNb Ha MaINHy, He n3BNeKaar NocJeNDHIO NOIHOCtBu N3 yNApOBKn (CM.puc.7). DepeBAAHnA NaHeNb, KOTOPa 3aKpbIBaEt IInCeByIO CTOpOHy MaINHbI, DOnJxHa 6blbTOIuHNO He MeHee 18 MM nMOXeT HABeUNBaTcNnCnpaba, INn CneBa. B ceJAX npAKTNCHORO nCnOJIb3OBAHNr MaINHbIMbl peKOMeHdyeM HABeUNBaTb NaHeNb CneBa, YTObI OHa OTKpbIbAanacB B Ty Xe camyIO CTOpOHy, YTO nDbepca MaINHbI.
A
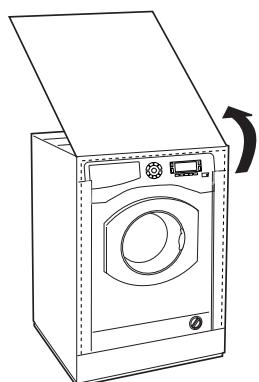
B
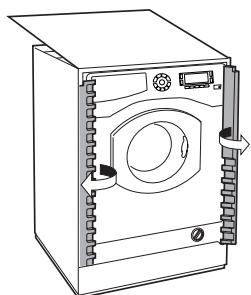
C
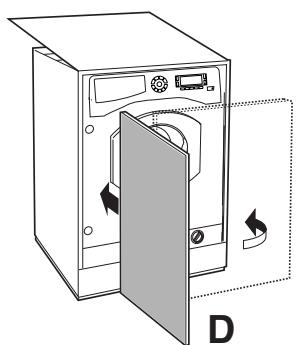
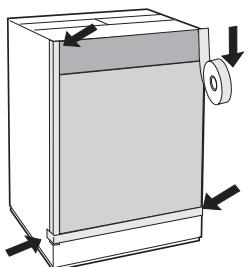
E
AkeccyapblnMOThaKaDbepHo nahen
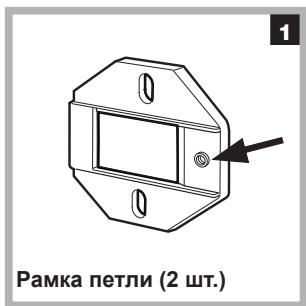
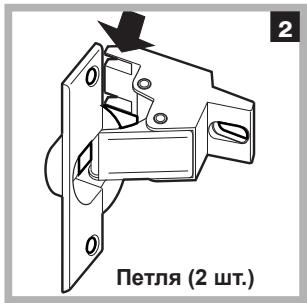
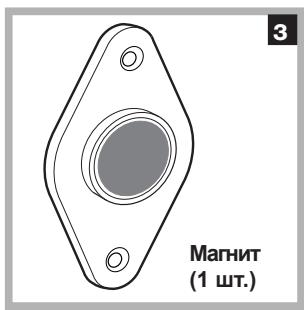

MarHnTHa 3aueJka
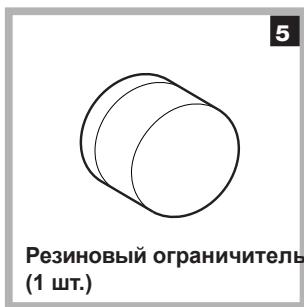
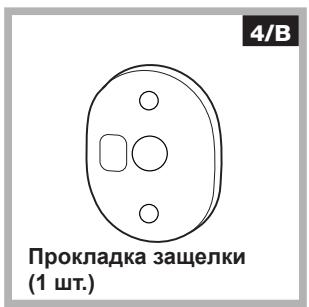
-camohape3HbIe BnHTbTIuA dJI.13 MM-6 tT.
-MeTpnuYeCKne BVHTbIC NotaHOn roJOBKO TnBДЛ. 25 MM (ДЯ Крелпеня MaHHTHOI plaCTNHKn K KopnyCy Me6eni)-2 wT.,
-Metprnueckne BnHTbI TIN C dI.15 MM (ДлгпркpenHЯ paMOK nTeJIb K KopnyCy Me6eJI) -4 wT.,
-Metpnueeckne BnHTbI TnD DII.7 MM (JЯЗкpenHnna peTJIb Ha pamkax)-4 7t.
KpenenneJementOBcJIueBOCCTOPoHbMaunHbI
-BInHTaMn Tnna C 3aKpeNITe paMKn neTeJIb TaKIM o6pa3OM, yTO6bl OTBepCTne, o6O3HaueHHOe CTpeJKOi Ha pnc.8-1, 6blNo HAnpabNeHo K BHyTpeHHeu Yactn IINcEBoI CTOpOHbl MaUNHbl.
- YCTaHOBInTe C npOTnBONIOJXHoi CTOpOHb BBepyx OTBeTHyU qAcTb MaHHTHO 3aUeJIKN, IcNoJIb3yI DBA BNHTA TINa B.
-ПометиTe npoknaKу,ИЗобразжehnyю Ha pnc.8-4B, MEXdI JInZeBOI CTOpOHoi ObOpyIDOBaHnI N OTBeTHOJ YacTbIO MaHHTHOI 3aUeJIKN.
IcnoB3OBAHne 7a6nOHa
- UTO6bI pa3MeTnTb NOJIOXeHne OTBepCTnHa JIeBOI CTOpOHe NaHEJI, BByIOBHNrTe Ⅲa6JIoN C ee BEpXHM JIeBbIM Kpaem, CBepeAcb C KOHTPOJbHbIMN JINHmIM Nua6JHOHa.
- YTO6bI pa3MeTnTb NOJIOXeHne OTBepCTn Ha npaBOI CTOpOHe NaHeJI, BbIPOBHraTe 1a6JIoH C ee BEpXHM npaBbIM KpaEM.
-Прocверпnte OTBерстЯДЯДВуX NeTeЛь, pe3иновоу ORpaHnUHTeЯ И MaHnTHOrO 3aMka,Испοльзу CBерл NOДхОДЯцero pa3Mepa.
KpenJIeHne 3JeMeHToB Ha DepeBraHHyU naHeIb (Dbepu)
- Bctabte neTnB OTBepCTn (noDbNkHna qactb neTn DOJnxHa 6bIb yCTaHOBneHa JInCeBOI CTOpOHn IO HAnpAbNeHIO OT NaHeNi) n 3akpeNTe INx 4 BNHTAMn TnA A.
- BCTaBtE MaHHTHyU 3aUeNky (puc. 8-3)В ВepxHee OTBepCTne Ha CTOpOHe, IPOTNBOJNOJXHOI NETJAM, n 3aФИKcPuyTe ee 2 BnHTAmu TnPa B.
- BCTaBte pe3nHObIy orpaHnUHTeIb B HnKHee OTBepCTne.
Tenepb naheIb (Dbepca) roToBa K yctaHOBke Ha MaunHy.
YctaHObKa DepeBraHHoN PaHeJi (DBePcBi) Ha MaunHy
Bctabte KOHcHK nTn (OTMeueHHb CTpeJIKOHa pnc. 8-2) B OTBepCTne dIa nTeN I npOdBnHbTe Ha naHeNb no HaprabJeHIO K JInCeBOI CTOpOHe MaunHbI.3akpeINTE 2 nTJIN BVHTAMn TnPa D.
KpenIeHne HnpaBnaOuix NInHTyCa (HnxHei DeKopatNBHO nHaJIi)
EcIn MaunHa yctaHabnBaetcB KOHcpe Me6bHoro Moyn, dIyPiHTyCa (NHXHeJ deKopatNBHO nAnei) Ipn3BOoNTcMoTtck OndHoi Oeix HaprablaOuXn, KaK POKa3aHo Ha pnc.9. OTPeynpuyTe IH NaIpybHy PInHTyCa nPn HeobxOIMOCTe PpIKpePnte PInHTyc K HaprablaUoIm (pnc.10)
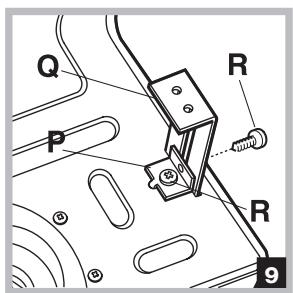
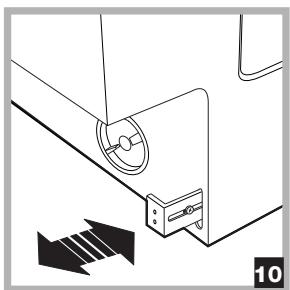
YctaHObKa HnpaBJIouoJe (puc. 9):
-3akpenTe yroIOK P BnHTOM R, BCTaBbTe HanpaBIAJIOUO Q B CneIaNbHOE OTBepCTne, pa3MeCTNe ee B JKeJaEMOM NIOJKeHIN I 3akpenTe c NOMOJIbO yroJIka P IN BVHTa R.
BctpbanBaHne MaunHbI B KOpnyc KxOHNo Me6eJI
- BCTaBbTe MaunHy B HnUy, BblpOBHReE C Me6eIbHO (puC. 11).
- OtperynpyTe HOKm MaunHbI, YTO6bI NOHrTb ee Ha nOxDxOyUo BVICOTy.
- Otperynipyte noJIOxHne depeBHHo nanei B roPn3OHTaJIbHOM IN BepTnKaJIbHOM HAnpAbHeHnx, IcNoIb3yra BNHTbIC N D, KAK NOka3aHO Ha pnc.12. BaxHo: PInnHTyc DoJIoKeH 3aKpbIBaTB HNXHIO JINIeByU qACTb MaUnHbI Do nOJa.
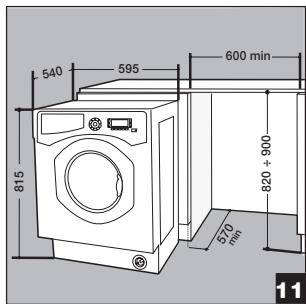
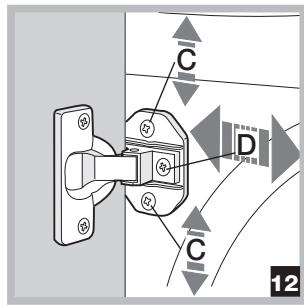
PnncnocoblennaIpepyunpoBKn BbICOTbICTnpaJIbHOMaunHbI
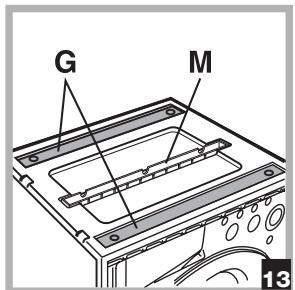
(HNxHEn DeKopatNBHOI paHEn) (Q).
IopkpbikkoN3 noJnCTnpoNa (puc.13) haxoTcra:2 nonepueHbIe HakJaKn (G); 1 nlaHaKa (M).
BHytpn6abapabaMaunHbI:
4ДОПОЛНИТЕNBHBE HOЖКИ (H); 4ВИNTA (I);
4 BnHTa (R);
4raikn(L);
2 Haprabnyouxn nIy nIInHTyca
PerylnpoBKa BbICOtbl CTnpaIbHOn MaunHbI
BpaueHnem 4-x HOxEK BbICota CTnpaJIbHOI MaUHHbI MOXET 6bITb OTpeYInPOBaHa O T 815 Do 835 MM.
Ecn Tpe6yETc yCTaHOBHT MaunHy Ha 6o 'IbUyO BbICOTy (do 870 MM), CneNyET NcNoB3OBaTb 2 HAKJaIKN (G); 4 DOnOpHnTeJIbHbIe HOKKn (H); 4 BnHTa (I); 4 raJkn (L) (cm. puc.14).
BbINOHNHe CneIyUoee: BbIBepHnTe 4 IMeIOUInecr HOxKn, IOMecTIne IOnpeuHyO HAKJaIKy G B nepeJHne Yactn OOBpyOBoAHnY N3aKePInTe ee BNHTAmI (BkpyTINB INX B OTBepCTNr, rIpe paHee 6bln 3aKpenJIeHb HOxKn). 3aTeM BKpyTIne DOnONHInTeJIbHbIe HOxKn H. IOBTopIne Yka3aHHbIe WArN dIra 3aJHne CTOpOHbI obOpuyOBoAHn. Tepeb OTpeyInpuyTe BbICOTy MaunHbIOT 835 Do 870 MM C NOMOuBIO DOnONHInTeJIbHbIX HOxEK H. YcTaHOBnB XeJLaEMyIO BbICOTy, 3aФNKCuPyTe raKN L Ha NOpEeyHOH NaKlaDke G. Jnry UcTAHOBKn MaunHbI Ha BbICOTy 870-900 MM, CneJyET YcTAHOBnTB NlaHKy M, OTpeYIpOBab HOxKn H Na TpeSyEmyIO BbICOTy. YTObbl BCTaBnTB NlaHKy M, Ocna6BeT 3 BnHTaN, pacNoJoxKeHHbIE B NepeJHne Yactn BEPxHeN KpbIuKn MaunHbI, NOMEcTIne PNaHky M, KaK noka3aHO Ha pnc.15, n 3aBePHnTe BnHTbl N.
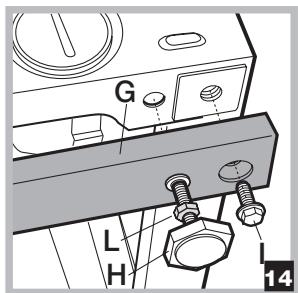
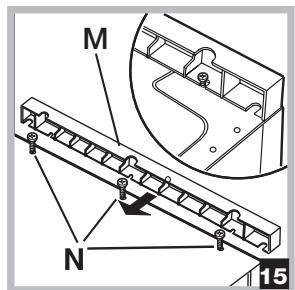
Panaelb ynpableneia
YuekuDnCmupaBHO2oBeuecmea:I3arpy3Ku CTnpalbHbIX BeueCTB u doabok (CM. «CmupaBhie beuecmea umnbI beleny)
KhoNka ON/OFF ①:6bICTpo HaxMnTE 3Tu KhoNky dJa BkIIOueHnra nn BbIKIOueHnra MaunHbI. INHdkaTOp START/PAUSE,peDKo MnaIouu 3eIeHbIM cBETOM, O3NaHaet, YTO MaUNHa BkIIOueHa. JIy BbIKIOueHnra CInpaJIbHO MaUNHbIB PnoceCE CtnpKn HeO6XODmO DepKaTb HaxaToh KhoNky, PnpMeRHO 2 cekyndbl. KopOTkoE nJIN cnyauHoe HaxaTne He npNBedet K OTKIOUeHnIO MaUNHbIB. B cnyuae BbIKIOueHnra MaunHbIB PnoceCE CTnPK TcKUu NzIKJ OTMeHReTc.
KhoNkBbIBOPA PPOrPAMM: Cnyka Tnla Bb6opa HuyKHO npOrpAmMbI (cM. «TbIuua npoapamM»).
KhoNka MEmO: DepeXnTe HaxaToI 3Ty KHOnKy DJIa COxpaHeHn I nePcoHaJIN3nPoBaHHbIX Bamn npOrpAmM. JIy BbI3Oba paHee coXpaHeHHoro ZNKla HaxmTe KhoNky MEmO.
KHOKNI DOONHINTEbHbIX FYHKU:HaXMMTe KHOKNy IJIa Bbl6opa HuxHOi Bam FyHKU. Ha DnCnPee 3aROPITcOOTBETCTByoUni NHdNKATOp.
KHONKa OTXIM ⑥: HaxMMTe 3Ty KHOJky dIy COKpaueHnra CKOpOCTn IIN NIONHO NCKJIoueHnRA OTXIMa - 3HaueHne POKa3bIbAetcRa Ha DCNJIee.
KhoNka TEMNEPATyPA:HaXMMTe 3Ty KhoNky
IЯ yMeHbWeHnA 3NaueHnA TempePaTpybI: 3NaueHne
POKa3bIbAeTcRa Na DInCnJIee.
KHONKa BLOKINPOBKA KHONOK:ДЯВКЛIOUeHnIa6NOKINPOBKN KOHCOLN ynpabJIeHnI DEpXHTe KHOJNKuHaxaTOn npIMepHO 2 cekyHdbI. BKLIOUeHHbI CmMBOJ03Haayet, YTO KOHCOLb ynpabJIeHnI 3a6NOKINPOBaHa.TakIM o6pa3OM, nporpAMMa He MOxET 6bITb CnyauHNo3MeHeHa, OcOBeHHo ecnB DOME dTeN.ДЯOTKJIIOUeHnI 6LOKINPOBKn KOHCOLN ynpabJIeHnI DEpXHTeKHOJNKu HaxaTo npIMepHO 2 cekyHdbI.
KHONKa NyCK C 3ADEPKKOJ Y: HAKMNTe
ДЯ npOrpamMnOBAHn BpeMeH 3aDEpKKn
Nyska Bbl6paHHoN npOrpamMbI. BpeM 3aDEpKKn
POKa3bIBaETcH Na DnCnJIee.
KHOJKA C INHdIKaTOPOM START/PAUSE: KOrJa 3eJIeHbI INHdIKaTOP peDKO MInaet, HaxMMte KHOJky dJa 3aNycka zukla cTnPKu. Iocne nyska zukla INHdIKaTOP nepeCTaet MInaTb. JIЯ npepbIBaHnA cTnPKu BHOBb HaxMMte 3Tu KHOJky; INHdIKaTOP 3aMnraet OpaHXKeBbIM cBeTom. EcJInc cIMBOJ O He rOpNT, MOxHO OTKpbITb JIOK MaSHINbl. JIЯ BO3O6HOBJIeHnA cTnPKu C MOMENTa, KOrJa OHa 6blJa npePBaHa, BHOBb HaxMMte 3Tu KHOJky.
Pexim OxuaHn
Hactoza CTnpaBna Maunha OTbeyaet Tpe6obAHnM HObIX HOpMaTINBOB IO 3KOHOMn 3NeKTPO3Heprn, yKomPJIeKTOBaHa cnCTeMoI aBTOMaTHueCKOTo OTKJIOUeHnR (peXmCoxpaHeHn 3Heprn), BKNIOuAIOSeiCsYepe3 30 MNHyT npocToa Maunbl. HaxmTe oDIn pa3 KHOkky ON/OFF. n POnOxKnTE, NOKa MaunHa BVOBb BKJIOChTcra.
DucnJeI
Dincpnne cnkynt nnporpammmipobahna MaunHbI npedeocTabnre T NOlb3OBaTeJIOMHOXKeCTBO CBeHeH.
Ha IByx BepxHnx CtPOkax A u B noka3bIbaIOTcB bI6paHHa PpOrpMa cTnPK, TeKuza a 0a3a cTnPK u BCE cBeJeHna O BvIOnJIHeHnn PpOrpAMMbI.
Ha cTPOKe C nOKa3bIbAeTcBpeM, ocTaIOUeEeCdo KOHca TeKyuIero UIKNa cTnRKn I, ecn 6bl 3aDaH 3ADEPJKKA 3AIPYCKA, BpeM, ocTaIOUeEeCdo 3aNysKa BbIbpaHHo nporpaMMbl.
Ha cTPOKe D nOKa3bIbAeTcMa KMCmMaJIbHoe 3HaueHHe CKOpOCTn OTXIMa, KOtOpbM MaUHnMoKTe BbINOJIHnTb B 3aBNCmIOCTn OT Bbl6paHHo IporpAMMbI; ecIn Bbl6paHHa IporpAMMa He IpeDyCMaTpINBaET OTXIM, daHHa CTPOKa He BKJIOuHaeTc.
Ha cTpOke E nOKa3bIbaETcra MaKcImMaJIbHOe 3NaueHne TempepaTypbI, KOtOpoe MOxHO BbIbpaTb B 3aBNCIMOCrN OT Bbl6paHHo IIporpAMMbI; ecn N Bbl6paHHa IporpAMMa He npeducMaTpNBaet HacTpoiKy TempepaTypbI, daHHa r CTpOKa He BKJIouyaeTcra.
Инд F OTHOCY T C K ΦyHKUIM 3aRopaHTC, KOrda BbIbpaHHa YHKUIA RBLIeTc COBmctmOc 3aDaHHo nporpammo.
CIMBOJ 3a6nokpoBaHHoro JIOka
BknHcHbI cMBOJ O3HaayeT, YTO JIOK 3a6JIOKINPOBaH BO n36eKaHne erO cnyaHOrO OTKpbIBaHn. Bo n36eKaHne NOBpeXdEHH, nepeTe KAK OTKpbITb JIOK, Heo6xOJIMO DoJdaTbcra, NOK aNORaCHET CmBOJ.
ПРИМЕЧАНЕ: ecлвькючehа Функця 3APYCK C 3AДEPЖКОД, пк OK OTkpыть Heльзя. Дпя 3ТORO HeobxODIMO nepeknchTuMaшинуВ ржим пay3bl pri nnomoцn KhoNk START/PAUSE.
!Pn nepBOM BKNIOeHm MaunHbI NOTpe6yeTcR BbIbpaTB Ja3bIK, IN DCNJIe ABTomATnueckn NOKaXET CTpaHnUy MeHIO Bblbopa J3bika.
Дя Вьбopa Нжногуяыka нахмITE кони Xи Y,дя подеверждени Вьбopa нахмITE Kногу Z.
EECNI Tpe6yETc CMeHHTbY3bIK, BbIKIIOHTe MaunHy, HAXMITE OINHOBpeMeHHO KHOPIKX Y, Y, Z IOIOXJNTe DO 3ByKOBOrO CNIRHaJa, OTKPOETc MeHIO BbIbopa 3bika.
ПорадOK Выpoonsнения засторки
- NOPRAOK BKJIIOUCHENMAUINHbI. HAnKmTe KHOJky,Ha NcNpee NOBHTcnaPiNcB IOBPO IIOXKAIOBATb. INdNkaTOp START/PAUSE peKnO MInraet 3eJIeHbIM ZBeTOM.
- NOPAOK 3AΓPY3KN BENBJ. OTKpoIte JIOK MaunHbI. 3aRpy3nTe B bapaban 6eJIbe, He npeBbIaJ MaKcMaJIbHbI dOyCTmbl Bec, yKa3aHHbI B TaBnIe nporpamM Ha cJeDyUoSe CTpaHnIe.
- IO3NPOBKA MOIOUSEO CPEICTBA. BbINbTe paCnpeIeJIteJIb N 3aCbIbTe MOIOUee cpeIcTBO B CneuaJIbHbIe IueKIn, KAK ONIcaHO B pa3JeIe «CmupaJIbHbIe eeIeecMea U munI b6JIbJr
4.3AKPOINTEJIOK
- BbIbOP PPOrPAMMbI. HaKmnte OndHy n3 KHOIOB BbIbOP PPOrPAMMbI dIy BbIbopa HuxHoi nporpamMbI. Ha3BaHne nporpaMMbl NOBHTcHa daNcPiee. BmecTe c nporpAmMo6yDet Noka3aHa TeMnepaTy a CKOpOCTb OTXIMMa, KOtOpbIE MOrYT 6bITb I3MeHeHbI. Ha dncPiee NOKa3bIbAeTcra npoDoJKNITEJbHOCTb DaHHORO ZIKJa.
- INPECOHAJIN3AUJN LUKJIACTNPKN. HaxmTe COOTBETCTBYUOJINE KHONKNI:
Iopraokn3MeHeHnTeMnePaTybIu/
JINnCKOpOCTNOTKIMa.MaunHa aBTOMaTnueckn
yCTaHaBJIbBaET MaKcImaJIbHbIe TEMpePaTy u CKOpOCTb OTKIMa,DOYCTUmbIe Dnla Bbl6paHHo
nporpaMMbl,CJeIOBaTeJIbHO,3TN 3HaueHnRe MOrYT
6blTb yBeJIuYeHbI. Ppi NOMOUs KNOH KMOxHO
noCTeNEHNO YMeHbUHTb TEMpePaTyBnnotb Do CTUPKn B XoIoDHO BODe "OFF".Ppi NOMOUs KNOHK
MOxHO NOCTeEHNO YMeHbUHTb CkOpOCTb OTKIMa
Bnnotb Do erO nCKnUoyehnra "OFF".Ppi eSe OndHom
HaxKaTHN 3Tnx KHOONBepHyTCr MaKcImaJIbHbIe DOYCTUMbIe 3HaueHnR.
!NckIIOueHHe: npn BbIbope nporpaMMbl 一 (60^) (1 Haxamue KhoNku) TempepaTpa MoKeT 6bITb yBeJIuHcHa do 90^
V.Порраммюване 3адержka 3anycka.
Дпя порраммювани 3адержк nусяа Вьбранов
поррамьн НжмITE COOTBETCTBYU ONU KHOЛКУ
ВЛЛТьdo NOлчЕня HУЖНО 3HAЧЕнЯ 3адержк.
Korda BKNHQUEHaYHKQU 3адержк, Ha ДИСПЛЕE
3aRopaETCnMBON V.Дпя OTМeны 3адержк nусяа
нжмITE KHONKY BПЛOTьdo NOЯВЛЕня Ha DИСПЛЕE
надпси OFF.
I3meHHe napaMeTpoB zukJa.
Haxmnte KhoNkny DnB BkJIIOUeHnI yHKn; 3aROpNTcN HdNKaTOP COOTBeTCTByIOSeKHOKN.
BHOb haxMnte KhoNky JIJI OTKIIOUeHnI cyHKnI; HdNKaTOp norachET.
!EcnnBb6paHnaФyHKnraYBnIeTcHecOBMeCTmMoC3aDaHHoINporpAMMo,NHnKaTOp 6yJeT MIRatb, IN TakarФyHKnra He 6yJeT BKNIOUeHa.
!EcnnBb6paHnaФyHKnraYBnIeTcR HecoBMecTMoNcDpyro,pahee3aDaHHoN IOnOpHNHTeNbHOfФyHKnnei,6yDetMnRaTbINHnKAtOP nepBOBb6paHNOfYHKnIn,u6yDetBKnUoyeha TOJbKO BTOPAJDONoHNHTeNbHraFyHKnI,INHnKAtOP BKJIoueHHOfФyHKnIN3aROpNTcR.
!DOnJIHnTeJbHbIeФyHKcIMMOrT N3MeHITb peKOMeHdyeMyO 3aRpy3Ky MaUINbI I/NJIn npoDoJXnTeJbHOCTb cIKJa.
- NYCK PPOPGAMMbI. HaxMnte KhoNky START/ PAUSE: CoOTBcETCTByUOuI INHdkaTOp 3aRopntcra 3eJeHbIM CBeTOM, n IIOK 3a6JIOKpyeTcra (CmB0JI IIOK 3A6JIOKINPOBAH -O 3aropntcra). B npocece cTnPKn Ha dinCIIee NOKa3bIBaetcra Na3BaHne TeKyuSeiФa3bI.ДЯ n3MeHeHn PPOrpaMMbl B npoecce BbINOJIeHncaNKJa nepeKInOHTe MaunHy B pexm naY3bI npn NOMOUs KNOKn START/ PAUSE (INHdkaTOp START/PAUSE peKo Miraet opAHKeBBIM ZBeTOM). 3aTeM Bb6epNTe HObI NcIKn IN BHOb HaxMnte KhoNky START/PAUSE. Ecn Tpe6yeTcra OTkpItb IIOK noCNe Iycka Unkna, HaxMnte KhoNky START/PAUSE. Korda norgachet INDikatOp, IIOK 3A6JIOKINPOBAH -O, MOxHo OTkpItb IIOK. BHOB haxMnte KhoNky START/PAUSE dIra BO3o6HOBJIeHn PPOrpaMMbl C MOMeHa, B KOtOpbl OHa 6bla npepBaHa.
- 3ABEPUHEHNE IPOPAMMbI. ПОКаЗьИаТСЯ COOБцЕнем на диспee «KOHEU LИКЛА». Посlete TOrO, КА ПогассET сIMВОЛ ЛOK 3AБЛОКИРОBAH -O, можно будет OTКрыть ЛOK. OTКpoTе ЛOK, ВыгPy3NTe БелBEи ВьIKNUOHTe MaшINHy.
!ДЯ OTMeHbI yXe 3anyUeHHOrO ZUKJa HAXMITE Ha HeCKoJIbKO CeKHyN KHOIpKy (1). LUKn npepBETcN MaSHHa BvIKJIOHHTCra.
Ta6JIuca npoRpaMM
| Погамы | Опесане погамы | Мakс
Тем. (°C) | Мakс.
Скорость (об./
MH.) | Стиралы сред_STВ | Мakс.
Загузka (Кг) | Пробл-
желов-
ность
цИКla |
| Пробл-
пател-
Ная
сторika | Сtrypka | Од的答案-
Вател | Orбеля-
Вател |
| YDAJIENHE ПЯТЕN | 40° | 1400 | ● | ● | ● | ● | ● | 4 | Погл-
желов-
ность
цИКla |
| XЛОПOK STAHДAPT. 60° (1) (1 haxamue кноки): сильноахязеньhoe
бени и почhoe цethoe бени. | 60°
(Max. 90°) | 1400 | ●(2) | ● | ● | ● | ● | 7 |
| XЛОПOK STAHДAPT. 40° (2 haxamue кноки): сильноахязеньhoe
бени и дениатhoe цethoeбени. | 40° | 1400 | - | ● | ● | ● | ● | 7 |
| XЛОПOK STAHДAPT. 20° (3 haxamue кноки): сильноахязеньhoe
бени и дениатhoe цethoeбени. | 20° | 1400 | - | ● | ● | ● | ● | 7 |
| СИNTETIKA ИHTECHСИВ (1 haxamue кноки): сильноахязеньhoe
почhoe цethoeбени. | 60° | 800 | ● | ● | ● | ● | ● | 3 |
| СИNTETIKA ДЕЛКATHА! (2 haxamue кноки): Слабоахязеньhoe
почhoe цethoeбени. | 40° | 800 | ● | ● | ● | ● | ● | 3 |
| ББICTРАЙ CTIPKA 60' (1 haxamue кноки): Ддь sbысторo освекеня
малоахязеньhoe-bени (нддяшерstи,шика и在其denя рунй остори). | 60° | 1400 | - | ● | ● | - | - | 3,5 |
| ББICTРАЙ CTIPKA 30' (2 haxamue кноки): Ддь sbысторo освекеня
малоахязеньhoe-bени (нддяшерstи,шика и在其denя рунй остори). | 30° | 800 | - | ● | ● | - | - | 3 |
| ПAMЯТь: Позволяет В教职工и в памяты машинь Лобуху погorammyстори. |
| АNTN-АЛLEРГИA | 60° | 1400 | - | ● | ● | - | - | 7 |
| ШЕРСТУХOD ПЛATINHUM: Ддь sbыстори, кашемраи Т.D. | 40° | 800 | - | ● | ● | - | - | 1,5 |
| ДЕЛКATHА! CTIPKA | 30° | 0 | - | ● | ● | - | - | 1 |
| OTЖIM (1 haxamue кноки) | - | 1400 | - | - | - | - | - | 7 |
| ПОLOOCKAHNE (2 haxamue кноки) | - | 1400 | - | - | ● | ● | - | 7 |
| СЛВ (3 haxamue кноки) | - | 0 | - | - | - | - | - | 7 |
IpoDOnKtHbOCTbUKNa, NOK3A3AHNHa N AINCnEe IINY Kya3AHNNBa HmCTpykuxRBnTcERPaccccTOM, CzENAHbIM HA OCHOBHM CTANdAPTHbIX YCNOBIM. KaKTNUeCKAR npDOJIHKTeBbHOCTb MOKET BApBIOBAtB 3aBnCHMOCTbX bKaTTOpBAtPOrTaX KAK TEmPeTAPyI aDabNeHne BObl Ha NOJaHe, TEmPeTAPyI NOMeEHN, KOJNUeCTBO MOUJOEo CpEDCTBA, KOJNUeCTBO nTIN 3aRyKeHHOrO bEnb, BalaNCxPOBbA BbBpaHNbEdoONITeNBbIbeFyHKnM.
1)PpOpaMbIynpaBHeHncoOBtCTByET HopMaTHBy EN 60456:3aaine nporpaMMy (1 Haxamue KhoNku) dnn x/6 bJe c Tempepatoy 60°C.
2)PpTtemepaType 60°C HeJIb3a BkIIOHTb fynKcHIO "PpeBaHteBnaCTnpka".
Функции CTnnpkn
Cynepctnpka
Благдяпспьзовию
болшeroобема ВОдьВ
наналецклmaибolyшew
прдогжтельноctи 3ta
функця обеспчиBaet
OTNIMaIbHyTO CTnKy.
Зта Функця служNTДЯ
уданения handoileТуньix
пяten.Moket ИСПОЛьЗОВаться
Кak c OTбeINBaTeJEM,
Тak n 6e3 Hero.Ecni
Тгебуетс пронзовсп тakke
OT6eINBaHne, BCTaBbTe DOnONHInTeJbHbI npnlaHouNcra Do3aTOp 4 B ryeKy 1. PpI 3aJIbe OT6eINBaTeJr He IpeBbIshaTe "MaKc." yPoBeHb, yKa3aHHbI Ha cTePxHne B CHeHTpe (CM.Cxemy).ДЯ BbINOHNHeHr TOJIbKO OT6eINBaHn6 Be3 NOHOrO UnkJa CTnPKr 3aJeIte OT6eINBaTeJb B DOOnONHInTeJbHbI DO3aTOp 4, Bbl6epnte IporpamMy «ПоLOckaHnE»n BKJIIOUHrTe DOnONHInTeJbHyo fYHKsIO "CypePCTnPKa".
!ФункцЯ He Moxket 6bIb BkIIOueHa C npOprpaMMaMn ,,,“OTKIM”,“CINB”
Y DonoiHnTeJIbHoE NonoCKaHne
При Вьборе 3то Функции NOBBIшаETСФфсгТИВHOCТь
пОLOСКАн,在OBSEСЧЕВаяМAKСИМальhoeуДALEHne
CTINAPALBOREBESECTBA.3TaФункцииOCOБEHNOYDObHAnДПЯ
JIIODECKOKeI,YUBCTBNTIELBOHKNCTIPAJIbHBIMBESECTBAM.
!Функиг He MoKet 6bIb BkHIOyeHa C npOrpaMMaMn "БыICTPAI CTNPKA 30",,,"OTXIM",CJIIB".
JerkargnaKka
Пи Вьборе 3TOI Функции ZIKblc STINКИ NTJKIMa
N3MeHЯJOTC RAKIM O6pa3OM, YTO6bl COKpATNTb CMHaEMOCtB
6eJIb. ПО 3abepseHn IMKIImaUHnA nPOn3BOJIT
MeДлEHNoE BpaueHne 6apabHa. INdNKaTOpФyHKUIN
JIΕΚΑΥ ΓΙΑχΚΑ 3aropaetcra, ИнДИΚaTOp START/PAUSE
peДKO MURAeT opAnHexeBbIM cBeTOM. ДЯ 3abepseHncaKIIa
HaxMnte KhoNkY START/PAUSE nIn KhoNkY JELKAR
ΓΙΑχΚΑ.ДЯ сLNBa BObl N BvIpy3kn 6eJIb Heo6xOДМо
HaxKaTb KhoNkY START/PAUSE nIn KhoNkY JELKAR ΓΙΑχΚΑ.
!Функции He MoKET 6bl TB BKIOUeHa C npOrpaMMamu
14,“5bICTPAr CTIPKA 30”,
PnpeBapnteJbHa nCtnpka
PnBbIbope DaHHOf yHKcNn PpOu3BOIDTCs
PpeBapnteJbHaag CTnpKa, CnOco6CTByIOuaydaJeHHIO
Hanboonee TpydHOBBIODUMbIX PTeH.
ПРИМЕЧАНЕ: ПОмecтnte CTираЛьньй пошokВ cneцальную яechу.
!Функлг He MoKet 6bIb BKNIOUeHa C npOprpamMaMn
Eco wash
Функшь Eco Wash no3BONJET 3KOHOMNt b 3HepnIO 3a ChET OTCyTCTBnI HeOBxOIMoCTn IIOIOrpeBa BObl IINCTNPKI 6JIbI - HeOeHIMoTO IpeIMUeCTBA KAK IIN OKpyKaHOSeI cpebl, TAK IN DnI CyTeTa 3a 3NeKTPo3HepriIO. DeIcSTBnTEbHO, YCNIIEHHOE DeIcTBnI N OTTNMAJIbHOE NOTpeBJIeHne BObl rapaHTnpYOT OTJNUHb pe3yIbTat 3a TY JVE IPOIoTKnITbHOCTb CTAndapTHoro UIKJa. IIN BOpEE 3ΦΦeKTHBHOI CTNPKI PekOMEHdyETcR NcIOnb3OBaTb XIKIOE MOIOUee CpeDCTBO.
!ФУнкцЯ He moKet bItb BkIHOeHa C nporpaMMaM

СтYPальные BeшесТВа И ТИПБI 6ЕЛБЯ
PacnpeIeJInteIb MOIOUxN cpeIcTB
Xopoши pe3yIbTaT CTnPK 3aBnCIT TAKKe OT npaBnHOB NO3npOBKn CTnpaIbHORO BeIeCTBa: n36blTOK CTnpaIbHORO BeIeCTBa He rapaHTnpyET 60nee 3ΦΦeKTHBHyIO CTnPKy, HapotNB, CnOCo6cTByET 6bpa3OBaHHo HaJIeTOB BHYTpN CTnpaIbHO MaUNHbI N 3aqr3HeHHO OKpyKaIoUe Cpebl.
!He nCnoB3yIe moOuIne cpeIcTBA IJI pyHoi CTnIPK, TAK KAK OHN Obpa3yIOT CNIuKOM MHOrO NeHbl.
BbInbTe paCnppeJnteIb N NOMeCTNe B HeRo MOIOUe CpeIcTBO IIN Do6aBky B CneDyUoIeM POPaKe.
OTdeneHne 1:MOUee cpeIcTBO dI npedBapntbHOI CTnPKI (nopowok)
Ipepe 3acbInkOc STnpaHbHOro nopoWka Heo6xOIMo npOBepuTb, YTO6bI He 6bl yCTaHOBneH dOnoJIHnTeJbHbI OTdeJeHne 4.
OTdeneHne 2:MoOoee cpeDCTBO dIa CTnPK (nopooK nn Jn Kndkoe)
MoIouee cpeICTBO IJIa CTnPKI 3aJIbAeTcI HeIOCEPeICTBeHNO nepeI 3aNyCKOM MaJINHbl.
OTdeneHne 3: OobAkn (OnoJaCKnBaTeIb N T.D.)
He haJIbBaTe onOlaCKnBaTeNb BblIe peWSeTkn OTJeHnI.
DOnoJIHnTeJbHoe OTdJeHHe 4:OT6eJIbBaTeJb
Iodrotobka 6eJb8
- Pa3dJIeIte 6eIbe no cIeNyUoIuM npu3HaKaM:
-TIN TKAHIN/0603HaueHnHa 3TKeTKe.
- CBET: OTdEnIte CBeTHoe 6eIbe OTe 6eNoRo.
- BbIbTe n3 KapMaHOB BCE npEiMeTbI n npOBepbTe pYROBNUbl.
- He npebblaIte MaKcImaIbHyIO 3aRpy3ky 6apabHa, yka3aHHyIO IJI cyXoro 6JIb:
Почные Тканн: Мкс. 7 кг
CnHTeTnueckne TkaHn: MaKc. 3 Kf
Uepctb: MaKc. 1,5 Kr
JenK: mKc. 1 Kr
CkOJIbko BecnT 6eJIbe?
1npoctbiHa 400-500rp.
1 Habojouka 150-200 rp.
1 cKaTeptb 400-500 rp.
1 xanat 900-1200 rp.
1 noIOTeHcE 150-250 rp.
CneuaJIbHbIe nporpaMMbl
YDAJAHNE IYAEH: nporpaMMa ДЯ CTNpKU OeyH rpy3HOrO 6eJIb. ПрorpaMMa obecneuBaET yPOBeH bCTNpKu BblIe cTaNdApTHOrO (yPOBeH A). He nOJIb3yIteCb 3ToI pRporpMMoI, pn CTnPKe 6eJIb pa3HbIX CBTOB. PeKOMeHdyETcN cNOJIb3OBA CTnPaJIbHbI NOpOwOK. ДЯ TpyDHOBbIBODIMbIX PRT peKOMeHdyETcO6pa6OtaTb INx CpeCuaJIbHbIMN Do6aBkAmN.
XJIOOKCTAHIDAPT.20°:X/66eJIb8cTaNdAPTHa npOrpAmMa nIdeaJIbHO NOxOuIT dIy CTnRPK X/6 6eJIb8 co CpeDnH3aRpy3HeHEm. OTIInuHbIe pe3yIbTaTbI IOnUyaOTcraTakKe ppi CTnRPKe B XOJIoHDH BODe, cpaBnHMbIe CO CTnRPoI ppi 40^ , oBeCneuBaOTcra MExaHnueCKIM DeIcTbNEM C pa3HOJ CKOpocTbU C IOBOTOPAOUIMMCs YacTbIM NIKaMn.
AHTN-ANJIEPnRA: nCNoIb3yIte npOrpamMy DnYdaJIeHnO OCHOBbIX aJIpeReHOB TaKx KaK PbIbUa, YecOTOnbIX KLeUeI, Co6aUbIe IIN KoUaUbIe WepCTN.
UIEPCTb: LcKl CTnPK "UepCTb" DaHHOI CTnpaJIbHOI MaunHbI Hotpoint-Ariston npoWeJ TecTnpOBaHne I bbl TbePjXeH KOMpaHnei Woolmark Company dJa CTnPKI WepCTaHBIX N3DeIiN, KLnaccuHpOBAHHbIX KaK «DpnyHOI CTnPKI" C TeM, YTObI TnPKA BblONHApCb B COOTBETCTBmC INHCpyKzmaMn Ha 3TKeTke BeuN INHCTpyKzmaMn, PnIpaTaembIM n3ROTOBtJeM EblTOBOrO 3JNeKTPponpibopa. Hotpoint-Ariston - 3TO nepBaMapka CTnpaJIbHbIX MaunH, noIyUnBsaJ OT Woolmark Com pany ceTpNaKaZmuO Woolmark Apparel Care - Platinum 3a KaueCTBO CTnPKI 3a 3KOHOMhbl paCXOD BObl I
3JIeKtpO3Heprn.(M1126)


DEJINKATHA CTNPKA: INCIOJIb3yIte IporpaMMy DnIa CTNPKU OeHb DEJINKaTHORO 6BJIb co CTPa3aMn IJIb 6IeCTkAMn.
PekomeHdyETcBbIBepHyTb Hau3HaHky 6eJIbe nepei CTnPKo N NOMeCTNTb MeNkoe 6eJIbe B CneUaJIbHbI MeWooyek DJIa CTnPKI DeJInKaTHoro 6eJIb.
IЯ ONTUMN3aun pe3yNbTaTOB peKOMeHdyETcN CNoJIb3OBAtBJ KnIKeOE CTnpAJIbHOE BeIecTBO IЯ DeIHKaTHORo 6ebj.
Дя CTирки УлКOBыx Идели Ил 3аHаВecOK
ИСПОЛБУМТЕ UKNК [И BKЛIOHNTe ДОПОЛНТЕЛьНую
Фуннцию (В ЗTom сCityae можно akTNBИРОВаТ ТаЖе
Фуннцию «ДОПОЛНТЕЛьНоп ПОLOСКанne»); Машина
ЗавершаET CINКЛ 6e3 сЛВа BODbl, И INДИКATOP
MURAET. ДЯ сИВа BODbl I N BbIgPy3Kи 6eJIЯ HeO6XODIMO
нжать KнONky START/PAUSE Ил KнONky ...
CnCTema 6aJIaHcnpOBKn 6eJIbIa
Ipeed KaJdbim OTxKIMOM BO n36exKaHne Upe3MepNbIX Bn6paun i dny paBHomepHoro pacnPpeJeHnna 6eIb8 B bapabaHe MaunHa npOn3BOdnt BpaUeHnco CKOpocTbIO, Cnerka npebbiuAHOuec CKOpocTb CTnpKn.
Ecnn nocne HeckoIbKnx nonbTOK 6eJIbe He 6ydet npaBnIbHO c6aIaNcHpOBAHO, MaunHa pOn3BeTeOTJIM Ha MeHbWei CKOpOCTn NO CpaBHeHIO C npedymOTpeHHo.
!CTnpaJIbHaMaShHa CnpoeKtnpoBaHa nI3rOToBJeHa B COOTBeTCTBmC MeJdyHapOdHbIMN HopMaTnBaAMn PO 6e3OpacHocTn. HeoXoJMo BVHMaTeJbHo IpoUHTaTb HactToJusHe ppeDyPpeKdEHN, COCTaBNeHHbE B ZeJx BaSei 6e3OpacHocTn.
Оьшпе Tpeбованя К бezонасноctи
- Послесиюльбовая Машинь оязатьнооткнунашие ee ot cetи поеменHoro TOKA ИЗakрыави Te BODONPOBOHbй Кран.
-Данhoeи3dJIeIneпpeiHa3HaueHO NCKNIOHTeBHOДЯ DOMaUSHero IcNoJb3OBAHnI.
- He pa3peshaTe NOIb3OBAtbcraMaSHHOJ LIucaM (BKNIOUaYJeTei) C OrpaHnueHHbIMN cN3NUeCKIMN, CEHCOPHBIMN, yMCTBeHHbIMN cNOC6HOCTaMn I He OblaJaIOUxN IOCTaTOOHbIMN 3HaHnAMyN ONbITOM, ECNI TObKO OHN HE NOnb3yIOTc MaShHOJ NOD HAbIIODeHNEM I NocNe IHCTpyKTaxa Co CTOpONblIIN, OTBeTCTBeHHbIX 3a INX 6e30NaChOCTb. He pa3peshaTe DeTAM INrpaTb C MaSHHOH.
CTnpaJIbHOI MaunHOI DOJXHbI NOJIb3OBAtbcra TOnbKO B3POCSJIbe Iuca,Co6JIIOJaIOUne INHCTpyKcUN, PpNBeDeHHbIE B DaHHOM TexHNueCKOM pyKOBOdCTBe.
He npikacaiTebc K n3deJIIO BJaXHbIM pyKaMn, 6ocNKOM nJIN BO BJaXHOJdEJKDe.
- He tānnte 3a ceTeBOI ka6eJIb dIЯ OTOcOeINHeHIna H3dJIINIA I3 3JIeKTpO p03eTKI, BO3bMNTecb 3a BUNKy pykoJ.
- He otkpblaIte pacnpedeIeIb npoIka B npoIecce CTnPKI.
- ɪnɜːbɪrəŋte KɔntaɪkTob CO CɪnBaemən Bɔdən, Tɑk kɑk Oha MɔkjEt 6bɪt b OʊeHb Iɒpəy eɪ.
- Kateropuueckn 3anpeuaeTc8 OTKpbIbA Tb JIOK CNIJIO: 3TO MOKeT npBecTN K NOBpeJeHInO 3aUHTHO MExaHn3Ma, ppeoXpaHraHoUeTo OT cJIyauHOrO OTKpbITnMaunHbl.
B clyuae HencnpabHoctn KaTeoropueeckn 3aPpeuaeTcR OTKpbIBaTb BHyTpEHHne MExaHn3MbI N3dennr C cJIbIO IX CAMOCToTEnbHO pemOHTa.
- ɪЗбэрайт养老服务 саразюшенисторьно машинов.
B Ipocece cTnpKJIIOK cTnpaJIbHOI MaUNHbI MOKeT Harpetbc.
- Пи Нeoбходимocтп посьг STИральну Maшину СлдуET BынолняТБ 3ТУ Oпeрацию ВДBOЕМИВТЮЕСпpeДельНО OCTOPOXHOCТБИ. HИКOrДА He посьайTe Maшину B OДИHOCKY, TAK KAK Maшина Oчень Тяжелая.
- Парацью Maшини Беляправец, утобь бабан nbл пус.
YtJn3aun
- YHNUTOXJEHne yNAKOBOUHbIX MaTePnaIIOB: COJIIOaIte MeCTHbIE HOpMaTINBbIC CJeNbIO NOBTOpHO IcNoJIb3OBAHnYyNAKOBOUHbIX MaTePnaIIOB.
Corlaacno Ebponecko DnpeKtBe 2002/96/ CE kacaTeIbHO yTINImaun 3JeKtpOnHbIX n 3JeKtpnuecknx 3JeKtponpnpobOB 3JeKtponpnpobBy He DoJXhB bIbpaCbBaTbCBA MecTe C ObUHbIM rOpOdCKM Mycopom. BbIbeDHeHbIe N3 CTPOr np6opby DOJXhB coBnpaTbc OTrJIbHO dNra ONTmImaun
nx yTnIn3aun n peKypepauncoCTabJIOUx nx MaTePnaIob, a TaKke dJa 6e3oNacHocTn OkpykaHOUs cpebln 3dOpOBb. CmB0n 3auepkHytaMyCOPNaH KOp3nHKa, HMeIoUncra Ha BCex npBopax, Cnyknt HanOMnHaHHeM O6 nx OTdeJIbHOY TnIn3aun. 3a 6OJIee noDpOBHo nHΦOpMaUnne O npAunbHOy yTnIn3aun 6bITOBbIX 3NeKTPoPnpBopOB PONb3OBaTeTI MOrTy 6OpaTNTbcr B CpeUaNbHyTOcSyapCTBeHHyO oprAHn3aUHIO UIN B Mara3HN.
AbarinHoe OTKpbITne IIOka
EcnI no npuHne OTKIOUeHnA 3NeKTPo3Heprn HEBO3MOXHO OTKpbITb JIOK MaUNHBi, YTO6bI BvIRpy3NTb YNCTOE 6eJIbe, DeIcTByIte CJeDyUOIm O6pa3OM:
- BbIHbTe lTEnCeJIbHyIO BUNKy MaUINHbI N3 3JIeKTpO p03eTKI.
- npOBepbTe, yTO6bI yPOBeH bOdbI B MaUNHe 6bl HnKe OTBepCTnJIoKa. B IpOTNBHom cIyae cIeNTE N3JIuSEK BOdbI Upe3 CJIINBHyIO Tpy6y B BeDpo, KaK POKa3aHO Ha CXMe.
- NOTAHNTe HApJyKa 3bIyOK, NOKa3aHHbI Ha CXMe, BnIObTb Do OCBO6OxJeHnI PnAChIKOBOro 6NOKIpOBOuHOrO BNHTa. 3aTEM NOTAHTE eR OBN3 I ONDOBpeMeHHO OTKpoIte JIOka.
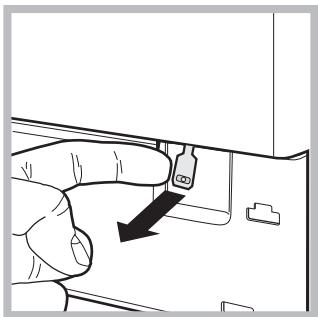
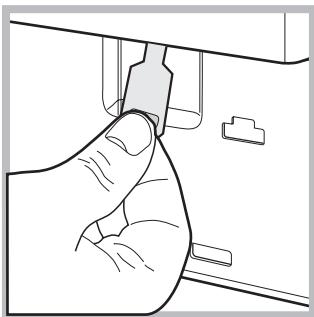
OTKJIIOUeHHe BOdBi N 3JIeKTpNueCKOTo TOKa
-ПepeкрьИаиTe BODОпpoBODныКран ПОспе КжДоМ CTИрКИ.ТakIMобразOM COKpaUaTcR ИЗHOC BODОпpoBODнOHССТЕмbl MaUHbI N COKpaUaTcR pNCK yTeHek.
- BbHbTe ⅢTEnCeIbHyU BnIky I3 3JIeKtpo pO3eTKn B IIpoIeCE CNTKn I TexHnueCKOrO O6CJyXnBaHnA CTnpaIbHOm MaunHbl.
Uxo3a cTnpaIbHoi MaunHOi
ДячNTи HapyЖьIx n pe3nHOBix qacteI CTnpaJIbHoi MaunHbl IcnoJb3yIte TprIky, CMOueHHyIO TeIIOB Odoi CMbIOM. He IcnoJb3yIte pactBOpHTeIN IJIa abpa3NBhle YIcTЯUne cpeICTBa.
Yxoid 3a pacnpeJeIHTeJIem MOUoIUX cpeICTB
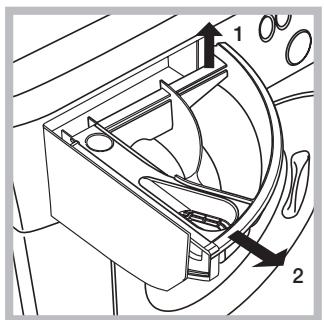
BbInbTe paCnpedeJInteIb,
PpINoDnAB ee n NOTaHyB
HapyKy (CM. cxEmy).
PpOMoIte
paCnpedeJInteIb TeNIOJ
BOIo. 3Ta Opeaunia
DOJXHa BbINOJIHTbcra
peyIpaHO.
YxOД 3a ЛЮКOMи 6apa6aHOM
- Послесиюльбовая стupaьнй Maшины BCERда спдует OCTаBJЯть ЛЮК ПОЛУТКрыт biom BO ИЗБекане образовая несяятух fix 3anaxobВ бapабаhe.
YxOД 3a HacocOM
Стиральна машина осанцени самочистцимся
насOCOM, He hyждаюшмся в Тхни ueckOM
облuyжвани. Tem He MeHee MeIКпе пеДmetы
(Mонеты, пуrobицbl) могут упаctь 3a Кожух,
прededхраняюшин haboc, расноложень B erо НИЖнe
ч actn.
!PpOBepbTe,UTo6blzuknCTnnpkn3aBepwnncn,N BblHbTe WTeNCeIbHyIO BNkU n3 CeTEBOI pO3eTKN.
ДяdoctynaKkoxyx:
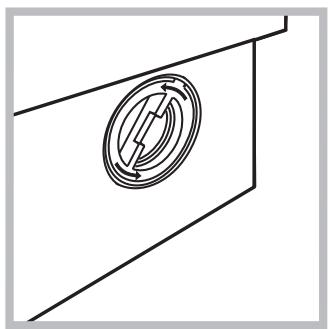
-
OTBnHTnTe KpbIuKU, NOBepHyB ee npOTNB yacobOy CTpeJIKN (CM. cxemy): HeboJbuay TeUka BObI YBnAETcH HopMaJIbHbIM YBnEHNEM;
-
TúaTeMbH No pOuNCTnTe BHyTpNi KɔkCyxa;
- 3aBnHTnte KpbIuKy Ha MeCTO;
Пюверka ВОДОПВОДНО ВЛАнга
Поберяп Teшланг подачи Вовы He рже odнoro pa3a B roД. Пи об hapжени Трешин Или pa3рьIBOB WlaHra 3amehnte erO:В поцecce CTnRPK nCJIbHOe BOdI B BOДОпpoBoDEдавЛeнHe MOжт пИВecTи K BHe3aHOMy OTOCoEDINHEnO WlaHra.
!Hnkorga He noIb3yItecb 6/y IshaHaMn.
HencpabHocTn MeToDbInx yctpaHeHna
Ecni BaWa CTnpaIbHa MaHnHa He pa6oTaE. IpeXe Yem ObaTntBcR B LcHTp CepBucHO 6cbNyKuBaHn (cm. Cepue Hoe 6cbNyKueaHne), npOBepbTe, MOxHO Jn yCTpaHNTb HncnPabHocTb, cJeDyra peKOMeHdaCnM, npINBeDEHHbIM B CJeDyUOeM nepeUHe.
HencnpaBHOCTN:
CTnpaJIbHaMaSiHa He BkIIOuHaeTcra.
Lukl CTnprKn He 3anyckaetc.
CTnpaJIbHajMaunHa He 3aINBaET BOy (Ha nucnnee noka3bIbAeTc coo6ueHne «Boa cInTa,OTKpbITb KpaH»).
MaunHa HnpepbIBHO 3aINBaet n CInBaet BODy.
CTnpaJIbHa MaunHa He CInBaET BODy Hr OTxnMaet 6eJIbe.
CTnpaJIbHaMaShHa CnJIbHO Bn6pnpyeT B npocece OTXIma.
YTeUKN BObI N3 CTnpaJIbHOIMaUNHbl.
MaunHa 3a6nKnpoBaHa, nCnnei MmraT n Noka3bIbaeT KoI HeNCpabHoctn (HanpM., F-01, F-.).
B npocece ctnpkn o6pa3yeTcnaNtukom 6nJIbHa nHa.
Bo3MOxHbI npuHbI / MToDbl yCTpaHeHnra:
- Μιτέπεncyνηλα Βυήκα Ε Κοεπινησα Α Σηκτρο Πθετκόη Ι ΙΟι Οχούπινι έ Θεός Α Κθάτας.
B DOME OTKJIIOUeHO 3JIeKTPnueCTBO.
JIUK MaunHbI 3aKpbIT HENLOTHO.
He 6blna haxata kHONka ON/OFF.
- He 6bIJa HaxaTa KhoNka START/PAUSE.
- IpeekpbIb VODOpPoBOHbI KpaH.
- Bыла запоррамmarpoвана заideржka зауckeцкла.
BODOpOBoHbI WJIaHr He noDCoeDInHeN K KpaHy.
- UJnaHr corHyT.
-Пepeкрыт ВОДОпоВОньй Кран.
B DOME HET BOIbl.
- HeioctaToUHoe BOIOnpoBOHoe daBJIeHne.
- He ьлна нажата коньа START/PAUSE.
CJINBHOI UJIANH He HAXOHTCA Ha BbICote 65-100 cm. OT nONa (cm. «UcmaHOeKa»).
- Koheu cIINBHorO ⅡJIaHra IORpyKeH B BOy (cM. «YcmaHOka»).
- HacteHHoe CnIBHOE OTBepCTne He OCHaUeHO BaHTy3OMДЛЯ BbInycka BO3dYxa.
Ecni nocne BblwepepeHcneHHbIX npOBepOK HeNCnpaBHOCTb He 6ydet yctpaHeHa, cJeDyeT peEeKpbITb BOODPpOBOHbI KpaH, BByIKJIOHTb CTnapJIbHyU MaunHy I o6paNTbcra B LcHTp CepBnCHOrO O6cIyXuBaHna.
EcnnBaWa KaBapTnpa HaxoDnTcHa NocNeHnx 3TaJax 3daHna, MOryT NaBnOdaTbcra YBHeHna CnfoHa, N03ToMyc TnpaNbHna MaunHa npOn3BOnT HepepbHBnI 3aINb I CInB BObl. IyCtpaHnE HTOAHomAInN B npOdaKe ImeIoTcR CneUaNbHbIe KNaanHbI IpOTNB ABHeHna CnfoHa.
- Bыбанная поррамma HeпдусматриbaeT сиВ BODы: Дя HeKOTopbIX поррамн Heобхдимо BKПОЧТь сиВ БPyHyI.
- BkIIOUeHa ΦyHKUJI NIEKKA IJIAXKA:ДЯЗАБЕРшENI pOgrpAMMbI
нжмTe KhoNky START/PAUSE (cM. «ПpozaPAMMbI uФyHKUU»).
CJINBHOI JIaNr COrHyT (CM. «YcmaHoKa»).
3acopeh cInBHOI Tpy6OpBOvO.
B MOMENT yCTaHOKn CTnpaJIbHOm MaunHbI 6apa6aH 6bl pa36nOKIpOBaH HENpABuJIbHO (CM. «YcmaHO6Ka»).
- CTnpaJIbHaMaUHnHa yCTaHOBJIeHa HepOBHO (cM. «YcmaHO6Ka»).
Maunha 3axkata Mekjdy Ctehbl MebeIbIO (cm. «YcmaHOka»).
-Плloxо ппкчен ВОДОПРОВОДньшланг (СМ.«УсmaHo经ka»).
- 3acopen pacnpedeIeIeIb MOIOJIeO cpeIcTBa (NOPAIOK eO YIcTKn Cm. 6 napaapaape «TexHueceKoe obcnykuaHue u yxod»).
CInBHOJnHaHr nIIOX 3aKpeNJIeH (cM. «YcmaHo6Ka»).
- BbIKIIOHTe MaunHy n BbIbTe ITeNCJIbHyIO BNJKy n3 ceTeBOJ pO3ETKn, NOIOXdIte 1 MNHyTu IN BHOB bKJIIOHTe MaunHy. Ecn HeNCpabHOCt b He ycTpaHЯETc, o6patNTecb B CepBucHyO Cnyk6y
MoHouee CpeIcTBO He npriOAnHO dIy CTnPK B CTnpaJIbHO MaUHe (Ha yNakOBKe DoJnxHO 6blb Yka3aHO «DJIaCTnPKB CTnpaJIbHO MaUHe», «ДЯpyHOr n MaunHHoN CTnPKn» IIN NIOdo6Hoe).
BpacnpedeIeIeIb 6blIO nOmeUeHO Upe3MepHoe KOJIuYeCTBO MOUSeIcpeIcTBA.
Mbl 3ab0HMcO CBOHX NOKyNaTeJnx I CTapaEMcCdelaTb cepBnCHoe OBCnyXnBaHne HAn6oJee KaueCTBeHHbIM. Mbl NoctoHHo COBepseHCTByeM Haan IpOdyKtbl, YTo6bl CdelaTb Bahe o6uEHNc cTexHkoI pOcTBIM IN PpNTHbIM.
YXoD 3a TEXHnKOJ
IpoDInTe cpoK 3KcPnyatauN IN CHN3bTe BepoTHOCTb IONOMKn TEXHNI.
BocnoIb3yItecIpoOeCCNoHaIbHbIMn CpeIcTBaMn IJra yXoJa 3a TexHkoI OT Indesit ProfessiOnal nJra HauBoJeepoCTOrO, 3ΦΦeKtINBHorO n IerKoro yXoJa 3a BaWeJ 6bITOBoi TexHkoI.
Пюдукты Indesit Professional npoизворясь в Италлс с coбл endem BbICOKx EBpОeIckx CTaHdapTOBВ oblaactn KauecTba, ekONOrnИ 6e3OpaNacHocTN IcNoIb3OBaHnI N Co3daHbI C yUeTOM MHOroJIeTHero OnbIa ПюиЗВODHTeJIЯ TexNiK. Y3NaIte noДробпee Ha caITe www.hotpoint-ariston.com B pa3dJe «CepBuc» I cnpaшиBaIte B mara3Inhax Baшero ropoDA.
ABTOpu3OBaHHbIe CepBnCHbIe UeHTpbI
YTo6bI 6bITb 6JIxke K HaIIM NOTpe6nteIaM, Mbl CO3daJIN 7HpOKyIO cepBnCHyIO CeTb, OCO6eHHocTbIO KOtOpO JABIaETcBAICOKa IOnrTOBka, npoceccnoHaJIaM uYeCTHOCTb cepBnCHbIX MaTePOB. Ha cerOJHraHm DeH bOHa HacHTbIBaET OKoI0 350 cepBnCHbIX ceHTPOB Ha TeppNTopN Poccn n CHF.
IX KOHTaKTbI Bbl MoKeTe HaITn B cepBnCHOM cepTnΦnKaTe nHa caIe www.hotpoint-ariston.com B paazene «CepBnc».
EcnBam Hado o6paNTbCBy C cepBnchbI ueHtp:
BhImaHne! PnppeMOHTe Tpe6yIte nCNoJIb3OBAHnOpnIHHaJIbHbIX 3anaChbIX qAcTei.
Ipeed Tem kak o6paTntbCBy Cnyk6y CepBnca:
- Поберът, Heьзя Ли устравпь Heисправноьcamoctоь HO (cM. «Heucраehocmu u Meodы ux ycmpaHena»);
BHOBB 3aynctnte nporpammy dny npOBepkn nCnpabHoctn Maunhbl;
B npOBHOM cnyae o6paNTbC8 B ABTOpN3OBaHHbI CepBnCHbI LcHTp no TelefoHAM, yka3aHHbIM B rapaHTnHOM TaJIHOHe.
!HnkOrda He o6paaTeCb K HeAeBTO3OBaHHbIM CepBnCHbIM ueHTpam.
Pn o6paueHnB CepBnCHyo Cnyk6y Heo6xOaMo coo6uTb:
TIN HENCnpaBHOCTN;
HOMep rapaHTnHOro DOkymeHaTa (cepBnCHOn KHNKKn, cepBnCHOrO cepTnΦnKaTa n T.IN.);
MoIeJIb MaIINHbI (MoI.) n cepinHbI Homep (S/N), yka3aHHbIe B INHΦOpMaIIOHHO Ta6JIuChe, pacnOJoxEHHo Ha 3aIHeI paHeJI cTIpaJIbHO MAsIHbI.
Другю полеснию Информацю и Новости Вы може найту на саite www.hotpoint-ariston.com в раздени «Сервис».
Pon3BOnTeIb:
Indesit Company
Bvane A. MepnoH 47, 60044, FabpnaHo (AH), IVaJnA
UmmopTeP:
OOO "INHe3nT Pyc"
C Bonpocamn (B Poccnn)
Io 01.01.2011: Pocn, 129223, MockBa, IpocneKr Mnpa, BBLI, naB.46
obpaaatbocnoapecy:
c 01.01.2011: Pocca, 127018, MockBa, yI. DvHueB, dom 12, Kopn. 1