USER MANUAL BWMD 742 HOTPOINT
Installation, 2-3-4-5
Unpacking and levelling
Connecting the electricity and water supplies
The first wash cycle
Technical data
Instructions for the fitter
GB
CIS
Pycckn,43
Description of the washing machine, 6-7
Control panel
Display
Running a wash cycle, 8
Wash cycles and functions, 9
Table of wash cycles
Wash functions
BWMD 742
Detergents and laundry, 10
Detergent dispenser drawer
Preparing the laundry
Special wash cycles
Load balancing system
Precautions and tips, 11
General safety
Disposal
Opening the porthole door manually
Care and maintenance, 12
Cutting off the water or electricity supply
Cleaning the washing machine
Cleaning the detergent dispenser drawer
Caring for the door and drum of your appliance
Cleaning the pump
Checking the water inlet hose
Troubleshooting, 13
Service, 14
This instruction manual should be kept in a safe place for future reference. If the washing machine is sold, transferred or moved, make sure that the instruction manual remains with the machine so that the new owner is able to familiarise himself/herself with its operation and features.
! Read these instructions carefully: they contain vital information relating to the safe installation and operation of the appliance.
Unpacking and levelling
Unpacking
- Remove the washing machine from its packaging.
- Make sure that the washing machine has not been damaged during the transportation process. If it has been damaged, contact the retailer and do not proceed any further with the installation process.
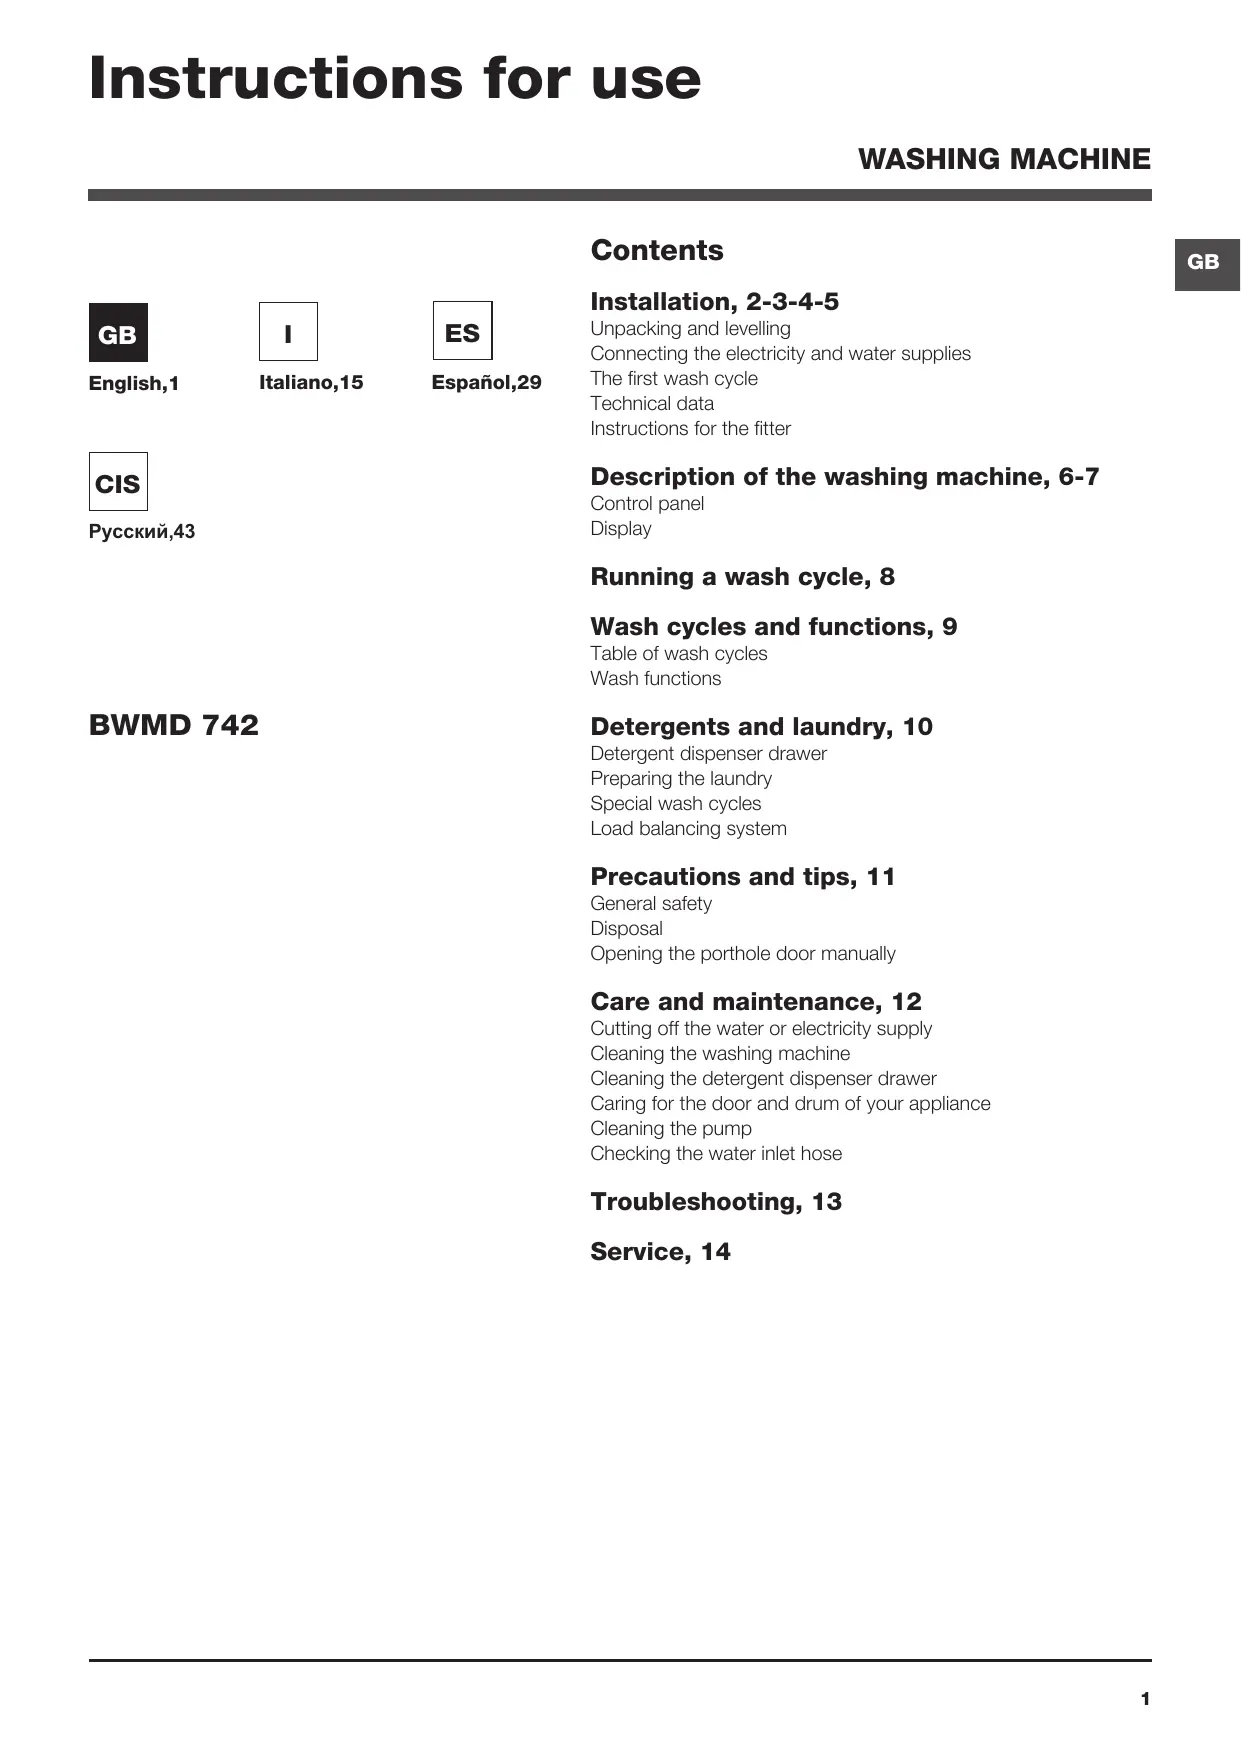
-
Remove the 4 protective screws (used during transportation) and the rubber washer with the corresponding spacer, located on the rear part of the appliance (see figure).
-
Close off the holes using the plastic plugs provided.
- Keep all the parts in a safe place: you will need them again if the washing machine needs to be moved to another location.
! Packaging materials should not be used as toys for children.
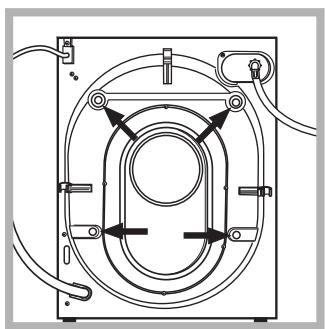
Levelling
- Install the washing machine on a flat sturdy floor, without resting it up against walls, furniture cabinets or anything else.
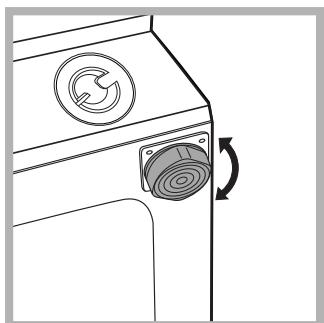
- If the floor is not perfectly level, compensate for any unevenness by tightening or loosening the adjustable front feet (see figure); the angle of inclination, measured in relation to the worktop, must not exceed 2^ .
Levelling the machine correctly will provide it with stability, help to avoid vibrations and excessive noise and prevent it from shifting while it is operating. If it is placed on carpet or a rug, adjust the feet in such a way as to allow a sufficient ventilation space underneath the washing machine.
Connecting the electricity and water supplies
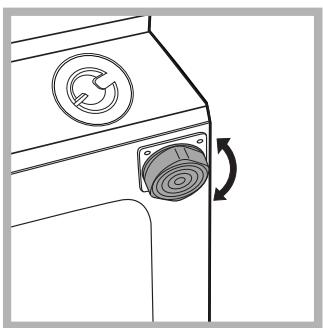
Connecting the water inlet hose
- Connect the supply pipe by screwing it to a cold water tap using a 3 / 4 gas threaded connection (see figure).
Before performing the connection, allow the water to run freely until it is perfectly clear.
-
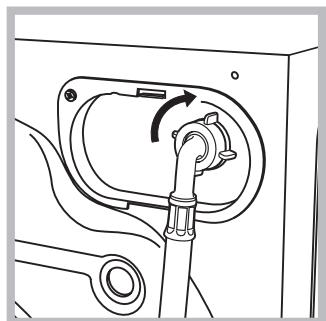
Connect the inlet hose to the washing machine by screwing it onto the corresponding water inlet of the appliance, which is situated on the top right-hand side of the rear part of the appliance (see figure).
-
Make sure that the hose is not folded over or bent.
! The water pressure at the tap must fall within the values indicated in the Technical details table (see next page).
If the inlet hose is not long enough, contact a specialised shop or an authorised technician.
! Never use second-hand hoses.
! Use the ones supplied with the machine.
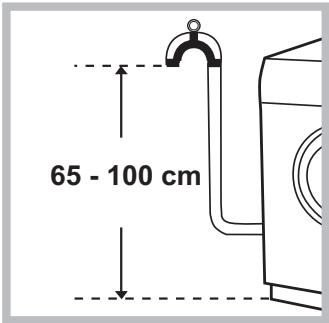
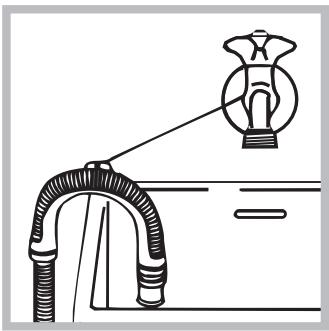
Connecting the drain hose
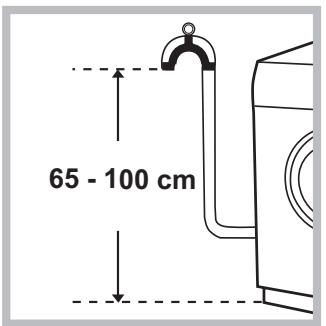
Connect the drain hose, without bending it, to a drainage duct or a wall drain located at a height between 65 and 100~cm from the floor;
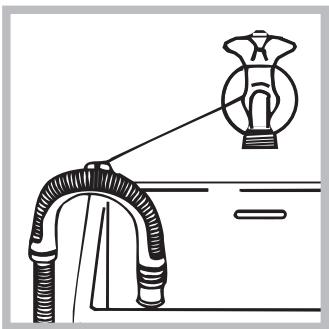
alternatively, rest it on the side of a washbasin or bathtub, fastening the duct supplied to the tap (see figure). The free end of the hose should not be underwater.
! We advise against the use of hose extensions; if it is absolutely necessary, the extension must have the same diameter as the original hose and must not exceed 150 cm in length.
Electrical connections
Before plugging the appliance into the electricity socket, make sure that:
- the socket is earthed and complies with all applicable laws;
- the socket is able to withstand the maximum power load of the appliance as indicated in the Technical data table (see opposite);
- the power supply voltage falls within the values indicated in the Technical data table (see opposite);
- the socket is compatible with the plug of the washing machine. If this is not the case, replace the socket or the plug.
! The washing machine must not be installed outdoors, even in covered areas. It is extremely dangerous to leave the appliance exposed to rain, storms and other weather conditions.
! When the washing machine has been installed, the electricity socket must be within easy reach.
! Do not use extension cords or multiple sockets.
The cable should not be bent or compressed.
The power supply cable must only be replaced by authorised technicians.
Warning! The company shall not be held responsible in the event that these regulations are not respected.
The first wash cycle
Once the appliance has been installed, and before you use it for the first time, run a wash cycle with detergent and no laundry, using the wash cycle (60°C).
| Technical data |
| Model | BWMD 742 |
| Dimensions | width 59.5 cm
height 81.5 cm
depth 54.5 cm |
| Capacity | from 1 to 7 kg |
| Electrical connections | please refer to the technical data plate fixed to the machine |
| Water connections | maximum pressure 1 MPa (10 bar)
minimum pressure 0.05 MPa (0.5 bar)
drum capacity 52 litres |
| Spin speed | up to 1400 rotations per minute |
| Test wash cycles in accordance with directives 1061/2010 and 1015/2010 | programme (60°) (1st press of the button);
Standard Cotton 60°C.
programme (40°) (2nd press of the button);
Standard Cotton 40°C. |
| CE | This appliance conforms to the following EC Directives:
- 2004/108/EC (Electromagnetic Compatibility)
- 2006/95/EC (Low Voltage)
- 2002/96/EC |
Instructions for the fitter
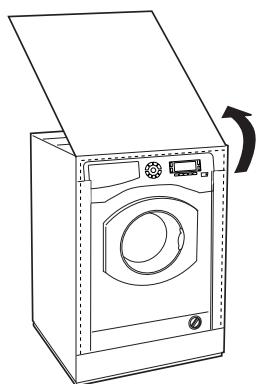
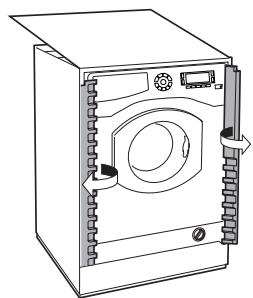
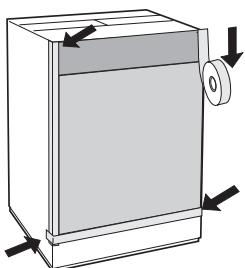
Mounting the wooden panel onto the door and inserting the machine into cabinets:
In the case where the machine must be shipped for final installation after the wooden panel has been mounted, we suggest leaving it in its original packaging. The packaging was designed to make it possible to mount the wooden panel onto the machine without removing it completely (see figures below).
The wooden panel that covers the face of the machine must not be less than 18 ~mm in thickness and can be hinged on either the right or left. For the sake of practicality when using the machine, we recommend that the panel be hinged on the same side as the door for the machine itself - the left.
A
B
C

E
Door Mounting Accessories (Fig. 1-2-3-4-5).
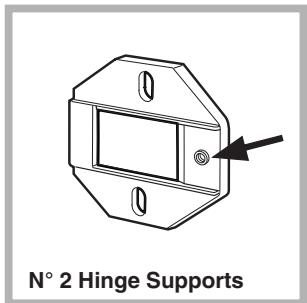
Fig. 1
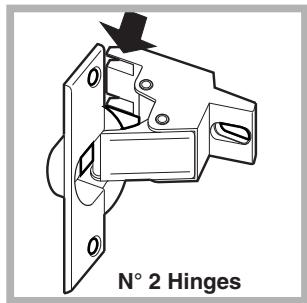
Fig. 2
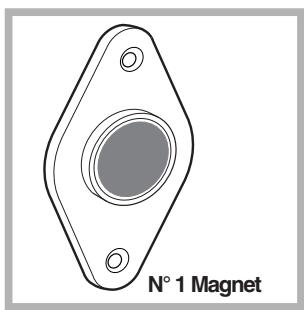
Fig. 3
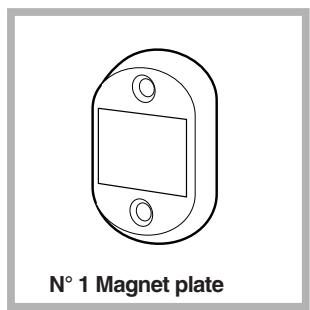
Fig. 4
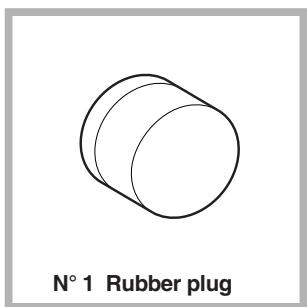
Fig. 5
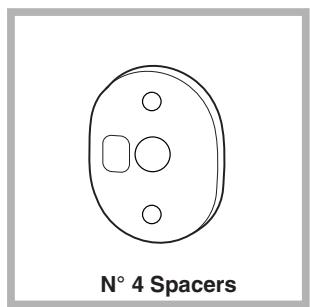
Fig. 4/B
- No. 6 type A self-threading screws, l = 13 mm.
- No. 2 type B metric, countersunk screws, l = 25 ; for fastening the magnet plate to the cabinet.
- No. 4 type C metric screws, l = 15 mm; for mounting the hinge supports to the cabinet.
- No. 4 type D metric screws, 1 = 7 ~mm ; for mounting the hinges on the supports.
Mounting the Parts onto the Face of the Machine.
- Fit the hinge supports to the appliance front panel, positioning the hole marked with an arrow in fig. 1 so that it is on the inner side of the front panel. Fit a spacer (fig. 4/B) between the surfaces using type C screws.
- Fit the magnet plate at the top of the opposite side, using type B screws to fix two spacers (fig. 4/B) between the plate and the surface.
Using the Drilling Template.
- To trace the positions of the holes on the left-hand side of the panel, align the drilling template to the top left side of the panel using the lines traced on the extremities as a reference.
- To trace the positions of the holes on the right-hand side of the panel, align the drilling template to the top right side of the panel.
- Use an appropriately sized router to mill the holes for the two hinges, the rubber plug and the magnet.
Mounding the Parts onto the Wooden Panel (Door).
-
Insert the hinges into the holes (the movable part of the hinge must be positioned facing away from the panel) and fasten them with the 4 type A screws.
-
Insert the magnet into the top hole on the opposite side of the hinges and fasten it with the two type B screws.
- Insert the rubber plug into the bottom hole.
The panel is now ready to be mounted onto the machine.
Mounting the Panel into the machine.
Insert the nib of the hinge (indicated by the arrow in fig. 2) into the hole for the hinge and push the panel towards the front of the machine. Fasten the two hinges with the type D screws.
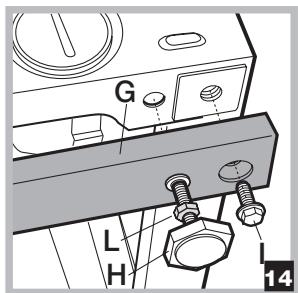
Fastening the plinth guide.
If the machine is installed at the end of a set of modular cabinets, mount either one or both of the guides for the base molding (as shown in fig. 8). Adjust them for depth based on the position of the base molding, and, if necessary, fasten the base to the guides (fig. 9).
This is how to assemble the plinth guide (fig. 8):
Fasten angle P using screw R , insert plinth guide Q into the special slot and once it is in the desired position, lock it in place using angle P and screw R .
Inserting the machine into the Cabinet.
- Push the machine into the opening, aligning it with the cabinets (fig. 6).
- Regulate the adjustable feet to raise the machine to the appropriate height.
- To adjust the position of the wooden panel in both the vertical and horizontal directions, use the C and D screws, as shown in fig. 7.
Important: close the lower part of the appliance front by ensuring that the plinth rests against the floor.
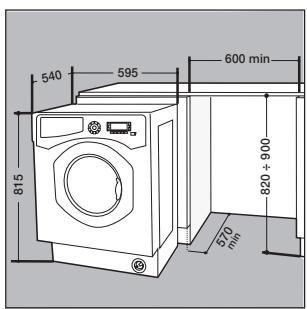
Fig. 6

Fig. 7
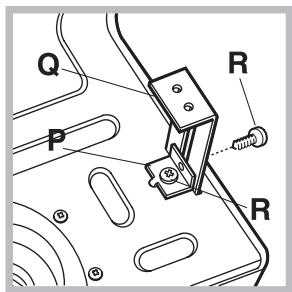
Fig. 8
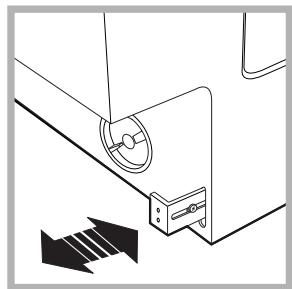
Fig. 9
Accessories provided for the height adjustment.
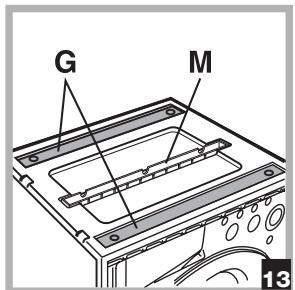
The following can be found inside the polystyrene lid (fig. 10): 2 crossbars (G), 1 strip (M)
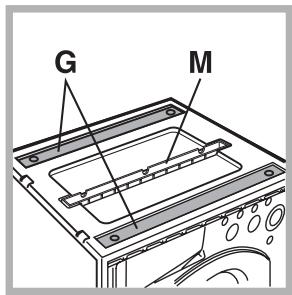
the following can be found inside the appliance drum:
4 additional feet (H)
4 screws (I),
4 screws ()
4 nuts (L)
2 plinth guides (Q)
Fig. 10
Adjusting the appliance height.
The height of the appliance can be adjusted (from 815 mm to 835 mm), by turning the 4 feet.
Should you require the appliance to be placed higher than the above height, you need to use the following accessories to raise it to up to 870 mm:
the two crossbars (G); the 4 feet (H); the 4 screws (I); the 4 nuts (L) then perform the following operations (fig. 11):
remove the 4 original feet, place a crossbar G at the front of the appliance, fastening it in place using screws I (screwing them in where the original feet were) then insert the new feet H.
Repeat the same operation at the back of the appliance.
Now adjust feet H to raise or lower the appliance from 835 mm to 870 mm.
Once you have reached the desired height, lock nuts L onto crossbar G.
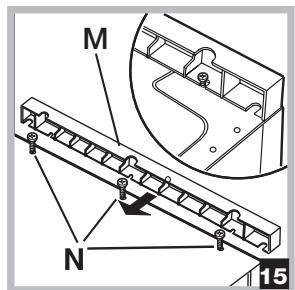
To adjust the appliance to a height between 870 mm and 900 mm, you need to mount strip M, adjusting feet H to the required height.
Insert the strip as follows:
loosen the three screws N situated at the front of the Top cover of the appliance, insert strip M as shown in fig. 12, then fasten screws N .
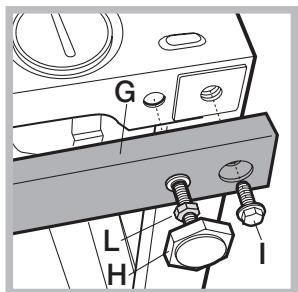
Fig. 11
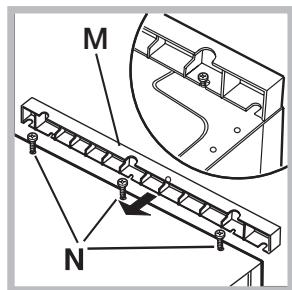
Fig. 12
Description of the washing machine
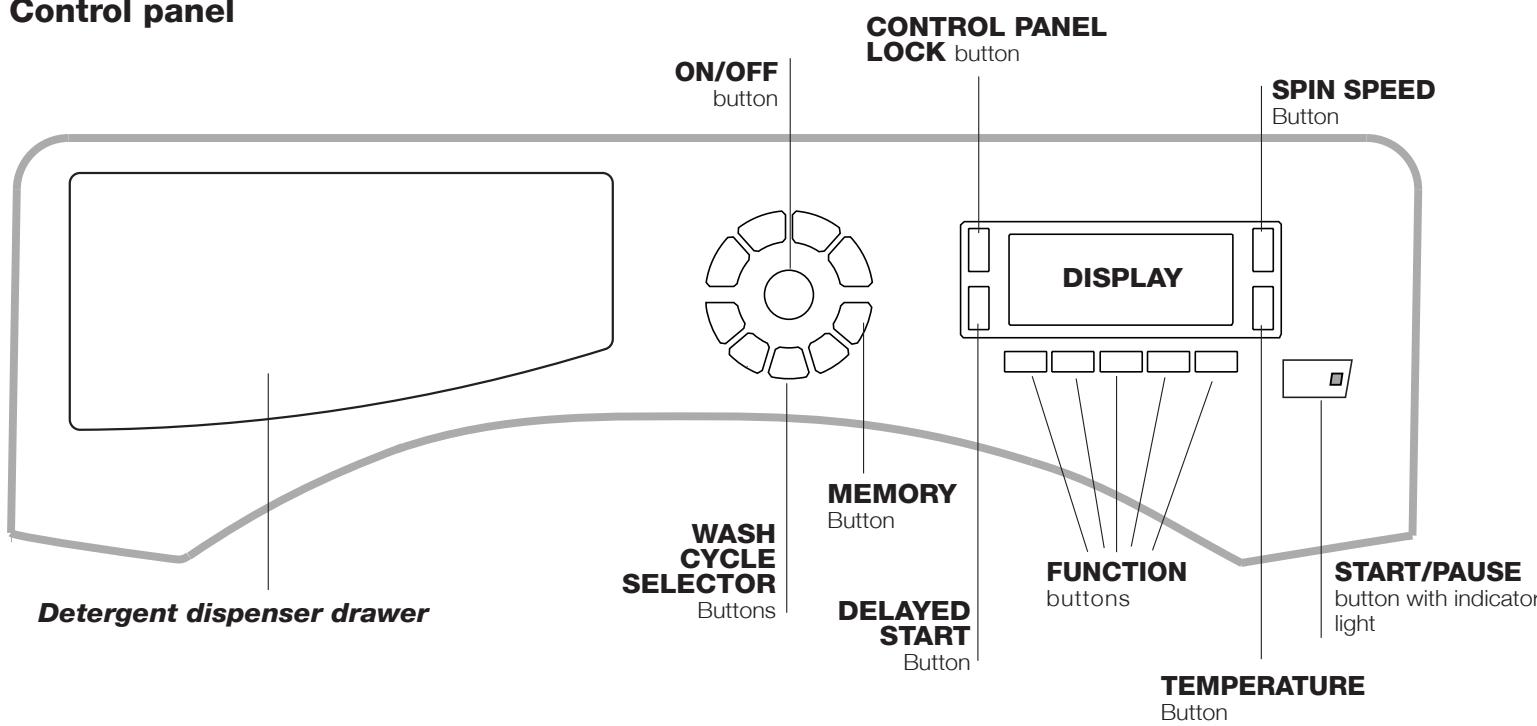
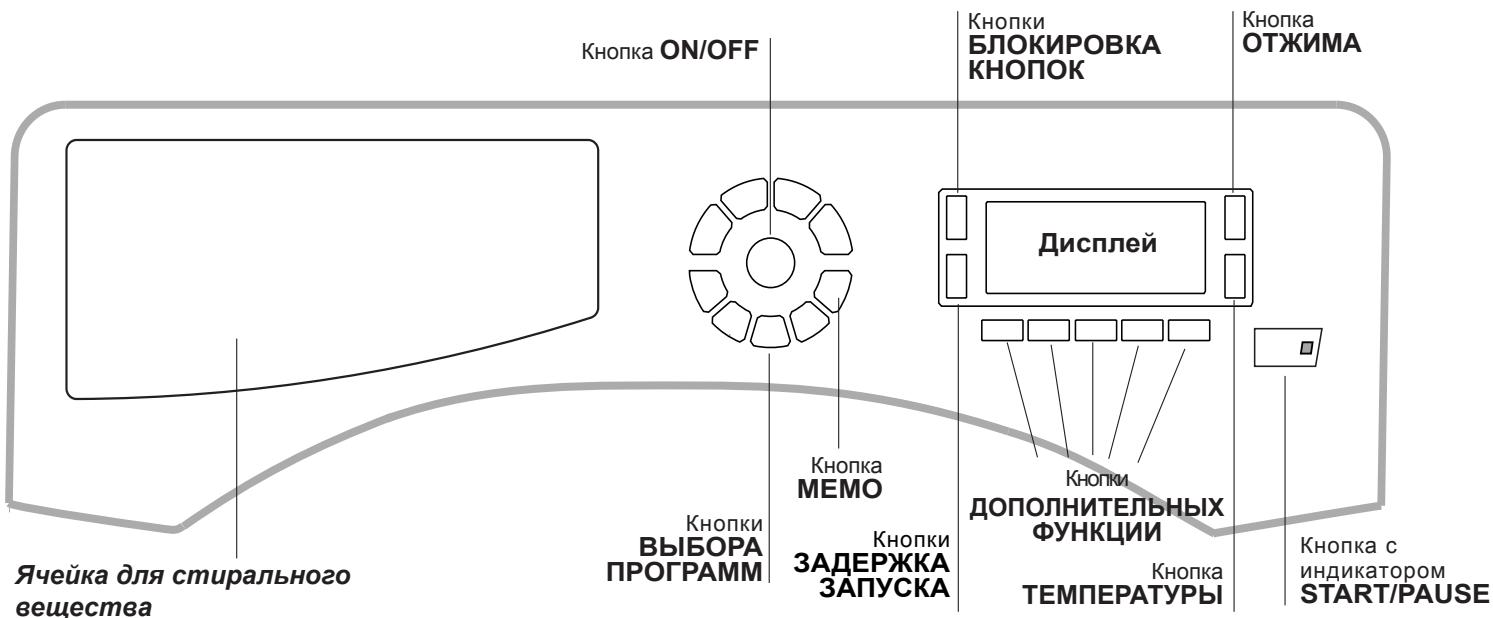
Control panel
Detergent dispenser drawer: used to dispense detergents and washing additives (see “Detergents and laundry”).
ON/OFF button: press this briefly to switch the machine on or off. The START/PAUSE indicator light, which flashes slowly in a green colour shows that the machine is switched on. To switch off the washing machine during the wash cycle, press and hold the button for approximately 2 seconds; if the button is pressed briefly or accidentally the machine will not switch off. If the machine is switched off during a wash cycle, this wash cycle will be cancelled.
WASH CYCLE SELECTOR buttons: used to set the desired wash cycle (see "Table of wash cycles").
MEMORY button: press and hold the button to store a cycle with your own set of preferences in the memory of the machine. To recall a previously stored cycle, press the MEMORY button.
FUNCTION buttons: press the button to select the desired function. The corresponding indicator light on the display will switch on.
SPIN button ⑨ : press to reduce or completely exclude the spin cycle - the value is indicated on the display.
TEMPERATURE button: press to decrease the temperature: the value will be shown on the display.
CONTROL PANEL LOCK button: to activate the control panel lock, press and hold the button for approximately 2 seconds. When the symbol is illuminated, the control panel is locked. This means it is possible to prevent wash cycles from being modified accidentally, especially where there are children in the home. To deactivate the control panel lock, press and hold the button for approximately 2 seconds.
DELAYED START button: press to set a delayed start time for the selected wash cycle. The delay time will be shown on the display.
START/PAUSE button with indicator light: when the green indicator light flashes slowly, press the button to start a wash cycle. Once the cycle has begun the indicator light will remain lit in a fixed manner. To pause the wash cycle, press the button again; the indicator light will flash in an orange colour. If the symbol 0 is not illuminated, the door may be opened. To start the wash cycle from the point at which it was interrupted, press the button again.
Standby mode
This washing machine, in compliance with new energy saving regulations, is fitted with an automatic standby system which is enabled after about 30 minutes if no activity is detected. Press the ON-OFF button briefly and wait for the machine to start up again.
Consumption in off-mode: 0,5 W
Consumption in Left-on: 0,5 W
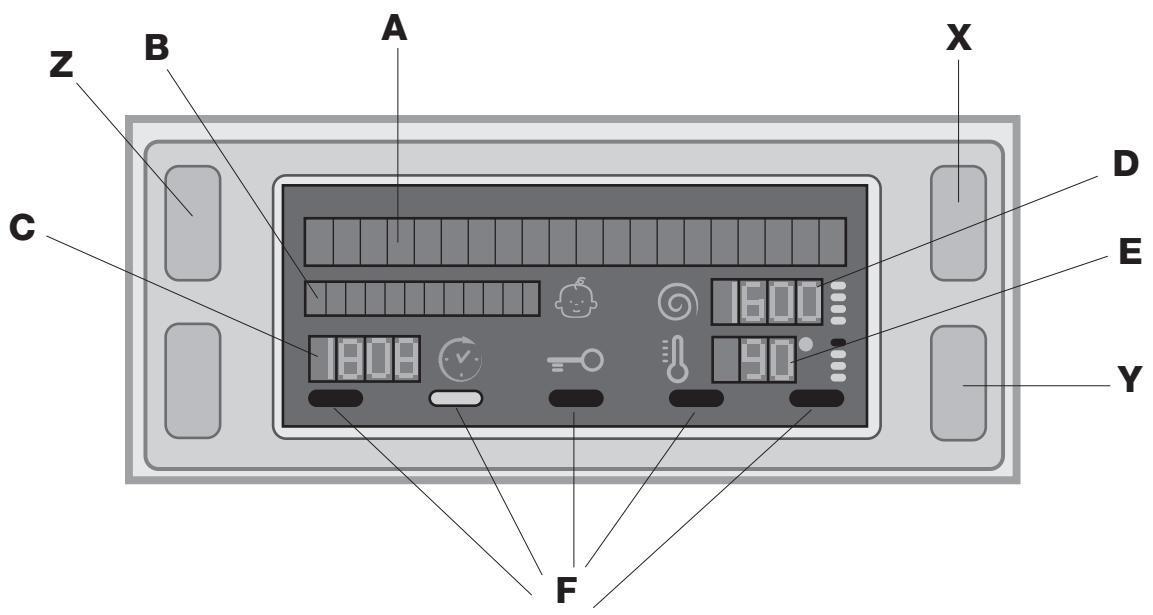
Display
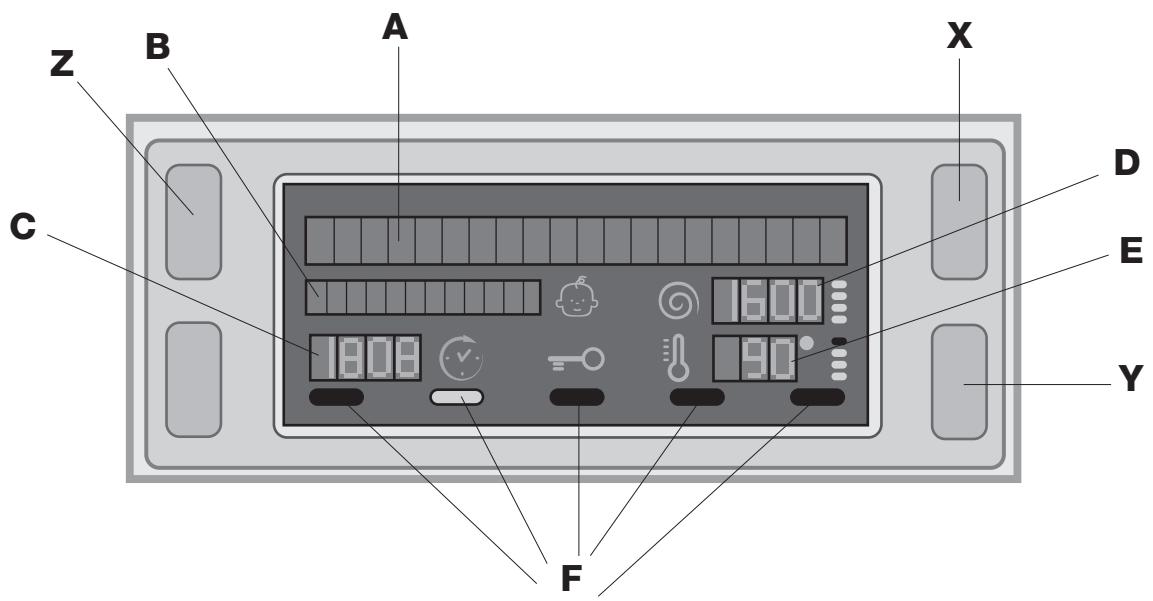
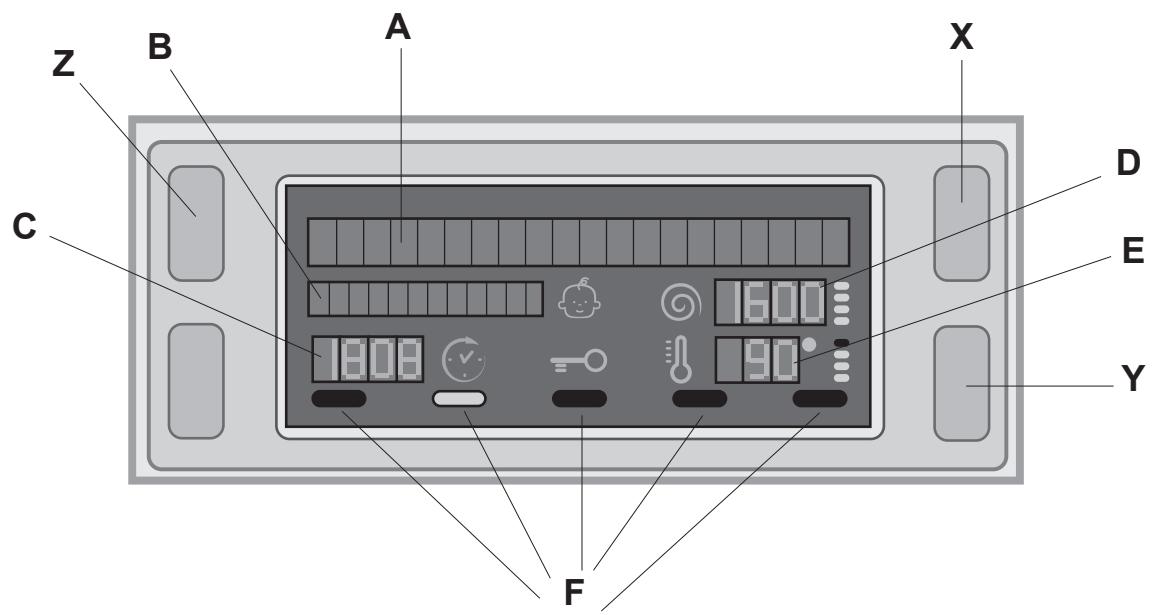
The display is useful when programming the machine and provides a great deal of information.
The two upper strings A and B provide details of the wash cycle selected, the wash cycle phase in progress and all information relating to the progress status of the wash cycle.
String C shows the time remaining until the end of the wash cycle in progress and, if a DELAYED START has been set, the time remaining until the start of the selected wash cycle.
String D shows the maximum spin speed value (this depends on the selected wash cycle); if the wash cycle does not include a spin cycle, the string remains unused.
String E shows the maximum temperature value which may be selected (this depends on the wash cycle used); if the temperature of the wash cycle cannot be modified, the string remains unused.
Indicator lights F correspond to the functions and light up when the selected function is compatible with the set wash cycle.
Door locked symbol 0
If the symbol is lit, this indicates that the washing machine door is blocked to prevent it from being opened accidentally. To prevent any damage from occurring, wait for the symbol to switch itself off before opening the appliance door.
N.B.: if the DELAYED START function has been activated, the door cannot be opened; pauses the machine by pressing the START/PAUSE button if you wish to open it.
The first time the machine is switched on, you will be asked to select the language and the display will automatically show the language selection menu.
To select the desired language press the X and Y buttons; to confirm the selection press the Z button.
To change the language switch off the machine and press buttons X, Y, Z simultaneously until an alarm is heard: the language-selection menu will be displayed again.
- SWITCH THE MACHINE ON. Press the button; the text HELLO will appear on the display and the START/PAUSE indicator light will flash slowly in a green colour.
- LOAD THE LAUNDRY. Open the porthole door. Load the laundry, making sure you do not exceed the maximum load value indicated in the table of programmes on the following page.
- MEASURE OUT THE DETERGENT. Pull out the detergent dispenser drawer and pour the detergent into the relevant compartments as described in "Detergents and laundry".
4. CLOSE THE DOOR.
- SELECT THE WASH CYCLE. Press one of the WASH CYCLE SELECTOR buttons to select the required wash cycle; the name of the wash cycle will appear on the display. A temperature and spin speed is set for each wash cycle; these may be adjusted. The duration of the cycle will appear on the display.
- CUSTOMISE THE WASH CYCLE. Use the relevant buttons:
Modifying the temperature and/or spin speed. The machine automatically selects the maximum temperature and spin speed set for the selected wash cycle; these values cannot therefore be increased. The temperature can be decreased by pressing the button, until the cold wash "OFF" setting is reached. The spin speed may be progressively reduced by pressing the button, until it is completely excluded (the "OFF" setting). If these buttons are pressed again, the maximum values are restored.
!Exception:if the 60^ 1st press of the button) programme is selected, the temperature can be increased up to a value of 90^
Setting a delayed start.
To set a delayed start for the selected programme, press the corresponding button repeatedly until the required delay period has been reached. When this option is enabled, the symbol lights up on the display. To remove the delayed start function press the button until the text "OFF" appears on the display.
Modifying the cycle settings.
- Press the button to enable the function; the indicator light corresponding to the button will switch on.
- Press the button again to disable the function; the indicator light will switch off.
! If the selected function is not compatible with the programmed wash cycle, the indicator light will flash and the function will not be activated.
If the selected function is not compatible with another function which has been selected previously,
the indicator light corresponding to the first function selected will flash and only the second function will be activated; the indicator light corresponding to the enabled function will remain lit.
The functions may affect the recommended load value and/or the duration of the cycle.
- START THE PROGRAMME. Press the START/ PAUSE button. The corresponding indicator light will become green, remaining lit in a fixed manner, and the door will be locked (the DOOR LOCKED O symbol will be on). During the wash cycle, the name of the phase in progress will appear on the display. To change a wash cycle while it is in progress, pause the washing machine using the START/PAUSE button (the START/ PAUSE indicator light will flash slowly in an orange colour); then select the desired cycle and press the START/PAUSE button again.
To open the door while a cycle is in progress, press the START/PAUSE button; if the DOOR LOCKED O symbol is switched off the door may be opened. Press the START/PAUSE button again to restart the wash cycle from the point at which it was interrupted.
- THE END OF THE WASH CYCLE. This will be indicated by the text "END OF CYCLE" on the display; when the DOOR LOCKED symbol switches off the door may be opened. Open the door, unload the laundry and switch off the machine.
If you wish to cancel a cycle which has already begun, press and hold the button. The cycle will be stopped and the machine will switch off.
Wash cycles and functions
Table of wash cycles
| Wash cycles | Description of the wash cycle | Max. temp.(°C) | Max. speed(rpm) | Detergents | Max. load(kg) | Residual dam-press % | Energy consumption kWh | Total water ht | Cycle duration |
| Prewash | Wash | Fabric softener | Bleach |
| 14 | Anti Stain | 40° | 1400 | ● | ● | ● | ● | 4 | - | - | - | 180' |
| 2 | Standard Cotton 60° (1) (1st press of the button): heavily soiled whites and delicate colours. | 60°(Max. 90°) | 1400 | ●(3) | ● | ● | ● | 7 | 53 | 1,1 | 58 | 190' |
| 3 | Standard Cotton 40° (2) (2nd press of the button): lightly soiled whites and delicate colours. | 40° | 1400 | - | ● | ● | ● | 7 | 53 | 0,99 | 82 | 185' |
| 4 | Standard Cotton 20° (3rd press of the button): lightly soiled whites and delicate colours. | 20° | 1400 | - | ● | ● | ● | 7 | - | - | - | 170' |
| 5 | Synthetics Resistant (1st press of the button): heavily soiled resistant colours. | 60° | 800 | ● | ● | ● | ● | 3 | 44 | 0,93 | 47 | 110' |
| 6 | Synthetics Resistant (4) (1st press of the button): lightly soiled resistant colours. | 40° | 800 | ● | ● | ● | ● | 3 | 44 | 0,57 | 46 | 95' |
| 7 | Synthetics Delicate (2nd press of the button): lightly soiled resistant colours. | 40° | 800 | ● | ● | ● | ● | 3 | - | - | - | 70' |
| 8 | Fastwash 60' (1st press of the button): to refresh normal soiled garments quick-ly (not suitable for wool, silk and clothes which require washing by hand). | 60° | 1400 | - | ● | ● | - | 3,5 | 53 | 0,81 | 40 | 60' |
| 9 | Fastwash 30' (2nd press of the button): to refresh lightly soiled garments quick-ly (not suitable for wool, silk and clothes which require washing by hand). | 30° | 800 | - | ● | ● | - | 3 | 71 | 0,15 | 35 | 30' |
| M | My Cycle: allows for any wash cycle to be stored. |
| 10 | Anti Allergy | 60° | 1400 | - | ● | ● | - | 4 | - | - | - | 195' |
| 11 | Woolmark Platinum (Wool): for wool, cashmere, etc. | 40° | 800 | - | ● | ● | - | 1,5 | - | - | - | 70' |
| 12 | Delicates | 30° | 0 | - | ● | ● | - | 1 | - | - | - | 80' |
| 13 | Spin (1st press of the button) | - | 1400 | - | - | - | - | 7 | - | - | - | 16' |
| 14 | Rinse (2nd press of the button) | - | 1400 | - | - | ● | ● | 7 | - | - | - | 36' |
| 15 | Pump out (3rd press of the button) | - | 0 | - | - | - | - | 7 | - | - | - | 2' |
The length of cycle shown on the display or in this booklet is an estimation only and is calculated assuming standard working conditions. The actual duration can vary according to factors such as water temperature and pressure, the amount of detergent used, the amount and type of load inserted, load balancing and any wash options selected.
1) Test wash cycle in compliance with directive 1061/2010: set wash cycle 60^ (1st press of the button). This cycle is designed for cotton loads with a normal soil level and is the most efficient in terms of both electricity and water consumption; it should be used for garments which can be washed at 60^ . The actual washing temperature may differ from the indicated value.
2) Test wash cycle in compliance with directive 1061/2010: set wash cycle 40^ (2nd press of the button).
This cycle is designed for cotton loads with a normal soil level and is the most efficient in terms of both electricity and water consumption; it should be used for garments which can be washed at 40^ . The actual washing temperature may differ from the indicated value.
3) At 60^ the "Prewash" function cannot be selected.
For all Test Institutes:
2) Long wash cycle for cottons: set wash cycle 40^ (2nd press of the button).
4) Long wash cycle for synthetics: set wash cycle 60^ (1st press of the button); temperature of 40^ (press TEMPERATURE button).
Wash functions
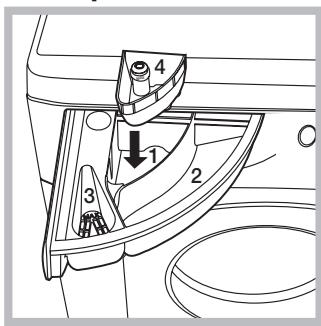
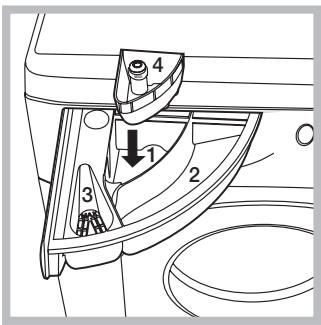
Super Wash
This option offers a high-performance wash due to the greater quantity of water used in the initial phase of the cycle, and due to the increased wash cycle duration, is particularly useful for the removal of stubborn stains. It can be used with or without bleach. If you desire bleaching, insert the extra tray compartment (4) into compartment 1. When pouring in the bleach, be careful not to exceed the "max" level marked
on the central pivot (see figure). To bleach laundry without carrying out a full wash cycle, pour the bleach into the extra compartment 4, select the "Rinse" cycle and activate the "Super Wash" option.
! The use of extra compartment 4 excludes the "Pre-wash" function.
! It cannot be used with the 心 , 心 , 心 , "Spin", "Pump out".
By selecting this option, the efficiency of the rinse is increased and optimal detergent removal is guaranteed. It is particularly useful for sensitive skin.
! It cannot be used with the "Fastwash 30", , , "Spin", "Pump out".
Easy Iron
By selecting this function, the wash and spin cycles will be modified in order to reduce the formation of creases. At the end of the cycle the washing machine will perform slow rotations of the drum; the EASY IRON and START/PAUSE indicator lights will flash (orange) and the text "END OF CYCLE" will appear on the display. To end the cycle, press the START/PAUSE button or the EASY IRON button. To drain the water so that the laundry may be removed, press the START/PAUSE button or the EASY IRON button.
It cannot be used with the "Fastwash 30", ⌒, ⌒.
P Prewash
If this function is selected, the pre-wash cycle will run; this is useful for removing stubborn stains.
N.B.: put the detergent in the relevant compartment.
It cannot be used with the, 一 _ 1 ^ 一 , 一 _ 2 ^ 一 , 一 _ 3 ^ 一 (60^), (40^)
Eco Wash
The Eco Wash function saves energy by not heating the water used to wash your laundry – an advantage both to the environment and to your energy bill. Instead, intensified wash action and water optimisation ensure great wash results in the same average time of a standard cycle.
For the best washing results we recommend the usage of a liquid detergent.
! It cannot be used with the , , , , ,
Detergent dispenser drawer
Good washing results also depend on the correct dose of detergent: adding too much detergent will not necessarily result in a more efficient wash, and may in fact cause build up on the inside of your appliance and contribute to environmental pollution.
! Use powder detergent for white cotton garments, for pre-washing, and for washing at temperatures over 60^ C .
! Follow the instructions given on the detergent packaging.
! Do not use hand washing detergents because these create too much foam.
Open the detergent dispenser drawer and pour in the detergent or washing additive, as follows.
compartment 1: Pre-wash detergent (powder)
Before pouring in the detergent, make sure that extra compartment 4 has been removed.
compartment 2: Detergent for the wash cycle (powder or liquid)
Liquid detergent should only be poured in immediately prior to the start of the wash cycle.
compartment 3: Additives (fabric softeners, etc.)
The fabric softener should not overflow the grid.
Preparing the laundry
- Divide the laundry according to:
- the type of fabric/the symbol on the label
- the colours: separate coloured garments from whites
- Empty all garment pockets and check the buttons.
- Do not exceed the listed values, which refer to the weight of the laundry when dry:
Durable fabrics: max. 7 kg
Synthetic fabrics: max. 3 kg
Wool: max. 1,5 kg
Silk: max. 1 kg
How much does your laundry weigh?
1 sheet 400-500 g
1 pillow case 150-200 g
1 tablecloth 400 - 500g
1 bathrobe 900-1200 g
1 towel 150-250 g
Special wash cycles
Anti Stain: this programme is suitable to heavily-soiled garments with resistant colours. It ensures a washing class that is higher than the standard class (A class). When running the programme, do not mix garments of different colours. We recommend the use of powder detergent. Pre-treatment with special additives is recommended if there are obstinate stains.
Standard Cotton 20^ : ideal for heavily soiled cotton loads. The effective performance levels achieved at cold temperatures, which are comparable to washing at 40^ , are guaranteed by a mechanical action which operates at varying speed, with repeated and frequent peaks.
Anti Allergy: use programme to remove major allergens such as pollen, mites, cat's and dog's hair.
Wool: the wool wash cycle on this Hotpoint/Ariston machine has been tested and approved by The Woolmark Company for washing wool garments labelled as hand washable provided that the garments are washed according to the instructions on the garment label and those issued by the manufacturer of this washing machine. Hotpoint/Ariston is the first washing machine brand to be approved by The Woolmark Company for Apparel Care- Platinum for its washing performance and consumption of energy and
water. (M1126)


Delicates: use programme to wash very delicate garments with decorative features, such as diamantes and sequins.
We recommend turning the garments inside out before washing and placing small items into the special bag for washing delicates. Use liquid detergent on delicate garments for best results.
To wash Silk garments and Curtains, select cycle 和 and then function 一 (in this case it will also be possible to enable the "Extra Rinse" function); the machine will end the cycle while the laundry is soaking and the indicator light will flash. To drain the water so that the laundry may be removed, press the START/PAUSE button or the 一 button.
Load balancing system
Before every spin cycle, to avoid excessive vibrations and to distribute the load in a uniform manner, the drum rotates continuously at a speed which is slightly greater than the washing rotation speed. If, after several attempts, the load is not balanced correctly, the machine spins at a reduced spin speed. If the load is excessively unbalanced, the washing machine performs the distribution process instead of spinning. To encourage improved load distribution and balance, we recommend small and large garments are mixed in the load.
This washing machine was designed and constructed in accordance with international safety regulations. The following information is provided for safety reasons and must therefore be read carefully.
General safety
- This appliance was designed for domestic use only.
- This appliance is not intended for use by persons (including children) with reduced physical, sensory or mental capabilities, or lack of experience and knowledge, unless they have been given supervision or instruction concerning use of the appliance by a person responsible for their safety. Children should be supervised to ensure that they do not play with the appliance.
- Do not touch the machine when barefoot or with wet or damp hands or feet.
- Do not pull on the power supply cable when unplugging the appliance from the electricity socket. Hold the plug and pull.
- Do not open the detergent dispenser drawer while the machine is in operation.
- Do not touch the drained water as it may reach extremely high temperatures.
- Never force the porthole door. This could damage the safety lock mechanism designed to prevent accidental opening.
- If the appliance breaks down, do not under any circumstances access the internal mechanisms in an attempt to repair it yourself.
- Always keep children well away from the appliance while it is operating.
- The door can become quite hot during the wash cycle.
- If the appliance has to be moved, work in a group of two or three people and handle it with the utmost care. Never try to do this alone, because the appliance is very heavy.
- Before loading laundry into the washing machine, make sure the drum is empty.
Disposal
- Disposing of the packaging materials: observe local regulations so that the packaging may be re-used.
- The European Directive 2002/96/EC on Waste Electrical and Electronic Equipment, requires that old household electrical appliances must not be disposed of in the normal unsorted municipal waste stream. Old appliances must be collected separately in order to optimise the recovery and recycling of the materials they contain and reduce the impact on human health and the environment. The crossed out "wheeled bin" symbol on the product reminds you of your obligation, that when you dispose of the appliance it must be separately collected. Consumers should contact their local authority or retailer for information concerning the correct disposal of their old appliance.
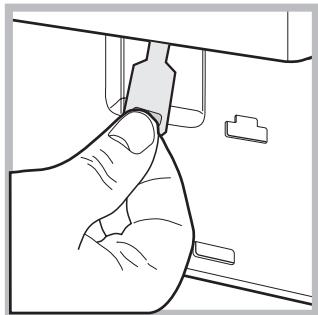
Opening the porthole door manually
In the event that it is not possible to open the porthole door due to a powercut, and if you wish to remove the laundry, proceed as follows:
- remove the plug from the electrical socket.
- make sure the water level inside the machine is lower than the door opening; if it is not, remove excess water using the drain hose, collecting it in a bucket as indicated in the figure.
- pull outwards using the tab as indicated in the figure, until the plastic tie-rod is freed from its stop position; pull downwards and open the door at the same time.

Cutting off the water and electricity supplies
- Turn off the water tap after every wash cycle. This will limit wear on the hydraulic system inside the washing machine and help to prevent leaks.
- Unplug the washing machine when cleaning it and during all maintenance work.
Cleaning the washing machine
The outer parts and rubber components of the appliance can be cleaned using a soft cloth soaked in lukewarm soapy water. Do not use solvents or abrasives.
Cleaning the detergent dispenser drawer
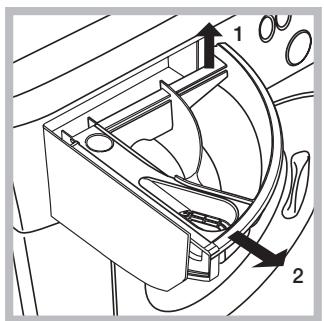
Remove the dispenser by raising it and pulling it out (see figure).
Wash it under running water; this operation should be repeated frequently.
Caring for the door and drum of your appliance
- Always leave the porthole door ajar in order to prevent unpleasant odours from forming.
Cleaning the pump
The washing machine is fitted with a self-cleaning pump which does not require any maintenance. Sometimes, small items (such as coins or buttons) may fall into the pre-chamber which protects the pump, situated in its bottom part.
! Make sure the wash cycle has finished and unplug the appliance.
To access the pre-chamber:
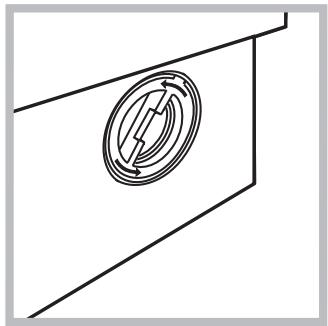
-
unscrew the lid by rotating it anti-clockwise (see figure): a little water may trickle out. This is perfectly normal;
-
clean the inside thoroughly;
- screw the lid back on;
Checking the water inlet hose
Check the inlet hose at least once a year. If there are any cracks, it should be replaced immediately: during the wash cycles, water pressure is very strong and a cracked hose could easily split open.
! Never use second-hand hoses.
Your washing machine could fail to work. Before contacting the Technical Assistance Centre (see "Assistance"), make sure that the problem cannot be solved easily using the following list.
| Problem: | Possible causes / Solutions: |
| The washing machine does not switch on. | · The appliance is not plugged into the socket fully, or is not making contact.
· There is no power in the house. |
| The wash cycle does not start. | · The washing machine door is not closed properly.
· The ON/OFF button has not been pressed.
· The START/PAUSE button has not been pressed.
· The water tap has not been opened.
· A delayed start has been set (see “Running a wash cycle”). |
| The washing machine does not take in water (the text “NO WATER, CHECK SUPPLY” appears on the display). | · The water inlet hose is not connected to the tap.
· The hose is bent.
· The water tap has not been opened.
· There is no water supply in the house.
· The pressure is too low.
· The START/PAUSE button has not been pressed. |
| The washing machine continuously takes in and drains water. | · The drain hose is not fitted at a height between 65 and 100 cm from the floor (see “Installation”).
· The free end of the hose is under water (see “Installation”).
· The wall drainage system is not fitted with a breather pipe.
If the problem persists even after these checks, turn off the water tap, switch the appliance off and contact the Assistance Service. If the dwelling is on one of the upper floors of a building, there may be problems relating to water drainage, causing the washing machine to fill with water and drain continuously. Special anti-draining valves are available in shops and help to avoid this inconvenience. |
| The washing machine does not drain or spin. | · The wash cycle does not include draining: some wash cycles require the drain phase to be started manually (see “Wash cycles and functions”).
· The EASY IRON function has been activated: To complete the wash cycle, press the START/PAUSE button (see “Wash cycles and functions”).
· The drain hose is bent (see “Installation”).
· The drainage duct is clogged. |
| The washing machine vibrates a lot during the spin cycle. | · The drum was not unlocked correctly during installation (see “Installation”).
· The washing machine is not level (see “Installation”).
· The washing machine is trapped between cabinets and walls (see “Installation”). |
| The washing machine leaks. | · The water inlet hose is not screwed on properly (see “Installation”).
· The detergent dispenser drawer is blocked (for cleaning instructions, see “Care and maintenance”).
· The drain hose is not fixed properly (see “Installation”). |
| The machine is locked and the display flashes, indicating an error code (e.g. F-01, F-..). | · Switch off the machine and unplug it, wait for approximately 1 minute and then switch it back on again.
If the problem persists, contact the Technical Assistance Service. |
| There is too much foam. | · The detergent is not suitable for machine washing (it should display the text “for washing machines” or “hand and machine wash”, or the like).
· Too much detergent was used. |
Before calling for Assistance:
- Check whether you can solve the problem alone (see "Troubleshooting");
- Restart the programme to check whether the problem has been solved;
- If this is not the case, contact an authorised Technical Assistance Centre using the telephone number provided on the guarantee certificate.
! Always request the assistance of authorised technicians.
- the type of problem;
the appliance model (Mod.);
the serial number (S/N).
This information can be found on the data plate applied to the rear of the washing machine, and can also be found on the front of the appliance by opening the door.

Italiano
Summario
Consumo in off-mode: 0,5 W
Consumo in Left-on: 0,5 W
Display
IHCtpyKuINI MoTaxy OobopyoBaHnA
Onncahne cTnpaJIbHoi MaunHbl, 48-49
Pahenb ynpablenia
Ducnnei
Iopraok BbINOJIHeHna cIKNa cTnpKn, 50
PpOrpaMbI nФункци, 51
Tablina nporpamM
Функци CTnIPKIN
BWMD 742
CTnpaIbHbIe BeIeCtBa I Tnbl 6JIb, 52
PacnpedeIeITeIb MOIOxN cpeIcTB
IodrotOBka 6eBja
CneuaJIbHbIe nporpaMMbl
CnCTema 6aJIaHcnpOBKn 6eJIbIa
PpeOocToPOXHOCTn I peKOMeHdaaun, 53
Obuine Tpe6oBaHnK 6e3oNaChOCTN
YtJnI3aIy
AbarHoe OTKpbTne JIOka
Texnueckoe o6cnykmbaHne u yxo, 54
Öklnüchene Bɔdbyi 3JIeKtpnueckoro Toka
YXoI3aCTnpaJIbHOIMaSHINHOI
Yxoid3a pacnpedeIeIeM MOIOux CpeIDCTB
YXoI 3aJIIOKOMI6apabahOM
YxO3aHacocOM
HencnpaBHOCTN MeToDbI nx yctpaHeHn, 55
CepBnchoe o6cnyxNbHne, 56
! CoxpaHnTe daHHoe pyKOBOcTBO. OHO doJXHO 6bITb B KOMnIeKTe CO CTnpaJIbHOm MaunHOB B cnyae npOdaJN, Ipepeaun o6OpyIOBaHn IIN pni nepee3De Ha HObyIO KBapTpy, YTObI HObI BJaJeNeU o6OpyIOBaHn MO 03HaKOMMTbcra C npaBnAmn erO fYHKUOHpOBaHn I 06CnJyKBaHn.
!BnMaTeIbHo npOuHTaTe pyKOBoDCTBO:B HEM COePkaTcB BaxHbIe CBeDeHnI NO yCTaHOBKe I 6e3OpacHOJ KcNpyataun CTnpaJIbHO MaUNHbI.
PacnaKOBka N BbIpaBnBaHne
PacnaKOBka
- PacnakyIte CtnpaJIbHyO MaShInHy.
- YbEaTeScb, yTO o6OpUoBaHne He 6bIIO NOBpeXeHO BO Bpemr TpaHcnpTnPoBKn. Ppr O6hApUxKeHn IOBpeXeHn - He NODKJIouaYte MaunHy-CBJXtEcB CIOCTaBUnkOM HMeDJIeHNO.
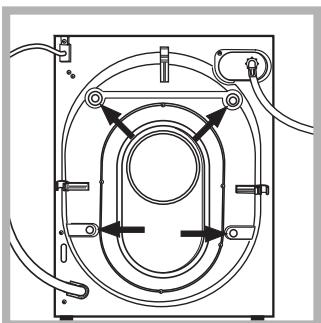
3.YdaJInteYeTbIpe TpaHCnOpTnPoBOUHbIX BInHTaN pe3INHOBbie np6Kn C npOKJaKamn, paCNoJIOKeHHbIe B 3aDHei qactn CTnpaJIbHoM MaunHbI (CM.pUC.).
4.3akpoTe OTBepCTn npuIarauOUMNCn PnlaCTNKOBbIMN 3aflnyuKamn.
5. CoxpanyIe BCE deTani: OHI Bam noHaIO6aTc npi nocJeDyuOe TpaHcnpOpTnPoBKe CTnpaJIbHOI MaunHbl.
!He pa3pewaIte DeTm nIrpTaB C ypaKOBOHyIMMaTePnAJaMn.
BbipabHbHne
- UctaHOBInTe CTnpaIbHyIO MaunHy Ha POBHom IN npOCHOM NOny, TAK YTObI OHa He Kacanacb CTeH, Me6eN IN npOuNX PpeDMeTOB.
- Y6eIntecb, yTo IJIaHr He nepeKpyeH n He nepeXkaT.
!Давпене Воры Должно 6ыть В п dedлax 3начени, уka3aHHbIXВ tabииce TexHnuecknxХapakTeprncTik (cM. c. 3).
!EcnIДиHa BOJOpBOJHO Ro ⅢaHra OKaKeTcA HeIOCTaTOUHoi,OBpaNTecbVBABTopu3OBAHHbI cepBnCHbI ueHTp.
HnkOrda He nCnOJIb3yIte 7JnaHr,6bIBuHe ByynoTpe6JeHm.
PoiCoeHHeHne CInBHoro IJnHaIra
IoDCoeDINHTe CInBHOJ
UHaHr, He nepeRn6a erO,
K CInBHOJ TpyBe Nn K
HaCTeHHOMy CInBHOMy
OTBepCTNIO, paCNILOXKeHHOMy
Ha BbICote OT 65 do 100 cm
OT POnA,
IIN NOMECTNTe ⅢaHr B
paKOBnHy IIN B BaHHy,
3aKpeINB npInaratoOuocn
HaipabJIHOUIO K KpaHy (CM.
cxemy). CBo6oHNbIK OHeuC
CINBHOrO ⅢaHra He DoJKeH
6bItb NorpyKeH B BodY.
!He pekomehnyetcnaOpnb3oBaTb ydInHnTeIbHbIe IaHn. Pnp HeobxOIMOCtN ydInHeHne DoJXHO IMeTb TAKO JNe dNaMeTp, YTO n OpRHaJIbHbIy IJHaHr, N erO dIIHa HdoJXHa pReBbIwaTb 150 cm.
IopKJIoueHne K 3JIeKTPocetn
IpepeBkJIuOHeHemn3dJIeNBApo3eTKy3JIeKTPocETn Heo6xOIMNO pnoBepntb CneDyUouee:
3a3eMJIIOUHKOHTAKDByXNIOJIOCHOPO3ETKIN OJIXeH6bITb COEHNHEc 3a3eMJIeHNEM I COOTBETCTBOBAtB HOpMaTnBAM;
- po3eTka 3JIeKTPocetTu DOnJXHa 6bIb paCHTaHa Ha MaKcImaJIbHyIO MOUHOCtB CTnpaJIbHOi MaUINHbl, yKa3aHHyU B Ta6Nuce TexHnueCKne daHHbIe (cM. ma6nucy c6Oky);
- HaprajkeHne 3JIeKTPocETn DOJNXHO COOTBeTCTBOBaTb 3NaueHnM, yKa3aHHbIM B Ta6nIe TexHnYeCKne daHHbIe (cM. ma6nucy c6oky);
3Jektpnuecka po3eTka n 7TeNceIbHa BUnKa CTnpaIbHO MaunHb IOnKhb6bITb OndHO TnPa. B npOTNBOM cnyae HeoXoDIMO 3aMeHHTb po3eTKy.
!3anpeaetaCyaTaHaBnBaTbCTnpaIbHyoMaunHy Ha yInue,daKe NOD HABecOM,TAK KAc ONaCHO NOBepraTbe BO3deNCTBNU DOJXI Irpo3bl.
!CtnpaJIbHaMaIINHa DoJIXHa 6bITb paCnOIOXeHa TaKIM O6pa3OM, YTO6bI DOCTyN K PO3ETke 3JIeKTPocETn OCTaBaJIcR CBO6OHNbIM.
!He nCnoJIb3yIte ydIINHITeJI n TpoIHNKn.
!CeteboKaBeIbN3dJIeNHe DoJKeH 6bItb CoHyt NIm Cxat.
!3aMeHa ceteBoro Ka6eJMy MoKeT OcyuIeCTBnAToTOLbKO yNoNHomOueHHbIMN cepBnCHbIMN ueHTpa
BhimaHne!ΦnpMa CHImaET C Ce6B BCaKyO OTBeTCTBeHHoCTb B Cnyuae HecobJIOHeNn BblIeONNCaHHbIX PpaBnI.
PepBbI zHKJI cTnpKn
PnncnocoblennaIpepyunpoBKn BbICOTbICTnpaJIbHOMaunHbI
(HNxHEn DeKopatNBHOI paHEn) (Q).
IopkpbikkoN3 noJnCTnpoNa (puc.13) haxoTcra:2 nonepueHbIe HakJaKn (G); 1 nlaHaKa (M).
BHytpn6abapabaMaunHbI:
4ДОПОЛНИТЕNBHBE HOЖКИ (H); 4ВИNTA (I);
4 BnHTa (R);
4raikn(L);
2 Haprabnyouxn nIy nIInHTyca
PerylnpoBKa BbICOtbl CTnpaIbHOn MaunHbI
BpaueHnem 4-x HOxEK BbICota CTnpaJIbHOI MaUHHbI MOXET 6bITb OTpeYInPOBaHa O T 815 Do 835 MM.
Ecn Tpe6yETc yCTaHOBHT MaunHy Ha 6o 'IbUyO BbICOTy (do 870 MM), CneNyET NcNoB3OBaTb 2 HAKJaIKN (G); 4 DOnOpHnTeJIbHbIe HOKKn (H); 4 BnHTa (I); 4 raJkn (L) (cm. puc.14).
BbINOHNHe CneIyUoee: BbIBepHnTe 4 IMeIOUInecr HOxKn, IOMecTIne IOnpeuHyO HAKJaIKy G B nepeJHne Yactn OOBpyOBoAHnY N3aKePInTe ee BNHTAmI (BkpyTINB INX B OTBepCTNr, rIpe paHee 6bln 3aKpenJIeHb HOxKn). 3aTeM BKpyTIne DOnONHInTeJIbHbIe HOxKn H. IOBTopIne Yka3aHHbIe WArN dIra 3aJHne CTOpOHbI obOpuyOBoAHn. Tepeb OTpeyInpuyTe BbICOTy MaunHbIOT 835 Do 870 MM C NOMOuBIO DOnONHInTeJIbHbIX HOxEK H. YcTaHOBnB XeJLaEMyIO BbICOTy, 3aФNKCuPyTe raKN L Ha NOpEeyHOH NaKlaDke G. Jnry UcTAHOBKn MaunHbI Ha BbICOTy 870-900 MM, CneJyET YcTAHOBnTB NlaHKy M, OTpeYIpOBab HOxKn H Na TpeSyEmyIO BbICOTy. YTObbl BCTaBnTB NlaHKy M, Ocna6BeT 3 BnHTaN, pacNoJoxKeHHbIE B NepeJHne Yactn BEPxHeN KpbIuKn MaunHbI, NOMEcTIne PNaHky M, KaK noka3aHO Ha pnc.15, n 3aBePHnTe BnHTbl N.
Panaelb ynpableneia
YuekuDnCmupaBHO2oBeuecmea:I3arpy3Ku CTnpalbHbIX BeueCTB u doabok (CM. «CmupaBhie beuecmea umnbI beleny)
KhoNka ON/OFF ①:6bICTpo HaxMnTE 3Tu KhoNky dJa BkIIOueHnra nn BbIKIOueHnra MaunHbI. INHdkaTOp START/PAUSE,peDKo MnaIouu 3eIeHbIM cBETOM, O3NaHaet, YTO MaUNHa BkIIOueHa. JIy BbIKIOueHnra CInpaJIbHO MaUNHbIB PnoceCE CtnpKn HeO6XODmO DepKaTb HaxaToh KhoNky, PnpMeRHO 2 cekyndbl. KopOTkoE nJIN cnyauHoe HaxaTne He npNBedet K OTKIOUeHnIO MaUNHbIB. B cnyuae BbIKIOueHnra MaunHbIB PnoceCE CTnPK TcKUu NzIKJ OTMeHReTc.
KhoNkBbIBOPA PPOrPAMM: Cnyka Tnla Bb6opa HuyKHO npOrpAmMbI (cM. «TbIuua npoapamM»).
KhoNka MEmO: DepeXnTe HaxaToI 3Ty KHOnKy DJIa COxpaHeHn I nePcoHaJIN3nPoBaHHbIX Bamn npOrpAmM. JIy BbI3Oba paHee coXpaHeHHoro ZNKla HaxmTe KhoNky MEmO.
KHOKNI DOONHINTEbHbIX FYHKU:HaXMMTe KHOKNy IJIa Bbl6opa HuxHOi Bam FyHKU. Ha DnCnPee 3aROPITcOOTBETCTByoUni NHdNKATOp.
KHONKa OTXIM ⑥: HaxMMTe 3Ty KHOJky dIy COKpaueHnra CKOpOCTn IIN NIONHO NCKJIoueHnRA OTXIMa - 3HaueHne POKa3bIbAetcRa Ha DCNJIee.
KhoNka TEMNEPATyPA:HaXMMTe 3Ty KhoNky
IЯ yMeHbWeHnA 3NaueHnA TempePaTpybI: 3NaueHne
POKa3bIbAeTcRa Na DInCnJIee.
KHONKa BLOKINPOBKA KHONOK:ДЯВКЛIOUeHnIa6NOKINPOBKN KOHCOLN ynpabJIeHnI DEpXHTe KHOJNKuHaxaTOn npIMepHO 2 cekyHdbI. BKLIOUeHHbI CmMBOJ03Haayet, YTO KOHCOLb ynpabJIeHnI 3a6NOKINPOBaHa.TakIM o6pa3OM, nporpAMMa He MOxET 6bITb CnyauHNo3MeHeHa, OcOBeHHo ecnB DOME dTeN.ДЯOTKJIIOUeHnI 6LOKINPOBKn KOHCOLN ynpabJIeHnI DEpXHTeKHOJNKu HaxaTo npIMepHO 2 cekyHdbI.
KHONKa NyCK C 3ADEPKKOJ Y: HAKMNTe
ДЯ npOrpamMnOBAHn BpeMeH 3aDEpKKn
Nyska Bbl6paHHoN npOrpamMbI. BpeM 3aDEpKKn
POKa3bIBaETcH Na DnCnJIee.
KHOJKA C INHdIKaTOPOM START/PAUSE: KOrJa 3eJIeHbI INHdIKaTOP peDKO MInaet, HaxMMte KHOJky dJa 3aNycka zukla cTnPKu. Iocne nyska zukla INHdIKaTOP nepeCTaet MInaTb. JIЯ npepbIBaHnA cTnPKu BHOBb HaxMMte 3Tu KHOJky; INHdIKaTOP 3aMnraet OpaHXKeBbIM cBeTom. EcJInc cIMBOJ O He rOpNT, MOxHO OTKpbITb JIOK MaSHINbl. JIЯ BO3O6HOBJIeHnA cTnPKu C MOMENTa, KOrJa OHa 6blJa npePBaHa, BHOBb HaxMMte 3Tu KHOJky.
Pexim OxuaHn
Hactoza CTnpaBna Maunha OTbeyaet Tpe6obAHnM HObIX HOpMaTINBOB IO 3KOHOMn 3NeKTPO3Heprn, yKomPJIeKTOBaHa cnCTeMoI aBTOMaTHueCKOTo OTKJIOUeHnR (peXmCoxpaHeHn 3Heprn), BKNIOuAIOSeiCsYepe3 30 MNHyT npocToa Maunbl. HaxmTe oDIn pa3 KHOkky ON/OFF. n POnOxKnTE, NOKa MaunHa BVOBb BKJIOChTcra.
DucnJeI
Dincpnne cnkynt nnporpammmipobahna MaunHbI npedeocTabnre T NOlb3OBaTeJIOMHOXKeCTBO CBeHeH.
Ha IByx BepxHnx CtPOkax A u B noka3bIbaIOTcB bI6paHHa PpOrpMa cTnPK, TeKuza a 0a3a cTnPK u BCE cBeJeHna O BvIOnJIHeHnn PpOrpAMMbI.
Ha cTPOKe C nOKa3bIbAeTcBpeM, ocTaIOUeEeCdo KOHca TeKyuIero UIKNa cTnRKn I, ecn 6bl 3aDaH 3ADEPJKKA 3AIPYCKA, BpeM, ocTaIOUeEeCdo 3aNysKa BbIbpaHHo nporpaMMbl.
Ha cTPOKe D nOKa3bIbAeTcMa KMCmMaJIbHoe 3HaueHHe CKOpOCTn OTXIMa, KOtOpbM MaUHnMoKTe BbINOJIHnTb B 3aBNCmIOCTn OT Bbl6paHHo IporpAMMbI; ecIn Bbl6paHHa IporpAMMa He IpeDyCMaTpINBaET OTXIM, daHHa CTPOKa He BKJIOuHaeTc.
Ha cTpOke E nOKa3bIbaETcra MaKcImMaJIbHOe 3NaueHne TempepaTypbI, KOtOpoe MOxHO BbIbpaTb B 3aBNCIMOCrN OT Bbl6paHHo IIporpAMMbI; ecn N Bbl6paHHa IporpAMMa He npeducMaTpNBaet HacTpoiKy TempepaTypbI, daHHa r CTpOKa He BKJIouyaeTcra.
Инд F OTHOCY T C K ΦyHKUIM 3aRopaHTC, KOrda BbIbpaHHa YHKUIA RBLIeTc COBmctmOc 3aDaHHo nporpammo.
CIMBOJ 3a6nokpoBaHHoro JIOka
BknHcHbI cMBOJ O3HaayeT, YTO JIOK 3a6JIOKINPOBaH BO n36eKaHne erO cnyaHOrO OTKpbIBaHn. Bo n36eKaHne NOBpeXdEHH, nepeTe KAK OTKpbITb JIOK, Heo6xOJIMO DoJdaTbcra, NOK aNORaCHET CmBOJ.
ПРИМЕЧАНЕ: ecлвькючehа Функця 3APYCK C 3AДEPЖКОД, пк OK OTkpыть Heльзя. Дпя 3ТORO HeobxODIMO nepeknchTuMaшинуВ ржим пay3bl pri nnomoцn KhoNk START/PAUSE.
!Pn nepBOM BKNIOeHm MaunHbI NOTpe6yeTcR BbIbpaTB Ja3bIK, IN DCNJIe ABTomATnueckn NOKaXET CTpaHnUy MeHIO Bblbopa J3bika.
He haJIbBaTe onOlaCKnBaTeNb BblIe peWSeTkn OTJeHnI.
DOnoJIHnTeJbHoe OTdJeHHe 4:OT6eJIbBaTeJb
Iodrotobka 6eJb8
- Pa3dJIeIte 6eIbe no cIeNyUoIuM npu3HaKaM:
-TIN TKAHIN/0603HaueHnHa 3TKeTKe.
- CBET: OTdEnIte CBeTHoe 6eIbe OTe 6eNoRo.
- BbIbTe n3 KapMaHOB BCE npEiMeTbI n npOBepbTe pYROBNUbl.
- He npebblaIte MaKcImaIbHyIO 3aRpy3ky 6apabHa, yka3aHHyIO IJI cyXoro 6JIb:
MaunHa HnpepbIBHO 3aINBaet n CInBaet BODy.
CTnpaJIbHa MaunHa He CInBaET BODy Hr OTxnMaet 6eJIbe.
CTnpaJIbHaMaShHa CnJIbHO Bn6pnpyeT B npocece OTXIma.
YTeUKN BObI N3 CTnpaJIbHOIMaUNHbl.
MaunHa 3a6nKnpoBaHa, nCnnei MmraT n Noka3bIbaeT KoI HeNCpabHoctn (HanpM., F-01, F-.).
B npocece ctnpkn o6pa3yeTcnaNtukom 6nJIbHa nHa.
Bo3MOxHbI npuHbI / MToDbl yCTpaHeHnra:
Bvane A. MepnoH 47, 60044, FabpnaHo (AH), IVaJnA
UmmopTeP:
OOO "INHe3nT Pyc"
C Bonpocamn (B Poccnn)
Io 01.01.2011: Pocn, 129223, MockBa, IpocneKr Mnpa, BBLI, naB.46
obpaaatbocnoapecy:
c 01.01.2011: Pocca, 127018, MockBa, yI. DvHueB, dom 12, Kopn. 1