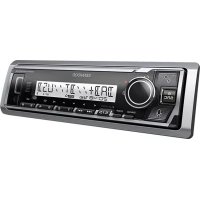
MODE D'EMPLOI KRF-V6300D KENWOOD
KENWOOD
AUDIOVIDEOCONTROLCENTER
KRF-V6300D
INSTRUCTION MANUAL
Kenwood Corporation

Declaration of Conformity with regard to the EMC Directive 2004/108/EC
Manufacturer:
Kenwood Corporation
2967-3 Ishikawa-machi, Hachioji-shi, Tokyo, 192-8525 Japan
EU Representative's:
Kenwood Electronics Europe BV
Amsterdamseweg 37, 1422 AC UITHOORN, The Netherlands

dtts
Digital Surround
ES Neo:6 96/24

DOLBY
DIGITAL EX
PRO LOGIC IIx
RDS
HOMI
Caution : Read this page carefully to ensure safe operation.
Units are designed for operation as follows.
Australia..AC 240 V only
Europe AC 230 V only

Products and batteries with the symbol (crossed-out wheeled bin) cannot be disposed as household waste.
Old electrical and electronic equipment and batteries should be recycled at a facility capable of handling these items and their waste byproducts.
Contact your local authority for details in locating a recycle facility nearest to you.
Proper recycling and waste disposal will help conserve resources whilst preventing detrimental effects on our health and the environment.
Notice: The sign "Pb" below the symbol for batteries indicates that this battery contains lead.
Safety precautions
WARNING :
TO PREVENT FIRE OR ELECTRIC SHOCK, DO NOT EXPOSE THIS APPLIANCE TO RAIN OR MOISTURE.

CAUTION
RISK OF ELECTRIC SHOCK. DO NOT OPEN

CAUTION: TO REDUCE THE RISK OF ELECTRIC SHOCK, DO NOT REMOVE COVER (OR BACK). NO USER-SERVICEABLE PARTS INSIDE. REFER SERVICING TO QUALIFIED SERVICE PERSONNEL.

THE LIGHTNING FLASH WITH ARROWHEAD SYMBOL, WITHIN AN EQUILATERAL TRIANGLE, IS INTENDED TO ALERT THE USER TO THE PRESENCE OF UNINSULATED "DANGEROUS VOLTAGE" WITHIN THE PRODUCT'S ENCLOSURE THAT MAY BE OF SUFFICIENT MAGNITUDE TO CONSTITUTE A RISK OF ELECTRIC SHOCK TO PERSONS.

THE EXCLAMATION POINT WITHIN AN EQUILATERAL TRIANGLE IS INTENDED TO ALERT THE USER TO THE PRESENCE OF IMPORTANT OPERATING AND MAINTENANCE (SERVICING) INSTRUCTIONS IN THE LITERATURE ACCOMPANYING THE APPLIANCE.
Unpacking
Unpack the unit carefully and make sure that all the accessories are present.

FM indoor antenna (1)
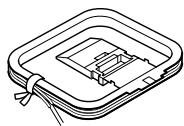
AM loop antenna (1)
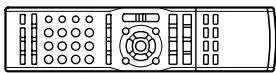
Remote control unit (1) RC-R0517

Batteries* (R03) (2)
- Batteries are attached to the packing material.
If any accessories are missing, or if the unit is damaged or fails to operate, notify your dealer immediately. If the unit was shipped to you directly, notify your shipper immediately. Kenwood recommends that you retain the original carton and packing materials in case you need to move or ship the unit in the future.
Keep this manual handy for future reference.
Caution : Read this page carefully to ensure safe operation.
Read Instructions - All the safety and operating instructions should be read before the product is operated.
Retain Instructions - The safety and operating instructions should be retained for future reference.
HeedWarnings - All warnings on the product and in the operating instructions should be adhered to.
Follow Instructions - All operating and use instructions should be followed.
- Cleaning - Unplug this product from the wall outlet before cleaning. Do not use liquid cleaners or aerosol cleaners. Use a damp cloth for cleaning.
- Attachments - Do not use attachments not recommended by the product manufacturer as they may cause hazards.
- Water and Moisture – This product shall not be exposed to dripping and splashing – for example, near a bath tub, wash bowl, kitchen sink, or laundry tub; in a wet basement; or near a swimming pool; and the like. Do not place an object containing liquid, such as a flower vase, on the appliance.
- Accessories - Do not place this product on an unstable cart, stand, tripod, bracket, or table. The product may fall, causing serious injury to a child or adult, and serious damage to the product. Use only with a cart, stand, tripod, bracket, or

table recommended by the manufacturer. Any mounting of the product should follow the manufacturer's instructions, and should use a mounting accessory recommended by the manufacturer. A product and cart combination should be moved with care. Quick stops, excessive force, and uneven surfaces may cause the product and cart combination to overturn.
- Ventilation – Slots and openings in the cabinet are provided for ventilation and to ensure reliable operation of the product and to protect it from overheating, and these openings must not be blocked or covered. The openings should never be blocked by placing the product on a bed, sofa, rug, or other similar surface. This product should not be placed in a built-in installation such as a bookcase or rack unless proper ventilation is provided or the manufacturer's instructions have been adhered to.
- Power Sources - This product should be operated only from the type of power source indicated on the product. If you are not sure of the type of power supply to your home, consult your product dealer or local power company.
- CAUTION – Polarization – This product may be equipped with a polarized alternating-current line plug (a plug having one blade wider than the other). This plug will fit into the power outlet only one way. This is a safety feature. If you are unable to insert the plug fully into the outlet, try reversing the plug. If the plug should still fail to fit, contact your electrician to replace your obsolete outlet. Do not defeat the safety purpose of the polarized plug.
- Power Cord Protection – Power-supply cords should be routed so that they are not likely to be walked on or pinched by items placed upon or against them, paying particular attention to cords at plugs, convenience receptacles, and the point where they exit from the product.
- Lightning – For added protection for this product during a lightning storm, or when it is left unattended and unused for long periods of time, unplug it from the wall outlet and disconnect the antenna or cable system. This will prevent damage to the product due to lightning and power-line surges.
-
Overloading - Do not overload wall outlets, extension cords, or integral convenience receptacles as this can result in a risk of fire or electric shock.
11.Object and Liquid Entry – Never push objects of any kind into this product through openings as they may touch dangerous voltage points or short-out parts that could result in a fire or electric shock. Never spill liquid of any kind on the product.
-
Servicing - Do not attempt to service this product yourself as opening or removing covers may expose you to dangerous voltage or other hazards. Refer all servicing to qualified service personnel.
- Damage Requiring Service – Unplug this product from the wall outlet and refer servicing to qualified service personnel under the following conditions:
a) When the power-supply cord or plug is damaged,
b) If liquid has been spilled, or objects have fallen into the product,
c) If the product has been exposed to rain or water,
d) If the product does not operate normally by following the operating instructions.
e) If the product has been dropped or damaged in any way, and
f) When the product exhibits a distinct change in performance – this indicates a need for service.
g) If an abnormal smell or smoke is detected.
- Replacement Parts – When replacement parts are required, be sure the service technician has used replacement parts specified by the manufacturer or have the same characteristics as the original part. Unauthorized substitutions may result in fire, electric shock, or other hazards.
- Safety Check - Upon completion of any service or repairs to this product, ask the service technician to perform safety checks to determine that the product is in proper operating condition.
16.Wall or Ceiling Mounting - This product should be mounted to a wall or ceiling only as recommended by the manufacturer.
- Heat - This product should be situated away from heat sources such as radiators, heat registers, stoves, or other products that produce heat. Do not place a flaming object, such as a candle or lantern, or near the product.
18.Power Lines – An outside antenna system should not be located in the vicinity of overhead power lines or other electric light or power circuits, or where it can fall into such power lines or circuits. When installing an outside antenna system, extreme care should be taken to keep from touching such power lines or circuits as contact with them might be fatal.
- Outdoor Antenna Grounding - If an outside antenna or cable system is connected to the product, be sure the antenna or cable system is grounded so as to provide some protection against voltage surges and built-up static charges. Article 810 of the National Electrical Code, ANSI/NFPA 70, provides information with regard to proper grounding of the mast and supporting structure, grounding of the lead-in wire to an antenna discharge unit, size of grounding conductors, location of antenna-discharge unit, connection to grounding electrodes, and requirements for the grounding electrode.
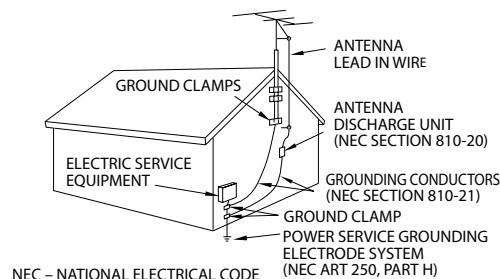
EXAMPLE OF ANTENNA GROUNDING AS PER NATIONAL ELECTRICAL CODE
Notes:
- Item 7 is not required except for grounded or polarized equipment.
- Item 19 complies with UL in the U.S.A.
To ensure safety, read the items carrying this marking carefully.
Before applying power 2
Safety precautions
Unpacking
IMPORTANT SAFETY INSTRUCTIONS 3
Special features 5
Notes on instructions 5
Names and functions of parts 6
Setting up the system 10
Speaker setup (Easy Setup) 21
Speaker setup (Detailed Setup) 22
Speaker setup flow
Getting into the setup mode
Speaker setup ("SP SETUP")
Adjusting the speaker level ("TEST TONE")
Distance setting ("DISTANCE")
Crossover ("CROSS OVER")
Low frequency effects level ("LFE LVL")
Audio Delay ("AUDIO DELAY")
Playing music or movie 26
Preparation
Turning on the power
Setting the speaker status (main unit only)
Selecting the input mode
Playback
Monitoring the input source in the original sound
(STRAIGHT DECODE)
Listening to music with PURE AUDIO MODE
Enjoying various surround effects 29
Listen mode
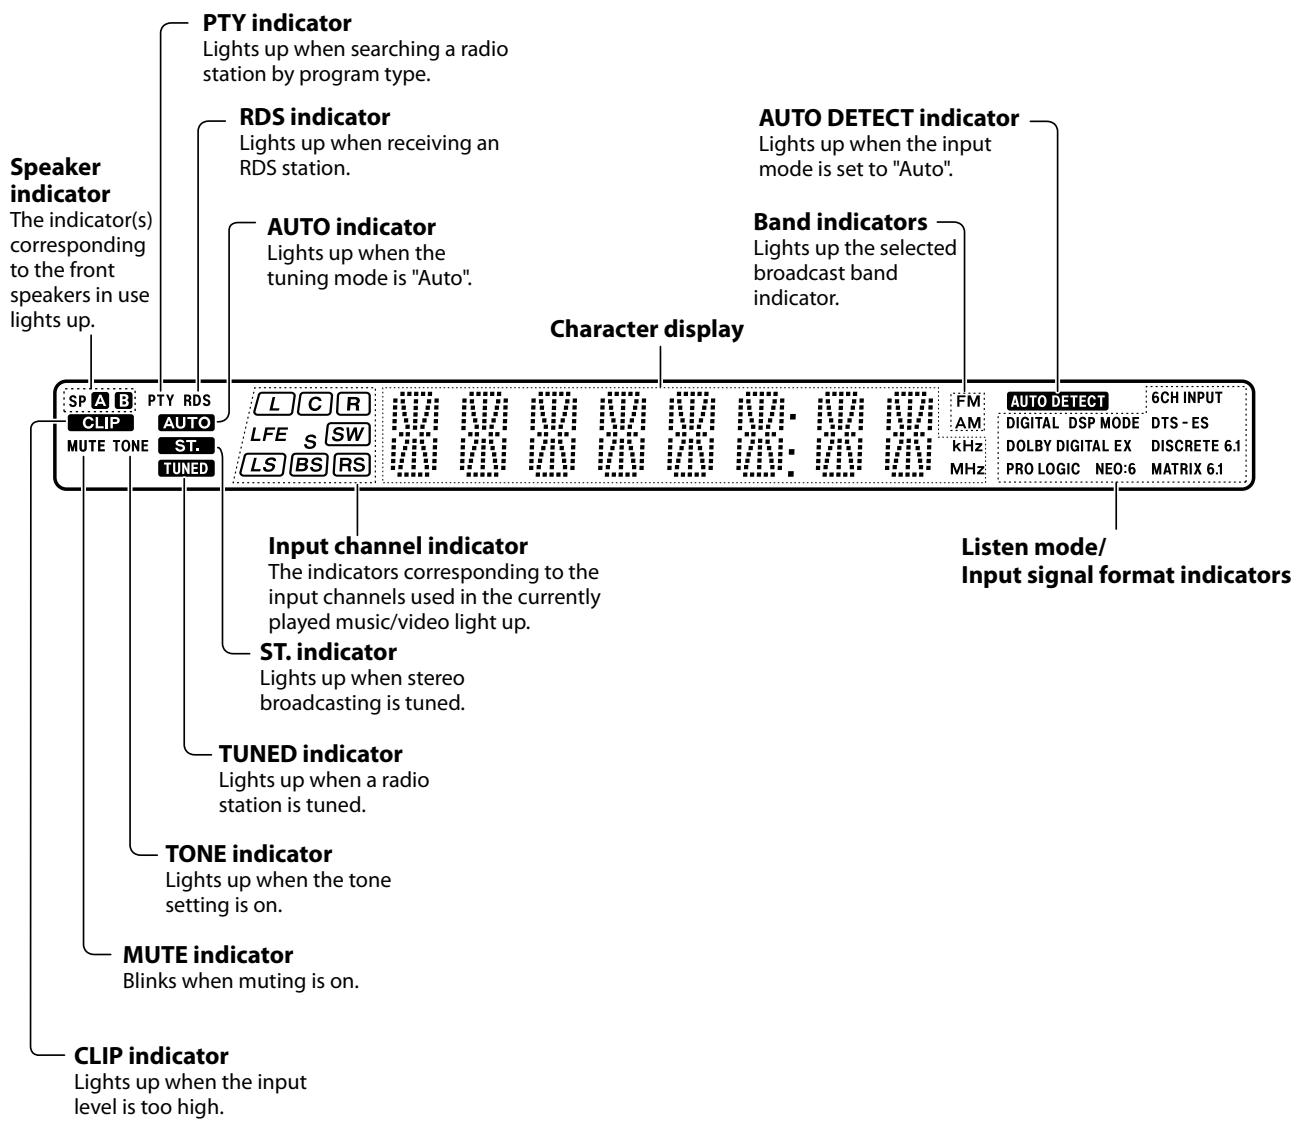
About indicators
Surround playback
96kHz LPCM playback
DVD 6-channel playback
Listening to radio broadcasts 34
Tuning (non-RDS) radio stations
Using RDS (Radio Data System)
RDS Auto Memory
Presetting radio stations manually
Receiving preset stations
Receiving preset stations in order (P.CALL)
Tuning by program type (PTY search)
Using the RDS DISP. key
Recording 38
Recording mode setting in digital audio source recording
Recording audio (analog sources)
Recording video
Adjusting the sound 39
Adjusting the Tone
Bass Boost
ACTIVE EQ mode
Adjustment according to the playing source
Speaker level adjustment
Input level adjustment
Midnight mode
Panorama mode
Dimension mode
Center Width mode
Convenient functions 42
Display dimmer adjustment
Listening with headphones
Muting the sound
Remote control operations for Kenwood DVD
players 43
Troubleshooting 44
Resetting the Microcomputer
In regard to contact cleaner
Maintenance of the unit
Specifications 47
HDMI, the HDMI logo and High-Definition Multimedia Interface are trademarks or registered trademarks of HDMI Licensing, LLC.
Manufactured under license from Dolby Laboratories. Dolby, Pro Logic, and the double-D symbol are trademarks of Dolby Laboratories.
Manufactured under license under U.S. Patent #s: 5,451,942; 5,956,674; 5,974,380; 5,978,762; 6,226,616; 6,487,535; 7,003,467; 7,212,872 & other U.S. and worldwide patents issued & pending. DTS, DTS Digital Surround, ES, and Neo:6 are registered trademarks and the DTS logos, Symbol and DTS 96/24 are trademarks of DTS, Inc. © 1996-2007 DTS, Inc. All Rights Reserved.
Making HDMI connection let you enjoy high quality video such as Blu-ray discs.
Audio signals came in at Audio IN termianl are interlocked with Video signals output at the HDMI MONITOR OUT terminal.
High-quality music playback in Pure Audio Mode
28
This function reproduces music signals in high quality with high fidelity to original sound.
In this mode, the display and the analog video circuitry are turned off to eliminate their effects on the audio circuitry. In addition, the optimum listen mode is selected according to the input music signal.
True home theater sound - 29
This unit incorporates a wide variety of surround modes to bring you maximum enjoyment from your video software. Select a surround mode according to your equipment or the software you are going to play and enjoy!
Dolby Digital
- Dolby Digital EX
Dolby Pro Logic II
- Dolby Pro Logic IIx
- DTS Digital Surround
DTS-ES
- DTS Neo:6
DTS 96/24
Easy Setup of the speaker - 21
The speaker settings can be completed by simply selecting the room type and the listening position. The audio will be corrected automatically according to the characteristics of the speaker system in use.
Crossover Frequency Adjustment - 25
The bass frequency from the subwoofer and the other speakers can be adjusted making better sound phase between speakers and natural sound field.
Audio Delay function (Lip Sync) 25
This function corrects deviation between the video and audio.
Notes on instructions
The operating instructions given in this manual assume that the user mainly operates the receiver using the remote control unit. When the same operation is also available on the main unit, the operating method is indicated in illustrations.
The [VOLUME CONTROL], [MULTI CONTROL] and [INPUT SELECTOR] knobs on the main unit are operated by turning the knobs clockwise or counterclockwise.
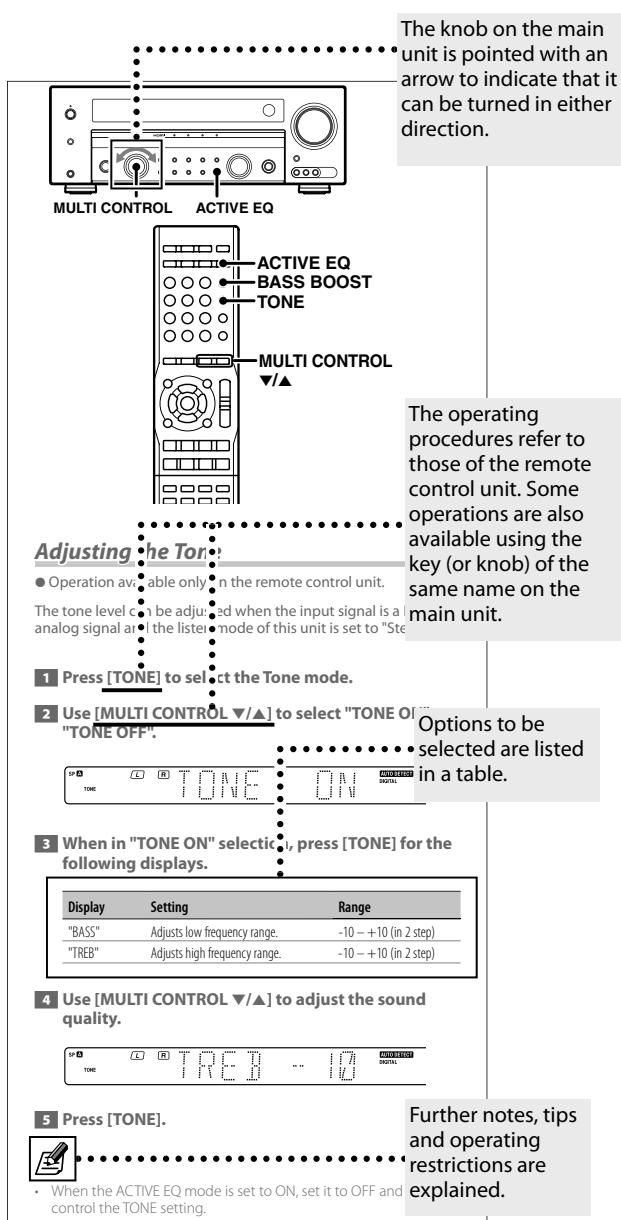
Example:

- The illustrations of the main unit display panel and the examples of operations are shown for the purpose of explanation and may differ from the actual view or operation.

(power) key
Standby indicator
Switch the unit ON and standby.
When the unit is in standby mode, the standby indicator is lit.
Display
Surround LED indicators DOLBY DIGITAL indicator
Light when in the Dolby Digital mode.
DTS indicator
Light when in the DTS mode.
STRAIGHT DECODE indicator
Light when in the STRAIGHT DECODE mode.
ACTIVE EQ indicator
Light when in the ACTIVE EQ mode.
Remote sensor
VOLUME CONTROL knob
6 PHONES jack
Use for headphone listening.
SPEAKERS A/B/OFF key
Use to select the front speaker, or select not to use the front speaker.
LISTEN MODE knob
Use to select the listen mode.
3 MULTI CONTROL knob
Use to control a variety of settings.
10 SETUP key
Use to set up this unit.
EASY SETUP key
Use for easy setup of the speakers.
SOUND key 39
Use to adjust the sound quality and ambience effects.
3 MEMORY key
35
Use for manual memory of radio stations.
14 BAND key
Use to select the broadcast band.
AUTO/MONO key
Use to select the auto tuning or manual tuning mode. Use to select a recording mode.
16 STRAIGHT DECODE key -27
Use to switch the straight decode mode on/off.
DIMMERkey
Use to switch the brightness of the display and indicators.
13 INPUT MODE key
Use to select the input mode.
ACTIVE EQ key
Use to select ACTIVE EQ setting.
20 INPUT SELECTOR knob
Use to select the input sources.
PURE AUDIO MODE key 28 PURE AUDIO MODE indicator
Use to switch the PURE AUDIO MODE ON/OFF.
When this mode is on, the PURE AUDIO MODE indicator is lights up.
2 AV AUX key
Use to select AV AUX source.
AV AUX jack
Use to connect a device such as a camcorder and a game player.
Standby mode
While the standby indicator is lit, a small amount of power is supplied to the system to back up the memory. This is called standby mode. Under the condition, the system can be turned ON by the remote control unit.
Remote control unit

1 AUTO MEMORY key 35
Use for auto memory of RDS and FM radio stations.
ANGLE key
Use to operate the Kenwood DVD player.*
2 MEMORY key
Use for manual memory of radio stations.
REPEAT key
Use to operate the Kenwood DVD player.*
RDS DISP. key
Use to display RDS information.
AUDIO key
Use to operate the Kenwood DVD player.*
4 PTYkey
36
Use for PTY search.
SUBTITLE key
Use to operate the Kenwood DVD player.*
5 Numeric keys
Use to call up preset stations.
Use to operate the Kenwood DVD player.*
⑥ LISTEN MODE key
Use to select a listen mode.
PURE AUDIO MODE key
28
Use to switch the PURE AUDIO MODE ON/OFF.
3 ▲,▼,▲,▶ keys
ENTER key
TOP MENU key
MENUKey
RETURN key
ON SCREEN key
Use to operate the Kenwood DVD player.*
Use to operate the Kenwood DVD player.*
BAND key 34
Use to select the broadcast band.
II key
Use to operate the Kenwood DVD player.*
AUTO/MONO key
Use to select the auto tuning or manual tuning mode.
key
Use to operate the Kenwood DVD player.*
P.CALL 一 一 />i keys
Use to call preset channel. 36
Use to operate the Kenwood DVD player.*
17 RECEIVER key
Use to turn this unit on and off.
DVD key
Use to turn the Kenwood DVD player on and off.
ACTIVE EQ key
Use to select ACTIVE EQ setting.
DIMMER key
Use to adjust the brightness of the display and the indicators.
BASS BOOST key
39
Use to select the maximum adjustment setting for the low frequency range.
TONE key
Use to switch the status of TONE control.
16 SOUND key
40
Use to adjust the sound quality and ambience effects.
7 SETUP key
22
Use to select the speakers' settings.
EASY SETUP key
21
Use to select speaker setting.
15 MULTI CONTROL / keys
Select an setup item.
20 VOLUME / keys
Use to adjust volume setting.
MUTE key
42
Use to temporarily mute the sound.
TUNING / keys
34
Use to select the radio station.
Use to operate the Kenwood DVD player.*
Input source keys
Use to select the input source.

- For how to be able to use the keys to operate the Kenwood
DVD player, see <Remote control operations for Kenwood DVD
players> 43
Preparing the remote control
Loading batteries
1 Remove the cover.
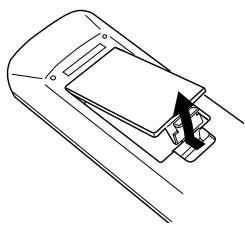
2 Insert batteries.

Insert two (R03) batteries following the polarity indications.
3 Close the cover.
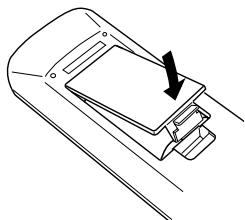

- The supplied batteries may have shorter lives than ordinary batteries due to use during operation checks.
CAUTION
Do not leave the battery near fire or under direct sunlight. A fire, explosion or excessive heat generation may result.
Operation
When the Standby indicator is lit, the power turns ON when you press [RECEIVER] on the remote control unit. When the power comes ON, press the key you want to operate.
When operating the connected components, always press the input source key of the component you need to operate first to swith the remote control unit to the selected input source mode, and then press the keys of the corresponding operation.

Operating range (Approx.)

- When the remote-controllable distance gets shorter than before, replace both batteries with new ones.
- Placing the remote sensor in direct sunlight, or in direct light from a high frequency fluorescent lamp may cause a malfunction. In such a case, change the location of the system installation to prevent malfunction.
CAUTION
Do not connect the power cord to a wall outlet until all connections are completed.
Make connections as shown in the following pages.
When connecting the related system components, be sure to refer to the instruction manuals supplied with the components you are connecting.

- Be sure to insert all connection cords securely. If their connections are imperfect, the sound may not be produced or there will be noise interference.
- Be sure to remove the power cord from the AC outlet before plugging or unplugging any connection cords. Plugging/ unplugging connection cords without disconnecting the power cord can cause malfunctions and may damage the unit.
- If this unit is installed in the proximity of a source of magnetism such as a magnet, color irregularities due to interference with the speakers may be observed on the TV screen. Be careful in the installation.
Microcomputer malfunction
If operation is not possible or an erroneous display appears, even though all connections have been made properly, reset the microcomputer by referring to .
CAUTION
The power of this equipment will not be completely cut off from the wall outlet when the power switch is turned off. Install the equipment so that the wall outlet is easily accessible and, in case of emergency, immediately unplug the power cord from the wall outlet.
CAUTION
Be sure to adhere to the following, or proper ventilation will be blocked causing damage or fire hazard.
- Do not place any object on the unit that may hinder heat radiation.
- Do not cover the unit with a cloth or install the unit on a carpet or mattress.
- Do not install the unit in a poorly ventilated place.
- Leave some space around the unit (from the largest outside dimension including projection) equal to or greater than, shown below.
Top panel : 50 cm
Side panel : 10 cm
Back panel : 10 cm
Speaker placement
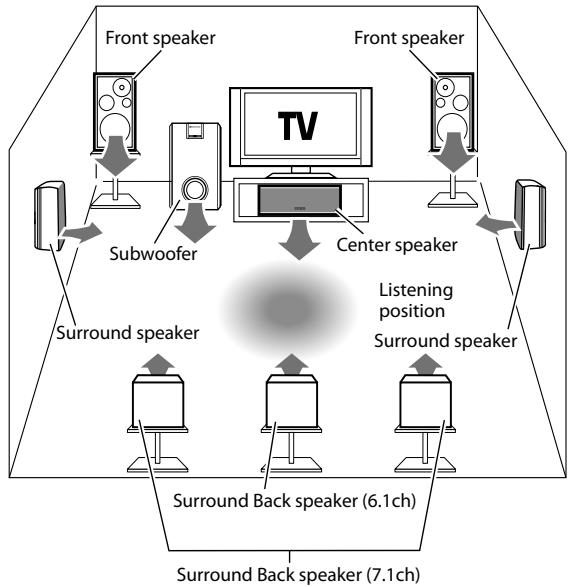
Front speakers:
Install in the front left and right positions. Symmetrical installation is ideal. The front speakers are always used regardless of the listen mode.
Center speaker:
Install in the front center position. This speaker improves the acoustic image positioning and reproduction of sound movement.
Surround speakers:
Install straight on or slightly behind the left and right of the listening position, at in an as high as possible height (ideally one meter above the height of the listener's ears). Symmetrical installation is ideal. The surround speakers reproduce the feeling of movement and presence of sound.
Subwoofer:
In general, install on the front center position near the front speakers. The subwoofer reproduces the powerful bass effects. As it is less directional to other speakers, it can be installed so that the bass can be reproduced best according to the listening room layout.
Surround Back speakers:
Install on the rear of the listening position, at the same height as the surround speakers.
When only one surround back speaker is installed, the system becomes a 6.1-channel surround system. When two surround back speakers are installed, it becomes a 7.1-channel surround system.

- Ideal surround play is possible when all of the speakers above are installed. If the center speaker and/or the subwoofer is not installed, the system optimizes playback according to the current system by assigning the sound of absent channels to other speakers.
Connecting components equipped with HDMI terminals
This unit has HDMI terminals which let you enjoy high definition video such as Blu-ray discs.
Audio connection (connection A or B) is necessary to output audio signal from the speakers connected to this unit.
1 Using an HDMI cable, connect the HDMI input terminal of this unit to the HDMI output terminal of a playback component.
2 Connect the audio line A (digital) or B (analog).
3 Using another HDMI cable, connect the HDMI monitor output terminal of this unit to the HDMI input terminal of the TV monitor.
It is recommended to mute the TV for the best surround sound from the speakers connected to this unit.

Connecting a DVD player
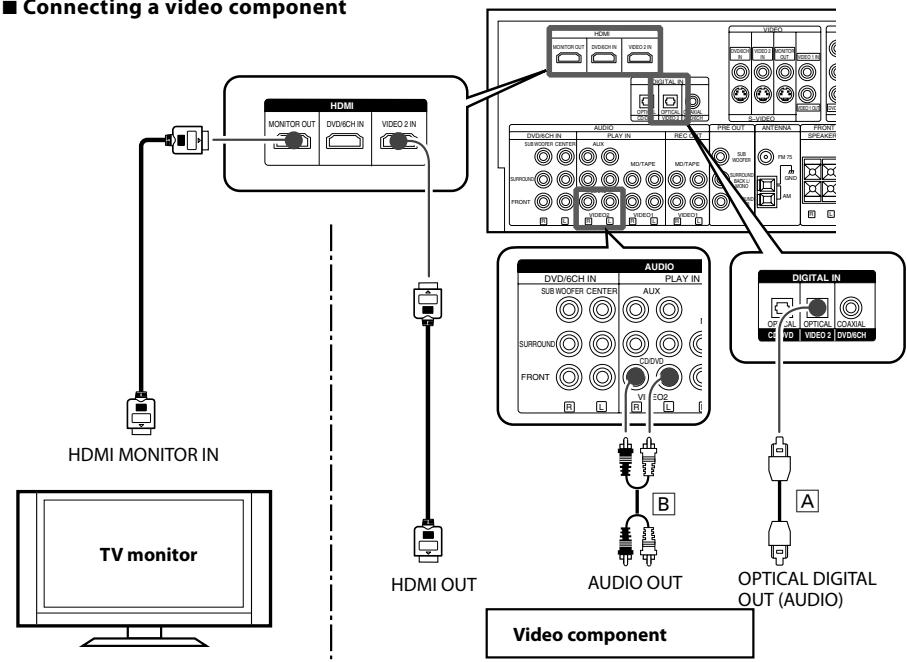
Connecting a video component

- Use an HDMI-certified category 2 cable (High Speed HDMI™ Cable) for the connection.
- If the resolution of the incoming video signal is different from that of the TV, no video is output. In this case, adjust the resolution on the DVD player.
- An HDMI/DVI converter cable is necessary to connect a TV with a DVI input terminal. The TV also needs to be compatible with HDCP (High-bandwidth Digital Contents Protection). Note that the video may be unable to be monitored depending on the combined components.
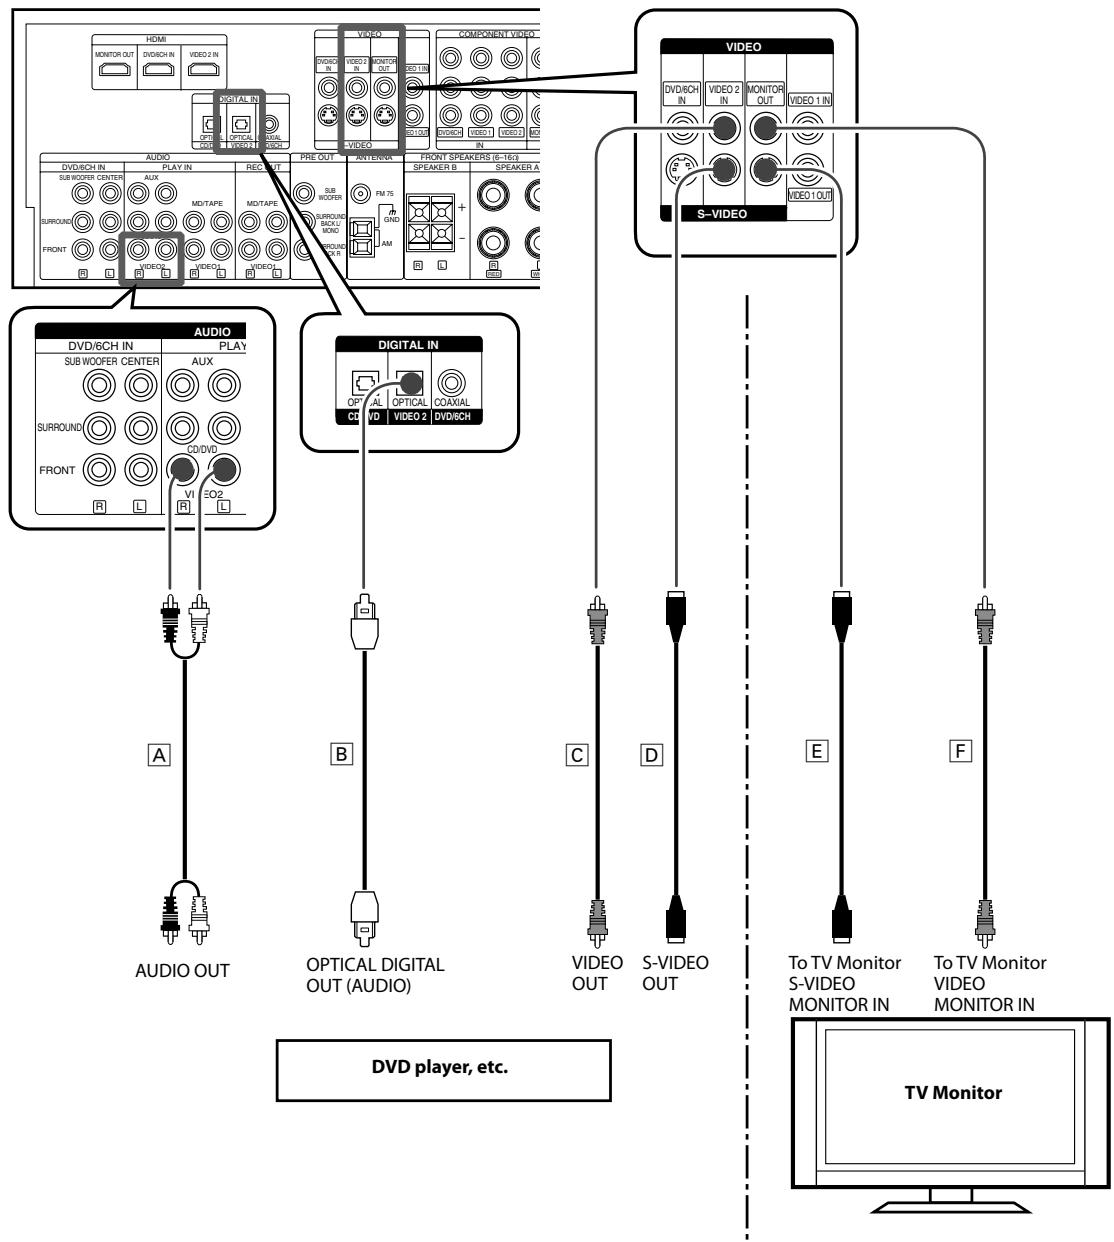
Connecting a DVD player
1 Connect the audio line : Connection A (analog) or B (digital)
2 Connect the video line and TV monitor : Connection C and F or Connection D and E

DVD player

- If your DVD player has COMPONENT Video OUT, COMPONENT Video connection is possible for better video quality. (16)
Connecting a DVD player with multichannel audio output terminal
1 Connect the audio line as shown on the right.
2 Connect the video line.
See above for connecting the video line.

Connecting a CD player
1 Connect the audio line : Connection A (analog) or B (digital)
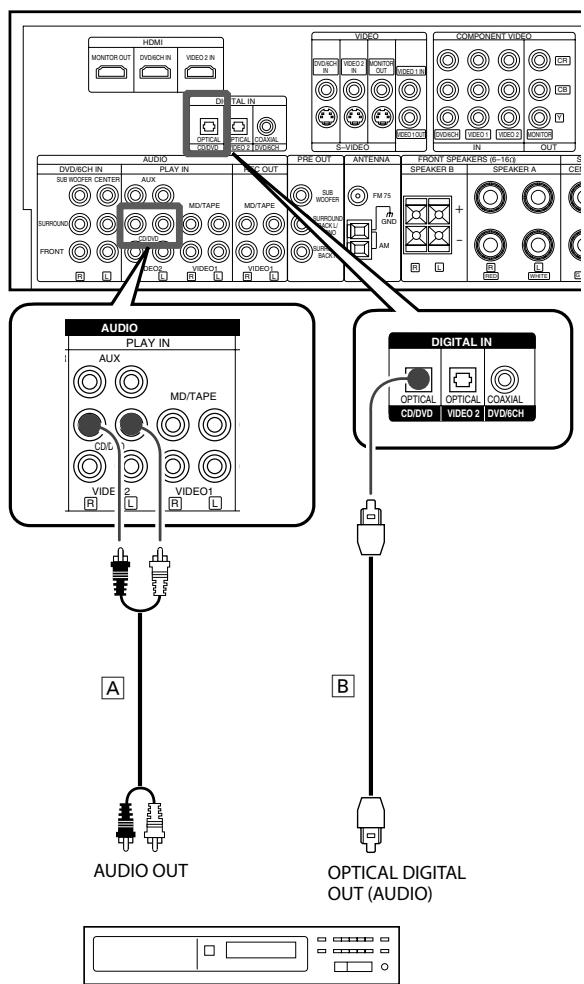
CD player
Connecting an MD player/ a cassette player
1 Connect the audio line : Connection A and B


- Connection B is not necessary if the connected component is not used for recording.
Connecting a video player
1 Connect the audio line : Connection A (analog) or B (digital)
2 Connect the video line and TV monitor : Connection C and F or Connection D and E
Connecting a video recorder
1 Connect the audio line: Connection A
2 Connect the video line: Connection B

Connecting video players (COMPONENTVIDEO connection)
Connecting a DVD player is described as an example.
1 Connect the audio line: See and make the audio connection.
2 Connect the video line and TV monitor as shown below.
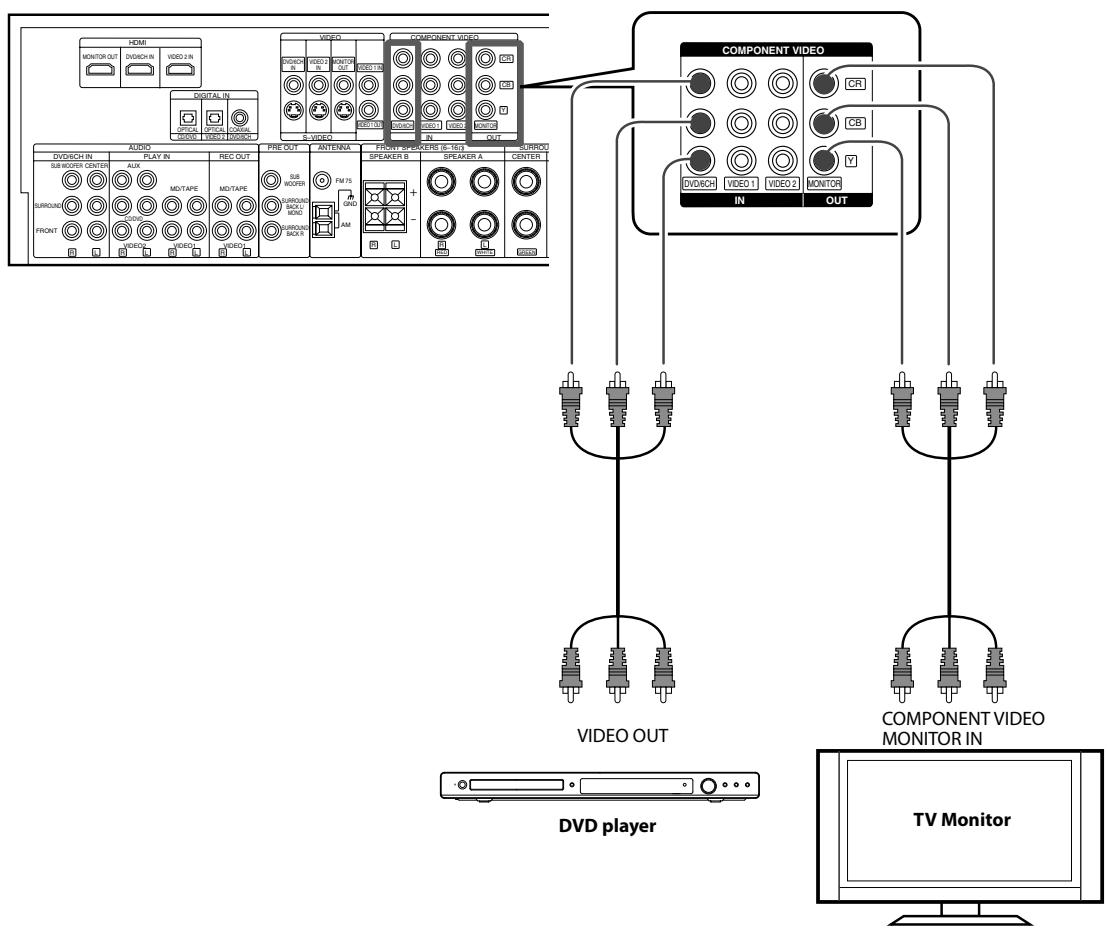

- Connect the same way for the VIDEO 1 and VIDEO 2 terminals.
- If the DVD player has 6 channel output, connecting to DVD/6CH IN terminals is possible. ( -[12])
- If some of the video equipment are connected to the COMPONENT terminals and the rest are connected to the normal (composite)VIDEO terminals, make sure to connect the TV to the MONITOR OUT terminals of both COMPONENTVIDEO and VIDEO.
Depending on the type of TV, it may be necessary to switch the input of the TV according to the type of video input (COMPONENT input or VIDEO (COMPOSITE) input). Refer to the instruction manual of your TV for more information.
Connecting the antennas
The broadcast reception cannot be made unless the antennas are connected. Connect the antennas correctly as instructed below.
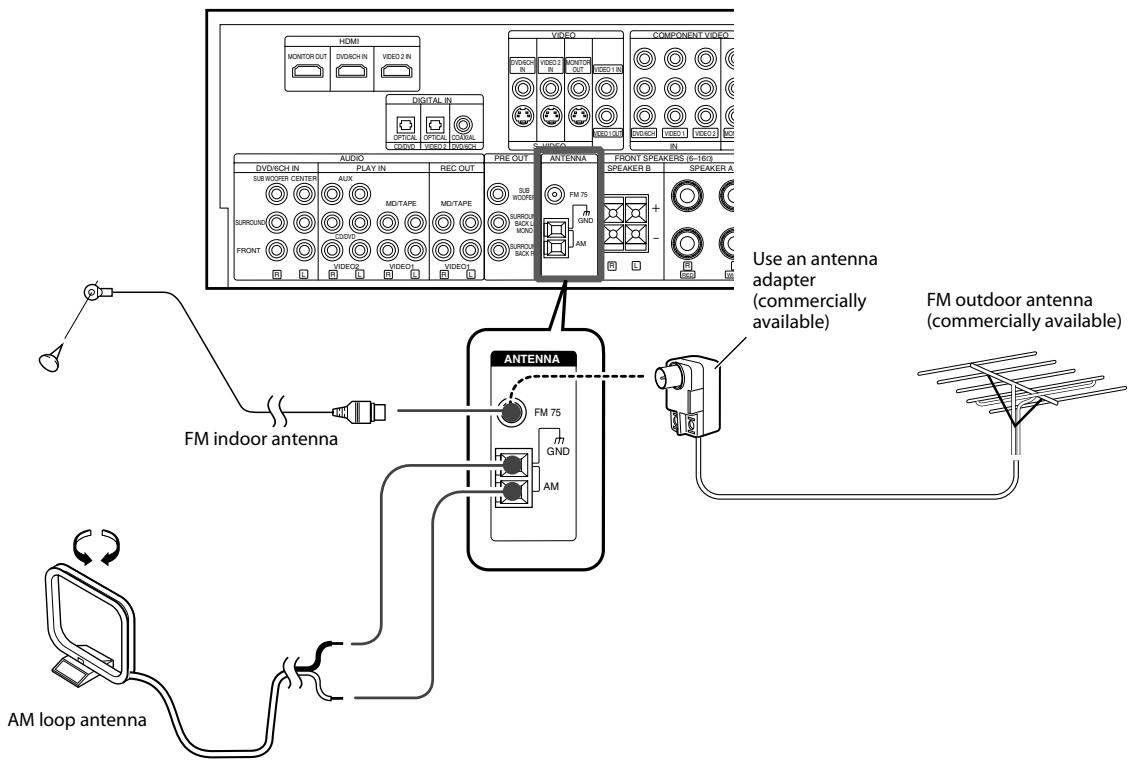
AM loop antenna
Place the supplied loop antenna as far as possible from the receiver, TV set, speaker cords and power cord. Adjust the direction for best reception.
1 Attach to the stand.

Push the lever.

3 Insert the antenna cord.

4 Release the lever.

5 Place the antenna and adjust the direction.
FM indoor antenna
The supplied indoor antenna is for temporary use only. For stable signal reception we recommend using an outdoor antenna. Disconnect the indoor antenna when you connect one outdoors.
1 Insert the antenna cord.
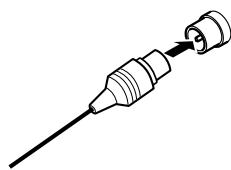
Fix the antenna on the wall.
FM outdoor antenna
Lead the 75 coaxial cable connected to the FM outdoor antenna into the room and connect it to the FM 75 terminal.
Connecting the speakers


After confirming the speaker impedance indications printed on the rear panel of the receiver, connect speakers with matching impedance ratings. Using speakers with a rated impedance other than that indicated on the rear panel of the receiver could result in malfunctions or damage to the speakers or the receiver.
Connecting the terminals
Screw type terminal
1 Strip coating.

2 Loosen.

3 Insert the cord.
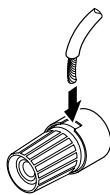
4 Secure.

Push type terminal
1 Strip coating.

Push the lever.

3 Insert the cord.

4 Return the lever.


- Never short circuit the + and - speaker cords.
- If the left and right speakers are connected inversely or the speaker cords are connected with reversed polarity, the sound will be unnatural with ambiguous acoustic imaging. Be sure to connect the speakers correctly.
Connecting to the AV AUX jacks
A component that is usually not connected to this unit, such as a portable video camera, can be connected to the [AV AUX] jacks on the front panel of this unit.
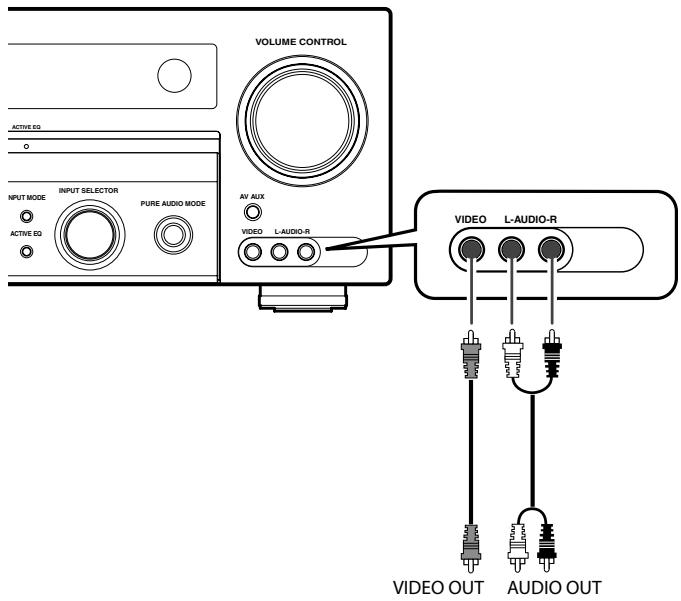
Portable video camera,
game player, and etc.
(commercially available)
Turning this unit ON


1 After completing all of the necessary connections, connect the power cord to a wall power outlet.
The standby indicator on the front panel lights red to indicate the standby mode.
2 Press the [] (Power)] key of this unit or the [] RECEIVER] key of the remote control unit to turn this unit ON.
The standby indicator on the front panel goes out and the display panel lights up.
To turn this unit OFF (standby mode)
Press the [ (Power)] key on this unit or the [ RECEIVER] key on the remote control unit.
The speaker setup can be completed by simply selecting the room type and listening position. The audio will be corrected automatically according to the characteristics of the speaker system in use.
If more detailed speaker settings are required, use the procedure in 22.

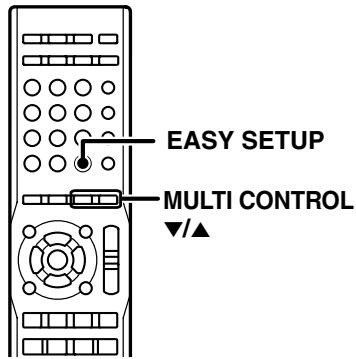
Press [EASY SETUP] to enter the easy setup mode.
Use [MULTI CONTROL /] to select your room type.

Press [EASY SETUP].
4 Use [MULTI CONTROL / ] to select your listening position.
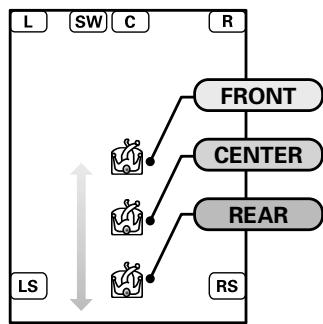
| SP S | L C(R) SW (LS) BS(RS) | | | | | | | | | |
Press [EASY SETUP].
The speakers are set up as shown below.
- Subwoofer : ON
- Front speaker: Average size
- Center speaker: Average size
- Surround speaker: Average size
- Subwoofer re-mix*: ON
- The function for adding the bass of other channels to the subwoofer channel according to the speaker setup.

- Easy setup with may not be appropriate with certain speaker systems or listening environment. In this case, go through
- Easy setup can set only the 5.1 channel system. If the setup for the 6.1-channel or 7.1-channel system is required, go through
Speaker setup flow
The detailed settings below allow you to enjoy full performance of the receiver according to the environment of your listening room.
Speaker settings consist of 6 elements.
Speaker Setup ("SP SETUP") - 23
Select whether each speaker channel is used or, if used, its size.
The Easy Setup function also allows you to make speaker settings easier.
See -21

Test Tone ("TEST TONE") - 24
Select the output level from each speaker.

Distance ("DISTANCE") - 24
Select the distance between each speaker and the listening position.

Crossover ("CROSS OVER") - 25
Set the lower limit of the bass frequencies reproduced from the speakers set to "NML" in the . The frequencies below the frequency set here are distributed to other speakers (those set to "LRG" and the subwoofer).

Low Frequency Effects Level ("LFE LVL") - 25
Select the level of bass audio enhancement.
Low Frequency Effect channel delivers separate non-directional bass signals to the subwoofer for more dynamic deep bass sound effects.

Audio Delay (Lip Sync) ("AUDIO DELAY") [25]
Adjust the deviation in time between the video and audio.
![KENWOOD KRF-V6300D - Audio Delay (Lip Sync) ("AUDIO DELAY") [25] - 1](/content/2025/01/124405/images/3988bf3185706d4f7ffac6486c87417b61ae9d99ad26bed9d83362452b49365e.jpg)
Speaker settings completed!
Getting into the setup mode
The setup procedure is identical for all of the setting elements. Once you remember the following procedure, you can easily set up other setting elements.
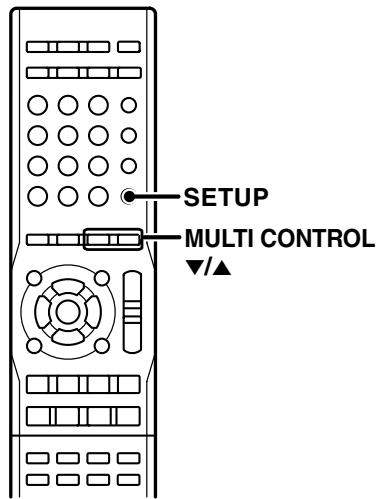
1 Press [SETUP] to enter the setup mode.
2 Use [MULTI CONTROL / ] to select the element to setup.
| Display | Setting |
| "SP SETUP" | Speaker setup |
| "TEST TONE" | Test tone |
| "DISTANCE" | Distance |
| "CROSS OVER" | Crossover |
| "LFE LVL" | Low frequency effects level |
| "AUDIO DELAY" | Audio delay |
| "EXIT" | Exit the setup mode. |
Press [SETUP] to get into the setup mode of the selected element.
4 Perform setup by referring to the page describing the selected item.
To exit the setup mode
Select "EXIT" in the step 2 and press [SETUP].

- The [SETUP] key and [MULTI CONTROL] knob on the front panel can also be used to select the item in the setup mode.
Speaker setup ("SP SETUP")
This sets up the speakers according to the speaker system in use. Speaker setup is required every time the speaker system is changed.
See ( 22) and select "SP SETUP".
2 Use [MULTI CONTROL / ] to select the subwoofer setting.
| Speaker | Display | Setting |
| Subwoofer | "SUBW ON" | With Subwoofer |
| "SUBW OFF" | Without Subwoofer |
3 Press [SETUP].
4 Repeat steps 2 - 3 for the rest of the speaker setting.
| Speaker | Display | Setting |
| Front speaker | "FRNT LRG" | Large size front speaker |
| "FRNT NML" | Average size front speaker |
| Center speaker | "CNTR NML" | Average size center speaker |
| "CNTR LRG" | Large size center speaker |
| "CNTR OFF" | No center speaker is connected. |
| Surround speaker | "SURR NML" | Average size surround speaker |
| "SURR LRG" | Large size surround speaker |
| "SURR OFF" | No surround speaker is connected. |
| Surround Back speaker | "BS LRG" | Large size surround back speaker |
| "BS NML" | Average size surround back speaker |
| "BS OFF" | No surround back speaker is connected. |
| "BS L/R"*1 | Left and Right Surround Back speakers are connected. |
| "BS MONO"*1 | Only one Surround Back speaker is connected. |
| Subwoofer re-mix*2 | "RMX ON" | Subwoofer re-mix is on. |
| "RMX OFF" | Subwoofer re-mix is off. |
1 This selection is available when either "BS LRG" or "BS NML" is selected.
2 The function for adding the bass of other channels to the subwoofer channel according to the speaker setup.
5 Go to the next setting, "TEST TONE".
If you wish to exit the setup mode, see

Reference for speaker size
"LRG": A speaker with a sufficient bass reproduction capability (a speaker with a large woofer or a large cabinet size).
"NML": A speaker with a lower bass reproduction capability than the "LRG" speakers (the bass frequencies will be output from the speakers set to "LRG" and the subwoofer).
If you cannot identify the size of a speaker, it is recommended to set it to "NML".
- When "SUBW OFF" is selected, the front speakers are automatically set to "FRNT LRG".
- For "FRNT LRG" selection, no sound will be heard from subwoofer even it is set to ON. However, if you select "RMX ON", you will be able to hear sound from the subwoofer.
- When in STEREO mode, the sound goes directly to front speakers.
- If "FRNT NML" is selected, "LRG" cannot be selected for the other speakers.
- If "CNTR NML" or "CNTR OFF" is selected, "SURR LRG" cannot be selected.
- If "SURR OFF" is selected, no surround back speaker can be selected.
- "BS LRG" cannot be selected unless "SURR LRG" is selected.
- If "BS MONO" is selected, surround back signal can only be output at the SURROUND BACK L terminal.
Adjusting the speaker level ("TEST TONE")
From your usual listening position, adjust the volume output of each speaker. The output level from each speaker should be the same.
See (→22) and select "TEST TONE".
2 Use [MULTI CONTROL / ] to select either "AUTO" or "MANUAL".
| Display | Setting |
| "AUTO" | The test tone is heard from the speakers one after another with 2 seconds each. |
| "MANUAL" | The test tone is heard from the speaker you have selected. |
3 Press [SETUP].
4 Adjust the output level.
If you select "AUTO":
When you hear the test tone from the speaker which you wish to adjust, use [MULTI CONTROL /] and adjust the volume of the test tone. When you finish adjusting, press [SETUP].
If you select "MANUAL":
Use [MULTI CONTROL / ] to adjust the volume of the test tone and press [SETUP]. You will hear the test tone from the next speaker.
5 Go to the next setting, "DISTANCE".
If you wish to exit the setup mode, see 22.
Distance setting ("DISTANCE")
This sets the distance from each speaker to the listening position.
Measure the distance from the listening position to each speaker and jot down in the table below.
| Speaker | Input channel indicator | Distance from the listening position |
| Front speaker (left) | "L" | feet (meters) |
| Center speaker | "C" | feet (meters) |
| Front speaker (right) | "R" | feet (meters) |
| Surround speaker (right) | "RS" | feet (meters) |
| Surround Back speaker (right) | "BS" | feet (meters) |
| Surround Back speaker (left) | "BS" | feet (meters) |
| Surround Back speaker* | "BS" | feet (meters) |
| Surround speaker (left) | "LS" | feet (meters) |
| Subwoofer | "SW" | feet (meters) |
- This selection is available when "BS MONO" is selected in the speaker setup.
See ( 22) and select "DISTANCE".
3 Use [MULTI CONTROL / ] to select the distance to the front speaker.
Adjustment will start from front left speaker.
Input channel indicator
4 Press [SETUP].
5 Repeat steps 3 - 4 to input the distance for the rest of the speaker.
6 Go to the next setting, "CROSS OVER".
If you wish to exit the setup mode, see 22.
Crossover ("CROSS OVER")
The crossover frequency is the lower limit of the bass frequencies reproduced from the speakers set to "NML" in the . The frequencies below the set crossover frequency are output from other speakers (those set to "LRG" and the subwoofer).
See (→22) and select "CROSS OVER".
2 Use [MULTI CONTROL / ] to select crossover frequency.
The frequency is selected from 40, 60, 80, 100, 120, 150 and 200Hz .
3 Press [SETUP].
4 Go to the next setting, "LFE LVL".
If you wish to exit the setup mode, see
Low frequency effects level ("LFE LVL")
Low frequency effect signal is used exclusively for giving the field effect of bass tone in the Dolby Digital and DTS signal.
See ( 22) and select "LFE LVL".
Use [MULTI CONTROL / ] to adjust the low frequency effect level.
The level is adjusted from 0dB to -10dB in 1dB step decrements.
3 Press [SETUP].
4 Go to the next setting, "AUDIO DELAY".
If you wish to exit the setup mode, see
Audio Delay (Lip Sync) ("AUDIO DELAY")
If the monitored video is delayed in time with respect to the audio from the speakers, the audio output timing can be delayed.
See (→22) and select "AUDIO DELAY".
Use [MULTI CONTROL / ] to adjust the delay time.
The delay time is adjusted from 0ms to 300ms in 10ms step.
3 Press [SETUP].

The setup is complete when the "EXIT" indication appears.
4 Press [SETUP] to exit the setup mode.
Preparation
Some preparatory steps are needed before starting playback.

Turning on the power
1 Turn on the power to the related components.
Press [RECEIVER] to turn on the receiver unit.
Setting the speaker status
Operation available only on the main unit.
Press [SPEAKERS A/B/OFF] to switch the speaker on or off.
The speaker indicator lights up when set to on.

- When the input mode is "6CH INPT", SPEAKERS B cannot be selected.
Operation available only on the main unit.
If you have selected a component connected to the DIGITAL IN jacks (CD/DVD,VIDEO2 and DVD/6CH INPUT), make sure that the input mode setting is correct for the type of audio signal to be used.
1 Use [INPUT SELECTOR] to select "CD/DVD", "VIDEO2", or "DVD/6CH".
2 Press [INPUT MODE].
Each press switches the setting as follows:
| Display | Setting | Input signal |
| "F-AUTO"*1 | Full Auto | Digital input or Analog input |
| "D-MANUAL" | Digital Manual | Digital input |
| "6CH INPT"*2*3 | 6ch input | DVD/6CH input |
| "ANALOG"*3 | Analog input | Analog input |
1 Factory setting.
2 "6CH INPT" setting can be switched only when the input selector is set to "DVD/6CH".
*3 This cannot be selected when in DTS play mode.
Full Auto ("F-AUTO"):
The unit detects the digital or analog input signal automatically. The unit selects the input mode and listen mode automatically during playback to match the type of input signal (Dolby Digital, DTS or PCM) and the speaker setting. Normally use Full Auto. In this mode, "AUTO DETECT" indicator lights up. "DIGITAL" indicator also lights up when digital input signal comes in.
"AUTO DETECT" and "DIGITAL" indicators

Digital Manual ("D-MANUAL"):
Some discs produce sound skipping even when "F-AUTO" is set. Select "D-MAINUAL" with such a disc. Digital Manual accelerates the input signal processing by fixing the listen mode and therefore minimizes sound skipping during disc playback.
If audio reproduction stops in the middle due to change in the input signal, press [LISTEN MODE].
Select this setting to play the DVD player connected to DVD/6CH IN jacks.
Select this setting to play analog signals from a cassette deck, VCR, or record player.

- If [INPUT MODE] is pressed too quickly, sound may not be produced. Press [INPUT MODE] again.
Playback

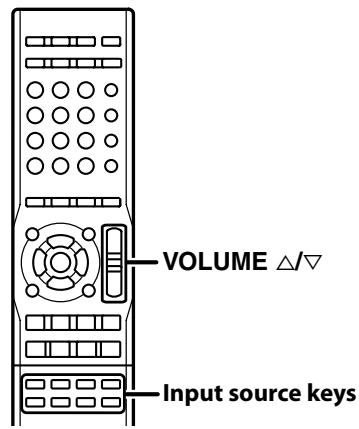
1 Select the source you want to play.
Use the Input source keys on the remote control unit to select a source.
Or use [INPUT SELECTOR] knob or [AV AUX] key.
2 Start playback from the selected source.
3 Use [VOLUME / ] to adjust the volume.
4 Enjoy various surround effects.
You can enjoy a variety of listen modes ( 29).
The surround effects can be fine tuned according to the selected input source ( 40).

- The AV AUX cannot be selected with the [INPUT SELECTOR] knob of this unit. This input should be selected using the [AV AUX] on this unit or the [AV AUX] key on the remote control unit.
The signal input from a source can be output directly without any sound field effect added to it.

1 Select the source you want to play.
2 Start playback from the selected source.
3 Press [STRAIGHT DECODE].
STRAIGT DECODE indicator lights up.
![KENWOOD KRF-V6300D - Press [STRAIGHT DECODE]. - 1](/content/2025/01/124405/images/899ea4b1da19fdd38b8c723898c2d3ba24e62d0a885f88a7ed163f58586db5f8.jpg)
When STRAIGHT DECODE is enabled, the listen mode is selected automatically according to the input signal. ( -29).
To cancel
Press [STRAIGHT DECODE] again.
STRAIGHT DECODE is also canceled when the listen mode is changed.
![KENWOOD KRF-V6300D - Press [STRAIGHT DECODE] again. - 1](/content/2025/01/124405/images/84bf85e7abffd7ab3cac28c37f7a71da967c6a98ecc6d54c164ba60d46cc9052.jpg)
- When the input mode is "6CH INPT", the listen mode does not change. (
- If the input signal uses a number of channels larger than the number of speakers in use, the signals are distributed automatically according to the available speakers.
Listening to music with PURE AUDIO MODE
PURE AUDIO MODE turns the display and video circuitry (other than HDMI) off to eliminate their effects on the audio circuitry. This mode thereby makes it possible to enjoy audio with higher quality and higher fidelity to the original sound.

PURE AUDIO MODE

1 Select the music source you want to listen to.
2 Start playback from the selected source.
3 Press [PURE AUDIO MODE].
When PURE AUDIO MODE is enabled, the listen mode is selected automatically according to the input signal. ( -29) PURE AUDIO MODE indicator lights up, the display will be turned off, and no video signal is output to the TV monitor.
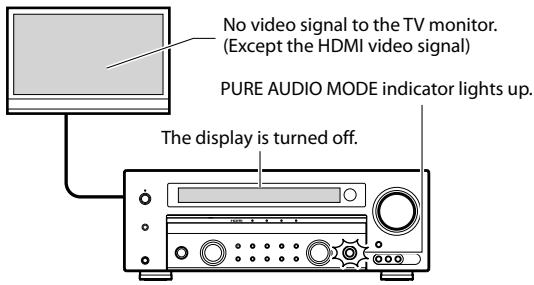
To cancel
Press [PURE AUDIO MODE] again.
PURE AUDIO MODE is also canceled when the listen mode is changed, or STRAIGHT DECODE is selected.
![KENWOOD KRF-V6300D - Press [PURE AUDIO MODE] again. - 1](/content/2025/01/124405/images/864a47e654d12d0f1ce131f1274d13dd3e97bf032200a62864166c70a912e2ba.jpg)
- When the input mode is "6CH INPT", the listen mode does not change. ( -26)
- The video other than the HDMI input video cannot be monitored when PURE AUDIO MODE is selected.
Listen mode
This unit is equipped with listen modes that allow you to enjoy an enhanced sonic ambience with a variety of video sources. In order to obtain the optimum effect from the surround modes, make sure to input the proper speaker settings beforehand. See -21 -22.
The below speaker placements are for 5.1 channel surround sound system which are;
- Dolby Digital
Dolby Pro Logic II
DTS
DSP mode
DVD 6-channel

The below speaker placements are for 6.1 channel surround sound system which are;
- Dolby Digital EX
DTS-ES
Neo:6

The below speaker placements are for 7.1 channel surround sound system which are;
- Dolby Pro Logic IIx
Neo:6

L: Front Left speaker
SW: Subwoofer
C: Center speaker
R: Front Right speaker
SL: Surround Left speaker
SR: Surround Right speaker
SB: Surround Back speaker
SBL: Surround Back Left speaker
SBR: Surround Back Right speaker
Dolby Digital
Dolby Digital is a highly sophisticated and versatile audio encoding/decoding technology. Dolby Digital technology can transmit mono, stereo (two-channel), or up to 5.1-channel surround sound (discrete* multichannel audio).
In 5.1-channel surround sound, the three front channels (Left/Center/Right) deliver crisp, clean dialogue and accurate placement of on-screen sounds, while twin surround channels (Left Surround/Right Surround) wrap around the audience and immerse them in the action. The LFE (Low-Frequency Effects) channel delivers real impact for explosions and other effects that can, literally, be felt as well as heard.
The superior coding efficiency of Dolby Digital-and its ability to deliver high-quality discrete multichannel audio without compromising video quality has made it the designated audio standard for DVD worldwide.
- The sound information contained in each of the six available channels is distinct and independent. These six channels are described as a "5.1-channel" system, because there are five full-bandwidth channels with 3 Hz to 20 kHz frequency range for Front Left and Right, Center, and Surround, plus one "Low Frequency Effects" (LFE) subwoofer channel devoted to frequencies from 3 to 120 Hz.
Dolby Digital EX
Dolby Digital EX takes the Dolby Digital 5.1-channel setup one step further with an additional center surround channel (reproduced through one or two speakers) for extra dimensional detail and an enveloping surround sound effect.
Feature films originally released in Dolby Digital Surround EX (the cinema version) carry the encoded extra surround channel in their subsequent DVD releases, as well as onto 5.1-channel digital satellite and TV broadcasts. With this receiver, you can hear Surround EX soundtracks as they were meant to be heard, with the increased realism created by the extra surround channel.
Dolby Pro Logic II
Dolby Pro Logic II technology processes any high quality stereo (two-channel) movie and music audio into five playback channels of full-bandwidth surround sound. A matrix surround decoding technology, Dolby Pro Logic II detects the directional cues that occur naturally in stereo content and uses these elements to create a five-channel surround sound playback experience.
Dolby Pro Logic II is fully compatible with all Dolby Pro Logic technologies. It provides optimal audio for playback in a 5.1-channel home theater system for the thousands of videocassettes and TV programs encoded in four-channel Dolby Surround (the encoding counterpart to Dolby Pro Logic's decoding technology). (Dolby Pro Logic II surround Movie mode)
Dolby Pro Logic II also enables video game consoles to encode five-channel surround sound information into a stereo signal with virtually no impact on the console's CPU, which means all this extra audio won't slow your game down. (Dolby Pro Logic II surround Game mode)
Dolby Pro Logic II can bring new life to your CD collection. Play your music through your home theater system, and you'll hear seamless, natural sound with new depth and detail. It's almost like hearing a newly remastered CD. (Dolby Pro Logic II surround Music mode)
Dolby Pro Logic IIx
Dolby Pro Logic IIx transforms any stereo or 5.1-channel signal into 6- or 7-channel, full range surround sound, creating a seamless, natural surround soundfield that immerses you in the entertainment experience.
Three listening modes, Movie, Music or Game allow you to tailor the audio to meet the different needs of the programming. In Game mode, for instance, special effects signals are routed to the surround channels for fuller, dramatic impact. Music mode features three additional use controls:
- Dolby Center Width adjusts the balance of the main vocals in the center and front channels.
- Dolby Panorama creates a seamless, wraparound surround effect.
- Dolby Dimension lets you set a deeper or shallower surround soundfield.
DTS
DTS Digital Surround is the standard for providing 5.1 channels of discrete digital audio in consumer electronics products and software content.
DTS can contain a larger volume of data than Dolby Digital, and can reproduce high quality surround sound. They are the same as the Dolby Digital 5.1 channels, but it is a format that lowered the audio compression rate when recording digitally. Because of that, rich sound with high S/N can be reproduced. Moreover, an exact, magnificent surround sound with wide dynamic range and excelling in separation is a feature of DTS.
DTS has a ".1" or LFE channel.
The indication "LFE" appears in the display when a signal is being input for this channel.
DTS-ES
In the cinema, the center surround channel is not discrete, but is matrixed into the left surround (LS) and right surround (RS) channels. Embedded in the soundtrack print master, this matrixed channel works with all cinema digital sound formats. DTS calls this process Extended Surround, or "ES".
Neo:6
Neo:6 provides up to six full-band channels of matrix decoding from stereo matrix material. Users with 6.1 and 5.1 systems will derive six and five separate channels, respectively, corresponding to the standard home theater speaker layouts. (The ".1"
subwoofer channel is generated by bass management in the receiver.)
Neo:6 provides optimum decoding of Extended Surround matrix soundtracks, and can also generate a center surround channel from 5.1 material.
Neo:6 technology allows various sound elements within a channel of channels to be steered separately, and in a way which follows the original presentation naturally.
Neo:6 offers a music mode that expands stereo non-matrix recordings into the five- or six-channel layout without diminishing the subtlety and integrity of the original stereo recording.
DTS 96/24
DTS 96/24 made it possible to achieve a wide frequency range of over 40kHz by increasing the sampling frequency to 96 or 88.2 kHz. Moreover, DTS 96/24's ability of 24 bit resolution offers the same frequency band and dynamic range as 96 kHz/24 bit PCM. DTS 96/24 is, as with conventional DTS Surround, compatible with multi-channels. Therefore, sources recorded using DTS 96/24 technologies can be played in high sampling frequency, multi-channel audio with ordinary DVDs and CDs.
DSP mode
The DSP mode lets you add the atmosphere of a live concert or hall to almost any type of program source. These modes are particularly effective when used with stereo program sources, like CD, television, and FM radio. You might enjoy trying the ARENA, JAZZ CLUB, THEATER, STADIUM or DISCO mode the next time you watch a concert or sporting event!
What's DSP?
DSP stands for Digital Signal Processor.
The way a sound is heard in an actual environment depends on a variety of different factors. One of the most important is reverberation (the act of decaying elements of sound echoing in various places).
The DSP modes produce the feeling of presence by using the DSP to create reverberation, without spoiling the sound quality of the original signal.
DVD 6-channel mode
Using a DVD player or the like equipped with six (5.1) output channels and this unit, you can enjoy multi-channel encoded DVD source material in all its splendor. Since the source signals are digital and each channel is input independently, the resulting sound quality, sense of spaciousness, and dynamic range are superb.
The indication "6CH INPUT" appears in the display during DVD 6-channel mode selection.

- LFE = Low Frequency Effects. This channel delivers separate non-directional bass signals to the subwoofer for more dynamic deep bass sound effects.
About indicators

It shows the channels contained in the input signal. Note that the input channel indicator does not show the channel of the listen mode.
The "LFE" indicator lights when the LFE channel signal is input. The LFE level can be adjusted. See < Low frequency effects level ("LFE LVL")> ( 25).
The "S" indicator lights when the surround component consists of a single channel.
The indicator for the selected listen mode lights up. "DIGITAL" also lights when the input signal is digital.
Surround playback
Select the listen mode according to the source being played back.

LISTEN MODE

Preparations
- Turn on the related components.
- Complete . -21 -22
- Select the source you wish to play back with surround sound.
- Select the input mode (analog or digital) for the source you wish to playback. (Noise may be produced when a DTS source is played by selecting the analog input.) 26
1 Start playing the video software.
Press [LISTEN MODE] to select the listen mode.
The listen mode settings are stored separately for each input. If the input mode is set to full auto ("AUTO DETECT" lights), the unit selects the optimal listen mode automatically based on the type of input signal and the speaker settings.
Each press of [LISTEN MODE] switches the setting as listed.
When the Dolby Digital signal is input:
| Display | Listen mode | Indicator |
| "DOLBY DIGITAL" | Dolby Digital surround mode | "DOLBY DIGITAL" |
| "DOLBY DIGITAL +PLIIx MOVIE" | Dolby Digital + Pro Logic lIx surround Movie mode | "DOLBY DIGITAL" and "PRO LOGIC" |
| "DOLBY DIGITAL +PLIIx MUSIC" | Dolby Digital + Pro Logic lIx surround Music mode | "DOLBY DIGITAL" and "PRO LOGIC" |
| "DOLBY DIGITAL EX" | Dolby Digital EX surround mode | "DOLBY DIGITAL EX" |
| "PLIIx MOVIE"* | Pro Logic lIx surround Movie mode | "DOLBY DIGITAL" and "PRO LOGIC" |
| "PLIIx MUSIC"* | Pro Logic lIx surround Music mode | "DOLBY DIGITAL" and "PRO LOGIC" |
| "PLIIx GAME"* | Pro Logic lIx surround Game mode | "DOLBY DIGITAL" and "PRO LOGIC" |
| "PLII MOVIE"* | Pro Logic lI surround Movie mode | "DOLBY DIGITAL" and "PRO LOGIC" |
| "PLII MUSIC"* | Pro Logic II surround Music mode | "DOLBY DIGITAL" and "PRO LOGIC" |
| "PLII GAME"* | Pro Logic II surround Game mode | "DOLBY DIGITAL" and "PRO LOGIC" |
| "PRO LOGIC"* | Pro Logic mode | "DOLBY DIGITAL" and "PRO LOGIC" |
| "STEREO" | Stereo mode | "DOLBY DIGITAL" |
- Available when the input signal has only 2 channels.
When "Dolby Digital EX" is selected:
"DOLBY DIGITAL EX" will scroll from right to left.

"DOLBY DIGITAL EX" indicator is lit.
When the DTS signal is input:
| Display | Listen mode | Indicator |
| "DTS+NEO6 CINEMA" | DTS + Neo:6 surround Cinema mode | "DTS" and "Neo:6" |
| "DTS-ES MATRIX 6.1" | DTS-ES MATRIX 6.1 channel surround mode | "DTS-ES" and "MATRIX 6.1" |
| "DTS-ES DISCRETE 6.1" | DTS-ES DISCRETE 6.1 channel surround mode | "DTS-ES" and "DISCRETE 6.1" |
| "DTS" | DTS 5.1 channel surround mode | "DTS" |
| "DTS96/24" | DTS 96/24 surround mode | "DTS" |
| "STEREO" | Stereo mode | "DTS" |
When "DTS" is selected:

"DTS" will scroll from right to left.
| Display | Listen mode | Indicator |
| "PLIIx MOVIE" | Pro Logic IIx surround Movie mode | "PRO LOGIC" |
| "PLIIx MUSIC" | Pro Logic IIx surround Music mode | "PRO LOGIC" |
| "PLIIx GAME" | Pro Logic IIx surround Game mode | "PRO LOGIC" |
| "PLII MOVIE" | Pro Logic II surround Movie mode | "PRO LOGIC" |
| "PLII MUSIC" | Pro Logic II surround Music mode | "PRO LOGIC" |
| "PLII GAME" | Pro Logic II surround Game mode | "PRO LOGIC" |
| "PRO LOGIC" | Pro Logic mode | "PRO LOGIC" |
| "NEO6 CINEMA" | Neo:6 surround Cinema mode | "Neo:6" |
| "NEO6 MUSIC" | Neo:6 surround Music mode | "Neo:6" |
| "ARENA" | DSP surround ARENA mode | "DSP MODE" |
| "JAZZ CLUB" | DSP surround JAZZ CLUB mode | "DSP MODE" |
| "THEATER" | DSP surround THEATER mode | "DSP MODE" |
| "STADIUM" | DSP surround STADIUM mode | "DSP MODE" |
| "DISCO" | DSP surround DISCO mode | "DSP MODE" |
| "STEREO" | Stereo mode | --- |

- Depending on the type of the signal or speaker setting, some listen modes cannot be selected.
- When playback is started, the sound may be cut or interrupted before the input source is confirmed as Dolby Digital.
- To enjoy Dolby Digital surround (as well as all the other listen modes) from a single component, be sure to use a Dolby Digital compatible source component.
- Dolby Digital or DTS signal having more channels than the maximum number of playback channels available using this unit's current settings is input, downmixing is performed to match the number of available channels.
- Some Dolby Digital Surround EX compliant discs do not contain identification signals. For this reason, the receiver may not detect these discs as Dolby Digital EX when the input mode is set to "F-AUTO". In this case, set the listen mode to "DOLBY DIGITAL EX".
Surround play is possible if you use a DVD player with 6-(5.1-) channel output.

Preparations
- Connect your DVD player to the DVD/6CH INPUT jacks of this unit.
- Turn on all other components that will be used.
- Complete .
1 Select "DVD/6CH" as the input source.
2 Press [INPUT MODE] to select "6CH INPT".
3 Start playback of a DVD disc.

- It is not possible to adjust the speaker level or sound effect of the channels separately when this unit is in the 6CH INPUT mode. ([SETUP], [SOUND], [LISTEN MODE], [ACTIVE EQ] and [TONE] will not be functional.) Adjust the speaker level with the controls of the DVD player. Refer to the Instruction manual of the DVD players for the detailed operating instructions.
This unit can store up to 40 stations in the memory and recall them by one-touch operation.
Radio stations can be classified into RDS (Radio Data System) stations and other stations. To listen to or store RDS stations in the preset memory see <Using RDS (Radio Data System)}.
Tuning (non-RDS) radio stations

MULTI CONTROL
INPUT SELECTOR
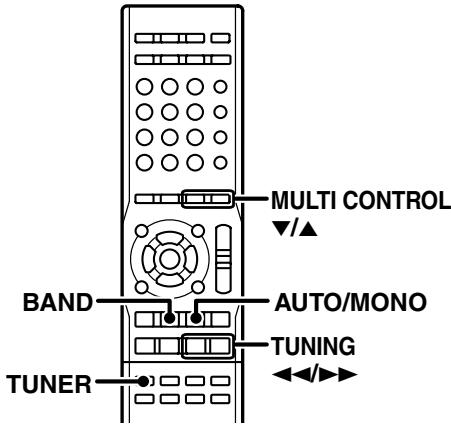
1 Use [TUNER] to select the tuner.
2 Use [BAND] to select the desired broadcast band.
Each press switches the band as follows:
①FM
②AM

3 Use [AUTO/MONO] to select the desired tuning method.
Each press switches the tuning method as follows:
| Selection | Operation | Indicator |
| Auto tuning | The next station is tuned automatically. | "AUTO" lit |
| Manual tuning | Select a station manually. | "AUTO" not lit |
| SP 0 | L | R | | | | | | | | | | | | | | | | | | | | | | | | | | | | | | | | | | | | | | | | | | | | | | | | | | | | | | | | | | | | | | | | | | | | | | | | | | | | | | | | | | | | | | | | | | | | | | | | | | | | | | | | | | | | | | | | | | | | | | | | | | | | | | | | | | | | | | | | | | | | | | | | | | | | | | | | | | | | | | | | | | | | | | | | | | | | | | | | | | | | | | | | | | | | | | | | | | | | | | | | | | | | | | | | | | | | | | | | | | | | | | | | | | | | | | | | | | | | | | | | | | | | | | | | | | | | | | | | | | | | | | | | | | | | | | | | | | | | | | | | | | | | | | | | | | | | | | | | | | | | | | | | | | | | | | | | | | | | | | | | | | | | | | | | | | | | | | | | | | | | | | | | | | | | | | | | | | | | | | | | | | | | | | | | | | | | | | | | | | | | | | | | | | | | | | | | | | | | | | | | | | | | | | | | | | | | | | | | | | | | | | | | | | | | | | | | | | | | | | | | | | | | | | | | | | | | | | | | | | | | | | | | | | | | | | | | | | | | | | | | | | | | | | | | | | | | | | | | | | | | | | | | | | | | | | | | | | | | | | | | | | | | | | | | | | | | | | | | | | | | | | | | | | | | | | | | | | | | | | | | | | | | | | | | | | | | | | | | | | | | | | | | | | | | | | | | | | | | | | | | | | | | | | | | | | | | | | | | | | | | | | | | | | | | | | | | | | | | | | | | | | | |
| AUC0 | | | | | | | | | | | | | | | | | | | | | | | | | | | | | | | | | | | | | | | | | | | | | FM | | | | | | | | | | | | | | | | | | | | | | | | | | | | | | | | | | | | | | | | | | | | | | | | | | | | | | | | | | | | | | | | | | | | | | | | | | | | | | | | | | | | | | | | | | | | | | | | | | | | | | | | | | | | | | | | | | | | | | | | | | | | | | | | | | | | | | | | | | | | | | | | | | | | | | | | | | | | | | | | | | | | | | | | | | | | | | | | | | | | | | | | | | | | | | | | | | | | | | | | ... | ... | ... | ... | ... | ... | ... | ... | ... | ... | ... | ... | ... | ... | ... | ... | ... | ... | ... | ... | ... | ... | ... | ... | ... | ... | ... | ... | ... | ... | ... | ... | ... | ... | ... | ... | ... | ... | ... | ... | ... | ... | ... | ... | ... | ... | ... | ... | ... | ... | . | ... | ... | ... | ... | ... | ... | ... | ... | ... | ... | ... | ... | ... | ... | ... | ... | ... | ... | ... | ... | ... | ... | ... | ... | ... | ... | ... | ... | ... | ... | ... | ... | ... | ... | ... | ... | ... | ... | ... | ... | ... | ... | ... | ... | ... | ... | ... | ... | ... | - | ... | ... | ... | ... | ... | ... | ... | ... | ... | ... | ... | ... | ... | ... | ... | ... | ... | ... | ... | ... | ... | ... | ... | ... | ... | ... | ... | ... | ... | ... | ... | ... | ... | ... | ... | ... | ... | ... | ... | ... | ... | ... | ... | ... | ... | ... | ... | ... | ... | ...... | ... | ... | ... | ... | ... | ... | ... | ... | ... | ... | ... | ... | ... | ... | ... | ... | ... | ... | ... | ... | ... | ... | ... | ... | ... | ... | ... | ... | ... | ... | ... | ... | ... | ... | ... | ... | ... | ... | ... | ... | ... | ... | ... | ... | ... | ... | ... | ... | ... | .. | ... | ... | ... | ... | ... | ... | ... | ... | ... | ... | ... | ... | ... | ... | ... | ... | ... | ... | ... | ... | ... | ... | ... | ... | ... | ... | ... | ... | ... | ... | ... | ... | ... | ... | ... | ... | ... | ... | ... | ... | ... | ... | ... | ... | ... | ... | ... | ... | ... | .... | ... | ... | ... | ... | ... | ... | ... | ... | ... | ... | ... | ... | ... | ... | ... | ... | ... | ... | ... | ... | ... | ... | ... | ... | ... | ... | ... | ... | ... | ... | ... | ... | ... | ... | ... | ... | ... | ... | ... | ... | ... | ... | ... | ... | ... | ... | ... | ... | ... | ...
UNED |
Normally, set to "AUTO" (auto tuning). If the radio waves are weak and there is a lot of interference, switch to manual tuning. (With manual tuning, stereo broadcasts will be received in monaural.)
4 Use [TUNING / ] to select the station.
"ST." lights when a broadcast is being received in stereo.


- [MULTI CONTROL▼/▲] can also be used to select a station.
Using RDS (Radio Data System)
RDS is a system that transmits useful information (in the form of digital data) for FM broadcasts along with the broadcast signal. Tuners and receivers designed for RDS reception can extract the information from the broadcast signal for use with various functions, such as automatic display of the station name.
Before using a function utilizing the RDS, be sure to perform the RDS Auto Memory operation by referring to the description in .(-35)
RDS functions:
RDS AUTO MEMORY function
Automatically selects and stores up to 40 RDS stations in the preset memory.
If fewer than 40 RDS stations have been stored in the preset memory, regular FM stations will be stored in the remaining places.
PS (Program Service) Name Display
Automatically displays the station name transmitted by the RDS station.
PTY (Program TYpe) identification Search
Automatically tunes to a station that is currently broadcasting the specified program type (genre).
RT (Radio Text) function
Displays the radio text data transmitted by some RDS stations when you press [DISPLAY]. There is "NO RT" or "RT ----" display if no text data is transmitted.
The "RDS" indicator lights up when an RDS broadcast (signal) is received.

- Some functions and function names may differ for certain countries and areas.
RDS Auto Memory
This function automatically stores up to 40 RDS stations in the preset memory. In order to use the PTY function, the RDS stations must be stored in the preset memory using the RDS AUTO MEMORY function.

1 Use [TUNER] to select the tuner.
2 Use [BAND] to set the broadcast band to "FM".
3 Press [AUTO MEMORY].

After a few minutes, up to 40 RDS stations are preset in order from channel "01".
Stations already stored in the preset memory may be replaced by RDS stations. (i.e., if the RDS AUTO MEMORY function detects 15 RDS stations, the stations currently preset at numbers 01-15 will be replaced by the RDS stations.)
Presetting radio stations manually
The RDS auto memory function assigns preset numbers to RDS stations starting from preset number "1". Therefore, be sure to execute the RDS auto memory function before using the following operations to manually store AM stations and other FM stations, and RDS stations. See .
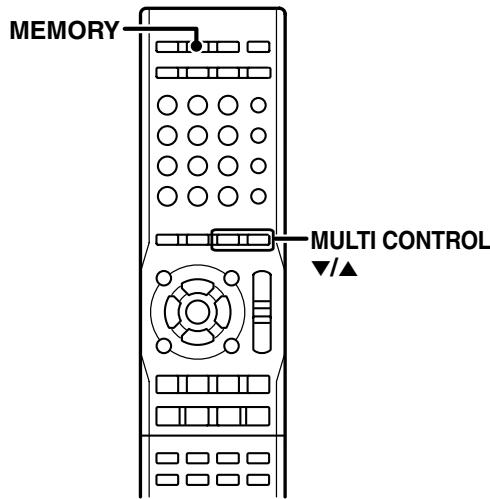
1 Tune to the station you want to store.
Press [MEMORY] while receiving the station.

Proceed to step 3 within 20 seconds. (If more than 20 seconds elapse, press [MEMORY] again.)
Use [MULTI CONTROL /] to select one of the station presets (1-40).
4 Press [MEMORY] again to confirm the setting.
Repeat steps 1, 2, 3, and 4 to store as many stations as necessary.
If you store a station at a previously used preset, the previous station will be replaced by the new one.
Receiving preset stations

1 Press [TUNER] to select tuner as the source.
2 Enter the number of the preset station you want to receive (up to "40" preset numbers).
Press the Numeric keys in the following order:
For preset No. 15: press [+10] , [5]
For preset No. 20: press [+10] , [+10] , [0]


- If you make a mistake entering a two-digit number, press [+10] repeatedly to return to the original display and start again.
Receiving preset stations in order (P.CALL)

1 Press [TUNER] to select tuner as the source.
2 Use [P.CALL▶▶] to select the desired station.
Each time you press the key, another preset station is received in order.
Holding down the [P.CALL 一 一 一 一 一 一 一 一 一 一 一 一 一 一 一 I], lets you skip through the presets, receiving each preset station at 0.5 second intervals.
Tuning by program type (PTY search)
This function lets you set the tuner to automatically search for stations which are currently broadcasting the type of program (genre) you want to listen to.
Under certain receiving conditions, it may take more than 1 minute to complete the search.

Preparations
- Execute the RDS auto memory procedure.
- Set the broadcast band to FM.
- Tune to an RDS station.
Press [PTY] to activate the PTY search mode.
![KENWOOD KRF-V6300D - Press [PTY] to activate the PTY search mode. - 1](/content/2025/01/124405/images/b72a99b0ecee67373a57f9fa7d0caff5b40c707ba0f685a7babf4b7fe8043f20.jpg)
When an RDS broadcast is received, the program type is shown on the display. If no PTY data is available, or if the station is not an RDS station, "NONE" is displayed.
2 While the "PTY" indicator is lit, use [TUNING / ] to select the program type of your choice.
| Program type | Display | Program type | Display |
| Pop Music | "POP M" | Weather | "WEATHER" |
| Rock Music | "ROCK M" | Finance | "FINANCE" |
| Easy Music | "EASY M" | Children's Program | "CHILDREN" |
| Light Classical Music | "LIGHT M" | Social Affairs | "SOCIAL" |
| Serious Classical Music | "CLASSICS" | Religion | "RELIGION" |
| Other Music | "OTHER M" | Phone In | "PHONE IN" |
| News | "NEWS" | Travel | "TRAVEL" |
| Current Affairs | "AFFAIRS" | Leisure | "LEISURE" |
| Information | "INFO" | Jazz Music | "JAZZ" |
| Sport | "SPORT" | Country Music | "COUNTRY" |
| Education | "EDUCATE" | National Music | "NATION M" |
| Drama | "DRAMA" | Oldies Music | "OLDIES" |
| Culture | "CULTURE" | Folk Music | "FOLK M" |
| Science | "SCIENCE" | Documentary | "DOCUMENT" |
| Varied Speech | "VARIED" | | |
3 Press [PTY] to start searching.
Example: Searching for a Rock Music broadcast.
Display while searching.
Blinks
![KENWOOD KRF-V6300D - Press [PTY] to start searching. - 1](/content/2025/01/124405/images/812fc4bb4557a340542530ea0e3899b728de615fce5f0bbcfc2ef183e386bdce.jpg)
Program type name display
Display when a station is received.
Goes out
![KENWOOD KRF-V6300D - Press [PTY] to start searching. - 2](/content/2025/01/124405/images/6cd470ec630033a11aa4fc7daa7458a086b6aceb4f0af96db339ffa3c7e44179.jpg)
Station name display
To select another program type
Repeat steps 1, 2 and 3.

- [MULTI CONTROL /] can also be used to select a station.
- No sound is heard while "PTY" is blinking.
- If the desired program type cannot be found, "NO PROG" is displayed, then after several seconds the display returns to the original display.
Using the RDS DISP. key

Pressing [RDS DISP.] changes the contents of the display.
Each press switches the display mode as follows:
①PS(Program Service) name display
②RT (Radio Text) display
③ Frequency display
① PS (Program Service) name display:
The station name is displayed automatically when an RDS broadcast is received.
If no PS data was sent, "NO PS" is displayed.

② RT (Radio Text) display:
Text data accompanying the RDS broadcast scrolls across the display. "NO RT" or "RT------" is displayed if the current RDS station does not provide RT data.

③ Frequency display:
Displays the frequency of the current station.

Recording mode setting in digital audio source recording
Operation available only on the main unit.
When recording a multi-channel digital audio source, it is recommended to set up the recording mode properly to convert the digital input into the 2-channel analog output. Usually use the "A-REC" (Auto record) mode.
However, some discs often produce sound skipping. The "M-REC" (Manual record) mode should be used with such a disc.

1 Use [INPUT SELECTOR] to select the source (CD/DVD, DVD/6CH or VIDEO2) you want to record.
2 Set the MD or TAPE recorder to record.
Press and hold [AUTO/MONO] for more than 2 seconds to select a recording mode during digital input.
| Recording mode | Display | Operation |
| Recording mode off | --- | The digital input record mode is switched off. |
| Auto record mode | "A-REC" | The digital input signals (DTS, Dolby Digital or PCM) are identified automatically and converted into stereo signals that are ready for recording. |
| Manual record mode | "M-REC" | The digital input signal type at the moment this mode is selected is held throughout this mode, and the signal is converted into stereo signals. But once the digital signal is changed to other signal, no signal is output. |
When the "A-REC" mode is selected, the digital input signal is converted to stereo signals even if the digital signal is changed.
When the digital mode changes during recording in the "A-REC" mode, the audio input source may be interrupted momentarily.

For "A-REC" mode:
For "M-REC" mode:
4 Start playback, then start recording.
If the audio reproduction stops in the middle due to change in the input signals, etc., press [AUTO/MONO].
Recording audio (analog sources)
1 Use [INPUT SELECTOR] to select the source (other than "MD/TAPE") you want to record.
2 Set the MD or TAPE recorder to record.
3 Start playback, then start recording.
Recording video
1 Use [INPUT SELECTOR] to select the video source (other than "VIDEO1") you want to record.
2 Set the video deck connected to VIDEO 1 to record.
Select the REC MODE to record a digital input source. See .
3 Start playback, then start recording.
Recording may not be normal for some video software. This is due to the copy guard condition.


Adjusting the Tone
Operation available only on the remote control unit.
The tone level can be adjusted when the input signal is a PCM or analog signal and the listen mode of this unit is set to "Stereo".
Press [TONE] to select the Tone mode.
2 Use [MULTI CONTROL / ] to select "TONE ON" or "TONE OFF".
3 When in "TONE ON" selection, press [TONE] for the following displays.
| Display | Setting | Range |
| "BASS" | Adjusts low frequency range. | -10 – +10 (in 2 step) |
| "TREB" | Adjusts high frequency range. | -10 – +10 (in 2 step) |
4 Use [MULTI CONTROL / ] to adjust the sound quality.
Press [TONE].

- When the ACTIVE EQ mode is set to ON, set it to OFF and then control the TONE setting.
Bass Boost
Operation available only on the remote control unit.
The tone level can be adjusted when the input signal is a PCM or analog signal and the listen mode of this unit is set to "Stereo".
Press [BASS BOOST].
Press the key once to select the maximum (+10) low frequency emphasis setting. TONE will automatically be turned ON.
To cancel
Press [BASS BOOST] again.
![KENWOOD KRF-V6300D - Press [BASS BOOST] again. - 1](/content/2025/01/124405/images/f9053f6101dd03e608de58a1a5d6a27863ef91f3b86f7cd2ddbd8cba8ee88637.jpg)
- Bass Boost does not function when this unit is in the sound quality or ambience effects adjustment mode.
- When the ACTIVE EQ mode is set to ON, set it to OFF and then control the Bass Boost setting.
ACTIVE EQ mode
You can enjoy a more impressive sound effect when ACTIVE EQ is turned ON during Dolby Digital and DTS playback and, when in PCM and analog stereo mode.
Press [ACTIVE EQ] for the following selections.
| Display | Setting |
| "ACTIVE EQ MUSIC" | Effective when listening to music. |
| "ACTIVE EQ CINEMA" | Effective when watching a movie. |
| "ACTIVE EQ GAME" | Effective when playing a game. |
| "ACTIVE EQ OFF" | Active EQ function is off. |
![KENWOOD KRF-V6300D - Press [ACTIVE EQ] for the following selections. - 1](/content/2025/01/124405/images/845e31d3f52443b074731574a0f8a7abe2d7d1e039db28093692bf053ffeb84a.jpg)
![KENWOOD KRF-V6300D - Press [ACTIVE EQ] for the following selections. - 2](/content/2025/01/124405/images/945f2e995e530c8e53574aa615bdd641a34ee83cb25c3e3c872d8e3705154a77.jpg)
- ACTIVE EQ function will not be available when REC MODE, AUTO TUNING or PRESET MEMORY is ON.
Adjustment according to the playing source
The audio can be adjusted as desired according to the source being played.
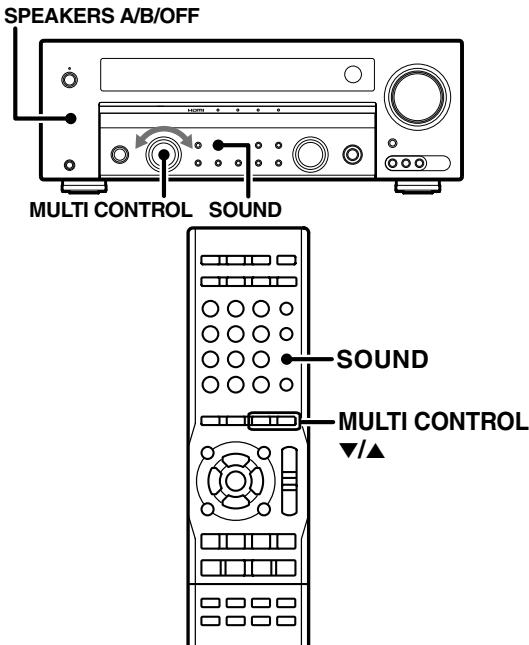
Press [SOUND] until the desired item appears on the display.
Each time you press the key, the menu changes as follows. Note that some items are not displayed depending on speaker settings and listen mode.
| Display | Adjustment | Range | |
| "C" | Center speaker level | -10 – +10dB | *1 |
| "RS" | Surround right speaker level | -10 – +10dB |
| "RB"* | Surround Back right speaker level | -10 – +10dB |
| "BS"* | Surround Back speaker level | -10 – +10dB |
| "LB"* | Surround Back left speaker level | -10 – +10dB |
| "LS" | Surround left speaker level | -10 – +10dB |
| "SW" | Subwoofer level | -10 – +10dB |
| "INPUT" | Input level | -6, -3, 0 | *2 |
| "NIGHT" | Midnight mode | "ON", "OFF" | *3 |
| "PANorama" | Panorama mode | "ON", "OFF" | *4 |
| "DIMENSION" | Dimension | |
| "CENTER WIDTH" | Center width | |
| Input source name | Exit the adjustment mode. | | |
- "RB" and "LB" can be selected when "BS L/R" is selected in the speaker setup. "BS" can be selected when "BS MONO" is selected in the speaker setup.
1 The adjustment is only temporary for the current input selection. The value will return automatically to the original setup value when the power is turned on/off or when the input selection is changed.
^2 Analog mode only
3 Dolby Digital and DTS mode only
4 Pro Logic II Music mode and Pro Logic IIx Music mode only
Use the [MULTI CONTROL / ] to adjust the setting as desired.
For detailed adjustment method, see the explanation of each item.
To exit the sound adjustment mode
Press [SOUND].
Speaker level adjustment
The output level from the desired speaker channels can be fine adjusted according to the properties of each disc. The adjustment is only temporary for the current input selection. The value will return automatically to the original setup value when the power is turned on/off or when the input selection is changed.
1 Press [SOUND] repeatedly until the speaker to be adjusted ("C", "RS", "RB", "BS", LB", "LS", or "SW") appears on the display.
2 Use the [MULTI CONTROL / ] to adjust the level.
3 Repeat steps 1 and 2 to adjust the level of other speakers.
Analog source only
If the input level of an analog source signal is too high, the CLIP indicator will blink to indicate. Adjust the input level.

2 Use the [MULTI CONTROL / ] to adjust the level.
![KENWOOD KRF-V6300D - Use the [MULTI CONTROL / ] to adjust the level. - 1](/content/2025/01/124405/images/175ab38e82c351fde24206e7f1ac2f70558dc5359d61cd997fedb77c85b28ba1.jpg)
Midnight mode
- Dolby Digital and DTS mode only
When watching movies at night, you might not be able to raise the volume as loud as normal. Midnight mode compresses the dynamic range of previously specified heavy sound passage of the Dolby Digital and DTS mode sound track (like scenes with sudden increases in volume) to minimize the difference in volume between the scenes with heavy sound passage and scenes with normal sound passage. This makes it easy to hear all of the sound track, even when listening at low volumes.
Press [SOUND] repeatedly until "NIGHT" appears on the display.
This can be selected only if "CD/DVD", "DVD/6CH" or "VIDEO2" is selected as the source and the listen mode is set to "DOLBY DIGITAL" or "DTS".
Use [MULTI CONTROL /] to select the "ON" or "OFF" setting.


- Some Dolby Digital or DTS software may not be compatible with the Midnight mode.
Panorama mode
- Pro Logic IIx Music and Pro Logic II Music mode only
When listening to music, you will be able to enjoy the "wraparound" sound effect when you adjust the panorama mode.
Press [SOUND] repeatedly until "PANorama" appears on the display.
The "PANorama" setting indication scrolls across the display.

"PANorama" will be scrolled from right to left.
2 Use [MULTI CONTROL /] to select the "ON" or "OFF" setting.
①"ON":PANORAMA mode is ON.
②"OFF": PANORAMA mode is OFF.

Dimension mode
- Pro Logic IIx Music and Pro Logic II Music mode only
When listening to music with certain recordings, you will also be able to achieve a suitable balance from all the speakers by adjusting the dimension mode.
Press [SOUND] repeatedly until "DIMENSION" appears on the display.
The "DIMENSION" indication scrolls across the display.
2 Use [MULTI CONTROL / ] to adjust the soundfield towards the rear or the front.
Soundfield is adjusted towards the front.

Soundfield is in neutral position.

Soundfield is adjusted towards the rear.

Center Width mode
- Pro Logic IIx Music and Pro Logic II Music mode only
Center Width adjustment allows you to enjoy an enhanced sound when listening to music through center image from only center speaker, or left and right speakers or various combinations adjustments.
Press [SOUND] repeatedly until "CENTER WIDTH" appears on the display.
The "CENTER WIDTH" indication scrolls across the display.
2 Use [MULTI CONTROL / ] to adjust the left-center-right output.
Center image will be heard from Center speaker only.

Center image will be heard from Left and Right speakers only.


- When in other positions, center image from Center speaker, Left and Right speakers can be heard simultaneously with various combinations.
- When the center speaker is switched OFF, this mode will not be effective.
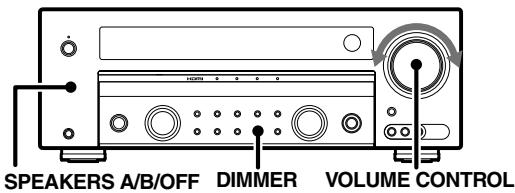

Display dimmer adjustment
The dimmer function lets you select the brightness of the display and indicators of this unit. You might find this useful if you darken your room to watch movies or listen to music.
Press [DIMMER].
The brightness of the display changes among the 3 available settings. Select the brightness level you find most pleasing.
![KENWOOD KRF-V6300D - Press [DIMMER]. - 1](/content/2025/01/124405/images/5f2d94059efd0a6d7e3b6be21063182b7a06eecbae559cf5080b251dbb5f6bd5.jpg)
![KENWOOD KRF-V6300D - Press [DIMMER]. - 2](/content/2025/01/124405/images/70f3a87454f33059163d1860f74751fc55aa1fc5164b4d9824600aa35b6fc026.jpg)
- The brightness of the LED indicators changes in 2 levels.
Listening with headphones
Operation available only on the main unit.
Press [SPEAKERS A/B/OFF] so that the speaker indicator goes off.
Make sure the "SP" indicator is turned off.
![KENWOOD KRF-V6300D - Press [SPEAKERS A/B/OFF] so that the speaker indicator goes off. - 1](/content/2025/01/124405/images/f7f3d29790a9ead095ccad037723d877bfd8cb3c85f4db04cf92002ea344c861.jpg)
If you turn off all of the speakers when in surround mode, the surround mode will be canceled as well, resulting in stereo playback.
2 Connect headphones to the PHONES jack.
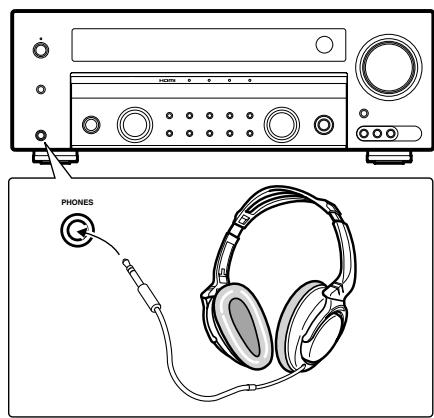
3 Use [VOLUME / ] to adjust the volume.
Muting the sound
Operation available only on the remote control unit.
Press [MUTE] to mute the sound of the speakers.
"MUTE" indicator blinks.
![KENWOOD KRF-V6300D - Press [MUTE] to mute the sound of the speakers. - 1](/content/2025/01/124405/images/e5608877b45aeb7145a85b2fb6f00e455e1a5115ba1fa3b1e8ee169aaed4165a.jpg)
To cancel
Press [MUTE] again so that the "MUTE" indicator goes off.
MUTE can also be deactivated by adjusting volume.
The remote control of this unit can control Kenwood DVD players directly without using the remote control supplied with the DVD player.
Compatible DVD player models
DV-4900, DV-4070B, DV-2070, DV-203, DVF-K9010, DVF-R9010, DVF-5010, DVF-R9030, DVF-R7030, DVF-3530, DV-402, DV-5900, DV-5700, DVF-R9050, DVF-J6050, DV-505, DV-503, DV-502, DVF-3550, DVF-3050, DVF-R4050, DVF-605, DV-6050, DVF-R5060, DVF-3060, DVF-3060K, DV-705, DVF-R5070, DVF-3070, DVF-N7080, DVF-8100, DVF-3200, DVF-3250, DVF-3300, DVF-3400, DVF-5400, DVF-3500 and DVF-5500.
How to operate the DVD player with the remote control
Press [DVD] to turn the DVD player on.
Press [CD/DVD] or [DVD/6CH] to operate the functions of the DVD player.
Pressing [CD/DVD] or [DVD/6CH] allows you to control the connected Kenwood DVD player with this remote control unit.
Press each key for DVD player operation. Refer to the operation manual of the DVD players for the detailed operating instructions.
(To return to the receiver operation mode, press other Input source key.)
DVD player operation keys
You can perform these basic operations using the keys described below when connected to Kenwood DVD player.
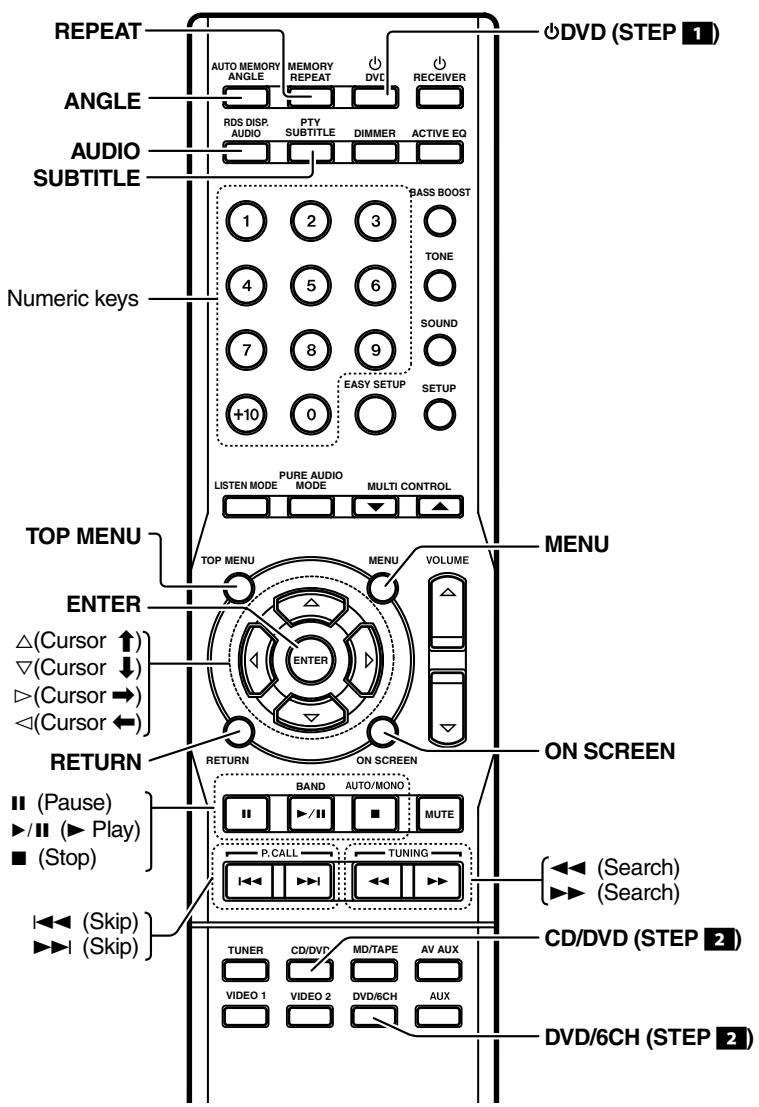
Troubles are not always due to malfunction or failure of the system. In case of a trouble, check the following tables before calling for service.
Amplifier
| Symptom | Cause | Remedy |
| No sound from the speakers. | The speaker cords are disconnected. | Connect it properly referring to <Connecting the speakers>. →18 |
| VOLUME is set to the minimum position. | Adjust the volume to a proper level. |
| MUTE is ON. | Turn OFF the MUTE. →42 |
| The SPEAKERS switches are set to OFF. | Set the SPEAKERS switch to ON. →26 |
| No sound from the speakers when playing the source connected with HDMI connection. | Audio line connection is not made. | Connect the audio line referring to <Connecting components equipped with HDMI terminals>. →11 |
| The standby indicator blinks and sound is not output. | Speaker cords are short-circuited. | Turn the power off, eliminate the short-circuiting, then turn on the power again. |
| There may be an internal defect. | If the standby indicator still blinks after eliminating the short-circuiting, there may be an internal defect. Switch it off, unplug the power cord and call for service. |
| Sound is not output from one of the speakers. | The speaker cord is disconnected. | Connect it properly referring to <Connecting the speakers>. →18 |
| The speaker is not set up correctly. | Set it up properly referring to <Speaker setup>. →21 →22 |
| Sound is not output from the surround speakers and/or the center speaker, or their sound is very soft. | The surround speaker cords and/or the center speaker cord is disconnected. | Connect it properly referring to <Connecting the speakers>. →18 |
| The speaker is not set up correctly. | Set it up properly referring to <Speaker setup>. →21 →22 |
| A surround mode has not been activated. | Select a surround mode. →32 |
| The surround and/or center volume controls are set to the minimum level. | Adjust the speaker levels using the test tone. →23 |
| When playing a Dolby Digital source signal using a DVD player, the sound is cut off soon after it starts. | There are many possible causes for this problem, depending on the type of DVD player used. | Set the input mode to digital manual before starting playback of the Dolby Digital source. →26 |
| No sound is produced during playback from a DVD player. | The input mode is set to digital manual. | Press the [INPUT MODE] key to select to full auto mode. →26 |
| A video source cannot be recorded normally. | The software is copy-guarded. | Copy-guarded video software cannot be recorded. |
| No video output. | PURE AUDIO MODE is on. | Turn off the PURE AUDIO MODE. →28 |
| Display is turned off. | PURE AUDIO MODE is on. | While the PURE AUDIO MODE is on, the display is turned off. →28 |
Tuner
| Symptom | Cause | Remedy |
| Radio stations cannot be received. | No antenna is connected. | Connect an antenna. →17 |
| The broadcast band is not set properly. | Set the broadcast band properly. →34 |
| The frequency of the desired station is not tuned. | Tune the frequency of the desired station. →34 |
| Interference | Noise due to ignition of an automobile. | Install the outdoor antenna away from the road. |
| Noise due to interference from an electric appliance. | Turn off the power to the appliance. |
| Noise due to a nearby TV set. | Install the unit farther away from the TV. |
| A station which was preset cannot be received by pressing the corresponding numeric key. | The preset station belongs to a frequency that cannot be received. | Preset a station with a receivable frequency. →35 |
Remote control unit
| Symptom | Cause | Remedy |
| Remote control operation is not possible. | The remote control is set to the DVD player operation mode. | Press any of the Input Source keys to select the appropriate operation mode. |
| Batteries are exhausted. | Replace with new batteries. → 9 |
| The remote control unit is too far away from the main system, controlling angle is too large, or there is an obstacle between this unit and the remote. | Operate the remote control unit within the controllable range. → 9 |
| The remote control has not been changed to the operation mode for the Kenwood DVD player you wish to control. | Press the [CD/DVD] or [DVD/6CH] key to activate the operation mode for the component you want to control before operation. |
Resetting the Microcomputer
The microcomputer may malfunction (unit cannot be operated, or shows an erroneous display) if the power cord is unplugged while the power is ON, or due to some other external factor. If this happens, execute the following procedure to reset the microcomputer and return the unit to its normal operating condition.
While holding down [ ] key on the unit, unplug the power cord and plug it back in.
- Please note that resetting the microcomputer will clear the contents of the memory and return the unit to the state it was in when it left the factory.
Do not use contact cleaners because it could cause a malfunction. Be specially careful not to use contact cleaners containing oil, for they may deform the plastic component.
Maintenance of the unit
When the front panel or case becomes dirty, wipe with a soft, dry cloth. Do not use thinner, benzine, alcohol, etc. for these agents may cause discoloration.
AUDIO section
Rated output power during STEREO operation (63 Hz - 12.5 kHz, 0.7% T.H.D., at 6 Ω)............100 W + 100 W
Effective output power during STEREO operation RMS (1 kHz, 10% T.H.D., at 6 Ω) 130 W + 130 W
Effective power output during SURROUND operation FRONT
(1 kHz, 0.7% T.H.D. at 6 Ω one channel driven).. 100 W + 100 W
(1 kHz, 10% T.H.D. at 6Ω one channel driven)... 130 W + 130 W
CENTER
(1 kHz, 0.7% T.H.D. at 6Ω one channel driven) .100 W
(1 kHz, 10% T.H.D. at 6 Ω one channel driven) .130 W SURROUND
(1 kHz, 0.7 % T.H.D. at 6 Ω one channel driven) ... 100 W + 100 W
(1 kHz, 10 % T.H.D. at 6 Ω one channel driven) .... 130 W + 130 W
Total harmonic distortion. 0.05% (1 kHz, 50 W, 6 Ω)
Frequency response (IHF'66) CD/DVD. 10Hz - 70kHz, + 0dB - - 3.0dB
Signal to noise ratio (IHF'66) CD/DVD 100 dB
Input sensitivity / impedance CD/DVD, AUX, MD/TAPE,VIDEO 1,VIDEO 2 .... 550 mV / 68 kΩ
AV AUX. 550 mV / 33 kΩ
DVD/6CH 550 mV / 18 kΩ
Output level / impedance
REC OUT (MD/TAPE,VIDEO 1) 550 mV / 470 Ω
PRE OUT (SURROUND BACK) 650 mV / 470 Ω
PRE OUT (SUBWOOFER) 2.0V/470Ω
Tone control BASS. ± 10 dB (at 100Hz TREBLE. ± 10 dB (at 10kHz
DIGITAL AUDIO section
Input terminal Optical CD/DVD,VIDEO 2 Coaxial DVD/6CH
VIDEO section
VIDEO input sensitivity / impedance
(VIDEO 1,VIDEO 2, DVD/6CH, AV AUX)
Composite............1 Vp-p / 75 Ω
VIDEO output level / impedance (VIDEO 1, MONITOR) Composite .1 Vp-p / 75 Ω
S-VIDEO input sensitivity / impedance (VIDEO 2, DVD/6CH)
Y-singal. 1 Vp-p / 75 Ω
C-singal. 0.286 Vp-p / 75 Ω
S-VIDEO output level / impedance (MONITOR)
Y-singal. 1 Vp-p / 75 Ω
C-singal. 0.286 Vp-p / 75 Ω
COMPONENT VIDEO input sensitivity / impedance (VIDEO 1,VIDEO 2,DVD/6CH)
Y-signal. 1 Vp-p / 75 Ω
CB/ CR-signal. 0.7 Vp-p / 75 Ω
COMPONENTVIDEOoutput level /impedance(MONITOR) Y-signal. 1Vp-p/75Ω
CB/ CR-signal. 0.7 Vp-p / 75 Ω
HDMI section
HDMI input terminal DVD/6CH,VIDEO 2
HDMI output terminal.........MONITOR
FM tuner section
Tuning frequency range. 87.5 MHz - 108.0 MHz
AM tuner section
Tuning frequency range. 531 kHz - 1,602 kHz
General
Power consumption 245W
Standby power consumption. less than 0.7 W
Dimensions W:440 mm (17-5/16") H: 159 mm (6-1/4") D:372 mm (14-5/8")
Weight (net) 9.3 kg (20.5 lb)

- Kenwood follows a policy of continuous advancements in development. For this reason specifications may be changed without notice.
- The full performance may not be exhibited in an extremely cold location (under a water-freezing temperature).
KENWOOD
For your records
Record the serial number, found on the back of the unit, in the spaces designated on the warranty card, and in the space provided below. Refer to the model and serial numbers whenever you call upon your dealer for information or service on this product.
Model Serial Number