SFB 10.1 A1 10-IN-1 REMOTE CONTROL - Télécommande universelle SILVERCREST - Notice d'utilisation et mode d'emploi gratuit
Retrouvez gratuitement la notice de l'appareil SFB 10.1 A1 10-IN-1 REMOTE CONTROL SILVERCREST au format PDF.
| Type de produit | Télécommande universelle 10-en-1 |
| Marque | SILVERCREST |
| Modèle | SFB 10.1 A1 |
| Nombre d'appareils contrôlables | 10 |
| Dimensions (L × l × H) | 217 × 50 × 22 mm |
| Poids (sans piles) | 102 g |
| Alimentation | 2 piles AAA/LR03 de 1,5 V |
| Type d'émetteur | Infrarouge, diode laser classe 1 |
| Affichage | Écran LCD rétroéclairé avec date, heure et code |
| Température de fonctionnement | +5 à +35 °C |
| Température de stockage | -20 à +50 °C |
| Humidité admissible | 5 à 90 % (sans condensation) |
| Méthodes de programmation | Recherche par marque, saisie manuelle, recherche automatique |
| Fonction d'apprentissage | Oui, jusqu'à 150 commandes |
| Macros programmables | 6 macros, jusqu'à 16 commandes chacune |
| Minuterie | Minuteur de sommeil (1-99 min) et 4 minuteries d'événement |
| Mémorisation des chaînes favorites | 4 favoris par appareil |
| Verrouillage des menus | Oui, fonction Lock |
| Nettoyage | Chiffon doux légèrement humide, pas de solvants |
| Entretien | Retirer les piles si inutilisé longtemps, remplacer toutes les piles en même temps |
| Réparabilité | Ne pas ouvrir ni réparer soi-même ; contacter le fabricant ou le service après-vente |
FOIRE AUX QUESTIONS - SFB 10.1 A1 10-IN-1 REMOTE CONTROL SILVERCREST
Questions des utilisateurs sur SFB 10.1 A1 10-IN-1 REMOTE CONTROL SILVERCREST
0 question sur cet appareil. Repondez a celles que vous connaissez ou posez la votre.
Poser une nouvelle question sur cet appareil
Téléchargez la notice de votre Télécommande universelle au format PDF gratuitement ! Retrouvez votre notice SFB 10.1 A1 10-IN-1 REMOTE CONTROL - SILVERCREST et reprennez votre appareil électronique en main. Sur cette page sont publiés tous les documents nécessaires à l'utilisation de votre appareil SFB 10.1 A1 10-IN-1 REMOTE CONTROL de la marque SILVERCREST.
MODE D'EMPLOI SFB 10.1 A1 10-IN-1 REMOTE CONTROL SILVERCREST
10-in-1 Remote Control
GB 10-in-1 Remote Control Operating manual
Pilot uniwersalny Instruktja obstugi
Telecomanda universală Instructiuni de utilizes
| Important safety instructions | 2 |
| Device summary | 3 |
| Initial use | 4 |
| Unpacking the device/checking the package contents | 4 |
| Inserting the batteries | 4 |
| Operating components | 5 |
| LCD display | 5 |
| Buttons | 6 |
| SETUP - System settings | 9 |
| Code Setup (Programming the remote control) | 11 |
| Programming by brand code search | 11 |
| Programming by manual code input | 12 |
| Programming by automatic code search | 12 |
| System-Setup | 14 |
| Setting the time | 14 |
| Setting the date | 14 |
| Adjust contrast | 15 |
| Background Illumination | 15 |
| Setting the global volume/mute switching | 15 |
| Setting the lock function | 16 |
| System reset | 17 |
| Timer Setup | 17 |
| Sleep timer | 17 |
| Event timer | 17 |
| Learn Setup | 18 |
| Code learn function | 19 |
| Macro Setup | 20 |
| Favourites channel | 21 |
| Volume control | 23 |
| Vol +/-, (Mute switching) | 23 |
| For operation | 23 |
| ALL OFF | 23 |
| Cleaning and storage | 24 |
| Faults / Remedies | 24 |
| Disposal | 25 |
| Technical data | 25 |
| Note regarding conformity | 26 |
| Importer | 26 |
| Warranty & Service | 26 |
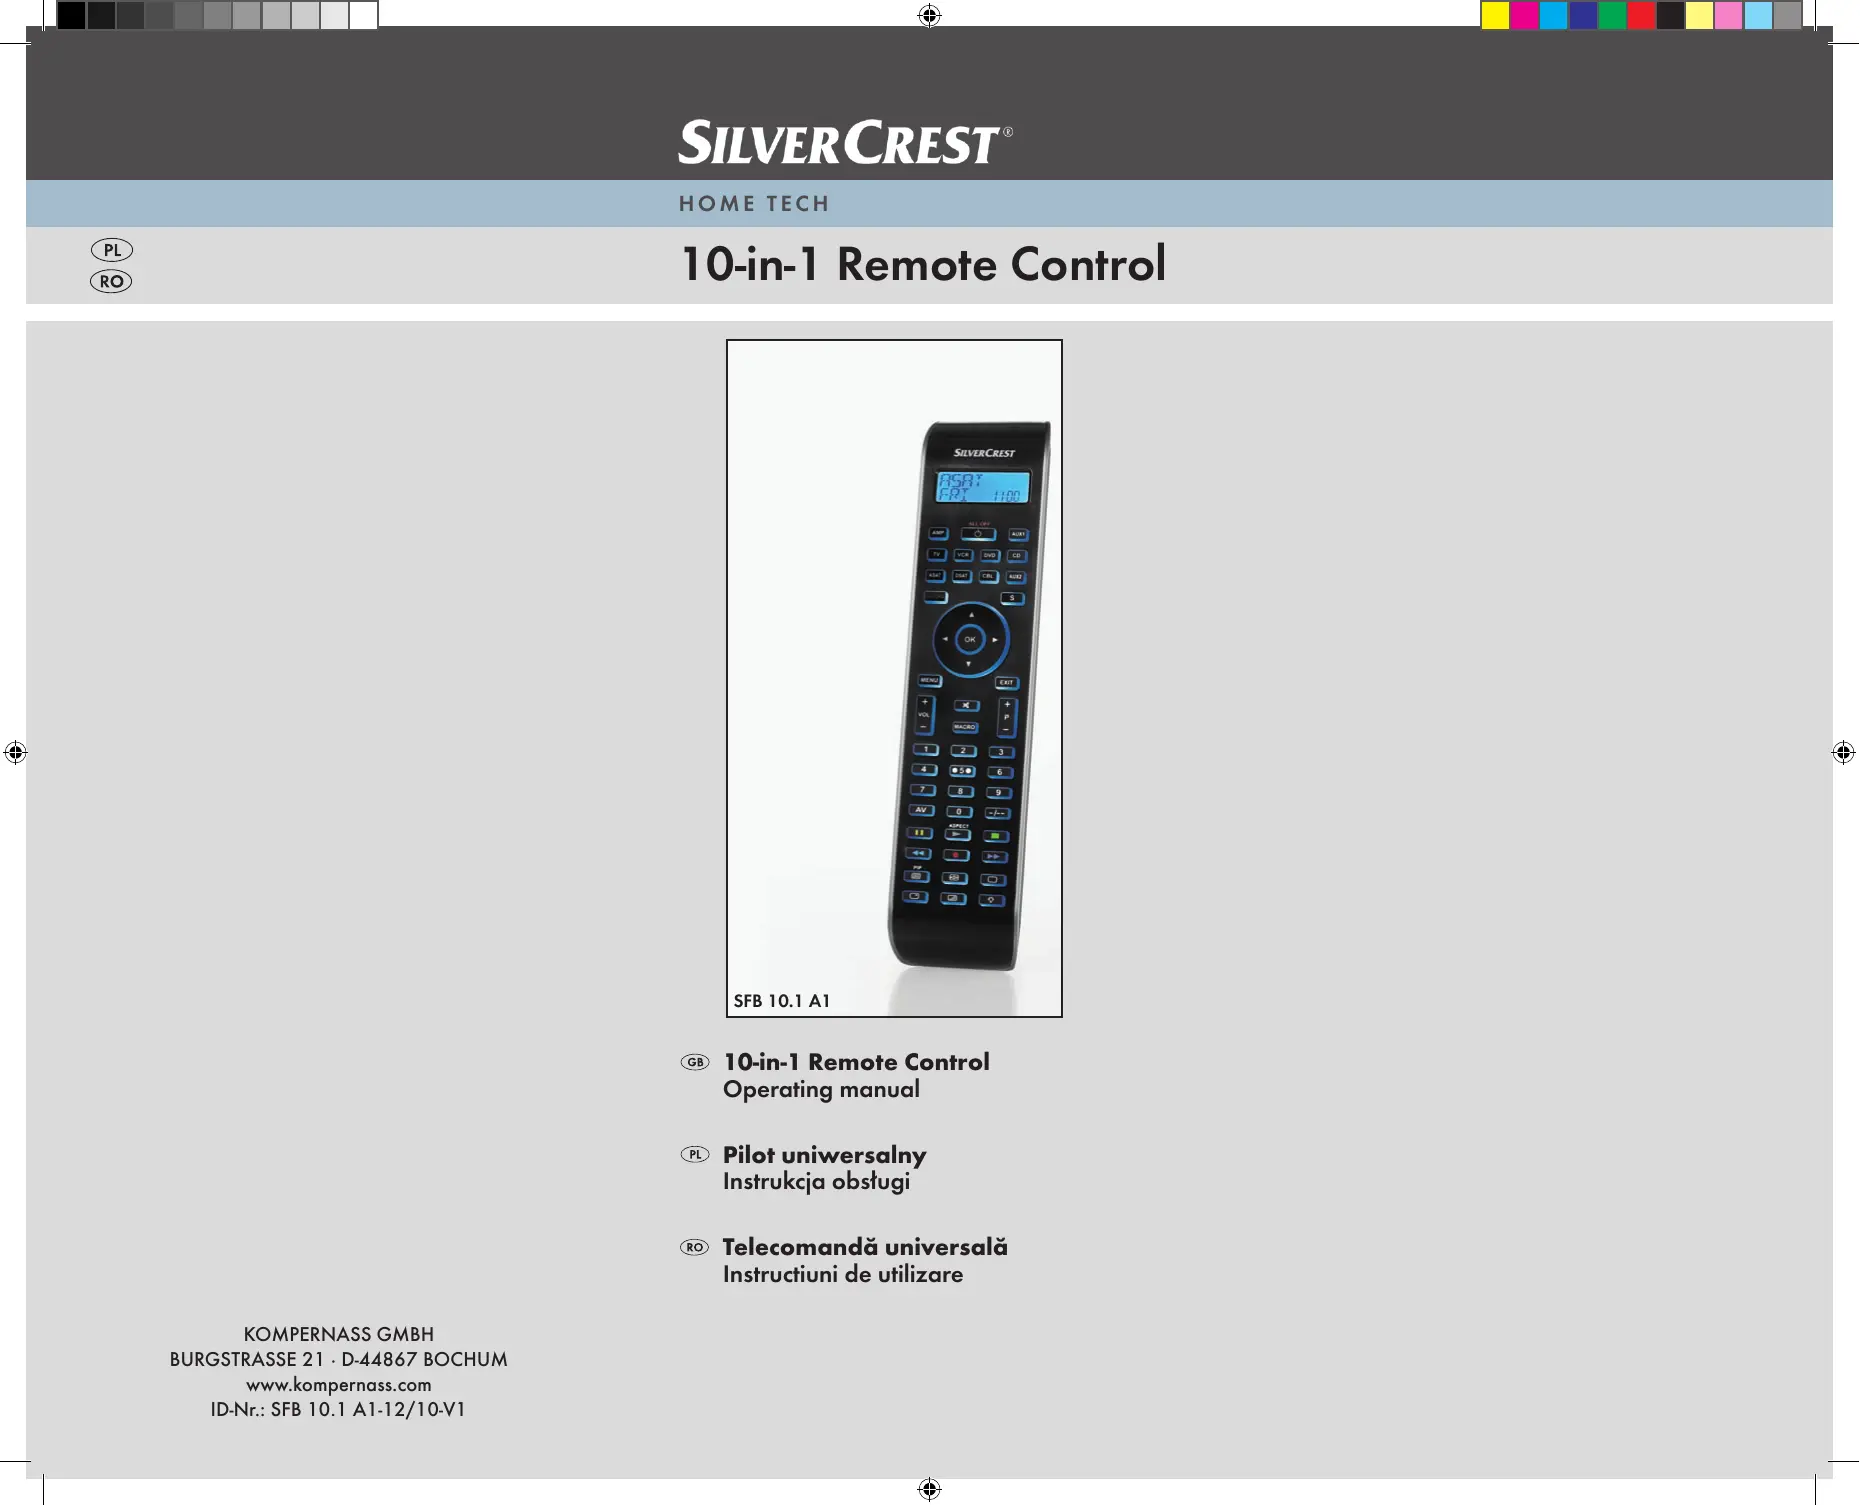
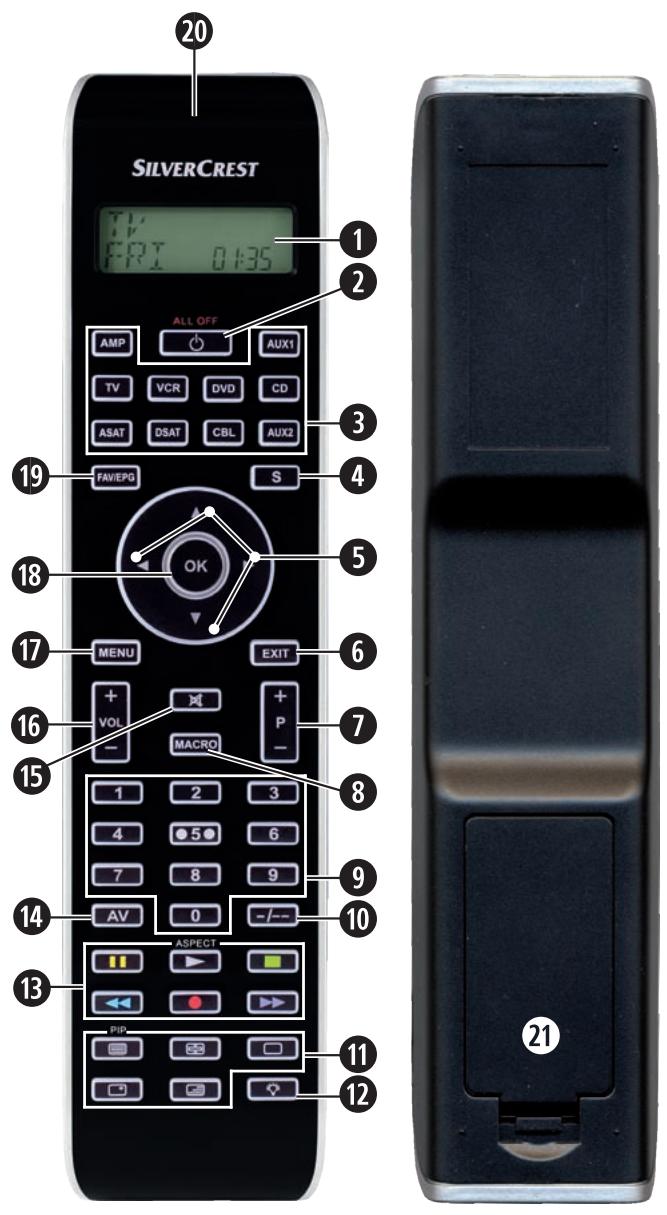
UNIVERSAL REMOTE CONTROL SFB 10.1 A1
This documentation is copyright protected. All rights including those of photographic reproduction, duplication and distribution by means of particular methods (for example data processing, data carriers and data networks), wholly or partially as well as substantive and technical changes are reserved.
Read the operating instructions carefully before using the device for the first time and preserve this booklet for later reference. Pass this manual on to whoever might acquire the device at a future date.
Important safety instructions
Proper use
Children may only operate the remote control under adult supervision.
The universal remote control can replace a maximum of ten remote controls. It can only be used for entertainment electronics with infrared receivers. The functions of the Universal remote control essentially correspond to those of the original remote control. The universal remote control is intended for private use. It is not suitable for commercial use.
Any other use is considered improper use. The manufacturer accepts no responsibility for damage caused by improper handling or unauthorized reconstruction.
Warning
A warning of this danger level signifies a possible dangerous situation. If the dangerous situation is not avoided it can lead to injuries. The directives in this warning are there to avoid personal injuries.
Important
A warning of this danger level signifies possible property damage. If the situation is not avoided it can lead to property damage. The directives in this warning are there to avoid property damage.
Note
A note signifies additional information that assists in the handling of the device.
Warning of injury danger as a result of improper handling of batteries!
Batteries must be handled with special care. Take note of the following safety instructions:
- Keep batteries well away from children. Children can put batteries into their mouths and swallow them. If a battery is swallowed medical assistance must be sought IMMEDIATELY.
-
Do not throw batteries into a fire. Never subject batteries to high temperatures.
-
Explosion hazard! Non-rechargeable batteries must never be recharged.
- Do not open the batteries or short-circuit them.
- Battery acid leaking from a battery can cause inflammation of the skin. In event of contact with the skin, rinse with large amounts of water. If the liquid comes into contact with your eyes, rinse thoroughly with water, do not rub and immediately consult a doctor.

Attention!
The Universal remote control contains an infrared diode of laser class 1. In order to avoid eye injuries do not look at the diode with optical devices.
Damage to the device
- If the device is defective, do not attempt to repair it yourself. In case of damage, contact the manufacturer or the manufacturer's service hotline (see Warranty information).
- If liquid escapes from the device or if the device has been otherwise damaged, it must be inspected by the manufacturer or the manufacturer's service hotline. Contact the manufacturer or the manufacturer's service hotline (see Warranty information).
- Take the batteries out of the battery compartment as soon as they are depleted.
- If you will not be using the device for a long period of time, remove the batteries to prevent them from discharging.
- Always change all batteries at the same time and always use batteries of the same type.
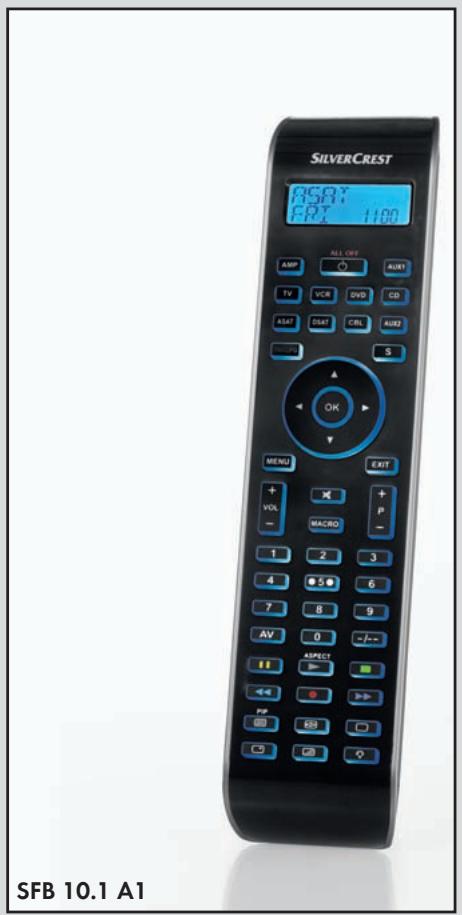
Device summary
LCD display
2 /ALL OFF button
Device buttons
S button
5 Arrow buttons
6 EXIT button
P+/-buttons
3 MACRO button
Number buttons
10 Button for one or two digit programme numbers
10 Teletext function buttons
12 Illumination button
Record/Playback buttons
14 AV button
Mute switching
16 VOL + / - buttons
7 MENU button
OK button
19 FAV / EPG button
20 Infrared sender/receiver
Battery compartment cover
Tips:
- The functions described here pertain to the theoretically ideal circumstance that the button structure of the respective original remote control is identical to this universal remote control. This only occurs, however, in rare cases. If, therefore, not all of the original remote control's functions can be reproduced it is not due to a deficiency in the Universal remote control.
- All the brand names used in these instructions or in the accompanying code list are trademarks of the corresponding companies.
Initial use
Unpacking the device/checking the package contents

Warning!
Keep the plastic packaging well away from small children. There is a risk of suffocation!
- Unpack the device and accessories.
- Check the package contents
-Universal remote control (URC),
-Operating instructions,
- Manufacturers directory with device code list:
- 2 × 1,5 V Batteries, type AAA/LRO3 (Micro)

Note: Transport damage
If you notice any transport damage contact the manufacturer or the manufacturer's Service-Hotline (see warranty information).
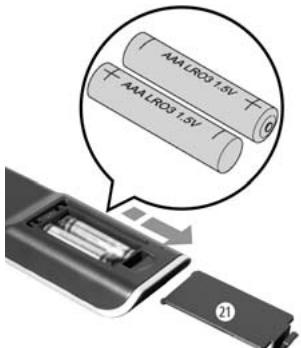
Inserting the batteries

Attention!
The Universal remote control must only be operated with 1.5 Volt batteries (Type AAA, LRO3).
Carry out the battery change as quickly as possible. Preset settings will remain saved for approx. 1 minute. If new batteries have not been installed within this time all of the settings will have to be carried out again. The time of day and date will, however, be lost in either case.

- Open the battery compartment cover ② in the direction of the arrow.
- Insert the batteries as shown in the diagram and close the battery compartment.
The LCD display ① is activated as long as batteries are installed. The following diagram shows the LCD display ① after the batteries have been installed or changed.

Note:
If no LCD display 1 is visible check the polarity of the batteries or install new ones.
Operating components
LCD display
The LCD display ① is divided into fields.

Text field 2
Here is shown the currently selected device, for example DVD, TV VCR etc.
Infrared symbol 23
Every time a button is pressed, with which an infrared signal is to be sent the Infrared symbol illuminates.
Code/Time field 24
Here is shown the device code of the relevant selected device or the time of day. With the time of day indicator ".the numbers blink in the middle.
Day of the week field 25
Here you can read the English shortened form of the current day of the week after you have entered the date.
MON = Monday
TUE = Tuesday
WED = Wednesday
THU = Thursday
FRI = Friday
SRT = Saturday
SUN
Standard display:
TV
FRI
00:00
The standard readout of the LCD display ① consists of the details for the relevant device, for example, "TV", the initial for the day of the week and the time of day indicator.
Buttons

Note:
All the functions described here can, of course, only be used if they are supported by the device being controlled.

/ALL OFF button. 2
ALL OFF

Switch device on/off. hold down for approx.
5 seconds to switch all devices on/off.
Device buttons 3
The device buttons are used to select the device that should be operated.
TV
Television
VCR
Video recorder
AUX1
Accessory unit 1
CBL
Cable receiver
CD
CD player
ASAT
Analogue satellite receiver
AMP
Audio amplifier
DVD
DVD player
DSAT
Digital satellite receiver
AUX2
Accessory unit 2
The mentioned button allocation is not compulsory. You can, for example, also save the code for the video recorder on the TV slot.
Hold down for 3 seconds to access the SETUP menu, press briefly to superimpose the date and/or to open access to additional functions such as EPG or PIP.
Arrow buttons 5

Move up, right, left and down in menus.
EXIT button 6
EXIT
Move a level backward in the menu.
P + / - buttons 7

Change the reception channel.
MACRO button 8
MACRO
MACRO button 8 followed by a number button 9 1-6 activates a previously saved chain of commands.
Number buttons 9


Enter programme and device code numbers.
Button for one/two digit programme numbers 10

For two digit programme numbers (depending on the device type) first press
the 10 button then via the number buttons 9 enter the programme number.
When pressed again the display becomes single digit once more.
Teletext function buttons ①
In teletext operation the buttons have the following functions:

Access the teletext function.
In normal TV operation first press the
S button 4 followed by the button to control the "PIP" function (picture in picture) of your television set.

Stop automatic paging forward for multi-page teletexts.

Enlarge page presentation

Screen text and TV image one upon the other

To end the teletext function.
i
Note:
- The teletext function is only available in the European TV mode and your TV device must have a teletext module.
- In addition the P + / - buttons ⑦ control the following teletext functions:
P + Leaf one page forward
P- Leaf one page backwards
Record/playback buttons 8
The playback buttons control devices such as DVD/CD players and video recorders:

ASPECT
Start playback
Image format switching with TV operation.

Record

StopPlayback/Record/Wind

Pause playback

Rewind

Wind forward
AV button 14

Switch to the AV input.
Mute switching 6

Switch sound on/off.
VOL+/- buttons 16

Set volume (Volume).
MENUButton

Access the menu of the controlled device.
OK button 18

You can confirm a menu selection with the OK button.
FAV/EPG button

Press the FAV/EPG button to access your previously programmed favourite station. To access the electronic programme guide of the target device first press briefly the S button ④ and then the FAV/EPG button.
In the system settings you undertake the following:
- Programming the remote control to the devices to be controlled
- Setting the time of day, date, display contrast, background illumination, volume, lock function as well as system reset.
- Timer settings
- The "learning" of designated button commands
- Setting up Macros
- Assigning favourites
On the following page you can see a summary of the menu structure.


3 Programming methods are available for the remote control: Programming by brand code search, by automatic code search and by direct code input (manual).
First you should use the brand code search since this method is the fastest way of programming if the manufacturer of your device is itemized in the code list. As second is recommended the direct code input followed by the automatic code search.
Programming by brand code search
With this method you select the brand and code direct via the LCD display ①.
Observe the following operational references to programme the remote control:
- Press the device button ③ for the device that you want to programme the remote control.
- Hold down the S button 4 for a little longer than 3 seconds. Carry out entries in the menu quickly because after approx. 15 seconds without an entry the menu will be ended.
- In the LCD display 1 "CODE SETUP" appears. Press the OK button 8. "ENTER CODE" now appears in the LCD display 1. With the buttons 5 select "BRAND CODE" and confirm with the OK button 8.
- Now appears the alphabetical first brand name from the list of pre-programmed devices.
- With the buttons 5 select the various brand names.
- To make access easier you can skip directly to specific letters of the alphabet with the number buttons 9:
$$ \begin{array}{l} 2 \Rightarrow A \quad 3 \Rightarrow D \quad 4 \Rightarrow G \quad 5 \Rightarrow J \ 6 \Rightarrow M \quad 7 \Rightarrow P \quad 8 \Rightarrow T \quad 9 \Rightarrow W \ \end{array} $$
Example With button number 5 the display skips to the letter "J". The first brand is "JVC". If, for example, you own a "Kenwood" brand device, continue leafing with the button ⑤ until this brand name appears. (* All brand names used here are trademarks of the corresponding manufacturer.)
- The majority of manufacturers use several different codes for the remote control. You must now ascertain which of the available codes is best suited to your device. On the right underneath the brand name the relevant code will be shown in the LCD display ①.
-
Point the remote control to the relevant device and press the function buttons to test the code (except ⑤, OK ⑧, EXIT ⑥, or the number buttons ⑨).
-
If most of the buttons function press the OK button to save the setting. In the LCD display 1 "OK" appears. Subsequently the menu will close automatically.
- If, however, none or only a few of the buttons function select with the or button 5 the next code and test again as described in step 8.
- With the EXIT button ⑥ you will move one level upwards in the menu.
Repeat these operational steps for all devices that you would like to control with the remote control.
Programming by manual code input
In this mode the remote control can be programmed by direct input of a code number. You can obtain the necessary code number from the enclosed manufacturers directory with device code list. In the event that the new code is invalid the last valid programmed code will be restored.
- Press the device button ③ for the device that you want to programme the remote control.
- Hold down the S button 4 for a little longer than 3 seconds.
- In the LCD display ① "CODE SETUP" appears. Press the OK button ⑧. "ENTER CODE" now appears in the LCD display ①. To access this function press the OK button ⑧.
- In the LCD display ① appears the presently used code for the selected device. Now the first digit of the code blinks and waits for your code input. Enter the new four digit code via the number buttons ⑨.
- If the entered CODE is valid the code will be saved. In the LCD display ① "OK" appears briefly. Subsequently the menu will close automatically. In the event of failure the LCD display ① shows briefly "ERROR" and waits for a new code entry. Then you repeat step 4.
- With the EXIT button ⑥ you will move one level upwards in the menu.
Programming by automatic code search
This process can take several minutes per device since all codes for the selected device have to be gone through. Therefore this method should only be used when the device cannot be programmed via brand code search or direct code input or if your device is not listed at all in the manufacturers directory with device code list.
Follow the steps listed below to carry out programming by means of the automatic code search.
- Press the device button ③ for the device that is to be controlled (i.e. VCR).
- Switch the device that is to be controlled with the remote control on. With VCR/DVD/CD devices please insert a tape and/or disc.
- Hold down the S button 4 for a little longer than 3 seconds.
- In the LCD display 1 "CODE SETUP" appears. Press the OK button 8. "ENTER CODE" now appears in the LCD display 1. Press the or button 5 until "SEARCH CODE" is shown in the LCD display 1. Point the remote control to the device and then press the OK button 8 to access the mode "automatic code search".
- The search begins. Thereby the device sends, one after the other, the code numbers in ascending order. The infrared symbol indicates this.
- When the device reacts by switching off press immediately the OK button to save the relevant code. The LCD display 1 shows briefly "OK".
- Check to see if the majority of your device's functions can now be controlled with the remote control. If yes you have most probably found the correct code. In the event that a few functions are not working you can start the automatic code search again beginning with step 1.
Note:
However, with a renewed code search, point the URC first to the target device after the previously found inadequate code has run its course.
- However if the device does not react any more you probably did not press the OK button ⑧ quick enough in step 6. Then press repeatedly the EXIT button ⑥ to exit the menu and return to the standard display.
- Now hold down the device button 3 of the device for which you have just sought the relevant code. Below on the right in the LCD display 1 will thereby be shown the relevant code. Make a note of this number.
- Then proceed as described in the preceding chapter "Programming by manual code entry" and check to see if the code with the next lowest number combination will function.
Tips:
- When code search is activated all buttons except OK ⑧ and EXIT ⑥ are ignored.
- If the automatic search has reached the end of the code list it stops there. The display then returns to "SEARCH CODE".
Setting the time
The LCD display ① shows you the time of day. You set this as follows:
- Hold down the S button 4 for a little longer than 3 seconds. The notice "CODE SETUP" appears. If approx. 15 seconds passes without an entry the device exits the menu and returns to the standard display.
- With the or button 5 select "SYSTEM SETUP" and confirm with the OK button 18.
- In the LCD display 1 "TIME SETUP" appears. Confirm with the OK button 18. The LCD display 1 now shows "TIME" and the time format (24 HR) blinks.
- With the or button 5 you can switch to the other time format (12 HR). After which the time display for the time of day will show an "R" or "P" before the time. "R" stands fpr "AM" = "ante meridium" (Morning, 0:00 o'clock midnight to 12:00 o'clock midday). "P" stands for "PM" = "post meridium" (Afternoon and evening, 12:00 o'clock midday to 0:00 o'clock midnight). Press the OK button 6 to confirm.
- Now the hour indicator blinks. With the or button 5 select the hour number for the present time of day and press the OK button 18.
- Now the minute indicator blinks. With the or button 5 select the minute number for the present time of day and press the OK button to save. The "TIME SETUP" notice appears again.
- To exit this or the following menus press repeatedly the EXIT button ⑥ until the standard display appears in the LCD display ①.
Setting the date
The LCD display 1 shows you the date when you press the S button 4. You set the date in this way:
- Hold down the S button 4 for a little longer than 3 seconds. The notice "CODE SETUP" appears.
- With the or button 5 select "SYSTEM SETUP" and confirm with the OK button 18.
- In the LCD display 1 "TIME SETUP" appears. Press the button 5 to change to "DATE SETUP". Confirm with the OK button 8.
- In the display the year "2010" blinks. With the or button ⑤ you can change the year and confirm with the OK button ⑧. With the or button ⑤ you can change the now blinking month and confirm with the OK
button 18. Now the day indicator blinks which you can also change with the or button 5. - To save press the OK button 18. The "DATE SETUP" notice appears again.
Adjust contrast
You can set the display's contrast as follows:
- Hold down the S button 4 for a little longer than 3 seconds. The notice "CODE SETUP" appears.
- With the or button 5 select "SYSTEM SETUP" and confirm with the OK button 18.
- With the or button 5 select "CONTRAST SETUP" and confirm with the OK button 18.
- In the LCD display ① the contrast value now blinks which you can set with the or button ⑤.
Display readout:
0 = highest contrast:
15 = lowest contrast
- With the OK button 8 you can save the desired setting.
The notice "CONTRAST SETUP" appears again.
Background Illumination
You can set how long the LCD display's ① background and the button illuminations remain alight after completion of the operation.. Thereby taking into account that the longer the illumination remains lit the shorter the battery life will be.
- Hold down the S button 4 for a little longer than 3 seconds. The notice "CODE SETUP" appears.
- With the or button 5 select "SYSTEM SETUP" and confirm with the OK button 18.
- With the or button 5 select "BACKLIT SETUP" and confirm with the OK button 18.
- In the LCD display ① now blinks the second count for the length of time that the light is to be left on which you can set with the buttons ⑤ from 0 to 60. If you select "0" the background illumination will shut off completely.
- With the OK button 18 you can save the desired setting. The notice "BACKLIT SETUP" appears again.
Setting the global volume/mute switching
So that you don't always have to first press a device button for the volume control and mute switching, for these functions the URC always only responds to an individual device, by default the television set. You can determine this target device yourself.
- Hold the S button 4 down for a little longer than 3 seconds. The notice "CODE SETUP" appears.
- With the or button 5 select "SYSTEM SETUP" and confirm with the OK button 18.
- With the or button 5 select "VOL/MUTE SETUP" and confirm with the OK button 18.
- The LCD display 1 shows "ALL VOL SET". Press the OK button 18, the display changes to "ALL VOL MODE".
-
Now press the device button 3 for the device that is to be controlled by the global volume control.
-
If the specified device is equipped with a volume control, "SUCCEED" will be displayed briefly and the menu will close. From now on the volume control functions on the device just specified.
- If this device is not equipped with its own volume control the URC will not allow this selection and shows "VOLUME ERROR". Even then the menu will close. The volume control will then continue to function on the former device.
You can also deactivate the global volume control for specific devices.
- For this purpose select in the VOL/MUTE SETUP with the or button 5 the function MODE VOL SET and confirm with the OK button 8.
- Now press the device button 3 for the device that is to be excluded from the global volume control. The LCD display 1 shows "SUCCEED" and the global volume control is deactivated if the URC is working in the operational mode of one of the selected devices.
You can also cancel the settings again in VOL/MUTE SETUP.
- For this purpose select in the VOL/MUTE SETUP with the or button 5 the function VOL/MUTE RESET and confirm with the OK button 8.
- The LCD display ① prompts you, with CONFIRM RESET, to a confirmation which is done by pressing the OK button ⑱. Press the OK button ⑲ If you want to delete the settings, the SUCCESS indicator then confirms the deletion. Otherwise you press the EXIT button ⑥ to abort the deletion.
Note:
If you press, in this menu, the EXIT button ⑥ the entire menu will close immediately.
Setting the lock function
With the lock function you can block access to all setup menus.
- Hold down the S button 4 for a little longer than 3 seconds.
- With the or button 5 select „SYSTEM SETUP" and confirm with the OK button 18.
- With the or button 5 select "LOCK SETUP and confirm with the OK button 18. The LCD display 1 shows the current settings.
- With the or button ⑤ now select between „LOCK" (Block) or „UNLOCK" (Unblock).
- With the OK button 8 you save the setting. In the LCD display 1, "LOCK SETUP" then appears again.
System reset
Via this function you can reset the URC to its factory default settings. Thereby all settings made by you will be deleted.
- Hold down the S button 4 for a little longer than 3 seconds. The notice "CODE SETUP" appears.
- With the or button 5 select "SYSTEM SETUP" and confirm with the OK button 18.
- With the or button 5 select "SYSTEM RESET" and confirm with the OK button 18.
- In the LCD display 1 now appears "CONFIRM RESET". Confirm the reset with the OK button 8. Then the LCD display 1 shows "SUCCEED RESET". All settings are now deleted and the menu is closed. Otherwise you can exit the menu by pressing the EXIT button 6. Then the settings remain preserved.
Timer Setup
The URC offers 2 timer modes, sleep timer and event timer.
Sleep timer
- Press the device button ③ for the device that is to be controlled (i.e. VCR).
- Hold down the S button 4 for a little longer than 3 seconds. The notice "CODE SETUP" appears.
- Press the or button 5 until "TIMER SETUP" is shown. Press the OK button 18 "TIMER SLEEP" appears in the LCD display ①. Confirm the selection of this function with the OK button 18.
- Now, below to the right in the LCD display ① blinks the minutes for the remaining time of the selected device. Set with the or button ⑤ the desired value from 1 to 99 minutes. Press the OK button ⑱ to confirm. With programmed sleep-timer the LCD display ① shows "zZ" on the right next to the time.
- Position the remote control in such a way that your infrared signal can reach the device to be switched off. After expiration of the set time the remote control will switch the device off.
- If you now press the S button 4 "SL" is shown in the display below on the left.
Event timer
The remote control has 4 event timers available via which you are allowed to send out specific series of button combinations at designated times.
- Hold down the S button 4 for a little longer than 3 seconds. The notice "CODE SETUP" appears.
-
With the or button 5 select "TIMER SETUP" and confirm with the OK button 18. "TIMER SLEEP" appears in the LCD display 1. With the or button 5 select the desired memory slot "TIMER SETUP 1" to "TIMER SETUP 4" and confirm with the OK button 18.
-
Now the hour of the time of day, to which the desired button combinations are to be carried out, blinks. Set with the or button 5 the desired hour and press for confirmation the OK button 18.
- Now the minutes of the time of day, to which the desired button combinations are to be carried out, blinks. Set with the or button 5 the desired minutes and press for confirmation the OK button 18.
- In the LCD display ① you will see "TIMER X KEY" (X stands for the desired timer). Now press the desired device button ③ followed by the desired sequence of the button commands.
- Press the S button to save your entry and to return to the timer menu.
- Proceed in a similar manner in order to, if required, programme the other timer memory slots also.
- With programmed event timer the LCD display 1 shows the timer symbol " " on the right next to the time.
(1) Tips:
- Per timer memory slot a maximum of 14 buttons can be programmed. After entry of the 14th button the sequence will be automatically saved and "FULL" is shown in the LCD display .
- In this menu also the device will return to the standard display after approx. 15 seconds without an entry.
Learn Setup
The Universal remote control (URC) can learn and save button signals of an original remote control. If the URC does not work after applying the programming methods already described or cannot carry out all commands please attempt to teach the URC with the help of the original remote control.
- Use new batteries for the URC and the original remote control.
- Maintain a distance of at least one metre from other light sources. The light sources could disrupt the infrared transmission.
- Place the URC and the original remote control at a distance of 20 to 50~mm from each other on an even surface so that the infrared diodes 20 are facing each other.
Tips:
- Do not use the following buttons for the learn function: all device buttons 3, MACRO 8, S button 4, EXIT 6.
- Press briefly the button of the original RC. When "SUCCEEDS" appears in the LCD display ① the button command has been successfully learnt. However, if "LEARN ERROR" (Failure) appears you must repeat the procedure.
-
If when teaching, during the notice "LEARNING", no button is pressed on the original RC after 25 seconds the learn menu will end. This mode can not be ended by pressing a button on the URC.
-
The memory can accommodate 150 button commands. If the memory is full the LCD display ① shows "LEARN FULL" and the learn mode will end.
- With the EXIT button 6 you return to the previous status (except with a notice of "LEARN KEY" and/or "LEARNING").
Code learn function
- Press the device button ③ for the device that the URC should learn a button code.
- Hold down the S button 4 for a little longer than 3 seconds. The notice "CODE SETUP" appears.
- With the or button 5 select the menu "LEARN SETUP" and then press the OK button 18.
- In the LCD display ① "LEARN SET" appears. Then press the OK button ⑥. In the LCD display ① "LEARN KEY" appears.
- First press the button on the URC that is to be taught. In the LCD display ① "LEARNING" appears. The URC now waits for the infrared signal from the original remote control.
Note:
Should the notice not change to "LEARNING" you have selected a button for which no button code can be taught.
- Point the infrared sensors of both remote controls towards each other.
- Now hold down the desired button of the original remote control until "SUCCEED" or "LEARN ERROR" appears in the display 0 of the URC.
- If in the LCD display ① "SUCCEED" appears (process successful), you can teach further buttons beginning with step 5. If "LEARN ERROR" appears (process unsuccessful) repeat the process in any case from step 5.
- To cancel/terminate the learning process, during the display "LEARN SET", repeatedly the EXIT button ⑥ until the standard display is show in the LCD display ①. During the notice "LEARN KEY" and/or "LEARNING" simply allow 30 seconds to pass without any operation then the device will end the menu.
Delete all programmed buttons of all devices
- Hold down the S button 4 for a little longer than 3 seconds. The notice "CODE SETUP" appears.
- With the or button 5 select the menu "LEARN SETUP" and then press the OK button 8. In the LCD display 1 "LEARN SET" appears.
- With the or button 5 select "LEARN CLEAR" (taught delete) and confirm with the OK button 18. In the LCD display 1 "CONFIRM CLEAR" (confirm delete) appears.
- Confirm with the OK button 13. In the LCD display 1 "SUCCEED" appears. All programmed buttons are deleted. Finally the menu will automatically end.
Macro Setup
With the MACRO function up to 16 button commands can be carried out with the press of a single button, that is to say, several previously saved control commands can be deleted with one MACRO button. There are 6 Macro memory slots available for you.
To programme a Macro
For Macro programming proceed as follows:
- Hold down the S button 4 for a little longer than 3 seconds. The notice "CODE SETUP" appears.
- With the or button 5 select "MACRO SETUP" and confirm with the OK button 18. In the display "MACRO SETUP 1" appears.
- With the or button 5 select the memory slot to be programmed (MACRO SETUP 1 - 6) and confirm with the OK button 8.
- In the LCD display ① "MACRO STEP" appears. Now press, one after the other, the desired buttons (max. 16). The sequence should begin with a device button ③.
- By default the Macro commands are sent in intervals of 1 every second. Since many devices react sluggishly it is possible that the sequence of the Macro commands are sent too quickly to the device. Then you have the option of programming, before a button command, a pause of between 5 - 21 seconds. For this purpose press, if necessary repeatedly, the MACRO button Below and to the right the LCD display shows the current pause length in seconds.
- When the maximum number of button commands is reached the LCD display ① shows "FULL".
- Save the entry with the S button 4. In the LCD display 1 "MACRO SETUP" appears.
- If, with the selection of the Macros to be programmed (step 3), you select a memory slot that is already occupied the existing Macro will be overwritten.
- Repeat the process from step 3 to create further Macros.
- With the EXIT button ⑥ you move a level upwards in the menu except during the entry of the button commands.
Tips:
- A maximum of 16 button commands can be saved in a Macro. After input of the 16th button command, "FULL" appears in the LCD display ①.
- To exit the mode without saving allow approx. 15 seconds to pass without an entry.
- In the mode "MACRO STEP" you can only return to the previous status with the S button ①.
Example: You want to save a command chain in a Macro. We begin in the mode "MACRO STEP".
Desired command chain: Switch on TV => PAUSE => switch to the AV input => switch on DVD => PAUSE => Playback DVD.
In the mode "MACRO STEP", for this you enter the following button commands:
| TV => | ○ => | MACRO (Pause time) => | AV => | DVD => |
| ○ => | MACRO (Pause time) => |
Execute a Macro
To execute a pre-programmed Macro proceed as follows:
- Press the MACRO button 8.
- With the corresponding number button ⑨ you access the desired Macro (1-6). Example: If Macro 3 is to be implemented press first the Macro button ⑧ and then, within 5 seconds, the number button "3".
To delete all Macros
To delete all pre-programmed Macros proceed as follows:
- Hold down the S button 4 for a little longer than 3 seconds. The notice "CODE SETUP" appears.
- With the or button 5 select "MACRO SETUP" and confirm with the OK button 18. In the display "MACRO SETUP 1" appears.
- With the or button 5 select "MACRO CLEAR" and confirm with the OK button 18.
- In the LCD display 1 "CONFIRM CLEAR" (confirm delete) appears. Confirm the delete process with the OK button 18. The LCD display 1 shows "SUCCEED". All Macros are now deleted and the menu will end.
Tips:
- When the LCD display ① shows "CONFIRM CLEAR" you can stop the delete process with the EXIT button ⑥.
- Individual Macros can not be deleted they can only be overwritten.
Favourites channel
Note:
With this function you can save your preferred stations as favourites.
To programme favourites
Your favourite stations are saved as follows:
- Press the device button ③ for the device that you want to save a favourite.
-
Hold down the S button 4 for a little longer than 3 seconds. The notice "CODE SETUP" appears.
-
With the or button 5 select "FAV CH SETUP" and confirm with the OK button 18. In the display "FAV CH SETUP 1" appears.
- With the or button 5 select the memory slot to be programmed (FAV CH SETUP 1 - 4) and confirm with the OK button 18.
- In the LCD display ① "FAV CH STEP" appears. Now press, one after the other, the buttons (max. 4) for access to your desired favourite stations.
- When the maximum number of button commands is reached the LCD display ① shows "FULL".
- Save the entry with the S button ④. In the LCD display ① "FAV CH SETUP" appears.
- If, with the selection of the favourites to be programmed (step 4), you select a memory slot that is already occupied the existing favourite will be overwritten.
- Repeat the steps to apply further favourites.
- With the EXIT button ⑥ you move a level backwards in the menu except during the entry of the button commands.
Note:
The input of the channel numbers can vary according to the model and brand of the selected devices. If necessary, with multi-digit channel numbers you must first press the button ⑩.
To access favourites
To access a pre-programmed favourite press the FAV/EPG button followed by the corresponding number button for the desired memory slot (1 - 4).
Delete All FAV channels
To delete all pre-programmed favourites proceed as follows:
- Hold down the S button 4 for a little longer than 3 seconds.
- With the or button 5 select "FAV CH SETUP" and confirm with the OK button 18. In the display "FAV CH SETUP 1" appears.
- With the or button 5 select "FAV CH CLEAR" and confirm with the OK button 18.
- In the LCD display ① "CONFIRM CLEAR" (confirm delete) appears. Confirm the delete process with the OK button ⑧. The LCD display ① shows "SUCCESS". All favourites are now deleted and the menu will end.
Tips:
- When the LCD display ① shows "CONFIRM CLEAR" you can stop the delete process with the EXIT button ⑥.
- Individual favourites can not be deleted they can only be overwritten.
Vol + / - , (Mute switching)
Press the "VOL+" button to increase the volume. With the "VOL-" button you reduce the volume. To mute the sound press the -button 5. A further press of this button turns the sound back on.
When you activate the VOL + / - buttons 16 on the URC basically the volume adjustment on the TV device is addressed, regardless thereof, which device button 3 was pressed previously. However, this does not apply to the following devices: "AMP", "DVD", "ASAT", and "DSAT" since it can be assumed that these devices are equipped with their own volume control.
For operation
To operate one of the programmed devices with the URC first press the corresponding device button 3. Then point the URC to this device and press the desired button.
Put the number buttons ⑨ exactly as you do with the original remote control. Before you make a two digit entry press, if necessary, the - - - button ⑩.
Press the FAV/EPG button to start the electronic programme guide of a device equipped with this function.
If you press the S button 4 the date is superimposed for 10 seconds in the LCD display below and on the right.
Whilst you hold down one of the device buttons 3 the active code for this device will be superimposed below to the right in the LCD display 1.
Via the MENU button ⑦ you access the dialogue for the setting of the respective target device.
Press the illumination button to switch the display and button illuminations on and/or off.
All OFF
(1) Tips:
With the button ALL OFF (all off) 2 all devices that are switched on can be automatically switched off. This function can switch on again devices that have already been switched off (depending on the device). For this hold down the ALL OFF button 2 for approx. 5 seconds. This will only function under the following circumstances:
- A visible connection exists between all the devices and the URC.
- Automatic code search, brand code search and MACRO function are not active.
- All target devices must be suitable for remote control switch off.
Cleaning and storage
Attention!
Ensure that moisture cannot permeate into the device during cleaning! Otherwise there is the danger of causing irreparable damage to the device!
Clean the housing of the device exclusively with a soft moist cloth and a mild dishwashing detergent.
Store the device exclusively in an environment that complies with the specifications given in the technical data.
Before storing remove the batteries so that they will not cause damage to the device if, during storage, they happen to leak.
Faults / Remedies
Your device does not react to the URC.
Check the batteries. They must have enough voltage and be properly installed.
Firstly have you pressed the correct device button ③ for the desired target device?
Check to see that the correct code is programmed in for the target device (see section "Code Setup").
The URC is transmitting the commands incorrectly.
Press the corresponding device button ③ to set the URC to the correct mode.
The batteries must have enough voltage and be properly installed.
It is possible that you are using the wrong code. Start the brand code search, the automatic code search or the direct code input (manual).
The URC does not change the station on the device.
Press the corresponding device button ③ to set the URC to the correct mode.
In the event that the original RC does not have a "-/--" button, change the programme with the P +/- buttons ① or the number buttons ⑨.
If this also does not work the child protection for the target device could be activated.
Some buttons on the URC do not function properly.
It is possible that your URC does not have all of the functions that are on the device's original remote control.
It is possible that you have not programmed in the optimal code. Search for a code that supports more of the target device's functions.
The URC stops reacting after a button is pressed.
The batteries must have enough voltage and be properly installed.
Point the URC towards your device.
The LCD display ① shows nothing.
The batteries must have enough voltage and be properly installed.
The contrast could be set too low. Increase the contrast setting.
Disposal
Do not dispose of the device in your normal domestic waste. This product is subject to the European directive 2002/96/EC.

Universal remote control
- Have the universal remote control or parts of it disposed of by a professional disposal company or by your communal disposal facility.
- Observe the currently applicable regulations. In case of doubt contact your disposal facility.
Batteries/rechargeable batteries
- Used batteries/rechargeable batteries may not be disposed of in household waste.
- Batteries can contain poisons which are damaging to the environment. Therefore, dispose of the batteries/rechargeable batteries in accordance with statutory regulations.
- Every consumer is legally obliged to surrender batteries/ rechargeable batteries to a community collection centre in their district or to a dealer. The purpose of this obligation is to ensure that batteries are disposed of in a non-polluting manner.
- Only dispose of batteries when they are fully discharged.
Dispose of packaging materials in an environmentally responsible manner.

Technical data
Controllable devices: 10
Dimensions
L×W×H: 217×50×22mm
Weight : 102 g (without batteries)
Infrared LED: Laser class 1
Power supply
Batteries: 2 × 1.5 ~V , type AAA/LRO3 (micro) (supplied)
Operating temperature: +5 - +35^
Storage temperature : -20 - +50 °C
Humidity: 5 - 90% (No condensation)
This device satisfies the fundamental requirements and other relevant regulations of the EMC Directive 2004/108/EC.
Importer
KOMPERNASS GMBH
BURGSTRASSE 21
44867 BOCHUM, GERMANY
www.kompernass.com
Warranty & Service
You receive a 3-year warranty for this appliance as of the purchase date. This appliance has been manufactured with care and meticulously examined before delivery.
Please retain your receipt as proof of purchase. In the case of a warranty claim, please make contact by telephone with our service department. Only in this way can a post-free despatch for your goods be assured.
The warranty covers only claims for material and manufacturing defects, but not for transport damage, wearing parts or for damage to fragile components, e.g. buttons or batteries.
This product is for private use only and is not intended for commercial use. The warranty is void in the case of abusive and improper handling, use of force and internal modifications not carried out by our authorized Service Centre.
Your statutory rights are not restricted in any way by this warranty.
The warranty period is not extended through repairs made under warranty. This applies also for replaced or repaired parts. Any damages or deficiencies found on purchase must be reported as soon as possible after unpacking, at the latest two days after purchase. On expiry of the warranty, all repairs carried out are subject to payment.
GB DES UK LTD
Tel.: 0871 5000 700 (£ 0.10 / minute)
e-mail: support.uk@kompernass.com
| Wazne zasady bezpiecznych | 28 |
| Przegląd urzędzenia | 30 |
| Uruchomienie | 30 |
| Rozpakowanie urzędzenia/sprawdzenia zakresu dostawy | 30 |
| Wkładanie baterii | 31 |
| Elementy obstogi | 32 |
| Wyświetlacz LCD | 32 |
| Przyciski | 33 |
| SETUP - ustawienia systemowe | 35 |
| Code Setup (programowanie pilota zdalnego sterowania) | 37 |
| Programowanie przyez wyszukiwanie kodu marki | 37 |
| Programowanie przyez ręczne wpisywanie kodu | 38 |
| Programowanie przyez automatyczne wyszukiwanie kodu | 38 |
| System-Setup | 40 |
| Ustawianie godziny | 40 |
| Ustawianie daty | 40 |
| Ustawianie kontrastu | 41 |
| Podswiectlenie | 41 |
| Ustawianie wspólnej glówność/wyłączenia dźwiȩku | 42 |
| Ustawianie funckji Lock | 43 |
| System-Reset | 43 |
| Timer Setup | 44 |
| Licznik fungcji Sleep | 44 |
| Licznik zdarzenia | 44 |
| Learn Setup | 45 |
| Funkcja uczenia kodów | 46 |
| Makro Setup | 47 |
| Ulubiony kanat | 49 |
| Regulacja glówność | 50 |
| Vol +/-, ✘ (wyciszenia) | 50 |
| Informacja dotyczność obstugi | 51 |
| Wymiarcz wyszystkie (ALL OFF) | 51 |
| Czyszczenersie i przechowywanie | 51 |
| Będy i spooby ich usuwania | 52 |
| Utylizacja | 53 |
| Dane techniczne | 53 |
| Wskazowej dotyczność zgodność | 54 |
| Importer | 54 |
| Gwarancja i serwis | 54 |
UNIWERSALNY PILOT ZDALNEGO STEROWANIA SFB 10.1 AI
Niniejsza dokumentacja jest prawnie chroniona. Wszelkie prawa, takze te dotyczne odtwarzania fotomechanicz-nego, powielania i Rozpowszechniania innymi metodami (np. obrbka danych, nosniki danych i sieci danych), takze czeciowo, jak rawnieź zmian zawartosci i techniki zastrzezone.
Przed pierwszym uzyciem zapoznaj sie z instrukcjq obstugi i zachowaj jq w celu poźniejszego wykorzystania. W przypadku przykazania urzędzenia osobom trzechim naleź przybekazać im takłe instrukcję.
Wañne zasady bezpieczność
Uzycie zgodne z przyeznaczeniem
Dzieci moga korzystac z pilota zdalnego sterowania wyfcznie pod nadzorem osoby dorostej.
Uniwersalny pilot zdalnégo sterowania要去zastepować maksymalnie dziesieć roźnych pilotów zdalnégo sterowania.
Mozna go uzywać wyłącznie do sprętu elektronicznego wyposzazonego w odbiornik na podczerwić. Funkcie w uniwersalnym pilocie zdalnégo sterowania odpowiadaj przyżanie funkcjom w oryginalnych pilotach zdalnégo sterowania.
Uniwersalny pilot zdalnégo sterowania jest przyznaczony do uzytku prywatnégo. Nie mayna go uzywać do celów komercyjnych.
Zastosowanie do jakiegokolwiek innego celu niz opisany uwazane jest za niedzgodne z przyznaczeniem. Producent nie ponosi odpowiedzialnosci za szkody, spowodowane uzytkowaniem urzadzenia niedzgodnie z和他的 przyznaczeniem lub samodzielnymi przyerbkami.
Ostrzeżenie
Wskazówka ostrzejagawca tego stopnia zagrożenia oznacza不可避免 do wystaquienia sytuacje niebezmiecznych. W razie braku不可避免 uniknięcia niebezmiecznej sytuacje, sąze to doprowadźć do odniesienia obrażen. Instrukcie w nimiejszej wskazówce ostrzejagawczyj stosuje są, byunikHQ odniesienia obrażen osob.
Uwaga
Wskazówka ostrzejagawczta gosto stopnia zagrożenia oznacza möglichwą szkode materialna. W razie braku只得niwość uniknięcia niebeźpiecznej sytuacje,要去 doprowadzić do szkód materialnych.Instrukcie w nimiejszej wskazówce ostrzejagawczej stosujie sie,by uniknocyszkód materialnych.
Wskazówka
Wskazówka oznacza dodatkowe informacja, ułatwie sączekorzystanie z urzędzenia.

Ostrzeżenie przyd odniesieniem obrażnych skutek niewlasciwogo obchodzenia są z bateriami!
Przy wymianie baterii naleź postępowac z najwiedszq ostrożnosciq. Naleź przyestrzejaco nastȩpujczych wskazówek bezpieczność:
- BaterieNSEZY trzymaCW miejscu niedostepnym dladzieci.Dziecko moze poIknc bateri.W wypadku polknięcia baterii nalezy jak najszybciej skorzystacz pomocy medycznej.
- Nie wrzucaj baterii do ognia. Nie wystawiaj baterii na dziatanie wysokich temperatur.
- Niebezpieczestrewo wybuchu! Baterii nie mayna ponownie ladowac.
- Nie podgrzewać iNie zwierać baterii
- Kwas wydostajycy sie z baterii besoin powodowej podrażnienia skóry. W przypadku kontaku ze skórq, sptuća obficie wodq. W przypadku przyedostania sie cieczy do oczu, sptuća obficie wodq, nie trześć jak najszybciej skorzystaec z pomocy lekarza.

Uwaga!
Universalny pilot zdalnégo sterowania jest wyposzaźony w diode podczerwieni o klasie lasera 1. Weluunikacja obrażć oczu, nie uzywaj w połączeniu z urzędzenia i opptycznych.
Uszkodzenia urzqdzenia
- Jeźeli urzqdzenie nie Dziata prawidłowo, nieNSE znelezy przy bHOWAc naprawiac go samodzielnie. W razing uszkodzenia skontakuj sie z producentem lub loro infoliniq serwisowq (patrz karta gwarancyjna).
- W raisie dostania sie cieczy do wnetrza urzqdzenia lub jeźeli urzqdzenie zostato uszkodzone w inny sposób, konieczne jest sprawdzenie urzqdzenia przyez producenta lub和他的 serwis. Skontaktuj są z producentem lub seinen infoliniq serwisowag (patrz wskazówki dotycz...)
Wyjmi baterie z komory baterii, jejeli sq zuzyte. - Jezeli nie bedziesz uzywat urzadzenia przydzyszyczas, to wyjmij baterie, aby zapobiec Rozladowaniu.
- Przy wymianie naleź ywmieniać wszystkie baterie za Jednym razem i nie naleź uzywać jederoczesnie roźngo typu baterii.
Wyswietlacz LCD
2 Przycisk / OFF
3 Przyciski urzqdzen
4 Przycisk S
5 Przyciski strzaftek
Przycisk EXIT
7 Przyciski P +/−
3 Przycisk MACRO
9 Przyciski cyfrowe
10 Przycisk do jakno-lub dwumiejscowych numerów programów
Przyciski funkcyjne wideotekstu
12 Przycisk podświetlany
3 Przyciski nagrywania/odtwarzania
Przycisk AV
Wyciszanie
16 Przyciski VOL + / -
17 Przycisk MENU
18 Przycisk OK
Przycisk FAV / EPG
20 Nadajnik i odiornik podczerwieni
Klapka komory na baterie
① Wskazówki:
- Opisane tutaj fungcjie dotyczq teoretyczneo, wyideali-zowanego przypadku, w którym struktura przycisków oryginalneo pilota zdalnego sterowania jest zgodna z przyciskami unto PilotaUniersalneo. Będzie to jedermiato.),不错se tylko w sporadycznych przypadkach. Brak moziwosci imitaci wszystkich fungcjio oryginalneo pilota zdalnego sterowania nie stanowy,) wyc wady pilotaUniersalneo.
- Wszystkie marki, uzyte w tej instrukcji lub w dołęczonej liść kodów, sq znakami handlowymi odpowiednych firm.
Uruchomienie
Rozpakowie urzędzenia/sprawdzenia zakresu dostawy
Ostrzejezenia!
Folie opakowaniowq nalezy trzymac z dala od przyeci.
Wystepujezagrozenieuduszeniem!
- Rozpakuj urzqdzenie i akcesoria.
-
Sprawdz zakres dostawy
-
uniwersalny pilot zdalnégo sterowania (UFB),
-instrukcja obstugi, - spis producentów z listq kodów urzqdzen
- 2 × 1,5 ~V baterie, typ AAA/LR03 (Micro)
Wskazówka: Uszkodzenia podczas transportu
W przypadku stwierdzenia uszkodzenia transportowej skontaktuj sie z producentem lub udostepnianq przyze niego infoliniq (patrz informacja dotyczqi gwarancji).
Włodanie baterii
Uwaga!
Pilot universalnyMZebyc uzytkowany wyjcznie z bateriami 1,5V (wielkosci AAA, LR03).
Wymianę bateri przechrowadź szybko. Dokonane ustawenia pozostaj zapamiątane przyżoz ok. 1 minuţ. Jeźeli w przyciągukiego czasu nie wędysz nowych baterii, to konieczne sądie ponowne przyperowadzenia wszystkich ustawien. Ustawienie czasu i daty zawsze zostanie ultracone.
- Otworz klapke komory na baterie w kierunku strzatlki.
- Włód zaterie zgodnie z ilustracja, a nastepnie zamknij komore baterii.
Wyswietlacz 1 jest aktywny, dopóki wtozone sq baterie. Ponizsza ilustracja tokazuje wyswietlacz LCD 1 po wtozeniu lub wymianie baterii.

Wskazówka:
Ježeli wyświetlacz LCD ① pozostanieNieaktywny, sprawdź biegunowośćbateri lub załód nowe baterie.
Wyświetlacz LCD
Wyświetlacz LCD ① jest podzielony na pola.

Pole tekstowe ②
Pokazywane jest tutaj aktualnie wybrane urzqdzenie, na przykjad DVD, TV, VCR itp.
Symbol podczerwieni 2
Przy kaczym naciśću przyciscu, powodujycym wysławie podczerwonego sygnatu, zastawieca symbol podczerwieni.
Pole z kodem/czasem 24
Tutaj wyświetla są kod wybranego urzędzenia lub czas.
Przy wyświetlaniu czasu miga „:” między cyframi.
Pole dni tygodnia 25
Tutaj wyświetlajq sie skrócone nazwy angielskich dni tygodnia po wprovadzeniu daty.
MONDAY = Monday = Poniedziatek
TUE = Tuesday = Wtorek
WED = Wednesday = Sroda
THU = Thursday = Czwartek
FRI = Friday = Piqtek
SUN = Saturday = Sobota
SUN = Sunday = Niedziela
Wskazanie standardowe:

Standardowe wskazanie na wyświetlaczu LCD ① składa sie z informaggi oactualnym urzędzeniu, np. „TV", skrotowej nazwy dnia tygodnia i wskazania godziny.
Przyciski
Wskazówka:
Wszystkie opisane tutaj funkcie moga byc oczywicie uzywane tylko pod warunkiem, ze sq one obstugiwane przy sterowane urzadzenie.
Przycisk 一 / ALL OFF ②

Włuczanie/wytlczanie urzqdzenia; nacijsnij i przytrzymaj przyez 5 sekund, by włuczyc/ wytlczyc urzqdzenie.
Przyciski urzqdzen 3
Za pomocq przycisków urzqdzen mozesz wybrać to urzqdzenie, któ bedzie obstugiwane:
TV telewizor
VCR magnetowid
AUX1 urzqdzenie dodatkowe 1
CBL dekker telewizji kablowej
CD odtwaracz ptyt CD
ASAT analogowydekodertelewizji satelitarnej
AMP wzmacniacz przywickowy
DVD odtwarzacz pIyT DVD
DSAT cyfrowy dekoder telewizji satelitarnej
AUX2 urzqdzenie dodatkowe 2
Przedstawione przyporzędkownikie klawszy nie jest obligatoryne. Tak&C mozescz przykladowo zaprogrammować kod magnetowidu równieź na sąjeścu odiornika telewizyjego.
Przycisk „S" ①
Naciśnij przyczisk i przytrzymaj 3 sekundy, by wybrać menu SETUP (KONFIGURACJA), naciśnij krótko, by wyświetlic date, wzgl. wybrać funkcję dodatkowe, takie jak EPG lub PIP.
Przyciski strzatek ③

S
Poruszanie po menu do góry, w prawo,
w dó t i w lewo.
Przycisk EXIT 6
EXIT
W menu powró t o jeder poziom.
Przyciski P + / - 1

Zmienia kanat odbioru.
Przycisk MACRO ⑧
MACRO
Naciśćcie przycisku MACRO 8, a na-stepnie po nim przycisku cyfrowego 9 1-6, uruchamia poprzednio zarejestrowany ciag polecen.
Przyciski cyfrowe ①
1
4
7
13/14
2
3
6
9
Wprowadz numery programu i kodurzqdzenia.
7
m = 311 ;
0
Przycisk do jakno/lub dwumiejscowych numerów programów 10

W celu wpisania dwumiejscowego numero programu (w zaleznosci od typu urzadzenia), nacinij przycisk 10, a nastepnie przyci-skami cyfrowymi 9 wpisz numero programu. Ponowyne naciniepiego przycisku przycza wyswietlacz z powrotem na wskazania JDBCNY.
Przyciski funkcyjne wideotekstu ①
Wtrybie teletekstu przyciski major战略布局:

Wyświetl fungcjęWideotekstu.
Podczas zwyk到账 ogladania telewizji
naciśnij najpierw przycisk S 4, a
natestPNi prerzycisk 5, by moc korzystać
z Funktion „PIP" (obraz w obrazie)
odbiornikaTelewizjnego.

Zatrzymaj automatyczne przechodzenie do nastepnej strony wideotekstu.

Powiekszenie widoku strony.

Widok tekstu naotozonego na obr.
Zakończenie funkci wideotekstu.

Wskazówki:
- Funkcja wideotekstu jest dostepna tylko w europejskim trybie TV, a odiornik TV musi posiadac modul teletekstu.
- Ponadto przyciski P +/- ① sterujq nastepujycymi funkcjami teletekstu:
P + Przejcie na nastepnq strone.
P - Przejcie na poprzedniq strone.
Przyciski nagrywania/odtwarzania 8
Przyciski odtwarzania 3 sterujq urzqdzeniami takimi jak odtwarzacze DVD/CDczy magnetowidy:

ASPECT
Odtwarzanie
Zmiana formatu obrazu w obstudze TV

Nagrywanie
Zatrzymywanie odtlwarzania/nagrywania
Zatrzymanie odtrwarzania
Cofanie
Przewijanie do przodu
Przycisk AV 1
AV
Przêćczanie na现阶段 AV.
Wyciszanie
K
Wtqcz/wyqcz dzwiek.
Przyciski VOL+/- 16

Ustawianie gtośnosci (Volume).
Przycisk MENU 17
MENU
Wywojule menu sterowanego urzadzenia.
Przycisk OK 18

Za pomoc przycisku OK zaatwierdz wybor menu.
Przycisk FAV/EPG 19
FAV/EPG
Naciśnij przycisk FAV/EPG, by wybrać wczesnie zaprogramowane ulubione stacje. NatestPNie naciśnij krótko przycisk S 4, a natestPNie przycisk FAV/ EPG, by wybrać funkcję elektronicznego przyzewodnika programowygo (EPG).
SETUP - ustawienia systemowe
Ustawenia systemowe zawierajnatapepujce mozliwoeci:
- Zaprogramowanie pilota zdalnego sterowania do sterowanych urzqdzen
- Ustawianie czasu, daty, kontrastu wyświetlacza, podświetlenia, gośnosci, funkcj i Lock i resetu
Ustawienia licznika czasu - "Uczenie" okreslonych polecen przycisków
- Tworzenie polecen makro
Ustalanie ulubionych
Na nastepnej stronie przyzdawiono przyegląd struktury menu.

Programowanie pilota jest möglichne na trzy spofosby:
Programowanie przyż wyszukiwanie kodu marki, przyż automatyczne wyszukiwanie kodu lub przyż bezpośrednia (ręczne) wadowszenia kodu.
Na pocztek najlepiej skorzystaj z kodu marki, gdyż jest to najszybsza metoda programwomania, jeźeli producent Twojego urzędzenia znejduje sie na listcie kodów. W drugiej kolejnosci zalecane jest bezposrednie wprovadzenia kodu, a dopiero na koncu automatyczne wyszukiwanie kodu.
Programowanie przy wyszukiwanie kodu marki
W przypadku tej metody wybierasz na wyświetlaczu LCD ① markę i kod.
Aby zaprogramować pilota zdalnégo sterowania wykonaj poniźsze operacja:
- Naciński przyciskkiego urzędzenia, do krógo chcesz zaprogramowania pilota.
- Naciśnij i przytrzymaj przycisk S ❶ przyez nieco ponad 3 sekundy. Nie przyerwyaj edycji menu, poniewaź po okato 15 sekundach bezczynnosci menu zestanie zamkniete.
- Na wyświetlaczu LCD ① pojawia sie napis „CODE SETUP". Nacisnij przycisk OK ⑧. Na wyświetlaczu LCD ① wyświetla sie teraz napis „ENTER CODE". Za pomocq przycisków ▲▼ ⑤ wybierz poźycje „BRAND CODE" i zatrownik dy wyropr przyciskiem OK ⑧.
- Pojawia sie pierwsza nazwa marki z posegregowanj alfabetycznie listy predefiniowanych urzqdzen.
- Za pomocq przycisków możesz wybrać poszȩczególne marki.
- Dla ułatwienia dostępu za pomocq przycisków cyfrowych molestz przyzejść bezpos省教育nio do wybranej litery pouchtkowej:
2 A 3 D 4 G 5 J
6 M 7 P 8 T 9 W
Przykstad: Przycisk 5 przesuwa wskazanie do litersy „J". Pierwszq markq jest „JVC“. Jeźeli posiadasz na przykstad urzqdzenie marki „Kenwood“, to przyciskiem
poruszaj sie w do przodu, az pojawi sie ta nazwa marki. (* Wszystkie wymienione tutaj nazwy marek sq znakami handlowymi odpowiednich firm.)
-
Wiekszość producentów stosuje kika rożnych kodowej dla pilotów zdalnégo sterowania. Musisz teraz stworȩdźć, tkóy z dostepnych kodów najlepiej pasuje do Twojugo urzędzenia. Z prawej strony pod nazwymi marki na wyświetlaczu LCD ① wyświetla są aktualny kod.
-
Skieruj pilota zdalnego sterowania na dane urzqdzenie i naciskaj przyciski funkcyjne, aby przytestownik (za wyjqtkiem przycisków ).
- Jeźeliwcskość przycisków dane, nacisnij OK 18, aby zapisć ustawienia. Na wyświetlaczu LCD ① wyświetla sie „OK". Na koncu menu automatycznie są zamyka.
- Ježeli nie działajźadne przyciski lub działa tylko kilkaz nich, to za pomocq przycisku lub przycisku ⑤ wybierz następty kod i przyepamjadź test, opisany w punkcie 8.
- Przyciskiem EXIT ⑥ przyysz przyjeść w menu o jeder poziom wyzej.
Powtarzaj te operacja dla wsztkich urzędzen, króre chcesz sterowania za pomocq pilota.
Programowanie przy ręczne wpisywanie kodu
W tym trybie要去cz zaporagramować pilota zdalnégo sterowania przy bezposrednie w povadzenie numeru kodu. Potrzejny numer kodu要去cz sprawdzić w dołuczonym spisieroducentów listk odów urzędzén. Jeźeli nowy kod jest niedopuszczaly, to urzędzenia odtworzy ostatnio zaprogramowy, dopuszczaly kod.
- Naciśnij przyczisk做的事情 ③, do krógo chcesz zaprogramowania pilota.
- Naciński i przytrzymaj przycisk S ❶ przyez nieco ponad 3 sekundy.
- Na wyświetlaczu LCD ① pojawia sie „CODE SETUP". Nacijsnij przycisk OK ⑧. Na wyświetlaczu LCD ① wyświetla sie teraz napis. Welu wyświetlenia tej funkcjni nacijsnij przycisk OK ⑧.
- Na wyświetłaczu LCD ① wyświetla są dotychczasowy kod wybranego urzędzenia. Miga teraz pierwsze.), kodu, króre czeka na w povadzenia cyfry. Za pomocq przycisków cyfrowych ⑨ wpisz nowy czteromiejscowy kod.
- Po wpwadzeniu prawidtowego KODU, zostanie on zapamiętany. Na wyświetlaczu LCD ① wyświetla są na chwile napis „OK". Na koncu menu automatycznie są zamyka. W razie niedpowodzenia na wyświetlaczu ① wyświetla są na chwile napis „ERROR" (będ) i czeka na ponowne wpisanie kodu. Powtórz wtedy krok 4.
- Za pomocq przycisku EXIT ⑥romatic Programming exercises in Java.
- Jeveno zozomski wychycki.
Programowanie przy automatyczne wyszukiwanie kodu
Ten proces moze potrwać do kilku minut na urzędzenia, gdyż konieczne jest wypróbowanie wszystkich kodów dla wybraneanu urzędzenia. Dlągo powiniene korzystać z tej metody tylko wtedy, jejeli zaprogramawanie urzędzenia przyez wyszukiwanie kodu marki lub bezpośrednie w povadzanie
kodu jest niemożliwe, albo jejeli Twoje urzędzenia nie jest w ogole podane na wykazie producentów z lista kodów urzędzen.
Wykonaj ponijsze operacja, aby przypegowadzić programowania za pomocq automatyczné wyszukiwania kodu.
- Naciśnij przyczysk urzędzenia ③, którym chcesz sterowania (np. VCR).
- Włącz urzędzenia, króre ma być sterowane za pomocq pilota zdalnégo sterOWANIA. W przypadku urzędźén VCR/ DVD/CD włódzon ponadto kasetę lub płyte do urzędzenia.
- Naciński i przytrzymaj przycisk S 4 przyceznieco ponad 3 sekundy.
- Na wyświetlaczu LCD ① pojawia sie „CODE SETUP". Nacijsnij przycisk OK ⑱. Na wyświetlaczu LCD ① wyświetla sie teraz napis „ENTER CODE". Naciskaj przycisk lub „ przycisk ⑤, az na wyświetlaczu ① wyświetli sie napis „SEARCH CODE". Skieruj pilota zdalnego sterowania na dane urzędzenia, a nastepnie nacijsnij przycisk OK ⑱, by wyświetlic tryb „automatycznego wyszukiwania kodu".
- Wyszukianie Rozpoczyna sie. Urzędzenia Rozpocznia wysygniie kolejno liczb kodów w kolejnosci rosnqcje. jest to sygnalizowane miganiem symbolu podczerwieni 3
- Gdy urzqdzenie zareaguje wyłçceniem sie, naciśnij od razu przyczisk OK 13, by zapisć aktualny kod. Na wyświetlaczu LCD 1 wyświetla sie na chwilę napis „OK".
- Sprawdz,czy teraz Wiekszość fungcji urzqdzeniaMZe byc sterowana za pomocq pilota.Jesli tak jest, prawdop podobnie wybrates prawidtowy kod. Jezelikila fungcji nie Dziata,to mozesz ponownie Rozpoczqc automatycze wyszukwanie kod od kroku 1.
Wskazówka:
Przy ponownym wyszukiwaniu kodu skieruj pilota zdalnego sterowania na urzqdzenie docelowe dopiero wtedy, gdywczesnej znaleziony,nieodpwiedni kod bedzie juicesneikaktualny.
- Gdy jederuk urzqdzenie nie bedzie reagowa, sprawdopodobnie w kroku 6 nie nacisnqtes dostatecznie szybko przycisku OK. Nastepnie nacinij kilka razy przycisk EXIT, by zakończyc menu i powrócić do standardowego widoku wyświetlacza.
- Teraz naciśnij i przytrzymaj przycisk urzędzenia 3, do ktorego szukasz pasujćego kodu. Na dole z praweji strony na wyświetlaczu LCD 1 wyświetla sie aktualny kod. Zapamiętaj te licźbe.
- Nastepnie postępuj zgodnia z opisem podanym w poprzejnim rozdziele „Programowanie przyez reczne wpi-sywanie kodu" i sprawdź,czy Dziata kod z nastepnq nizszq kombinacja liczb.
Wskazówki:
- Przy wybrzej faktcji wyszukiwania kodu wsystkie przyciski z wyjatkiem przyciscu OK 18 i EXIT 6 nie dziatajq.
- Gdy automatyczne wyszukiwanie dotrze do konca listy, to proces zostaje tam zatrzymany. Widok na wyświetlaczu powraca do napisu „SEARCH CODE".
System-Setup
Ustawianie godziny
Wyświetlacz LCD ① tokazuje godzne. Sposob ustawiania godziny:
- Naciński przytrzymaj przycisk S 4 przyczne noce ponad 3 sekundy. Na wyświetlaczu wyświetla są napis „CODE SETUP". Jeźeli przyrziews z edycje na okato 15 sekund, menu zostanie zamknięte i ponownie wyświetli są widok standardowy.
- Za pomocq przycisku lub przycisku wybierz „SYSTEM SETUP" i zatwierdz wybor przyciskiem OK 18.
- Na wyświetlaczu LCD ① pojawia sie „TIME SETUP". Zatwierdz wybor przyciskiem OK ⑧. Na wyświetlaczu LCD ① wyświetla sie teraz napis „TIME" i miga format czasu (24 HR).
- Za pomocq przycisku lub przycisku (\clubsuit) mozesz przytaczyc na inny format czasu (12 HR). Nastepnie w widoku czasu przyed godzina wyswietla sie wskazanie pory dnia ("R''") lub ("P''."R''") oznacza ("AM'' = "ante meridium''(przedpojudnie,0:00 - 12:00 godz.)." (P'') oznacza ("PM'' = "post\ meridium''(popoJudniu,12:00 - 0:00 godz.)) .Nacisnij przycisk OK 18, by zatwierdzić wybor.
- W tym momencie miga wskazanie godzin. Za pomocq przycisku lub przycisku wybierz liczegodzinactualnégo czasu, a natestPNie nacijsnij przycisk OK 18.
- W tym momencie miga wskazanie minut. Za pomocq przycisku lub przycisku wybierz liczbe minut aktualnégo czasu, a nastepnie naciśnij przycisk OK 18. Ponownie wyświetla sie napis „TIME SETUP".
- By zakończyc to lub nastepne menu, nacziskaj przyczisk EXIT ⑥ dotqd, az na wyświetlaczu LCD ① wyświetli są widok standardowy.
Ustawianie daty
Na wyświetlaczu LCD ① wyświetla są data po naciśću przycziku S ④. Ustawianie daty:
- Naciński przytrzymaj przycisk S ⓸ przyez nieco ponad 3 sekundy. Na wyświetlaczu wyświetla są napis „CODE SETUP".
- Za pomocq przycisku lub przycisku wybierz menu „SYSTEM SETUP" i zatwierdź wybór przyciskiem OK 18.
- Na wyświetlaczu LCD ① pojawia sie „TIME SETUP". Naciśnij przyczicism ⑤, aby przyzejść do menu „DATE
SETUP".Zatwierdz wybor przyciskiem OK 18.
- Na wyświetlacz u miga liczba roku „2010". Za pomocq przycisku lub przycisku możesz zmienić liczbe roku i zatwierdzić przyciskiem OK ⑧. Za pomocq przycisku lub przycisku możesz teraz zmienć migajćcliczbe miesiecy i zatwierdzić wybor przyciskiem OK ⑧. Zaczyna mijać wskazanie dni, ktoré rownikę要去ź zmienć za pomocq przycisku lub przycisku
- Naciśnij przyczisk OK w celu zapisania nowych ustawien. Ponownie wyświetla są napis „DATE SETUP".
Ustawianie kontrastu
Kontrast wyświetlacza możesz ustawic w natestepujczy sposob:
- Naciński przytrzymaj przycisk S ⓸ przyez nieco ponad 3 sekundy. Na wyświetlaczu wyświetla są napis „CODE SETUP".
- Za pomocq przycisku lub przycisku wybierz menu „SYSTEM SETUP" i zatwierdź wybor przyciskiem OK 18.
- Za pomocq przycisku lub przycisku wybierz menu „CONTRAST SETUP" i zatwierdz wybor przyci-skiem OK 18.
- Na wyświetlaczu LCD ① miga teraz wartość kontrastu, krórgozysz ustawic za pomocq przycisku lub przyciscu
Wskazanie na wyświetlaczu:
0 = najwiekszy kontrast
15 = najnizszy kontrast
- Przyciskiem OK 8 zapisz wybrane ustawienie. Ponownie wyświetla sie napis „CONTRAST SETUP".
Podswietenie
Mоżesz ustownić.czas podświetlenia wyświetlacza LCD ① i przycisków po zakończeni obstugi. Pamiętaj, ze dędźsy czas podświetlenia oznacza krótszy czas pracy baterii.
- Naciński przytrzymaj przycisk S 4 przyceznico ponad 3 sekundy. Na wyświetlaczu wyświetla są napis „CODE SETUP".
- Za pomocq przycisku lub przycisku wybierz menu „SYSTEM SETUP" i zatwierdz wybor przyciskiem OK 18.
- Za pomocq przycisku lub przycisku wybierz menu „BACKLIT SETUP" i zatwierdz wybor przyciskiem OK 18.
- Na wyświetlaczu LCD ① miga teraz wskazanie sekund czasu podświetlenia, króre moźesz ustawić za pomocq przycisków ▲ ▼ ⑤ w zakresie od 0 do 60 sekund.
W przypadku wybrania ustawienie „0", podstawienie jest wyłączone.
- Przyciskiem OK 8 zapisz wybrane ustawienie. Ponownie wyświetla sie napis „BACKLIT SETUP".
Ustawianie wspólnej gośnosci/wythagzenia dzwieku
Aby za kaźdym razem podczas ustawiania gólność i wyłuczania glosu nie trzeba byto dodatkowo najpierw nacziska przycisku urzędzenia, piolot zdalnégo sterowania w tych funkcjach;będzie zawsze uruchamiat jeder i to samo urzędzenia, standardowo odiornik telewizyjniy. Urzędzenia docelowe w tych funkcjach możesz dowolnie zdefiniować.
- Naciśnij i przytrzymaj przycisk S ④ przyez nieco ponad 3 sekundy. Na wyświetlaczu wyświetla są napis „CODE SETUP".
- Za pomocq przycisku lub przycisku wybierz menu „SYSTEM SETUP" i zatwierdz wybor przyciskiem OK 18.
- Za pomocq przycisku lub przycisku wybierz menu "VOL/MUTE SETUP" i zatwierdz wybor przyciskiem OK 18.
- Wyswietlacz LCD ① wyswietla napis „ALL VOL SET". Nacisnij przycisk OK ⑧, na wyswietlaczu wyswietla sie „ALL VOL MODE".
- Teraz naciśnij przycisk ③ w urzędzeniu, króre besteht sterOWANE za posrechnictwem funkci wspólnej regulacja gośnosci.
- Gdy podane urzędzenia bedzie wyposzazone w fungcję regulacja gośnosci, przy czwiść wyświetli są napis „SUCCEED" (= POWODZENIE) u menu zostanie za-mkniète. Od tejchwili regulacja gośnosci bedzie Dziata-ta na zdefiniowane urzędzenia.
- Gdy zdefiniowane urzqdzenie nie bedzie wyposazone w niedaleznq regulacja gośnosci, pilot zdalnégo sterowania nie zezwoli na wybraniekiego urzqdzenia i wyświetli sie komunikat „VOLUME ERROR" (= BłAD). Wtedy rówNież menu zostanie zamkniète. Od tejchwili regulacja gośnosci bedzie dziatła na dotychczas zdefiniowane urzqdzenie.
Mоzesьuzziwyfuczyfunckje wspólnejregulacji gósnosci w konkretnych urzqdzeniach.
- W tym celu w menu VOL/MUTE SETUP przyciskiem lub przyciskiem wybierz funkacja MODE VOL SET i zatrowników por przyciskiem OK 18.
- Teraz naciśnij przycisk ③ w urzędzeniu, króre bedzie wyłęczone ze sterowania za posrefindwem).[1] wyspolnej regulacja gośnosci. Na wyświetlaczu LCD ① wyswielmetla są komunikat „SUCCEED" (POWODZENIE) i).[2] wyspolnej regulacja gośnosci wyłączy są, gdy pilot zdalnégo sterowania bedzie pracyawat w trybie pracy jederngo z wybranych urzędzenia.
W menu VOL/MUTE SETUPmözeszaltimore skasowacustawienia.
- W tym celu w menu VOL/MUTE SETUP przyciskiem lub przyciskiem wybierzFUNCje VOL/MUTE RESET i zaatwierdzy wybor przyciskiem OK 8
- Komunikat na wyświetlaczu LCD ① CONFIRM RESET informuje o koniecznosci zatzierdzenia skasowania ustawien przyciskiem OK ⑧. Nacisnij przycisk OK ⑧, by usunjć ustawenia, wyświetlienie komunikatu SUCCESS Oznacza pomyśnlne usuniecie ustawien. Albo sąż nacisnij przycisk EXIT ⑥, by anulować usuwanie.
Wskazówka:
W przypadku naciśća w tym menu przycisku EXIT 6, nastymi zamniȩcie;cęgo menu.
Ustawianie funkcjj Lock
Za pomocq funkcjI Lock mozesz zablokować dostep do wsztkich menu konfiguracje.
- Naciński przytrzymaj przycisk S 4 przycez niedco ponad 3 sekundy.
- Za pomocq przycisku lub przycisku wybierz menu „SYSTEM SETUP" i zatwierdź wybor przyciskiem
- Za pomocq przycisku lub przycisku wybierz menu „LOCK SETUP" i zatwierdz wybor przyciskiem OK 18. Na wyświetlaczu LCD 1 wyświetla są aktualne ustawuminium.
- Za pomocq przycisku lub przycisku wybierz teraz opcie "LOCK" (blokada wączona) lub UNLOCK" (blokada wętćzona).
- Przyciskiem OK 18 zapisz ustawienie. Na wyświetlaczu LCD ① wyświetla są ponownie napis „LOCK SETUP".
System-Reset
Za pomocq tej funkcjji mozesz przywróciustawienia fabryczne uniwersalnego pilota zdalnego sterowania.
Wszystkie dotychczas dokonane ustawienia dostanq skasowane.
- Naciński przytrzymaj przycisk S 4 przyczne są polad 3 sekundy. Na wyświetlaczu wyświetla są napis „CODE SETUP".
- Za pomocq przycisku lub przycisku wybierz menu „SYSTEM SETUP" i zatwierdź wybór przyciskiem OK 18.
- Za pomocq przycisku lub przycisku wybierz menu „SYSTEM RESET" i zatwierdź wybor przyciskiem OK 18.
- Na wyświetlaczu LCD ① wyświetla są teraz napis „CONFIRM RESET". Skasowanie zatwojć przycziskiem OK ⑧. NatestPNie na wyświetlaczu LCD ① wyświetla są komunikat „SUCCEED RESET". Wszystkie ustawienia zostanq teraz skasowane a menu zamkniete. Lub teź zamknij menu, naciskajc przyczisk EXIT ⑥. Ustawienia pozostanq wtedy zachowane.
W universalnym pilocie zdalnego sterowania sq dostepne 2 tryby licznika czasu, licznik funkci Sleep i licznik zarzenia.
Licznik fungcji Sleep
- Naciśnij przyczysk urzyszdenia ③, krórym chcesz sterowania (np. VCR).
- Naciński przytrzymaj przycisk S 4 przyce niedo ponad 3 sekundy. Na wyświetlaczu wyświetla są napis „CODE SETUP".
- Naciskaj przycisk lub przycisk dotqd, aż wyświetli są napis „TIMER SETUP". Naciszij przycisk OK 18, na wyświetlaczu LCD ① wyświetla są napis „TIMER SLEEP". Wybor jej funkcj zi zatrwiédź przyciskiem OK 18.
- Teraz w sprawym dolnym rogu wyświetlacza LCD ① miga liczba minut pozostęgo czasu przy wybraneano urzędzenia. Za pomocź przycisku lub przycisku ⑤ ustaw odpowiedniq wartość w zakresie od 1 do 99 minut. Nacijsnij przycisk OK ⑧, by zatwierdzić wybor. Przy zaprogramowanym zegarze funkci Sleep na wyświetlaczu LCD ① wyświetla są z prawejm strony czasu symbol „z".
- Skieruj pilota w taki sposób, by和他的 sygnaty podczerwieni mogy dojsć do wyłczanego urzędzenia. Po upływie ustawionego czasu pilot zdalnégo sterowania wyłczy urzędzenia.
- Gdy teraz nacijsiesz przycisk S 4, w lewym dolnym rogu wyświetlacza LCD wyświetli są napis 1 „SL".
Licznik zdarzenia
Pilot zdalnego sterowania obstuguje 4 liczniki zdarzenia, za posrechnictwem kórych mayo okreslonym czasie wystać utalone série kombinacje przycisków.
- Naciśnij i przytrzymaj przycisk S 4 przyce nieco ponad 3 sekundy. Na wyświetlaczu wyświetla są napis „CODE SETUP".
- Za pomocq przycisku lub przycisku wybierz menu "TIMER SETUP" i zatwierdź wybor przyciskiem OK ⑧. Na wyświetlaczu LCD ①. Wyświetla są teraz napis "ENTER CODE". Za pomocq przycisku lub przycisku wybierz wolne sącie wamyci od "TIMER SETUP 1" do "TIMER SETUP 4" i zatwierdź wybor przyciskiem OK ⑬.
- Teraz miga liczba godzin czasu, po upywie ktorego uruchomi sie zqdana kombinacja przycisków. Za pomocq przycisku lub przycisku ustaw godzine i nacijsnij przycisk OK w celu zatwierdzenia wyboru.
-
Teraz miga liczba minut czasu, po upywie którego uruchomi sieźdana kombinacja przycisków. Za pomocq przycisku lub przycisku ustaw minuty i naciść przycisk OK w celu zatwierdzenia wyboru.
-
Na wyświetlaczu LCD ① wyświetla sie napis „TIMER X KEY" (X oznacza zȩdany licznik czasu). Teraz naciść zȩdany przycisk urzędzenia ③ i zaraz po tym zȩdano sekwuencje polecen przycisków.
- Naciśnij przycisk S ①, by zapisć zmiany i powrócić do przyeglądu licznika czasów.
- Wykonaj analogiczne czynnosci, by w razie potrzeby za-programować pozostawe_CITY sąpie licznika czasu.
- Przy zaprogramowanym zegarze funkcj przypinania o zdarzeniach, na wyświetlaczu ① wyświetla są z sprawej strony czasu symbol zagara „ ".
Wskazówki:
- W kaźdym.), zęsztowski są wstawodzeniu 14 przycisków. Po wrawdzeniu zȩzyczne zostanie automatycznie zaprogramowania i na wyświetlaczu LCD ① wyświetlasie napis „FULL".
- Röwnież tym menu urzędzenia po upływie okół 15 sekund przyzewy w edycji powróci do widoku standardowego.
Learn Setup
Uniwersalny pilot zdalnégo sterOWania (PU) moze odczytać i zapamiętć sygnaty oryginalnégo pilota zdalnégo sterOWania. Jeźeli opisane powyȩj metodyNiezapewnia dziatania PU lub nie pozwoln mu wykonywać wzystkich funkci, to spróbuj nauczyć PU odpowiednich polecen przy użyciu oryginalnégo pilota lub pilotów.
- Zalóź nowe baterie do PU i do oryginalnéo pilota zdal-nego sterowania.
- Zachowaj co najmiej jeder metr odstepu od innych zródeşswiatta. Zórdta swiatta mogq zaktóci wysyrianie promieni podczerwieni.
- Połoz uniwersalnégo pilota zdalnégo sterowania i oryginalnégo pilot urzadzenia w odlegósci 20-50 cm od siebie na plaskim podło tak, by diody podczerwieni 20 byty skierowane do siebie.
Wskazówki:
- Podczas funckji uczenia nie uzywaj nastepujycych przycisków: wszystkie przyciski urzqdzenia 3, MACRO 8, przycisk S 4, EXIT 6.
- Naciśnij krótko przyczysk na oryginalnym pilocie zdalnego sterowania. Gdy na wyświetlaczu LCD ① wyświetli są ponownie komunikat „SUCCEED", poleczenia przyciscu zostato pomyslinie zaprogramowane. Gdy jeder wyświetli są komunikat „LEARN ERROR" (BłAD PROGRAMOWANIA), musisz powtorzyc operacja.
- Gdy podczas trwania uczenia i wyświetlania napisu „LEARNING" (uczenie) po 30 sekundach nie zostanie nacińskiptyźaden przycisk na oryginalnym pilocie zdal
nego sterowania, menu uczenia zostanie zakoningzone.
Tego menu nie mayna zakończy poprzej naciść przycisku na uniwersalnym pilocie zdalnégo sterowania.
- W pamięci miesci sącznie 150 polecen. Jeźeli pAMIÇć jest pełna, to na wyświetlaczu LCD ① wyświetli sąnapis „MEM FULL", a tryb uczenia zostaje zakończy.
- Za pomocq przycisku EXIT ⑥ przywróć poprzedni stan (wyjatek stanowy wyświetlanie napisu „LEARN KEY" wzgl. „LEARNING").
Funkacja uczenia kodów
- Naciśnij przyczysk urzędzenia 3, do krórego uniwersalny pilot zdalnégo sterowania nauczy są kodu przyczysku.
- Naciński przytrzymaj przycisk S 4 przyce niedo ponad 3 sekundy. Na wyświetlaczu wyświetla są napis „CODE SETUP".
- Za pomocq przycisku lub przycisku wybierz menu „LEARN SETUP" (uczenie) i nacijsnij przycisk OK 19.
- Na wyświetlaczu LCD ① wyświetla są napis „LEARN SET". NatestPNie nacisnij przycisk OK ⑧. Na wyświetlaczu LCD ① wyświetla są napis „LEARN KEY" (wybierz przycisk).
- Naciśnij najpierw ten przycisk PU, kóry ma zostac za programowy ("nauczony"). Na wyświetlaczu LCD ① wyświetla są napis „LEARNING". Uniwersaly pilot zdalnego sterowania czeka teraz na sygnat podczerwieni od oryginalnego pilota zdalnego sterowania.
Wskazówka:
Ježeli napis na wyświetlaczu nie zmieni są „LEARNING", wybraź przyczisk, do k口罩 go uniwersaly pilot zdalnégo sterowania nie są nauczyć kodu.
- Ustaw czujniki podczerwieni obu pilotów zdalnégo sterowania naprzejcowo siebie.
- Naciński i przytrzymaj teraz wymagany przycisk orygi nalnego pilota, az na wyświetlaczu LCD ① uniwersal-nego pilota zdalnego sterowania wyświetli są napis „SUCCEED" lub „LEARN ERROR".
- Gdy na wyświetlaczu LCD ① pojawi sie „SUCCESSION" (operacja zakończona pomyśnlnie), to要去z programowania nastepne przycziski, Rozpoczynajęc od kroku 5. Jeźeli pojawi sie „LEARN ERROR" (proces nie powiędź sie), to powtórz operacja równieź od kroku 5.
- W celu przerwania/zakonczenia operaci programowania, przy wskazaniu „LEARN SET" nacziskaj przycisk EXIT 6 dotqd, aż na wyświetlaczu ① wyświetli są wskazanie standardowe. Przy wyświetlanym napisie „LEARN KEY" wzgl. „LEARNING" zaczekaj 30 sekund bez naczkaniaźadnégo przycisku, aż do zamknęcia menu.
Usunac wzystkie zaprogramowane przyciski wzystkich urzadzen
-
Naciśnij i przytrzymaj przycisk S 4 przyce nieco ponad 3 sekundy. Na wyświetlaczu wyświetla są napis „CODE SETUP".
-
Za pomocq przycisku lub przycisku wybierz menu "LEARN SETUP" i nacinij przycisk OK 18. Na wyświetlacz u LCD 1 wyświetla są napis "LEARN SET".
- Za pomocq przycisku lub przycisku wybierz menu "LEARN CLEAR" (usún nauczone) i zatwierdz wybor przyciskiem OK ⑧. Na wyświetlaczu LCD ① wyświetla sie napis „CONFIRM CLEAR" (zatwierź uusage).
- Zatwierdź wybor przyciskiem OK ⑧. Na wyświetlaczu LCD ① wyświetla są napis „SUCCEED". Wszystkie zaprogramOWANE przycisku zostymi usuniety. Na koncu menu automatycznych są zamyka.
Wskazówka:
Gdy na wyświetlaczu LCD wyświetli są napis „CONFIRM CLEAR", przyszysz przywość uwuwanie przyciskiem EXIT 6.
Makro Setup
Za pomocq funcjio MAKRO maybe wykonywa c racem do 16 pojedynczych polecen przye nacijsiecie jegno przycisku. Oznacza to, ze jeder przycisk MAKRO maybe wykona kila zapamietyanch wczesnej polecen sterujycych. Masz do dyspozycji 6 pami ci makr.
Rejestrowanie makra
W celu zaprogramwomania makro postepuj w nastepujacy sposob:
- Naciśnij i przytrzymaj przycisk S 4 przyce nieco ponad 3 sekundy. Na wyświetlaczu wyświetla są napis „CODE SETUP".
- Za pomocq przycisku lub przycisku wybierz menu „MACRO SETUP" i zatwierdź wybor przyciskiem OK 18. Na wyświetlaczu wyświetla są napis „MACRO SETUP 1".
- Za pomocq przycisku lub przycisku wybierz.), w pamięci do zarejestrowania makra (MACRO SETUP 1 - 6) i zatwierdź wybor przyciskiem OK 18.
- Na wyświetlacz u LCD ① wyświetla sie napis „MACRO STEP". NatestPNie naciśnij kolejno zędane przyciski (maks. 16). Sekwencja powinna Rozpoczynać sie od przycisku urzędzenia ③.
- Standardowo polecenia makr sq wysyfane w odstepach czasowych co 1 sekunde. PoniewaczNiektore urzadzenia reaguq z pewnym opozniieniem,MZe sie zdarzyc, ze sekwencja polecen makro bedzie wysylana do urzadzenia zbyt szybko. Mozna wtedy zaprogramowae przerwe 5-21 sekund przyd wystaniem polecenia przyciskiem. W tym celu ponownie nacinij przycisk MACRO W dolnym prowym rogu wyswietlacza LCD ① wyswietla sie bierzqa dlugosc przerwy w sekundach.
-
Po OSIgnięciu maksymalnej ilosci polecen przycisków, na wyświetlaczu LCD ① wyświetla są napis „FULL".
-
Zapisz w povadzonq sekwencje przyciskiem S ④. Na wyświetlaczu LCD ① wyświetla sie napis „MACRO SETUP".
- Jeźeli wybierajc zarejestrowane makro (krok 3) zaznaczysz juszzejte.), w pamięci, istniajeczemakrozostanie nadpisane.
- Powtarzaj operacja od kroku 3, aby zaprogramowania inne makra.
- Za pomocq przycisku EXIT ⑥ przydiesz do poziomu wyjej menu, z wyjość fungcj i w povadzania polecen przycisków.
Wskazówki:
- W ramach jegno makro mozes zapamięć maksymalnie 16 pojedynczych polecen przycisków. Po wpro-wadzeniu 16 polecenia przycisku, na wyświetlaczu LCD wyświetla są komunikat „FULL" ①.
- By zakończyc tryb bez wpwadzeniazmian,zaczekaj okato 15 sekund bez naciskania zadnego przyciscu.
- W trybie „MACRO STEP"要去除杂去杂的 pomocq przycisku S ④ powrócić do poprzejnégo stanu.
Przyklad: Chcesz zapisć ciąg polecen w makro. Zacznij od trybu „MACRO STEP".
Wymagany ciag polecen: Wtqcz TV => PRZERWA =>\ przeqtz na wejscie AV => wqtz DVD => PRZERWA =>\ odtwarzaj DVD.
W trybie „MACRO STEP" wpwadź w tym celu przyciskami nastepujecie polecenia:
TV => MacRO (czas przerwy) => AV => DVD
=> => MACRO (czas przerwy) =>
Wykonywanie makra
Aby wykonac zaprogramowane wczesniej makro postepuj w nastepujczy sposob:
- Naciśnij przyczysk MACRO 8.
- Za pomocq odpowiedniego przycisku cyfrowego 9 otworz zqdane makro (1-6). Przykta: By wykonacmakro 3, nacinij przycisk MACRO 8, a nastepnie w ciagu 5 sekund przycisk cyfrowy 3
Usuwanie wzystkich makr
Aby skasować zaprogramowane wczesniaj wszystkie makra postepuj w nastepujczy sposób:
- Naciński przytrzymaj przycisk S 4 przyczne są polad 3 sekundy. Na wyświetlaczu wyświetla są napis „CODE SETUP".
-
Za pomocq przycisku lub przycisku wybierz menu „MACRO SETUP" i zatwierdź wybor przyciskiem OK 18. Na wyświetlaczu wyświetla są napis „MACRO SETUP 1".
-
Za pomocq przycisku lub przycisku wybierz menu "MACRO CLEAR" i zatwierdź wybor przyciskiem 18.
- Na wyświetlaczu LCD ① wyświetla sie napis „CONFIRM CLEAR" (zatwierdz usuniść). Zatzierdz usuniecie przycziskiem OK ⑧. Na wyświetlaczu LCD ① wyświetli sie napis „SUCCEED". Wszystkie makra zostanq skasOWANE a menu zamkniete.
Wskazówki:
- Gdy na wyświetlaczu LCD ① wyświetli są napis „CONFIRM CLEAR",要去 przerwać usuwanie przyzisciem EXIT ⑥.
- Pojedynczych makr nie możesz usuwac, tylko możesz je nadpisywac.
Ulubiony kanat
Wskazówka:
Za pomocq tej functcji mozesz zapisywac wybrane stace jeako ulubione.
Programowanie ulubionych
Ulubione stace mozesz zapamietac w nastepujczy sposob:
- Naciśnij przyczisk/togo urzędzenia 3, do krógo chcesz zapisć ulubione stacje.
- Naciński przytrzymaj przycisk S 4 przyceznico po-nad 3 sekundy. Na wyświetlaczu wyświetla są napis „CODE SETUP".
- Za pomocq przycisku lub przycisku wybierz menu „FAV CH SETUP" i zatwierdź wybor przyciskiem OK 18. Na wyświetlaczu wyświetla są napis „FAV CH SETUP 1".
- Za pomocq przycisku lub przycisku wybierz.), i zatwierdzy wybor przyciskiem OK 18.
- Na wyświetlaczu LCD ① wyświetla są napis „FAV CH STEP". Teraz naciszij kolejno przyciski (maks. 4) w celu wybrania ulubionej staci.
- Po OSIgnięciu maksymalnej ilosci polecen przycisków, na wyświetlaczu LCD ① wyświetla są napis „FULL".
- Zapisz wpwadzonq sekwencje przyciskiem S 4. Na wyświetlaczu LCD ① wyświetla sie napis „FAV CH SETUP".
- Jeźeli wybieraźc zapamiętanhulubionq stȩ (£krok 4) zaznaczysz jź zajęte sąje sze w pamieci, istnieżca ulubiona stȩ zostanie nadpisana.
- Powtórz kolejne kroki przy tworzeniu dalszych ulubionych.
- Za pomocq przycisku EXIT ⑥ przydiesz do poziumu nizzej menu, z wyjatkiem functcji w povadzania polecen przycisków.
Wskazówka:
W zależnosci od modelu i marki wybranego urzędzenia sposob w povadzania numerów kanatów sąć roźny. Ewentualnie w przypadku kanatów o złozonych numerach najpierw musisz nacisné przycisk -/- 10.
Wybieranie ulubionych
W celu wybrania uprzednio zapamiętanej ulubionej staci, naciśnij przyczysk FAV/EPG 19, a nastepnie odpowiedni przyczysk cyfrowy zydanegojej mośca wAMIcie (1 - 4).
Kasowanie wszystkich kanatów FAV
Aby skasowac zaprogramowane ulubione staje, postepuj w nastepujczy sposob:
- Naciński przytrzymaj przycisk S 4 przycez niedco ponad 3 sekundy.
- Za pomocq przycisku lub przycisku wybierz menu "FAV CH SETUP" i zatwierdź wybor przyciskiem OK 18. Na wyświetlaczu wyświetla są napis "FAV CH SETUP 1".
- Za pomocq przycisku lub przycisku wybierz menu "FAV CH CLEAR" i zatwierdź wybor przyciskiem OK 18.
- Na wyświetlaczu LCD ① wyświetla są napis „CONFIRM CLEAR" (zatwojć zusuniȩcie). Zatwojć zusunjęcie przycziskiem OK ⑧. Na wyświetlaczu LCD ① wyświetli są napis „SUCCEED". Wszystkie ulubione stacje dostanq skasowane a menu zamkniȩte.
Wskazówki:
- Gdy na wyświetlaczu LCD ① wyświetli są napis „CONFIRM CLEAR",要去 przerwać usuwanie przyzyciskiem EXIT ⑥.
- Pojedynczych ulubionych staci nie要去cz usuwac, tylko要去cz je nadpisywac.
Regulacja głowosnosci
Vol + / - ,四 (wyciszenie)
Naciśnij przycisk „VOL +“, aby zȩększyć gośnosć.
Przyciskiem „VOL-“要去除去,nacisijn przycisk ⑤. Ponowne nacisnieciekiego przycisku wącza dzwiek z powrotem.
Naciśćcie przycisków VOL +/− 16 naUniiversalmypi-locie zdalnegosterowania powinno uruchamiać regulacja gólnosci odbiornika TV,niezależnie od unto,który przycisk urzędzén 3 zostaf uprzednio naciński. Nie dotyczy to jakność urzędzén „AMP", „DVD", „ASAT" i „DSAT", gdy不足以 wyjsć z załozenia,źurzędzenia te major własnq regulacja glosu.
Aby moc obstugiwaćaddresses z zaprogramowanych urzędzenia za pomocq universalnego pilota zdalnego sterowania musisz najpierw nacinność odpowiedni przycisk urzędzenia ③. NatestPNie skieruj pilota na urzędzenia i nacijsnij wymagany przycisk.
Korzystaj z przycisków cyfrowych dokadnie w taki sam sposob, jak przy korzystaniu z oryginalnégo pilota. Przed wprovadzeniem dwucyfrowej pozycji nacijsnij ewentualnie przycisk
Nacijsnij przycisk FAV/EPG 19, aby uruchomic elektroniczny przyzewodnik programowy urzadzenia, wyposzazonego w tę funkcję.
Gdy naciniesz przycisk S 4, w sprawym dolnym rogu wyświetlacza LCD 1 przyez 10 sekund;będzie wyświetblaşa sie data.
Przy nacińskiym i przytrzymanym przycisku urzędzenia 3, w sprawym dolnym rogu wyświetlacza LCD ① wyświetla są kod uaktywniony do tego urzędzenia.
Przyciskiem MENU ❷ przyyszwość ekran ustanówien danego urzędzenia docelowego.
Naciśnij przyczysk podświetlany 12, by wączyć wzgl. wyłczyć podświetlenie wyświetlacza i przyczisków.
Wyęcz wszystkie (ALL OFF)
Wskazówki:
Przyciskiem ALL OFF (wyłucz wsztkie)romatic automatycznie wyłczyc wsztkie wączone urzędzenia. Za pomocymi fungcjimi要去źyszczem ponownie wączyc wyłczone wczȩtnie urzędzenia (w zależnosci od urzędzenia). W tymelu naciść i przytrzymaj przyze sądo 5 sekund przycisck ALL OFF. Powyźsze dane tylko pod nastepujczymi warunkami:
- Uniwersalny pilot zdalnégo sterowania ma zapewnionq widzialnosć wszystkich urzgodzen.
- Funktion automatycznégo wyszukiwania kodu, wyszukiwania kodu marki i Funktion MAKRO nie są aktywnie.
- Wszystkie urzqdzenia docelowe musq obstugiwać wyłuczanie za pomocq pilota zdalnégo sterowania. By ponownie wączyc automatycznie wszystkie urzqdzenia, ponownie naciśnij i przytrzymaj przycisk ⑤ ②,ź wszystkie urzqdzenia zostanq wączone.
Czyszczenie i przechowywanie
Uwaga!
Podczas czyszczenia nalezy pamietac o tym, aby do wetrza obudowy nie przyedostafa sie wilgoć! W przyceiwyn razine powstajeNiebezpieczenstwo nieodwracalnego uszkodzenia urzędzenia!
Obudowé urzqdzenia czysz wylqcznie lekko wilgotnq szmatkq z delikatnym plynem do mycia.
Urzqdzenie przechowuj wyłçcznie w otoczeniu spelniajcym wymogi podane w rozdziele Dane techniczne.
Przed odtozeniem urzqdzenia na dduuszcy czas, wyjmij baterie, by nie spowodowy uszkodzenia urzqdzenia gdy wylejq w trakcie przerwy w uzytkowaniu.
Błędy i sposoby ich usuwania
Urzqdzenie nie reaguje na Dziatanie uniwersalnego pilota zdalnego sterowania.
Sprawdzić baterie. Muszqmieć wystarczajcq napięcie i byc prawidłowo włozone.
Nacisnqtes wczesniej prawidtowy przycisk urzqdzenia docelowego?
Sprawdź,czy dla urzędzenia docelowego zostat za-programowy prawidowej kod (patrz rozdzią „Code Setup").
Uniwersalny pilot zdalnego sterowania nieprawidlowo przyesyta polecenia.
Nacijsnij odpowiedni przycisk urzadzenia ③, aby przytczyc uniwersalnégo pilota zdalnégo sterowania na prawidłowy tryb.
Baterie muszqmiec wystarczajqce napięcie i być prawidtowo wtozone.
Byc要去 uzywasz nieprawidowego kodu. Rozpoczniwyszukiwanie kodu marki, automatyczne wyszukiwanie kodu lub bezposrednie (ręczne) wadowszenia kodu.
Uniwersalny pilot zdalnego sterowania nie przyoczata staci w urzqdzeniu.
Nacijsnij odpowiedni przycisk urzadzenia ③, aby przytczyc uniwersalnégo pilota zdalnégo sterowania na prawidłowy tryb.
Jeźeli oryginalny pilot zdalnégo sterowania nie posiada przycisku „-/--“, to przy.§czaj programy przyciskami P +/− ⑦ lub przyciskami cyfrowymi ⑨.
Jeżeli to nie działa, to być moź jest aktywna blokada rodzicielska danego urzędzenia.
Niekóre przyciski uniwersalnégo pilota zdalnégo sterowaniaNie Dziataj prawidtowo.
Uniwersalny pilot zdalnego sterowania要去 sie obstugiwac wszystkich funkcji oryginalnego pilota.
Byc moze nie zaprogramowale's optymalneo kodu. Wyszukaj kodu, który;będzie obstugiwat wiecej funkci docelowego urzqdzenia.
Uniwersalny pilot zdalnégo sterowania nie reaguje na naciskanie przycisków.
Baterie muszqmiec wystarczajqce napiecie i byc prawidtowo wtozone.
Skieruj pilota na urzqdzenie.
Wyświetlacz LCD ① przykiego nie pokazuje.
Baterie muszqmiec wystarczajqce napięcie i być prawidłowo włozone.
Ustawiony jest zbyt niski kontrast. Zwiększ ustawienie kontrastu.
Utylizacja
W zadnym przypadku nie sązy wyrzuć urzędzenia do normalnych smieci domowych. Produkt jest zgodny z dyrektyw q 2002/96/EC.

Universalny pilot zdalnégo sterowania
- Uniwersalnégo pilota zdalnégo sterowania naleź y utyli-zować tylko przy częwne prędsiȩbiorstwo utylizacji odpadów lub przy komunalny zakład oczyszczania.
- Przestrzejagaj aktualnie obowizujiangych przyepisów. Wrazie pytan i wąpliwośćngezy skont⁺tować są z mięscowym przyȩsiem pręd.§biorstwem usuwania odpadów.
Baterie i akumulatorki
- Baterii i akumulatorów nie wolno wyrzuć razem ze smieciami domowymi.
- Baterie mogę zawierać substancje trujść, szkodliwe dla srodkowiska naturalnégo. Bateria/akumulatory utylizuj zawsze zgodnia z obłowiazujycymi przyepamisi.
- Kaźdy konsument jest ustawowo zobowiędzany do odawania wszystkich baterii i akumulatorów w punktach zbiorczych gminy, Dzielnicy lub w skelepie. Obwiązek ten zostat w povadzony, aby baterie/akumulatory byty usuwanew spośob nieszkidliwy dlaŚro dowiska naturalnégo.
- Baterie / akumulatory oddawaj zawsze w stanie catkowitego Rozladowania.
Wszystkie materiały wchodźcie w skład opakowania naleź przy przykazac do odpwiednich punktow zbiórki odpadów.

Dane techniczne
| Obstugiwane urzqdzenia: | 10 |
| Wymiary | |
| D x S x W: | 217 x 50 x 22 mm |
| Masa: | 102 g (bez baterii) |
| Dioda podczerwieni: | Klasa lasera 1 |
| Zasilanie baterie: | 2 x 1,5 V typ AAA/ LR03 (Micro) (znajdujá sie w zestawie) |
| Temperatura robocza: | +5 - +35°C |
| Temperatura przechowywania: | -20 - +50 °C |
| Wilgotnosć: | 5 - 90 % |
| (przy braku kondensacje) |
Wskazówka dotyczęca zgodnosci
Urzadzenie zostato przytestowane i posiada dopuszczenia w zakresie podstawowych wymagan i innych obwiaguzujacych przypeisow dyrektywy w sprawie kompatybilnosci elektromagnetycznej 2004/108/EC.
C E
Importer
KOMPERNASS GMBH
BURGSTRASSE 21
44867 BOCHUM, GERMANY
www.kompernass.com
Gwarancja i serwis
Urzadzenie objete jest trzyletniq gwarancja, liczac od daty zakupu. Urzadzenie zostato starannie wyprodukowane i poddane skrupulatnej kontrli przydny zachowac jakodowod dokonania zakupu. W przypadku napraw gwarancjnych skontaktuj sie Telefonicznie z najbliszym punktem serwisowym. Tylko w ten sposobUNCTA zagwarantowae bezplatnq wysytke zakupionego produktu.
Gwarancja obejmuje wyłacznie wady materiały i fabryczne, natomiastNie obejmuje czȩci ulegajycych zuzyciu ani uszkodzen czȩci tawo famliwych, np. wyłacznika lub akumulatorów.
Produkt przyznaczony jest wyłęczne do uzytku domowego, a nie do zastosowan przyemystowych i profesjonalnych. Gwarancja traci wąźnosć w przyypadku niewośćwo go uzywania urzędzenia, uzywania niedzego z przyznaczenia, uzycia sity lub ingerenci w urzędzenia, dokonywanejo poza naszymi autoryzowanymi punktami serwisowymi.
Niniejsza gwarancja nie ogranica ustawowych spraw na-bwyczy urzqdzenia.
Ustuga gwarancyjna nie przyd扰乱za czasu trwania gwarancji. Dotyczy to rownikiesz wymienionych i naprawionych czosci. Szkody
i wady wykryte ewentualnie podcza zakupu nalezy zgostośćniażwlocznie po Rozpakowaniu urzędzenia, nie poźnej niedwa od daty zakupu. Wszystkie naprawy wykonane po upływie okresu gwarancyinode go będą wykonywane odplataNie.
PL Kompernass Service Polska
Tel.: 022 / 3972212
E-mail: support.pl@kompernass.com
| Indicății de siguranta importance | 56 |
| Prezentarea aparatului | 57 |
| Punerea în functiune | 58 |
| Dezambalarea / inspecta la livrare | 58 |
| Introducerea baterilor | 58 |
| Elemente de operare | 59 |
| Afșaj LCD | 59 |
| Butoanele | 60 |
| SETUP - setări sistem | 63 |
| Setarea codului (Programarea telecomenzii) | 65 |
| Programarea prinăutarea codului mărcii | 65 |
| Programarea prin introducerea manuală a codului | 66 |
| Programarea prinăutarea automată a codului | 66 |
| Setarea systemului | 68 |
| Setarea orei | 68 |
| Setarea datei | 68 |
| Setarea contrastului | 69 |
| Lumina de fundal | 69 |
| Reglarea intensitatei sonore globale/modului silențios | 69 |
| Setarea functiei Lock | 70 |
| Resetarea systemului | 71 |
| Setarea temporizatorului | 71 |
| Temporizator de oprine | 71 |
| Temporizator comenzi | 71 |
| Setarea functiei de înțare | 72 |
| Codul functiei de înțare | 73 |
| Setarea macrourilor | 74 |
| Canale favorite | 76 |
| Reglarea intensitatei sonore | 77 |
| Vol +/-, (mod silențios) | 77 |
| Despre operare | 77 |
| Toate OPRITE | 78 |
| Curățarea și ingrijërea | 78 |
| Defecțiuni / remedii | 78 |
| Eliminarea aparatelor uzate | 79 |
| Date tehnice | 80 |
| Informații privind conformitatea | 80 |
| Importer | 80 |
| Garantia & service-ul | 80 |
TELECOMANDA UNIVERSALSA SFB 10.1 A1
Această documentatae este protejata de legea privind drepturile de autor. Toate drepturile, inclusiv acelea de reproducere fotomecanica, de multiplicare si raspandire prin procedee speciale (de exemplu, prelimucarea datelor, suporturi de date si retele de date), chiar si partial, precum si dreptul de modificari tehnice, sunt rezervate.
Citi ci atentie instruclunile deutilizare inainte de prima utili-zare si pstra-ile pentru o consultare ulterioar. Daca imnata aparatul unor teri, ataati si instruclunile deutilizare.
Indicații de siguranta importante
Utilizarea conform destinatiei
Copiilor le este permisa utilizes area telecomenzii numai sub supravegherea unui adult.
Telecomanda universala poate inlocui maxim zece telecomenzi de la aparate diferite. Poate fi utilizata numai pentru aparatele electronice de divertisment cu receptor de infrarosu. Functile telecomenzii universale corespend in mare parte acelora ale telecomenzilor originale ale aparatelor respective. Telecomanda universala este destinata utilizingii private. Nu poate fi folosită pentru uz profesional.
Orice altautilizareeste contraventionala.Producatorul nu acordagarantiepentru paguberezultatein urmautilizarii neconformeseauamodificarilorarbitrareadusetelecomenzii.
AVERTIZARE
Avertizarile pentru acest grad de pericol marcheaz o situatie potențial periculoasă. Daca situția periculoasă nu este evită, aceasta poate provoca raniri. Respectati indicatorii din această averizare pentru a evita ranirea personelor.
ATENTIE
Avertizarile pentru acest grad de pericol marchează potențiale pagube materiale. Daca situata periculoasă nu este evită, aceasta poate provoca pagube materiale. Respectati indicatorile din această avertizare pentru a evita pagubele materiale.
Indicatie
Indicatiile marchează informații suplimentare care ușurează lucrul cu aparatul.
Avertizare contra pericolului de raniri prin manipularea incorcetă a baterilor!
Bateriile trebuie tratate cu deosebita atentie. Respectati urma-toarele indicati de siguranta:
-
bateriile nu trebuie să ajunga pe mana copiilor. S-ar putea ca acestia să pună bateriile in gurași să le inghită. Dacă s-a inghitit o baterie, consultati imedit un medic;
-
nu aruncai bateriile in foc. Nu expuneti bateriile temperaturilor ridicate;
pericol deexplozie! Este interzisreincarcarea bateriilor; - nu deschideti sini scurtcircuitati bateriile;
- acizii scurşi din baterii pot provoca iritaţii ale pielii. La contactul cu pielea spalăi cu apă din abundță. Dacă lichidul ajunge in ochi, clătiţi temeinic cu apă, nu frecati,și consultati imediat un medic.

Atentie!
Telecomanda universală dispune de o diodă laser clasa 1. Pentru a evita afeçtiunile oculare, nu priviți in această diodă cu aparate optice.

Defecte ale telecomenzii
- Daca telecomanda este defectă, nu incecurți să o reparati singuri. In caz de defecte luți legătura cu producătorul采暖 linia Telefonica directă púsă la disposizție de acesta (vezi bonul de garantie).
- Daca'in telecomanda se infiltreaza lichide sau daca prezinta defecte, acestea trebuie remediate de catre producator sau cu ajutorul primit prin intermediul liniei Telefonice directe. Luafi legatura cu producatorul sau cu personalul de la linia Telefonica directa (vezi garantia).
- Scoatei bateriile consumate din telecomanda.
- Dacă nu/utilizăi telecomanda un tamp mai lung, scoateți bateriile pentru a evita descârcarea acestora.
- Inlocuţi toate bateriile in acelaşi timpși nu Utilizati baterii de tipuri diferite.
Prezentarea aparatului
Afiçaj LCD
Buton / ALL OFF
3 Butoane aparat
4 Buton S
Butoane cu sageti
6 Buton EXIT
7 Butoan P + / -
Buton MACRO
Butoane numerice
10 Buton jusqu'numere de program formate din una sau doua cife
10 Butoane fonctionale pentru teletext
12 Buton de luminare
Butoane inregistrare /redare
14 Buton AV
Mod silentios
16 Butoane VOL + -
7 Buton MENU
8 Buton OK
19 Buton FAV / EPG
20 Emitator / receptor infrarosu
Capac compartment de baterii
① Indicatii:
- Funcţiile descrie aici se refera la cazul teoretic ideal în care structura butoanelor acesti telecomenzi universale este identifică cu aceea a telecomenzii originale. Acest lucru se va în ampla în numai în cazuri extrem de rare. Daca telecomanda universală nu permite executarea tuturon funcţilor disponibile pe telecomanda originală, acessistLucru nu inseamna că telecomanda este defectă.
- Toate numele de modele utilizes in acest manual sau in lista de coduri alaturata reprezinta marmi commerciale ale respectivelor firme.
Punerea'in functiune
Dezambalarea / inspectia la livrare
Avertizare!
Nu lasati foliile de ambalare la indemana copiilor. Pericol de asfixiere.
- Dezambalati aparatul si componentele accesorii.
-
Verificazioni dacia au fost livrate alla parte componentele - Telecomanda universala (TU)
-
Instruetioni de'utilizaré
- Listcu codurile aparatelor oferita de producator
- 2 baterii de 1,5 V, tip AAA/LRO3 (micro)
① Indicatie: daune in timpul transportului
Dacă observati pagube in urma transportului, adresati-va producătorului sau luati legătura cu linia Telefonica directă (vezi guaranția).
Introducerea bateriilor
Atentiel!
Este permisautilizarea telecomenzii universale numai cubateri de 1,5 V (dimensiune AAA, LRO3).
Inlocui repede bateriile. Setarile sunt pastrate cca 1 minut. Daca in interval de un minut nu sunt introduse alte baterii, va trebui sa realizati din nou toate setarile telecomenzii. In oricare caz, ora si data vor trebui resetate.

- Deschidei capacul compartmentului de baterii 2 in directia sagetii.
- Introduciţi bateriile conform imaginiiși inchideşiti capacul. Afisajul LCD 1 rămăne activat, atât timp CAT IN telecomandă există baterii. Urmatoarea imagine prezintă afisajul LCD 1 după introducerea sau schimbarea baterilor.
TV
FRI
00:00
Indicatie
Daca pe afisajul LCD 1 nu se afisează date, verificati polaritatea bateriilor sau inlocuiţi baterile.
Elemente de operare
Afisaj LCD
Afisajul LCD ① este impaftit in mai multe campuri.

Camp de text 2
Aici este afisat aparatul selectat in momentul de faţă, de exemplu, DVD, TV, VCR etc.
Simbolul infraroşu ②
Simbolul se va aprinde la fiecare apasare de buton in urma carea se emite un semnal infrarosu.
Câmp cod / oră 24
Aici este afisat codul aparatului selectat in momentul respectiv sau ora. La afisarea orei,他们在数palpaie .
Câmp ziua sǎptamànii ②
După introducerea datei in acest camp se pot observa formele prescurtate, in engleză, ale zilelor săptamânii.
MON = Monday = Luni
TUE = Tuesday = Marti
WED = Wednesday = Miercuri
THU = Thursday = Joi
FRI = Friday = Vineri
SRT = Saturday = Sambata
SUN = Sunday = Duminic
Afisaj standard
TV
FRI 00:00
Afisajul standard de pe LCD ① confine date despre aparatul setat in respectivul moment, de exemplu, "TV", prescurtarea pentru ziua săptamâniiși ora.
Butoanele
Indicatie
FunciiIe descrie aici pot fi executate numai dacă aparatul respectiv define respectivele functii.
Buton / ALL OFF ②
ALL OFF

Pornirea / oprirea aparatului; tinei butonul apasat cca 5 secunde pentru a porni / opri toate aparatele.
Butoane aparat 3
Cu ajutorul butoanelor pentru aparate selectaşi aparatul pe care doriti să-l Utilizati:
TV Televizor
VCR Videorecorder
AUX1 Periferic 1
CBL Receptor TV cablu
CD Player
ASAT Receptor satelit analog
AMP Amplificator audio
DVD DVD Player
DSAT Receptor satelit digital
AUX2 Periferic 2
Această alocare a butoanelor nu este obligatore. Puteti, spre exemplu, memora codul pentru videorecorder in locul pentru televizor.
Butonul "S" ①
S
Tinei apasat 3 secunde pentru apelarea meniului SETUP, apasati scurt pentru afisarea datei, resp. pentru apelarea functilor auxiliare ca EPG sau PIP
Butoanele cu sageji 5

Navigati in meniuri in sus, la dreapta, in jos sau la stanga.
Butonul EXIT ⑥
EXIT
Reveniti la nivelul anterior din menui.
Butoanele P +/— 7

Schimbarea canalului.
Butonul MACRO 8
MACRO
Butonul MACRO 8 urmat de apăsarea unua dentre butoanele numerice 9 1-6, activează un sir de comenzi memorate anterior.
Butoanele numerice ⑨


Introducerea numerolei de program si codurilor aparatului.
Butonul pentru numero de program formate din una tau două cifre 10

Pentru numerele de program formate din doua cître (in functie de tipul aparatului) apăsati mai intai butonul 10, iar apoi cu ajutorul butoanelor numerice 9 introduciți numărul programului.
Dupa o noua apasare a butonului, afisajul va fi din nou pentru o singuracifra.
Butoane fonctionale pentru teletext 10
In modul teletext, butoanele au urmatoarele functii:

Apelati functia teletext Cnd aparatul functio neaza in modul TV apasati mai intai butonul
S 4 urmat de butonul [ ] pentru a utilizes functia "PIP" (imagine in imagine) a televizorului dumneavoastră.
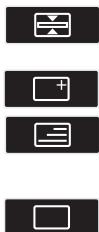
Pauza schimbare automata in cazul pagingiler teletext cu mai multe file.
Màrire afisaj pagină
Afisare suprapusă a imaginii cu textul Şi imaginii televizorului
Oprirea functiei teletext.
Indicatii
- Funcția teletext este disponibilită numai dacă televizorul este setat pentru programe din Europași dacă dispune de un modul teletext.
- Butoanele P + / - ① execută următoarele functii de teletext: P+ răsfoiere inainte P- răsfoiere inapoi
Butoanele inregister / redare 8
Butoanele de redare 3 comanda aparate ca DVD/CD Player si videorecordere:

Incepere redare
ASPECT
Schimbare format imagine la utilizesa televizorului

Inregistrare

Redare / Inregistrare / Oprire derulare

Pauza derulare

Derulare apoi

Derulare inaine
Butonul AV 14

ComutarepeintrareAV.
Silentios 19

Pornire / oprine sunet.
Butoane VOL+/- 16

Reglare intensitate sonora (volum).
Butonul MENU 17
MENU
Apelarea meniului aparatului Utilizat.
Butonul OK 18

Cu butonul OK confirmati o selecte din menui.
Butonul FAV/EPG 19
FAV/EPG
Apăsăti butonul FAV/EPG pentru a apela postul preferat pre-programat. Pentru a apela ghidul de programe electronic a respectivului aparat, apăsăti mai înțăi scurt butonul S ④și apoi butonul FAV/EPG.
In meniul setarisistemrealizati urmatoarele setari:
- programarea telecomenzii pentru aparatul pe care doriti să-l controlati;
- setarea orei, datei, contrastului afisajului, iluminarii de fundal, intensitatei sonore, functiei de blocare (Lock) precum si resetare sistem (System-Reset);
- Setarile temporizatorului
"Invatarea" anumitor comenzi de butoane - Crearea de macrouri
Salvarea canalelor favorite
Pe pagina urmátoare este prezentata o imagine cu structura meniului.

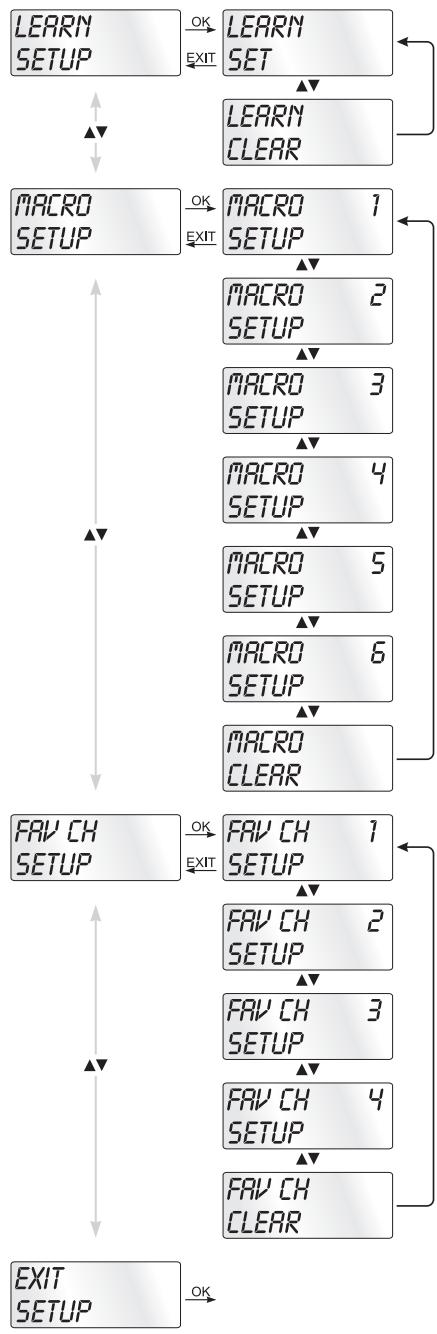
Pentru programarea telecomenzii avei la disponție 3 metode de programare: programarea prinăutarea codului mărci, prinăutarea automata a codului Sau prin introducere manuală a codului.
Mai intài utiliziţiăcătarea codului mărcii pentru ca este metoda cea mai rapidă de programare, dacă produçătorul respectivului aparat se găsește in lista de coduri livrata impreună cu telecomanda. Ca a doua variantă se recomandă metoda de introducere manuală a codului, urmăță deăutarea automata a acestuia.
Programarea prin căutarea codului mărcii
In cazul acesti metode, selecta direc t marca si codul aparatului de pe afisajul LCD 1.
Pentru programare telecomenzii urmai urmatoarele indicati:
- Apasati butonul pentru aparatul 3 corespunzator pe care doriti săl programati la telecomandă.
- Tineji apasat butonul S 4 pentru mai mult de 3 secunde. Introducei date in meniu fara sa faceti pauza, pentru ca, dupa cca 15 secunde in care nu ati introdus nimic, meniul va disparea de pe ecran.
- Pe afisajul LCD 1 apare „CODE SETUP". Apasati butonul OK 18. Pe afisajul LCD 1 apare acum „ENTER CODE". Cu ▲▼ butoanele 5 selectati „BRAND CODE" si confirmati cu butonul OK 18.
- Acum va fi afṣata lista cu numele mǎrcilor de aparate pre-programate.
- Cu butoanele 5 selectati diferitele nume de marmi.
- Pentru a usura accesul, prin utilizarea butoanelor numerice 9 puteti ajunge direct la o anumita litera:
2 A 3 D 4 G 5
6 M 7 P 8 T 9 W
Exemplu: cu butonul 5 ajungeti la afisarea marcilor care incep cu ^ . Primamarca este JVC**. Daca, de exemplu, sunteti posesorul unui aparat marca ,Kenwood**, rasfoiti cu butonul 5 mai departe, pana cand apare numele acestei marmi. (* Toate numele de produse utilize aici sunt marmi commerciale ale respectivelor firme.)
- Majoritatea producatorilor utilizează mai multe coduri pentru telecomandă. Acum trebuie să aflatî care dintré codurile disponibile este cel mai bun pentru aparatul dumneavoastră. În dreptă, sub numele mărci este afișat codul actual pe afișajul LCD 1.
-
Indreptaţi telecomanda spre aparatul pentru care este setata în momentul de fataăși apăsătii butoanele de functii pentru a testa codul (exceptand 5 , OK 18, EXIT 6 Sau butoanele numerie 9).
-
Daca functioneaza majoritatea butoanelor, apasati butonul OK 18, pentru a salva setarile. Pe afisajul LCD 1 apare "OK". In final meniul dispare automat.
- Daca nu functioneaza niciun buton sau doar foarte pujine buoane, selecta ci Sau , butonul 5, urmatorul cod si testati din nou in modul descri cr la punctul 8.
- Cu butonul EXIT 6 ajungei la urmatorul nivel din menui. Repetai acesti paşi pentru toate aparatele pe care doriti sa le operati cu telecomanda.
Programarea prin introducerea manuală a codului
In acest mod telecomanda poate fi programata prin introducerea directa a codului numeric. Codul numeric il gasiţi in indicatele de produçatori ce contine lista de coduri. Daca noul cod introdus nu este valid, va fi preluat din nou ultimul cod valid programat.
- Apasati butonul pentru aparatul 3 corespunzator pe care doriti săl programati la telecomanda.
- Tinei apasat butonul S 4 pentru mai mult de 3 secunde.
- Pe afisajul LCD 1 apare „CODE SETUP". Apasati butonul OK 18. Pe afisajul LCD 1 apare acum „ENTER CODE". Pentru apelarea acestei functii apasati butonul OK 18.
- Pe afisajul LCD ① apare codul utilizesat momentan pentru aparatul selectat. Acum se aprinde Şi se stinge prima parte din corpul codului Şi se așteaptă să introduciți codul. Introduciți noul cod din patru cifre cu ajutorul butoanelor numerice ⑨.
- Dacă CODUL introdus este valid, va fi salvat. Pe afisajul LCD ➀ apare un moment „OK", apoi meniul va dispârea. Dacă operția esuează, pe afisaj ➁ apare „ERROR" (eroare)și se așteapță că introduciți un nou cod. In acest caz repeteti pasul 4.
- Cu butonul EXIT ⑥ ajungei la urmatorul nivel din menui.
Programarea prinăutarea automată codului
Acest proceso poate dura mai multe minute pentru fiecare aparat, deoarece trebuie parcurse toate codurile pentru aparatul selectat. De aceea, această metodă ar trebui Utilizata, dacă aparatul nu poate fi programat prin celelalte două metode descrie mai sus, sau dacă aparatul dumneavoastră nu se regăsește în lista cu coduri.
Urmai pasi prezentai mai jos, pentru a realiza programare.
prin cautarea automata a codului.
- Apasati butonul ③ corespunzator aparatului dvs. (de ex. VCR).
- Porniti aparatul pe care doriti să-l Utilizati cu telecomanda. In cazul aparatelor VCR/DVD/CD introduci o casetă, resp. un disc.
- Tinefi apasat butonul S 4 pentru mai mult de 3 secunde.
- Pe afisajul LCD 1 apare „CODE SETUP". Apasati butonul OK 18. Pe afisajul LCD 1 apare acum „ENTER CODE". Apasati acum Sau , butonul 5, pana cand pe afisai 1 apare „SEARCH CODE". Indreptati telecomanda spre aparat si apasati butonul OK 18, pentru a apela modul „cautare automata a codului".
- Incepe căutarea. Acum aparatul trimite consecutiv numerele de coduri in ordine crescătoare. Simbolul infrarosu 23 indica executarea acesti operatiuni.
- Daca exista reactie din partea aparatului, adica daca se opreste, apasați imediat butonul OK 8, pentru a salva codul actual. Pe afisajul LCD 1 apare pentru scurt tamp OK".
- Verificazioni in mare daca funzioni aparatului dumneavoastrà pot fi executate de la telecomanda. Daca da, inseamna cà ati gasit codul corect. Daca nu se pot executa anumite funzioni, puteti reincepe de la pasul 1 cautarea automata a codului.
Indicatie
Pentru o nouă càutare, indreptați telecomanda spre aparat numai după ce ați trecut de codul invalid găsit anterior.
- Daca aparatul nu mai reaioneaza, inseamna ca la pasul 6 nu a; apasat destul de repede butonul OK 18. Apasati de mai multe ori butonul EXIT 6, pentru a paurasi meniul si pentru a reveni la afisarea standard.
- Tinei acum apasat butonul pentru aparatul 3 pentru care incercati să cautati codul potrivit. Accum, in dreapta jos, este afisat codul actual pe afisajul LCD 1. Tineiunte această cifră.
- Acum procedati in modul descrijis in capitolul „Programaarea prin introducerea manuală a codului" si verificati dacă codul functionează cu următoarea cea mai mică combinatie de cifre.
Indicatii
- Daca cautarea codului este activata, sunt ignoreate todo butoanele, cu exceptiaUTOanelor OK 18 si EXIT 6.
- Procesul de cautare automata se oprește in momentul in care a ajuns la sfârsitul listei de coduri. Afișajul revine la „SEARCH CODE".
Setarea orei
Afisajul LCD 1 va arata ora. Ora se setează astfel:
- Tineşapasat butonul S 4 pentru mai mult de 3 secunde. Apare „CODE SETUP". Aşteptaşi cca 15 sec. fara a facenico introducere, pentru ca aparatul să pärasească meniul ŞI pentru a reveni la modul standard de afisare.
- Cu sau , butonul 5, selecanti „SYSTEM SETUP" si confirmati cu butonul OK 18.
- Pe afisajul LCD ➀ apar „TIME SETUP". Confirmati cu butonul OK 18. Afisajul LCD ➁ arata acum „TIME", iar formatul datei (24 HR) clipeste.
- Cu sau , butonul 5, puteti schimba in celalalt mod de afisare al orei (I2 HR). Apoi, mai târziu, pe afisajul orei, inainte de ora vete vedea un „R" sau un „P". „R" in-seamna „AM" = „ante meridium" (dimineata, intre orele 0:00 s i 12:00). „P" inseamna „PM" = „post meridium" (după-masa, intre orele 12:00 s i 0:00). Apasati butonul OK 69 pentru a confirma.
- Acum clipeşte afisajul orei. Cu sau , butonul 5, selectati ora exactăși apasati butonul OK 18.
- Acum clipește afisajul minutelor. Cu sau , butonul 5, selectați minutele exacteși apăsăti butonul OK 18 pentru a salva. Acum va apărea din nou „TIME SETUP".
- Pentru a paarasi acest meniu Sau meniurile urmatoare, apasahti butonul EXIT 6 de atatea ori pana pe afisajul LCD 1 apare modul standard de afisare.
Setarea datei
Afisajul LCD 1 va arata data, dacapasa batonul S 4. Astfel setati data:
- Tineşapasat butonul S 4 pentru mai mult de 3 secunde.
Apare „CODE SETUP". - Cu sau , butonul 5, selecanti „SYSTEM SETUP" si confirmati cu butonul OK 18.
- Pe afisajul LCD ① apare „TIME SETUP". Apasati , butonul ⑤, pentru a schimba pe „DATE SETUP". Confirmati cu butonul OK ⑱.
- Pe afisaj clipeste numarul corespunzator anului,2010". Cu Sau , butonul 5, puteti modifica anul. Confirmati modificarea cu butonul OK 18. Cu Sau , butonul 5, puteti modifica acum luna. Confirmati cu butonul OK 18. Acum clipeste afisajul zilei, pe care o puteti, de asemenea, modifica cu Sau , butonul 5.
- Pentru confirmare, apasati butonul OK 18. Acum va aparea din nou „DATE SETUP".
Setarea contrastului
Setarea contrastului afisajului se realizazeza in modul urmator:
- Tineti apasat butonul S 4 pentru mai mult de 3 secunde. Apare "CODE SETUP".
- Cu sau , butonul 5, selecanti „SYSTEM SETUP" si confirmati cu butonul OK 18.
- Cu sau , butonul 5, selecta 与 "CONTRAST SETUP" si confirmata 已 cu butonul OK 18.
- Pe afisajul LCD ① clipeste acum valoarea contrastului, pe care il puteti seta cu Sau , butonul ⑤:
Pe ecran sunt afisate:
0 = contrast maxim
15 = contrast minim
- Cu butonul OK 18 salva tiet setarile dorite. Acum va aparea din nou "CONTRAST SETUP".
Lumina de fundal
Puteti seta tampul de luminare a fundalului afisajului LCD ➀ si a butoanelor dupa executarea unei comenzi. Aminti-va ca o durata de iluminare mai lunga reduce durata de viața a bateriilor.
- Tinei apasat butonul S 4 pentru mai mult de 3 secunde.
Apare „CODE SETUP". - Cu sau , butonul 5, selecanti „SYSTEM SETUP" si confirmati cu butonul OK 18.
- Cu sau , butonul 5 selectati „BACKLIT SETUP" si confirmati cu butonul OK 18.
- Pe afisajul LCD ① clipesc secundele pentru tampul de ilumi-nare ramas, secunde pe care le puteti seta cu butoanele ⑤ intre 0 si 60. Daca selectaţi „O", iluminarea de fundal estedezactivata.
- Cu butonul OK 18 salva ti setarile dorite. Acum va aparea din nou „BACKLIT SETUP".
Reglarea intensitatei sonore globale / modului silentios
Pentru a va scuti de apasarea unui buton de aparat de fiecare data cand doriti sà modificati sonorul sau săl opriti de tot, telecomanda efectueaza aceastà comanda numai pentru un sinjur aparat, in mod standard pentru televizor. Dumneavoastră puteti modifica setarea standard si să alegeti un alt aparat.
- Tinei apasat butonul S 4 pentru mai mult de 3 secunde. Àpare „CODE SETUP".
- Cu sau , butonul 5, selecanti „SYSTEM SETUP" si confirmati cu butonul OK 18.
- Cu sau , butonul 5, selecta ti „VOL/MUTE SETUP" si confirmati cu butonul OK 18.
- Afisajul LCD 1 indica „ALL VOL SET". Apasati butonul OK 18, afisajul comută pe „ALL VOL MODE".
-
Acum apasati butonul de aparat ③ corespunzător aparatului caruia doriti să-i modificati volumul sonor.
-
Daca aparatul respectiv dispune de un system de reglare a volumului sonor, se afisează scurt „SUCCEED" (= reusită), iar meniul dispare de pe ecran. Reglarea volumului sonor va avea efect de acum inainte asupra aparatului ales de dvs.
- Daca aparatul respectiv nu dispune de sistemas de reglare a volumului sonor, telecomanda nu va permite această seleţieși va indicatora „VOLUME ERROR" (= eroare). Şi in acest caz menul va dispărea de pe ecran. Reglarea volumului sonor va avea efect in continuare asupra aparatului de până acum.
Puteti, de asemenea,dezactiva reglarea volumului sonor pentru anumite aparate.
- Pentru aceasta selectaftin VOL/MUTE SETUP cu sau , butonul 5, functia MODE VOL SET si confirmata cu butonul OK 18.
- Acum apăsăti butonul de aparat 3 pentru aparatul pe care doriti săl excludei. Afișajul LCD 1 indica „SUCCESSION", iar reglarea volumului sonor estedezactivata cand telecomanda lucrează in modul de operare al unuia+dentre aparatele selectate.
Puteti revoca din nou setarile din VOL/MUTE SETUP.
- Pentru aceasta selectafti in VOL/MUTE SETUP cu sau , butonul ⑤ , functia VOL/MUTE RESET si confirmati cu butonul OK 18.
- Afisajul LCD 1 va solicita prin intermediul CONFIRM RESET sa confirmati cu butonul OK 18. Apasati butonul OK 18, dacar Doriti s as tergeti setarile, iar afisarea cuvantului SUCCESS va confirma stergerea. Sau apasati butonul EXIT 6, pentru a intrerupe stergerea.
① Indicatie
Dacă, in acest meniu, apăsăti butonul EXIT 6, meniul va dispărea de pe ecran.
Setarea functiei Lock
Cu ajutorul functiei Lock, puteti bloca accesul la toate meniurile de setare.
- Tinei apasat butonul S 4 pentru mai mult de 3 secunde.
- Cu sau , butonul 5, selecanti „SYSTEM SETUP" si confirmati cu butonul OK 18.
- Cu sau , butonul 5, selecuţi „LOCK SETUP" si confirmaţi cu butonul OK 18. Afisajul LCD 1 va arata setările actuale.
- Cu sau , butonul 5, selectati acum „LOCK" (blocat) sau „UNLOCK" (liber).
- Cu butonul OK 18 salvati setarea. Pe afisajul LCD 1 apare din nou "LOCK SETUP".
Resetarea systemului
Această functie va permite sa readuceți telecomanda la setările din momentul livrăii. Setările realizate de dumneavoastră vor fi sterse.
- Tineşapasat butonul S 4 pentru mai mult de 3 secunde.
Apare „CODE SETUP". - Cu sau , butonul 5, selecti "SYSTEM SETUP" si confirmati cu butonul OK 18.
- Cu sau , butonul 5, selectati „SYSTEM RESET" si confirmati cu butonul OK 18.
- Pe afisajul LCD ➀ apare acum „CONFIRM RESET". Confirmati resetarea cu OK ➁. Apoi, afisajul ➂ va arata „SUCCEED RESET". Setarile au fost sterse.si meniul dispare de pe ecran. Sau puteti pärasi meniul prin apasarea butonului EXIT ➂. Setarile vor fi păstrate în continuare.
Setarea temporizatorului
Telecomanda va ofera doua moduri de temporizare, pentru oprire si pentru rezultate.
Temporalizator de oprire
- Apasati butonul ③ corespunzator aparatului dvs. (de ex. VCR).
- Tineji apasat butonul S 4 pentru mai mult de 3 secunde.
Apare „CODE SETUP". - Apăsăti ▲ sau▼, butonul 5, până este afişat „TIMER SETUP". Apăsăti butonul OK 18, „TIMER SLEEP" apare pe afişajul LCD 1. Confirmăti selectarea acesti functii cu butonul OK 18.
- Acum, in partea dejos dreapta a afisajului LCD 1, clipesc minutele ramase pana la opirea aparatului selectat. Cu Sau , butonul 5, seta valoarea dorita其中之一 1 si 99 de minute. Apasati butonul OK 8 pentru a confirma. In cazul temporizatoruluidea programat, tampul este afisat in partea dreapta, langa ora, a afisajului LCD 1 "zZ".
- Pozitionati telecomanda astfel incat undele infrarosi sα poata ajunge la aparat. Dupā expirarea timului setat, telecomanda va opri aparatul.
- Daca apasati acum butonul S 4, in partea stangă de jos a afisajului LCD 1 va fi afisat „SL".
Temporizator comenzi
Telecomanda dispune de 4 temporizatoare pentru comenzi, pe care le puteti programa sa emita, la o ora precisă, comenzile unor seri de combinati de butoane.
- Tineşapasat butonul S 4 pentru mai mult de 3 secunde.
Âpare „CODE SETUP". -
Cu sau , butonul 5, selectati „TIMER SETUP" si confirmatu ci buonul OK 18. Pe afisaj 1 apare „TIMER SLEEP". Cu sau , butonul 5, selectati locul de salvare dorit „TIMER SETUP 1" pana la „TIMER SETUP 4" si confirmatu ci buonul OK 18.
-
Acum clipeste ora, la care trebuie executata combinața de butoane dorita. Cu sau , butonul 5, setați ora doritași apăsăti butonul OK 18 pentru confirmare.
- Acum clipesc minutele, la care trebuie executata combina de butoane dorite. Cu Sau , butonul 5, seta tiniutele dorita si apasati butonul OK 13 pentru confirmare.
- Pe ecranul LCD ➀ apare „TIMER X KEY" (X reprezinta temporizatorul dorit). Apasati acum butonul pentru aparatul dorit ➂, iar apoi secventa dorita de comenzi de buoane.
- Apasati butonul S 4, pentru a salva datele introduse si pentru a reveni la meniul general pentru temporizatoare.
- Procedati in mod analog pentru a programa si celelalte temporizatoare.
- Când temporizatoarele de comenzi sunt programate, afișajul LCD ① arata simbolul pentru temporizator „ü”, in dreapta, lângă ceas.
① Indicatii
- Pentru fiecare temporizator pot fi programate 14 butoane. După introducerea celui de-al 14-lea buton, secventa este salvata automat, iar pe afisaj ① va apărea „FULL".
- Şi in acest menui, dacă nu ați introdus nicio data, după 15 secunde aparatul revine la modul standard de afisare.
Setarea functiei de invățare
Telecomanda universală (TU) poate invățași salva semnale ale butoanelor unei telecomenzi originale. Dacă TU nu functionează după aplicarea uneia+dentre metodele de programare illustrate mai sus sau dacă nu poate executa todo comenzile, incercați să invățați TU aceste comenzi cu ajutorul telecomenzii/telecomenzilor originale.
- Utilizathi baterii nei pentru TU si pentru telecomanda originală.
- Păstrați o distanță de cel puțin un metru fata de alte surse de lumină. Sursele de lumină pot perturba transferul undelor infrarosoi.
- Asezati TU si telecomanda originala pe o suprafata plana, la o distanà de 20 - 50 de mm una fata de cealaltă, astfel incat diodele laser ale celor două telecomenzi să fie indreptata una spre cealaltă.
① Indicatii
- Nu utilizes urmátoarele butoane pentru functiţa de invătare: toate butoanele de aparate 3, MACRO 8, butonul S 4, EXIT 6.
-
Apăsăti scurt butonul telecomenzii originale. Dacă pe afișajul LCD ➀ apare „SUCCESSION", comanda butonului a fost invităță. Dacă apare „LEARN ERROR" (eşuare), trebuie să repeteti proceedsel.
-
Daca la invatare, in timpe este afisat "LEARNING" (invatare) nu se apasa niciun buton al telecomenzii originae in 30 de secunde, meniul de invatare este terminat. Acest mod nu poate fi terminat prin apasarea unui buton de pe TU.
- Memoria poate inmagazina in total 150 de comenzi pentru diferite butoane. Daca memoria este plina, afisajul LCD ① indica „LEARN FULL", iar modul de invatare este terminat.
- Cu butonul EXIT ⑥ reveniti la statusul precedent (exceptie la afisarea „LEARN KEY", resp. „LEARNING").
Codul functiei de invatare
- Apasa ti butonul de aparat 3 corespunzator aparatului pentru care doriti să invatați telecomanda un cod de butoane.
- Tineji apasat butonul S 4 pentru mai mult de 3 secunde. Apare „CODE SETUP".
- Cu sau , butonul 5, selecţi meniuI „LEARN SETUP" (invătare) si apăsati apoi butonul OK 18.
- Pe afisajul LCD 1 apare „LEARN SET". Apasati apoi butonul OK 13. Pe afisajul LCD 1 apare „LEARN KEY" (selectati butonul).
- Apăsăti mai intăi butonul de pe TU pe care dorți ša-l programăti. Pe afisajul LCD ➀ apare „LEARNING". Telecomanda universálă așteapă acum semnalul infrarosu de la telecomanda originală.
Indicatie
Dacă afișajul nu comută pe „LEARNING", inseamna că ati selectat un buton pentru care nu se poate programa un cod de butoane.
- Depaţi unul de celalalt senzorii infrarosii ai celor două telecomenzi.
- Acum tinei apasat butonul dorit de pe telecomanda originala, pana cand pe afisajul LCD 1 al telecomenzii universale apare "SUCCESS" sau LEARN ERROR".
- Daca pe afisajul LCD ➀ apare „SUCCEED" (procedura incheiata cu succes),莅cepand cu pasul 5 puteji programa.si alte buoane. Daca apare „LEARN ERROR" (procedura esuata), repeti procedura莅cepand de la pasul 5.
- Pentru a intrerupe/termina procesul de invăjare, in timpe ce este afișat „LEARN SET" apăsăti butonul EXIT 6 până când pe afișajul LCD 1 apare modul normal de afișare. In timpe ce este afișat „LEARN KEY", resp. „LEARNING" nu execuți și nicio comanda tamp de 30 de secundeși aparatul va închide meniu.
Stergerea tuturor butoanelor programate pentru todo aparatele
- Tinei apasat butonul S 4 pentru mai mult de 3 secunde.
Âpare „CODE SETUP". -
Cu sau , butonul 5, selectati meniul „LEARN SETUP" si apasafti butonul OK 18. Pe afisajul LCD 1 apare „LEARN SET".
-
Cu sau , butonul ⑤, selecţi „LEARN CLEAR" (stergere comenzi invățate)și confirmați cu butonul OK 18. Pe afişajul LCD ① apare „CONFIRM CLEAR" (confirmare stergere).
- Confirmatu cu butonul OK 18. Pe afisajul LCD 1 apare "SUCCEED". Toate buoanele programate au fost sterse. In final meniul dispare automat.
① Indicatie
Dacă pe afișaj apare „CONFIRM CLEAR", puteți intrerupe țergereia cu butonul EXIT 6.
Setarea macrourilor
Cu functia MACRO pot fi executable până la 16 comenzi printr-o singură apăsare de buton, adică mai multe comenzi salvate anterior pot fi executable cu un buton MACRO. Sunt disponibile 6 locuri de salvare.
Programarea unui macrou
Pentru programarea unui macrou procedati in modul urmator:
- Tineşapasat butonul S 4 pentru mai mult de 3 secunde.
Apare „CODE SETUP". - Cu sau , butonul 5, selectaşi „MACRO SETUP" si confirmati cu butonul OK 18. Pe ecran apare „MACRO SETUP 1".
- Cu sau , butonul ⑤, selectati locul de salvare pe care doriti săl programati (MACRO SETUP 1 - 6) si confirmati cu butonul OK ⑧.
- Pe afisajul LCD ➀ aparé „MACRO STEP". Apasati acum unul dupa celalalt butoanele dorite (max. 16). Secventa trebuie inceputá prin apasarea unui buton de aparat ➂.
- Standard, comenzile de macrouri sunt emise la intervale de câte 1 secundă. Deoarece unele aparate reaktioneză prea incet, este posibil ca sucesiunea comenzilor de macrouri să fie transmisă prea repede CATRE aparat. Aveti insă posibilitatea de a programa o pauza de 5 - 21 de secunde inainte de emiterea unei comenzi. Pentru aceasta apasați, eventual repetat, butonul MACRO 8. In partea dreaptă jos a afisajului LCD ➀ apare durata pauzei actuale in secunde.
- Cánd s-a ajuns la numárul maxim de comenzi de butoane, afisajul LCD 1 indica "FULL".
- Salvati ci bu tonul S 4. Pe afisajul LCD 1 apare „MACRO SETUP".
- Daca pentru macroul pe care doriti să-l programati (pasul 3) selecuţi un loc de salvare deja ocupat, macroul existent este suprascris.
-
Repetati apoi procedeul incepand cu pasul 3 pentru crea rea alter macrouri.
-
Cu butonul EXIT ⑥ merge fi un pas inainte in meniu, cu exceptia cazului in care introduci comenzi de butoane.
① Indicati
- Pentru un macrou pot fi salvate maxim 16 comenzi de butoane. După salvarea celei de-a 16-a comanda pe afisajul LCD ➀ apare „FULL".
- Pentru a părsi modul fără a salva, nu executati nici o comanda cca 15 secunde.
- In modul „MACRO STEP" cu butonul S ➀ puteti reveni la statusul anterior.
Exemplu: doriji sā salvati un sir de comenzi intr-un macrou.
Incepem in modul „MACRO STEP".
Sir de comenzi dorit: pornire TV => PAUZă => comutare pe iesire AV => pornire DVD => PAUZă => rulare DVD.
In modul „MACRO STEP" introduci următoarea comanda de butoane:
$$ \begin{array}{r l} \text {T V} & = > \ & \Rightarrow \quad \text {M A C R O} \quad (\text {T i m p p a u z} \text {a}) = > \quad \text {A V} = > \quad \text {D V D} = > \ & = > \quad \text {M A C R O} \quad (\text {T i m p p a u z} \text {a}) = > \quad \end{array} $$
Executare macrou
Pentru executarea unui macrou programat anterior, procedati astfel:
- Apasati butonul MACRO 8.
- Cu butonul numeric 9 corespunzător apelăti macroul dorit (1-6). Exemplu: dacă doriti executarea macrouului 3, apăsăti mai intăi butonul MACRO 8 si apoi, in interval de 5 secunde, butonul numeric „ 3".
Stergerea tuturor macrourilor
Pentru stergerea tuturor macrourilor programate anterior, procedati astfel:
- Tineşapasat butonul S 4 pentru mai mult de 3 secunde.
Apare „CODE SETUP". - Cu tau , butonul 5, selectati „MACRO SETUP" si confirmatu ci butonul OK 18. Pe ecran除去 „MACRO SETUP 1".
- Cu sau , butonul 5, selecta ti „MACRO CLEAR" si confirmati cu butonul OK 18.
- Pe afisajul LCD ➀ aparé „CONFIRM CLEAR" (confirmare stergere). Confirmaşi stergerea cu butonul OK ➁. Pe afisajul LCD ➂ aparé „SUCCESSION". Macrourile au fost ǚsterse Şi meniuł dispare de pe ecran.
① Indicatii
- Dacă pe LCD ① apare „CONFIRM CLEAR", puteti intre-rupe stergerea cu butonul EXIT ⑥.
- Nu este posibila stergerea separata a macrourilor, ci doar suprascrierea acestora.
① Indicatie
Cu această functie puteji salva canalul preferat la favorite.
Programarea canalelor favorite
Canalul favorit se salvează astfel:
- Apasati butonul pentru aparatul 3 pentru care doriti să salvati un canal favorit.
- Tineşapasat butonul S 4 pentru mai mult de 3 secunde. Apare „CODE SETUP".
- Cu sau , butonul 5, selectati „FAV CH SETUP" si confirmati cu butonul OK 18. Pe ecran apare „FAV CH SETUP 1".
- Cu Sau , butonul 5, selectati locul de salvare dorit (FAV CH SETUP 1 - 4) si confirmati cu butonul OK 8.
- Pe afisajul LCD ➀ apare „FAV CH STEP". Apasati acum unul dupa celalalt butoanele (max. 4) pentru apelarea canalului dvs. favorit.
- Când s-a ajuns la numărul maxim de comenzi de butoane, afisajul LCD ① indica „FULL".
- Salvati cu butonul S 4. Pe afisajul LCD 1 apare „FAV CH SETUP".
- Daca pentru canalul favorit pe care doriti să-l programați (pasul 4) selectați un loc de salvare deja ocupat, canalul existent este suprascris.
- Repetati pa sii pentru salvarea altero canale favorite.
- Cu butonul EXIT ⑥ mergei un pas inapoi in menu, cu exceptia cazului in care introduci comenzi de butoane.
① Indicatie
Introducerea numarului canalului poate varia in functie de model si marca aparatului selectat. Pentru numerele formate din 2 cifre trebuie sa apasa mai intai butonul 10.
Apelarea canalelor favorite
Pentru apelarea unui canal favorit salvat anterior, apasaft butonul FAV/EPG urmat de butonul numeric corespunzator pentru locul de salvare dorit (1 - 4).
Stergerea tuturor canalelor FAV
Pentru stergerea tuturor canalelor favorite programate anterior, procedati astfel:
- Tinefi apasat butonul S 4 pentru mai mult de 3 secunde.
- Cu sau , butonul 5, selectati "FAV CH SETUP" si confirmati cu butonul OK 18. Pe ecran apare "FAV CH SETUP 1".
- Cu sau , butonul 5, selectati "FAV CH CLEAR" si confirmatu cu butonul OK 18.
- Pe afisajul LCD ➀ apare „CONFIRM CLEAR" (confirmare stergere). Confirmati stergerea cu butonul OK 18. Pe afisajul LCD ➁ apare „SUCCEED". Canalele favorite au fost sterse.si meniul dispare de pe ecran.
Indicatii
- Daca pe LCD ① apare „CONFIRM CLEAR", puteti intre-rupe stergerea cu butonul EXIT ⑥.
- Nu este posibila stergerea separata a canalelor favorite, ci doar suprascrierea acestora.
Reglarea intensitatei sonore
Vol + / - , (mod silentios)
Apăsăti butonul „VOL +“ pentru a mari intensitatea sonora. Cu butonul „VOL -“ reduței intensitatea sonora. Pentru modul silentios, apăsăti butonul
Dacapasaftdin nou acest buton,sunetul porneste din nou.
Dacă apăsăti butoanele VOL +/- 16 ale telecomenzii univer- sale, va reaçionià setarea intensitatei sonore de la TV, indiffe- rent ce buton de aparat 3 a fost apăsăt inainte. Acest lucru nu este valabile pentru aparatele „AMP", „DVD", „ASAT" si „DSAT", deoarece se pleaca de la premisa ca aceste aparate dispon de un system propriu de reglare a intensitatei sonore.
Despre operare
Pentru a comanda cu telecomanda universală unul dentre aparatele programate, apasați mai înțai butonul 3 pentru aparatul respectiv.
Apoi indreptaţi telecomanda universală spre acest aparatși apăsăti butonul dorit.
Utilizati butoanele numerice 9 la fel ca cele ale telecomenzii originale. Inainte de a introduce o combinatie de doua cife, apasati butonul
Apasati butonul FAV/EPG 9, pentru a porni ghidul de programe al unui aparat care define această functie.
Daca apasati butonul S 4, in partea dreaptă de jos a afisajului LCD 1 va apărea data tamp de 10 secunde.
Daca tinei apasat unul dentre butoanele de aparate 3, in partea dreapta de jos a afisajului LCD 1 va apareca codul activ pentru acest aparat.
Cu butonul MENU ⑦ apelati fereastra pentru setarile respectivului aparat.
Apasati butonul de iluminare 1, pentrudezactivarea iluminarii ecranului, resp.UTOanelor.
Toate OPRITE
① Indicatii:
Cu butonul ALL OFF (toate oprit) se pot opri automat toate aparatele active. Această functie poate, de asemenea, porni aparate stinse in momentul apăsării butonului (in functie de aparat). Pentru aceasta tinei apăsata cca 5 secunde butonul ALL OFF Acest lucru functionează in următoarele conditi:
- Daca intre toate aparatele si telecomanda universala exista contact „vizual".
- Daca nu sunt active cautarea automata a codului, cautare codului marmi si functia MACRO.
- Daca aparatele respective pot fi oprite de la telecomanda. Pentru pornirea automata a aparatelor, tineji din nou apasat butonul 2 panacce pornesctoate aparatele.
Curățareași ingrijirea
Atentiel!
Asigurati-va că la curățarea telecomenzii in aceasta nu se va infiltra umezeală! In caz contrar telecomanda poate suferi daune irremediabile!
Curatai carcasa aparatului numai cu un prosop putin umed si un detergent slab.
Păstraţi telecomanda intr-un mediu corespunțător specificiților din datele tehnice.
Inainte de a o pune la pastrare scoatei bateriile din telecomanda, pentru a evita scurgerea acestora si defectarea telecomenzii.
Defectiuni / remedii
Aparatul dvs. nu raspunde la comenzile telecomenzii.
Verificati bateriile. Trebuie sa aibă suficientă tensiuneși sa fie asezate corect.
Aṭi apāsāt butonul ③ corect pentru aparatul pe care doriti sa-l Utilizati?
Verificati dacă acest aparat a fost programat cu codul corect (vezi seciunea „Setarea codului'').
Telecomanda nu transmite corect comenzile.
Apăsăti butonul ③ pentru aparatul corespunțător pentru a comuta telecomanda în modul corect.
Bateriile trebuie sa aiba suficienta tensiune si sa fie asezate corect.
Este posibil sautilazi un cod fals. Porniti căutarea pentru codul mărcii,ăutarea automata a codului sau introduci codul manual.
Telecomanda nu comută transmitătorul pe aparat.
Apasati butonul 3 pentru aparatul corespunzator pentru a comuta telecomanda in modul corect.
Dacă telecomanda originală nu confine butonul „-/--", schimbați programele cu butoanele P+/-- ⑦ sau cu butoanele numerice ⑨.
Dacă nici acum nu functioneaza, poate este activata proteția pentru copii a aparatului.
Anumite butoane ale telecomenzii universale nu functionează corect.
Este posibil ca telecomanda universală să nu posede todo functile telecomenzii originale.
Probabil nu a ti programat codul corect. Cauta un cod care suporta mai multe functi ale aparatului.
Telecomanda nu reacftioneaza dupa apasarea unui buton.
Bateriile trebuie sa aiba suficienta tensiune si sa fie asezate corect.
Indreptaţi telecomanda universală spre aparat.
Pe afisajul LCD 1 nu apare nimic.
Bateriile trebuie sa aiba suficienta tensiune si sa fie asezate corect.
Contrastul este prea redus. Măriti valoare setării.
Eliminarea aparatelor uzate
Nu aruncaşi aparatul sub nicio formă in gunoiul menajer obișnuit. Acest produscade sub incidța directivei europene 2002/96/EC

Telecomanda universala
- Eliminati telecomanda universală sau componentele acestoia printr-o firmă de reciclare autorizata sau la instalata locală de eliminare a deseurilor.
- Respectati reglementarile actuale in vigoare. In caz de dubii, luati legatura cu instalata locala de reciclare
Bateriile/acumulatoarele
- Bateriile / acumuloarele nu se eliminață impreună cu resturile menajere.
- Bateriile pot confine substante nocive care pot afecta mediol inconjurator. De aceea, eliminati bateriile / acumulatoareneaparat conform disposititilor legale vigoare.
-
Orice utilizator are obligata legala de a preda bateriile / Accumatoarele la central local de colectare sau la magazinele unde acestea pot fi returnate. Această obligatie are scopul de a asigura eliminarea ecologica a baterilor / Accumatoarelor.
-
Predaţi baterile / acumuloarele numai dacă sunt descârcati.
Eliminati toate materialele de ambalare intr-un mod ecologic.
Date tehnice
Aparate comandate: 10
Dimensiuni L× I× 217× 50× 22mm
Greutate: 102 g (färä baterii)
LED infrarosii: clasa laser 1
Alimentare baterii: 2 × 1,5 ~V tip AAA/LRO3 (Micro) (cuprine in furnitură)
Temperatura de operare: +5 - +35 °C
Temperatura de pástrare: -20 +50 °C
Umiditatea: 5 - 90% (fãra condens)
Informati privind conformitatea C E
In privinta conformitate, acest aparat corespunde cerintelorfundamentale si alter prevederi ale Directivei CEM 2004/108/EC.
Importer
KOMPERNASS GMBH
BURGSTRASSE 21
44867 BOCHUM, GERMANY
www.kompernass.com
Garantia & service-ul
Pentru acest aparat se acorda o garantie de 3 ani incepand cu data cumpararii. Aparatul a fost produs cu grijăși verificat cu scrupulozitate inaintea livrarii. Păstrați bonul de casa pentru a dovedi cumpararea. Daca aveți solicituri privind garantția, contactați telefonic centrul dumneavoastră de service. Numai astfel poate fi asigurată o expediere gratuită a produsului dumneavoastră.
Garantia acoperă numai defectele de material sau de fabricatie, nuși deteriorarile rezultate in urma transportului, piesele de uzură Sau deteriorarile apărute la componentele fragile, de ex. comutatoare sau acumulatoare.
Aparatul este destinat numai pentru uz privat si nu pentru outilizare profesională. In cazul manevrăii abuzive sau necorespunzătoare, uzului de forță si intervenților care nu au fost realizate de câtre filiala noastră autorizata de service, garantia iși pierde valabilitatea.
Drepturile dumneavoastră legale nu sunt limitate prin această garantie.
Perioada de garantie nu este prelungita dupa realizare a reparatior realizate in perioada garantie. Acest lucru este valabil si pentru piesele inlocuite si reparate. Deteriorarile si deficientele prerente deja la cumparare trebuie semnalate imediat dupadezambalare sauc cel tarrziin doua zile de la data cumpararii. Reparatiile necessities dupa expirarea perioadei de garantie se efectueaza contra cost.
RO Kompernass Service Romania
Tel.: 031/8270170
e-mail: support.ro@kompernass.com
Universal Remote Control SFB 10.1 A1
DE Herstellerverzeichnis mit Gerätecodeliste
AT
CH
NL Register van producenten met lijst van
BE apparatusatcodes
FR Index des fabricants avec liste des
BE codes apparel
IT Registrar produttori con elenco codici
MTapparechi
ES Índice de fabricantes con lista decottivos de aparatos
PT Fabricantes Diretrório com lista decottigos de dispositorio
GB Manufacturer List with Device Code List
IE
DK Producentfortegnelse med apparat-kodeliste
Fl Valmistajahakemisto ja laitekoodiluettelo
SE Föreckning über tillverkare med lista über apparatkoder
GR Kataloyoc kataoekuaotη μελiota
CY KW8IKWV OUOKEUWV
PL Wykaz producentsz listkodow urzadzen
HU Gyartok keszülékkódjat tartalmazó jegyzék
HR Spisak proizvodača sa listom code-ova uredaj
Seznam proizvajalcev s kodami aparatov
SK Zoznam vyrobcov s kódmi pristrojov
Cz AdresarVyrobcu seseznamem kódu pro pristroj
RO Index producatori cu lista de coduri ale aparatelor
BG Onnc Ha npOn3BOOnTeJIte CbC cnncbK Ha KOIOBE Ha ypeH
| TV | 1223 | 1225 | 1232 | |
| A.R.SYSTEMS | 1223 | ATORI | 1212 | 1219 |
| ACME | 1211 | AUCHAN | 1230 | |
| ACURA | 1212 1219 | 1237 | ||
| ADC | 1210 | AUDIO TON | 1211 | 1226 1233 |
| ADMIRAL | 1209 1210 1214 | 1216 | 1218 1223 | |
| 1215 | 1226 | 1227 1233 | ||
| ADYSON | 1211 1225 1226 | 1237 | ||
| 1232 1233 | AUSIND | 1224 | ||
| AGASHI | 1232 1233 | AUTOVOX | 1209 | 1210 1211 |
| AGAZI | 1210 | 1224 | 1226 1233 | |
| AGB | 1238 | AWA | 1232 | 1233 |
| AIKO | 1211 1212 1219 | BAIRD | 1226 | 1233 |
| 1223 1225 1226 | BANG & OLUFSEN | 1209 | ||
| 1232 1233 | BASIC LINE | 1212 | 1213 1216 | |
| AIM | 1223 | 1219 | 1223 1227 | |
| AIWA | 1193 | 1228 | 1233 | |
| AKAI | 1212 1213 1216 | BASTIDE | 1211 | 1226 1233 |
| 1218 1219 1223 | BAUR | 1218 | 1220 1223 | |
| 1226 1227 1231 | BAZIN | 1226 | 1233 | |
| 1232 1233 1238 | BEKO | 1065 | 1077 1223 | |
| AKIBA | 1213 1223 1227 | 1237 | ||
| 1228 | BEON | 1216 | 1218 1223 | |
| AKURA | 1210 1213 1219 | BEST | 1237 | |
| 1223 1227 1228 | BESTAR | 1216 | 1223 1237 | |
| ALARON | 1232 | BINATONE | 1211 | 1226 1233 |
| ALBA | 1211 1212 1213 | BLACKTRON | 1228 | |
| 1218 1219 1222 | BLACKWAY | 1228 | ||
| 1223 1225 1227 | BLUE SKY | 1213 | 1223 1227 | |
| 1232 1237 | 1228 | |||
| ALCYON | 1224 | BLUE STAR | 1228 | |
| ALLORGAN | 1226 1233 | BOOTS | 1211 | 1226 1233 |
| ALLSTAR | 1216 1223 | BPL | 1223 | 1228 |
| AMPLIVISION | 1211 1226 1230 | BRANDT | 1003 | 1006 1007 |
| 1233 1237 | 1229 | |||
| AMSTRAD | 1210 1212 1213 | BRINKMANN | 1223 | |
| 1219 1223 1227 | BRIONVEGA | 1209 | 1216 1218 | |
| 1238 | 1223 | |||
| ANAM | 1212 | BRITANNIA | 1211 | 1225 1226 |
| ANGLO | 1212 1219 | 1232 | 1233 | |
| ANITECH | 1210 1212 1219 | BRUNs | 1209 | |
| 1223 1224 | BSR | 1217 | ||
| ANSONIC | 1212 1219 1221 | BTC | 1213 | 1227 |
| 1223 1236 1237 | BUSH | 1034 | 1180 1184 | |
| ARC EN CIEL | 1229 | 1193 | 1212 1213 | |
| ARCAM | 1225 1226 1232 | 1214 | 1216 1217 | |
| 1233 | 1218 | 1219 1222 | ||
| ARCAM DELTA | 1211 | 1223 | 1226 1227 | |
| ARISTONA | 1216 1218 1221 | 1228 | 1233 | |
| 1223 1231 | CAPSONIC | 1210 | ||
| ARTHUR MATRIN | 1230 | CARENA | 1223 | |
| ASA | 1209 1215 | CARREFOUR | 1222 | |
| ASBERG | 1216 1223 1224 | CASCADE | 1212 | 1219 1223 |
| ASTRA | 1212 | CATHAY | 1216 | 1218 1223 |
| ASUKA | 1210 1211 1213 | CCE | 1233 | |
| 1225 1226 1227 | CENTURION | 1216 | 1218 1223 | |
| 1228 1232 1233 | CENTURY | 1209 | ||
| ATLANTIC | 1211 1216 1218 | CGE | 1217 | 1224 1237 |
| CIMLINE | 1212 1219 1227 | ELBE-SHARP | 1238 |
| CITY | 1212 1219 | ELCIT | 1209 1238 |
| CLARIVOX | 1218 | ELECTRO TECH | 1212 |
| CLATRONIC | 1210 1211 1212 | ELEKTRA | 1228 |
| 1213 1216 1219 | ELIN | 1211 1216 1218 | |
| 1223 1224 1226 | 1219 1223 1225 | ||
| 1227 1233 1237 | 1232 | ||
| CMS | 1232 | ELITE | 1213 1216 1223 |
| CMS HIGHTEC | 1233 | 1227 | |
| CONCORDE | 1212 1219 | ELMAN | 1217 |
| CONDOR | 1221 1216 1219 | ELTA | 1212 1219 1232 |
| 1223 1225 1228 | EMERSON | 1209 1223 1237 | |
| 1232 1237 | EMPEROR | 1228 | |
| CONTEC | 1211 1212 1219 | ERRES | 1216 1218 1221 |
| 1222 1225 1232 | 1223 | ||
| CONTINENTAL | 1229 | ESC | 1233 |
| EDISON | ETRON | 1212 | |
| COSMEL | 1212 1219 | EUROFEEL | 1233 |
| CROSLEY | 1209 1217 1224 | EURO-FEEL | 1210 |
| CROWN | 1212 1216 1218 | EUROLINE | 1218 |
| 1219 1223 1224 | EUROMAN | 1228 1232 1233 | |
| 1237 | 1237 | ||
| CS ELECTRONICS | 1211 1213 1225 | EUROMANN | 1210 1211 1216 |
| 1227 1232 | 1223 1225 1226 | ||
| CYBERTRON | 1213 1227 | EUROPHON | 1211 1216 1217 |
| DAEWOO | 1018 1035 1066 | 1223 1226 1232 | |
| 1240 1182 1192 | 1233 1238 | ||
| 1194 1211 1212 | EXPERT | 1230 | |
| 1216 1219 1223 | EXQUISIT | 1223 | |
| 1225 1226 1227 | FENNER | 1212 1219 | |
| 1232 1233 | FERGUSON | 1031 1060 1218 | |
| DAINICHI | 1213 1225 1227 | FIDELITY | 1211 1214 1223 |
| 1232 | 1225 1232 | ||
| DANSAI | 1210 1216 1218 | FILSAI | 1233 |
| 1223 1225 1232 | FINLANDIA | 1214 | |
| 1233 | FINLUX | 1209 1211 1216 | |
| DANTAX | 1218 1237 | 1217 1218 1223 | |
| DAWA | 1223 | 1224 1226 1233 | |
| DAYTRON | 1212 1219 | 1238 | |
| DE GRAAF | 1214 | FIRST LINE | 1211 1212 1216 |
| DECCA | 1211 1216 1218 | 1219 1223 1225 | |
| 1223 1226 1233 | 1226 1232 1233 | ||
| 1238 | FISHER | 1209 1211 1217 | |
| DESMET | 1216 1218 1223 | 1222 1226 1233 | |
| DIAMANT | 1223 | 1237 | |
| DIAMOND | 1232 | FLINT | 1216 1223 1227 |
| DIXI | 1212 1216 1218 | FORMENTI | 1209 1211 1217 |
| 1219 1223 1233 | 1218 1224 1225 | ||
| DTS | 1212 1219 | 1232 | |
| DUAL | 1211 1217 1223 | FORMENTI- | 1232 |
| 1226 1233 | PHOENIX | ||
| DUAL-TEC | 1211 1212 1217 | FORTRESS | 1209 |
| 1226 | FRABA | 1223 1237 | |
| DUMONT | 1209 1211 1226 | FRIAC | 1237 |
| 1233 | FRONTECH | 1210 1212 1214 | |
| DUX | 1218 | 1215 1219 1233 | |
| DYNATRON | 1216 1218 1223 | FUJITSU | 1226 1233 |
| ELBE | 1223 1227 1233 | FUJITSU GENERAL | 1233 |
| 1236 1237 1238 | FUNAI | 1210 |
| GALAXI | 1223 | 1218 | 1219 | 1222 | |
| GALAXIS | 1223 | 1237 | 1223 | 1227 | |
| GBC | 1212 | 1217 | 1219 | HISAWA | 1213 |
| 1227 | 1230 | ||||
| GEANT CASINO | 1230 | HITACHI | 1058 | 1061 | |
| GEC | 1211 | 1215 | 1216 | 1238 | |
| 1218 | 1223 | 1226 | 1215 | ||
| 1233 | 1238 | 1223 | |||
| GELOSO | 1212 | 1214 | 1217 | HORNYPHON | 1216 |
| 1219 | HORNYPHONE | 1223 | |||
| GENERAL | 1212 | 1219 | HOSHAI | 1213 | |
| TECHNIC | HUANYU | 1211 | |||
| GENEXXA | 1213 | 1215 | 1216 | HYGASHI | 1211 |
| 1223 | 1227 | 1232 | |||
| GIANT | 1233 | HYPER | 1211 | 1212 | |
| GOLDHAND | 1232 | 1219 | 1225 | ||
| GOLDLINE | 1223 | 1232 | 1233 | ||
| GOLDSTAR | 1211 | 1212 | 1214 | HYPSON | 1210 |
| 1216 | 1217 | 1218 | 1218 | ||
| 1219 | 1223 | 1225 | 1228 | ||
| 1226 | 1232 | 1233 | IBERIA | 1223 | |
| 1234 | 1237 | ICE | 1210 | ||
| GOODMANS | 1203 | 1210 | 1212 | 1213 | |
| 1216 | 1218 | 1219 | 1223 | ||
| 1222 | 1223 | 1226 | 1227 | ||
| 1231 | 1233 | 1234 | ICES | 1225 | |
| 1238 | 1240 | IMPERIAL | 1215 | ||
| GORENJE | 1237 | 1223 | |||
| GPM | 1213 | 1227 | INDIANA | 1216 | |
| GRAETZ | 1215 | INGELEN | 1215 | ||
| GRANADA | 1211 | 1214 | 1216 | INGERSOL | 1212 |
| 1218 | 1221 | 1222 | INNO HIT | 1211 | |
| 1223 | 1224 | 1226 | 1216 | ||
| 1230 | 1233 | 1238 | 1223 | ||
| GRANDIN | 1212 | 1213 | 1218 | 1227 | |
| 1228 | 1238 | ||||
| GRONIC | 1233 | INNOVATION | 1210 | 1212 | |
| GRUNDIG | 1010 | 1075 | 1200 | INTERACTIVE | 1237 |
| 1223 | 1224 | 1231 | INTERBUY | 1212 | |
| 1237 | INTERFUNK | 1209 | |||
| HALIFAX | 1210 | 1211 | 1225 | 1218 | |
| 1226 | 1232 | 1233 | 1237 | ||
| HAMPTON | 1211 | 1225 | 1226 | INTERNATIONAL | 1232 |
| 1232 | 1233 | INTERVISION | 1210 | ||
| HANSEATIC | 1211 | 1212 | 1216 | 1226 | |
| 1217 | 1218 | 1219 | 1233 | ||
| 1223 | 1226 | 1228 | IRRADIO | 1212 | |
| 1233 | 1236 | 1237 | 1218 | ||
| HANTAREX | 1212 | 1219 | 1223 | 1224 | |
| 1238 | ISUKAI | 1213 | |||
| HANTOR | 1223 | 1228 | |||
| HARWOOD | 1219 | 1223 | ITC | 1211 | |
| HCM | 1210 | 1211 | 1212 | 1233 | |
| 1219 | 1223 | 1226 | ITS | 1213 | |
| 1227 | 1228 | 1233 | 1225 | ||
| HEMA | 1219 | 1226 | 1233 | 1232 | |
| HIGASHI | 1232 | ITT | 1212 | ||
| HILINE | 1223 | ITV | 1212 | ||
| HINARI | 1212 | 1213 | 1216 | JVC | 1216 |
| KAISUI | 1211 1212 1213 | 1233 | |
| 1219 1223 1225 | MARANTZ | 1216 1218 1223 | |
| 1226 1227 1228 | MARELLI | 1209 | |
| 1232 1233 | MARK | 1216 1218 1219 | |
| KAMOSONIC | 1211 | 1223 1225 1226 | |
| KAMP | 1211 1225 1232 | 1232 1233 | |
| KAPSCH | 1215 | MASUDA | 1233 |
| KARCHER | 1211 1212 1218 | MATSUI | 1238 1211 1212 |
| 1223 1228 1237 | 1214 1216 1218 | ||
| KAWASHO | 1232 | 1219 1222 1223 | |
| KENDO | 1214 1223 1237 | 1226 1231 1233 | |
| KENNEDY | 1217 | MEDIATOR | 1216 1218 1221 |
| KIC | 1233 | 1223 1231 | |
| KINGSLEY | 1211 1225 1232 | MEDION | 1210 1212 1223 |
| KNEISSEL | 1223 1236 1237 | M-ELECTRONIC | 1219 1223 1225 |
| KOLSTER | 1216 1223 | 1226 1232 1233 | |
| KONKA | 1213 1227 | MELVOX | 1230 |
| KORPEL | 1216 1218 1223 | MEMOREX | 1212 1219 |
| KORTING | 1209 1237 | MEMPHIS | 1212 1219 |
| KOSMOS | 1223 | MERCURY | 1219 1223 |
| KOYODA | 1212 | METZ | 1209 |
| KTV | 1211 1233 | MICROMAXX | 1210 1212 |
| KYOTO | 1232 1233 | MICROSTAR | 1210 1212 |
| LASAT | 1237 | MINERVA | 1224 1238 |
| LENCO | 1212 1219 | MINOKA | 1216 1223 |
| LENOIR | 1211 1212 1219 | MITSUBISHI | 1209 1216 1222 |
| LEYCO | 1210 1216 1218 | 1223 | |
| 1223 | MIVAR | 1211 1224 1225 | |
| LG | 1234 1237 1233 | 1232 1233 1234 | |
| 1195 1211 1212 | 1235 1236 1237 | ||
| 1214 1216 1217 | 1238 1239 | ||
| 1218 1219 1223 | MOTION | 1224 | |
| 1225 1226 1232 | MTC | 1232 1237 | |
| LIESENK | 1218 | MULTI SYSTEM | 1218 |
| LIESENSKOTTER | 1223 | MULTITECH | 1211 1212 1214 |
| LIFE | 1210 1212 | 1217 1218 1219 | |
| LIFETEC | 1210 1212 1219 | 1223 1225 1226 | |
| 1223 1227 | 1232 1233 1237 | ||
| LLOYDS | 1219 | MURPHY | 1211 1225 1232 |
| LOEWE | 1014 1055 1223 | NAONIS | 1214 |
| 1236 1237 1238 | NEC | 1222 1233 | |
| LOEWE OPTA | 1209 1216 1218 | NECKERMANN | 1209 1211 1214 |
| LUMA | 1214 1218 1219 | 1216 1218 1220 | |
| 1223 | 1223 1226 1231 | ||
| LUMATRON | 1214 1216 1218 | 1233 1237 | |
| 1223 1226 1233 | NEI | 1216 1218 1223 | |
| LUX MAY | 1216 | NEUFUNK | 1219 1223 1231 |
| LUXOR | 1211 1214 1233 | NEW TECH | 1212 1216 1219 |
| 1234 | 1223 1226 1231 | ||
| M ELECTRONIC | 1211 1212 1215 | NEW WORLD | 1213 1227 |
| 1216 1218 | NEWTECH | 1233 | |
| MAGNADYNE | 1209 1217 1218 | NICAMAGIC | 1211 1225 1232 |
| 1238 | NIKKAI | 1210 1211 1213 | |
| MAGNAFON | 1211 1224 1225 | 1216 1218 1219 | |
| 1232 1238 | 1222 1223 1225 | ||
| MAGNUM | 1210 1212 | 1226 1227 1232 | |
| MANDOR | 1210 | 1233 | |
| MANESTH | 1210 1211 1216 | NOBLIKO | 1211 1224 1225 |
| 1218 1223 1226 | 1232 | ||
| NOKIA | 1215 | 1188 1189 1190 | |
| NORDIC | 1233 | 1191 1196 1197 | |
| NORDMENDE | 1209 1215 1216 | 1209 1211 1216 | |
| NORDVISION | 1218 | 1217 1218 | |
| NOVATRONIC | 1223 | PHOENIX | 1209 1216 1218 |
| OCEANIC | 1215 1230 | 1223 1225 1232 | |
| OKANO | 1223 1237 | 1237 | |
| ONCEAS | 1211 | PHONOLA | 1209 1216 1218 |
| ONWA | 1227 | 1221 1223 1225 | |
| OPERA | 1223 | 1231 1232 | |
| ORBIT | 1216 1223 | PIONEER | 1215 1216 1218 |
| ORION | 1062 1203 1212 | 1223 1237 | |
| 1216 1218 1219 | PLANTRON | 1210 1216 1219 | |
| 1223 1238 | 1223 | ||
| ORLINE | 1223 1227 | PLAYSONIC | 1226 1233 |
| ORSOWE | 1238 | POPPY | 1212 1219 |
| OSAKI | 1210 1211 1213 | PRANDONI- | 1214 1224 1238 |
| 1223 1226 1227 | PRINCE | ||
| 1233 | PRECISION | 1211 1226 1233 | |
| OSIO | 1234 | PRIMA | 1212 1215 1219 |
| OSO | 1213 1227 | PROFEX | 1212 1219 |
| OSUME | 1222 1227 | PROFI-TRONIC | 1216 1223 |
| OTTO VERSAND | 1211 1216 1217 | PROLINE | 1216 1221 1223 |
| 1218 1220 1222 | PROSONIC | 1211 1218 1223 | |
| 1223 1226 1231 | 1225 1232 1233 | ||
| 1233 1238 | 1237 | ||
| PAEL | 1211 1225 1232 | PROTECH | 1210 1211 1212 |
| PALLADIUM | 1211 1220 1223 | 1216 1217 1218 | |
| 1226 1231 1233 | 1233 | ||
| 1237 | PROVISION | 1218 1223 1240 | |
| PALSONIC | 1233 | PYE | 1216 1218 1221 |
| PANAMA | 1210 1211 1212 | 1223 1231 | |
| 1219 1223 1225 | PYMI | 1212 1219 | |
| 1226 1232 1233 | QUANDRA VISION | 1230 | |
| PANASONIC | 1004 1013 1020 | QUELLE | 1210 1211 1216 |
| 1024 1026 1044 | 1217 1218 1220 | ||
| 1050 1057 1073 | 1222 1223 1226 | ||
| 1185 1198 1215 | 1233 1234 | ||
| 1223 1238 | QUESTA | 1222 | |
| PANAVISION | 1223 | RADIALVA | 1223 1227 |
| PATHE CINEMA | 1211 1217 1225 | RADIOLA | 1216 1218 1221 |
| 1230 1232 1236 | 1223 1231 1233 | ||
| 1237 | RADIOMARELLI | 1209 1223 1238 | |
| PATHE MARCONI | 1229 | RADIOSHACK | 1223 |
| PAUSA | 1212 1219 | RADIOTONE | 1216 1219 1223 |
| PERDIO | 1223 1232 | 1237 | |
| PERFEKT | 1223 | RECOR | 1223 |
| PHILCO | 1209 1217 1223 | REDSTAR | 1223 |
| 1224 1237 | REFLEX | 1223 | |
| PHILHARMONIC | 1211 1226 1233 | REVOX | 1216 1218 1223 |
| PHILIPS | 1002 1005 1009 | 1237 | |
| 1012 1016 1019 | REX | 1210 1214 1215 | |
| 1021 1022 1023 | RFT | 1209 1236 1237 | |
| 1029 1033 1036 | RHAPSODY | 1232 | |
| 1037 1038 1041 | R-LINE | 1216 1218 1223 | |
| 1042 1045 1052 | ROADSTAR | 1193 1210 1212 | |
| 1059 1069 1076 | 1213 1219 1227 | ||
| 1231 1221 1223 | ROBOTRON | 1209 | |
| 1181 1186 1187 | ROWA | 1232 1233 | |
| ROYAL LUX | 1237 | 1306 1308 1309 | |
| RTF | 1209 | 1310 1290 1291 | |
| SABA | 1006 1060 1068 | 1292 1293 1294 | |
| 1172 1209 1215 | SINGER | 1209 1217 1230 | |
| 1238 | SINUDYNE | 1209 1217 1218 | |
| SAISHO | 1210 1211 1212 | 1220 1223 1238 | |
| 1219 1226 1233 | SKANTIC | 1215 | |
| 1238 | SOLAVOX | 1215 | |
| SALORA | 1214 1215 1217 | SONITRON | 1226 1233 1237 |
| 1234 1238 | SONOKO | 1210 1211 1212 | |
| SAMBERS | 1224 1238 | 1216 1218 1219 | |
| SAMSUNG | 1039 1043 1056 | 1223 1226 1228 | |
| 1063 1070 1237 | 1233 | ||
| 1234 1201 1210 | SONOLOR | 1215 1220 1230 | |
| 1211 1212 1216 | SONTEC | 1216 1218 1223 | |
| 1218 1219 1223 | 1237 | ||
| 1225 1226 1231 | SONY | 1000 1001 1008 | |
| 1232 1233 | 1011 1015 1025 | ||
| SANDRA | 1211 1225 1226 | 1030 1040 1054 | |
| 1232 1233 | 1071 1199 1202 | ||
| SANSUI | 1216 1223 | 1212 1220 1222 | |
| SANYO | 1049 1211 1217 | SOUND & VISION | 1213 1227 |
| 1219 1222 1225 | SOUNDWAVE | 1216 1218 1223 | |
| 1226 1232 1233 | STANDARD | 1211 1212 1213 | |
| 1236 1237 | 1216 1219 1223 | ||
| SBR | 1218 1221 1223 | 1226 1227 1233 | |
| 1231 | STAR LITE | 1219 1223 | |
| SCHAUBLORENTZ | 1215 | STARLIGHT | 1218 |
| SCHNEIDER | 1211 1213 1216 | STENWAY | 1227 1228 |
| 1217 1218 1221 | STERN | 1214 1215 | |
| 1223 1226 1227 | STRATO | 1219 1223 | |
| 1231 1233 | STYLANDIA | 1233 | |
| SEG | 1210 1211 1217 | SUNKAI | 1212 1227 |
| 1218 1219 1222 | SUNSTAR | 1219 1223 | |
| 1223 1225 1226 | SUNWOOD | 1212 1216 1219 | |
| 1232 1233 | 1223 | ||
| SEI | 1220 1223 1238 | SUPERLA | 1211 1225 1232 |
| SEI-SINUDYNE | 1209 1215 1238 | 1233 1238 | |
| SELECO | 1214 1215 1217 | SUPERTECH | 1219 1223 1225 |
| SENCORA | 1212 1219 | 1231 1232 | |
| SENTRA | 1219 1227 | SUPRA | 1212 1219 |
| SERINO | 1232 | SUSUMU | 1213 |
| SHARP | 1017 1028 1048 | SUTRON | 1212 1219 |
| 1051 1072 1222 | SYDNEY | 1211 1225 1226 | |
| 1238 | 1232 1233 | ||
| SIAREM | 1209 1217 1223 | SYSLINE | 1218 |
| 1238 | SYTONG | 1225 1232 | |
| SIERRA | 1216 1221 1223 | TANDY | 1211 1213 1215 |
| 1231 | 1226 1227 1233 | ||
| SIESTA | 1237 | TARGA | 1273 1274 1275 |
| SILVA | 1225 1232 | 1276 1277 1278 | |
| SILVER | 1222 | 1302 1304 1305 | |
| SILVERCREST | 1270 1271 1273 | 1307 1284 1285 | |
| 1274 1275 1276 | 1286 1287 1288 | ||
| 1277 1278 1279 | 1289 | ||
| 1280 1281 1282 | TASHIKO | 1211 1214 1222 | |
| 1283 1295 1296 | 1225 1226 1232 | ||
| 1297 1298 1299 | 1233 | ||
| 1300 1301 1303 | TATUNG | 1193 1211 1216 |
| 1218 | 1223 | 1226 | UHER | 1215 | 1216 | 1223 | |
| 1233 | 1238 | 1224 | 1237 | ||||
| TCM | 1204 | 1205 | 1206 | ULTRAVOX | 1209 | 1211 | 1217 |
| 1207 | 1208 | 1210 | 1223 | 1225 | 1232 | ||
| 1212 | 1241 | 1242 | UNIC LINE | 1223 | |||
| 1243 | 1244 | 1245 | UNITED | 1218 | |||
| 1246 | 1247 | 1248 | UNIVERSUM | 1210 | 1216 | 1217 | |
| 1249 | 1250 | 1251 | 1218 | 1220 | 1222 | ||
| 1252 | 1253 | 1254 | 1223 | 1224 | 1226 | ||
| 1255 | 1256 | 1257 | 1233 | 1234 | 1237 | ||
| 1258 | 1259 | 1260 | UNIVOX | 1223 | |||
| 1261 | 1262 | 1263 | VESTEL | 1214 | 1215 | 1216 | |
| 1264 | 1265 | 1266 | 1217 | 1218 | 1223 | ||
| 1267 | 1268 | 1226 | 1233 | ||||
| TEAC | 1223 | 1233 | VEXA | 1212 | 1218 | 1219 | |
| TEC | 1211 | 1212 | 1217 | 1223 | |||
| 1219 | 1226 | 1233 | VICTOR | 1216 | |||
| TEDELEX | 1233 | VIDEOLOGIC | 1232 | ||||
| TELEAVIA | 1229 | VIDEOLO- | 1211 | 1213 | 1225 | ||
| TELECOR | 1223 | 1226 | 1227 | GIQUE | 1226 | 1227 | 1232 |
| 1233 | 1233 | ||||||
| TELEFUNKEN | 1216 | 1223 | VIDEOSYSTEM | 1216 | 1223 | ||
| TELEGAZI | 1223 | 1227 | VIDEOTECHNIC | 1225 | 1226 | 1232 | |
| TELEMEISTER | 1223 | 1233 | |||||
| TELESONIC | 1223 | VI SIOLA | 1211 | 1225 | 1232 | ||
| TELESTAR | 1223 | VISION | 1216 | 1223 | 1233 | ||
| TELETECH | 1212 | 1218 | 1219 | VORTEC | 1216 | 1218 | 1223 |
| 1223 | VOXSON | 1209 | 1214 | 1215 | |||
| TELETON | 1211 | 1222 | 1226 | 1216 | 1223 | 1224 | |
| 1233 | WALTHAM | 1211 | 1223 | 1226 | |||
| TELEVIDEON | 1225 | 1232 | 1233 | ||||
| TELEVISO | 1230 | WATSON | 1216 | 1218 | 1223 | ||
| TENSAI | 1212 | 1213 | 1216 | 1227 | |||
| 1219 | 1223 | 1226 | WATT RADIO | 1211 | 1217 | 1225 | |
| 1227 | 1233 | 1232 | |||||
| TESMET | 1216 | WEGA | 1209 | 1222 | 1223 | ||
| TEVION | 1210 | 1212 | WEGAVOX | 1219 | |||
| TEXET | 1211 | 1219 | 1226 | WELTBlick | 1216 | 1218 | 1223 |
| 1232 | 1233 | 1233 | |||||
| THOMSON | 1003 | 1006 | 1032 | WESTON | 1217 | ||
| 1060 | 1067 | 1172 | WHITE WES- | 1211 | 1218 | 1223 | |
| 1211 | 1216 | 1223 | TINGHOUSE | 1225 | 1232 | ||
| 1229 | WINDSTAR | 1228 | |||||
| THORN | 1218 | 1223 | 1240 | XCRYPTON | 1223 | ||
| TOKAI | 1216 | 1223 | 1226 | YAMISHI | 1223 | 1226 | 1227 |
| 1233 | 1228 | 1233 | |||||
| TOKYO | 1211 | 1225 | 1232 | YOKAN | 1223 | ||
| TOMASHI | 1228 | YOKO | 1210 | 1211 | 1212 | ||
| TOSHIBA | 1027 | 1046 | 1047 | 1213 | 1216 | 1218 | |
| 1053 | 1064 | 1074 | 1219 | 1223 | 1226 | ||
| 1090 | 1233 | 1183 | 1227 | 1232 | 1233 | ||
| 1193 | 1203 | 1222 | 1237 | ||||
| TOWADA | 1215 | 1217 | 1233 | YORX | 1213 | 1227 | |
| TRAKTON | 1233 | ZANUSSI | 1214 | 1226 | 1233 | ||
| TRANS CONTINENS | 1223 | 1226 | 1233 | ||||
| TRANTEC | 1232 | ||||||
| TRIDENT | 1226 | 1233 | 1238 | ||||
| TRISTAR | 1227 | ||||||
| TRIUMPH | 1223 | 1231 | 1238 |
| Digital TV | Pioneer | 1141 1146 1149 | |
| Philips | 1173 1176 1178 | 1151 | |
| Samsung | 1177 | Samsung | 1150 |
| Sony | 1174 1175 1179 | ||
| Plasma TV | |||
| HT Projector | LG | 1136 | |
| Mitsubishi | 1170 | Philips | 1142 |
| Panasonic | 1161 | Samsung | 1135 |
| Philips | 1167 | Toshiba | 1153 |
| Sanyo | 1160 | ||
| Sharp | 1162 | ||
| Sony | 1158 1159 | Plasma TV Monitor | |
| Toshiba | 1169 | Daewoo | 1138 |
| Hitachi | 1154 | ||
| JVC | 1155 | ||
| LCD Projection TV | LG | 1140 1148 | |
| Sharp | 1131 | Philips | 1143 1156 |
| Sony | 1108 | Thomson | 1145 1157 |
| Toshiba | 1130 | ||
| Projection TV | |||
| LCD TV | Hitachi | 1171 | |
| Bush | 1101 | LG | 1164 1168 |
| Daewoo | 1106 | Pioneer | 1163 |
| Denver | 1096 | Samsung | 1166 |
| Goodmans | 1123 | Telefunken | 1165 |
| Hitachi | 1089 | ||
| JVC | 1132 | ||
| LG | 1081 1084 1094 | TV/Tuner | |
| 1095 1098 1105 | Philips | 1079 | |
| 1110 1111 1114 | |||
| 1118 1126 1136 | |||
| 1168 | DVD | ||
| Matsui | 1133 | AIWA | 2049 2175 |
| Panasonic | 1091 1102 1112 | AKAI | 2139 |
| Philips | 1078 1079 | AKURA | 2153 |
| Samsung | 1080 1082 1083 | ALBA | 2015 2023 2050 |
| 1087 1093 1097 | BEST BUY | 2152 | |
| 1104 1113 1116 | BRANDT | 2013 2040 2146 | |
| 1121 | BUSH | 2025 2050 2051 | |
| Sharp | 1092 1103 1109 | 2122 2124 2130 | |
| 1115 1119 1120 | 2147 2151 | ||
| 1122 1127 1128 | CAMBRIDGE AUDIO | 2149 | |
| Sony | 1085 1086 1088 | CENTREX | 2154 |
| 1107 1117 | CGV | 2149 | |
| Toshiba | 1099 1100 1124 | CLASSIC | 2144 |
| Viewsonic | 1125 1129 | CLATRONIC | 2151 |
| CONIA | 2147 | ||
| C-TECH | 2150 | ||
| LCD TV/Radio Tuner Combo | CYBERHOME | 2003 2029 2032 | |
| 2046 | |||
| Philips | 1078 | DAEWOO | 2030 2109 2115 |
| 2127 | |||
| DANSAI | 2070 | ||
| Plasma Display | DAYTEK | 2005 2026 | |
| Hitachi | 1139 1144 | DEC | 2151 |
| Panasonic | 1137 1147 | DENON | 2061 2063 2068 |
| Philips | 1134 1152 | DENVER | 2151 2153 |
| DENZEL | 2148 | NU-TEC | 2147 |
| DIAMOND | 2149 2150 | ONKYO | 2141 2146 2155 |
| DK DIGITAL | 2042 2159 | ORAVA | 2151 |
| DUAL | 2148 | ORION | 2069 2122 |
| DVX | 2150 | ORITRON | 2140 |
| EASY HOME | 2152 | P&B | 2151 |
| ECLIPSE | 2149 | PACIFIC | 2150 |
| ELTA | 2045 | PANASONIC | 2014 2016 2039 |
| ELTAX | 2157 | 2111 2117 2131 | |
| ENZER | 2148 | 2162 2166 2167 | |
| FINLUX | 2149 | 2176 | |
| GERICOM | 2054 | PHILIPS | 2000 2006 2027 |
| GLOBAL SOLUTIONS | 2150 | 2034 2037 2043 | |
| GLOBAL SPHERE | 2150 | 2060 2108 2125 | |
| GOLDSTAR | 2017 | 2142 2146 2155 | |
| GOODMANS | 2056 2151 2154 | 2158 | |
| GRAETZ | 2148 | PIONEER | 2007 2008 2011 |
| GRUNDIG | 2048 2143 2154 | 2035 2057 2138 | |
| H&B | 2151 | 2172 | |
| HAAZ | 2149 2150 | PROLINE | 2154 |
| HIMAX | 2152 | PROVISION | 2151 |
| HITACHI | 2012 2058 2145 | RAITE | 2148 |
| 2148 2152 2168 | REDSTAR | 2153 | |
| 2181 | REOC | 2150 | |
| INNOVATION | 2140 2145 | ROADSTAR | 2066 2151 |
| JVC | 2020 2052 2118 | ROWA | 2147 2154 |
| 2119 2146 2160 | SABA | 2013 2040 | |
| KENWOOD | 2047 2067 2171 | SABAKI | 2150 |
| KINGAVON | 2151 | SAMSUNG | 2012 2019 2112 |
| KISS | 2148 | 2114 2116 2165 | |
| KODA | 2151 | SANSUI | 2149 2150 |
| KXD | 2152 | SANYO | 2036 2044 2123 |
| LAWSON | 2150 | 2161 2170 | |
| LENCO | 2151 | SCANMAGIC | 2001 |
| LG | 2017 2024 2031 | SCHNEIDER | 2140 |
| 2126 2169 | SCIENTIFIC LABS | 2150 | |
| LIFE | 2140 | SCOTT | 2021 |
| LIFETEC | 2140 2145 2189 | SEG | 2015 2033 2148 |
| LIMIT | 2150 | 2150 | |
| LOEWE | 2055 | SHARP | 2038 2113 2120 |
| LOGICLAB | 2150 | SIGMATEK | 2152 |
| LUXOR | 2154 | SILVA | 2153 |
| MAGNAVOX | 2146 2151 2155 | SILVERCREST | 2183 2184 2186 |
| MAGNUM | 2145 | 2185 2195 2196 | |
| MARANTZ | 2060 2064 2065 | 2205 2218 2219 | |
| 2142 | 2222 2223 2224 | ||
| MATSUI | 2040 2071 | 2225 2226 2227 | |
| MEDION | 2140 2145 2189 | 2228 | |
| METZ | 2138 | SINGER | 2149 2150 |
| MICO | 2149 | SKYMASTER | 2033 2144 2150 |
| MICROMAXX | 2140 2145 | SKYWORTH | 2153 |
| MICROMEDIA | 2146 | SM ELECTRONIC | 2150 |
| MICROSTAR | 2140 2145 | SONY | 2004 2009 2010 |
| MIZUDA | 2151 2152 | 2018 2022 2028 | |
| MONYKA | 2148 | 2041 2110 2156 | |
| MUSTEK | 2001 2144 2163 | 2164 2173 2174 | |
| MX ONDA | 2149 | SOUNDMASTER | 2150 |
| NAIKO | 2154 | SOUNDMAX | 2150 |
| NEUFUNK | 2148 | STANDARD | 2150 |
| STAR CLUSTER | 2150 |
| STARMEDIA | 2151 |
| SUPERVISION | 2150 |
| SYNN | 2150 |
| TARGA | 2185 2186 2197 |
| 2198 2199 2200 | |
| 2201 2202 2203 | |
| 2204 2206 2207 | |
| 2208 2209 2210 | |
| 2211 2212 2213 | |
| 2214 2215 2216 | |
| 2217 2220 2221 | |
| 2193 2194 | |
| TCM | 2132 2134 2135 |
| 2136 2137 2140 | |
| 2145 2177 2178 | |
| 2179 2180 2187 | |
| 2188 2189 2190 | |
| 2191 2192 | |
| TEAC | 2062 2138 2147 |
| 2150 | |
| TEC | 2153 |
| TEVION | 2140 2145 2150 |
| 2189 | |
| THOMSON | 2013 2128 |
| TOKAI | 2148 2153 |
| TOSHIBA | 2002 2121 2129 |
| 2146 2155 | |
| TRUVISION | 2152 |
| WHARTFEDALE | 2149 2150 |
| XLOGIC | 2150 |
| YAKUMO | 2154 |
| YAMADA | 2053 2154 2182 |
| YAMAKAWA | 2148 |
| YUKAI | 2001 |
| ZENITH | 2146 2155 |
| DVD Recorder | |
| JVC | 2085 2086 2087 |
| 2088 | |
| LG | 2095 |
| Panasonic | 2081 2090 2092 |
| Philips | 2079 2080 2089 |
| 2091 2093 2094 | |
| Samsung | 2075 2099 2107 |
| Sony | 2072 2073 2074 |
| 2076 2077 2078 | |
| 2082 2083 2084 | |
| TCM | 2133 |
| Toshiba | 2096 2097 2098 |
| Yukai | 2100 |
| SAT/DVD | |
| Humax | 2059 |
| DVD-DVR | |
| Panasonic | 2081 2090 |
| Philips | 2101 2105 |
| Pioneer | 2102 2103 2104 |
| Samsung | 2106 |
| Toshiba | 2096 |
| VCR | |
| ADELSOUND | 3041 |
| ADYSON | 3046 |
| AIWA | 3040 3044 3045 |
| 3082 3086 3087 | |
| 3088 | |
| AKAI | 3043 3045 3087 |
| AKIBA | 3046 3093 |
| AKURA | 3045 3046 3087 |
| 3093 | |
| ALBA | 3040 3043 3046 |
| 3047 3088 3089 | |
| 3090 3093 | |
| AMBASSADOR | 3043 3090 |
| AMSTRAD | 3040 3046 3047 |
| 3086 | |
| ANITECH | 3046 3093 |
| ANSONIC | 3041 |
| ASA | 3044 3091 3092 |
| ASUKA | 3040 3044 3046 |
| 3086 3091 3092 | |
| 3093 | |
| AUDIOSONIC | 3047 |
| AUDIOTON | 3043 |
| BAIRD | 3040 3045 3047 |
| 3086 3087 3089 | |
| BASIC LINE | 3043 3046 3047 |
| 3088 3089 3090 | |
| 3093 | |
| BAUR | 3092 |
| BESTAR | 3043 3045 3047 |
| 3089 3090 | |
| BLACK PANTHER LINE | 3047 3089 |
| BLAUPUNKT | 3029 3042 3092 |
| BLUE SKY | 3044 |
| BONDSTEC | 3043 3046 3090 |
| BRANDT | 3045 |
| BUSH | 3040 3046 3047 |
| 3064 3074 3082 | |
| 3088 3089 3093 | |
| CASIO | 3040 |
| CATHAY | 3047 |
| CATRON | 3043 3090 |
| CGE | 3040 3045 3086 |
| 3087 | |
| CIMLINE | 3046 3088 3093 |
| CLATRONIC | 3043 3046 3090 |
| CONDOR | 3043 3047 3089 |
| 3090 | |
| CROWN | 3043 3046 3047 |
| 3089 | 3090 | 3093 | |
| DAEWOO | 3028 | 3043 | 3047 |
| 3050 | 3056 | 3073 | |
| 3075 | 3089 | 3090 | |
| DANSAI | 3046 | 3047 | 3093 |
| DANTAX | 3088 | 3046 | |
| DAYTRON | 3047 | 3089 | 3093 |
| DE GRAAF | 3092 | 3047 | |
| DECCA | 3040 | 3045 | 3086 |
| 3087 | 3092 | 3088 | |
| DENKO | 3046 | 3045 | |
| DIAMANT | 3044 | 3087 | |
| DUAL | 3040 | 3045 | 3047 |
| 3087 | 3092 | 3093 | |
| DUMONT | 3040 | 3086 | 3092 |
| ELBE | 3047 | 3040 | |
| ELCATECH | 3046 | 3041 | |
| ELSAY | 3046 | 3043 | |
| ELTA | 3046 | 3047 | 3093 |
| EMERSON | 3046 | 3093 | |
| ESC | 3043 | 3047 | 3089 |
| ETZUKO | 3046 | 3093 | INTERBUY |
| EUROPHON | 3043 | INTERFUNK | |
| FERGUSON | 3040 | 3045 | 3087 |
| FIDELITY | 3040 | 3046 | 3086 |
| FINLANDIA | 3040 | 3092 | IRRADIO |
| FINLUX | 3040 | 3086 | 3087 |
| 3092 | ITT | ||
| FIRST LINE | 3088 | 3091 | 3093 |
| FIRSTLINE | 3044 | 3046 | |
| FISHER | 3043 | JVC | |
| FLINT | 3088 | 3061 | |
| FORMENTI/PHOENIX | 3092 | KAISUI | |
| KARCHER | |||
| FROTECH | 3043 | 3090 | |
| FUJITSU | 3040 | 3086 | |
| FUNAI | 3040 | 3086 | |
| GALAXY | 3040 | 3086 | |
| GBC | 3043 | 3090 | KYOTO |
| GEC | 3092 | LENCO | |
| GELOSO | 3093 | LEYCO | |
| GENERAL | 3043 | 3090 | |
| GENERAL | 3029 | 3088 | |
| TECHNIC | 3076 | ||
| GOLDHAND | 3046 | 3093 | |
| GOLDSTAR | 3040 | 3044 | LOEWE |
| 3091 | LOEWE OPTA | ||
| GOODMANS | 3040 | 3043 | 3044 |
| 3046 | 3047 | 3085 | |
| 3086 | 3089 | 3090 | |
| 3091 | 3093 | ||
| GRAETZ | 3045 | 3087 | |
| GRANADA | 3040 | 3042 | LOGIK |
| 3092 | LOGISTH | ||
| GRANDIN | 3040 | 3043 | MARANTZ |
| 3046 | 3047 | 3086 | |
| 3089 | 3090 | 3091 | |
| 3093 | M ELECTRONIC | ||
| GRUNDIG | 3042 | 3081 | MEDIATOR |
| MEDION | 3029 3088 3094 | PYE | 3006 3092 |
| M-ELECTRONIC | 3040 3044 | QUELLE | 3042 3086 3092 |
| MEMOREX | 3040 3044 3086 | RADIALVA | 3044 3046 |
| 3091 | RADIOLA | 3092 | |
| MEMPHIS | 3046 3093 | REX | 3045 3087 |
| METZ | 3029 3042 | RFT | 3043 3046 3090 |
| MICROMAXX | 3029 3088 3094 | 3092 | |
| MICROSTAR | 3029 3088 3094 | ROADSTAR | 3044 3046 3047 |
| MIGROS | 3040 3086 | 3082 3089 3091 | |
| MITSUBISHI | 3086 3092 | 3093 | |
| MULTITECH | 3040 3043 3046 | ROYAL | 3046 |
| 3086 3090 3092 | SABA | 3045 3087 | |
| 3093 | SAISHO | 3041 3088 3093 | |
| MURPHY | 3040 3086 | SAMSUMG | 3000 3032 3048 |
| NATIONAL | 3029 | 3053 3055 3058 | |
| NEC | 3045 3087 | 3083 3094 | |
| NECKERMANN | 3042 3045 3087 | SAMURAI | 3045 3046 3090 |
| 3092 | SANSUI | 3087 | |
| NEI | 3092 | SANWA | 3041 |
| NESCO | 3040 3046 3093 | SANYO | 3066 |
| NIKKAI | 3043 3046 3047 | SAVILLE | 3047 |
| 3090 | SBR | 3092 | |
| NOKIA | 3045 3047 3087 | SCHAUB LO-RENZ | 3040 3045 3086 |
| NORDMENDE | 3045 3087 | 3087 | |
| OCEANIC | 3040 3045 3086 | SCHNEIEDER | 3040 3044 3046 |
| 3087 | 3047 3086 3088 | ||
| OKANO | 3046 3047 3088 | 3089 3090 3091 | |
| ORION | 3041 3064 3085 | 3092 3093 | |
| 3088 | SEG | 3046 3047 3093 | |
| ORSON | 3040 3086 | SEI-SINUDYNE | 3041 3092 |
| OSAKI | 3040 3044 3046 | SELECO | 3043 3044 3045 |
| 3086 3091 3093 | 3087 | ||
| OTTO VERSAND | 3092 | SENTRA | 3043 3046 3090 |
| PALLADIUM | 3041 3042 3044 | SENTRON | 3046 3093 |
| 3045 3046 3087 | SHARP | 3001 3020 3054 | |
| 3091 3093 | SHINTOM | 3046 3093 | |
| PANASONIC | 3002 3007 3010 | SHIVAKI | 3044 3091 |
| 3011 3016 3017 | SHORAI | 3041 | |
| 3025 3029 3033 | SIEMENS | 3042 3044 3091 | |
| 3052 3059 3079 | SILVA | 3044 3091 | |
| PATHE CINEMA | 3041 | SILVER | 3047 |
| PATHE MARCONI | 3045 3087 | SILVERCREST | 3102 3103 3104 |
| PERDIO | 3040 3086 | 3106 | |
| PHILCO | 3046 | SINUDYNE | 3041 3092 |
| PHILIPS | 3006 3008 3014 | SOLAVOX | 3090 |
| 3022 3024 3026 | SOLOVOX | 3043 | |
| 3030 3034 3035 | SONNECLAIR | 3046 | |
| 3042 3049 3067 | SONOKO | 3047 3089 | |
| 3068 3069 3070 | SONTEC | 3044 3091 | |
| 3071 3072 3077 | SONY | 3003 3004 3005 | |
| 3078 3092 | 3018 3031 3036 | ||
| PHONOLA | 3092 | 3051 3080 3084 | |
| PIONEER | 3092 | SOUNDWAVE | 3044 |
| PORTLAND | 3043 3047 3089 | STANDARD | 3047 3089 |
| 3090 | STARLITE | 3044 | |
| PRINZ | 3040 3086 | STERN | 3047 |
| PROFEX | 3093 | SUNKAI | 3088 |
| PROLINE | 3040 3086 | SUNSTAR | 3040 3086 |
| PROSONIC | 3040 3047 3088 | SUNTRONIC | 3040 3086 |
| SUNWOOD | 3046 3093 | CLYDE CABLE- | 4003 |
| SUPRA | 3044 | VISION | |
| SYMPHONIC | 3040 3046 | COMCRYPT | 4026 |
| TAISHO | 3041 3088 | CRYPTOVISION | 4004 |
| TANDBERG | 3047 | FIDELITY | 4000 |
| TARGA | 3105 3104 | FILMNET | 4026 |
| TASHIKO | 3040 3044 3086 | FILMNET | 4005 4020 |
| TATUNG | 3040 3045 3082 | CABLECRYPT | |
| 3086 3087 3092 | FILMNET COM- | 4005 | |
| TCM | 3029 3037 3038 | CRYPT | |
| 3039 3088 3094 | FINLUX | 4007 | |
| 3095 3096 3097 | FOXTEL | 4028 | |
| 3098 3099 3100 | FRANCE TELECOM | 4022 4027 | |
| 3101 | FREEBOX | 4029 | |
| TEAC | 3040 3045 3047 | GEC | 4003 |
| TEC | 3043 3046 3047 | GENERAL INT- | 4018 4025 |
| 3090 | RUMENT | ||
| TECHNICS | 3029 | GOODING | 4006 |
| TELEAVIA | 3045 3087 | GRUNDIG | 4000 4006 |
| TELEFUNKEN | 3045 3087 | HIRSCHMANN | 4007 |
| TELETECH | 3046 3047 | ITT NOKIA | 4007 |
| TENOSAL | 3046 3093 | JERROLD | 4008 4014 4016 |
| TENSAI | 3040 3041 3044 | 4018 4025 | |
| 3046 3086 3091 | JVC | 4006 | |
| 3093 | MACAB | 4027 | |
| TEVION | 3029 3088 3094 | MASPRO | 4006 |
| THOMSON | 3012 3045 3087 | MATSUI | 4006 |
| THORN | 3044 3045 3087 | MINERVA | 4006 |
| TOKAI | 3044 3045 3046 | MNET | 4026 |
| 3091 3093 | M-NET | 4020 | |
| TONSAI | 3093 | MOVIE TIME | 4013 |
| TOSHIBA | 3015 3023 3045 | MR ZAPP | 4027 |
| 3063 3074 3085 | MULTICHOICE | 4026 | |
| 3087 3092 | NOKIA | 4007 | |
| TOWADA | 3046 3093 | NOOS | 4027 |
| TOWIKA | 3046 3093 | PALLADIUM | 4006 |
| TVA | 3043 3090 | PHILIPS | 4006 4015 4022 |
| UHER | 3044 3091 | 4027 | |
| ULTRAVOX | 3047 | PIONEER | 4000 4009 4010 |
| UNITED QUICK | 3047 3089 | PVP STEREO | 4016 |
| STAR | VISUAL MATRIX | ||
| UNIVERSUM | 3040 3042 3044 | SAGEM | 4027 |
| 3086 3091 3092 | SAT | 4000 | |
| VIDEO | 3029 3088 | SCIENTIFIC AT- | 4011 4012 |
| WELTBLICK | 3091 | LANTA | |
| WETBLICK | 3044 | STARCOM | 4025 |
| YAMISHI | 3046 3093 | TELE 1 | 4005 4020 4026 |
| YOKAN | 3046 3093 | TELEPIU | 4020 4026 |
| YOKO | 3043 3044 3046 | TORX | 4025 |
| 3090 3091 3093 | UNITED CABLE | 4016 | |
| UNIVERSUM | 4006 4007 | ||
| VIDEOWAY | 4017 | ||
| VISIOPASS | 4007 4022 4027 | ||
| Panasonic | 5001 | ||
| CBL | |||
| ABC | 4025 | ||
| ALCATEL | 4023 4024 | ||
| ARCON | 4000 | ||
| AXIS | 4000 | ||
| CABLETIME | 4001 4002 4019 | ||
| 4021 | |||
| Satellite | 5150 5177 5190 | ||
| AB SAT | 5161 | BOSTON | 5177 5189 |
| ABSAT | 5189 5190 5199 | BRAIN WAVE | 5069 5128 5153 |
| AGS | 5189 | BRANDT | 5099 |
| AKAI | 5093 5122 | BROADCAST | 5068 5130 |
| ALBA | 5051 5052 5053 | BROCO | 5138 5190 |
| 5054 5081 5095 | BSKYB | 5010 5162 | |
| 5131 5144 5190 | BT | 5189 | |
| ALDES | 5053 5054 5055 | BT SATELLITE | 5099 5154 |
| 5126 5131 | BUBU SAT | 5190 | |
| ALLSAT | 5056 5075 5093 | BUSH | 5052 5056 5070 |
| 5112 5121 5122 | 5081 5095 5112 | ||
| ALLSONIC | 5054 5060 5126 | 5121 5131 | |
| 5182 | BVV | 5153 | |
| ALLTECH | 5147 5190 | CAMBRIDGE | 5150 5183 |
| ALPHA | 5122 | CANAL SATELLITE | 5163 5181 |
| ALTAI | 5133 | CANAL+ | 5097 5181 |
| AMITRONICA | 5190 | CHANNEL MASTER | 5053 5131 |
| AMPERE | 5058 5133 5177 | CHAPARRAL | 5090 |
| AMSTRAD | 5057 5094 5010 | CHEROKEE | 5189 5199 |
| 5125 5129 5133 | CHESS | 5103 5179 5185 | |
| 5149 5151 5155 | 5190 | ||
| 5162 5177 5183 | CITYCOM | 5052 5072 5017 | |
| 5190 5194 5195 | 5159 5176 5186 | ||
| ANGLO | 5190 | 5191 | |
| ANKARO | 5054 5060 5123 | CLATRONIC | 5069 5128 |
| 5126 5182 5190 | CLEMENS- | 5083 | |
| ANTTRON | 5051 5054 5121 | KAMPHUS | |
| 5144 | CNT | 5055 | |
| APOLLO | 5051 | COLOMBIA | 5177 |
| ARCON | 5058 5059 5076 | COLUMBUS | 5078 |
| 5153 5177 | COMAG | 5177 | |
| ARMSTRONG | 5057 5122 | COMMANDER | 5123 |
| ASA | 5134 | COMMLINK | 5054 5126 |
| ASAT | 5093 5122 | COMTEC | 5126 5132 |
| ASLF | 5190 | COMTECH | 5071 |
| AST | 5064 5127 | CONDOR | 5060 5182 5186 |
| ASTACOM | 5154 5189 | CONNEXIONS | 5066 5133 5182 |
| ASTON | 5104 | CONRAD | 5141 5142 5176 |
| ASTRA | 5057 5061 5062 | 5177 5182 5183 | |
| 5063 5087 5115 | 5186 | ||
| 5130 5138 5186 | CONRAD ELEC- | 5186 5190 | |
| 5190 | TRONIC | ||
| ASTRO | 5054 5055 5060 | CONTEC | 5071 5072 5132 |
| 5067 5119 5144 | 5142 | ||
| 5148 5180 5181 | COSAT | 5075 | |
| 5182 5183 5186 | CROWN | 5057 | |
| AUDIO TON | 5054 5075 5144 | CYBERMAXX | 5108 |
| AURORA | 5193 | DAERYUNG | 5066 |
| AUSTAR | 5017 5193 | DAEWOO | 5002 5190 |
| AVALON | 5133 | DANSAT | 5056 5112 5121 |
| AXIEL | 5189 | D-BOX | 5166 |
| AXIS | 5060 5063 5071 | DDC | 5053 5131 |
| 5132 5138 5182 | DECCA | 5073 | |
| BARCOM | 5059 | DELEGA | 5053 |
| BEST | 5059 5060 5182 | DEW | 5071 5132 |
| BLAUPUNKT | 5067 5119 5180 | DIAMOND | 5074 |
| BLUE SKY | 5190 5195 | DIGIALITY | 5186 |
| BOCA | 5057 5087 5142 | DIGIPRO | 5196 |
| DISCOVERER | 5179 5185 | FRACARRO | 5095 5165 |
| DISCOVERY | 5189 | FRANCE SA- | 5078 |
| DISEQC | 5189 | TELLITE/TV | |
| DISKXPRESS | 5059 | FREECOM | 5051 5082 5180 |
| DISTRATEL | 5195 | 5183 | |
| DISTRISAT | 5122 | FREESAT | 5147 5194 |
| DITRISTRAD | 5075 | FTE | 5058 5084 5142 |
| DNR | 5153 | 5150 | |
| DNT | 5066 5093 5122 | FTEMAXIMAL | 5182 5190 |
| 5133 | FUBA | 5051 5059 5060 | |
| DONG WOO | 5086 | 5062 5066 5067 | |
| DRAKE | 5076 | 5078 5080 5093 | |
| DSTV | 5193 | 5115 5133 5176 | |
| DUNE | 5182 | 5180 5182 | |
| DYNASAT | 5188 | FUGIONKYO | 5196 |
| ECHOSTAR | 5066 5103 5133 | GALAXI | 5059 |
| 5163 5165 5190 | GALAXIS | 5054 5060 5063 | |
| 5199 | 5071 5075 5081 | ||
| EINHELL | 5051 5054 5057 | 5101 5017 5126 | |
| 5125 5126 5177 | 5132 5138 5164 | ||
| 5183 5190 | 5176 5182 5193 | ||
| ELAP | 5189 5190 | GALAXISAT | 5127 |
| ELEKTA | 5055 | GARDINER | 5191 |
| ELSAT | 5151 5190 | GMI | 5057 |
| ELTA | 5051 5060 5075 | GOLDBOX | 5163 5181 |
| 5093 5122 5182 | GOLDSTAR | 5082 | |
| EMANON | 5051 | GOODING | 5184 |
| EMME ESSE | 5060 5070 5083 | GOODMANS | 5052 5081 |
| 5165 5182 5188 | GRANADA | 5061 5115 | |
| ENGEL | 5190 | GRANDIN | 5113 5178 |
| EP SAT | 5052 | GROTHUSEN | 5051 5082 |
| EURIEULT | 5178 5194 5195 | GRUNDIG | 5052 5054 5067 |
| EUROCRYPT | 5115 | 5070 5094 5105 | |
| EURODEC | 5106 | 5010 5029 5031 | |
| EUROPA | 5122 5123 5142 | 5032 5034 5043 | |
| 5183 5186 | 5118 5119 5129 | ||
| EUROPHON | 5177 5186 | 5156 5158 5162 | |
| EUROSAT | 5057 | 5180 5183 5184 | |
| EUROSKY | 5057 5060 5176 | 5193 5195 | |
| 5177 5182 5183 | G-SAT | 5121 | |
| 5186 | HANSEATIC | 5089 5143 5185 | |
| EUROSPACE | 5077 | HANSEL & | 5177 5186 |
| EUROSTAR | 5057 5167 5176 | GRETEL | |
| 5186 5188 5191 | HANTOR | 5051 5069 5086 | |
| EUTELSAT | 5190 | 5128 | |
| EUTRA | 5147 | HANURI | 5055 |
| EXATOR | 5051 5054 5144 | HASE & IGEL | 5153 |
| FENNER | 5179 5182 5185 | HAUPPAUGE | 5025 5044 |
| 5190 | HELIOCOM | 5058 5186 | |
| FERGUSON | 5052 5056 5070 | HELIUM | 5186 |
| 5106 5049 5112 | HINARI | 5053 5121 5131 | |
| 5121 5145 | HIRSCHMANN | 5067 5083 5030 | |
| FIDELITY | 5125 5149 5183 | 5119 5133 5134 | |
| FINLANDIA | 5052 5115 | 5135 5137 5141 | |
| FINLUX | 5052 5061 5080 | 5180 5182 5183 | |
| 5115 5136 5141 | 5186 5189 5194 | ||
| FINNSAT | 5071 5106 | HISAWA | 5069 5128 |
| FLAIR MATE | 5190 | HITACHI | 5052 5070 |
| FOXTEL | 5017 5193 5198 | HNE | 5177 |
| HOUSION | 5123 | LENG | 5069 |
| HOUSTON | 5075 | LENNOX | 5075 |
| HUMAX | 5100 5009 5017 | LENSON | 5079 5183 |
| 5024 5026 5229 | LEXUS | 5122 | |
| HUTH | 5054 5057 5068 | LG | 5082 |
| 5069 5071 5075 | LIFE | 5101 | |
| 5083 5123 5126 | LIFESAT | 5060 5089 5101 | |
| 5128 5130 5132 | 5103 5108 5143 | ||
| 5142 5177 5186 | 5177 5179 5182 | ||
| 5197 | 5185 5190 | ||
| HYPSON | 5178 | LIFETEC | 5060 5089 5101 |
| ID DIGITAL | 5017 | 5103 5108 | |
| IMEX | 5178 | LION | 5077 |
| IMPERIAL | 5081 5095 | LORENZEN | 5123 5153 5155 |
| INGELEN | 5194 | 5177 5186 | |
| INNOVATION | 5060 5089 5101 | LORRAINE | 5082 |
| 5103 5108 | LUPUS | 5060 5182 | |
| INTERNATIONAL | 5177 | LUXOR | 5061 5115 5129 |
| INTERSTAR | 5196 | 5141 5166 5183 | |
| INTERTRONIC | 5057 | LYONNAISE | 5106 |
| INTERVISION | 5075 5146 5186 | M&B | 5143 |
| ITT NOKIA | 5052 5061 5070 | M&B1 | 5185 |
| ITT/NOKIA | 5115 5134 5141 | MACAB | 5106 |
| 5166 | MANATA | 5154 5177 5178 | |
| JOHANSSON | 5069 5128 | 5189 5190 | |
| JOK | 5152 5154 5189 | MANHATTAN | 5052 5055 5070 |
| JSR | 5075 | 5075 5154 5189 | |
| JVC | 5184 | MARANTZ | 5093 |
| KAMM | 5190 | MASCOM | 5055 5137 |
| KATHREIN | 5067 5072 5084 | MASPRO | 5052 5070 5090 |
| 5090 5093 5003 | 5114 5119 5147 | ||
| 5008 5012 5021 | 5153 5156 5180 | ||
| 5022 5023 5026 | 5184 5190 | ||
| 5119 5122 5137 | MATSUI | 5099 5119 5131 | |
| 5144 5148 5159 | 5154 5180 5184 | ||
| 5169 5176 5180 | 5189 | ||
| 5189 5190 5191 | MAX | 5186 | |
| 5199 | MB | 5089 5143 5185 | |
| KATHREIN EU-ROSTAR | 5176 | MEDIABOX | 5163 5181 |
| MEDIAMARKT | 5057 | ||
| KEY WEST | 5177 | MEDIASAT | 5063 5138 5163 |
| KLAP | 5189 | 5181 5183 | |
| KONIG | 5186 | MEDION | 5060 5089 5101 |
| KOSMOS | 5082 5083 5084 | 5103 5108 5177 | |
| 5137 | 5182 5190 | ||
| KR | 5054 5144 5147 | MEDISON | 5190 |
| KREISELMEYER | 5067 5119 5180 | MEGA | 5093 5122 |
| K-SAT | 5190 | MELECTRONIC | 5191 |
| KYOSTAR | 5051 5144 5177 | METRONIC | 5051 5054 5055 |
| L&S ELECTRONIC | 5177 5182 | 5059 5113 5126 | |
| LASAT | 5055 5060 5085 | 5144 5159 5178 | |
| 5086 5087 5132 | 5190 5191 5195 | ||
| 5150 5176 5177 | METZ | 5067 5119 5180 | |
| 5179 5182 5186 | MICRO | 5183 5186 5190 | |
| LEMON | 5153 | MICRO ELECT- | 5190 |
| LENCO | 5051 5082 5088 | RONIC | |
| 5123 5138 5153 | MICRO TECH- | 5077 5138 5190 | |
| 5176 5182 5186 | NOLOGY | ||
| 5190 | MICROMAXX | 5060 5089 5101 | |
| 5103 5108 5182 | PACKSAT | 5189 | |
| MICROSTAR | 5060 5089 5101 | PALCOM | 5053 5062 5078 |
| 5103 5108 | 5079 5131 | ||
| MICROTEC | 5190 | PALLADIUM | 5057 5183 5184 |
| MINERVA | 5067 5184 | PALSAT | 5179 5183 |
| MITSUBISHI | 5052 5067 5099 | PALTEC | 5062 |
| MITSUMI | 5087 | PANASAT | 5187 5193 |
| MORGAN SYDNEY | 5107 | PANASONIC | 5052 5070 5094 |
| MORGAN'S | 5057 5087 5093 | 5010 5162 | |
| 5122 5142 5150 | PANDA | 5052 5056 5112 | |
| 5177 5190 | 5115 5180 5186 | ||
| MOTOROLA | 5192 | PATRIOT | 5177 5189 |
| MULTICHOICE | 5105 5193 | PHILIPS | 5052 5070 5093 |
| MULTISTAR | 5084 5086 | 5039 5041 5116 | |
| MULTITEC | 5103 5179 | 5117 5119 5121 | |
| MURATTO | 5065 5082 5127 | 5122 5123 5142 | |
| MYSAT | 5190 | 5144 5154 5156 | |
| NAVEX | 5069 5128 | 5158 5159 5163 | |
| NEC | 5091 5120 | 5169 5180 5181 | |
| NETWORK | 5121 | 5184 5189 5191 | |
| NEUHAUS | 5063 5075 5079 | PHOENIX | 5071 5081 5121 |
| 5123 5138 5142 | 5132 | ||
| 5153 5183 5186 | PHONOTREND | 5052 5054 5075 | |
| 5190 | 5083 5126 5164 | ||
| NEUSAT | 5153 5190 | PIONEER | 5163 5181 |
| NEXT WAVE | 5102 | POLSAT | 5106 |
| NEXTWAVE | 5197 | POLYTRON | 5072 |
| NIKKO | 5057 5190 | PREDKI | 5069 5128 |
| NOKIA | 5052 5061 5070 | PREISNER | 5133 5142 5150 |
| 5015 5019 5033 | 5177 | ||
| 5115 5134 5141 | PREMIER | 5181 | |
| 5166 5170 5175 | PREMIERE | 5075 5097 5017 | |
| NOMEX | 5109 | 5163 5181 | |
| NORDMENDE | 5051 5052 5053 | PRIESNER | 5057 |
| 5055 5106 5128 | PROFI | 5088 | |
| 5131 5145 | PROFILE | 5189 | |
| NOVA | 5193 | PROMAX | 5052 |
| NOVIS | 5069 5128 | PROSAT | 5053 5054 5081 |
| OCEANIC | 5074 5077 | 5095 5126 5131 | |
| OCTAGON | 5051 5054 5071 | 5146 | |
| 5123 5132 5144 | PROSONIC | 5155 | |
| OKANO | 5057 5083 5084 | PROTEK | 5074 |
| ONDIGITAL | 5116 5117 5124 | PROVISION | 5055 |
| OPTEX | 5072 5075 | PYE | 5184 |
| OPTUS | 5181 5193 5197 | QUADRAL | 5053 5054 5060 |
| ORBIT | 5064 | 5126 5131 5142 | |
| ORBITECH | 5051 5139 5140 | 5146 5154 5182 | |
| 5142 5179 5181 | 5189 5199 | ||
| 5183 | QUELLE | 5067 5125 5176 | |
| ORIGO | 5077 | 5186 | |
| OSAT | 5054 5129 | QUIERO | 5106 |
| OTTO VERSAND | 5067 | RADIOLA | 5093 5122 |
| PACE | 5052 5056 5067 | RADIX | 5066 5011 5018 |
| 5070 5081 5094 | 5037 5133 5147 | ||
| 5010 5040 5047 | 5168 5171 5174 | ||
| 5112 5121 5124 | 5194 | ||
| 5157 5162 5189 | RAINBOW | 5054 5144 5147 | |
| 5199 | RED STAR | 5182 | |
| PACIFIC | 5074 | REDIFFUSION | 5091 |
| REDPOINT | 5063 5138 | 5228 5230 | |
| REDSTAR | 5060 | SKANTIN | 5190 |
| RFT | 5054 5093 5122 | SKARDIN | 5063 5138 |
| 5123 5126 5139 | SKINSAT | 5183 | |
| ROADSTAR | 5190 | SKR | 5190 |
| ROCH | 5178 | SKY | 5192 |
| ROVER | 5146 5182 5190 | SKY DIGITAL | 5094 |
| RUEFACH | 5088 | SKYMASTER | 5054 5089 5103 |
| SABA | 5055 5070 5077 | 5004 5020 5126 | |
| 5095 5121 5145 | 5143 5146 5167 | ||
| 5152 5153 5154 | 5179 5185 5190 | ||
| 5176 5186 5189 | SKYMAX | 5093 5122 | |
| 5195 | SKYSAT | 5179 5183 5185 | |
| SABRE | 5052 | 5186 5190 | |
| SAGEM | 5106 5160 | SKYVISION | 5075 |
| SAKURA | 5071 5081 5132 | SL | 5153 5177 |
| SALORA | 5061 5091 5115 | SMELECTRONIC | 5179 5190 |
| SAMSUNG | 5051 5006 5007 | SMART | 5176 5177 5190 |
| 5016 5028 | 5194 | ||
| SAT | 5053 5064 5065 | SONY | 5094 5181 |
| 5127 5149 5183 | SR | 5057 5087 5177 | |
| SAT CRUISER | 5197 | STARLAND | 5103 5190 |
| SAT PARTNER | 5183 | STARRING | 5069 5128 |
| SAT TEAM | 5190 | START TRAK | 5051 |
| SATCOM | 5068 5089 5130 | STRONG | 5051 5054 5060 |
| 5143 5185 5186 | 5082 5095 5182 | ||
| SATEC | 5070 5121 5190 | 5193 5196 | |
| SATELCO | 5182 | STVI | 5178 |
| SATFORD | 5068 5130 | SUMIDA | 5057 |
| SATLINE | 5146 | SUNNY SOUND | 5182 |
| SATMASTER | 5068 5130 | SUNSAT | 5138 5190 |
| SATPARTNER | 5051 5054 5055 | SUNSTAR | 5057 5087 5177 |
| 5069 5082 5083 | 5182 | ||
| 5128 | SUPER SAT | 5188 | |
| SATPLUS | 5179 | SUPERMAX | 5197 |
| SCHACKE | 5144 | SYSTEC | 5177 |
| SCHNEIDER | 5060 5101 5103 | TANDBERG | 5106 |
| 5108 5158 5179 | TANDY | 5054 | |
| 5189 | TANTEC | 5052 5070 5078 | |
| SCHWAIGER | 5072 5074 5089 | 5079 | |
| 5100 5102 5121 | TARGA | 5221 | |
| 5142 5143 5177 | TATUNG | 5073 | |
| 5179 5185 5186 | TCM | 5060 5089 5101 | |
| 5195 | 5103 5108 5205 | ||
| SCS | 5176 | 5206 5207 5208 | |
| SEDEA ELECTRON | 5177 5196 | 5209 5210 5211 | |
| SEEMANN | 5057 5063 5066 | 5212 5213 5214 | |
| 5138 | 5215 5216 5217 | ||
| SEG | 5051 5060 5069 | 5218 5219 5220 | |
| 5089 5128 5143 | TECHNILAND | 5068 5130 | |
| 5155 5182 5185 | TECHNISAT | 5066 5079 5000 | |
| SELECO | 5075 5165 | 5013 5014 5027 | |
| SEPTIMO | 5195 | 5111 5122 5139 | |
| SERVI SAT | 5178 5190 | 5140 5172 5173 | |
| SIEMENS | 5067 5119 5150 | 5179 5181 5183 | |
| 5180 | TECHNOLOGY | 5193 | |
| SILVA | 5082 | TECHNOSAT | 5197 |
| SILVERCREST | 5222 5223 5224 | TECHNOWELT | 5177 5186 5195 |
| 5225 5226 5227 | TECO | 5057 5087 | |
| TELANOR | 5053 | VECTOR | 5077 |
| TELASAT | 5089 5143 5176 | VEGA | 5182 |
| 5185 5186 | VENTANA | 5093 5122 | |
| TELECIEL | 5144 | VESTEL | 5155 |
| TELECOM | 5190 | VIA DIGITAL | 5096 |
| TELEDIREKT | 5121 | VIASAT | 5199 |
| TELEFUNKEN | 5051 5070 5099 | VISIONIC | 5196 |
| 5154 5189 | VISIOSAT | 5069 5075 5103 | |
| TELEKA | 5054 5057 5066 | 5104 5152 5189 | |
| 5133 5137 5144 | 5190 | ||
| 5153 5156 5183 | VIVA | 5123 | |
| 5186 | VIVANCO | 5110 | |
| TELEMASTER | 5055 | VIVID | 5198 |
| TELEMAX | 5085 | VORTEC | 5051 5124 |
| TELESAT | 5089 5143 5185 | VTECH | 5065 5191 |
| 5183 | V-TECH | 5064 5127 5152 | |
| TELESTAR | 5079 5179 5181 | 5159 | |
| 5193 | WELA | 5142 | |
| TELETECH | 5167 | WELLTECH | 5179 |
| TELEVES | 5052 5107 5177 | WETEKOM | 5179 5183 5185 |
| 5183 | WEVASAT | 5052 | |
| TELEWIRE | 5075 | WEWA | 5052 |
| TEMPO | 5197 | WINERSAT | 5069 5128 |
| TEVION | 5060 5089 5101 | WINTERGARTEN | 5126 |
| 5103 5108 5190 | WISI | 5052 5064 5065 | |
| THOMSON | 5052 5096 5099 | 5066 5067 5119 | |
| 5106 5035 5038 | 5127 5133 5142 | ||
| 5042 5045 5046 | 5152 5180 5183 | ||
| 5048 5145 5176 | 5186 | ||
| 5181 5186 5189 | WOORISAT | 5055 | |
| 5190 | WORLD | 5128 | |
| THORENS | 5074 | WORLDSAT | 5189 |
| THORN | 5052 5056 5070 | XCRYPTON | 5182 |
| TIOKO | 5072 5177 | XSAT | 5190 5199 |
| TOKAI | 5122 | ZAUNKONIG | 5153 |
| TONNA | 5052 5068 5075 | ZEHNDER | 5055 5059 5060 |
| 5130 5183 5190 | 5065 5084 5036 | ||
| TPS | 5098 | 5127 5155 5159 | |
| TRIAD | 5064 5065 5082 | 5176 5182 5191 | |
| 5127 | ZENITH | 5192 | |
| TRIASAT | 5080 5136 5183 | ZINWELL | 5017 |
| TRIAX | 5067 5079 5136 | ZODIAC | 5054 5144 |
| 5176 5177 5183 | |||
| 5190 | SAT/DVD | ||
| TURNSAT | 5190 | Humax | 5050 |
| TVONICS | 5049 | ||
| TWINNER | 5107 5177 5178 | SAT-DVR | |
| 5190 | BSkyB | 5203 | |
| UEC | 5193 5198 | Humax | 5200 |
| UHER | 5179 | Pace | 5204 |
| UNIDEN | 5092 5149 | Zehnder | 5202 |
| UNISAT | 5057 5071 5122 | ||
| 5132 5177 | Satellite Receiver | ||
| UNITOR | 5059 5069 | /Recorder | |
| UNIVERSUM | 5067 5119 5134 | Humax | 5005 |
| 5149 5155 5176 | Kathrein | 5201 | |
| 5180 5184 5186 | |||
| VARIOSAT | 5119 5180 | ||
| VARIOSTAT | 5067 | ||
| DVR/PVR | VOODOO | 6006 | |
| ZT GROUP | 6006 | ||
| Digital Network | |||
| Recorder | |||
| Sony | 6012 | CD | |
| ADCOM | 7001 | ||
| AIWA | 7002 | ||
| DVR | |||
| ABS | 6006 | BUSH | 7003 |
| ALIENWARE | 6006 | CARRERA | 7004 |
| CYBERPOWER | 6006 | DENON | 7015 7019 |
| DELL | 6006 | DUAL | 7001 |
| DIRECTV | 6000 6004 6007 | ELTA | 7009 |
| 6011 | EMERSON | 7001 | |
| DISH NETWORK | 6003 | FISHER | 7005 |
| DISHPRO | 6003 | GOLDSTAR | 7004 |
| ECHOSTAR | 6003 | GRUNDIG | 7008 |
| EXPRESSVU | 6003 | HARMAN/KARDON | 7006 |
| GATEWAY | 6006 | HITACHI | 7001 |
| GOI | 6003 | INNOVIATION | 7009 |
| HEWLETT | 6006 | JVC | 7007 |
| PACKARD | KENWOOD | 7005 | |
| HOWARD COM- | 6006 | LG | 7004 |
| PUTERS | LIFETEC | 7009 | |
| HP | 6006 | LINN | 7008 |
| HTS | 6003 | MAGNUM | 7009 |
| HUGGES | 6011 | MARANTZ | 7008 7018 7021 |
| HUGGES NET- | 6000 | MATSUI | 7008 |
| WORKSYSTEMS | MEDION | 7009 | |
| HUMAX | 6000 | MEMOREX | 7001 |
| HUSH | 6006 | MERIDIAN | 7008 |
| IBUYPOWER | 6006 | MICROMAXX | 7009 |
| JVC | 6003 6011 | MICROMAEGA | 7008 |
| LINKSYS | 6006 | MICROSTAR | 7009 |
| MEDIA CENTER | 6006 | MISSION | 7008 |
| PC | NAIM | 7008 | |
| MICROSOFT | 6006 | ONKYO | 7000 |
| MIND | 6006 | PANASONIC | 7003 |
| NIVEUS MEDIA | 6006 | PHILIPS | 7008 7016 |
| NORTHGATE | 6006 | PHILIPS CD-V | 7000 |
| PANASONIC | 6009 6015 | PIONEER | 7014 7020 |
| PC | 6019 | PROTON | 7008 |
| PHILIPS | 6000 6011 6013 | QUAD | 7008 |
| PROSCAN | 6004 | REALISTIC | 7001 |
| RCA | 6001 6004 6007 | ROTEL | 7008 7022 |
| 6011 | SABA | 7001 | |
| REPLAYTV | 6008 6009 6014 | SAE | 7008 |
| SONIC BLUE | 6008 6009 | SAMSUNG | 7010 |
| SONY | 6005 6006 | SANSUI | 7008 |
| STACK 9 | 6006 | SCHNEIDER | 7008 |
| SYSTEMAX | 6006 | SILVERCREST | 7026 7027 7028 |
| TAGAR SYSTEMS | 6006 | 7029 | |
| TCM | 6016 6017 6018 | SONY | 7011 |
| TIVO | 6000 6005 6010 | TANDBERG | 7008 |
| 6011 | TCM | 7009 7023 7024 | |
| TOSHIBA | 6002 6006 | 7025 | |
| TOUCH | 6006 | TEAC | 7012 |
| ULTIMATETV | 6007 | TECHNICS | 7017 |
| VIEWSONIC | 6006 | TELEFUNKEN | 7001 |
| TEVION | 7009 | Eltax | 8095 |
| THOMSON | 7001 | GoldStar | 8035 |
| UNIVERSUM | 7008 | Goodmans | 8036 |
| VICTOR | 7007 | Grundig | 8033 8034 8035 |
| VICTOR | 7004 | Harman/Kardon | 8031 8033 |
| RESEARCH | Hitachi | 8106 | |
| YAMAHA | 7013 | JVC | 8064 8075 8098 |
| Kenwood | 8056 8067 8109 | ||
| LG | 8035 8107 | ||
| Marantz | 8033 8034 8052 | ||
| AUDIO | |||
| Amplifier | 8070 8085 8086 | ||
| Bush | 8000 | 8087 8089 | |
| Denon | 8006 8028 8029 | Micromega | 8033 |
| 8030 8062 | Mitsubishi | 8036 | |
| Goodmans | 8023 | Okano | 8036 |
| Grundig | 8000 | Onkyo | 8032 8088 |
| Kenwood | 8012 | Panasonic | 8061 8100 8104 |
| Linn | 8000 | 8105 8113 | |
| Marantz | 8000 8005 8009 | Philips | 8033 8052 8060 |
| 8024 8052 | 8096 | ||
| Meridian | 8000 | Pioneer | 8043 8045 8047 |
| Micromega | 8000 | 8053 8055 8066 | |
| Naim | 8000 | 8092 8093 8110 | |
| Philips | 8000 | Revox | 8033 |
| Pioneer | 8000 8004 8007 | Rotel | 8065 |
| 8017 8020 8025 | Samsung | 8103 | |
| Quad | 8000 | Sansui | 8033 |
| Rotel | 8065 | Sanyo | 8034 8099 8108 |
| Silvercrest | 8119 | Sharp | 8081 |
| Sony | 8001 8010 8011 | Sony | 8037 8039 8040 |
| 8014 8044 | 8041 8044 8046 | ||
| Teac | 8015 8022 8027 | 8058 8059 8094 | |
| Technics | 8002 8008 8016 | 8102 | |
| Thorens | 8000 | TCM | 8114 8115 8116 |
| Yamaha | 8003 8013 8018 | 8117 8118 | |
| 8019 8021 8026 | 8031 | ||
| Tecan | 8050 8051 8061 | ||
| LCD TV/Radio | Thomson | 8057 8069 8071 | |
| Tuner Combo | Thorens | 8033 | |
| Philips | 8090 | Universum | 8035 8036 |
| Yamaha | 8013 8038 8042 | ||
| 8048 8049 8054 | |||
| Receiver | 8063 8068 | ||
| Pioneer | 8043 | ||
| Yamaha | 8018 | ||
| Tuner | |||
| Mustek | 8101 | ||
| Receiver/Amplifier | Philips | 8090 8091 | |
| Yamaha | 8013 | Pioneer | 8092 8093 |
| Sony | 8111 | ||
| Yamaha | 8003 | ||
| Receiver/Tuner | |||
| Aiwa | 8084 8112 | ||
| Akai | 8036 | TV/Tuner | |
| Denon | 8062 8072 8073 | Philips | 8091 |
| 8074 8076 8077 | |||
| 8078 8079 8080 | |||
| 8082 8083 | |||
| DK Digital | 8097 | ||