
X-SMC00DAB - Système audio PIONEER - Notice d'utilisation et mode d'emploi gratuit
Retrouvez gratuitement la notice de l'appareil X-SMC00DAB PIONEER au format PDF.


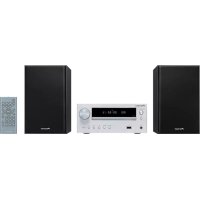
| Type de produit | Système audio micro-chaîne |
| Marque | PIONEER |
| Modèle | X-SMC00DAB |
| Dimensions (L x H x P) | 430 mm x 218 mm x 114 mm |
| Poids net | 2,9 kg |
| Alimentation | Adaptateur secteur CA 100-240 V, 50/60 Hz |
| Consommation électrique (marche) | 25 W |
| Consommation électrique (veille) | 0,5 W ou moins |
| Puissance de sortie | 2 x 10 W RMS (1 kHz, 10 % THD, 8 Ω) |
| Haut-parleurs | 2 voies : haut-parleur de grave 6,6 cm, radiateur passif 7,7 cm |
| Récepteur radio FM | Plage 87,5-108 MHz |
| Récepteur radio DAB+ | Plage 174,928-239,200 MHz (Bande III) |
| Lecteur CD | CD audio, CD-R/RW (CD-DA, MP3, WMA) |
| Prise USB | Lecture de fichiers MP3/WMA sur clé USB (FAT16/32) |
| Connecteur iPod/iPhone | Dock pour iPod/iPhone/iPad mini (charge incluse) |
| Entrée audio auxiliaire | Prise mini-jack 3,5 mm en façade |
| Sortie casque | Prise mini-jack 3,5 mm |
| Télécommande | Oui, avec piles AAA fournies |
| Écran | Affichage à cristaux liquides, rétroéclairage réglable (4 niveaux) |
| Minuterie / Alarme | Minuteur de sommeil et réveil programmable (une fois ou quotidien) |
| Égaliseur | Préréglages EQ, P.BASS, graves/aigus réglables |
| Montage mural | Possible (fixations non fournies) |
| Accessoires inclus | Télécommande, adaptateur secteur, antenne DAB/FM, support iPhone, 2 panneaux interchangeables (sauf X-SMC00DAB-W), notice |
FOIRE AUX QUESTIONS - X-SMC00DAB PIONEER
Questions des utilisateurs sur X-SMC00DAB PIONEER
0 question sur cet appareil. Repondez a celles que vous connaissez ou posez la votre.
Poser une nouvelle question sur cet appareil
Téléchargez la notice de votre Système audio au format PDF gratuitement ! Retrouvez votre notice X-SMC00DAB - PIONEER et reprennez votre appareil électronique en main. Sur cette page sont publiés tous les documents nécessaires à l'utilisation de votre appareil X-SMC00DAB de la marque PIONEER.
MODE D'EMPLOI X-SMC00DAB PIONEER
X-SMC00 X-SMC00DAB X-SMC00DAB-W
Slim Micro System
Discover the benefits of registering your product online at http://www.pioneer.co.uk (or http://www.pioneer.eu).

Operating Instructions
Made for
iPod
iPhone
CAUTION
TO PREVENT THE RISK OF ELECTRIC SHOCK, DO NOT REMOVE COVER (OR BACK). NO USER-SERVICEABLE PARTS INSIDE. REFER SERVICING TO QUALIFIED SERVICE PERSONNEL.
D3-4-2-1-1_B1_En
WARNING
This equipment is not waterproof. To prevent a fire or shock hazard, do not place any container filled with liquid near this equipment (such as a vase or flower pot) or expose it to dripping, splashing, rain or moisture.
D3-4-2-1-3_A1_En
WARNING
To prevent a fire hazard, do not place any naked flame sources (such as a lighted candle) on the equipment.
D3-4-2-1-7a_A1_En
WARNING
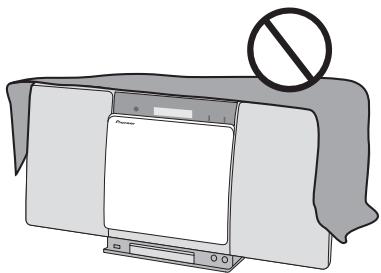
Slots and openings in the cabinet are provided for ventilation to ensure reliable operation of the product, and to protect it from overheating. To prevent fire hazard, the openings should never be blocked or covered with items (such as newspapers, table-cloths, curtains) or by operating the equipment on thick carpet or a bed.
D3-4-2-1-7b*A1En
Operating Environment
Operating environment temperature and humidity: +5°C to +35°C (+41°F to +95°F) less than 85% RH (cooling vents not blocked)
Do not install this unit in a poorly ventilated area, or in locations exposed to high humidity or direct sunlight (or strong artificial light)
D3-4-2-1-7c*A1_EN
When using this product, confirm the safety information shown on the bottom of the unit and the AC adapter label.
D3-4-2-2-4_B1_En
This product is for general household purposes. Any failure due to use for other than household purposes (such as long-term use for business purposes in a restaurant or use in a car or ship) and which requires repair will be charged for even during the warranty period.
K041_A1_En
CAUTION
The OSTANDBY/ON switch on this unit will not completely shut off all power from the AC outlet. Since the power cord serves as the main disconnect device for the unit, you will need to unplug it from the AC outlet to shut down all power. Therefore, make sure the unit has been installed so that the power cord can be easily unplugged from the AC outlet in case of an accident. To avoid fire hazard, the power cord should also be unplugged from the AC outlet when left unused for a long period of time (for example, when on vacation).
D3-4-2-2-2a*A1En
CAUTION
This product is a class 1 laser product classified under the Safety of laser products, IEC 60825-1:2007.
CLASS 1 LASER PRODUCT
D58-5-2-2a_A1_En
WARNING
Store small parts out of the reach of children and infants. If accidentally swallowed, contact a doctor immediately.
D41-6-4_A1_En
Information for users on collection and disposal of old equipment and used batteries
(Symbol for equipment)
(Symbol examples) for batteries

These symbols on the products, packaging, and/or accompanying documents mean that used electrical and electronic products and batteries should not be mixed with general household waste.
For proper treatment, recovery and recycling of old products and used batteries, please take them to applicable collection points in accordance with your national legislation.
By disposing of these products and batteries correctly, you will help to save valuable resources and prevent any potential negative effects on human health and the environment which could otherwise arise from inappropriate waste handling.
For more information about collection and recycling of old products and batteries, please contact your local municipality, your waste disposal service or the point of sale where you purchased the items.
These symbols are only valid in the European Union.
For countries outside the European Union:
If you wish to discard these items, please contact your local authorities or dealer and ask for the correct method of disposal.
K058a_A1_En
AC adapter caution
- Make sure to grasp the body of the AC adapter when removing it from the power outlet. If you pull the power cord, it may become damaged which could lead to fire and/or electrocution.
- Do not attempt to plug in or remove the AC adapter with wet hands. This may result in electrocution.
- Insert the prongs of the AC adapter all the way into the power outlet. If the connection is incomplete, heat may be generated which could lead to fire. Furthermore, contact with the connected prongs of the adapter may result in electrocution.
- Do not insert the AC adapter into a power outlet where the connection remains loose despite inserting the prongs all the way into the outlet. Heat may be generated which could lead to fire. Consult with the retailer or an electrician regarding replacement of the power outlet.
- Do not place the unit, a piece of furniture, etc., on the power cord, or pinch the cord. Never make a knot in the cord or tie it with other cords. The power cords should be routed such that they are not likely to be stepped on. A damaged AC adapter and power cord can cause a fire or give you an electrical shock. Check the AC adapter and the power cord once in a while. When you find it damaged, ask your nearest PIONEER authorized service center or your dealer for a replacement.
POWER-CORD CAUTION
Handle the power cord by the plug. Do not pull out the plug by tugging the cord and never touch the power cord when your hands are wet as this could cause a short circuit or electric shock. Do not place the unit, a piece of furniture, etc., on the power cord, or pinch the cord. Never make a knot in the cord or tie it with other cords. The power cords should be routed such that they are not likely to be stepped on. A damaged power cord can cause a fire or give you an electrical shock. Check the power cord once in a while. When you find it damaged, ask your nearest PIONEER authorized service center or your dealer for a replacement.
S002*A1_EN
Thank you for buying this Pioneer product.
Please read through these operating instructions so that you will know how to operate your model properly. After you have finished reading the instructions, put them in a safe place for future reference.
Contents
01 Before you start
What's in the box 5
Loading the batteries in the remote control 5
Using the remote control 6
02 Part names and functions
Remote control 7
Hang from the wall to use 8
Front panel 9
Top panel/Rear panel 10
Change the interchangeable panel 11
03 Connections
Connecting antenna 12
Using external antennas. 12
Plugging in 12
04 Getting started
To turn the power on 13
Setting the clock 13
General control 13
Input function. 13
Display brightness control 13
Volume auto setting. 13
Volume control. 13
Muting. 13
Sound controls 14
Equalizer 14
P.BASS control 14
Bass/treble control 14
Setting the wake-up timer 14
Calling the wake-up timer. 15
Cancelling the wake-up timer. 15
Using the wake-up timer. 15
Using the sleep timer 15
Using Headphones 15
05 iPod/iPhone/iPad mini playback
Confirming what iPod/iPhone/iPad mini models are supported 16
Connecting your iPod/iPhone 16
Connecting iPod/iPhone/iPad mini using supplied iPhone stand 17
Playing iPod/Phone/IPad mini 17
06 Disc playback
Playing discs or files 18
Advanced CD or MP3/WMA disc playback 19
Direct track search 19
Repeat play. 19
Random play 19
Programmed play (CD or MP3/WMA) 20
About downloading MP3/WMA 20
About folder playback order 20
Specify the folder to play. 21
Switch the display contents 21
07 USB playback
Playing USB storage devices 22
Repeat play. 22
Random play 22
Specify the folder to play. 23
Switch the display contents 23
Playing in the desired order (Programmed Play) 23
08 Using the tuner
Listening to the radio broadcasts 24
Tuning. 24
Saving station presets. 24
To recall a memorised station 25
To scan the preset stations. 25
To erase entire preset memory. 25
Listening to the DAB+ 25
About DAB+ (Digital Audio Broadcasting) 25
Auto Scan. 25
Selecting a station in the station list 25
Manual tune. 26
Changing the information display 26
Memorising a station 26
DAB Frequency table (BAND III) 27
09 Other connections
Connecting auxiliary components 28
10 Additional information
Troubleshooting 29
Playable discs and formats 31
Regarding copy protected CDs 31
Supported audio file formats 31
Cautions on use 31
When moving this unit 31
Place of installation. 31
Do not place objects on this unit 32
About condensation 32
Cleaning the product. 32
Cleaning the lens. 32
Handling discs 32
Storing 32
Cleaning discs 32
About specially shaped discs 32
About iPod/iPhone 33
Restoring all the settings to the defaults 33
Specifications 34
Chapter 1:
Before you start
What's in the box
Please confirm that the following accessories are in the box when you open it.
Remote control
- AC adapter
- Changeable panel × 2 (X-SMC00DAB-W do not have an interchangeable panel in the box)
AAA batteries (R03)× 2
DAB/FM wire antenna
iPhone stand
Warranty card
- Operating instructions (this document)
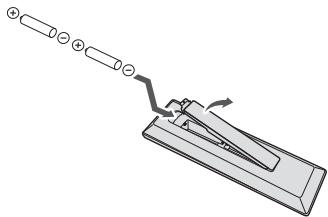
Loading the batteries in the remote control
1 Open the rear lid and load the batteries as illustrated below.
2 Close the rear lid.
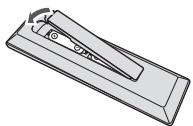
The batteries included with the unit have been provided to allow you check product operation and may not last long. We recommend using alkaline batteries that have a longer life.
CAUTION
- When inserting the batteries, make sure not to damage the springs on the battery's terminals. This can cause batteries to leak or over heat.

Insert the battery by aligning the pole against the remote control's terminal

If a battery pushes and bends the terminal out of shape, there is possibility of the alkaline battery shorting out
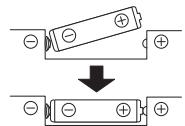
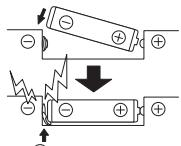
The terminal is bent out of shape
- Do not use any batteries other than the ones specified. Also, do not use a new battery together with an old one.
- When loading the batteries into the remote control, set them in the proper direction, as indicated by the polarity marks ( and ).
- Do not heat batteries, disassemble them, or throw them into flames or water.
- Batteries may have different voltages, even if they are the same size and shape. Do not use different types of batteries together.
- To prevent leakage of battery fluid, remove the batteries if you do not plan to use the remote control for a long period of time (1 month or more). If the fluid should leak, wipe it carefully off the inside of the case, then insert new batteries. If a battery should leak and the fluid should get on your skin, flush it off with large quantities of water.
- When disposing of used batteries, please comply with governmental regulations or environmental public institution's rules that apply in your country/area.
WARNING
Do not use or store batteries in direct sunlight or other excessively hot place, such as inside a car or near a heater. This can cause batteries to leak, overheat, explode or catch fire. It can also reduce the life or performance of batteries.
Using the remote control
The remote has a range of about 7 m at an angle of about 30° from the remote sensor.
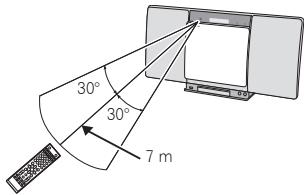
Keep in mind the following when using the remote control:
- Make sure that there are no obstacles between the remote and the remote sensor on the unit.
- Remote operation may become unreliable if strong sunlight or fluorescent light is shining on the unit's remote sensor.
- Remote controllers for different devices can interfere with each other. Avoid using remotes for other equipment located close to this unit.
- Replace the batteries when you notice a fall off in the operating range of the remote.
Chapter 2:
Part names and functions
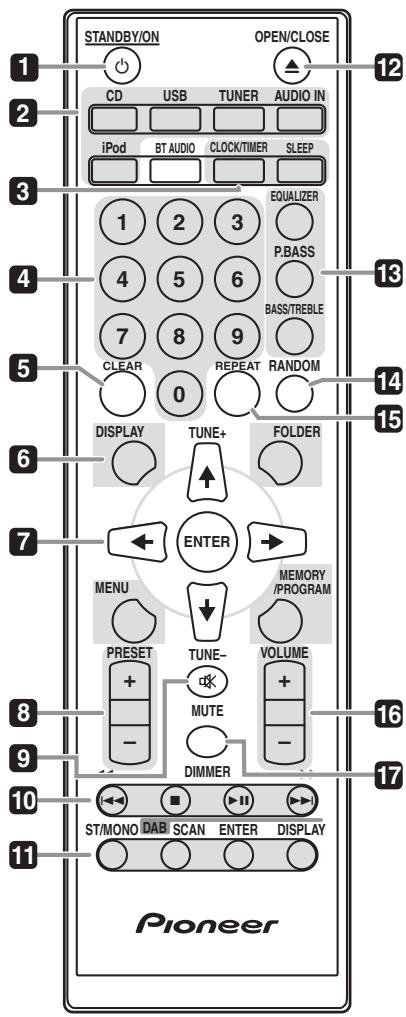
Remote control
1 STANDBY/ON
Switches the receiver between standby and on (page 13).
2 Input function buttons
Use to select the input source to this receiver (pages 17, 18, 22, 24 and 28).
3 Control buttons CLOCK/TIMER
Use for setting the clock, as well as for setting and checking the timers (page 13).
SLEEP
See Using the sleep timer on page 15.
4 Numeric buttons (0 to 9)
Use to enter the number (page 19).
5 CLEAR
Use to clear the programmed play (page 20).
6 Control buttons DISPLAY
Press to change the display for songs playing back from CD or USB (page 21).
FOLDER
Use to select the folder of the MP3/WMA disc or USB mass storage device (page 20).
MENU
Use to access the menu.
MEMORY/PROGRAM
Use to memory or program the MP3/WMA disc (page 20).
7 / / ← / → (TUNE +/- ), ENTER
Use to select/switch system settings and modes, and to confirm actions.
Use TUNE + / - can be used to find radio frequencies (page 24).
8 PRESET + / -
Use to select preset radio stations (page 25).
9 MUTE
Mutes/unmates the sound (page 13).
10Playback control buttons
Use to control each function after you have selected it using the input function buttons (page 18).
11 Tuner control buttons ST/MONO
Use to switch the sound mode between stereo and monaural. (page 24)
DAB SCAN
Use to scan for DAB radio station (page 25).
DAB ENTER
Use to confirm the DAB radio station (page 25).
DAB DISPLAY
Press to change the DAB display for information mode (page 26).
12 OPEN/CLOSE
Use to open or close the electric slide CD door (page 18).
13 Sound control buttons
Adjust the sound quality (page 14).
14 RANDOM
Randomize order of track playback from a CD, iPod or USB (page 19).
15 REPEAT
Press to change the repeat play setting from a CD, iPod or USB (page 19).
16 Volume control buttons
Use to set the listening volume (page 13).
17 DIMMER
Dims or brightens the display. The brightness can be controlled in four steps (page 13).

Note
- The BT AUDIO button is not available for this unit.
Hang from the wall to use
When hanging the unit from a wall, firmly screw the wall hanging screws (sold separately) into the wall, and confirm that the wall is capable of holding the unit safely. If the materials or strength of the wall cannot support the weight of the unit, then there is the possibility of the unit falling off.
1 Screw the wall hanging screws into the wall, putting them the specified attachment measurement (130 mm) apart.
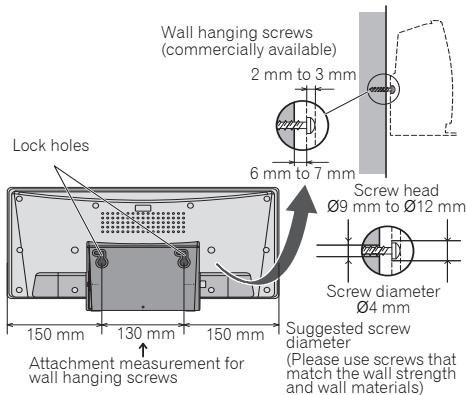
2 Insert the wall hanging screws into the lock holes.
3 Slide to the left to secure in place. (Slide distance is around 10mm )


Note
- When attaching the unit to the wall, there is the possibility of it falling depending on how it is attached. Take due care to avoid any accidents.
- Select a location for the placement/installation of unit that is sufficiently strong enough to hold the weight of the unit. If you do not know the strength etc. of the wall, then consult with a professional.
- The company bears no responsibility for accidents or damages caused by inadequate installation/attachment, incorrect use, modifications, natural disasters etc.
- Place all cables along the wall to prevent anyone from tripping over them.
- Do not exchange the changeable panel while the unit is hanging from a wall.
- When the unit is hanging from a wall, pay extra attention to make sure your iPod/iPhone does not fall.
- Do not hold the unit by grabbing onto the iPod/iPhone connector.
Front panel
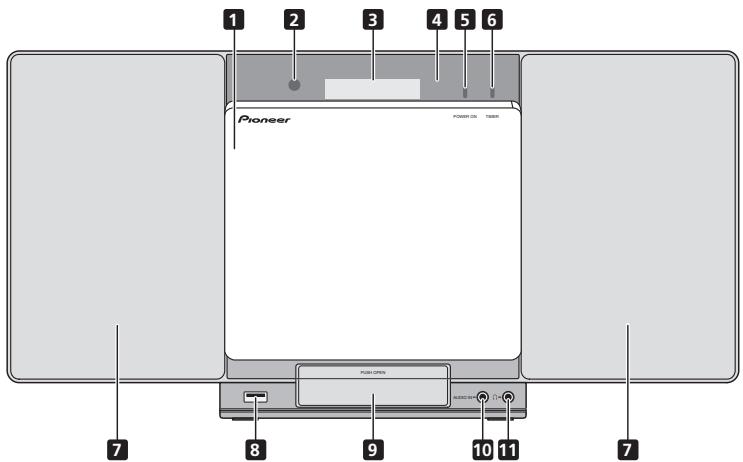
1 Electric slide CD door
2 Remote sensor
Receives the signals from the remote control.
3 Main display
4 Display panel
5 POWER ON indicator
When the power is on, this indicator lights.
6 TIMER indicator
Lit when the unit power is off but when the timer setting is activated.
7 Speaker
8 iPod/iPhone terminal
Use to connect your USB mass storage device or Apple iPod/ iPhone/iPad mini as an audio source (pages 17 and 22).
9 iPod/iPhone connector port
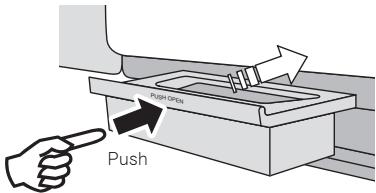
To connect the iPod/iPhone, press the PUSH OPEN tab (page 16).
10 AUDIO IN socket
Use to connect an auxiliary component using a stereo minijack cable (page 28).
11 Headphone socket
Use to connect headphones. When the headphones are connected, there is no sound output from the speakers (page 15).
Top panel/Rear panel

1 STANDBY/ON button
Switches the receiver between standby and on (page 13).
2 INPUT button
Selects the input source.
3 EQ button
Used when switching sound mode (page 14).
4Playback control buttons
Select the desired track or file to be played back. Stop current playback. Stop playback or resume playback from the point where it was paused.
5 VOLUME - / +
Use to set the listening volume (page 13).
6 Disc tray open/close button
Use to open or close the electric slide CD door (page 18).
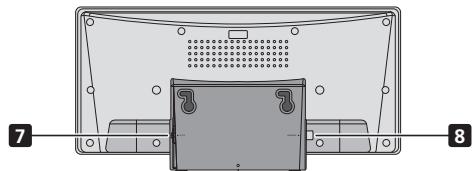
7 DC IN terminal
Plug the supplied AC adapter (page 12).
8 DAB/FM antenna socket
Connect provided DAB/FM wire antenna here (page 12).
Change the interchangeable panel
(X-SMC00DAB-W do not have an interchangeable panel in the box)

CAUTION
- Exchange of the changeable panel should be performed on a stable surface.
- Do not exchange the changeable panel while the unit is hanging from a wall.
- Be careful not to scratch or damage the display panel when exchanging the changeable panel.
- Do not apply excessive force to the changeable panel.
- If the panel is not attached correctly there is a chance that opening and closing operations will not be performed correctly. Because incorrect attachment can also be the cause of irregular or unwanted noise, make sure the panel is attached in the correct position.
- Be sure to turn off the power and unplug the power cord from the power outlet whenever making or changing connections.
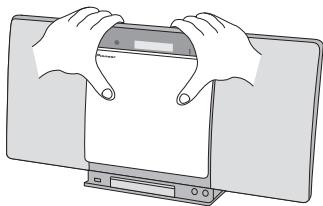
1 Make sure the electric slide CD door is closed.
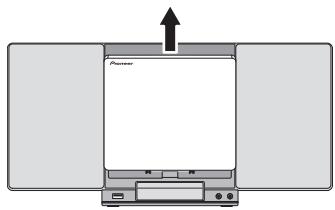
2 Using both hands, slide the changeable panel up to remove it.
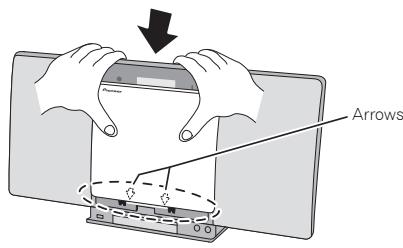
3 Align the line below the arrow and the bottom of the changeable panel, then slide downward using both hands until you hear a clicking sound.
Chapter 3:
Connections

CAUTION
- Be sure to turn off the power and unplug the power cord from the power outlet whenever making or changing connections.
- Connect the power cord after all the connections between devices have been completed.
Connecting antenna
Connect the DAB/FM wire antenna as shown below. To improve reception and sound quality, connect external antennas (see Using external antennas below).
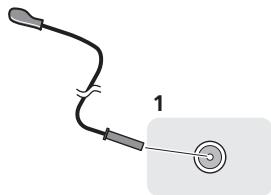
1 Connect the DAB/FM wire antenna into the DAB/FM antenna socket.
For best results, extend the DAB/FM antenna fully and fix to a wall or door frame. Don't drape loosely or leave coiled up.
Using external antennas
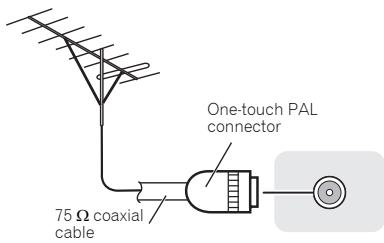
To improve DAB/FM reception
Use a PAL connector (not supplied) to connect an external DAB/FM antenna.
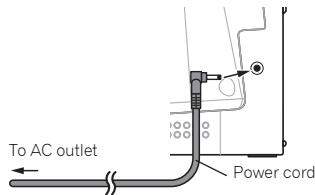
Plugging in
CAUTION
- Do not use any power cord other than the one supplied with this unit.
- Do not use the supplied power cord for any purpose other than that described below.
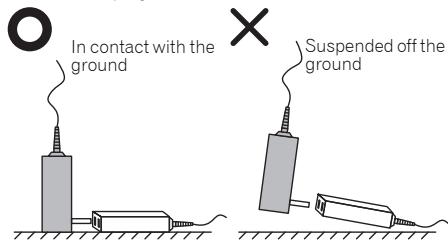
- The cord on the AC adaptor is 1.5m long. Make sure that the body of the AC adaptor is not suspended off the ground during use, as this will place unnecessary force on the DC plug.
- When inserting the AC adapter into a wall socket, make sure that there is no gap between the AC adaptor and the wall socket. Such a gap may cause a poor connection, and metal items like coins or paperclips falling into it may cause a short circuit and start a fire.

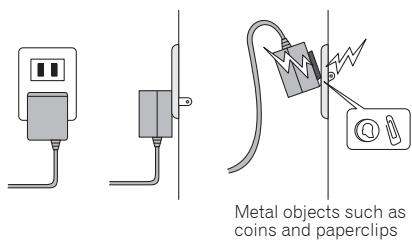
Front view Side view
Side view
Connect the AC adaptor into a wall socket. Only connect the AC adapter when all other connections to the unit have been completed.
Chapter 4:
Getting started
To turn the power on
Press the STANDBY/ON to turn the power on.
After use:
Press the STANDBY/ON to enter the power stand-by mode.

Note
- In standby mode, if iPod/iPhone/iPad mini is connected, the unit turns charge mode.
Setting the clock
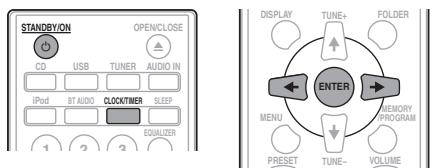
1 Press STANDBY/ON to turn the power on.
2 Press CLOCK/TIMER on the remote control. "CLOCK" is shown on the main display.
3 Press ENTER.
4 Press ← / ⇒ to set the day, then press ENTER.
5 Press / ⇒ to set the hour, then press ENTER.
6 Press ← / ⇒ to set the minute, then press ENTER to confirm.
7 Press ENTER.
To confirm the time display:
Press the CLOCK/TIMER. The time display will appear for about 10 seconds.
To readjust the clock:
Perform "Setting the clock" from step 1.

Note
- When power supply is restored after unit is plugged in again or after a power failure, reset the clock.
General control
Input function
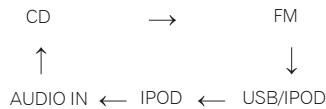
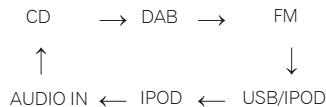
When the INPUT on main unit is pressed, the current function will change to different mode. Press the INPUT repeatedly to select desired function.
X-SMC00
X-SMC00DAB
Display brightness control
Press DIMMER to dims the display brightness. The brightness can be controlled in four steps.
Volume auto setting
If you turn off and on the main unit with the volume set to 31 or higher, the volume starts at 30 and sets in to the last set level.
Volume control
Press the VOLUME - / + on the unit or press VOLUME + / - on the remote control to increase or decrease the volume.

CAUTION
- The sound level at a given volume setting depends on speaker efficiency, location, and various other factors. It is advisable to avoid exposure to high volume levels. Do not turn the volume on to full at switch on. Listen to music at moderate levels. Excessive sound pressure from earphones and headphones can cause hearing loss.
Muting
The volume is muted temporarily when pressing the MUTE on the remote control. Press again to restore the volume.
Sound controls
Equalizer
When the EQUALIZER is pressed, the current mode setting will be displayed. To change to a different mode, press the EQUALIZER repeatedly until the desired sound mode appears.
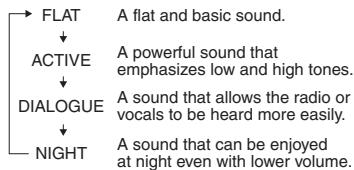
P.BASS control
When the power is first turned on, the unit will enter the P.BASS mode which emphasises the bass frequencies. To cancel the P.BASS mode, press the P.BASS on the remote control.
Bass/treble control
Press the BASS/TREBLE, then press / / ↔ to adjust the bass or treble.

Note
- The EQUALIZER and P.BASS cannot operate simultaneously. The most recently selected of these two functions will be the one used.
- BASS/TREBLE can operate alongside either the EQUALIZER or P.BASS.
When one of the above two functions is selected, the function that is not selected will be displayed as follows.
1 When P.BASS setting (ON/OFF) is changed
- EQUALIZER:FLAT
2 When EQUALIZER setting (ON/OFF) is changed
P.BASS:OFF
Setting the wake-up timer
Used to change the existing timer setting, or to set a new timer.
1 Press STANDBY/ON to turn the power on.
2 Press and hold CLOCK/TIMER.
3 Press ← / ⇒ to select "ONCE" or "DAILY", then press ENTER.
ONCE - Works once only at a preset time.
DAILY - Works at the preset time on a preset day.
4 Press ← / → to select "TIMER SET", then press ENTER.
5 Press ← / ⇒ to select the timer playback source, then press ENTER.
- CD, DAB, FM, USB/IPOD, IPOD and AUDIO IN can be selected as the playback source.
6 Press ← / ⇒ to select the timer day, then press ENTER.
7 Press ← / → to set the hour, then press ENTER.
8 Press ← / ⇒ to set the minute, then press ENTER.
- Set the time to finish as in steps 7 and 8 above.
9 Adjust the volume press VOLUME + / - , then press ENTER.
10 Press STANDBY/ON to enter the power standby mode.
- The TIMER indicator lights up.
Calling the wake-up timer
An existing timer setting can be reused.
1 Follow steps 1 to 3 in "Setting the wake-up timer".
2 Press ← / → to select "TIMER ON", then press ENTER.
Cancelling the wake-up timer
Turn off the timer setting.
1 Follow steps 1 to 3 in "Setting the wake-up timer".
2 Press ← / → to select "TIMER OFF", then press ENTER.
Using the wake-up timer
1 Press STANDBY/ON to turn the power off.
2 At the wake-up time, this unit will turn on automatically and play the selected input function.

Note
- If at the wake-up time an iPod/iPhone/iPad mini is not connected to the unit or a disc is not inserted, the unit will be turned on but will not play back the track.
Some discs may not be played automatically at the wake-up time. - When setting the timer set at least one minute between the start and end time.
Using the sleep timer
The sleep timer switches off the unit after a specified time so you can fall asleep without worrying about it.
1 Press SLEEP repeatedly to select a switch off time.
Choose between 10 min, 20 min, 30 min, 60 min, 90 min, 120 min, 150 min, 180 min or OFF. The newly set value displays for 3 seconds, and then the setting is completed.

Note
- The sleep timer can be set by pressing SLEEP while the remaining time is displayed.
Using Headphones
Connect the headphones plug to the PHONES terminal. When the headphones are connected, there is no sound output from the speakers.
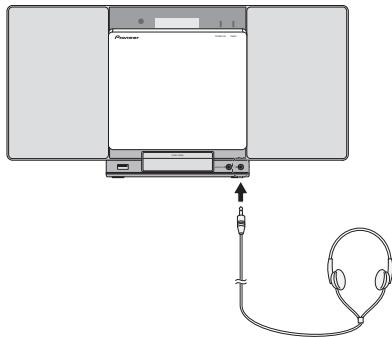
- Do not turn the volume on to full at switch on and listen to music at moderate levels. Excessive sound pressure from earphones and headphones can cause hearing loss.
- Before plugging in or unplugging the headphone, reduce the volume.
- Be sure your headphone has a 3.5 mm diameter plug and impedance between 16 Ω and 50 Ω . The recommended impedance is 32 Ω .
- Audio from the iPod/iPhone/iPad mini cannot be heard via the headphones connected to the unit. "HP MUTE" will be displayed if you connect the headphones when the iPod/iPhone/iPad mini function is selected.
Chapter 5:
iPod/iPhone/iPad mini playback
Merely by connecting your iPod/iPhone/iPad mini to this unit, you can enjoy high-quality sound from your iPod/iPhone/iPad mini. Playback setting for iPod/iPhone/iPad mini music can be performed from this unit or the iPod/iPhone/iPad mini itself.
Confirming what iPod/iPhone/iPad mini models are supported
The iPod/iPhone/iPad mini playable on this unit are shown below.
| iPod/iPhone/iPad mini | Dock connector | iPod/iPhone Terminal |
| iPod nano 3G/4G/5G/6G | ✓ | ✓ |
| iPod nano 7G | × | ✓ |
| iPod touch 1G/2G/3G/4G | ✓ | ✓ |
| iPod touch 5G | × | ✓ |
| iPhone | ✓ | ✓ |
| iPhone 3G | ✓ | ✓ |
| iPhone 3GS | ✓ | ✓ |
| iPhone 4 | ✓ | ✓ |
| iPhone 4S | ✓ | ✓ |
| iPhone 5 | × | ✓ |
| iPad mini | × | ✓ |

Note
- Pioneer does not guarantee that this unit plays iPod/ iPhone/iPad mini models other than the ones specified.
Some functions may be restricted depending on the model or software version. - iPod/iPhone/iPad mini is licensed for reproduction of non-copyrighted materials or materials the user is legally permitted to reproduce.
- Features such as the equalizer cannot be controlled using this system, and we recommend switching the equalizer off before connecting.
- Pioneer cannot under any circumstances accept responsibility for any direct or indirect loss arising from any inconvenience or loss of recorded material resulting from iPod/iPhone/iPad mini failure.
- For detailed instructions on using the iPod/iPhone/iPad mini, please refer to the manual supplied with the iPod/ iPhone/iPad mini.
- This system has been developed and tested for the software version of iPod/iPhone/iPad mini indicated on the website of Pioneer (http://pioneer.jp/homeav/support/ios/eu/).
- Installing software versions other than indicated on the website of Pioneer to your iPod/iPhone/iPad mini may result in incompatibility with this system.
- This unit cannot be used to record CD, tuner or other content on an iPod/iPhone/iPad mini.
Connecting your iPod/iPhone
CAUTION
- When connecting iPod/iPhone devices, always use the dock adapter provided with iPod/iPhone devices, or a commercially available adapter designed to support iPod/iPhone. The iPod/iPhone cannot be connected without a dock adapter; attempting to connect an iPod/iPhone without it will cause damage or malfunction.
- An iPod/iPhone universal dock adapter is not supplied with this unit.
Important
- If you use a commercially available protective cover with your iPod/iPhone, you may not be able to connect your iPod/iPhone to the unit.
1 Press the PUSH OPEN.
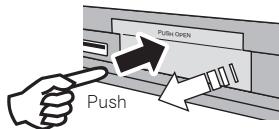
2 Attach the dock adapter to iPod/iPhone connector port.
When attaching the dock adapter, be sure to orient the frontback directions of the dock adapter correctly. To attach, first place the protruding tabs on the front side of the adapter into the depressions on the iPod/iPhone connector port and press into position. When attaching the adapter, be careful not to strike the connectors.
3 Connect your iPod/iPhone.
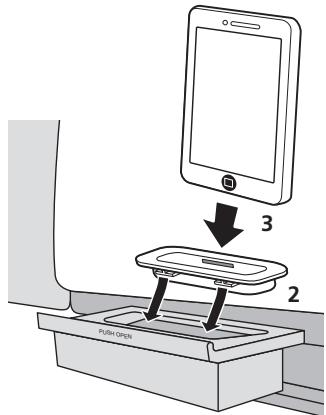
- When iPod/iPhone is not connected to the unit, close the iPod/iPhone connector port firmly.
CAUTION
- Do not use an adaptor that converts into a Lightning connector on the unit's dock connector to connect an iPod/iPhone/iPad mini. This may lead to malfunction/ damage to the connector.
Connecting iPod/iPhone/iPad mini using supplied iPhone stand
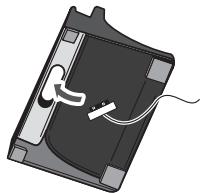
1 Connect the iPod/iPhone/iPad mini cable to the iPod/iPhone terminal on the front of the unit.
2 Pass the iPod/iPhone/iPad mini cable through the bottom of the stand and connect it to the iPod/iPhone/iPad mini.
3 Set the iPod/iPhone/iPad mini on the stand.
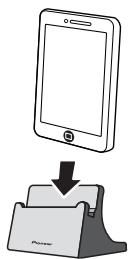
Playing iPod/iPhone/iPad mini
1 Connect your iPod/iPhone/iPad mini.
- If an iPod/iPhone/iPad mini is connected while the unit is turned on, playback of the iPod/iPhone/iPad mini will not begin.
2 Press iPod or USB as the input source.
"IPOD" or "USB/IPOD" is shown on the main display.
3 When the recognition is completed, will begin playing automatically.
- The available iPod/iPhone/iPad mini playback controls from the unit are II, I
-
In the following case, operate your iPod/iphone/iPad mini directly:
-
Searching a file by artist name or genre.
- Playing in the repeat or random mode.
CAUTION
- When your iPod/iPhone/iPad mini is connected to this unit and you wish to operate the iPod/iPhone/iPad mini directly, be sure to steady the iPod/iPhone/iPad mini with the other hand to prevent malfunctions due to faulty contacts.

Note
- For detailed instructions on using the iPod/iPhone/iPad mini, please refer to the manual supplied with the iPod/ iPhone/iPad mini.
- iPod/iPhone/iPad mini recharging occurs whenever an iPod/ iPhone/iPad mini is connected to this unit. (This function is supported in standby mode as well.)
- When input is switched from iPod to another function, iPod/Phone/iPad mini playback is temporarily stopped.
Important
If this unit cannot play your iPod/iPhone/iPad mini, perform the following troubleshooting checks:
- Check whether the iPod/iPhone/iPad mini is supported by this unit.
- Reconnect the iPod/iPhone/iPad mini to the unit. If this doesn't seem to work, try resetting your iPod/iPhone/iPad mini.
- Check that iPod/iPhone/iPad mini software is supported by the unit.
If the iPod/iPhone/iPad mini cannot be operated, check the following items:
- Is the iPod/iPhone/iPad mini connected correctly? Reconnect the iPod/iPhone/iPad mini to the unit.
- Is the iPod/iPhone/iPad mini experiencing a hangup? Try resetting the iPod/iPhone/iPad mini, and reconnect it to the unit.
Chapter 6:
Disc playback
This system can play back a standard CD, CD-R/RW in the CD format and CD-R/RW with MP3 or WMA files, but cannot record on them. Some audio CD-R and CD-RW discs may not be playable due to the state of the disc or the device that was used for recording.
MP3:
MP3 is a form of compression. It is an acronym which stands for MPEG Audio Layer 3. MP3 is a type of audio code which is processed by significant compression from the original audio source with very little loss in sound quality.
- This system supports MPEG-1/2 Audio Layer 3 (Sampling rates: 8kHz to 48kHz ; Bit rates: 64 kbps to 384 kbps).
- During VBR file playback, time counter in the display may differ from its actual playback time.
WMA:
WMA (Windows Media Audio) files are Advanced System Format files that include audio files which are compressed with Windows Media Audio codec. WMA is developed by Microsoft as an audio format file for Windows Media Player.
- This system supports WMA (Sampling rates: 32 kHz/44.1 kHz/48 kHz; Bit rates: 64 kbps to 320 kbps).
- During VBR file playback, time counter in the display may differ from its actual playback time.
Playing discs or files
1 Press STANDBY/ON to turn the power on.
2 Press CD on the remote control or INPUT repeatedly on the main unit to select CD input.
3 Press OPEN/CLOSE to open the electric slide CD door.
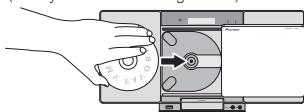
4 Insert the disc.
Inset the disc with the printed label facing outward (you can see it).
Inset the disc while pressing down on it until the centre of the disc is held in place (until you hear a clicking sound).
5 Press OPEN/CLOSE to close the electric slide CD door.
6 Press to start playback.
After the last track is played, the unit will stop automatically.
CAUTION
- Do not touch the lens.
- Be careful not to get your hand or headphone cable caught when opening and closing the slide door.
- Do not insert two or more discs into the disc tray at once.
- Do not play discs of special shapes (heart, octagon, etc). It may cause malfunctions.
- Do not touch the electric slide CD door when it is moving.
- If power is lost while the electric slide CD door is open, wait until the power is restored.
Note
- Due to the structure of the disc information, it takes longer to read an MP3/WMA disc than a normal CD (approximately 20 to 90 seconds).
- When the beginning of the first track is reached during fast reverse, the unit will enter the playback mode (only for CD).
- If TV or radio interference occurs during CD operation, move the unit away from the TV or radio.
Tip
- When no operation has done in CD mode and the audio file is not played for more than 30 minutes, the power will automatically turn off.
Various disc functions
| Function | Main unit | Remote control | Operation |
| Play | →II | →II | Press in the stop mode. |
| Stop | ■ | ■ | Press in the playback mode. |
| Pause | →II | →II | Press in the playback mode. Press ➔II to resume playback from the paused point. |
| Track up/down | ←←→← | ←→ | Press in the playback or stop mode. If you press the button in the stop mode, press ➔II to start the desired track. |
| Fast forward/reverse | ←←→← | ←→ | Press and hold down in the playback mode. Release the button to resume playback. |
Advanced CD or MP3/WMA disc playback
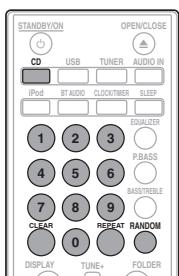

Direct track search
By using the numeric buttons, the desired tracks on the current disc can be played.
Use the numeric buttons on the remote control to select the desired track whilst playing the selected disc.
Note
- A track number higher than the number of tracks on the disc cannot be selected.
To stop playback:
Press ■.
Repeat play
Repeat play can play one track, all tracks or a programmed sequence continuously.
To repeat one track:
Press REPEAT repeatedly until "RPT ONE" appears. Press ENTER.
To repeat all tracks:
Press REPEAT repeatedly until "RPT ALL" appears. Press ENTER.
To repeat desired tracks:
Perform steps 1 to 5 in "Programmed play (CD or MP3/WMA)" section on next page and then press REPEAT repeatedly until "RPT ALL" appears. Press ENTER.
To cancel repeat play:
Press REPEAT repeatedly until "RPT OFF" appears. Press ENTER.

Note
After performing repeat play, be sure to press Otherwise, the disc will play continuously.
During repeat play, random play is not possible.
Random play
The tracks on the disc can be played in random order automatically.
To random play all tracks:
Press RANDOM repeatedly until "RDM ON" appears. Press ENTER.
To cancel random play:
Press RANDOM repeatedly until "RDM OFF" appears. Press ENTER.

Note
- If you press the during random play, you can move to the track selected next by the random operation. On the other hand, the does not allow you to move to the previous track. The beginning of the track being played will be located.
- In random play, the unit will select and play tracks automatically. (You cannot select the order of the tracks.)
- During random play, repeat play is not possible.
Programmed play (CD or MP3/WMA)
You can choose up to 32 selections for playback in the order you like.
1 Whilst in the stop mode, press MEMORY/PROGRAM on the remote control to enter the programming save mode.
2 Press or the numeric buttons on the remote control to select the desired tracks.
3 Press ENTER to save folder and track number.
4 Repeat steps 2 to 3 for other folder/tracks. Up to 32 tracks can be programmed.
- If you want to check the programmed tracks, press MEMORY/PROGRAM.
- If you make a mistake, the last programmed tracks will be canceled by pressing CLEAR.
5 Press II to start playback.
To cancel the programmed play mode:
To cancel the programmed play, press twice on the remote control. The display will show "PRG CLR" and all the programmed content will be cleared.
Adding tracks to the program:
Press the MEMORY/PROGRAM. Then follow steps 2 to 3 to add tracks.

Note
- When a disc is ejected anything programmed is cleared.
- If you press the STANDBY/ON to enter the standby mode or change the function from CD to another, the programmed selections will be cleared.
- During the program operation, random play is not possible.
About downloading MP3/WMA
There are many music sites on the internet that you can download MP3/WMA music files. Follow the instructions from the website on how to download the music files. You can then play back these downloaded music files by burning them to a CD-R/RW disc.
- Your downloaded song/files are for personal use only. Any other usage of the song without owner's permission, is against the law.
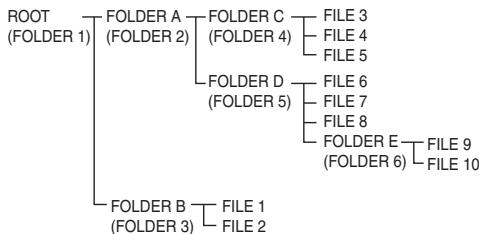
About folder playback order
If MP3/WMA files are recorded in several folders, a folder number will be set to each folder automatically.
These folders can be selected by the FOLDER on the remote control. If there is no supported file formats inside the selected folder, the folder is skipped and the next folder will be selected.
Example: How the folder numbers are assigned if MP3/WMA format files are recorded are as shown below.
1 ROOT folder is set as FOLDER 1.
2 As for folders inside ROOT folder (FOLDER A and FOLDER B), the folder which is recorded earlier on the disc will be set as FOLDER 2 and FOLDER 3.
3 As for folder inside FOLDER A (FOLDER C and FOLDER D), the folder which is recorded earlier on the disc will be set as FOLDER 4 and FOLDER 5.
4 FOLDER E that is inside FOLDER D will be set as FOLDER 6.
- The folder and file order information which is recorded on the disc depends on the writing software. There may be possibilities that this unit will playback the files not according to our expected playback order.
- From a disc with MP3/WMA files up to 255 folders and 999 files (including non playable files) can be read.
Specify the folder to play
To specify the folder to play, perform the following steps.
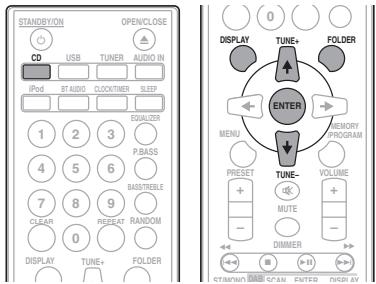
1 Press CD, and load an MP3/WMA disc.
2 Press FOLDER, and press ↑/↓ to select desired playback folder.
3 Press ENTER.
Playback will start from the first song of the selected folder.
Even if it is stopped, it is possible to press / , to select a folder.
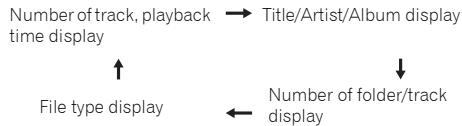
Switch the display contents
1 Press DISPLAY.
If the title, artist and album name has been written to the file, that information will be displayed. (The unit can only display alphanumeric characters. Non-alphanumeric character are displayed as **.

Note
Copyright protected WMA files" or "Unsupported files cannot be played back. In these case the files will be skipped automatically.
- There may be cases where no information can be displayed.
- Displaying title, artist and album name is only supported for MP3 files.
Chapter 7:
USB playback
Playing USB storage devices
It is possible to listen to two-channel audio using the USB interface on the front of this receiver.
- Pioneer does not guarantee that any file recorded on a USB storage device will play or that power will be supplied to a USB storage device. Also note that Pioneer will accept no responsibility whatsoever for loss of files on USB storage devices caused by connection to this unit.
1 Press USB as the input source.
"USB/IPOD" is shown on the main display.
2 Connect the USB storage device.
The number of folders or files stored on the connected USB storage device appear on the main display automatically.
This receiver does not support a USB hub.
- If an iPod/iPhone/iPad mini is connected to the unit, the unit will automatically begin charging it.
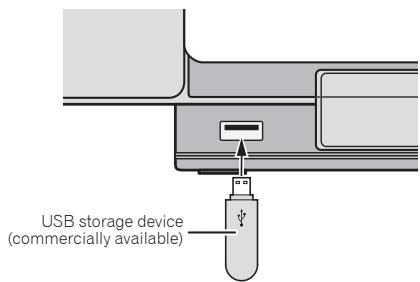
3 When the recognition is completed, press to start playback.
- When changing to a different input source, stop the USB memory playback first, before changing.
4 Disconnect USB storage device from the iPod/iPhone terminal.
Turn the power off before removing the USB storage device.

Note
- USB flash drive that supports USB 2.0 can be used.
- This unit may not recognize a USB storage device, play files or supply power to a USB storage device. For details, see When a USB storage device is connected on page 30.
- When a USB storage device is not playing and no operations have been performed for more than 30 minutes, the unit will automatically power off.
Repeat play
Repeat play can play one track, all tracks or a programmed sequence continuously.
To repeat one track:
Press REPEAT repeatedly until "RPT ONE" appears. Press ENTER.
To repeat all tracks:
Press REPEAT repeatedly until "RPT ALL" appears. Press ENTER.
To repeat desired tracks:
Perform steps 1 to 5 in "Programmed play (CD or MP3/WMA)" section on next page and then press REPEAT repeatedly until "RPT ALL" appears. Press ENTER.
To cancel repeat play:
Press REPEAT repeatedly until "RPT OFF" appears. Press ENTER.

Note
- After performing repeat play, be sure to press . Otherwise, the file of USB storage device will play continuously.
During repeat play, random play is not possible.
Random play
The file of USB storage device can be played in random order automatically.
To random play all tracks:
Press RANDOM repeatedly until "RDM ON" appears. Press ENTER.
To cancel random play:
Press RANDOM repeatedly until "RDM OFF" appears. Press ENTER.

Note
- If you press the during random play, you can move to the track selected next by the random operation. On the other hand, the does not allow you to move to the previous track. The beginning of the track being played will be located.
- In random play, the unit will select and play tracks automatically. (You cannot select the order of the tracks.)
- During random play, repeat play is not possible.
Specify the folder to play
To specify the folder to play, perform the following steps.
1 Press USB, and connect the USB storage device.
2 Press FOLDER, and press / to select desired playback folder.
3 Press ENTER.
Playback will start from the first song of the selected folder.
Even if it is stopped, it is possible to press / , to select a folder.
Switch the display contents
The unit can display the information recorded in the USB storage device. For details, see Switch the display contents on page 21.
Playing in the desired order (Programmed Play)
The unit can play folders stored on a USB storage device in the desired order. For details, see Programmed play (CD or MP3/WMA) on page 20.
Chapter 8:
Using the tuner
Listening to the radio broadcasts
The following steps show you how to tune in to FM radio broadcasts using the automatic (search) and manual (step) tuning functions. Once you are tuned to a station you can memorize the frequency for recall later. See Saving station presets below for more on how to do this.
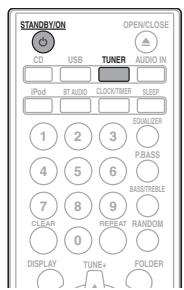
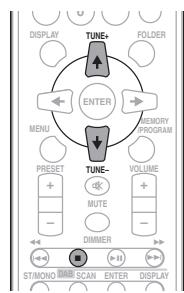
Tuning
1 Press the STANDBY/ON to turn the power on.
2 Press TUNER.
3 Press TUNE + / - on the remote control to tune in to the desired station.
Automatic tuning:
Press and hold TUNE +/- , scanning will start automatically and the tuner will stop at the first receivable broadcast station.
Manual tuning:
Press the TUNE + / - repeatedly to tune in to the desired station.

Note
- When radio interference occurs, automatic tuning may stop automatically at that point.
Automatic tuning will skip weak signal stations. - To stop the automatic tuning, press.
To receive an FM stereo transmission:
- Press ST/MONO to select stereo mode and "AUTO" will be displayed.
Improving poor FM reception:
1 Press ST/MONO repeatedly to select MONO.
This will change the tuner from stereo to mono and usually improve the reception.
Saving station presets
If you often listen to a particular radio station, it's convenient to have the receiver store the frequency for easy recall whenever you want to listen to that station (Preset tuning). This saves the effort of manually tuning in each time. This unit can memorize up to 30 stations.
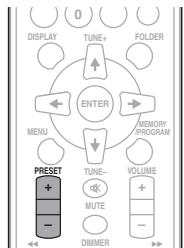
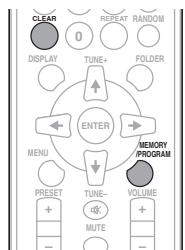
1 Tune to a station you want to memorize.
See Tuning above for more on this.
2 Press MEMORY/PROGRAM.
The preset number will flash.
3 Press PRESET + / - to select the preset channel number.
4 Press MEMORY/PROGRAM to store that station in memory.
If the preset number has changed from flashing to lighting, before the station is memorised, repeat the operation from step 2.
- Repeat steps 1 to 4 to set other stations, or to change a preset station. When a new station is stored in the memory, the station previously memorised for that preset channel number will be erased.

Note
- The backup function protects the memorised stations for a few hours should there be a power failure or the AC power cord become disconnected.
To recall a memorised station
1 Press PRESET + / - to select the desired station.
To scan the preset stations
The stations saved in the memory can be scanned automatically. (Preset memory scan)
1 Press and hold PRESET + / -
The preset number will appear and the programmed stations will be tuned in sequentially, for 5 seconds each.
2 Press PRESET + / - again when the desired station is located.
To erase entire preset memory
1 Press TUNER on the remote control.
2 Press CLEAR until "MEM CLR" appears.

All stations will be erased.
Listening to the DAB+
About DAB+ (Digital Audio Broadcasting)
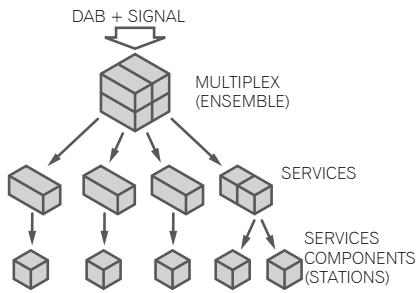
Digital Audio Broadcasting is a digital transmission system where audio signals are converted to digital signals for broadcasting. DAB+ is broadcast as a group of data called multiplex (ensemble) which may contain one or more stations (services). Each station contains a primary service and there may be one or more secondary services. This allows several programmes or services to be transmitted on a single frequency.
Auto Scan
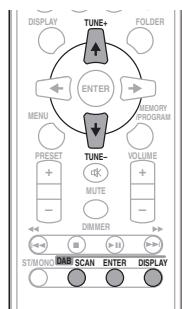
When turned on for the first time, the unit scans radio stations automatically to create a station list. You can make the auto scan again when you move the unit to other areas or add multiplex channels to the station list.
1 Press the TUNER until "DAB" appears on the display.
2 Press DAB SCAN on the remote control for more than 3 seconds.
Auto Scan scanning begins.
After the scan:
The stations will be stored in alphanumeric order and the first station on the list will be selected and you will hear it through the speakers.
- To listen to other stations, see Selecting a station in the station list below.

If no station is found, "NO SIG" appears.
- Up to 100 appears for total received stations.
Selecting a station in the station list
Once a DAB+ station is received, you can select stations in the station list.
1 Press the TUNER until "DAB" appears on the display.
2 Whilst receiving a DAB+ station, press the TUNE +/- to select the desired station.
3 Within 10 seconds, press the DAB ENTER on the remote control to tune into the desired station.
Manual tune
You can manually store stations which Auto Scan cannot find. If reception is poor, you can adjust the sensitivity. Manual tune is only available after Auto tune. Perform Auto Scan first.
1 Press the TUNER until "DAB" appears on the display.
2 Press the DAB SCAN once.
3 Within 10 seconds, press the TUNE + / - to select the DAB+ frequency.
4 Within 10 seconds, press the DAB ENTER.
- If the level is too low, move the aerial or unit to improve reception.
Changing the information display
You can switch DAB+ display information.
Press the DAB DISPLAY button.
Each time the button is pressed, the information display changes in the following order.
When "NO SIG" appears, the DAB DISPLAY button does not allow you to change the display.
[Station Name]
Station name is displayed. (set by default)
[Scrolling text]
Information scrolls across the display when sent from the station.
[Programme type]
A description of the type of content being broadcast by the station.
[Multiplex name]
The name of the multiplex (ensemble) which provides the current service.
[Frequency]
The DAB+ frequency for the station.
[Stereo mode]
Display stereo mode.
[Transfer speed]
The data transfer speed.
[Signal quality]
The signal quality is displayed as a number (0 - 100).
[85-100: Good, 70-84: Fair, 0-69: Poor]
Memorising a station
You can store 10 DAB stations in memory and recall them at the push of a button. (Preset tuning)
1 Tune to the desired DAB station.
2 Press the MEMORY/PROGRAM.
The preset number will flash.
3 Within 10 seconds, press the PRESET + / - to select the preset channel number.
Store the stations in memory, in order, starting with preset channel 1.
4 Within 10 seconds, press the MEMORY/PROGRAM to store that station in memory.
If the preset number indicators disappear before the station is memorised, repeat the operation from step 2.
5 Repeat steps 1 - 4 to set other stations, or to change a preset station.
When a new station is stored in the memory, the station previously memorised for that preset channel number will be erased.
DAB Frequency table (BAND III)
| Frequency | Label | Frequency | Label |
| 174.928 MHz | 5A | 208.064 MHz | 9D |
| 176.640 MHz | 5B | 209.936 MHz | 10A |
| 178.352 MHz | 5C | 211.648 MHz | 10B |
| 180.064 MHz | 5D | 213.360 MHz | 10C |
| 181.936 MHz | 6A | 215.072 MHz | 10D |
| 183.648 MHz | 6B | 216.928 MHz | 11A |
| 185.360 MHz | 6C | 218.640 MHz | 11B |
| 187.072 MHz | 6D | 220.352 MHz | 11C |
| 188.928 MHz | 7A | 222.064 MHz | 11D |
| 190.640 MHz | 7B | 223.936 MHz | 12A |
| 192.352 MHz | 7C | 225.648 MHz | 12B |
| 194.064 MHz | 7D | 227.360 MHz | 12C |
| 195.936 MHz | 8A | 229.072 MHz | 12D |
| 197.648 MHz | 8B | 230.784 MHz | 13A |
| 199.360 MHz | 8C | 232.496 MHz | 13B |
| 201.072 MHz | 8D | 234.208 MHz | 13C |
| 202.928 MHz | 9A | 235.776 MHz | 13D |
| 204.640 MHz | 9B | 237.488 MHz | 13E |
| 206.352 MHz | 9C | 239.200 MHz | 13F |

Note
- Label is not displayed on the main display. Will displayed only frequency.
Chapter 9:
Other connections

CAUTION
- Before making or changing the connections, switch off the power and disconnect the power cord from the AC outlet.
Connecting auxiliary components
Connect the front panel AUDIO IN mini-plug jack to your auxiliary playback component.
- This method can be used to play music on this unit from iPod/iPhone/iPad mini that do not support use of an iPod Dock and iPod/iPhone terminal.
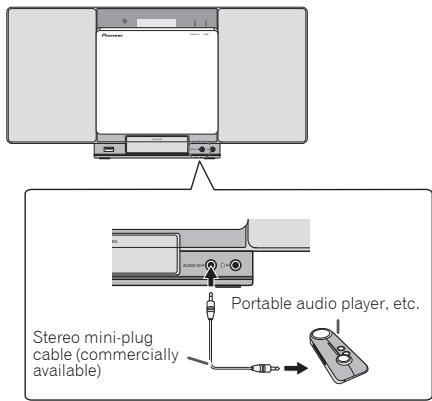
1 Switch input by pressing the INPUT on the main unit or the AUDIO IN on the remote control.
When INPUT is selected "AUDIO IN" will be displayed on the main display.

Note
- If the AUDIO IN mini Plug jack is connected to auxiliary phones jack, the volume of the unit will be adjusted by the volume on the playback component. If the sound is distorted after you lower the volume of the unit, try lowering the volume on the auxiliary playback component.
Chapter 10:
Additional information
Troubleshooting
Incorrect operations are often mistaken for trouble and malfunctions. If you think that there is something wrong with this component, check the points below. Sometimes the trouble may lie in another component. Investigate the other components and electrical appliances being used. If the trouble cannot be rectified even after exercising the checks listed below, ask your nearest Pioneer authorized service center or your dealer to carry out repair work.
- If the unit does not operate normally due to external effects such as static electricity disconnect the power plug from the outlet and insert again to return to normal operating conditions.
General problem
| Problem | Check | Remedy |
| Settings you have made have been cleared. | Was the power cord unplugged? | When power cord is unplugged, the settings you have made is cleared. Please set the clock again. If you do not want to clear the settings, do not unplug the power cord. |
| Difference in volume between CDs, MP3, WMA, iPod/iPhone/iPad mini, Tuner and AUDIO IN. | This is not a problem with this unit. | The volume may sound differently depending on the input source and recording format. |
| This unit cannot be operated with the remote control. | Are you operating from far away? | Operate within 7 m, 30° of the remote sensor on the front panel (page 6). |
| Is the remote control sensor exposed to direct sunlight or strong artificial light from a fluorescent bulb, etc.? | The remote control signals may not be received properly if the remote control sensor is exposed to direct sunlight or strong artificial light from a fluorescent bulb, etc. | |
| Are the batteries dead? | Replace the batteries (page 5). | |
| Disc cannot be played. | Is the disc scratched? | Scratched discs may not play. |
| Is the disc dirty? | Wipe the dirt off the disc (page 32). | |
| Is the disc inserted correctly? | Make sure that the printed label is facing outward, visible to you (page 18). | |
| Is this unit placed in a humid location? | There could be condensation inside. Wait a while for the condensation to evaporate. Do not place this unit near an air-conditioner, etc. (page 32). | |
| Sound skips when the disc is played back. | Is the playback volume too loud? | If the sound skips when played back at a loud volume, reduce the playback volume (page 13). |
| Folder or file names are not recognized. | Have you exceeded the maximum number of folder or file names this unit can recognize? | Up to 255 folders can be recognized on one disc. Up to 999 files can be recognized within one folder. Depending on the folder structure, however, this unit may not be able to recognize certain folders or files. |
| The unit turns off automatically. | If no play back and no operation has done for 30 minutes or more, the unit turns off automatically. |
When a USB storage device is connected
| Problem | Check | Remedy |
| USB storage device is not recognized. | Is the USB storage device properly connected? | Connect the device securely (all the way in). |
| Is the USB storage device connected via a USB hub? | This unit does not support USB hubs. Connect the USB storage device directly. | |
| Is the USB storage device supported by this unit? | This unit only supports USB mass storage class devices. | |
| This unit supports portable flash memory and digital audio playback devices. | ||
| Only the FAT16 and FAT32 file systems are supported. Other file systems (exFAT, NTFS, HFS etc.) are not supported. | ||
| USB flash drive that supports USB 2.0 can be used. | ||
| This device does not support the use of external hard disc drives. | ||
| This is not a problem with this unit. | Turn the power off then back on. | |
| Some USB storage devices may not be recognized properly. | ||
| File cannot be played. | Is the file copyright-protected (by DRM)? | Copyright-protected files cannot be played. |
| This is not a problem with this unit. | Files stored on a computer cannot be played. | |
| It may not be possible to play some files. | ||
| Folder or file names are not displayed or are not properly displayed. | Do the folder or file names contain more than 30 characters? | The maximum number of characters displayable for the folder and file names is 30. |
| Folder or file names are not displayed in alphabetical order. | This is not a problem with this unit. | The order in which the folder and file names are displayed depends on the order in which the folders or files were recorded on the USB storage device. |
| Much time is required to recognize the USB storage device. | What is the USB storage devices capacity? | Some time may be required to load the data when large capacity USB storage devices are connected (this could take several minutes). |
| Power is not supplied to the USB storage device. | Is AUTH_ERR displayed on the front panel display? No power is supplied if the power consumption is too high. | Turn the power off then back on. |
| Turn the power off, then disconnect and reconnect the USB storage device. | ||
| Press INPUT to switch to the other mode, then switch again to the USB mode. |
When an iPod/iPhone/iPad mini is connected
| Problem | Remedy |
| Can't operate the iPod/iPhone/iPad mini by the remote control. | Make sure the iPod/iPhone/iPad mini is connected correctly (refer to Connecting your iPod/iPhone on page 16). |
| Can't operate the iPod/iPhone/iPad mini. | Make sure the iPod/iPhone/iPad mini is connected correctly (refer to Connecting your iPod/iPhone on page 16).If the iPod/iPhone/iPad mini is experiencing a hangup, try resetting the iPod/iPhone/iPad mini, and reconnect it to the unit. |
Playable discs and formats
| Audio CD | • Commercially available audio CDs • CD-R/ -RW/ -ROM discs containing music recorded in the CD-DA format |
| WMA | WMA files recorded on CD-R/ -RW/ -ROM discs or USB storage devices |
| MP3 | MP3 files recorded on CD-R/ -RW/ -ROM discs or USB storage devices |
Only the discs that have been finalized can be played.
- Discs recorded in packet write mode (UDF format) are not compatible with this unit.
Corporation and product names mentioned herein are trademarks or registered trademarks of the respective corporations.
Only discs recorded in ISO9660 Level 1, Level 2 and Joliet can be played.
- Files protected by DRM (Digital Rights Management) cannot be played.
Note
This unit does not support multisession discs or multiborder recording.
- Multisession/multiborder recording is a method in which data is recorded on a single disc in two or more sessions/borders. A "session" or "border" is one recording unit, consisting of a complete set of data from lead-in to lead-out.
Regarding copy protected CDs
This unit is designed to conform to the specifications of the audio CD format. This unit does not support the playback or function of discs that do not conform to these specifications.
Supported audio file formats
This unit does not support lossless encoding.
Cautions on use
When moving this unit
When moving this unit, be sure to first check that there is no disc loaded and disconnect the iPod/iPhone/iPad mini. Then press STANDBY/ON, wait for "STANDBY" disappears on main display to turn off, then unplug the power cord. Damage may occur if the unit is transported or moved with a disc inserted, or when another device is connected to the iPod/iPhone connector port, iPod/iPhone terminal, or AUDIO IN mini-plug jack.
Place of installation
- Choose a stable place near the TV or stereo system being used with this unit.
- Do not place this unit on top of a TV or color monitor. Also install it away from cassette decks and other devices easily affected by magnetic forces.
Avoid the following locations:
- Places exposed to direct sunlight
- Humid or poorly ventilated places
- Extremely hot places
- Places exposed to vibrations
- Places in which there is much dust or cigarette smoke
- Places exposed to soot, steam or heat (kitchens, etc.)
Do not place objects on this unit
Do not place any objects on top of this unit.
Do not obstruct the ventilation holes.
Do not use this unit on shaggy rugs, beds, sofas, etc., or wrapped in cloth, etc. Doing so will prevent the heat from dispersing, leading to damage.
Do not expose to heat.
Do not place this unit on top of an amplifier or other component that generates heat. When rack mounting it, to avoid the heat given off by the amplifier or other audio component, place it on a shelf below the amplifier.
- Turn off the unit's power when not using it.
- Depending on signal conditions, striped patterns may appear on a TV screen and noise may enter the sound of radio broadcasts when the unit's power is on. If this happens, turn the unit's power off.
About condensation
If this unit is moved suddenly from a cold place into a warm room (in winter, for example) or if the temperature in the room in which this unit is installed rises suddenly due to heater operation, etc., water droplets (condensation) may form inside (on operating parts and the lens). When condensation is present, this unit will not operate properly and playback is not possible. Let this unit stand at room temperature for 1 or 2 hours with the power turned on (the time depends on the extent of condensation). The water droplets will dissipate and playback will become possible. Condensation can also occur in the summer if this unit is directly exposed to the air flow from an air-conditioner. If this happens, move this unit to a different place.
Cleaning the product
- Unplug the power cord from the power outlet when cleaning this unit.
- Clean this unit using a soft cloth. For tough dirt, apply some neutral detergent diluted in 5 to 6 parts water to a soft cloth, wring out thoroughly, wipe off the dirt, then wipe again with a soft, dry cloth.
- Alcohol, thinner, benzene, insecticides, etc., could cause the print or paint to peel off. Also, leaving rubber or vinyl products in contact with this unit for long periods of time could mar the cabinet.
- When using chemical-impregnated wipes, etc., read the cautions included with the wipes carefully.
Cleaning the lens
- This unit's lens should not become dirty in normal use, but if for some reason it should malfunction due to dust or dirt, consult your nearest Pioneer authorized service center. Although lens cleaners for players are commercially available, we advise against using them since some may damage the lens.
Handling discs
Storing
Always place discs in their cases and store them vertically, avoiding hot, humid places, places exposed to direct sunlight and extremely cold places.
- Be sure to read the cautions included with the disc.
Cleaning discs
- Discs may not play if there are fingerprints or dust on them. In this case, use a cleaning cloth, etc., to gently wipe the disc from the inside towards the outside. Do not use dirty cleaning cloths.
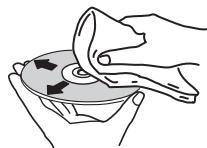
- Do not use benzene, thinner or other volatile chemicals. Also do not use record spray or antistatic agents.
- For tough dirt, apply some water to a soft cloth, wring out thoroughly, wipe off the dirt, then wipe off the moisture with a dry cloth.
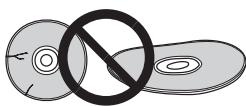
- Do not use damaged (cracked or warped) discs.
- Do not let the signal surface of discs get scratched or dirty.
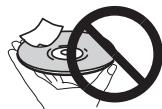
- Do not attach pieces of paper or stickers to discs. Doing so could warp discs, making it impossible to play them. Also note that rental discs often have labels attached to them, and the label's glue may have oozed out. Check that there is no glue around the edges of such labels before using rented discs.
About specially shaped discs
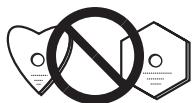
Specially shaped discs (heart-shaped, hexagonal, etc.) cannot be played on this unit. Do not attempt to play such discs, as they could damage this unit.
About iPod/Phone
Made for

iPod iPhone
"Made for iPod" and "Made for iPhone" mean that an electronic accessory has been designed to connect specifically to iPod or iPhone, respectively, and has been certified by the developer to meet Apple performance standards. Apple is not responsible for the operation of this device or its compliance with safety and regulatory standards. Please note that the use of this accessory with iPod or iPhone may affect wireless performance.
iPhone, iPod, iPod nano and iPod touch are trademarks of Apple Inc., registered in the U.S. and other countries.
Restoring all the settings to the defaults
Use the steps below to restore the all settings to their defaults.
1 Press STANDBY/ON to turn the power on.
2 Press CD on the remote control or INPUT repeatedly on the main unit to select CD input.
3 Press OPEN/CLOSE to open the electric slide CD door.
4 Press STANDBY/ON while pressing.
Use the buttons on this unit's top panel. "DEFAULT" is displayed while the settings are being restored. Power is turned off.
Specifications
Amplifier section
RMS Power Output: 10 W + 10 W (1 kHz, 10 %, T.H.D., 8 Ω)
Tuner section
Frequency Range (FM) 87.5 MHz to 108 MHz Frequency Range (DAB). 147.928 MHz to 239.200 MHz Antenna Input (DAB/FM) .75Ω unbalanced
Miscellaneous
iPod/iPhone connector port. 5V,1A
iPod/iPhone terminal .5V,1A
Power source. AC 100 V to 240 V, 50 Hz/60 Hz
Power consumption Power on .25W Power stand-by .0.5 W or less
Dimensions .430 mm (W) x 218 mm (H) x 114 mm (D) Weight (without package) 2.9 kg
Speaker
Type
Passive radiator
Fullrange 6.6 cm cone
Passive radiator 7.7 cm cone
Playback frequency range 60 Hz to 20 kHz
- Accessories
Remote control 1
ACadapter. 1
Changeable panel (X-SMC00DAB-W do not have an interchangeable panel in the box) 2
AAA batteries (R03) 2
DAB/FM wire antenna 1
iPhone stand 1
Warranty card Operating instructions (This document)

Note
- Specifications and the design are subject to possible modifications without notice, due to improvements.
© 2013 PIONEER CORPORATION.
All rights reserved.
http://www.pioneer.co.uk
http://www.pioneer.eu
© 2013 PIONEER CORPORATION.
All rights reserved.
PIONEER CORPORATION
1-1, Shin-ogura, Saiwai-ku, Kawasaki-shi, Kanagawa 212-0031, Japan
PIONEER ELECTRONICS (USA) INC.
P.O. BOX 1540, Long Beach, California 90801-1540, U.S.A. TEL: (800) 421-1404
PIONEER ELECTRONICS OF CANADA, INC.
340 Ferrier Street, Unit 2, Markham, Ontario L3R 2Z5, Canada TEL: 1-877-283-5901, 905-479-4411
PIONEER EUROPE NV
Haven 1087, Keetberglaan 1, B-9120 Melsele, Belgium TEL: 03/570.05.11
PIONEER ELECTRONICS ASIACENTRE PTE. LTD.
253 Alexandra Road, #04-01, Singapore 159936 TEL: 65-6472-7555
PIONEER ELECTRONICS AUSTRALIA PTY. LTD.
5 Arco Lane, Heatherton, Victoria, 3202, Australia, TEL: (03) 9586-6300
PIONEER ELECTRONICS DE MEXICO S.A. DE C.V.
Blvd. Manuel Avila Camacho 138 10 piso Col.Lomas de Chapultepec, Mexico, D.F. 11000 TEL: 55-9178-4270
K002_B3_En

- X-SMC00 X-SMC00DAB X-SMC00DAB-W
- CAUTION
- WARNING
- OPERATING ENVIRONMENT
- INFORMATION FOR USERS ON COLLECTION AND DISPOSAL OF OLD EQUIPMENT AND USED BATTERIES
- AC ADAPTER CAUTION
- POWER-CORD CAUTION
- CONTENTS
- 01 BEFORE YOU START
- 02 PART NAMES AND FUNCTIONS
- 03 CONNECTIONS
- 04 GETTING STARTED
- 05 IPOD/IPHONE/IPAD MINI PLAYBACK
- 06 DISC PLAYBACK
- 07 USB PLAYBACK
- 08 USING THE TUNER
- 09 OTHER CONNECTIONS
- 10 ADDITIONAL INFORMATION
- CHAPTER 1
- BEFORE YOU START
- WHAT'S IN THE BOX
- LOADING THE BATTERIES IN THE REMOTE CONTROL
- USING THE REMOTE CONTROL
- CHAPTER 2
- PART NAMES AND FUNCTIONS
- 1 STANDBY/ON
- 2 INPUT FUNCTION BUTTONS
- 3 CONTROL BUTTONS CLOCK/TIMER
- SLEEP
- 4 NUMERIC BUTTONS (0 TO 9)
- 5 CLEAR
- 6 CONTROL BUTTONS DISPLAY
- FOLDER
- MENU
- MEMORY/PROGRAM
- 7 / / ← / → (TUNE +/- ), ENTER
- 8 PRESET
- 9 MUTE
- 10PLAYBACK CONTROL BUTTONS
- 11 TUNER CONTROL BUTTONS ST/MONO
- DAB SCAN
- DAB ENTER
- DAB DISPLAY
- 12 OPEN/CLOSE
- 13 SOUND CONTROL BUTTONS
- 14 RANDOM
- 15 REPEAT
- 16 VOLUME CONTROL BUTTONS
- 17 DIMMER
- NOTE
- HANG FROM THE WALL TO USE
- FRONT PANEL
- TOP PANEL/REAR PANEL
- 1 STANDBY/ON BUTTON
- 2 INPUT BUTTON
- 3 EQ BUTTON
- 4PLAYBACK CONTROL BUTTONS
- 5 VOLUME
- 6 DISC TRAY OPEN/CLOSE BUTTON
- 7 DC IN TERMINAL
- 8 DAB/FM ANTENNA SOCKET
- CHANGE THE INTERCHANGEABLE PANEL
- 1 MAKE SURE THE ELECTRIC SLIDE CD DOOR IS CLOSED
- 2 USING BOTH HANDS, SLIDE THE CHANGEABLE PANEL UP TO REMOVE IT
- 3 ALIGN THE LINE BELOW THE ARROW AND THE BOTTOM OF THE CHANGEABLE PANEL, THEN SLIDE DOWNWARD USING BOTH HANDS UNTIL YOU HEAR A CLICKING SOUND
- CHAPTER 3
- CONNECTIONS
- CONNECTING ANTENNA
- 1 CONNECT THE DAB/FM WIRE ANTENNA INTO THE DAB/FM ANTENNA SOCKET
- USING EXTERNAL ANTENNAS
- TO IMPROVE DAB/FM RECEPTION
- PLUGGING IN
- CHAPTER 4
- GETTING STARTED
- TO TURN THE POWER ON
- AFTER USE
- SETTING THE CLOCK
- 7 PRESS ENTER
- TO CONFIRM THE TIME DISPLAY
- TO READJUST THE CLOCK
- GENERAL CONTROL
- INPUT FUNCTION
- X-SMC00
- X-SMC00DAB
- DISPLAY BRIGHTNESS CONTROL
- VOLUME AUTO SETTING
- VOLUME CONTROL
- MUTING
- SOUND CONTROLS
- EQUALIZER
- P.BASS CONTROL
- BASS/TREBLE CONTROL
- WHEN ONE OF THE ABOVE TWO FUNCTIONS IS SELECTED, THE FUNCTION THAT IS NOT SELECTED WILL BE DISPLAYED AS FOLLOWS
- SETTING THE WAKE-UP TIMER
- CALLING THE WAKE-UP TIMER
- CANCELLING THE WAKE-UP TIMER
- USING THE WAKE-UP TIMER
- USING THE SLEEP TIMER
- 1 PRESS SLEEP REPEATEDLY TO SELECT A SWITCH OFF TIME
- USING HEADPHONES
- CHAPTER 5
- IPOD/IPHONE/IPAD MINI PLAYBACK
- CONFIRMING WHAT IPOD/IPHONE/IPAD MINI MODELS ARE SUPPORTED
- CONNECTING YOUR IPOD/IPHONE
- IMPORTANT
- 1 PRESS THE PUSH OPEN
- 2 ATTACH THE DOCK ADAPTER TO IPOD/IPHONE CONNECTOR PORT
- 3 CONNECT YOUR IPOD/IPHONE
- CONNECTING IPOD/IPHONE/IPAD MINI USING SUPPLIED IPHONE STAND
- PLAYING IPOD/IPHONE/IPAD MINI
- CHAPTER 6
- DISC PLAYBACK
- MP3
- WMA
- PLAYING DISCS OR FILES
- TIP
- ADVANCED CD OR MP3/WMA DISC PLAYBACK
- DIRECT TRACK SEARCH
- TO STOP PLAYBACK
- REPEAT PLAY
- TO REPEAT ONE TRACK
- TO REPEAT ALL TRACKS
- TO REPEAT DESIRED TRACKS
- TO CANCEL REPEAT PLAY
- RANDOM PLAY
- TO RANDOM PLAY ALL TRACKS
- TO CANCEL RANDOM PLAY
- PROGRAMMED PLAY (CD OR MP3/WMA)
- ABOUT DOWNLOADING MP3/WMA
- ABOUT FOLDER PLAYBACK ORDER
- SPECIFY THE FOLDER TO PLAY
- 1 PRESS CD, AND LOAD AN MP3/WMA DISC
- 2 PRESS FOLDER, AND PRESS ↑/↓ TO SELECT DESIRED PLAYBACK FOLDER
- 3 PRESS ENTER
- SWITCH THE DISPLAY CONTENTS
- 1 PRESS DISPLAY
- CHAPTER 7
- USB PLAYBACK
- PLAYING USB STORAGE DEVICES
- 1 PRESS USB AS THE INPUT SOURCE
- 2 CONNECT THE USB STORAGE DEVICE
- 3 WHEN THE RECOGNITION IS COMPLETED, PRESS TO START PLAYBACK
- 4 DISCONNECT USB STORAGE DEVICE FROM THE IPOD/IPHONE TERMINAL
- PLAYING IN THE DESIRED ORDER (PROGRAMMED PLAY)
- CHAPTER 8
- USING THE TUNER
- LISTENING TO THE RADIO BROADCASTS
- TUNING
- AUTOMATIC TUNING
- MANUAL TUNING
- TO RECEIVE AN FM STEREO TRANSMISSION
- IMPROVING POOR FM RECEPTION
- 1 PRESS ST/MONO REPEATEDLY TO SELECT MONO
- SAVING STATION PRESETS
- 1 TUNE TO A STATION YOU WANT TO MEMORIZE
- 2 PRESS MEMORY/PROGRAM
- 3 PRESS PRESET + / - TO SELECT THE PRESET CHANNEL NUMBER
- 4 PRESS MEMORY/PROGRAM TO STORE THAT STATION IN MEMORY
- TO RECALL A MEMORISED STATION
- TO SCAN THE PRESET STATIONS
- TO ERASE ENTIRE PRESET MEMORY
- LISTENING TO THE DAB
- ABOUT DAB+ (DIGITAL AUDIO BROADCASTING)
- AUTO SCAN
- AFTER THE SCAN
- SELECTING A STATION IN THE STATION LIST
- MANUAL TUNE
- CHANGING THE INFORMATION DISPLAY
- [STATION NAME]
- [SCROLLING TEXT]
- [PROGRAMME TYPE]
- [MULTIPLEX NAME]
- [FREQUENCY]
- [STEREO MODE]
- [TRANSFER SPEED]
- [SIGNAL QUALITY]
- MEMORISING A STATION
- CHAPTER 9
- OTHER CONNECTIONS
- CONNECTING AUXILIARY COMPONENTS
- 1 SWITCH INPUT BY PRESSING THE INPUT ON THE MAIN UNIT OR THE AUDIO IN ON THE REMOTE CONTROL
- CHAPTER 10
- ADDITIONAL INFORMATION
- TROUBLESHOOTING
- PLAYABLE DISCS AND FORMATS
- REGARDING COPY PROTECTED CDS
- SUPPORTED AUDIO FILE FORMATS
- CAUTIONS ON USE
- WHEN MOVING THIS UNIT
- PLACE OF INSTALLATION
- AVOID THE FOLLOWING LOCATIONS
- DO NOT PLACE OBJECTS ON THIS UNIT
- DO NOT OBSTRUCT THE VENTILATION HOLES
- DO NOT EXPOSE TO HEAT
- ABOUT CONDENSATION
- CLEANING THE PRODUCT
- CLEANING THE LENS
- HANDLING DISCS
- STORING
- CLEANING DISCS
- ABOUT SPECIALLY SHAPED DISCS
- ABOUT IPOD/PHONE
- RESTORING ALL THE SETTINGS TO THE DEFAULTS
- SPECIFICATIONS
- AMPLIFIER SECTION
- TUNER SECTION
- MISCELLANEOUS
- SPEAKER
- ACCESSORIES
- PIONEER CORPORATION
- PIONEER ELECTRONICS (USA) INC
- PIONEER ELECTRONICS OF CANADA, INC
- PIONEER EUROPE NV
- PIONEER ELECTRONICS ASIACENTRE PTE. LTD
- PIONEER ELECTRONICS AUSTRALIA PTY. LTD
- PIONEER ELECTRONICS DE MEXICO S.A. DE C.V
Marque : PIONEER
Modèle : X-SMC00DAB
Catégorie : Système audio