
DDJ-WEGO2 - Contrôleur DJ PIONEER - Notice d'utilisation et mode d'emploi gratuit
Retrouvez gratuitement la notice de l'appareil DDJ-WEGO2 PIONEER au format PDF.
| Type de produit | Contrôleur DJ compact |
| Marque | Pioneer |
| Modèle | DDJ-WEGO2 |
| Alimentation | USB bus power (5 V) |
| Connectivité | USB 2.0, prise casque (6,35 mm et 3,5 mm), entrée micro (6,35 mm), sortie MASTER OUT (RCA), connexion iPhone/iPad via câble Lightning |
| Poids | Environ 1,5 kg |
| Dimensions (L x P x H) | Environ 480 x 250 x 70 mm |
| Logiciel inclus | Virtual DJ LE (édition limitée Pioneer) |
| Fonctions principales | JOG FX (contrôle multi-effets), PULSE CONTROL (LED multicolores synchronisées), compatibilité iPhone/iPad, 4 decks, échantillonneur, boucle, hot cue, crossfader courbe réglable |
| Entretien et nettoyage | Nettoyer avec un chiffon doux et sec ; éviter les solvants et l'humidité excessive |
| Sécurité | Débrancher le câble USB avant tout nettoyage ; ne pas exposer à l'eau ou à des températures extrêmes ; utiliser uniquement les accessoires fournis |
| Pièces détachées et réparabilité | Pièces détachées disponibles via le support Pioneer ; réparation par un centre agréé recommandée |
| Informations générales | Compatibilité Windows XP/Vista/7/8 (32 et 64 bits), Mac OS X 10.5.x et ultérieur ; versions couleur multiples |
FOIRE AUX QUESTIONS - DDJ-WEGO2 PIONEER
Questions des utilisateurs sur DDJ-WEGO2 PIONEER
0 question sur cet appareil. Repondez a celles que vous connaissez ou posez la votre.
Poser une nouvelle question sur cet appareil
Téléchargez la notice de votre Contrôleur DJ au format PDF gratuitement ! Retrouvez votre notice DDJ-WEGO2 - PIONEER et reprennez votre appareil électronique en main. Sur cette page sont publiés tous les documents nécessaires à l'utilisation de votre appareil DDJ-WEGO2 de la marque PIONEER.
MODE D'EMPLOI DDJ-WEGO2 PIONEER
DJ Controller
DDJ-WEGO2
DDJ-WeGO2
http://pioneerdj.com/support/
The Pioneer DJ support site shown above offers FAQs, information on software and various other types of information and services to allow you to use your product in greater comfort.
Operating Instructions
Contents
How to read this manual
- Thank you for buying this Pioneer product. Be sure to read both this leaflet and Read Before Use (Important)/Quick Start Guide! Both documents include important information that you must understand before using this product.
- In this manual, names of screens and menus displayed on the computer screen, as well as names of buttons and terminals on the product, etc., are indicated within brackets. (e.g.: [RECORD] panel, [CONFIG] menu, [CUE] button, [VINYL] mode, [AUX IN] terminals)
01 Before start
Features....3
What's in the box 3
02 Before you start
Installing the software....4
Using the driver utility software....6
Mounting the iPhone/iPad stand....7
03 Connections
04 Part names and functions
1 Browser.... 10
2 Deck....11
3 Mixer 11
05 Basic Operation
Starting the system....12
Loading tracks and playing them ( A) 12
Using the mixer functions ( B)....12
Adjusting the sound quality.... 12
Monitoring sound with headphones ( C) 13
Mixing ( B, D)....13
Inputting the sound of the microphone.... 13
Quitting the system 13
06 Operation (this unit's features)
JOG FX mode types (⇒ E) 14
Changing the color of the jog dial's illumination (⇒F).... 14
Switching the skin color.... 15
07 Advanced Operation
Using the CUE function ( G).... 16
Using the LOOP function ( H).... 16
Using the HOT CUE function ( I) 16
Using the SAMPLER function ( I) 16
Operating four decks ( J)....17
08 Operation (other functions)
Analyzing files 18
Editing the beat grid 18
Adjusting the jog dial's MIDI message sending interval 18
Adjusting the sensitivity of the jog dial's touch sensor.... 19
Mood lighting mode 19
09 Additional information
Troubleshooting....20
Using as a controller for other DJ software....21
About trademarks and registered trademarks 22
Cautions on copyrights 22
Before start
Features
This unit is a DJ controller in a compact size enabling DJ performances with dynamic sound and a variety of light effects. With it, DJ performances are possible not only with a computer, but also with an iPhone/iPad by using the included connection cable and designated stand. This unit is equipped with a "JOG FX" function for transforming the sound dynamically and a "PULSE CONTROL" function allowing the colors of the lights to be changed in a variety of ways using the multicolor LEDs. Three color variations are provided for the body, letting users select a color matching their personality and interior. In addition, the colors in which the LEDs light can be customized to express the user's personality. This DJ controller lets users enjoy their DJ lives, with their own tastes and in their own styles.
iPhone/iPad CONNECTION
By connecting this unit with an iPhone/iPad using the included connection cable, the contents of the iPhone/iPad can easily be used for DJ performances.
JOG FX
This unit is equipped with a JOG FX function allowing multiple effects to be controlled simultaneously with the jog dial. The parameters of multiple effects can be controlled through the simple operation of turning the jog dial, so a wide variety of transformations of the sound can be enjoyed. Also, by using in combination with the FX Pulse function, DJ performances can be staged with an extensive array of animations using multicolored lights.
PULSE CONTROL
Thanks to the use of multi-color LEDs installed in JOG dials, the colorful illumination changes in conjunction with DJ operations, adding brilliance to DJ performances.
• Main PULSE CONTROL animations
① Mix Pulse
The offset in the beats of the two tracks is indicated by the lights. The jog dial lights with the set illumination color when the beats are perfectly synchronized, and the jog dial's lights turn off when the beats are off. This lets you easily synchronize the beats and tempos while checking the offset of the beats visually.
② Launch Pulse
When a track is loaded, red light flows toward the jog dial, letting the user know at a glance that the track has been loaded.
③ FX Pulse
The lights on the jog dial move in various ways according to the effect that is operated, adding excitement to the DJ performance through the movement of the light in addition to the changes in the sound.
Color variations and customizing
The colors in which this unit's multicolor LEDs light can be customized, and the colors of the interface of the "Virtual DJ Limited Edition" bundled software can also be customized. The colors can be set to your tastes, to suit your current mood or a variety of different situations.
DESIGN
This unit has a design using solid colors and forms that suit room interiors well, in a compact size designed for portability. While the body has rounded, gentle forms, it comes in three color variations that create a solid impression, and a jog dial highlighting the animations of the multicolored lights is used to achieve a design that makes DJ performances fun. Furthermore, the input/output terminals are positioned on the side panel to reduce the distance to a notebook computer and allow installation even in small spaces. In addition, the unit uses a stand that also serves as a grip, so it is easy to carry the unit to other locations for DJ performances.
VIRTUAL DJ LE
The “Virtual DJ Limited Edition” DJ software with the Pioneer original interface is included. Major features such as looping, effects, sampling, 4-channel mixing, and video will allow you to enjoy a wide range of DJ performances. In addition, you can select the interface colors according to your taste and preference from many different options.
Compatibility with various DJ software programs
Thanks to the MIDI capability, 4-deck control, sampler and many other features can be controlled by a variety of DJ applications. See the Pioneer support page for the latest information on software compatibility:
http://pioneerdj.com/support/
What's in the box
• VIRTUAL DJ LE software/driver software/operating instructions CD-ROM
- USB cable
• Read Before Use (Important)/Quick Start Guide
• Warranty (for some regions) ^1
• iPhone/iPad connection cable (Lightning)
- iPhone/iPad stand
• Stand fixing screws x 3
- VIRTUAL DJ LE license key (indicated on this unit's bottom panel)
1 The included warranty is for the European region.
— For the North American region, the corresponding information is provided on the last page of both the English and French versions of the "Read Before Use (Important)/Quick Start Guide".
— For the Japanese region, the corresponding information is provided on the last page of the Japanese version of the “Read Before Use (Important)/Quick Start Guide”.
Cautions
The license key cannot be reissued. Be careful not to lose it.
Before you start
Installing the software
Before installing the software
- First read the Software end user license agreement on page 21 carefully.
- Turn off this unit's power switch, then disconnect the USB cable connecting this unit and the computer.
• If any other programs are running on the computer, quit them. - To install or uninstall the driver software, you need to be authorized by the administrator of your computer. Log on as the administrator of your computer before proceeding with the installation.
- If you connect this unit to your computer without installing the driver software first, an error may occur on your computer depending on the system environment.
- If installation of the driver software is interrupted after it has started, start the installation procedure over again from the beginning.
About the driver software (Windows)
This driver software is an exclusive ASIO driver for outputting audio signals from the computer.
• There is no need to install the driver software when using Mac OS X.
- Checking the latest information on the driver software
For detailed information on this unit's designated driver software, see the Pioneer DJ support site below. http://pioneerdj.com/support/
About the VIRTUAL DJ LE software
VIRTUAL DJ LE is a DJ software application by Atomix productions. DJ performances are possible by connecting the computer on which this software is installed to this unit.
- If VIRTUAL DJ is already installed on your computer, VIRTUAL DJ LE will not operate properly. Uninstall all versions of VIRTUAL DJ already installed on your computer before installing VIRTUAL DJ LE for this unit.
For instructions on uninstalling VIRTUAL DJ, see the Pioneer DJ support site below. http://pioneerdj.com/support/ - When using Windows, the ASIO driver must be installed.
Minimum operating environment
| Supported operating systems | CPU and required memory |
| Mac OS X 10.5.x | Intel®processor |
| 1 GB or more of RAM | |
| Windows® XP Home Edition/Professional (SP3 or later) | Intel® Pentium® 4 or AMD AthlonTM XP processor |
| 512 MB or more of RAM |
| Others | |
| Hard disk | Free space of 50 MB or greater |
| Optical drive | Optical disc drive on which the CD-ROM can be read |
| USB port | A USB 2.0 port is required to connect the computer with this unit. |
| Display resolution | Resolution of 1 024 x 768 or greater |
Recommended operating environment
| Supported operating systems | CPU and required memory | |
| Mac OS X 10.6.x | Intel®processor | |
| 2 GB or more of RAM | ||
| Windows®7Professional | 32-bit version | Intel®CoreTM2 or AMD AthlonTMX2processor |
| 1 GB or more of RAM | ||
Others
| Hard disk | Free space of 200 MB or greater |
| Display resolution | Resolution of 1 280 x 1 024 or greater (Windows)Resolution of 1 440 x 900 or greater (Mac) |
The conditions below must be satisfied in order to conduct video mixing.
- Mac
— ATI ^™ or NVIDIA ^® video chipset with 256 MB of dedicated DDR3 RAM — Video card must support dual-screen output. - Windows
— ATI ^TM or NVIDIA ^® video card with 256 MB of dedicated DDR3 RAM — Video card must support dual-screen output.
• Full functionality is not guaranteed on all computers, even those meeting the operating environment requirements described above. - Even with the required memory indicated for the operating environment above, lack of memory due to resident programs, the number of services, etc., could prevent the software from offering optimal functionality and performance. In such cases, free up sufficient memory. We recommend installing additional memory for stable operation.
- Depending on the computer's power-saving settings, etc., the CPU and hard disk may not provide sufficient processing capabilities. For notebook computers in particular, make sure the computer is in the proper conditions to provide constant high performance (for example by keeping the AC power connected) when using VIRTUAL DJ LE.
- Note that problems may arise with the functionality of VIRTUAL DJ LE depending on other software running on your computer.
◆ Installing the VIRTUAL DJ LE software
- Cautions when the included software involves an Internet environment
A separate contract with and payment to a provider offering Internet services is required. - The installer screen's design may differ depending on the version of VIRTUAL DJ LE, but the operating procedure is the same.
- Checking the latest information on the VIRTUAL DJ LE software
For the latest information on the operating environment and compatibility, and to acquire the latest operating system, please visit the following Atomix productions website:
To obtain the latest version of the VIRTUAL DJ LE software, you must register your user account on the Atomix productions website. http://www.virtualdj.com
About the installation procedure
The installation procedure depends on the operating system (OS) on the computer you are using.
For Windows
After installing the driver software, install the VIRTUAL DJ LE software.
For Mac OS X
Only install the VIRTUAL DJ LE software.
About the installation procedure (Windows)
Do not connect this unit and the computer until installation is completed.
- Log on as the user which was set as the computer's administrator before installing.
• If any other programs are running on the computer, quit them.
1 Turn on the computer's power.
2 Insert the included CD-ROM into the computer's CD drive.
The CD-ROM menu is displayed.
- If the CD-ROM menu does not appear when the CD-ROM is inserted, open the CD drive from [Computer (or My Computer)] in the [Start] menu, then double-click the [CD_menu.exe] icon.
3 When the CD-ROM menu appears, select [Install Driver Software (Pioneer\_DDJ\_WeGO2\_Driver\_X.XXX)], then click [Start].
4 Proceed with installation according to the instructions on the screen.
If [Windows Security] appears on the screen while the installation is in progress, click [Install this driver software anyway] and continue with the installation.
When the installation program is completed, a completion message appears.
After installing the driver software, install the VIRTUAL DJ LE software.
- When installing on Windows XP
If [Hardware Installation] appears on the screen while the installation is in progress, click [Continue Anyway] and continue with the installation.
5 Select [Install VIRTUAL DJ LE(DDJ-WeGO2)] from the CD-ROM's menu, then click [Start].
The VIRTUAL DJ LE installer is launched.
6 Once the VIRTUAL DJ LE installer is launched, click [Next].
• To return to the previous screen: click [Back].
• To cancel installation: click [Cancel].
7 Read the contents of the [End-User License Agreement] carefully, and if you agree, check [I accept the terms in the License Agreement], then click [Next]. If you do not agree to the terms of the [End-User License Agreement], click [Cancel] to cancel installation.
8 Select the type of installation for VIRTUAL DJ LE, then click [Next].
- When [Typical] is selected, plug-ins and other components are installed simultaneously. Normally select [Typical].
- When [Custom] is selected, you can select which components to install.
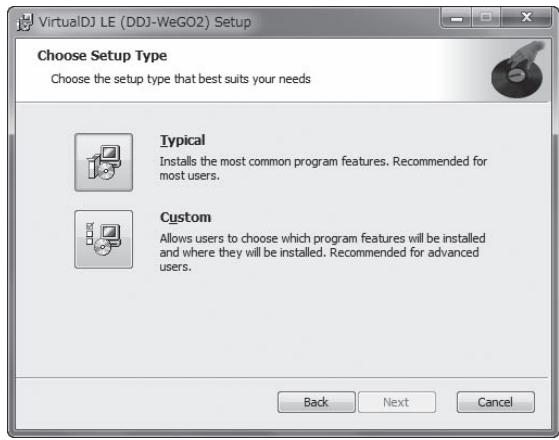
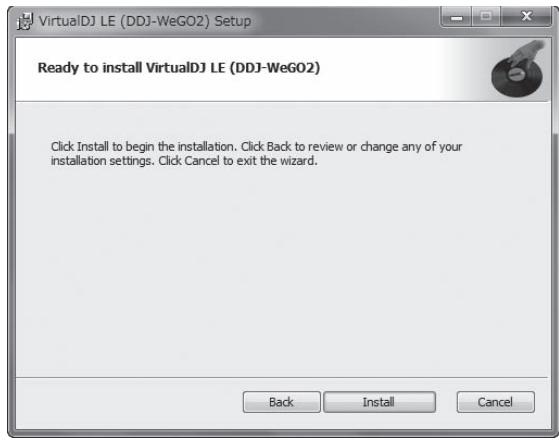
9 When the screen below is displayed, click [Install]. Installation begins.
The message of successful installation appears once installation is completed.
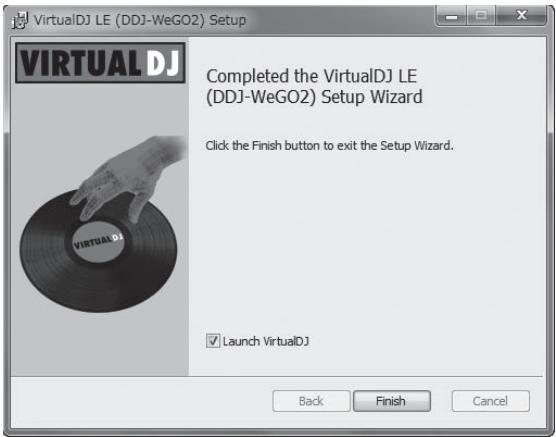
10 Click [Finish].
This completes the installation procedure.
VIRTUAL DJ LE is launched if [Launch VirtualDJ] on the screen is checked when [Finish] is clicked.
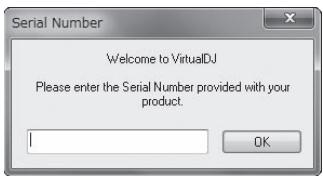
11 Input the serial number printed on this unit's bottom panel (XXXX-XXXX-XXXXX/WEGO2), then click [OK].
This unit's bottom panel
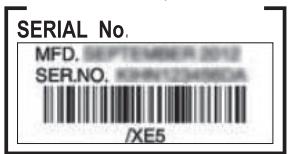
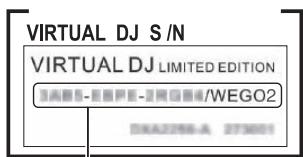
VIRTUAL DJ LE Serial number
◆ Connecting this unit and computer
1 Connect this unit to your computer via a USB cable.
For instructions on connections, see Connecting with a computer on page 8.
2 Slide this unit's [ON/OFF] switch to the [ON] position.
Turn on the power of this unit.
- The message [Installing device driver software] may appear when this unit is first connected to the computer or when it is connected to a different USB port on the computer. Wait a while until the message [Your devices are ready for use] appears.
About the installation procedure (Mac OS X)
1 Insert the included CD-ROM into the computer's CD drive.
The [CD_menu] icon appears on the screen. Double-click it.
2 When the CD-ROM's menu is displayed, select [Install VIRTUAL DJ LE(DDJ-WeGO2)], then click [Start].
The VIRTUAL DJ LE installer is launched.
3 Once the VIRTUAL DJ LE installer is launched, click [Continue].
4 Read the contents of the license agreement carefully, click [Continue] and then click [Agree] to accept the license agreement.
If you do not agree to the license agreement, click [Disagree] to cancel installation.
5 Select the type of installation for VIRTUAL DJ LE, then click [Install].
— To select standard installation, click [Install].
— To install in a different location, click [Change Install
Location...] and choose the place of installation.
Installation begins.
The message of successful installation appears once installation is completed.
6 Click [Close].
This completes the installation procedure.
Using the driver utility software
This unit functions as an audio device conforming to the ASIO standards.
Using the settings utility software
This function can only be used by those using a Windows operating system.
◆ Launching the settings utility software
Click the Windows [Start] menu>[All Programs]>[Pioneer]>[DDJ_WeGO2]>[DDJ_WeGO2 ASIO Settings Utility].
- For Windows 8, click [DDJ_WeGO2 ASIO Settings Utility] from the [Start] screen.

◆ Adjusting the buffer size
This unit functions as an audio device conforming to the ASIO standards.
- If an application using this unit as the default audio device (DJ software, etc.) is running, quit that application before adjusting the buffer size.
- If the buffer size is made large, drops in audio data (breaks in the sound) occur less easily, but the time lag due to the delay in the transfer of the audio data (latency) increases.
- If the kernel buffer number is made large, breaks in the sound occur less easily, but the time lag due to latency increases.
- Operate referring to the procedure below to adjust the buffer size and kernel buffer.
If there are interruptions in the sound with the default settings
Set the kernel buffer size to [4], then set the buffer size to the minimum value at which there are no interruptions in the sound.
If there are no interruptions in the sound with the default settings
1 Gradually decrease the buffer size, setting it to the minimum value at which there are no interruptions in the sound.
2 Set the kernel buffer size to [2] and check whether there are interruptions in the sound.
- If there are interruptions in the sound, set the kernel buffer size to [3].
Checking the version of the driver software
Click the Windows [Start] menu>[All Programs]> [Pioneer]>[DDJ_WeGO2]>[DDJ_WeGO2 Version Display Utility].
- For Windows 8, click [DDJ_WeGO2 Version Display Utility] from the [Start] screen.
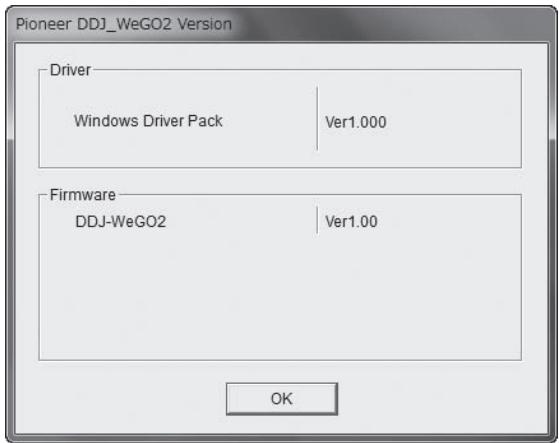
- You can check the firmware version of this unit on the screen.
- The firmware version is not displayed when this unit is not connected to the computer or when this unit and computer are not properly communicating.
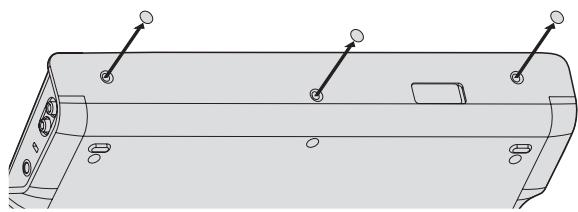
Mounting the iPhone/iPad stand
To use an iPhone/iPad, mount the included iPhone/iPad stand.
WARNING
Keep the included screws and the screw covers that have been removed from the unit out of the reach of children. If they should be swallowed, contact a physician immediately.
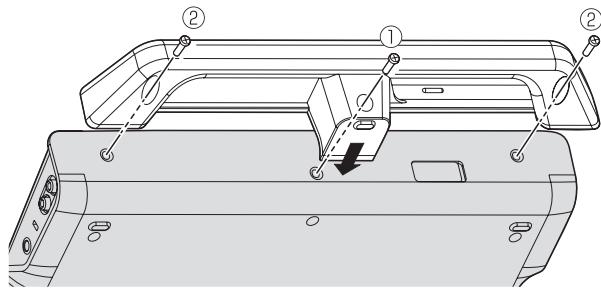
1 Remove the three screw covers.
natural_image
Technical line drawing of a vehicle front panel with control buttons and mounting holes (no text or symbols)2 Fasten the included screws in the order shown on the diagram below.
- Do not use any screws other than the included ones.
Cautions on using the iPhone/iPad stand
- This stand is exclusively for use with an iPhone/iPad. Do not place tablets other than iPads or large devices on the stand.
- Set the iPhone/iPad on the stand in the horizontal direction. It may be unstable if set in the vertical direction.
- Do not apply excessive force to the stand. Doing so may damage this unit.
- Please note that Pioneer will accept no responsibility whatsoever for damage to or malfunction of the device, injury, etc., due to the device falling, etc.
- Do not move with an iPhone/iPad placed on the stand. The iPhone/iPad could fall off.
- If there is a cover on the iPhone/iPad, remove the cover before placing the iPhone/iPad on the stand. If the cover is left on, the iPhone/iPad could be unstable.
iOS devices that can be used with this unit and placed on the stand
- iOS
iOS 6 - Devices supporting the iPhone/iPad connection cable (Lightning) iPad (4th generation), iPad mini, iPhone 5, iPod touch (5th generation)
For the latest information on iOS devices, see [DDJ-WeGO2] on the Pioneer DJ support site below.
http://pioneerdj.com/support/
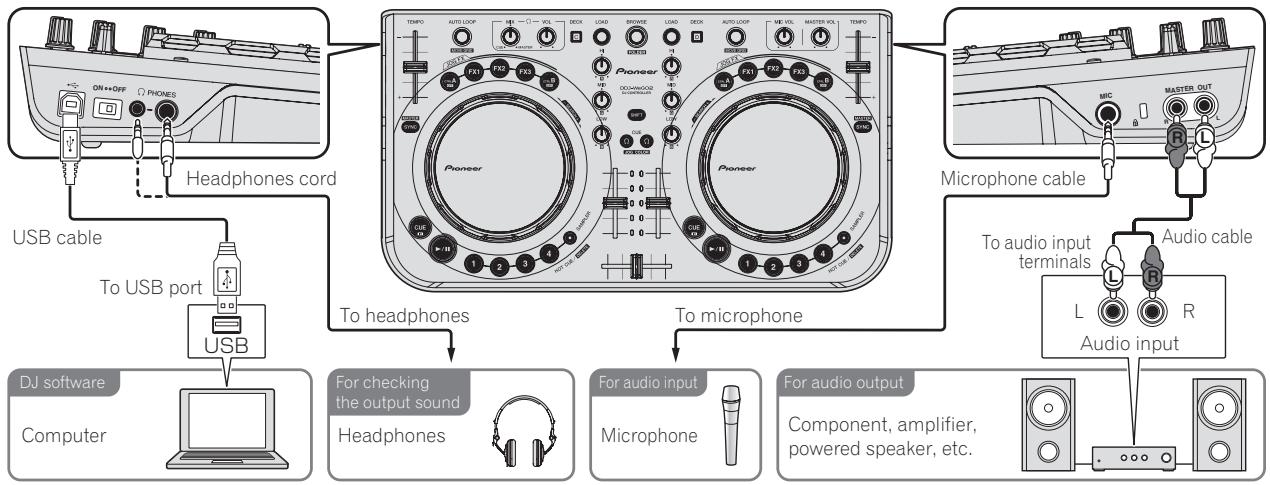
Connections
Be sure the power is off when connecting equipment and changing connections.
Be sure to use the USB cable included with this product.
Refer to the operating instructions for the component to be connected.
Connecting with a computer
- The iPhone/iPad connection has priority, so do not connect an iPhone/iPad when using a computer.
- VIRTUAL DJ LE for DDJ-WEGO2 is customized to output the audio only from the unit not from the computer. Please connect headphones, an amplifier or powered speakers as shown in the figure below to hear the output sound.
Audio output from your computer will be available if a paid upgrade to VIRTUALDJ PRO FULL is completed.
With this unit, the power is supplied by USB bus power. The unit can be used simply by connecting it to a computer using the USB cable.
- Connect this unit and the computer directly using the included USB cable.
- Connect the computer to which this unit is to be connected to an AC power supply.
• A USB hub cannot be used.
• In cases like the ones below, the power may be insufficient and this unit may not operate on USB bus power.
— When the computer's USB power supply capacity is insufficient.
— When other USB devices are connected to the computer.
— When headphones with an impedance of less than 32 are connected.
— When headphones are simultaneously connected to the stereo phone jack and the stereo mini-phone jack.
— When a monaural jack is connected to the [PHONES] terminal.
flowchart
graph TD
    A["Headphones cord"] --> B["Pioneer"]
    B --> C["Microphone cable"]
    C --> D["To audio input terminals"]
    C --> E["Audio cable"]
    A --> F["USB cable"]
    F --> G["To USB port"]
    G --> H["USB"]
    H --> I["DJ software"]
    I --> J["Computer"]
    A --> K["To headphones"]
    K --> L["For checking the output sound"]
    L --> M["Headphones"]
    M --> N["For audio input"]
    N --> O["Microphone"]
    O --> P["For audio output"]
    P --> Q["Component, amplifier, powered speaker, etc."]
Connecting with an iPhone/iPad
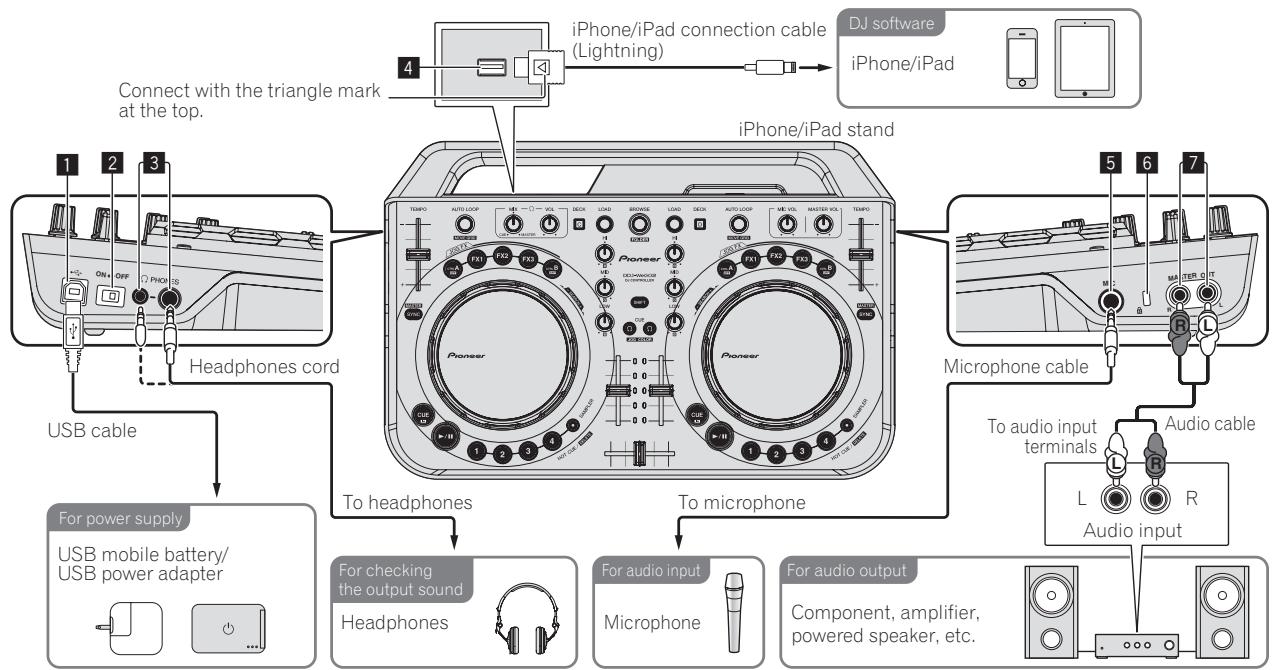
flowchart
graph TD
    A["Headphones cord"] --> B["USB cable"]
    B --> C["For power supply"]
    C --> D["USB mobile battery/USB power adapter"]
    D --> E["To headphones"]
    E --> F["For checking the output sound"]
    F --> G["Headphones"]
    G --> H["To microphone"]
    H --> I["For audio input"]
    I --> J["Microphone"]
    J --> K["For audio output"]
    K --> L["Component, amplifier, powered speaker, etc."]
    L --> M["To audio input terminals"]
    M --> N["L Audio input"]
    N --> O["To microphone cable"]
    O --> P["Microphone cable"]
    P --> Q["DJ software"]
    Q --> R["iPhone/iPad connection cable (Lightning)"]
    R --> S["iPhone/iPad"]
- An iPhone/iPad cannot be charged with the iPhone/iPad connection cable (Lightning).


USB terminal
When using a computer
- Connect this unit and the computer directly using the included USB cable.
• A USB hub cannot be used.
When using an iPhone/iPad
- Connect this unit and a USB mobile battery or USB power adapter using a USB cable. The USB power adapter must have a power supply capacity of DC 5 V/500 mA or greater. Note that depending on the capacity and charging status of the product being used, operation may be unstable.

ON/OFF switch
Turns this unit's power on and off.

PHONES terminals
Connect headphones here.
Both stereo phone plugs (∅ 6.3 mm) and stereo mini phone plugs (∅ 3.5 mm) can be used.
- Connect headphones with an impedance of 32 or more.
Headphones with an impedance of less than 32 are not supported. - Do not connect headphones simultaneously to the stereo phone jack and the stereo mini-phone jack.

iPhone/iPad terminal
Connect this unit with the iPhone/iPad using the iPhone/iPad connection cable (Lightning).

MIC jack
Connects a microphone here.
- Only the volume of the microphone's sound can be adjusted.

Kensington security slot

MASTER OUT terminals
Connect powered speakers, etc., here.
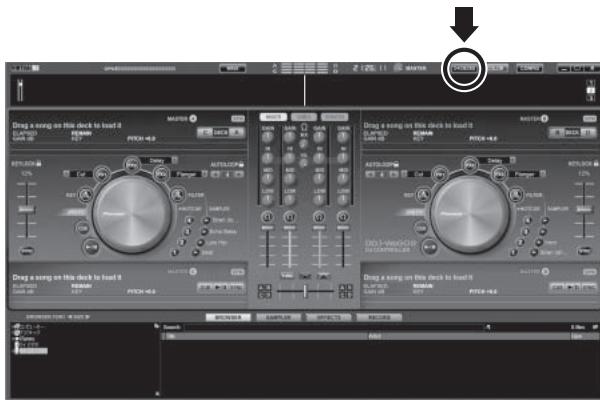
Part names and functions
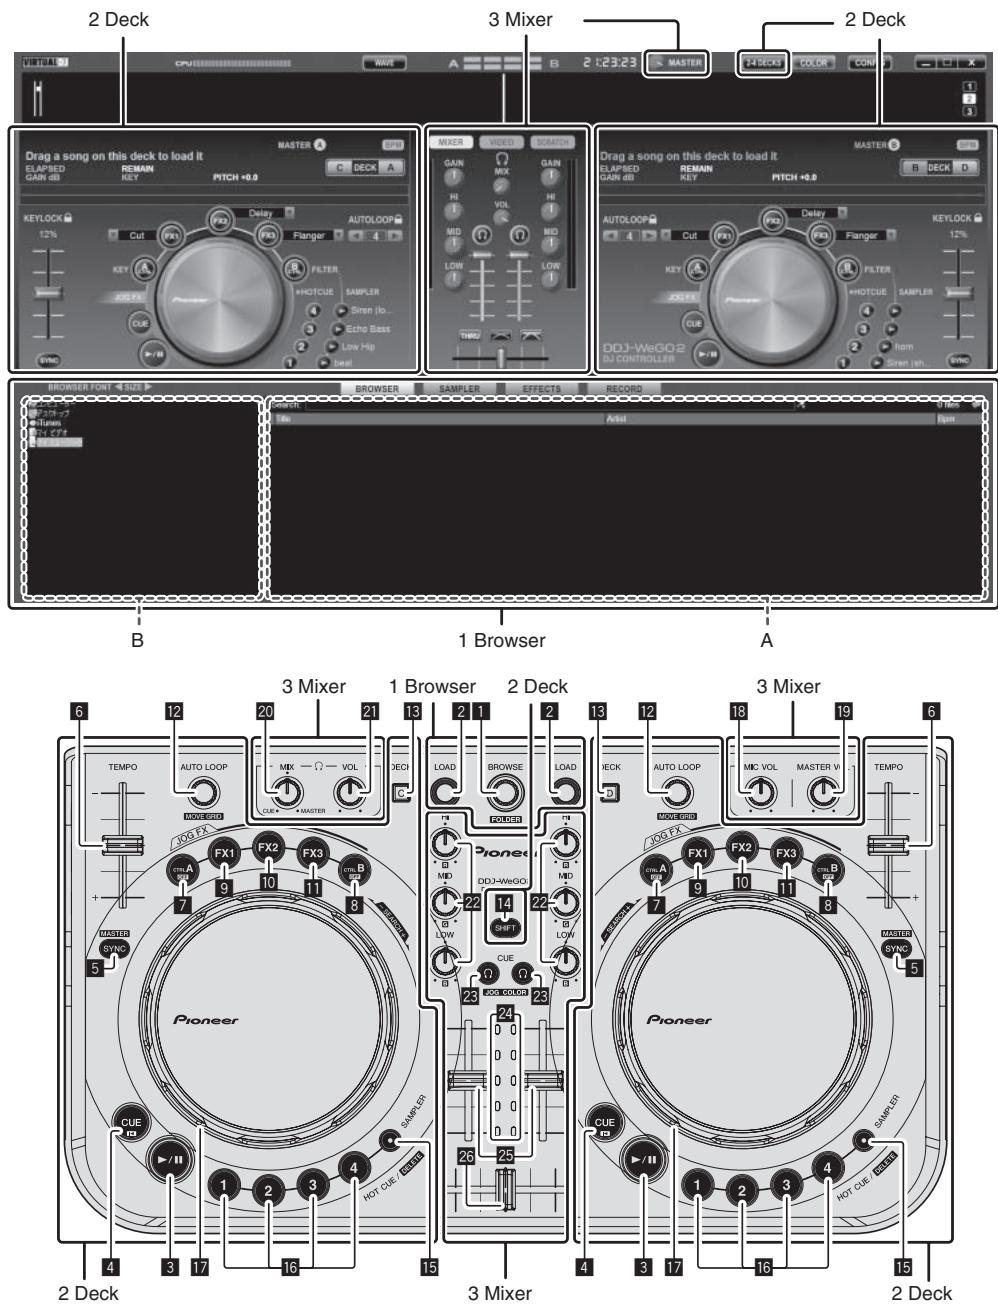
1 Browser
1 Rotary selector
- Turn: The cursor moves in section A of the above diagram.
- [SHIFT] + turn: The cursor moves in section B of the above diagram.
- [SHIFT] + press: Folders in section B of the above diagram open and close. * If a panel other than the [BROWSE] panel is displayed, turn the rotary selector to display the [BROWSE] panel.
2 LOAD button
Loads the track selected with the cursor in each of the decks.
2 Deck
3 ▶/II button
Use this to play/pause tracks.
4 CUE button
- Press: Sets a cue point or moves the cue point.
- [SHIFT] + press: The playing position moves to the beginning of the track.
5 SYNC (MASTER) button
- Press: Synchronizes to the master deck's tempo.
- [SHIFT] + press: Sets the master deck for synchronization.
6 TEMPO slider
Adjusts the playing speed.
7 CTRL A button
- Press: Turns key control on and off.
- [SHIFT] + press: Turns key control, the filter and effects 1 to 3 all off at once.
8 CTRL B button
- Press: Turns the filter on and off.
- [SHIFT] + press: Turns key control, the filter and effects 1 to 3 all off at once.
9 FX1 button
- Press:
Turns effect 1 on and off.
• [SHIFT] + press: Switches the effect types of FX1.
10 FX2 button
- Press:
Turns effect 2 on and off.
• [SHIFT] + press: Switches the effect types of FX2.
11 FX3 button
- Press:
Turns effect 3 on and off.
• [SHIFT] + press: Switches the effect types of FX3.
12 AUTO LOOP (MOVE GRID) control
- Turn: Changes the loop length for playback.
-
Press: Turns loop playback on and off.
-
[SHIFT] + turn: Moves the beat grid position.
* This function can be used when you upgrade to VIRTUALDJ PRO FULL. - [SHIFT] + press: Sets the manual loop's in and out points. Turns manual loop playback on and off.
13 DECK button
Switches the deck to be operated.
14 SHIFT button
When another button is pressed while pressing the [SHIFT] button, a different function is called out.
15 SAMPLER button
- Press: Turns the sampler mode on and off.
16 HOT CUE (DELETE)/SAMPLER button
- Press: When the sampler mode is off, sets or calls out the hot cue point. When the sampler mode is on, plays/stops playback of the sample sound.
- [SHIFT] + press: When the sampler mode is off, cancels the hot cue set at the button that is pressed. When the sampler mode is on, if a sample sound is playing, playback returns to the beginning of the sample sound and continues from there.
17 Jog dial
When the JOG FX mode is off
— Scratch
When turned while touching a metallic part of the top of the jog dial, the sound is played according to the direction and speed at which the jog dial is turned.
— Pitch bend
The playing speed can be adjusted by turning the outer part of the jog dial during playback.
— Manual search
When the jog dial is spun while pressing [SHIFT] button during playback, the track is fast-forwarded/fast-reversed.
When the JOG FX mode is on
— JOG FX control
Effect parameters can be adjusted by turning the jog dial.
For details, see JOG FX mode types ( E ) on page 14.
Do not place objects on or apply strong forces to the top of the jog dial. Also, note that drinks or other liquids getting into the product could result in malfunction.
3 Mixer
18 MIC VOL control
Adjusts the audio level input to the [MIC] terminal.
19 MASTER VOL control
Adjusts the sound level output from the master.
- The adjustment made here does not affect the [MASTER] control on the computer's screen.
20 HEADPHONES MIX control
Adjusts the balance of the monitor volume between the sound of the deck whose [Ω] button is pressed and the master sound.
- The sampler sound is output regardless of the position of the [HEADPHONES MIX] control.
21 HEADPHONES VOL control
Adjusts the audio level output from the [PHONES] terminal.
- The adjustment made here does not affect the [VOL] control (headphones volume control) on the computer's screen.
- The sound of the microphone connected to the [MIC] jack is not output from the headphones.
22 EQ (HI, MID, LOW) controls
These adjust the sound quality input to the various decks. [HI] (treble range), [MID] (middle range), [LOW] (low range)
23 CUE ⏻ (Headphones cue button)
Use this to monitor the sound of the respective decks over the headphones.
24 Channel Level Indicator
Indicates the level of the sound before it passes through the channel faders of the respective decks.
25 Channel fader
Adjusts the sound level output from the various decks.
26 Crossfader
Switches the sound of the decks assigned to the left and right sides of the crossfader for output.
Basic Operation
Starting the system
When using a computer
1 Connect this unit to your computer via a USB cable.
2 Boot up the connected computer.
3 Slide this unit's [ON/OFF] switch to the [ON] position.
Turn on the power of this unit.
- The message [Installing device driver software] may appear when this unit is first connected to the computer or when it is connected to a different USB port on the computer. Wait a while until the message [Your devices are ready for use] appears.
Launching VIRTUAL DJ LE
About the order of operations when launching VIRTUAL DJ LE
Always first turn on this unit's power, wait for the startup illumination to finish, check that this unit's [CTRL A], [FX1], [FX2], [FX3] and [CTRL B] buttons are all lit dimly, then launch VIRTUAL DJ LE.
◆ Launching VIRTUAL DJ LE (Windows)
From the Windows [Start] menu, click the [All Programs] > [VirtualDJ] > [VirtualDJ LE (DDJ-WeGO2)] icon.
◆ Launching VIRTUAL DJ LE (Mac OS X)
In Finder, open the [Application] folder, then double-click the [VirtualDJ LE] icon.
When VIRTUAL DJ LE is launched the first time, a screen for entering the serial number appears.
Input the serial number printed on this unit's bottom panel (XXXX-XXXX-XXXXX/WEGO2), then click [OK].
When using an iPhone/iPad
Audio disorders (beeping) may occur in this unit when calling or sending/receiving data on the mobile phone. This problem can arise when the mobile phone's communications protocol is GSM, and is due to interference caused by GSM. If this happens, change the iPhone/iPad's setting to flight mode.
This problem does not occur with the 3G or LTE communications protocols.
1 Connect the iPhone/iPad with this unit using the iPhone/iPad connection cable (Lightning).
2 Connect this unit with the USB mobile battery or USB power adapter.
3 Slide this unit's [ON/OFF] switch to the [ON] position.
4 Launch the DJ application on the iPhone/iPad.
Loading tracks and playing them ( A)
1 Turn the rotary selector while pressing the [SHIFT] button to select a folder or item.
- When a folder or item with the [+] mark is selected and the rotary selector is pressed while pressing the [SHIFT] button, that folder or item is opened or closed.
2 Release the [SHIFT] button then turn the rotary selector to select the track.
3 Press the [LOAD] button to load the selected track onto the deck.
4 Press the [▶/II] button to play the track.
- When this button is pressed again during playback, playback pauses.
Using the mixer functions ( B)
- Adjust the volume of the powered speakers, etc., connected to the [MASTER OUT] terminals to an appropriate level. Note that if the volume is set too high, the output sound could be very loud.
1 Operate the channel faders to adjust the audio level output from the respective decks.
2 Operate the crossfader to switch the deck whose sound is output from the speakers.
— Left edge: Sound is output from deck [A] or [C].
— Center: The sound of all the decks is mixed and output.
— Right edge: Sound is output from deck [B] or [D].
- The curve characteristics can be switched using the crossfader curve setting button on the [MIXER] panel at the center of the computer's screen.
— [THRU]: Select this when you do not want to use the crossfader.
— [图标]: Set here for a curve that rises gradually.
— [图1]: Sets an abruptly rising curve.
3 Turn the [MASTER VOL] control to adjust the audio level of the speakers.
Adjusting the sound quality
Turn the [EQ (HI, MID, LOW)] controls on the respective decks.
Monitoring sound with headphones ( C)
1 Connect headphones to the [PHONES] terminal.
2 Press the [CUE Ⓤ] button for the deck you want to monitor.
3 Turn the [HEADPHONES MIX] control.
- Turn counterclockwise: The volume of the deck whose [CUE Ⓞ] button is pressed increases relatively.
- Turn clockwise: The [MASTER OUT] volume increases relatively.
4 Turn the [HEADPHONES VOL] control.
- The sound of the deck whose [CUE Ⓤ] button is pressed is output from the headphones.
- When the [CUE] button is pressed again, monitoring is canceled.
Mixing ( B, D)
1 Operate the [TEMPO] slider to match the playing speed on one deck to the playing speed on the other deck.
— Move towards the + (front) side: The playing speed increases.
— Move towards the – (back) side: The playing speed decreases.
2 If the beats of the two decks are off, use the jog dial's pitch bend function to correct for this offset.
The playing speed can be adjusted by turning the outer part of the jog dial during playback.
— Spin clockwise: The playing speed increases.
— Spin counterclockwise: The playing speed decreases.
— Stop spinning: Playback at the normal speed resumes.
- When the [SYNC (MASTER)] button is pressed, the two decks are automatically set to the same playing speed. (The playing speed is set to the speed of the deck selected as the master for synchronization.)
3 Operate the channel faders or crossfader to mix the sound of the two decks and switch between them.

Notes
- If the beats of the two decks do not match, the jog dial of the deck selected as the master for synchronization lights in the set illumination color and the jog dial of the other deck is off.
- Once the beats of the two decks are matched, both jog dials light in the set illumination color.
For the illumination color setting, see Changing the color of the jog dial's illumination ( F ) on page 14.
Inputting the sound of the microphone
The sound of the microphone connected to the [MIC] terminal can be mixed.
1 Connect the microphone to the [MIC] terminal.
2 Adjust the audio level input to the [MIC] terminal.
- Turn the [MIC VOL] control: The [MIC] terminal's input audio level is adjusted.
- Only the volume of the microphone's sound can be adjusted.
• The sound of the microphone is not output from the headphones.
Quitting the system
1 Quit VIRTUAL DJ LE.
2 Slide this unit's [ON/OFF] switch to the [OFF] position.
3 Disconnect the USB cable from your computer.
Operation (this unit's features)
JOG FX mode types ( E)
flowchart
graph TD
    A["CTRL A OFF"] --> B["FX1"]
    B --> C["FX2"]
    C --> D["FX3"]
    D --> E["CTRL B OFF"]
    style A fill:#f9f,stroke:#333
    style B fill:#ccf,stroke:#333
    style C fill:#cfc,stroke:#333
    style D fill:#fcc,stroke:#333
    style E fill:#cff,stroke:#333
This unit is equipped with 5 types of JOG FX modes.
The JOG FX mode types are shown below.
| Mode | Description of mode | |
| Key control | Key control is turned on and off by pressing the [CTRL A] button.When on, the key can be adjusted by turning the jog dial.Also, when on, it is possible to adjust only the key control parameter by holding the button pressed in and turning the jog dial while touching a metal part of the top of the jog dial. | |
| Effect 1 | Effect 1 is turned on and off by pressing the [FX1] button.When on, effect 1 parameter 1 can be adjusted by turning the jog dial.Also, when on, effect 1 parameter 2 can be adjusted by turning the jog dial while pressing the [SHIFT] button.Also, when the effect is on, it is possible to adjust only effect 1 parameter 1 by holding the button pressed in and turning the jog dial while touching a metal part of the top of the jog dial. | |
| Effect 2 | Effect 2 is turned on and off by pressing the [FX2] button.When on, effect 2 parameter 1 can be adjusted by turning the jog dial.Also, when on, effect 2 parameter 2 can be adjusted by turning the jog dial while pressing the [SHIFT] button.Also, when the effect is on, it is possible to adjust only effect 2 parameter 1 by holding the button pressed in and turning the jog dial while touching a metal part of the top of the jog dial. | |
| Effect 3 | Effect 3 is turned on and off by pressing the [FX3] button.When on, effect 3 parameter 1 can be adjusted by turning the jog dial.Also, when on, effect 3 parameter 2 can be adjusted by turning the jog dial while pressing the [SHIFT] button.Also, when the effect is on, it is possible to adjust only effect 3 parameter 1 by holding the button pressed in and turning the jog dial while touching a metal part of the top of the jog dial. | |
| Filter | The filter is turned on and off by pressing the [CTRL B] button.When on, the filter can be adjusted by turning the jog dial.Also, when on, it is possible to adjust only the filter parameter by holding the button pressed in and turning the jog dial while touching a metal part of the top of the jog dial. |
- When the jog dial is turned while multiple modes are on, the parameters of the modes that are on (for effects, parameter 1) are adjusted simultaneously.
- All modes are cancelled by pressing the [CTRL A] or [CTRL B] button while pressing the [SHIFT] button.
- The respective effect's type can be selected by pressing the [FX1], [FX2] or [FX3] button while pressing the [SHIFT] button.
- The types and numbers of parameters differ according to the effect. This operation has no effect for effects with no corresponding parameters.
- For details on the effects that can be used, see the Pioneer website. http://pioneerdj.com/support/
Changing the color of the jog dial's illumination (⇒F)
This unit is equipped with a function for changing the color of the jog dial's illumination.
- The changed illumination color setting is retained even when this unit's power is turned off.
Selecting the color from the preset colors
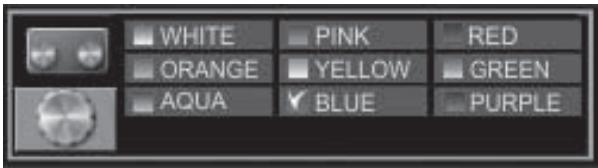
Press the [CUE Ⓞ] button while pressing the [SHIFT] button to change the color of the illumination of the jog dial.
The color of the illumination changes in the order shown below.
| Illumination color | Illumination mode |
| Frosty white | Pulse Mode Active |
| Red | |
| Orange | |
| Yellow | |
| Green | |
| Emerald green | |
| Aqua | |
| Blue | |
| Violet | |
| Off | Pulse Mode Normal |
- The color of the jog dial's illumination can be switched independently for the four decks.
- When the color is turned off for any of the four decks, the mode switches to Pulse Mode Normal.
- Pulse Mode Active: Enables Mix Pulse and FX Pulse.
- Pulse Mode Normal: Disables Mix Pulse and FX Pulse.
— Mix Pulse
The offset in the beats of the two tracks is indicated by the lights. The jog dial lights with the set illumination color when the beats are perfectly synchronized, and the jog dial's lights turn off when the beats are off. This lets you easily synchronize the beats and tempos while checking the offset of the beats visually.
— FX Pulse
The lights on the jog dial move in various ways according to the effect that is operated, adding excitement to the DJ performance through the movement of the light in addition to the changes in the sound.
Adjusting the color freely
Turn the [EQ (HI, MID, LOW)] controls while pressing the [SHIFT] button to change the color of the illumination of the jog dial.
The colors of the illumination and the corresponding [EQ (HI, MID,
LOW)] controls are shown below.
| EQ (HI, MID, LOW) controls | Illumination color |
| EQ [HI] control | Red |
| EQ [MID] control | Green |
| EQ [LOW] control | Blue |
- When the color is turned off (when the EQ (HI, MID and LOW) controls are all set to the minimum) for any of the four decks, the mode switches to Pulse Mode Normal.
Switching the skin color
With VIRTUAL DJ LE, the skin's background color can be selected from among 10 colors, the jog color from among 9 colors.
1 Press the [COLOR] button.
COLOR
2 Select the desired background color.
3 Select the desired jog color.
Advanced Operation
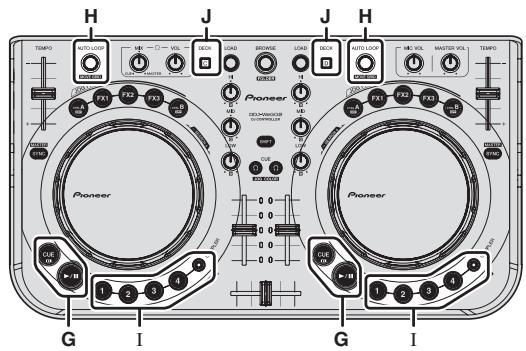
Using the CUE function ( G)
1 In the pause mode, press the [CUE] button to set a cue point at the position at which playback is paused.
— When no hot cue is set at any of buttons [1] to [4], the cue point is simultaneously set as hot cue [1].
— If hot cues have already been set, the hot cue last operated is reset at the cue point position.
2 During playback, press the [CUE] button to return to the last operated hot cue point and pause there (Back Cue).
3 After returning to the cue point, keep pressing the [CUE] button to continue playing (Cue Sampler).
Using the LOOP function ( H)
Manual looping
Loops with a maximum length of approximately 4 seconds can be created.
1 During playback, press the [AUTO LOOP] control while pressing the [SHIFT] button to set the loop in point.
2 After the loop in point is set, press the [AUTO LOOP] control while pressing the [SHIFT] button to set the loop out point and start loop playback.
- When the [AUTO LOOP] control is pressed while pressing the [SHIFT] button during loop playback, loop playback is canceled.
- When a manual loop is set after turning on [1] on the computer's screen, the loop out point is automatically set by adjusting the loop length to be playable as auto loops (1/8 to 32).
- When a manual loop is set after turning off [icon] on the computer's screen, [< _> ] is displayed on the [AUTO LOOP] window's beat number display. To use the auto loop function after this, first cancel manual loop playback, then turn the [AUTO LOOP] control clockwise or counterclockwise until the beat number display appears on the [AUTO LOOP] window.
- If about 4 seconds pass after the loop in point is set, the set loop in point is canceled.
Auto looping
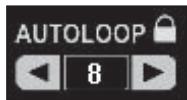
1 During playback, turn the [AUTO LOOP] control to set the length for loop playback in number of beats.
2 Press the [AUTO LOOP] control to start loop playback.
- The length of the loop can be changed by turning the [AUTO LOOP] control during loop playback.
Using the HOT CUE function ( I)
With this function, playback can be started instantaneously from the position at which a hot cue is set.
- Up to four hot cues can be set and stored per track.
1 During playback or in the pause mode, press a [HOT CUE (DELETE)/SAMPLER] button to set a hot cue.
2 Press the [HOT CUE (DELETE)/SAMPLER] button at which the hot cue is set to call out the hot cue.
- A previously set hot cue can be deleted by pressing the [HOT CUE (DELETE)/SAMPLER] button while pressing the [SHIFT] button.
- Hot cue operations can be performed when the [SAMPLER] button is not lit.
Using the SAMPLER function ( I)
The sounds of up to 8 sampler slots can be operated in addition to deck operations.
Press a [HOT CUE (DELETE)/SAMPLER] button to start playback of the sampler slot.
On this unit, sampler slot operations can be performed when the [SAMPLER] button is lit.
The [HOT CUE (DELETE)/SAMPLER] buttons on this unit and the sampler slots in VIRTUAL DJ LE correspond as follows:
— [HOT CUE (DELETE)/SAMPLER] buttons on this unit's left deck: Sampler slots 1 to 4
— [HOT CUE (DELETE)/SAMPLER] buttons on this unit's right deck: Sampler slots 5 to 8
- Playback returns to the beginning of the sample and continues by pressing the [HOT CUE (DELETE)/SAMPLER] button while pressing the [SHIFT] button when the sample is playing.
Making the SAMPLER settings
The [SAMPLER] volume, etc., can be adjusted through operations on the computer.
1 Click [SAMPLER] on the computer's screen to switch to the [SAMPLER]screen.
2 Operate the function on the computer's screen.
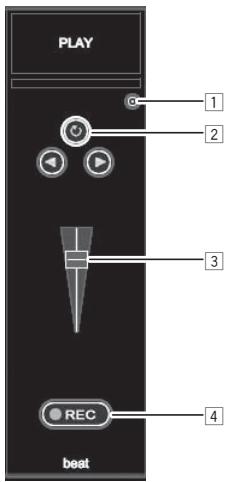
1 Opens the [SAMPLER] options screen. Set for example whether or not to play the [SAMPLER] in sync with the currently playing track.
2 Selects the [SAMPLER] playing mode (play just once or play repeatedly).
3 Adjusts the [SAMPLER]'s volume.
4 Recording starts when the [REC] button is pressed. When the [REC] button is pressed again, recording stops.
Operating four decks ( J)
With VIRTUAL DJ LE, you can select either a 2-deck layout or a 4-deck layout.
This unit supports operation with a 4-deck layout.
1 Click the [2-4 DECKS] button on the computer's screen to switch the deck layout.
2 Press the [DECK] button to switch the deck to be operated.
The [DECK C] button lights when deck C is selected, the [DECK D] button lights when deck D is selected.
- When the 4-deck layout is selected, the decks can be switched from the buttons on the computer screen as described below.
— Press the [DECK C] button: Switches the deck on the left side.
(Deck A ⇔ Deck C)
— Press the [DECK D] button: Switches the deck on the right side.
(Deck B ⇔ Deck D)
- With a 4-deck layout, the outputs of the respective decks can be assigned to either the left or right sides of the crossfaders using the assign buttons at the sides of the crossfaders on the computer's screen.
- When the decks are switched, the positions of the controls and faders on the computer screen and on this unit may differ. In such cases, move the controls and faders on this unit to the same positions as the controls and faders on the computer's screen.
The controls and faders for which this operation is required when the decks are switched are as follows:
— TEMPO slider
— EQ (HI, MID, LOW) controls
— Channel fader
Operation (other functions)
Analyzing files
- This function is operated on the computer. It cannot be operated on this unit.
We recommend analyzing files before playing them with VIRTUAL DJ LE. When files are analyzed, the track's BPM and key are detected and the beat grid is attributed automatically.
1 On the browser screen, select the track to be analyzed and right-click it.
The track options menu is displayed.
2 From the menu, click [BPM] > [Re-Analyze] to start analyzing.
When multiple tracks or folders are selected, click [Scan for BPMs] on the menu displayed after right-clicking.
- When analysis is completed, the icon at the beginning of the track item switches from ☐ to ☐.
Editing the beat grid
- This function is operated on the computer. It cannot be operated on this unit.
1 Load the track whose beat grid you want to edit onto a deck.
2 Select the loaded track on the browser screen and right-click it.
3 Select [BPM] > [Manual Edit].
The [Adjust BPM Values] screen is displayed.
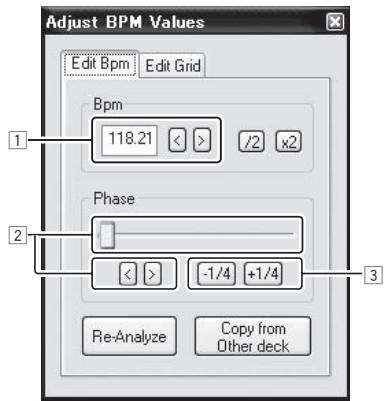
1 Input the [BPM] value directly or use the [< ] and [ > ] buttons to adjust the grid spacing.
2 Move the slider or use the [<] and [> ] buttons to move the grid position.
3 Use the [-1/4] and [+1/4] buttons to move the grid position in units of beats.
Adjusting the jog dial's MIDI message sending interval
This unit is equipped with a mode for adjusting the jog dial's MIDI message sending interval.
Depending on your computer's operating system and specifications, the jog dial may not operate properly if the sending interval of MIDI message for JOG dial is too short. In this case, follow the procedure below to adjust the MIDI message sending interval.
- The value set in the jog dial MIDI message sending interval adjustment mode is retained even when this unit's power is turned off.
1 Turn on the power while pressing the right deck's [CTRL A] button and [FX1] button.
The unit starts up in the jog dial MIDI message sending interval adjustment mode. Wait until the startup illumination finishes.
2 Press the [SHIFT] button and select the jog dial's MIDI message sending interval.
The sending interval changes in units of 1 ms each time the [SHIFT] button is pressed.
The jog dial's MIDI message sending interval is indicated by how the LEDs on the channel level indicator light.
| MIDI message sending interval | Channel Level Indicator |
| 3 ms* | |
| 4 ms | |
| 5 ms | |
| 6 ms | |
| 7 ms | |
| 8 ms | |
| 9 ms | |
| 10 ms | |
| 11 ms | |
| 12 ms | |
| 13 ms |
*: Setting upon purchase
3 Press the [▶/Ⅲ] button.
The sending interval is set.
4 Turn the power off.
The mode for adjusting the jog dial's MIDI message sending interval adjustment is canceled.
Adjusting the sensitivity of the jog dial's touch sensor
This unit is equipped with a mode for adjusting the sensitivity of the jog dial's touch sensor.
- The value set in the jog dial sensitivity adjustment mode is retained even when this unit's power is turned off.
1 Turn on the power while pressing the left deck's [CTRL A] and [FX1] buttons.
The unit starts up in the jog dial sensitivity adjustment mode. Wait until the startup illumination finishes.
2 Press the [SHIFT] button to select the jog dial's sensitivity.
The jog dial's sensitivity changes each time the [SHIFT] button is pressed.
The jog dial's sensitivity is indicated by how the [HOT CUE (DELETE)/SAMPLER] buttons and [SAMPLER] LEDs light.
| Jog dial sensitivity | LED that lights |
| -4 (low) | Left deck's [HOT CUE1] button |
| -3 | Left deck's [HOT CUE2] button |
| -2 | Left deck's [HOT CUE3] button |
| -1 | Left deck's [HOT CUE4] button |
| 0* | Left and right decks' [SAMPLER] button |
| +1 | Right deck's [HOT CUE1] button |
| +2 | Right deck's [HOT CUE2] button |
| +3 | Right deck's [HOT CUE3] button |
| +4 (high) | Right deck's [HOT CUE4] button |
*: Setting upon purchase
3 Press the [▶/Ⅲ] button.
The jog dial's sensitivity is set.
4 Turn the power off.
The mode for adjusting the jog dial's sensitivity is canceled.
Mood lighting mode
When this mode is set, the brightness of the illumination of the left and right jog dials automatically changes slowly. This can be used as mood lighting.
• This mode can be set even if no DJ application is running.
Launching the mood lighting mode
Press the [SHIFT], [DECK C] and [DECK D] buttons simultaneously.
- The mood lighting mode is set automatically if no operation is performed for 10 minutes.
Canceling the mood lighting mode
Operate any one of the control panel's buttons, controls, sliders, jog dials, etc.
Additional information
Troubleshooting
- Incorrect operation is often mistaken for trouble or malfunction. If you think that there is something wrong with this component, check the points below and the [FAQ] for the [DDJ-WeGO2] on the Pioneer DJ support site.
http://pioneerdj.com/support/
Sometimes the problem may lie in another component. Inspect the other components and electrical appliances being used. If the problem cannot be rectified, ask your nearest Pioneer authorized service center or your dealer to carry out repair work.
- This unit may not operate properly due to static electricity or other external influences. In this case, proper operation may be restored by turning the power off, waiting 1 minute, then turning the power back on.
| Problem | Check | Remedy |
| This unit is not recognized by the computer. | Is the [ON/OFF] switch for power supply set to [ON]? | Set the [ON/OFF] switch for power supply to [ON]. |
| Is the included USB cable properly connected? | Connect the included USB cable properly. (page 8) | |
| Are you using a USB hub? | USB hubs cannot be used. Connect the computer and this unit directly using the included USB cable. (page 8) | |
| Is an iPhone/iPad connected? | Disconnect the iPhone/iPad. | |
| Positions of controls and sliders on this unit and VIRTUAL DJ LE differ. | — | When controls and sliders on this unit are moved, the controls and slides on VIRTUAL DJ LE are synchronized. |
| Music files cannot be played. | Are the music files damaged? | Play music files that are not damaged. |
| Distorted sound. | Is the sound level input to the [MIC] terminal set to an appropriate level? | Set the audio level input to the terminals to a suitable level for the connected devices. |
| Are the [MASTER OUT] terminals set to unbalanced output with a monaural cable? | With an unbalanced output, the sound will be distorted unless the output is set to a suitable level. Use the [MASTER VOL] control to set the output to a suitable level. | |
| Sound being played is interrupted when using DJ software. | Is the computer connected to this unit connected to an AC power supply? | When using a notebook computer on battery power, the power management system may set the battery energy saving mode, decreasing the CPU's clock frequency. If this happens, noise may be generated and operation may become slower. Connect the computer to which this unit is to be connected to an AC power supply. |
| Is the driver software's latency value suitable? | Set the driver software's latency to a suitable value. (page 6) | |
| No sound is produced. | Is the included USB cable properly connected? | Connect the computer and this unit directly using the included USB cable. USB hubs cannot be used. (page 8) |
| Are terminals or plugs dirty? | Wipe any dirt off terminals and plugs before connecting. | |
| Is the driver software properly set? | Set the driver software properly. (page 6) | |
| Are the connected components and amplifiers properly set? | Set the external input selection and volume on the components and amplifiers properly. | |
| Is this unit's volume set appropriately? | Set the channel faders, crossfader and master volume appropriately. (page 12) | |
| Noise (a booming sound) can be heard in the sound. | Is a mobile phone placed near this unit? | Move the mobile phone away from this unit. Noise may be heard during calls or when sending or receiving data on the mobile phone. When using an iPhone/ iPad connected to this unit, change the iPhone/iPad's setting to flight mode. |
| [SYNC] function does not work properly. | Have the music files been properly analyzed? | If the results of analysis of the music files are not correct, edit the beat grid manually. (page 18) |
| Sound is interrupted when the ASIO driver is set. | Has the ASIO driver been set with VIRTUAL DJ LE running? | Set the ASIO driver before launching VIRTUAL DJ LE. (page 6) |
| Recorded samples cannot be saved. Samples cannot be registered at sampler slots 7 or 8. | — | The functions for saving and calling out recorded samples can be used when you upgrade to VIRTUALDJ PRO FULL. |
| Computer on which Windows XP is installed freezes or CPU usage rate is 100%. | Have you turned off this unit's power while VIRTUAL DJ LE was running or disconnected the USB cable during use? | Be sure to quit VIRTUAL DJ LE before turning off this unit's power. Also, do not disconnect the USB cable during use. |
| Communications cannot be established when this unit is turned on after launching VIRTUAL DJ LE. Operations of buttons and controls are not associated, or LEDs do not light. | Have you started up this unit and VIRTUAL DJ LE in the wrong order? | Always first turn on this unit's power, wait for the startup illumination to finish, check that this unit's [CTRL A], [FX1], [FX2], [FX3] and [CTRL B] buttons are all lit dimly, then launch VIRTUAL DJ LE. (page 12) |
| Recording is not possible. | Is there a 2-byte code (used in Japanese, etc.) included in the file path for where the recorded file is to be stored? | Set so that there are no 2-byte codes (used in Japanese, etc.) in the file path for where recorded files are to be stored. |
| Nothing appears on the computer's screen though VIRTUAL DJ LE was launched. | Is your computer's display resolution 1 024 x 768 or greater? | Right-click the task bar and launch the task manager. On the task manager's [Application] tab, right-click [VirtualDJ] and select [Maximize]. |
Using as a controller for other DJ software
This unit also outputs the operating data for the buttons and dials in MIDI format. If you connect a computer with a built-in MIDI-compatible DJ software via a USB cable, you can operate the DJ software on this unit. The sound of music files being played on the computer can also be output from the DDJ-WEGO2.
To use as a controller for other DJ software, first make the DJ software's audio and MIDI related settings.
For details, see your DJ software's operating instructions.
About MIDI messages
For details on this unit's MIDI messages, see "List of MIDI Messages".
- "List of MIDI Messages" can be acquired from the following URL: http://pioneerdj.com/support/
About the driver software (Windows)
This driver software is an exclusive ASIO driver for outputting audio signals from the computer.
• There is no need to install the driver software when using Mac OS X.
Operating environment
| Supported operating systems | ||
| Windows® 8/Windows® 8 Pro | 32-bit version | √ |
| 64-bit version | ^1 | |
| Windows® 7 Home Premium/Professional/Ultimate | 32-bit version | √ |
| 64-bit version | ^1 | |
| Windows Vista® Home Basic/Home Premium/Business/Ultimate | 32-bit version | √ |
| 64-bit version | ^1 | |
| Windows® XP Home Edition/Professional (SP2 or later) | 32-bit version | √ |
When using a 64-bit version of Windows, the driver software can only be used for 32-bit applications.
Checking the latest information on the driver software
For detailed information on this unit's designated driver software, see the Pioneer DJ support site below. http://pioneerdj.com/support/
About the installation procedure
- For the operating procedure, see About the installation procedure (Windows) on page 5.
❖ Software end user license agreement
This Software End User License Agreement ("Agreement") is between you (both the individual installing the Program and any single legal entity for which the individual is acting) ("You" or "Your") and PIONEER CORPORATION ("Pioneer"). TAKING ANY STEP TO SET UP OR INSTALL THE PROGRAM MEANS THAT YOU ACCEPT ALL OF THE TERMS OF THIS LICENSE AGREEMENT. PERMISSION TO DOWNLOAD AND/OR USE THE PROGRAM IS EXPRESSLY CONDITIONED ON YOUR FOLLOWING THESE TERMS. WRITTEN OR ELECTRONIC APPROVAL IS NOT REQUIRED TO MAKE THIS AGREEMENT VALID AND ENFORCEABLE. IF YOU DO NOT AGREE TO ALL OF THE TERMS OF THIS AGREEMENT, YOU ARE NOT AUTHORIZED TO USE THE PROGRAM AND MUST STOP INSTALLING IT OR UNINSTALL IT, AS APPLICABLE.
1 DEFINITIONS
1 "Documentation" means written documentation, specifications and help content made generally available by Pioneer to aid in installing and using the Program.
2 “Program” means all or any part of Pioneer’s software licensed to You by Pioneer under this Agreement.
2 PROGRAM LICENSE
1 Limited License. Subject to this Agreement's restrictions, Pioneer grants to You a limited, non-exclusive, non-transferable, license (without the right to sublicense):
a To install a single copy of the Program in Your computer or mobile device, to use the Program only for Your personal purpose complying with this Agreement and the Documentation ("Authorized Use");
b To use the Documentation in support of Your Authorized Use; and
c To make one copy of the Program solely for backup purposes, provided that all titles and trademark, copyright and restricted rights notices are reproduced on the copy.
2 Restrictions. You will not copy or use the Program or Documentation except as expressly permitted by this Agreement. You will not transfer, sublicense, rent, lease or lend the Program, or use it for third-party training, commercial time-sharing or service bureau use. You will not Yourself or through any third party modify, reverse engineer, disassemble or decompile the Program, except to the extent expressly permitted by applicable law, and then only after You have notified Pioneer in writing of Your intended activities.
3 Ownership. Pioneer or its licensor retains all right, title and interest in and to all patent, copyright, trademark, trade secret and other intellectual property rights in the Program and Documentation, and any derivative works thereof. You do not acquire any other rights, express or implied, beyond the limited license set forth in this Agreement.
4 No Support. Pioneer has no obligation to provide support, maintenance, upgrades, modifications or new releases for the Program or Documentation under this Agreement.
3 WARRANTY DISCLAIMER
THE PROGRAM AND DOCUMENTATION ARE PROVIDED "AS IS" WITHOUT ANY REPRESENTATIONS OR WARRANTIES, AND YOU AGREE TO USE THEM AT YOUR SOLE RISK. TO THE FULLEST EXTENT PERMISSIBLE BY LAW, PIONEER EXPRESSLY DISCLAIMS ALL WARRANTIES OF ANY KIND WITH RESPECT TO THE PROGRAM AND DOCUMENTATION, WHETHER EXPRESS, IMPLIED, STATUTORY, OR ARISING OUT OF COURSE OF PERFORMANCE, COURSE OF DEALING OR USAGE OF TRADE, INCLUDING ANY WARRANTIES OF MERCHANTABILITY, FITNESS FOR A PARTICULAR PURPOSE, SATISFACTORY QUALITY, ACCURACY, TITLE OR NON-INFRINGEMENT.
4 EXPORT CONTROL AND COMPLIANCE WITH LAWS AND REGULATIONS
You may not use or otherwise export or re-export the Program except as authorized by United States law and the laws of the jurisdiction in which the Program was obtained. In particular, but without limitation, the Program may not be exported or re-exported (a) into any U.S.-embargoed countries or (b) to anyone on the U.S. Treasury Department's Specially Designated Nationals List or the U.S. Department of Commerce Denied Persons List or Entity List. By using the Program, you represent and warrant that you are not located in any such country or on any such list. You also agree that you will not use the Program for any purposes prohibited by United States law, including, without limitation, the development, design, manufacture, or production of nuclear, missile, or chemical or biological weapons.
5 U.S. GOVERNMENT RESTRICTED RIGHTS
The Program and Documentations are “commercial computer software” and “commercial computer software documentation” as those terms are defined in 48 C.F.R. §252.227-7014 (a) (1) (2007) and 252.227-7014 (a) (5) (2007). The U.S. Government’s rights with respect to the Program and Documentations are limited by this license pursuant to 48 C.F.R. § 12.212 (Computer software) (1995) and 48 C.F.R. §12.211 (Technical data) (1995) and/or 48 C.F.R. §227.7202-3, as applicable. As such, the Program and Documentations are being licensed to the U.S. Government end users: (a) only as “commercial items” as that term is defined in 48 C.F.R. §2.101 generally and as incorporated in DFAR 212.102; and (b) with only those limited rights as are granted to the public pursuant to this license. Under no circumstance will the U.S. Government or its end users be granted any greater rights than we grant to other users, as provided for in this license. Manufacturer is Pioneer Corporation, 1-1 Shin-Ogura, Saiwai-ku, Kawasaki-shi, Kanagawa-Ken, 212-0031 Japan
6 DAMAGES AND REMEDIES FOR BREACH
You agree that any breach of this Agreement's restrictions would cause Pioneer irreparable harm for which money damages alone would be inadequate. In addition to damages and any other remedies to which Pioneer may be entitled, You agree that Pioneer may seek injunctive relief to prevent the actual, threatened or continued breach of this Agreement.
7 TERMINATION
Pioneer may terminate this Agreement at any time upon Your breach of any provision. If this Agreement is terminated, You will stop using the Program, permanently delete it from your computer or mobile device where it resides, and destroy all copies of the Program and Documentation in Your possession, confirming to Pioneer in writing that You have done so. Sections 2.2, 2.3, 2.4, 3, 4, 5, 6, 7 and 8 will continue in effect after this Agreement's termination.
8 GENERAL TERMS
Limitation of Liability. In no event will Pioneer or its subsidiaries be liable in connection with this Agreement or its subject matter, under any theory of liability, for any indirect, incidental, special, consequential or punitive damages, or damages for lost profits, revenue, business, savings, data, use, or cost of substitute procurement, even if advised of the possibility of such damages or if such damages are foreseeable. In no event will Pioneer's liability for all damages exceed the amounts actually paid by You to Pioneer or its subsidiaries for the Program. The parties acknowledge that the liability limits and risk allocation in this Agreement are reflected in the Program price and are essential elements of the bargain between the parties, without which Pioneer would not have provided the Program or entered into this Agreement.
2 The limitations or exclusions of warranties and liability contained in this Agreement do not affect or prejudice Your statutory rights as consumer and shall apply to You only to the extent such limitations or exclusions are permitted under the laws of the jurisdiction where You are located.
3 Severability and Waiver. If any provision of this Agreement is held to be illegal, invalid or otherwise unenforceable, that provision will be enforced to the extent possible or, if incapable of enforcement, deemed to be severed and deleted from this Agreement, and the remainder will continue in full force and effect. The waiver by either party of any default or breach of this Agreement will not waive any other or subsequent default or breach.
4 No Assignment. You may not assign, sell, transfer, delegate or otherwise dispose of this Agreement or any rights or obligations under it, whether voluntarily or involuntarily, by operation of law or otherwise, without Pioneer's prior written consent. Any purported assignment, transfer or delegation by You will be null and void. Subject to the foregoing, this Agreement will be binding upon and will inure to the benefit of the parties and their respective successors and assigns.
5 Entire Agreement. This Agreement constitutes the entire agreement between the parties and supersedes all prior or contemporaneous agreements or representations, whether written or oral, concerning its subject matter. This Agreement may not be modified or amended without Pioneer's prior and express written consent, and no other act, document, usage or custom will be deemed to amend or modify this Agreement.
6 You agree that this Agreement shall be governed and construed by and under the laws of Japan.
About trademarks and registered trademarks
• Pioneer is a registered trademark of PIONEER CORPORATION.
- Microsoft, Windows, Windows Vista and Internet Explorer are either registered trademarks or trademarks of Microsoft Corporation in the United States and/or other countries.
- Apple, iPad, iPod, iPod touch, iPhone, iTunes, Safari, Finder, Mac, Macintosh and Mac OS are trademarks of Apple Inc., registered in the U.S. and other countries.
- Intel, Pentium, and Intel Core are trademarks of Intel Corporation in the U.S. and/or other countries.
• AMD Athlon is a trademark of Advanced Micro Devices, Inc.
• ASIO is a trademark of Steinberg Media Technologies GmbH.
• VirtualDJ is a registered trademark of Atomix Productions.
- iOS is a trademark on which Cisco holds the trademark right in the US and certain other countries.
The names of companies and products mentioned herein are the trademarks of their respective owners.
This product has been licensed for nonprofit use. This product has not been licensed for commercial purposes (for profit-making use), such as broadcasting (terrestrial, satellite, cable or other types of broadcasting), streaming on the Internet, Intranet (a corporate network) or other types of networks or distributing of electronic information (online digital music distribution service). You need to acquire the corresponding licenses for such uses. For details, see http://www.mp3licensing.com.
Cautions on copyrights
Recordings you have made are for your personal enjoyment and according to copyright laws may not be used without the consent of the copyright holder.
- Music recorded from CDs, etc., is protected by the copyright laws of individual countries and by international treaties. It is the full responsibility of the person who has recorded the music to ensure that it is used legally.
- When handling music downloaded from the Internet, etc., it is the full responsibility of the person who has downloaded the music to ensure that it is used in accordance with the contract concluded with the download site.
— The specifications and design of this product are subject to change without notice.
© 2013 PIONEER CORPORATION. All rights reserved.
PIONEER CORPORATION
1-1, Shin-ogura, Saiwai-ku, Kawasaki-shi, Kanagawa 212-0031, Japan
- DJ Controller
- DDJ-WEGO2
- Contents
- How to read this manual
- Before start
- Before you start
- Connections
- Part names and functions
- Basic Operation
- Operation (this unit's features)
- Advanced Operation
- Operation (other functions)
- Additional information
- Before start
- Features
- iPhone/iPad CONNECTION
- JOG FX
- PULSE CONTROL
- Color variations and customizing
- DESIGN
- VIRTUAL DJ LE
- Compatibility with various DJ software programs
- What's in the box
- Cautions
- Before you start
- Installing the software
- Before installing the software
- About the driver software (Windows)
- - Checking the latest information on the driver software
- About the VIRTUAL DJ LE software
- ◆ Installing the VIRTUAL DJ LE software
- - Checking the latest information on the VIRTUAL DJ LE software
- About the installation procedure
- For Windows
- For Mac OS X
- About the installation procedure (Windows)
- Turn on the computer's power.
- Insert the included CD-ROM into the computer's CD drive.
- When the CD-ROM menu appears, select [Install Driver Software (Pioneer\_DDJ\_WeGO2\_Driver\_X.XXX)], then click [Start].
- Proceed with installation according to the instructions on the screen.
- Select [Install VIRTUAL DJ LE(DDJ-WeGO2)] from the CD-ROM's menu, then click [Start].
- Once the VIRTUAL DJ LE installer is launched, click [Next].
- Select the type of installation for VIRTUAL DJ LE, then click [Next].
- When the screen below is displayed, click [Install]. Installation begins.
- Click [Finish].
- ◆ Connecting this unit and computer
- About the installation procedure (Mac OS X)
- Using the driver utility software
- Using the settings utility software
- ◆ Launching the settings utility software
- ◆ Adjusting the buffer size
- Checking the version of the driver software
- Mounting the iPhone/iPad stand
- WARNING
- Cautions on using the iPhone/iPad stand
- iOS devices that can be used with this unit and placed on the stand
- Connections
- Connecting with a computer
- USB terminal
- ON/OFF switch
- PHONES terminals
- iPhone/iPad terminal
- MIC jack
- Kensington security slot
- MASTER OUT terminals
- Part names and functions
- Browser
- Rotary selector
- LOAD button
- Deck
- ▶/II button
- CUE button
- SYNC (MASTER) button
- TEMPO slider
- CTRL A button
- CTRL B button
- FX1 button
- FX2 button
- FX3 button
- AUTO LOOP (MOVE GRID) control
- DECK button
- SHIFT button
- SAMPLER button
- HOT CUE (DELETE)/SAMPLER button
- Jog dial
- Mixer
- MIC VOL control
- MASTER VOL control
- HEADPHONES MIX control
- HEADPHONES VOL control
- EQ (HI, MID, LOW) controls
- CUE ⏻ (Headphones cue button)
- Channel Level Indicator
- Channel fader
- Crossfader
- Basic Operation
- Starting the system
- When using a computer
- Launching VIRTUAL DJ LE
- When using an iPhone/iPad
- Loading tracks and playing them ( A)
- Using the mixer functions ( B)
- Adjusting the sound quality
- Monitoring sound with headphones ( C)
- Mixing ( B, D)
- Notes
- Inputting the sound of the microphone
- Quitting the system
- Operation (this unit's features)
- Changing the color of the jog dial's illumination (⇒F)
- Selecting the color from the preset colors
- Adjusting the color freely
- Switching the skin color
- COLOR
- Advanced Operation
- Using the CUE function ( G)
- Using the LOOP function ( H)
- Manual looping
- Auto looping
- Using the HOT CUE function ( I)
- Using the SAMPLER function ( I)
- Making the SAMPLER settings
- Operating four decks ( J)
- Operation (other functions)
- Analyzing files
- Editing the beat grid
- Adjusting the jog dial's MIDI message sending interval
- Adjusting the sensitivity of the jog dial's touch sensor
- Turn on the power while pressing the left deck's [CTRL A] and [FX1] buttons.
- Press the [SHIFT] button to select the jog dial's sensitivity.
- Press the [▶/Ⅲ] button.
- Turn the power off.
- Mood lighting mode
- Launching the mood lighting mode
- Canceling the mood lighting mode
- Additional information
- Troubleshooting
- Using as a controller for other DJ software
- About MIDI messages
- Checking the latest information on the driver software
- ❖ Software end user license agreement
- DEFINITIONS
- PROGRAM LICENSE
- WARRANTY DISCLAIMER
- EXPORT CONTROL AND COMPLIANCE WITH LAWS AND REGULATIONS
- U.S. GOVERNMENT RESTRICTED RIGHTS
- DAMAGES AND REMEDIES FOR BREACH
- TERMINATION
- GENERAL TERMS
- About trademarks and registered trademarks
- Cautions on copyrights
- PIONEER CORPORATION
Marque : PIONEER
Modèle : DDJ-WEGO2
Catégorie : Contrôleur DJ