TP7040TWF - Sèche-linge AEG-ELECTROLUX - Notice d'utilisation et mode d'emploi gratuit
Retrouvez gratuitement la notice de l'appareil TP7040TWF AEG-ELECTROLUX au format PDF.



| Type de produit | Sèche-linge à pompe à chaleur |
| Marque | AEG-ELECTROLUX |
| Modèle | TP7040TWF |
| Dimensions (H x L x P) | 85 x 60 x 58 cm |
| Profondeur avec porte ouverte | 109 cm |
| Poids net | 52 kg |
| Alimentation électrique | 220-230 V, 6 A, 1050 W |
| Capacité de charge maximale | 7 kg |
| Volume du tambour | 108 L |
| Classe d'efficacité énergétique | A |
| Consommation énergétique (coton armoire) | 1,85 kWh |
| Programmes | COTONS (Extra sec, Armoire, Prêt à repasser), TISSUS MISTI (Extra sec, Armoire, Prêt à repasser), Laine, Jeans, Microfibre, Repassage facile, Rafraîchir, Séchage à temps, etc. |
| Fonctions | Extra délicat, Intensif, Anti-piega prolongé, Signal sonore, Séchage à temps, Départ différé, Sécurité enfants |
| Sécurité enfants | Oui |
| Reversibilité de porte | Oui |
| Entretien | Nettoyage des filtres après chaque cycle, vidange du réservoir d'eau, nettoyage du condenseur |
| Température ambiante autorisée | +5°C à +35°C |
| Accessoires optionnels | Kit colonne, Kit de décharge, Piédestal avec tiroir |
FOIRE AUX QUESTIONS - TP7040TWF AEG-ELECTROLUX
Questions des utilisateurs sur TP7040TWF AEG-ELECTROLUX
0 question sur cet appareil. Repondez a celles que vous connaissez ou posez la votre.
Poser une nouvelle question sur cet appareil
Téléchargez la notice de votre Sèche-linge au format PDF gratuitement ! Retrouvez votre notice TP7040TWF - AEG-ELECTROLUX et reprennez votre appareil électronique en main. Sur cette page sont publiés tous les documents nécessaires à l'utilisation de votre appareil TP7040TWF de la marque AEG-ELECTROLUX.
MODE D'EMPLOI TP7040TWF AEG-ELECTROLUX
7040 TWF
Istruzioni per l'uso User manual
Asciugabiancheria Tumble dryer
Grazie per aver scelto uno dei nostri prodotti di qualità.
Per garantire il funzionamento ottimale e regolare dell'apparecchio, la preghiamo di leggere attentamente questo manuale d'istruzioni. In tal modo potrà eseguire ogni operazione alla perfezione e con la massima efficienza. Le consigliamo inoltre di conservare il manuale in un luogo sicuro, affinché possa consultarlo ogni volta che ne avrà bisogno. Infine, qualora l'apparecchio cambiasse proprietario, non dimentichi di consegnargli il presente manuale.
Le auguriamo di trarre la massima soddisfazione dal suo nuovo acquisto.
INDICE
ISTRUZIONI D'USO 3
INFORMAZIONI IMPORTANTI PER LA SICUREZZA 3
TUTELA DELL'AMBIENTE 5
INSTALLAZIONE 6
Trasporto dell'apparecchio 6
Posizionamento dell'apparecchio 6
Rimozione del materiale di imballaggio 7
Collegamento elettrico 7
Reversibilità della porta 7
Accessori speciali 8
DESCRIZIONE DEL PRODOTTO 9
PANNELLO DEI COMANDI 10
Pannello dei comandi 10
Display 10
PREPARAZIONE AL PRIMO UTILIZZO 11
TABELLA DEI PROGRAMMI 11
UTILIZZO QUOTIDIANO 13
Suddivisione della biancheria 13
Pesi medi della biancheria 14
Accensione della macchina / accensione della luce 14
Come caricare la biancheria 14
Selezione del programma 15
Funzione EXTRA DELICATO (EXTRA SANFT)
15
Funzione INTENSIVO (TROCKNEN PLUS) 15
Funzione EXTRA ANTIPIEGA (KNITTERSCHUTZ
PLUS) 16
Funzione SEGNALE ACUSTICO (SIGNAL) 16
Funzione ASCIUG. A TEMPO (ZEITWAHL) 16
RITARDATA PARTENZA (ZEITVORWAHL) 16
Funzione SICUREZZA BAMBINI 17
Avvio del programma 17
Modifica del programma 17
Estrazione della biancheria 17
PULIZIA E CURA 18
Pulizia del filtro porta 18
Pulizia della guarnizione della porta 20
Svuotamento del serbatoio dell'acqua 20
Pulizia dei filtri dello scambiatore di calore 21
Per pulire il cestello 23
Pulire il pannello e l'esterno 23
COSA FARE SE ... 23
IMPOSTAZIONI DELL'APPARECCHIO 25
CARATTERISTICHE TECNICHE 26
ASSISTENZA TECNICA 27
ISTRUZIONI D'USO
INFORMAZIONI IMPORTANTI PER LA SICUREZZA

Per la vostra sicurezza e per garantire un impiego corretto, prima di installare e utilizzare per la prima volta l'apparecchio, vi consigliamo di leggere con attenzione il manuale per l'utente, inclusi i suggerimenti e le avvertenze. Per evitare errori e incidenti, è importante garantire che tutte le persone che utilizzano l'apparecchio ne conoscano il funzionamento e le caratteristiche di sicurezza. Conservare queste istruzioni e accertarsi che rimangano unite all'apparecchio in caso di vendita o trasloco, in modo che chiunque lo utilizzi sia correttamente informato sull'uso e sulle norme di sicurezza.

- Leggere il libretto d'istruzioni perima di usare l'apparecchiatura.
Sicurezza generale
- È pericoloso modificare le specifiche o cercare di alterare il prodotto in qualunque modo.
- Questa apparecchiatura non deve essere utilizzata da bambini o da persone le cui capacità fisiche, sensoriali o mentali o la cui mancanza di esperienza e conoscenze sull'uso dell'apparecchiatura impediscano loro di utilizzarlo senza rischi in assenza di una persona responsabile per la loro incolumità.
- Evitare che i bambini o gli animali domestici entrino nel cestello. Per sicurezza, ispezionare il cestello prima dell'utilizzo.
- Oggetti come monete, spille di sicurezza, chiodi, viti, pietre o altri materiali duri e taglienti possono danneggiare gravemente l'apparecchiatura; prestare attenzione a non introdurli insieme alla biancheria.
- Per evitare il pericolo di incendio dovuto all'eccessiva asciugatura, non utilizzare l'apparecchiatura per asciugare i seguenti capi: cuscini, trapunte e altri imbottiti (poiché possono accumulare calore).
- Oggetti di gommapiuma (schiuma di lattice), cuffie da bagno, tessuti impermeabili, articoli in gomma e indumenti o cuscini con imbottitura in gommapiuma non devono essere asciugati nell'asciugatrice.
- Dopo l'uso, per la manutenzione o la pulizia staccare sempre la spina dell'alimentazione.
- Non cercare in nessun caso di modificare o riparare l'apparecchiatura da soli. Le modifiche o riparazioni eseguite da persone non esperte possono causare seri danni o malfunzionamenti. Contattare il Centro di assistenza locale. Richiedere sempre l'installazione di ricambi originali.
- I capi con macchie di olio da cucina, acetone, benzina, cherosene, smacchiatori, trementina, cere e prodotti per rimuovere la cera devono essere lavati in acqua calda con abbondante detersivo prima di essere introdotti nell'asciugatrice.
- Pericolo di esplosione: non inserire nell'asciugatrice capi che siano stati a contatto con solventi infiammabili (benzina, alcol denaturato, liquidi per la pulizia a secco e simili). Queste sostanze sono volatili, perciò possono creare un rischio di esplosione. Inserire nell'asciugatrice solo capi lavati in acqua.

- Pericolo di incendio! i capi che siano stati sporcati o imbevuti con olio vegetale o da cucina non devono essere inseriti nell'asciugatrice per evitare potenziali rischi di incendio.
- I capi trattati con smacchiatori devono essere risciacquati in acqua prima di essere introdotti nell'asciugatrice.
- Prima di inserire i capi nell'asciugatrice, verificare che nelle tasche non siano stati dimen- ticati accendini o fiammiferi
AVVERTENZA!
- Non arrestare mai l'asciugatrice prima del termine del ciclo di asciugatura. Nel caso sia assolutamente necessario, fare attenzione perché la biancheria e il cestello possono essere molto caldi. Pericolo di incendio!
- Non lasciare che si accumulino residui e lanugine nell'asciugatrice.
- Pericolo di scosse elettriche! Non pulire l'apparecchiatura con getti d'acqua.
- L'ultima fase del programma di asciugatura è una fase di raffreddamento per proteggere i capi di biancheria.
- Non introdurre nell'asciugatrice capi che siano stati lavati con sostanze chimiche industriali.
- Assicurare la buona ventilazione nell'ambiente in cui è installata la macchina.
Installazione
- Questa apparecchiatura è pesante. Prestare attenzione quando occorre spostarlo.
- Al momento del disimballaggio, verificare che l'apparecchiatura non abbia subito danni durante il trasporto. In caso di dubbi, non utilizzarlo e rivolgersi al Centro di assistenza.
- Disimballare completamente l'apparecchiatura prima dell'installazione. L'eliminazione incompleta dei materiali di imballaggio può causare gravi danni all'apparecchiatura. Vedere la relativa sezione del libretto di istruzioni.
- Se si rendesse necessaria una modifica all'impianto elettrico per l'installazione dell'apparecchiatura, l'intervento dovrà essere effettuato da personale qualificato e competente.
- Se l'apparecchiatura è installata su un pavimento in moquette o un tappeto, regolare i piedini in modo da permettere una corretta circolazione dell'aria.
- Dopo aver installato la macchina, controllare che non sia posata sul cavo elettrico di alimentazione.
- Se l'asciugatrice è installata sopra la lavabiancheria, deve obbligatoriamente essere utilizzato l'apposito kit di montaggio (accessorio opzionale).
Uso
- Questa apparecchiatura è destinata solo all'uso domestico. e non deve essere utilizzato per scopi diversi da quelli per il quale è stato progettato.
- Introdurre solo capi idonei ad essere asciugati a macchina. Seguire le istruzioni riportate sull'etichetta dei singoli capi.
• Non introdurre nell'asciugatrice capi non lavati. - Non caricare eccessivamente l'apparecchiatura. Vedere la relativa sezione del libretto di istruzioni.
-
Non introdurre nell'asciugatrice capi ancora troppo bagnati.
-
Non introdurre nell'asciugatrice indumenti che siano stati a contatto con prodotti volatili a base di petrolio. Se si utilizza uno smacchiatore o un detergente volatile, attendere che il prodotto sia completamente evaporato prima di introdurre i capi nell'apparecchiatura.
- Per scollegare il cavo di alimentazione dalla presa elettrica; afferrare direttamente la spina ed evitare di tirare il cavo.
- Non utilizzare mai l'asciugatrice se il cavo di alimentazione, il pannello dei comandi, il piano di lavoro o la base sono danneggiati in modo tale da rendere accessibili le parti interne.
- Ammorbidenti o prodotti simili devono essere utilizzati come specificato nelle istruzioni del produttore.
- Attenzione – superficie molto calda : non toccare il coprilampada dello sportello se la luce è accesa.
Solo per le asciugatrici dotate di luce interna
Sicurezza bambini
- Questa apparecchiatura non deve essere utilizzata da bambini o persone inferme senza supervisione.
- I bambini non sono in grado di riconoscere i rischi associati alle apparecchiature elettriche. È consigliabile controllare che i bambini non giochi con l'apparecchiatura.

AVVERTENZA!
- I componenti di imballaggio (come il polistirolo o i sacchetti di plastica) possono essere molto pericolosi per i bambini perché possono causare soffocamento! Tenerli fuori dalla portata dei bambini.
- Tenere in un luogo sicuro e al di fuori della portata dei bambini anche tutti i detersivi.
- Evitare che i bambini o gli animali domestici entrino nel cestello.
TUTELA DELL'AMBIENTE
Il simbolo ✉ sul prodotto o sulla confezione indica che il prodotto non deve essere considerato come un normale rifiuto domestico, ma deve essere portato nel punto di raccolta appropriato per il riciclaggio di apparecchiature elettriche ed elettroniche. Provvedendo a smaltire questo prodotto in modo appropriato, si contribuisce a evitare potenziali conseguenze negative, che potrebbero derivare da uno smaltimento inadeguato del prodotto. Per informazioni più dettagliate sul riciclaggio di questo prodotto, contattare l'ufficio comunale, il servizio locale di smaltimento rifiuti o il negozio in cui è stato acquistato il prodotto.
Dove portare gli apparecchi fuori uso?
In qualsiasi negozio che vende apparecchi nuovi oppure si restituiscono ai centri di raccolta ufficiali della SENS oppure ai riciclatori ufficiali della SENS.
La lista dei centri di raccolta ufficiali della SENS è visibile nel sito www.sens.ch.
Protezione ambientale
I materiali di imballaggio sono riciclabili. I componenti in plastica sono identificati dai marchi >PE<, >PS< ecc. Smaltire questi materiali conformemente alle norme locali in vigore.

La pompa di calore dell'asciugabiancheria contiene un circuito chiuso con refrigerante esente da CFC (Cloro-Fluoro-Carburi) Il circuito refrigerante della pompa di calore non deve essere danneggiato.

AVVERTENZA!
Se l'apparecchio non è più utilizzato:
- Togliere la spina dalla presa.
- Al momento dello smaltimento, tagliare il cavo di alimentazione ed eliminarlo insieme alla spina.
- Rimuovere il fermo della porta. In questo modo si eviterà che i bambini possano chiudersi all'interno.
INSTALLAZIONE
Trasporto dell'apparecchio

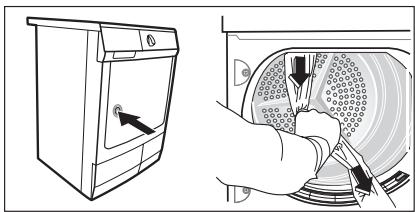
Se non è possibile trasportare l'apparecchiatura in posizione verticale, ribaltarla esclusivamente sul lato sinistro (vedere illustrazione).

AVVERTENZA!
Se il dispositivo è stato capovolto in fase di trasporto, lasciarlo in posizione verticale per 12 ore prima di connetterlo alla presa elettrica e utilizzarlo per la prima volta, in modo che l'olio possa scorrere nuovamente nel motore. In caso contrario il motore rischia di venire danneggiato.

natural_image
Two-step diagram showing hand positioning of a device with checkmark and X mark (no text or symbols)Posizionamento dell'apparecchio
- Per ragioni di comodità, si consiglia di collocare l'apparecchiatura vicino alla lavabiancheria.
- L'asciugatrice deve essere installata in luogo pulito.
- L'aria deve circolare liberamente attorno all'apparecchiatura. Non ostruire la griglia di ventilazione frontale o le griglie di entrata dell'aria sul retro dell'apparecchiatura.
- Per assicurare un funzionamento più silenzioso e con meno vibrazioni quando l'asciugatrice è in funzione, collocarla su una superficie solida e piana.
- Quando l'asciugatrice è stata posizionata nella posizione definitiva di funzionamento, controllare che sia in piano servendosi di una livella. Se l'apparecchiatura non è in piano, sollevare o abbassare i piedini.
- I piedini non devono essere rimossi. Non ridurre la distanza libera dal pavimento con tappeti, passatoie o simili. Si potrebbe causare un surriscaldamento, che comprometterebbe il funzionamento dell'apparecchiatura.

- L'aria calda emessa dall'asciugatrice può raggiungere una temperatura massima di 60°C. Non è quindi opportuno installare l'elettrodomestico su pavimenti non resistenti a temperature elevate.
- Per non compromettere la prestazione dell'asciugatrice, durante il funzionamento la temperatura ambiente non deve essere inferiore a +5°C e superiore a +35°C.
- Trasportare l'apparecchiatura solo in posizione verticale.
- L'apparecchiatura non deve essere installata dietro una porta bloccabile, una porta scorrevole, una porta con una cerniera sul lato opposto a quello dell'apparecchiatura. Così facendo si impedirebbe l'apertura completa dell'asciugatrice.
Rimozione del materiale di imballaggio

ATTENZIONE
Prima di utilizzare l'apparecchiatura, tutti i materiali di imballaggio utilizzati per il trasporto devono essere rimossi.
- Aprire la porta
- Togliere le strisce adesive applicate al-l'interno, sulla parte superiore del cestello.
- Togliere le pellicole e le protezioni in polistirolo.
Collegamento elettrico
I particolari sulla tensione di rete, sul tipo di corrente e sui fusibili richiesti sono riportati sulla targhetta nominale. Tale targhetta è montata vicino all'apertura (vedere il capitolo "Descrizione del prodotto").
Collegare l'apparecchio ad una presa di terra, conformemente alle normative sui cavi in vigore.

AVVERTENZA!
Il fabbricante declina qualsiasi responsabilità per danni o lesioni che possano derivare dalla mancata conformità alle precauzioni di sicurezza sopra riportate.
Dovesse essere necessario sostituire il cavo elettrico, il lavoro dovrà essere effettuato dal nostro centro di assistenza.

AVVERTENZA!
Il cavo di alimentazione deve potere essere accessibile dopo l'installazione della macchina.
Reversibilità della porta

AVVERTENZA!
Prima di procedere a modificare la reversibilità della porta, staccare la spina di alimentazione.
- Aprire la porta.
- Svitare la cerniera A sulla parte anterio-re della macchina e smontare la porta.
- Rimuovere le piastre di copertura B. A questo scopo, inserire un cacciavite sot- tile nelle scanalature come mostrato nella figura, premere leggermente verso il basso ed estrarre le piastre di copertura.

-
Con l'utensile adatto esercitare pressione per liberare il blocco C dal fissaggio, estrarlo e inserirlo dall'altro lato con una rotazione di 180°.
-
Svitare la cerniera A dalla porta di carico e reinserirla con rotazione di 180° sul lato opposto, riavvitandola.
-
Reinserire le piastre di copertura Bsul lato opposto, con rotazione di 180°.
-
Svitare le piastre di copertura D nella parte anteriore della macchina e riavvitarle sul lato opposto, con una rotazione di 180°.
-
Svitare il blocco della porta E, premere leggermente e rimuoverlo dalla parte anteriore della macchina.

-
Premere il pulsante a scatto F verso il basso, spingere leggermente il coperchio e rimuoverlo dal davanti della macchina.
-
Sostituire il blocco della porta E sul lato opposto, riavvitarlo nella porta.
-
Sull'altro lato, inserire il coperchio F e far scattare il pulsante.
-
Rimontare la porta e le cerniere e riavvitare.
Nota relativa alla protezione da contatto: La macchina è sicura soltanto quando sono state installate tutte le parti in plastica.
Accessori speciali
KIT DI INSTALLAZIONE IN COLONNA
Disponibile presso il vostro distributore autorizzato.
Il kit di installazione in colonna consente di installare l'asciugabiancheria sopra una lavatrice a carica frontale. Questa soluzione consente di guadagnare spazio.
Leggere attentamente le istruzioni fornite con il kit.
KIT DI SCARICO
Disponibile presso il vostro distributore autorizzato (può essere collegato ad alcuni tipi di asciugabiancheria).
Kit di installazione per lo scarico dell'acqua di condensa in un lavello, un sifone, una conduttura, ecc. Dopo aver eseguito l'installazione, il contenitore dell'acqua viene scaricato automaticamente. Il contenitore dell'acqua deve trovarsi all'interno dell'apparecchiatura.
Il tubo installato deve trovarsi ad un'altezza tra i 50 cm e un massimo di 1 m da terra. Il tubo non deve essere attorcigliato. Se possibile ridurre la lunghezza del tubo.
Leggere attentamente le istruzioni fornite con il kit.
PIEDISTALLO CON CASSETTO
Disponibile presso il vostro distributore autorizzato.
Per posizionare l'apparecchiatura più in alto, ad un'altezza che faciliti l'introduzione e l'estrazione della biancheria.
Il cassetto può essere utilizzato per conservare tutto ciò che riguarda la biancheria come ad es.: asciugamani, prodotti per la pulizia ed altro.
Leggere attentamente le istruzioni fornite con il kit.
DESCRIZIONE DEL PRODOTTO
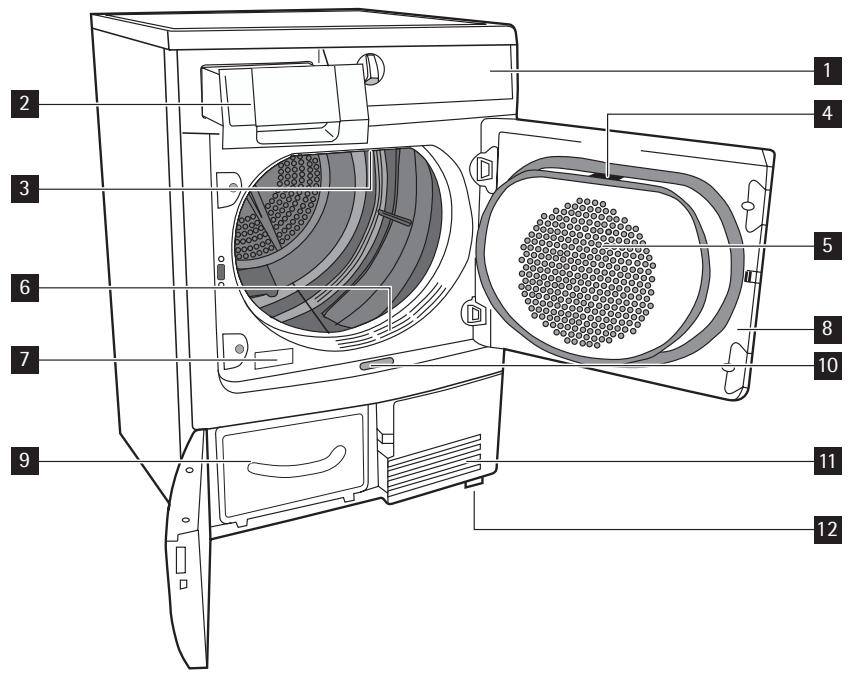
1 Pannello dei comandi
2 Serbatoio per l'acqua di condensa
3 Luce del cestello
4 Microfiltro
5 Filtro a maglie larghe
6 Filtro lanugine
7 Targhetta di identificazione
8 Porta (reversibile)
9 Sportello scambiatore di calore, filtro, scambiatore di calore
10 Pulsante di apertura sportello nello zoccolo
11 Griglia di ventilazione
12 Piedini regolabili
PANNELLO DEI COMANDI
Pannello dei comandi

1 Selettore programmi e interruttore ON/OFF (Acceso/Spento)
2 Tasti funzione
3 Tasto AVVIO PAUSA (START PAUSE)
4 Tasto RITARDATA PARTENZA (ZEITVORWAHL)
5 Display
6 Spie luminose
Display

1 Tempo residuo / messaggio di errore
2 avvertenze
3 simbolo funzione anti-piega prolungato
4 stato fase del ciclo
5 simbolo opzione partenza ritardata
6 simbolo sicurezza bambini
 | |||
| [mmol] | [mmol] | [mmol] | |
| asciugatura (spia fase di asciugatura) | raffreddamento (spia fase di asciugatura) | antipiega (spia fase di asciugatura) | extra antipiega |
| [mmol] | [mmol] | [mmol] | |
| svuotare la tanica del-l'acqua di condensa (avvertenza) | pulire i filtri (avvertenza) | pulire il condensatore (avvertenza) | sicurezza bambini |
| [mmol] | [mmol] | [mmol] | |
| partenza ritardata | durata ciclo | asciugatura a tempo (10 min - 3 h) | ritardata partenza |
PREPARAZIONE AL PRIMO UTILIZZO
Per rimuovere gli eventuali residui di lavorazione passare un panno umido nel cesto oppure eseguire un breve ciclo (circa 30 min.) inserendo degli stacci umidi nell'asciugatrice. All'inizio del ciclo di asciugatura (3-5 min.) il funzionamento potrebbe essere leggermente più rumoroso. Ciò è dovuto all'avvio del compressore ed è un fenomeno normale per gli elettrodomestici alimentati da compressore, come frigoriferi, congelatori, ecc.
TABELLA DEI PROGRAMMI
| Programmi | Cari-co1) | Impiego/Caratteristiche | Opzioni | Simbo-lo sull'eti chetta |
| COTONI (BAUMWOLLE) | ||||
| EXTRA (EXTRA-TROCKEN) | 7 kg | Asciugatura completa di tessuti spessi o multistrato, ad esempio asciugamani in spugna, accappatoi. | tutti tranne EX-TRA DELICATO (EXTRA SANFT) e ASCIUG. A TEM-PO (ZEITWAHL) | |
| NORMALE (SCHRANKTROC-KEN) 2) | 7 kg | Asciugatura di tessuti di uguale spesso-re, ad esempio articoli in spugna, ma-glieria, asciugamani. | tutti tranne EX-TRA DELICATO (EXTRA SANFT) e ASCIUG. A TEM-PO (ZEITWAHL) | |
| PRONTO STIRO (BÜGELTROC-KEN) 2) | 7 kg | Per biancheria in cotone o lino di spes-sore normale, ad esempio lenzuola, to-vaglie. | tutti tranne EX-TRA DELICATO (EXTRA SANFT) e ASCIUG. A TEM-PO (ZEITWAHL) | |
| TESSUTI MISTI (MISCHGEWEBE) | ||||
TESSUTI MISTI (MISCHGEWEBE)
| Programmi | Cari-co1) | Impiego/Caratteristiche | Opzioni | Simbo-lo sull'eti chetta |
| EXTRA (EXTRA-TROCKEN) | 3 kg | Asciugatura di tessuti spessi o multi-strato, ad esempio maglioni, biancheria da letto, tovaglie. | tutte tranne ASCIUG. A TEM-PO (ZEITWAHL) |  |
| NORMALE (SCHRANKTROC-KEN) 2) | 3 kg | Asciugatura di tessuti sottili da non stirare, ad esempio camicie in tessuti mi-sti, tovaglie, indumenti per bambini, calzini, articoli di corsetteria. | tutte tranne ASCIUG. A TEM-PO (ZEITWAHL) |  |
| PRONTO STIRO (BÜGELTROC-KEN) | 3 kg | Asciugatura per tessuti sottili da ripas-sare col ferro, ad esempio maglieria o camicie. | tutte tranne ASCIUG. A TEM-PO (ZEITWAHL) |  |
| Speciale | ||||
| ASCIUGATURA A TEMPO (ZEIT-PROGRAMM) | 7 kg | Asciugatura di biancheria col tempo im-postato dall'utente. | tutti tranne EX-TRA DELICATO (EXTRA SANFT) e INTENSIVO (TROCKNEN PLUS) |  |
| BIANCHERIA (BETTWÄSCHE) | 3 kg | Per asciugare biancheria da letto (len-zuola singole o doppie, federe, coprile-ti, copripiumini). | tutti tranne EX-TRA DELICATO (EXTRA SANFT) e ASCIUG. A TEM-PO (ZEITWAHL) |  |
| JEANS | 7 kg | Per asciugare capi sportivi come jeans, felpe e simili, in tessuti di spessore di-verso (ad esempio su colletto, polsini e cuciture). | tutti tranne EX-TRA DELICATO (EXTRA SANFT) e ASCIUG. A TEM-PO (ZEITWAHL) |  |
| MICROFIBRA (MIKROFASER) | 1 kg | Per asciugare tessuti sottili, poliesteri e poliammide, che non richiedono stira-tura | tutti tranne EX-TRA DELICATO (EXTRA SANFT) e ASCIUG. A TEM-PO (ZEITWAHL) |  |
| STIRO FACILE (LEICHTBÜGELN PLUS) | 1 kg (o 5 cami-cie) | Asciugatura capi sintetici come per esempio camicie e camicette. Dopo questo programma i capi saranno stirati con maggior facilità. Per avere un buon risultato, consigliamo di scuotere i capi bagnati e di metterli direttamente nel-l'asciugatrice. Dopo la fine del program-ma, sistemare i capi su degli appendia-biti. | tutti tranne EX-TRA DELICATO (EXTRA SANFT) e ASCIUG. A TEM-PO (ZEITWAHL) | |
| REFRESH (AUF-FRISCHEN) | 1 kg | Per rinfrescare o pulire delicatamente gli indumenti. | EXTRA ANTIPIE-GA (KNITTER-SCHUTZ PLUS), SEGNALE ACU-STICO (SIGNAL), RITARDATA PAR-TENZA (ZEITVOR-WAHL) | |
| LANA REFRESH (WOLLPFLEGE) | 1 kg | Per rinfrescare capi di lana. I capi diven-tano morbidi e soffici. Consigliamo di togliere i capi subito dopo la fine del programma. | SEGNALE ACU-STICO (SIGNAL), RITARDATA PAR-TENZA (ZEITVOR-WAHL) | |
1) Peso massimo dei capi asciutti.
2) Ai soli fini normativi:
Per effettuare un test relativo alle prestazioni, utilizzare i programmi standard indicati nel documento EN 61121. Se si rendesse necessario correggere il grado di umidità residuo della biancheria, regolare il programma utilizzando la funzione INTENSIVO (TROCKNEN PLUS).
3) Selezionare EXTRA DELICATO (EXTRA SANFT).
UTILIZZO QUOTIDIANO
Suddivisione della biancheria
- Suddivisione per tessuto:
- Cotone/lino per i programmi del gruppo COTONI (BAUMWOLLE).
- Tessuti misti e sintetici per i programmi del gruppo TESSUTI MISTI (MISCHGEWEBE) .
- Suddivisione in base all'etichetta: Le etichette indicano:

Possibilità di asciugatura a macchina

Asciugatura a temperatura normale

Asciugatura a temperatura ridotta

Asciugatura a macchina non possibile

Non introdurre nell'apparecchio biancheria che in base alle indicazioni dell'etichetta non è idonea all'asciugatura a macchina.
Questo apparecchio può essere utilizzato per tutti i capi lavati che in base alle indicazioni dell'etichetta sono idonei all'asciugatura a macchina.
- Non asciugare tessuti colorati nuovi insieme a capi di colore chiaro. I colori dei tessuti potrebbero diffondersi.
- Non asciugare capi in jersey e maglieria con il programma EXTRA (EXTRATROCKEN) . I capi potrebbero restringersi!
- Tessuti di lana e simili possono essere asciugati usando il programma LANA REFRESH (WOLLPFLEGE).
Preparazione della biancheria
- Per evitare che la biancheria si aggrovigli: chiudere le cerniere, abbottonare i copripiumini e annodare eventuali lacci (ad esempio, quelli dei grembiuli).
- Svuotare le tasche. Rimuovere gli oggetti di metallo (graffette, spille di sicurezza, ecc.).
- Rivoltare i capi in tessuti a doppio strato (per esempio, nel caso delle giacche con interno in cotone, la fodera in cotone deve trovarsi all'esterno). In questo modo i tessuti si asciugheranno meglio.

Non caricare eccessivamente l'apparecchio. Rispettare il volume di carico massimo di 7 kg.
Pesi medi della biancheria
| Accappatoio | 1.200 g |
| Copripiumino | 700 g |
| Camice da lavoro da uomo | 600 g |
| Pigiama da uomo | 500 g |
| Lenzuola | 500 g |
| Tovaglia | 250 g |
| Camicia da uomo | 200 g |
| Camicia da notte | 200 g |
| Federa | 200 g |
| Asciugamano in spugna | 200 g |
| Camicetta | 100 g |
| Intimo da donna | 100 g |
| Mutande da uomo | 100 g |
| Tovagliolo | 100 g |
| Strofinaccio | 100 g |
Accensione della macchina / accensione della luce
Ruotare la manopola di selezione su un programma qualsiasi o su LUCE (BELEUCHTUNG). La macchina è accesa. Quando la porta di caricamento è aperta, il cestello è illuminato.
Come caricare la biancheria

ATTENZIONE
Fare attenzione a non incastrare la biancheria tra lo sportello e la guarnizione di gomma.
- Aprire lo sportello:
Spingere energicamente sullo sportello (sul punto di pressione) - Caricare la biancheria (senza forzare).
- Chiudere lo sportello con decisione, fino allo scatto.

natural_image
Line drawing of a kitchen appliance with a door and button, no text or symbols presentSelezione del programma
Usare la manopola di selezione per selezionare il programma richiesto. Il tempo stimato richiesto per completare il programma viene visualizzato nel display nel formato 2.32 ( ore . minutì). Durante il programma il tempo si riduce ogni minuto.

natural_image
Pure diagram of a circular component with arrows indicating rotation, surrounded by dots and an open circle (no text or symbols)Funzione EXTRA DELICATO (EXTRA SANFT)
Per un'asciugatura particolarmente delicata dei capi contrassegnati con il simbolo ☐ sull'etichetta e per i tessuti sensibili alle alte temperature (per es. acrilico, viscosa). Il programma viene eseguito a temperatura ridotta.
La funzione Delicato è indicata solo per carichi inferiori a 3 kg.
Per attivare la funzione:

- Scegliere il programma di asciugatura.
- Premere il tasto EXTRA DELICATO (EXTRA SANFT) (1). La spia corrispondente si accende. Per deselezionare la funzione, premere nuovamente il tasto EXTRA DELICATO (EXTRA SANFT) (1). La spia corrispondente si spegne.
Funzione INTENSIVO (TROCKNEN PLUS)
La funzione INTENSIVO (TROCKNEN PLUS) effettua un'asciugatura più intensa.
Per attivare la funzione:
- Scegliere il programma di asciugatura.
- Premere il tasto INTENSIVO (TROCKNEN PLUS) (2). La spia corrispondente si accende.
Per deselezionare la funzione, premere nuovamente il tasto INTENSIVO (TROCKNEN PLUS) (2). La spia corrispondente si spegne.
Funzione EXTRA ANTIPIEGA (KNITTERSCHUTZ PLUS)
Questa funzione prolunga la fase anti-piega per una durata complessiva di 90 minuti. Du-rante questa fase, il cestello ruota a intervalli, per mantenere la biancheria morbida e senza pieghe.
Per attivare la funzione:
- Scegliere il programma di asciugatura.
- Premere il tasto EXTRA ANTIPIEGA (KNITTERSCHUTZ PLUS) (3). La spia corrispondente si accende e sul display si accende il simbolo 📋.
Selezionando questa funzione aggiuntiva, la fase antipiega alla fine del ciclo di asciugatura viene prolungata di 60 minuti. Durante la fase antipiega, la biancheria può essere estratta in qualunque momento.
Per deselezionare la funzione, premere nuovamente il tasto EXTRA ANTIPIEGA (KNITTER-SCHUTZ PLUS). La spia corrispondente si spegne e dal simbolo 📋 scompare il numero 90.
Funzione SEGNALE ACUSTICO (SIGNAL)
Alla consegna dell'apparecchio, la funzione SEGNALE ACUSTICO (SIGNAL) è disattivata.
Se la funzione è attiva, viene emesso un segnale acustico nei seguenti casi:
- fine ciclo
- fase antipiega e inizio o fine della fase
- interruzione ciclo, con un avviso
- allarme
Per attivare la funzione:
- Scegliere il programma di asciugatura.
- Premere il tasto SEGNALE ACUSTICO (SIGNAL) (4). La spia corrispondente si accende.
Per deselezionare la funzione, premere nuovamente il tasto SEGNALE ACUSTICO (SIGNAL)
(4). La spia corrispondente si spegne.
Funzione ASCIUG. A TEMPO (ZEITWAHL)
Questa opzione permette di selezionare la durata del programma dopo l'impostazione della funzione ASCIUGATURA A TEMPO (ZEITPROGRAMM). La durata del programma può variare da 10 minuti a 3 ore, con incrementi di 10 minuti.
- Ruotare il selettore su ASCIUGATURA A TEMPO (ZEITPROGRAMM). Sul display lampeggia l'indicazione 10' (il tempo corrispondente alla fase di raffreddamento).
- Premere ripetutamente il tasto ASCIUG. A TEMPO (ZEITWAHL) (5) finché sul display non compare la durata desiderata, ad es. 20 per un programma di 20 minuti.
Se la durata non viene selezionata, il programma si imposta automaticamente su 10 minuti.
RITARDATA PARTENZA (ZEITVORWAHL)

Consente di ritardare l'inizio di un programma di asciugatura da un minimo di 30 min. fino ad un massimo di 20 ore.
- Selezionare il programma di asciugatura ed eventuali ulteriori opzioni.
-
Premere il tasto RITARDATA PARTENZA (ZEITVORWAHL) ripetutamente fino a che non compare sul display la durata di programma desiderata, ad esempio 12h se il programma deve incominciare dopo 12 ore.
-
Per attivare la partenza ritardata, premere il tasto AVVIO PAUSA (START PAUSE). Il tempo mancante alla partenza scorre nel display.
Funzione SICUREZZA BAMBINI
Per impedire che un programma venga avviato o modificato accidentalmente, è possibile impostare la sicurezza bambini. Questa funzione consente di bloccare tutti i tasti e la manopola dei programmi. Per attivare o disattivare la funzione, premere simultaneamente i tasti EXTRA ANTIPIEGA (KNITTERSCHUTZ PLUS) SEGNALE ACUSTICO (SIGNAL) (3) e (4) per 5 secondi.

- Prima dell'inizio del programma: l'apparecchio non può essere utilizzato
- Dopo l'inizio del programma: il programma in funzione non può essere modificato
Sul display viene visualizzato il simbolo ☐ ad indicare che la funzione di sicurezza bambini è stata attivata.
Il dispositivo di sicurezza bambini non si disattiva al termine del programma.
Per poter avviare un nuovo programma, occorrerà prima disattivare la sicurezza bambini.
Avvio del programma
Premere il tasto AVVIO PAUSA (START PAUSE) (6). Il programma si avvia.
La fase del programma è indicata sul display dal simbolo corrispondente:
- - fase di asciugatura
- ♣ - fase di raffreddamento
- 📋 - fase anti-piega
Durante la selezione di un programma, compaiono tutti i simboli delle fasi previste da quel programma. Quando si avvia un programma, viene visualizzato solo il simbolo della fase in corso.
Modifica del programma
Per modificare un programma selezionato per errore dopo l'avvio del programma, ruotare dapprima il selettore dei programmi su OFF (AUS) quindi reimpostare il programma.

Una volta avviato, il programma non può più essere modificato. Se si tenta di modificare il programma girando la manopola, il display e i led lampeggiano. Se viene premuto un tasto opzione (ad esclusione del Segnale acustico), nel display viene visualizzato il messaggio Err. Il programma di asciugatura non viene comunque modificato (protezione biancheria).
Estrazione della biancheria
Al termine del ciclo di asciugatura, sul display lampeggia ☐ e si accende il simbolo della fase antipiega ☑. Se è stato premuto il tasto SEGNALE ACUSTICO (SIGNAL) (4), viene emesso un segnale acustico intermittente per circa un minuto.

I cicli di asciugatura sono seguiti automaticamente da una fase antipiega, che dura circa 30 minuti. Durante questa fase il cestello ruota a intervalli. In questo modo, la biancheria si mantiene morbida e senza pieghe. Durante la fase antipiega, la biancheria può essere estratta in qualunque momento. (Per evitare la formazione di pieghe, si consiglia di estrarre la biancheria verso la fine della fase antipiega.) Se è stata selezionata la funzione EXTRA ANTIPIEGA (KNITTERSCHUTZ PLUS) 📋, la fase antipiega viene prolungata di 60 minuti.
- Aprire lo sportello.
- Prima di estrarre la biancheria, rimuovere la lanugine dal filtro ultrafine. Si consiglia di utilizzare un panno umido. (Vedere il capitolo "Manutenzione e pulizia".)
- Estrarre la biancheria.
- Ruotare il selettore dei programmi in posizione OFF (AUS).

Dopo ogni ciclo di asciugatura:
- Pulire il filtro ultrafine e il filtro fine
- Vuotare il serbatoio dell'acqua di condensa
(Vedere il capitolo "Manutenzione e pulizia".)
- Chiudere lo sportello.
PULIZIA E CURA
Pulizia del filtro porta
I filtri raccolgono tutta la lanugine che si accumula durante l'asciugatura. Perché l'asciuga-trice funzioni perfettamente, i filtri (ultrafine e fine) devono essere puliti dopo ogni ciclo di asciugatura.
Il simbolo di avvertimento ⊕ si accende per ricordare all'utente di eseguire questa operazione.

ATTENZIONE
Non mettere in funzione l'asciugatrice senza i filtri o con filtri danneggiati o intasati.
- Aprire la porta
- Con la mano umida pulire il filtro ultra-fine incorporato nella parte inferiore dell'apertura di carico.

natural_image
Technical diagram of a circular device with internal components and mounting brackets (no text or symbols)- Dopo un certo periodo di tempo sui filtri si forma una patina dovuta ai residui di detersivo presenti nella biancheria.
Quando ciò avviene, pulire i filtri con acqua tiepida ed una spazzola. Rimuovere il filtro dallo sportello tirandolo. Può essere posizionato con il nottolino rivolto a destra o a sinistra.
Dopo la pulizia, non dimenticare di ri- montarlo.
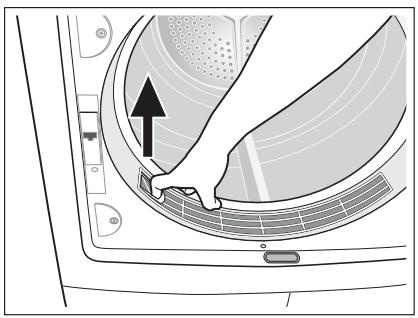
natural_image
Diagram of a device interior showing a circular component with a black arrow pointing to a textured area, no text or symbols present.- Premere il pulsante di sblocco sul filtro a maglia larga.
Il filtro a maglia larga si stacca.
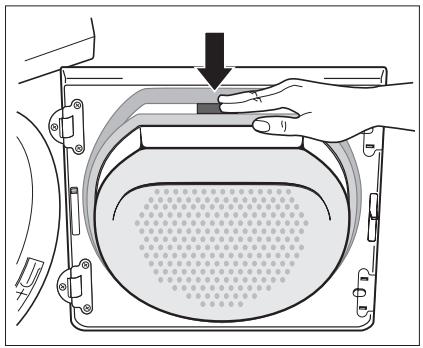
natural_image
Illustration of a hand pressing down on a device component with a black arrow indicating the process (no text or symbols present)- Estrarre il filtro fine.
- Eliminare la lanugine dal filtro fine. A questo scopo si consiglia di usare un panno umido.

Pulire l'intera superficie del filtro
La superficie del filtro fine non deve essere pulita dopo ogni ciclo, ma deve essere controllata regolarmente e pulita all'occorrenza.

natural_image
Diagram of a hand inserting a fan into a device with a circular top and mesh pattern (no text or symbols)- Per fare questo, prendere la parte superiore del filtro a maglia larga e tirarlo verso di sé fino a che non esce dai 2 supporti.
- Rimuovere la lanugine dall'intera area del filtro. Si consiglia di usare un aspiratore.
- Premere entrambi i perni del filtro a maglia larga nelle staffe sullo sportello fino allo scatto.
- Rimontare il filtro fine.
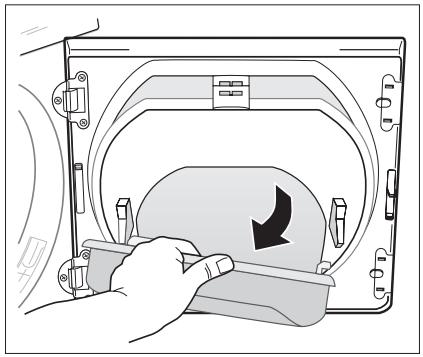
natural_image
Illustration of a hand pressing down on a device component with a black arrow indicating rotation (no text or symbols present)- Premere sul gruppo filtro fino a bloccarlo in posizione corretta.

Se non è stato inserito il filtro fine, il filtro a rete larga non si blocca in posizione corretta e la porta non si chiude.
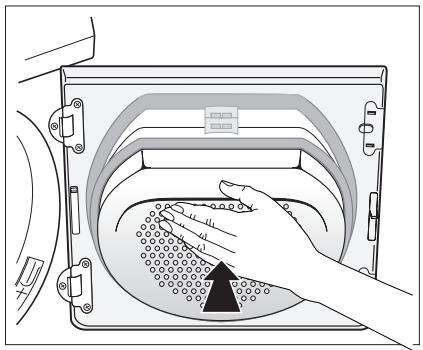
natural_image
Diagram of a hand placing a component into a device casing with a mesh chamber (no text or symbols)Pulizia della guarnizione della porta
Pulire la guarnizione della porta con un panno umido immediatamente dopo ogni ciclo di asciugatura.
Svuotamento del serbatoio dell'acqua
Svuotare la vaschetta dell'acqua di condensa dopo ogni ciclo di asciugatura.
Se la tanica dell'acqua è piena, un programma attivo si interrompe automaticamente e sul display si accende il simbolo Svuotare la tanica ➕ Per continuare il programma, è necessario svuotare la tanica dell'acqua.

AVVERTENZA!
Rischio di avvelenamento. L'acqua dal serbatoio non può essere bevuta o utilizzata per preparare pasti.
- Estrarre il serbatoio dell'acqua 1 e tirare verso l'alto il tubo di scarico secondo i limiti del possibile 2.

-
Versare l'acqua di condensa in una bacinella o in un recipiente simile.
-
Inserire i collegamenti di scarico e ri- montare il serbatoio dell'acqua.
Se il programma è stato interrotto a causa del serbatoio pieno: Premere il tasto AVVIO PAUSA per continuare il ciclo di asciugatura.

natural_image
Line drawing of a hand using a tool to lift a component, with no visible text or symbols
La condensa può essere utilizzata come acqua distillata, per esempio nel ferro a vapore.
Filtrare prima l'acqua, (ad esempio con un filtro per caffé), per eliminare qualsiasi residuo.
Pulizia dei filtri dello scambiatore di calore
Se la spia pulire i filtri alla base => si illumina, lo scambiatore di calore alla base dell'apparecchiatura deve essere pulito, indicativamente ogni 3 cicli di asciugatura. Entrambi i filtri si trovano nella base dell'apparecchiatura.

Nell'alloggiamento del filtro può raccogliersi acqua, quindi è normale che i filtri della lanugine dello scambiatore di calore si bagnino.

- Non utilizzare l'asciugabiancheria senza i filtri per la lanugine.
- I filtri intasati comportano un maggiore consumo di energia (prolungamento del ciclo di asciugatura) e causano danni all'asciugabiancheria.
-
Se la pompa di calore non viene pulita, deve essere sottoposta a costose operazioni di pulizia.
-
Aprire lo sportello
-
Aprire lo sportellino nello zoccolo: Premere il pulsante sul fondo dell'apertura dello sportello ed aprire lo sportellino di sinistra.
-
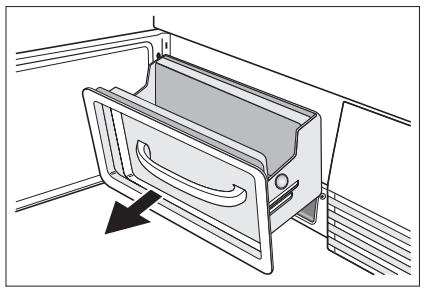
Estrarre l'alloggiamento del filtro tramite la maniglia.

natural_image
Technical line drawing of a mechanical device with a handle and internal panel (no text or symbols)-
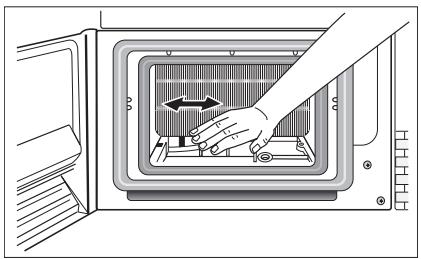
Per pulire il filtro: Estrarre il filtro dal-l'alloggiamento premendo i punti di pressione ai lati ed estrarre il telaio sollevandolo verso l'alto. Togliere i residui dal filtro passandovi sopra con la mano bagnata.
-
Servirsi di una mano umida per rimuovere la lanugine dal filtro nella base.
Se necessario, estrarre e pulire il filtro con acqua tiepida, utilizzando uno spazzolino. Pulire l'interno dello sportello, il vano di raccolta della lanugine e le guarnizioni in gomma.
- Rimontare il filtro nell'alloggiamento a. Inserire il secondo filtro nell'alloggia- mento (si sentirà un rumore di blocco) e farlo scorrere all'interno della camera del filtro b. Chiudere lo sportellino nello zoccolo. Nota: Se il filtro non viene ri- montato, l'alloggiamento non scorre nella base dell'apparecchio.

natural_image
Illustration of a hand pressing down on a microwave oven with a directional arrow (no text or symbols)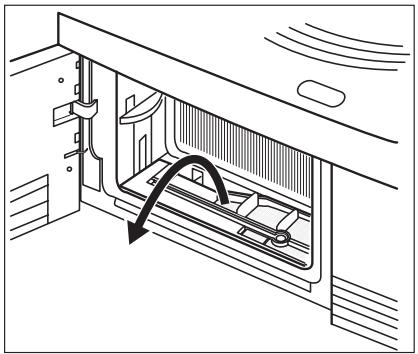
natural_image
Technical line drawing of a mechanical assembly with an arrow indicating motion direction (no text or symbols)
natural_image
Technical illustration of two mechanical assembly setups labeled a and b, showing internal components and alignment (no text or symbols present)- Indicativamente, ogni 6 mesi rimuovere i residui di lanugine dallo scambiatore con l'apposita spugna. Per eseguire questa operazione, usare guanti di gomma.
Suggerimento: La lanugine può essere rimossa facilmente se viene prima inumidita (ad esempio con uno spruzzatore) o in alternativa, con l'aiuto dell'aspirapolvere.

natural_image
Illustration of a hand inserting a component into a microwave oven (no text or symbols visible)Per pulire il cestello

ATTENZIONE
Non usare materiali abrasivi per pulire il cestello. Utilizzare un detergente delicato per pulire l'interno del cestello e le razze.

Tenere pulita la superficie interna del cestello e le razze del cestello. I minerali dell'acqua o dei detersivi possono depositarsi sulla superficie interna del cestello. Ciò può causare una asciugatura insufficiente della biancheria.
Pulire il pannello e l'esterno

ATTENZIONE
Non usare pulitori per mobili o detergenti abrasivi per pulire la macchina. Usare un panno umido per pulire il pannello e la struttura dell'apparecchio.
COSA FARE SE ...
Risoluzione dei problemi
| Problema1) | Possibile causa | Rimedio |
| L'asciugatrice non funziona. | L'asciugatrice non è collegata all'alimentazione di rete. | Inserire la spina nella presa di rete. Controllare il fusibile nella scatola elettrica (installazione domestica). |
| La porta è aperta. | Chiudere l'oblò | |
| Non è stato selezionato il tasto Start/Pause (Avvio/Pausa) . | Premere il tasto Start/Pause (Avvio/Pausa) . | |
| Programma impostato non corretto. | Impostare un programma adatto. 2) | |
| Risultati di asciugatura insoddisfacenti. | Filtri otturati. | Pulire i filtri. 3) |
| Scambiatore di calore intasato. | Pulizia dello scambiatore di calore. 3) | |
| Peso massimo superato. | Rispettare il volume di carico massimo. | |
| Griglia di ventilazione ostruita. | Liberare la griglia di ventilazione alla base dell'apparecchiatura. | |
| Residui all'interno del cestello. | Pulire l'interno del cestello. | |
| Elevato livello di durezza dell'acqua. | Impostare un livello corretto. 4) | |
| La porta non si chiude. | I filtri non sono stati montati corretta-mente. | Installare il microfiltro e/o rimontare il filtro a maglie larghe. |
| Err ( Error) sul display LCD. 5) | Tentativo di modificare i parametri do-po l'avvio del programma. | Spegnere e riaccendere l'apparecchiatu-ra. Impostare i parametri richiesti. |
| Nessuna luce nel cestello. | Il selettore di programma è in posizione OFF . | Ruotarlo su LUCE (se disponibile) o su un programma qualsiasi. |
| La lampadina è guasta. | Sostituire la lampadina (vedere la sezio-ne successiva). | |
| Trascorrere del tempo ano-malo sul di-splay LCD. 5) | Il tempo prima del termine è calcolato sulla base di: tipo, volume e umidità della biancheria. | Si tratta di un processo automatico che non segnala un errore dell'apparecchia-tura. |
| Programma inattivo. | Serbatoio dell'acqua pieno. | Vuotare il serbatoio dell'acqua3), preme-re il tasto Start/Pause (Avvio/Pausa) . |
| Ciclo di asciu-gatura troppo breve. | Limitato carico di biancheria/Biancheria troppo asciutta per il programma sele-zionato. | Selezionare il programma a tempo o un grado di asciugatura più elevato (per es. EXTRA ). |
| Ciclo di asciu-gatura troppo lungo. 6) | Filtri otturati. | Pulire i filtri. |
| Volume di carico eccessivo. | Rispettare il volume di carico massimo. | |
| La biancheria non è stata sufficiente-mente centrifugata. | Centrifugare adeguatamente la bian-cheria. | |
| La temperatura ambiente è troppo ele-vata: nessun malfunzionamento del-l'apparecchiatura. | Se possibile, abbassare la temperatura ambiente. |
1) Se sul display LCD compare un messaggio di errore (per es. E51- solo per le asciugatrici con display LCD): Spegnere e riaccendere l'apparecchiatura. Impostare il programma. Premere il tasto Start/Pause (Avvio/Pausa). L'asciugatrice non funziona? Contattare il centro di assistenza locale e riportare il codice di errore.
2) Seguire i consigli sui programmi; vedere il capitolo Panoramica dei programmi.
3) Vedere il capitolo. "Pulizia e cura"
4) Vedere il capitolo Impostazioni della macchina.
5) Solo per le asciugatrici con display LCD.
6) Nota: Dopo 5 ore, il ciclo di asciugatura termina automaticamente (vedere la sezione Ciclo di asciugatura completato).
Sostituzione della lampadina interna
Usare solo lampadine speciali per asciugatrici, reperibili presso uno dei centri di assistenza locali.

Quando l'apparecchio è acceso, la lampadina interna si spegne 4 minuti dopo l'apertura della porta.

AVVERTENZA!
Non usare lampadine standard! Queste sviluppano troppo calore e possono danneggiare la macchina!
Prima di sostituire la lampadina, staccare la spina dalla presa di rete; in presenza di un collegamento fisso: svitare completamente e disattivare il fusibile.
- Svitare il coprilampada (posto direttamente dietro l'apertura di carico, in alto; fare riferimento al capitolo "Descrizione del prodotto.)
- Sostituire la lampadina difettosa.
- Riavvitare il coprilampada.
Controllare che la guarnizione sia correttamente montata prima di riavvitare il coprilampa- da. Non mettere in funzione l'asciugatrice se non è stata montata correttamente la guarni- zione del coprilampada.

AVVERTENZA!
Per ragioni di sicurezza, il coprilampada deve essere riavvitato perfettamente. Se ciò non avviene, l'asciugatrice non deve essere messa in funzione.
1) L'acqua contiene calcare e sali minerali in quantità variabile a seconda dell'area geografica. Una variazione significativa della conduttività dell'acqua rispetto ai valori prefissati in fabbrica può influire leggermente sull'umidità residua della biancheria alla fine del ciclo. L'asciugatrice consente di regolare la sensibilità del sensore di asciugatura in base ai valori di conduttività dell'acqua.
2) Per impostazione predefinita, il messaggio di avvertenza LED viene sempre visualizzato alla fine del ciclo di asciugatura, oppure durante il ciclo di asciugatura, se la tanica dell'acqua di condensa è piena. Se si utilizza uno scarico esterno per l'acqua di condensa, è possibile che il messaggio non venga visualizzato.
IMPOSTAZIONI DELL'APPARECCHIO
| Impostazione | Implementazione |
| Segnale acustico sempre attivato/disattivato | 1. Ruotare il selettore dei programmi su qualsiasi programma.2. Premere contemporaneamente i tasti EXTRA DELICATO (EXTRA SANFT) INTENSIVO (TROCKNEN PLUS) (1) e (2) per circa 5 secondi.- la spia sopra il tasto SEGNALE ACUSTICO (SIGNAL) (4) inizia ad accendersi - il segnale acustico è attivato in modo permanente- la spia si spegne - il segnale acustico è disattivato in modo permanente3. Alla consegna dell'apparecchio, il segnale acustico è disattivato. Per attivare o disattivare il segnale acustico è possibile utilizzare il tasto SEGNA-LE ACUSTICO (SIGNAL) (4), ma l'impostazione non viene memorizzata. |
| Durezza dell'ac-qua ^1) Svuotare il ser-batoio dell'acqua ⇨ - avvertenza^2) | 1. Ruotare il selettore dei programmi su qualsiasi programma.2. Premere contemporaneamente i tasti EXTRA DELICATO (EXTRA SANFT) ASCIUG. A TEMPO (ZEITWAHL) (1) e (5) per circa 5 secondi. Viene visualizzata l'impostazione attuale:- [ ] bassa conduttività <300 μS/cm- [ ] media conduttività 300-600 μS/cm- [ ] alta conduttività >600 μS/cm3. Premere più volte il tasto AVVIO PAUSA (START PAUSE) (6) fino ad impostare il livello desiderato.4. Per memorizzare l'impostazione premere simultaneamente i tasti EXTRA DELICATO (EXTRA SANFT) ASCIUG. A TEMPO (ZEITWAHL) (1) e OFF (AUS) (5), oppure ruotare la manopola sulla posizione .1. Ruotare il selettore dei programmi su qualsiasi programma.2. Premere contemporaneamente i tasti INTENSIVO (TROCKNEN PLUS) ASCIUG. A TEMPO (ZEITWAHL) (2) e (5) per circa 5 secondi.Viene visualizzata l'impostazione attuale:- simbolo ⇨ e ____- il messaggio di avvertimento è disattivato- simbolo ⇨ e ____- il messaggio di avvertimento è attivato |
CARATTERISTICHE TECNICHE
CE
1) In alcuni paesi potrebbero essere applicati dati di volumi di carico a seconda dei vari metodi di misurazione.
2) In conformità alla norma EN 61121.
3) Suggerimenti per gli istituti di prova: il ciclo deve essere controllato in conformità alla norma EN 61121.
| Altezza x larghezza x profondità | 85 x 60 x 58 cm |
| Volume del cestello | 108 l |
| Profondità con sportello aperto | 109 cm |
| Altezza regolabile | 1,5 cm |
| Peso a vuoto | circa 52 kg |
| Volume di carico (in base al programma) ^1) | max. 7 kg |
| Tensione | 220-230 V |
| Fusibile necessario | 6 A |
| Potenza totale | 1050 W |
| Classe di efficienza energetica | A |
| Consumo energetico (7 kg di cotone, pre-centrifugato a 1000 giri/min) ^2) | 1,85 kWh |
| Consumo energetico annuale medio | 124,2 kWh |
| Utilizzo | Domestico |
| Temperatura ambiente consentita | da + 5 °C a + 35 °C |
| Valori di consumoI valori di consumo sono stati stabiliti in condizioni standard, pertanto possono differire nell'uso domestico. | |
| Programma | tempo di asciugatura medio in minuti |
| COTONI NORMALE 3) | 1,85 / 140 (carico 7 kg pre-centrifugato a 1000 giri/min)1.57/ 123 (carico 7 kg pre-centrifugato a 1400 giri/min) |
| COTONI PRONTO STIRO 3) | 1,39 / 110 (carico 7 kg pre-centrifugato a 1000 giri/min) |
| TESSUTI MISTI NORMALE 3) | 0,58 / 45 (carico 3 kg pre-centrifugato a 1200 giri/min) |
ASSISTENZA TECNICA
In caso di problemi tecnici, provare a risolverli consultando le istruzioni per l'uso (sezione Cosa fare se...).
In caso di dubbi, non utilizzare l'apparecchio e contattare il Centro di assistenza locale.
Per velocizzare gli interventi di assistenza, si prega di fornire le seguenti informazioni:
- Modello
- Numero prodotto (PNC)
- Numero di serie (riportato sulla targhetta matricola del prodotto – vedere la sezione Descrizione prodotto)
- Tipo di problema
- Messaggi di errore visualizzati dall'apparecchio
Per avere sempre a portata di mano i dati identificativi dell'apparecchio, annotarli in questo spazio:
| Modello: | ...... |
| PNC: | ...... |
| S N: | ...... |
Thank you for choosing one of our high-quality products.
To ensure optimal and regular performance of your appliance please read this instruction manual carefully. It will enable you to navigate all processes perfectly and most efficiently. To refer to this manual any time you need to, we recommend you to keep it in a safe place. And please pass it to any future owner of the appliance.
We wish you much joy with your new appliance.
CONTENTS
| OPERATING INSTRUCTIONS | 29 |
| IMPORTANT SAFETY INFORMATION | 29 |
| ENVIRONMENT | 31 |
| INSTALLATION | 32 |
| Transporting the appliance | 32 |
| Appliance positioning | 32 |
| Removing transport safety packaging | 32 |
| Electrical connection | 33 |
| Changing door stop | 33 |
| Special accessories | 34 |
| PRODUCT DESCRIPTION | 35 |
| CONTROL PANEL | 36 |
| Control panel | 36 |
| Display | 36 |
| BEFORE FIRST USE | 37 |
| PROGRAMME CHART | 37 |
| DAILY USE | 39 |
| Sorting laundry | 39 |
| Average laundry weights | 39 |
| Switching appliance/drum light on | 40 |
| Laundry loading | 40 |
| Selecting the programme | 41 |
| EXTRA DELICATE (EXTRA SANFT) function | |
| 41 | |
| INTENSIVE (TROCKNEN PLUS) function | 41 |
| LONG ANTI-CREASE (KNITTERSCHUTZ PLUS) function | 41 |
| BUZZER (SIGNAL) function | 42 |
| TIME (ZEITWAHL) function | 42 |
| DELAY START (ZEITVORWAHL) | 42 |
| CHILD LOCK function | 42 |
| Starting the programme | 43 |
| Changing programme | 43 |
| Laundry unloading | 43 |
| CARE AND CLEANING | 44 |
| Cleaning fluff filter | 44 |
| Cleaning the door seal | 45 |
| Emptying the water reservoir | 45 |
| Cleaning heat exchanger filters | 46 |
| To clean the drum | 48 |
| Clean operating screen and housing | 48 |
| WHAT TO DO IF ... | 49 |
| MACHINE SETTINGS | 50 |
| TECHNICAL SPECIFICATIONS | 51 |
| SERVICE | 52 |
Subject to change without notice
OPERATING INSTRUCTIONS
IMPORTANT SAFETY INFORMATION

In the interest of your safety and to ensure the correct use, before installing and first using the appliance, read this user manual carefully, including its hints and warnings. To avoid unnecessary mistakes and accidents, it is important to ensure that all people using the appliance are thoroughly familiar with its operation and safety features. Save these instructions and make sure that they remain with the appliance if it is moved or sold, so that everyone using it through its life will be properly informed on appliance use and safety.

- Please read the instruction book before using this appliance.
General safety
- It is dangerous to alter the specifications or attempt to modify this product in any way.
- This appliance is not intended for use by persons (including children) with reduced physical and sensory conditions or lack of experience and knowledge, unless they have been given supervision or instruction concerning use of the appliance by a person responsible for their safety.
- Make sure that small children and pets do not climb inside the drum. To avoid this, please check into the drum before using.
- Any objects such as coins, safety pins, nails, screws, stones or any other hard, sharp material can cause extensive damage and must not be placed into the machine.
- In order to avoid danger of fires caused by excessive drying, do not use appliance to dry the following items: Cushions, quilts etc. (these items accumulate heat).
- Items such as foam rubber (latex foam), shower caps, waterproof textiles, rubber backed articles and clothes or pillows fitted with foam rubber pads should not be dried in the tumble dryer.
• Always unplug the appliance after use, cleaning and maintenance. - Under no circumstances should you attempt to repair the machine yourself. Repairs carried out by inexperienced persons may cause injury or serious malfunctioning. Contact your local Service Centre. Always insist on genuine spare parts.
- Items that have been soiled with substances such as cooking oil acetone, petrol, kerosene, spot removers, turpentine, waxes and wax removers should be washed in hot water with an extra amount of detergent before being dried in the tumble dryer.
- Danger of explosion: Never tumble dry items that have been in contact with inflammable solvents (petrol, methylated spirits, dry cleaning fluid and the like). As these substances are volatile, they could cause an explosion. Only tumble dry items washed with water.
- Risk of fire: items that have been spotted or soaked with vegetable or cooking oil constitute a fire hazard and should not be placed in the tumble dryer.
- If you have washed your laundry with stain remover you must execute an extra rinse cycle before loading your tumble dryer.
- Please make sure that no gas lighters or matches have accidentally been left in pockets of garments incase they are loaded into appliance

WARNING!
- Risk of fire! Never stop a tumble dry before the end of the drying cycle unless all items are quickly removed and spread out so that the heat is dissipated.
- Lint must not be allowed to accumulate around the tumble dryer.
- Risk of electric shock! Do not spray down the appliance with jets of water.
- The final part of a tumble dryer cycle occurs without heat (cool down cycle) to ensure that the items are left at a temperature that ensures that items will not be damaged.
- The tumble dryer is not to be used if industrial chemicals have been used for cleaning.
- Ensure you have good ventilation in the installation room to avoid the back flow of gases into the room from appliances burning other fuels, including open fires.
Installation
- This appliance is heavy. Care should be taken when moving it.
- When unpacking the appliance, check that it is not damaged. If in doubt, do not use it and contact the Service Centre.
- All packaging must be removed before use. Serious damage can occur to the product and to property if this is not adhered to. See relevant section in the user manual.
- Any electrical work required to install this appliance should be carried out by a qualified electrician or competent person.
- If the machine is situated on a carpeted floor, please adjust the feet in order to allow air to circulate freely under the appliance.
- After having installed the appliance, check that it is not pressing or standing on its electrical supply cable.
- If the tumble dryer is placed on top of a washing machine, it is compulsory to use the stacking kit (optional accessory).
Use
- This appliance is designed for domestic use. It must not be used for purposes other than those for which it was designed.
- Only wash fabrics which are designed to be machine dried. Follow the instructions on each garment label.
- Do not dry unwashed items in the tumble dryer.
- Do not overload the appliance. See the relevant section in the user manual.
- Clothes which are dripping wet should not be placed in the dryer.
- Garments which have been in contact with volatile petroleum products should not be machine dried. If volatile cleaning fluids are used, care should be taken to ensure that the fluid is removed from the garment before placing in the machine.
- Never pull the power supply cable to remove the plug from the socket; always take hold of the plug itself.
- Never use the tumble dryer if the power supply cable, the control panel, the working surface or the base are damaged so that the inside of the tumble dryer is accessible.
- Fabric softeners, or similar products should be used as specified by the fabric softener instructions.
- Caution – hot surface : Do not touch the door light cover surface when the light is switched on.
(Only dryers equipped with internal drum light)
Child safety
- This machine is not intended for use by young children or infirm persons without supervision.
- Children often do not recognise the hazards associated with electrical appliances. Children should be supervised to ensure that they do not play with the appliance.

WARNING!
- Danger of suffocation! The packaging components (e.g. plastic film, polystyrene) can be dangerous to children - Keep them out of children's reach.
- Keep all detergents in a safe place out of children's reach.
- Make sure that children or pets do not climb inside the drum.
ENVIRONMENT
The symbol ☒ on the product or on its packaging indicates that this product may not be treated as household waste. Instead it should be taken to the appropriate collection point for the recycling of electrical and electronic equipment. By ensuring this product is disposed of correctly, you will help prevent potential negative consequences for the environment and human health, which could otherwise be caused by inappropriate waste handling of this product. For more detailed information about recycling of this product, please contact your local council, your household waste disposal service or the shop where you purchased the product.
Environmental information
The packaging materials are environmentally friendly and can be recycled. The plastic components are identified by markings, e.g. >PE<, >PS<, etc. Please dispose of the packaging materials in the appropriate container at the community waste disposal facilities.

The heat pump of your tumble dryer contains a closed refrigerant circuit filled with a refrigerant which is free from fluoro-chloro-hydrocarbons. The refrigerant circuit in the heat pump must not be damaged.

WARNING!
When a unit is no longer being used:
- Pull the plug out of the socket.
- Cut off the cable and plug and dispose of them.
- Dispose of the door catch. This prevents children from trapping themselves inside and endangering their lives.
INSTALLATION
Transporting the appliance

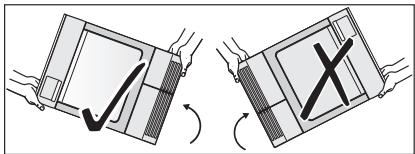
Only tip the appliance on its left side to transport (see illustration), if it cannot be transported in an upright position.
natural_image
Two-panel diagram showing hand positioning of a device with checkmark and X mark, no text or symbols present
WARNING!
If the appliance was not transported in an upright position, leave it to stand for 12 hours before connecting it to the electricity supply and using it for the first time, so that the oil can flow back to the compressor. Otherwise the compressor could be damaged.
Appliance positioning
- It is recommended that, for your convenience, the appliance is positioned close to your washing machine.
- The tumble dryer must be installed in a clean place, where dirt does not build up.
- Air must be able to circulate freely all round the appliance. Do not obstruct the front ventilation grille or the air intake grilles at the back of the appliance.
- To keep vibration and noise to a minimum when the tumble dryer is in use, it should be placed on a firm, level surface.
- Once in its permanent operating position, check that the tumble dryer is absolutely level with the aid of a spirit level. If it is not, raise or lower the feet until it is.
- The feet must never be removed. Do not restrict the floor clearance through deep pile carpets, strips of wood or similar. This might cause heat built-up which would interfere with the operation of the appliance.

- The hot air emitted by the tumble dryer can reach temperatures of up to 60^ C. The appliance must therefore not be installed on floors which are not resistant to high temperatures.
- When operating the tumble dryer, the room temperature must not be lower than +5°C and higher than +35°C, as it may affect the performance of the appliance.
- Should the appliance be moved, it must be transported vertically.
- The appliance must not be installed behind a lockable door, a sliding door a door with a hinge on the opposite side to that of the appliance in such a way that a full opening of the tumble dryer is restricted.
Removing transport safety packaging

CAUTION!
Before use all parts of the transport packaging must be removed.
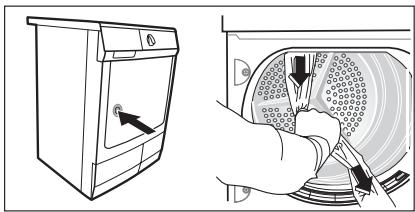
- Open loading door
- Pull off adhesive strips from inside appliance on top of drum.
- Remove foil hose and polystyrene padding from the appliance.
natural_image
Illustration showing a hand inserting a fan into a washing machine (no text or symbols present)Electrical connection
Details on mains voltage, type of current and the fuses required should be taken from the type plate. The type plate is fitted near the loading aperture (see "Product description" chapter).
Connect the machine to an earthed socket, in accordance with current wiring regulations.
WARNING!
The manufacturer declines any responsibility for damage or injury through failure to comply with the above safety precautions.
Should the appliance power supply cable need to be replaced, this must be carried out by our Service Center.
WARNING!
The plug must be accessible after installing the machine.
Changing door stop
WARNING!
Before changing the door stop, disconnect the mains plug.
- Open loading door.
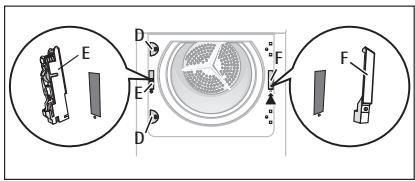
- Unscrew hinge A from the front of the appliance and take off the loading door.
- Remove cover plates B. To do this, insert a thin screwdriver into the slots as shown in the illustration, push downwards slightly and pry out the cover plates.

-
Use an appropriate tool and exert pressure to unfasten locking block C from the snap-on fixture, take out and re-insert on the other side having rotated the block through 180°.
-
Unscrew hinge A from the loading door, rotate through 180^ , re-insert on the opposite side and screw down.
-
Re-insert cover plates Bon the opposite site having first rotated them through 180°.
-
Unscrew cover plates D from the front of the appliance, rotate through 180°, screw on the opposite side.
- Unscrew door lock E, push down slightly and remove from the front of the appliance.
- Push snap-in button F in and down, push cover down slightly and remove from front of the appliance.
- Change door lock E over to the opposite side, screw down the door interlock.
- On the other side, insert cover F and allow snap-in button to lock into place.
- Insert loading door and hinges into recesses on the front of the appliance and screw down.
Note regarding contact protection: The appliance is only secure for operations again once all plastic parts have been inserted.
Special accessories
STACKING KIT
Available from your authorized dealer.
The stacking kit is to install the tumble dryer on the top of the 60 cm wide front load washing machine. The installation helps to get more space.
Read carefully the instructions supplied with the kit.
DRAINING KIT
Available from your authorized dealer (can be attached to some types of the tumble dryers). Installation kit for through draining of the condensed water into a basin, siphon, gully, etc. After installation the water container is drained automatically. The water container must stay in the appliance.
Installed hose must be on the height from minimum of 50 cm to maximum of 1 m from floor level. The hose cannot be in loop. If possible decrease the length of the hose.
Read carefully the instructions supplied with the kit.
PEDESTAL WITH THE DRAWER
Available from your authorized dealer.
To put the appliance higher at the level which helps to easy load and remove the laundry. The drawer can be use for laundry storage e.g. : towels, cleaning products and more.
Read carefully the instructions supplied with the kit.
PRODUCT DESCRIPTION

1 Control panel
2 Water reservoir
3 Drum light
4 Fine fluff filter
5 Coarse fluff filter
6 Fluff filter
7 Rating plate
8 Loading door (reversible)
9 Heat exchanger door, fluff filter, heat exchanger
10 Button for opening door in plinth
11 Ventilation grille
12 Adjustable feet
CONTROL PANEL
Control panel
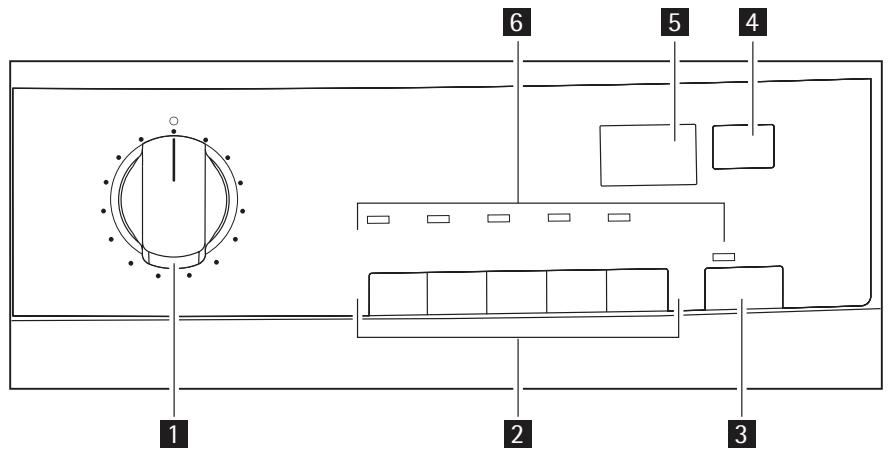
1 Programme selector and on/off switch
2 Function buttons
3 START PAUSE button
4 DELAY START (ZEITVORWAHL) button
5 Display
6 Status LED
Display

1 time to end / error message
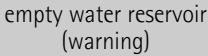
2 warnings
3 long anti-crease icon
4 cycle phase status
5 delay time option icon
6 child lock icon
 | |||
| [16150] | [2417] | [1982] | [1994] |
| drying (drying phase indicator) | cooling (drying phase indicator) | crease guard (drying phase indicator) | long anti-crease |
| [16270] | [2012] | [1962] | [1912] |
 | clean filter (warning) |  | chickock |
| [2272] | [1948] | [4430] | [1538] |
| [2272] | [2070] |  | [1677] |
BEFORE FIRST USE
In order to remove any residues which may have been produced during production, wipe the dryer drum with a damp cloth or carry out a brief drying cycle (ca. 30 min.) with damp cloths in the machine.
At the beginning of drying cycle (3-5 min.) there could be a slightly higher sound level. It is because of start of the compressor that is normal for compressor powered appliances such: refrigerators, freezers.
1) maximal weight of dry clothes
2) For test institutes only:
PROGRAMME CHART
| Programmes | Load^1) | Application/properties | Options | Care mark |
| COTTONS (BAUMWOLLE) | ||||
| EXTRA DRY (EX-TRATROCKEN) | 7 kg | To dry thick or multi- layered fabrics, e.g. terry towelling items, bathrobes. | all except EXTRA DELICATE (EXTRA SANFT) and TIME (ZEITWAHL) | [Special] [Special] |
| CUPBOARD DRY (SCHRANK-TROCKEN) ^2) | 7 kg | To dry fabrics of even thicknesses, e.g. terry towelling items, knitwear, towels. | all except EXTRA DELICATE (EXTRA SANFT) and TIME (ZEITWAHL) | [Special] [Special] |
| IRON DRY (BÜ-GELTROCKEN) ^2) | 7 kg | To dry normal thickness cotton or linen laundry, e. g. bedding, table linen. | all except EXTRA DELICATE (EXTRA SANFT) and TIME (ZEITWAHL) | [Special] [Special] |
| EASY CARE (MISCHGEWEBE) | ||||
| EXTRA DRY (EX-TRATROCKEN) ^2) | 3 kg | To dry thick or multi-layered fabrics, e. g. pullovers, bedding, table linen. | all except TIME (ZEITWAHL) | [Special] [Special] [Special] |
| CUPBOARD DRY (SCHRANK-TROCKEN) | 3 kg | To dry thin fabrics which are not ironed, e.g. easy care shirts, table linen, baby clothes, socks, lingerie with bones or wires. | all except TIME (ZEITWAHL) |  |
| IRON DRY (BÜ-GELTROCKEN) | 3 kg | To dry thin fabrics which are also to be ironed, e.g. knitwear, shirts. | all except TIME (ZEITWAHL) |  |
| special | ||||
| TIME PRO-GRAMME (ZEIT-PROGRAMM) | 7 kg | To dry laundry with the time set by the user. | all except EXTRA DELICATE (EXTRA SANFT) and IN-TENSIVE (TROCK-NEN PLUS) |  |
| BED LINEN (BETTWÄSCHE) | 3 kg | To dry bed linen (single and double sheet, pillowcase, bedspread, duvet cov-er). | all except EXTRA DELICATE (EXTRA SANFT) and TIME (ZEITWAHL) |  |
| JEANS | 7 kg | To dry leisure clothing, such as jeans, sweat-shirts, etc., of different material thicknesses (e.g. at the neck, cuffs and seams). | all except EXTRA DELICATE (EXTRA SANFT) and TIME (ZEITWAHL) |  |
| MICRO-FIBRE (MIKROFASER) | 1 kg | To dry thin fabrics, polyester and polya-mide, which are not ironed. | all except EXTRA DELICATE (EXTRA SANFT) and TIME (ZEITWAHL) |  |
| EASY IRON PLUS (LEICHTBÜGELN PLUS) | 1 kg (or 5 shirts) | To dry easy care cloths such as shirts and blouses. After this programme the cloths iron easiest. To have good result, we recommend to shake the wet cloths and put straight in the tumble dryer. After the programme end, remove the cloths and put on the cloths hanger. | all except EXTRA DELICATE (EXTRA SANFT) and TIME (ZEITWAHL) |  |
| FRESHEN-UP (AUFFRISCHEN) | 1 kg | To refresh or clean softly the clothes. | LONG ANTI-CREASE (KNIT-TERSCHUTZ PLUS), BUZZER (SIGNAL), DELAY START (ZEITVOR-WAHL) | |
| WOOL CARE (WOLLPFLEGE) | 1 kg | To refresh the cloths made of wool . The cloths become soft and cosy. We re-commend to remove the cloths immedi-ately after the programme end. | BUZZER (SIG-NAL), DELAY START (ZEITVOR-WAHL) | |
To make a performance test use the standard programmes which are specified in the EN 61121 document. If is necessary to correct the remaining moisture level of the laundry, adjust the programme with the INTENSIVE (TROCKNEN PLUS) function.
3) select EXTRA DELICATE (EXTRA SANFT)
DAILY USE
Sorting laundry
- Sort by fabric type:
- Cotton/linen for programmes in COTTONS (BAUMWOLLE) programme group.
- Mixtures and synthetics for programmes in SYNTHETICS (MISCHGEWEBE) programme group.
- Sort by care label: The care labels mean:
| Drying in the tumble dryer possible in principle | |
| Drying at normal temperature | |
| Drying at reduced temperature | |
| Drying in the tumble dryer not possible |

Do not place in the appliance any wet laundry which is not specified on the care label as being suitable for tumble-drying.
This appliance can be used for all wet laundry items which are labelled as suitable for tumble-drying.
- Do not dry new, coloured textiles together with light-coloured laundry items. Textile colours may bleed.
- Do not dry cotton jersey and knitwear with the EXTRA programme. Items may shrink!
- Wool and wool-like textiles can be dried using the WOOL CARE (WOLLPFLEGE) programme.
Preparing laundry
- To avoid laundry becoming tangled: close zips, button up duvet covers and tie loose ties or ribbons (e.g. of aprons).
- Empty pockets. Remove metal items (paper clips, safety pins, etc).
- Turn items with double-layered fabrics inside out (e.g. with cotton-lined anoraks, the cotton layer should be outermost). These fabrics will then dry better.

Do not overload the appliance. Observe max. loading volume of 7 kg.
Average laundry weights
| bathrobe | 1200 g |
| quilt cover | 700 g |
| man's work shirt | 600 g |
| man's pyjamas | 500 g |
| sheet | 500 g |
| tablecloth | 250 g |
| man's shirt | 200 g |
| night dress | 200 g |
| pillow case | 200 g |
| towelling towel | 200 g |
| blouse | 100 g |
| ladies' briefs | 100 g |
| men's underpants | 100 g |
| napkin | 100 g |
| tea cloth | 100 g |
Switching appliance/drum light on
Turn the programme selector to any programme or turn it to DRUM LIGHT (BELEUCH-TUNG). The appliance has been switched on. When the loading door is opened, the drum light is illuminated.
Laundry loading

CAUTION!
Do not jam the laundry in between the loading door and rubber seal.
- Open the loading door:
Push against the loading door (push point) - Load the laundry (do not force it in).
- Close the loading door securely. Lock must audibly lock.

natural_image
Line drawing of a kitchen appliance with a door and button, no text or symbols presentSelecting the programme
Use the programme selector to set the programme you require. The estimated time to end of the programme appears on the LCD, e.g. 2.32 (hours. minutes).
During the cycle, time elapses by steps of one minute.
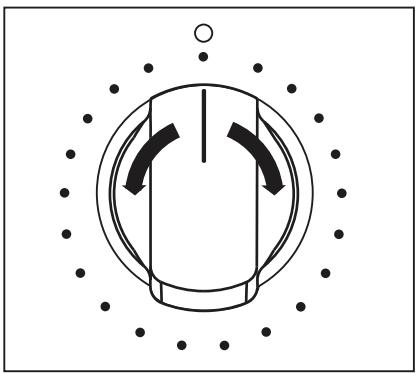
natural_image
Pure diagram of a circular component with internal curved arrows, surrounded by dots and a small circle (no text or symbols)EXTRA DELICATE (EXTRA SANFT) function
For especially gentle drying of sensitive fabrics with the 📍 care label and for temperature-sensitive textiles (e.g. acrylic, viscose). Programme is executed with reduced heat.
Delicate function is only suitable for use with loads of up to 3 kg.
To activate it:
- Choose the drying programme.
- Press EXTRA DELICATE (EXTRA SANFT) button (1) - the LED above is on.
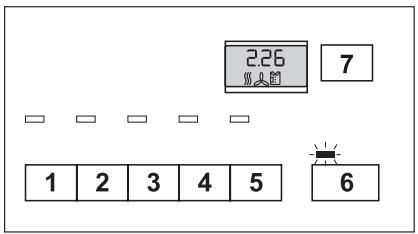
To deselect function press again EXTRA DELICATE (EXTRA SANFT) button (1). The LED above is off.
INTENSIVE (TROCKNEN PLUS) function
You can increase the drying result by using the INTENSIVE (TROCKNEN PLUS) function
To activate it:
- Choose the drying programme.
- Press INTENSIVE (TROCKNEN PLUS) button (2) - the LED above is on.
To deselect function press again INTENSIVE (TROCKNEN PLUS) button (2). The LED above is off.
LONG ANTI-CREASE (KNITTERSCHUTZ PLUS) function
This function prolongs anti-crease phase what gives 90 min. in total. The drum rotates in intervals during this phase. The laundry thereby remains relaxed and free of creases.
To activate it:
- Choose the drying programme.
- Press LONG ANTI-CREASE (KNITTERSCHUTZ PLUS) button (3) - the LED above is on and display shows the following icon 📋.
If this additional function is selected, the anti-crease phase at the end of the drying cycle is lengthened by 60 minutes. The laundry can be removed at any time during the anti-crease phase.
To deselect function press again LONG ANTI-CREASE (KNITTERSCHUTZ PLUS) button. The LED above is off and 90 from the icon disappears 📋.
BUZZER (SIGNAL) function
The appliance is supplied with the BUZZER (SIGNAL) function deactivated.
The buzzer sounds or plays a tune when activated during:
- cycle end
- anti-crease phase and when phase starts or ends
- cycle interruption by a warning
- alarm
To activate it:
- Choose the drying programme.
- Press BUZZER (SIGNAL) button (4) - the LED above is on.
To deselect function press again BUZZER (SIGNAL) button (4). The LED above is off.
TIME (ZEITWAHL) function
To select the programme duration after setting the TIME PROGRAMME (ZEITPROGRAMM). You can select a programme duration from 10 mins to 3 hrs in 10-minute steps.
- Turn the programme knob to the TIME PROGRAMME (ZEITPROGRAMM). The blinking 10' appears in the display. (corresponding to the cooling phase).
- Press the TIME (ZEITWAHL) button (5) repeatedly until the desired programme duration is shown in the display, e.g. 20 for a programme of 20 minutes.
If the programme duration is not selected, the duration is automatically set to 10 mins.
DELAY START (ZEITVORWAHL)

Allows to delay the start of a drying programme from minimum of 30 min. to maximum of 20 hours.
- Select the drying programme and additional options.
- Push the DELAY START (ZEITVORWAHL) button again and again until the necessary delay start is shown in the display, e.g. 12h if the programme has to start after 12 hours.
- To activate the delay timer, push the START PAUSE button. Time to start elapses in the displayed.
CHILD LOCK function
The child lock can be set to prevent a programme being accidentally started or a programme in operation being accidentally changed. The child lock function locks all buttons and the programme knob. The child lock can be activated or deactivated by holding down the LONG ANTI-CREASE (KNITTERSCHUTZ PLUS) (3) and BUZZER (SIGNAL) (4) buttons simultaneously for 5 seconds.

- Before programme is started: Appliance cannot be used
- After programme is started: Programme in operation cannot be changed
The 📁 icon appears in the display to indicate that the child safety device is activated. The child safety device is not deactivated once the programme comes to an end. If you want to set a new programme, you must first deactivate the child safety device.
Starting the programme
Press the START PAUSE button (6). The programme is started.
The programme phase is shown in LCD by appropriate icon:
- - drying phase indication
- ℰ - cooling phase indication
-
- anti-crease phase indication
During program selection all appropriate phase icons are displayed. When program is started only current cycle phase is indicated by single icon.
Changing programme
To change a programme which has been selected by mistake once the programme has started, first turn the programme selector to OFF (AUS) and then reset the programme.

The programme cannot longer be changed directly once the programme has started. If nevertheless there is an attempt to change the programme on the programme dial, the programme progress display and the maintenance indicators flash. If an option (excluding the buzzer) is set, Err appears in the multidisplay. The drying programme is not however affected by this (laundry protection).
Laundry unloading
Once the drying cycle is complete, display shows a blinking ☐, anti-crease 📋 icon appears on LCD. If the BUZZER (SIGNAL) button (4) has been pressed, an acoustic signal sounds intermittently for about one minute.

The drying cycles are automatically followed by an anti-crease phase which lasts around 30 minutes. The drum rotates at intervals during this phase. This keeps the laundry loose and free of creases. The laundry can be removed at any time during the anti-crease phase. (The laundry should be taken out towards the end of the anti-crease phase at the latest to prevent creases from forming.) If LONG ANTI-CREASE (KNITTERSCHUTZ PLUS) function has been selected, the anti-crease phase is lengthened by 60 minutes.
- Open door.
- Before removing the laundry, remove fluff from the micro-fine filter. It is best to use a damp hand for this purpose. (See "Care and cleaning" chapter.)
- Remove laundry.
- Turn the programme selector to OFF (AUS).

After each drying cycle:
- Clean the micro-fine filter and fine filter
-
Drain the condensed water container
(See chapter "Care and cleaning".) -
Close the door.
CARE AND CLEANING
Cleaning fluff filter
The filters collect all the fluff which collect during drying. To ensure that the tumble dryer works perfectly, the fluff filters (micro-fine filter and fine strainer) must be cleaned after each drying cycle.
The warning icon ⚙ is on to remind you of this operation.

CAUTION!
Do not operate the tumble dryer without fluff filters or with damaged or blocked fluff filters.
- Open loading door
- Use a moist hand to clean the micro-fine filter, which is built into the lower part of the loading aperture.

natural_image
Technical diagram of a circular device with internal components and labeled parts (no readable text or symbols)- After a period of time, a gleam because of detergent residue on laundry forms on the filters. When this occurs, clean the filters with warm water using a brush. Remove the filter from the door pulling it out. It can be positioned with the tooth facing to the left or to the right).
After cleaning do not forget to put it back.
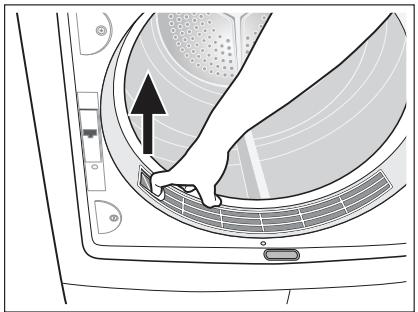
natural_image
Diagram of a device interior showing a hand inserting a component into a circular housing (no text or symbols visible)- Push down the unlock button on the large coarse filter.
Large mesh filter jumps up.
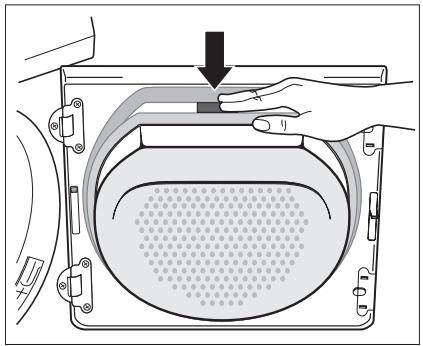
natural_image
Diagram of a hand pressing down on a mechanical component with a downward arrow indicating force or direction (no text or symbols present)- Take out fine strainer.
- Remove fluff from fine strainer. It is best to use a moist hand for this purpose.

Clean the full filter area
The strainer area does not have to be cleaned after every drying cycle, but should be checked regularly and cleaned of fluff if necessary.
- To do this, grip the top of the large mesh filter and pull it forwards until it comes loose from the 2 brackets.
- Remove fluff from the full filter area. It is best to use a vacuum cleaner for this purpose.
- Push both journals of the large mesh filter into the brackets on the loading door until they snap into place.
-
Re-insert fine strainer.
-
Push against the large mesh filter until it locks into the interlock.

If the fine strainer is not fitted, the large mesh filter will not snap into place and the loading door cannot be closed.
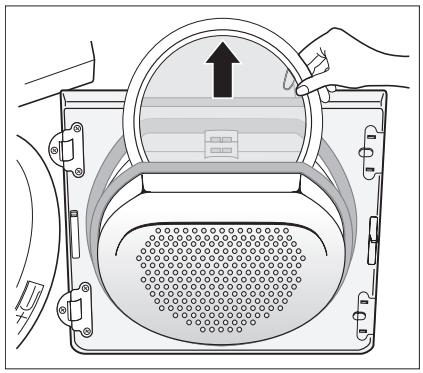
natural_image
Diagram of a washing machine with hand operating the lid and vent, showing internal components (no text or symbols)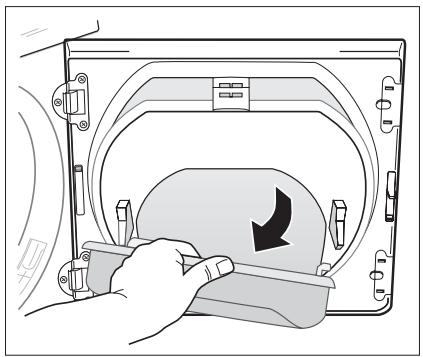
natural_image
Illustration of a hand pressing down on a device component with a black arrow indicating rotation (no text or symbols present)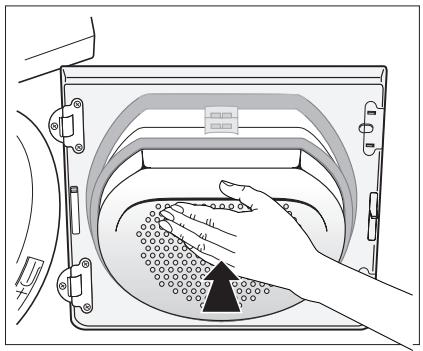
natural_image
Illustration of a hand placing a textured object into a device casing (no text or symbols visible)Cleaning the door seal
Clean the door seal with a moist cloth immediately after the drying cycle is completed.
Emptying the water reservoir
Empty the water reservoir after each drying cycle.
If the water reservoir is full, an active programme will break off automatically and the empty container ≈ symbol on the display will light up. To continue the programme, the water reservoir must first be empty.

WARNING!
Risk of poisoning. The water from the water reservoir is not applicable to drink or to prepare meals.
- Pull out the water reservoir 1 and pull up the water reservoir drainage pipe as far as it will go 2.
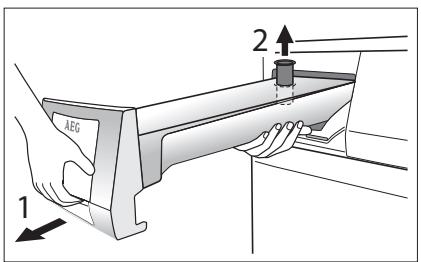
- Pour condensed water out into a basin or similar receptacle.
- Slide outlet connections in and refit water reservoir.
If the programme has been interrupted as a result of the water reservoir being full: Push the START PAUSE button to continue the drying cycle.
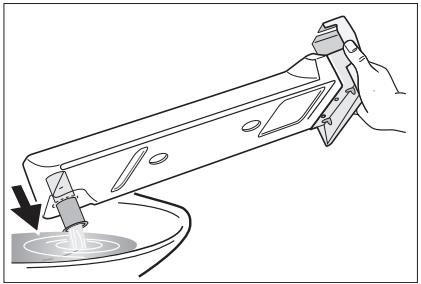
natural_image
Line drawing of a hand using a tool to apply liquid onto a surface (no text or symbols present)
The water from the water reservoir can be used as distilled water, e.g. for steam ironing.
But first filter the water (e.g. with a coffee filter) to remove residue and small pieces of the fluff.
Cleaning heat exchanger filters
If the indicator clean base filters lights up, the heat exchanger fluff filters in the base of the appliance must be cleaned, i.e. after each 3 drying cycles. Both filters are located in the appliance base.

Water can collect in the filter housing therefore it is normal for the heat exchanger fluff filters to become wet.

- Do not operate the tumble dryer without the fluff filters.
- Clogged filters cause higher energy consumption (drying cycle elongation) and tumble dryer damage.
-
A dirty heat pump can only be cleaned up with a costly process.
-
Open loading door
-
Open door in plinth: To do this, push the release button on the bottom of the door aperture and open the door in the plinth to the left.
-
Pull filter housing out of the base by the handle.
-
To clean the fluff filter: Remove filter from filter housing push the pressure points on the sides and pull the filter frame up and out of the housing. Remove fluff from the fluff filter with a moist hand.
-
Use a moist hand to remove the fluff from the filter in the base.
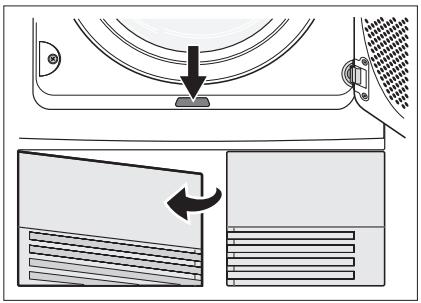

natural_image
Technical line drawing of a mechanical device with a handle and internal components, showing no text or symbols.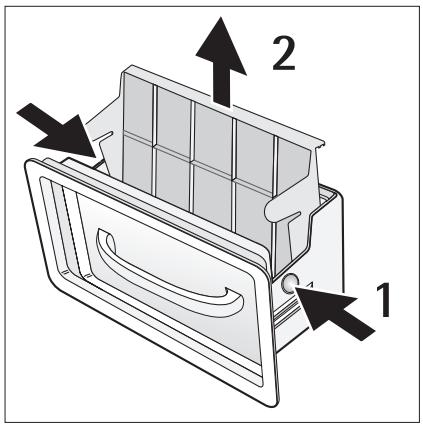
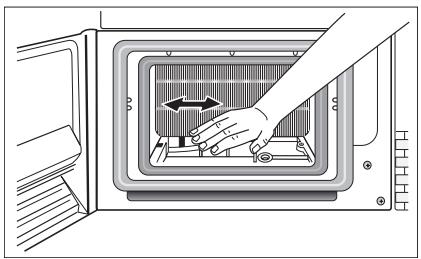
natural_image
Illustration of a hand pressing down on a microwave oven with a directional arrow (no text or symbols)If necessary pull out and clean the filter with warm water using a wiper or brush. Clean the inside of the door, the fluff filter chamber and the rubber seals of fluff.
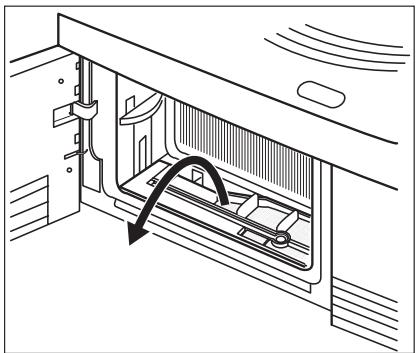
natural_image
Diagram of a mechanical device with an arrow indicating motion or force direction (no text or symbols present)- Insert the fluff filter into the base a. Insert the second fluff filter into the filter housing (it has to audibly lock) and slide it inside the filter chamber b. Close the door in plinth. Note: If the fluff filter is not inserted in the filter housing, the filter housing cannot be slide into the appliance base.
- As necessary, approx. once every 6 months, remove the fluff from the heat exchanger using the sponge supplied. When doing this, please use rubber gloves.
Tip: The fluff can be removed more easily if it is first dampened (e.g. with a laundry dampener) or with the help of vacuum cleaner.
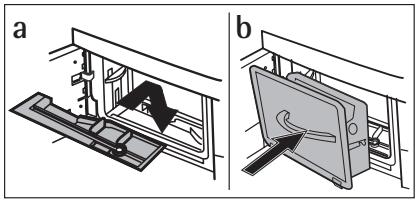
natural_image
Technical diagram showing two mechanical assembly states (a and b) with no visible text or symbols
natural_image
Illustration of a hand inserting a component into a microwave oven (no text or symbols visible)To clean the drum

CAUTION!
Do not use abrasive materials to clean the drum. Use a soft detergent to clean the inner side of the drum and the drum blades.

Keep the inner surface of the drum and the drum blades clean. The minerals from the water or cleaning agents can collect on the inner surface of the drum. This cause that the laundry is not sufficient dry.
Clean operating screen and housing

CAUTION!
Do not use furniture cleaners or aggressive cleaning agents to clean the appliance. Use a damp cloth to wipe down the operating screen and housing.
WHAT TO DO IF ...
Troubleshooting by yourself
| Problem1) | Possible cause | Remedy |
| Dryer does not work. | Dryer not connected to mains supply. | Plug in at mains socket. Check fuse in fuse box (domestic installation). |
| Loading door opened. | Close loading door | |
| The START PAUSE button not pressed. | Press the START PAUSE button. | |
| Unsatisfactory drying results. | Incorrect programme set. | Set suitable programme.2) |
| Fluff filters clogged. | Clean fluff filters.3) | |
| Heat exchanger clogged. | Clean heat exchanger.3) | |
| Max. loading exceeded. | Respect max. loading volume. | |
| Covered ventilation grill. | Uncover ventilation grill in base area. | |
| Residue inside the drum. | Clean the drum inside. | |
| High water hardness. | Set suitable water hardness4). | |
| Loading door does not close | Filters not locked in place. | Install fine filter and/or snap course filter into place. |
| Err(Error) on the LCD.5) | Attempt to change parameters after start of the programme. | Turn the dryer off and on. Set requested parameters. |
| No drum light | Programme selector in OFF position. | Turn it to DRUM LIGHT (if available) or to any programme. |
| Defective light bulb. | Replace light bulb (see next section). | |
| Abnormally elapsing time on the LCD5) | Time to end is calculated on the basis of: type, volume and dampness of laundry. | Automatic process; this is not a machine fault. |
| Programme inactive | Full water reservoir. | Empty water reservoir3), press START PAUSE button. |
| Drying cycle to short | Small laundry volume./Too dry laundry for selected programme. | Select time programme or higher drying level (e.g. EXTRA DRY). |
| Drying cycle to long6) | Fluff filters clogged. | Clean fluff filters. |
| To high loading volume. | Respect max. loading volume. | |
| Laundry insufficiently spun. | Spun adequately the laundry. | |
| Particularly high room temperature - no machine fault. | Lower the room temperature if possible. |
1) In case of error message on the LCD (e.g. E51-only dryers with the LCD): Switch the dryer off and on. Set programme. Press the START PAUSE button. Does not work? - inform local service and quote the error code.
2) follow program recommendation - see Programme overview chapter
3) see Care and cleaningchapter
4) see Machine settings chapter
5) only dryers with the LCD
6) Note: After around 5 hours the drying cycle ends automatically (see Drying cycle complete section).
Changing the bulb for interior lighting
Only use a special bulb which is designed specially for dryers. The special bulb can be obtained from your local service centre.

When the appliance is switched on, the interior lighting switches itself off after 4 minutes when the door is open.

WARNING!
Do not use standard bulbs! These develop too much heat and may damage the appliance! Before replacing the bulb, disconnect the mains plug; with a permanent connection: fully unscrew or deactivate the fuse.
- Unscrew cover above the bulb (this can be found directly behind the loading aperture, at the top; refer to "Description of machine" section.)
- Replace defective bulb.
- Screw cover back down.
Check the correct positioning of o-ring gasket before screwing back the door light cover. Do not operate the dryer when missing o-ring gasket on door light cover.

WARNING!
For safety reasons, the cover must be screwed down tightly. If this is not done, the dryer must not be operated.
MACHINE SETTINGS
1) Water contains, a variable quantity of limestone and mineral salts of which quantities vary according to geographical locations thus varying its conductivity values. Relevant variations of the conductivity of the water compared to those prefixed by the factory could slightly influence the residual humidity of the laundry at the end of the cycle. Your dryer allows you to regulate the sensitivity of the drying sensor based on conductivity values of the water.
2) By default the warning LED is always on at the end of the drying cycle or during the cycle if the water reservoir is full. When using an external drain for the condensed water warning can be offi
| Setting | Implementation |
| Buzzer permanent on/off | 1. Turn the programme selector to any programme.2. Press simultaneously the EXTRA DELICATE (EXTRA SANFT) (1) and INTENSIVE (TROCKNEN PLUS) (2) buttons and hold down for approx. 5 seconds.- diode above BUZZER (SIGNAL) button (4) starts lighting - buzzer permanently on.- lighting diode comes off - buzzer permanently off.3. The buzzer is by default always off. You can use the BUZZER (SIGNAL) button (4) to activate or deactivate sound but the machine does not memorize your selection. |
| Water hardness ^1) | Turn the programme selector to any programme.Press simultaneously the EXTRA DELICATE (EXTRA SANFT) (1) and TIME (ZEITWAHL) (5) buttons and hold down for approx. 5 seconds. The current setting is on the display:low conductivity <300 μS/cmmedium conductivity 300-600 μS/cmhigh conductivity >600 μS/cmPress the START PAUSE button (6) sequentially until you set desired level.To memorize setting press simultaneously the EXTRA DELICATE (EXTRA SANFT) (1) and TIME (ZEITWAHL) (5) buttons or turn knob to OFF (AUS) position |
| Emptying water reservoir warning off ^2) | Turn the programme selector to any programme.Press simultaneously the INTENSIVE (TROCKNEN PLUS) (2) and TIME (ZEITWAHL) (5) buttons and hold down for approx. 5 seconds.The current setting is on the display:warning icon and - - - - - - - - - - - - - - - - - - - - - - - - - - - - - - - - - - - - - - - - - - - - - - - - - - - - - - - - - - - - - - - - - - - - - - - - - - - - - - - - - - - - - - - - - - - - - - - - - - - - |
TECHNICAL SPECIFICATIONS
CE
1) different loading volume data may be needed in some countries as a result of different measuring methods
2) in accordance to EN 61121
3) hints for test institutes: cycle has to be checked in accordance to EN 61121
| Height x width x depth | 85 x 60 x 58 cm |
| Drum volume | 108 l |
| Depth with loading door open | 109 cm |
| Height can be adjusted by | 1.5 cm |
| Weight when empty | approx. 52 kg |
| Loading volume (depends on programme) ^1) | max. 7 kg |
| Voltage | 220-230 V |
| Necessary fuse | 6 A |
| Total power | 1050 W |
| Energy efficiency class | A |
| Energy consumption (7 kg of cotton, pre-drained at 1000 rpm) ^2) | 1.85 kWh |
| Average annual energy consumption | 124,2 kWh |
| Use | Domestic |
| Permitted ambient temperature | + 5°C to + 35°C |
| Consumption valuesThe consumption values have been established under standard conditions. They can deviate when the appliance is operated in domestic circumstances. | |
| Programme | applianceaverage drying time in min. |
| COTTON CUPBOARD DRY 3) | 1.85/ 140 (7 kg load pre-drained at 1000 rpm)1.57/ 123 (7 kg load pre-drained at 1400 rpm) |
| COTTON IRON DRY 3) | 1.39/ 110 (7 kg load pre-drained at 1000 rpm) |
| SYNTHETICS CUPBOARD DRY 3) | 0.58/ 45 (3 kg load pre-drained at 1200 rpm) |
SERVICE
If there are technical faults, first check if you can remedy the problem yourself with the help of the operating instructions - see chapter What to do if....
If you cannot remedy the problem on your own, get in touch with the Customer Care Department or one of our service partners.
To assist you quickly, these data are necessary:
- Model description
- Product number (PNC)
- Serial number (S No. is on rating plate stuck to the product - to find it see chapter Product description))
- Type of failure
– Any error messages shown by the display.
So that you have the necessary reference numbers from your appliance at hand, we recommend that you write them in here:
| Model description: | ...... |
| PNC: | ...... |
| S No: | ...... |

www.aeg.com/shop


CE
- INDICE
- ISTRUZIONI D'USO
- INFORMAZIONI IMPORTANTI PER LA SICUREZZA
- Sicurezza generale
- AVVERTENZA!
- Installazione
- Uso
- Sicurezza bambini
- TUTELA DELL'AMBIENTE
- Dove portare gli apparecchi fuori uso?
- Protezione ambientale
- Trasporto dell'apparecchio
- Posizionamento dell'apparecchio
- Rimozione del materiale di imballaggio
- ATTENZIONE
- Collegamento elettrico
- Reversibilità della porta
- Accessori speciali
- KIT DI INSTALLAZIONE IN COLONNA
- KIT DI SCARICO
- PIEDISTALLO CON CASSETTO
- PANNELLO DEI COMANDI
- PREPARAZIONE AL PRIMO UTILIZZO
- UTILIZZO QUOTIDIANO
- Suddivisione della biancheria
- Preparazione della biancheria
- Accensione della macchina / accensione della luce
- Come caricare la biancheria
- Selezione del programma
- Funzione EXTRA DELICATO (EXTRA SANFT)
- Funzione INTENSIVO (TROCKNEN PLUS)
- Funzione EXTRA ANTIPIEGA (KNITTERSCHUTZ PLUS)
- Funzione SEGNALE ACUSTICO (SIGNAL)
- Funzione ASCIUG. A TEMPO (ZEITWAHL)
- RITARDATA PARTENZA (ZEITVORWAHL)
- Funzione SICUREZZA BAMBINI
- Avvio del programma
- Modifica del programma
- Estrazione della biancheria
- PULIZIA E CURA
- Pulizia del filtro porta
- Pulire l'intera superficie del filtro
- Pulizia della guarnizione della porta
- Svuotamento del serbatoio dell'acqua
- Pulizia dei filtri dello scambiatore di calore
- Per pulire il cestello
- Pulire il pannello e l'esterno
- COSA FARE SE ...
- Sostituzione della lampadina interna
- CARATTERISTICHE TECNICHE
- CE
- ASSISTENZA TECNICA
- OPERATING INSTRUCTIONS
- IMPORTANT SAFETY INFORMATION
- General safety
- WARNING!
- Installation
- Use
- Child safety
- ENVIRONMENT
- Environmental information
- Transporting the appliance
- Appliance positioning
- Removing transport safety packaging
- CAUTION!
- Electrical connection
- Changing door stop
- Special accessories
- STACKING KIT
- DRAINING KIT
- PEDESTAL WITH THE DRAWER
- PRODUCT DESCRIPTION
- CONTROL PANEL
- BEFORE FIRST USE
- DAILY USE
- Sorting laundry
- Preparing laundry
- Switching appliance/drum light on
- Laundry loading
- Selecting the programme
- EXTRA DELICATE (EXTRA SANFT) function
- INTENSIVE (TROCKNEN PLUS) function
- LONG ANTI-CREASE (KNITTERSCHUTZ PLUS) function
- BUZZER (SIGNAL) function
- TIME (ZEITWAHL) function
- DELAY START (ZEITVORWAHL)
- CHILD LOCK function
- Starting the programme
- Changing programme
- Laundry unloading
- CARE AND CLEANING
- Cleaning fluff filter
- Clean the full filter area
- Cleaning the door seal
- Emptying the water reservoir
- Cleaning heat exchanger filters
- To clean the drum
- Clean operating screen and housing
- WHAT TO DO IF ...
- Changing the bulb for interior lighting
- MACHINE SETTINGS
- TECHNICAL SPECIFICATIONS
- SERVICE
Marque : AEG-ELECTROLUX
Modèle : TP7040TWF
Catégorie : Sèche-linge