Lavatherm 3350 - Sèche-linge AEG-ELECTROLUX - Notice d'utilisation et mode d'emploi gratuit
Retrouvez gratuitement la notice de l'appareil Lavatherm 3350 AEG-ELECTROLUX au format PDF.


| Type de produit | Sèche-linge à condensation |
| Marque | AEG-Electrolux |
| Modèle | Lavatherm 3350 |
| Dimensions (L x P x H) | 60 cm x 58 cm x 85 cm |
| Poids net | 40 kg |
| Capacité de séchage | 7 kg |
| Classe énergétique | C |
| Alimentation électrique | 230 V / 50 Hz |
| Puissance absorbée | 2400 W |
| Programmes de séchage | Prêt à repasser, Prêt à ranger, Extra sec, Synthétiques, Coton, Jeans, Chemises, Sport, Mixte, Rapide 30 min |
| Fonctions principales | Départ différé, Anti-froissage, Signal sonore, Sélection de la température, Niveau de séchage ajustable |
| Niveau sonore | 65 dB(A) |
| Filtre à peluches | Nettoyage après chaque cycle (toile amovible) |
| Bac de récupération d'eau | Vidange manuelle après chaque cycle |
| Condenseur | Nettoyage périodique (tous les 30 cycles environ) |
| Sécurité enfants | Oui |
| Arrêt automatique en fin de programme | Oui |
| Indicateur de filtre obstrué | Oui, voyant lumineux |
| Pièces détachées principales | Filtre à peluches, courroie d'entraînement, galet tendeur, résistance chauffante, condenseur |
| Indice de réparabilité | 8,4 / 10 |
| Longueur du cordon d'alimentation | 1,8 m |
| Garantie constructeur | 2 ans |
FOIRE AUX QUESTIONS - Lavatherm 3350 AEG-ELECTROLUX
Questions des utilisateurs sur Lavatherm 3350 AEG-ELECTROLUX
0 question sur cet appareil. Repondez a celles que vous connaissez ou posez la votre.
Poser une nouvelle question sur cet appareil
Téléchargez la notice de votre Sèche-linge au format PDF gratuitement ! Retrouvez votre notice Lavatherm 3350 - AEG-ELECTROLUX et reprennez votre appareil électronique en main. Sur cette page sont publiés tous les documents nécessaires à l'utilisation de votre appareil Lavatherm 3350 de la marque AEG-ELECTROLUX.
MODE D'EMPLOI Lavatherm 3350 AEG-ELECTROLUX
LAVATHERM 3350/3300
Exhaust air dryer
Operating instructions
Hello
Allow me to introduce myself: I am your AEG LAVATHERM tumble dryer. From now on, I should like to make tumble-drying easier for you, and not simply because of my attractive appearance, but also thanks to my "intrinsic qualities". I am economical in terms of energy, take good care of your laundry, am especially quiet in operation, easy to operate, and simple to care for.
If you carefully read and follow my operating instructions before first use and familiarize yourself with my installation and connection instructions, you are sure to experience a good deal of joy when using me to dry your laundry!
Printed on recycled paper. AEG – putting words into action.
Contents
Safety instructions
| Before first use | 26 |
| For the user | 26/27 |
| You should also note the following | 27/28 |
| Out of concern for the environment ... | 29 |
| Important recommendations for drying | 30/31 |
| Machine description | 32/33 |
| Before drying | 34 |
| Correct drying | 34 |
| Loading your laundry | |
| Opening the loading door | 35 |
| Loading your laundry | 35 |
| Removing and putting back laundry | 35 |
| Selecting the drying programme | |
| Programme selector switch | 36 |
| The buttons and their functions | 36/37 |
| Programme tables | 38/39 |
| Cooling phase and automatic anti-crease programme | 40 |
| Programme end | |
| Switching off the machine | 40 |
| Cleaning the lint strainer | 41/42 |
| Cleaning, maintenance, and care | 42 |
| If you think your tumble dryer is not working properly ... | 43 |
| Special accessories | 43 |
| Customer service | 44 |
| Technical data | 45 |
Safety instructions
Before first use ...
Safety instructions for the user
- I must be installed level. My four adjustable feet can be used to compensate for uneven floor conditions. Please use a screwdriver to adjust my adjustable feet. Place the screwdriver in the vertical slots visible from the front.
- My drum should be wiped with a damp cloth.
- I should not be installed in any room likely to be affected by frost, since the reliability of my electronic system may be impaired by temperatures below freezing point.
- If my door mounting does not meet your installation requirements, you can have the door rehinged by your specialist retailer or our service centre.
- If, for reasons of space, there is no alternative to installing your dryer directly next to a gas or electric cooker or coal range, you must interpose a thermally insulated panel (measuring 85 x 57.5 cm) between cooker and dryer. This panel should be coated with aluminium foil on the side facing the cooker.
The safety of AEG electrical appliances conforms to the recognized rules of technology and the Appliance Safety Act. As manufacturers, we nonetheless feel obliged to familiarize you and any other persons using the machine with the following instructions:
- To ensure safe operation, I should only be operated as indicated in the Operating Instructions.
- Please make sure before using your machine for the first time that the mains voltage and current type indicated on my rating plate agree with the mains voltage and current type where the machine is used and that the used circuit is sufficiently fused.
- Only use me to dry general household laundry.
- Only use me to dry laundry that has been washed in water.
- Before cleaning, care, and maintenance work, make sure that the appliance is switched off. You will proceed safely if you first pull the mains plug out of the socket or, if your machine is connected by a fixed wiring connection, you switch off the FI protection switch or LP switch or completely remove the fuse.
- Keep the space around me free of fluff.
- Never direct a water jet on to my outer casing!
- Never use my supply lead to pull the mains plug out of the socket!
- Never operate me if
■ my mains supply lead is damaged, or
I show visible damage in the region of the control panel, work-top, or plinth.
If the mains supply lead needs to be changed or such damage needs to be repaired, please contact our service centre or a repair shop authorized by ourselves.
- Repairs to electrical appliances should only be performed by a trained electrician. Improper repairs may place the user at serious risk.
- If any other maintenance needs to be carried out, you are also basically recommended to contact our service centre or a repair shop authorized by ourselves. Only original AEG spare parts fulfill all requirements!
- If I am installed under a worktop in your kitchen or utility room, an earthed intermediate panel must be provided as access protection according to the installation and connection instructions when the worktop has been removed.
- Do not sit on or lean against my open door. There may otherwise be a danger of my tilting!
- Children may not recognize the dangers of improper use of electrical appliances. Please therefore ensure proper supervision during use.
- Prevent children and small animals from climbing into my drum. Always therefore close my door when you have finished drying your laundry.
- My vent should not be connected to a smoke or exhaust gas flue. Also never introduce my vent into a shaft used to ventilate the installation areas of fireplaces.
Avoid installing me in rooms housing flue-connected fireplaces with coal- or oil-fired furnaces and gas heaters and in which the underpressure is 0.04 mbar or more.
Ensure sufficient space ventilation to avoid any underpressure. To be able to operate me safely, you should seek the advice and consent of the competent district chimney-sweep or the local building authority. - When the day finally comes to withdraw me from service and to replace me with another machine, please make sure that you inactivate my door lock and cut my electrical supply lead. This will prevent children at play from locking themselves in and thus endangering their lives. Finally, make sure that I am properly disposed of.
- If I am wrongly operated or used for any purpose other than that for which I am intended, AEG cannot assume liability for any possible damage.
- Never use me as a surface for standing on.
- My rear wall heats up during drying. That is perfectly normal, though you should avoid touching it!
- Please keep my packaging away from children. The foil represents a special source of danger. You are advised to dispose of this material as quickly as possible. The instruction leaflet on the machine package supplied together with my printed instructions gives data on the type of packaging material and its proper disposal.
-
Only dry materials washed in water! Never dry articles treated with inflammable liquids and solvents (petrol, alcohol, stain-removers, etc.) in a tumble dryer.
-
Articles containing foam rubber or similar materials must also not be machine-dried. The dryer may catch fire.
- Fabrics containing residues of hair spray, nail varnish remover, hair setting lotion, or similar agents should not be machine-dried owing to the danger of gas formation.
- If so-called "conditioners" are machine-dried – regardless of the respective properties of these conditioners – coating of the fluff filter sufficient to cause choking cannot be excluded. In such cases, we recommend you not to add them or to choose a different make.
- Machine-dried laundry becomes fluffy and pleasant to touch. If you want to make a contribution to relief of the environment, you can therefore omit fabric conditioners during washing of your laundry.
- Should you use perfume-free or so-called fragrance-free eco/biodetergents, your laundry may possibly have an unusual odour after drying, i. e. your laundry lacks "freshness". This is not due to any defect in your machine, but refers to odours inherent in the fabrics themselves, which, owing to absence of fragrances in the detergent, are not neutralized or masked.
- Make sure that no garments get jammed when closing my door, since the fabrics may be damaged.
- I am able to operate only, when my door is closed. If my door is open, a safety switch prevents me from starting.
- You will perhaps be amazed at the amount of fluff trapped in my fluff filter after drying. This fluff, however, is not the result of overstressing of your laundry by the drum action, but during to a normal process of wear and tear. When your laundry is being worn or washed, fibres becomes detached from the fabrics by abrasion. These are carried away by the wind if your laundry is line-dried. In your tumble dryer, however, these fibres are concentrated in the fluff filter. The fraction of fluff actually collected during machine-drying amounts to only 0.03 kg per kg laundry.
- To clean my stainless steel drum, you never use any acid-containing descalers, chlorine- or iron-containing scouring agents, or even steel wool. Our service centre stocks suitable agents.
- Also keep furniture polishes or agressive cleaners away from my screen and control panel.
Out of concern for the environment ...
All tumble dryers require energy for drying. I am especially economical to run if you take note of the following hints:
■ Thoroughly spin-dry your laundry first!
I am especially energy-saving to run if your laundry is well spin-dried before tumble-drying (i. e. at least at 800 min ^-1 ). Higher spin speeds reduce consumption, shorten the drying time, and make drying more economical.
■ Ensure good ventilation!
To ensure economical tumble-drying, the room temperature should not exceed 35^ C.
■ Use the optimum wash load!
You will use your tumble dryer most economically by using the wash loads recommended in the programme table. The following data will help you better estimate the laundry weight.
Laundry weights
Guidance values for cotton garments (dry weights):
| Bath robe | 1200 g |
| Overall | 300-600 g |
| Quilt cover | 700 g |
| Bed-sheet | 500 g |
| Blouse | 100 g |
| Towel | 200 g |
| Dishcloth | 100 g |
| Gentleman's shirt | 200 g |
| Pillow-case | 200 g |
| Nightdress/pyjamas | 20C-500 g |
| Tablecloth | 20C-300 g |
| Underwear | 250 g |
■ Clean the fluff filter!
Each time you have used your tumble dryer, clean my fluff filter! A choked fluff filter leads to longer drying times and higher power consumption.
All used materials are environmentally compatible! They can be safely disposed of or burnt in a refuse incinerator.
Regarding the materials: The plastics can also be recycled and are marked as follows:
PE < for polyethylene e. g. as used in outer wrapping and bags inside;
PS < for polystyrene foam e. g. as used in the packing; this material is basically CFC-free.
The cardboard parts are made of waste paper and should be put back into the waste paper collection system.
Important recommendations on drying
| Wollens and downs | Never dry wool or wool mixtures (felting risk).Down-filled fabrics should also not be dried in me, since, depending on quality, the fine internal fibres tend to shrink. Linen fabrics may be dried only if you find a manufacturer's instruction to that effect. The fabric may "roughen" if I am improperly used for tumble-drying. |
| Care symbols | Check that the garments to be dried are suitable for drying in a tumble dryer. Appropriate information is given on the garment care label.The following symbols are important for tumble-drying:○ Tumble-drying is basically possible● Normal drying● Gentle drying● Tumble-drying not allowedLaundry with care label mark should not be dried in me. |
| Gentle programme/ S-button | We recommend you to dry temperature-sensitive laundry (e. g. acrylics and laundry marked on the care label in the gentle programme (S-button pressed).If the indicated care symbols are missing, proceed as follows: Dry your whites and coloureds and your easy-care fabrics at normal temperature, ensuring the respectively optimum load owing to creasing. You should dry sensitive garments at reduced heating capacity, i. e. with the gentle button pressed. |
| Creasing | Overdrying causes creasing of easy-care laundry. We therefore recommend programme 7.The risk of creasing increases with a greater load. Especially when machine-drying sensitive fabrics, you should therefore reduce the load to 1.5 kg or less. Please note that, at a load of 1.5 kg, you should select a time programme, since electronic sensing of the degree of dryness is otherwise no longer precisely assured. |
| Knitwear | Knitwear tends to shrink. If you buy such materials, take note of this fact when choosing sizes, and avoid "overdrying" of this laundry (therefore never select the extra drying programme). The risk of shrinkage, however, is low for high-quality branded laundry. |
| Starched laundry | You can also tumble-dry starched laundry. To retain the required starched effect, use twice as much starch when starching.When you have taken out your laundry, it is advisable to wipe my drum with a damp cloth to remove any starch residues. |
Spin-dry your laundry well before tumble-drying (at least at 800 min ^-1 ). Higher spin speeds reduce power consumption during drying and make it more economical. Easy-care fabrics should be briefly spun before they are loaded in my drum.
Close zip-fasteners and tie together loose strings (e. g. of aprons). You will thereby avoid tangling of your laundry.
Clothes made of double-layered fabrics (polyamide outer layer, cotton inner layer, e. g. anoraks) should be turned inside out before drying. You will then achieve a better tumble-drying effect.
Never dry new, dark-coloured fabrics together with light-coloured garments, since this may otherwise cause discoloration.
Spin-drying
Preparing your laundry
Machine description
Features

A Programme selector switch
B Operating indicator
C Illuminated indicator for fluff filter (if available)
D Signal button for programme end
E Gentle button
F Start button
G Door release and cancel button for all selected additional functions
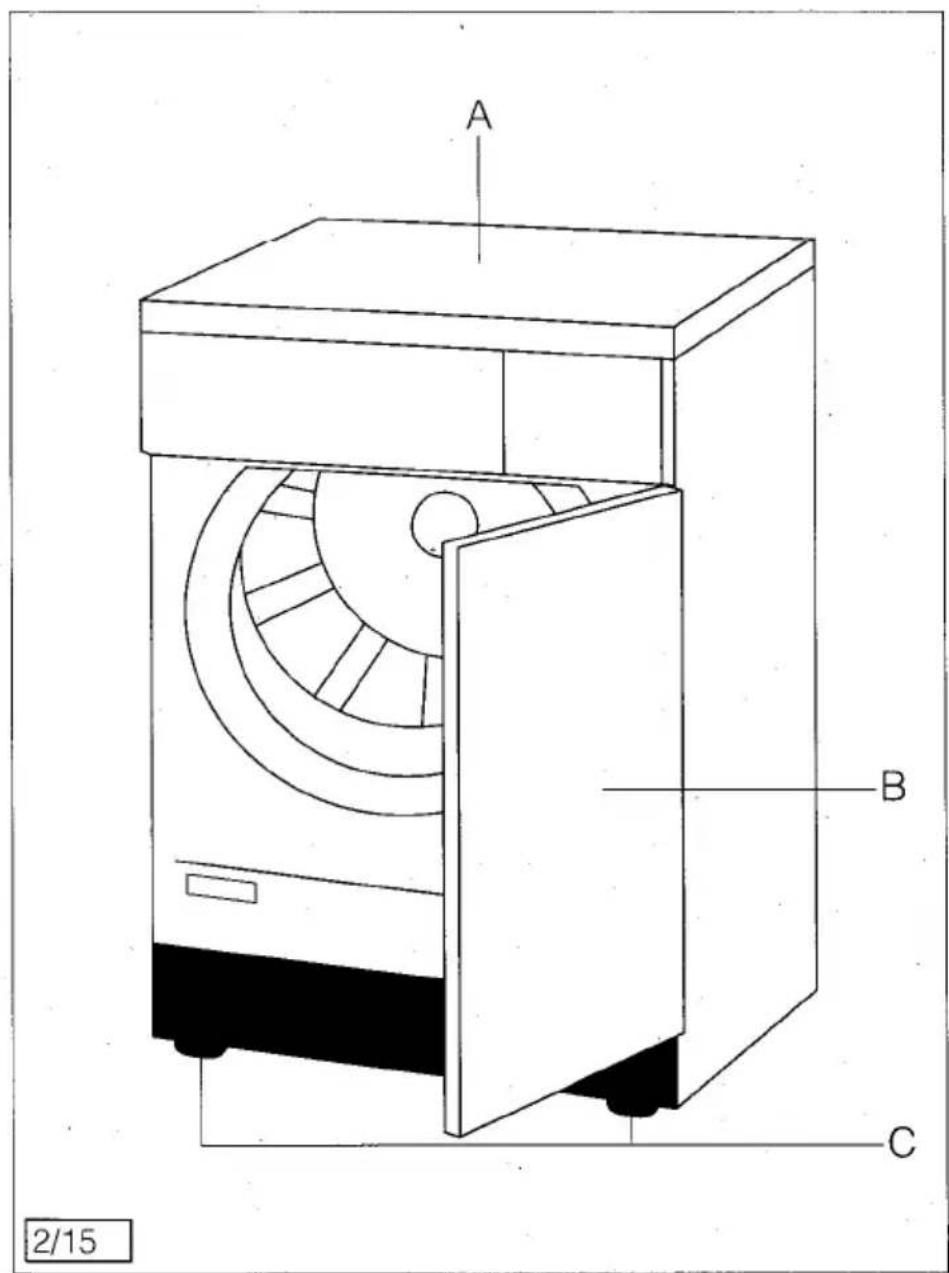
A Detachable worktop
B Machine door, opened via door release button (only when machine is connected) or door trip
C 4 height-adjustable screw-in feet (front and rear)
Before drying
| Sorting your laundry | Sort your laundry according to- Cottons and linen- Easy-care laundry- Dark-coloured laundry/fabrics- Light-coloured laundry/fabricsMake sure that your laundry is suitable for machine-drying.Never dry wool or wool mixtures or knitwear made of or containing wool (felting risk). |
| Take care when handling some fabrics | Empty pockets.Remove metal objects (e. g. paper clips, safety pins, etc.).Button up pillow-slips, and close zip-fasteners, hooks, or eyes. Tie together loose belts and long apron strings. |
| Correct drying (brief instructions) | |
| Before drying | 1. Sort your laundry2. Select the programme3. Open the door4. Loosen your laundry and place it inside5. Close the door6. Select additional functions7. Press the start button |
| When the programme has ended | 8. Open the door9. Take out your laundry10. Switch off your machine11. Clean the fluff filter12. Close the door |
Loading your laundry
You have two ways of opening my loading door:
1. Press the door release button ©
To open my door in this way, you must connect me to the mains supply. That means, you must place the power plug in the plug socket and turn my programme selector switch from the 0 position. In this case, my operating indicator lights up.
2. Door trip function
If you have not connected me to the mains supply (i. e. my operating indicator does not light up), my door can be opened by slight pressure at the centre of the LH side.
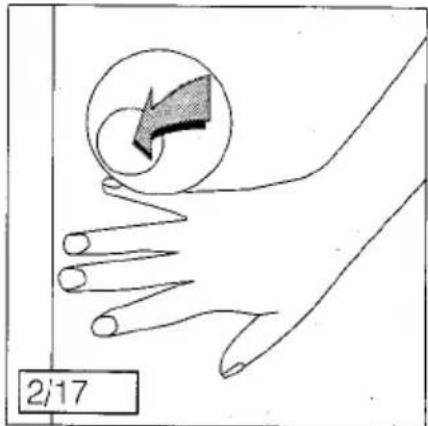
This form of door release is also of course possible if I am connected to the mains supply and you want to interrupt a drying programme.
Loosen your laundry before loading it into your tumble dryer. You will thereby avoid long running times and creasing caused tangling of your laundry.
Wherever possible, use the recommended full wash load, since this ensures optimum economy. However, do not overfill my drum. This will also adversely affect the power consumption and raise the risk of heavier creasing.
You may remove and put back individual items whilst the drying programme is running. Simply press the clear/door release button or open my door with the door trip function.
Take care when removing or re-inserting garments:
My drum or the laundry itself may still be hot, posing a possible risk of scalding.
Before restarting the programme, you must reselect the pre-selected additional functions (gentle button or audible tone), since the latter are automatically cancelled when the drying sequence is interrupted. This does not apply if you have opened my door with the door trip function.
To continue the drying programme, close the door and press the start button.
Selecting the drying programme
Programme selector switch
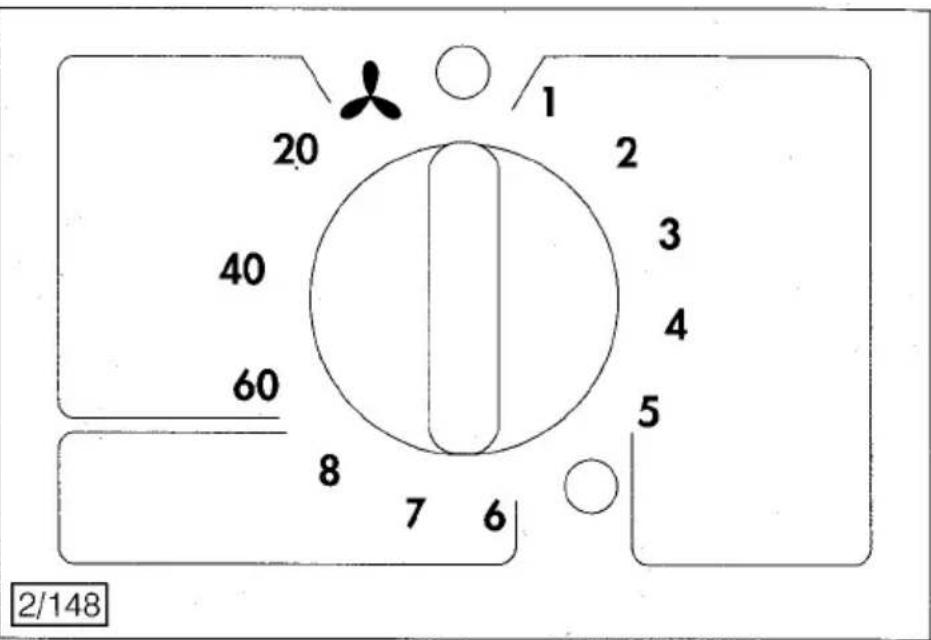
You can turn my programme selector switch clockwise from any position. It has three functions:
- Using the programme selector switch, you switch me on and off. Depending on the operational status, my operating indicator then comes on or goes out.
- Via the programme selector switch, you select your drying programme. Instructions on programme selection are given in the programme table ("programme tables" section).
- My drum lighting is switched on and off by the programme selector switch.
The button functions
Combination of the main and additional programmes with my buttons gives a range of programmes meeting all requirements.
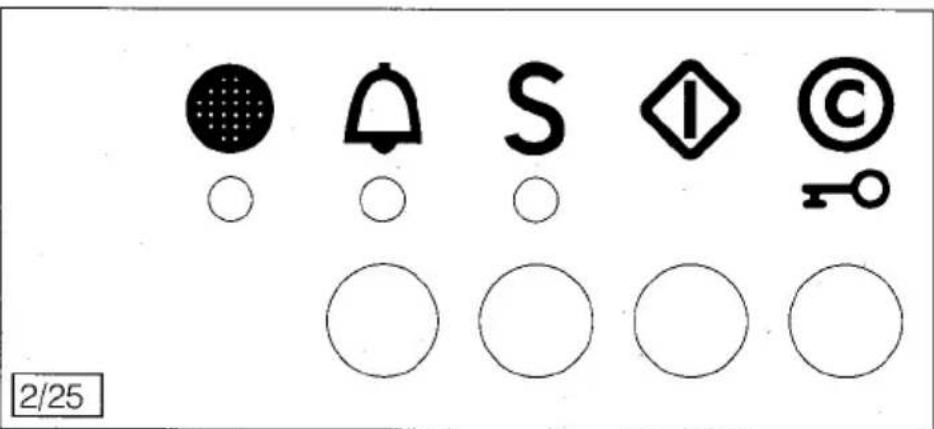
When buttons are pressed, a red mark appears in the display located above.
To enable this button to fulfil its function, you must connect me to the mains supply and turn my programme selector switch from the 0 position. The operating indicator then lights up, and my door springs open when the door release button is pressed.
If I am not connected to the mains supply, my door will spring open if you apply slight pressure at the centre on the LH side of my door (if the door has been rehinged to the RH side, you must press the centre of the RH side of my door, "Opening the oading door" section).
If you press my door release button during a drying programme, my drum immediately stops rotating when my door springs open. All additional functions selected by operating buttons are simultaneously cancelled, i. e. the pressed buttons spring back to their original position (this does not apply if the door is opened by the door trip function). If you want to continue the drying programme, you must re-operate the previously pressed function buttons and press the start button.
Specific additional functions can also be corrected or cancelled only by pressing the clear/door opening button. My door is then automatically opened.
You start the preselected programme with this button.
My heating capacity is reduced when you press this button. This button enables you to dry temperature-sensitive laundry, such as e.g. acrylics or fabrics marked ☐ on the care label. The drying times are correspondingly prolonged by the lower heating capacity. Please also note that economical use of the S-button is only assured at low wash loads (1 – 2.5 kg). We therefore recommend you to use the gentle button only on programme 6, 7, and 8 (see programme table).
An audible tone sounds at the programme end when this button is pressed. This signal sounds at specific intervals for 30 minutes. During this time, my drum alternately rotates (reverses) at specific intervals (see automatic anti-crease programme).
If this indicator comes on (if available), you should interrupt the drying programme and clean the fluff filter in which the fluff collects during drying or check my venting outlet. When the fluff filter or heat exchanger is cleaned, the indicator goes out, and you can continue the drying sequence by repressing the start button.
Programme table
You will find a brief table listing the following programmes on my front wall
Programmes for cotton and linen (up to 5 kg wash load)
| Programme number | Degree of dryness | Laundry/fabric type |
| 1 | Extra-dry | Thick or multi-layered materials to be dried thoroughly |
| 2 | Storage-dry | Materials of uniform medium thickness to be dried thoroughly |
| 3 | Slightly dry | Thin materials still to be ironed |
| 4 | Iron-dry | Cotton or linen laundry of normal thickness |
| 5 | Wringer-dry | Cotton or linen laundry to be wrung (also starched laundry) |
Programmes for easy-care materials: mixed fabrics and synthetics (1 - 2.5 kg wash load)
| Programme number | Degree of dryness | Laundry/fabric type |
| 6 | Extra-dry | Thick or multi-layered materials to be dried thoroughly |
| 7 | Storage-dry | Thin materials requiring no further aftertreatment (e. g. ironing) |
| 8 | Slightly dry | Thin synthetics and mixed synthetic fabrics still to be ironed |
Instructions for test centres
For testing to IEC 1121 s.e., the following programme settings are to be used:
Programme A(5.0 kg) Programme setting: 2
Programme B (5.0 kg) Programme setting: 4
Programme C (2.5 kg) Programme setting: 7
Airing
Programme setting
With this programme, you can simply and rapidly iron creased fabrics in a cold air flow.
Lightly moisten the creases. It is also possible to air garments.
| Laundry/fabric examples | Gentle button use | Consumption values in kWh* | Time duration in min* |
| Terry towelling, bathrobes | no | ||
| Terry towelling, cotton jersey laundry, flannelette bedding, terry kitchen towels | no | 3.4 | 80 |
| Cotton jersey laundry, cotton shirts | no | ||
| Bedding, tablecloths | no | 2.5 | 65 |
| Bedding, tablecloths | no |
*Values refer to 5.0 kg cotton laundry spun at 800 min ^-1
| Laundry/fabric examples | Gentle button use | Consumption values in kWh** | Time duration in min** |
| Sweaters, bedding, and tablecloths | yes | ||
| Easy-care shirts, tablecloths, babywear, socks, girdles | yes | 1.2 | 35 |
| Bedding and table-cloths, easy-care shirts and blouses | yes |
**Values refer to 2.5 kg laundry spun at 1000 min ^-1
Time programmes
You can set a time between 20 and 60 minutes for drying of wash loads of under 1 kg or for afterdrying of individual garments.
If you are not satisfied with the drying result, we recommend you to choose a different programme. The degree of dryness of your laundry decreases with a higher programme number.
Cooling phase and anti-crease sequence
Shortly before the programme end, my heating system is switched off to cool your laundry. Unless you immediately remove your laundry from my drum when the drying sequence has ended, the 30-minute anti-crease programme automatically follows. During this sequence the alternately reversing tumbling action of the drum continuously loosens the laundry so that it remains fluffy and crease-free until taken out. When the anti-crease programme has ended, I automatically switch myself off. You should remove your laundry from my drum by this time to avoid creasing.
Programme end
You switch me off by turning my programme selector switch to the 0 position. My drum lighting is then also switched off. My operating indicator goes out.
Indication of operating faults
In many cases, only minor operating faults cause an appliance not to operate properly. To spare you the need to call the service centre whenever operating faults occur, my illuminated indicator alerts you to the following fault, which you can correct yourself:
The illuminated indicator for "fluff filter" lights up.
Fault:
My fluff filter is choked.
Correction:
Please clean my fluff filter.
If the drying sequence is interrupted for a prolonged period (1 minute and longer), my fluff filter indicator may respond even when the amount of fluff being generated is low. Please clean the fluff filter in this case, and continue the drying sequence.
The fault indicator is cancelled by opening my door or switching off the machine. The indicated fault is then of course not rectified. When the programme is restarted, it is re-indicated.
If your machine does not work despite the measures noted above, please call the service centre. When calling, please quote the E-No. and F-No. (Customer service section).
Cleaning the lint strainer
Abraded fabric, some 70% of which occurs during everyday wear, 20% during washing, and only 10% during drying (source: Hautberatungsstelle für Elektrizitätsanwendung e.V. (HEA)*, Frankfurt), is abraded in the form fo fluff (lint) which collects in the lint strainer inside the appliance door.
To ensure trouble-free air circulation, you must clean my lint strainer after each drying cycle.
First open the appliance door and press the unlocking button of the strainer lid.
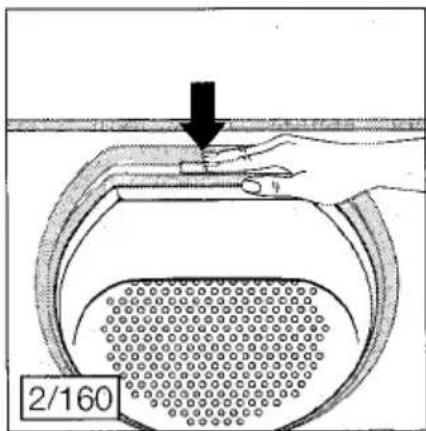
The strainer lid will spring open, and you can take out the lint strainer. Remove the lint from the strainer by wiping a moistened hand or damp cloth over the strainer.

After re-inserting the cleaned lint strainer, press the strainer lid until it engages in the locking mechanism.
Without the lint strainer being inserted in place, the strainer lid cannot engage and the appliance door cannot be closed. Your dryor cannot then be operated.
Cleaning the strainer area
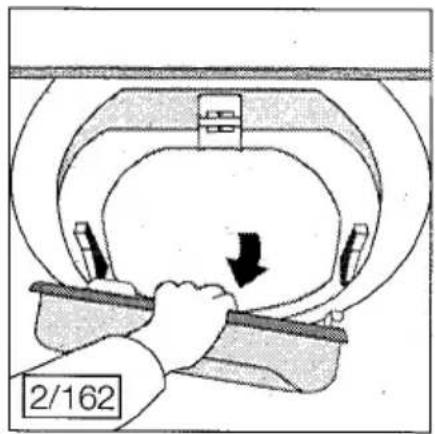
Despite the lint strainer, lint will collect in the strainer area after some time. You should then clean the whole strainer system.
■ Open the loading door.
■ Take out the lint strainer.
- Grasp the opened strainer lid at the top and pull it forwards until it springs out of its holder.
■ The lint in the strainer area can now be easily removed.
■ Press the strainer lid with both lugs into the holders in the loading door until the strainer lid engages.
■ Re-insert the lint strainer.
■ Apply pressure to the strainer lid until it engages in the locking mechanism.
Cleaning the inside of the drum
Cleaning, maintenance, and care
If the required degree of dryness is no longer attained, i. e. your laundry is either too dry or too damp, we recommend you to clean the inside surface of the drum an drum ribs with a vinegar-soaked cloth. A scarcely visible coating due to detergent residues in the laundry may arise at these locations and may prevent correct sensing of the degree of dryness.
Cleaning the screens and controls
Never clean my screens and controls with commercial furniture polishes or aggressive cleansers. If cleaning should be necessary, please only use a damp cloth.
If you think your tumble dryer is not working properly . . .
... if the dryer does not work?
■ Have you plugged in the machine?
■ Have you set the programme selector switch?
■ Have you pressed the start button?
■ Have you closed the door properly?
■ Is the fuse in the fuse box in good working order?
... if the machine does not dry satisfactorily?
■ Have you set the correct program?
■ Have you cleaned the fluff filter?
■ Have you used the recommended wash load?
■ Have you properly spin-dried the laundry before drying?
■ Has a coating formed on the inside surface of the drum or on the drum ribs?
... if the drum lighting does not work?
■ Have you plugged in the machine?
■ Have you turned the programme selector switch from the 0 position?
■ Does the bulb still work or does it need to be changed? In this case, use only a 10 W bulb which you can order from our customer service department under ET-No. 647078970.
Caution! Unplug before replacing
Special accessories
You can order the following special accessories via your retailer:
Your tumble dryer can be stacked together with any LAVAMAT fully automatic washing machine of the current or previous series by means of a space-saving stacking kit.
Two different kits are available:
- Stacking kit with retractable panel (E-No. 607 899 978)
- Stacking kit without retractable panel (E-No. 916018900)
You can install me in kitchen furniture runs. After removing my work-top, you must cover the electrical parts with an earthed cover sheet (ET-No. 647 405 423).
Faults you can rectify yourself
Stacking kit
Installing under a worktop
Customer service
If you find no reference to any particular fault in my Operating Instructions, please contact the service centre. When doing so, quote the E-No. and F-No. of your dryer. You will find these numbers on my rating plate.
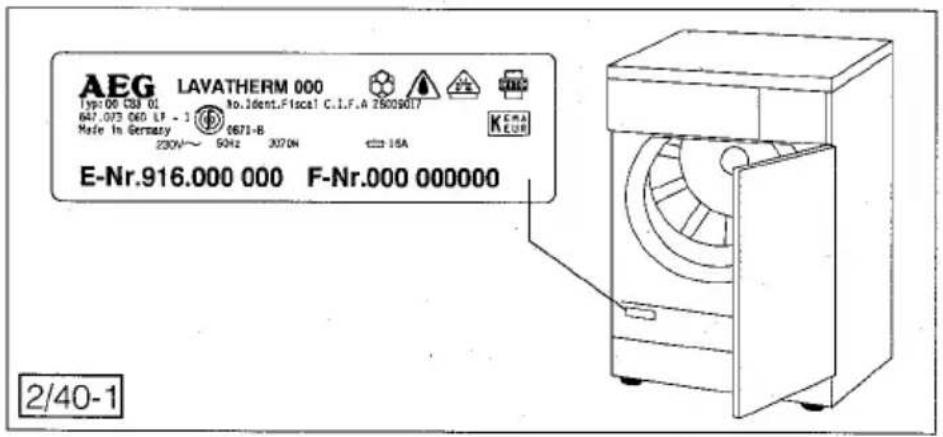
Your indication of these numbers enables the service centre to make precise identification of the required spare part so that your tumble dryer can be repaired at the engineer's first visit. You will thus save yourself additional costs due to any possible repeated trips by the service engineer.
To keep these numbers handy, we recommend you to enter them here:
E-No.
F-No.
Technical data
Dimensions:
With worktop:
Height 85.0cm
Width 60.0cm
Depth 60.0cm
Without worktop:
Height 82.0cm
Width 59.5cm
Depth 57.0 cm
Connection:
You will find information on electrical connection on the rating plate of your machine. If your dryer is designed for changeover, the instructions given in the changeover diagram on the junction box on the rear of the machine are to be additionally complied with.
When connecting, you must ensure that the nominal voltage indicated on the rating plate agrees with the voltage of your electricity supply.
Wash loads
Depending on programme, up to max. 5 kg.
Varying wash load data in certain countries are substantiated by different measurement methods.
Consumption for 5 kg Cotton previously spin-dried at 800 min ^-1 in cotton programme storage-dry 3.4 kWh.
Height adjustability:
+ 1 cm/-0.4 cm
Depth with door open: 116.5 cm
Weight empty: 43 kg
Application: household
Allowable ambient temperatures: +5°C to +35°C
CE This appliance complies with the following EC Directives:
- 73/23/EEC of 19.02.1973 - Low-Voltage Directive
- 89/336/EEC of 03.05.1989 (including Amentment Directive 92/31/EEC) – EMV Directive.
AEG Hausgeräte GmbH
Postfach 1036
D-90327 Nürnberg
© Copyright by AEG
H 245 208 700 - 05961./26 -
- LAVATHERM 3350/3300
- Hello
- Contents
- Safety instructions
- Before first use ...
- Safety instructions for the user
- Out of concern for the environment ...
- ■ Thoroughly spin-dry your laundry first!
- ■ Ensure good ventilation!
- ■ Use the optimum wash load!
- Laundry weights
- ■ Clean the fluff filter!
- Important recommendations on drying
- Spin-drying
- Preparing your laundry
- Machine description
- Features
- Before drying
- Loading your laundry
- Press the door release button ©
- Door trip function
- Take care when removing or re-inserting garments:
- Selecting the drying programme
- Programme selector switch
- The button functions
- Programme table
- Instructions for test centres
- Airing
- Time programmes
- Cooling phase and anti-crease sequence
- Programme end
- Indication of operating faults
- Fault:
- Correction:
- Cleaning the lint strainer
- Cleaning the strainer area
- Cleaning the inside of the drum
- Cleaning, maintenance, and care
- Cleaning the screens and controls
- If you think your tumble dryer is not working properly . . .
- ... if the dryer does not work?
- ... if the machine does not dry satisfactorily?
- ... if the drum lighting does not work?
- Special accessories
- Customer service
- Technical data
- Dimensions:
- Connection:
- Wash loads
- Height adjustability:
Marque : AEG-ELECTROLUX
Modèle : Lavatherm 3350
Catégorie : Sèche-linge