Lavatherm 530 - Sèche-linge AEG-ELECTROLUX - Notice d'utilisation et mode d'emploi gratuit
Retrouvez gratuitement la notice de l'appareil Lavatherm 530 AEG-ELECTROLUX au format PDF.


| Type de produit | Sèche-linge à condensation |
| Marque | AEG-Electrolux |
| Modèle | Lavatherm 530 |
| Capacité de charge maximale | 6 kg |
| Dimensions (H x L x P) | 85 x 60 x 60 cm |
| Poids net | 42 kg |
| Alimentation électrique | 230 V / 50 Hz |
| Puissance absorbée | 2200 W |
| Intensité du courant | 10 A |
| Programmes de séchage | Coton, Synthétiques, Délicats, Laine, Mixte, Rapide 30 min |
| Fonctions supplémentaires | Départ différé, Fin différée, Séchage doux, Anti-froissage |
| Capteur d'humidité | Oui, arrêt automatique lorsque le linge est sec |
| Type de condenseur | Condenseur à air |
| Réservoir d'eau | Oui, amovible, capacité 3,5 L |
| Filtre à peluches | Oui, nettoyage après chaque cycle |
| Niveau sonore | 65 dB(A) |
| Classe énergétique | C (selon ancienne étiquette, à vérifier) |
| Consommation énergétique annuelle | 560 kWh |
| Indice de réparabilité | 7,4 / 10 |
| Disponibilité des pièces détachées | Minimum 10 ans après l'achat |
FOIRE AUX QUESTIONS - Lavatherm 530 AEG-ELECTROLUX
Questions des utilisateurs sur Lavatherm 530 AEG-ELECTROLUX
0 question sur cet appareil. Repondez a celles que vous connaissez ou posez la votre.
Poser une nouvelle question sur cet appareil
Téléchargez la notice de votre Sèche-linge au format PDF gratuitement ! Retrouvez votre notice Lavatherm 530 - AEG-ELECTROLUX et reprennez votre appareil électronique en main. Sur cette page sont publiés tous les documents nécessaires à l'utilisation de votre appareil Lavatherm 530 de la marque AEG-ELECTROLUX.
MODE D'EMPLOI Lavatherm 530 AEG-ELECTROLUX
LAVATHERM 530 electronic
Condenser Tumble Dryer
Hello
Allow me to introduce myself: I am the tumble dryer LAVATHERM from AEG. From now on, I should like to make tumble drying more fun for you, not only because of my attractive appearance, but also thanks to my »intrinsic qualities«. I use very little energy, take great care of your laundry and I am very quiet in operation, easy to use and look after.
You must read these instructions prior to using the appliance and retain them for future reference.

Printed on recycled paper AEG - putting words into action
Contents
Safety instructions
Before first use 4
For the user 5/6
You should also note the following 6/7
Out of concern for the environment... 7/8
Important recommendations for drying 9/10
Appliance description 11-13
Before starting to dry 14
How to tumble dry correctly 14
Loading the laundry
Open loading door 15
Loading laundry 15
Adding or removing laundry 15
Selecting the drying programme
Programme selector 16
The push buttons and their functions 16/17
Programme charts 18/19
Cooling phase and automatic anti-crease programme 20
Programme end
Switching off the appliance 20
Indicating operating errors 21
Emptying the condensed water container 22
Cleaning the fluff filter 22
Cleaning, care and maintenance 23/24
If you think your machine is not operating properly 25
Optional extras 26
Service 27
Technical Data 28
Safety instructions
Before first use
- It must stand on a firm and level base. My 4 adjustable feet allow for small height adjustments to compensate for uneven floor conditions. To adjust my feet insert a screwdriver into the vertical slots visible at the front.
- Wipe my drum with a damp cloth.
- I must not be sited in areas which may be affected by frost as the reliability of the electronic components will be adversely affected by sub-zero temperatures. Furthermore, condensed water remaining in the pump, the hoses and in the condensed water container lead to damage.
- It is essential that my ventilation slots are kept clear so that I can draw sufficient air. This is particularly important if I am sited on long-pile carpets.

natural_image
Diagram of a mechanical component with internal grooves and a circular feature, labeled '2/28' (no readable text or symbols beyond label)Even if the machine is built-under into a fitted kitchen the ventilation slots must be left open.
- The door can be hinged on the left or the right. Re-hinging of the door has to be carried out by an AEG Service Engineer or by an AEG appointed Service Agent.
- If you have to site me next to a gas, coal or electric cooker due to space problems, you have to place a heat insulating board (dimensions 85 x 57.5 cm) between me and the cooker. The side facing the cooker should be covered with aluminium foil.
AEG electrical appliances conform to the recognised safety regulations governing electrical domestic appliances. As a manufacturer, we nonetheless feel obliged to familiarise you and any other persons using the machine with the following instructions:
- To ensure safe operation I must only be operated according to the operating instructions.
- Please make sure before using your machine for the first time that the mains voltage and supply indicated on my rating plate agrees with the mains voltage where the machine is to be used. The fuse required is indicated on the rating plate.
- I am a domestic tumble dryer suitable for drying the usual household laundry. Check with the care labels in the laundry whether the manufacturer of the garment recommends tumble drying.
- Only dry laundry which has been washed in water and has been spin-dried.
- Before cleaning, care and maintenance work, make sure that the appliance is switched off. We advise for safety reasons that you pull the mains plug out of the socket, switch off at the power point or completely remove the fuse in the fuse box serving this circuit.
- Keep my surrounding area free from fluff.
- Do not site me on long-pile carpets as my ventilation slots must not be blocked.
- Never direct a water jet onto my outer casing!
- Never use my supply lead to pull the mains plug out of the socket!
- Never operate me if:
■ My mains supply lead is damaged, or
I show visible damage to the control panel, worktop or plinth. If the mains supply lead needs to be changed or damage needs to be repaired, please contact AEG service centre or AEG authorised service agents.
- Repairs to electrical appliances must only be carried out by trained electricians. Improper repairs may place the user at serious risk.
- We recommend that repairs to AEG appliances should only be carried out by AEG service engineers or by AEG appointed service agents. This way you ensure that AEG spare parts are used which fulfil all the necessary requirements.
- If I am installed under a worktop in your kitchen or utility room, ie. my worktop has been removed, an earthed cover plate must be fitted as access protection according to the Build-under installation instructions.
- The condensed water is not suitable for drinking.
- Do not lean or sit on the open loading door - risk of machine tipping over.
- Children cannot recognise dangers when tampering with electrical appliances. Therefore, ensure proper supervision when appliances are in use.
- After drying has been completed, always close the loading door to prevent children or pets climbing into the drum.
You should also note the following
- My exhaust air must not be vented into a chimney flue.
My exhaust air must not be ducted into shafts which serve as ventilation shafts of heated areas.
Avoid siting me in areas where coal, oil or gas burning stoves are discharging into a chimney flue and where the depression is 0.04 mbar and more.
Ensure sufficient ventilation of the installation area to prevent depression. - When the day finally comes to withdraw me from service and to replace me with another machine, please make sure that you deactivate my door lock and cut off my electrical supply lead, disposing of lead and plug safely. This will prevent children from locking themselves in and endangering their lives. Then ensure environment-friendly disposal.
- If I am incorrectly operated or used for any purpose other than that for which I am intended, AEG cannot assume liability for any possible damage.
- Do not use me to stand on.
-
During drying my rear panel will get hot. This is normal. Take care and do not touch.
-
Please keep my packaging away from children. The foil represents a particular danger. Dispose of this material as quickly as possible. You will find details of the type of packaging materials used and how to dispose of these correctly in the literature accompanying the machine.
- Only dry in the tumble dryer articles which have been washed in water. Do not dry articles which have been cleaned in inflammable liquids, e.g. dry cleaning fluids or stain removers (benzine, alcohol etc.).
- Do not dry articles containing foam rubber or rubber-like materials in the tumble dryer (risk of fire).
- Garments which contain residue of hairspray, nail varnish remover, hair styling agents, etc. must not be dried in the tumble dryer - risk of gas formation.
- Fabric conditioner sheets leave some residue on the fluff filter of the machine and they may actually block the filter. We would recommend that you use liquid fabric conditioner as part of the wash cycle rather than the conditioner sheets, if you want to use conditioner at all.
-
Laundry which is dried in a tumble dryer is fluffy and soft and for environmental reasons you may decide not to use fabric conditioner.
-
If you are using perfume-free or ecologically sound washing agents without perfume you may find that your laundry is not smelling as fresh as it used to. These are textile odours which have not been neutralised or covered by the perfumes normally found in washing detergents.
- Make sure that no garmets are trapped in my loading door, otherwise damage will occur to the article.
- I can only start to work when my door is closed. When the door is open a safety switch prevents me from operating.
- If you are surprised by the amount of fluff in my filter after the drying cycle let me assure you that I do not subject your laundry to a lot of wear and tear. Fluff collected in my filter is due to you using and wearing your laundry and some due to washing in a washing machine. I only create 0.03 g of fluff per 1 kg of laundry.
- Do not use descalers containing acid, chlorine or ferrous substances or even soap filled pads to clean my stainless steel drum. AEG Service stocks appropriate cleaners for this purpose.
- Do not use furniture polish or abrasive cleaning agents on my control panel and controls. Wipe with soft cloth and lukewarm water only.
Out of concern for the environment
All tumble dryers require energy to dry. I operate very economically if you bear the following information in mind:
■ Select the correct spin to extract max. amount of water I save a lot of energy when the laundry has been spun at minimum 800 rpm. Higher spin speeds extract even more water, shortening the drying times and reducing energy consumption.
■ Good ventilation in the laundry room The temperature in the room where the tumble dryer is located should not exceed 35 C to ensure the most economical operating conditions.
Information on the packaging material of the appliance
■ The loads should have the correct weight
The most economical way to dry is to keep to the recommended weights in the programme charts. The following may help you to assemble the right load more easily:
Laundry weight:
Guide values for cotton (dry weight)
| Bathrobe | 1200 g |
| Overall | 300-600 g |
| Duvet cover | 700 g |
| Sheet | 500 g |
| Blouse | 100 g |
| Towel | 200 g |
| Tea towel | 100 g |
| Shirt | 200 g |
| Pillow case | 200 g |
| Nightdress/pyjama | 200-500 g |
| Tablecloth | 200-300 g |
| Underwear | 250 g |
■ Clean the fluff filter
My fluff filter must be cleaned after each drying cycle. A fluffed up filter requires longer drying times and thus more energy.
■ Clean the heat exchanger
You can save even more energy if you clean the heat exchanger regularly.
The packaging material meets ecological requirements and can be easily disposed of or can be burned safely in the municipal incinerators.
To the materials: the plastics can be recycled and are marked as follows:
PE < for Polyaethylene, e.g. the outer wrapping and the bags inside.
PS < for blown (CFC free) Polystyrene, e.g. the fillers
The cardboard parts have been manufactured from recycled material and should be taken for recycling again.
Important recommendations for drying
Do not dry any wool or wool mixtures – these fabrics will felt. Down-filled articles such as eider-downs should not be dried in a tumble dryer unless recommended by the manufacturer of the article. Linen should only be dried in the tumble dryer if the manufacturer of the article recommends this, tumble drying tends to make the surface of the article rough.
Check whether the manufacturer of the garment has recommended tumble drying on the care label in the garment. You will find the following symbols in the garments.

May be tumble dried
Can be tumble dried on high heat setting
Tumble dry on low heat setting
Do not tumble dry
Laundry which has been marked with the symbol☒ is not suitable for drying in a tumble dryer.
Heat sensitive materials such as acrylics with care label ☐ are recommended to be dried in the Special care programme (press button S).
Easy-care fabrics tend to crease when over-dried. We recommend to use programme 7.
The fuller the drum the more creasing will occur. We recommend to reduce the load to 1.5 kg or less for minimum iron fabrics particularly those which are large or light in weight. For loads below 1.5 kg we recommend that you use a time controlled drying cycle as the electronic sensor cannot accurately sense small loads.
These garments tend to shrink during tumble drying, remember this when buying new articles and choose size accordingly. Take care not to over-dry these garments and do not choose the programme "extra-dry". Shrinkage should however be minimal if good quality garments are chosen.
Starched laundry can also be tumble dried. To achieve the starched effect use double the dose of starch. Wipe my drum with a damp cloth after drying to remove any starch residues.
Spin your laundry well before tumble drying. We recommend at least 800 rpm. Higher spind speeds will reduce the drying times and the energy consumption. For easy-care fabrics choose the special spin which you will find on your washing machine for these fabrics.
Preparing the laundry
Close zips and any buttons and tie loose apron strings etc. to prevent laundry from tangling.
Turn double layered garments such as anoraks inside out to get a more even drying result.
Do not dry new dark coloured garments together with light coloured ones to prevent discolouration of garments.
Appliance description
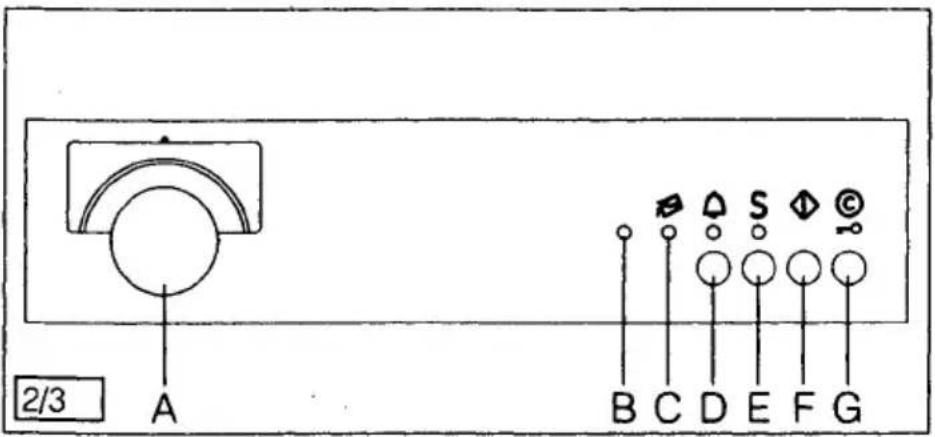
A Programme selector
B Machine "ON" light
C "Empty condensed-water container" indicator
D Accoustic "programme end" indicator
E Button for special care programme
F Start button
G Door release/cancel button (for any depressed buttons)
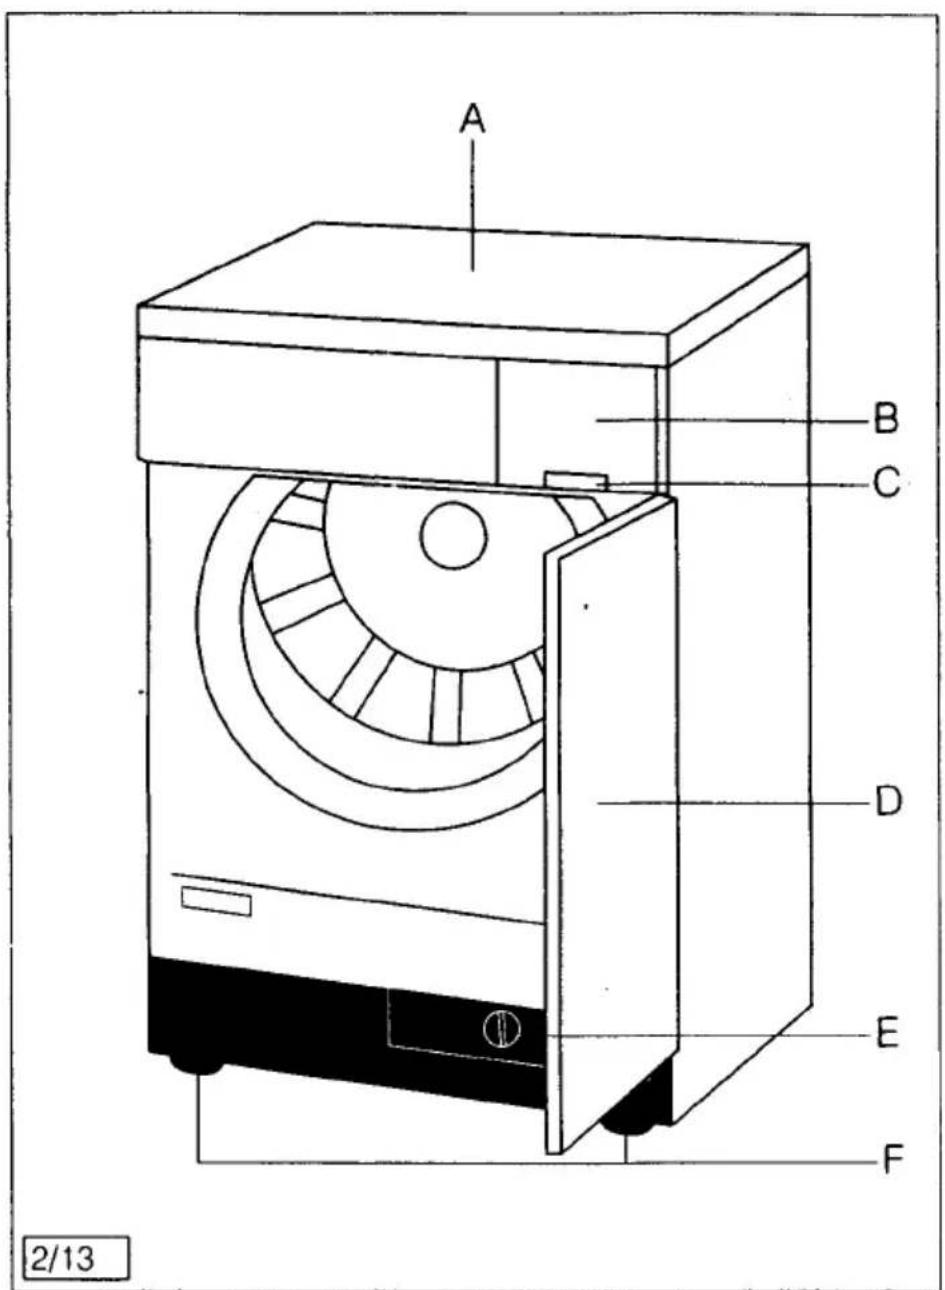

A Removable worktop
B Condensed-water container
C Condensed-water container handle
D Appliance door is opened by pressing door release button (when machine is connected to electricity) or by using override
E Heat exchanger
F 4 height adjustable feet (front and rear)
Features
Condensed- water container
A Opening to empty condensed water
Before starting to dry
| Sorting the laundry | Sort your laundry as follows:– cottons and linens– easy-care fabrics– dark coloured laundry– light coloured laundryCheck that the laundry is recommended for tumble drying.Due to felting do not dry any woollen garments, wool mixtures, hand-knitted wool garments or any garments which incorporate a proportion of wool. |
| Prepare garments for tumble drying | Empty pocketsRemove any metal articles from laundry, e.g. paper clips, safety pins, coins etc.)Close all buttons, zips, hooks and eyes. Tie loose belts and apron strings. |
| How to tumble dry correctly (Brief instructions) | |
| What to do before drying | 1. Sort the laundry2. Select the programme3. Open loading door4. Loosen laundry and place in drum5. Close the loading door6. Select option buttons7. Press start button |
| At the end of the programme | 8. Open the loading door9. Remove the laundry10. Switch off the appliance11. Clean the fluff filter12. Empty the condensed-water container13. Close the loading door |
Loading the laundry
There are two ways of opening my loading door:
1. Press the door release button ©
To open my door this way I have to be connected to the electrical supply. This means, the machine has to be plugged in, socket switched on and the programme selector has to be moved from the off (0) position. My machine "on" lamp lights up.
2. Override
If I am not connected to the electrical supply (e.g. my machine "on" light is off), press my door half-way up on the left-hand side to open.

You can use this method of opening the door any time you want regardless of whether the machine is connected to the electrical supply.
Loosen the laundry before loading into the tumble dryer. This will cut down on drying times and reduce creasing due to tangling. If you keep to the recommended weights for the different loads this ensures economical operation. But do not overfill the dryer, this will increase the drying, the energy consumption and result in excessive creasing.
You can open the loading door at any time during the programme to add or remove laundry. To open the door press the Cancel/Door release button or use the Override.
Take care when adding or removing laundry
The inside of my drum and the laundry may be hot - so do take care when adding or removing laundry during a drying cycle.
Before you re-start the machine you have to re-select the Option buttons (Special care button or acoustic programme end signal) as they will have been cancelled when the door was opened. This does not apply if you use the Override to open the door. Close the loading door and press the Start button and the drying cycle will continue.
Selecting the drying programme
Programme selector

My programme selector can be turned clockwise to any setting. It has 3 functions:
- The programme selector switches me and the machine "on" light on and off.
- You use the programme selector to set the drying programme required. Consult the programme chart as to which programme you should choose.
- The programme selector switches my light inside the drum on and off.
The buttons and their functions
By combining the main programmes on the programme selector with the available buttons I offer maximum programming flexibility.
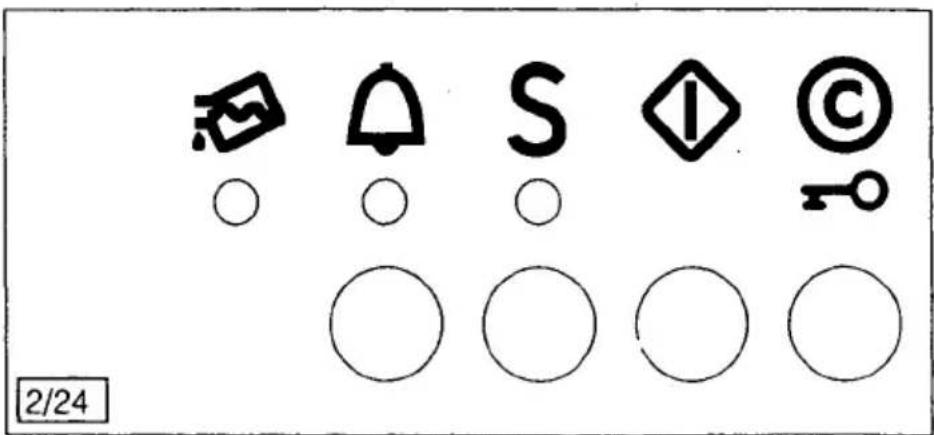
For this button to function you need to connect me to the electrical supply and turn my programme selector to a setting. The machine "on" lamp lights up. Now press the door release button to open my loading door.
If I am not connected to the electrical supply, press my door half way up on the left-hand side and the door springs open. If the door is hinged on the left-hand side then press the door on the right-hand side.
If you press my door release button during a drying cycle, the drum stops rotating when the door springs open. At the same time any depressed buttons are cancelled. This does not apply if the door has been opened using the Override.
To continue the programme re-select the buttons required and press the Start button.
To cancel any depressed buttons, press the Cancel/Door release button. The loading door automatically springs open.
Press this button to start the programme.
When you press this button the drying temperature is recuced. You can dry delicate fabrics such as acrylics or other delicate fabrics which bear the care label. Due to the lower heat the drying times are somewhat longer. Selecting the S-button is only economical for loads of 1 - 2 kg. For this reason we only recommend the use of this button for programmes 6, 7 and 8 (see programme chart).
Press this button if you wish the programme end to be indicated by an acoustic signal. The signal can be heard intermittently for 30 minutes. During this period my drum rotates intermittently (see automatic anti-crease cycle).
When the condensed-water container is full the machine interrupts the drying programme or will not start the programme and the indicator lights up – empty the container. As soon as the empty container is inserted, the machine continues with the drying cycle after having pressed the Start button.
If the condensed-water container has not been inserted or has been inserted wrongly the indicator lights up and you cannot start a drying cycle.
Programme Chart
Brief programme instructions are found on the front of the machine.
Programmes for cottons/linens (capacity up to 5 kg)
| Progr.-Number | Degree of Dryness | Symbols | Type of Laundry/Fabric |
| 1 | Extra Dry |  | Heavy weight or multi-layered textiles |
| 2 | Cupboard Dry |  | Textiles medium weight, articles not made up of multi-layers |
| 3 | Very slightly damp |  | Lightweight materials requiring ironing |
| 4 | Ironing damp |  | Normal cotton and linen articles |
| 5 | To be ironed by rotary ironer |  | Cotton and linen articles, to be ironed by rotary ironer or starched laundry |
Programmes for easycare fabrics: cotton/polyester mixtures and synthetics (capacity 1 - 2 kg)
| Progr.-Number | Degree of Dryness | Symbols | Type of Laundry/Fabric |
| 6 | Extra Dry |  | Heavy and multi-layered textiles |
| 7 | Cupboard Dry |  | Lightweight materials which do not require ironing |
| 8 | Slightly damp | Lightweight synthetics and cotton/polyester mixtures requiring ironing |
Information for Test Institutes:
For the test according to DIN 44986 the following programme selections should be used:
Programme A (5.0 kg) Programme Selection 2
Programme B (5.0 kg) Programme Selection 4
Programme C (1.5 kg) Programme Selection 7
Airing Programme
Programme Selection
You can use this programme to air textiles or to tumble out slight surface creasing. Slightly damp the creases and tumbling in cold air will help to smooth out the creases.
| Laundry Examples | Use S-Button | Electrical Consumpt. (kWh)* | Time in Min.* |
| Towelling material, bath robes | No | ||
| Towelling garments, cotton bed linen, kitchen towels, cotton underwear | No | 3.5 | 85 |
| Cotton shirt and underwear | No | ||
| Sheets and pillowcases, tablecloths | No | 2.9 | 70 |
| Cotton sheets and pillow cases, tablecloth | No |
* Values refer to 5 kg cotton laundry which has been spun at 800 rpm.
| Laundry Examples | Use S-Button | Electrical Consumpt. (kWh)* | Time in Min.** |
| Sweatshirts, bed linen and table linen | yes | ||
| Easycare fabric shirts, table linen, baby clothes, socks and underwear | yes | 0.8 | 25 |
| Bed and table linen, easycare fabric shirts and blouses | yes |
** The values refer to 1.5 kg laundry which has been spun in the easycare fabric spin programme of the washing machine.
Drying by time
You can select a drying time between 20 and 60 minutes for small loads under 1 kg or indeed for single garments.
If a particular programme does not give you the result you require choose another programme number. Laundry will get progressively dryer the lower the programme number chosen.
Cooling phase and anti-crease cycle
Shortly before the programme finishes the laundry is could down. If the laundry is not removed at the end of the programme the anti-crease cycle commences automatically. It lasts for 30 minutes and the drum rotates intermittently. This ensures the laundry remains loose and fluffy and does not pick up any creasing. At the end of the anti-crease cycle the programme switches off automatically and the laundry should really be taken from the machine at this point to prevent creasing.
Programme end
Switching off the appliance
Turn the programme selector to the 0 (off) position. The interior light and the machine "on" light will go out.
Indicating operating errors
Sometimes slight operating errors cause the machine not to function the way it should. To help you find out what went wrong I indicate certain operating mistakes you may have made on the illuminated indicators.
Indicator "empty the condensed-water container" lights up.
Cause:
My condensed-water container is full.
Remedy:
Remove the condensed-water container from the control panel of the machine, empty it and re-insert into machine.
By opening the loading door or switching off the machine all "operating error" indicators are switched off although the cause of the operating error has still to be corrected. The operating error will be indicated again when the next drying programme is started.
If you have followed the above procedures but the machine is still not operating please contact AEG Service quoting the E-No and the F-No (see section on Service).
Emptying the condensed-water container
Empty the condensed-water container after each drying cycle. The condensed-water container is located on the right of the control panel.
Lift the container slightly as you are pulling it forward. Re-insert the empty container into the machine.
If the machine has been adapted to discharge the condensed water into a drainage facility using the conversion kit available as an optional extra the condensed-water container does not have to be emptied.
The container holds approx. 3.8 l. This means 5 kg of laundry spun at 800 rpm can be dried before the container needs to be emptied. If laundry is spun at below 800 rpm it may be necessary to empty the container during the drying programme.
The condensed water can be utilised in the same way as distilled water, e.g. for you steam iron. Before using the condensed water filter it through a fine strainer or a paper coffee filter. This will filter out very fine fluff.
Cleaning the fluff filter
Fluff collects in the fluff filter on the inside of the loading door. (The amount of fluff breaks down as follows according to HEA, Frankfurt, the main advisory body for electrical appliances: (70% due to wear, 20% due to washing and 10% due to tumble drying). To ensure unimpeded airflow it is necessary to clean my fluff filter after each drying cycle. To clean the filter lift up the coarse filter and remove fluff from fine filter.

natural_image
Mechanical assembly diagram showing a lever mechanism with an arrow indicating motion (no text or symbols present)Fluff is more easily removed if you damp your hand slightly or use a damp cloth. After cleaning the fine filter, fold down and clip in coarse filter.
Cleaning, Care and Maintenance
My heat exchanger must be cleaned regularly, e.g. after approx. 50 drying cycles or 3 months depending on how much it is used and on the type of laundry dried. If you dry heavy weight or double-layered laundry on a regular basis, you should clean the heat exchanger more often. This will prevent long drying times, high energy consumption and poor drying results.
The heat exchanger is located in the plinth on the right-hand side. To clean the heat exchanger remove it from the machine as follows:
- Open the machine door
- Open access flap to heat exchanger

by turning the lever on the flap to the left - flap springs open.
- Unlock heat exchanger
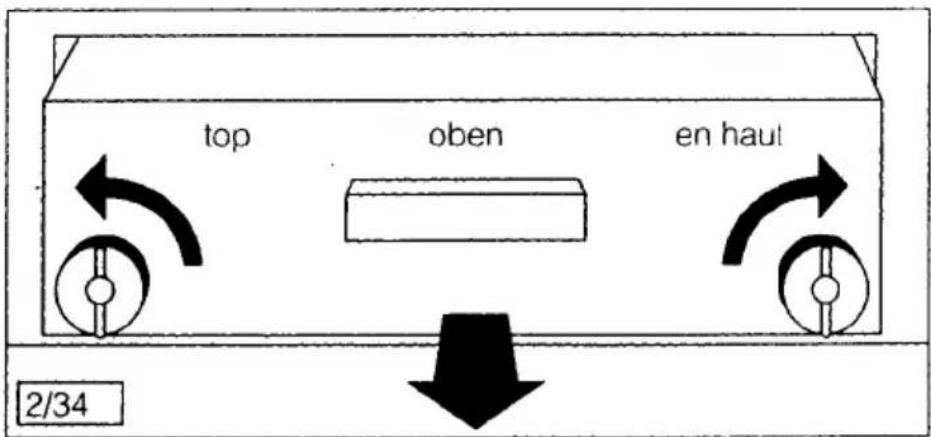
by turning the two locking discs a quarter turn in the direction of the arrows.
- Pull out heat exchanger by lifting it up firmly by the handle.
Clean the heat exchanger by rinsing through with clean water using a handhelder shower or clean with a soft brush. Do not use any pointed objects or tools to reach into the heat exchanger. This may lead to damage of the heat exchanger.
Make sure that the draining slots at the back of the heat exchanger are also clean.
Cleaning the heat exchanger when tumble dryer is stacked on a washing machine
Cleaning the drum
Cleaning of the controls and control panels
Tilting of machine during transport
Insert the heat exchanger using the reverse sequence. Make sure it is inserted the right way up – with the words "top – oben – en haut" at the top.
Important: Do not use the machine without the heat exchanger.
To clean the heat exchanger remove the plinth cover as follows:
- Open the machine door
- Pull the plinth cover forward at the base to disengage and unhook at the top

- Open access flap, turn the two locking discs in the direction of the arrow and remove heat exchanger from the machine.
- Re-insert the heat exchanger after cleaning, close the access flap and replace plinth cover by hooking it into the top and clipping in the bottom.
If the required degree of dampness or dryness is no longer reached, e. g. the laundry is either too dry or too damp an almost invisible film may have formed on the inside of the drum and the electronic sensors are unable to sense accurately. Clean the inside of the drum and the lifters with a cloth and vinegar.
Controls and control panel must not be cleaned with any furniture polish, household cleaners or abrasive cleaning materials. Should cleaning be necessary use warm water and a soft cloth.
Should the machine have been tilted during transportation the over-flow protector may be activated through residual water in the machine. The appliance cannot be started before the residual water is removed by tilting the machine 45 degrees backwards. Place a floor cloth underneath to absorb the water.
If you think your machine is not working properly...
... the appliance is not working
■ Has the plug been inserted into the socket?
■ Have you selected a programme?
■ Have you pressed the start button?
■ Have you closed the loading door?
■ Is the fuse in working order?
■ Have you emptied and re-inserted the condensed-water container?
■ Has the over-flow protector been activated?
... the drying result is unsatisfactory
■ Have you selected the correct programme?
■ Have you cleaned the fluff filter?
■ Have you cleaned the heat exchanger regularly?
■ Have you used the recommended weight for the programme?
■ Has the laundry been spun sufficiently to extract water?
Are the ventilation slots in the plinth area clear?
■ Has a hardly visible film formed on the drum interior or the lifters?
... the drum illumination does not work?
■ Has the plug been inserted into the socket?
■ Have you turned the programme selector from the 0 (off) position?
Is the bulb still in operational order or is it due for replacement? Use only 10 W replacement bulbs available from AEG Spare Parts Department under product number ET-No. 647078970. Important: Before changing the bulb unplug the appliance or switch off at the power socket.
Optional Extras
Stacking kit to stand Lava-therm tumble dryer on Lava-mat washing machine
Building under a continuous worktop
Drainage kit for condenser tumble dryer
The following items can be obtained as optional extras through your AEG stockist:
You can combine me with a LAVAMAT washing machine of the current or the previous range to make a space saving washer/dryer combination by using one of the two available stacking kits:
- Stacking kit with pull-out shelf to rest your laundry basket E-No. 607 899 966
- Stacking kit without pull-out shelf E-Nr. 607 899 969
You can build me under a continuous worktop either with my own worktop in place or you can remove my existing worktop. In this case you must fit an earthed cover plate available from AEG Spare Parts Department under the product number ET-No. 647 405 423.
The dryer can be adapted to drain the condensed water into an existing drain, sink etc. This eliminates having to empty the condensed-water container but the container must nonetheless be inserted in the control panel of the machine. The drainage kit can be ordered from your stockist under the product number E-No. 607899955.
Service
We would like to point out that repairs are not free of charge during the warranty period if they are due to a user error, misuse or abuse of the appliance or if advice contained in our literature accompanying the machine has not been followed (see also our warranty conditions).
If you do not find any information in this booklet as to how to rectify a fault please contact AEG Service quoting the E-No. and the F-No. of the appliance which can be found on the rating plate.

These numbers enable the Service Department to prepare as far as possible any spare parts required to rectify the fault on first call. This may save you money.
Transfer the E-No. and the F-No. into the space provided below for easy reference.
E-No.
F-No.
Technical Data
Dimensions
With worktop:
Height: 85.0 cm
Width: 60.0 cm
Depth: 60.0 cm
Without worktop:
Height: 82.0 cm
Width: 59.5 cm
Depth: 57.0 cm
Connection
Information relating to electrical connection is given on the rating plate and in this booklet in the relevant section.
Please ensure that the voltage and current indicated on the rating plate agrees with the voltage of your electricity supply.
Capacity
Depending on the programme chosen: up to 5 kg
Electricity consumption: 5 kg cotton spun at 800 rpm
programme cupboard dry 3.5 kWh
Adjustable height
+1 cm/-0.4 cm
Depth with door open: 116.5 cm
Weight: 51 kg
Suitable for: domestic use
Ambient temperatures: +5°C to +35°C
The appliance is radio-interference suppressed in accordance with EN 55014 DIN VDE 0875 part 1, EC Directive 82/499 EC, 87/308 EC as well as the Standard relating to the Retroactive Effect of the Mains Supply EN 60555 part 1 – 3/DIN VDE 0838 part 1 – 3, June 1987.
AEG Hausgeräte AG
Postfach 1036
D-8500 Nürnberg 1
© Copyright by AEG
H 244 293 940 - 09920.5/26 -
- LAVATHERM 530 electronic
- Hello
- Contents
- Safety instructions
- Out of concern for the environment... 7/8
- Important recommendations for drying 9/10
- Appliance description 11-13
- Before starting to dry 14
- How to tumble dry correctly 14
- Loading the laundry
- Selecting the drying programme
- Programme charts 18/19
- Cooling phase and automatic anti-crease programme 20
- Programme end
- Indicating operating errors 21
- Emptying the condensed water container 22
- Cleaning the fluff filter 22
- Cleaning, care and maintenance 23/24
- If you think your machine is not operating properly 25
- Optional extras 26
- Service 27
- Technical Data 28
- Before first use
- You should also note the following
- Out of concern for the environment
- Information on the packaging material of the appliance
- ■ The loads should have the correct weight
- Laundry weight:
- ■ Clean the fluff filter
- ■ Clean the heat exchanger
- Important recommendations for drying
- Preparing the laundry
- Appliance description
- Features
- Before starting to dry
- Press the door release button ©
- Override
- Take care when adding or removing laundry
- Programme selector
- The buttons and their functions
- Programme Chart
- Information for Test Institutes:
- Airing Programme
- Drying by time
- Cooling phase and anti-crease cycle
- Switching off the appliance
- Indicating operating errors
- Cause:
- Remedy:
- Emptying the condensed-water container
- Cleaning the fluff filter
- Cleaning, Care and Maintenance
- If you think your machine is not working properly...
- ... the appliance is not working
- ... the drying result is unsatisfactory
- ... the drum illumination does not work?
- Optional Extras
- Service
- Technical Data
- Dimensions
- Connection
- Capacity
- Adjustable height
Marque : AEG-ELECTROLUX
Modèle : Lavatherm 530
Catégorie : Sèche-linge