
VIEW 5 - Logiciel de traitement d'images NIKON - Notice d'utilisation et mode d'emploi gratuit
Retrouvez gratuitement la notice de l'appareil VIEW 5 NIKON au format PDF.

| Type de produit | Logiciel de traitement d'images |
| Version | 5.0 |
| Marque | Nikon |
| Systèmes d'exploitation compatibles | Windows 98 SE, Me, 2000 Pro, XP Home/Pro ; Mac OS 9.0-9.2, Mac OS X 10.1.2+ |
| Configuration minimale (Windows) | Pentium 300 MHz, 64 Mo RAM (128 Mo pour RAW), 25 Mo disque, résolution 800x600 16 bits |
| Configuration minimale (Mac) | PowerPC G3/G4, 64 Mo RAM (128 Mo pour RAW), 25 Mo disque, résolution 640x480 16 bits |
| Interfaces supportées | USB (COOLPIX), IEEE 1394/FireWire (D1 series) |
| Formats de fichiers supportés | JPEG, TIFF (RGB et YCbCr), RAW (.NEF), QuickTime (.MOV) |
| Fonctions principales | Transfert d'images (Nikon Transfer), navigation par vignettes (Nikon Browser), visualisation et zoom (Nikon Viewer), diaporama, impression |
| Options de transfert | Sélection par règle, renommage, ajout d'informations IPTC, suppression après transfert |
| Rotation d'images | Rotation par pas de 90° |
| Diaporama | Lecture interactive, continue ou aléatoire, intervalle réglable |
| Impression | Dispositions multiples, sélection de taille, réglages qualité |
| Entretien et mises à jour | Mises à jour disponibles sur le site Nikon (www.nikon-image.com) |
| Sécurité | Protection des images contre la suppression, sauvegarde des originaux |
FOIRE AUX QUESTIONS - VIEW 5 NIKON
Questions des utilisateurs sur VIEW 5 NIKON
0 question sur cet appareil. Repondez a celles que vous connaissez ou posez la votre.
Poser une nouvelle question sur cet appareil
Téléchargez la notice de votre Logiciel de traitement d'images au format PDF gratuitement ! Retrouvez votre notice VIEW 5 - NIKON et reprennez votre appareil électronique en main. Sur cette page sont publiés tous les documents nécessaires à l'utilisation de votre appareil VIEW 5 de la marque NIKON.
MODE D'EMPLOI VIEW 5 NIKON
Nikon View 5 Reference Manual
For Version 5.0
| Overview | (Pp. 2-3) |
| Getting Started | (Pp. 4-9) |
| Using Nikon View 5 | (Pp. 10-20) |
| Tutorial | (Pp. 21-69) |
| Preferences | (Pp. 70-74) |
| Appendices | (Pp. 75-94) |
Overview
Welcome to Nikon View 5! Before using Nikon View 5, be sure to read this manual thoroughly.
Nikon View 5 is software for transferring images taken with a Nikon digital camera from a memory card to a computer. Images on the memory card can be viewed as a list of thumbnails. You can transfer images by connecting the camera to your computer with a cable or by inserting the memory card into a card reader or card slot.
Using Nikon View 5, you can also view or print the photographed images.
Nikon View 5 version 5.0 can be used with the COOLPIX series cameras that support USB connection, as well as the D1 series cameras.
Nikon View 5 supports the following file types: JPEG, TIFF (RGB), TIFF (YCbCr), RAW data, and movie (QuickTime).
When using Nikon View 5, refer also to the documentation provided with your camera.
Trademark Information
Microsoft® and Windows® are registered trademarks of Microsoft Corporation in the United States of America and other countries.
IBM is a registered trademark of International Business Machines Corporation.
Adobe and Adobe Photoshop are trademarks or registered trademarks of Adobe Systems, Inc.
Pentium, and Celeron are trademarks of Intel Corporation.
Macintosh, Mac OS, and QuickTime are trademarks of Apple Computer, Inc.
Cumulus is a registered trademark of Canto Software.
All other trade names mentioned in this manual or other documentation provided with your Nikon product are trademarks or registered trademarks of their respective holders.
Reading This Manual
This manual describes how to work with the images stored on your camera's memory card using Nikon View 5. It is divided into the following chapters:
Getting Started
Read this chapter for information on the type of system requirements for using NikonView 5 and for complete installation instructions.
Using Nikon View 5
This chapter explains how to use common features of Nikon View 5.
- Tutorial
The tutorial provides all the information needed to browse the images on the memory card, and transfer them to a computer using the camera, card reader, or card slot.
- Preferences
This chapter describes the options available in the Nikon View 5 Preferences dialog box.
- Appendices
Included in the appendices are troubleshooting tips, instructions for uninstalling and reinstalling Nikon View 5, and a visual index to the program's menus.
The content of this reference manual applies to both the COOLPIX series and the DI series cameras. We ask for your understanding that certain parts of this manual may not apply to your camera.
To make it easier to find the information you need, the following symbols and conventions are used:

This icon marks cautions, information that you should read before use to prevent damage to your Nikon product.

This icon marks notes, information that you should read before using Nikon View 5.

This icon marks tips, information that you may find helpful when using Nikon View 5.

This icon indicates that more information is available elsewhere in this manual or in other documentation.

This symbol indicates that the cross-reference marked with the icon is to the Nikon View 5 Reference Manual (this manual).


Blue text indicates a link to another part of this manual or to a web page. An Internet connection is required to view web pages.

Background Knowledge
This manual assumes familiarity with operations common to the Macintosh or Windows operating systems.
If you are in doubt about the meaning of any of the terms used here, refer to the documentation or the Help provided with your operating system.

Illustrations
While the majority of the illustrations are taken from the Windows version of the product (Windows Millennium Edition), save where otherwise noted the operations described apply to both the Macintosh and Windows versions.

Printing This Manual
If desired, portions of this manual can be printed for ease of reference using the Print... command in the Adobe Acrobat Reader File menu.

Life-Long Learning
As part of Nikon's "Life-Long Learning" commitment to ongoing product support and education, continually-updated information is available on-line at the following web-sites:
For users in the United States of America: http://www.nikonusa.com/
For users in Europe: http://www.nikon-euro.com/
- For users in Asia, Oceania, the Middle East, and Africa: http://www.nikon-asia.com/
Visit these sites to keep up-to-date with the latest product information and general advice on digital imaging and photography. For more information, please contact your nearest Nikon representative.
http://www.nikon-image.com/eng/
Getting Started
Installing Nikon View 5
Before You Begin (Pp. 5-6)
Installation (Pg. 7)
Nikon View 5 Overview (Pp. 8-9)
About This Chapter
This chapter takes you step-by-step through the process of installing Nikon View 5 and supporting software.
System Requirements
Windows
Before installing Nikon View 5, make sure that your computer system satisfies the following requirements:
| CPU | Pentium 300 MHz or higher |
| Operating system | Windows 98 Second Edition (SE)*1, Windows Millennium Edition (Me)*1, Windows 2000 Professional*1, Windows XP Home Edition/Professional*1 |
| Memory (RAM) | When working with RAW data*2 images: 128 MB or more When not working with RAW data*2 images: 64 MB or more |
| Hard disk space | 25 MB required to install Nikon View 5 10 MB plus twice the capacity of the memory card in use are required to run Nikon View 5 |
| Video resolution | 800 × 600 pixels or higher with 16-bit color or higher |
| IEEE I394 interface (DI series) | Only boards compliant with Open Host Controller Interface (OHCI) are supported *3,4 |
| USB interface (COOLPIX series) | Only built-in USB ports supported *3 |
| Miscellaneous | CD-ROM drive required for installation Internet connection required to upload images to the Web*5 |
1 Only pre-installed versions supported.
2 Consult the documentation provided with your camera as to whether it supports RAW data.
3 The camera may not function as expected when connected to IEEE I394 or USB hubs.
4 Please see the web page address below for support information concerning compatible boards.
*5 Only the European version of NikonView 5 supports uploading images to the web.

Support and updates
For the latest information and updates, visit http://www.nikon-image.com/eng/
Before installing Nikon View 5, make sure that your computer system satisfies the following requirements:
| Model | Model iMac *1, iMac DV *1, Power Macintosh G3 (Blue & White)*1, Power Macintosh G4 or later *1, iPhone *1, PowerBook G3 or later *1 |
| Operating system | Mac OS 9.0, Mac OS 9.1, Mac OS 9.2, Mac OS X (Version 10.1.2 or later) |
| Memory (RAM) | When working with RAW data*2 images: 128 MB or more When not working with RAW data*2 images: 64 MB or more |
| Hard disk space | 25 MB required to install Nikon View 5 10 MB plus twice the capacity of the memory card in use are required to run Nikon View 5 |
| Video resolution | 640 × 480 pixels or higher with 16-bit color or higher |
| Firewire interface (DI series ) | Only built-in Firewire ports supported*3 |
| USB interface (COOLPIX series) | Only built-in USB ports supported*3 |
| Miscellaneous | CD-ROM drive required for installation Internet connection required to upload images to the Web*4 |
1 Built-in FireWire (IEEE I 394) or USB interface may be required depending on the camera.
2 Consult the documentation provided with your camera as to whether it supports RAW data.
3 The camera may not function as expected when connected to FireWire (IEEE I 394) or USB hubs.
4 Only the European version of NikonView 5 supports uploading images to the web.
Installing Nikon View 5 and Supporting Software
Windows / Macintosh
If you have already completed installation, click here for information on starting Nikon View 5.
The procedure for installing Nikon View 5 varies with your operating system. Click the links below for complete installation instructions. After reading these instructions, you will be returned to the Nikon View 5 Reference Manual.
Camera
COOLPIX series (USB supported)
Operating system

Windows XP Home Edition / Professional
Windows 2000 Professional
Windows Millennium Edition (Me)
Windows 98 Second Edition (SE)

Mac OS
Nikon View 5 Overview
Nikon View 5 consists of three programs which work independently of each other: Nikon Transfer, Nikon Browser, and Nikon Viewer. This section provides an overview of these programs.
Nikon Transfer
Nikon Transfer enables you to transfer image files on the memory card to your computer. When you transfer image files using Nikon Transfer, you can select images to be transferred, set up transfer options, or change destination folders and file names.

Pg. For more information on:

22 Tutorial: Nikon Transfer
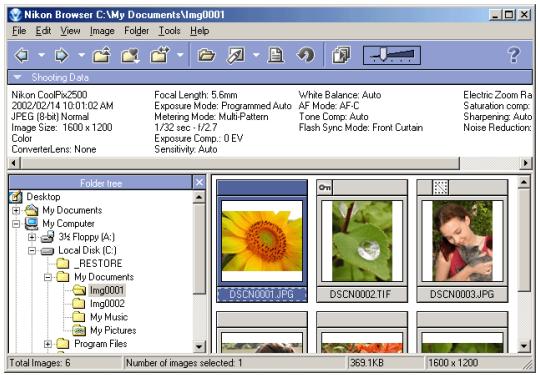
Nikon Browser
Nikon Browser enables you to browse a list of thumbnails showing the image files that have been transferred to your computer. You can also use the thumbnails displayed to move or open the image files associated with them, or view them in a slideshow.

Pg. For more information on:

37 Tutorial:Nikon Browser
Nikon Viewer
Nikon Viewer enables you to view a still image. In Nikon Viewer you can zoom in on or out from the still image displayed in the view area as well as decide which part of the image should be displayed, enabling you to take a closer look at the image.

Pg. For more information on:

60 Tutorial:Nikon Viewer
Using Nikon View 5
How to use Nikon View 5
| Connecting Your Camera | (Pg. 11) |
| Starting Nikon View 5 | (Pg. 12) |
| Starting Nikon View under Windows XP | (Pg. 13) |
| Starting Nikon View under Mac OS X | (Pg. 14) |
| If Nikon Transfer Does Not Start | (Pg. 15) |
| Transferring Images | (Pg. 16) |
| Viewing Still Images | (Pg. 17) |
| Playing Back Movies | (Pg. 18) |
| Printing Images | (Pg. 19) |
About This Chapter
This chapter describes the basic operations of Nikon View 5.
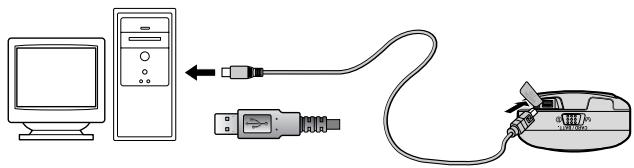
Connecting Your Camera
If your computer is running the Windows operating system, be sure to install Nikon View 5 before connecting your camera to the computer.
Connecting the camera to your computer
Turn the camera on and connect it to the computer.
For more information on connecting your camera and on the cables required, see the documentation provided with your camera.
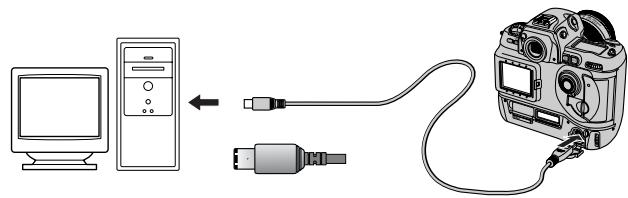
DI series (IEEE 1394/Firewire interface)
COOLPIX series (USB interface)
Using a card slot
When inserted in a PC-card adapter (available separately), the camera memory card functions as a Type II PCMCIA ATA card, allowing images to be read from the card.
Inserting a memory card
Remove the memory card from the camera and insert it in the adapter.
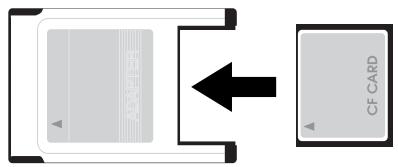
Insert the adapter into a PCMCIA TYPE II ATA card slot on your computer. For more information on inserting the adapter, see the documentation provided with your computer.
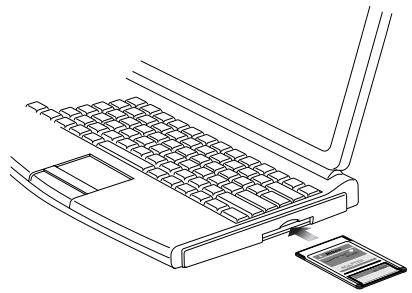
Depending on your operating environment, it may be necessary to install drivers, register the card with the system, or adjust settings to configure the computer to read memory cards. For details, see the documentation provided with your computer or operating system.
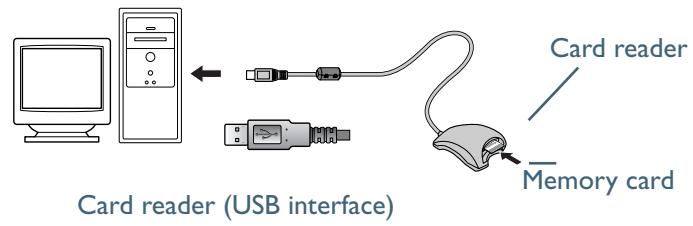
Using a Card Reader
Images on the memory card can also be viewed using a card reader.
Inserting a Memory Card
After removing the memory card from the camera, insert it in the card reader and connect the reader to the computer. See the documentation provided with the card reader for more information on connecting it to a computer.

If Nikon Transfer does not start
If Nikon Transfer does not start, Click here to confirm that the camera is registered as a device with your computer.
Starting Nikon View 5
Starting Nikon Transfer
Once installation is complete, Nikon Transfer will start automatically whenever your Nikon digital camera is connected to your computer and turned on, or when the camera memory card is inserted in a card slot or in a card reader connected to the computer. Note that only one camera can be connected to the computer at a time.
On a Macintosh, Nikon Transfer starts after Nikon Browser.

Auto start
Nikon Transfer will start automatically when:
A supported camera is connected while on and with a memory card in place
- A supported camera with a memory card in place is connected and then turned on
- A memory card from the COOLPIX series (excluding COOLPIX600) or DI series is inserted in a card reader or card slot
Starting NikonView underWindows XP
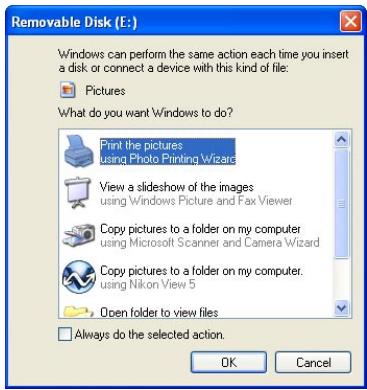
If your computer is running Windows XP Home Edition/Professional, procedures to start Nikon View 5 are different from other operating systems.
Under Windows XP, the Removable Disk dialog box is displayed when you connect the camera to the computer or insert the memory card into the card reader or card slot. Select Copy pictures to a folder on my computer (using Nikon View 5) in this dialog box to start Nikon Transfer.
When you connect a D1, DIX, DIH, or COOLPIX990/880 to the computer, the Removable Disk dialog box is not displayed. Nikon Transfer starts automatically. The Removable Disk dialog box is not displayed when the data stored on the memory card consists of movies only.
Procedures to start NikonView 5 under Windows XP
To start Nikon Transfer under Windows XP, follow the steps below.
- Connect the camera to your computer using an interface cable or insert the memory card in a card reader or card slot.
-
Turn the camera on.
-
The Removable Disk dialog box is displayed.
- Select Copy pictures to a folder on my computer (using NikonView 5).
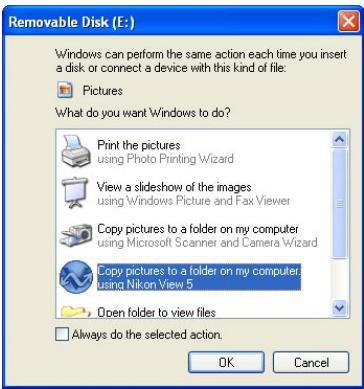
- Click OK.
- Nikon Transfer starts.
Always do the selected action check box
In the Removable Disk dialog box, if you select Copy pictures to a folder on my computer (using Nikon View 5) and the Always do the selected action check box, the Removable Disk dialog box will not be displayed the next time. Nikon Transfer starts automatically.
If you clear the Always do the selected action check box, the Removable Disk dialog box will be displayed.
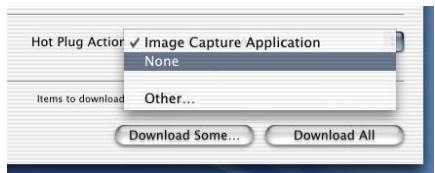
Starting NikonView under Mac OS X
If the operating system on your computer is Mac OS X, Nikon Transfer and Image Capture launch automatically when you connect a camera for the first time.

When using Nikon Transfer under Mac OS X, it is recommended that you use the following settings when you connect a camera for the first time:
- Connect the camera to your computer using an interface cable or insert the memory card in a card reader or card slot.
-
Turn the camera on.
-
Image Capture launches.
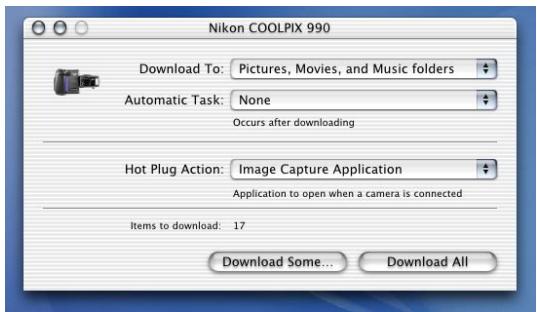
- Select None from the Hot Plug Action pop-up menu and exit Image Capture.
- Turn the camera off.
- Nikon Transfer launches automatically the next time you turn the camera on.

Starting Image Capture
You can also start Image Capture by double-clicking its icon in the Applications folder.
This section describes the possible causes and solutions when Nikon Transfer does not start. If the problem persists, contact your retailer or our User Support Center.
The procedure for installing Nikon View 5 varies with your operating system and make of camera. Click the links below for complete installation instructions. After reading these instructions, you will be returned to the present manual.
If nothing is displayed
| Possible Cause | |
| A memory card is not inserted in the camera or card reader | 12 |
| The images on the memory card were taken with a make of camera not supported under Nikon View 5. | 11 |
| The camera is not properly installed. | 12 |
| Disable auto launch is selected in the Auto launch tab of the Preferences dialog box. | 71 |
| Your computer is running Nikon Capture (Windows only). | — |
If a window other than Nikon Transfer is displayed
| Possible Cause | |
| The icon on the desktop was used to start the program. | 36 |
| The Start menu was used to start the program (Windows version only). | 36 |
| The icon in Nikon Software folder was used to start the program (Macintosh version only). | 36 |
| The operating system on your computer is Windows XP. | 13 |
| The operating system on your computer is Mac OS X. | 14 |
Transferring Images
Using the Image Transfer Window
To transfer image files, use Nikon Transfer.
Transferring image files
I. Start Nikon Transfer.

- Specify the destination folder for the transferred image files to be transferred in the File destination and naming area of Nikon Transfer.
- Click the Transfer button. The image files are transferred to the destination folder you specified.
For more information on transferring image files using Nikon Transfer, see "Transferring images using Nikon Transfer" (23) in "Tutorial: Nikon Transfer."
- When transfer is complete, Nikon Transfer closes, and the transferred images are displayed in Nikon Browser as thumbnails.

Transferring images using the TRANSFER button on the camera
If the camera connected to your computer is equipped with a TRANSFER button, you can also use it to transfer images. Click here for further instructions on transferring images using the TRANSFER button on the camera.
Viewing still images
- Check that Nikon Browser is displayed on your computer's screen.
Toolbar
- In Nikon Browser, select a still image you want to view from thumbnail list area.
Select a thumbnail
- On the toolbar, click the View button.

- Nikon Viewer starts and displays the selected image.
For more information on viewing still images, see "Viewing still images"
(51) in "Tutorial: Nikon Browser."
Viewing movies
- Check that Nikon Browser is displayed on your computer's screen.
- In Nikon Browser, select a movie you want to play back from the list of thumbnails.
Selected thumbnail
- On the toolbar, click the View button.
View button
- The selected movie is played back with the program specified in the Movie tab of the Preferences dialog box.

For more information on viewing movies, see "Playing back movies" (51) in "Tutorial: Nikon Browser."
Printing Images
Printing Images from Nikon Browser
In Nikon Browser, you can print a still image by selecting the thumbnail displayed in the thumbnail list area.
I. In Nikon Browser, select one or more still images you want to print from the list of thumbnails.
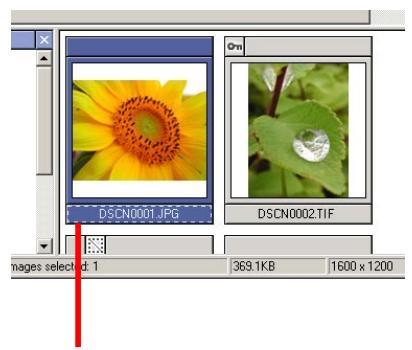
Selected thumbnail
- On the toolbar, click the Print button.
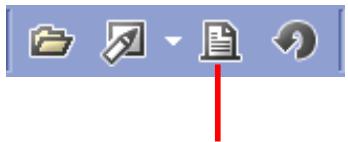
Print button
- The Print dialog box will be displayed.
- Make the necessary settings and click the Print button.

- The selected images are printed.
For more information on printing from Nikon Browser, see "Printing images" (54) in "Tutorial: Nikon Browser."

Setting up the printer
For information on how to set up your printer, consult the documentation provided with your printer.
Printing Images from NikonViewer
In Nikon Viewer, you can print still images displayed in the view area.
- Check that the image you wish to print is displayed in the view area.
- On the toolbar, click the Print button.

Print button
- The Print dialog box will be displayed.

- Make the necessary settings and click the Print button.
- The selected image is printed

Print button
Tutorial
Transferring and making use of image files
Nikon Transfer (Pp. 22-36)
Nikon Browser (Pp. 37-59)
Nikon Viewer (Pp. 60-69)
About This Chapter
This chapter guides you through the functions of Nikon Transfer, Nikon Browser, and Nikon Viewer in detail, including transferring, thumbnail display and printing
Using Nikon Transfer
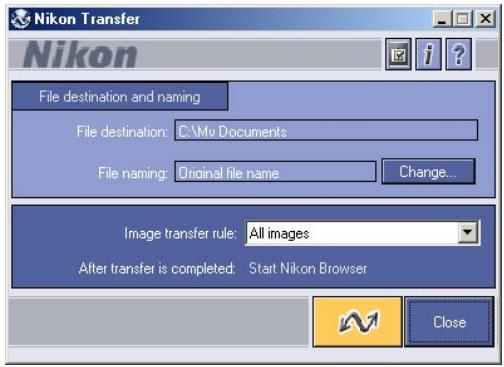
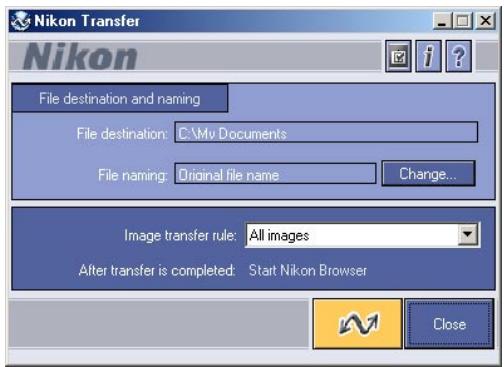
Nikon Transfer has the following buttons and functions.
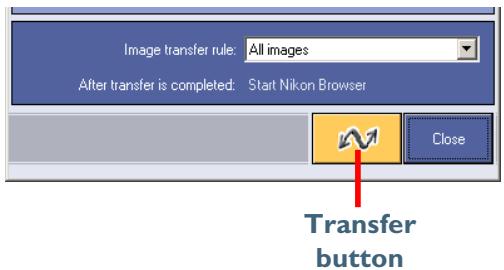
Image transfer rule menu
Specifies which image files should be transferred from the memory card (23).
After transfer is completed field
Displays actions to be performed after transfer, as set in the General tab of the Transfer options dialog box (34).

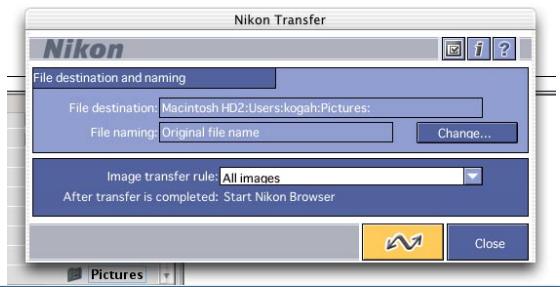
File destination and naming area
You can confirm and change the settings for the destination and naming of the files to be transferred in this area (24).
| Button | Function |
| Transfer options | Sets transfer conditions and actions (29). |
| File information | Adds file information to the image files (33). |
| Help | Displays help for Nikon View 5 (69). |
| Button | Function |
| Transfer | Starts transferring image files to the computer according to the specified conditions (34). |
| Close | Closes Nikon Transfer. |
| Close |

Menu in the Macintosh version
The Macintosh version of Nikon View 5 has menu commands that duplicate the functions of the tool buttons, while the Windows version does not.
Transferring Images Using Nikon Transfer
This section describes how to use Nikon Transfer to transfer image files to your computer from a memory card inserted in a camera, card reader, or card slot.
Step I—Specify the image transfer rule
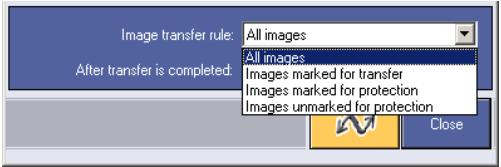
From the Image transfer rule pull-down menu, select a transfer rule.
By default, all the image files on the memory card are transferred. The rule you set will be retained even if Nikon Transfer is shut down and restarted.

If you are using a camera equipped with a TRANSFER button
You can also transfer image files using the TRANSFER button on your camera. Click here for further instructions on transferring images using the TRANSFER button.
The following rules are available:
| Rule | Description |
| All Images | Transfers all image files. This is default setting at installation. |
| Images marked for transfer | Transfers only the images that have been marked for transfer in the camera. |
| Images marked for protection | Transfers only the images that are marked for protection in the camera. |
| Images unmarked for protection | Transfers only the images that are not marked for protection in the camera. |

Setting the transfer mark
The transfer mark can be set using the Auto Transfer function on your camera, or using the button. Some cameras may not support the transfer mark. Consult the documentation provided with your camera on how to set the transfer mark.
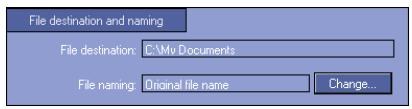
Step 2—Set up the transfer destination and file name
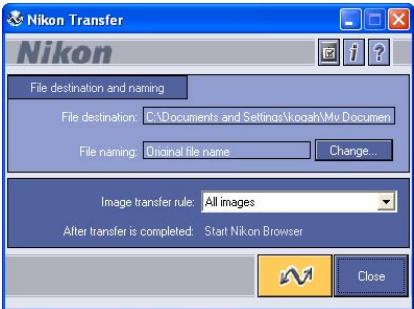
You can set the file name and the location to save the files before transferring the image files by modifying the settings in the File destination and naming area.

File destination and naming area
File destination field
Displays the current destination of the files to be transferred. At installation, the default destination is set to "My Pictures\NikonView Images" (or "My Documents\NikonView Images" when the "My Pictures" folder does not exist) in Windows, and "Documents" in Macintosh (or "Picture" in Mac OS X).
File naming field
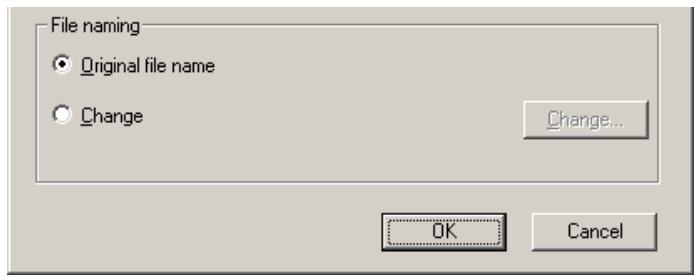
Displays "Original file name" or "Automatically generated file name."
You can modify each setting using the File Destination and Naming dialog box. The changes made are reflected in the File destination and naming area. The default setting at installation is "Original file name." This means that the image name set at the time of shooting is maintained after transfer.

If you cannot change the transfer destination
If an image database that uses a hot folder is specified in the Database tab
(32) of the Transfer options dialog box, the File destination box in the
File destination and naming area will be fixed to the path set in the Specify a hot folder field.
If you want to change the naming of the transferred files, click the Change button in the File destination and naming area of Nikon Transfer.
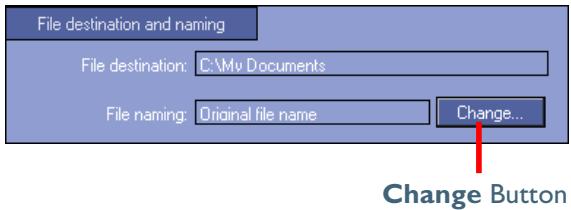
Clicking Change displays the File Destination and Naming dialog box.

If a file with the same name already exists in the destination folder
If a file with the same name already exists in the destination folder, a sequential number is appended before the file extension at transfer.
Specifying a transfer destination
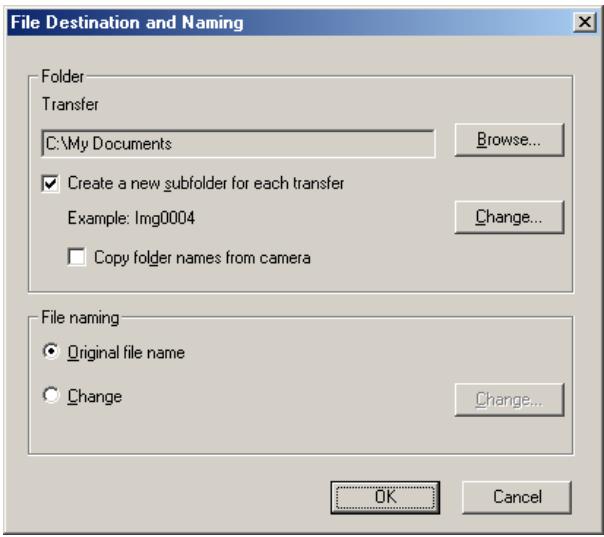
You can set the transfer destination in the Folder area of the File Destina-tion and Naming dialog box.
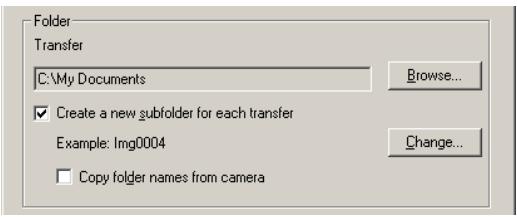
Transfer field
Displays the current destination of the files to be transferred. Click Browse to specify a different destination.
Create a new subfolder for each transfer check box
Select this check box to create a subfolder under the folder specified in the Transfer field with a name similar to that shown in the Example. The image files will be transferred to the newly created folder. Click Change to change the name of the subfolder.
Copy folder names from camera check box
This check box is enabled when the Create a new subfolder for each transfer check box is selected. Select this check box to maintain the folder structure set in the camera. The files will be transferred to sub folders such as "100NIKON" or "100NCDIX."
Folder name creation rules dialog box
When you click Change in the Folder area, the Folder name creation rules dialog box is displayed.
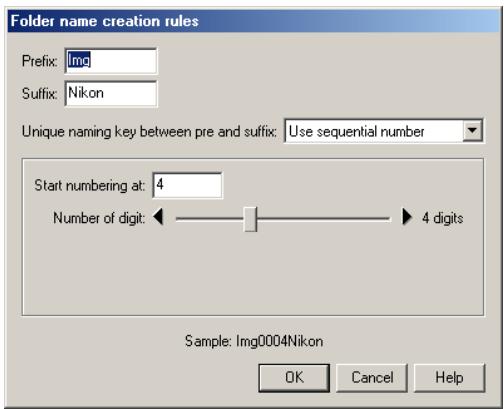
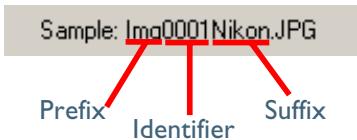
Folders are named as follows: "prefix + identifier + suffix". An identifier can be a unique number, date, or date and time, which is specified in the Folder name creation rules dialog box.

Prefix field
Specify the characters you want to append to the beginning of the folder name.
Suffix field
Specify the characters you want to append to the end of the folder name.
Unique naming key between pre and suffix pull-down menu
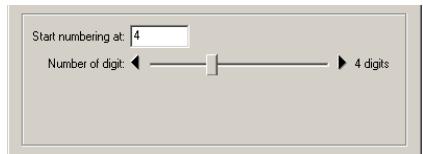
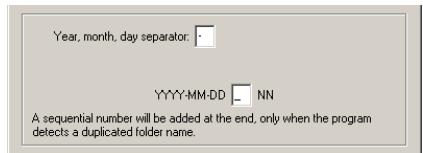
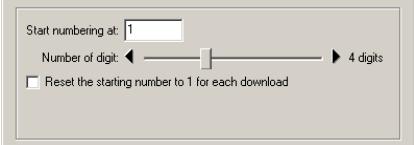
Select the identifier you want to use for the folder name from Use sequential number, Use current date, or Use current date & time. The dialog box will show different options depending on the identifier you choose.

When you select Use sequential number, the folder name will include the sequential number with the starting number and number of digits you specify.
When you select Use current date, the folder name will include the date of transfer.
When you select Use current date & time, the folder name will include the date and time of transfer.
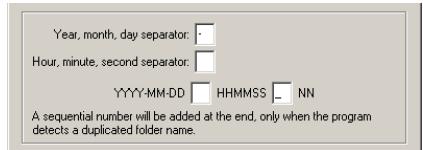
The date and time is of the form YYYY-MM-DD-HH-MM-SS-NN, where YYYY denotes the year, MM the month, DD the day of the month, HH the hour, MM the minute, SS the second, and NN the serial number added when a folder name already exists.
For a delimiter, you can also use a symbol other than a hyphen.
Specifying the file name
You can set the file name in the File naming area of the File DestINATION and Naming dialog box.

File naming limitations
The following limitations apply when naming a file:
Windows
- In an operating environment that supports long file names (255 characters or less including thepathname), the following characters cannot be used: \/ : , ; * ? " < > |
- In an operating environment that does not support long file names, a file name should be within 8 characters. Also, a space and the following characters cannot be used: \/ : , ; * ? " < >
Macintosh
A file name should be within 31 characters. Also, a colon (:) cannot be used for a file name.
Original file name
Select this option to use the image file name set in the camera when saving the transferred files.
Change
Select this option to save the transferred files with a name similar to that shown in the Example.
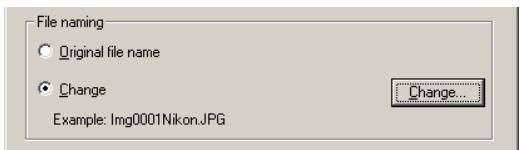
Click Change to change the file name shown in the Example.

Extensions
Depending on the file type, one of the following extensions will be assigned:
| JPEG | .JPG |
| TIFF | .TIF |
| RAW data | .NEF |
| Movie | .MOV |
File name creation rules dialog box
When you click Change in the File naming area, the File name creation rules dialog box is displayed.
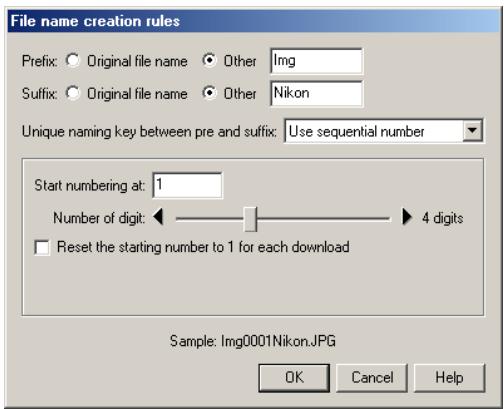
Files are named as follows: "prefix + identifier + suffix". An identifier can be a unique number, date, or date and time, which is specified in the File name creation rules dialog box.
Prefix field
Select Original file name to append the file name assigned in the camera to the beginning of the transferred file name. Select Other to append characters of your choice to the beginning of the file name.
Suffix field
Select Original file name to append the file name assigned in the camera to the end of the transferred file name. Select Other to append characters of your choice to the end of the file name.
Unique naming key between pre and suffix pull-down menu Select the identifier you want to use for the file name from Use sequential number, Use current date, or Use current date & time. The dialog box will show different options depending on the identifier you choose.

When you select Use sequential number, the file name will include the sequential number with the starting number and number of digits you specify.
When you select Use current date, the file name will include the date of transfer.
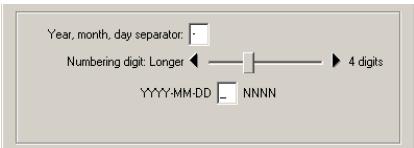
When you select Use current date & time, the file name will include the date and time of transfer.
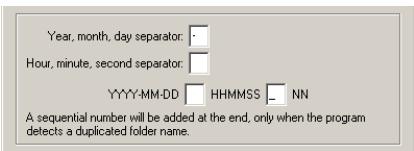
The date and time is of the form YYYY-MM-DD-HH-MM-SS-NN, where YYYY denotes the year, MM the month, DD the day of the month, HH the hour, MM the minute, SS the second, and NN the serial number added when a file name already exists.
For a delimiter, you can also use a symbol other than a hyphen.
Step 3—Set up the transfer options
Click the Transfer options button in Nikon Transfer to display the Transfer options dialog box (32).
Transfer options button
The Transfer options dialog box
The Transfer options dialog box has the following tabs:
General
- Transfer
- Creator (Macintosh version only)
- Database
The changes you make in this dialog box take effect when you click the OK button. Clicking the Cancel button closes the Transfer options dialog box without applying the changes you made in the dialog box.
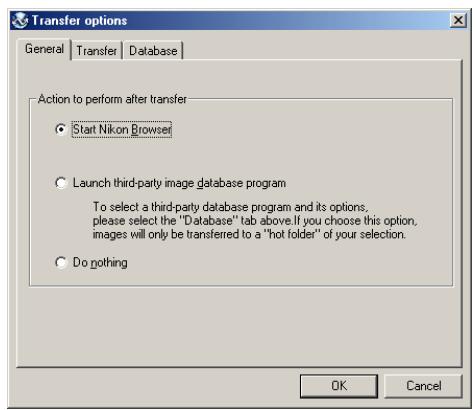
The General tab
In the General tab, you can set the action to perform after transferring image files.
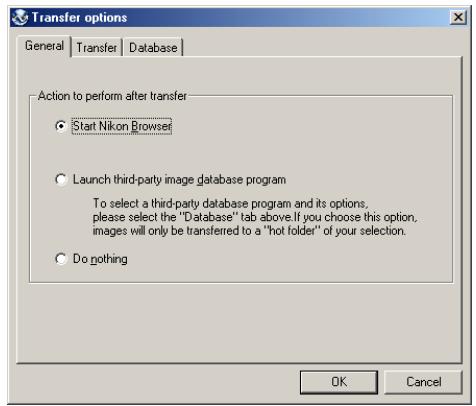
Start Nikon Browser
Select this option to start Nikon Browser after the image files are transferred.
Launch third-party image database program
Select this option to launch an image database program specified in the Database tab (32) and register the transferred files.
Do nothing
Select this option if you want Nikon View 5 to do nothing after the transfer of the image files is complete. (In Macintosh, the thumbnail display in Nikon Browser is not updated when the images are transferred to your computer.)
The Transfer tab
In the Transfer tab, you can make settings regarding the image files to be transferred.
Windows
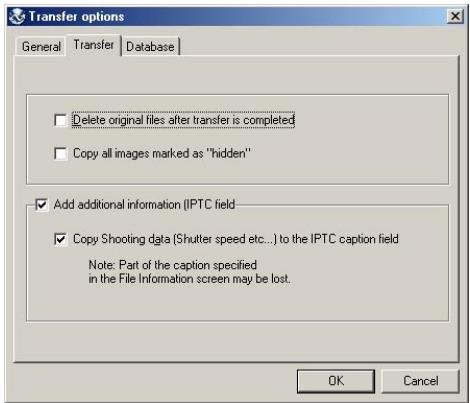
Delete original files after transfer is completed check box
Select this check box to delete the image files from the memory card after they are transferred to your computer. The protected image files and the image files that are not transferred are not deleted. If this check box is cleared, the original files will be left untouched in the memory card after they are transferred.
Copy all images marked as "hidden" check box
Select this check box to transfer all the image files that are marked as "hidden." The hidden files are not transferred if the check box is cleared.
Add additional information (IPTC field) to all files check box
Select this check box to add the file information set in the IPTC Information dialog box (33) to the transferred image files. When you select this option, the Copy Shooting data (Shutter speed etc...) to the IPTC caption field check box becomes enabled.
Copy Shooting data (Shutter speed etc...) to the IPTC caption field check box
Select this check box to copy the shooting data to the transferred image files as a caption.
Macintosh
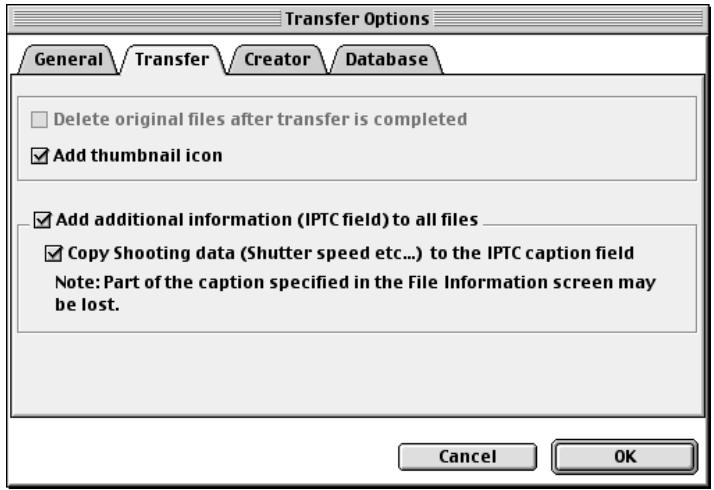
Add thumbnail icon check box
Select this check box to add thumbnail icons to the transferred image files.
Add additional information (IPTC field) to all files check box Select this check box to add the file information set in the IPTC Information dialog box (33) to the transferred image files. When you select this option, the Copy Shooting data (Shutter speed etc...) to the IPTC caption field check box becomes enabled.
Copy Shooting data (Shutter speed etc...) to the IPTC caption field check box
Select this check box to copy the shooting data to the transferred image files as a caption.
The Creator tab (Macintosh version only)
The Macintosh version of Nikon Transfer has the Creator tab in the Transfer Options dialog box. In the Creator tab, you can set the programs you want to associate with the transferred image files. Once you make settings in this tab, double-clicking the image file opens it in the associated program.
To associate a program, click Change and select the program in the Program selection dialog box.
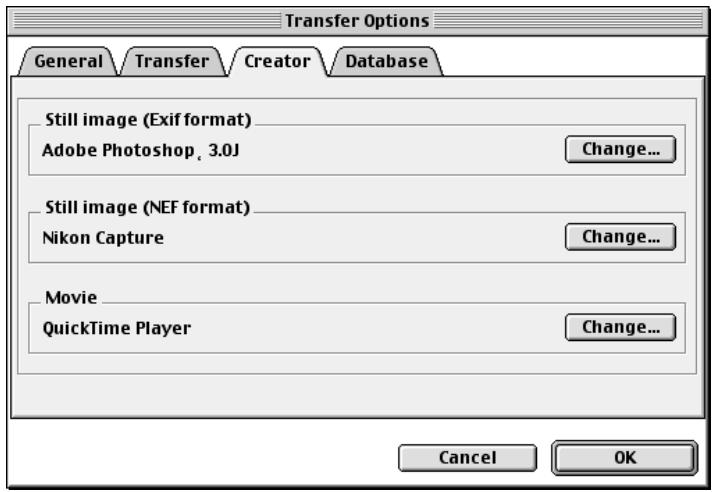
Still image (Exif format) field
Specify the program to associate with either ".JPG" or ".TIF" image files. Clicking Change displays the dialog box in which you can specify a program.
Still image (NEF format) field
Specify the program to associate with ".NEF" image files. Clicking Change displays the dialog box in which you can specify a program.
Movie field
Specify the program to associate with ".MOV" movie files. Clicking Change displays the dialog box in which you can specify a program.
The Database tab
In the Database tab, you can specify the database program for managing the transferred image files. To change specification for an item, click the Change button next to the corresponding item.
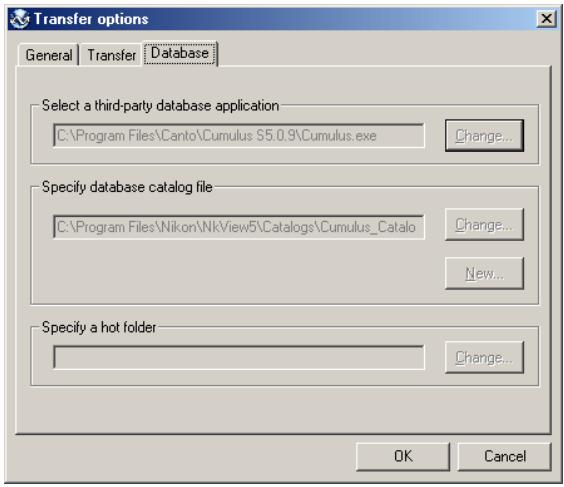

If Select a third-party database program is not selected
If Select a third-party database program is not selected in the General tab, the Database tab is disabled.
Select a third-party database application field
If the selected image database application catalogs images in a file, you will be prompted to select the catalog file used. If it instead uses a hot folder, you will be prompted to select a folder for registering images. Be sure that the application selected is supported under Nikon View 5.
Specify database catalog file field
Set this field if the selected image database program catalogs images in a file. Click Change to select an existing catalog file, or click New to create a new catalog file.
Cumulus 5.0 and iViewMediaPro 1.0 are examples of database programs that use a catalog file.
Specify a hot folder field
Set this field if the selected image database program adds images stored in a folder to the database.
Click Change to select a hot folder in which image files are copied.
The folder name you specify here is automatically reflected in the File Destination and Naming dialog box (24).
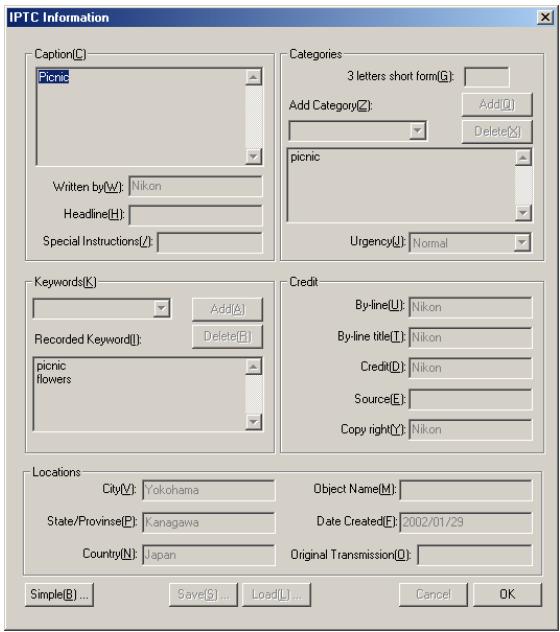
Step 4—Add additional file information
When you click the File information button, the IPTC Information dialog box is displayed. In this dialog box, you can add file information such as captions and keywords to the image files to be transferred.
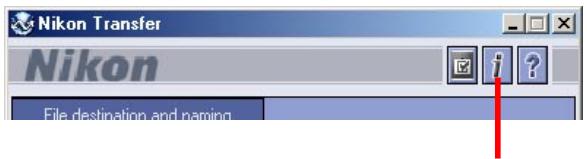
File information button
You can view the IPTC Information dialog box in Simple or Detail mode.
Simple mode
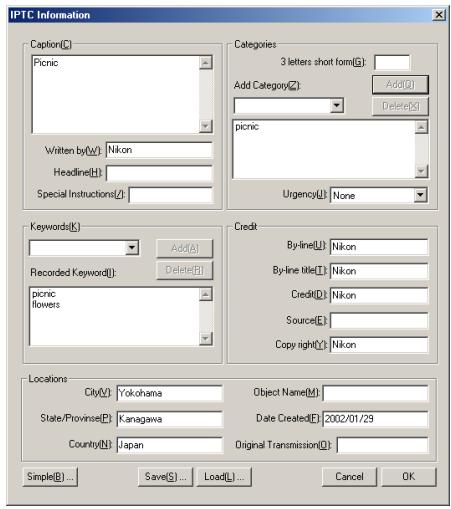
Detail mode
After the files are transferred, you can view the added information in Nikon Browser (48).
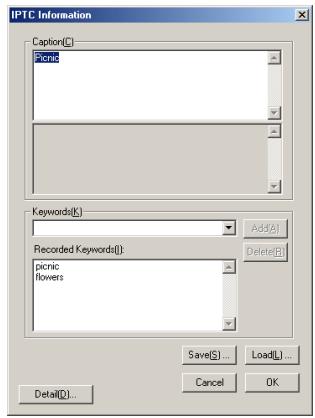
Setting the IPTC Information dialog box (Simple mode)
Caption area
You can enter the caption you want to add to the image to be transferred.
Keywords area
You can enter keywords that you want to add to the file information. To add keywords, enter keywords in the text box and click Add. The Recorded Keywords text box displays all the previously added keywords in a list. The maximum number of keywords you can add is 20.
To save the file information you entered, click Save. To open previously saved file information, click Load.
Click Detail to display the IPTC Information dialog box in the Detail mode. In the Detail mode, you can enter more detailed information such as credits and locations.

Adding file information
If the Add additional information (IPTC field) to all files check box in the Transfer tab (30) of the Transfer options dialog box is selected, the settings in the IPTC Information dialog box are added to the files during transfer.
You cannot add file information to movie files.
Step 5—Transfer image files
Click the Transfer button to start the transfer of image files with the specified transfer settings.
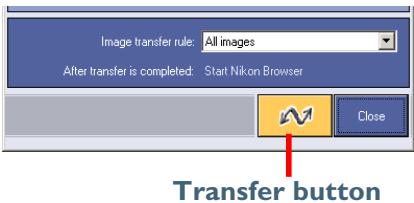
The Transferring dialog box is displayed during transfer. The thumbnail of the file being transferred is displayed in this dialog box. Clear the Show thumbnail check box to stop the thumbnail from being displayed.
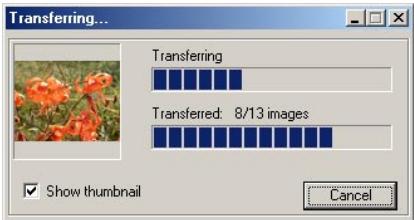

Operations during transfer
You cannot perform any other operation on NikonView 5 while the Transferring dialog box is displayed.
Cancelling during transfer
To cancel transfer of the image files, click Cancel in the Transferring dialog box. When you are transferring multiple image files, the images that have already been transferred at the time Cancel is clicked are saved in the destination folder.
Programs that launch after transfer
When transfer is completed, the action specified in the General tab (29) of the Transfer options dialog box is processed.
Unexpected termination
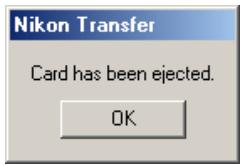
Nikon Transfer will display a warning message if any of the operations listed below are performed at the time of its startup. Click OK to close the warning and exit Nikon Transfer.
- If you turn the camera off, or disconnect the cable connecting the computer and camera or card reader.
- If you remove the memory card from the camera, card slot, or card reader.
To avoid unexpected termination, use the Close button to exit Nikon Transfer.

Restarting Nikon Transfer
Nikon Transfer can be restarted using the methods described below.
If you have turned the camera off, disconnected the cable, or removed the memory card from the card reader or card slot, you can restart the program by:
- Turning the camera on
- Connecting the camera to the computer
- Inserting the memory card in a card reader or card slot
Nikon Transfer launches when a camera is connected or memory card inserted.

If you exited Nikon Transfer while the camera and computer were connected
If you exited Nikon Transfer while the camera and computer were connected, start Nikon View 5 using the Start menu (Windows) or the desktop icon. When you start the program this way Nikon Browser will be displayed.

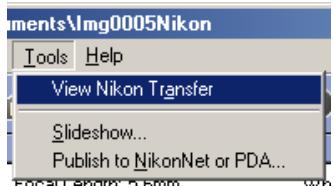
To start Nikon Transfer from Nikon Browser, select View Nikon Transfer on the Tools menu.
Using Nikon Browser
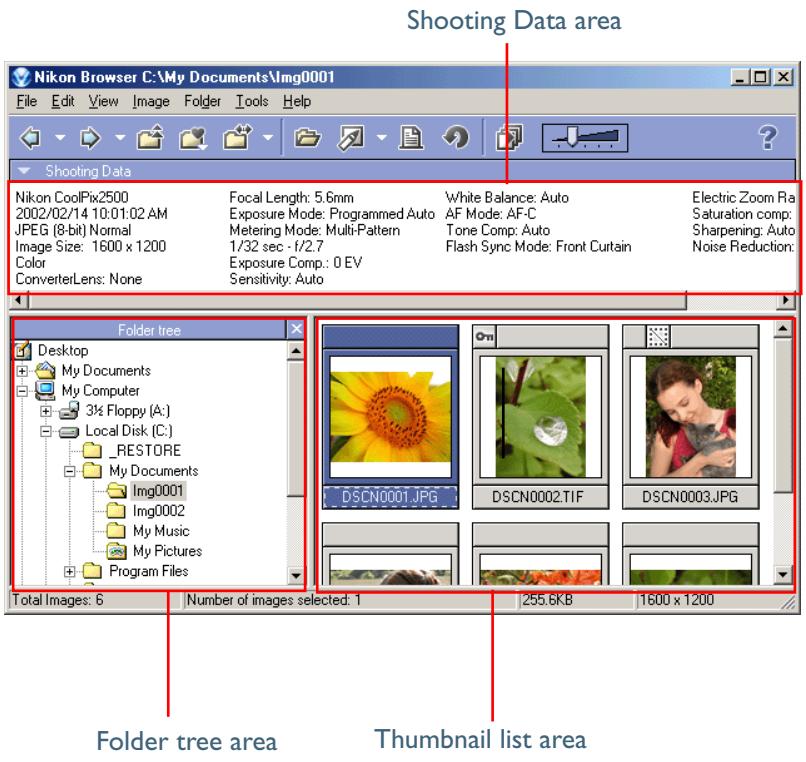
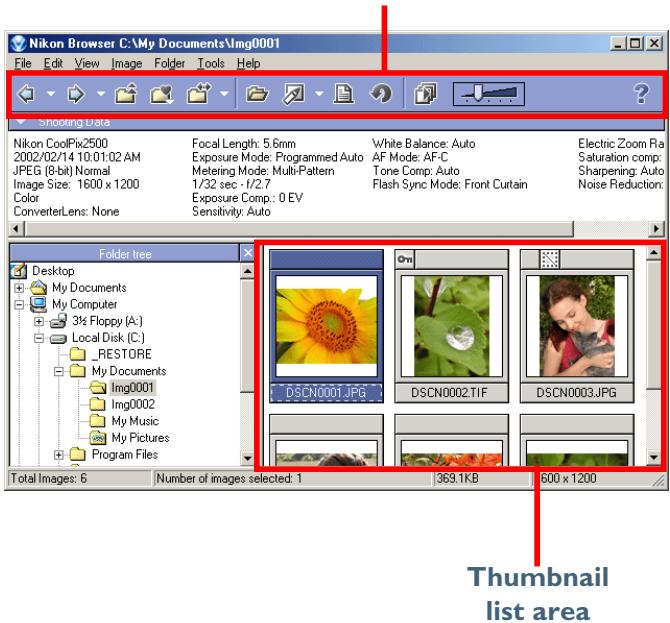
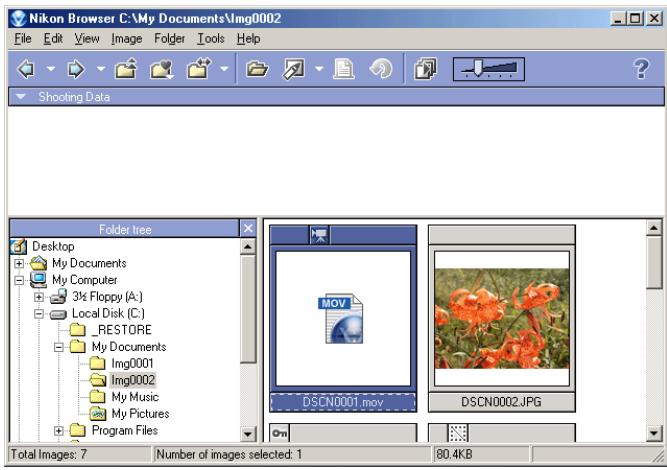
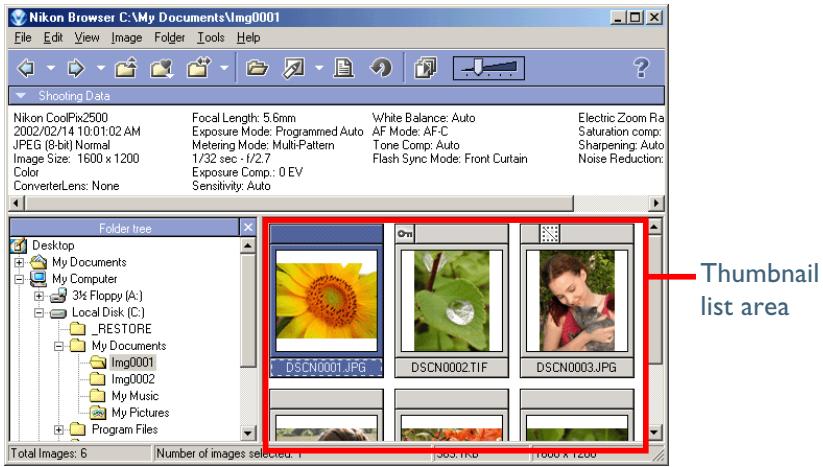
Nikon Browser contains the following items:
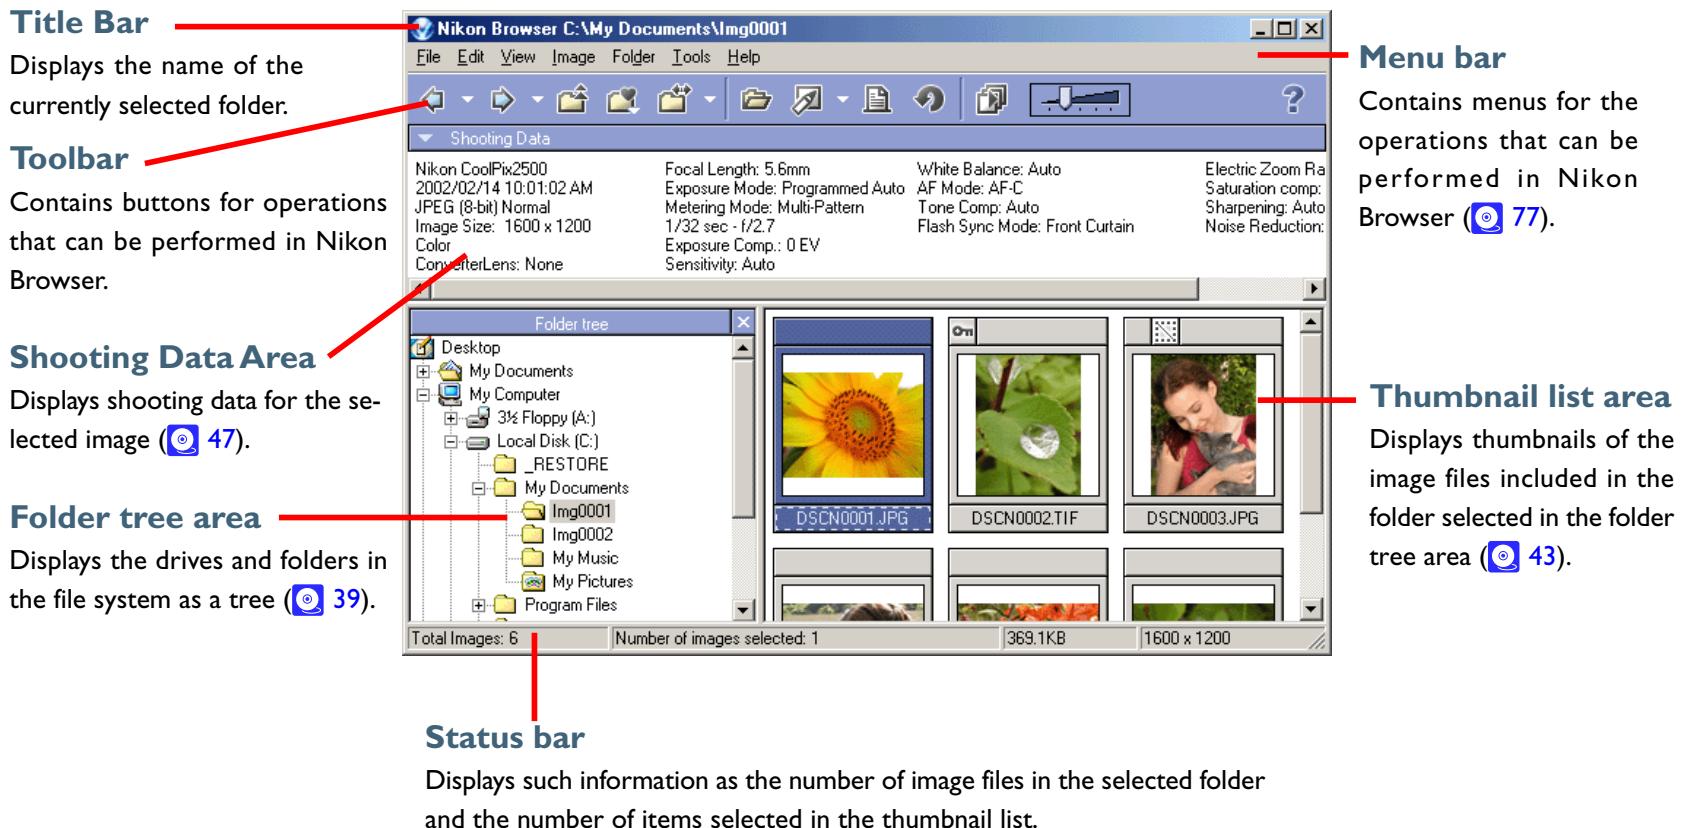
The majority of operations in Nikon Browser are performed using the menu bar and tool buttons. In the case of operations that can be performed by means of both menus and tool buttons, the explanation in this manual gives priority to the tool buttons.
Nikon Browser contains the following buttons:
| Button | Function |
| Back | Returns to the folder selected before the current folder (39). |
| Forward | Returns to where you were when you clicked the Back button (39). |
| Up | Selects the folder one level higher than the current folder in the folder hierarchy (39). |
| Favorites | Adds the selected folder to the Favorites or selects a folder from the list of Favorites (41). |
| Transfer Destination | Displays a list of 10 most recent destination folders for image files that were transferred using Nikon Transfer. When you select a folder from the list, the folder will be selected in the folder tree area (39). |
| View | Opens the file associated with the thumbnail selected in the thumbnail list area. Nikon Viewer is used for still images, and the program designated in Preferences is used for movie files (50). |
| Button | Function |
| Edit | Opens the image file selected in the thumbnail list area with the designated image editing program (52). |
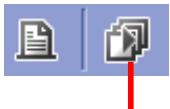
| Prints the still image selected in the thumbnail list area (54). | |
| Rotate | Rotates the still image selected in the thumbnail list area. The thumbnail is rotated as well as the image itself (46). |
| Slideshow | Plays back the image files selected in the thumbnail list area as a slideshow (56). |
| Help | Displays help for Nikon View 5 (69). |
Working with folders
When you select a folder from the folder tree area, the thumbnails of image files in the folder are displayed in the thumbnail list area.
You can close the folder tree area by clicking the Close button in the upper right corner. To display the folder tree area again, select View Folders from the View menu.


Selecting a folder using the keyboard
In Windows, you can select a folder using the following keys instead of the tool buttons:
HOME
Selects the Desktop icon displayed at the root of the folder tree.
END
Selects the folder or drive displayed at the bottom of the folder tree area.
- BACKSPACE
Selects the folder one level higher than the current folder in the folder tree.
Choosing a folder
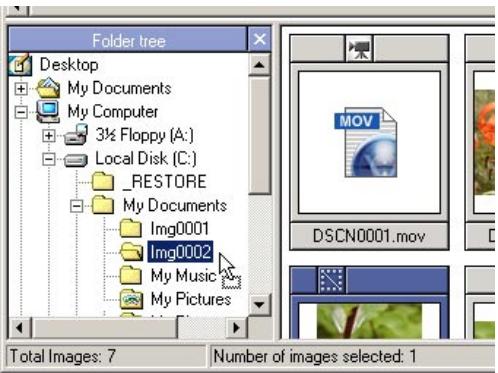
The folder tree area displays drives and folders in your computer as a tree from the desktop down. In the folder tree area, you can only select one folder at a time.
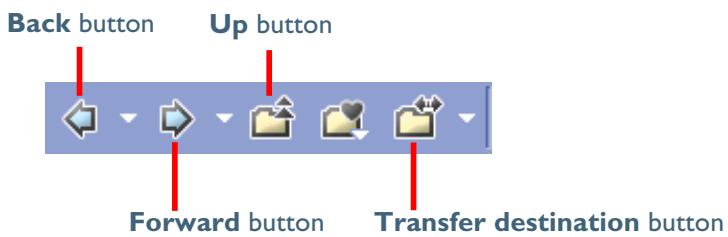
You can go back to the previous folder by clicking the Back button on the toolbar. You can also select from up to 10 previous folders by clicking the drop-down arrow on the right.
Use the Forward button to go back to where you were when you clicked the Back button. You can also select from up to 10 folders by clicking the drop-down arrow on the right.
Click the Up button to select a folder one level higher than the current folder in the folder hierarchy.
Click the Transfer destination button to view a list of 10 most recent destination folders for image files that were transferred using Nikon Transfer. When you select a folder from the list, the folder will be selected in the folder tree area.

Opening folders in Explorer or Finder
In Windows, you can open a folder in Explorer by selecting a folder and clicking Open with Explorer from the Folder menu.
In Macintosh, you can open a folder in Finder by selecting a folder and clicking Open in Finder from the Folder menu.
Moving image files
Moving files between folders
You can move image files by dragging and dropping thumbnails displayed in the thumbnail list area to a folder in the folder tree area.

Creating and deleting folders in the folder tree area
You cannot create or delete folders in the folder tree area. If a folder is created in a program other than Nikon View 5, the display of the folder tree area is refreshed when Nikon View 5 is notified by the system that a new folder was created (Windows), or when the user selects Refresh from the View menu (Macintosh).
| Button | Windows | Macintosh |
| Moving within the same drive | Drop | Drop |
| Copying within the same drive | CTRL + drop | OPTION + drop |
| Moving between separate drives | SHIFT + drop | — |
| Copying between separate drives | Drop | Drop |

Deleting folders (Windows)
If you want to delete a folder, select a folder one level higher than the folder you want to delete, so that the folder thumbnail is displayed in the thumbnail list area. Then, select the folder thumbnail in the thumbnail list area and select Delete from the File menu.
Adding folders to Favorites
In Nikon Browser, you can add folders containing transferred images to Favorites.Folders to be added to Favorites can be selected using either the Favorites tool button or the Favorites option in the Folder menu. Up to 30 folders can be listed in Favorites.
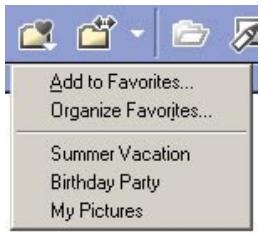
Add to Favorites dialog box
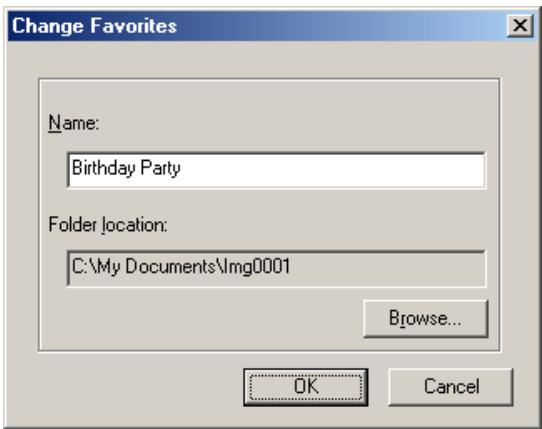
To add a folder to Favorites, select the folder you want to add in the folder tree area. Then, click the Favorites button on the toolbar, or select Favorites > Add to Favorites from the Folder menu. The Add to Favorites dialog box will be displayed.
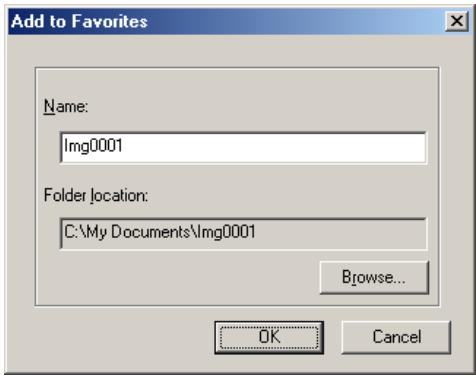
Name box
You can assign a name to the folder selected in the Folder location box. The folder will then be listed in Favorites under the assigned name. This does not affect the name of the original folder.
Folder location box
Displays the location of the folder to be added to Favorites.
To add a different folder to Favorites, click Browse and select the folder you want to add. Click OK to add the selected folder to Favorites.
Organize Favorites dialog box
To organize folders within Favorites, click the Favorites button on the toolbar, or select Favorites > Organize Favorites from the Folder menu. The Organize Favorites dialog box will be displayed.
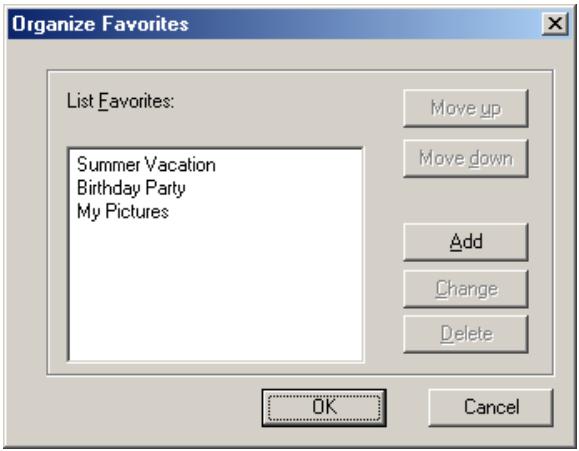
List Favorites box
The folders that have been added to Favorites are displayed in the list.
Move up / Move down buttons
Click to move the selected folder in List Favorites up and down. The folders will be displayed in Favorites in Folder > Favorites in the order you specify in this list.
Add button
Click to display the Add to Favorites dialog box. In this dialog box, you can add folders to the Favorites.
Change button
Click to display the Change Favorites dialog box.
In this dialog box, you can change the name of folders listed in Favorites.
This does not affect the name of the original folder.
Delete button
Click to remove the selected folder from Favorites. The original folder is not deleted from your computer.
Working with thumbnails
The thumbnail list area displays thumbnails for all images stored in the selected folder.
Thamburger display
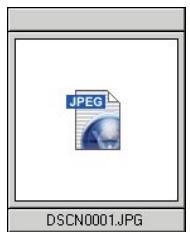
Sometimes, a generic file icon is displayed instead of a thumbnail in the thumbnail list area. This is because some image editing programs strip off the thumbnail data appended to the image file.

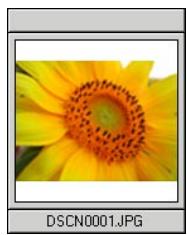
If this happens, select the Re-create thumbnails from actual image data check box in the THumbs nails tab (72) of the Preferences dialog box. This will enable NikonView 5 to create thumbnail data based on the image. The new thumbnail will be displayed in the thumbnail list area.
Note also that a folder icon is displayed in the thumbnail list area if there is a subfolder in the folder selected in the folder tree area (Windows version only).
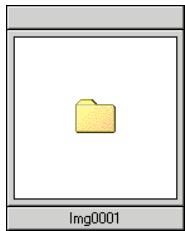
To open the folder, select the folder icon in the thumbnail list area and click the View button on the toolbar. The folder will be selected in the folder tree area.
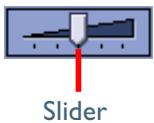
Changing the thumbnail size
You can change the display size of thumbnails in the thumbnail list area by using the slider on the toolbar or the View Size option in the View menu.
The following five sizes are available:
| Minimum | 64 × 64 pixels |
| Small | 96 × 96 pixels |
| Normal | 128 × 128 pixels |
| Large | 192 × 192 pixels |
| Maximum | 256 × 256 pixels |
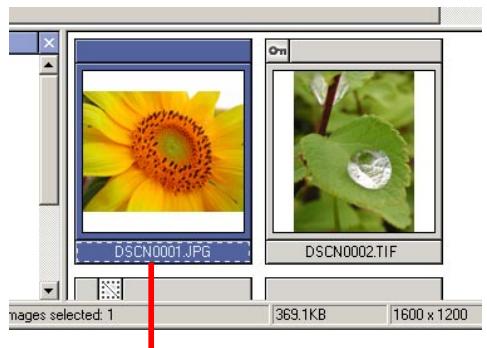
Selecting thumbnails
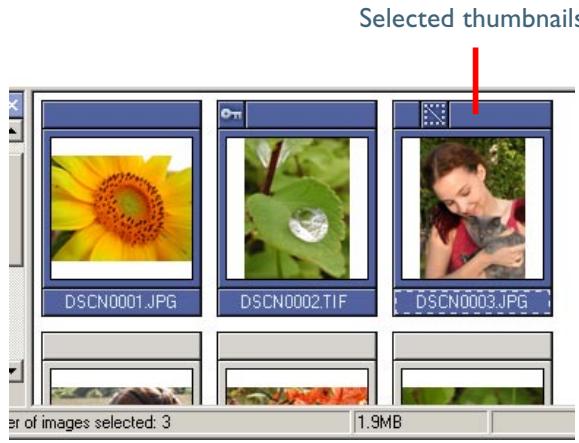
Thumbnail previews of the images in the selected folder are shown in the thumbnail list area. Click a thumbnail to select it.
To select multiple thumbnails, hold down the CTRL key (Windows) or the Command key (Macintosh) while clicking on each of the thumbnails.
You can also drag the mouse and select multiple thumbnails.

Selecting Multiple Images
You can use the Select option in the Edit menu to select all images that have the same attribute set in the camera, such as protected/unprotected and hidden (Windows version only).
Thumbnail attributes
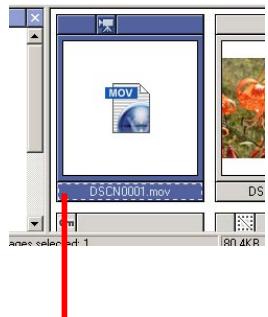
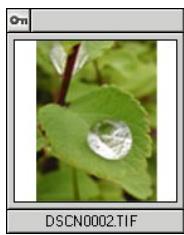
Each thumbnail displayed in the thumbnail list area has an icon that represents its attributes. There are three types of icons: Protection, Hide (Windows version only), and Movie.
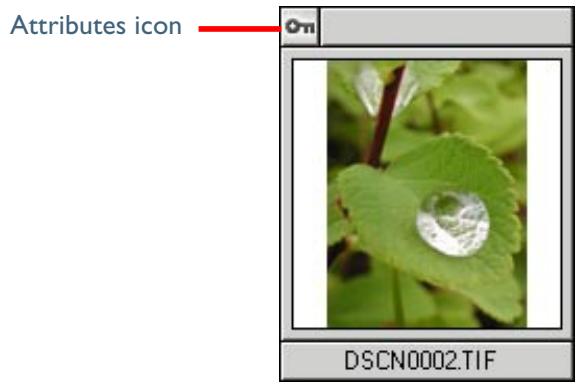
| Icon | Description |
| Protection Attribute | Image protection is ON. |
| Hide | Hide Image mode is ON |
| Movie | Movie file. |
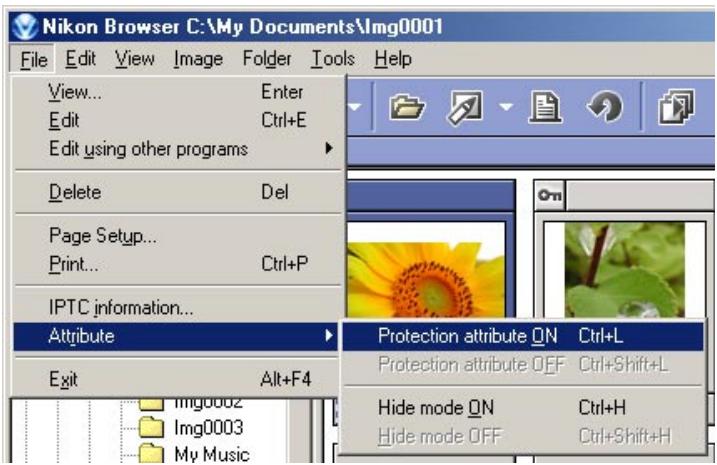
You can also protect (Windows and Macintosh) or hide (Windows only) images associated with the selected thumbnail by selecting Attribute from the File menu. Protecting an image prevents it from accidental deletion. Hiding an image prevents it from being shown in Explorer.
Rotating thumbnails
In the thumbnail list area, you can rotate selected thumbnails. The rotation applied to a thumbnail is also reflected in the associated image file. Use the Rotate Image(s) dialog box to rotate thumbnails.
To display the Rotate Image(s) dialog box, click the Rotate button on the toolbar, or select Rotate from the Image menu.
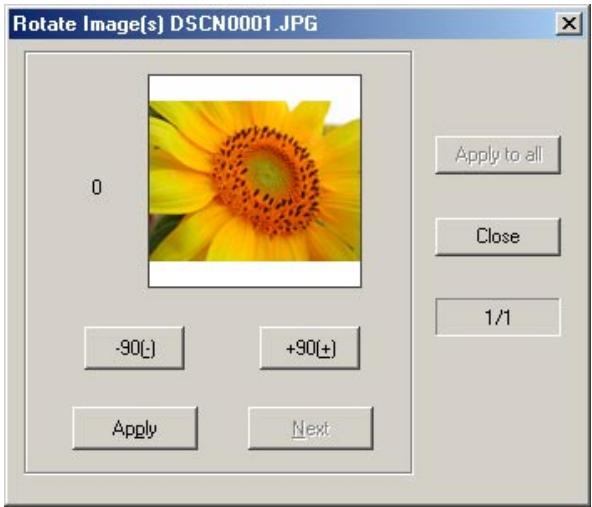
In the Rotate Image(s) dialog box, click -90 to rotate the thumbnail 90 degrees counterclockwise or +90 to rotate 90 degrees clockwise. Click the same button twice if you want to rotate the thumbnail 180 degrees. You can check the results in the preview area.
When one thumbnail is selected
Click Apply to rotate both the thumbnail and the associated image file and then close the dialog box.
When multiple thumbnails are selected
Click Apply to rotate both the thumbnail and the associated image file and then display the next thumbnail.
You can move on to the next thumbnail without altering the current thumbnail by clicking Next.
Click Apply to all to apply the orientation of the current thumbnail to all the selected thumbnails and the associated image files. Rotation is not applied to the skipped files and files that have already been rotated.

Rotating movies
Movies cannot be rotated. If a movie file is included in the selected thumbnails, the movie file is not displayed in the Rotate Image(s) dialog box.
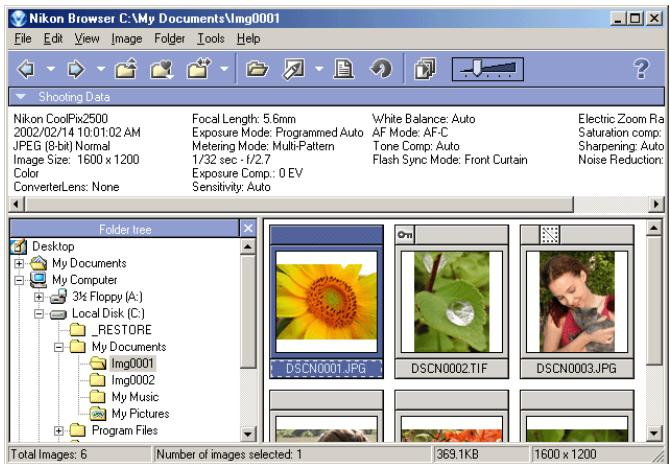
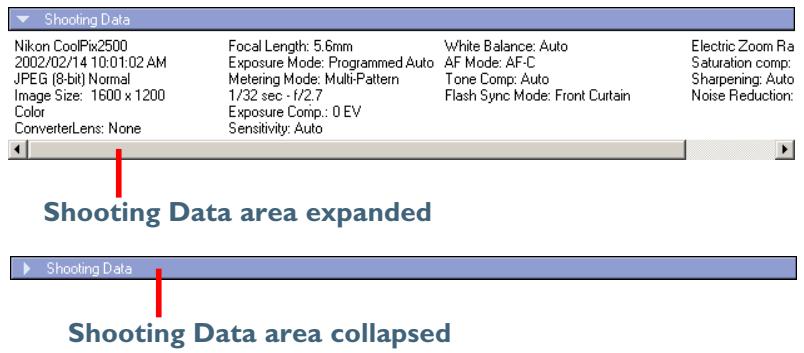
Displaying shooting data
When you select a single thumbnail, shooting data is displayed in the Shooting Data area. No shooting data is displayed if no thumbnail is selected or multiple thumbnails are selected.
You can show or hide the shooting data by selecting View Shooting Data from the View menu. You can also expand or collapse the Shooting Data area by clicking the toggle button (a small triangle) in the upper left corner.
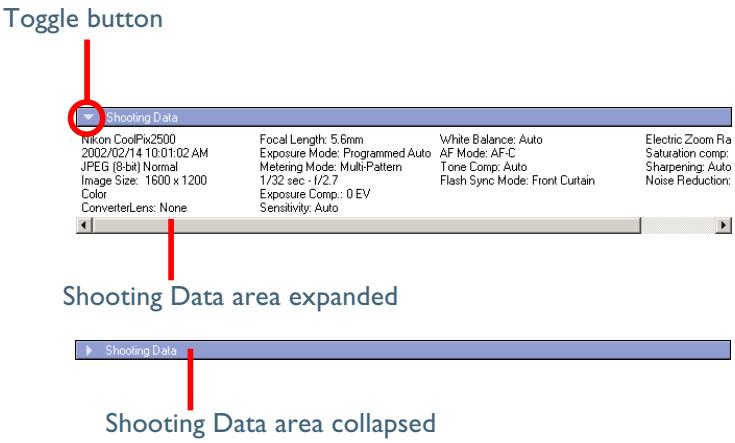
The information displayed includes the following items. Available information varies according to the model of the camera.
Camera Name / Date and Time / Image Quality / Image Size / Color / Converter Lens / Lens / Focal Length / Exposure Mode / Metering Mode / Shutter Speed / Aperture / Exposure Compensation / Sensitivity / White Balance / AF Mode / Tone Compensation / Flash Sync Mode / Flash Mode / Dimmer Compensation Offset / Electronic Zoom Scale / Saturation Control / Color Mode / Hue Adjustment / Image Sharpening / Noise Reduction / Camera ID / Latitude (GPS) / Longitude (GPS) / Altitude (GPS)

COOLPIX990/880
Only the following data is displayed:Thumbsail data, File name, File size, Date and time, Number of bits, Protection Attribute, Hide Attribute
Viewing file information
In Nikon Browser, you can use the IPTC Information dialog box to view the file information added to an image file during transfer.
Displaying the IPTC Information dialog box
To open the IPTC Information dialog box, select a thumbnail in the thumbnail list area and click IPTC Information (Windows) or File Information (Macintosh) on the File menu.

Simple mode
In the lower part of the Caption area in the IPTC Information dialog box, the shooting data added to the image file during transfer is displayed.

Registering shooting data
Shooting data is added to the image file during transfer when the Copy Shooting data (Shutter speed etc...) to the IPTC caption field check box in the Transfer tab (30) of the Transfer options dialog box is selected.
You can view the IPTC Information dialog box in Simple or Detail mode. Click the Simple/Detail button to toggle between Simple and Detail mode.
Detail mode
For more information on the IPTC Information dialog box, see "Step 4: Add additional file information" (33) in "Tutorial: Nikon Transfer." Movies can be played back by clicking the associated thumbnail.

File information from Nikon Browser
IPTC information displayed in Nikon Browser cannot be edited. Note that there is no file information attached to movies.
Deleting image files
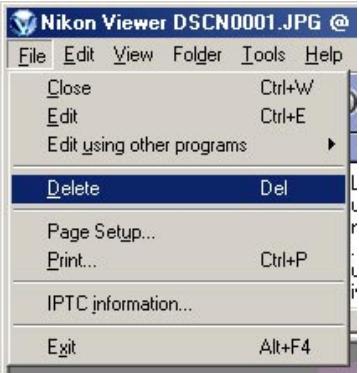
To delete image files in Nikon Browser, select the associated thumbnails in the thumbnail list area and select Delete from the File menu.

You can attain the same results by pressing the DELETE key (Windows) or COMMAND + DELETE keys (Macintosh).
If any protected image files are included in the selected thumbnails, a dialog box will be displayed confirming the deletion. Click the Yes button in the dialog box to go ahead with the deletion.
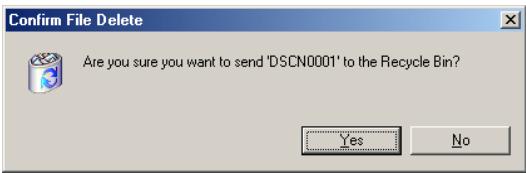
If a folder thumbnail is displayed in the thumbnail list area, you can select the folder to delete the folder and all its contents (Windows version only).

Deleted image files
Deleted image files are moved to the Recycle Bin (Windows) or the Trash (Macintosh). To cancel the deletion, open the Recycle Bin or the Trash and put the deleted files back to the original location. In Windows, if you delete image files from a memory card inserted in the camera, card slot, or card reader, or from a network folder, the image files are permanently erased and cannot be recovered.
Displaying Images
When you select a thumbnail in the thumbnail list area, still images are displayed in Nikon Viewer while movie files are played back in the program selected in the Movie Tab of the Preferences dialog box ( 74).
Viewing still images
To view a still image, select the associated thumbnail in the thumbnail list area, and click the View button on the toolbar or select View from the File menu. Nikon Viewer launches and displays the image.

Other ways of viewing images
You can also open an image in Nikon Viewer by:
- double-clicking the thumbnail
- selecting the thumbnail and pressing the ENTER key (Windows) or the RETURN key (Macintosh)
Displaying images in Nikon Viewer
The image file associated with a thumbnail selected in Nikon Browser is displayed in the view area of Nikon Viewer. Only one image can be displayed at a time.
If multiple thumbnails are opened, only one image is displayed. You have to switch back and forth to view the other images.
You can use the NikonViewer status bar to check the number of the opened images and the status of the currently displayed image.

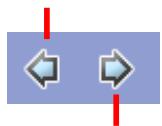
You can change the displayed image using the Forward and Back buttons on the toolbar of Nikon Viewer.
Forward button
Back button
In Windows, even if you open only one thumbnail in the thumbnail list area, you can browse through all the still images stored in the same folder as the selected image by using the Forward and Back buttons.

Image Editing Programs
To edit a still image, select its thumbnail and click the Edit button on the toolbar or select Edit from the File menu. This will launch the Image Editing Program specified in the Still image tab (73) of the Preferences dialog box.

Pg. For more information on:

60 Tutorial:Nikon Viewer
Playing back movies
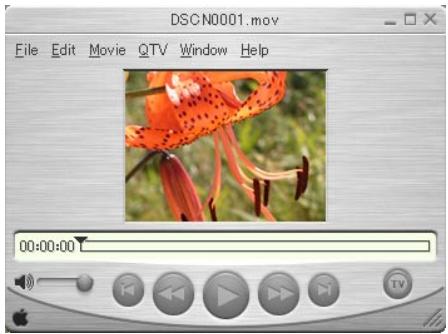
To play back a movie, select the associated thumbnail in the thumbnail list area and click the View button on the toolbar, or select View from the File menu. The application specified in the Movie tab (74) of the Preferences dialog box launches and plays back the movie.

Other ways to play back movies
You can also play back a movie by:
- double-clicking the thumbnail
- selecting the thumbnail and pressing the ENTER key (Windows) or the RETURN key (Macintosh)
Installing QuickTime
In Windows, you cannot use Windows Media Player to play back movies recorded with the COOLPIX series digital cameras. If a movie player program is not installed, install the version of QuickTime bundled with Nikon View 5 (COOLPIX series only).
For more information on installation, see Nikon View 5 Installation Guide.

Program to edit movies
To edit a movie, select its thumbnail and click the Edit button on the toolbar or click Edit on the File menu. This will launch the program specified in the Movie tab (74) of the Preferences dialog box.
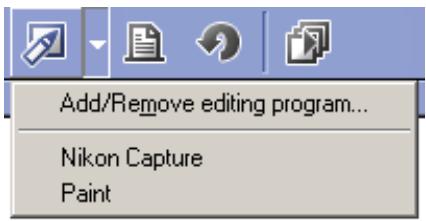
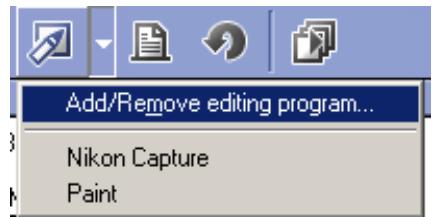
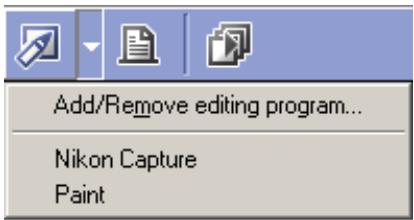
Adding and removing editing programs
In Nikon Browser, use the Add/Remove editing program dialog box to register programs frequently used to edit image files.
You can only specify one program in the Movie and Still images tabs in Preferences. If you register programs, you can choose from multiple programs depending on the image that you are editing.
You can access the registered programs by clicking the drop-down arrow next to the Edit tool button or selecting Edit using other programs from the File menu.

Pg. For more information on:

73 Preferences: Still Image

74 Preferences: Movie
Displaying the Add/Remove editing program dialog box
To display the Add/Remove editing program dialog box, select Add/Remove editing program from the Edit tool button pull down menu, or select Edit using other programs from the File menu.
In the Add/Remove editing program dialog box, you can organize registered programs as well as register them.

The Add/Remove editing program dialog box
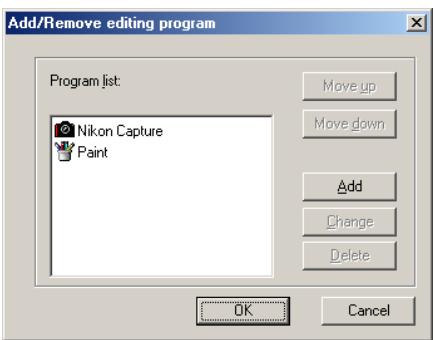
Program list box
The registered programs are displayed in the list.
Move up / Move down buttons
Click to move the selected program in the Program list up and down. You can modify the order of the registered programs that are displayed by clicking the Edit tool button or selecting Edit using other programs from the File menu.
Add button
Click to display the Add program dialog box. In the Add program dialog box, you can select and register programs.
Change button
Click to display the Change program dialog box. In the Change program dialog box, you can change the registered programs.
Delete button
Click to remove the selected program from the Program list. The program itself is not deleted.
The Add program dialog box
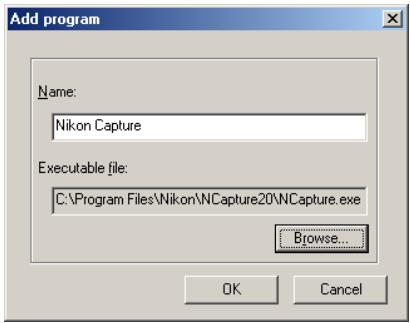
Name box
You can assign a name to the program selected in Executable file. The program is added to the Program list with this name instead of the actual program name.
Executable file box
Displays the path and file name of the program to add.
To add a different program to the Program list, click Browse and select the program you want to add. Click OK to add the selected program to the Program list.
The Change program dialog box
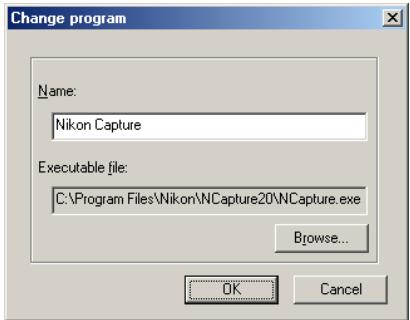
In the Change program dialog box, you can change the name of the program that appears in the Edit tool button pull down menu, and in the Edit using other programs submenu. This does not affect the name of the original program.
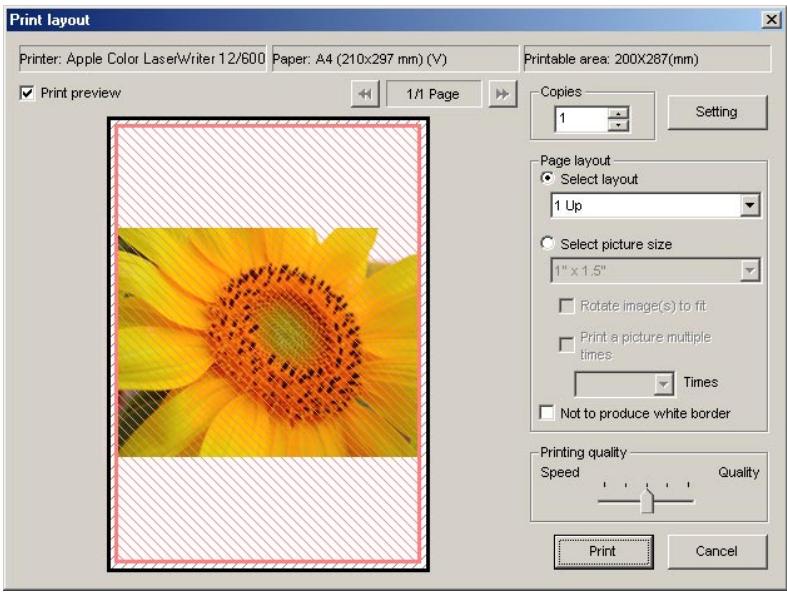
Printing images
In Nikon Browser, you can print a still image by selecting the thumbnail displayed in the thumbnail list area. Use the Print layout dialog box to print a still image.
To display the Print layout dialog box, select the thumbnail of the image you want to print in the thumbnail list area, then click the Print button on the toolbar, or select Print from the File menu. You can also print multiple still images at one time.

When you have made all the necessary settings, click Print to start printing.
Clicking Cancel closes the Print layout dialog box without printing.
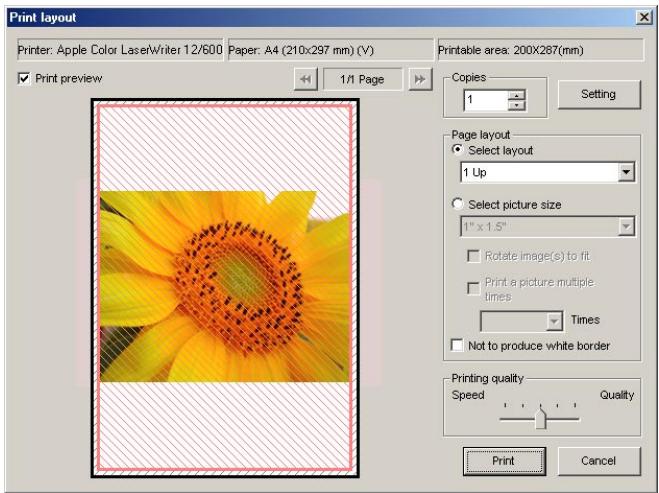
The Print layout dialog box
When you click Setting, the Printer settings dialog box is displayed. The settings you make in this dialog box are applied to the following items:
| Printer | Displays the name of the currently selected printer. |
| Paper | Displays the currently selected paper size. |
| Printable Area | Displays the printable area for the selected paper size. |
Print preview check box
Select this check box to display a preview. You can toggle display of the preview for each page.
Copies box
Specify the number of copies to print. The maximum number of copies is 100.
Setting button
Click to display the Printer settings dialog box in which you can modify the printer and paper settings. The changes made are applied to the Printer, Paper, and Printable area fields.
Page layout area
Choose from either Select layout or Select picture size.
Select layout
Select this option if you want to select the number of images to print on one page from the list.
| Number of images per page | Paper Orientation (portrait) (landscape) | |
| 1 | 1 in the center | 1 in the center |
| 2 | 2 pictures one on top of the other | 2 pictures side by side |
| 4 | 2 rows × 2 columns | 2 rows × 2 columns |
| 8 | 4 rows × 2 columns | 2 rows × 4 columns |
| 16 | 4 rows × 4 columns | 4 rows × 4 columns |
| 25 | 5 rows × 5 columns | 5 rows × 5 columns |
You can specify whether to print the image information together. You can also specify to print a list of image information. The size of the images are automatically adjusted according to the layout.
Select picture size
Select this option if you want to select the size of the image from the list.
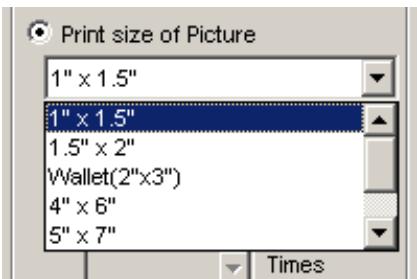
Selecting this option also enables you to rotate the image to adjust the margin or print the same image multiple times.
Rotate image(s) to fit check box
Select this check box to adjust the image size so that it fits into the box with a red border. If the aspect ratio of the box and the image differ, part of the image may not be printed.
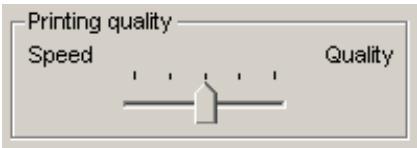
Printing quality area
Use the slider to adjust the balance between the speed and quality of printing.
Playing a slideshow
In Nikon Browser, you can view the image files associated with the selected thumbnails as a slideshow.
Displaying the Slideshow Properties dialog box
To view a slideshow, select the thumbnails of the image files you want to view in the thumbnail list area, then click the Slideshow button on the tool bar or select Slideshow from the Tools menu.

Slideshow button
The slideshow window is displayed with the Slideshow Properties dialog box displayed in front of the slides. You can change the slideshow settings using this Slideshow Properties dialog box.
You can show or hide the Slideshow Properties dialog box by pressing the TAB key.

When one thumbnail is selected
In Windows, if you select only one thumbnail in the thumbnail list area, all the images in the same folder are played back in the slideshow.
In Macintosh, only the selected images are played back in the slideshow.
Setting the Slideshow Properties dialog box
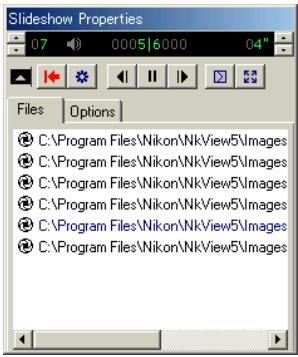
Files tab
Displays a list of file names (and in Windows, file paths) of the image files that are currently displayed in the slideshow.
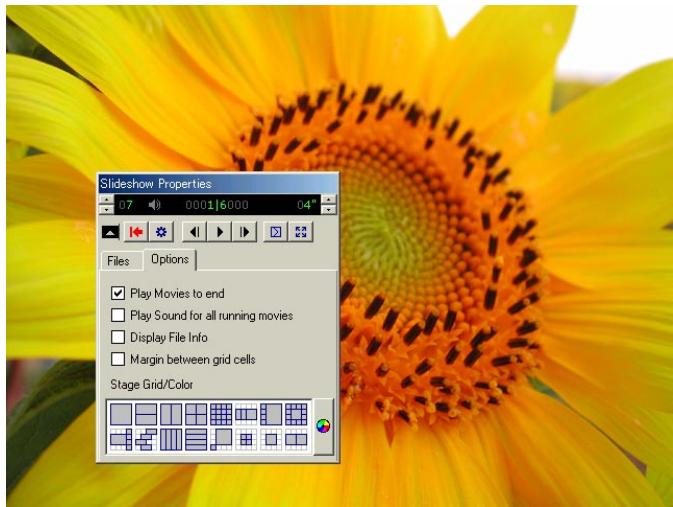
Options tab
Use this tab to set how each slide is displayed.
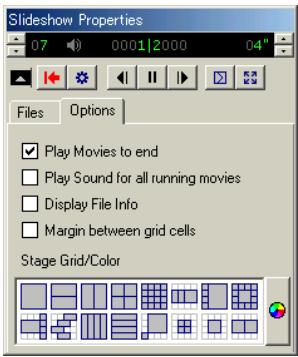
Play Movies to end check box
Select this check box to play the movie to the end before showing the next slide. If you clear this check box, the next slide is shown after the specified time even if the movie has not finished.
Play Sound for all running movies check box
Select this check box to play back the sound of all the movie files included in the slideshow.
Display File Info check box
Select this check box to display the file location, size, and zoom ratio under each slide.
Margin between grid cells check box
If you selected a stage grid option that displays multiple slides at the same time, selecting this check box creates margins between slides. Clear this check box to remove the margins.
Stage Grid/Color field
Select the format and number of slides to display at the same time.
Using the toolbar
The toolbar has buttons to control the playback of the slideshow, and buttons to specify how the slides are displayed.
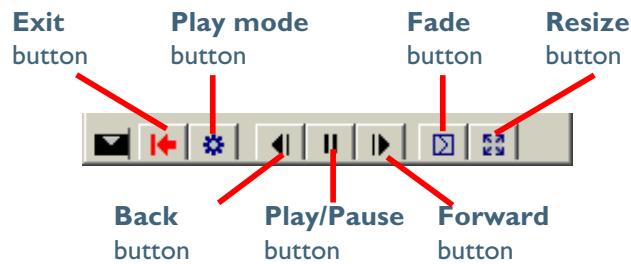
Exit button
Exits the slideshow
Play mode button
Use this button to set how to play back the slideshow.
Select Interactive to switch slides interactively by clicking the mouse button.
Select Continuous to play the slideshow again after the last slide is displayed.
Select Random to play the slideshow in random order.
Back button
Displays the previous slide.
Play/Pause button
Pauses the slideshow when playing or starts it again when paused. When you select Interactive in the Play mode button, the button icon takes the shape of a computer mouse, on which you can click to display the next slide.
Forward button
Displays the next slide.
Fade button
Use this button to select how one slide fades into or out of another.
Resize button
Use this button to select the zoom ratio of the slides. You can also adjust the aspect ratio, or adjust the size of the slides to fit the screen.
Status bar
You can control the sound volume on the status bar. You can also check the number of the remaining slides and the total number of slides.
You can also specify the interval between slide changes, in the range of 1 to 99 seconds.

Switching the Slideshow Properties dialog box display
You can expand or collapse the Slideshow Properties dialog box by clicking the Toggle button on the toolbar.

Exiting the slideshow
To exit the slideshow, click the Exit button.
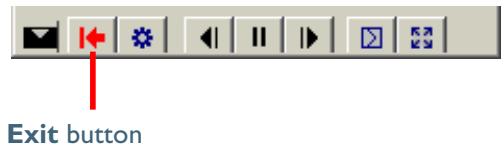
You can also exit the slideshow by pressing the ESC key.

About the slideshow
When large size images are played back with a short time interval, it may not be possible to cancel the slideshow. See the Nikon View 5 ReadMe file for instructions on how to stop the slide show (Windows only).
Using Nikon Viewer
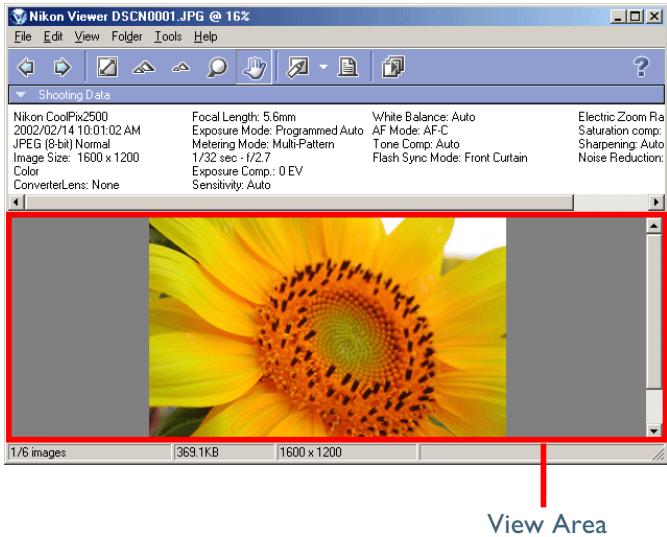
NikonViewer has the following items:
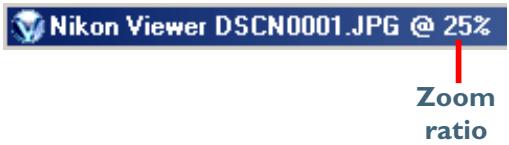
Title Bar
Displays the file name and zoom ratio of the currently displayed image.
Toolbar
Contains buttons for the operations that can be performed in Nikon Viewer.
Shooting Data Area
Displays shooting data for the image displayed in the view area.
View Area
Displays images.
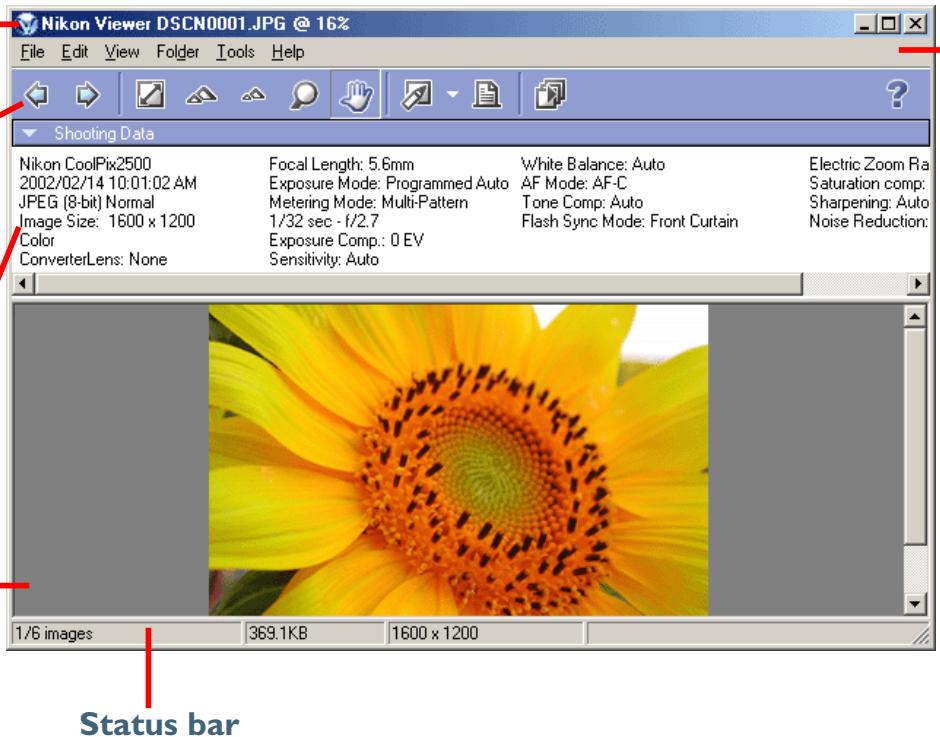
Displays such information as the number of all the images that can be displayed, the position of the currently displayed images among them, and the file size of the currently displayed image.
- Menu bar
Contains menus for operations that can be performed in Nikon Viewer.
The majority of operations in NikonViewer are performed using the menu bar and tool buttons. In the case of operations that can be performed by means of both menus and tool buttons, the explanation in this manual gives priority to the tool buttons.
The Nikon Viewer contains the following buttons:
| Button | Function |
| Back | Displays the previous image when multiple images are selected for display (62). |
| Next | Displays the next image when multiple images are se- lected for display (62). |
| View entire image | Adjusts the zoom ratio of the image so that it fully fits the view area (63). |
| Zoom in | Zooms into the displayed image (63). |
| Zoom out | Zooms out of the displayed image (63). |
| Zoom tool | The shape of the mouse pointer changes to the shape of a magnifying glass, with which you can change the zoom ratio of the displayed images (64). |
| Button | Function |
| Hand tool | The shape of the mouse pointer changes to the shape of a hand, with which you can pan the image around when the entire image is not displayed in the view area (64). |
| Edit | Opens the displayed image in the program designated for editing images, which is specified in the Preferences (65). |
| Prints the displayed image (65). | |
| Slideshow | Plays back the displayed image together with the images ready for display as a slideshow (66). |
| Help | Displays help for Nikon Viewer (69). |
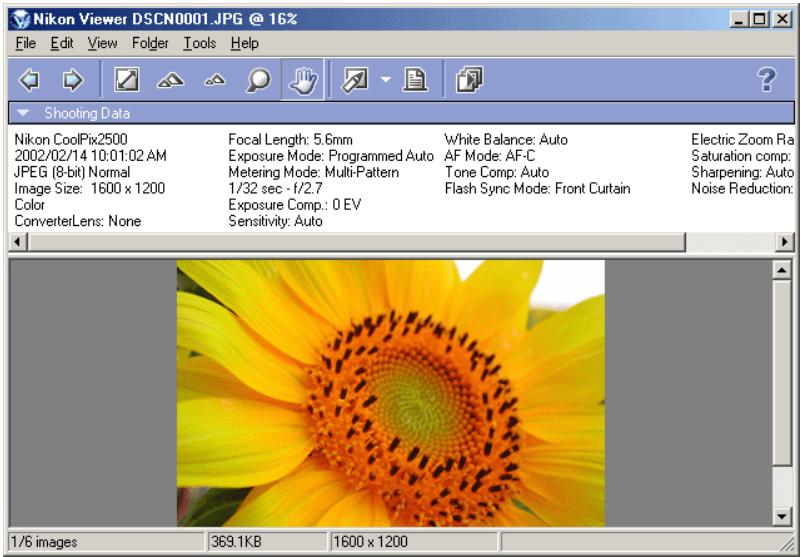
Displaying images in detail
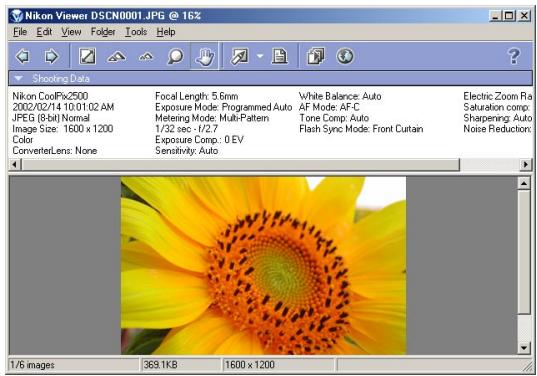
When a thumbnail is selected in Nikon Browser, the associated image is displayed in the Nikon Viewer View area. Nikon Viewer displays in its view area the image file associated with a thumbnail selected in Nikon Browser. Only one image can be displayed at a time. You can zoom in on images displayed in the viewer to take a closer look.
View area
If multiple thumbnails are opened, only one image is displayed. You have to switch back and forth to view the other images.
You can check the number of the opened images and the status of the currently displayed image in the status bar of Nikon Viewer.
| 1/6 images | 369.1KB | 1600 x 1200 |
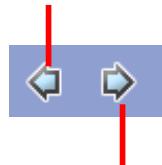
When multiple images are opened, you can use the Forward and Back buttonsDE on the toolbar to view the other images. The order of display is the same as the order of display in the thumbnail list area of Nikon Browser.
Back button
Forward button

When one thumbnail is selected
In Windows, even if you open only one thumbnail in the thumbnail list area, you can browse through all the still images stored in the same folder as the selected image.
Viewing the entire image
You can make the entire image fit to the display area by clicking the View entire image button or selecting View entire image from the View menu. The zoom ratio does not exceed 100% even if the entire image is smaller than the view area.
View entire image button

About the zoom ratio
The following zoom ratios are applied when you zoom into or out of an image:
1/16(6%), 1/12(8%), 1/8(12%), 1/6(16%)
1/4(25%), 1/3(33%), 1/2(50%), 1/1.5(66%)
1/1(100%), 1.5/1(150%), 2/1(200%), 3/1(300%)
4/1 (400%), 6/1 (600%), 8/1 (800%)
Zooming into or out of an image
You can zoom into or out of the image that is displayed in the view area. To zoom in and out, use the tools described below. The zoom ratio of the displayed image is displayed in the window title bar.
Zoom In / Zoom Out buttons
Click the Zoom In button to zoom into the image. Click Zoom Out to zoom out of the image. You can perform the same operations by selecting Zoom In or Zoom Out from the View menu.

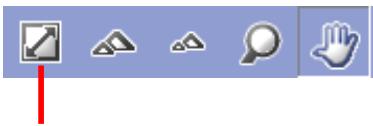
The Zoom tool button
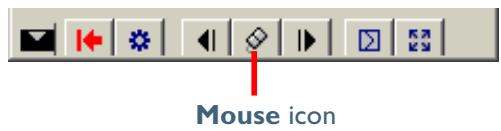
When you click the Zoom tool button on the toolbar or select Zoom tool from the View menu, the shape of the mouse pointer changes to the shape of a magnifying glass.

When you click on an image with the Zoom tool, you can zoom into the image, centering the display around the point you click. To zoom out of the image, hold down the ALT key (Windows) or the OPTION key (Macintosh) when clicking on the image. A plus sign is added to the magnifier pointer when zooming in, and a minus sign when zooming out.
Moving the display position
When you click the Hand tool button on the toolbar or select Hand tool from the View menu, the shape of the mouse pointer changes to the shape of a hand.
You can use the Hand tool to move around the image when the entire image is not displayed in the view area.
You can also move around the image by using the scroll bars at the bottom and on the right of the view area.


Hand tool and Zoom tool
The Hand and Zoom tools can not be used at the same time.
Editing image files
You can open and edit the image displayed in the view area with the program specified in the Still image tab of the Preferences dialog box.
To open the image in the specified program, click the Edit button on the toolbar.
If you register a program using the Add/Remove editing program dialog box, you can also edit the image with a program other than the one specified in the Preferences dialog box.
To display the Add/Remove editing program dialog box, click the dropdown arrow on the Edit tool button and select Add/Remove editing program from the menu.
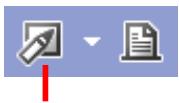
Edit button
For more information on the Add/Remove editing program dialog box, see "Adding and removing editing programs" (52) in "Tutorial: Nikon Browser."
Printing images
You can print the image displayed in the view area. Use the Print layout dialog box to print the image.
To display the Print layout dialog box, click the Print button on the toolbar, or select Print from the File menu.
For more information on printing, see "Printing images" (54) in "Tutorial: Nikon Browser."
Viewing a slideshow
You can view the images opened in the view area as a slideshow. To view a slideshow, click the Slideshow button on the toolbar, or select Slideshow from the Tools menu.
Slideshow button
For more information on playing back a slideshow, see "Playing back a slideshow" (56) in "Tutorial: Nikon Browser."

If only one image is opened
In Windows, if the currently displayed image is the only image opened, all the image files in the same folder as the one displayed are played back as a slideshow.
Displaying shooting data
When you select a single thumbnail, shooting data is displayed in the Shooting Data area.
No shooting data is displayed if no thumbnail is selected or if multiple thumbnails are selected. You can expand or collapse the shooting data by selecting View Shooting Data on the View menu. You can also expand or collapse the Shooting Data area by clicking the toggle button (a small triangle) in the upper left corner.
For more information on the shooting data, see "Displaying shooting data" (47) in "Tutorial: Nikon Browser."
Viewing file information
In Nikon Viewer, you can display the file information for the image displayed in the view area. To view the file information, select IPTC Information (Windows) on the File Information (Macintosh) menu to display the IPTC Information dialog box.
For more information on the file information, see "Viewing file information" (48) in "Tutorial: Nikon Browser."
Opening folders in Nikon Browser
The folder containing the image currently displayed in the view area can be opened in Nikon Browser. To open the folder in Nikon Browser, select Open with Browser from the Folder menu.
Opening folders in Explorer or Finder
In Windows, the folder containing the image currently displayed in the view area can be opened in Explorer by selecting Open with Explorer from the Folder menu.
With Macintosh, the folder containing the image currently displayed in the view area can be opened in Finder by selecting Open with Finder from the Folder menu.
Deleting image files
To delete the image file displayed in the view area, select Delete from the File menu or press the Delete key.
The deleted image file is moved to the Recycle Bin (Windows) or the Trash (Macintosh).
When the displayed image is deleted, NikonViewer displays the next image in Nikon Browser's thumbnail list area. If the deleted image was the last image and there are no following files, then nothing is displayed in the view area.

Deleted image files
Deleted image files are moved to the Recycle Bin (Windows) or the Trash (Macintosh). To cancel the deletion, open the Recycle Bin or the Trash and put the deleted files back in their original location. In Windows, if you delete image files from the memory card inserted in the camera, card slot, or card reader, or from a network folder, the image files are permanently erased and cannot be recovered.
Viewing Help
To view Nikon View 5 Help, click the Help button on the toolbar, or use the Help menu.
Windows
Click the Help button on the toolbar, or select Help topics on the Help menu to display the Help topics window.
Macintosh
Click the Help button on the toolbar, or select Nikon View 5 Help on the Help menu to display "Nikon View 5 Help."
Select Show Balloons on the Help menu to enable balloon help. Only Mac OS default balloon help is available.

Viewing help in Nikon Transfer and Nikon Browser
Clicking the Help button in Nikon Transfer or Nikon Browser displays the same help.
Preferences
Fine-tuning Nikon View 5
Overview of the Preferences Dialog Box (Pg. 71)
The Auto Launch Tab (Pg. 71)
The Buttons Tab (Pg. 72)
The Still image Tab (Pg. 73)
The Movie Tab (Pg. 74)
About This Chapter
This chapter describes the options available in the Nikon View 5 Preferences dialog box.
Overview of the Preferences Dialog Box
Displaying the Preferences dialog box
To display the Preferences dialog box, select Preferences on the View menu of Nikon Browser or NikonViewer. You cannot display the dialog box from within Nikon Transfer.
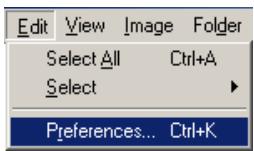
The Preferences dialog box contains the following tabs: Auto launch, Thumbsails, Still image, Movie, and Publish to NikonNet or PDA.
Changes to the settings take effect not as they are made, but only when you click the OK button in the Preferences dialog box.
Clicking the Cancel button closes the Preferences dialog box without applying the changes you made to the dialog box.

The Transfer options dialog box of Nikon Transfer
In Nikon Transfer, you can set transfer options using the Transfer options dialog box. For more information on the Transfer options dialog box, see "The Transfer options dialog box" (29) in "Tutorial: Nikon Transfer."
The Auto launch Tab
Setting how to launch Nikon Transfer
In the Auto launch tab, you can set how you want Nikon Transfer to launch.

Auto launch when connected to a camera or a card
Select this option to launch Nikon View 5 automatically when you turn the camera on and connect it to your computer or when you insert the memory card into the card reader or card slot. When Nikon View 5 launches, it displays Nikon Transfer.
Disable auto launch
Select this option if you do not want Nikon Transfer to launch automatically when a camera is connected or a memory card is inserted.

The Disable auto launch option in Windows XP
In Windows XP, the Disable auto launch option is effective only with the D1/DIX/D1H and COOLPIX990/880 cameras. When other cameras are connected, the Disable auto launch option is ignored and Nikon Transfer launches automatically.
The-Thumbs nails Tab
Setting how to create thumbnails
In the Thumbs nails tab, you can specify how the thumbnails displayed in Nikon Browser's thumbnail list area are created.
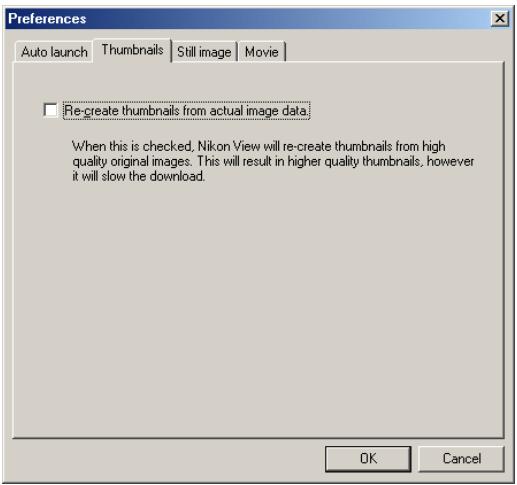
Re-create thumbnails from actual image data check box
Select this check box to create a high-resolution thumbnail from an image file and display the thumbnail in Nikon Browser's thumbnail list area when there is no large thumbnail for the image file. Note that this will increase the amount of time needed to display thumbnails.
Clear this check box to create a thumbnail from the thumbnail data of an image file and display the thumbnail in Nikon Browser's thumbnail list area when there is no large thumbnail for the image file.
If the thumbnail data is not included in the image file, the operating system's generic file icon is displayed as a thumbnail in Nikon Browser's thumbnail list area.
When data for a large thumbnail exists in the original image file, standard size thumbnails will be generated from the large thumbnail, irrespective of the above setting.

Large thumbnails
Still images taken with a USB connected COOLPIX series, DIX, and DIH cameras include large thumbnails for high-resolution thumbnail display. Large thumbnails are not included in image files taken with the Dl or COOLPIX990/880/775.
The Still image Tab
Selecting an image editing program
In the Still image tab you can specify a program to edit still images. The specified program will launch when you select Edit from the File menu of Nikon Browser or Nikon Viewer.
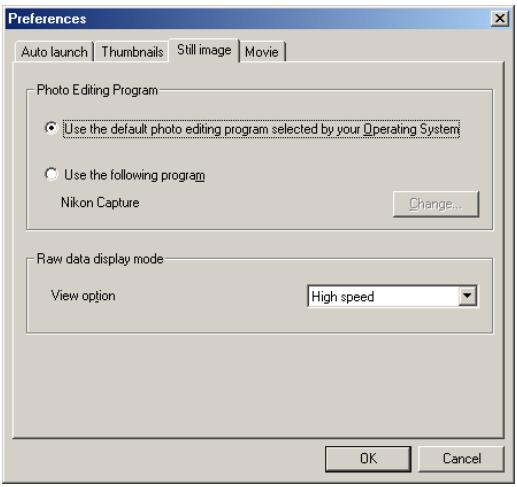
Photo Editing Program area
Use the default photo editing program selected by your Operating System
Select this option if you want the operating system to display the selected image in the default image editing program.
Use the following program
Select this option if you want the operating system to display the selected image in a specified image editing program. To specify a program, click Change and select the program in the Select program dialog box.

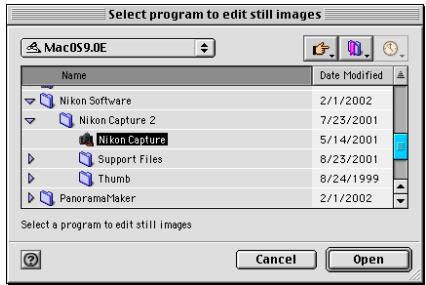
When you select a program, its name is displayed.
RAW data area
Select the mode to display *.NEF image files. You can choose from either High speed or High quality.
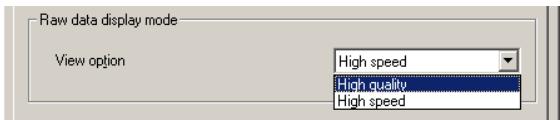
The Movie Tab
Selecting a movie player program
In the Movie tab, you can specify a program to play back or edit movies. The selected program will launch when you select a movie file thumbnail in Nikon Browser's thumbnail list area.
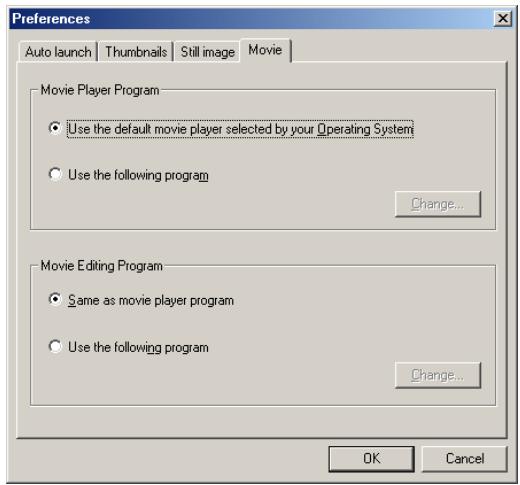
Movie Player Program area
Use the default movie player selected by your Operating System
Select this option if you want the operating system to play back the movie in the default program.
Use the following program
Select this option if you want the specified program to launch and play back the movie. To specify a program, click Change and select the program in the Select program dialog box. When you select a program, its name is displayed.
Movie Editing Program area
Same as movie player program
Select this option if you want the program specified in the Movie Player Program area to launch and display the movie.
Use the following program
Select this option if you want the specified program to launch and display the movie to edit. To specify a program, click Change and select the program in the Select program dialog box. When you select a program, its name is displayed.
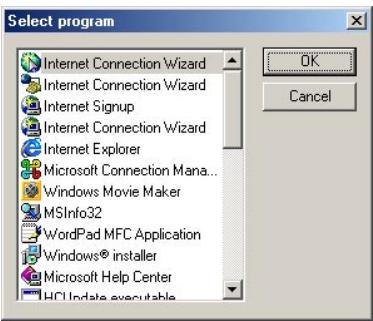
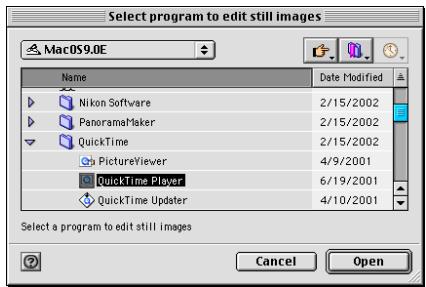
Appendices
Nikon View 5 Visual Index (Pp. 76-89)
Troubleshooting (Pg. 90)
Connecting the Camera and Inserting (Pg. 91) the Memory Card
Reinstalling Nikon View 5 (Pp. 92-94)
The following pages provide a visual index to the Nikon View 5 menus.
Nikon Transfer Menus (Macintosh Version Only)

About Nikon View 5...
About Nikon View 5...
Display version information for Nikon View 5.
File
| Transfer | @T |
| View... | @O |
| Close | @W |
| Edit | @E |
| Edit using other program | |
| Cancel registration | |
| Delete | @× |
| Page Setup... | |
| Print... | @P |
| File information | |
| Attribute | |
| Quit | @Q |
Transfer
Transfer images from the memory card to the computer.
Close
Closes Nikon Transfer.
File Information
Displays the file information. You can also add additional information
Quit
Quits Nikon View 5.
Edit
| Cannot Undo %Z |
| Cut %X |
| Copy %C |
| Paste %V |
| Clear |
| Select All %A |
| Select |
| Transfer Options... |
| Preferences... %K |
Cannot Undo / Cut / Copy / Paste / Clear / Select All / Select
Used when editing the text entered in a dialog box.
Transfer Options
Displays the Transfer options dialog box, in which you can set transfer conditions and actions.
Help
| About Balloon Help... |
| Show Balloons |
| Nikon View 5 Help ?? |
Show Balloons
Displays Balloon Help.
Nikon View 5 Help
Open the Nikon View 5 help file.
Nikon Browser menus (Windows)
| File | |
| View... | Enter |
| Edit | Ctrl+E |
| Edit using other programs | |
| Delete | Del |
| Page Setup... | |
| Print... | Ctrl+P |
| IPTC information... | |
| Attribute | |
| Exit | Alt+F4 |
View
Opens the image file associated with the selected thumbnail in Nikon Viewer.
Edit
Edits the image file associated with the selected thumbnail using the specified program.
Edit using other programs
Displays the Add/Remove editing program command in the submenu. Select the command to add editing programs. The menu also displays up to 10 registered programs.
Delete
- Deletes the image file associated with the selected thumbnail.
Page Setup
Sets the page size for printing.
Prints the selected image(s).
IPTC information
Displays the file information.
Attribute
Displays the following commands in the submenu: Protection attribute
ON, Protection attribute OFF, Hide mode ON, and Hide mode
OFF. Use the commands to toggle the attributes of the selected image on and off.
Exit
Quits Nikon View 5.
Add/Remove editing program...
Nikon Capture Paint
Add/Remove editing program
Select this command in Edit using other programs. You can add programs for editing images, or change the name of the program displayed in the menu. Up to 10 programs can be added.
Protection attribute GN Ctrl+L
Protection attribute OFF Ctrl+Shift+L
Hide mode QN
Hide mode OFF
Ctrl+H
Ctrl+Shift+H
Protection attribute ON
Turns deletion protection on.
Protection attribute OFF
Removes the protection setting from the selected file.
Hide mode ON
Hides the selected file.
Hide mode OFF
Removes hide setting from selected file.
Nikon Browser menus (Windows - Cont'd)
Edit
Select All
Ctrl+A
Select
Preferences... Ctrl+K
Select All
Selects all the displayed thumbnails.
Select
Displays the following commands in the submenu: Image with Protection attribute ON, Image with Protection attribute OFF, Image with Hide mode ON, and Image with Hide mode OFF. Use the commands to select all the thumbnails that have the same attribute.
Preferences
Displays the Preferences dialog box.
Image with Protection attribute QN Image with Protection attribute OFF
Image with Hide mode ON Image with Hide mode OFF
Image with Protection attribute ON Selects all protected thumbnails.
Image with Protection attribute OFF Selects all unprotected thumbnails.
Image with Hide mode ON
Selects all hidden thumbnails.
Image with Hide mode OFF
Selects all thumbnails that have not been hidden.
Display Toolbar
Shows or hides the toolbar.
View
DisplayIooalbar
Display Status bar
View Shooting Data
View Folders
Thumbnail size
Sort key
Sort order
Refresh
,
,
,
F5
Display Status bar
Shows or hides the status bar.
View Shooting Data
Shows or hides the Shooting Data area.
View Folders
Shows or hides the folder tree area.
Thumbnail size
Displays the following commands in the submenu: Minimum, Small, Normal, Large, and Maximum. Use the commands to change the size of the thumbnails.
Sort key
Displays the File name and Updated date and time commands in the submenu. Use the commands to sort the thumbnails based on the specified condition.
Sort order
Displays the Ascending and Des
scending commands in the submenu.
Use the commands to sort the thumb
nails in the ascending or descending
order.
Refresh
Refreshes the display of Nikon Browser.
Nikon Browser menus (Windows - Cont'd)
Minimum
Small
Normal
Large
Maximum
Minimum
Sets the size of thumbnails to 64 × 64 pixels.
Small
Sets the size of thumbnails to 96 x 96 pixels.
Normal
Sets the size of thumbnails to 128 × 128 pixels.
Large
Sets the size of thumbnails to 192 × 192 pixels.
Maximum
Sets the size of thumbnails to 256 × 256 pixels.
File name
Updated date and time
File name
Sorts thumbnails based on the file names.
Updated date and time
Sorts thumbnails based on the updated date and time.
Ascending
Descending
Ascending
Sorts thumbnails in ascending order of the selected Sort key.
Descending
Sorts thumbnails in descending order of the selected Sort key.
Image
Rotate... Ctrl+R
Rotate
Rotates selected thumbnails and associated images.
Nikon Browser menus (Windows - Cont'd)
Folder
Back
Forward
Up one level
Favorites
Transfer destination
Open with Explorer
Alt+LeftArrow
Alt+Right Arrow
Ctrl+U
Add to Favorites...
Organize Favorites...
Summer Vacation
Birthday Party
My Pictures
Back
Goes back to the previously selected folder.
Forward
Takes you back to where you were when you selected the Back command.
Up one level
Moves to the folder one level higher than the current folder in the folder hierarchy
Favorites
- Displays the Add to Favorites and
Organize Favorites commands in the submenu. Use the commands to add the selected folder to the Favorites or organize the folders you added.
Transfer destination
- Displays the 10 most recent transfer destinations.
Open with Explorer
Opens the folder that holds the selected thumbnail in Explorer.
Add to Favorites
Adds the selected folder to the Favorites. You can add up to 30 folders.
Organize Favorites
Organizes the folders added to Favor- ites.You can change the name and order of the folders displayed in Favorites.
Iools
Launch Image Transfer...
Slideshow...
Launch Image Transfer
Launches Nikon Transfer.
Slideshow
1 Plays the selected thumbnails as a slideshow.
Help
Help topics... F1
About Nikon View...
Help topics
Displays Nikon View 5 help topics.
About Nikon View
Displays version and copyright information for NikonView 5.
Nikon Browser menus (Macintosh)

About Nikon View 5...
About Nikon View 5
Displays version and copyright information for NikonView 5.
File
| Transfer | T |
| View... | 0 |
| Close | W |
| Edit | E |
| Edit using other program | |
| Cancel registration | |
| Delete | <x> |
| Page Setup... | |
| Print... | P |
| File information | |
| Attribute | |
| Quit | $Q |
View
Opens the image file associated with the selected thumbnail.
Edit
Edits the image file associated with the selected thumbnail using the specified program.
Edit using other program
Displays the Add/Remove editing program command in the submenu. Select the command to add editing programs. The menu also displays up to 10 registered programs.
Delete
Deletes the image file associated with the selected thumbnail.
Page Setup
Sets the page size for printing.
Prints the selected image(s).
File information
Displays the file information.
Attribute
Displays the Protection attribute ON and Protection attribute OFF commands in the submenu. Use the commands to toggle the attributes of the selected image on and off.
Quit
Quits Nikon View 5.
Add/Remove editing program...
Add/Remove editing program
You can add programs for editing images, or change the name of the program displayed in the menu. The menu also displays up to 10 registered programs.
Nikon Browser menus (Macintosh - Cont'd)
Protection attribute ON 9L Protection attribute OFF 9L
Protection attribute ON
- Sets the Protection attribute to an image file.
Protection attribute OEE
Cleared the Protection attribute of an image file.
Edit
Cannot Undo Z
Cut X
Copy C
Paste V
Clear
Select All A Select
Transfer Options...
Preferences... K
Image with Protection attribute ON Image with Protection attribute OFF
Image with Protection attribute ON Selects all the protected thumbnails.
Image with Protection attribute OFF Selects all the unprotected thumbnails.
Cannot Undo / Cut / Copy / Paste / Clear
Used when entering text in a text field, for example, file and folder names. You can cancel commands, cut, paste, or delete the selected text, and select all text.
Select All
Selects all the displayed thumbnails.
Select
Displays the Image with Protection attribute ON and Image with Protection attribute OFF commands in the submenu. Use the commands to select all the thumbnails in the list that have the same attribute.
Preferences
Displays the Preferences dialog box.
Nikon Browser menus (Macintosh - Cont'd)
View
| ✓ View Shooting Data ✓ ViewFolders | |
| Thamburger size | |
| Sort key | |
| Sort order | |
| Previous | |
| Next | |
| View entire image | |
| Zoom in | |
| Zoom out | |
| Zoom Tool | |
| Hand tool | |
| Refresh | |
View Shooting Data
- Shows or hides the Shooting Data area.
View Folders
Shows or hides the folder tree area.
Thumbsail size
Displays the following commands in the submenu: Minimum, Small, Normal, Large, and Maximum. Use the commands to change the size of the thumbnails.
Sort key
Displays the File name and Updated date and time commands in the submenu. Use the commands to sort the thumbnails based on the specified condition.
Sort order
Displays the Ascending and Descending commands in the submenu. Use the commands to sort the thumbnails in the ascending or descending order.
Refresh
Refreshes the display of the folder tree, thumbnail list, and Shooting Data areas.
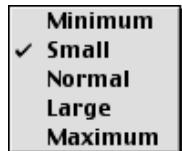
Minimum
Sets the size of the thumbnails to 64 × 64 pixels.
Small
Sets the size of the thumbnails to 96 × 96 pixels.
Normal
Sets the size of the thumbnails to 128 × 128 pixels.
Large
Sets the size of the thumbnails to 192 × 192 pixels.
Maximum
Sets the size of the thumbnails to 256 × 256 pixels.
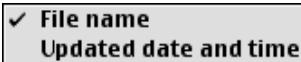
File name
Sorts the thumbnails based on the file names.
Updated date and time
Sorts the thumbnails based on the updated date and time.

Ascending
Sorts the thumbnails in ascending order of the selected Sort key.
Descending
Sorts the thumbnails in descending order of the selected Sort key.
Nikon Browser menus (Macintosh - Cont'd)
Image
Rotate... R
Rotate
Rotates the selected thumbnails and the associated images.
Folder
Back 96
Forward 96
Up one level 96U
Favorites Transfer Destination
Open with Browser Open in Finder
Back
Goes back to the previously selected folder.
Forward
Takes you back to where you were when you selected the Back command.
Up one level
Moves to the folder one level higher than the current folder in the folder hierarchy.
Favorites
Displays the Add to Favorites and Organize Favorites commands in the submenu. Use the commands to add the selected folder to Favorites or organize the list of Favorites.
Transfer Destination
Displays the 10 most recent transfer destinations.
Open in Finder
Opens the folder that holds the selected thumbnail in the Finder.
Add to Favorites...
Organize Favorites...
Documents
Add to Favorites
Adds the selected folder to Favorites. You can add up to 30 folders.
Organize Favorites
Organizes the folders added to Favor- ites.You can change the name and order of the folders displayed in Favor- ites.
Tools
Launch Image Transfer...
Slideshow...
Publish to NikonNet or PDA...
Launch Image Transfer
Displays Nikon Transfer.
Slideshow
Plays the selected thumbnails as a slideshow.
Help
About Balloon Help...
Show Balloons
Nikon View 5Help ?
Show Balloons
Displays Balloon Help.
Nikon View 5 Help
Opens the Nikon View 5 help file.
Nikon Viewer menus (Windows)
| File | |
| Close | Ctrl+W |
| Edit | Ctrl+E |
| Edit using other programs | |
| Delete | Del |
| Page Setup... | |
| Print... | Ctrl+P |
| IPTC information... | |
| Exit | Alt+F4 |
Prints the selected image(s).
IPTC information
Displays the IPTC Information dialog box.
Exit
Closes Nikon Viewer.
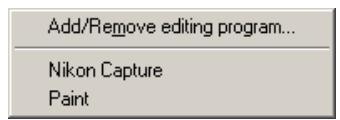
Add/Remove editing program
You can add programs for editing images, or change the name of the program displayed in the menu. The menu also displays up to 10 registered programs.
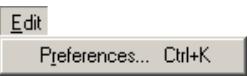
Preferences
Displays the Preferences dialog box.
Close
Closes the image displayed in the view area.
Edit
Edits the image file associated with the selected thumbnail using the specified program.
Edit using other programs
Displays the Add/Remove editing program command in the submenu. Select the command to add editing programs. The menu also displays up to 10 registered programs.
Delete
Deletes the image file associated with the selected thumbnail.
Page Setup
Sets the page size for printing.
Nikon Viewer menus (Windows - Cont'd)
| View | |
| Display Toolbar | |
| Status bar | |
| View Shooting Data | |
| Previous | Left Arrow |
| Next | Right Arrow |
| View entire image | |
| Zoom in | Ctrl+"+" |
| Zoom out | Ctrl+"" |
| Zoom Tool | Ctrl+9 |
| Hand tool | Ctrl+0 |
| Refresh | F5 |
Display Toolbar
Shows or hides the toolbar.
Display Status bar
Shows or hides the status bar.
View Shooting Data
Shows or hides the Shooting Data area.
Previous
Displays the previous image.
Next
Displays the next image.
View entire image
Displays the entire image.
Zoom in
Zooms into the displayed image.
Zoom out
Zooms out of the displayed image.
ZoomTool
Zooms into the image, centering the display around the point you click.
Hand tool
Pans around the image when the entire image is not displayed.
Refresh
Refreshes the display of the view area, Shooting Data area, and the status bar.
Folder
Open with Browser
Open with Explorer
Open with Browser
Opens the folder containing the displayed image in Nikon Browser.
Open with Explorer
Opens the folder containing the displayed image in Explorer.
Iools
Slideshow...
Slideshow
Plays the selected images in a slideshow.
Help
Help topics... F1
About Nikon View...
Help topics
Displays Nikon View 5 help topics.
About Nikon View
Displays version and copyright information for Nikon View 5.
Nikon Viewer menus (Macintosh)

About Nikon View 5...
About Nikon View 5
- Displays version information for Nikon View 5.
File
| Transfer | T |
| View... | 0 |
| Close | W |
| Edit | E |
| Edit using other program | |
| Cancel registration | |
| Delete | < |
| Page Setup... | |
| Print... | P |
| File information | |
| Attribute | > |
| Quit | $Q |
Close
Closes Nikon Viewer.
Edit
Opens and edits the image file associated with the selected thumbnail using the specified program.
Edit using other programs
Displays the Add/Remove editing program command in the submenu. Select the command to add editing programs. The menu also displays up to 10 registered programs.
Delete
Deletes the image file associated with the selected thumbnail.
Cancel registration
Closes the displayed image.
Page Setup
Sets the page size for printing.
Prints the selected image(s).
File information
Displays the file information.
Quit
Quits Nikon View 5.
Add/Remove editing program...
Add/Remove editing program
You can add programs for editing images, or change the name of the program displayed in the menu. The menu also displays up to 10 registered programs.
Nikon Viewer menus (Macintosh - Cont'd)
Edit
| Cannot Undo %Z |
| Cut %X |
| Copy %C |
| Paste %V |
| Clear |
| Select All %A |
| Select |
| Transfer Options... |
| Preferences... %K |
Preferences
Displays the Preferences dialog box.
View
| ✓ View Shooting Data | |
| ✓ ViewFolders | |
| Thamburger size | |
| Sort key | |
| Sort order | |
| Previous | |
| Next | |
| View entire image | |
| Zoom in | + |
| Zoom out | - |
| ✓ Zoom Tool | 9 |
| Hand tool | 0 |
| Refresh | |
View Shooting Data
Shows or hides the Shooting Data area.
Previous
Displays the previous image.
Next
Takes you back to where you were when you selected the Previous command.
View entire image
Zooms out of the image to display the entire image.
Zoom in
Zooms into the displayed image.
Zoom out
Zooms out of the displayed image.
Zoom Tool
Zooms into the image, centering the display around the point you click. The shape of the mouse pointer changes to the shape of a magnifying glass.
Hand tool
Pans around the image when the entire image is not displayed.
Refresh
Refreshes the display of the view area, Shooting Data area, and the status bar.
Folder
| Back | ©[Forward]Up one level |
| PreferencesTransfer Destination | |
| Open with BrowserOpen in Finder | |
Open with Browser
Opens the folder containing the displayed image in Nikon Browser.
Open in Finder
Opens in the Finder the folder containing the image displayed in Nikon Viewer.
Nikon Viewer menus (Macintosh - Cont'd)
Tools
Launch Image Transfer...
Slideshow...
Publish to NikonNet or PDA...
Slideshow
Plays the images in the folder containing the selected thumbnail as a slideshow.
Help
About Balloon Help...
Show Balloons
Nikon View 5Help ?
Show Balloons
Displays Balloon Help.
NikonView 5 Help
Opens the Nikon View 5 help file.
Appendix B: Troubleshooting
The following pages describe possible problems you may encounter while using Nikon View 5. If the problem persists, contact your retailer or our User Support Center.
| Problem | Possible Cause | |
| Nikon View 5 does not start automatically when a camera or card reader is connected. | ·A memory card is not inserted in the camera or card reader. ·The images on the memory card were taken with a make of camera not supported under Nikon View 5. ·The camera is not properly installed. ·Disable Auto Launch is selected in the Auto launch tab of the Preferences dialog. ·Your computer is running Nikon Capture (Windows only). | 12 12 12 71 — |
| The thumbnail list is not displayed. | ·A folder that contains no images is selected. ·The card does not contain images taken with a Nikon digital camera. | 39 — |
| Movies cannot be played back (Windows version only) | ·A movie player program is not installed. | 51 |
| Can not find image files which have been transferred to the computer. | ·A destination folder is not specified in the File Destination and Naming dialog box. | 24 |

Life-Long Learning
As part of Nikon's "Life-Long Learning" commitment to ongoing product support and education, continually-updated information is available on-line at the following web-sites:
For users in the United States of America: http://www.nikonusa.com/
For users in Europe: http://www.nikon-euro.com/
- For users in Asia, Oceania, the Middle East, and Africa: http://www.nikon-asia.com/
Visit these sites to keep up-to-date with the latest product information and general advice on digital imaging and photography.
For more information, please contact your nearest Nikon representative.
http://www.nikon-image.com/eng/
If you are using a COOLPIX series digital camera (excluding 990/880) keep in mind the following when connecting it to a computer.
When a digital camera with a memory card is connected, or when a memory card is inserted in a card reader or card slot:
Windows
The computer will show the camera or memory card as a new drive in the My Computer window. Opening the drive will reveal the folder DCIM, which holds further folders (for example, 100NIKON) containing images taken with the camera. Note that if you are connecting a camera to the computer for the first time, the camera must be registered as a device with Windows.
Macintosh
The camera or memory card will appear on the desktop as an untitled volume. Opening this volume will reveal the folder DCIM, which holds further folders (for example, 100NIKON) containing images taken with the camera. Note that memory cards formatted on a Dl series camera will appear on the desktop not as an untitled volume, but as a volume labeled NIKON DIX.
Before disconnecting or turning off a digital camera off, or removing a memory card from a card reader or card slot:
Windows Millennium Edition, Windows 2000 Professional, Windows XP Home Edition/Professional
Click the Unplug or Eject Hardware icon in the taskbar and remove the camera or memory card from the system.
Windows 98 Second Edition
Double click the My Computer icon, and select the removable disk corresponding to the camera. Then, on select Eject from the File menu.
Macintosh
Drag the untitled volume corresponding to the camera or memory card into the Trash. Note that memory cards formatted on a D1 series camera will appear on the desktop not as an untitled volume, but as a volume labeled NIKON DIX.
Appendix D : Reinstalling Nikon View 5
When Nikon View 5 does not function as expected (see Appendix B "Troubleshooting"), you may have to reinstall the program. This appendix describes how to uninstall and reinstall Nikon View 5 on both the Macintosh and Windows platforms.
Reinstalling Nikon View 5
Before reinstalling Nikon View 5, you will need to uninstall the program.
Windows
Step I—Uninstall NikonView 5
From the Start menu, select Programs > NikonView 5 > NikonView 5 Uninstall.
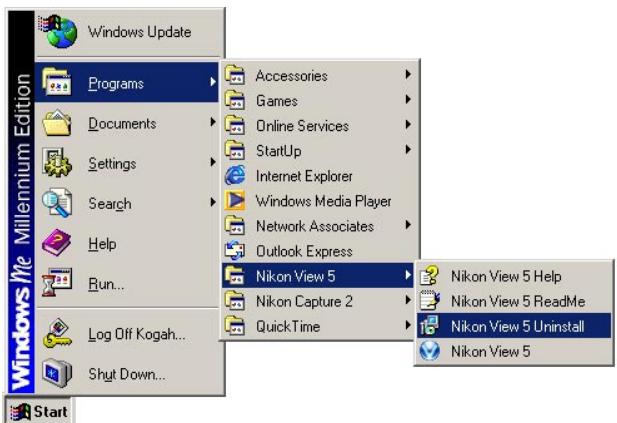
Click here to proceed to the next step.

Windows: 2000 Professional , XP Home Edition/Professional
Log on as Administrator when uninstalling Nikon View 5 from Windows 2000 Professional or as Computer Administrator when uninstalling Nikon View 5 from Windows XP Home Edition/Professional.
Macintosh
Step I—Start the installer
Insert the Nikon View 5 CD into the CD-ROM drive, and select Nikon View 5 in the Software tab of the Install Center dialog box. The license agreement and ReadMe windows will be displayed. Click Accept and Continue to proceed to the installer dialog shown in Step 2.
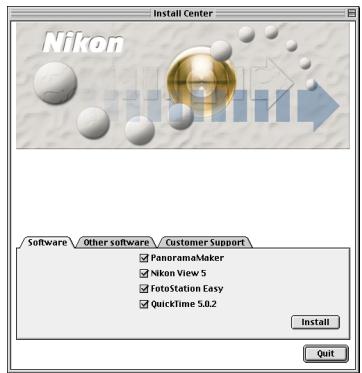
Click here to proceed to the next step.

Mac OS X
You will be required to enter Administrator password to uninstall Nikon View 5 under Mac OS X.
Windows
Step 2—Confirm deletion of files
When the message, "Do you want to completely remove the selected application and all of its components?" appears, click OK to begin the process of uninstalling Nikon View 5.
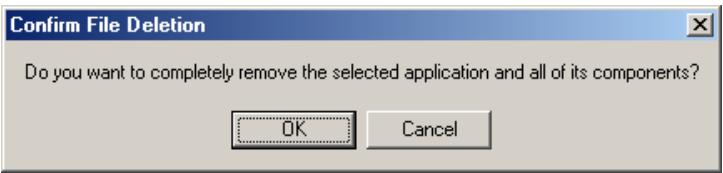
Step 3—Detect Shared components
If any of the components used by Nikon View 5 are also used by another program, a confirmation dialog will be displayed. Follow the instructions in the dialog to remove the component or leave it untouched.
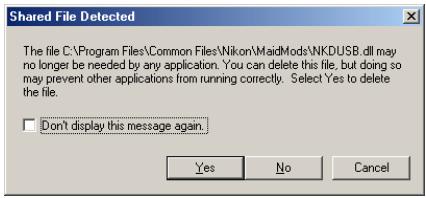

Click here to proceed to the next step.
Macintosh
Step 2—Uninstall NikonView 5
To start the process of uninstalling Nikon View 5, select Uninstall from the pull-down menu in the top left corner of the installer dialog box and then click the Uninstall button in the bottom right corner.
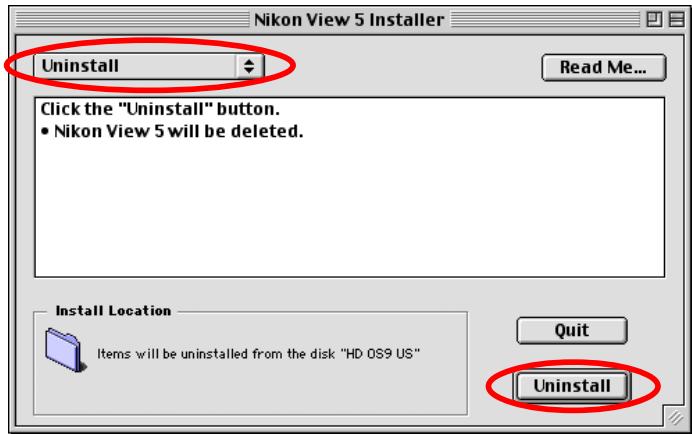
Step 3—Exit other applications
Click Continue to automatically quit all other applications and continue the process of uninstalling Nikon View 5.

No other applications can be running during this operation. Click Continue to automatically quit all other running applications. Click Cancel to leave your disks untouched.
Cancel
Continue
Windows
Step 4—Restart your computer
The dialog shown below will be displayed when the process of uninstalling NikonView 5 is complete.
Confirm that Yes, I want to restart my computer now is selected and click Finish to restart your computer.
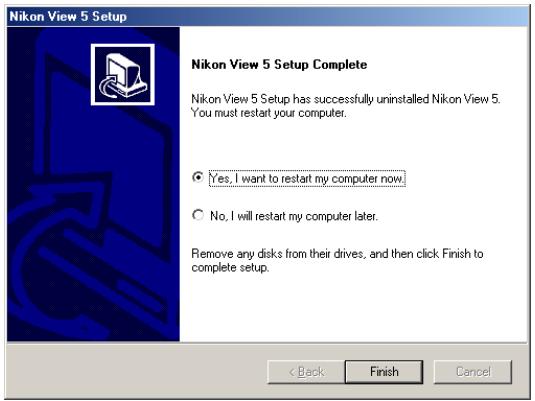
Step 5—Reinstall Nikon View 5
Reinstall Nikon View 5 as described in "Getting Started: Installation" (7).

Pg. For more information on:

7 Installing Nikon View 5
Macintosh
Step 4—Exit the installer
Once the process of uninstalling Nikon View 5 is complete, a message will be displayed.
Click OK to exit the uninstaller.

The uninstall was successful. However, some files/folders could not be deleted because they are shared by other applications, are currently in use, or contain files not installed by this install program.
OK
Step 5—Restart your computer
Restart your computer.
Step 6—Reinstall Nikon View 5
Reinstall Nikon View 5 as described in "Getting Started: Installation" (7).

Pg. For more information on:

7 Installing Nikon View 5
- Nikon View 5 Reference Manual
- Overview
- Trademark Information
- Reading This Manual
- Getting Started
- Using Nikon View 5
- - Tutorial
- - Preferences
- - Appendices
- Background Knowledge
- Illustrations
- Printing This Manual
- Life-Long Learning
- About This Chapter
- System Requirements
- Windows
- Support and updates
- Installing Nikon View 5 and Supporting Software
- Windows / Macintosh
- Camera
- COOLPIX series (USB supported)
- Operating system
- Nikon View 5 Overview
- Nikon Transfer
- Nikon Browser
- Nikon Viewer
- Connecting Your Camera
- Connecting the camera to your computer
- Using a card slot
- Inserting a memory card
- Using a Card Reader
- If Nikon Transfer does not start
- Starting Nikon View 5
- Starting Nikon Transfer
- Auto start
- Starting NikonView underWindows XP
- Procedures to start NikonView 5 under Windows XP
- Always do the selected action check box
- Starting NikonView under Mac OS X
- Starting Image Capture
- If nothing is displayed
- If a window other than Nikon Transfer is displayed
- Transferring Images
- Transferring images using the TRANSFER button on the camera
- Viewing still images
- Viewing movies
- Printing Images
- Printing Images from Nikon Browser
- Setting up the printer
- Printing Images from NikonViewer
- Tutorial
- Using Nikon Transfer
- Image transfer rule menu
- After transfer is completed field
- File destination and naming area
- Menu in the Macintosh version
- Transferring Images Using Nikon Transfer
- Step I—Specify the image transfer rule
- If you are using a camera equipped with a TRANSFER button
- Setting the transfer mark
- Step 2—Set up the transfer destination and file name
- File destination field
- File naming field
- If you cannot change the transfer destination
- If a file with the same name already exists in the destination folder
- Specifying a transfer destination
- Transfer field
- Create a new subfolder for each transfer check box
- Copy folder names from camera check box
- Folder name creation rules dialog box
- Prefix field
- Suffix field
- Unique naming key between pre and suffix pull-down menu
- Specifying the file name
- File naming limitations
- Original file name
- Change
- Extensions
- File name creation rules dialog box
- Step 3—Set up the transfer options
- The Transfer options dialog box
- The General tab
- Start Nikon Browser
- Launch third-party image database program
- Do nothing
- The Transfer tab
- Delete original files after transfer is completed check box
- Copy all images marked as "hidden" check box
- Add additional information (IPTC field) to all files check box
- Copy Shooting data (Shutter speed etc...) to the IPTC caption field check box
- Macintosh
- Add thumbnail icon check box
- The Creator tab (Macintosh version only)
- Still image (Exif format) field
- Still image (NEF format) field
- Movie field
- The Database tab
- If Select a third-party database program is not selected
- Select a third-party database application field
- Specify database catalog file field
- Specify a hot folder field
- Step 4—Add additional file information
- Caption area
- Keywords area
- Adding file information
- Step 5—Transfer image files
- Operations during transfer
- Cancelling during transfer
- Programs that launch after transfer
- Unexpected termination
- Restarting Nikon Transfer
- If you exited Nikon Transfer while the camera and computer were connected
- Using Nikon Browser
- Working with folders
- Selecting a folder using the keyboard
- Choosing a folder
- Opening folders in Explorer or Finder
- Moving image files
- Moving files between folders
- Creating and deleting folders in the folder tree area
- Deleting folders (Windows)
- Adding folders to Favorites
- Add to Favorites dialog box
- Name box
- Folder location box
- Organize Favorites dialog box
- List Favorites box
- Move up / Move down buttons
- Add button
- Change button
- Delete button
- Working with thumbnails
- Thamburger display
- Changing the thumbnail size
- Selecting thumbnails
- Selecting Multiple Images
- Thumbnail attributes
- Rotating thumbnails
- When one thumbnail is selected
- When multiple thumbnails are selected
- Rotating movies
- Displaying shooting data
- COOLPIX990/880
- Viewing file information
- Displaying the IPTC Information dialog box
- Registering shooting data
- File information from Nikon Browser
- Deleting image files
- Deleted image files
- Displaying Images
- Other ways of viewing images
- Displaying images in Nikon Viewer
- Image Editing Programs
- Pg. For more information on:
- Playing back movies
- Other ways to play back movies
- Installing QuickTime
- Program to edit movies
- Adding and removing editing programs
- Displaying the Add/Remove editing program dialog box
- The Add/Remove editing program dialog box
- Program list box
- The Add program dialog box
- Executable file box
- The Change program dialog box
- The Print layout dialog box
- Print preview check box
- Copies box
- Setting button
- Page layout area
- Select layout
- Select picture size
- Rotate image(s) to fit check box
- Printing quality area
- Playing a slideshow
- Displaying the Slideshow Properties dialog box
- Setting the Slideshow Properties dialog box
- Files tab
- Options tab
- Play Movies to end check box
- Play Sound for all running movies check box
- Display File Info check box
- Margin between grid cells check box
- Stage Grid/Color field
- Using the toolbar
- Exit button
- Play mode button
- Back button
- Play/Pause button
- Forward button
- Fade button
- Resize button
- Status bar
- Switching the Slideshow Properties dialog box display
- Exiting the slideshow
- About the slideshow
- Using Nikon Viewer
- Title Bar
- Toolbar
- Shooting Data Area
- View Area
- - Menu bar
- Displaying images in detail
- Viewing the entire image
- About the zoom ratio
- Zooming into or out of an image
- Zoom In / Zoom Out buttons
- The Zoom tool button
- Moving the display position
- Hand tool and Zoom tool
- Editing image files
- Viewing a slideshow
- If only one image is opened
- Opening folders in Nikon Browser
- Viewing Help
- Viewing help in Nikon Transfer and Nikon Browser
- Preferences
- Fine-tuning Nikon View 5
- Overview of the Preferences Dialog Box
- Displaying the Preferences dialog box
- The Transfer options dialog box of Nikon Transfer
- The Auto launch Tab
- Setting how to launch Nikon Transfer
- Auto launch when connected to a camera or a card
- Disable auto launch
- The Disable auto launch option in Windows XP
- The-Thumbs nails Tab
- Setting how to create thumbnails
- Re-create thumbnails from actual image data check box
- Large thumbnails
- The Still image Tab
- Selecting an image editing program
- Photo Editing Program area
- Use the default photo editing program selected by your Operating System
- Use the following program
- RAW data area
- The Movie Tab
- Selecting a movie player program
- Movie Player Program area
- Use the default movie player selected by your Operating System
- Movie Editing Program area
- Same as movie player program
- Appendices
- Nikon Transfer Menus (Macintosh Version Only)
- About Nikon View 5...
- File
- Transfer
- Close
- File Information
- Quit
- Edit
- Cannot Undo / Cut / Copy / Paste / Clear / Select All / Select
- Transfer Options
- Help
- Show Balloons
- Nikon View 5 Help
- Nikon Browser menus (Windows)
- View
- Edit using other programs
- Delete
- Page Setup
- IPTC information
- Attribute
- Exit
- Add/Remove editing program
- Protection attribute ON
- Protection attribute OFF
- Hide mode ON
- Hide mode OFF
- Nikon Browser menus (Windows - Cont'd)
- Select All
- Select
- Display Status bar
- View Shooting Data
- View Folders
- Thumbnail size
- Sort key
- Sort order
- Refresh
- Minimum
- Small
- Normal
- Large
- Maximum
- File name
- Updated date and time
- Ascending
- Descending
- Rotate
- Folder
- Back
- Forward
- Up one level
- Favorites
- Transfer destination
- Open with Explorer
- Add to Favorites
- Organize Favorites
- Iools
- Launch Image Transfer
- Slideshow
- Help topics
- About Nikon View
- Nikon Browser menus (Macintosh)
- About Nikon View 5
- Edit using other program
- Nikon Browser menus (Macintosh - Cont'd)
- Protection attribute OEE
- Cannot Undo / Cut / Copy / Paste / Clear
- Thumbsail size
- Image
- Open in Finder
- Tools
- Nikon Viewer menus (Windows)
- Nikon Viewer menus (Windows - Cont'd)
- Display Toolbar
- Previous
- Next
- View entire image
- Zoom in
- Zoom out
- ZoomTool
- Hand tool
- Open with Browser
- Nikon Viewer menus (Macintosh)
- Cancel registration
- Nikon Viewer menus (Macintosh - Cont'd)
- Zoom Tool
- Appendix B: Troubleshooting
- Windows 98 Second Edition
- Appendix D : Reinstalling Nikon View 5
- Reinstalling Nikon View 5
- Step I—Uninstall NikonView 5
- Step I—Start the installer
- Mac OS X
- Step 2—Confirm deletion of files
- Step 3—Detect Shared components
- Step 2—Uninstall NikonView 5
- Step 3—Exit other applications
- Step 4—Restart your computer
- Step 5—Reinstall Nikon View 5
- Step 4—Exit the installer
- Step 5—Restart your computer
- Step 6—Reinstall Nikon View 5
Marque : NIKON
Modèle : VIEW 5
Catégorie : Logiciel de traitement d'images