
XM-504Z - Amplificateur de voiture SONY - Notice d'utilisation et mode d'emploi gratuit
Retrouvez gratuitement la notice de l'appareil XM-504Z SONY au format PDF.

| Type de produit | Amplificateur de voiture |
| Marque | Sony |
| Modèle | XM-504Z |
| Puissance maximale | 4 x 100 W (à 4 Ω) ou 2 x 100 W + 1 x 250 W (en pontage, à 4 Ω) |
| Puissance nominale | 4 x 50 W (à 4 Ω, 0,04 % THD) ou 4 x 60 W (à 2 Ω, 0,1 % THD) |
| Réponse en fréquence | 5 Hz – 80 kHz (+0/-10 dB) |
| Distorsion harmonique | 0,005 % ou moins (à 1 kHz, 4 Ω, 10 W) |
| Filtre passe-bas | 80 Hz, -18 dB/octave (commutable) |
| Filtre passe-haut | 80 Hz, -12 dB/octave (commutable) |
| Impédance des enceintes | 2 – 8 Ω (stéréo), 4 – 8 Ω (en pontage) |
| Entrées | Prises RCA (0,3 – 6 V) et connecteur haut niveau (1,2 – 12 V) |
| Alimentation | Batterie 12 V CC (masse négative), tension 10,5 – 16 V |
| Consommation électrique | 30 A (à puissance nominale, 4 Ω, 50 W x 4) |
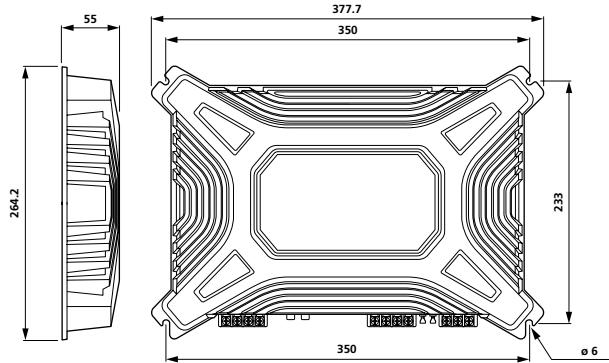
| Dimensions (L x H x P) | Environ 350 x 55 x 233 mm (sans parties saillantes) |
| Poids | Environ 3,1 kg (sans accessoires) |
| Circuit de protection | Intégré (surchauffe, courant continu, court-circuit) – témoin POWER/PROTECTOR passe du vert au rouge |
| Alimentation à impulsions | Régulateur intégré pour une alimentation stable et efficace |
| Installation | Coffre ou sous siège, ne pas obstruer la dissipation thermique |
| Fusible recommandé | 50 A (à placer près de la batterie) |
| Accessoires fournis | Vis de montage (4), câble d’entrée haut niveau (1), capuchon de protection (1) |
| Entretien et nettoyage | Essuyer avec un chiffon sec ; éviter l’humidité et la poussière |
| Sécurité | Ne pas couvrir les ailettes de refroidissement ; utiliser un fusible de même calibre ; ne pas connecter d’enceintes actives |
| Pièces détachées et réparabilité | Fusible 50 A (non fourni) ; contacter un revendeur Sony agréé pour toute réparation |
| Informations générales | Garantie et assistance Sony ; les spécifications peuvent être modifiées sans préavis |
FOIRE AUX QUESTIONS - XM-504Z SONY
Questions des utilisateurs sur XM-504Z SONY
0 question sur cet appareil. Repondez a celles que vous connaissez ou posez la votre.
Poser une nouvelle question sur cet appareil
Téléchargez la notice de votre Amplificateur de voiture au format PDF gratuitement ! Retrouvez votre notice XM-504Z - SONY et reprennez votre appareil électronique en main. Sur cette page sont publiés tous les documents nécessaires à l'utilisation de votre appareil XM-504Z de la marque SONY.
MODE D'EMPLOI XM-504Z SONY
Specifications
| Circuit system | OTL (output transformerless) circuitPulse power supply |
| Inputs | RCA pin jacksHigh level input connector |
| Input level adjustment range | 0.3 – 6 V (RCA pin jacks),1.2 – 12 V (High level input) |
| Outputs | Speaker terminals |
| Speaker impedance | 2 – 8 Ω (stereo)4 – 8 Ω (when used as a bridging amplifier) |
| Maximum output | Four speakers: 100 W × 4 (at 4 Ω)Three speakers: 100 W × 2 + 250 W × 1 (at 4 Ω) |
| Rated output (supply voltage at 14.4 V) | Four speakers:50 W × 4 (20 Hz – 20 kHz, 0.04 % THD, at 4 Ω)60 W × 4 (20 Hz – 20 kHz, 0.1 % THD, at 2 Ω) |
| Frequency response | 5 Hz – 80 kHz (10 dB) |
| Harmonic distortion | 0.005 % or less (at 1 kHz, 4 Ω, 10 W) |
| Low-pass filter | 80 Hz, -18 dB/oct |
| High -pass filter | 80 Hz, -12 dB/oct |
| Power requirements | 12 V DC car battery (negative earth) |
| Power supply voltage | 10.5 – 16 V |
| Current drain | at rated output: 30 A (4 Ω, 50 W × 4)Remote input: 1 mA |
| Dimensions | Approx. 350 × 55 × 233 mm (w/h/d)not incl. projecting parts and controls |
| Mass | Approx. 3.1 kg not incl. accessories |
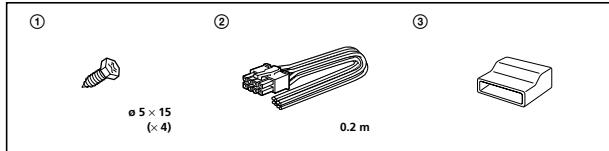
| Supplied accessories | Mounting screws (4)High level input cord (1)Protection cap (1) |
Design and specifications are subject to change without notice.
Especificaciones
| Sistema de circuito | Circuito OTL (salida sin transformador) |
| Suministro de alimentación por impulsos | |
| Entradas | Tomas con terminales RCA |
| Conector de entrada de alto nivel | |
| Margen de ajuste de nivel de entrada | De 0,3 a 6 V (tomas con terminales RCA) |
| De 1,2 a 12 V (entrada de alto nivel) | |
| Salidas | Terminales de altavoz |
| Impedancia de altavoz | De 2 a 8 Ω (estéreo) |
| De 4 a 8 Ω (si se utiliza como amplificador en puente) | |
| Salida máxima | Cuatro altavoces: 100 W × 4 (a 4 Ω) |
| Tres altavoces: 100 W × 2 + 250 W × 1 (a 4 Ω) | |
| Salida nominal(tensión de suministro a 14,4 V) | Cuatro altavoces: |
| 50 W × 4 (de 20 Hz a 20 kHz, 0,04 % THD, a 4 ) | |
| 60 W × 4 (de 20 Hz a 20 kHz, 0,1 % THD, a 2 ) | |
| Respuesta de frecuencia | De 5 Hz a 80 kHz ( _10^+ dB) |
| Distorsión armónica | 0,005 % o inferior (a 1 kHz, 4 Ω, a 10 W) |
| Filtro de paso bajo | 80 Hz, -18 dB/oct |
| Filtro de paso alto | 80 Hz, -12 dB/oct |
| Requisitos de alimentación | Batería de automóvil de cc de 12 V (negativo a masa) |
| Tensión de suministro de alimentación | De 10,5 a 16 V |
| Consumo de energía | Con salida nominal: 30 A (4 Ω, 50 W × 4) |
| Entrada remota: 1 mA | |
| Dimensiones | Aprox. 350 × 55 × 233 mm (an/al/prf) ,componentes y controles salientes excluidos |
| Masa | Aprox. 3,1 kg, accesorios excluidos |
| Accesorios suministrados | Tornillos de montaje (4) |
| Cable de entrada de alto nivel (1) | |
| Cubierta protectora (1) |
Diseño y especificaciones sujetos a cambios sin previo aviso.
Features
| • Maximum power output of 100 W per channel (at 4 Ω). |
| • This unit can be used as a bridging amplifier with a maximum output of 250 W. |
| • Built-in Low-pass filter (80 Hz, -18 dB/oct) and High-pass filter (80 Hz, -12 dB/oct). |
| • Built in protection circuit*. |
| • Pulse power supply** for stable and regulated output power. |
| • Direct connection can be made with the speaker output of your car audio if it is not equipped with the line output (High level input connection). |
| * Protection circuitThis amplifier is provided with a protection circuit that operates in the following cases:— when the unit is overheated— when a DC current is generated— when the speaker terminals are short circuited.The colour of the POWER/PROTECTOR indicator will change from green to red, and the unit will shut downIf this happens, turn off the connected equipment, take out the cassette tape or disc, and determine the cause of the malfunction. If the amplifier has overheated, wait until the unit cools down before use.** Pulse power supplyThis unit has a built-in power regulator which converts the power supplied by the DC 12 V car battery into high speed pulses using a semiconductor switch. These pulses are stepped up by the built-in pulse transformer and separated into both positive and negative power supplies before being converted into direct current again. This is to regulate fluctuating voltage from the car battery. This light weight power supply system provides a highly efficient power supply with a low impedance output. |
POWER/PROTECTOR indicator

Installation
Before Installation
| • Mount the unit either inside the trunk or under a seat. |
| • Choose the mounting location carefully so the unit will not interfere with the normal movements of the driver and it will not be exposed to direct sunlight or hot air from the heater. |
| • Do not install the unit under the floor carpet, where the heat dissipation from the unit will be considerably impaired. |
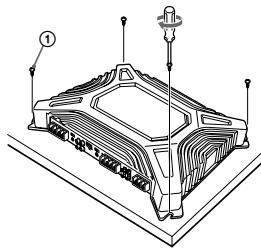
First, place the unit where you plan to install it, and mark the positions of the four screw holes on the mounting board (not supplied). Then drill a 3 mm pilot hole at each mark and mount the unit onto the board with the supplied mounting screws. The mounting screws are all 15 mm long, so make sure that the mounting board is thicker than 15 mm.
Mount the unit as illustrated.

Fuse Replacement
| If the fuse blows, check the power connection and replace both the fuses. If the fuse blows again after replacement, there may be an internal malfunction. In such a case, consult your nearest Sony dealer. |
Warning
| When replacing the fuse, be sure to use one matching the amperage stated above the fuse holder. Never use a fuse with an amperage rating exceeding the one supplied with the unit as this could damage the unit. |
Características
| • Salida de potencia máxima de 100 W por canal (a 4 ). |
| • Esta unidad puede utilizarse como amplificador en monoaural con una salida máxima de 250 W. |
| • Filtro de paso bajo (80 Hz, -18 dB/oct) y filtro de paso alto (80 Hz, -12 dB/oct) incorporados. |
| • Circuito de protección* incorporado. |
| • Suministro de alimentación por impulsos** para obtener una potencia de salida estable y regulada. |
| • Es posible realizar una conexión directa con la salida de altavoz de un sistema de audio para automóvil si éste no está equipado con salida de línea (conexión de entrada de alto nivel). |
| * Circuito de protecciónEste amplificador dispone de un circuito de protección que se activa en los siguientes casos:— si la unidad se calienta excesivamente— si se genera corriente cc— si se produce un cortocircuito en los terminales de los altavoces.El color del indicador POWERIPROTECTOR cambiará de verde a rojo y la unidad se desactivará. Si esto ocurre, apague el equipo conectado, extraiga la cinta de casete o el disco y determine la causa del fallo de funcionamiento. Si el amplificador se ha sobrecalentado, espere hasta que la unidad se enfrie antes de volver a utilizarla.** Suministro de alimentación por impulsosEsta unidad dispone de un regulator de potencia incorporado que convierte el suministro de alimentación de cc de 12 V de la batería del automóvil en impulsos de alta velocidad mediante un interruptor semiconductor. Estos impulsos se incrementan mediante el transformador de impulsos incorporado y se dividen en suministro de alimentación positiva y negativa antes de volver a convertirse en corriente directa. De esta forma, se regula la tensión fluctuante de la batería del automóvil. Este sistema de suministro de alimentación de peso ligero proporciona una alta eficacia del suministro con una salida de baja impedancia. |
Indicador POWER/PROTECTOR

Instalación
Antes de realizar la instalación
| • Monte la unidad en el interior del maletero o debajo de un asiento.• Elija cuidadosamente el lugar de instalación de forma que la unidad no dificulte los movimientos normales del conductor y no quede expuesta a la luz solar directa ni al aire caliente de la calefacción.• No instale la unidad debajo de la moqueta del suelo, en cuyo caso la disipación de calor de la misma disminuirá considerablemente. |
En primer lugar, coloque la unidad donde tenga previsto instalarla y marque sobre la superficie del tablero de montaje (no suministrado) las posiciones de los cuatro orificios para los tornillos. A continuación, perforre los orificios con un diámetro de aproximadamente 3 milímetros y monte la unidad sobre el tablero mediante los tornillos de montaje suministrados. Ya que la longitud de estos tornillos es de 15 mm, compruebe que el grosor del tablero de montaje sea superior a 15 mm.
Monte la unidad tal como se muestra en la ilustración.

Sustitución del fusible
| Si el fusible se funde, compruebe la conexión de alimentación y sustituya ambos fusibles. Si el fusible se funde de nuevo después de sustituirlo, es posible que exista un fallo de funcionamiento interno. En este caso, póngase en contacto con el distribuidor Sony más próximo. |
Advertencia
| Al sustituir el fusible, asegúrese de utilizar uno cuyo amperaje coincida con el especificado en el portafusible. No utilice nunca un fusible con un amperaje superior al del suministrado con la unidad, ya que la disipación de calor podría dañarla. |

規格
| 電路系統 | OTL(無變壓器輸出)電路 |
| 脈衝電源 | |
| 輸入 | RCA插接插口 |
| 高電平輸入連接器 | |
| 輸入電平調整範圍 | 0.3-6V(RCA插接插口) |
| 1.2-12V(高電平輸入) | |
| 輸出 | 揚聲器端子 |
| 揚聲器阻抗 | 2-8Ω(立體聲)4-8Ω(當用作橋式放大器時) |
| 最大輸出 | 4個揚聲器:100W×4(在4Ω時)3個揚聲器:100W×2+250W×1(在4Ω時) |
| 額定輸出(14.4V時的電源電壓) | 4個揚聲器:每聲道50W(20Hz-20kHz,0.04%THD,在4Ω時)每聲道60W(20Hz-20kHz,0.1%THD,在2Ω時) |
| 頻率響應 | 5Hz-80kHz(2dB) |
| 諧波失真 | 0.005%或少於0.005%(在1kHz、4Ω、10W時) |
| 低通濾波器 | 80Hz,-18dB/oct |
| 高通濾波器 | 80Hz,-12dB/oct |
| 電源 | 12V直流電汽車電池(負接地) |
| 電源電壓 | 10.5-16V |
| 耗用電流 | 在額定輸出時為30A(4Ω、50W×4) |
| 遙控輸入:1mA | |
| 尺寸 | 約350×55×233mm(寬/高/深),不包括突出部分和控制器 |
| 重量 | 約3.1kg不包括附件 |
| 提供的附件 | 安裝用螺釘(4)高電平輸入線(1)保護蓋帽(1) |
設計和規格若有變更,恕不另行通知
功能
| ●每聲道最大功率輸出為100W(在4Ω時)。 |
| ●本機可用作最大功率輸出為250W的橋式放大電源。 |
| ●內置式低通濾波器(80Hz,-18dB/oct)和高通濾波器(80Hz,-12dB/oct)。 |
| ●內設保護電路*。 |
| ●穩定輸出功率用脈衝電源**。 |
| ●若您的汽車音響未配備線路輸出,則可以用汽車音響的揚聲器輸出進行直接連接(高電平輸入連接)。 |
| *保護電路 |
| 本放大器提供一種保護電路,它在下列情況下進行動作: |
| —當本機過熱時 |
| —當產生直流電時 |
| —當揚聲器端子短路時。 |
| POWER/PROTECTOR(電源/保護電路)指示燈的顏色將由綠變成紅,隨之本機將停機。 |
| 若發生這種情況,關掉相連接的裝置,取出磁帶或唱樣,然後確定故障的原因。若放大器過熱,則等待本機冷卻後再使用。 |
| **脈衝電源 |
| 本機有一個內設電源穩壓器,它使用半導體轉換開關可將12V直流電汽車電池轉換成高速脈衝。內設脈衝變壓器可將這些脈衝逐步升高,同時這些脈衝在被再次轉換或直流電之前被分離為正負電源。這是為了調整汽車電池的波動電壓。這種輕負荷電源系統可提供低阻抗輸出的高效電源。 |
POWER/PROTECTOR(電源/保護電路)指示燈

安装
安装之前
| 本機可安裝在車尾行李艙內,也可安裝在座位底下。要仔細地選擇安裝位置,以使本機不影響司機的正常活動,也不要使本機受陽光直射或將本機置於熱氣管道的熱源附近。切勿將本機安置於地板地毯下,否則本機的散熱將大受影響。 |
首先,將本機放在您打算安裝的地方,並且在安裝板(未提供)上標記4個螺釘孔的位置。然後在每個標記處鑽一個3 mm裝配孔,用提供的安裝用螺釘將本機安裝在安裝板上。所有安裝用螺釘都是15 mm長,所以要確保安裝板的厚度在15 mm以上。
按圖示安裝本機
更換保險絲
| 如果保險絲燒斷,請檢查電源連接並更換兩個保險絲。若保險絲更換後又被燒斷,則可能是內部故障。在這種情況下,請向離您最近的 Sony 經銷商諮詢。 |
警告
| 當更換保險絲時,要確保使用與保險絲管座上規定安培數一致的保險絲。切勿使用額定安培數超過附帶保險絲安培數的保險絲,否則會損壞本機。 |
Troubleshooting guide
| The following checklist will assist in the correction of most problems which you may encounter with your unit.Before going through the checklist below, refer to the connection and operating procedures. |
| Problem | Cause/Solution |
| The POWER/PROTECTOR indicator does not light up. | The fuse is blown. → Replace the fuse with a new one. |
| The earth lead is not securely connected. → Fasten the earth lead securely to a metal point of the car. | |
| The voltage going into the remote terminal is too low.• The connected master unit is not turned on.→ Turn on the master unit.• The system employs too many amplifiers. → Use a relay. | |
| Check the battery voltage (10.5 – 16 V). | |
| • The POWER/PROTECTOR indicator will change from green to red.• The unit becomes abnormally hot. | Use speakers with suitable impedance.• Stereo operation: 2 – 8 ohms• Bridging operation: 4 – 8 ohms |
| The speaker outputs are short-circuited.→ Rectify the cause of the short-circuit. | |
| Alternator noise is heard. | The power connecting leads are installed too close to the RCA pin cords. → Keep the leads away from the cords. |
| The earth lead is not securely connected. → Fasten the earth lead securely to a metal point of the car. | |
| Speaker leads are touching the car chassis.→ Keep the leads away from the car chassis. |
Guía de solución de problemas
| La siguiente lista le resultará útil para solucionar la mayoría de los problemas que pueda encontrar con la unidad.Antes de consultar la lista, examine los procedimientos de conexión y funcionamiento. |
| Problema | Causa/Solución |
| El indicador POWER/PROTECTOR no se ilumina. | El fusible se ha fundido. → Sustitúyalo por otro nuevo. |
| El cable de toma a tierra no está firmemente conectado.→ Conéctelo firmemente a un punto metálico del automóvil. | |
| La tensión que recibe el terminal remoto es demasiado baja.No ha encendido la unidad principal conectada.→ Enciéndala.El sistema emplea demasiados amplificadores.→ Utilice un relé. | |
| Compruebe la tensión de la batería (de 10,5 a 16 V). |
| El indicador POWER/PROTECTOR cambia de verde a rojo.La unidad se calienta de forma anormal. | Emplee altavoces con una impedancia adecuada.Funcionamiento estéreo: de 2 a 8 ΩFuncionamiento en puente: de 4 a 8 ΩSe ha producido un cortocircuito en las salidas de los altavoces.→ Rectifique la causa del cortocircuito. |
| Se escucha ruido del alternador. | Los cables de conexión de alimentación se encuentran demasiado cerca de los cables con terminales RCA.→ Manténgalos alejados entre sí.El cable de toma a tierra no está firmemente conectado.→ Conéctelo firmemente a un punto metálico del automóvil.Los cables del altavoz han entrado en contacto con el chasis del automóvil. → Manténgalos alejados del chasis. |
故障排除指南
| 下列檢查表有助於解決您使用本機時可能遇到的大多數問題。在使用下面的檢查表之前,請檢查連接和操作步驟是否正確。 |
| 故障 | 原因/解決方法 |
| POWER/PROTECTOR(電源/保護電路)指示燈未點亮。 | 保險絲被燒斷了 → 更換新的保險絲。 |
| 接地導線沒有牢固地連接好。→ 將接地導線牢固地固定在汽車的金屬部位上。 | |
| 進入遙控端子的電壓太低。• 連接的主機沒有被打開。 → 打開主機。• 本系統使用太多放大器。 → 使用繼電器。 | |
| 檢查電池的電壓(10.5 - 16 V)。 | |
| • POWER/PROTECTOR指示燈將由線變紅。• 本機變得不正常地發熱。 | 使用適當阻抗的揚聲器。• 立體聲操作:2 - 8 Ω• 橋式操作:4 - 8 Ω |
| 揚聲器輸出短路了。 → 檢查短路原因。 | |
| 聽到交流發電機噪聲。 | 電源連接線安裝得太靠近 RCA 插接導線。→ 要使電源線遠離插接導線。 |
| 接地導線沒有牢固地連接好。→ 將接地導線牢固地固定在汽車的金屬部位上。 | |
| 揚聲器導線碰到了汽車底盤。→ 要使這些導線遠離汽車底盤。 |
Stereo Power Amplifier AMPLIFICADOR
Operating instructions
Manual de instrucciones
使用說明書
POR FAVOR LEA DETALLADAMENTE ESTE MANUAL DE INSTRUCCIONES ANTES DE CONECTAR Y OPERAR ESTE EQUIPO. RECUERDE QUE UN MAL USO DE SU APARATO PODRÍA ANULAR LA GARANTÍA.
XM-504Z
©2004 Sony Corporation
Parts for Installation and Connections
Componentes de instalación y conexiones 安裝及線路連接用的零件
Dimensions
Dimensiones
尺寸
Unit: mm
Unidad: m
單位:mm
Precautions
- This unit is designed for negative earth 12 V DC operation only. - Use speakers with an impedance of 2 to 8 ohms (4 to 8 when used as a bridging amplifier).
- Do not connect any active speakers (with built-in amplifiers) to the speaker terminals of the unit. Doing so may damage the active speakers.
- Avoid installing the unit in areas subject to:
— high temperatures such as from direct sunlight or hot air from the heater.
— rain or moisture
— dust or dirt.
- If your car is parked in direct sunlight and there is a considerable rise in temperature inside the car, allow the unit to cool down before use.
- When installing the unit horizontally, be sure not to cover the fins with the floor carpet etc.
- If this unit is placed too close to the car radio or antenna, interference may occur. In this case, relocate the amplifier away from the car radio or antenna.
- If no power is being supplied to the master unit, check the connections.
- This power amplifier employs a protection circuit to protect the transistors and speakers if the amplifier malfunctions. Do not attempt to test the protection circuits by covering the heat sink or connecting improper loads.
- Do not use the unit on a weak battery as its optimum performance depends on a good power supply.
- For safety reasons, keep your car audio volume moderate so that you can still hear sounds outside your car.
If you have any questions or problems concerning your unit that are not covered in this manual, please consult your nearest Sony dealer.
Caution
- Before making any connections, disconnect the earth terminal of the car battery to avoid short circuits.
- Be sure to use speakers with an adequate power rating. If you use small capacity speakers, they may be damaged.
- Do not connect the terminal of the speaker system to the car chassis, and do not connect the terminal of the right speaker with that of the left speaker.
- Install the input and output cords away from the power supply lead as running them close together can generate some interference noise - This unit is a high powered amplifier. Therefore, it may not perform to its full potential if used with the speaker cords supplied with the car.
- If your car is equipped with a computer system for navigation or some other purpose, do not remove the earth lead from the car battery. If you disconnect the lead, the computer memory may be erased. To avoid short circuits when making connections, disconnect the +12 V power supply lead until all the other leads have been connected.
Precauciones
- Esta unidad está diseñada para utilizarse sólo con cc de 12 V negativo a masa
- Emplee altavoces con impedancia de 2 a 8 Ω (de 4 a 8 Ω cuando se utilice como amplificador en puente).
- No conecte altavoces activos (con amplificadores incorporados) a los terminales de altavoz de la unidad, ya que puede dañar dichos altavoces.
- Evite instalar la unidad en lugares expuestos a:
— altas temperaturas, como a la luz solar directa o al aire caliente de la calefacción
— la lluvia o la humedad
— suciedad o polvo.
- Si aparca el automóvil bajo la luz solar directa y se produce un considerable aumento de temperatura en el interior, deje que la unidad se enfríe antes de utilizarla.
- Si instala la unidad horizontalmente, asegúrese de no cubrir las aletas con la moqueta del suelo, etc. - Si coloca la unidad demasiado cerca de la radio o antena del automóvil, pueden producirse interferencias. En este caso, aleje e amplificador de dicha radio o antena.
- Si la unidad principal no recibe alimentación, compruebe las conexiones.
- Este amplificador de potencia emplea un circuito de protección para proteger los transistores y los altavoces en caso de que dicho amplificador presente fallos de funcionamiento. No intente someter a prueba los circuitos de protección cubriendo el disipador de calor o conectando cargas inadecuadas.
- No utilice la unidad si la batería se está agotando, ya que el rendimiento óptimo de dicha unidad depende de un buen suministro de alimentación.
- Por razones de seguridad, mantenga el volumen del sistema de audio en un nivel moderado de forma que sea posible oír los sonid del exterior del automóvil.
Si desea realizar alguna consulta o solucionar algún problema relativos a la unidad que no aparezcan en este manual, póngase en contacto con el distribuidor Sony más próximo.
Precaución
- Antes de realizar las conexiones, desconecte el terminal de toma a tierra de la batería del automóvil para evitar cortocircuitos.
- Asegúrese de utilizar altavoces con una potencia nominal adecuada. Si emplea altavoces de pequeña capacidad, pueden dañarse.
- No conecte el terminal ⊖ del sistema de altavoces al chasis del automóvil, ni el terminal ⊖ del altavoz derecho al del altavoz izquierdo.
- Instale los cables de entrada y salida alejados del cable de suministro de alimentación, ya que en caso contrario puede generarse ruido por interferencias.
- Esta unidad es un amplificador de alta potencia. Por tanto, puede no funcionar a pleno rendimiento si se utiliza con los cables de altavoz suministrados con el automóvil.
- Si el automóvil está equipado con un sistema de ordenador para la navegación o para otra finalidad, no desconecte el conductor de toma a tierra de la batería del automóvil. Si lo desconecta, la memoria del ordenador puede borrarse. Para evitar cortocircuitos al realizar las conexiones, desconecte el cable de suministro de alimentación de +12 V hasta conectar todos los cables.
使用前須知事項
- 本機僅能在負接地 12V 直流電下操作。
- 使用 2 至 8 阻抗的揚聲器(當用作橋式放大器時為 4 至 8 )。 - 切勿將任何有源揚聲器(帶內設放大器)與本機的揚聲器端子相連接。否則會損壞有源揚聲器。
- 避免將本機安裝在下列地方:
高溫,加陽光直射下或暖氣設備的熱氣附近
一 受雨淋或受潮的地方
多鹰或污染的地方。
- 若您的汽車停放在陽光直射的地方,導致車內升溫過高,則應使本機冷卻後再使用。
- 當水平臥式安裝本機時,要確保散熱片不被地毯等物蓋住。
- 若將本機放得離汽車收音機或天線太靠近,可能產生干擾。在這種情況下,要重新將放大器安置於遠離汽車收音機或天線的地方。
- 若無電源供給主機,則檢查連接是否正確。
- 若放大器發生故障,本功率放大器可使用保護電路保護晶體管和揚聲器。切勿試圖通過覆蓋散熱裝置或連接不適當的負荷來測試保護電路。
- 切勿使用電力不足的電池操作本機,因爲本機的最佳性能取決於良好的電源。
- 為了安全起見,要使您的汽車音響保持適當的音量,以使您能聽到車外的聲音。
若還存在本說明書中未提及的有關本機的任何問題或疑問,則請向離您最近的Sony經銷商諮詢。
告誡
- 在進行任何連接之前,要斷開汽車電池的接地端子,以免短路
- 確保使用足夠額定功率的揚聲器。若使用小容量揚聲器,則揚聲器可能會損壞。
- 切勿將揚聲器系統的 端子連接至汽車底盤,也不要將右揚聲器的 端子與左揚聲器的 端子相連接。
- 要將輸入線和輸出線安裝得遠離電源導線,因為將它們靠在一起太近會產生干擾噪音。
- 本機是高功率放大器。因此,若使用隨汽車提供的揚聲器導線,則本機不可能充分發揮它的電勢。
- 若您的汽車配備用作導航或其它用途的電腦系統,則切勿拆掉汽車電池的接地電線。若您斷開接地電線,則電腦存儲功能可能被消除。為避免進行連接時發生短路,直到所有其它導線連接好之後才可連接 +12 V 電源導線。
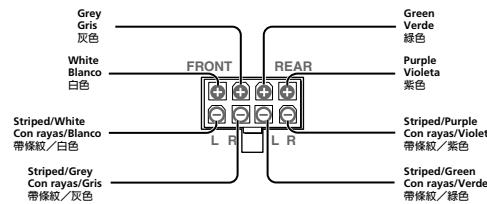
Input Connections
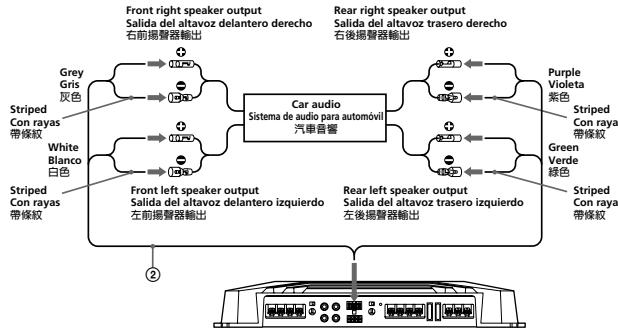
High Level Input Connection (with Speaker Connection 1, 2 or 4)
Conexión de entrada de alto nivel (con conexión de altavoces 1, 2 o 4)
高電平輸入連接(用揚聲器連接方法 1,2 或 4)
flowchart
graph TD
    A["Car audio\nSistema de audio para automóvil\n汽車音響"] --> B["Front right speaker output\nSalida del altavoz delantero derecho\n右前揚聲器輸出"]
    A --> C["Rear right speaker output\nSalida del altavoz trasero derecho\n右後揚聲器輸出"]
    B --> D["Grey Gris\n灰色"]
    B --> E["Striped Con rayas\n帶條紋"]
    B --> F["White Blanco\n白色"]
    C --> G["Purple Violeta\n紫色"]
    C --> H["Striped Con raya\n帶條紋"]
    C --> I["Green Verde\n綠色"]
    C --> J["Striped Con raya\n帶條紋"]
    A --> K["Front left speaker output\nSalida del altavoz delantero izquierdo\n左前揚聲器輸出"]
    A --> L["Rear left speaker output\nSalida del altavoz trasero izquierdo\n左後揚聲器輸出"]
    K --> M["②"]
    L --> M
Line Input Connection (with Speaker Connection 1, 2 or 4)
Conexión de entrada de línea (con conexión de altavoces 1, 2 o 4)
線路輸入連接(用揚聲器連接方法 1,2 或 4)


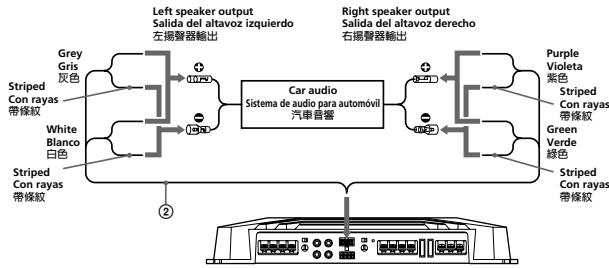
High Level Input Connection (with Speaker Connection 3)
Conexión de entrada de alto nivel (con conexión de altavoces 3)
高電平輸入連接(用揚聲器連接方法 3)
flowchart
graph LR
    A["Grey Gris 灰色"] --> B["Left speaker output"]
    C["Striped Con rayas 带條紋"] --> B
    D["White Blanco 白色"] --> B
    E["Striped Con rayas 带條紋"] --> B
    B --> F["Car audio Sistema de audio para automóvil 汽車音響"]
    G["Purple Violeta 紫色"] --> F
    H["Striped Con rayas 带條紋"] --> F
    I["Green Verde 綠色"] --> F
    J["Striped Con rayas 带條紋"] --> F
    F --> K["Output"]

Line Input Connection (with Speaker Connection 3)
Conexión de entrada de línea (con conexión de altavoces 3)
線路輸入連接(用揚聲器連接方法 3)
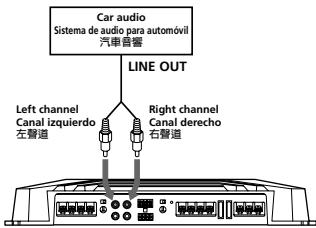


Note
Make sure that the line output from the car audio is connected to the jack marked "L (BTL)" on the unit.
Nota
Compruebe que la salida de línea del sistema de audio está conectada a la toma con la marca "L (BTL)" de la unidad. 註
確信汽車音響的線路輸出被連接到本機標有“L(BTL)”的插孔上。
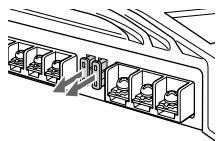
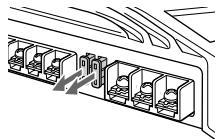
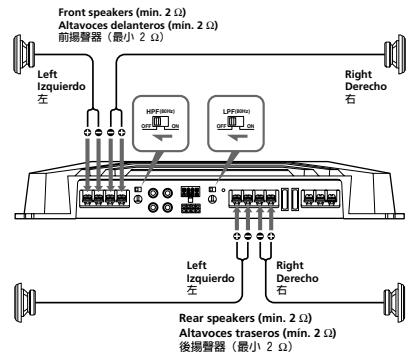
揚聲器連接
打開或關閉如下圖所示位於裝置後部的 LPF 和 HPF 開關
High Level Input Connector
Conector de entrada de alto nivel
高電平輸入連接器
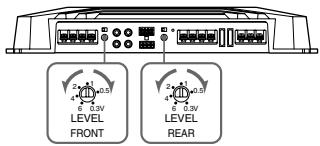
Level Adjustment Control
The input level can be adjusted with this control when using source equipment made by other manufacturers. Turn it in the clockwise direction when the output level of the car audio seems low.
電平調節控制器
當使用其它廠商製造的聲源裝置時,用這控制器可以調節輸入電平。當汽車音響的輸出電平較低時以順時針方向轉動此控制器。
Control de ajuste de nivel
Es posible ajustar el nivel de entrada mediante este control al utilizar equipos fuente de otros fabricantes. Gírelo en el sentido de las agujas del reloj si el nivel de salida del sistema de audio para automóvil parece bajo.
Power Connection Leads (not supplied)
Cables de conexión de alimentación (no suministrados)
電源連接導線(未提供)
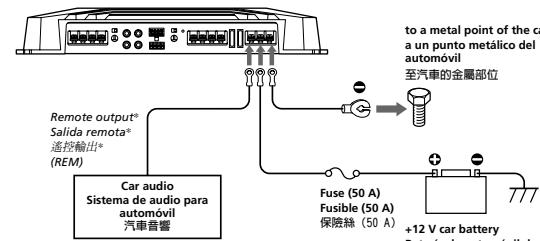
* If you have the factory original or some other car audio without a remote output on the amplifier, connect the remote input terminal (REMOTE) to the accessory power supply.
* Si dispone del sistema de audio para automóvil original de fábrica o de otro sistema sin una salida remota en el amplificador, conecte el terminal de entrada remota (REMOTE) al suministro de alimentación accesoria.
* 如果您擁有放大器上無遙控輸出的工廠原裝的或某些其它的汽車音響時,請將遙控輸入端子(REMOTE)連接到附件電源上。
[Non-Text]
Make the terminal connections as illustrated below.
Realice las conexiones de terminal como se ilustra a continuación.
按以下圖示連接端子。
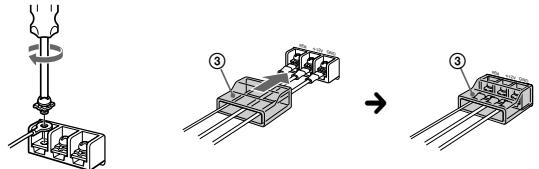
Note When you tighten the screw, be careful not to apply too much torque* as doing so may damage the screw.
* The torque value should be less than 1 N•m.
Nota Al apretar el tornillo, tenga cuidado de no aplica demasiada fuerza de torsión*, ya que puede dañarlo.
* El valor de fuerza de torsión debe ser inferior a 1 N•m.
Pass the leads through the cap, connect the leads, then cover the terminals with the cap.
Pase los cables a través de la cubierta, conéctelos y cubra los terminales con dicha cubierta.
將導線穿過蓋帽,連接導線,然後用蓋帽覆蓋端子
Notes on the power supply
- Connect the +12 V power supply lead only after all the other leads have been connected.
- Be sure to connect the earth lead of the unit securely to a metal point of the car. A loose connection may cause a malfunction of the amplifier.
- Be sure to connect the remote control lead of the car audio to the remote terminal.
- When using a car audio without a remote output on the amplifier, connect the remote input terminal (REMOTE) to the accessory power supply.
- Use a power supply lead with a fuse attached (50 A).
- Place the fuse in the power supply lead as close as possible to the car battery.
- During full-power operation, a current of more than 50 A will run through the system. Therefore, make sure that the leads to be connected to the +12 V and GND terminals of this unit are larger than 10-Gauge (AWG-10) or have a sectional area of more than 5mm^2 .
Notas sobre el suministro de alimentación
- Conecte el cable de suministro de alimentación de +12 V sólo después de haber conectado los otros cables.
- Asegúrese de conectar firmemente el cable de toma a tierra de la unidad a un punto metálico del automóvil. De lo contrario, pueden producirse fallos de funcionamiento del amplificador.
- Asegúrese de conectar el cable de control remoto del sistema de audio al terminal remoto.
- Si utiliza un sistema de audio sin salida remota en el amplificador, conecte el terminal de entrada remota (REMOTE) al suministro de alimentación accesoria.
- Emplee un cable de suministro de alimentación con un fusible fijado (50 A).
- Coloque el fusible en el cable de suministro de alimentación lo más cerca posible de la batería del automóvil.
- Durante el funcionamiento a pleno rendimiento, fluye por el sistema una corriente superior a 50 A. Por tanto, compruebe que los cables que va a conectar a los terminales de +12 V y GND de esta unidad tengan una capacidad superior a 10-Gauge (AWG-10) o tengan una zona de sección superior a 5 mm ^2 .
有關電源的注意事項
- 在所有其它導線連接好之後才可連接 +12 V 電源導線
- 要確保將本機的接地導線牢固地連接至汽車的金屬部位。鬆動的連接可能造成放大器故障。
- 務必將汽車音響的遙控導線連接至遙控端子。
- 當使用放大器上沒有遙控輸出的汽車音響時,請將遙控輸入端子(REMOTE)連接到附件電源上。
- 使用附帶保險線(50 A)的電源導線
- 將電源導線中的保險絲放得儘可能靠近汽車電池
- 當全功率操作時,50 A 以上的電流將通過本系統。因此,要確保連接至本機 12 V 電源導線和接地端子的導線的線規大於 10(AWG-10)或者這些導線具有 5 mm² 以上的截面。
4-Speaker System (with Input Connection A or C)
Sistema de 4 altavoces (con conexión de entrada A o C)
4-揚聲器系統(用輸入連接方法 A 或 C)

3-Speaker System (with Input Connection A or C)
Sistema de 3 altavoces (con conexión de entrada A o C)
3-揚聲器系統(用輸入連接方法 A 或 C)
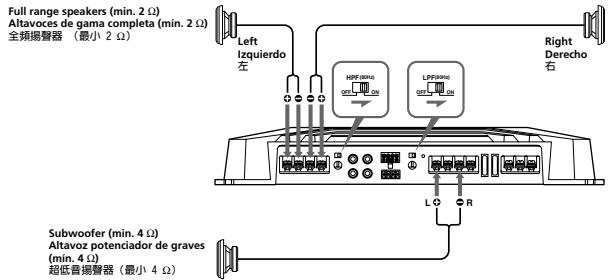
Notes - In this system, the volume of the subwoofer will be controlled by the car audio fader control. - In this system, the output signals to the subwoofer will be the combination of both the REAR L and R INPUT jacks or the REAR high level input connector signals.
Notas - En este sistema, el volumen de los altavoces potenciadores de graves se controla mediante el control de equilibrio entre altavoces del sistema de audio. - En este sistema, las señales de salida que recibe el altavoz potenciador de graves serán la combinación de las tomas REAR L y R INPUT o de las señales del conector de entrada de alto nivel REAR.
註 - 在本系統中,超低音揚聲器的音量將由汽車音響的音量漸減控制器控制。 - 在本系統中,至超低音揚聲器的輸出信號將成為 REAR L 和 R INPUT 插口信號或 REAR 高電平輸入連接器信號的組合。
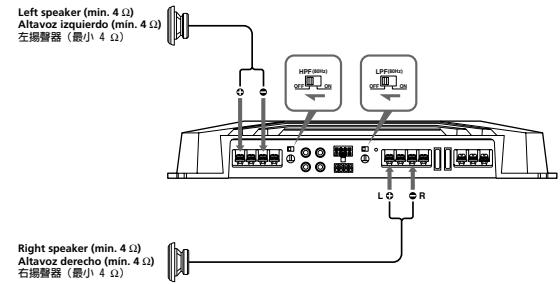
2-Speaker System (with Input Connection B or D)
Sistema de 2 altavoces (con conexión de entrada B o D)
雙揚聲器系統(用輸入連接方法 B 或 D)

2-Way System (with Input Connection A or C)
Sistema de 2 vías (con conexión de entrada A o C)
雙向系統(用輸入連接方法 A 或 C)
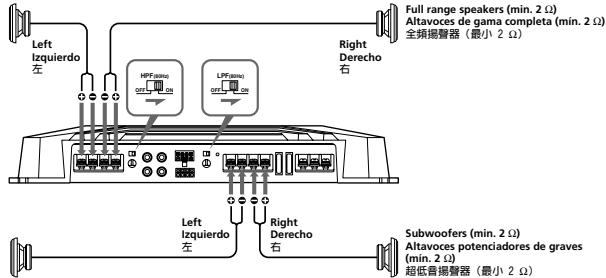
Note In this system, the volume of the subwoofer will be controlled by the car audio fader control.
Nota 註 En este sistema, el volumen de los altavoces potenciadores de graves se controla mediante el control de equilibrio entre altavoces del sistema de audio. 在本系統中,超低音揚聲器的音量將由汽車音響的音量漸減控制器來控制。
