800-259 - Vacuum Cleaner Menuett - Free user manual and instructions
Find the device manual for free 800-259 Menuett in PDF.


| Product type | Vacuum Cleaner |
| Brand | Menuett |
| Model | 800-259 |
| Dimensions (L x W x H) | 400 x 300 x 250 mm |
| Weight | 5 kg |
| Power supply | 220-240 V, 50/60 Hz |
| Power consumption | 1200 W |
| Dust capacity | 2.5 L (bagless) |
| Filtration system | HEPA filter |
| Cord length | 6 m |
| Noise level | 75 dB(A) |
| Type | Canister vacuum cleaner |
| Cleaning functions | Dry vacuuming, carpet and hard floor |
| Accessories included | Crevice tool, upholstery brush, floor nozzle |
| Maintenance | Empty dust bin after each use; clean filter every 3 months |
| Safety features | Overheat protection, do not vacuum liquids, keep away from heat sources |
| Spare parts | HEPA filter, dust bin, foam filter |
| Repairability | Replaceable filter and dust bin; professional service recommended for motor issues |
| Warranty | 2 years |
Frequently Asked Questions - 800-259 Menuett
User questions about 800-259 Menuett
0 question about this device. Answer the ones you know or ask your own.
Ask a new question about this device
Download the instructions for your Vacuum Cleaner in PDF format for free! Find your manual 800-259 - Menuett and take your electronic device back in hand. On this page are published all the documents necessary for the use of your device. 800-259 by Menuett.
USER MANUAL 800-259 Menuett
natural_image
Exterior view of a modern vacuum cleaner (no signage or text visible on body)SE Bruksanvisning för robotdammsugare
NO Bruksanvisning for robotstøvsuger
PL Instrukcja obsługi odkurzacza samojezdnego
EN Operating instructions for robotic vacuum cleaner
SE - Bruksanvisning i original
EN - Operating instructions (Translation of the original instructions)
Jula reserves the right to make changes. In the event of problems, please contact our service department.
www.jula.com
Tillverkare/ Produsent / Produenci/ Manufacturer
Jula AB, Box 363, 532 24 SKARA
Importör/ Importør/ Importer/ Importer
Care for the environment!
Must not be discarded with household waste! This product contains electrical or electronic components that should be recycled. Leave the product for recycling at the designated station e.g. the local authority's recycling station.
SVENSKA....5
SÄKERHETSANVISNINGAR....5
TEKNISKA DATA....7
BESKRIVNING 7
HANDHAVANDE 9
UNDERHÅLL 12
FELSÖKNING 15
NORSK 16
SIKKERHETSANVISNINGER 16
TEKNISKE DATA....18
BESKRIVELSE....18
BRUK....20
VEDLIKEHOLD 23
FEILS∅KING....26
POLSKI 27
ZASADY BEZPIECZEŃSTWA 27
DANE TECHNICZNE 29
OPIS 29
OBSŁUGA 31
KONSERWACJA 34
WYKRYWANIE USTEREK 37
ENGLISH 38
SAFETY INSTRUCTIONS 38
TECHNICAL DATA 40
DESCRIPTION 40
USE 42
MAINTENANCE 46
TROUBLESHOOTING 48
SÄKERHETSANVISNINGAR

natural_image
Technical diagram of a mechanical assembly with no visible text or symbolsLadda batteri
OBS!
natural_image
Technical diagram of a mechanical component with no visible text or symbolsnatural_image
Illustration of hands holding a blank document inside a circular mechanical device (no text or symbols visible)flowchart
graph TD
    A["Start: Initial Setup with Grid Layout"] --> B["Step 1: Down arrow"]
    B --> C["Step 2: Up arrow"]
    C --> D["Step 3: Left hand, Right hand, Bottom hand"]
    D --> E["End: Final Step with Player Hand Action"]
- Montera tillbaka dammduksplattan.
natural_image
Technical line drawing of a mechanical assembly with no visible text or symbolsFöre användning
natural_image
Line drawings of a robotic vacuum cleaner with a hand inserting a component into the lid (no text or symbols)natural_image
Line drawing of a mechanical component with an upward arrow indicating motion (no text or symbols)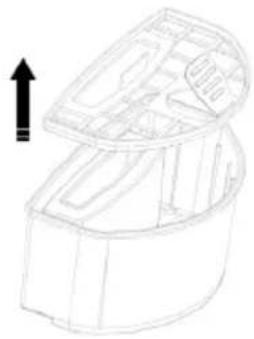
natural_image
Line drawing of a 3D object resembling a vehicle or container with an upward arrow indicator (no text or symbols)
natural_image
Hand pouring granular material into a bowl (no text or symbols)flowchart
graph TD
    A["Water Purifier with inlet"] --> B["Cut into a tank with outlet"]
    B --> C["Close-up of filter with hand holding part"]
    C --> D["Close-up of filter with drain holding part"]
natural_image
Technical line drawing of a mechanical component with no visible text or symbolsFELSÖKNING
natural_image
Simple line drawing of a circular object with a small protrusion, labeled 'A x1' below (no text or symbols on the object itself)
D x1

B x1

C x1

E x1

F x3
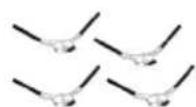
G × 4
A. 1 støvsuger
B. 1 ladbart batteri
C. 1 nettadapter
D. 1 filter
E. 1 støvdukplate
F. 3 støvduker
G. 4 sidebørster
natural_image
Technical line drawing of a mechanical component with no visible text or symbolsLade batteriet
OBS!
– Når batteriet er ferdig ladet, lyser lysringen blått.
– Når batteriet er utladet, lyser lysringen rødt.
natural_image
Technical diagram of a mechanical component with no visible text or symbolsBruk av støvduk
natural_image
Illustration of hands holding a blank rectangular object with internal components, no text or symbols visibleflowchart
graph TD
    A["Step 1: Top panel folding"] --> B["Step 2: Top panel folding with diagonal lines"]
    B --> C["Step 3: Top panel folding with horizontal lines and arrows indicating folding direction"]
    C --> D["Step 4: Top panel folding with horizontal lines and arrows indicating folding direction"]
natural_image
Technical line drawing of a mechanical assembly with no visible text or symbolsFør bruk
natural_image
Line drawing of a hand pressing down on a circular device with a pointer (no text or symbols)
natural_image
Line drawing of a hand placing an object into a container with a lid, showing mechanical components and legs (no text or symbols)natural_image
Line drawing of a mechanical component with an upward arrow indicating motion (no text or symbols)
natural_image
Line drawing of a 3D mechanical part with an upward arrow indicating direction (no text or symbols)
natural_image
Hand pouring granular substance from a container into a bowl (no text or symbols)flowchart
graph TD
    A["Top Cover"] --> B["Close-up of component"]
    B --> C["Close-up of cleaner with hand tool"]
    C --> D["Final Gasifier"]
natural_image
Technical diagram of a mechanical assembly with no visible text or symbolsFEILS∅KING

natural_image
Technical diagram of a mechanical assembly with no visible text or symbolsnatural_image
Technical line drawing of a mechanical component with no visible text or symbolsnatural_image
Illustration of hands holding a blank document with mechanical components inside (no text or symbols visible)natural_image
Technical line drawing of a mechanical assembly with no visible text or symbolsPrzed użyciem
natural_image
Line drawing of a hand pressing down on a circular device with a knob, mounted on a stand (no text or symbols)
natural_image
Line drawing of a hand placing a small object into a device with an open lid (no text or symbols)natural_image
Line drawing of a mechanical component with an upward arrow indicating motion (no text or symbols)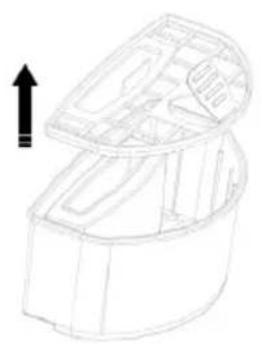
natural_image
Technical line drawing of a mechanical component with an upward arrow indicator (no text or symbols present)
natural_image
Hand pouring granular substance from a container into a bowl (no text or symbols)flowchart
graph TD
    A["Top Cover"] --> B["Close-up Screen"]
    B --> C["Close-up Screen with Grip"]
    C --> D["Cleaner with lid and vent"]
    D --> E["Final Cover with lid and vent"]
natural_image
Technical line drawing of a mechanical component with no visible text or symbolsWYKRYWANIE USTEREK
Read the user instructions carefully before use!
Save them for future reference.
WARNING: Failure to follow all the instructions and safety instructions can result in a risk of personal injury and/or material damage.
- The appliance is only intended for indoor use.
- Check that the dust container is correctly fitted before using the appliance.
- Never expose the appliance to rain or use it in damp conditions.
- Remove fragile items, cords, clothing, paper and the like and fold up/hang up curtains, draperies, etc., that the unit can become entangled in. If the appliance becomes entangled it can pull down lamps, furniture, etc. resulting in damage.
- Do not sit or stand on the appliance, or place any objects on it. Close supervision is required when the appliance is used by or near children or pets.
- Do not use the appliance to clean up burning or glowing objects such as cigarettes or hot ash.
- Never vacuum up flammable or toxic substances such as petrol, toner powder, acid or asbestos dust.
- All doors leading outside should be closed when the appliance is working.
-
Do not use the appliance if it is damaged or not working normally. Take the appliance to an authorised service centre to be checked, repaired or adjusted.
-
Turn the power switch off if the product is not going to be used for some time.
- Always check before use that the mains adapter is connected to a powered mains outlet.
- Operating temperature: 0 to 40^ . Do not expose the appliance to high temperatures or direct sunlight for long periods.
- This appliance can be used by children from eight years and upwards and by persons with physical, sensorial or mental disabilities, or persons who lack experience or knowledge, if they are supervised or receive instructions concerning the safe use of the appliance and understand the risks involved with its use. Do not allow children to play with the appliance. Cleaning and maintenance must not be carried out by children unless they are more than eight years old, and are kept under supervision.
- Keep the appliance and its power cord out of the reach of children under eight years of age.
Charging the battery
- Only charge the battery with the voltage and current stated on the packaging. Only use the supplied battery or batteries recommended by the manufacturer. Insert the battery with the correct polarity. Battery voltage: 14.4 VDC, power consumption, operation: 800 mA
- Only use the mains adapter and charger supplied.
- The charger is only intended for indoor use.
- Never attempt to charge the appliance if the power cord or plug are damaged.
- Do not touch the appliance, the power cord or the plug with wet hands or wet parts of your body.
-
Switch off the appliance, unplug the power cord, and remove the battery before cleaning.
-
Remove the battery when the tool is not going to be used for some time.
- The battery must be removed before the appliance is finally discarded.
- Switch off the appliance and unplug the power cord before removing the battery.
- Recycle used batteries in accordance with local regulations.
TECHNICAL DATA
| Battery technology NiMH |
| Operating time 45 min |
| Weight 1.5 kg |
| Battery capacity 850 mAh |
| Dimensions H7.5x 28 cm |
| Voltage 230/19 V |
| Charging time 4 h |
| Sound level 70 dB |
| Dust container 0.2 l |
| Charge strength 600 mAh |
DESCRIPTION
 |  |  | |
| C x1 | B x1 | C x1 | |
 |  |  | A. 1 vacuum cleanerB. 1 rechargeable batteryC. 1 mains adapterD. 1 filterE. 1 dust cloth plateF. 3 dust clothsG. 4 side brushes |
| D x1 | E x1 | L x3 | |
 |


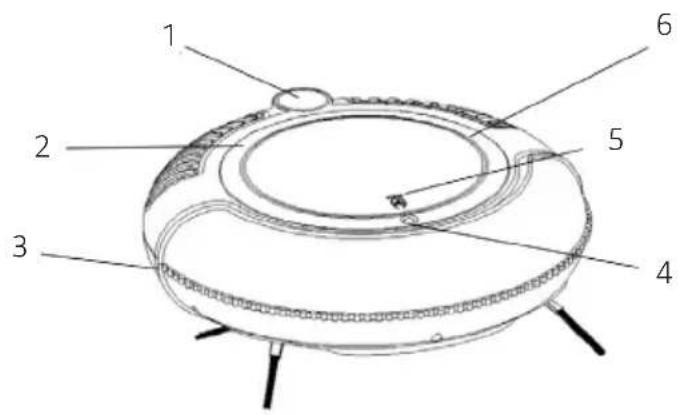
- Power switch
- Light ring
- Collision strip
- DC connection
- Lock button for cover
- Dust container
- Handle
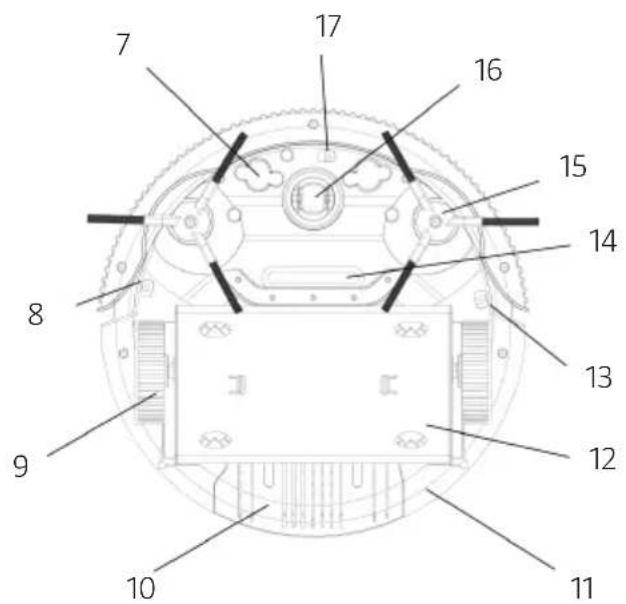
- Drop sensor
- Wheel
- Battery cover
- Base plate
- Dust cloth plate
- Drop sensor
- Suction opening
- Side brush
- Front wheel
- Drop sensor
USE
Intended use
The robotic vacuum cleaner is designed to vacuum smooth floors, such as wood, tiles or vinyl flooring. The robotic vacuum cleaner is not designed to vacuum thick mats.
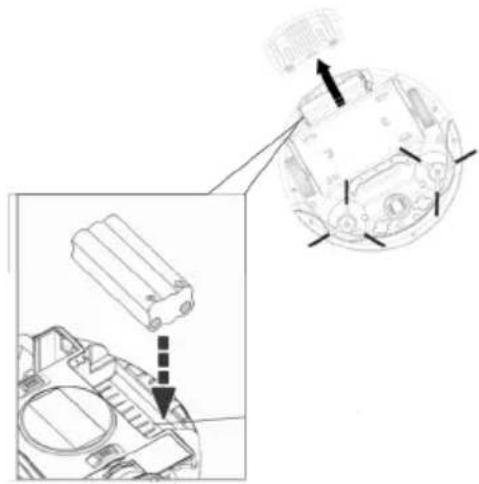
Inserting/removing the battery
NOTE: Switch off the robotic vacuum cleaner and unplug the power cord before inserting or removing the battery.
- Remove the dust cloth plate.

-
Open the battery compartment.
-
Insert the battery with the correct polarity and refit the battery cover. Make sure the cover's catches are properly aligned.
Charging the battery
NOTE:
- The power switch must be switched off position during charging; otherwise, the ring light remains red to indicate that the robotic vacuum cleaner needs to be switched off.
-
If the power switch is not switched off during charging the robotic vacuum cleaner must be turned off and restarted with the power switch when charging is complete.
-
Check before charging the battery that the battery is inserted properly and the power switch has been turned off.
-
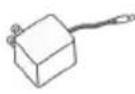
Connect the mains adapter to the robotic vacuum cleaner's DC connection and then plug the adapter into a power outlet. The light ring flashes blue.

- When the battery is fully charged, the light ring lights blue.
-
When the battery is discharged, the light ring lights red.
-
Always charge the battery for 4 hours continuously for the best battery life.
— In the vent of a power failure during charging, the elapsed charging time restarts and it takes 4 hours before the light ring lights blue. However, the robotic vacuum cleaner can be used after a total of 4 hours charging time.
Fitting the side brushes
- Place the brush marked L on the bracket marked L and the brush marked R on the bracket marked R and press into place.
- Loosen the brushes by pulling upwards.

natural_image
Technical diagram of a mechanical component with no visible text or symbolsUsing the dust cloth
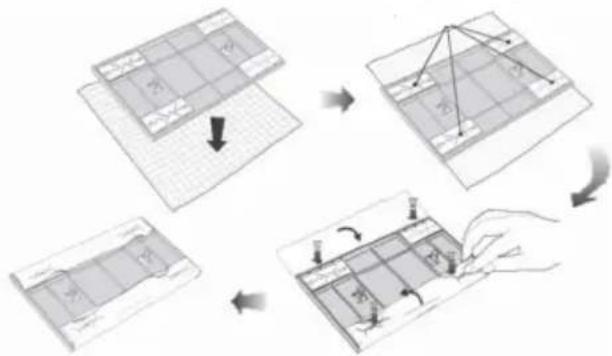
NOTE: Remove the dust cloth plate from the robotic vacuum cleaner with the dust cloth is to be used.
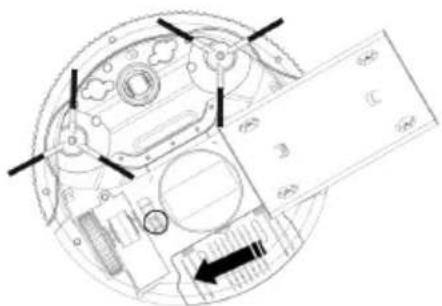
- Loosen the dust cloth plate by placing a finger under the dust cloth plate, press to the left and lift.

natural_image
Illustration of hands holding a blank document inside a circular mechanical device (no text or symbols visible)- Place the dust cloth flat on a clean surface.
- Place the dust cloth plate with the smooth side towards the dust cloth.
- Fold one edge of the dust cloth over the edge of the plate and press the cloth into the slot.
- Stretch the cloth, and fold over the other edge and press into the slot in the same way.
- Position the plate with dust cloth on the underside of the vacuum cleaner and press into the mount close to the rear wheels. Repeat on the other side.
flowchart
graph TD
    A["Initial Position: Grid Layout"] --> B["Step 1: Folded Position"]
    B --> C["Step 2: Reordering Grid Layout"]
    C --> D["Step 3: Final Position"]
    D --> E["Final Position: Revised Grid Layout"]
- Refit the dust cloth plate.

natural_image
Technical line drawing of a mechanical assembly with no visible text or symbolsBefore use
- Empty and replace the dust container and insert the filter properly.
- Place the robotic vacuum cleaner in a room with a free floor area.
- Check the filter before using the robotic vacuum cleaner. The robotic vacuum cleaner can be damaged if it used without a filter.
- Remove the dust cloth plate and the side brushes before the robotic vacuum cleaner is used on carpets, to prevent these parts wearing unnecessarily.
Vacuum cleaning
- Switch the power switch to the on position to start vacuum cleaning. When the battery is discharged, the light ring lights red and the robotic vacuum cleaner stops.
- Switch the power switch off before charging and when the robotic vacuum cleaner will not be used for some time.
Movement patterns

flowchart
graph LR
    A["Step 1: Arrow with cross"] --> B["Step 2: Spiral Circle"]
    B --> C["Step 3: Arrow with left"]
    C --> D["Step 4: Spiral Circle"]
Random Spiral Wall following Spiral
MAINTENANCE
Emptying the dust container
- Open the cover by pressing the button.
- Insert the finger in the slot and pull up the dust collector.

natural_image
Line drawings of a device with a hand inserting a component into a circular opening, showing the process (no text or symbols)- Open the dust container lid.
- Remove the filter.
- Empty the dust container.

natural_image
Three-step illustration showing a container being open, then being filled with granular material and pouring into a bowl (no text or symbols)- Wash the dust container with water. Never attempt to clean the dust container in a dishwasher, washing machine or the like. Clean the filter regularly with a soft brush.
-
Allow the filter and dust container cover to dry be refitting.
-
Refit the duct container in the vacuum cleaner. NOTE! Check that the suction cover, which works as a non-return valve, is in the right position when the dust container is refitted.

flowchart
graph TD
    A["Water Filter with Pump"] --> B["Inserting component"]
    B --> C["Close-up of filter plate with lid"]
    C --> D["Final cleaning unit with lid"]
Cleaning the intake
After a period of use dust and dirt collect around the suction opening. Keep the suction opening clean for the best function.
- Switch off the robotic vacuum cleaner.
- Remove dust and dirt around the suction opening.

natural_image
Technical line drawing of a mechanical component with no visible text or symbolsTROUBLESHOOTING
| Problem Possible cause Action | ||
| The light ring is red after the robotic vacuum cleaner has started. | · The battery has discharged.· The robotic vacuum cleaner has been lifted up. | · Charge the battery.· Place the robotic vacuum cleaner on the floor. |
| The robotic vacuum cleaner works but does not pick up dust and rubbish. | · The dust container is full.· The filter is not fitted correctly. | · Empty the dust container.· Insert the filter correctly. |
| The robotic vacuum cleaner moves backwards when it starts. | · The floor is dark.· One or more drop sensors are covered. | · Place the robotic vacuum cleaner on a light floor.· Clean the drop sensors. |
| The light ring flashes blue after 4 hours of charging. | Power failure during on-going charging. | The robotic vacuum cleaner can be used if it has been charge for at least 4 hours in total. |
| The side brushes are bent or work poorly. | The brushes have been used for a long period. | Dip the brushes in hot water to restore the original form. |
| The robotic vacuum cleaner does not start. | · The battery is not fitted correctly.· The battery has discharged.· The robotic vacuum cleaner is locked. | · Insert the battery correctly.· Switch off the robotic vacuum cleaner and fully charge the battery.· Restart the robotic vacuum cleaner. |
| The robotic vacuum cleaner runs in circles, not straight forward. | The drive belt on one of the wheels is loose. | · Loosen the cover over the wheel and readjust the belt.· Contact a qualified service technician for repair. |
If you cannot rectify the problem by using the troubleshooting chart:
- Restart the robotic vacuum cleaner using the power switch on the control panel.
- Contact a qualified service technician if the robotic vacuum cleaner still does not work correctly.
- Care for the environment!
- SVENSKA....5
- SÄKERHETSANVISNINGAR....5
- TEKNISKA DATA....7
- BESKRIVNING 7
- HANDHAVANDE 9
- UNDERHÅLL 12
- FELSÖKNING 15
- NORSK 16
- SIKKERHETSANVISNINGER 16
- TEKNISKE DATA....18
- BESKRIVELSE....18
- BRUK....20
- VEDLIKEHOLD 23
- FEILS∅KING....26
- POLSKI 27
- ZASADY BEZPIECZEŃSTWA 27
- DANE TECHNICZNE 29
- OPIS 29
- OBSŁUGA 31
- KONSERWACJA 34
- WYKRYWANIE USTEREK 37
- ENGLISH 38
- SAFETY INSTRUCTIONS 38
- TECHNICAL DATA 40
- DESCRIPTION 40
- USE 42
- MAINTENANCE 46
- TROUBLESHOOTING 48
- SÄKERHETSANVISNINGAR
- Ladda batteri
- OBS!
- Före användning
- Lade batteriet
- Bruk av støvduk
- Før bruk
- Przed użyciem
- Read the user instructions carefully before use!
- WARNING: Failure to follow all the instructions and safety instructions can result in a risk of personal injury and/or material damage.
- Charging the battery
- USE
- Intended use
- Inserting/removing the battery
- NOTE:
- Fitting the side brushes
- Using the dust cloth
- Before use
- Vacuum cleaning
- Movement patterns
- MAINTENANCE
- Emptying the dust container
- Cleaning the intake
Brand : Menuett
Model : 800-259
Category : Vacuum Cleaner