
MC-9814USB - CD Player Clas Ohlson - Free user manual and instructions
Find the device manual for free MC-9814USB Clas Ohlson in PDF.


| Product Type | Portable CD Player with USB |
| Brand | Clas Ohlson |
| Model | MC-9814USB |
| Dimensions (approx.) | 140 x 140 x 25 mm |
| Weight (approx.) | 300 g |
| Power Supply | 2 x AA batteries or AC adapter (DC 5V) |
| Disc Compatibility | CD, CD-R, CD-RW, MP3 CD |
| USB Playback | Supports MP3 files from USB flash drive |
| Playback Functions | Play, Pause, Stop, Skip, Repeat, Shuffle, Program |
| Audio Output | 3.5 mm headphone jack |
| Display | LCD screen with track/time info |
| Anti-skip Protection | Yes (electronic shock protection) |
| Maintenance | Clean with soft dry cloth; keep away from moisture |
| Safety | Do not disassemble; avoid exposure to extreme temperatures |
| Spare Parts | Not available as separate parts |
| Repairability | Not user-serviceable; contact service center |
Frequently Asked Questions - MC-9814USB Clas Ohlson
User questions about MC-9814USB Clas Ohlson
0 question about this device. Answer the ones you know or ask your own.
Ask a new question about this device
Download the instructions for your CD Player in PDF format for free! Find your manual MC-9814USB - Clas Ohlson and take your electronic device back in hand. On this page are published all the documents necessary for the use of your device. MC-9814USB by Clas Ohlson.
USER MANUAL MC-9814USB Clas Ohlson
natural_image
Black and silver portable electronic device with multiple speakers and control knobs (no visible text or symbols)Modell/Malli: MC-9814USB
STEREO CASSETTE RADIO WITH CD/MP3 PLAYER
Article number: 38-2522
Model: MC-9814USB
Please read the entire instruction manual before using and save it for future use. We apologise for any text or photo errors and any changes of technical data. If you have any questions concerning technical problems please contact our Customer Service Department (see address on reverse.)
Important information: Read the instruction manual carefully and make sure that you understand everything before you use the product, save it for future use.
Warnings
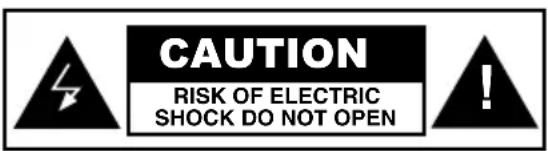
Warning! Do not open the casing! Certain components within the product's casing contain dangerous currents. Contact with these may give you an electric shock.
On CD player
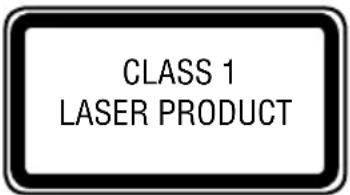
CLASS 1 LASER PRODUCT
Warning! Do not open the casing! Invisible laser beam can cause eye damage. Avoid exposure to the laser beam. Do not look into the laser beam even with optical instruments.
- The product should only be repaired by qualified service personnel.
• The product should not be taken apart or changed. - Do not place the product where it could fall into water or another type of liquid.
- Do not place the stereo cassette radio in a damp, dusty environment or where there are strong vibrations.
1. Description
• Stereo cassette radio with CD/MP3 player.
• Remote control included.
- Connection for SD memory card or USB memory.
• Operated on 230 V or 8x R14 batteries (not included).
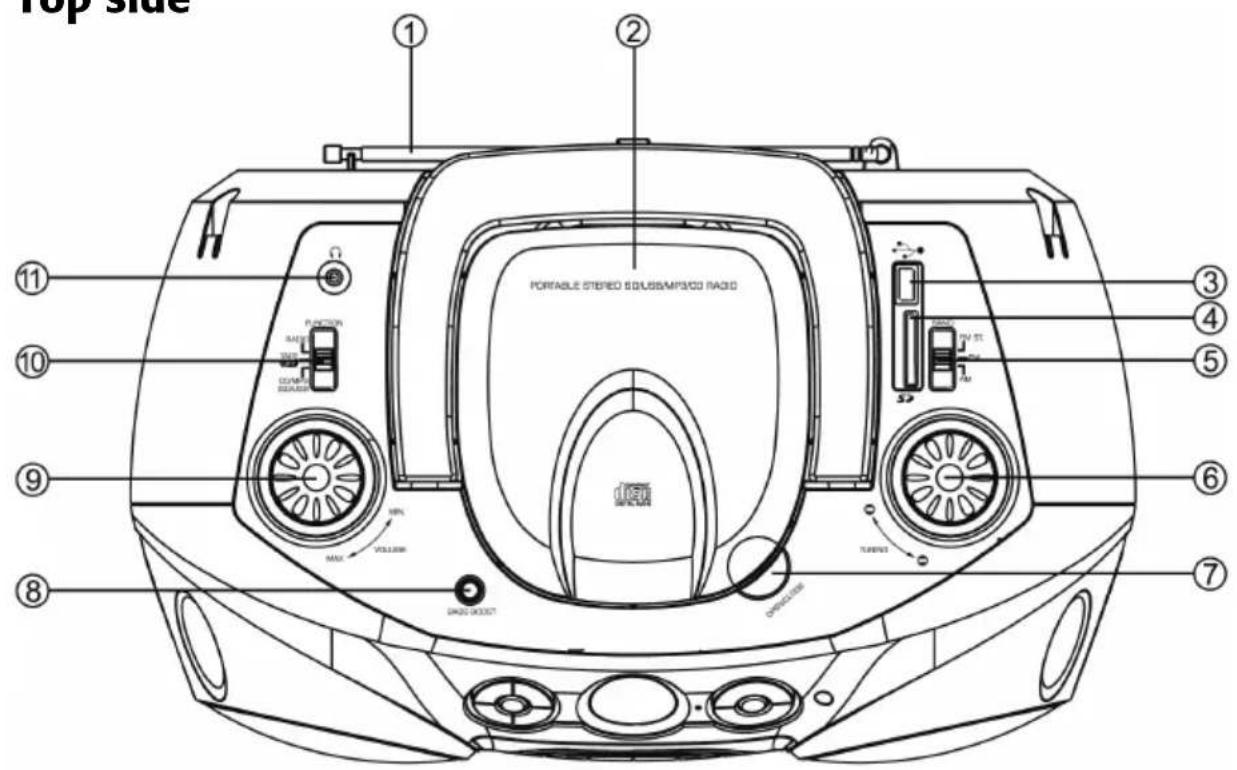
Top side
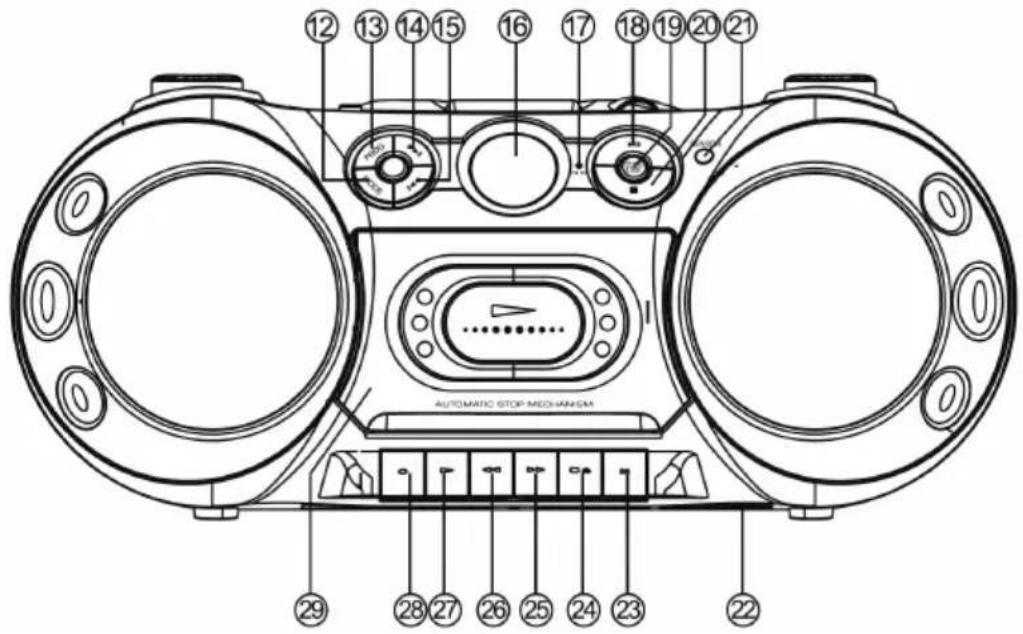
Front
- Telescopic antenna (for FM reception)
- CD door
- Connection for USB memory
- Connection for SD/MMC memory card
- FMST/FM/AM wavelength switch: FM Stereo, FM and AM
- TUNING Station setting
- OPEN/CLOSE Open/Close the CD door
- [BASS BOOST] bass amplification
- [VOLUME] volume control
- RADIO/TAPE-OFF/CD/MP3/SD/USB Function switch
- Headset outlet
- MODE CD functions
- PROG CD programming
- [▶] Forward to the next CD track, quick search forward.
- [◀] Back to previous CD track, quick search backwards.
- LCD display
- FM ST. (FM Stereo indicator)
- [▶ II ] (Play CD or Pause)
- CD/SD/USB Select sound source
- [■] Stop playing the CD
- SENSOR Sensor for the remote control
- Battery compartment
- [Ⅱ] Pause when playing cassette
- [■] Stop playing the cassette and open the cassette tape door
- [▶] Fast forwarding
- [◀] Fast rewinding
- [▶] Start playing a cassette
- [●] Record button
- Cassette tape door
1.1 Remote control
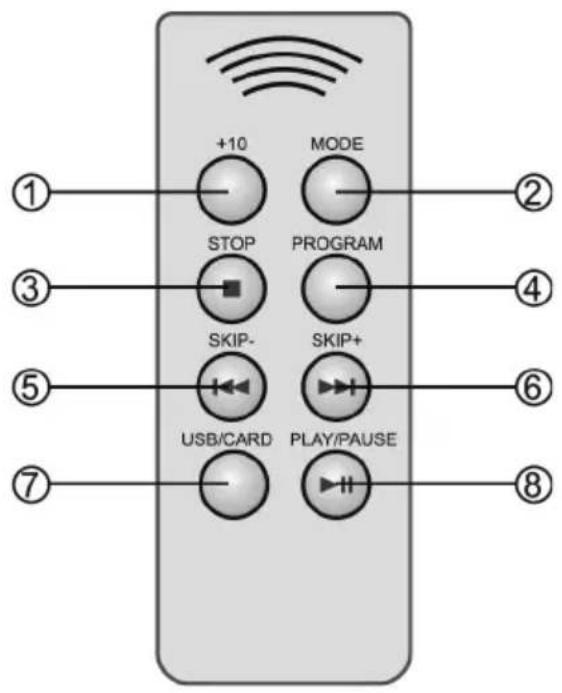
- [+10] Continue to 10
- MODE Functions
- [■] Stop
- PROGRAM Programming
- [◀] Go back to previous track, quick search backwards
- [▶] Forward to the next CD track, quick search forward.
- USB/CARD Select USB or memory card
- [▶ II] Play/Pause
2. Power Supply
Mains connection
Place the network cable plug in the outlet on the backside and connect the plug to a wall socket.
Using with batteries
Insert batteries:
- Remove the battery cover by pressing in the direction of the arrows.
- Insert 8x R14 batteries according to the marking on the backside.
- Put back the battery cover.
Note:
- The network cable should be unplugged from the stereo cassette radio when changing batteries.
- When the network cable is connected the player is not running on batteries.
- Remove bad batteries to avoid damage from leakage.
- Remove the batteries from the player if it is not to be used for a long time.
3. Listen to the radio
- Set the function control to RADIO position when you want to listen to the radio. The display lights up.
- Select the frequency with the control (MW, FM, FM ST).
- Set the desired station with the control TUNING.
- Both the built-in antenna and the telescopic antenna receive signals, stronger/ weaker depending on direction.
FM reception: Extend the telescopic antenna completely and angle it if needed.
AM (Medium wave): Turn the player until the best reception.
- Adjust the volume with the VOLUME knob.
- Shut the radio off when you are done listening by setting the control on TAPE/OFF.
Helpful suggestions
- If you listen to FM stereo (FM ST) at a certain station and it is weak or have background sound try to turn the control to FM (mono). It normally gives better reception.
- If the control is on FM ST and you turn it to set a station the indicator lamp FM ST lights up if a station is found and it is in stereo with good reception.
4. Play music
Play music from CD/MP3, SD memory card or USB memory
Select what device to listen from by pressing CD/SD/USB. Selected device is shown on the display (CD-SD-USB). When you have opened desired file the functions for all types of devices are the same. If you only have one type of device the first file will start automatically.
4.1 Insert a CD/MP3
- Turn the function control to CD/MP3/SD/USB
- Open the CD door
- Insert a CD with the label facing up. If you insert the CD with the wrong side up NO DISC is shown in display. CD-single (8 cm) can be played without adaptor.
- Close the CD door carefully with one hand.
4.2 Remove the CD
- Make sure that the CD does not play, if it does press [■] (20) to end playing.
- Open the CD door.
- Carefully remove the CD and put it in its case.
- Close the CD door carefully.
Helpful suggestions:
- Never touch the laser line in the CD compartment with your hands. Only clean with a special CD meant for laser line cleaning.
4.3 Listen to the CD
Normal playing
- Insert a CD to the player. The CD will start spinning and CD is displayed while the CD is being read.
- Turn the function control to CD/MP3/SD/USB.
- The playing automatically starts with track 1 after a few seconds when the CD is read. 001 is shown in the display.
- Adjust volume with [VOLUME] (9).
- Press PLAY/PAUSE to temporarily stop the playing. Press PLAY/PAUSE to start the playing again.
- Press [■] (20) to stop the playing.
- Set the function control to TAPE/OFF to turn the player off.
Note!
- Never push the CD door down during playing. That may cause damage to the CD or CD player.
- Always press STOP before removing the CD from the player.
- If you move or bump into the player during playing it might quieten for a short while and then start up again. That is normal for CD players.
4.4 Skip tracks
- This function gives you the possibility to find the beginning of a track on the CD during playing. Press [▶] (14) once or several times to skip to the next track. Current track will show in the display.
- Press [◀] (15) once or several times to skip to the previous track. Current track will be shown in the display. Press once to return to the beginning of current track.
- Press and hold [▶] or [◀] to quick search through the tracks. Let go of the button when you have found the right track.
4.5 BASS BOOST
Press [BASS BOOST] to increase the bass.
4.6 Electronic anti-shake memory (ESP)
The electronic anti-shake memory prevents the sound from disappearing or "skipping" if the player is exposed to small bumps or vibrations.
When the CD starts to play the buffer memory is automatically switched on. The music's digital data is stored in the forward storage buffer memory before it is decoded and starts to play.
When the player encounters an impact during playing the memory continues to decode and play. This allows time for the pickup to stabilize and continue collecting new data later on.
Note! When the ESP function is activated or shut off the sound quiets down for about 1-2 seconds.
5. Alternative play
Functions the same way for all storage media.
5.1 Repeat a track from CD
- Press MODE (12) once in stop or play mode. "REP" is shown on the display.
- Press [▶] (14) or [◀] (15) to select track for repetition.
- The selected track will continue to play until you press [■] (20) or press [MODE] (12) several times.
5.2 Repeat all tracks from the CD
- Press MODE (12) twice in stop or play mode. "REP ALL" is shown on the display.
- Press [▶] (14) or [◀] (15) to select a track for repeat play.
- The selected track will continue to play until you press [■] (20) or press [MODE] (12) several times.
5.3 INTRO (listen to the 10 first seconds of each track)
- Press MODE (12) three times in stop or play mode.
- INTRO is shown on display, press [▶ II] (18) to start play with track 1.
- The selected tracks will continue to play until you press [■] (20) or press [MODE] (12) several times.
5.4 Random (random play)
All tracks will play in random order.
- Press MODE (12) four times in stop or play mode.
- RAND is shown on display, press [▶ II] (18) to start play of all tracks in random order.
- Play will continue until you press [■] (20) or press [MODE] (12) several times.
5.5 Programmed playback
Up to 20 tracks can be programmed for playback in selected order. Programming can only be done when the player is in stop mode.
- Press [■] (20) to go to stop mode.
- Press [PROG] (13), the display will show PROG and program number P01
- Press [▶] (14) or [◀] (15) to select the first track.
- Press PROG to save the first track, program number P02 will show on display and the player awaits your next selection of track.
- Repeat step 3 and 4 until all selected tracks (max 20) are saved in the memory.
- Press [▶ II ] (18) when the programming is done.
- First selected track will start playing
- All tracks will play in programmed order.
- Press [■] (20) twice to stop playing and to erase the programming.
NOTE! The memory for programmed tracks will be erased:
- If you open the CD door.
- If you switch function control from TAPE or RADIO mode.
- If the power to the player is shut off.
6. The Stereo Cassette Player's function
[II] (23) Pause
Press [ II ] to pause the cassette playing.
[■] (24) Stop
Press [■] to stop the play back or other on-going function. Or to open the cassette door in stop mode.
[▶] (25) Fast forward
Press down to fast forward the tape, press [■] to stop the fast forwarding.
[◀] (26) Quick rewind
Press down to quickly rewind the tape, press [■] to stop rewinding.
[▶] (27) Play back,
Press down the button to start play back from the cassette.
[●] (28) Recording
Press down both [●] and [▶] to record from CD, radio, memory card or USB memory.
Note! If the cassette is protected against recording the buttons will not be able to press down. See the Erase protection of recording.
Automatic tape stop: The cassette player has a built-in tape stop and shuts off automatically when the tape ends.
7. How to use the cassette tape player
- Open the cassette door by pressing [■].
- Place the cassette inside the cassette holder.
- Close the cassette door.
- Set the function control on TAPE/OFF.
- Press [▶] to start playing.
- Adjusting the volume.
- Press [■] to stop play. Press once more to open the cassette door.
NOTE! When the tape ends while playing the [▶] button goes up and the playing stops.
If you want to play the other side of the tape: Remove the cassette and turn it, place it and close the cassette door and press [▶].
8. Take care of your cassette tapes
- The tape might tangle up or get deformed if it is not stretched between the tape spools. If the tape is loose it needs to be tightened before use. Use a pencil or similar to wind up the tape according to the picture.
- If the tape is heavy or makes strange noises it can be fixed by fast forwarding the tape.
- Avoid using C120 tapes in the player since they have a thinner tape strip which may tangle.
8.1 Protect recording against erasing
The tapes are equipped with erase protection. With small tags on the backside that you remove with a screwdriver or similar. If you want to erase earlier recording and the tag is missing you can put a piece of tape over the hole.
8.2 Erase cassette tape
- Set the function control to TAPE.
- Press RECORD until it locks in pressed down position (play is affected at the same time) to start the recording. The new recording starts and the old recording will be erased at the same time. Note that the surrounding should be quiet. Possible sounds will be recorded via the built-in microphone.
9. Recording
9.1 Record from the built-in radio
- Set the function control (10) to RADIO and set the desired channel.
- Place a cassette tape in the cassette door.
- Press [●] (28) and [▶] (27) until they lock in pressed down position to start the recording. Press PAUSE [II] (23) if you do not want to start the recording at once. Press [II] again when you want to start the recording.
- Press [■] (24) to stop the recording otherwise the recording will end when the tape ends.
- Press [◀] (26) to rewind to the beginning of the recording. Press [■] (24) and then [▶] (27) to listen to the recording, adjust the volume.
NOTE! The beginning and end of the tape is equipped with start tape that is not recordable. If you want to make sure that the recording starts without interruption you should forward the tape for a few seconds before starting the recording.
9.2 Record from CD
- Place a cassette tape in the cassette door.
- Set the function control (10) to [CD/MP3/SD/USB] and press [CD/SD/USB] (19), select and start playing.
- Press [●] (28) and [▶] (27) until they lock in pressed down position to start the recording. Press PAUSE [II] (23) if you do not want to start the recording at once. Press [II] again when you want to start the recording.
- Press [■] (24) to stop the recording otherwise the recording will end when the tape ends.
- Press [◀] (26) to rewind to the beginning of the recording. Press [■] (24) and then [▶] (27) to listen to the recording, adjust the volume.
9.3 Record from USB memory (USB or memory card (SD))
- Place a cassette tape in the cassette door.
- Set the function control (10) to [CD/MP3/SD/USB] and press [CD/SD/USB] (19), select USB or SD and start playing.
- Press [●] (28) and [▶] (27) until they lock in pressed down position to start the recording. Press PAUSE [II] (23) if you do not want to start the recording at once. Press [II] again when you want to start the recording.
- Press [■] (24) to stop the recording otherwise the recording will end when the tape ends.
- Press [◀] (26) to rewind to the beginning of the recording. Press [■] (24) and then [▶] (27) to listen to the recording, adjust the volume.
10. Care and maintenance of player
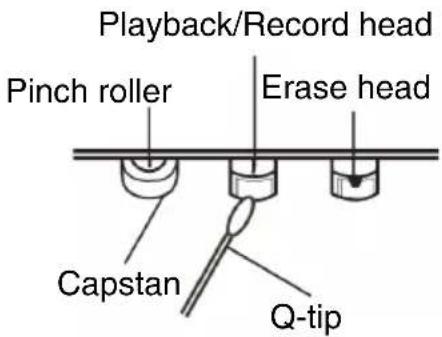
Clean the Open the cassette door and use a cleaning cotton swab with rubbing alcohol or special cleaning solution for the audio head.
NOTE! Do not use metal tools when cleaning. Do not put in a tape before the details are completely dry.
11. Headphones
Connect headphones (not included) to the outlet (11). The speakers will mute automatically when you connect the headphones.
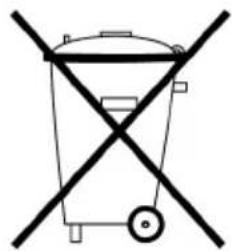
12. Protect the environment
Sort your waste and recycle products instead of throwing them away. All home electronics and packing material should be sorted and handled according to local environmental ordinances.
natural_image
Simple line drawing of a trash bin with no text or symbols13. Technical data
Size: 390 x 230 x 165 mm
Power: 230 VAC, 50 Hz
Battery type: 8x R14 batteries
Radio:
Frequency range: AM: 522 – 1,710 KHz
FM 87.5 - 108 MHz
CD player: Semiconductor laser
Decoding: 16 bites linear
Connection for SD memory card or USB memory
Headphone outlet: ∅ 3.5 mm stereo plug, 8 – 32 Ohm
STEREOKASSETTRADIO MED CD/MP3
Artikelnummer: 38-2522
Modell: MC-9814USB
KLASS 1 LASERAPPARAT
natural_image
Simple line drawing of a trash bin with no text or symbols13. Tekniska data
Storlek: 390 x 230 x 165 mm
Drivspänning: 230 VAC, 50 Hz
Batteridrift: 8 x R14 batterier
Radio:
KLASSE 1 LASERAPPARAT
natural_image
Simple line drawing of a trash bin with no text or symbols13. Tekniske data
Størrelse: 390 x 230 x 165 mm Drivspenning: 230 V AC, 50 Hz Batteridrift: 8 stk. R14 batterier
Radio: Frekvensområde: AM: 522 – 1 710 KHz FM: 87,5 – 108 MHz
CD-spiller: Halvlederlaser Avkoding: 16 bites linjer
LUOKAN 1 LASERLAITE
natural_image
Simple line drawing of a trash bin with no text or symbols13. Tekniset tiedot
Mitat: 390 x 230 x 165 mm
For consumer contact, please visit
www.clasohlson.co.uk and click on
customer service.
INTERNET www.clasohlson.co.uk

- STEREO CASSETTE RADIO WITH CD/MP3 PLAYER
- Article number: 38-2522
- Model: MC-9814USB
- Warnings
- On CD player
- CLASS 1 LASER PRODUCT
- Description
- Remote control
- Power Supply
- Mains connection
- Using with batteries
- Insert batteries:
- Note:
- Listen to the radio
- Helpful suggestions
- Play music
- Play music from CD/MP3, SD memory card or USB memory
- Insert a CD/MP3
- Remove the CD
- Helpful suggestions:
- Listen to the CD
- Normal playing
- Note!
- Skip tracks
- BASS BOOST
- Electronic anti-shake memory (ESP)
- Alternative play
- Repeat a track from CD
- Repeat all tracks from the CD
- INTRO (listen to the 10 first seconds of each track)
- Random (random play)
- Programmed playback
- The Stereo Cassette Player's function
- How to use the cassette tape player
- Take care of your cassette tapes
- Protect recording against erasing
- Erase cassette tape
- Recording
- Record from the built-in radio
- Record from CD
- Record from USB memory (USB or memory card (SD))
- Care and maintenance of player
- Headphones
- Protect the environment
- Technical data
- STEREOKASSETTRADIO MED CD/MP3
- Artikelnummer: 38-2522
- Modell: MC-9814USB
- KLASS 1 LASERAPPARAT
- Tekniska data
- KLASSE 1 LASERAPPARAT
- Tekniske data
- LUOKAN 1 LASERLAITE
- Tekniset tiedot
Brand : Clas Ohlson
Model : MC-9814USB
Category : CD Player