
DAB-1635 - CD Player Clas Ohlson - Free user manual and instructions
Find the device manual for free DAB-1635 Clas Ohlson in PDF.


| Product Type | CD Player |
| Brand | Clas Ohlson |
| Model | DAB-1635 |
| Dimensions (approx.) | 200 x 200 x 50 mm |
| Weight (approx.) | 0.8 kg |
| Power Supply | AC 220-240 V, 50 Hz or DC 6V (4x R6/AA batteries) |
| Playable Discs | Audio CD, CD-R, CD-RW |
| Output | Headphone jack (3.5 mm), stereo speakers |
| Playback Modes | Play, pause, stop, skip, repeat, shuffle, program |
| Display | LCD with track number and time |
| Controls | Buttons on unit, remote control included |
| Cleaning | Wipe with a dry, soft cloth. Do not use liquids. |
| Safety | Do not expose to moisture. Keep away from heat sources. |
| Spare Parts | Contact Clas Ohlson customer service for replacement battery compartment or remote. |
| Reparability | Designed for easy battery replacement. Other repairs should be done by a qualified technician. |
Frequently Asked Questions - DAB-1635 Clas Ohlson
User questions about DAB-1635 Clas Ohlson
0 question about this device. Answer the ones you know or ask your own.
Ask a new question about this device
Download the instructions for your CD Player in PDF format for free! Find your manual DAB-1635 - Clas Ohlson and take your electronic device back in hand. On this page are published all the documents necessary for the use of your device. DAB-1635 by Clas Ohlson.
USER MANUAL DAB-1635 Clas Ohlson
CD Player with DAB Radio
natural_image
Line drawing of a car's front dashboard and steering wheel (no text or symbols)Art.no
38-8212
Model
DAB-1635
Ver. 20170808
CD Player with DAB Radio
Art.no 38-8212 Model DAB-1635
Please read the entire instruction manual before using the product and then save it for future reference. We reserve the right for any errors in text or images and any necessary changes made to technical data. In the event of technical problems or other queries, please contact our Customer Services (see address details on the back).
Safety
- The product should not be taken apart or modified. Certain unshielded components inside the casing carry dangerous voltages. Contact with these can lead to fire or electric shock.
- The product is intended for indoor use only.
- Never subject the product to high temperature, dust, heavy vibration, impacts, humidity or moisture.
- The CD mechanism is sensitive to shocks. Make sure that CD playback has been stopped before moving the product.
- Do not place the product where there is a risk of it falling into water or other liquid. Do not place any objects containing liquid on the product, e.g. flower vases or drinks.
- Do not cover the product. Adequate ventilation with a distance of at least 10 cm between ventilation holes and the surrounding area is necessary to prevent the appliance from becoming too warm.
- Disconnect the product from the power supply by unplugging it from the wall socket. Make sure that the wall socket and plug are easily accessible.
- The on/off button on the front of the radio does not disconnect the product from the electricity mains.
- Protect your hearing. Listening on high volume for prolonged periods can lead to permanent hearing loss.
- Repairs and service should only be performed by qualified tradesmen, and only with original spare parts.
Buttons and functions
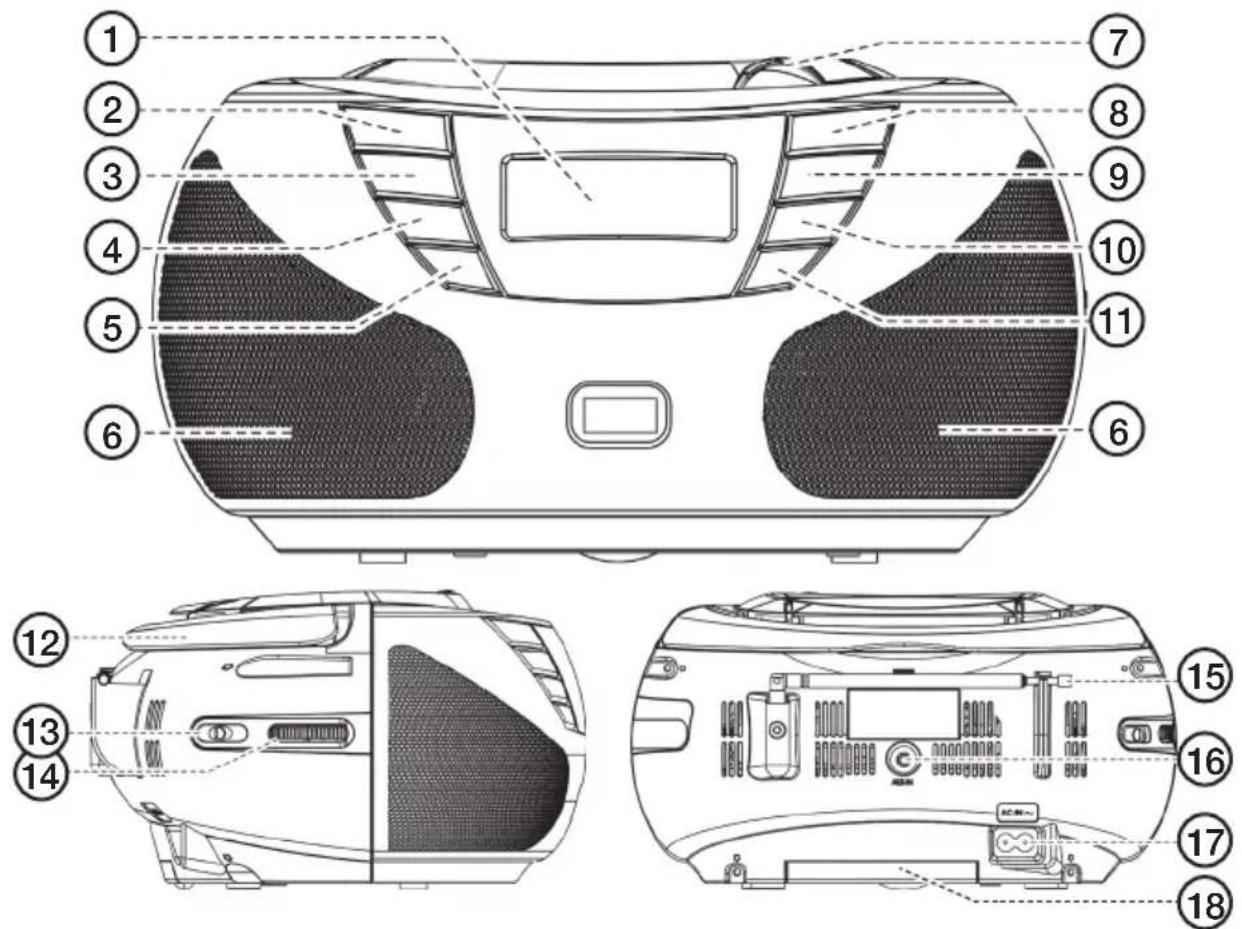
- Display
- [PLAY MODE/INFO/MENU] Press this button to change the play mode (CD), press for info, hold in to display the menu
- [PRE/PROG] Saves the track on playback list (CD), hold in to save channels, press to select channels
- [DAB/FM] Press to toggle between digital (DAB/DAB+) and analogue (FM) radio
- [On/off
- Loudspeakers
- CD drawer
- [|◄◄/TUNE-] Press to return to previous track/reduce value, hold in to search backwards
- [▶▶/TUNE+] Press to skip to the next track/increase value, hold in to search forwards
- [■/ENTER] Stop, select/confirm
- [▶]//SCAN ] Play/pause, automatic search for radio channels
- Handle
- [CD, AUX, DAB/FM] Select audio source: CD, Auxiliary (audio input), DAB/FM radio
- [VOLUME MAX/MIN] Increase/decrease the volume
- Aerial
- AUX IN: 3.5 mm external audio source input socket
- AC IN: AC power input socket
- Battery cover
Installation
Aerial
Extend the aerial (15) fully for the best signal reception.
The optimum radio signal reception is usually achieved when the aerial is vertical.
Mains operation
Connect the mains lead to the AC IN socket (17) and to a 230 V wall socket.
The product should be unplugged during heavy thunder storms to protect it from lightning strikes.
Battery operation
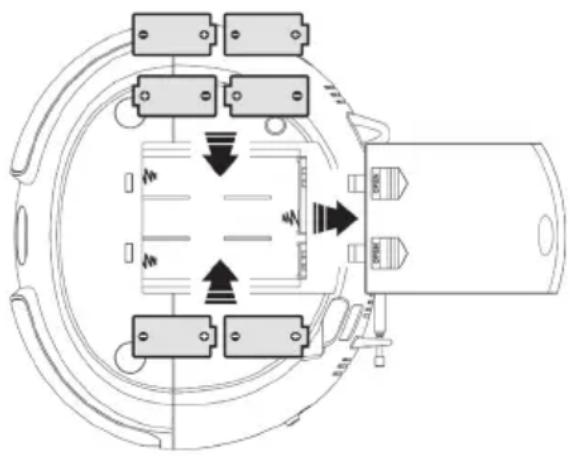
- Remove the battery cover (18) by first sliding it in the direction of the arrows.
- Insert 6 × C/LR14 batteries. Observe the markings in the battery compartment to ensure correct polarity.
- Refit the battery cover.
Note: Remove the batteries from the product if it is not to be used for a long time.
Old batteries can begin to leak and damage the product.
natural_image
Technical diagram of a mechanical or electrical component with multiple ports and directional arrows indicating flow or movement (no text or symbols present)External audio source input socket
If you wish to connect an external audio source to the radio such as a mobile phone or MP3 player, you can do this by plugging it into the AUX-IN socket (16) on the back of the CD player.
Operating instructions
Switching on/off
Switch the radio on by pressing [💡]. “Welcome to Digital Radio” will appear on the display.
Audio setting
Adjust the volume by turning the volume dial (14).
Setting the time and date
The CD player automatically sets the time and date when receiving DAB channels or FM channels with RDS information (Radio Data System).
CD player
CD playback
- Select audio source: Set the selector (13) to CD mode. "CD" will show on the display.
- Open the CD drawer (7).
- Insert a CD (label side up) and close the CD drawer. When the disc has been read the number of tracks and total playing time will be shown on the display.
- Press [▶|/SCAN] to start playback. The first track on the CD will begin playing.
- Press [|◀◀/TUNE-] or [▶▶|/TUNE+] repeatedly to change track.
- Hold in [|◀◀/TUNE-] or [▶▶|/TUNE+] while a track is playing to search backwards or forwards in the track.
- Press [▶||] to pause playback. "Pause" will show on the display. Press the button again to resume playback.
- Press [■/ENTER] to stop playback.
The CD player will even stop playing when:
- The CD drawer is opened.
• The audio source is changed. - The entire CD has been played and no other playback option has been selected.
Playback options
Press [ PLAY MODE/INFO/MENU ] the required number of times to select repeated or random playback.
Choose from the following playback options:
- REP1: Repeat a single track.
- REP ALL: Repeat all the tracks on the disc.
- RAND: Play the tracks in random order.
Playback list
Up to 20 CD tracks can be saved on a playback list and you can choose in which order they are to be played. Note: If longer than 10 seconds elapses between button-presses the CD player automatically exits programming mode.
- Make sure that playback of the CD has been stopped by pressing [■/ENTER].
- Press [PRE/PROG] to enter programming mode. "PROG" will flash on the display and ("PROG01") the first slot of the playback list will be displayed.
-
Select the track that you wish to save in the slot by pressing [|◀◀/TUNE-] or [▶▶|/TUNE+] the required number of times. Confirm your selection by pressing [PRE/PROG]. The next slot in the playback list will be displayed.
-
Repeat step 3 above and save all the tracks in the order you'd like them to be played.
-
Finalise the programming and start playback by pressing [▶|/SCAN].
- To interrupt playback of the playback list, press [■/ENTER] twice until "PROG" disappears from the display.
Note: The playback list is erased from the memory when you select another audio source or switch the CD player off.
DAB radio
The radio receiver supports both analogue (FM) and digital (DAB/DAB+) radio transmissions.
- Selecting an audio source: Set the selector switch (13) to either the DAB position or the FM position.
- Press [ DAB/FM ] and select DAB reception. "DAB" will show on the display.
Searching for radio stations
Press [▶|/SCAN] to begin an automatic scan for DAB channels. Whilst the radio is scanning, “Scanning…” will appear on the display along with a progress bar indicator and a number showing how many channels have been found.
- Note: If no DAB channels are found "No Signal" will appear on the display.
- Make sure that DAB broadcasts are available in your geographical area.
- If reception is poor, try to change the position of the aerial or move the radio to improve reception.
- Perform a new scan by pressing [▶|/SCAN].
Choosing radio channels
Press [|◀◀/TUNE-] or [▶▶|/TUNE+] repeatedly to select a channel from the channel list.
Handy tip: Up to 10 DAB channels can be saved as preset channels on a list so that you can choose your favourite stations more quickly. Refer to the Preset channels section below.
Note: If the CD player is moved to a new location or if radio stations change frequencies, some preset channels might become unavailable. If the CD player does not find the selected channel, “Not available” will appear on the display. Refer to the DAB menu section to clear the channel list of unavailable channels and perform a new channel search.
DAB menu
- In DAB mode, press and hold in [PLAY MODE/INFO/MENU] to go to the DAB menu.
- Press [|◀◀/TUNE-] or [▶▶|/TUNE+] repeatedly to navigate the menu.
- Press [■/ENTER] to select a menu/function.
The following menus will appear:

flowchart
graph LR
    A["Full scan"] --> B["Manual tune"]
    B --> C["Prune"]
    C --> D["Language"]
    D --> E["Factory Reset"]
    E --> F["SW version"]
- Full Scan: Automatic scan for DAB radio channels.
- Press [■/ENTER] to confirm. The CD player automatically starts scanning for DAB radio channels.
- Manual tune: Manual scan for DAB radio channels.
- Press [|◀◀/TUNE-] or [▶▶/TUNE+] repeatedly to manually select a channel. Press [■/ENTER] to confirm. The channel number and frequency will be displayed.
- Prune: Clear the channel list of unavailable radio channels.
- Press [|◀◀/TUNE-] or [▶▶/TUNE+] to select Yes or No. Press [■/ENTER] to confirm. Yes clears the channel list and No aborts the clearance.
- Language: To change language settings.
- Press [|◀◀/TUNE-] or [▶▶|/TUNE+] repeatedly to change language (the current language is indicated by an asterisk *. Press [■/ENTER] to confirm.
- Factory Reset: Reset to factory default settings.
- Select No (no reset) or Yes (reset). Press [■/ENTER] to confirm. "System reset OK?" will appear on the display.
- SW version: Shows the current software version.
- Press [■/ENTER] to display the software version.
Display options (DAB mode)
Press [ PLAY MODE/INFO/MENU ] repeatedly to display information about the current radio station.
The following information can be displayed:

flowchart
graph LR
    A["Programme Type"] --> B["Ensemble Name"]
    B --> C["Signal Strength"]
    C --> D["Date"]
    D --> E["Time"]
    E --> F["Channel Number/Frequency"]
    F --> G["Audio Bit Rate/Comp"]
    G --> H["Radio Text"]
- Programme Type: current programme type (genre)
- Ensemble Name: group name of the channels transmitted on the same frequency.
• Signal Strength: the signal strength of the radio channel - Date: the current date
• Time: the current time - Channel Number/Frequency: the number and frequency of the radio channel
- Audio Bit Rate/Comp: the audio bit rate and type of data compression
• Radio Text: text messages from the radio channel
FM radio
- Selecting an audio source: Set the selector switch (13) to either the DAB position or the FM position.
- Press [ DAB/FM ] and select FM reception. "FM" appears on the display.
Searching for radio stations
- Manual tuning: Press [|◀◀/TUNE-] or [▶▶/TUNE+] repeatedly to navigate through the frequency band.
- Automatic search: Hold in [|◀◀/TUNE-], [▶▶/TUNE+] or [▶||/SCAN] to automatically search for the next detectable radio channel. The search stops when a channel has been found.
If the selected channel transmits RDS information (Radio Data System), the name of channel will be shown on the display.
Handy tip: Up to 10 FM channels can be saved as preset channels on a list so that you can choose your favourite stations more quickly. Refer to the Preset channels section below.
FM menu
- In FM mode, press and hold in [PLAY MODE/INFO/MENU] to go to the FM menu.
- Press [|◀◀/TUNE-] or [▶▶|/TUNE+] repeatedly to navigate the menu.
- Press [■/ENTER] to select a menu/function.
The settings marked with an asterisk * are the current settings.
The following menus will appear:
Scan Setting
Audio Setting
Language
Factory Reset
SW version
- Scan Setting: Choose the sensitivity for scanning for FM channels.
- Press [|◀◀/TUNE-] or [▶▶/TUNE+] to select either Strong stations only (low sensitivity) or All stations (high sensitivity). Press [■/ENTER] to confirm.
- Audio Setting: Select whether you wish to receive stereo audio or if you want to receive transmissions in mono. In poor reception conditions mono can improve the sound quality.
- Press [|◀◀/TUNE-] or [▶▶/TUNE+] to select Stereo allowed or Forced mono. Press [■/ENTER] to confirm.
- Language: To change language settings.
- Press [|◀◀/TUNE-] or [▶▶/TUNE+] repeatedly to change language. Press [■/ENTER] to confirm.
- Factory Reset: Reset to factory default settings.
- Select No (no reset) or Yes (reset). Press [■/ENTER] to confirm. "System reset OK?" will appear on the display.
- SW version: Shows the current software version.
- Press [■/ENTER] to display the software version number.
Display options (FM mode)
Press [ PLAY MODE/INFO/MENU ] repeatedly to display information about the current radio station.
The following information can be displayed:

flowchart
graph LR
    A["Programme Type"] --> B["Signal Strength"]
    B --> C["Date"]
    C --> D["Time"]
    D --> E["Frequency"]
    E --> F["Audio Type"]
    F --> G["Radio Text"]
- Programme Type: current programme type (genre)
• Signal Strength: the signal strength of the radio channel
• Date: the current date
• Time: the current time
• Frequency: the frequency of the radio channel - Audio Type: shows whether the transmission is received in stereo or mono.
- Radio Text: text messages from the radio channel
Preset channels
Up to 10 stations can be preset in both DAB and FM mode, this will enable you to access your favourite stations more quickly.
Note: No more than 15 seconds must elapse between button-presses otherwise the CD player will return to the previous display mode.
Saving a radio channel as a preset channel
- Choose the channel that you wish to save.
- Press and hold in [PRE/PROG] until "P1" starts to flash on the display.
- Select a slot for the channel by pressing [|◀◀/TUNE-] or [▶▶/TUNE+].
- Save by pressing [■/ENTER]. "Preset stored" will appear on the display.
Selecting a channel from the preset channels
- Press [PRE/PROG]. "Preset Recall" will appear on the display.
- Press [|◀◀/TUNE-] or [▶▶/TUNE+] repeatedly to navigate the preset channel list.
- Select a channel number and confirm by pressing [■/ENTER].
If you choose a channel slot which has no preset radio channel on it, "Empty" will be shown on the display.
Audio source input (AUX IN)
- Connect an external audio source to the 3.5 mm input jack (16) on the back of the CD player.
- Selecting an audio source: Set the selector (13) to AUX mode. "AUX" appears on the display.
- Start playback on the external audio source.
- Adjust the volume to a desired level.
Care and maintenance
- The CD player should be wiped clean using a soft, dry cloth.
- Unplug the mains lead from the wall socket and remove the batteries from the CD player when it is not to be used for a long time.
Taking care of your CDs
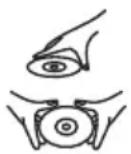
- Do not touch the surface of the CD. Use only the edges for handling.
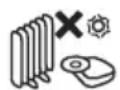
- Do not expose the CD to direct sunlight, heat or dust.
- Do not put labels on the CD.
- Only use a specialised marker suitable for marking your CDs.
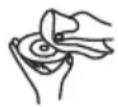
- Dry from the centre and out when cleaning. Do not ever dry in circles.
- Use a dry soft cloth without detergents or solvents.
• Always store the CD in its case when it is not being played.
Troubleshooting guide
| The CD player will not switch on. | Make sure that the mains lead is undamaged and is securely connected to both the electrical socket and the CD player.Is the wall socket live?The batteries might be dead. Replace if necessary.If the mains lead is connected to the CD player without being connected to a wall socket the CD player will not switch on even if there batteries in it. Disconnect the mains lead. |
| The CD player shuts off unexpectedly. | If neither the CD player function or the radio function is used for 15 minutes, the CD player will automatically enter standby mode. |
| No sound from connected external device. | Make sure that the correct audio source has been chosen (AUX IN).Check that the audio cable connecting the device and the CD player is intact and securely connected.Check the volume level of both the CD player and the connected device. |
| Poor or non-existent radio reception.The automatic radio channel scan doesn’t work. | Make sure that the aerial is fully extended.Try moving the aerial.Move the CD player to another place.Perform a factory reset. Refer to the FM menu/DAB menu sections above. |
| The time and date are not shown correctly. | · The time and date are automatically set when DAB channels or FM channels with RDS are received. The time it takes for the data to register depends on the transmitting radio channel and the strength of the signal. |
| If the CD player is operating abnormally in some other way. | · Perform a factory reset. Refer to the FM menu/DAB menu sections above.· Try cutting off the power to the CD player. Disconnect the mains lead from the wall socket and remove the batteries. Wait for a few seconds and then reinsert the batteries and reconnect the mains lead. |
Responsible disposal
This symbol indicates that this product should not be disposed of with general household waste. This applies throughout the entire EU. In order to prevent any harm to the environment or health hazards caused by incorrect waste disposal, the product must be handed in for recycling so that the material can be disposed of in a responsible manner. When recycling your product, take it to your local collection facility or contact the place of purchase. They will ensure that the product is disposed of in an environmentally sound manner.
natural_image
Symbol of a trash bin crossed with no text or labels, representing waste sorting or disposal (no text present)Specifications
Rated voltage 100–240 V AC, 50/60 Hz
Batteries 6 × C/LR14 (sold separately)
Frequency range FM: 87.5–108 MHz, DAB: 174–240 MHz
Power consumption 10 W
Size (W × D × H) 245 × 220 × 135 mm
Weight 1.1 kg
natural_image
Top-down schematic of a mechanical or electrical component with four labeled components and directional arrows (no text or symbols)Felsökningsschema
natural_image
Symbol of a trash bin with crossed lines indicating no waste or restriction, and a solid black rectangle below (no text or labels)Specifikationer
Nätanslutning 100–240 V AC, 50/60 Hz
Batterier 6 × C/LR14 (säljs separat)
Frekvensområde FM: 87,5–108 MHz, DAB: 174–240 MHz
natural_image
Technical diagram of a mechanical or electrical component with four labeled components and directional arrows (no text or symbols)Feilsøking
natural_image
Symbol of a trash bin crossed with no text or labels, accompanied by a horizontal line and a rectangular block below (no text or symbols present)Spesifikasjoner
natural_image
Technical diagram of a mechanical or electrical component with four rectangular components and directional arrows indicating flow or movement (no text or symbols present)Fehlersuche
natural_image
Symbol of a trash bin crossed with no visible text or labelsTechnische Daten
Declaration of Conformity
This declaration of conformity is issued under the sole responsibility of the manufacturer.
Portable CD-player with DAB/FM-radio
38-8212
DAB-1635
has been manufactured in full compliance with the requirements of the RE-directive 2014/53/EU and relevant harmonized standards
har tillverkats i full överensstämmelse med kraven i 2014/53/EU och relevanta harmoniserade standarder / har blitt produsert i full overensstemmelse med kravene i 2014/53/EU og relevante harmoniserte standarder / on valmistettu noudattaen kokonaisuudessaan koskevan direktiivin 2014/53/EU ja asiaankuuluvat yhdenmukaistetut standardit / hat in voller Übereinstimmung mit den Anforderungen der 2014/53/EU und einschlägigen harmonisierten Normen hergestellt wurde.
Reference to harmonized standards used, or reference to the specifications in which declaration of conformity is declared:
Hänvisning till de harmoniserade standarder som använts eller hänvisningar till de specifikationer som försäkran om överensstämmelse deklareras: / Referere til harmoniserte standarder som brukes, eller henvisninger til spesifikasjonene der samsvarserklæring er erklärt: / Viittaus yhdenmukaistettuihin standardeihin tai viittaus eritelmiin, jossa vaatimustenmukaisuusvakuutus on julistettu: / Referenz verwendet harmonisierten Normen oder Bezugnahme auf die Spezifikationen, in der Konformitätserklärung wird erklärt:
Article 3.1a (Health): EN 62311
Article 3.1a (Safety): EN 60065
Article 3.1b (EMC): EN 55020 EN 55032
Article 3.2 (Radio): EN 303345
Signed for and on behalf of:
Henrik Alfredsson
Technical Manager
Insjön, Sweden, 2017-08-09
CLAS OHLSON AB, SE-793 85 INSJÖN, SWEDEN
Sverige
Postal 10 – 13 Market Place
Kingston Upon Thames
Surrey
KT1 1JZ
Deutschland
Kundenservice Hotline: 040 2999 78111
E-Mail: kundenservice@clasohlson.de
Homepage
www.clasohlson.de

- CD Player with DAB Radio
- Safety
- Buttons and functions
- Installation
- Aerial
- Mains operation
- Battery operation
- External audio source input socket
- Operating instructions
- Switching on/off
- Audio setting
- Setting the time and date
- CD player
- CD playback
- Playback options
- Playback list
- DAB radio
- Searching for radio stations
- Choosing radio channels
- DAB menu
- Display options (DAB mode)
- FM radio
- FM menu
- Display options (FM mode)
- Preset channels
- Saving a radio channel as a preset channel
- Selecting a channel from the preset channels
- Audio source input (AUX IN)
- Care and maintenance
- Taking care of your CDs
- Troubleshooting guide
- Responsible disposal
- Specifications
- Felsökningsschema
- Specifikationer
- Feilsøking
- Spesifikasjoner
- Fehlersuche
- Technische Daten
- Declaration of Conformity
- Portable CD-player with DAB/FM-radio
- Sverige
- Deutschland
Brand : Clas Ohlson
Model : DAB-1635
Category : CD Player