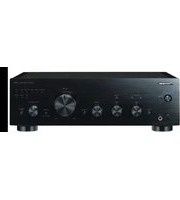
A-70DA - Hi-Fi System PIONEER - Free user manual and instructions
Find the device manual for free A-70DA PIONEER in PDF.


| Type de produit | Integrated Amplifier with DAC |
| Marque | Pioneer |
| Modele | A-70DA |
| Categorie | Hi-Fi System |
| Puissance de sortie | 90 W + 90 W (4 Ω, 1 kHz, THD 0.2 %) |
| Reponse en frequence | 5 Hz - 100 kHz |
| Rapport signal/bruit | 106 dB (line, IHF-A) |
| Distorsion harmonique totale | 0.005 % (20 Hz - 20 kHz) |
| Impedance d'entree | 47 kΩ (line) |
| Entrees analogiques | 5 x RCA (Line), 1 x Phono (MM) |
| Entrees numeriques | 1 x USB (Type B), 1 x Optique, 1 x Coaxial |
| Sorties | 1 x Pre-out, 1 x Subwoofer, Prises haut-parleurs (A/B) |
| Convertisseur N/A | ES9016 SABRE32 Reference DAC |
| Frequence d'echantillonnage max | 192 kHz / 24-bit (USB, coaxial, optique) |
| Alimentation | AC 220-240 V, 50/60 Hz |
| Consommation electrique | 260 W (max), 0.3 W (veille) |
| Dimensions (L x H x P) | 435 mm x 147 mm x 370 mm |
| Poids | 10.6 kg |
| Entretien et nettoyage | Utiliser un chiffon doux et sec. Eviter les solvants. |
| Securite | Ne pas exposer a l'humidite. Deconnecter avant nettoyage. |
| Pieces detachees et reparabilite | Contacter un centre agree Pioneer pour les pieces et reparations. |
| Informations generales | Pour une utilisation optimale, consulter le manuel utilisateur complet. |
Frequently Asked Questions - A-70DA PIONEER
User questions about A-70DA PIONEER
0 question about this device. Answer the ones you know or ask your own.
Ask a new question about this device
Download the instructions for your Hi-Fi System in PDF format for free! Find your manual A-70DA - PIONEER and take your electronic device back in hand. On this page are published all the documents necessary for the use of your device. A-70DA by PIONEER.
USER MANUAL A-70DA PIONEER
Information for users on collection and disposal of old equipment and used batteries
(Symbol for equipment)

(Symbol examples) for batteries
These symbols on the products, packaging, and/or accompanying documents mean that used electrical and electronic products and batteries should not be mixed with general household waste.
For proper treatment, recovery and recycling of old products and used batteries, please take them to applicable collection points in accordance with your national legislation.
By disposing of these products and batteries correctly, you will help to save valuable resources and prevent any potential negative effects on human health and the environment which could otherwise arise from inappropriate waste handling.
For more information about collection and recycling of old products and batteries, please contact your local municipality, your waste disposal service or the point of sale where you purchased the items.
These symbols are only valid in the European Union.
For countries outside the European Union:
If you wish to discard these items, please contact your local authorities or dealer and ask for the correct method of disposal.
K05Ba_A1_En
WARNING
To prevent a fire hazard, do not place any naked flame sources (such as a lighted candle) on the equipment.
D3-4-2-1-7a_A1_En
VENTILATION CAUTION
When installing this unit, make sure to leave space around the unit for ventilation to improve heat radiation (at least 30 cm at top, 10 cm at rear, and 10 cm at each side).
WARNING
Slots and openings in the cabinet are provided for ventilation to ensure reliable operation of the product, and to protect it from overheating. To prevent fire hazard, the openings should never be blocked or covered with items (such as newspapers, table-cloths, curtains) or by operating the equipment on thick carpet or a bod.

natural_image
Illustration of a portable electronic device with no visible text or symbols on its body, featuring control knobs and a prohibition symbol (no readable text or labels)D3-4-2-1-7b*A1_En
CAUTION
TO PREVENT THE RISK OF ELECTRIC SHOCK. DO NOT REMOVE COVER (OR BACK). NO USER-SERVICEABLE PARTS INSIDE. REFER SERVICING TO QUALIFIED SERVICE PERSONNEL.
D3.4.2.1-1 B1 En
WARNING
This equipment is not waterproof. To prevent a fire or shock hazard, do not place any container filled with liquid near this equipment (such as a vase or flower pot) or expose it to dripping, splashing, rain or moisture.
D3-4-2-1-3 A1 En
Operating Environment
Operating environment temperature and humidity:
+5 °C to +35 °C (+41 °F to +95 °F); less than 85 %RH (cooling vents not blocked)
Do not install this unit in a poorly ventilated area, or in locations exposed to high humidity or direct sunlight (or strong artificial light)
D3-4-2-1-7c^A1_En
CAUTION
The O/I STANDBY/ON switch on this unit will not completely shut off all power from the AC outlet. Since the power cord serves as the main disconnect device for the unit, you will need to unplug it from the AC outlet to shut down all power. Therefore, make sure the unit has been installed so that the power cord can be easily unplugged from the AC outlet in case of an accident. To avoid fire hazard, the power cord should also be unplugged from the AC outlet when left unused for a long period of time (for example, when on vacation).
D3-4-2-2-2a*A1_En
This product is for general household purposes. Any failure due to use for other than household purposes (such as long-term use for business purposes in a restaurant or use in a car or ship) and which requires repair will be charged for even during the warranty period.
K041 A1 En
POWER-CORD CAUTION
Handle the power cord by the plug. Do not pull out the plug by tugging the cord and never touch the power cord when your hands are wet as this could cause a short circuit or electric shock. Do not place the unit, a piece of furniture, etc., on the power cord, or pinch the cord. Never make a knot in the cord or tie it with other cords. The power cords should be routed such that they are not likely to be stepped on. A damaged power cord can cause a fire or give you an electrical shock. Check the power cord once in a while. When you find it damaged, ask your nearest PIONEER authorized service center or your dealer for a replacement.
S002*_A1_En
Thank you for buying this Pioneer product.
Please read through these operating instructions so that you will know how to operate your model properly. After you have finished reading the instructions, put them in a safe place for future reference.
Contents
01 Before you start
What's in the box....4
Loading the batteries in the remote control .....4
Using the remote control....4 Installing the amplifier....4
02 Connecting up
Making cable connections....5
About "B-wiring"....5
Connecting speaker cables....6
Connecting audio cables....6
Connecting to the balanced input terminals (A 70DA only). 6
Digital audio input connectors....7
Using a USB cable to connect to a computer ....7
Using centralized control with other Pioneer
components 7
Plugging in....7
03 Controls and displays
Front panel 8
Rear panel 9
Remote control 10
04 Operation
Playback 11
Set the power to Standby....11
When using the unit as a power amplifier .....11
Playing music from a digit audio component...11
Making an audio recording ....12
To set for automatic standby status (Auto Power
Down)....12
Restoring all the settings to the factory default
settings....12
05 Using the USB DAC function
Install the driver....13
Playing music from a computer....13
06 Additional information
Troubleshooting....14
About the USB DAC function .....15
Cleaning the unit....15
Specifications....16
Chapter 1:
Before you start
What's in the box
Please confirm that the following accessories are in the box when you open it.
- Remola control
• AAA/FC R03 dry cell batteries x2
- Short pin plug x ?
(At time of purchase, these plugs have been factory installed in the rear panel's PHONO IN terminals.) • Power comp (Length: 1.8 m)
- Warranty card
- Caution sheet (To first-time users)
- Operating instructions (This document)

WARNING
- Store small parts out of the reach of children and infants. If accidentally swallowed, contact a doctor immediately.

Note
- Illustrations featured in the Operating Instructions may have been modified or simplified for ease of explanation, and may therefore differ from the actual product appearance.
• The Illustrations used here are mainly of the A-10DA.
Loading the batteries in the remote control

1 Open the rear lid.
2 Insert the new batteries, matching the polarities as indicated inside the case.
3 Close the rear lid.
The batteries included with the unit have been provided to allow you check product operation and may not last long. We recommend using alkaline batteries that have a longer life.

WARNING
- Do not use or store batteries in direct sunlight or other excessively hot place, such as inside a car or near a heater. This can cause batteries to leak, overheat, explode or catch fire. It can also reduce the life or performance of batteries.

Caution
Incorrect use of batteries may result in such hazards as leakage and bursting. Observe the following precautions:
- When inserting the batteries, make sure not to damage the springs on the battery's ⊕ terminals. This can cause batteries to leak or overheat.
- Do not use any batteries other than the ones specified. Also, do not use a new battery together with an old one.
- When leading the batteries into the remote control, set them in the proper direction, as indicated by the polarity marks (⊕ and ⊖).
- Do not heal batteries, disassemble them, or throw them into flames or water.
- Batteries may have different voltages, even if they are the same size and shape. Do not use different types of batteries together.
• To prevent leakage of battery fluid, remove the batteries if you do not plan to use the remote control for a long period of time (1 month or more). If the fluid should leak, wipe it carefully off the inside of the case, then insert new batteries. If a battery should leak and the fluid should gel on your skin, flush it off with large quantities of water.
- When disposing of used better as, please comply with governmental regulations or environmental public institution's rules that apply in your country/area.
Using the remote control
The remote has a range of about 7 m at an angle of about 30° from the remote sensor.

Keep r mind the following when using the remote control:
• Make sure that there are no obstacles between the remote and the remote sensor on the unit.
- Remote operation may become unreliable if strong sunlight or fluorescent light is shining on the unit's remote sensor.
- Remote controllers for different devices can interfere with each other. Avoid using remotes for other equipment, coated close to this unit.
- Replace the batteries when you notice a fall off in the operating range of the remote.
Installing the amplifier
When installing this unit, make sure to put it on a level and stable surface.
- Don't install it on the following places:
- on a color TV (the screen may distort)
- near a cassette deck (or close to a device that gives off a magnel clieled). This may interfere with the sound.
- in direct sunlight
- in damp or well areas
-in extremely hot or cold areas - in places where there is vibration or other
movement - in places that are very costly
- in places that have hot fumes or oils (such as a kitchen)
- Do not mount the unit on a sofa or other object or material with absorbent qualities, since sound quality may be adversely affected.
Connecting up
Chapter 2:
Connecting up
Making cable connections

Caution
- Before making or changing the connections, switch all the power and disconnect the power cord from the AC outlet. - Connect the power cord after all the connections between devices have been completed.

flowchart
graph TD
    A["Portable Radio System"] --> B["PRE-OUT jacks on pre-amplifier or AV amplifier"]
    A --> C["Audio device with balanced output terminals"]
    A --> D["Recording device or other device"]
    A --> E["Speaker system B Right Left"]
    A --> F["This unit's rear panel"]
    A --> G["SACD/CD player"]
    A --> H["Network audio player"]
    A --> I["Iod cock, etc."]
    A --> J["Right Left Speaker system A"]
    A --> K["Power cord (included)"]
    style A fill:#f9f,stroke:#333
    style B fill:#ccf,stroke:#333
    style C fill:#cfc,stroke:#333
    style D fill:#fcc,stroke:#333
    style E fill:#cff,stroke:#333
    style F fill:#ffc,stroke:#333
    style G fill:#cfc,stroke:#333
    style H fill:#cfc,stroke:#333
    style I fill:#cfc,stroke:#333
    style J fill:#cfc,stroke:#333
    style K fill:#cfc,stroke:#333

Caution
- The SIGNAL GND terminal is provided to reduce noise when connecting the unit to components such as an analog turntable
- The PHONO IN terminals are factory equipped with short pin plugs. These should not be removed except when connecting a turntable. Be sure to save the short pin plugs in a safe place.
- Do not insert the short pin plugs in any connectors other than the PHONO IN terminals. Connecting them to any other terminals may cause malfunctions.
- Do not connect the PHONO IN terminals to any component other than a turntable; also, do not connect to a turntable equipped with built-in equalizer. An excessively high sound output may be produced, resulting in damage to your speakers or other devices.
- The A-600A's PHONO IN term nars are designed to be used only with turntables equipped with MM (moving-magnet) type cartridges. Turntables equipped with MC (moving-coil) cartridges cannot be used.
- Make sure not to bend the cables over the top of this unit (as shown in the Illustration). If this happens, the magnet c field produced by the transformers in this unit may cause a humming noise from the speakers.

- The unit's POWER AMP DIRECT terminal's should never be connected to any other component's connectors except FRE-AMP OUT.
- If your turntable has a grounding wire, secure it to the ground terminal on this amplifier.

Note
- When connecting a tape cassette deck, playback noise may be heard, depending on the installation location. This noise is caused by leakage flux from the amplifier's transformer. In this event, change the installation location, or move the deck farther from the amplifier.
- Foc is a trademark of Apple Inc., registered in the U.S. and other countries.
About "Bi-wiring"
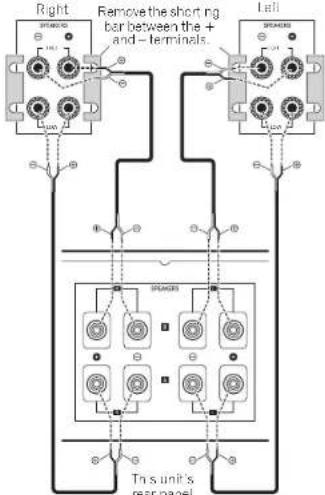
This unit can be used with speakers that support bi-wiring. Be sure to connect the high-frequency and low-frequency connections correctly.
- During playback, be sure that both the SPEAKERS A button and SPEAKERS B button are set to ON (page 8).
Speaker system
Speaker system

Caution
- When using blwiring to connect speakers, avoid adverse effects on the amplifier by being sure to remove the HIGH and LOW short bars provided with the speakers. For detailed information, consult the instructions provided with the speakers.
Connecting up
- When using speakers with removable network circuits, note that if the network is removed, no effect will be produced and damage may be caused to the speaker.
- Another method of connection is to connect the SPEAKERS A terminals to HIGH and the SPEAKERS B terminals to LOW (reverse that shown in the illustration).
Connecting speaker cables
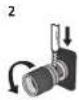
1 Twist the cable cores.
2 Loosen the nut on the SPEAKERS terminal, and insert the speaker cable into the exposed hole in the terminal shaft.
3 Retighten the terminal nut.



Caution
- When using only one set of speaker terminals (SPEAKERS A or SPEAKERS B), or when utilizing bi-wiring connections, the speaker used should have a nominal impedance between 4 Ω and 16 Ω. When using both sets of terminals, the connected speakers should have nominal impedance between 8 Ω and 32 Ω. Consult the instructions accompanying your speakers for details regarding the impedance value.
- Make sure the positive and negative (1/-) terminals on the amplifier match those on the speakers.
- These speaker terminals carry HAZARDOUS live voltage. To prevent the risk of electric shock when connecting or disconnecting the speaker cables, d sconnect the power cord before touching any uninsulated parts.
- Make sure that all the bare speaker wire is twisted together and inserted fully into the speaker terminal. If any of the bare speaker wire touches the back panel it may cause the power to cut off as a safety measure.
Connecting audio cables
Connect the white plug to the left (L) jack, and the red plug to the right (R) jack. Be sure to insert the plugs to ly into the jacks.

Connecting to the balanced input terminals (A-70DA only)
Connect the BALANCED IN terminals of the unit to a SACD player. USB DAC, network player, or other device with balanced output terminals.

A 70DA's rear pane
The phase may differ depending on the device to be connected. Use the phase selector switch on the rear panel of the drill to match the phase.
- Initial setting (No. 2 HOT)

- Settings when polarity changed (No. 3 HOT)
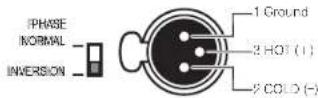

Note
- For details on the phase of the balanced output terminals of the device to be connected, refer to the instruction manual of the device.
- When connecting the unit to a Pioneer player, match the phase to the initial setting (No. 2 HOT).

Caution
• The BASS, TREBLE, BALANCE, and LOUDNESS
funct ons do no. work for a device connected to the BALANCED IN terminals.
Connecting up
Digital audio input connections
If you connect the DIGITAL IN terminal of the unit and the digital audio output, of a digital audio device with a separately sold digital cable, you can play the audio of the digital audio device with the unit.
For details on the output of audio input to the DIGITAL IN terminal, refer to page 11.
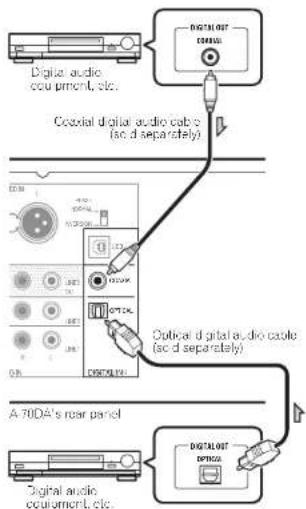
flowchart
graph TD
    A["Digital audio equipment, etc."] --> B["Covial digital audio cable (ac d separately)"]
    B --> C["Optical d-axis audio cable (ac d separately)"]
    C --> D["A 70DA's rear panel"]
    D --> E["Digital Audio Equipment, etc."]
    style A fill:#f9f,stroke:#333
    style B fill:#ccf,stroke:#333
    style C fill:#cfc,stroke:#333
    style D fill:#fcc,stroke:#333
    style E fill:#cff,stroke:#333

Note
- Digital signal formats that can be input to this unit include linear PCV's signals with sampling rate and quantitative bits up to 192 kHz/32 bits. (Depending on the connected device and environment, operation may not be successful).
Using a USB cable to connect to a computer
If a USB cable (sold separately) is used to connect this unit's DIGITAL IN USB terminal to a computer's USB port, music files located on the computer can be played through this unit.
For more information regarding the output of audio signals input to the DIGITAL IN USB terminal, consult page 13.

Important
A dedicated driver needs to be installed on your computer (page 13).

A 70DA's rear panel

Note
This unit cannot be used to play audio files from a computer unless Media. Player is installed on the connected computer.
Using centralized control with other Pioneer components
Multiple Pioneer components equipped with CONTROL IN/OUT jacks can be connected to the unit, allowing centralized control of the components via the remote sensor on the unit. This also allows remote control of components not equipped with a remote sensor, or installed in places where the component's remote sensor cannot be accessed.


Note
- For connections use a commercially available monaural miniplug cord (without resistor).
- When connecting the CONTROL IN/OUT jacks, commercially available audio cards must also be used to make analog connections. Merely connecting the CONTROL IN/OUT jacks alone will not allow proper system control.
- When a control cord is connected to the unit's CONTROL IN jack, the unit cannot be controlled by pointing the remote control at the unit (the remote sensor is automatically disabled).
Plugging in

Important
- When going on a trip or otherwise not using the unit for an extended period, always disconnect the power core from its outlet. Note that various internal settings will not be lost even if the power core is disconnected from its outlet for an extended time.
- If it is necessary to detach the power cord, first be sure to press the O/ISTANDBY/ON button on the front panel of the unit so the unit is turned OFF before delaching the cord.

Caution
- The use of a power cord other than the one provided will invalidate the warranty, since Pioneer will not be responsible for any damage incurred. (The power cord provided with the unit has a rated current capacity of 10 A.)
- Do not use any power cord other than the one supplied with this unit.
- Do not use the supplied power core for any purpose other than that described below.
After you've finished making all connections, plug the unit into an AC outlet.

1 Plug the supplied power cord into the AC IN socket on the rear panel of the unit.
2 Plug the other end into an AC outlet.
Chapter 3:
Controls and displays
Front panel
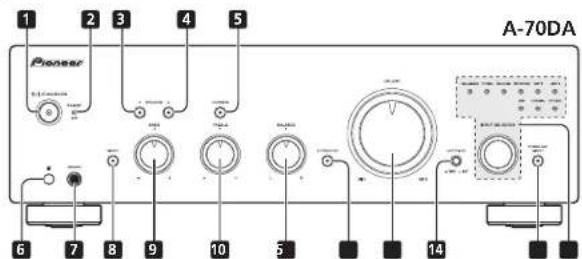
1 ⏻/I STANDBY/ON
Switches the amplifier between off and on. When power is turned on, the power indicator in the center of the button will light.
2 STANDBY/APD indicator
When power is set to standby, the indicator lights red. When the Auto Power Down (APD) function is on, the indicator lights green (page 12).
3 SPEAKERS A button/indicator
Use this button to listen to the speaker system connected to SPEAKERS A terminals.
On: The indicator lights. Sound is heard from the speaker system.
Off: The indicator goes off. No sound is heard from the speaker system.
4 SPEAKERS B button/indicator
Use this button to listen to the speaker system connected to SPEAKERS B terminals.
On: The indicator lights. Sound is heard from the speaker system.
Off: The indicator goes off. No sound is heard from the speaker system.
5 LOUDNESS button/indicator
Use when listening at low volume levels.
On: The indicator lights: Bocels low and high frequencies to give added punch to playback even at a low volume level.
Off: The indicator goes off: Should normally be left in this position.
- This button does not operate when the DIRECT button is in the on position.
- When sound volume is raised, the amount of change produced by the LOUDNESS circuit is reduced.
6 Remote sensor
Receives the signals from the remote control (page 4).
7 PHONES jack
Use to connect headphones (when connected, there is no sound output from the speakers). No sound is produced when the POWER AMP DIRECT button is ON.
8 DIRECT button/indicator
On: The end-cater lights: When this button is set to ON, sound signals are output directly, without being passed through the varcus adjustment circuits (BASS TREBLE, BALANCE, LOUDNESS). This allows reproduction of the grains with greater fidelity, but it disables any settings made with the BASS, TREBLE, BALANCE or LOUDNESS controls. When a device connected to the BALANCED IN terminals is played DIRECT turns on and cannot be turned off.
Off: The indicator goes off: The signal passes through the various frequency adjusting circuits. When the indicator is OFF, adjustments can be made with the BASS, TREBLE, BALANCE, and LOUDNESS controls.
9 BASS tone control
Use to adjust the low-frequency lons. The center position is the flat (normal) position. When turned to the right, low-frequency lons are emphasized; when turned to the left, low-frequency tones are de-emohased.
- This button does not operate when the DIRECT button is in the on position.
10 TREBLE tone control
Use to adjust the high-frequency tone. The center position is the flat (normal) position. When turned to the right, high frequency tones are emphasized; when turned to the left, high-frequency tones and use emphasized.
- This button does not operate when the DIRECT button is in the on position.
11 BALANCE control
Should normally be left in the center position. Adjust balance if the sound is louder from one of the speakers, I the right side is louder, turn toward the L (left) position and if the left side is louder, turn toward the R (right) position.
- This button does not operate when the DIRECT button is in the on position.
12 ATTENUATOR button (A-70DA only)
Press when you wish to make line adjustments to the sound volume when playing at very low sound volume levels.
13 VOLUME control
Use to adjust the volume level. (Also allows adjustment of the headphone sound volume.)
14 CARTRIDGE select switch (A-70DA only) Select the type of cartridge used with your turnable.
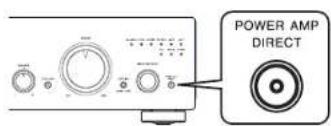
15 POWER AMP DIRECT button/indicator
Press this button when the unit is to be used as a power amplifier (page 11).
16 INPUT SELECTOR knob/indicators
Turn the knob clockwise or counterclockwise so that the indicator light is for your desired input source. Turning the knob clockwise causes the lit ind cator to right. Turning counterclockwise causes it to left. When the remote control's MUTE button is brassed to mute the sound, the ind cator for the input source selected with the INPUT SELECTOR knob flashes.
Controls and displays
Rear panel
See pages 5-7 for details regarding connections.
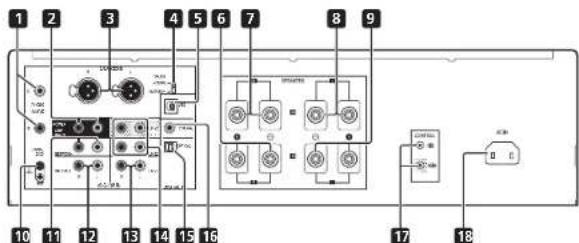
1 PHONO IN (MM/MC) terminals (A-70DA)
PHONO IN (MM) terminals (A-50DA)
2 POWER AMP DIRECT IN terminals
When using the unit as a power amplifier, connect the pre-amplifier here (page 11).
3 BALANCED IN terminals (A-70DA only)
4 Phase selector switch (A-70DA only)
Switches the phase of the BALANCED IN terminals
5 DIGITAL IN USB terminal
6 SPEAKERS A terminals (Right channel)
7 SPEAKERS B terminals (Right channel)
8 SPEAKERS B terminals (Left channel)
9 SPEAKERS A terminals (Left channel)
10 GND (Turntable ground) terminal
This ground terminal is designed to help reduce noise when a turntable is connected. It is not a safety ground.
11 NETWORK IN terminals
12 SACD/CD IN terminals
13 LINE 1 terminals
14 LINE 2 IN/OUT terminals
15 DIGITAL IN OPTICAL terminal
16 DIGITAL IN COAXIAL terminal
17 CONTROL IN/OUT jack
18 AC IN jack
Connect power core to Here and an AC wall socket.
Remote control

1 ⏻ STANDBY/ON
Switches the amplifier between standby and on.
2 Input selector buttons
Press to select an input source. These select the component connected to the corresponding input on the rear panel.
• The BALANCED button cannot be used with the A5CDA.
3 SACD PLAYER control buttons
Use to control Pioneer SACD player.
4 NETWORK AUDIO PLAYER control
buttons
Use to control Pioneer network audio player.
5 LOUDNESS
Use to sell the loudness circuit ON/OFF (page 8).
6 MUTE
Mutes/unmutes the sound.
7 DIRECT
Press to access Direct listening (page 8).
8 DIMMER
This button allows the illumination of the cril's front panel indicators to be set in three levels (does not affect the STANDBY indicator).
9 POWER AMP DIRECT
Press In a bullon when the unit is to be used as a power amplifier (page 11).
10 SPEAKERS A
Use this button to listen to the speaker system connected to SPEAKERS A terminals.
11 SPEAKERS B
Use this button to listen to the speaker system connected to SPEAKERS B terminals.
12 VOLUME +/-
Use to set the listening volume.
13 APD
Use to see the Auto Power Down function to ON/OFF (page 12).
Operation
Chapter 4:
Operation
Playback

flowchart
graph TD
    A["SACD/CD player"] --> B["Network audio player"]
    B --> C["Turntable"]
    C --> D["Audio device with balanced output terminals"]
    D --> E["iPod cock, etc."]
    E --> F["Recording device or other device"]
    G["Playback"] --> H["Pioneer"]
    H --> I["6"]
    H --> J["5"]
    H --> K["3"]
    H --> L["Playback"]
1 Turn on the power of the playback component.
2 Turn power ON to the unit.
- If the unit is in the standby mode, press the remote control's ◎ STANDBY/ON button.

3 Select the source you want to playback.

Select the playback component.
- When using the front panel controls, rotate the INPUT SELECTOR knob.
- In the case of the A-T0DA, if PHONO is selected, use the CARTRIDGE select switch to designate the type of cartridge used with your turntable, either MM (■) or MC (■).
4 Start playback of the component you selected in step 1.
5 Adjust playback volume with VOLUME control.

6 Adjust the tone to your preference using the BASS and TREBLE controls, and LOUDNESS button.
If the DIRECT button has been set to ON, these controls are disabled.

Caution
- The BASS, TREBLE, BALANCE, and LOUDNESS functions do not work for a device connected to the BALANCED IN terminals.
Set the power to Standby
1 Press the remote control's ⏻ STANDBY/ON button.

The next time you wish to turn on the power, press the remote control's ◎ STANDBY/ON author.
- If the front panel's ○/I STANDBY/ON button is pressed, the power will be turned off. In this case, if the power is off, pressing the remote control's - ○ STANDBY/ON button will not turn on the power. To turn on the power again, press the front panel's ○/I STANDBY/ON button.
When using the unit as a power amplifier When a pre-amplifier is connected to the unit's POWER AMP DIRECT IN terminals, the unit can be used as a power amplifier.
1 Press the POWER AMP DIRECT button on the remote control or front panel of the unit.
The POWER AMP DIRECT indicator will light.

Caution
- When the POWER AMP DIRECT indicator is lighted, operations change as follows:
-
The unit's front-panel VOLUME, BASS, TREBLE, and BALANCE controls are disabled. These adjustments are controlled by the component connected to the unit's POWER AMP DIRECT IN terminals.
-
The LOUDNESS button and ATTENUATOR button (A-/CDA only) are disabled.
- When the POWER AMP DIRECT indicator is lighted, sound volume from the unit will automatically be fixed at its maximum output. When using this unit as a power amplifier, check the output level of the component connected to the POWER AMP DIRECT IN terminals and set it to a low level as appropriate before turning on the POWER AMP DIRECT indicator. If the sound volume of the component connected to the POWER AMP DIRECT IN terminals is initially set to a high output level, loud sound may suddenly be cutout when the POWER AMP DIRECT indicator lights.
- Sound is not produced from the PHONES lack and LINE 2 OUT terminals.
- For more information, consult the operating instructions for the component connected to the unit's POWER AMP DIRECT IN terminals.
Playing music from a digital audio component
Output the digital audio input to the DIGITAL IN COAXIAL or OPTICAL terminal.
1 Make a digital input connection.
• See Digital audio input connections on page 7.
2 Switch to the COAXIAL or OPTICAL input.
Each press of the COAXIAL/OPTICAL button on the remote control switches the input alternately.
- When using the front panel controls, rotate the INPUT SELECTOR knob.
• Sound is produced from the LINE 2 OUT term na s.

Note
- Digital signal formats that can be input to this unit include linear PCM signals with sampling rates and quantitative bits up to 192 kHz/32 bits (Depending on the connected device and environment, operation may not be successful).
Making an audio recording
You can make an audio recording from any audio source connected to the amplifier.

flowchart
graph TD
    A["SACD/CD player"] --> B["Playback"]
    C["Network audio player"] --> B
    D["Tumtable"] --> B
    E["iPod dock, etc"] --> B
    B --> F["Recorder"]
    F --> G["Audio recording component (CD recorder, tapa deck, etc.)"]
1 Select the source you want to record. 2 Start recording, then start playback of the source component.

Caution
- Confirm that the short pin plugs are not inserted in the LINE 2 OUT terminals, since malfunction will result if they are inserted.
- Audio connected to the following terminals cannot be output from the LINE 2 OUT terminals.
-LINE 2 IN
BALANCED IN
-POWER AMP DIRECT IN
To set for automatic standby status (Auto Power Down)
This function automatically switches the unit to standby mode if no signal or switch operation is detected for 30 minutes.
1 If the unit's power is ON, press the APD button on the remote control.

When this condition is set to ON, the STANDBY/APD indicator on the unit's front paral will light green. Press the but ors again to disable the selling
- This selling car also be made by pressing the front panel LOUDNESS button and POWER AMP DIRECT button simultaneously and holding them depressed for 3 seconds.
• The factory default setting is ON. - Rotating the TREBLE, BASS, BALANCE, or VOLUME controls will not be counted as a control operation for purposes of resetting the Automatic Power-Down 30-minute timer.

Note
- Depending on the connected devices, the unit may not be automatically powered down for reasons such as there being a lot of noise.
Restoring all the settings to the factory default settings
1 When power is in standby mode, hold the front-panel's SPEAKERS A button and POWER AMP DIRECT button depressed simultaneously for five seconds.
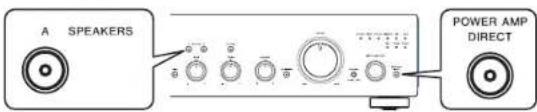
2 Turn power ON to the unit.
Chapter 5:
Using the USB DAC function
Install the driver
• To use the DIGITAL IN USB terminal to play back music files on the computer with the unit, you need to install a dedicated driver on your computer. For details, refer to the Pioneer website. The instruction manual also contains information regarding the installation procedure and computer settings, so refer to the instruction manual as well.
Playing music from a computer
Use this function to play digital audio input to the unit's rear panel DIGITAL IN USB port.
1 Connect the unit to a computer via USB cable (page 7).
2 P r USB to select DIGITAL IN USB as the input source.
- When using the front panel controls, rotate the INPUT SELECTOR knob.
• Sound is produced from the LINE 2 OUT terminals.
3 Begin playback on the computer.
Note
- When the unit and a computer are connected to play back audio with a USB cable, the unit can input the following signals: Linear PCM
- Quantitative bits: 16 bit, 24 bit, 32 bit
– Sampling frequency: 44.1 kHz, 48 kHz, 88.2 kHz, 96 kHz, 176.4 kHz, 192 kHz, 352.8 kHz, 364 kHz DSD
– Sampling frequency: 2.8 MHz, 5.6 MHz, 11.2 MHz
- Playback cannot be controlled from this unit during use of this function; use your computer to control playback.
- When disconnecting the USB cable, always stop playback on the computer first.
- Sound may not be produced if your computer does not support USB 2.0 HS.
- This unit does not support use of a USB hub. Always use a USB cable to connect the unit directly to the computer.
Chapter 6:
Additional information
Troubleshooting
Incorrect operations are often mistaken for trouble and malfunctions. If you think that there is something wrong with this component, check the points be ew. Sometimes the trouble may lie in another component. Investigate the other components and electrical appliances being used. If the trouble cannot be neclified even after exercising the checks listed below, ask your nearest Pioneer authorized service center or your dealer to carry out repair work.
- If the unit does not operate normally due to external effects such as static electricity disconnect the power plug from the outlet and insert again to return to normal operating conditions.
Problem Remedy
| The power does not turn on. • Is the power plug disconnected from the power outlet? Connect the power plug correctly to its outlet (page 7).• Is the power cord disconnected from the AC IN connector? Connect the power cord correctly (page 7). | |
| Power turns off. • Is the Auto Power Down function turned ON? If you do not want the power to turn off automatically, disable the Auto Power Down function (page 12). | |
| The power turned off and the STANDBY/APD indicator is flashing three times repeatedly. | • The production circuit has been activated. This cond lon will result. It a very low frequency sound is played at a high sound volume level.- Turn the power OFF and wait for at least one m pine, then turn the power ON again play the music at a lower sound volume level.- After regarding the power, it the STANDBY/APD indicator flashes four lmos. It indicates the receiver channels are malfunctioning. Disconnect the power cord and consult your dealer or nearest Pioneer service station. |
| The power turned off and the STANDBY/APD indicator is flashing once every two seconds. | • The unit's internal temperature has risen and the safety circuit has operated.- Turn power OFF and wait for a minute or more, allowing the unit's temperature to cool before turning the power ON span.- Install the unit in a cost on with better ventilation- Confirm that the unit is installed correctly; if the unit is turned on again without being allowed to cool the same symptoms may appear (page 4). |
| The power turned off and the STANDBY/APD indicator is flashing twice repeatedly. | • Are you using speakers with impedance values not supported by this unit? Confirm the speaker's nominal impedance value (page 6).• Are any speaker cables loose from the SPEAKERS terminals and touching other wires or the surface of the rear pane? Disconnect the power cord and reconnect the speaker cables correctly (page 6). |
| The power turned off and the STANDBY/APD indicator is flashing six times repeatedly. | • The production circuit has been activated. This cond lon will result. It a very high-frequency sound is played at a high sound volume level.- Lower the sound volume and try playing again.- If the same symptom appears when the power is turned OFF then ON again, the unit's circuitry may be damaged. Disconnect the power cord and consult your dealer or nearest Pioneer service station. |
| The STANDBY/APD indicator is flashing four times, five times, or seven times repeatedly and the power does not turn on. | • The unit's circuitry is damaged. Disconnect the power cord and consult your dealer or nearest Pioneer authorized service center. |
Problem Remedy
| No sound is output when a function is selected. | • A connection cable is d connected or connected impropory. Check your connections (page 6).• Connectors or pin plugs on a cable and dirty. Write off any dirt from connectors and pin plugs.• Confirm that the unit's input selector is set to the desired playback component. Set selector correctly (page 11).• Press MUTE on the remote control to turn mulling off (page 10). |
| No sound from one speaker. • Are the connection cables or speaker cables disconnected on one side? Reconnect: securely (page 5). | |
| Can I operate the remote control. | • Replace the battery (page 4).• Operate within 7 ms, 80% of the remote sensor on the front panel (page 4).• Remove the obstac e or operate from another position.• Avoid exposing the remote sensor on the front panel to direct light.• Is the control cord for one component connected improperly? Confirm correct connections (page 7). |
| Can I change input source. • Check whether POWER AMP DIRECT function is ON. If so, press the front panel's POWER AMP DIRECT button to turn the function OFF (page 11). | |
| Sound of the digital input is not output. | • The digital format of the output device is not supported. If the output device is set to an audio signal (Carby Digital, DIS, etc.) other than PCM, change the setting ic PCM. |
| Sound of the digital input is not output when playing back a SACD. | • Many SACD players (including Blu-ray players and DVD players compatible with SACD playback) are not designed to output digital when playing back a SACD. Check the specifications of the SACD player. Alternatively, play back the audio with an analog connection. |
| No sound is heard when a linear PCM signal with frequency of 5G d/z or more is input to the DIGITAL IN COAXIAL terminal. | • Sound may not be output properly depending on the digital coastal cable used; try replacing the cable (solid separately) with another. |
Additional information
About the USB DAC function
| Problem Remedy | |
| Music files on a computer connected via USB cannot be played back. | • To connect a computer and the unit via USB and then play back music files input via USB, you need to download a dedicated driver from the Pioneer website and then install it on the computer. Consult the Pioneer website for instructions on installing the driver. |
| No sound is produced when attempting to play files on a computer. | • Are volume settings correct, or the CS and application program? Raise the volume settings as required. |
| • Is the CS audio output set to MUTE? Cancel the MUTE setting. | |
| • Are multiple applications running simultaneously? The closing applications that are not in use. | |
| • Has the audio output been set properly within the CS or application used? For audio device select "Pioneer A 70DA A 50DA USB Audio". | |
| No sound is produced when using a USB input. | • Is another device selected in the computer settings or is the sound mixed in the computer settings? Check the computer settings. |
| • Is the unit connected correct? Is the unit detected by the computer? If the unit is switched to the USB input after it is connected to a computer, other than unit may be selected in the sound settings of the computer; if that happens, select the unit again. Also check the connection. | |
| • Are the file format, operating system, and software supported? Check the supported operating systems, software, and file sampling frequencies. | |
| • Is the dedicated driver installed on the computer? A dedicated driver needs to be installed on the computer. For details, refer to the Pioneer website. | |
| Non musical computer sounds from the USB input are audibly. | • Depending on the computer settings, the startup sound, error sounds, and other sounds of the computer may be played back from the unit. Check the computer settings. |
| When using a source other than USB input, music files on the computer can be played. | • When the input is other than USB, the unit is recognized from the computer. Switch the input to USB and then select the unit in the sound settings of the computer again. |
| If 384 kHz or 356 kHz is set in the sound settings of the computer, a certain browser or software is terminated and the audio plays back without sound. | • The browser or software may not support 384 kHz or 356 kHz. Check the specifications of the browser or software. |
Important
- For details on the computer settings, also refer to the instruction manual of the driver software available on the Pioneer website.
Cleaning the unit
- Use a polishing cloth or dry cloth to wipe off dust and dirt.
- When the surface is dirty, wipe with a soft cloth cloped in some neutral cleanser diluted five or six times with water, and wrung out well, and then wipe again with a dry cloth. Do not use furniture wax or cleansers.
- Never use thinners, benzine, insecticide sprays or other chemicals on or near this unit, since these will corrode the surface.
Specifications
Amplifier section
Power output specification is for when power supply is 230 V.
• Continuous power output (both
channels driven at 20 Hz to 20 kHz)
| A-70DA/A-50DA | 90 W + 90 W(THD 0.5 %, 4 Ω) |
| A-70DA/A-50DA | 65 W + 65 W(THD 0.5 %, 6 Ω) |
Audio section
- Input terminals (sensitivity/impedance)
BALANCED 500 mV/82 kΩ
SACD/CD, NETWORK. LINE 1, LINE 2 ... 200 mV/50 kΩ
POWER AMP DIRECT....1 V/10 kΩ
PHONO (MM) 2.8 mV/50 kΩ
PHONO (MC)....0.24 mV/100 Ω (A-70DA only)
COAXIAL 500 mVp p/75 Ω
• Output (Level/Impedance)
LINE 2 OUT 200 mV/2.2 kΩ
• Frequency response
SACD/CD, NETWORK, LINE 1, LINE 2
5 H/10 50 kHz ±3 dB*
- RIAA DEVIATION
PHONO (MM) 20 Hz to 20 kHz +0.5 dB*
PHONO (MC)
20 Hz to 20 kHz +0.5 dB* (A-70DA only)
* Measured with DIRECT button switched on.
- Tone control
Bass = 10 dB (100 Hz)
Treble ± 10 dB (10 kHz)
• Signal-to-Noise Ratio (IHF SHORTED,
A-NETWORK)
SACD/CD, NETWORK, LINE 1, LINE 2 .... '01 dB'
PHONO (MM, 5 mV input) 89 dB*
PHONO (MC, 0.5 mV input)....74 dB* (A-70DA only)
* Measured with DIRECT button switched on.
• Guaranteed impedance
A. B. 4 Ω to 16 Ω
A+B 8Ω to 32Ω
Bi-wiring....4Ω to 16Ω
Miscellaneous
Power requirements
AC 220 V to 230 V, 50 Hz
Power consumption
A-70DA....74W
A-50DA....72W
In standby 0.3 V
Dimensions
A-70DA, . . . 435 mm (W) x 141.5 mm (H) x 370 mm (D)
A-50DA....435 mm (W) x 138.5 mm (H) x 368 mm (D)
Weight (without package)
A-70DA....17.2 kg
A-50DA....11.2 kg
Accessories
Remote control....1
AAA/IEC R00 dry cell batteries 2
Short pin plug....2
Power cord
Warranty card
Caution sheet
Operating instructions (This document)

Note
- Specifications and the design are subject to
possible modifications without notice, due to
improvements.
• Corporation and product names mentioned herein
are Trademarks or registered Trademarks of the
respective corporations
• "Pioneer" is a trademark of Pioneer Corporation,
and is used under license.
© 2015 Onkyo & Pioneer Corporation.
All rights reserved.
natural_image
Illustration of a portable electronic device with no visible text or symbols on its body, including a prohibition symbol above the label (no readable text or symbols on the device itself)ATTENTION
POUR ÉVITER TOUT RISQUE D'ÉLECTROCUTION, NE PAS ENLEVER LE COUVERCLE (NI LE PANNEAU ARRIÈRE), AUCUNE PIÈCE RÉPARABLE PAR L'UTILISATEUR NE SE TROUVE À L'INTÉRIEUR, CONFER TOUT ENTRETIEN À UN PERSONNEL QUALIFIÉ UNIQUEMENT.
D3-4-2-1-1 B1 Fr
AVERTISSEMENT
A propos de "bi-câblage (bi-wiring)"
A-70DA....435 mm (L) × 141.5 mm (Hi × 370 mm (P))
A-50DA....435 mm (L) × 138.5 mm (H) × 268 mm (P)
Pays (sans err ballage)
A-70DA....17.2 kg
A-50DA....11.2 kg
Accessoires
Télécommande....1
© 2015 Onkyo & Pioneer Corporation
natural_image
Illustration of a portable electronic device with no visible text or symbols on its body, featuring control knobs and a prohibition symbol (no readable text)ACHTUNG
- Quantitative Bits: 16 bit, 24 bit, 32 bit
- Ablas frequent: 24,1 kHz, 48 kHz, 88,2 kHz, 96 kHz, 176,4 kHz, 199 kHz, 352,8 kHz, 384 kHz DSD
Abtastfrequenz: 2.8 MHz, 5.6 MHz, 11.2 MHz
natural_image
Illustration of a portable electronic device with no visible text or symbols on its body, including a prohibition symbol (no readable text or labels)3 Pulsante/spia SPEAKERS A
1 Terminali PHONO IN (MM/MC) (A-70DA)
PHONO IN (MM) Terminali (A-50DA)
2 Terminal POWER AMP DIRECT IN
natural_image
Illustration of a portable electronic device with no visible text or symbols on its body, including a prohibition symbol (no readable text)Gebruiksomgeving
WAARSCHUWING NETSNOER
2 STANDBY/APD-indicator
1 ⏻ STANDBY/ON
natural_image
Illustration of a portable electronic device with no visible text or symbols on its body, including a prohibition symbol (no readable text or labels)PRECAUCIÓN
PARA PREVENIR EL PELIGRO DE CHOQUE ELECTRICO NO REMOVER LA TAPA NI LAS PARTES DENTRO NO UTILIZADAS, LLAMAR UNA PERSONA CUALIFICADA.
D3-4-2-1-1_B2_Es
ADVERTENCIA
1 T e r RHONOHN (MM/ME) s (A-70DA)
Terminales PHONO IN (MM) (A-50DA)
2 T e r ROWERAMB DIRECT IN
5 T e r DIGITAL IN USB I
6 T e r SPEAKERS Aa(cahal Deracho)
7 T e r SPEAKERS Ba(cahal Derecho)
8 T e r SPEÄKERS Ba(cahale s Izquierdo)
9 T e r SPEÄKERS Aa(cahale s Izquierdo)
10 Terminal GND (tierra giratoria)
1 ⏻ STANDBY/ON
natural_image
Illustration of a portable electronic device with a prohibition symbol (no text or labels on the device body)ВНИМАНИЕ
© Onkyo & Pioneer Corporation, 2015.
Все права защищены.
Discover the benefits of registering your product online at http://www.pioneer.co.uk (or http://www.pioneer.eu).
Anteros Building, Odyssey Business Park, West End Road, South Ruislip, Middlesex,
HA4 6QQ United Kingdom
Tel: +44(0)208 836 3612
- Avenue de Marais F - 95816 Argenteuil Cedex FRANCE
Tel :+33(0)969 368 050
© 2015 Onkyo & Pioneer Corporation.
All rights reserved.
© 2015 Onkyo & Pioneer Corporation.



- Information for users on collection and disposal of old equipment and used batteries
- WARNING
- VENTILATION CAUTION
- CAUTION
- Operating Environment
- POWER-CORD CAUTION
- Contents
- Before you start
- Connecting up
- Controls and displays
- Operation
- Using the USB DAC function
- Additional information
- Chapter 1:
- Before you start
- What's in the box
- Note
- Loading the batteries in the remote control
- Open the rear lid.
- Insert the new batteries, matching the polarities as indicated inside the case.
- Close the rear lid.
- Using the remote control
- Installing the amplifier
- Connecting up
- Chapter 2:
- Making cable connections
- About "Bi-wiring"
- Connecting speaker cables
- Connecting audio cables
- Connecting to the balanced input terminals (A-70DA only)
- - Initial setting (No. 2 HOT)
- - Settings when polarity changed (No. 3 HOT)
- Digital audio input connections
- Using a USB cable to connect to a computer
- Important
- Using centralized control with other Pioneer components
- Plugging in
- Plug the supplied power cord into the AC IN socket on the rear panel of the unit.
- Plug the other end into an AC outlet.
- Chapter 3:
- Controls and displays
- ⏻/I STANDBY/ON
- STANDBY/APD indicator
- SPEAKERS A button/indicator
- SPEAKERS B button/indicator
- LOUDNESS button/indicator
- Remote sensor
- PHONES jack
- DIRECT button/indicator
- BASS tone control
- TREBLE tone control
- BALANCE control
- ATTENUATOR button (A-70DA only)
- VOLUME control
- POWER AMP DIRECT button/indicator
- INPUT SELECTOR knob/indicators
- Rear panel
- ⏻ STANDBY/ON
- Input selector buttons
- SACD PLAYER control buttons
- NETWORK AUDIO PLAYER control
- buttons
- LOUDNESS
- MUTE
- DIRECT
- DIMMER
- POWER AMP DIRECT
- SPEAKERS A
- SPEAKERS B
- VOLUME +/-
- APD
- Operation
- Chapter 4:
- Set the power to Standby
- Playing music from a digital audio component
- Making an audio recording
- Select the source you want to record. 2 Start recording, then start playback of the source component.
- To set for automatic standby status (Auto Power Down)
- If the unit's power is ON, press the APD button on the remote control.
- Restoring all the settings to the factory default settings
- Chapter 5:
- Using the USB DAC function
- Install the driver
- Playing music from a computer
- Connect the unit to a computer via USB cable (page 7).
- P r USB to select DIGITAL IN USB as the input source.
- Begin playback on the computer.
- Chapter 6:
- Additional information
- Troubleshooting
- Cleaning the unit
- Specifications
- Amplifier section
- • Continuous power output (both
- channels driven at 20 Hz to 20 kHz)
- Audio section
- - Input terminals (sensitivity/impedance)
- • Output (Level/Impedance)
- • Frequency response
- - RIAA DEVIATION
- - Tone control
- • Signal-to-Noise Ratio (IHF SHORTED,
- A-NETWORK)
- • Guaranteed impedance
- Miscellaneous
- Dimensions
- Accessories
- Power cord
- ATTENTION
- AVERTISSEMENT
- A propos de "bi-câblage (bi-wiring)"
- Accessoires
- ACHTUNG
- Pulsante/spia SPEAKERS A
- Gebruiksomgeving
- WAARSCHUWING NETSNOER
- STANDBY/APD-indicator
- PRECAUCIÓN
- ADVERTENCIA
- ВНИМАНИЕ
Brand : PIONEER
Model : A-70DA
Category : Hi-Fi System